

How to De-Winterize Your Travel Trailer (RV Checklist)
Are you ready to take on the camping season? Before hitting the road, it’s important that you de-winterize your travel trailer. To ensure you don’t miss a beat, we’ve created an extensive de-winterize travel trailer checklist:
How to De-winterize Your Travel Trailer:
- Charge and Re-install All Batteries
- Check the Tires. During winter storage, an RV’s tires will lose about two to three psi of air pressure for every month or inactivity. Also, check depth of the tire tread
- Check the Exterior for cracks, broken seals, and exterior lights
- Flush the Freshwater System of All Antifreeze
- Sanitize the Freshwater System
But that’s just a quick glimpse!
So below, we’ll go through all the necessary steps for a safe and successful camping season. From checking propane tanks and water lines to draining plugs and inspecting batteries, our de-winterize travel trailer checklist has got everything covered.
So don’t delay – get started now with these most important steps so you can hit the open road in no time.
Table of Contents:
De-winterizing the exterior of an rv, de-winterizing the propane system of an rv, de-winterizing the freshwater system of an rv, check all rv batteries after winterization, what should i remove from the rv for winter, when should you de-winterize a travel trailer.
- How do you sanitize a camper water system after Dewinterizing?
Do you have to de-winterize an RV?

When de-winterizing your RV for the spring and summer, it’s a good idea to inspect the exterior of your vehicle.
This includes checking for any signs of damage from winter weather or animals that may have nested in the vehicle while not in use. Start by looking over all surfaces of your RV, including windows, walls, roof, and tires.
Check for any cracks or holes that could cause a leak or other issues during travel.
Next, check all tire pressure levels to ensure they are properly inflated and safe to drive on. Tires can deflate during cold temperatures so make sure they are filled with air before hitting the road again.
Inspect each tire individually as well as tread depth – if you notice uneven wear patterns this may indicate an alignment issue which should be addressed prior to driving long distances with your RV.
If you have a spare tire, don’t forget about those also!
Tire covers are a great thing to consider for your RV during the downtime in winter as they can protect your RV’s tires from sun, rain, snow, sleet, and cold. They are surprisingly easy to put on and are fairly inexpensive.
Click that link to read all about them on my site.
To maintain the aesthetic appeal of your RV, use a soft brush such as an old toothbrush and a gentle cleaner like dish soap mixed with warm water to clean off any dirt or debris that has accumulated on its exterior.
Use a gentle cleaner like dish soap mixed with warm water along with a soft brush such as an old toothbrush – avoid using anything abrasive which could scratch paintwork or decals on the side of your trailer. Make sure you rinse off completely after cleaning too so there is no residue left behind.
Gently scrub away any accumulated dirt and debris on the exterior of your RV with a soft brush such as an old toothbrush, taking care not to damage paintwork or decals.
Use a gentle cleaner such as dish soap mixed with warm water along with a soft brush like an old toothbrush – avoid using anything abrasive which could scratch paintwork or decals on the side of your trailer. Make sure to rinse off completely after cleaning so there is no residue left behind.
After thoroughly inspecting the exterior of your RV for any damage or wear and tear, you can now proceed to de-winterize it. Moving on to the propane system of an RV, it is important that all components are properly checked before use.

Propane systems are essential for many RV owners, providing the fuel needed to power appliances and heaters. After a long winter, it’s important to de-winterize your propane system before you hit the road. Here’s what you need to do:
Check Propane Tanks:
Start by inspecting your propane tanks for any signs of damage or leaks. Ensure all valves are firmly shut and the container is still tightly sealed. Inspect the tanks for any flaws, and if found, get them substituted quickly before reuse.
Test Connections:
Once you have checked the tanks themselves, test all of their connections with a soapy water solution or leak detector spray. This will help identify any potential leaks in the lines between your tank and other components such as hoses or regulators. If there is a leak present, make sure it gets fixed immediately before turning on your propane system again.
Replace Components if Necessary:
In some cases, parts may need to be replaced due to age or wear and tear from being exposed to cold temperatures during winter storage periods. Check things like hoses, regulators, and other components for cracks or tears in order to ensure they can safely hold pressure when used again this season.
Check Gas Lines & Valves:
Lastly, inspect gas lines throughout your RV for any signs of corrosion or blockages which could prevent the proper flow of gas through them when turned on later down the line – literally. Make sure that all valves along these lines are functioning correctly too; otherwise, you might find yourself stuck without hot water until they’re repaired.
Essential measures should be undertaken to de-winterize an RV’s propane system in order to guarantee secure and proficient functioning. Next, we will look at how to properly de-winterize the freshwater system of an RV.
Once you’re done checking, test all LP gas appliances by lighting the burners and ensuring everything is working normally. Your refrigerator also likely runs on propane, so also check to make sure the fridge is starting to get cold .

De-winterizing the RV water system is a vital step in preparing for your next camping adventure.
The first step in the de-winterizing process is draining and flushing all non-toxic RV antifreeze from the RV’s fresh water tank, system, and RV water lines, including connections to your hot water heater as well as other fixtures.
If you removed the water filter when winterizing, make sure that gets put back in place.
The step-by-step process is:
- Connect your trailer’s water intake to a garden hose (at your house or campground)
- Turn on the water at the spigot
- Turn on every faucet in the camper including the shower (both hot and cold water in case there is lingering antifreeze in the hot water heater tank)
- Let the water run until totally clear
- Turn off the water at the spigot
- Turn on the water pump
- Repeat the procedure to eliminate any antifreeze in the freshwater tank
This process will fill up your holding tanks, so ideally have that connected at a dump station or campground or have a plan to dump it soon.
If you aren’t able to connect to a water source, this process will still work with a full fresh water tank in conjunction with the water pump.
The last step in de-winterizing is checking all valves associated with the freshwater system to ensure they are opened correctly and do not leak when pressurized.
This can be done by turning each valve handle several times clockwise until tight then back off slightly counterclockwise – if done properly these should remain open without having to constantly adjust them manually every time you want fresh water flowing into your RV.
Lastly, test out all faucets and shower (including an outside shower if you have one) within reach to make sure everything is working properly before hitting those dusty trails once more.
To ensure the freshwater system of your RV is de-winterized properly, be sure to follow all steps in this checklist. Moving on, it’s important to check all batteries after winterization for optimal performance and safety.
It is essential to check all RV batteries after winterization.
Verify that the batteries have been adequately charged to guard against destruction or erosion during storage. Connectors should be cleaned and tightened, while battery fluid levels should also be checked and topped off if necessary with distilled water.
If possible, it’s best to use a battery tester/charger like this one on Amazon when checking the voltage of each battery in order to get an accurate reading. Anything lower than 12 volts indicates that the battery needs charging before being put back into service. If your RV has two or more batteries connected together in parallel, they should both read at least 12 volts when tested individually with a multimeter.
That tester is good for regular as well as deep-cycle batteries, lead-acid batteries, as well as both 6-volt, and 12-volt systems.
You can also test for resistance between terminals using an ohmmeter or continuity tester; anything higher than 0 ohms indicates a good connection between terminals and proper electrical flow through the cables connecting them.
Additionally, you may want to inspect the case of each battery for signs of wear such as cracks or bulges which could indicate internal damage due to overcharging or other issues caused by improper maintenance during winterization procedures.
Frequently Asked Questions
Before winterizing your RV , it is important to remove all food and perishables.
All water tanks should be drained and cleaned with a bleach solution. Remove any batteries from the RV and store them in a warm location. Cover windows, vents, air conditioners, and other openings with plastic or foam insulation to protect against cold temperatures.
Finally, inspect all hoses for cracks or leaks before storing away until springtime. Taking these steps will ensure your RV is properly winterized and ready for the next camping season.
It is important to de-winterize a travel trailer as soon as the weather begins to warm up. In Texas where I live, that would be early March. But if you live in Chicago, that may be too soon.
Here’s a handy chart showing the date of the last freeze regionally around the US:
This will help prevent damage from freezing temperatures and ensure that all systems are functioning properly before taking it out on the road. To de-winterize, start by draining any antifreeze or water left in the system, then flush out fresh water until it runs clear.
Next, inspect all hoses and fittings for cracks or other damage and replace them if necessary. Finally, fill with fresh potable water and check for leaks at each connection point. Taking these steps now can save you time and money later.
How do you sanitize a camper water system after de-winterizing?
To sanitize a camper water system after de-winterizing, it is important to first flush the entire system with fresh water.
Add a quarter cup of bleach for every 15 gallons of tank capacity and fill the tank with fresh water, then proceed to turn on all faucets until chlorine is detectable.
Turn on all faucets until you smell chlorine at each outlet, then let sit for 12 hours before draining and refilling with clean potable water. Lastly, run all faucets again to ensure that any remaining traces of bleach have been flushed out completely. Following these steps will help keep your camper’s drinking water safe and free from contaminants.
Yes, IF you added biodegradable antifreeze to your trailer’s freshwater system, de-winterizing an RV is a necessary step before taking it out for the first time in the season.
Now if you live somewhere mild like Florida, adding antifreeze isn’t likely necessary, in which case you may not need to do much of anything.
But for most of us, this process involves flushing antifreeze from the water lines and draining tanks to ensure that all systems are working properly. Inspecting and replacing any components or accessories that may have been harmed during storage should be carried out, if necessary.
Following these steps will help ensure safe travels throughout your camping adventure.
Today we looked at all the crucial things you must do to get your RV ready after having winterized it during the colder months. From batteries to the fresh water system, to interior and exterior checks, we covered it all.
After following this step-by-step guide, you are now ready to enjoy your RV during the camping season.
Before embarking on your journey, ensure that there are no water leaks or other potential issues present in the RV. Ensure all is in good working order to guarantee a secure and delightful excursion with companions and family.
It’s also a good idea to check and maybe replace batteries in a smoke alarm if your trailer has one.
DSC09424 by Adventures On Wheels and IMG_0081 by JBLM MWR is licensed under CC2.0 and may be cropped, edited, and/or had a text overlay added. Still frame taken from video How to Winterize an RV + What Tools & Supplies You Need | RV DIY by RVLove | Marc & Julie Bennett , also licensed under CC2.0 and may be cropped, edited, and/or had a text overlay added.
Middle Class Dad is a participant in the Amazon Services LLC Associates Program, an affiliate advertising program designed to provide a means for sites to earn advertising fees by advertising and linking to Amazon.com. As an Amazon Associate, I may earn a small commission from qualifying purchases if you click to Amazon from my site and choose to make a purchase. This is no way increases the cost to you.
Jeff Campbell
Jeff Campbell travels on and off with his 3 daughters in a Newmar Baystar Class A Motorhome. He writes extensively on both RVs, campgrounds, parenting on the road tips, remote learning & schooling, and much more! Click Here to learn more about me. Click Here to learn more about my site. Editorial Policies.
Leave a Reply Cancel reply
Your email address will not be published. Required fields are marked *
Save my name and email in this browser for the next time I comment.
Recent Posts
RV vs Regular Toilet Paper: Key Differences
When it comes to choosing the right toilet paper for your recreational vehicle (RV), there are some important considerations to keep in mind. But what's the difference between RV toilet paper and...
Essential Family Camping Gear 2024 Must-Haves
When it comes to family camping, having the right gear can make all the difference in creating lasting memories and enjoying the great outdoors. Whether you're planning a weekend getaway or a longer...
- Class A Motorhomes
- Class B Motorhomes
- Class C Motorhomes
- Diesel Motorhomes
Travel Trailers
5th Wheel Trailers
RVs on Clearance
RVs on Order
Used Motorhomes
- Used Class A Motorhomes
- Used Class B Motorhomes
- Used Class C Motorhomes
- Used Diesel Motorhomes
Used Travel Trailers
Used 5th Wheel Trailers
- RV Lifestyle
- Maintenance
- Order Repair Parts
- Van Conversion Parts
Fill out our online appraisal form and find out what your RV is worth.
- RV DIY (Do It Yourself)
- Camping 101 to Advanced
- RV Maintenance & Service
- RV Parts & Accessories
- Towing Guides
- Brand & Manufacturer Guides
- RV Body Type Breakdowns & Comparisons
- About Bucars
- Leave a Review
- Why Bucars?
- Check our Reviews
- Warranty Progrßams
- Diamond Kote
- Sell Your RV
- Pre-qualify for Financing
- Get Directions
- Schedule an RV Viewing
- Schedule a Service Appointment
- View Address and Contact Form

- Learning Centre
How to De-winterize Trailers: The Ultimate RV De-winterizing Checklist
April 12, 2021
Share The Article
The sun is shining, the birds are chirping, and the ice is thawing – do you know what that means? It’s about time to de-winterize your RV! Keep in mind that Canadian weather can be very unpredictable. One day it might be sunny and +20°C and the next day we could have 10 inches of snow! Before you start the process of de-winterizing your RV, it’s best to wait until the last snowstorm of the year has passed. Mid to late April is generally a safe bet and it’s just in time for a May long weekend trip! It’s crucial to de-winterize your RV to reverse the winterizing process and get your RV all set for your next trip. The process of de-winterizing your RV includes many important steps so it’s a good idea to set aside a few hours. This will ensure you aren’t rushing to de-winterize your trailer right before your trip which may cause you to miss a crucial step in the process. As a general rule of thumb, you’ll also want to de-winterize your RV 3-4 weeks prior to your first trip of the year. This means you better get a move on if you’re aiming for May long weekend! In this article, we’re sharing a complete checklist of everything you’ll need to do to de-winterize your trailer. Are you ready to get started? Let’s dive in!
Examine & Repair Your RV Exterior
The exterior of your trailer is a great place to start the de-winterizing process. Heavy snow and ice can be very damaging to the exterior of RVs, so it’s important to check for common damage before you hit the road. This is especially important when it comes to cracks and leaks. A leak in your trailer’s exterior can lead to many unpleasant problems down the line, such as wet insulation and mould. Here are the steps you should take when inspecting your RV’s exterior:
- Check all vents, windows, compartments, and doors for cracked caulking and be sure to replace any caulking that is cracked or peeling.
- Take a look at the seams of all your slides and replace the seals if necessary.
- Extend your awning , check for any damage at the end of the awning rail, give your awning a good rinse, and leave it out to dry.
- Look for signs of water damage especially on the roof. You’ll want to pay attention to cracks in the seams that may have been caused by heavy snowfall.
- Inspect your hitch for rust and damage and replace any broken parts.
- Check all of your exterior lights (brake lights, turn signals, running lights) and replace any bulbs that have burnt out.
Check & Reinflate Your Tires

- Find out the manufacturer’s recommendations for your tire pressure based on your load.
- Use a tire pressure gauge to check the air pressure of your tires.
- Inflate your tires to the specified pressure.
- Check your tires for any tread deformities and uneven wear and purchase new tires if your tires are worn out. A fresh set of tires is a great way to start the camping season!
Bonus tip: When checking your tires, make sure they are cold for the most accurate tire pressure readings.
Charge & Reinstall Your RV Batteries
Every month that your RV is in storage, your RV batteries lose a small percentage of their charge. As you may know, your RV batteries play a ton of important roles when you’re not connected to power. Batteries power your cooking appliances, water heaters, refrigerators, power awnings, and more. Without charged batteries, you could be dealing with lukewarm food and water all trip long. Yum… lukewarm milk… Here’s what you should do to ensure your batteries are good to go for your next trip:
- Disconnect your RV from electricity to ensure you will get an accurate reading.
- Use a voltmeter to check the charge of your batteries . 12-volt RV batteries will read 12.7 volts when they are fully charged. If your batteries are fully charged, you can skip the next steps!
- Turn off your engine and any internal appliances.
- Use a wrench to remove the cables from the battery leads , starting with the black cable first and then the red cable.
- Check the water level and refill with distilled water if the water level is below the plates.
- Attach the battery charger cables to the battery , starting with the red cable first and then the black cable.
- Plug the charger into the power source and turn it on .
- Allow your batteries to charge completely . This may take a few hours or even a few days depending on the battery size. The charger usually has an indicator light that will tell you when the battery is fully charged.
- Turn off the power and disconnect the battery from the charger.
- Check the water level and fill the battery with distilled water to the correct level.
- Ensure that batteries are reinstalled securely .
Bonus tip: A best practice to extend the lifespan of your RV batteries is to let the batteries discharge only 50% before recharging them. Next winter, try to keep your batteries charged consistently and you’ll be ready to go once the season starts.
Flush & Sanitize Your Water System
One of the best parts about having an RV is the ability to turn on a tap for quick and easy access to clean drinking water on the go, even in the most remote locations! That’s what makes this part of the RV de-winterizing process so crucial. In order to keep your pipes from freezing, you probably added antifreeze to your water system last fall. If you didn’t… you might have a whole different problem on your hands!
Flushing Your Water System
Antifreeze is great for preventing your pipes from freezing but it needs to be flushed from your system in the spring so your water is safe to drink. Here are the steps you’ll need to take to flush your water system:
- Close all taps and install all drain valves.
- Drain your fresh water holding tank entirely to remove the majority of the antifreeze and replace it with potable water.
- Turn on your water pump .
- Starting with the fixture furthest away from your fresh water tank, turn on every water faucet one at a time.
- Flush your toilet several times.
- Keep the water running for several minutes , until the water runs clear and all the antifreeze has been flushed.
- Turn off all your faucets and the water pump.
- Perform a pressure test to check for any small, unnoticeable leaks.
- Switch your water heater out of bypass mode and into the summer position (or drain the antifreeze from the water heater tank if it was not in bypass mode).
- Replace all of your water filters .
- Dump your grey and black water tanks .
Sanitizing Your Water System
After flushing your water system, you’ll want to sanitize it to remove any bacteria or mould. Here are the steps you’ll need to take to sanitize your water system:
- Find out how much bleach you will need. Measure 1/4 cup of bleach for every 16 gallons of water in your freshwater tank
- Dilute your bleach in at least a gallon of water.
- Use a funnel to pour your bleach-water mixture into your freshwater tank .
- Fill your fresh water tank full with potable water.
- Turn on all of your faucets until you start to smell bleach.
- Let the water sit for 12 hours.
- Drain all the water from the system.
- Refill your fresh water tank with potable water.
- Turn on the water pump and turn on all your faucets , keeping them running until you can no longer smell bleach.
Bonus tip: If your water still doesn’t taste clean and fresh after flushing & sanitizing your systems, you can add baking soda into each of your drains to improve the flavour. Be sure to flush your water system again and the taste should eventually improve.
Check Your Propane System

- Turn off all appliances that run on propane .
- Open the propane valves and check for a bad odour. (This smell is added by the manufacturer to help you identify leaks). It’s possible that the smell may have worn away due to rust in the tank. If there’s no smell, proceed to the next step to make sure you don’t have any leaks!
- Apply soapy water or a leak detector solution to the propane valve .
- Slowly open the valve . If bubbles start to form, you’ve got a leak on your hands!
- In case of a leak, make sure there are no flames or sparks, keep light switches and appliances turned off, and keep your phone away from the area.
- If you detected a leak, make sure to get your propane system repaired before your next trip!
Now You’re Ready to Hit the Road!
And there you have it! Once you’ve completed every item on this checklist, you should be all set and ready to go for your first camping adventure of the season! During your RV de-winterizing routine, you may have noticed that your old RV just doesn’t cut it anymore. Maybe it’s old and rundown or maybe there isn’t enough space for your growing family or your new hobbies. Does that sound like you? It might be time for an RV upgrade ! At Bucars RV, we love helping our customers find the RV of their dreams. We have a huge selection of new and used RVs to meet everyone’s needs, wants, and price points! Come visit us at our showroom just north of Calgary or contact us today!
Recent Articles

Calgary RV Dealership Celebrates 65 Years of ‘Refreshingly Different’ Customer Service with Canada-first Award Win
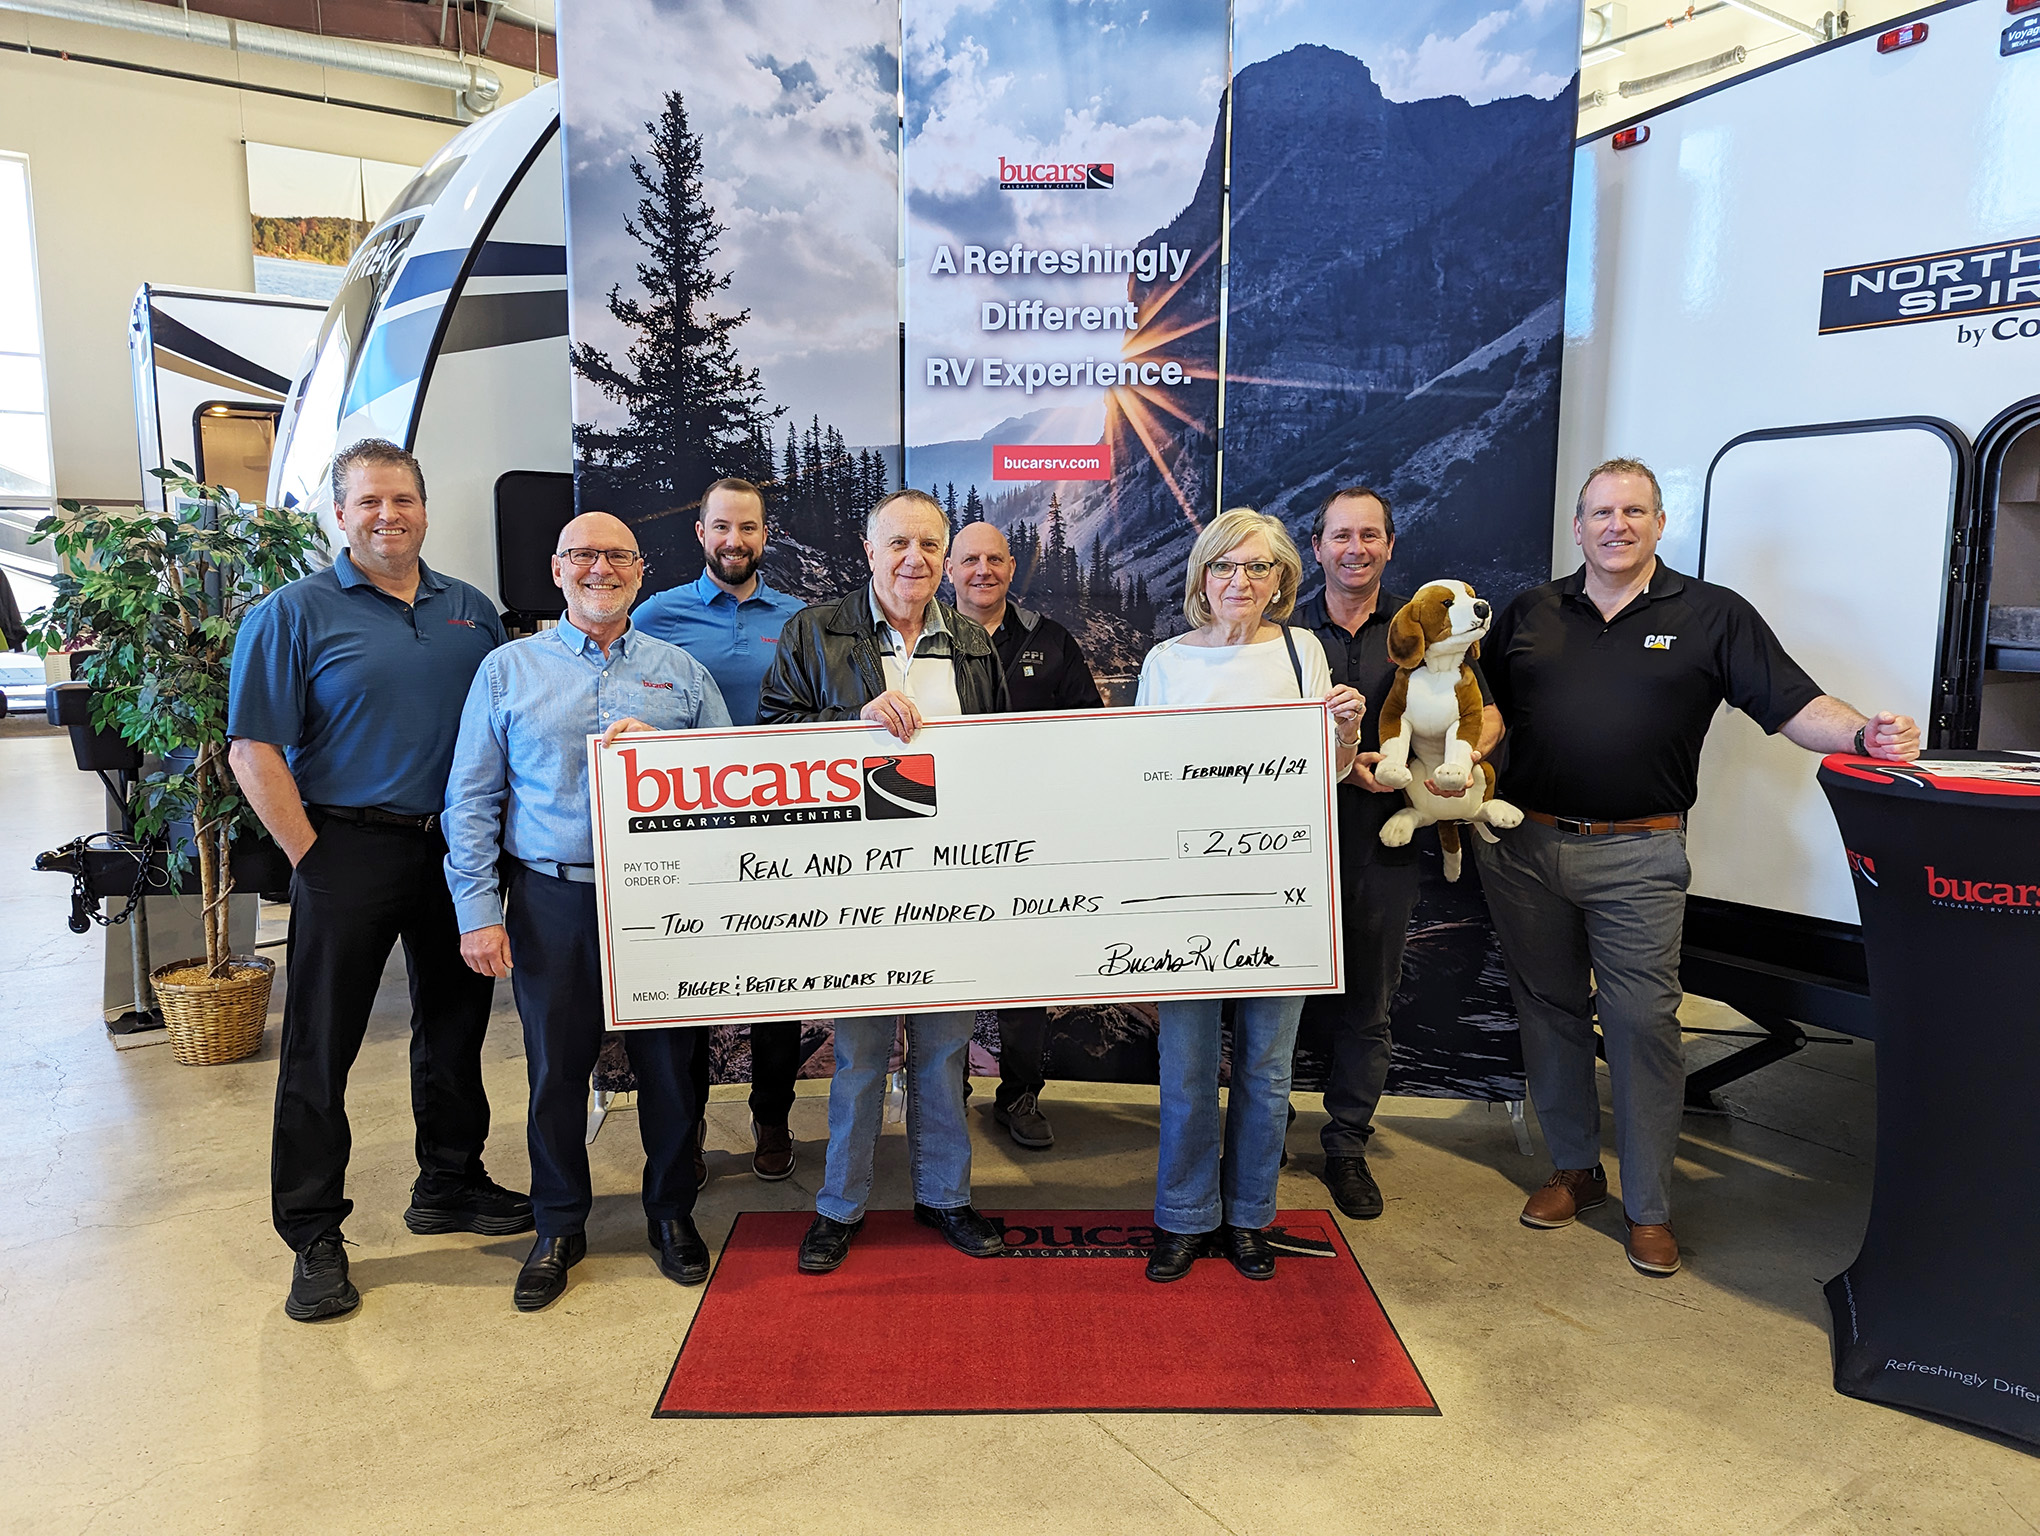
$2,500 Prize Winner: Real Millette!
Categories:, you might also be interested in.

Dewinterizing Your RV and Getting Ready for the Camping Season
5 RV Security Tips
Finance Your RV
At Bucars RV Centre we have one of the most experienced and reputable RV finance departments in Calgary and area. Our team works hard to provide RV financing rates and terms that let our customers leave with the RV of their dreams.
What's On Now
You’re invited to our 65th birthday party.
On April 5, 6 & 7, let’s celebrate 65 years of Bucars RV! Register now for a chance to win our early bird prize draw for a $1,000 Bucars RV Centre gift card!

De-Winterizing & Spring Maintenance – RV102 on April 6 at 10:00 a.m.
Join our energetic Solar Seminar presented by our partners at GoPower! Registration is open to anyone for our free, fun and informative RV seminars. Save your seat today!

Book Your RV Spring Maintenance Today
Spring appointments are filling up fast, book your RV repair & service now! Get your RV tuned up and be #BucarsReady for the spring camping season!
Introducing the 2025 Tiffin Wayfarer: Arriving Soon!
This new Class C motorhome combines innovative features with exceptional craftsmanship. Be first to take it for a test drive, schedule your VIP Viewing today.

$2,500 Cash Prize: Our Winner Has Been Drawn!
Click to find out who the lucky winner of our $2,500 cash prize winner is from the Bigger & Better at Bucars RV Sale!
Pre-Order Your 2024 Model Today
Now taking pre-orders on 2024 models from our leading selection of Manufacturers. Order now for spring delivery.
Pre-Owned Inventory, Backed by Bucars RV.
Browse pre-owned RVs and find the RV of your dreams this summer. Each pre-loved RV is backed by Bucars’ Certified Pre-Owned stamp of approval.
Check Out the Clearance Corral, New RVs Added!
New RV’s at clearance prices, round up a great deal from our Clearance Corral today.
Raptor Ridge RV Resort & Bucars RV Centre
Experience a newly built RV Resort minutes from downtown Drumheller. Titled lots are selling now.
Fly & Buy Appointment
" * " indicates required fields

9-POINT CHECKLIST FOR DE-WINTERIZING YOUR RV
By coltonrv
Spring is coming and if you’re like us, you’re already itching to get your RV out of winter storage and head out on your first camping trip of the season.
But don’t just get up and go. Winterizing your RV doesn’t mean it’s perfectly preserved—it can still suffer damage and degradation in storage. There’s a critical process to make sure your motorhome survived the winter, and you’ll need to prepare your RV for the camping season.
Need to know how to get your RV ready for spring? Here’s our handy 9-point checklist for de-winterizing your RV.
Tools You’ll Need:
- Piping tape
- Ratchet set 1-1/16 in. socket
- Anode rods (replace yearly)
1) Exterior
Give your RV a thorough washing to remove dust, debris, and other gunk that collected during winter storage. You should use a gentle car soap to clean the vehicle (we recommend Thetford RV Wash & Wax ), but you might need a bug and tar remover to get rid of stuck-on bugs and tar from last season. Be sure to clean your awning and remove any mildew and stains that may have developed.
Inspect the RV’s exterior. The biggest problem to check for is water leaks. Check all the caulking closely for any cracks or damage. Inspect windows, doors, roof vents and any other seams. If you find any cracks in the caulking or missing sealant, remove the old sealant and replace it.
Also check for any other damage on your motorhome. Make sure the awning is intact and operating properly, and check your lights and signals.
2) Batteries
RV batteries will discharge by as much as 10% per month in storage, so you’ll need to get them ready for use. Before you check your batteries:
- Always wear safety glasses and latex gloves
- Disconnect shore power
- Turn off all RV power and make sure the main cutoff is in the OFF position
Make sure all battery connections are clean. If the terminals are corroded, you can use hot water and baking soda to clean them up. Check for any cracks in the batteries that may have developed from winter freezing. Replace cracked batteries.
Charge the batteries, then check the battery fluid levels and add distilled water as needed. Water should only be added to lead-acid batteries after they are fully charged.
If you remove the batteries, be very careful with wiring. Make sure the positive and negative wires are clearly marked.
If you decide to replace the batteries, always replace multiple battery packs together. Never add a new battery to an old one.
Your RV’s tires have lost 2-3 psi per month while in storage. Check each tire on your RV—including the spare—for cracks along the side wall and treads. Inflate to the proper tire pressure, according to the tire manufacturer’s weight chart.
This is one of the most important steps in de-winterizing your RV. Failing to check your tires could result in faster tread wear, uneven handling, or a blowout on the road.
4) Interior
Give the interior a thorough cleaning. While de-winterizing your RV, you’ll probably find spider webs, dust, and other debris. Look for evidence of rodents. Air out the RV and look closely for signs of damage, including discolored paneling or ceilings (signs of water leaks). Clean out every corner, including your water heater and refrigerator compartment drawers.
5) RV Fresh Water System
Check your motorhome’s fresh water system for leaks. Move the water heater’s bypass valve into the Normal position, then turn on the hot and cold water and check all faucets and pipes for leaks.
If you used non-toxic RV antifreeze to winterize your fresh water system, you’ll need to drain and flush it from the system. To clean out the system:
- For every 15 gallons of tank capacity, add 1/4 cup of liquid household bleach to one gallon of water. Add the bleach water to the fresh water tank.
- Pump the water through all the water lines and fixtures, and let it sit for 4 hours.
- Drain the system and flush it out until the water tastes and smells bleach-free.
6) Propane System
Check your propane system to be sure seals and hoses haven’t dried out and cracked. When you test your RV’s propane system:
- Turn off all LP items before you begin
- Don’t smoke!
- No flames or sparks
- Turn on the leak detector inside your RV
Open the valve on the tank all the way. Smell for leaks. Apply a soapy water solution on the valve and regulator and watch closely for bubbling or spurting. Check for evidence of rodent damage on wires and hoses.
Clean your LP gas appliances, then test them by lighting them and letting them run for a while.
If you suspect a leak, turn off the propane immediately and have a certified RV service technician inspect and repair the leak.
If all the LP gas appliances work properly, make sure the RV’s appliances and accessories operate properly in the LP gas mode. After checking the refrigerator, turn it off and keep the doors open so it can return to room temperature before testing it in electric mode.
7) Appliances
Test all your appliances in electric mode. Check the outside access covers for your water heater and refrigerator and be sure they’re clean and free of debris.
8) Dump Hoses
Check your sewage dump hose for holes and leaks. There’s nothing worse than discovering a leak when you’re dumping waste!
9) Waste Tank Valves
Finally, check the seals on your waste tank valves. Before you do this, make sure the waste tank is empty. You might want to perform this check while connected to a dump station.
Check the valve seal by carefully moving the handle in small increments to make sure it’s working correctly. If it’s sticking, you can add some valve lubrication to the tanks to restore the condition of the seal.
Follow this checklist to de-winterize your RV and you’ll avoid all kinds of unwelcome surprises on your camping adventures. Spending the time to prepare your RV for the spring lets you fully enjoy your first trip of the season, anxiety-free.
- Do you need a service appointment? Service Appointments
- Looking for an RV now that spring is arriving? Check out all the inventory!

- Skip to primary navigation
- Skip to main content
- Skip to primary sidebar
- Skip to footer
Journey With Confidence
A Complete RV Winterizing Checklist

Get Your RV Ready for Winter
Many travelers will use their RVs to travel to warmer areas during the winter, while others will prepare them for a few months in storage. If you find yourself in a situation where you need to winterize your RV, you’ve come to the right place! There are many different things you’ll need to do to help your camper endure the colder seasons, so let’s review our RV winterizing checklist.
The Essential RV Winterizing Checklist
Many of these steps will be quick fixes that can be completed within a few minutes or hours. However, make sure you give yourself enough time to properly prepare your RV for the off-season. Skipping or overlooking steps can lead to devastating consequences and long-term damage. Winter can be a difficult time for an RV, especially if it isn’t properly prepared for winter conditions.
1. Drain water supply
The most important step of winterizing an RV is draining the water supply. During the winter, RVs will be subjected to a wide range of temperatures. If they aren’t being regularly heated and used, the stagnant water that’s left behind can freeze and expand, which will lead to burst pipes, flooding, and other types of structural damage.
There are many to-do items on an RV winterizing checklist, but none of them will do you much good if you don’t address the water situation first. Luckily, it doesn’t take too long to empty the water reserves in most RV. You just need to make sure you’re being thorough.
Begin by draining your holding tanks
This includes everything in the freshwater tank, grey water tank, and black water tank. The freshwater tank can simply be emptied, but the other two will need to be flushed and cleaned.
Winter and early spring is a prime time for bacteria, mold, and other nasty things to build up, so give your RV a fresh start for the season. Use the tank flushing system if you have one. If not, you can use a cleaning wand and/or an RV holding tank cleaning product . Take the contaminated water to your nearest dump station so it can be safely processed.
Empty standing water in appliances
Just because your tanks are now empty doesn’t mean that your RV is completely drained. A small amount of water will linger in appliances like sinks, showers, toilets, ice makers, refrigerators, dishwashers, and washing machines.
Go around your RV and turn on all faucets (cold and hot). Flush toilets multiple times until they run dry. Empty out the water supply for your other appliances.
Use an air compressor to dry water lines
Even after everything has been drained there will still be a bit of moisture left in the pipes. This is why it’s a good idea to hook up an air compressor to your RV water lines.
This step isn’t a complete necessity on an RV winterizing checklist, but it never hurts to stay on the safe side when you’re dealing with water. Use 30-50 psi of compressed air to clear out any remaining moisture in your plumbing system. Once that is complete, replace the caps on the holding tanks and water lines.
2. Use RV antifreeze
Next up, you’ll want to apply RV antifreeze to your plumbing system. This will prevent any warping over the winter when the RV is exposed to fluctuating temperatures.
Bypass water heater
The first thing you’ll want to do when adding antifreeze is bypass the water heater. If you don’t do this, the water heater will have to be completely filled with antifreeze before it will spread to the rest of the plumbing. You will end up wasting a ton of antifreeze (and money) if you don’t first bypass this system.
To do this, you’ll need a kit . Turn off the water heater, disconnect the cold and hot lines, and install the bypass kit according to the directions on the product. Reconnect the water lines and open the bypass, and you’re good to go!
Place RV water line in antifreeze container
Now it’s time to fill the RV plumbing system with antifreeze . Disconnect the RV water line (if you haven’t already done so), and place the end in a container of RV antifreeze (this will usually be a pink or green substance). Usually, you will need 2-3 gallons of antifreeze to winterize an RV, but you’ll need up to 10 gallons more if you aren’t able to bypass the water heater first.
Turn on freshwater pump
Activate the freshwater pump and allow antifreeze to travel through the plumbing system. Turn on the faucets throughout your camper until they start to run pink or green with antifreeze. Flush the toilet several times until the same thing happens. Pour 2-3 additional cups of antifreeze into each drain and toilet. Finally, you can turn off the pump and reconnect the RV water line to the freshwater tank.
Drain water heater
After everything on the RV winterizing checklist is done up to this point, you can return to the water heater. Remove the plug and drain its contents. This is usually done last so that nothing goes wrong with the draining and bypass installation.
3. Clean interior
Now that the vehicle is safe from water damage, it’s time to turn your attention to other aspects of winterizing. Clean out the RV and remove any extra cargo. This will help reduce weight and it will help you declutter. Make sure you don’t leave any food or temperature-sensitive items inside.

4. Protect against humidity
Major water damage can be avoided by following the steps above, but humidity can still be a pain in the neck. To prevent mold, mildew, or just unpleasant dampness, there are a few things you can do to reduce humidity levels.
Start off by wiping down and drying potentially moist areas of your RV. This includes the bathroom, kitchen, and windows. Add a few desiccants or drying agents in cupboards, windowsills, or secluded corners. Consider using an RV dehumidifier to help keep moisture out.
5. Remove battery
RV batteries are important pieces of equipment, and they need to be protected during the winter. To prevent any possible temperature damage, remove the battery and store it in a temperature-regulated area as long as the RV is sitting unused.
Basements, garages, closets, and crawlspaces are good options where your battery will be out of sight and out of mind. Wrap it in a few blankets to provide an extra layer of insulation.
6. Cover vents
Next item on the RV winterizing checklist: Protect the vehicle’s exterior! By this point, most of the interior issues have been addressed, so it’s time to turn our attention outward.
Begin by protecting all RV exterior vents. If these are left exposed, they provide entry points for snow, ice, humid air, and even infestations. Mice, bugs, and other pests might see your RV as a great place to spend the winter, so make sure they can’t get in. Place vent covers over every opening, and consider adding a layer of plastic wrapping for extra waterproofing.
7. Leave RV on blocks to distribute weight
RVs are sturdy vehicles, but they are still quite heavy. If the entire weight of the RV sits on the wheels for several months, this can cause structural issues and will shorten the lifespan of the tires. To prevent this, use RV blocks to distribute the weight as long as it is sitting unused.
8. Add RV skirting/covers
Now we’ve reached the final step on our RV winterizing checklist! Time to cover up the RV and let it rest until the next travel season rolls around. Install RV skirting around the base and tires to prevent snow and ice from getting underneath.
Add an RV cover that will provide protection against rain, snow, dirt, and wind. It’s easy to buy or make these protective coverings , and something is always better than nothing.
9. Consider storage options
If all of these steps feel like too much of a hassle, or you live in a particularly cold area, you may want to consider other storage options for the winter. For an extra cost, you can store your RV in a temperature-regulated facility.
You will still have to do some level of preparation, but it won’t be nearly as involved. These storage facilities can be quite expensive, but it may be worth the price to you if you want to let someone else take care of everything.
10. Track your RV maintenance
Make sure you keep track of all your RV maintenance and repairs with an online tool such as RV LIFE Maintenance . Not only can you keep all of your documents in one place, but you’ll also receive timely reminders when maintenance is due to help you avoid costly repairs and potentially serious accidents.
Related articles:
- How To Avoid Winter Camping Problems In Your RV
- Covered RV Storage vs Motorhome Covers: What’s Best?
- Is Your Rig Ready For Cold Winter Storage?
Travels with Ted
How to De-Winterize your RV: A Complete Checklist

This post may contain affiliate links. See our affiliate disclaimer here.
Share this post!
With spring quickly approaching, it is time to get your recreational vehicle ready for camping season. Before hitting the road on your first camping trip of the season, it is important to ensure your RV has been properly de-winterized.
This process involves a checklist of tasks that include checking for damage, testing out systems, assessing the health of your RV tires, flushing your pipes and ensuring the RV’s major components, such as appliances, are working properly.
Read the below guide to learn how to properly de-winterize your RV.
Also check out our complementary guide on how to winterize your RV for winter storage .
- 1 Checklist for De-Winterizing your RV
- 2.1 Reconnect the Battery
- 2.2 Inspect RV for Damage
- 2.3 Check Tires
- 2.4 Check and Repair all Exterior Seals
- 2.5 Replace and Turn On Propane Tanks
- 2.6 Check Safety Systems
- 2.7 Test Appliances
- 3.1 Flush the RV Holding Tanks and Water Lines
- 3.2 Sanitize the Fresh Water Tank
- 4 Perform Regular Appliance Maintenance
Checklist for De-Winterizing your RV
Here is a quick checklist for de-winterizing your RV. Detailed instructions for each task can be found below.
- Reconnect the House Battery
- Inspect the RV for Damage
- Check RV Tires
- Inspect and Repair all Exterior Seals
Replace and Turn On Propane Tanks
Check safety systems, test appliances.
- Flush the RV Holding Tanks and Pipes
Sanitize the Fresh Water Tank
- Perform Annual Maintenance Tasks
How to De-Winterize your RV: Initial Checks
The first step in de-winterizing your RV is checking for damage and ensuring the RV’s major components are working properly.
Reconnect the Battery

Your RV’s house battery should have been charged and disconnected before winter storage. Therefore, the first step in our guide on how to de-winterize your RV is reconnecting the battery.
Most RVs have a disconnect or kill switch (pictured above), so you just need to turn the switch to reactivate battery power. Once the battery is turned on, charge the battery and check its performance. After charging, use a voltmeter to test the battery’s voltage. A fully charged RV battery should read about 12.7 volts on the voltmeter.
Inspect RV for Damage

Hopefully, you have been checking in on your RV periodically during the winter months. During de-winterization, complete a final visual inspection of the RV. Look for any obvious damage, evidence of rodents or other visible issues.
If you find damage, take photos for your insurance claim and schedule a repair appointment. If you find evidence of mice or other rodents, thoroughly clean all areas where you find droppings or other evidence of their presence. Set traps to remove any rodents that are still occupying your RV. If mice are found in the traps, read more about how to keep mice out of your RV.
Check Tires

Also check your tires to ensure they are in good enough condition for safe travel. First, visually inspect the tires to ensure there are no tears or excessive wear. Don’t forget to visually inspect the spare tire as well. Then, use a tire gauge to check the pressure. Adjust the tire pressure with a portable air compressor before moving the RV.
Check and Repair all Exterior Seals

The seals around windows, doors and exterior storage bays need to be checked before winterization and after winter storage. When de-winterizing your RV, inspect the seals for cracks, chips or thinning. Apply new sealant anywhere you find damage. For more details on which sealants to use and the re-sealing process, see our article on the best RV sealants for every job .

If your propane tanks were stored away from the RV, reconnect the tanks to the RV lines. Turn on the propane and verify it is working by lighting the stove.

Use the testing features on your gas and smoke alarms to verify they are working properly. Replace the batteries or the alarm, if needed.
Also check the fire extinguisher. RVs come with one of two types of fire extinguishers, rechargeable and disposable. If your fire extinguisher has a dial with “recharge” and “overcharge” sections, it is rechargeable. The extinguisher needs servicing if the dial indicates an issue. Disposable fire extinguishers have a dial that reads either “full” or “empty.” The fire extinguisher needs to be replaced if the dial is pointing to empty.

After turning on your propane and connecting your RV to shore power, start testing the appliances by the following the below steps.
- Turn the refrigerator on using the propane setting. Make sure the it turns on without any error messages and starts to cool after a few hours.
- Once you have verified the fridge works on propane, turn it to the AC setting and verify it continues to work using shore power.
- Turn on the air conditioner and verify it turns on and produces cold air.
- Turn on the furnace and verify it turns on and produces warm air.
Note: you should wait to test the water heater until after your plumbing system and tanks have been flushed and sanitized.
How to De-Winterize your RV’s Plumbing System
Flush the rv holding tanks and water lines.

If you followed our instructions for winterizing your RV, you used antifreeze to prevent damage to your system in below freezing temperatures. To de-winterize your RV, you now need to flush the system and remove the antifreeze. Follow the below steps to properly flush your RV water system.
- Connect the RV to a sewer outlet or dump station.
- Open the black and gray water tanks to allow antifreeze to drain out.
- Connect the RV to a city water connection or fill the freshwater tank.
- Open all water faucets, including sinks and indoor and outdoor showers.
- Turn on the water at the city water connection or turn on the water pump.
- Allow water to run out all faucets for several minutes.
- While water is running, inspect lines under sinks and in the underbelly for leaks.
- Hold the toilet flush down and run at least a few gallons of water into the black tank.
- When the water comes out clear and does not smell of antifreeze, close the faucets and turn the water off.
- Dump your gray and black water holding tanks.

To ensure water in the RV tank is safe for drinking, washing hands and brushing your teeth, you also need to sanitize your RV’s fresh water tank. Follow the below instructions or see our guide to sanitizing the RV fresh water tank for more details.
- Mix a cleaning solution of ¼ cup of bleach and 1 gallon of water for every 15 gallons of tank capacity.
- Put the cleaning solution into the fresh water tank using the RV’s “sanitize” setting or by pouring it in with a funnel.
- Completely fill the rest of your fresh water tank with potable water.
- Turn on all faucets in the kitchen and bathroom and run water until you smell bleach.
- Let the cleaning solution sit in the tank overnight or for eight hours.
- Completely drain the fresh water tank ( Click here for a guide to draining RV fresh water )
- Refill the tank with water and drain again.
- Repeat until you no longer smell bleach.
Once the fresh water tank is sanitized, you can turn off the water heater bypass and test that your water heater is working properly using both propane and electricity.
Perform Regular Appliance Maintenance

Springtime, before your first camping trip of the year is a great time to perform required annual RV maintenance tasks. These tasks include cleaning your air conditioner, water heater and furnace. Purchase a copy of our eBook, The Owner’s Guide to RV Maintenance , for step-by-step instructions.

If you’ve made it this far, your RV should be defrosted and ready to hit the road! Now, check out our favorite summer RV destinations to start planning your next road trip.
Do you have any questions about how to de-winterize your RV? Drop them in the comments section below.
Happy Camping!

Christina Pate is a seasoned full-time RVer who, along with her husband Justin, has journeyed across the US, Canada, and Mexico. Drawing from her extensive travels, RV repairs and RV renovations, she founded Travels with Ted to guide and inspire fellow RV enthusiasts. Christina is also the co-author of The Owner’s Guide to RV Maintenance and the creator of My RV Log Book .
- Skip to primary navigation
- Skip to main content
- Skip to primary sidebar
- Skip to footer
- KYD Insiders
- Tricia’s Cookbook
- KYD Magazine
Keep Your Daydream
Rv de-winterization basics for beginners & checklist.
RV De-Winterization Basics for Beginners & Checklist
Spring is in the air, and you know what that means: the start of a new camping season! If you’re going a little stir-crazy after the cold, dark, and (in some areas) VERY snowy winter months, there’s no better cure than de-winterizing your RV as soon as temperatures allow.
If your RV has been in storage for the off-season, you’re probably dreaming of dusting off the snow and taking it out for its first warm-weather trip of the year. But don’t hit the road before you follow these 11 steps to get your RV travel-ready!
#1: Inspect the Exterior
You don’t have to inspect every inch with a magnifying glass; just do a general visual inspection to check for any leaks or cracks—especially on the roof. If you store your RV outside, snow and ice can create structural damage or crack seals along seams. Check the roof sealant for any cracks and inspect the roof for tears or damage.
While you’re up there, check the AC cowlings for cracks near the screws and reseal around those if needed.
Finally, check all of your windows, doors, and slideout seams, and replace sealant as necessary. The goal is to find any places where water could get in, and seal them tight to keep your rig leak-free for the season ahead.
And since you’re going around checking these things anyway, take the time to lubricate your doors, stabilizers, hinges, steps, and any other metal-on-metal contact points.
#2: Don’t Forget the Underbelly
Now that you’ve climbed up on the roof to make sure it’s clean and crack-free, it’s time to go low. Crawl under your RV at least a little way to check your shocks and running gear for cracks or other signs of damage. The first time you hitch up, squeeze the trailer brake and check for proper brake function.
Think about the last time your bearings were repacked, and have that done if you’re due. RV wheel bearings should be repacked once a year or every 10,000-12,000 miles, whichever comes first.
Inspect the underbelly for tears or openings that could allow pests to come inside, and fill any holes.
#3: Charge Your Batteries
Hopefully, you kept your batteries charged during the off-season, either at home using a battery tender or by periodically checking and charging them on-site. Keeping your batteries charged extends their lifespan and allows you to skip this step next spring!
Before you take your first trip, make sure your battery has a full charge. Depending on the type and size of battery you have, this could take a few days, so plan ahead.
If you have a lead-acid battery, check the water level and replace as needed with distilled water. Water should fully cover the plates before charging for optimal battery health.
Finally, reinstall your battery so that it’s secure and ready for travel.
#4: Flush and Sanitize Your Water Lines
Pink RV antifreeze is non-toxic, but you still don’t want to drink it! Before you travel, flush your water lines to clear out all of the antifreeze before using them. If you put antifreeze directly into your fresh water tank, drain that tank fully before filling it with potable water.
Then, flush the antifreeze from your system using these steps:
- Fill your fresh water tank with potable water and turn on the water pump, or connect to a city water supply. If you’re using the water pump, wait a couple of minutes for the system to pressurize.
- Open all cold water faucets, one by one. Don’t forget all sinks, the toilet, and your indoor and outdoor showers.
- Run the water until it’s clear
- Take the water heater out of bypass mode. Usually, this involves turning a couple of valves; your owner’s manual will show the correct configuration.
- Allow the water heater to fill with fresh water for a few minutes.
- Open all hot water faucets, one by one. Again, include all sinks and indoor and outdoor showers.
- Replace any water filters that were removed for storage.
- Dump your gray and black holding tanks at an appropriate dump station.
Spring is also the perfect time to sanitize your fresh water system and remove any bacteria or mold that may have grown in your tank or water lines during storage.
Follow these steps to sanitize your fresh water tank and lines:
- Close all fresh water and low point drains.
- In a large water jug, create a chlorine mixture using ¼ cup of household bleach for every 15 gallons of fresh water capacity in your tank, plus a gallon or two of water.
- Add the chlorine mixture to your fresh water tank using a funnel. Then, fill the rest of the tank with potable water.
- Turn on the water pump and run water through all hot and cold water lines. Take special care to fill any lines used for drinking water. Run the water until you smell bleach, then turn off your faucets.
- Let the solution sit for between 4 and 12 hours. Make sure not to leave the solution in any of your tanks or lines for longer than 24 hours.
- Drain all water from the fresh water system at an appropriate disposal site.
- Fill the fresh water tank with clean potable water.
- Run water through your lines until the bleach smell dissipates.
While you’re using your water pump to flush and sanitize your water lines, listen for evidence of leaks. When you turn your water pump on, it’s normal to hear the pump run for several seconds while it pressurizes the system. But once the system reaches full pressure, the pump should shut off. If you hear the pump turn back on while all the faucets are closed, or if it fails to shut off, you have a leak somewhere in your plumbing system.
While a leak is never fun to find, it’s much nicer to know before you take your first trip of the season!
#5: Replace Propane Tanks
Fill your propane tanks and ensure that they are correctly mounted and connected. Open the valves to allow the propane to flow, then apply soapy water to the connection points with a spray bottle or sponge. If any bubbles form, it could indicate a leak. If this happens, tighten any fittings and check again. Now is also an excellent time to check that your propane tanks don’t require recertification before they can be refilled.
Once your propane is connected, test propane appliances like your furnace, stove, water heater, and oven. However, don’t test the water heater until you have a full hot water tank! Make sure you’ve taken your water heater out of bypass mode and either connected to city water or filled your fresh tank and turned on the water pump.
If you find any propane leaks or issues, have a professional RV repair tech or service department inspect the system. Propane leaks can be deadly.
#6: Check the Tires
Your tires will lose approximately one to two PSI of air pressure each month that they sit unused. Depending on how long your RV has been in storage, it’s very likely that you’ll have low tire pressure. Inflate the tires to match the PSI recommended by the manufacturer based on the load.
Make sure to complete this step before driving! Underinflation (low pressure) is the leading cause of blowouts , not high pressure. Speaking of which, test your TPMS sensors to make sure they’re working as they should. With the TPMS turned on, remove a sensor. The system should start making a sound to alert you that something is wrong!
Also, check your tires for cracks in the sidewalls or uneven wear in the tread. Perform the penny test to ensure your tires have sufficient tread for safe travel: put a penny into the groove of your tread with Lincoln’s head facing down toward the tire. If the top of his head is visible, you need new tires.
P.S. Don’t forget to check the spare!
#7: Check Electric Appliances
Now that you’ve tested your propane-powered appliances, it’s time to test everything else, too. First, test your 12-volt devices with the battery connected at a full charge to ensure it’s supplying sufficient power to your coach. Then, connect your RV to a home outlet (if available) and test individual appliances to make sure they’re working correctly. You don’t want to discover that something is broken when you’re miles away from home on this season’s maiden voyage!
Note that you will probably need a 20 amp circuit to test the air conditioning. This kind of circuit can be tricky to access in a home. If your dryer circuit is accessible, that should do. Otherwise, you may need to visit an RV park with a 30-amp or 50-amp pedestal.
#8: Check the Lights
Whether you have a motorized or towable RV, check that all headlights, taillights, brake lights, and turn signals illuminate and function properly. Replace bulbs as needed.
#9: Replace Filters
Clean or replace all air and water filters. These collect dust and debris while you’re camping, and sitting in storage certainly doesn’t make them any cleaner! Start the season with clean filters so that your systems run as efficiently as possible.
#10: Test Safety Devices
Finally, test your safety devices before the camping season starts. Replace old batteries with new ones in any battery-powered devices. Then test all safety alarms: the smoke alarm, carbon monoxide detector, and LP detector.
Inspect your fire extinguisher, and check the expiration date. Purchase a new one if it’s out of date. If you have the dry powder style of extinguisher, shake it and tap the bottom to distribute any powder that has settled.
Operate and test all emergency exit windows to be sure they open smoothly.
Hopefully, you won’t need any of these safety devices—but this final check ensures that they are ready if you do!
#11: Inspect all Engines
Check the oil level in your onboard generator, and top off if necessary. Then start the generator to make sure it runs without issue.
In a motorized RV engine, check the following fluid levels:
- Transmission
- Brake fluid
- Power steering
- Engine coolant
- Windshield washer fluid
Top off any low fluids and visually inspect for leaks. Make sure all regular maintenance, such as oil changes, has been completed if it’s due.
Extra Credit:
If you’ve done all the above steps and still want more, here are a few ways you can go above and beyond for ultimate travel-readiness.
- Wash and wax the exterior
- Clean the awning
- Clean corrosion from batteries
- Rinse window screens and fan vent screens
- Inspect interior (including inside fridge and cabinets) for signs of mold or other damage
- Clean appliances
- Inspect sewer dump hose
Reader Interactions
March 27, 2023 at 12:48 am
As usual, you guys are the boss. Thanks so much for the good info.
March 27, 2023 at 1:02 am
How can I by supply’s or service from ronni
March 27, 2023 at 10:55 am
Great information! This will be my first de-winterizing of our Keystone 24RDS. A little intimidated for sure. Are there any videos to walk ( hold my hand) through the process? Thanks in advance.
March 27, 2023 at 12:09 pm
The blog mentions the use of your’s home’s dryer circuit to test your electrical appliances, AC, etc. I would say that this is not always a safe choice, especially for 30 amp RV’s. The dry circuit is generally wired for 240v service, whereas the RV is 120v…thus, you might fry your RV’s equipment, or, even worse, start a fire!
March 27, 2023 at 7:28 pm
Loved this episode. Lots of good information! Thanks so much and safe travels!
March 27, 2023 at 11:01 pm
Great video, but what were the lubricants? I heard Boeshield T-9, but there were at least two other aerosol lubes you used that I didn’t catch the names of.
March 30, 2023 at 1:07 am
Corrosion Technologies 90101 CorrosionX. I had to stop the video and look twice.
March 31, 2023 at 8:40 pm
great video! now for the big question: will you guys go through Quebec? will there be a meet and greet? we would love to see. you guys!
July 6, 2023 at 7:46 am
Every RV lover must learn about these things, care and maintenance are necessary if anyone wants a peaceful life on the road. Proper cleaning and regular inspection for wear n tear are the key things for it. You did a great job by posting on de-winterization. I also do the same thing and I must advise everyone to use RV Roof Magic RV roof repair system, as it is the best rubber roof sealant having 25 years of history of success. It gives you long-term benefits with a peaceful journey when you use the best waterproof, airtight, and highly insulated sealant like RV Roof Magic that will make your RV roof strong and highly flexible in extreme temperature fluctuations and can withstand ponding water 365 days a year that makes the RV roof less susceptible in heavy rainfall, snowfall, and hailstorms.
Leave a Reply Cancel reply
Your email address will not be published. Required fields are marked *
Where Are We Now?
Keepyourdaydream.

- KYD Partners
Popular Posts
- Season 4 Route & Plan
- Ep 100: How We Turned “Someday” Into Today!
- RV Newbie? Top 10 things a new RVer should know!
Looking for something?
Keep in touch, join the kyd community.
You’ll receive the once-per-month “KYD Drop” loaded with inspiration, ideas and stuff to make you smile 😀
- First Name *
- Email Address *
- Phone This field is for validation purposes and should be left unchanged.

How to De-Winterize an RV or Camper: A Step-by-Step Guide
When winter ends and the weather starts to warm up, it’s time to get your RV or camper out of storage and prepare it for the upcoming camping season. One of the most important steps in this process is de winterizing your RV. Knowing how to de winterize an RV typically involves reversing the steps you took to winterize it, which includes flushing out the antifreeze and making sure all the water lines and tanks are clean and ready to use. There is a bit more to it than that though, which we’ll cover in today’s guide.
Inspecting the RV or Camper

Exterior Inspection
Before taking your RV or camper out of storage, it’s important to inspect the exterior for any damage that may have occurred during the winter months.
Start by performing a thorough walkaround of your RV and look at the condition of windows, window seals, paint, latches, doors, door seals, compartments, and all exterior components.
Climb up safely and inspect the roof. Look at seams along the edges and around all roof vents, antennas, A/C units, etc.
Check for any cracks or leaks on the roof. Look for any signs of water damage around the roof vents, skylights, and air conditioning units.
Finally, check the seals around the doors and windows1, and replace any that are worn or damaged.
Finally, check and test all exterior lights to ensure they are working properly, including the headlights, taillights, brake lights, and turn signals. Replace any bulbs that are burned out or not functioning properly.
Interior Inspection
Once the exterior has been inspected, it’s time to move on to the interior. Start by checking the batteries and ensuring they are fully charged. Test the smoke detectors and carbon monoxide detectors to ensure they are working properly.
Next, check the plumbing system for any leaks or damage. Turn on the water pump and check for any leaks under the sink or around the toilet. Check the water heater and ensure it is functioning properly.
Inspect the appliances, including the refrigerator, stove, and microwave, to ensure they are working properly. Check the propane system for any leaks or damage. Finally, inspect the interior for any signs of water damage or pests.
Check Your RV Tires

Before hitting the road after a long winter, it’s important to check your RV’s tires. Over time, tires can lose air pressure, which can lead to uneven wear and even blowouts. Here are some steps to follow when checking your RV tires:
- Check the tire pressure: Use an air inflation gauge to check the pressure of each tire when they are cold. Inflate them to the correct pressure according to the manufacturer’s guidelines.
- Inspect the tires: Look for signs of wear, such as cracks in the sidewalls and worn down treads. If you notice any significant damage, it may be time to replace your tires.
- Check the tread depth: Use a tread depth gauge to check the depth of the tire treads. If the treads are worn down to 2/32 of an inch or less, it’s time to replace the tires.
- Check the age of the tires: Even if your tires look fine, they may still need to be replaced if they are more than six years old. Over time, the rubber can break down and become less reliable, and you don’t want to find that out the hard way while on the road.
By following these steps, you can ensure that your RV tires are in good condition and ready for the road. It’s also a good idea to carry a spare tire and a tire repair kit with you in case you run into any issues on the road.
Here’s a helpful video from RV Education 101 on how to inspect your RV tires:
Charge And Reinstall Your Camper’s Batteries

Most people remove their RV batteries when they store the vehicle for the winter. This practice ensures that the battery maintains a regular temperature and doesn’t freeze during the storage period.
Before reinstalling the battery, ensure that it’s fully charged and topped up with water (if applicable). Check with a multimeter for the minimum reading of 12 volts. You will need your battery hooked up to perform the next steps.
Attach the battery charger to the RV charger while the battery charger is turned off. Turn the battery charger on and allow the battery to fully charge. Depending on the battery size, your RV batteries may need to charge for a few hours or even a few days.
Once the battery is fully charged, reinstall it in your camper. Make sure to connect the terminals correctly and double check the connections and tighten them well.
Refill or Replace Your Propane Tanks

Propane is an essential component of any RV or camper, as it powers the stove, refrigerator, furnace, and water heater. Before using your RV or camper, you need to refill or replace your propane tanks.
If your propane tanks have been sitting idle all winter, it’s crucial to check them for leaks and damage. Inspect the hoses, fittings, and valves for any cracks or signs of wear and tear. If you notice any damage, replace those parts immediately.
When it comes to refilling your propane tanks, you have a few options. You can either refill them at a propane filling station or exchange them for new ones at a propane exchange location.
Refilling your tanks is typically cheaper than exchanging them, but it can take a little more time.
When refilling your propane tanks, make sure to fill them to no more than 80% capacity. Overfilling your tanks can cause them to burst or leak. You should also turn off all propane-powered appliances and pilot lights before refilling your tanks.
It’s important to note that propane tanks have a lifespan of 12 years. If your propane tanks are nearing the end of their lifespan or are due for recertification, it’s best to replace them rather than refill them.
When replacing your propane tanks, make sure to choose the right size for your RV or camper. You can consult your owner’s manual or speak with a professional to determine the appropriate size.
Overall, refilling or replacing your propane tanks is a crucial step in dewinterizing your RV.
Flushing the Water System

Te next step in dewinterizing an RV or camper is to remove the antifreeze and flush the water system .
First, fill the fresh water tank with clean water. Then, turn on the water pump and open all the faucets, including the shower and toilet, until the water runs clear. This can take several minutes.
It’s also a good idea to flush the hot water tank separately. Turn off the water pump and drain the hot water tank. Then, close the drain valve and refill the tank with clean water. Turn the water pump back on and open all the hot water faucets until the water runs clear.
It’s important to note that some RVs and campers may have a built-in water filtration system. If this is the case, it’s still recommended to sanitize the water system after flushing it because the filter may not remove all bacteria or other contaminants.
Check out this video showing the RV water system dewinterization process:
Sanitizing the Water System

After de-winterizing the RV water system, it is important to sanitize it to ensure that it is free of harmful bacteria and other contaminants. Sanitizing the RV water system involves the following steps:
- Fill the fresh water tank with a solution of one-quarter cup of household bleach for every 15 gallons of water.
- Turn on the RV water pump and open all of the faucets (hot and cold) to allow the solution to run through the entire water system.
- Let the solution sit in the water system for at least 12 hours.
- Drain the water system completely and refill the fresh water tank with potable water.
- Run the water through the entire system again, opening all of the faucets (hot and cold), until the bleach smell is gone.
It is important to note that the bleach solution should not be used in the freshwater tank for more than 24 hours, as it can damage the tank. Additionally, the water heater should be turned off during the sanitization process to prevent damage to the heating element.
Once the water system has been sanitized, it is important to regularly maintain it to prevent the growth of harmful bacteria and other contaminants. This can be done by regularly flushing the water system with fresh water and using a water filter to remove impurities.
Check Your Plumbing System For Leaks

Once you’ve drained, flushed, sanitized, and refilled your water system, you should next check for any leaking pipes in your rig.
Turn on the electric water pump and get everything re-pressurized, and wait for the pump to shut off.
Listen for the pump turning back on, and if so, it means you could have a leak somewhere.
Visually inspect under sinks, around the toilet, and anywhere else plumbing runs in your rig to make sure there are no leaks, and address any leaks you find immediately.
Testing the Appliances and Systems
After de-winterizing your RV, it’s important to test all of the appliances and systems to ensure they are in proper working order. This will help you identify any potential problems before you hit the road.
Water Heater
The water heater is an important component of your RV, especially if you plan on using hot water during your travels. To test the water heater, turn it on and let it run for a few minutes. Check the temperature of the water to make sure it’s heating properly. You should also check for any leaks around the water heater.
The furnace is another important part of your RV, especially if you plan on traveling in colder weather. To test the furnace, turn it on and let it run for a few minutes. Check to make sure it’s blowing warm air and that the temperature is adjusting properly. You should also check for any unusual noises or smells.
Air Conditioner
The air conditioner is essential for keeping your RV cool during hot weather. To test the air conditioner, turn it on and let it run for a few minutes. Check to make sure it’s blowing cold air and that the temperature is adjusting properly. You should also check for any unusual noises or smells.
Refrigerator
The refrigerator is important for keeping your food and beverages cold during your travels. To test the refrigerator, turn it on and let it run for a few hours. Check to make sure it’s cooling properly and that the temperature is adjusting as needed. You should also check for any leaks, smells (like ammonia ) or unusual noises.
By testing these appliances and systems, you can ensure that your RV is ready for your next adventure. If you notice any problems, it’s important to address them before hitting the road.
Test Your Camper’s Electrical System
Before hitting the road, it’s important to ensure that your camper’s electrical system is in good working order. This will help prevent any issues on the road and keep you and your passengers safe. Here are a few steps to test your camper’s electrical system:
Step 1: Test the Outlets
Next, test the outlets in your camper to ensure that they are working properly. Plug in a small appliance, such as a hair dryer or phone charger, and make sure it works. If an outlet is not working, check the breaker box to see if a breaker has tripped.
Step 2: Make Sure Your RV Inverter Is Working
Make sure the RV’s power inverter is working by checking the input voltage which should be 12V. Then check the output voltage to ensure it’s 120V.
If both are reading these measurements, you’re good to go.
Restock Emergency and First Aid Supplies

Restocking your RV’s emergency and first aid supplies is an important step in preparing for the upcoming season. It’s important to make sure you have everything you need in case of an emergency or unexpected situation. Here are some tips to help you restock your emergency and first aid supplies:
- Check the stock of your emergency supplies and restock any items that need it.
- Throw out any expired medications and dry food.
- Make sure you have enough bottled water for emergency use.
- Check your first aid kit and make sure it’s fully stocked with all the necessary items like bandages, antiseptic, and pain relievers.
- Consider adding items such as a fire extinguisher, a flashlight, and a whistle to your emergency supplies.
By taking the time to restock your emergency and first aid supplies, you’ll be better prepared for any unexpected situations that may arise during your travels. It’s always better to be safe than sorry, and having the right supplies on hand can make all the difference in an emergency.
Double-Check Your RV Insurance And Registration
Before hitting the road, it is important to ensure that your RV insurance and registration are up to date. Double-checking these items can save you from potential legal and financial troubles down the road.
First, check your RV insurance policy to ensure that it is current and provides adequate coverage for your needs. This may include liability coverage, collision coverage, comprehensive coverage, and more. Make sure to review the terms and conditions of your policy, including any deductibles or exclusions.
Next, verify that your RV registration is current and up to date. This will ensure that you are legally allowed to operate your RV on public roads. Check with your state’s Department of Motor Vehicles (DMV) to see if there are any specific requirements or regulations that you need to follow.
If you plan on traveling to other states or provinces, be sure to research the local laws and regulations regarding RV insurance and registration. Some states may require additional coverage or registrations, while others may have different requirements for RVs than passenger vehicles.
By double-checking your RV insurance and registration, you can have peace of mind knowing that you are legally and financially protected while on the road.
Replace Your RV’s Air And Water Filters
One important step in de winterizing an RV is to replace its air and water filters. Over time, these filters can become clogged with debris, reducing the efficiency of your RV’s systems and potentially causing damage.
When replacing the air filter, first locate the filter compartment. This is typically located near the engine or in the cabin of the RV. Remove the old filter and dispose of it properly. Then, insert the new filter, making sure it is securely in place. Consult your RV’s owner manual or a professional mechanic if you are unsure of how to replace the air filter.
Replacing the water filter is also important for ensuring clean and safe drinking water while on the road. The location of the water filter will vary depending on your RV’s make and model. Consult your owner’s manual or a professional mechanic for guidance on locating and replacing the water filter.
When replacing the water filter, it is important to choose the correct type of filter for your RV. There are a variety of water filters available, including carbon filters and sediment filters. Carbon filters are effective at removing chlorine and other chemicals from the water, while sediment filters are designed to remove dirt, sand, and other particles. Consider your specific needs when selecting a water filter for your RV.
Regularly replacing your RV’s air and water filters is a simple but important step in maintaining your RV’s systems and ensuring a safe and comfortable trip.
Repack Your Camper’s Wheel Bearings
One of the most important steps in de winterizing your RV or camper is repacking the wheel bearings. Neglecting this task can lead to premature wear and tear on your tires and even cause dangerous accidents on the road. Here are the steps to repack your camper’s wheel bearings:
- First, jack up the camper and remove the wheel and hub assembly from the axle spindle.
- Next, remove the outer bearing and clean it with a solvent.
- Inspect the bearing for any signs of wear, such as pitting, cracking, or discoloration. If the bearing is damaged, replace it with a new one.
- Use a bearing packer (or your hands) to apply new grease to the bearing. Make sure the grease is evenly distributed throughout the bearing.
- Reinstall the outer bearing and hub assembly onto the spindle.
- Repeat steps 2-5 for the inner bearing.
- Finally, adjust the wheel bearing to the recommended torque specifications and reinstall the wheel onto the hub assembly.
It’s recommended to repack your camper’s wheel bearings every 10,000 to 12,000 miles or at least once a year, whichever comes first. If you frequently travel on rough roads or in extreme weather conditions then you may need to repack them more often.
Here’s a helpful video from Brazen Brits showing how to repack RV wheel bearings:
If you’re not comfortable performing this task yourself, it’s best to have an RV repair center do it for you. Neglecting to repack your camper’s wheel bearings can lead to costly repairs and even put your safety at risk.
Do A Spring Cleaning

After the RV has been dewinterized, it’s time to do a thorough spring cleaning. This will help ensure that the RV is clean and ready for use. The cleaning should start from the top and work down to the bottom.
First, clean the roof of the RV. Remove any debris or leaves that may have accumulated during the winter. Check for any damage or leaks that may have occurred during the winter.
Next, clean the exterior of the RV. Use a mild detergent and a soft brush to clean the exterior. Rinse thoroughly with water. Check for any damage or cracks in the exterior.
After the exterior is clean, move on to the interior of the RV. Start by cleaning the floors. Use a vacuum or broom to remove any dirt or debris. Then, mop the floors with a mild detergent.
Next, clean the walls and ceiling of the RV. Use a soft brush or cloth to remove any dust or dirt. If there are any stains, use a mild detergent and water to clean them.
Finally, clean the appliances and furniture in the RV. Use a mild detergent and water to clean the appliances. Use a soft cloth to clean the furniture.
By following these steps, the RV will be clean and ready for use. It’s important to do a spring cleaning every year to ensure that the RV is in good condition and ready for use.
When Should I De Winterize My RV?
Knowing when to dewinterize your RV is crucial to ensuring that it is in good condition for the upcoming camping season. Generally, it is recommended to dewinterize your RV or camper in the early spring once the temperatures start to consistently stay above freezing.
If you live in an area with milder winters, you may be able to dewinterize your RV earlier than someone living in a colder climate. It’s important to keep an eye on the weather forecast and make sure that there are no more freezing temperatures expected before you begin the camper de-winterization process.
It’s also important to consider how long your RV has been in storage. If it has been stored for an extended period of time, it’s a good idea to do a thorough inspection before the time comes to start your RV dewinterization. This can help you get ahead of and address any potential issues that could get in your way and delay your project.
Leave a Comment Cancel reply
Save my name, email, and website in this browser for the next time I comment.
Terms and Conditions

How To De-Winterize A Travel Trailer (Getting Ready For Summer)
Winter can be a magical time filled with snow-filled adventures and cozy nights in front of the fire. But as the frost begins to thaw and the chirping of birds replaces the winter silence, it’s time to prepare for the warmer months ahead. One such preparation is de-winterizing your travel trailer . In this comprehensive guide, we’ll walk you through the essential steps on how to de-winterize a travel trailer effectively and efficiently.
Table of Contents
1. Understanding De-Winterization
De-winterization involves preparing your travel trailer for spring and summer use after it has been winterized, or prepared for winter storage. During winterization, you most likely took measures to protect your trailer’s plumbing system from freezing temperatures. Now, it’s time to reverse those measures and get your RV ready for some summer fun!
2. Essential Tools
Before starting the de-winterization process, gather these essential tools:
- A fresh water hose
- Non-toxic RV antifreeze
- Towels or rags
- A wrench set
- An air compressor (optional)
It’s also a good idea to have your RV owner’s manual on hand. It can provide detailed information specific to your model.
3. Step-by-Step Guide
Step 1: Drain the Antifreeze
The first step to de-winterize a travel trailer is to drain all the antifreeze you’ve added to your plumbing system over winter. It’s vital to ensure the antifreeze is fully drained from all pipes, tanks, and faucets.
Step 2: Inspect for Damage
Check your travel trailer for any damage that may have occurred during the winter months. This includes inspecting the roof, walls, tires, and undercarriage.
Step 3: Clean the Water System
Sanitizing the water system is crucial after winter storage. Flush your water system with a solution of water and bleach, then thoroughly rinse it. Don’t forget to clean your water heater, too!
Step 4: Check the Appliances
Turn on all appliances to ensure they are working correctly. This includes the air conditioner, refrigerator, stove, oven, and any other appliances your travel trailer may have.
4. Preventive Maintenance
After de-winterizing your travel trailer, it’s time to perform preventive maintenance. This includes checking and topping off fluid levels, inspecting seals, and lubricating moving parts. Also, don’t forget to check the tire pressure. It’s crucial for safe towing!
5. Final Tips
De-winterizing your travel trailer isn’t just about getting it ready for use. It’s about ensuring your trailer is safe and functional for the warmer months.
Remember, each travel trailer is unique, and some steps may vary depending on the model and make of your RV. Always refer to your owner’s manual or consult with a professional if you’re unsure.
After de-winterizing, it’s time to plan your summer adventures! From picturesque landscapes to sunny beaches, the possibilities are endless when you have a fully prepped travel trailer.
As you venture out, consider keeping a maintenance checklist for your travel trailer. This can help you stay on top of the condition of your trailer and prevent any unforeseen issues down the line.
Wrapping Up
De-winterizing your travel trailer is an essential step in transitioning from winter hibernation to exciting summer road trips. It might seem like a daunting task at first, but with the right tools, a comprehensive checklist, and this detailed guide at your side, you’ll have your travel trailer ready for the road in no time.
Just imagine the amazing destinations and unforgettable memories that await you. All it takes is a little preparation, and you’re ready to embrace the warmer months with open arms (and an open road).
Disclaimer : This guide is meant to provide general advice on de-winterizing a travel trailer. Always follow the manufacturer’s instructions or consult a professional if unsure. Improper de-winterizing could lead to significant damage.
Good luck, and happy camping.
Check out our article on: (10 Steps) How To Winterize An RV Or Camper For Safe Storage
Please keep in mind that we may receive commissions when you click our links and make purchases. However, this does not impact our reviews and comparisons. We try our best to keep things fair and balanced, in order to help you make the best choice for you.
As an Amazon Associate, I earn from qualifying purchases.
Home » Guides » How To Winterize A Travel Trailer (Step by Step Guide)
How To Winterize A Travel Trailer (Step by Step Guide)

- Last Updated: Apr 2, 2024
When the cold weather starts to creep in, it’s time to start thinking about winterizing your travel trailer. If you want to ensure that your trip is a success, you must take the necessary steps to prepare for the colder months. This article will discuss how to winterize a travel trailer so that you can stay warm and comfortable on your next trip!
Why Do You Need To Winterize Your Travel Trailer?
There are a few reasons why you might need to winterize your travel trailer. First, if you live in an area with cold weather, you will want to ensure that your travel trailer is prepared for the colder temperatures . Second, if you plan on taking a trip during the winter months, you will need to ensure that your travel trailer is winterized correctly to stay warm and comfortable while on the road.

What Happens If You Don’t Winterize Travel Trailer?
Depending on where you live, you may be able to get away without winterizing your travel trailer.
However, if you live in an area where the temperatures dip below freezing, it’s essential to take the necessary steps to protect your investment . Failing to do so could result in severe damage and costly repairs.
So what exactly happens if you don’t winterize your travel trailer? Water lines can freeze and burst, causing extensive damage. The holding tanks can also freeze and crack, resulting in leaks.
And if the RV is left unattended for an extended period, the battery could die. All of these scenarios are costly to fix and could have been avoided by taking the time to winterize the RV.
Related>> How Tall is a Travel Trailer? (And Why You Need to Know)
When Should I Winterize My RV?
The best time to winterize your RV is before the first frost. This will help to ensure that your lines and pipes don’t freeze and burst. However, if you live in an area with a mild climate, you may be able to get away with winterizing your RV later in the season.
No matter when you decide to winterize your travel trailer, the most important thing is to do it before you take it out for the season. This will help to ensure that your RV is ready for anything that winter throws your way.

Tools Needed Before You Start
To winterize your travel trailer, you’ll need a few tools. These include:
- A water heater bypass kit
- A clean and empty five-gallon bucket
- Air compressor
- An RV antifreeze solution (this is different from the automotive antifreeze method)
- Pressure relief valve
- A rags or towels
Once you have all of these things, you’re ready to start winterizing your travel trailer!
How Do You Winterize Your Travel Trailer? Simple Steps To Follow
If you are like many people, you enjoy spending time outdoors in your RV during the warmer months. However, when winter arrives, it’s essential to take steps to protect your investment. Winterizing your travel trailer will help ensure it is ready for next season.
Here are some simple steps that you can follow to winterize your travel trailer:
Step # 1: Clean And Inspect The Roof And Seal Any Leaks
Begin by removing any leaves or debris accumulated on the roof throughout the fall. Next, inspect all the seals around your vents, skylights, and other openings. If you see any cracks or gaps, use a sealant to fill them in and prevent leaks.
Step # 2: Drain The Freshwater Tank And Add RV Antifreeze To All Faucets, Showers, And Toilets
- Open all of the faucets in your travel trailer to allow any water left in the lines to drain out.
- Add RV antifreeze to each one.
- Drain plug on the fresh water tank and add RV antifreeze to that as well.
To do this, pour a few inches of RV antifreeze into a bowl and then use a funnel to add it to each toilet bowl. For your sinks and showers, turn on the faucet until you see the antifreeze coming out, then turn it off. Non-toxic RV antifreeze is safe for humans, pets, and the environment.
Related>> Top 10 Best Toilets for RVs (2022 Review)
Step # 3: Add Antifreeze To The Toilet Bowl And Holding Tanks
Add a few inches of RV pump antifreeze to winterize your toilet to the bowl. Next, flush the bathroom several times until the antifreeze appears in the bowl. Inline water filters, turn off the bypass valve, and open all of your RV’s faucets until the antifreeze comes out.
Step # 4: Disconnect And Drain The Battery
To winterize your battery:
- Start by disconnecting it from the power source.
- Use a hydrometer to test the level of acid in each cell. If the level is low, add distilled water until it reaches the fill line.
- Charge the battery fully before storing it for the winter.
Related >> Top 10 Best RV Batteries For Boondocking (2022 Review)
Step # 5: Cover Or Remove Any Exposed Water Lines
To protect your water lines from freezing temperatures, start by disconnecting them from the water source. Next, drain any remaining water from the pipes by opening all the faucets in your travel trailer. Finally, either cover the lines with insulation or remove them entirely and store them indoors for the winter.
Step # 6: Remove All Food From The Refrigerator And Freezer
To prepare your refrigerator for winter:
- Start by removing all of the food from it.
- Clean the interior and make sure there is no mold or mildew present.
- Turn off the power to the fridge and prop the doors open to prevent ice buildup.
Step # 7: Cover The Windows To Help Insulate The Trailer
To help insulate your travel trailer:
- Start by covering the windows with plastic.
- Use weather-stripping to seal any gaps around the doors and windows.
- Consider adding a layer of insulation to the walls and ceiling of your trailer.
Step # 8: Store Your Trailer In A Safe And Dry Location
When it comes time to store your travel trailer for the winter, make sure to choose a safe and dry location, if possible, avoid storing it outdoors where it will be exposed to the elements. Instead, opt for a spot in your garage or shed. Winter storage is typically available at most RV dealerships.

By taking these simple steps, you can help to ensure that your travel trailer is ready for winter. Contact a local dealer or service center for more information on winterizing your RV. They will be able to assist you with any questions that you may have.
Wrapping UP
Now that you know how to winterize a travel trailer, it’s time to get started! This process may seem daunting at first, but it’s actually quite simple. Just be sure to take your time and follow the steps carefully. Before you know it, your trailer will be ready for winter!

Leave a Comment Cancel reply
Recently published guides.

Buying a Generator for RV Life

RV Refrigerators: How Do They Work?

How to Repair Norcold Fridge Flap
IMAGES
VIDEO
COMMENTS
Check the Tires. During winter storage, an RV's tires will lose about two to three psi of air pressure for every month or inactivity. Also, check depth of the tire tread. Check the Exterior for cracks, broken seals, and exterior lights. Flush the Freshwater System of All Antifreeze. Sanitize the Freshwater System.
Measure 1/4 cup of bleach for every 16 gallons of water in your freshwater tank. Dilute your bleach in at least a gallon of water. Use a funnel to pour your bleach-water mixture into your freshwater tank. Fill your fresh water tank full with potable water. Turn on all of your faucets until you start to smell bleach.
5. Prepare your black water tank for travel. Speaking of your water system, don't forget about your black tank! This was probably drained before you stored the RV, but make sure you give it a thorough rinse and scrub. In addition, it's a good idea to add an enzyme cleaner to the tank.
Step 1: Reconnect Plumbing System. The plumbing system is the lifeline for water usage in your RV and the key focus of your dewinterization effort. To begin, ensure that all valves and outlets are closed before introducing water into the system. Next, reconnect the main water supply and gradually fill the system, keeping a keen eye out for any ...
Park your RV or trailer on level ground and set the parking brake. Apply pressure to the brake pedal and hold it for a few seconds. If the pedal sinks to the floor, there may be a problem with the brakes. With the engine off, pump the brakes a few times to build up pressure. Then start the engine and apply pressure to the brake pedal again.
How to de-winterize a camper RV water system for the Little Guy Max Trailer. EASY for all small campers & trailers. Checklist below ⬇️ ️ Subscribe to Randi'...
To clean out the system: For every 15 gallons of tank capacity, add 1/4 cup of liquid household bleach to one gallon of water. Add the bleach water to the fresh water tank. Pump the water through all the water lines and fixtures, and let it sit for 4 hours. Drain the system and flush it out until the water tastes and smells bleach-free.
This step isn't a complete necessity on an RV winterizing checklist, but it never hurts to stay on the safe side when you're dealing with water. Use 30-50 psi of compressed air to clear out any remaining moisture in your plumbing system. Once that is complete, replace the caps on the holding tanks and water lines. 2.
Freshwater tank and water line sanitization. The next step in dewinterizing an RV is to sanitize the freshwater system. Using a ratio of approximately 1/4 cup bleach for every 15 gallons of water or a water system cleaner, fill the freshwater tank almost full. If possible, hauling your RV is a great way to agitate the mixture.
2.4 Check and Repair all Exterior Seals. 2.5 Replace and Turn On Propane Tanks. 2.6 Check Safety Systems. 2.7 Test Appliances. 3 How to De-Winterize your RV's Plumbing System. 3.1 Flush the RV Holding Tanks and Water Lines. 3.2 Sanitize the Fresh Water Tank. 4 Perform Regular Appliance Maintenance.
Join the KYD Insiders for monthly Livestreams, meet-ups and the most supportive RV community anywhere! https://patreon.com/keepyourdaydreamRV De-winterize Ch...
Wash and wax the exterior. Clean the awning. Clean corrosion from batteries. Rinse window screens and fan vent screens. Inspect interior (including inside fridge and cabinets) for signs of mold or other damage. Clean appliances. Inspect sewer dump hose. RV De-Winterization Basics for Beginners & Checklist Spring is in the air, and you know what ...
Flushing the Water System. Te next step in dewinterizing an RV or camper is to remove the antifreeze and flush the water system. First, fill the fresh water tank with clean water. Then, turn on the water pump and open all the faucets, including the shower and toilet, until the water runs clear.
In this video, we'll go through the step-by-step process of dewinterizing my 2020 Keystone Bullet 243BHS travel trailer. While you may have a different RV, m...
While de-winterizing your RV's water system, instead of using your RV water pump to flush antifreeze from your camper's water system, you can also use a garden hose or city water supply. ... After dewinterizing your RV battery, water system, propane and engine, the final step for getting your RV ready for travel is making sure your papers ...
Step 1: Drain the Fresh Water Tank. If you've just finished the air compressor method and want to add antifreeze from there, go ahead and skip to Step 3. If you're only using antifreeze, however, you'll need to start by draining your fresh water tank.
De-winterizing your travel trailer is an essential step in transitioning from winter hibernation to exciting summer road trips. It might seem like a daunting task at first, but with the right tools, a comprehensive checklist, and this detailed guide at your side, you'll have your travel trailer ready for the road in no time.
De-winterizing Checklist, by Steve Revelli Exterior. De-winterizing Checklist, by Steve Revelli Exterior. Complete Item Notes Remove moth balls from basement Remove protective coverings from vents Unplug and put ultras sonic away Inspect extension cord going to camper Clean and wash roof Inspect roof and seals Wash exterior, slide out awnings ...
Fill the fresh water holding tank completely full of water. Turn on the water pump and run water through all hot and cold faucets until you smell the bleach. Close the faucets and let the solution sit in the water tank and water lines for twelve hours. Drain all of the water and re-fill the tank with potable water.
If you used antifreeze to winterize the water system, you should drain it. • For every 15 gallons, add ¼ of a cup of liquid bleach to a gallon of water, and place the bleach water in the water tank. • Pump water through all lines and fixtures for four hours. • Drain and flush the system until the water is rid of bleach smell and taste.
Jeff from Johnson's RV shows us how to properly de-winterize a trailer for the upcoming camping season!
Step 1: Draining Your RV. Remove and bypass any inline water filters. Drain fresh water, black and gray holding tanks. Flush black and gray holding tanks with built-in flushing system or use a cleaning wand. Lubricate termination valves with WD 40. Drain water heater by removing the drain plug and opening the pressure relief valve.
Add a few inches of RV pump antifreeze to winterize your toilet to the bowl. Next, flush the bathroom several times until the antifreeze appears in the bowl. Inline water filters, turn off the bypass valve, and open all of your RV's faucets until the antifreeze comes out. Step # 4: Disconnect And Drain The Battery.