"Growing Old With You" lyrics
- Restless Road Lyrics


How to display travel souvenirs – 50+ creative ways
Yes, it’s true guys, there might be affiliate links in this awesome, free post. This means that if you decide to buy something that you find here, and you use one of my links to do so, I will earn a small commission at no extra cost to you. I plan to use this money on ice cream, chocolate, and to travel more so I can write these useful guides for you. As an Amazon Associate, I earn from qualifying purchases.
Traveling is one of the most exciting and enriching experiences we can have. Exploring new places, meeting new people, and trying new foods are just some of the things that make traveling so special. And of course, bringing back souvenirs is a great way to remember those experiences and keep them close to our hearts.
But what do you do with all those souvenirs once you’re back home? It’s easy to let them collect dust on a shelf or get lost in a drawer, but there are so many creative ways to display them and keep those memories alive. From classic options like framing postcards and photos to more unconventional ideas like turning travel maps into wallpaper, there are endless possibilities for showcasing your souvenirs in a way that reflects your personality and style.
In this article, we’ve compiled more than 50 of the most creative ways to display travel souvenirs. Whether you’re a minimalist or a maximalist, a DIY enthusiast, or a fan of store-bought solutions, there’s something here for everyone. So, dust off those souvenirs and get ready to turn them into meaningful works of art that will inspire you every day.
Table of Contents

45+ best free travel apps you want to download for your next trip

How to use Revolut for travel – 15+ ways to save money and time abroad

How to keep valuables safe while traveling – 50 tips to keep your stuff safe when abroad
Shelf displays for travel souvenirs.
Shelves are a great way to display your travel souvenirs, and there are many creative ways to do so. When arranging your souvenirs on shelves, keep in mind the overall aesthetic of the room. Choose a color scheme and style that complements the way you decorate your space with travel souvenirs. Don’t overcrowd the shelves – leave some space to allow the items to breathe. And don’t be afraid to switch things up from time to time to keep your display fresh and interesting. Here are a few tips to make your souvenir display look amazing:
- Use floating shelves to create a minimalist display. Arrange your souvenirs in a way that creates balance and visual interest. Don’t be afraid to experiment with various sizes until you feel the balance looks just how you like.
- Group items by color or theme. For example, if you have a collection of pottery from different countries, group them on a shelf.
- Use a mix of items, such as small figurines, postcards, and photographs, to create a layered display. Vary the heights of the items to add depth.
- Display your souvenirs in shadow boxes or on small easels. This will give them a more formal, museum-like feel.
- If you have a large collection of travel mementos to display, consider creating a gallery wall. Use a mix of shelves, frames, and other display items to create a visually stunning display. Who knows, maybe you’ll open up your house for visitors at one point.
- Hang items from a kitchen utensil holder or a hanging jewelry display, if you need. You have plenty of options online to make them look great and match your desired aesthetic, so check out these options as well.
And here are a few ideas on how and what types of souvenirs you can combine on various shelves. Feel free to mix and match by using shelves, tables, or small parts of your room.
- Make up a corner with your related items per country (an Indian corner, a Chinese corner, a French corner, etc.). Combine things like books, tea sets, and various other items to give the full feeling of the destination.
- Display all of your travel guides (from Lonely Planet or independent travelers, like mine ) on a bookshelf. Who doesn’t want to see a wall full of books, am I right?
- Make decorative arrangements with sand and shells in IKEA glass containers (or their Amazon version ). The same can be done for other types of souvenirs like sand from the desert, rock collections, or other natural items you are allowed to take. That last part is not negotiable: you shouldn’t take anything from the environment if the rules forbid you to.
- Create handpainted Christmas tree decorations with each destination. If you’re more artistic, you can paint each destination on a simple Christmas tree globe, or you can buy some already-made ones from Etsy . In the end, most souvenirs are not sourced locally anyway, so you can choose to be creative with this.
- Create personalized decoration items like pillowcases, embroidered pillows, or throw blankets. These will make your house look warm and cozy and will make you dream of traveling every time you see them. Don’t overdo it though because it stops being funny and starts being in-your-face instead. Check out this example from Etsy.
- Get a travel keepsake box for each destination and add all of your related items to it. Then, display them in a corner of your living room or bedroom after labeling (or use some personalized boxes if you can), so you create a nice overview of your accomplishments. You get bonus points if this memory box is in the shape of a suitcase , and it’s even better if you can find sets of them in assorted colors. This is also a great gift for a traveling couple , for example.
- Create a shadowbox for each destination, including maps, ticket stubs, postcards, etc., or even 3D items like shells, rocks, or small figurines. Arrange them in a grid for a modern and minimalist display, or just put them randomly throughout the house for a more relaxed feeling.
- Make a collage of your boarding passes, luggage tags, entry tickets, public transportation tickets, etc. from a destination and display them on a shelf. You can also hang these on a wall and make a huge piece of wall art with it. It’s a nice way to reuse these items that will otherwise be thrown away.
- Make resin or epoxy art to remember your trips like these amazing rings on Etsy . You can either make nice standing pieces of art to display, or you can even make rings and pendants to wear all the time. I’ve even seen epoxy decorations made out of coins from various countries, so the sky is the limit when it comes to resin art.
- Display all airplane models you have flown on a shelf. This is more for aviation passionate people, but there are more like us than you think. You can either buy the models straight from the airlines so they have the correct logos as well, or you can buy generic ones from Amazon. If you want to be even fancier, you can make 3D puzzles with them and you get to double your fun.
- Make coasters with photocopied versions of your passport stamps. You can either use them as day-to-day coasters, or you can add them as a collection to each destination’s shelf or corner. They’re a conversation starter for sure as any guest will see them for sure.

- Make an embroidery of your travel itinerary , especially for road trips. You can use a map to do so, and old maps look particularly great for this. Then, use embroidery floss and needles to stitch the route you have used, and you can even choose the colors in a way that matches the map’s colors. You can then display these on a special shelf.
- Create a travel binder . You can use a journal bought from each destination to hold the items, making the binder part of the fun, and you can add all sorts of items to it. Include printed photos, postcards, maps, notes from your journaling throughout the trip, entry tickets, transportation tickets, stamps, and everything else you can think of.
- Make origami-specific items and display them on a string, as a mobile for babies, or together on a shelf. You can do virtually anything with origami items, as you can make them of any size and color, and it’s a great way to spend your time as well.
- Have small 3d puzzles with the places you have been to and display them on a shelf. There are great small ones with most of the important buildings in the world, and some can be bought from museum souvenir shops as well. This will recreate a mini-version of the world over time, and it’s cool to see them all.
- Make a tabletop with resin with your coins or keep them in a nice jar. If you’re not the type to collect currency for the sake of it, but always have random coins left over after every trip, this idea is for you. Gather all of them in a huge jar and either use it as a centerpiece or make a tabletop containing all of these coins nicely displayed next to each other. The color palette is nice and warm and the finished item will be unique.
- Add sewing pins to a globe with places you have been to. This is the easiest option you can do if you have very limited space, but still want to show off where you have been. You can buy a big or small globe, depending on your available space, and add pins to it to show the places you have already visited. You can even use tiny flags for this, matching every country, and at one point it will look really cool and colorful like this.

Buy nice or cry twice – 15 travel items to buy nice and 15 to get on a budget

40 + traveling essentials for baby stress-free trips

65+ Pro tips on how to travel on a low budget
Wall displays you can create with your souvenirs.
One of the most popular ways to display travel souvenirs is on the wall. There are endless possibilities when it comes to wall displays for travel souvenirs. The key is to choose items that have meaning to you and arrange them in a way that tells a story about your adventures. Here are a few creative ideas to get you started:
- Create a gallery wall with framed photos, postcards, and other mementos from your travels. Mix and match frames for a fun and eclectic look. This option is really nice as you can always add to it, so it will always be growing and changing, keeping your home looking fresh.
- Hang a world map and use push pins or string to mark the places you’ve visited. You can also add photos or small souvenirs from each location, and you can use a painted wall map instead. Maps are great centerpieces anyway and adding your souvenirs will make them personal as well.
- Hang a large tapestry or rug from your travels as a statement piece. You can also use smaller textiles as wall hangings. Especially if you travel often to oriental destinations, you can find amazing pieces of tapestries that you can make some wall displays with.
- Frame free city maps and make a wall art arrangement from them. This way they don’t go to waste and you get a nice piece of wall art. These maps can be used for other ideas as well, so read the whole post before deciding what to do with them.
- Make a piece of wall art with your coins and bills from each country. You can either make a collage with all of them or create separate areas for each destination and keep them more organized.
- Make wall art with your postcards . Better yet, send them to yourself so you also have a stamp and postal stamp on each of them to make them even more special.
- Get these very small frames and put the pages with the stamps from your old passports in them. They look great on long walls like on hallways or staircases or can be combined with different-sized frames for a more vivid look.
- Make an embroidery with flag patches and display it on a wall, or sew all of them on your backpack and see how fast it gets covered. The downside to the last option is that once you change your backpack, it’ll all be out as well, so keep this in mind when deciding.
- Print out your bucket list and check the ones you did already done. You can frame it by continent or area and add pictures to the ones that you already covered. Even better, make the bucket list a central piece on your wall and connect framed pictures with a string from all the places you have been to. It’ll make a nice star-shaped wall art that will evolve over time.
- Add your souvenirs on a corkboard . This way, you can even change them often, once you get bored, or you can use them as well to plan and dream about your next trip.
The form you have selected does not exist.
Travel collections you can display
Most souvenirs are already collections in themselves, but I would like to focus more on people that make it a purpose to collect various things from every place they have been to. So, no matter if you collect cups, currency, or teaspoons, here’s your time to shine.
- Organize your wine bottle collection on a display shelf. If you want to drink the wine (which you should, this is what it’s made for), you should keep only the bottles or fill them up with something else. There are special shelves you can use for this or you can just display them on a classic shelf on a wall.
- Organize your spices in spice racks . If you’re a passionate cook, spices are probably the best thing for you to collect. Spice racks are perfect for this purpose, and you can even keep a tiny bit of each condiment in each container and use the rest for your meals.
- Have multiple tea boxes . Collecting tea from all parts of the world can be an amazing way to display your souvenirs. Collect them in specific (or labeled) tea boxes and display the boxes even after the tea in them is long gone, or use the boxes to refill your stash over time.
- Have a shelf for all your mugs . I have recently seen a nice story about a woman that remarried, and the first thing her new husband did was to build her a shelf for her mug collection. I don’t know about you, but this sounds like the perfect love story for me.
- Make a collage with napkins from different airlines/restaurants. This is an interesting collection to have, but also a cheap one. Collect napkins from all the restaurants and airlines you use and make a nice collage out of them. It’s a nice reminder of the places you have been to.
- Have a dedicated shelf with cooking books like this one from around the world . If you’re a passionate cook, or just collect the books in the hope of ever getting to use them, display these cooking books somewhere in your living room or kitchen area, if there’s room. I usually try to get a stamp from the library where I bought it from as well, as a means of authenticity for where the book is coming from.

- Get a specialized album for your coin or currency collection. This goes without saying, but currency should usually be kept in special albums for collectors, as it keeps them safe and nice looking over time. Also, a pro tip: keep two pieces of each item next to each other, to be able to see both sides at the same time. You can leave this as an inheritance to your offspring, as it will be more and more valuable over time.
- Have a special souvenir spoon holder . For those of you collecting teaspoons, there are special holders you can use to display your collection nicely. I had no idea people collected tea spoons as travel souvenirs until I met my mother-in-law, so I’m very happy to be able to share this idea with you as well. I recommend one with a glass door so you don’t have to do the dusting too often.
- Show your toiletries collection . You know the toiletries you get in complimentary baskets at the hotels or the small, special ones you buy in handmade souvenir shops while away? A nice way to display them is by labeling them and putting them in a nice basket in your guest bathroom. It makes the place look cozy and can be used by guests as well.
- Organize your scarves from around the world . If you collect scarves from around the world, try to find a scarf organizer and see if you can display them nicely. I also like to order personalized scarves that are hand-painted like these ones from Etsy ; they look nice and make me feel really good about wearing something unique.
- Show off your rock collection . If geology is your passion, there’s nothing like a shelf full of rocks, geodes, or gems from all around the world. You can even buy a special case to show off your collection and I wouldn’t blame you if you choose one.
- Display rubber ducks from each destination around your bathtub. I know, I know, who collects rubber ducks? Well, some people with children might, and I know a few without children that are doing this. It’s a cool way to display your souvenirs and it’s not so obvious since they’re not taking over the living room, so why not?
Ideas to share your travel knowledge
While most people buy some sort of physical items as souvenirs, some of us decide to go for something less tangible. I’m better with words than I am with anything else (hence you’re reading this post), and some people are better with video, music, or other forms of art. These too can be seen as souvenirs from around the world, so let’s see some ideas on how to display them properly.
- Make a blog and display your stories . This is probably obvious, as this is the path I have chosen. My blog started as a place for me to tell my stories and has evolved into the animal you can see now. You can do the same, it’s easier than it sounds, and it can be a nice hobby if you like writing.
- Create a YouTube video with helpful information . More and more people do this, it seems like everyone with a GoPro has a Youtube channel nowadays. It’s a nice way to share your knowledge and show the good, the bad, and the ugly of traveling, so feel free to do this if you are so inclined.
- Create collections of maps on Google MyMaps . I truly like this as I get to share them after I return. I have done this for so long and shared them with so many people, I started to offer them as products as I see people love them so much! It’s a nice way to feel useful and share information, so check it out if you rely on GoogleMaps. And check out my favorite free travel apps , you’d be surprised how much you can do for free these days!

- Save a playlist with music from each destination (or about each destination). This idea came to mind when, right before taking off to Japan, one of our friends was singing “Big in Japan” to us, on repeat. If I were more musical, I’d totally save a playlist for each destination, containing music from or about the destination where I’m headed, just to get me in the mood. Then, I’d listen to it when back so I can keep on dreaming.
- Learn the language of each destination you have been to. Now, this is for the people inclined to learn languages, I’ve heard there are some in this world. You can use a tool like Babbel for this and learn at least a few phrases in each language you have been exposed to. It’s an awesome way to be reminded of your trips!
- Publish a book with your stories and pictures . I know, I know, who reads books these days? I can assure you that some people still do, including myself. Even people that don’t buy physical books but only read eBooks still can get to read about your trips and adventures. You can write stories, describe your heritage journey with the help of MyHeritage , make a photo album, or write a children’s book. Let your imagination float and see what comes of it!
- Make a book with international food recipes you have collected. This is similar to the idea above, but hear me out. If you collect recipes and cooking classes from all over the world, you can do so much with them. You can create cooking books, you can create subscription boxes where each week you receive a recipe and the ingredients to cook it, or you can create a travel&cooking blog or YouTube channel. Find a way to share this information and you’ll learn so much in the process.
Creative ways to display your travel photos
I know, I know, who prints photos these days anyway? Well, I think pictures make for fabulous souvenirs, and these creative ways to display them have multiple advantages. Using pictures as souvenirs is cost-effective, highly personal, and can look really nice in your home, if displayed properly. Check out some of the options below!
- Make a photo album . There are multiple ways to do this, from buying a cheap photo album from a store or even a few sets from Amazon , and you can have an album for each trip. If you feel fancy, you can even label them accordingly or combine this with some other ideas as well, like including tickets and other keepsakes.
- Make a coffee table book . If you’re more artistic kind, you can print a nice coffee table book with your pictures. If you’re also a bit business-inclined, you can even sell them to your friends or on marketplaces like Etsy. People pay a lot of money for these things and if you love doing them, why not?
- Make a personalized collage of your photos . There are plenty of frames that can keep up to 8-10 pictures, and you can make a nice collage out of your photos like this. You can even buy just a few and change the pictures from time to time, just to make your house look different with very little effort.
- Have a map on the wall and add your pictures there . I have seen this once in a friend’s house and LOVED the idea. You can stick a huge map on your wall like this one , and add pictures of you at the places where you have been. It looks great and makes for a nice road on Memory Avenue.
- Make a giant accent wall with all your photos . This option doesn’t work for everyone but hear me out. By using your personal photos, you can create a one-of-a-kind piece of artwork that showcases your adventures and memories. Not only does it serve as a conversation starter for guests, but it also allows you to relive your favorite travel moments every time you walk by it.
- Make an accent canvas print for your home . Especially if your travel photos are more artistic, you can use them to print a nice canvas print. You need very high-quality pictures though, but if you have them, you can use the horizontal ones for the wall above your bed in your bedroom, for example.
- Use some Christmas lights . Another idea I saw in a friend’s house and I loved it! Get a string of Christmas lights and some rope, spread them alongside a long wall, and use clothespins to display your instant photos. It’s a cool way to decorate an otherwise useless wall like in the hallway or up the stairs, and it doesn’t require too much DIY talent to implement.
- Use your pictures to create everyday use objects . Nowadays, with the solutions you can find online or at every printing shop around, you can make mugs, keychains, T-shirts, Christmas tree decorations, and mouse pads with your pictures, and God knows what else. I’m not saying you should do ALL of them, as that might be a bit overkill, but sprinkling some of these in your daily life might be a nice, creative way to display travel souvenirs
- Make magnets with your travel photos . I know I know, this is a bit tacky, but you can keep them on a board or on the fridge, so it doesn’t have to be so in-your-face. What’s the difference between a $3 magnet made in China and one made by you with pictures you have taken?
- Get an electronic photo frame . These are nice to keep on your desk, either at home or at work, as you can change the pictures often so they’re not boring, and you can add things like calendars and to-do lists to the display rotation as well. There’s nothing like being bored in a meeting that could have been an email and looking at pictures with some palm trees from The Maldives, believe me.
- Make yourself a personalized wall or desk calendar . Especially if you have pictures from all seasons, you can pair them with the corresponding months, and make it look really professional even. Hell, you can even gift them or sell some around, especially at the beginning of the year when everyone can use a calendar.
FAQ – creative ways to display travel souvenirs
How do you organize travel keepsakes.
There are many ways to display your travel keepsakes, but the easiest ones would be to: 1. Use a shadow box to keep them organized by destination 2. Use a box in the shape of a suitcase 3. Get a memory box for your souvenirs 4. Make a DIY album with your keepsakes 5. Build a piece of wall art.
How do you display art from travels?
Collecting pieces of art from your trips is a great souvenir, and you can display them like this: 1. Organize a “destination corner” in your house 2. Build a dedicated shelf for your pieces of art 3. Publish a photo book with your pictures.
How can you organize travel souvenirs?
Keeping your souvenirs in order is a great idea, and you can keep them organized like this: 1. Get an album for your coin or currency collections 2. Have a dedicated box for your rock collections 3. Keep all the related ones in a shadowbox
How can you pack souvenirs?
One way to safely pack souvenirs to be sure they make it home is to wrap them in bubble wrap and pack them between your clothes or in your shoes. Another good way is to wrap them in a piece of clothing and put them in your shoes, so they’ll be safe while flying.

Creative ways to display travel souvenirs – the takeaway
In conclusion, displaying your travel souvenirs in creative ways is a fun and exciting way to add a personal touch to your home decor. From creating a gallery wall with your favorite photos to using unique items as decorative accents, there are endless possibilities for showcasing your adventures.
Not only does this type of decor allow you to relive your favorite travel moments, but it also serves as a reminder of the incredible experiences you’ve had. So, whether you’re a seasoned traveler or just starting out, don’t be afraid to get creative with your souvenirs and turn them into beautiful decor pieces that you can enjoy for years to come. Happy decorating!
3 thoughts on “How to display travel souvenirs – 50+ creative ways”
- Pingback: Romantic travel gifts - The perfect gifts for travel couples in 2023
- Pingback: 5 Ways To Change Up Your Home Interior To Stand Out - chelseamamma.co.uk
- Pingback: Buy nice or cry twice - 15 travel items to buy nice and 15 to get on a budget | Honest Travel Stories
Leave a Comment Cancel reply
Save my name, email, and website in this browser for the next time I comment.
- Google Plus

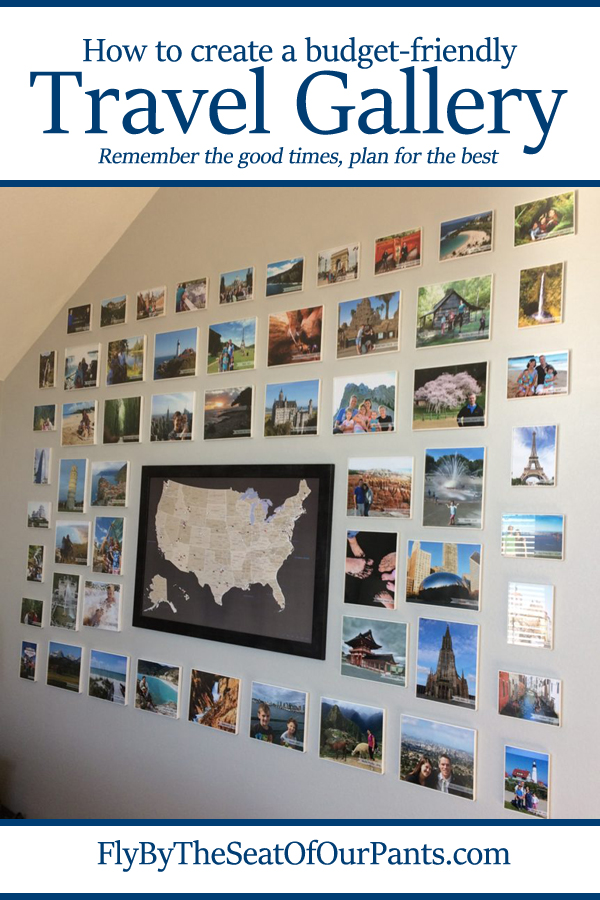
How to Create the Perfect Travel Photo Gallery Wall

Sharing is caring!
A Travel Photo Gallery Wall is the perfect way to help your vacations keep on giving you inspiration and fond memories. Let your love of that dream destination continue to grow with a travel picture wall, well after the plane has touched down.
One of the best parts about traveling is being able to re-live the sights seen and memories created. A fun way our family does this is by having a travel gallery on our wall with a map .
Where to put a Travel Photo Gallery Wall?
When we started traveling a lot as a family, we wanted something to strengthen our good memories of trips together and inspire future travel. We looked at lots of travel wall ideas.
We considered collecting travel wall decor from different destinations. Ultimately, but we decided our own memories from the lens of our own cameras and our viewpoint would be the best way to make our travels last forever.
We chose to create our wall of travel photos on a spacious and open wall in our master bedroom right next to our bed. Travel is a priority in our family, so it’s our private travel wall gallery. We aren’t showing off to our friends and family all our travel experiences, but rather keeping them close to our hearts and minds in our private room.
My husband and I cuddle up together and reminisce about our trips on the walls. We love seeing how little our kids were on past trips. Then when we get home from a trip, we enjoy going through our travel pictures and picking the best one to represent our feelings of the destination and our trip there.
We all use the travel photo gallery wall and push pin map to create future trip ideas and plans together.
Adding photos of our most recent adventures sometimes means we have to take out an old photo, but we keep a file of all our travel photos used in the past. Changing the travel photos on the wall make it look ‘new and different’ which sometimes is hard to do in a home.
Don’t let the memories fade when the trip ends! Get your travel pictures on the wall!

Benefits of a Travel Photo Gallery Wall
I love having a travel wall of photos. Here are all the reasons this is worth your time, resources and a full wall in your home (or more!)
- Remember stunning scenes, majestic vistas, and beautiful cities. Photos never do it justice, but it will bring back my memory of the place
- Create stronger bonds of love for your family
- Feel nostalgic for good memories from journies around the world
- To encourage and motivate future trips and adventures to add to the collection (and get another pin in our travel map!)
- Have travel on your mind as you can see so much of the world left to explore.
- Motivation to save for your next trip
- Find destinations that are interesting and new right from the pushpin map. Easily see the spots you haven’t been to and be curious about what there might be to do or see there.
Travel Wall of Photos | Before and After
Our previous wall was a collection of random frames and different sizes of travel photos. We added the travel photos on our wall as we took new trips – with whatever frame we could find. We added new frames and photos as we went so it was a bit chaotic.
Not to mention the ugly yellow and red wall! we were due for an update!

When we recently repainted our master bedroom, we wanted to be more intentional in creating our travel gallery. In the past, we would find a random new frame for a new trip photo and cram it into space on the wall.
My goals for the new gallery wall with a map included:
- Display many of our favorite travel photos
- Professional Push pin map to help us track our trips and plan future trips
- Look Clean and Organized

How to Create a Travel Picture Wall
1. push pin map.
A travel Gallery photo wall needs to include a push pin map! I love the maps ready complete with the foam backing to easily stick pins in our vacation spots. A travel map helps you envision the world and be curious about a variety of places to see.
Push Pin maps are high quality and look gorgeous. There are so many options to choose from, you are sure to find exactly what works for your style and travel type.
Here are some travel wall ideas to consider as your pick your map.
- USA or World map?
- Artistic Map or Accurate Map?
- Busy Map or Simple Design?
- Colorful or muted tones?

After looking for many, many options, we decided that even though the artistic maps were more aesthetically pleasing, a map with accurate cities and roads would meet our needs better.
However, with our new room colors and simple design, we wanted a map that had muted tones and was easy to look at from a distance. We found a simple earth-toned map with major cities and roads listed. It is perfect!
These Push Pin Travel Maps have 8 frame options and over 20 different maps to choose from. They come with a foam board already installed so it is ready to start adding your pins. And you will even receive map pins in your order, so you can start pinning your travels immediately.
We received our Push Pin map within a week of ordering it. It is durable in quality and was shipped to protect the frame. The map arrived exactly as shown on the website.
You’ll find many different options for world maps and US maps and even keepsake boxes and other travel decor and treasures from Push pin Maps.

Now comes the fun part of finding your very favorite photos from your trips.
- How many photos?
- Landscape only or with people in the photos?
- Label photos with date or location?
- Artistic prints or random assortment
Keep in mind that most of your best travel photographs will be landscape not vertical. You’ll need more wide frames than long frames. There will be the occasional tall photos (like the Eiffel Tower, Tower of Pisa or Gateway Arch ). so don’t limit to only landscape. We opted for a design that gave us minimal vertical photo spaces and plentiful landscape options.
Do you want only artistic photos or some with your family in them? We opted for some of both. We love seeing how little our kids were on certain trips and talking about their changing looks and personality through the years. But we also enjoy using our photography skills to capture the perfect perspective at our destination.
Do you want to label your photos with locations or years? We put a small tag on each photo with the location and year. Even though we thought we would remember every trip forever, after 6 years of traveling, we realized we were wrong. When we would look at our wall we were forgetting when and where we experienced things.
If you print all your photos at the same time, it is much cheaper to get 8x10s here for only $.70 each. There is a $9 shipping fee, so this is only cost effective if you are buying a large number of photos. We received 60 8 x 10s in a couple of days for half the cost of printing locally.
Do you want larger, decorative frames with mats or simple frames ?
On our previous travel wall, the variety of frames and mats were distracting and chaotic. We just wanted to see our photos without the distraction of the frames. We purchased inexpensive, uniform frames . We ordered all the same frames in bulk and saved money.
If your budget allows, you may consider making canvas prints of your favorite photos.
4.Other Decor
Many travel galleries have beautiful pieces of decor mixed in. Arrows, Quotes, Wooden plaques, or globes or travel souvenirs on a shelf might be a perfect addition to your travel display. Look around for a favorite travel decoration to add to your travel photo gallery wall.
Our wall was just a little full, so we put travel decor in other locations in our home.
Total Cost of our Travel Photo Gallery Wall
- 60 8×10 prints= $35
- 36 5×7 prints =$28
- Push Pin Travel Map = $120 ( includes the frame and pins)
- 60 8×10 frames and 36 5×7 frames = $88
Total for a new travel wall = $271
Do you have a travel photo wall idea?
Please share it with me at [email protected] or on Instagram.com/flybytheseatofourpants
I would love to find inspiration in your travels!
Fly by the Seat of our Pants contains affiliate links. When you buy through the links it helps keep this website running, at no extra cost to you.
If you liked this, you may like these posts, too!

Long Layover At DFW Airport? Take TEXRail Direct To Grapevine

Unique Valentine’s Day Gift Ideas for Couples
Related posts.

Don’t miss this Hidden Gem for a Fantastic Family Vacation near DFW

How to Teach Your Child to Read | Best Gift you can Give your Kids

Best Things to do in Amarillo, Texas with Kids
24 comments.

Love this and plan on doing something similar in my basement. Can you tell me how you put the info on each of the photos? What program you used? Love the idea of that. Thanks!

I used adobe photoshop. Im sure there are many photo editing software that can do it. Canva is a free program…

Great tips and ideas! Thank you. Another DIY project to add to the list.

Great information, I have never thought of doing this. I really like the idea. I just need to figure out where I could put this in my house somehow. I have always wanted away to put our fun adventures on a wall.
Its a great way to bring your trip home with you! You could even do a small corner of just a few photos you rotate through…

I love this idea. I’ve always wanted to create a travel wall and this has given me the inspiration to do it! I love how you added the map as the center point and built the rest around it. Its a very organized way to display many photos in one area and tell a story with it.
Thank you! I really like how it turned out! Show me yours when you finish it!

This is an awesome idea! I have one but it is in the process of being made. =) Planning more vacation trips with my little ones.
share with me what you come up with! Hope your travels go smoothly with the littles!

Awesome idea! This will be the same thing that me and my wife are planning to do by the time we move to our new home. Thanks for sharing it!

Thank you so much for this post! I have actually been working on our travel gallery and have had a hard time deciding which direction to take. I think my original thought would have been to chaotic. You inspired me to go with a more simple approach. I’m excited to work on it now!
oh good! I know my first few ideas would’ve been really chaotic because of the number of trips we take! Most wall only have a few photos with more decor, but I wanted to streamline mine!

I absolutely LOVE this idea! Now I just have to find a wall 🙂
Yep that can be challenging! Is there a wall you really dislike that you can redo?

I think this is awesome and something I will definitely do. I just had my first child in September of 2017 and we’ve already traveled to North Carolina from Alaska together. About to fly again to Oregon and then England for the summer. This is also a great way for me to FINALLY decorate my bedroom!
Wow! You are going places! Yep, we love it in our bedroom too!

Love this idea! I was actually just looking for ideas on how to do the same sort of things. I love how clean and organized yours looks. I have a large world map that I want to do it with.
Finding the map was the hardest part for me! So if you already have yours you are ready to go!

I love this and want to do it! Plus the low cost makes me super happy!
Right? I thought it would cost a lot more to re do the entire thing to my liking!

I love this! My fiancé and I were recently talking about printing our trip photos and starting a photo gallery.
Perfect time to start just as you are starting out your marriage! Leave lots of blanks for the future!!

Love this idea! The muted map tones really help the pictures stand out. Definitely going to do something similar! (I wonder how we could include both a world map and a U.S. map… hmm….)
Oh, good idea. I was think I would just convert over to a world map, but it would be better to have both! Our kids just got passports and we are starting to travel the world more. Let me know what you come up with!
Write A Comment Cancel Reply
- International
- National Parks
- Budget Tips
- Support this Website | Contribute to Blogger Jamie Harper
- Disclosure & Privacy
- Work with Me
How to organize your travel photos in four steps

Apr 7, 2020 • 6 min read
Travel photographer Laura Watilo Blake knows a thing or to about good digital hygiene, and keeping track of all the shots she takes on each trip. She shared her top tips for wrangling your own collection of travel photos before your next adventure.
As a professional travel photographer, it’s been a necessity to keep my image archives in order so when a client calls looking for a photo of Argentine grilling or a panoramic shot of Colombia’s famed wax palms in the Cocora Valley, I can quickly and easily access the photos no matter where I am in the world.

There have been a few hiccups over the course of my career, including a few corrupt SD cards and failed hard drives, but over time, I’ve developed strategies for naming my files, adding pertinent information about the destination and backing up the images on multiple hard drives and a cloud-based storage service.
Don’t just take my word for it. I have sought out the helpful advice of Lisa Griffis, a personal photo organizer and certified member of the Association of Personal Photo Organizers . After spending 35 years in photojournalism and design for the newspaper industry, Griffis launched Rescue Your Photos to help people preserve their own visual legacies. She curates and organizes both print and digital photos for clients. These are our tips for wrangling your travel memories.

1. Back up the chaos.
Before tinkering with files on a computer, save everything to an external hard drive “in case anything gets deleted by accident,” Griffis says.
What size hard drive you need depends on how much data you need to back up. Consider the amount of data already on your computer's internal drive, as well as any data backed up to the cloud. If you have photos on your smartphone worth backing up, add that data to your calculations as well.
External hard drives range from $70 for two-terabyte portable hard drive to hundreds of dollars for expandable RAID systems. The acronym “RAID” stands for "redundant array of independent disks," in which a bunch of hard drives act like one big superdrive. Not only can a RAID system expand as your photo collection grows, but it also can be configured for automatic dual back-ups to keep data safer should one drive fail.
If you need suggestions for various types of RAID systems, B&H Photo & Electronics in New York City has a roundup of options here . I have a five-bay Drobo at home with more than 24 terabytes, plus several portable LaCie Rugged drives that go with me on my travels.
Once you’ve decided on the hard drive that fits your needs, you can automate backups using your computer’s operating system, with software that comes with the drive or a third-party app or service.

2. Start sorting and organizing your digital images into folders.
With everything backed up, you can start collecting images from the smartphone and online locations and place them in a “holding tank,” says Griffis. “Your ‘to-be-organized’ folder is the dumping ground for all the images you bring from devices, camera cards, the scanner, etc.”
As you bring each set of digital images into this folder, try to keep events or months together instead of dumping a gazillion images from your camera roll. Use your smartphone’s built-in app to identify groupings like months, events or collections.
Once you have a group of photos in the folder, review the images quickly and get rid of anything that isn’t a keeper. Next, create or rename a folder and give it a name that represents the group of photos that will go into it.
I have my folders organized and named by year, followed by folders listed sequentially by year, month, day and the place, event or theme. For example, inside my 2018 folder, you’ll see “20181012_cinqueterre.” The numeric sequence represents October 12, 2018, while the text after the underscore indicates the photos were taken in Cinque Terre, Italy . Subsequent folders show the raw files straight from the camera and the final images that are ready for archiving, uploading and printing.
“Starting with the date makes sense because the computer does the filing for you,” Griffis says, “but you can sort things in a way that suits them, whether it’s chronological or by name, person or event. I tell them to start by closing their eyes and imagining how they would have files organized in an actual file drawer.”

3. Rename digital photos to add context.
Just as you organize everything into folders, it’s important to add detailed information about the individual photos in the actual file names. After all, the story behind the image is just as important as the picture itself. You’ll want to include who, what and where,” says Griffis.
In the example above, I’ve organized my images starting with the place where it was taken and what’s happening in the photo (ex. ohio-hocking-hills-hike-conkles-hollow-0324.jpg). At the end, I always include the original number assigned to the image straight out of the camera in case I need to go back and find the original raw file for further editing.
If it seems daunting to rename all of your files one by one, then download Adobe Bridge , a free media management program that helps manage and organize images and other files. The batch rename features allows you to quickly rename multiple files in one fell swoop.
The robust program does a lot more as well, including editing, sorting, adding metatags and publishing photos. You can also apply a star rating to the images you love the most, which will help when it comes time to find your favorite images that you want to share and display.
If you’re doing your file naming manually, be sure to save a copy of your best images in a separate folder labeled “Favorites.”

4. Develop a photo archiving strategy using the 3-2-1 backup rule
Now that you have your files in order, it’s important to not only maintain the file-naming practices going forward, but also establish a frequent back-up schedule using the 3-2-1 method.
The “3” stands for three copies of your files saved in three distinct places. The “2” means that two copies of your data should be in two separate places, such as your computer and a hard drive, or on two hard drives if your archive is too large to fit on your computer. The “1” indicates one set of data should exist at a separate location in case of some unforeseen natural disaster, fire, flood or theft.
“Most people don’t have anything backed up,” says Griffis. “But it’s important to get systems in place, especially in uncertain times. I don’t care if it’s in the cloud, on an extra hard drive in a lockbox at the bank, or at your mom’s house 100 miles away.”

Griffis uses a cloud-based back-up service called Backblaze to securely back up the contents on her computer and all attached hard drives once a day. When it comes to archiving photos, Dropbox , Google Photos , Amazon Prime Photos , Apple iCloud and Flickr are the most popular. Each has its advantages and disadvantages, so do your research first.
“If you use the cloud to back up materials,” Griffis says, “make sure that the website doesn't compress images. Many do and it will affect the file size of the image.”
Of the services listed above, Google Photos will back up unlimited photos and videos for free up to 16 megapixels and 1080p video resolution, but it downsizes files that are higher quality. It does have a setting that preserves the original quality of the photos and videos, but there is an additional fee for storing the files.
You may also like: Five creative ways to display your travel photos at home
Explore related stories

Jan 11, 2024 • 8 min read
Italy has so many delights for visitors, it’s hard to know where to start. Lucky for you, we’ve made this list of the best experiences all over the country.

Oct 19, 2023 • 8 min read

Jul 27, 2023 • 2 min read

Oct 8, 2022 • 10 min read

Jul 20, 2022 • 5 min read

Sep 1, 2021 • 8 min read

Sep 24, 2020 • 1 min read

Jul 28, 2020 • 6 min read

Jan 21, 2020 • 2 min read

Jan 7, 2020 • 6 min read
70+ World Travel Themed Home Decor Ideas
Pretty soon, I’ll have my first place of my own (I’ve moved out before, but I was always in some sort of dorm), and I’m super excited to buy all the furniture, decor, and everything else that goes with getting your own place. Given my very obvious travel addiction, I thought it would make sense for a lot of the home decor in my new apartment to be travel themed. I can’t make EVERYTHING travel themed (my boyfriend would kick me out before we even moved in), but let’s just say people won’t have to guess what I had in mind when decorating our new place. So, if you are moving into a new place, or just looking to do some redecorating, check out these world travel themed home decor ideas!
Disclaimer: This post contains affiliate links. Find more information about affiliate links on our policy page .
- Living Room
- Dining Room
- Other Decorations
Travel Inspired Living Room Decorations
Travel throw pillows.
Pillows are a great way to add just a touch of travel decor to a living room. They’re not overly obnoxious, but still obvious. Plus, since they come in so many different colors, it’s not too terribly difficult to find one that would match your couch!

Stacked Travel Chests
I found out real fast when looking at furniture that end tables are surprisingly expensive. So, when I saw these on Amazon, I thought it was a really cool idea. Instead of the traditional end table (that may or may not have a small drawer to put things in), why not get suitcase styled chests? They’re stack-able and can store way more than your traditional end table.

Suitcase Shelves
I found these in one of the home decor stores I had visited and thought it was a cute idea. Instead of the traditional wooden shelves, get creative and use shelves that were decorated to look like suitcases. They’ll match your suitcase end tables!

Travel Coasters
If you don’t already have some souvenir drink coasters from your various trips around the world, you can get some world map drink coasters to make sure your new, nice tables don’t get ruined by condensation from drinking glasses.

World Map Tissue Box Cover
I don’t think too many people use tissue box covers anymore, but I thought it was one of the more unique travel decor ideas. If nothing else, it’s a conversation piece!

Traditional Globes
What’s the first thing that comes to mind when thinking of travel decor? A globe of course! You can’t decorate your new place with a travel theme and not have at least one globe around.

Travel Themed Dining Room Decor
Travel placemats.
Like I mentioned above, once you get that nice, new table, you don’t want it to be ruined from moisture from cold drinks or hot plates. Placemats are an easy and common fix to that problem. If you’re going to be buying placemats anyway, might as well make them travel themed, right?

World Map Table Runner
If dinner placemats aren’t enough, why not complete the look with a matching table runner?

World Travel Bedroom Decor
Travel lamp.
Looking for something cool and unique to show off to all of your friends? Then you have to check out this floating globe lamp! It uses magnets to make the globe levitate and it even spins around like a traditional globe! It has LEDs built into the frame to make it light up and look even cooler! Of course, you can always go with the more traditional travel home decor too…

World Map Bed Comforter
Do you dream of traveling the world? I thought so! Why not go to sleep surrounded by a map of all the places you dream of visiting?

Travel Pillow Cases
Of course, you can’t have a world map bed comforter and not have matching pillow cases. You just can’t do it.

Travel Themed Bathroom Decor
Travel inspired shower curtains.
Since most showers require some sort of shower curtain (unless you don’t mind lots of water getting all over the floor), having a travel themed shower curtain is an easy way to add a touch of travel to your home life. It’s simple, and separate from the rest of the rooms in the house (in case you don’t want your guests overwhelmed by travel decor the moment they walk into your new place).

World Map Towels
If you are looking to make the entire bathroom travel themed (instead of just having a touch of it), you can also get bath towels that are travel themed. It’s especially nice if you have a rack where you can sort of hang them on display when not in use.

Travel Inspired Kitchen Items
Travel themed alcohol items.
Even if you’re not into the “travel decor” thing, you can still add a bit of travel to your home life. You can break out these glasses when you’ve brought home some souvenir drinks from your most recent destination.

World Map Plates
If you don’t have a big dinning room table, or aren’t really the type of person to use placemats and a table runner, you can still add a bit of travel decor to meal time with these cool looking plates!

Travel Inspired Napkins
My mom always gives me a hard time because I have a bad habit of wiping my hands on my jeans instead of using a napkin (especially when eating greasy or salty foods), but if I had these napkins, I might be a little more inclined to use them (hint-hint mom: these would make a good moving gift).

World Map Cutting Board
Cutting boards are another one of those more subtle items that don’t necessarily get put on display. Since most traditional cutting boards are typically pretty bland, you can spice yours up by getting a travel decorated one.

Travel Themed Office Decor
Push pin cork globe.
My boyfriend and I are to turning our second bedroom into an office since both of us have computer desks. It’s the perfect place to put a tiny globe like this one. Plus, it’s exciting being able to put a new pin in it every time we go someplace new.

Globe Book Ends
I LOVE books. Unfortunately I don’t have as much time to read as I used to (which I think is a shame given how much I really loved it), but I’m really proud of my bookshelves and all the books that sit on them. Plus, I’ve always loved the feel of sitting in a library (especially those rustic ones you see in movies). I figured why not combine some of my biggest passions and add a little travel decor to my bookshelves?

Book Box Covers
If you’ve never heard of book boxes, don’t feel guilty. I hadn’t heard of them either until I started shopping for home decor! Book boxes are great for those book lovers (like me) that want their books to remain in mint condition. You can put your favorite books in book boxes to protect them from dust and moisture. Plus you can give your bookshelves more of a universal look (like the rustic library I mentioned above).

Pencil Holder
Because no desk would be complete without a pencil or pen holder.

Travel Wall Decor
Decorative world maps.
This is what usually comes to mind when you think of travel decor (and usually some of the first results when looking online). You can always go with the traditional, school-like world map, but there are some really cool looking world maps out there if you’re looking for something a little more unique.

Scratch Off World Maps
In more recent years, scratch off world maps have become more popular. They’re a great way to showcase all of the different places you’ve been! My mom got me one for Christmas and I absolutely love it. However, all of the places I’ve been are pretty small, so it doesn’t look like I’ve scratched anything off, but I’m working on it!

Wall Clocks
This is another one of more simple travel decor ideas. It’s a common household decoration and easy to customize to your style. Plus, there are lots of different options out there, so it isn’t too difficult to find one you like.

Word Art and Hangings
You can find all sorts of quotes that have been turned into travel decor. I feel like almost every home decor store that I’ve walked into has had some sort of wall piece with an inspiration adventure quote on it. Even if you’re not looking to go all out with the travel theme, they’re something small and nice you can hang on the wall to express your passion for travel.

Other Travel Decorating Ideas
World map welcome mat.
What better way to welcome guests than to welcome them to your adventures? No better way to set the travel theme than to have it be the first thing you see!

Light Switch Covers
I don’t know if I would replace every light switch cover in my new place with a travel inspired one, but I thought it was a unique way to incorporate travel into home decor. At this point though, the rest of the place is already travel themed, might as well make the light switches travel themed too.

Outlet Covers
If you’ve got travel themes lights switch covers, it only makes sense that you have travel inspired outlet covers too. If you have one, you just have to have the other!

And that’s it for my long list of travel themed home decor! What did you think? Will you be including any of these items the next time you decide to do some redecorating? Let me know in the comments below!
Further Reading
- Useful Gifts for Travelers
Liked this article? Pin it to Pinterest!
Leave a comment cancel reply.
Your email address will not be published. Required fields are marked *
Save my name, email, and website in this browser for the next time I comment.
This site uses Akismet to reduce spam. Learn how your comment data is processed .

HOW TO DISPLAY TRAVEL SOUVENIRS & WHAT TO COLLECT!
INSIDE: Ultimate Guide to Travel Souvenirs, and how to display them with style.
If you love to travel, perhaps you’ve thought of starting a travel collection of travel souvenirs?
Don’t know where to start, or what to collect?
We can help.
Take a look at our BIG LIST of the BEST SOUVENIRS TO COLLECT FROM TRAVEL!
(Don’t ask what’s your favourite souvenir to buy when you travel? I can’t pick just one.)
Once you’ve chosen your signature travel souvenir, the next problem is how to display travel souvenirs in a way that appeals to your design eye!
Here’s a few ideas to solve that dilemma!
Take a look.
Disclosure: This article contains affiliate links . If you make a purchase after clicking on one of these links, we may receive a small commission at NO extra cost to you.

Image credit: Enrique Hoyo s via Pexels CC0
How to Display Travel Souvenirs
The biggest problem of shopping for souvenirs around the world comes with storing or making the most of them.
People often ask us:
- How to display travel souvenirs?
- How to organize travel souvenirs?
- How to store travel souvenirs after a holiday?
- How to keep travel souvenirs?
- How to decorate with travel souvenirs?
- What should I do with my cruise or trips memorabilia?
- What are some good collections to start, and what do you do with them?
These are our top 14 tips on how to display souvenirs from travel.

Image credit: Mark McCammon via Pexels CC0
No.1: Interior Decorating with Travel Souvenirs
Be inspired by house designers .
Here’s the hot tip on how to decorate with travel souvenirs.
Group travel purchases of the same nature together to make a harmonious vignette.
This is like a “ pocket-size table arrangement that tells a story about you and your home”.
You can do this:
- on a side table
- on an entry table
- on a dresser, or
- on a runner on your dining table.
The trick is to leave space between items , and not have too many items cluttering up the area.
The answer to how to display plants or how to display seashells is much the same.

Image credit: Nasim Keshmiri via Unsplash CC0
Group similar treasures together
You can also display a collection of similar objects together to make a travel souvenir display.
For example:
- all your clocks on one wall
- all your red and white toadstools on a timber shelf by the window
- all your vintage glass bottles in a sunny spot to catch the light
- all the bright embroidered cushions together on one couch
- all the special themed handmade items in one corner of the room

Image credit: Natasha Connell via Unsplash CC0
How to organize travel souvenirs? Group heights and sizes together
Build a DIY cabinet to size to store a complete collection to store all the things you collect, such as:
- all the different sodas and soft drinks in glass bottles
- cereal boxes (be sure to visit the Cereal Killer cafe in London !)
- wine bottles
- sauces & condiments
- beer bottles
This makes a colorful cheery display!
Hot tip: If you’ve drunk the contents before it goes out of date, fill the empty bottle with colored water to maintain the visual effect.

Image credit: Jason Leung on Unsplash CC0
Color Code your travel gifts & souvenir ideas
Display your travel souvenirs by color.
Put all the green souvenirs together in one place.
Or color code them in a rainbow.
There’s no rules!

Image credit: Laura Mitulla via Unsplash CC0
No.2 How to store your travel souvenirs collection
Buy the storage solution particular to your chosen collectible, travel keepsake or best travel souvenirs eg:
- pressed pennies book
- Disney autograph book
- dried herbs in uniform, vacuum sealed glass jars
- souvenir spoon holder
Here’s a modern spoon holder made from clear acrylic to make your display storage for spoons look like an modern art gallery!
Here’s a souvenir spoon holder with a door to keep out the dust.
It’s lockable too.

No.3 Travel Keepsake Box for special travel memorabilia
A travel memory box is a way to store your valuable or nostalgic travel mementoes that don’t need to go on display.
This wooden keepsake box can be used to store:
- special ticket stubs
- boarding passes
- expensive jewelry that you don’t wear every day
- printed photos you never want to lose
- excess currency
- handwritten letters
- postcard collections from your adventures

Image credit: Eric Prouzet via Unsplash CC0
No.4: Travel Display Shelving
Pigeon hole cabinet for a mug collection display.
Purchase a special pigeon hole cabinet with lots of separate shelf areas and store one collectible in each section.
For example, one handcrafted ceramic teacup or mug in each space to form a big visible collection of cups and drinking utensils such as Finnish kuksa cups.

Image credit: Yannes Kiefer via Unsplash CC0
Floating Shelves Souvenir Display Case
Add two or three rows of floating shelves to your wall and line your collectibles, such as your entire nail polish collection from abroad, or shot glasses, along it.
Floating shelves should be placed at a height that is preferably out of reach of kids to keep your travel knick knacks safe.
For fun, you can add a good quality, cinema style lightbox to the shelf, and write an artistic description about the collection.
Can’t think of the perfect narrative?
Try finding a meaningful or relevant line from a poem or reading a favorite book to spark your inspiration.
This would also be one way how to display kids art.

Image credit: Jens Behrmann via Unsplash CC0
Vintage shelves display cabinet
Or, find a fabulous vintage cabinet and do the same.
The best thing about a vintage cabinet is the unusual shelving layout, where not all shelves are the same size, width or height.
This adds visual interest, but also allows to you group your travel souvenirs together, despite them being different heights or widths.
You can also place super tall items on TOP of the cabinet.
This makes them a focus point, as this draws your eye to them in the room.

No.5: Storage Solutions for Travel Knick Knacks
Glass dome displays for your vacation souvenirs.
Buy a few glass domes, or a clear glass cake stand , and store your favourite dolls, toys, and items under the lid.
Place a few domes or cake stands IN A ROW for extra points.
This is the ultimate travel knick knack display.

Image credit: Chris Hertel via Flickr CC BY-2.0
Clear Glass Vase storage
Buy a giant clear glass vase, and place all your small collectibles inside.
This method is particularly good for storing items of the same nature, eg:
- die cast cars
- sewing thimbles
- colored pencils
- lipgloss tubes

Travel Shadow Box displays
Wondering what to put in a shadow box ?
Buy a memento shadow box to store your excess coins, odd currency notes you no longer need, small trinkets, ticket stubs etc
Travel Shadow Box Bank
You can also buy a travel shadow box piggy bank.
Fill the front of the vacation shadow box bank with travel inspiration, travel motivation quotes, or your favorite travel mementos.
Add all your spare coins and notes to this unique money box for your next trip!

Image credit: Cottonbro via Pexels CC0
No.6: How to Display Travel Photos
Order photo books .
Take photos of all your travel souvenirs and make up a photo book online.
Print travel photos for the fridge
Display travel photos of your favorite experiences, days out, and snaps of your beloved purchases on the fridge.
Don’t forget to highlight all your fun food adventures, like hunting for cute snacks at Tokyo Disney Sea!
Instamatic collages look particularly stylish.
Make a travel souvenirs collage
Make a travel display collage of all your:
- paper tickets
- airline tickets
- boarding passes
Make a wire display for your travel mementos
Hang some wire along one wall, a la art gallery style, and peg photos and light souvenirs or trinkets to it.
You can also string ribbon to do the same thing.
And this is another solution to how to display kids art, or how to display Disney photos too.
Set up a slide show on your computer as a screensaver
If there’s no other spare space, a screensaver slide show will save the day!

No.7: How to display travel magnets
Our fridge is filled with most of our travel magnets these days.
The best way to make it look like an art gallery is to position each magnet on it’s own, with space around it.
You can also:
- attach them to a silver baking tray and prop this on a shelf in the lounge
- buy a magnetic office noticeboard and arrange them on this giant art canvas
- arrange the magnets on a souvenir magnet display board by color, by destination, or by size
BUY NOW ON AMAZON: Wall Mounted Framed Magnetic Chalkboard

Image credit: Bogdan Glisik on Unsplash CC0
No.8: How to display ornaments
Wondering how to display Christmas ornaments ?
Look no further than a house shape wooden display case.
Blown glass Christmas ornaments can be hung on a bare tree branch and strung from the ceiling.
Check out these cool Airplane Christmas ornaments!
Everyone who loves airplane travel NEEDS at least one airplane ornament for the tree
- personalized Christmas plane ornament with Flight Captain
- Hallmark Keepsake “Mystery Ship” Christmas ornament
- Commercial airliner resin hanging tree ornament
- three pack of decorative tinplate biplanes for the tree

Image credit: Lina Kivaka via Pexels CC0
No.9: How to display postcards
- Buy a giant white or black frame, sized to fit, and lay them out. Add a matt board to style it up professionally.
- Line them up on a wall, clipped with tiny wooden pegs to a long piece of string.
- Display them lined up along on floating shelves, by destination or color.
- Blu tack them to the back of the bathroom door.

No.10: Cool Keychain Collection Display
Wondering how to display keychains?
These travel knick knacks are one of the most tricky to exhibit , as they are all different shapes, sizes and themes.
Why not try:
- buying a kitchen utensil holder and hanging them on there
- hanging them on a rotating jewelry organizer stand
- pinning them to a hessian pin board or a corkboard
- hang them in a wall mounted keychain display case
Or hang a few favorites on your keys, and rotate out at the beginning of each season!

No.11: Ways to display patches
Take a look at these travel patches ideas to store your cloth patches.
- inside a glass fronted photo frame
- sewn onto a queen size woollen blanket
- sewn onto a cloth tote for shopping excursions
- sewn or ironed onto a cloth apron
- sewn or ironed onto a cotton vest
- sewn onto a zip up jacket or beloved denim jacket
- sewn onto a cotton canvas army style haversack, in khaki or butter color
- sewn onto classic military messenger bag in olive green
- sewn them onto a giant wall hanging quilt of colored squares, one per square

Image credit: Markus Spiske via Pexels CC0
No.12: Travel Sticker Display ideas
One of life’s lovely, if temporary, things!
Display your stickers:
- on your car’s rear window
- on a giant freestanding mirror
- on an old door that no longer serves a purpose. Lean it up against a display wall.
- on your stowed luggage
- create a bullet journal full of stickers
- on your laptop cover
- in a purpose bought sticker collecting album
Image credit: Jess Bailey via Pexels CC0
No.13: How to display magazines
Pick a few favorites and pile them up on a side table, next to a fresh vase of flowers.
You can also make a BIG stack of these unique souvenirs in one corner of the room, and use the pile as a shelf for a soft souvenir, like a beloved plush toy.

Image credit: Elly Fairytale via Pexels CC0
No.14: My favorite thing to do with travel mementos!
USE your dish towels (aka, tea towels or dish cloth) when you cook your lunch or dinner, or bake goodies for friends.
Wash your face with your plant-dyed shibori face cloths from Kyoto.
Pop your bottle openers in the dish drawer.
Eat from your ceramic dishes, enjoy your shaving brushes, and drink from your travel coffee mugs so you can feel the joy they bring every single day!
I LOVE drinking from my Snoopy mug from the Charlie Brown cafe in Hong Kong.
It’s the one I carried around the world for 6 weeks in my suitcase.
(Forever grateful it made it home in one piece.)

Image credit: Jen Theodore via Pexels CC0
Make a memento patchwork quilt
Sew up all your favorite dish towels, prayer flags, random fabric pieces from Japan or Morocco, and t-shirts into a big cosy quilt.
If you aren’t crafty, find someone who is.

Image credit: Elijah Macleod via Unsplash CC0
LOOKING FOR SOME MORE TRAVEL TIPS?
Correct at time of publication on Roam the Gnome . Please check with venue for updates. We apologise in advance if there have been any changes we are unaware of. All prices in AUD dollars, unless otherwise stated
Click the blue links below for more travel tips
How to Save Money for DISNEY vacations!
Round up of the most fun hotels for kids around the world, take the kids to see the real elves & santa at joulukka christmas forest in lapland, finland.
Affiliate Disclosure:
This website contains references to products and services from our favourite brands. Some of these are affiliate links . If you make a purchase or booking after clicking on a link on Roam the Gnome™, we may receive a small affiliate commission at NO COST to you. All information on disclosures can be found in our Privacy Policy
Roam the Gnome ™ is a participant in the Amazon Services LLC Associates Program, an affiliate advertising program designed to provide a means for website owners to earn advertising fees by advertising and linking to amazon.com, and any other website that may be affiliated with Amazon Service LLC Associates program. Amazon and the Amazon logo are trademarks of Amazon.com, Inc. or its affiliates. As an Amazon associate , I earn from qualifying purchases.
Click here for a detailed explanation of our Advertising policy.
Thank you for visiting Roam the Gnome Family Travel™ Website Directory. Bookmark this page so you can find us again.
100 Incredible Travel Photo Ideas to Inspire Your Next Adventure
By: Author Valerie Forgeard
Posted on Published: December 28, 2022 - Last updated: July 31, 2023
Categories Travel
Are you looking for creative ways to capture your travel memories? Whether you’re an experienced photographer or just starting, plenty of unique photo ideas will make your travel photos stand out from the rest.
From shooting at unusual angles and playing with perspective to finding exciting subjects, here are some great ideas and tips for taking beautiful and eye-catching vacation photos. So get ready to explore the world through your lens!
Landscape photography is an easy way to capture your travels and the beauty of nature.
When traveling, it can be difficult to find the time (or energy) to take a landscape photo. But if you have the opportunity, don’t miss it! Landscape photos are a great way to capture your trip’s incredible memories. Here are some great photo ideas that will help you keep fond memories of the different landscapes you encounter:
- Sunset over the sea
- Lighthouses
- The view from the top of a mountain
- Sunrise over the mountains
- Misty morning shots of a city skyline or a mountainside
- A rainbow after a thunderstorm
- The view from your hotel window
- A tree with leaves changing color in the fall
- An old building or structure that has been around for years
- A photo of a city skyline at sunset
- A picture with a landmark or other famous place in the background
- A full moon over a lake
- A street in a new city
- An old building with character that has been around for hundreds of years
- The landscape
- A lush green forest in spring
- A film location
When you’re traveling, don’t be afraid to take a selfie. It’s a great way to document your experiences and share them with everyone back home. Try out some of these photography ideas:
- A photo of you with a local friend
- A photo of the view outside your window
- Yourself at a tourist spot
- A photo of your reflection in the mirror
- A photo of you eating
- A selfie with a foreign language sign
- A photo of you in front of your window seat on an airplane
- A selfie with a statue of someone you admire
- A photo of yourself in front of a famous painting or sculpture
- A selfie with your favorite piece of street art or graffiti
- A selfie of you walking on the beach
- A selfie of you jumping into the water
- A photo of you having a drink at the airport
- A photo of you and your suitcase
- Selfie with a famous person you met on your trip
- Selfie in your hotel room
- Selfie while walking on the street
- A picture of you in front of a famous landmark
- Selfie with your favorite tourist attraction
- Selfie on a boat
- Selfie of you at a local event or concert
- Selfie with traditional clothes
Local Culture
Local culture is an essential indicator of a country’s identity. It’s essentially the way of life and habits of the people. It’s their way of thinking and acting that makes their country unique. Here are some ideas for travel photos that you can use to document the cultural side of your trip.
- The local color
- A poster of a local celebrity
- Architecture
- A photo in a museum or art gallery
- An animal you don’t see every day
- A photo of a local product purchased
- A local delicacy
- A selfie with a local statue
- A photo from a local market
- A photo of a festival or parade in the city
- A religious building
- A religious ritual or ceremony (if allowed)
- A local place to relax after a long day
- Local people in traditional dress (if approved)
- Local food stalls
- A local dance performance
- A local sports team playing a game
- Local transportation
- A game popular with the locals
- Cultural symbols
Capturing Moments
Capturing moments in photos is something I love to do. It’s a great way to express your feelings and emotions without having to say anything.
I used to make the mistake of not taking photos to live better in the present, but now I know that memory can fade, and now I love capturing moments in photos because it brings back all the beautiful memories from the past.
- Sailing and boating
- A photo of your tour guide showing you something
- A photo of a map (or screenshot of Google Maps) or directions that help you reach your destination
- Your plane is making its way through the clouds to your destination
- A surfer riding the waves at sunset
- Trying to catch a wave
- A hike in the rainforest
- A photo of you or friends jumping into a pool
- A photo of something that represents what it means to be from where you’re from
- A photo from inside a vehicle
- Photos while riding in cabs or busses
- A photo with someone who makes you happy, such as a friend, family member, or even your pet!
- A photo of your feet in the sand
- A photo of a street performer
- Your going away party
- The reflection of something in the water, like an animal or a tree
- An empty bus stop on a rainy day
- An empty street in the rain
- The terrace of a café on a sunny day
Creating a Social Impact
Traveling is about more than just seeing the sights and taking selfies. It’s about taking in your surroundings, learning about other cultures, and connecting with the people around you. And when you travel to a place that needs more attention, it’s even more important to spread that awareness. After all, travel isn’t just about exploring new places – it’s also an opportunity to contribute to the lives of the people you meet.
- A place destroyed by natural disasters.
- Plastic bottles on the beach
- Taking a photo of an endangered species
- A national park
- Unusual weather
- The local school that needs help
- Local charity (make sure the organization is reputable)
- Photo of your donation
- The entrance to an orphanage (don’t take pictures of children unless you have official permission to do so)
- A picture of an abandoned building or house
- An animal shelter
- Local vegetarian or vegan food
- Local wildlife
- Take a picture of yourself holding up a handwritten sign that says, “I believe in peace.”
- A CO2-reduced mode of transportation
What Makes a Good Travel Photo?
Whether you’re traveling alone or with friends, taking photos is a great way to document your trip.
The best travel photos are those that capture the natural beauty of your surroundings. Whether you’re traveling alone or with friends, taking photos on the road is a great way to document your trip.
Here are a few photography tips on how to capture beautiful images and make sure they look their best:
Shoot in Color Instead of Black and White
Color is more than just a pretty face. It’s also your best friend when it comes to travel photography, helping you capture the vibrancy of your surroundings and giving your vacation pictures a time frame as technology advances.
When you shoot in color, you have the ability to capture every detail and texture of a scene. You don’t have to worry about getting the perfect exposure or how the image will look on paper – you can just focus on capturing what you have in front of you and worry about the rest later.
Black and white photography, on the other hand, requires you to think about what makes an image work, because there’s no color to cover imperfections or distract from flaws in composition or subject matter. Rather than focusing on getting everything right in every shot, black-and-white photography requires you to analyze every element in the image to ensure that everything fits together seamlessly for maximum impact – whether it’s making sure that each subject is sufficiently separated from the others, or ensuring that there is enough contrast between light sources and shadows within a scene so that there are no unwanted distractions from what should be the focus of the image.
What makes black and white photos special is that black and white photos are timeless, while color photos can quickly look dated as technology advances. Some photographers even choose to convert their images to black and white after the fact, believing that it gives them more creative freedom than shooting in color.
Color is vibrant and eye-catching, but black and white can be just as impressive – if not more so – than its counterpart.
When Possible, Use Natural Light
When traveling and taking photos, it’s easy to get into the habit of shooting only when the sun is shining. But if you have the time, you should shoot with natural light as much as possible.
Natural light is softer than artificial light and gives your photos a more flattering look. It also makes your subjects look more natural and less posed.
If you don’t have much time or access to natural light, find a place with good artificial lighting. If you’re at a restaurant, ask if there are any empty seats where the light isn’t too bright or harsh. If there isn’t, move outside or around the corner to another area where the lighting is better than your current spot.
Experiment With Angles and Perspectives
Photography is about capturing the world around you. It’s not just about taking a photo, it’s about conveying your feelings and emotions. The best travel photos are the ones that show you a place from an angle or perspective you’ve never seen before. Experiment with different angles and perspectives to make your photos even more interesting – you may discover something new about a place that no one has noticed!
Don’t be afraid to get creative with your camera. Using filters and other effects can add life to your images, but remember that these are just tools, not rules. If something doesn’t work for you, don’t use it again!
A photo should tell a good story. When choosing where to shoot, look for areas where there are lots of exciting objects that you can include in the shot – a fountain or sculpture would be ideal. If there are no apparent subjects, look for patterns in architecture or street signs; these can make great subjects for photos!
Get Up Close and Personal With Your Subject
Zoom in to see the details of a flower, or zoom out to capture the scene of a busy cityscape.
Zooming in allows you to focus on one part of the image while leaving other parts out of focus. This can be very effective at isolating your subject from its surroundings and focusing the viewer’s attention on what matters most to you.
When photographing landscapes and scenery, use a wide-angle lens that shows large areas of the landscape in one shot. If you’re photographing small objects like flowers or insects, you should use a macro lens that allows you to take extreme close-ups that show intricate details of small objects like petals and leaves.
How to Share Your Travel Photos
We used to organize an evening with family and friends to share our travel experiences. Nowadays, everything is shared instantly. So if you’re a photography enthusiast, it’s time to start thinking about your next trip.
There are many ways to share your photos online. Here are some tips on how to show off your travel photos online:
Set Up an Online Gallery
Setting up an online gallery is the easiest way to show off your travel pictures. There are many services on the Internet, including Flickr and SmugMug. You can also use your website or blog to showcase your photos.
The purpose of an online gallery is to share your best shots with friends and family, as well as potential clients and employers. If you’re serious about becoming a professional photographer, it’s a good idea to create such a gallery, even if you don’t plan to charge money to view photos.
Use Social Media
If you don’t have much time and don’t mind strangers seeing your pictures, you can post them on social media. Facebook, Instagram, and Snapchat are easy ways to share photos with friends. You can also post them on travel forums or blogs if you want feedback and advice from other travelers.
- On Facebook, simply upload your favorite travel photos to your Timeline and tag them with where they were taken. Your friends will see them in their news feeds over time – some may even like them or comment on them!
- On Instagram, use hashtags to link your Instagram photo to other images from the exact location (e.g., “#paris”). This way, people can search for images related to their destination and find yours too!
- If you use Snapchat, create a story that lasts 24 hours so people can view a series of snaps together without having to keep going back to old snaps. If you’re on Twitter or Tumblr, try posting updates in real time by sharing photos with your followers every few minutes (or seconds!). This is fun for both sides because it creates a sense of excitement for what’s happening!
Create a Blog
A blog is one of the most effective ways to show off your travel memories of the best places you’ve been and the amazing people you’ve met, while detailing your trip. Nowadays, blogs are easy and intuitive to create and can be used to showcase your best shots from around the world.
Blogs are also great for sharing your experiences with others, such as advice on what to do or not do when visiting a particular place or region. For example, if you’ve been to Australia several times and know the best places to go, why not share some tips about those places on your blog? You might even want to share some stories about your experiences there!
Another reason blogging can be beneficial is the opportunity to connect with people who have traveled to similar places. This is especially important if you want to connect with like-minded people from around the world with similar interests.
The first step is to choose a platform on which to create your blog. There are many options, like WordPress or Tumblr, but they all offer similar features. The next step is to choose a template that fits your style and needs.
You can also use free websites like Weebly or Squarespace, which allow you to create a beautiful website without any coding knowledge.
A great way to showcase your photos is to use a grid layout, where each image fills an entire column or row. This way, users can see each travel photo without having to scroll down a lot, which makes browsing photos much easier.
Another good option is to add captions under each travel photo so viewers can read what’s happening in each image or why you chose it as one of your favorites.
Create a Physical Travel Photo Album With Your Favorite Photos
A physical travel photo album of your favorite photos is a great way to showcase your photos, especially for those who don’t use the internet, like older people.
It’s also a great way to preserve your memories and share them with family and friends. Or maybe you want to stay offline to protect your privacy.
You can create a photo book at home or hire someone to create it. Many companies offer a photo book service where the book is designed and printed for you.
You can also design a photo book yourself at home or hire someone to create it. Many companies offer a photo book service where they design and print the book for you.
Here are some tips on how to create a physical photo album:
- Select your favorite travel photos from your collection . It’s better to start with fewer photos than too many, because it can be difficult to choose which vacation photos to put in an album.
- Select your favorite photos in terms of quality and content – this will ensure that all the images go well together. For example, if you’re creating a vacation album, all the pictures should have been taken during that road trip so they have similar backgrounds and lighting conditions.
- Create a theme for your album (e.g., “vacation,” “family portrait,” “friends”). If you give yourself guidelines for what kind of photos you need, it’ll be easier for you to choose good photos from your collection.
- Consider adding captions or short descriptions next to each photo . These little extras make the album more personal and interactive – perfect if it’s intended as a gift!
Recent Post
The Importance of Space Travel: 12 Reasons Why We Must Venture Beyond Earth
Related Articles
15 Reasons Why Travelling in Your Own Country is an Important and Rewarding Experience
The Importance of Traveling: 10 Reasons Why You Should Start Planning Your Next Trip
Shelf Decor Ideas | A Guide to Style Your Home

Shelf Decor Ideas – When decorating a shelf, consider your design tastes along with your storage needs. That will produce an appearance that is lovely and practical. Mix and match pieces that are simply for style (such as decorative things ) with pieces that increase the performance of your space. When embellishing a shelf, concentrate on organizing items in odd numbers. You can also blend heights and textures to keep things visually interesting.
As a first accessory, do not make a shelf dull without any decorations. Use some additional designs to make it alive and enchanting. Start from the color, texture, angle, and proportion. Add the combination of those or pick one of them. Adjust with your theme so that it builds a tight nuance inside the room. Here are some tips to start your journey.
Table of Contents
Our Recommendation List
Wall Shelf Decor Ideas

Wall shelving is an easy and simple way to provide your space an elegant and eclectic feel while surrounding yourself with the important things that inform your story. It takes some styling, but curated collections give a layered, sophisticated feel to your space while letting visitors see your pieces through your eyes.
Organizing the shelves can become a style project in itself as you evaluate the ideal range and pattern to produce visual interest. Best of all, shelves make it easy to turn your collections giving you a simple choice for upgrading your space or changing your design to match the season.
Whether it’s African statuary or chinoiserie plates, presenting your preferred pieces on open shelves can include character and style to any space in your house. Here are some practical styling suggestions that will help you in creating a completely styled shelf.
Hit the Books

If you prefer to do any of your reading offline, you know how quickly books and magazines stack up. However that does not indicate they have to become mess. Use your preferred checks out as screen pieces for shelving that looks easily put together.
Develop a color story with your books to enhance your room’s color combination. Or go minimal and present two or three of your preferred covers as an art setup.
If you are trying to find a storage option along with a style idea, try displaying your books vertically in tight groups and anchoring them with bookends.
Include Greenery

Absolutely nothing adds a little life to a room like a bit of flora. Simply a couple of plants can get up an entire space, including texture to your shelves and a pop of color to your room. Look for plants with visual appeal like fresh cut blossoms, or an edgy succulent. Fresh flowers also smell lovely, which is constantly a plus. Turn to flower services such as myglobalflowers.com to pick the most suitable plants, and flowers.
You could also add some mason jars or leftover tea tins with herbs or beautiful colored microgreens. It is amazing easy way to keep fresh culinary herbs as rosemary, basil or mint right at hand and add a little life and air to your space.
Show Leaning Art & Photographs

In a world where pictures are generally hung, leaning your artwork is an elegant way to break the guidelines. In addition to being exceptionally stylish, open shelf art display screens are very practical for small areas. Gone are the hours invested fretting about irregular spacing or questioning if your painting is really straight or if it just looks straight. Simply let your preferred paintings and images raid the wall.
Long shelves and little images likewise offer you the alternative to organize your pieces together, letting you mix and match for your own in-home art programs. It is a great reason to pull out all your art and experiment until you get the perfect look.
Related : Bathroom Cabinet Ideas
Produce Visual Interest Through Height

When arranging items on your shelves ensure that the objects differ in height for a larger visual impact. Whether you opt to show a tall, distinct art piece, or a sleek, contemporary vase, include something that draws your eye up.
Use Neutrals

If you have a great deal of colorful challenge show or if you are styling shelves in a space with a bright paint color, make certain to consist of some neutrals to tone the combination down. This develops balance, and makes sure that your shelves do not look too self-important and mismatched. You can even attempt styling completely in neutrals for an appearance that feels advanced and classic. When going neutral on your shelves, whites, blacks, beiges and metallics are constantly a great choice.
Related : Kitchen Remodeling Ideas
Display Items That Differ In Size

For shelves that feel complete and completed, mix and match bigger and smaller sized pieces to produce a layered look. Attempt beginning with a couple of large staple items, and then accessorizing with smaller sized, more detailed things. Combining bigger and smaller sized pieces develops a balanced appearance. Boxes, baskets, big bowls, and broad views are terrific pieces to integrate either as a foundation or to complete space.
Related : Kitchen Cabinet Hardware Ideas
Paint Your Shelves

While there are lots of cool shelves readily available in fundamental blacks, whites, and wood tones, do not be afraid to try something a little bolder. Painted shelves can be a special addition to the color palette of your room or they can add that unanticipated pop of color in a neutral space. Or go monochromatic and paint your shelving the very same color as the surrounding walls. Including color is also an unique method to bring attention to the things being shown on your shelves, making certain that none of your effort goes unnoticed.
Place a Mid-Sized Standing Shelf

If you are an old-middle fashion, you had better choose a little simple but elegant taste like this small shelf decor ideas. It is a mid-sized design for a yoga studio. With white as the primary color to the wall, get the more pure and fresh feeling once entering it. Adjust it with a medium wood floor color. Add some mini statues or handicrafts on the shelf. Choose the neutral color and with a little combination of green so that it arcs a natural sense. It might be simple but still, bring in a deep content atmosphere
Craft an Asymmetric Contemporary Shelf
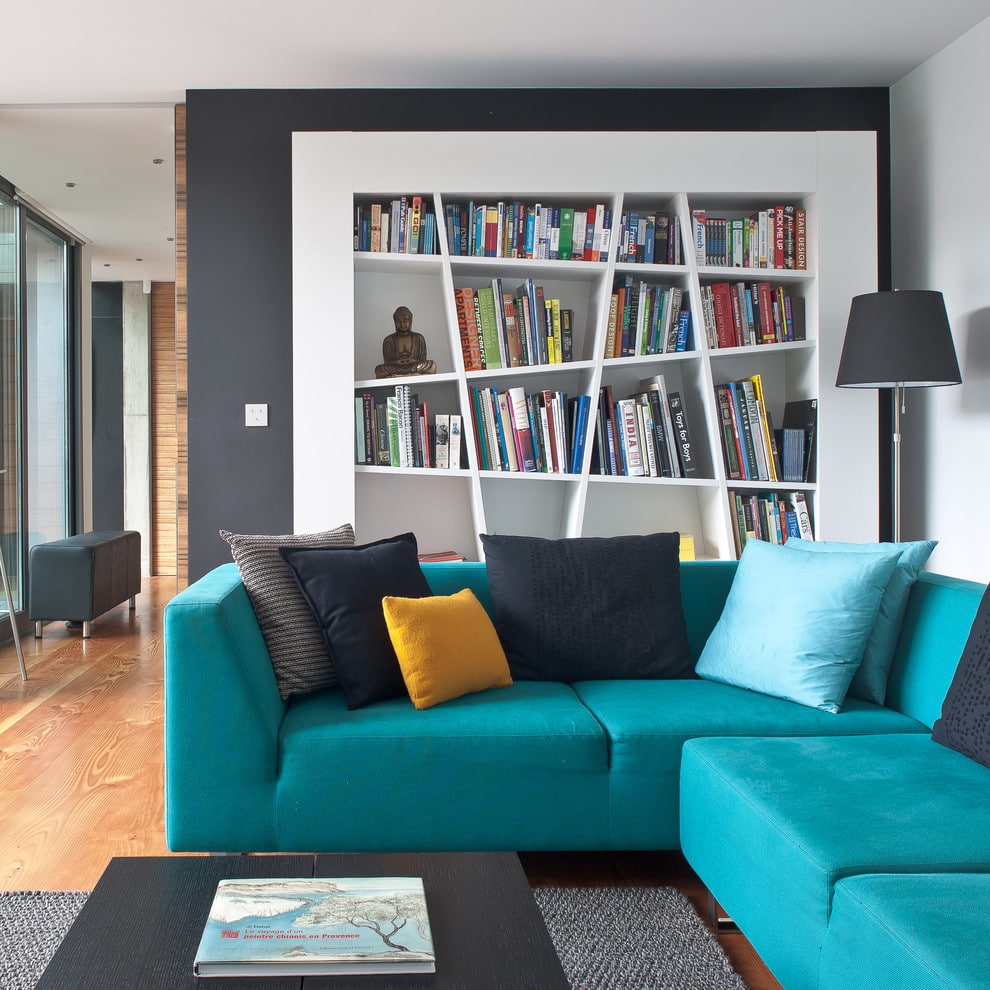
There are many a contemporary designs for a family room. If you start designing, why not trying the light one. It is a turquoise one. It is light means that you do not have put in many objects inside, and it arcs a brilliant performance inside. With the asymmetric design, you do not have to organize the shelf with a rigid treatment. All you have to do is make them appropriate for some books with varied sizes. With double-wall borders, it gives a sense of a 3D effect.
Try The Mountain Decorating

Living near a mountainous area? It is so romantic to feel a deep breath of winter. I recommend you to choose a classic gray carpet instead of wood. This floor is easy to clean and more practical. If you are feeling a little bit gloomy inside, add some light colors inside like light brown or white. An additional lamp supports the room bright. Put a mini radio, paintings, and books on the shelf with a little bit of distant space so that it is neat though with a little organization.
Combine with Multicolored Tile
A private bathroom is suitable for a medium or large one. The angle is the key to designing a medium room. White is an exclusive color. Use a wooden pattern as the tile. Ceramics are the most suitable material to apply. in this bathroom shelf decor ideas, use mirrors to separate the bathtub and the closet. It shows the reflection, which gives a more expanse room. Put the shelf along the wall with a medium tone color. Therefore, you can keep the bottles of shampoo and soap well there.
Pick The Circular One for Girl’s Bedroom
Girls are always details. That is why choosing the right theme is necessary. Most like pink as the primary color. However, you can still combine it with others. Start decorating the carpet design with a mosaic pattern with combo colors. With the shelf at the corner, why not choose the circular one. The circle gives a flexible sense, which means you do not have to pay attention to the precise measurement of size or angle. All you have to do is adjusting it with the right proportion and creating harmony with other items.
Related: Bedroom Corner Cabinet Ideas
Make a Simple DIY Model
Building a space for a dining room is a little bit rigid, in that it adjusts many things. For example, whether you separate the kitchen with the dining room or not. Also, you may live with a group of family members, so you need a wider room, of course. However, by using the white walls and wood floor dining, you can adjust them with a few contractions, since white is neutral. Bringing in a DIY shelf is acceptable. With free shape, you do not need to put the books combined with other vases or Pict arts. Go ahead with the books and read them already.
Use Custom Cerused Oak Shelf
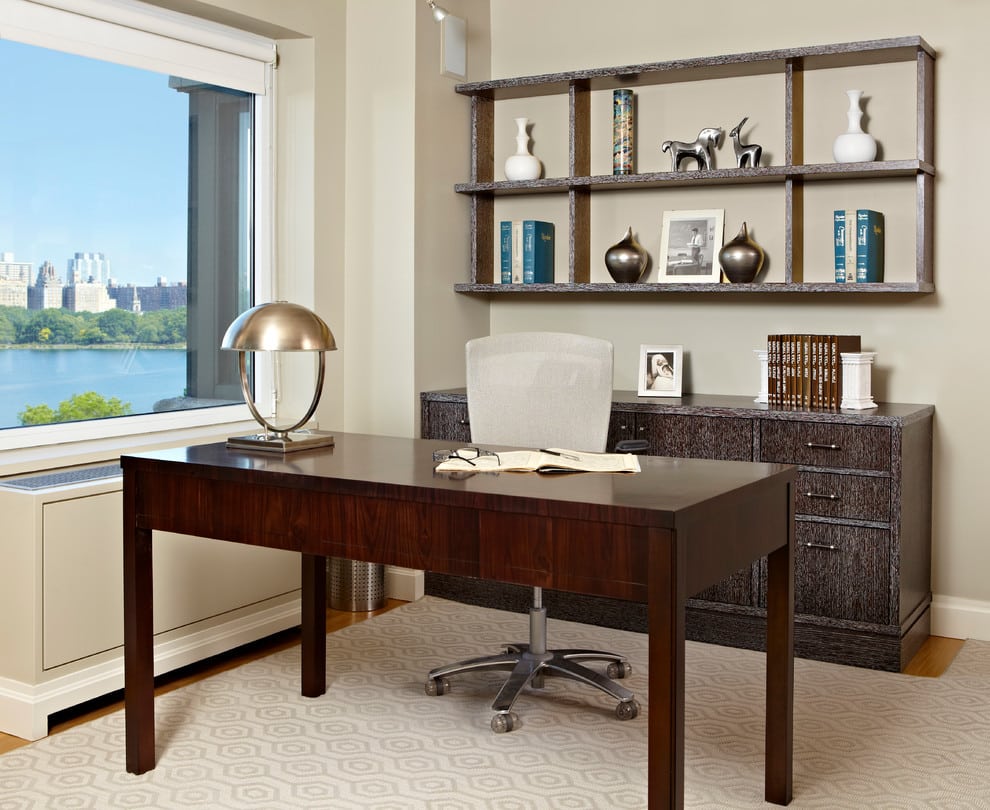
Do you imagine having an elegant casual look for your workspace? With these beige walls, you can create an adorable look of the room. Add light wood floor so that it matches with the wall. Put in a buffet cabinet and geometric print area inside. With the open shelf design, you can put many items there as the decoration. The wooden material gives a rustic sense.
Related: Rustic Home Design Ideas
Floating Wall Shelf Decorating Ideas

As big as our homes might be, we are always in for some extra storage space. That is how most of us come across floating shelves ideas. These are not only supply sufficient space for our belongings, but likewise embellish our spaces. It also make them more advanced by looking like if they were not linked to the wall at all.
Related : 27 Exclusive Wall Shelf Ideas
Floating shelf is definitely one of the most intelligent home decor concepts ever for shelf decor ideas. It is easy and extremely cost-efficient. Both large and little floating shelves display antiques in an elegant method. We can utilize them to showcase family pictures, art collections, and travel memorabilia.
A particularly fascinating type are hanging wall shelves which extend directly without visible assistance, and are made of solid materials such as wood to make sure our belongings will remain in location. A sensible alternative for wall shelves for books are likewise hollow-core built ones, or versatile pieces of old and unused wood.
Living Room Wall Shelf Decor Ideas

Decorating with shelves is something you need very much for your living room. Although at a glance, many people see this thing is not that essential. But you have to know that you truly require it. Many people might think that things that should remain in living space is restricted to a set of chair and table for the visitor, and some small furnishings such as corner table. In fact, you likewise require shelving to store some essential things. Simply imagine how your living room will appear like if you purchase some magazines then you have no shelf, so after reading those magazines, you just put it on the table. It will be a mess definitely. If you have shelves, it will be different due to the fact that you can conserve your books in it.
When you think of living room shelving, you may consider a cupboard or cabinet to save things as modern bookshelf. Yes, it is true that for living room shelf, you can utilize cupboard or cabinet. However, do not you wish to have something more lovely and beneficial than ordinary shelf? If it is so, then you can install floating shelving for living room. Floating shelves are shelving which are set on the wall. It consists of lots of shelves which look like board. Those shelves are installed apart one another. It can be brown, black, white, as well as other bright color such as red.
Kitchen Shelf Decor Ideas

Why hide your gorgeous dishware and cooking tools in cabinets? In kitchen decor, Floating or open shelving in your pantry or kitchen not just helps organize your bowls, baskets, plates, and tea cups however makes them into practical works of art. Mix and match your entire collection, or arrange the pieces by color for a tidy, contemporary display. By keeping your favorite items exposed, you’re most likely to grab that platter or pitcher – not just for unique occasions but for daily meals.
Related : 21 Kitchen Cabinet Refacing Ideas
Ladder Shelf Decor Ideas

Decorating your home in an innovative style is everything about believing beyond the apparent. Rather of going with mundane and recurring decoration, you can select innovative furnishings that bring inimitable design to your interiors.
Ladder shelves and show systems do specifically that! Integrating a touch of rustic appeal with clever, space-saving styles, ladders are a terrific alternative to traditional cabinets and displays. Their lightweight frame and compact style turn that forgotten, old corner into a practical and aesthetic space.
While some trendy ladder bookshelves and storage units suit perfectly with the modern-day theme, you can even turn some of the old step ladders into lovely DIY shelves. Sleek, elegant and original, the incredible inspirations showcased here should tempt you to drag that old ladder out of the attic and turn it into a fascinating display.
There are a lot of ways in which you can get imaginative with ladder shelves without breaking a sweat, considering the wide options offered. Modern ladder shelf designs are completely suited for urbane, contemporary interiors.
Melting away into the backdrop sometimes and standing apart on other celebrations to offer crisp visual contrast, the white ladder shelf bring a brand-new dimension to any interior without using up too much space. Slotting in snugly beside that beautiful fireplace or that pretty, big window, this corner ladder shelf displays breathe a brand-new lease on life into that boring, lonely corner.
More Shelf Decor Ideas Images

1 thought on “Shelf Decor Ideas | A Guide to Style Your Home”
Very helpful..thank you very much
Leave a Comment Cancel reply
Jet-setting with the Elf: 10 Travel-Themed Elf on the Shelf Ideas for Your Family

As the holiday season approaches, the mischievous Elf on the Shelf makes its grand return to homes around the world. This playful tradition keeps the magic of Christmas alive, with the Elf getting up to new antics every day.
At Family Vacations U.S., we thought, why not blend the excitement of travel with the whimsical charm of this holiday tradition? Without further ado, here are ten travel-themed Elf on the Shelf antics to transport your family to new horizons right from the comfort of your home.

- Packing Suitcase Antic : Catch the Elf in the act of packing a suitcase with miniature vacation essentials, like a tiny swimsuit, sunglasses, and a map. Instructions: Find a small box or case to serve as the Elf’s suitcase. Fill it with miniature vacation essentials – a tiny swimsuit, sunglasses, and a map. Place the Elf next to the open suitcase, as if it’s packing for a trip.
- Scavenger Hunt : Elf sets up a scavenger hunt with clues leading to a “hidden treasure” – perhaps a new holiday ornament or small treat. Instructions: The Elf sets up a scavenger hunt with clues leading to a “hidden treasure” – perhaps a new holiday ornament or small treat. Hide the clues around the house, each one leading to the next, with the final clue leading to the treasure. Start the hunt by giving the kids the first clue, and watch the adventure unfold!
- Local Tourist : Have the Elf explore local landmarks or take silly photos with household “monuments” – like posing next to a towering stack of pancakes for breakfast. Instructions: Choose some household “monuments” or local landmarks. Position the Elf taking silly photos with these landmarks. Create a mini photo album or online gallery to showcase the Elf’s “local” adventures.
Each of these antics brings a dash of wanderlust to your holiday traditions, and who knows, perhaps the Elf will inspire your next family vacation! As you embark on these playful adventures, the world feels a little smaller, and the magic of the holiday season shines a little brighter. Happy traveling with your Elf! When it is time for your Elf to say goodbye, here is an idea for a goodbye letter from your elf.


Mudpie Fridays >> Christmas >> 25+ Ideas when taking Elf On The Shelf on vacation
25+ Ideas when taking Elf On The Shelf on vacation
Elf on the shelf on vacation . I am sure there are many parents reading this wondering the same thing we did. Why did we start the Elf on the Shelf Christmas tradition? I have lost track of the number of times we have gotten into bed only for one of us to say… we haven’t done the elf. Oops. I have even woken up in the middle of the night! And this year we have an added complication. As far as we will be travelling before Christmas. Would you be brave enough to take elf on the shelf on holiday?
It is not unusual for us to go away for the odd weekend in the run-up to Christmas we did this last year. In this case, normally our Scout elves do not travel with us. Instead preferring to stay at home in peace and quiet and guard the Christmas tree. Well, at least that is what they tell us. The boys each have an elf that visits them each year. Elfie (original) and Chocolate. Aptly named by Harry when he turned up with chocolate the first year and seems to have done every year since.
Yet this time we are away for six nights ending on Christmas Eve. So it seems that our Elf on the shelf will be coming on holiday with us this year. The trip is pretty special and needs quite a bit of planning. So have decided to get ready early and make sure I have everything we need for the elves for our road trip. To keep the Christmas magic alive.

Table of Contents
Tips for taking your elf on th shelf on vacation
How do they find you.
I have thought long and hard about elf-on-the-shelf ideas and how we are going to announce our trip. To add to the excitement of the fact that we travelling, before we go I will set the elves up with an atlas. Open on the page of our destination or looking at travel details. I will do this activity the night before we travel so once the boys have been told. This way when they magically appear it will all make sense. Our elves have little doors which will magically appear in our hotel room which will explain how they will get there for the length of the trip. After all the elves have an excellent sense of direction.
Travelling with your elf on the shelf
I have thought about this long and hard. Firstly what if one suitcase goes missing? Well, we are lucky as we will be taking four bags and have two elves so at least that double the chances of getting at least one little guy. Of course, if you are really worried about this then you can always pack them in your hand luggage. My only concern with this is if it gets pulled at security and the boys see them.
If our elves are magically appearing then we need to be careful how we pack them. For this reason, a great way to do this is to put in a bag that will be hidden in the clothing. So there is less chance of little eyes spying on them. Plus it means I will be able to do most of the unpacking without worrying about hiding things in the suitcase.
Packing for your elf on the shelf for the holiday
Having Christmas travel plans with the elf on the shelf means that I need to be super organised. So I need to know what high jinks they will be up to each night. But at the same time, we are limited in weight and I do not want to be taking lots of additional things away with us. When we have enough already!
It is also important to remember when taking your elf on the shelf when travelling, that certain things can not be packed in suitcases or allowed into another country. I have tried to be mindful of these in our ideas below. Of course, if you are going on a car ride you will have much more flexibility this holiday season.
Moving around with your elf on the shelf on vacation
To compound our fun elf travels we will be staying in several different locations with our elves. So having a bag where everything is located is probably even more important. Since our elves will be presenting the day’s activities to the boys they will at least know what we are going. As I will include pictures of the new accommodation we are staying in so at least they will know how to find us. But finding a new spot each day in a hotel room may be a challenge!
25 Ideas when taking Elf on The Shelf on vacation with you
Most of these fun ideas use the items which you are likely to find in a hotel room. Obviously, if you are staying in self-catering accommodation then you may have more options at your disposal. It is also good to get family members to help.
- Mini snowballs with toilet paper
- Floating in the sink
- Stuck in the glass
- Having a bed made of towels
- Writing a postcard
- Being tied up (remember to pack some string)
- if you bring string then you can also set up a zip line wth a candy cane
- Playing hide and seek in a sock
- Looking at maps
- Reading a local guidebook
- Writing a list of things to do while sightseeing
- Writing shopping list
- Totting up the receipts
- Taking selfies while asleep
- Elf with his own box of clothes
- Leaving clothes for days out or travel destinations
- Making a Wordsearch for the holiday destination
- Putting on a swimming costume
- Pretending to lay on the beach
- Pinning destinations in an atlas or map
- Delivering a note for Father’s Christmas to tell him where you are
- Surprising with boarding passes or plane tickets
- Leaving Christmas decorations or PJs related to your destination ie Disney
- Pack items in their own bag or suitcase
- Leaving instructions on cleaning, heating emptying the bins or similar
- Writing a list of things to do before you leave
- If you are travelling somewhere cold then make a snow angel on the balcony
- Present a souvenir on your last night
Other great ideas for not taking your elf on the shelf on holiday
If travelling with Santa’s special helpers feels like too much hard work. Then you could free elf from his duties at home and release him to scout elf’s north pole duties instead. Or perhaps they could be part of a special mission?
You may also find these other Elf on the shelf blog posts useful. Some come with handy printables.
Quick and easy elf-on-the-shelf ideas
Elf on the shelf ideas for a 2-year-old, 16 easy christmas family traditions.
Are you taking your elf on the shelf when travelling this Christmas holiday? Let me know your holiday travel plans in the comments below.
Wishing you a wonderful Christmas season x
If you’ve liked this post please follow me on my social media channels:
Mudpie Fridays: Twitter | Instagram | Facebook | Pinterest |LinkedIn
PIN for later – Elf on the shelf when travelling
- Christmas , Elf on the Shelf
The Best Christmas Gifts For Eight-Year-Old Boys 2023
30+ Christmas Gifts for Her
The Best Christmas Gifts for Tween Boys 25+ Ideas
Complete Guide to Santa Park Rovaniemi Lapland
Santa Claus Secret Forest Joulukka – What to expect
The Best Pantomimes in Surrey 2022
Leave a reply.
Your email address will not be published. Required fields are marked *
Notify me of follow-up comments by email.
Notify me of new posts by email.
This site uses Akismet to reduce spam. Learn how your comment data is processed .
Welcome to Mudpie Fridays where I share our travels. Both here in the UK but also across Europe and further afield. My name is Clare and I am married with two mischievous boys, Charlie aged 11 and Harry who is 7. Read along as we find hidden gems, pack as much holiday time in as possible, while working a 9-5 and find amazing and unusual experiences. Proving travel can be fun, educational and hugely rewarding with kids. Grab a coffee and come and join us on our latest adventures.
Looking For Something?
No.8 top parenting blogs 2023.
Search UK Days Out & Travel
Search our Worldwide Adventures
Amazon Affiliate Disclosure
Mudpie Fridays is a participant in the Amazon EU Associates Programme, an affiliate advertising programme designed to provide a means for sites to earn advertising fees by advertising and linking to https://www.amazon.co.uk
Today's Most Popular Posts

Around the World From Home: Travel Theme Preschool Activities
Wishing you could get out and travel…but can’t? Looking to introduce travel to your littles or classroom? Find our favorite around the world activities and travel theme preschool crafts to spark wanderlust from home.

Disclosure : This site contains affiliate links for products and services I recommend. When you make a purchase through an affiliate link, at no additional cost to you, I may earn a small commission. Read our full disclosure here.
As much as I’d love to travel all the time, I can’t.
We have jobs. Travel isn’t cheap. My kids are a handful to deal with. Sometimes things just happen and you’re stuck at home!
But who says you need to put the travel bug on the shelf?
Travel, adventure, and having some sort of understanding of the vastness of the world is part of our everyday lives, too. We continue to teach about and introduce travel and culture, even from home.
From reading books, to doing map puzzles, to learning languages, our hearts and minds are often immersed in worlds way beyond our living room windows.
Whether you’re looking to fill the days stuck at home or simply wanting to introduce new places and cultures for later, you’ll love the suggestions below.
I’m sharing my favorite theme activities, preschool crafts, and DIY adventures so you can travel around the world without leaving your home.
After reaching out, five travel and family bloggers submitted their favorite travel activities for kids. You’ll find their incredible suggestions, as well.
So, go beat the boredom and start sparking that wanderlust with your kids.
Adventure Around the World with these Travel Theme Preschool Activities
Read some travel books.
My librarian years haven’t failed me yet.
I may be home with my kids now, but in a past life, I planned hundreds, if not thousands, of children’s storytimes. I adored taking kids around the world through stories, and then following it up with preschool crafts and on theme activities.
With library books, digital resources, and even materials you may have at home, you can easily recreate a travel themed book-venture.
Reading books about and set around the world is great for prepping your kids – whether they’re in preschool or high school – for an upcoming trip. Even with no travel plans, though, introducing a lesson on a specific country, keeps their views of the world vast!
Teach Kids to Navigate With Analog Wayfinding
Are you dreaming of fun family hikes? Exploring forested trails, splashing through creek…wait, the phone with the trails map just fell in that stream!
Did this dream hike just turn into a nightmare? In a GPS world, adventurous families still go off-grid (sometimes on purpose, sometimes by accident).
Kids of all ages can navigate without digital devices—it’s a life skill best learned before getting lost on a trail. Here are three ways to begin wayfinding:
- Look for Landmarks: In the car or on bike rides, even preschoolers can navigate the way home. Asking “Which way should we go from here? How do you know?” trains them to pay attention to landmarks. Older kids can take on trail-boss responsibilities, in charge of the rout out and back.
- Get Comfortable with Paper Maps: Drawing maps is more than a fun art project—it helps kids internalize spaces. Start small, drawing the neighborhood. Include favorite places—even the dog’s! Work up to reading printed maps symbols and identifying hills and valleys by topo lines.
- Compass Games in the Backyard Develop Orienteering Skills: Start with basic skills like holding the compass flat so the needle floats freely. To find magnetic north, hold the compass straight and turn until the needle points to N (red goes in the shed!) Low-tech geocaches and treasure hunts are a fun way to grow orienteering skills. Most importantly, stash a compass in each backpack, ready for the next real adventure!
*Submitted by Suzanne from Blue Planet Travels .
Go on a Home Safari
Our DIY home safari adventure was one of my finer ideas as a parent. You know you’re winning when something keeps your kids engaged for more than 20 minutes.
The best part about this adventure, was that I didn’t really need to do much. My son has a safari play set, so we simply pulled it out and highlighted the safari theme with other books and activities.
Some of his favorite add-ons were putting animal stickers on his map and watching a virtual safari on our TV.
Even if you don’t own a safari play set, this is easy to recreate with a few stuffed animals and books or DIY flashcards.
Create a Travel Vision Board
Kids can get excited about travel without ever leaving home by designing a travel vision board. Vision boards are a crafty and creative way to spark kids’ dreams about future fun trips and adventures.
Creating a travel vision board simply consists of cutting out inspiring words and pictures of places you’d like to visit from magazines – or printing some off the internet – and pasting them on to poster board.
My daughter likes to customize her visual creations using crayons, markers or colored pencils, decorating with stickers and glitter, designing borders around each picture and including fun quotes.

Young children may need a little help getting their imagination rolling. You can ask questions like “if you could travel anywhere in the world, where would you go? What would you do while there?”
Let children run wild with their ideas. Are they dreaming of an Arctic dogsledding adventure in their future? A visit to a theme park or waterpark? Or maybe a trip to Italy for pizza and gelato?
Whether children tailor their board for ultimate bucket-list destinations or for upcoming family trips, designing a travel vision board helps kids visualize and look forward to future exciting experiences.
*Submitted by Deanne from Scenic and Savvy .
Play Travel Related Board Games
One of my favorite indoor activities for young children is to play board games.
A travel-themed board game young children particularly like is Ticket To Ride First Journey. It is suitable for ages 6 and up. You can either purchase the Europe or United States of America map. The goal of the game is to be the first player to complete six Tickets. You complete a Ticket when you have built a continuous line of trains between the two cities printed on your Ticket. The map, pieces and cards are all bright and colorful, which will appeal to young children. It inspires children to travel to and visit different cities in Europe or the United States of America, depending on which version you purchase.
Another favourite travel-themed board game for young children is My First Carcassonne, which is suitable for ages 4 and up. The first player to place all their meeples down wins the game. The game consists of placing a tile down to build the medieval city of Carcassonne in France. You can place a meeple down when you close a street. The tiles and meeples are also bright and colourful like Ticket to Ride First Journey. The tiles fit together no matter the placement, which makes it easy for little ones.
Playing board games is a fantastic travel activity to do at home with young children.
*Submitted by Clara of Petite Capsule. Check out her roundup of indoor activities for babies for more at home ideas.
Learn a New Language
Learning a new language has never been as popular as it is right now! Experts all agree that the younger children learn a new language, the more easily they will learn it fluently and remember it throughout their lives.
Not only will it strengthen their brains, but it will also help them to understand other cultures. If your family can’t travel, you might as well learn.
Fortunately, there are several ways to help your children learn a language – even if you don’t know the language yourself. There are tons of apps out there for a variety of age groups.
My personal favorite is Mondly Kids. It covers a multitude of languages and uses sounds and pictures (in addition to words) so children who can’t read can still learn. This would be good for children about 4 to 10, but I have known 2-year-olds who could have figured it out. If you help them learn how to use the app for a few levels, most kids will pick it up pretty quickly.
Different apps have different features, so be sure to explore your options. Any type of helpful app will have music, stories, or videos in another language. YouTube has tons of options, but there may be better apps for specific languages.
While immersing your child in the language (without any English words during learning), bilingual videos also have their perks. Since children under 3 are still learning English, it doesn’t hurt to sing songs that teach them words for both languages.
* Submitted by Raquel of Meals and Mile Markers. Check out more of her recommendations to feed your wanderlust from home.
Camp in Your Living Room
Did you not grow up setting up a living room tent and begging your parents to let you sleep in it?
Why not set up a simple home tent (use a sheet if you don’t have a play tent) and transport your family to the mountains? Maybe your kids prefer the National Parks? Or the Grand Canyon.
We’ll pack some “camping” snacks, roll out our sleeping bags, read books and listen for animal sounds. Set your TV for theme-appropriate background noise!
Take a Virtual Theme Park Ride or Tour
Theme parks are a special place, especially for kids! No other destination combines so many varieties of fun – thrill rides and rollercoasters, playgrounds, candy, shows and live entertainment, animals, and the chance to meet your favorite characters in person. When we aren’t able to visit our favorite theme parks, we can experience some from the comfort of our own couch.
Make sure nobody suffers from motion sickness before proceeding .
To watch as a family, access YouTube through your smart TV, or project your laptop screen to your TV. Google has plenty of tips on how to do this if you have any trouble.
If you have a VR headset, there are many options to install virtual rollercoaster apps, which are heaps of fun, but only one person can use these at a time. If you don’t have one, there are plenty of options to play along with just your TV or computer.
Disney teamed up with Google to create a street-view virtual visit of their parks, allowing you to walk through. You can choose which direction you want to go, look from side-to-side, and, just like always, there are crowds. You may even spot some of your favorite characters around the park! Start here and just use your mouse to click through!
If you want something slightly more thrilling, there are rollercoasters you can virtually ride! To make it as realistic as possible, try clearing some space in front of the T.V, and put some chairs in front, side-by-side.
Here are a few YouTube options to get you started:
- Virtual Disney World
- Canada’s Wonderland
- Universal Studios
Best of all, there are no crowds, and lunch won’t cost a fortune! Until we can go back, enjoy these virtual theme park experiences.
*Submitted by Jenna of I Know The Pilot .
Cook an Ethnic Recipe
Sometimes I serve Ikea Swedish meatballs from a bag and call it a Scandinavian delicacy. Other times, we make curry from scratch.
My kids love ethnic food, because they’re exposed to it frequently. It’s one of my favorite family travel benefits . Recently, I’ve started trying to teach about the places certain foods come from.
This doesn’t work for boxed mac and cheese, though. Sorry.
We’ll talk about where a certain food comes from and if we’ve been there or are planning on it soon. Sometimes we read stories from that area and look at maps.
Personally, cooking is one of my favorite activities and I love being able to transport my family anywhere around the world right from my kitchen.
It makes trying new food fun and gets them excited to travel. My toddler also loves helping me in the kitchen…then eating his creations!
If you’re enjoying these at home travel activities, check out our Travel Gifts for Kids . Many gift suggestions are geared towards preschool kids, and are ideal for venturing around the world when you can’t travel!
Around the World Theme Preschool Crafts
Anytime my kids have a chance to create something or get a little messy, their day is made!
With simple craft supplies, household products, and recyclables we’ve created instruments from around the world, masks, toy airplanes, nature mandalas, binoculars, and many more preschool theme crafts!

A quick online search will yield more global crafts and activities like printable passports and flags, along with an endless supply of free coloring pages.
Typically, when we spend some time learning, reading, or planning an at home adventure, I’ll search for related crafts and activities to keep my toddler engaged and busy!
We have an entire Pinterest board dedicated to learning about and introducing travel at home. You can find our favorite travel theme crafts, preschool books, and other fun activities to take you and your kids around the world.
What activities and adventures take you around the world? How do you keep the wanderlust alive for your kids when you’re stuck at home. How do you prep them for an upcoming trip, whether it’s tomorrow or in ten months? I’d love to hear your favorite at home travel ideas.
Save these travel theme activities and around the world adventures for later. Pin to Pinterest:

The at home safari sounds like a ton of fun! Connor already gets super excited to go see his Winnie the Pooh, so I’m sure he’ll love finding animals around the house as he gets older! I like the idea of camping inside your house or in the yard too. I remember doing that as a kid!
Awe that’s so cute!! Camping inside is always a hit..it’s like they’re allowed to make a mess!!
Leave a Reply Cancel reply
Your email address will not be published. Required fields are marked *
This site uses Akismet to reduce spam. Learn how your comment data is processed .
- learn more about Explore With Tori
- join our adventure mom squad: subscribe
- see how you can work with me
WHAT ARE YOU LOOKING FOR?
Where can you find me.
This site contains affiliate links, at no additional cost to you. As an Amazon Associate I earn from qualifying purchases.
The Most Important Elf on the Shelf Rules You Need to Remember This Season
They'll help you ensure a spot on Santa's nice list! 🎅🏻

Every item on this page was chosen by a The Pioneer Woman editor. We may earn commission on some of the items you choose to buy.
The Elf on the Shelf is a decades-long Christmas tradition that involves a special Scout Elf who is assigned to report back to Santa on the rights (and wrongs) of the children of his assigned house before the big holiday. The premise of this adorable holiday game is that each morning, the Elf takes on a new position around the house, which the kids scurry about in search of. The kiddos can even customize their Elf with a fun name , outfits , and accessories to add a layer of creativity to the holiday tradition.
Like any good game, this one has a set of rules that the kids must follow to ensure the Elf doesn’t lose his magic. If you’re unfamiliar with these rules, that’s not to worry, because we’ve compiled a list of the most important ones to ensure a smooth season with your family’s beloved Elf.
Your Elf should arrive during Scout Elf Return Week.
According to the official Elf on the Shelf website , Scout Elf Return Week usually falls between the end of November, when it's still Turkey time, and the beginning of December, when it's time to pull out all your Christmas decorations. In 2023, Scout Elf Return Week was from November 22 to December 1. But if your Elf happens to be late, don’t fret. Santa occasionally holds a few Elves back to help him with last-minute Christmas-related tasks at the North Pole before releasing them to their respective houses.
Don’t touch your Elf!
Let your family’s Elf be a lesson in “you can look, but not touch,” for the kiddos. This is the most important rule because touching the Elf leads to him losing his magic. If an Elf loses his magic, he’ll be unable to fly back to the North Pole to inform Santa of what’s been going on at home, which no one wants. If a gust of wintry wind, or perhaps Fido, knocks the Elf over, a parent can help put Santa’s little helper back in its place.
But again, kids must not touch the Elf! We know mistakes happen, though, so if an Elf is accidentally touched, there are ways to restore his magic. Performing a Christmas carol , sprinkling cinnamon on the Elf, or writing a letter to Santa are all ways that the kids can help restore the Elf’s magic (and keep them occupied while you’re busy maki ng Christmas cookies ).
Scout Elves can’t talk, but they sure can listen!
Children should be encouraged to confide in their Elf, whether that’s about their Christmas wish list, secrets, or what they did this year to be on the nice (or naughty) list. After all, your Elf makes the commute all the way to the North Pole each night to report on the kids to Santa, so it’s only fair to give him something to talk about!
Your Elf changes position every night.
It’s important to note that your Elf only moves when he isn’t being watched, so evading bedtime to catch the Elf in its act won’t do anything for the kids (other than putting them on the naughty list!) After a long night of reporting back to the Big Claus in the North Pole while the kids are sound asleep, your Elf makes its way to a new location around the house. Sometimes it's somewhere predictable, like the fireplace mantle, while other times it's somewhere more unexpected, like behind your stack of cookbooks. Either way, the kids will love searching the house every morning to see where the Elf is.
Elves must return to the North Pole nightly.
Each evening, between the first day the Elf makes its way onto your shelf and Christmas Eve, marks another journey that he takes from your home to the snowy North Pole. This is why the Elf takes on a new location around the house everyday. It’s simply his resting place after a long night of reporting to Santa. Again, this is a great opportunity for the kids to try their hand at penning a letter to Santa entailing their Christmas hopes, wishes, and dreams so the Elf can take it back to him at night.
Your Elf should leave on Christmas Eve.
Although the famous poem “A Visit from St. Nicholas” states that on the night before Christmas, “not a creature was stirring, not even a mouse,” your Elf is here to prove that statement wrong. On December 24, your Elf will make his final journey back to the North Pole to help Santa prepare for Christmas Day! After all, St. Nick needs all the help he can get to bring presents and Christmas cheer to everyone on the nice list. This is a great opportunity to teach the kiddos that if you love someone, you should let them go. And if it’s meant to be, then your Elf will be back on that shelf in a year’s time!
.css-kddnhp:before{background-image:radial-gradient(circle at 15px 0, #44ABA5 9px, #44ABA5 15px, rgba(255,255,255,0) 16px);background-repeat:repeat-x;content:'';display:block;height:2rem;margin-bottom:0.625rem;}@media(max-width: 48rem){.css-kddnhp:before{margin-left:-0.99rem;width:100vw;-webkit-background-size:30px 16px;background-size:30px 16px;}}@media(min-width: 40.625rem){.css-kddnhp:before{margin-left:0;width:100%;-webkit-background-size:30.659px 16px;background-size:30.659px 16px;}} Start Your Very Own Elf on the Shelf Tradition

'The Elf on the Shelf: A Christmas Tradition'

The Elf on the Shelf Outfit Set - Festive Skirts and DIY Ugly Sweater

The Elf on the Shelf: North Pole Goal and Gear

The Elf on the Shelf Tiny Tidings Ballerina
Nitya Rao is the editorial assistant at The Pioneer Woman, covering stories ranging from food, fashion, beauty, lifestyle, news, and more.
.css-l114lb:before{background-repeat:no-repeat;-webkit-background-size:contain;background-size:contain;content:'';display:block;margin:auto auto 0.25rem;}.loaded .css-l114lb:before{background-image:url('/_assets/design-tokens/thepioneerwoman/static/images/butterfly.svg');}@media(max-width: 48rem){.css-l114lb:before{width:2.039rem;height:1.616rem;}}@media(min-width: 48rem){.css-l114lb:before{width:2.5rem;height:1.9rem;}} Christmas

45 Heartfelt Gifts for Mom from Daughters

60 Best Side Dishes for a Glazed Ham

Save Leftover Ham for an Easy, Cheesy Tetrazzini

40 Thoughtful Gifts to Wow Your Boyfriend's Mom

Roast a Garlic and Herb Leg of Lamb for Easter

60 Best Gifts for the Mother-in-Law Who Has It All

21 Best Cocktails to Make With Baileys Irish Cream

Roasted Rack of Lamb Looks Fancy But It's So Easy

How Much Ham Do You Need Per Person?

50 Creative Ideas for Leftover Glazed Ham

Serving for Brunch: Classic Ham and Cheese Quiche
Travel With Elves: How To Travel With Elf On The Shelf & Keep The Magic Intact
by Hannah | 18 Oct 2021 | Activities , Elves
Going away whilst you have an elf visitor? We share ideas for how to travel with elf on the shelf and keep the magic intact.
- Family Friendly
- Time & Effort
- Supplies Needed

OK, confession time. I have spent far more time than any grown woman should debating how to handle our elf visitor when it comes to going away.
I realised some time ago that I am fastidious bordering crazy about keeping the elf on the shelf story intact.
As a parent, we manage to fumble our way through all sorts of misdemeanours. And there are certainly far (far!) more important issues in life than whether elf moved half an inch or was caught by the edge of a fingernail.
But, having committed to an elf visitor in our home some years ago, I’ve found myself completely invested in keeping the magic alive. That being said, please read on with your tongue firmly in your cheek as this article does not take itself too seriously (and in fact caused laughing bordering on hysteria by Jo when she reviewed it!)!!
Elf Didn’t Move? DO NOT PANIC!
Our 4 easy steps will have you sorted. And we’ve got a child-proof page of reasons ready too!
Behind The Scenes
Travel With Elf Friends
Now, we’re a family that travels a lot. So it was inevitable that December would include days (and some nights!) away from home. And hence ‘elf travel management’ was high on my agenda to resolve! Having now navigated this every year (save for 2020), I thought I’d share a few tricks of the trade that may be of assistance to you.
How you choose to handle travel with your elf will of course be dependent on a whole host of factors including the length of your trip, where you’re going, how much energy you want to direct towards this and how invested your children are in their elf visitor to begin with!

Below you’ll find the method we’ve used for years now, enabling our elf to come along on our travels.
But if it all seems too much effort – a completely reasonable thought process!!! – I’ve also shared some other approaches which I wish I’d thought of, or known about, earlier. 😉
Yes I Am Suitably Embarrassed To Have Given This A Name!
The Two Bag Elf Travel Method
Before I start … I know I have given this too much thought! Please try not to judge me too harshly –it all came from a place of wanting the magic to stay intact for our sons. And actually it’s really not as tricky as it sounds and we’ve thoroughly enjoyed the boys’ wonder each time.
So if you’d like to give the impression that your elf is travelling magically alongside you, then this method hasn’t failed us yet.

- Think about your elf’s position the night before the day of travel. You’ll want them easy to grab but ideally tucked away in a less busy part of the house / hotel room / etc (in a hotel room, we normally use the bathroom for arrivals and departures)
- Upon departure, as everyone steps out of the door, you will suddenly remember something you need to check (perhaps once everyone is safely in the car). Maybe a window was left open or there’s a last minute comfort break required…
- Heading back into the house, ensure you have two small bags with you. These bags must NOT be see-through(!) and ideally would be made from a quiet material (yes, I know, too much thought but you’ll thank me come part five!)
- Wrap Elfie up in one bag and then place that into the second, making the package as small as possible. Place it in a secure pocket, at the bottom of a handbag or equivalent. (If travelling by place, be sure to keep your elf in hand luggage in case of mishaps.)
- Upon arrival at the other end, feign a desperate bathroom need as quickly as possible and dash in with bag in tow, locking the door. Set your elf friend up as fast as you can, ideally somewhere you could have missed in your rush to answer the call of nature –behind a shower curtain, on a low shelf, behind a towel, you get the idea.
Now hide the bags and relax –your job is done.
It’s up to you whether you go the whole hog and give a squeal of excitement at your bathroom discovery, or just leave Elfie to be discovered by the young folk in due course.
But your elf is now installed safely in your holiday location. For the return home, simply repeat the process.
Elf Goodbye Letter
Ease farewell sadness with this special elf goodbye letter. Complete with free printable pdf ready for your little ones on Christmas morning.

Grab Your Copy Of
The stress-free elf diary.
Subscribe to our mailing list for access to the Elf Diary - w ith 24 fun easy ideas and accompanying shopping list!
You'll also get access to all our other Jolly Festive planning resources - win-win!
Success! Now check your email to confirm your subscription. Don't forget to check your spam as your system doesn't know us like you do quite yet!
We respect your privacy. Unsubscribe at any time.
In Case You Are Still Reading 😉
Other Ideas for Travelling Whilst Hosting An Elf
If this article has managed to wind its way to similar souls and you are still reading, then please do continue for ideas of how to manage Elfie whilst away and ideas for leaving them at home.
More Like This?
Looking for other festive activities to enjoy? Whether it’s at home or out and about, we’ve got a whole host of ideas to keep you in the Christmas spirit!
1. Elf Hotel Room Ideas
Should you have decided to give the two-bag elf travel method a go, then you may well be wondering what to do with your elf whilst you’re away. You’ll likely be more limited with elf activities than you would be at home.
As we have followed the no-touch rule very closely (of course 😉), we have tended to be quite conservative in elf locations on holiday. Some that have worked for us:
- On the window sill
- Tucked at the edge of the mirror/TV
- Inside the cupboard / safe
- Around the bathroom (especially of course for arrival and departure)
- In a coffee/tea cup
It’s worth leaving an explanatory note for any housekeepers, together with perhaps a little thank you gift as you depart for any added inconvenience.

2. Elf Carrying Facility
If a concealment transfer method for Elfie seems too stressful, then why not do the complete opposite.
Find a large jar or other clear container and create a safe travel method for your elf to use. Encourage your little ones to let Elfie know the day before. Or they could even write a note to their elf visitor explaining (a great way to keep young folk busy whilst you’re packing?!)
The night before departure, your elf will ‘magically’ set themselves up in their new travel home and now they can be safely carried around and brought along for the ride.
You may also choose to keep your elf in their travel home the whole time you’re away (to avoid worries about accidental movement by hotel staff for example). Instead, focus Elfie’s daily changes on dressing up for the holiday inside the container, or perhaps doing little activities inside (e.g. eating marshmallows or making toilet paper snowballs). Or Elfie can just have their own holiday chilling in situ!
Last Minute Christmas Eve Box Idea
Looking to join in with this new tradition but don’t have much time or budget? We share some simple DIY Christmas Eve Box ideas so you can create your own quickly and cheaply!
3. Special Assignment from Santa
If you’d prefer not to have to worry about looking after an elf whilst you’re away, then why doesn’t Santa give your elf a special task to complete whilst you travel? They can be there to welcome you back home.
Ideally ask a neighbour to move Elfie to a new position ready for your return. If that’s not possible, you could always take a small leaf out of the two-bag approach above and find an excuse to head back indoors at the last minute before leaving to move elf yourself.
4. Elfies From Home

A variation on leaving your elf visitor at home. Perhaps they are going to keep an eye on the house whilst you’re away.
In which case, why not take a handful of “elfies” before you leave which magically appear on your phone each morning from a mystery number (either a friend or someone with their phone’s ID withheld) so your little ones can enjoy some elf mischief from afar.
How do you manage December travel with your elf? Looking for more elf-spiration? Check out our other articles –> here .
Share Your Elf Adventure!
Don’t forget to follow us on Instagram @jollyfestive.
And be sure to tag #jollyfestive in your photos. We love to see which Christmas activities you’ve been enjoying!
More Activities

15 Spectacular Ice Hotels to Discover in 2024: The World’s Coolest Overnight Stay
Explore the 15 coolest ice hotels around the globe! Experience a night below zero, where stunning arctic craftsmanship meets thrilling adventure.

What Is It Like To Stay At An Ice Hotel? Lowdown on a Night In The Snow!
Tips, tricks, and the full lowdown on what it’s really like to spend a night sub-zero in an ice hotel and how not to freeze!

The Best Christmas Markets In Europe To Visit In 2024
Need some soul-warming this winter? Here’s 25 of the best Christmas Markets in Europe that should be on your wish list for 2024!
Submit a Comment Cancel reply
Your email address will not be published. Required fields are marked *
Save my name, email, and website in this browser for the next time I comment.
A dash of North Pole Magic, direct to your inbox!
Unsubscribe at any time.
- Share full article
Advertisement
Supported by
How To: Style Bookshelves
There’s an Art to Arranging a Bookshelf. Here’s How It’s Done.
Jeremiah Brent, the newest cast member of Netflix’s “Queer Eye,” shows how he styles the shelves in the home he shares with his husband, Nate Berkus.

By Tim McKeough
In a public library, styling a bookshelf is easy: Just fill it with books. At home, a bookcase needs to do a lot more than hold books.
So how do the pros do it?
Start by thinking of your shelves as a kind of three-dimensional wallpaper that adds visual interest to a room. The things you choose to display should express your personality.
“It’s like a little cabinet of curiosities,” said Jeremiah Brent , an interior designer and the newest cast member of Netflix’s “Queer Eye.” Your bookshelves, he added, offer “an opportunity for people to look in and see where you’ve been and where you’re going.”

In the Manhattan home he shares with his husband, Nate Berkus — a much-photographed space featured in Mr. Brent’s new book, “The Space That Keeps You,” and often seen on Instagram , as well — the bookshelves in the den are always changing. But they’re usually filled with stacks of favorite design books, photos of loved ones and pieces of art made by their children, Poppy and Oskar.
“It’s about having fun and playing around with different ways to layer things in and tell your story,” Mr. Brent said. Here’s how he does it.
How to Style Bookshelves: Jeremiah Brent’s Dos and Don’ts

Artfully arranged shelves can add visual interest to a room. “It’s about having fun,” said the interior designer Jeremiah Brent.
But that doesn’t mean there aren’t some basic rules →
DO: Use unexpected objects. “Make sure everything doesn’t feel formulaic,” Brent said. His guests may expect to find chic objects on his shelves, but “currently there’s pottery that our children are making, which are multicolored and look like they’re melting.”
DON’T: Edit too much. “It drives me crazy when people place just one object on a shelf,” Brent said. “That doesn’t feel like it’s expressing anything.”
DO: Add photos of loved ones. “It’s nice to have pictures of the babies when they were babies,” Brent said. “It takes you back.” (No one will dock you style points.)
DON’T: Stack books with the spines facing in. “That stresses me out, because how do you know what you’re grabbing?” Brent said. “It’s always interesting to walk into a home and see what people read.”
DO: Change things frequently. “Our shelves are always evolving, because so are we,” Brent said. “The kids bring something home, my husband moves things around or I move things around. That’s how it should be.”
DON’T: Stagger the placement of your shelves . “I have a really hard time when shelves are staggered,” he said. “I like chaos inside, but the actual bookshelves should all be lined up.”
Want more decorating ideas from the pros? Check out this helpful advice:

Choose Your Favorite Books
Stuffing your shelves completely full of books can look great, especially in a home library. But if you want to mix in objects, art and photos, you may have to pick and choose which books to display.
Start by choosing ones with good-looking covers. “We try to keep the colors coordinated in groupings,” Mr. Brent said, hastening to add: “We also try to keep them within their category: art, history, décor, jewelry or whatever it may be.”
Well-worn paperbacks and other less attractive books can be stored elsewhere. In Mr. Brent’s home, cabinets with doors at the bottom of the bookshelves hold the overflow.
Stack Them Up
Don’t line up your books in endless rows. Instead, try building stacks.
“There are things we do that really help” to create a collected look, Mr. Brent said, “like mixing books horizontally and vertically.”
When you’re adding a horizontal stack to a shelf, “usually, piles of three or more feels nice,” he said. Also, “think about mixing different heights.”
On some shelves, Mr. Brent may stack lots of books to create a stepped pyramid that fills the space. On others, he may use only a few to create a pedestal for other objects.
Add Objects That Mean Something
Your bookshelves shouldn’t resemble something out of a catalog: Forget about displaying anything impersonal, even if it looks nice. This is the place to show off things you have collected over many years.
“We’ve got artifacts that my husband and I have collected since we met,” Mr. Brent said. “Everywhere we go, we pick up pottery or funny little sculptures. We’ve got tassels from curtains in old homes that we’ve kept and laid across books. We’ve got feathers that my daughter grabbed. It’s a mishmash of everything that we find beautiful, or an expression of somewhere we’ve been.”
“The existential step I have for people,” Mr. Brent explained, “is to try to figure out a way they can incorporate their past and present, but still leave room for the future.”
Create Balance
Once you’ve selected most of the books and objects you want to display, you’re still only halfway there.
Now, Mr. Brent said, “you’ve got to play around with balance and scale.”
The goal is to spread the pieces across the shelves equally — mixing tall and short, light and weighty objects — so you don’t end up with some sections that looked stuffed while others feel emptier.
“If you’ve got a shelf that’s heavy with books,” Mr. Brent suggested, “lighten it up with some objects next to it.”
Even for design pros, he said, “there are no rules.” Balance can be achieved only through trial and error.
“It only really happens,” he continued, “when you get up there and play with it.”
Hang Interesting Pieces on Top
For the ultimate layered look, use picture hangers to mount one or a few special pieces of art on the front of the bookcase.
“I love to hang art on the face of the bookshelf,” Mr. Brent said, “so it almost feels like things are spilling out.”
And not just framed artwork: Sometime he’ll adorn a bookcase with other pieces, like ceramic beads or a mirror finished in shell.
“I love the organized chaos of a bookshelf that spills over with story,” Mr. Brent said.
For weekly email updates on residential real estate news, sign up here .
How to Buy a Home
With careful research and determination, the keys to that dream house can be yours..
Start by organizing your finances and asking the right questions: Is homeownership right for you ? What are the best markets for first-time buyers ? And can you afford to buy a house ?
From buying real estate with friends and family to owning a house before finding a spouse , people are exploring creative paths to homeownership that also make financial sense.
For most, the down payment is the primary hurdle keeping them from buying a home, but you may have options .
Are you confused by all the new mortgage gimmicks being offered by lenders? Don’t worry, our guide can help .
Buying a vacant lot offers the chance to build a home on your own terms. Here is what to know if you choose that option .
To those looking to buy property as an investment, a tenant-occupied apartment can be appealing. Weigh the pros and cons carefully .
Bad credit? No savings? There are still ways for you to buy a home .
IMAGES
COMMENTS
Travel round the world Put some pictures on the shelf Hold you close and keep the faith Raise some kids with our last name Well, come on, baby, what you say we do I feel like growing old with you Growing old with you What ya say we put us down some roots Find a house up on a hill Travel round this world Put some pictures on the shelf Maybe one ...
I'm growing old with you. [Chorus] What you say we put us down some roots? Find a house up on the hill. Travel 'round this world. Put some pictures on the shelf. Maybe one day our babies go. And ...
Have multiple tea boxes. Collecting tea from all parts of the world can be an amazing way to display your souvenirs. Collect them in specific (or labeled) tea boxes and display the boxes even after the tea in them is long gone, or use the boxes to refill your stash over time. Have a shelf for all your mugs.
1. Push Pin Map. A travel Gallery photo wall needs to include a push pin map! I love the maps ready complete with the foam backing to easily stick pins in our vacation spots. A travel map helps you envision the world and be curious about a variety of places to see. Push Pin maps are high quality and look gorgeous.
Make use of a digital frame. Shutterstock. Digital frames are an incredible way to display a lot of your travel photos at once. The frames rotate through whatever photos you have set to them so you can organize a bunch of images together into a slideshow. You can even have multiple digital frames with each one dedicated to a different location ...
3. Rename digital photos to add context. Just as you organize everything into folders, it's important to add detailed information about the individual photos in the actual file names. After all, the story behind the image is just as important as the picture itself.
Wall Clocks. This is another one of more simple travel decor ideas. It's a common household decoration and easy to customize to your style. Plus, there are lots of different options out there, so it isn't too difficult to find one you like. See latest prices.
The typical around the world itinerary takes people to 15 - 20 countries. Yes, you can fit in more than 20 countries in a one year trip around the world, but your expenses will go up and the amount of time you have to immerse yourself in each country goes down. There is no way you are going to get everywhere.
No.9: How to display postcards. Buy a giant white or black frame, sized to fit, and lay them out. Add a matt board to style it up professionally. Line them up on a wall, clipped with tiny wooden pegs to a long piece of string. Display them lined up along on floating shelves, by destination or color.
This is a recap of the first 12 months of our trip around the world. So, here we are, 32 countries visited, 365 days of travel, and thousands of memories made. Here is a recap of our year, shown with our 100 favorite photos. In no particular order at all, here are some of our best moments, favorite spots, and unforgettable things we have done.
Try to sync your sleeping pattern with the local time zone immediately. 8. The cheapest way to travel is by bus. 9. The slowest way to travel is by bus. Be prepared for a long, slow journey. Yes, they can sometimes be torture, but what a view you will get of local life on the road. 10. Get travel insurance.
A photo of you in front of your window seat on an airplane. A selfie with a statue of someone you admire. A photo of yourself in front of a famous painting or sculpture. A selfie with your favorite piece of street art or graffiti. A selfie of you walking on the beach. A selfie of you jumping into the water.
The golden age of rail travel is alive on this 23,000-mile journey. Step into the golden age of rail travel while looping the world on a 23,000-mile journey by Great Rail Journeys that combines ...
Use a wooden pattern as the tile. Ceramics are the most suitable material to apply. in this bathroom shelf decor ideas, use mirrors to separate the bathtub and the closet. It shows the reflection, which gives a more expanse room. Put the shelf along the wall with a medium tone color.
Download and use 100,000+ Travel Around The World stock photos for free. Thousands of new images every day Completely Free to Use High-quality videos and images from Pexels. Photos. Explore. License. Upload. Upload Join. Free Travel Around The World Photos. Photos 175.9K Videos 32.4K Users 75.3K. Filters. Popular. All Orientations.
The Elf sets up a scavenger hunt with clues leading to a "hidden treasure" - perhaps a new holiday ornament or small treat. Hide the clues around the house, each one leading to the next, with the final clue leading to the treasure. Start the hunt by giving the kids the first clue, and watch the adventure unfold!
Taking selfies while asleep. Elf with his own box of clothes. Leaving clothes for days out or travel destinations. Making a Wordsearch for the holiday destination. Putting on a swimming costume. Pretending to lay on the beach. Pinning destinations in an atlas or map.
Play Travel Related Board Games. One of my favorite indoor activities for young children is to play board games. A travel-themed board game young children particularly like is Ticket To Ride First Journey. It is suitable for ages 6 and up. You can either purchase the Europe or United States of America map.
Planning an around the world trip can be an overwhelming experience. From figuring out your budget to designing your itinerary to packing your bags, there are so many things to consider. We know what it is like. It's exciting and terrifying and awesome all at the same time. It took us four years of discussion just to even make the decision to ...
Gocta Waterfall. This Peruvian waterfall, known as Gocta Waterfall, is 2,529 feet high—at one point it was considered the third highest waterfall in the world, but it's now ranked as 15th. It ...
25 Ideas for an Elf on the Shelf Road Trip. 1. Put him in the car bundled up and ready to go. 2. Have him tie the kids' shoes together in knots. 3. Use dad's shaving cream and a razor to pretend he's shaving. 4. Elf is sick so he sleeps in a box of tissue with a tissue pillow and blanket.
For some, Christmas traditions entail sipping eggnog, wrapping presents, and hanging stockings above a roaring fireplace, or in the Drummond's case wearing matching Christmas pajamas and making cinnamon rolls.For others, holiday traditions look more like a little red doll with a pointed hat perched on the mantle, otherwise known as: Elf on the Shelf.
I realised some time ago that I am fastidious bordering crazy about keeping the elf on the shelf story intact. As a parent, we manage to fumble our way through all sorts of misdemeanours. And there are certainly far (far!) more important issues in life than whether elf moved half an inch or was caught by the edge of a fingernail.
Jeremiah Brent, the newest cast member of Netflix's "Queer Eye," shows how he styles the shelves in the home he shares with his husband, Nate Berkus. By Tim McKeough In a public library ...