25 Functional DIY Room Divider Ideas with Free Plans
Looking for a way to make your home more organized?
You’ve come to the right place! We have 25 ideas for how you can make your own room divider. Whether you want something simple or complicated, we have an idea that will work for you. Plus, the tutorial about how to make one is really easy and fun!
So what are you waiting for? Get started on your project today with our helpful tutorials and tips. And don’t forget to share your finished product with us on social media so we can see it too!
Scroll down below to get started making your own room divider!

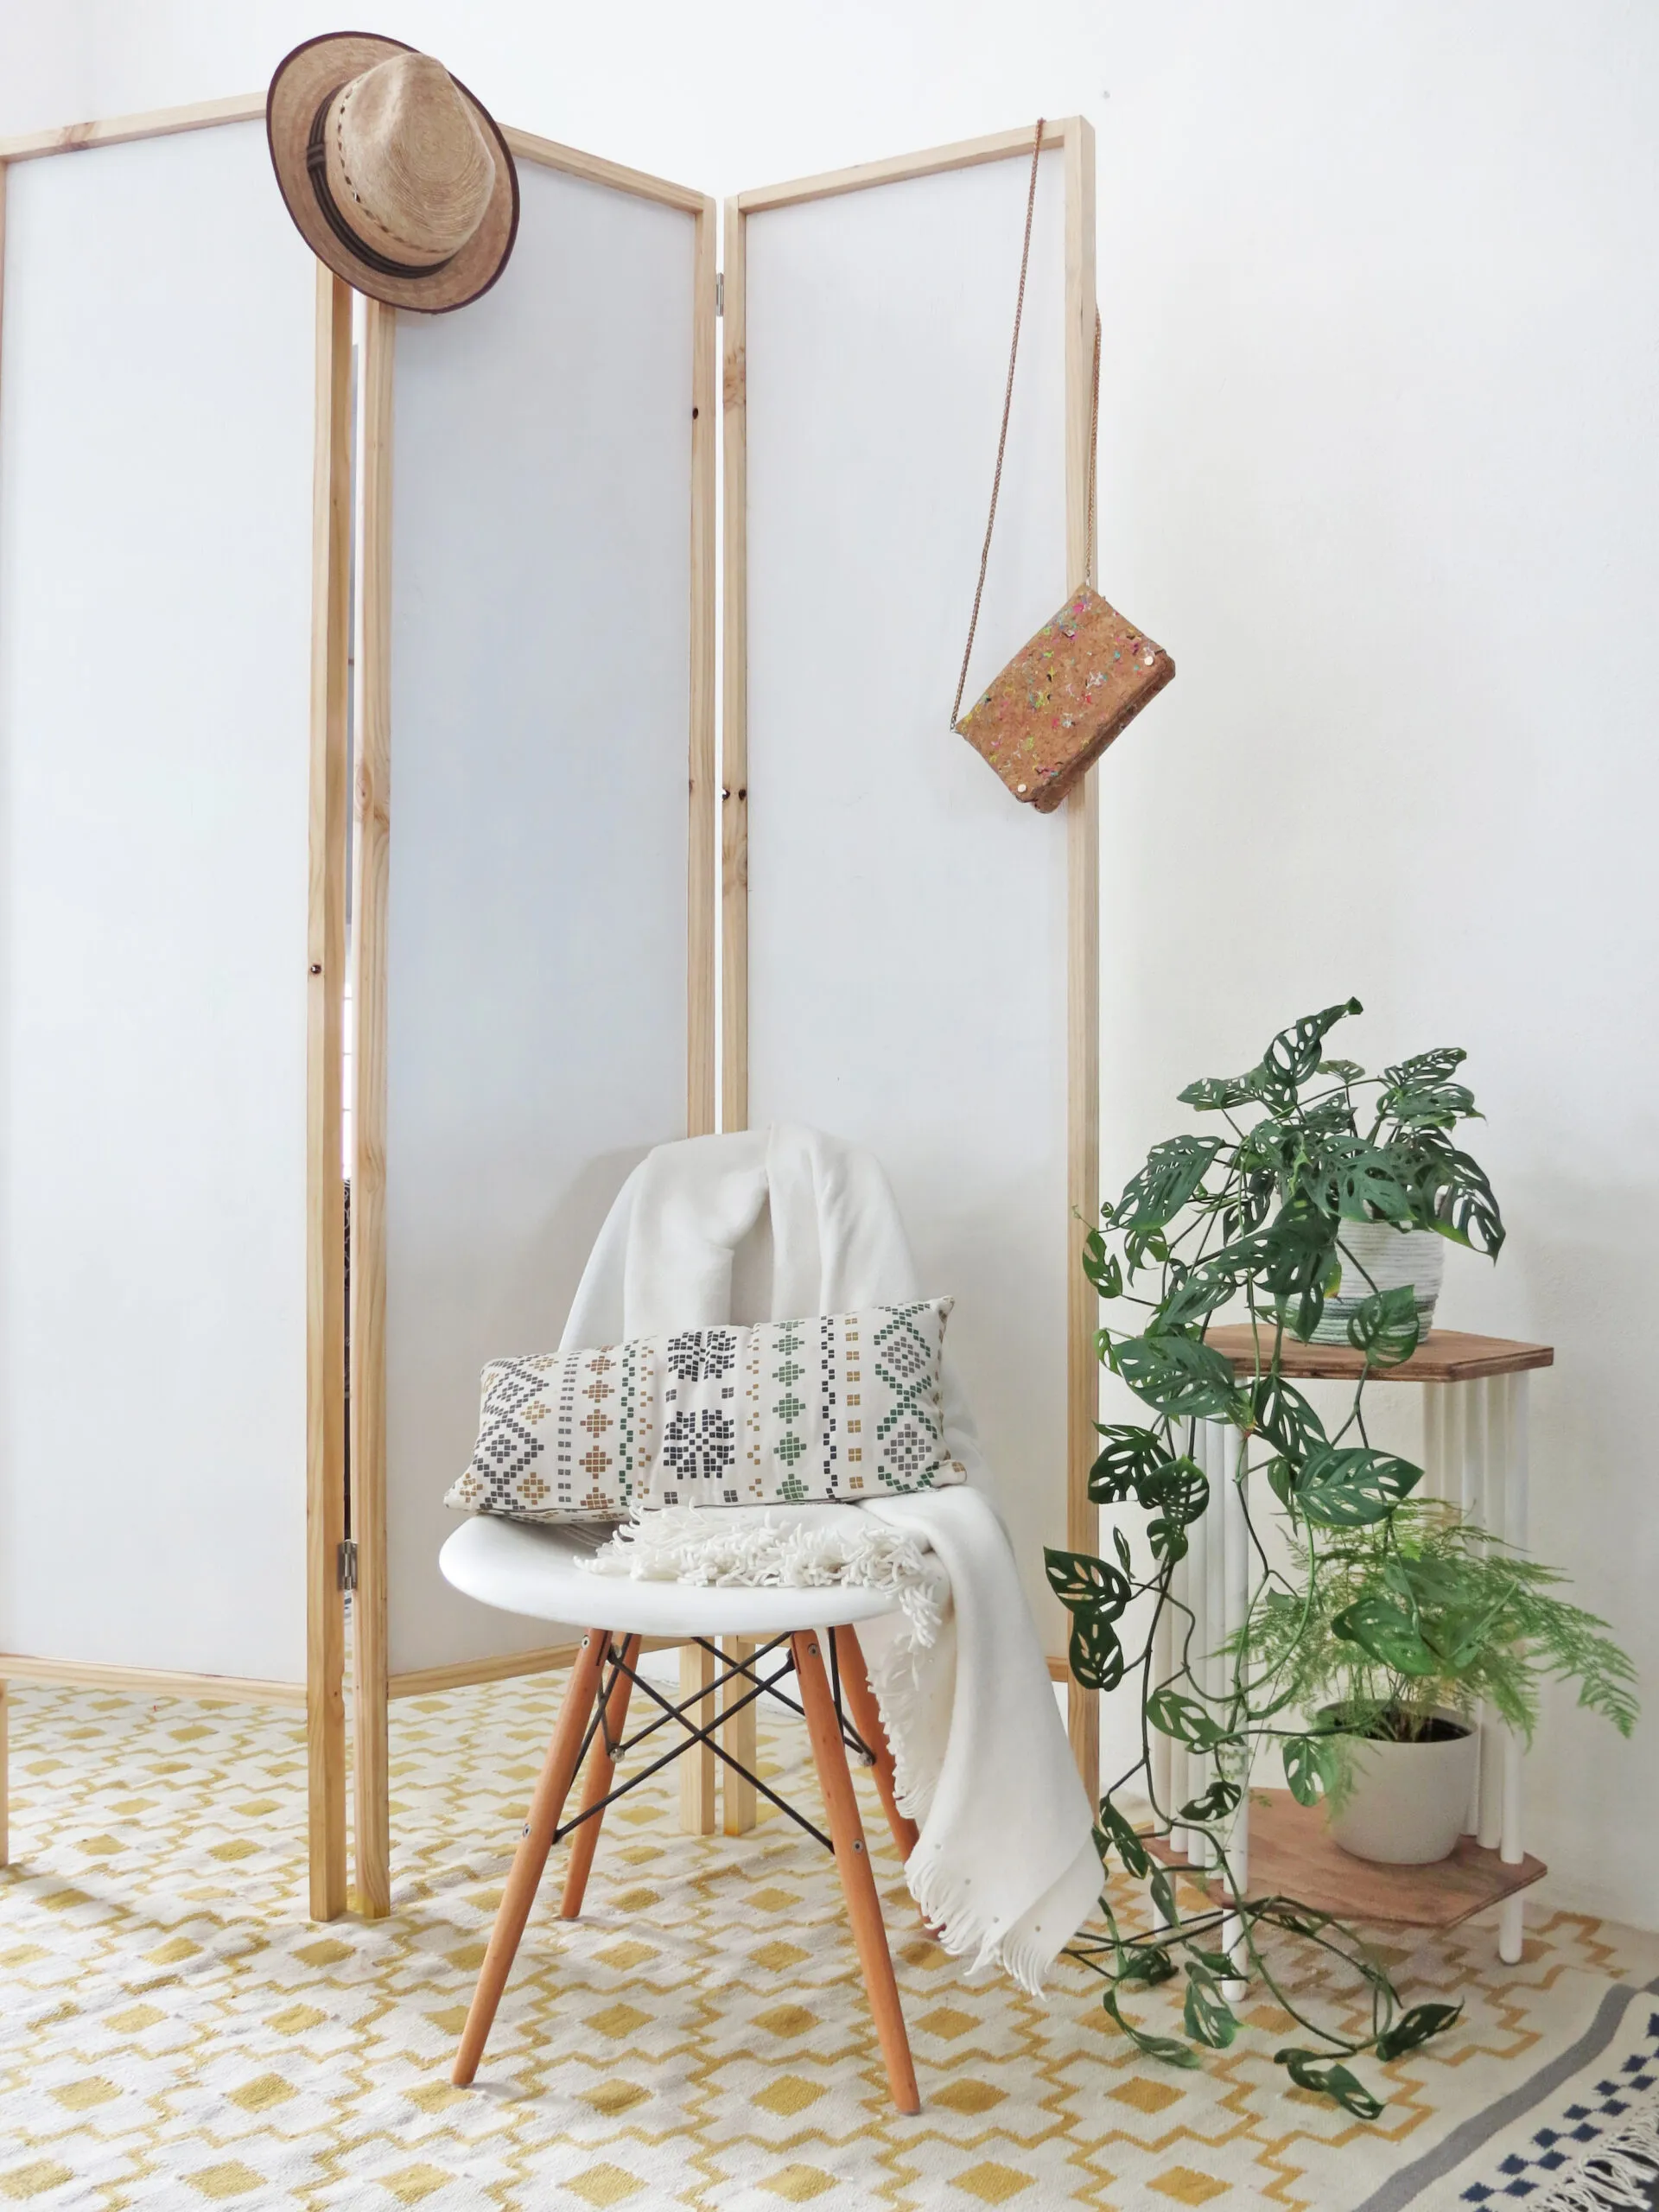
A Foldable and Easy to Remove Room Divider

If you’re looking for a way to divide your space, then this project is perfect. This DIY room divider can be made with just three sheets of plywood and some other lumber pieces that are easy to work with. The best part about the screen is how easily movable it is– whether you want privacy in one area or need different spaces throughout the house!
A Macrame Room Divider with A Bohemian Vibe

Weaving can be used to make an amazing DIY room divider. A macrame curtain offers a bohemian vibe without making the space dark or cramped–and doing this project will take some commitment! The knots are important because they’re what holds everything together; so don’t slack on these details. We promise that at least this daunting task will reward all your efforts: when you see how incredible your new room divider looks hanging up!
DIY Partition Wall Closet

We all know the feeling of walking into a large space and panicking about how to make it feel like home. A great way is with an affordable DIY room divider that doubles as your closet! This project will cost around $150 in materials, but you are guaranteed not to regret such a practical investment. The best part? With this semi-permanent solution, if one day you feel like changing things up again – no problem!
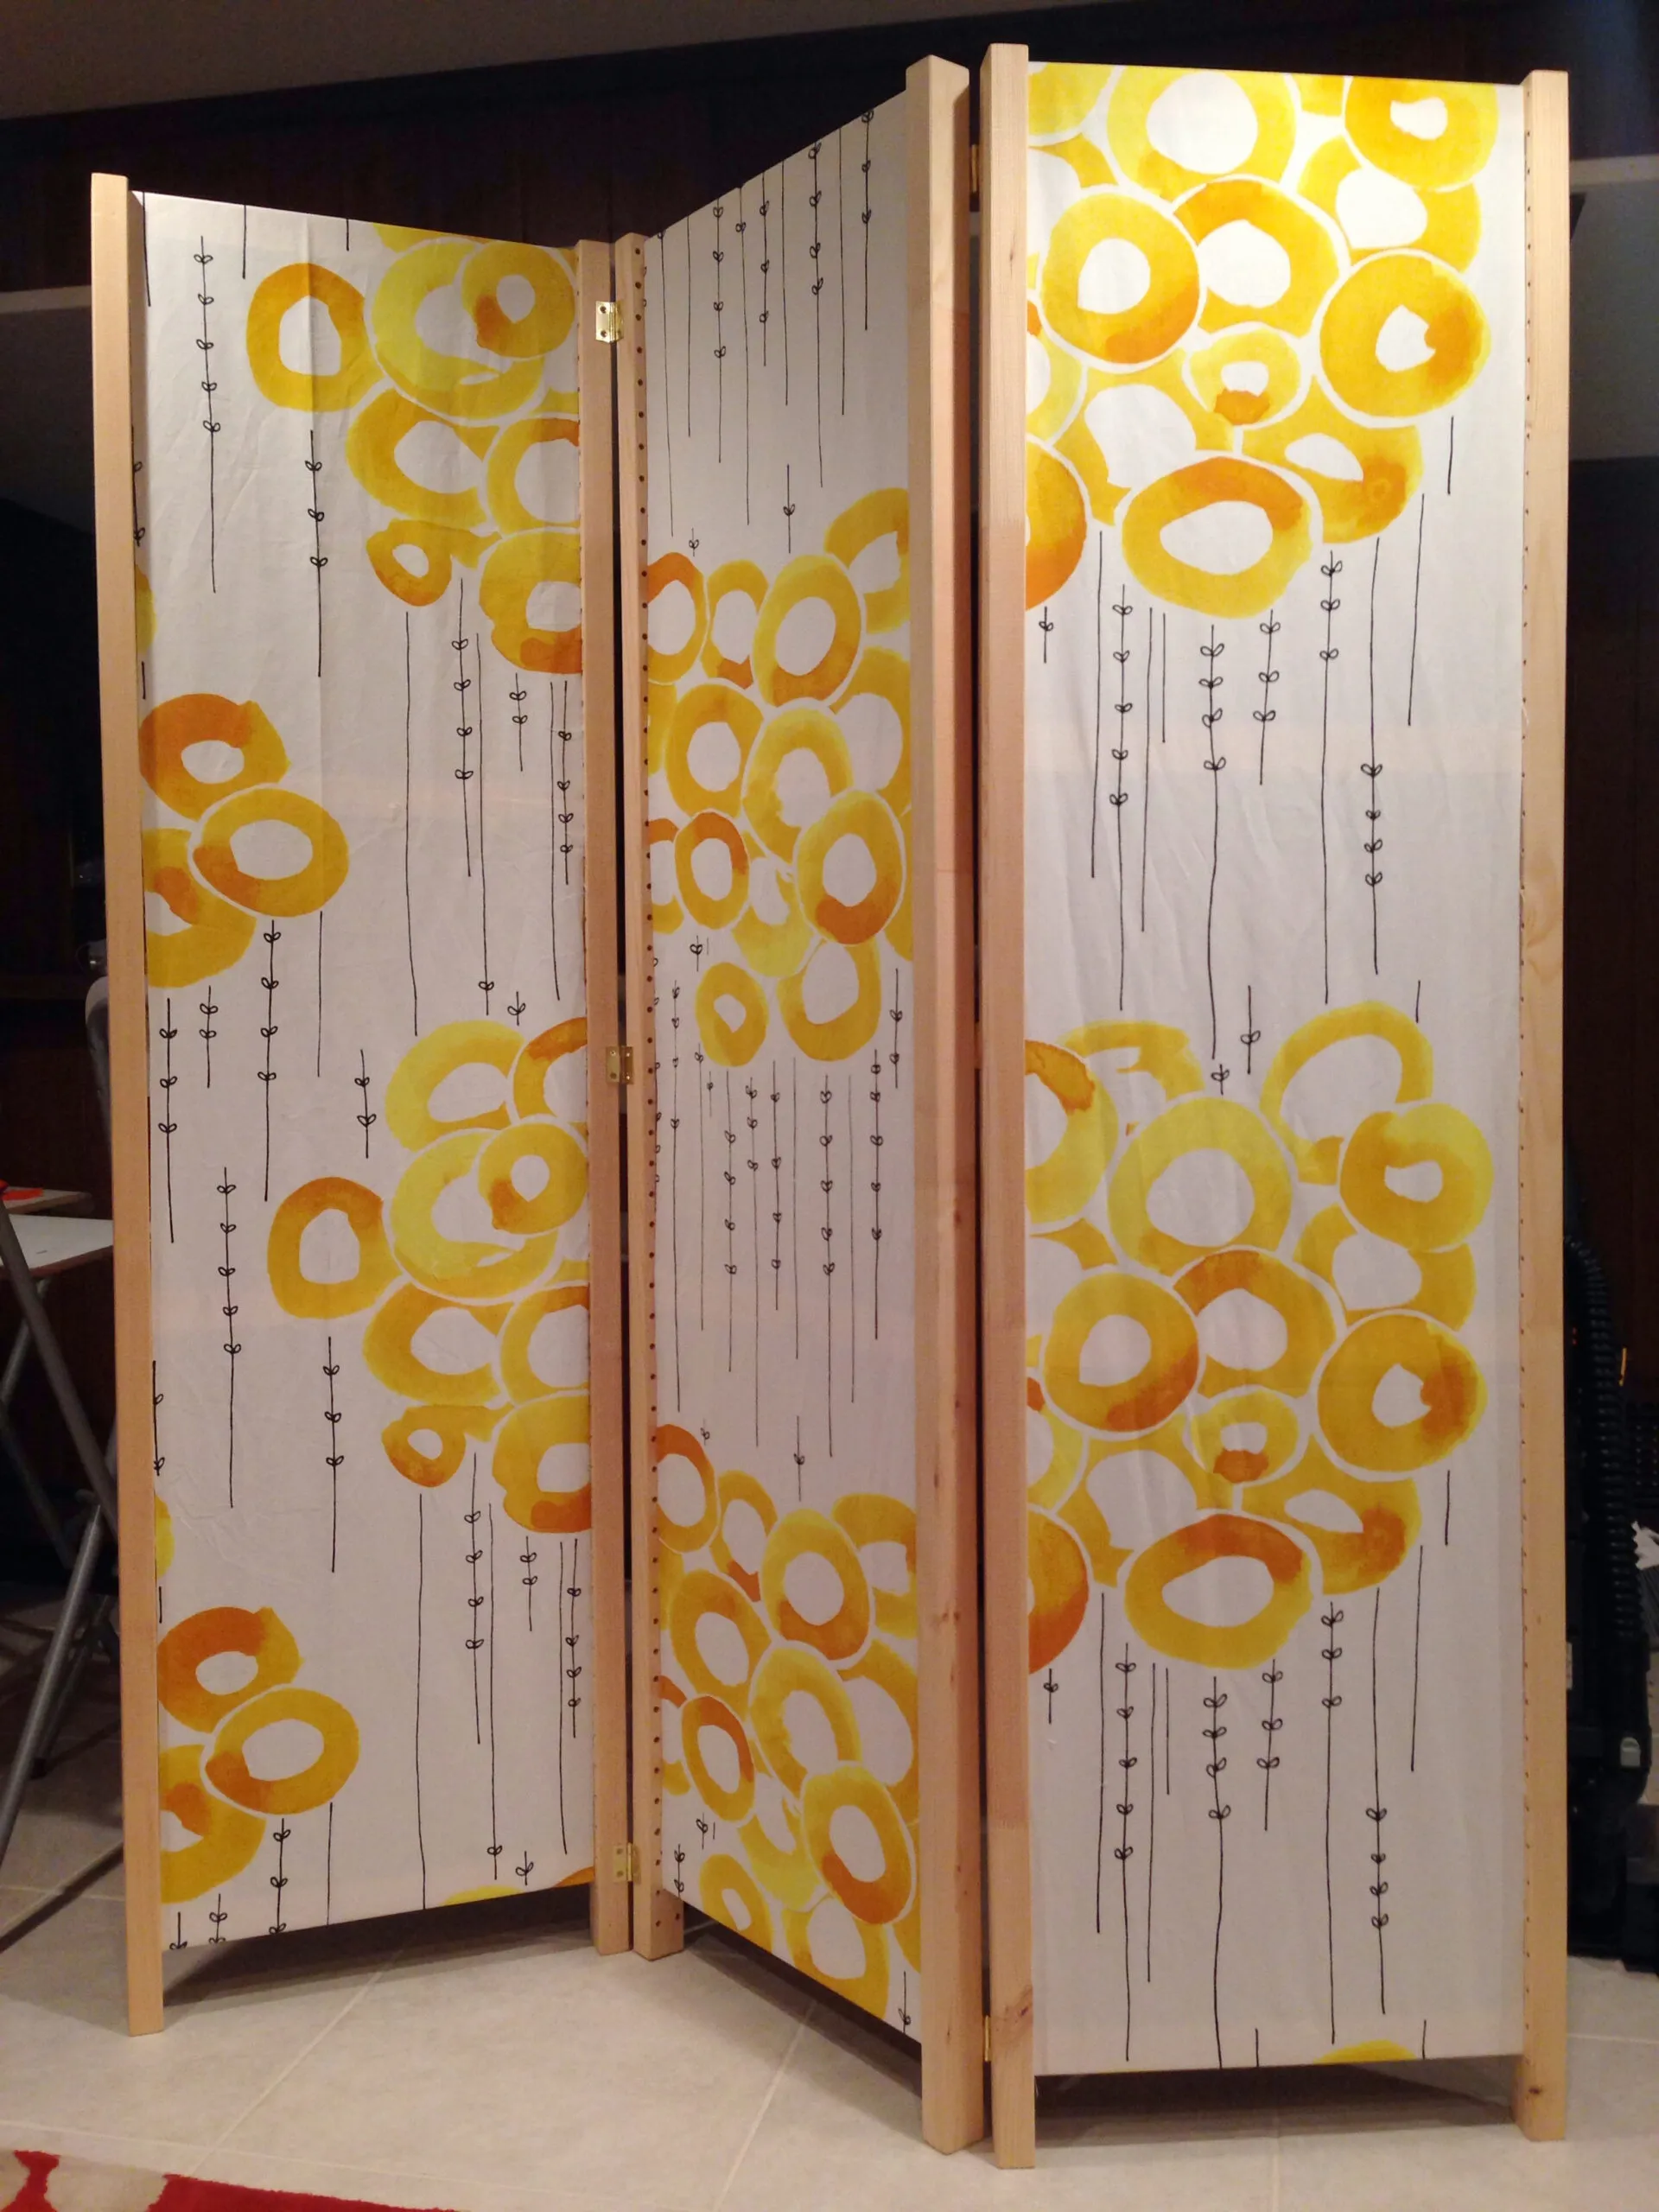
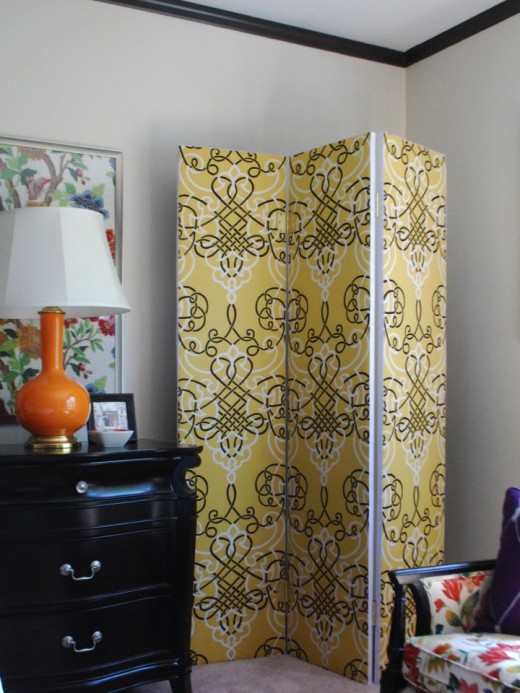
A Folding Screen Stenciled Makeover

It’s easy and fun to stencil your project, especially if you have a design that is pretty or unique. Besides, it provides for an exciting makeover opportunity because of its simplicity! This folding screen used to be old and boring with the same color; but now thanks to our new update idea, this $35 piece has become refreshed in style.
Refinish An Old and Dirty Divider with Garden Fairies

In a room divider, bold colors can make it look stiff and uninviting. To give the panels a fresher feel, we believe using lighter shades of paint to brighten up the area is better. In this example, white color is used and there are two drawings of what seems to be garden fairies on the panels. Now, heading into the room feels like entering a fairy tale!
A (Less Than) $250 Sliding Barn Door Room Divider

Who would have thought for $250 you can get this huge sliding barn door that separates the communal and the working space? The idea of a sliding room divider is highly convenient. Imagine how easy it will be to just slide open your doors, separating work from play without even trying! By teaming up with one or more people on this project, it is perfect for a weekend’s project!
A Unique and Artistic Room Divider–A Macrame Folding Screen

A room divider has become one of the most important pieces of furniture these days because people are living in smaller houses now more than ever before. Macrame-style screens give off a cool vibe that makes them fit nicely into any contemporary space since they’re minimalistic yet stylish looking. You can DIY one for yourself at home with some simple steps – it will save you so much money too!
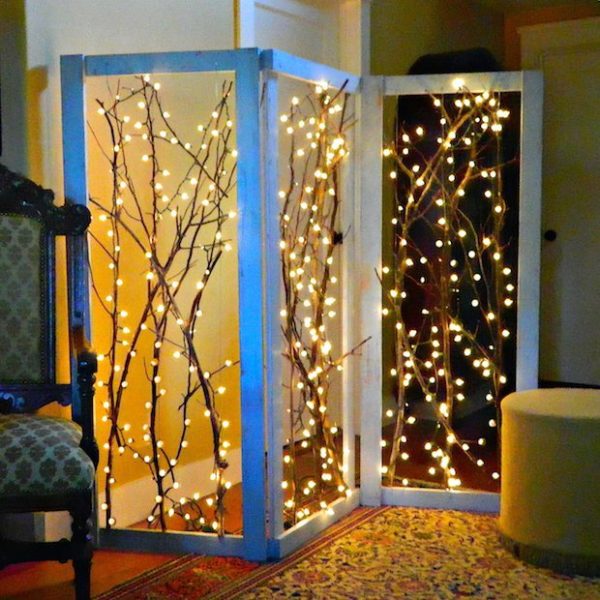
‘Trees with Twinkle Lights’ Room Divider

When you look outside during the winter, it’s hard not to get in a festive mood. The beauty of snowy trees and twinkling lights is enough to make anyone feels cozy! That feeling can be recreated at home with this creative design idea for DIY room dividers that replaces panels with lit-up branches! This will create an intimate lighting atmosphere, also perfect for Christmas or any other occasion where a warm ambiance is desired!
An Inexpensive Water Bottle Room Divider

Environmental issues are no longer something to be ignored. With the right materials (used plastic bottles) and a step-by-step tutorial, you can make your own room divider that not only makes organizing space feel so much more satisfying but also will contribute positively to our environment! Also, note that this is a very inexpensive and quick project too!
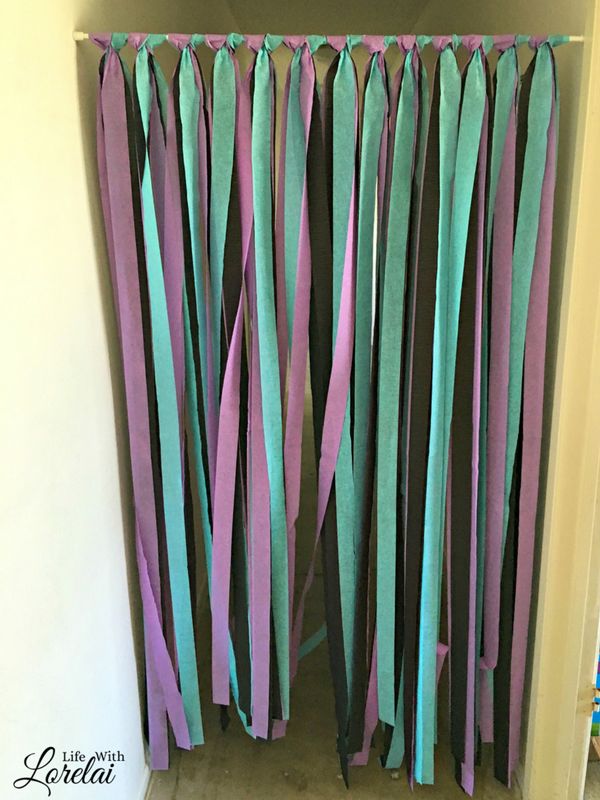
A Curtain Room Divider for Less Than $200

Your master bedroom is too big to just have one room? Consider adding a curtain divider! This idea will give you privacy without the cost of an entirely new door and frame. You only need four rods for each side; this system can be done in any style, material, or color that suits your decorating needs. The best part about these dividers is their inexpensive price tag–only $175 total after installation costs which include all materials needed!
A Weekend Project–A Simple and Decorative Room Divider

A DIY room divider is a great project for beginner woodworkers. One example of this type of project can be found here, with information on how to make it! This design has an opening in the top middle that lets you see out onto another side while still giving some privacy. With just 7 steps, this gives any beginner enough guidance on how to build their very first project.
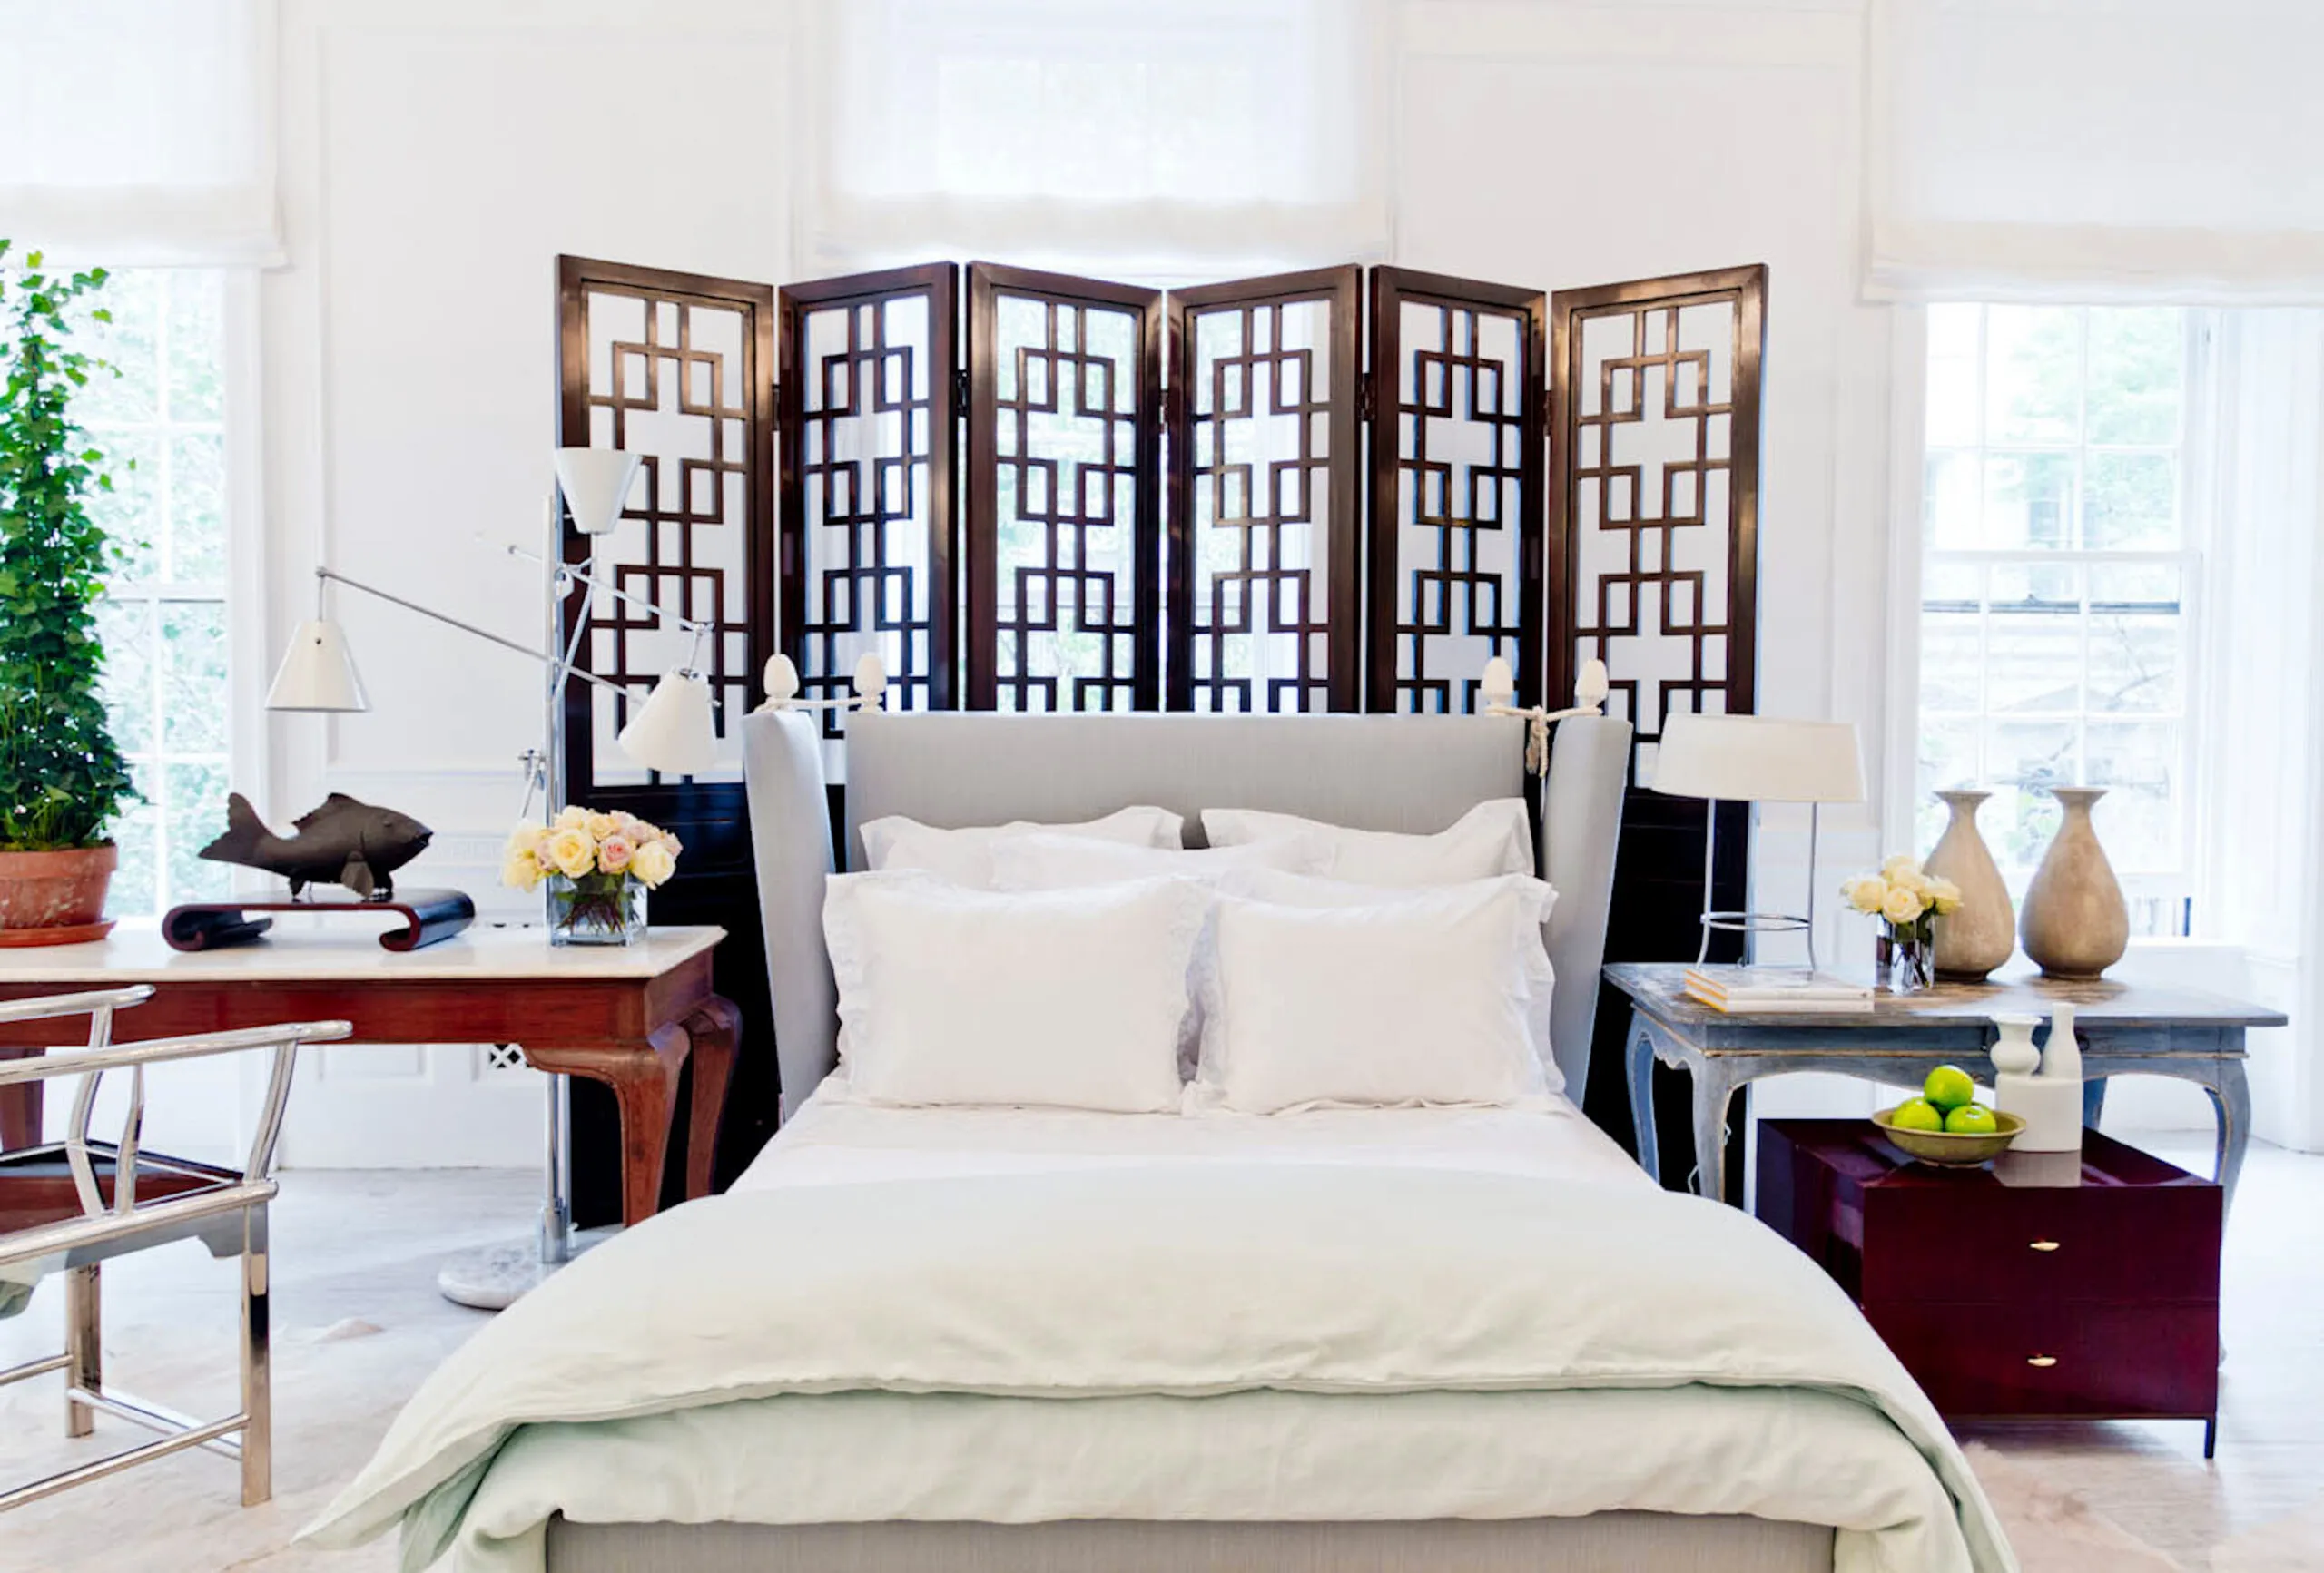
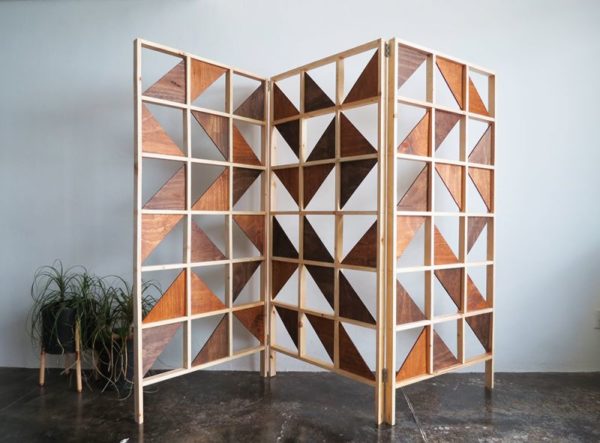
A Fretwork Screen with A Geometric Rectangular Motif

Now, we have come to an eye-catching room divider made with a geometric fretwork design. Guaranteed, when people walk in their jaws must be dropping! The best part about building it on your own is the fact that you won’t pay more than $500 like in stores! It’s much cheaper and easy to make one yourself!
A Quick and Attractive Room Divider from Curtain Rod

You may be thinking that a DIY room divider at least will take all day. Imagine how surprised you’ll feel when we tell you this curtain rod is actually made pretty quickly–in less than 10 minutes! The idea is unique too because the pipe’s hidden away under the curtain, and what remains on the show? A rope to make it look rustic and cool!
A Simple-to-Customize Woven Room Divider

If you are looking for having a private and secluded area of your home or office that nobody else has access to; then it’s time we talk about creating your very own personalized DIY woven yarn room dividers in whatever color scheme and shape desired. These simple yet beautiful additions will add character to any environment!
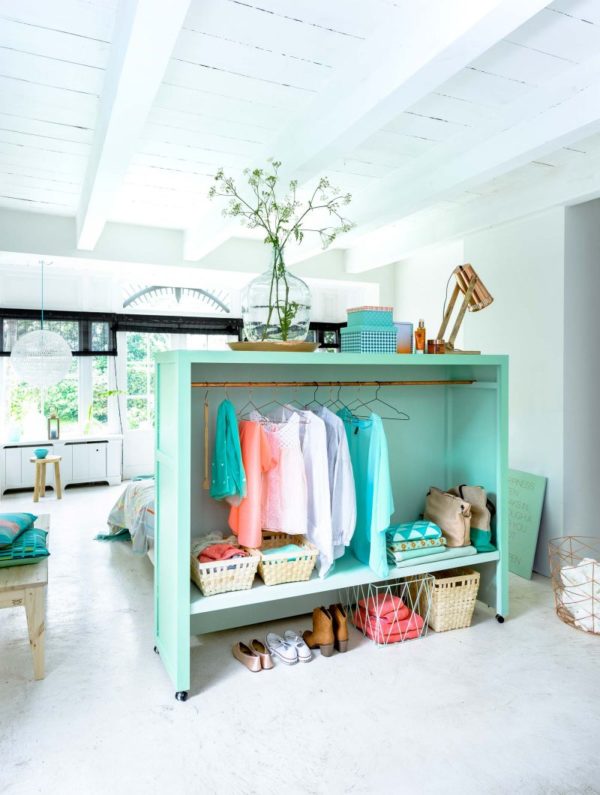
A Room Divider That Doubles As A Rack

When you are short on space and need something that can be both a room divider and a hanging rack, this DIY room divider project is one of the best options. IKEA has similar racks, but it may cost more money. Making your own dividers with this tutorial also allows customization such as adding shelves to have extra storage space!
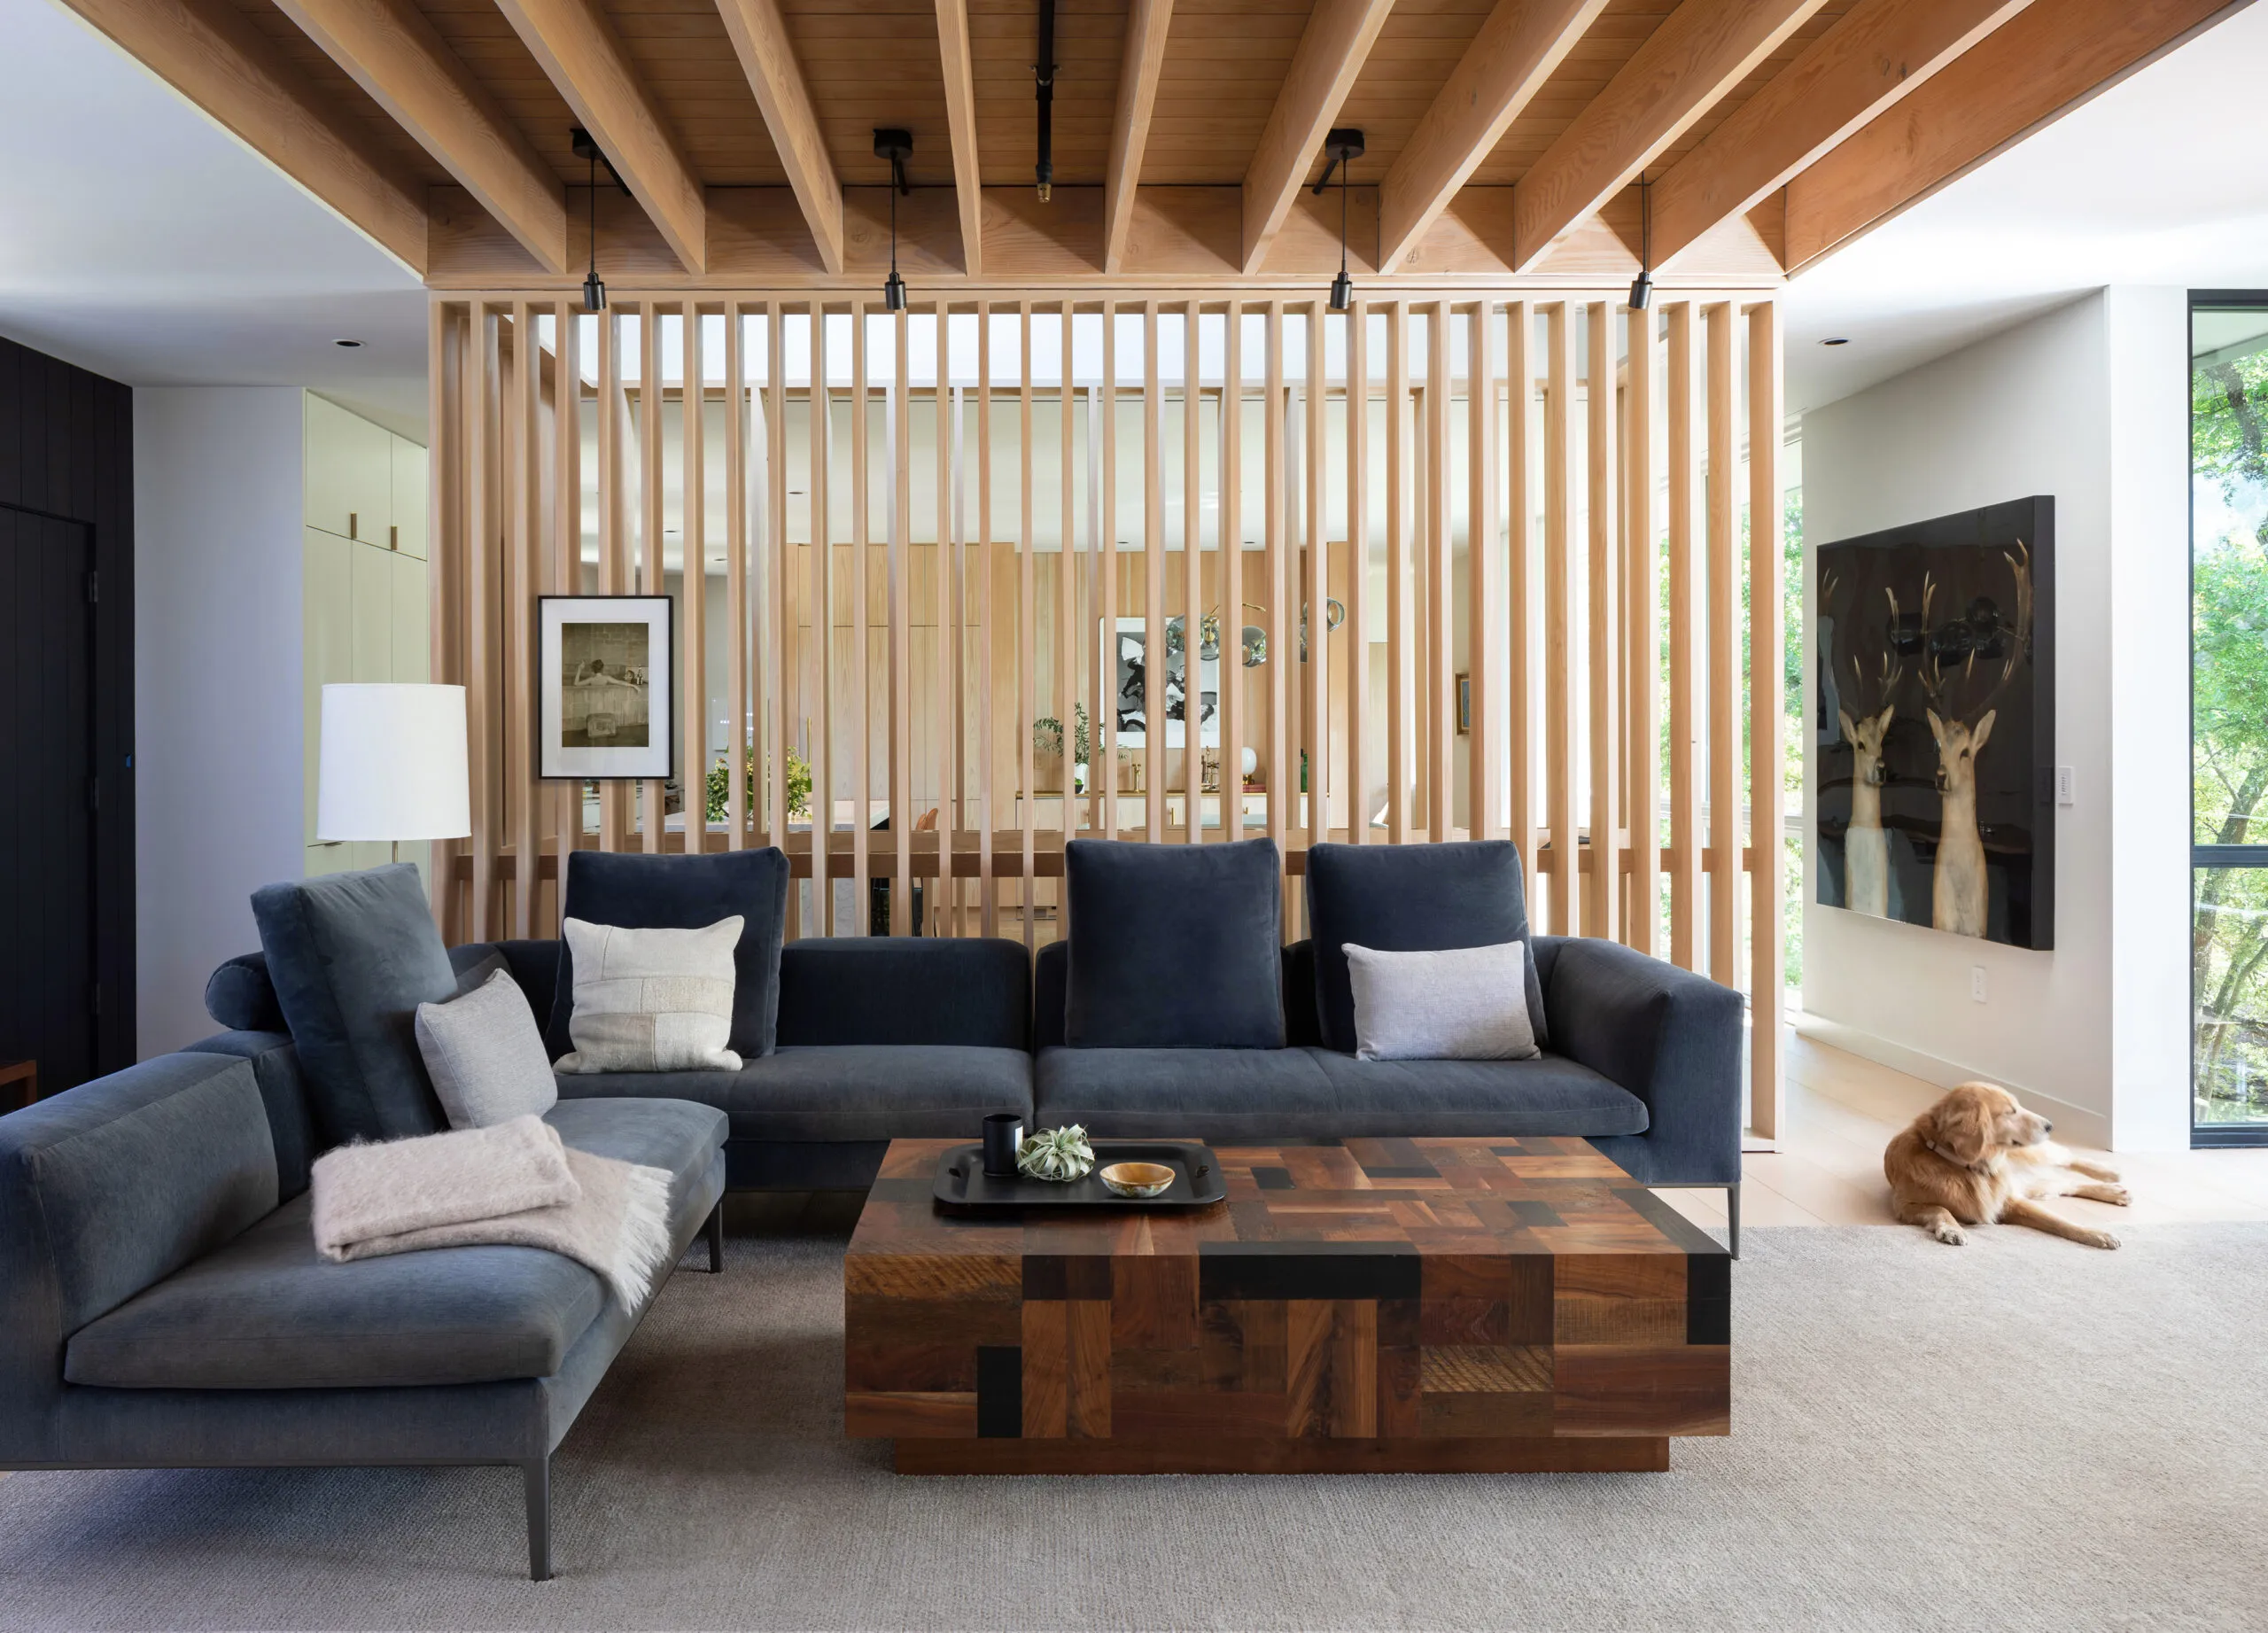
A Minimalist Room Divider with A Natural Touch

Bamboo is a very versatile material and this DIY room divider made out of it is no exception. The bamboo divider can be used to section off areas and creates privacy. Plus, it gives an elegant touch to home furnishings that need some visual interest. The best part about this project is the lighting installed underneath them which creates ambiance and heightens their mood after eating delicious food at the table!
Shiny Rolling Doors As A Room Divider

This is what you’ve been waiting for–a room divider that will never disappoint. Create a movable room divider with style by adding this high-gloss beauty to your home. Roll the door away when you need extra space for hosting guests or having company over, and easily roll it back in place when you want privacy again!
Transform the IKEA Plant Stand to A Room Divider

Room dividers can be used as a privacy screen and vice versa. This is why they are such an ingenious invention! If you have got some spare time, get creative with this IKEA plant stand DIY room divider that’s just waiting to come alive in your space. Just install the wooden boards on top of it for panels which provide a place to hang plants too. The result is a screen that not only provides privacy but acts as much-needed natural décor too!
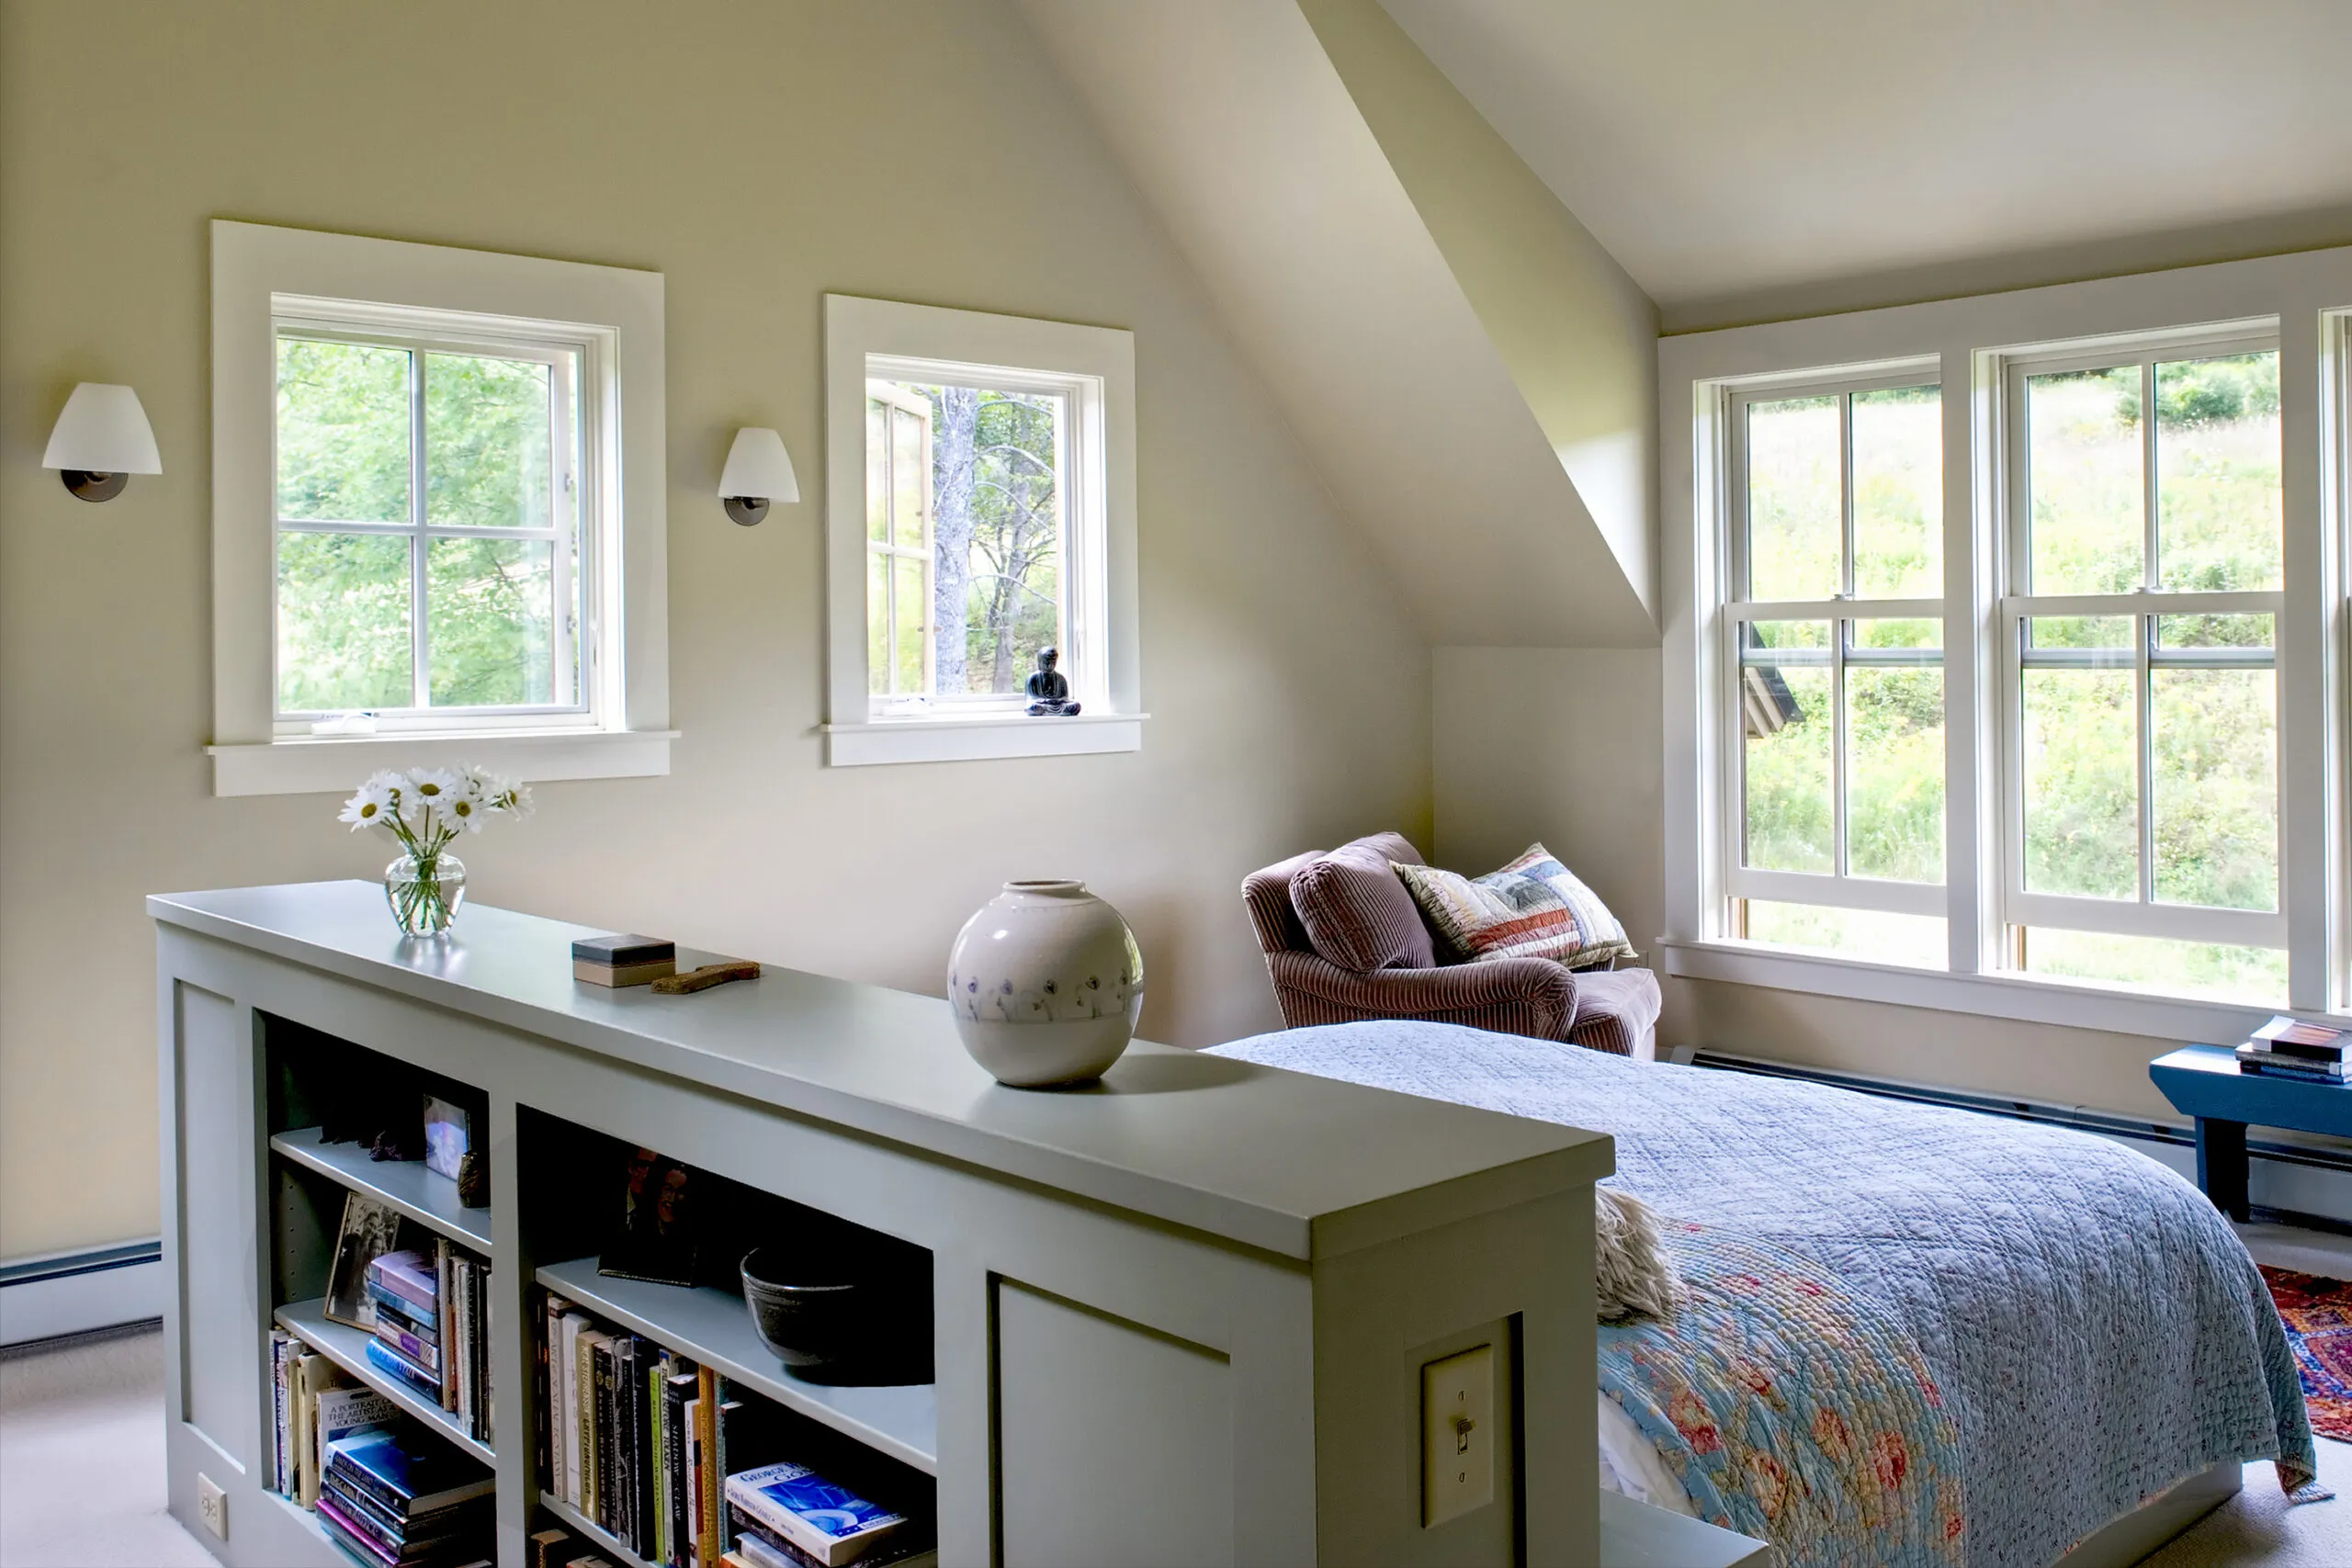
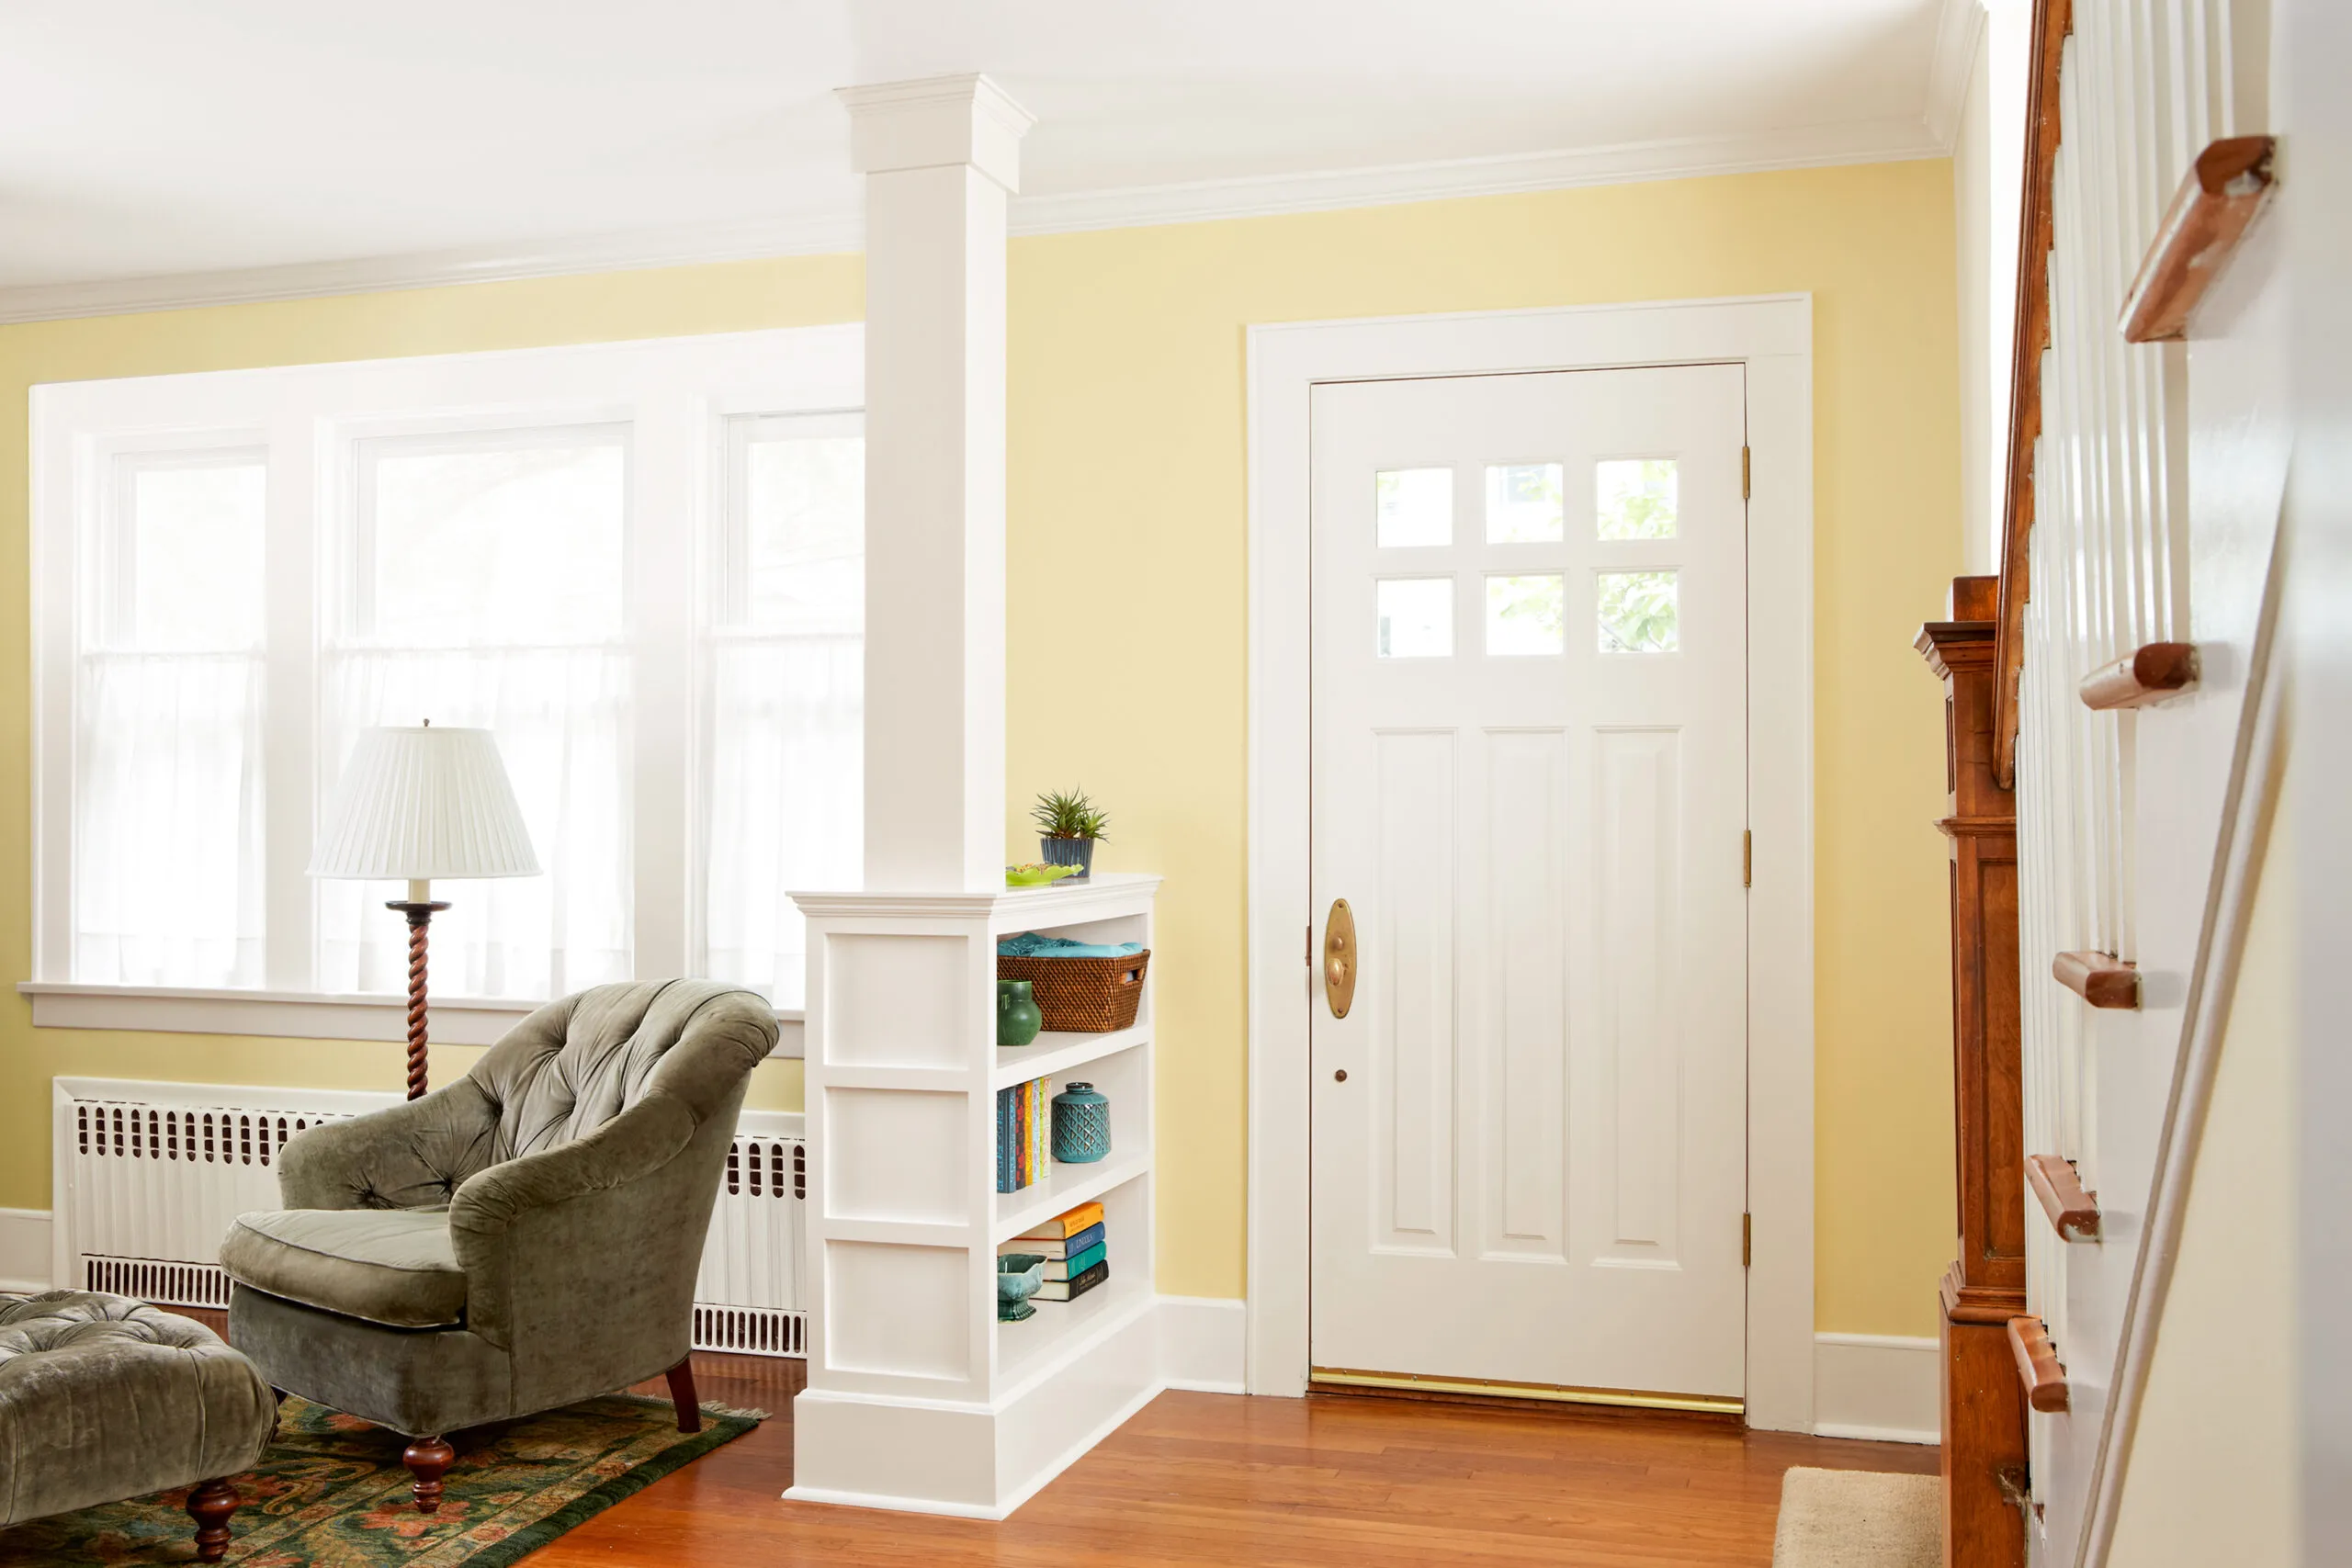
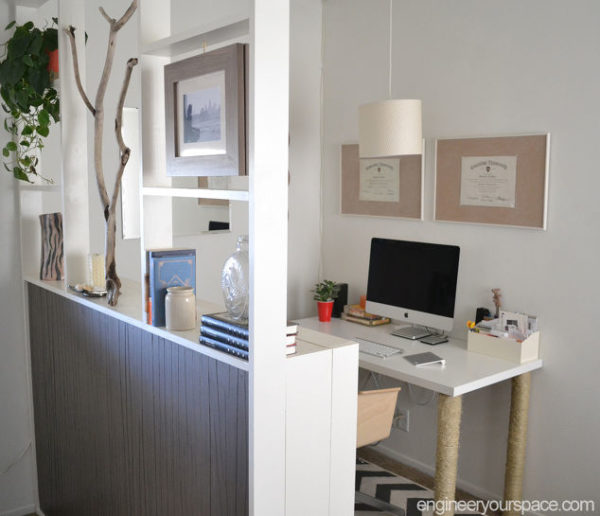
A Built-In Columned Room Divider

Transform your home entranceway into an elegant hallway by building yourself a columned room divider that can make sure no one sees all of the mess made by kids playing in the living room. This entire process only costs around $150 and takes just two days making it perfect for a weekend project!
A Photo Display Room Divider Turned Into Chalkboards!

This chalkboard room divider is a super creative update to the traditional tri-fold photo screen! The first step in this project involves taking down any existing photos and replacing them with large, durable chalkboards. It’s recommended by our tutorial that you use this chalkboard divider as wedding decorations because, surely, it will make people smile!
A Foldable Five-Panel Screen Room Divider

When it comes to furniture, we go for comfort and convenience. That’s why this five-panel room divider is so great! It folds up when you don’t need it which means your living space can have more floor space or be rearranged easily with less hassle because the dividers are light enough where they’re easy to fold!
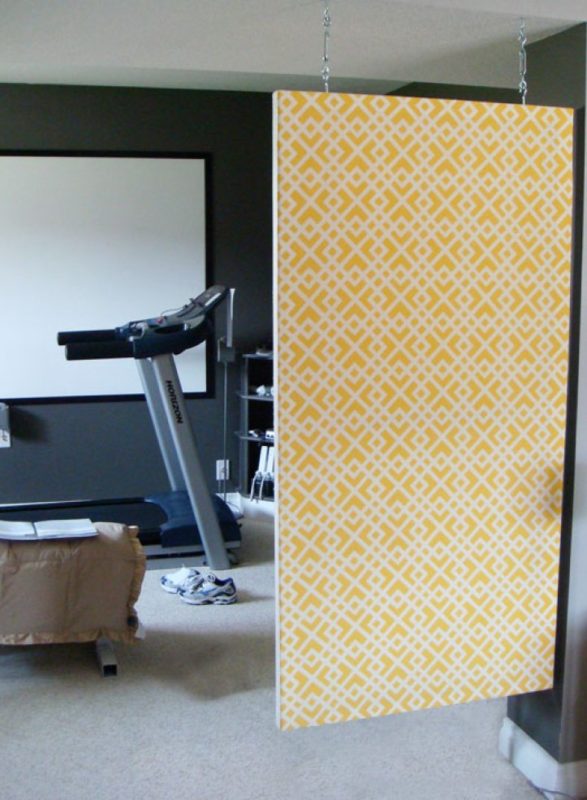
A Hanging Room Divider Made of Hardboard

A hanging room divider is a space-saving solution for any home. Unlike other pieces of furniture, it does not take up floor or table-top space and can be easily moved from one side to the next when needed! This project uses a hardboard that will then hang on s-hooks. You can also paint these boards whatever color you want them to be – which means they’ll match anything in your house!
A Hanging Room Divider Made of Canvas and Fabric

Here comes a hanging room divider idea that will not only divide the space but also make it more interesting. Whereas most dividers are made from wood, this one is built of two giant canvases covered in patterned fabric. To hang them up all you need to do is insert some hooks into the ceiling and voila! You have your very own room divider that is also an art installation on display for guests to enjoy when they come over.
Upgrade Your Space with A Bulletin Board Room Divider

A workspace is where we need to be productive and inspired during working hours. That’s why the surrounding has to support such atmosphere too! Creating this bulletin board room divider can create just that. It provides users with a space for sticky notes or other office necessities like paperclips, pens, etc., which will make their workday more efficient!
A Room Divider That Resembles A Barn Door

House design has long been influenced by the rustic charm of farmhouses. For a more modern twist on this style, try incorporating furniture inspired by these iconic structures into your home! One great way to do so is with barn doors as room dividers. This easy project will give an instant lift and strong character to any space in which it’s installed!
Related Posts

25 Free Amigurumi Monkey Patterns for Any Skill Level

25 Best DIY Outdoor Furniture Ideas (with Free Plans)

25 Free Amigurumi Cow Patterns (for Any Skill Level)

27 DIY Shoe Rack Designs for Your Stunning Shoe Collection

50 DIY Outdoor Privacy Screen Ideas with Free Plans

25 DIY Gender Reveal Party Ideas for a Memorable Celebration
Leave a comment cancel reply.
Save my name, email, and website in this browser for the next time I comment.
- Skip to primary navigation
- Skip to main content
- Skip to primary sidebar
- DIY Home Decor
- DIY Projects
- DIY Fashion
25 Cheap DIY Room Divider Ideas
Modern people are facing many problems these days, and the short space is one of them. Due to the continuous increase in population, we are really getting short on space. As a result, we live in compact and tiny spaces that are very tough to be decorated, furnished, and sectioned. But there is also one more fact that necessity is the mother of invention. People have sorted out the short space problem very wisely by building the room dividers to partition a small space into desired and needy sections. And the creators have played very nicely with these room dividers, giving you various room dividers from various materials and sources that you can build quickly at home.
Our DIY department has complied all the amazing and gorgeous room dividers in one post so check out these 25 cheap DIY room divider ideas to make for more privacy . Following these room divider ideas, you can satisfy your need for a room divider at free cost as all these ideas hint at home lying or open sources like pallets , crates, window panels, canvas, headboards , etc., so make the most favorite one room divider and enjoy a portioned, separate, private and also alone space for most of your activities like laptop handling, working on the project, watching a movie, etc.
1. DIY Geometric Room Divider

It may look tricky to make a DIY geometric room divider. But everyone would work on this project having fun. You can secure your space effortlessly with more privacy with the help of this DIY room divider. Moreover, you can fold place it everywhere you want once you have used this divider. Not only as a divider, but you can also use it as room décor. Adjust the colorful wood or hardboard rays in a geometric pattern to fit in a foldable wood frame, and enjoy! ohohdeco
2. Homemade Room Dividers

Get an inspiring and bold statement look for your home’s décor with this colorful and easy-to-make DIY room divider. Use these dividers elegantly to enjoy your living separately. To make this divider, you can reuse your old and useless doors. Cover those doors with your desired paints and wallpaper. Later on, screw them up to get a foldable divider. hallmarkchannel
3. Multipurpose Room Divider

Keep the privacy of your living room and place it at a higher level with this multi-functional room divider. You can use this divider as a storyboard and decoration piece at the same time. You can enjoy your place and chalk down your tasks on the chalkboard paint side of this divider. The other fabric patterned side can use for pinning up your favorite pictures and sceneries. hgtv
4. How to Make a Room Divider

To make a room divider by yourself doesn’t require any professional skills. You can work on this DIY Project even with beginner-level skills. To make this divider at home, all you need to do is adjusting the wood panel in your desired patterns. Paint these panels and joint them with screws. Screws will allow the flexible movement of this divider. So, you can fold or place it anywhere you want. While sharing a room, enjoy your comfort with this highly efficient room divider. decobymado
5. Wooden Room Divider Plan

Reuse old wood blocks or boards to create a divider for your place. You may need to work from scratch to set up scrap boards in a structured form to make this divider. You can adjust wood blocks in a horizontal pattern and fit them in a wood steel or wood frame. You would love to see results in the form of a DIY divider once you have done processing. ladyexplorer
Watch This Video: How To Make Your Own Room Divider – DIY Room Divider (04 Minutes 17 Seconds)
6. DIY Woven Room Divider

The woven yarn room divider is a perfect idea to add something new to your room ambiance, plus enjoying your space. Not only for home, but this DIY divider is also suitable for offices and small working places to stop unnecessary interruptions during work. This DIY divider may take more time to customize than a simple one. But you would love this woven yarn craft. All you need to do is weaving in your desired pattern on wicker. sugarandcloth
7. Build a Hinged Room Divider

Build a customized room separator to save your space and enjoy living with style. You can make your own hinged divider in a trending way. The processing of this DIY divider is similar to others. But it may take more time while applying wallpapers and paint molding. After using wallpapers on panels, all you need to do is hinging them up with screws. hgtv
8. DIY Room Divider Screen

While working from home, keep your workplace separate from your kids and other members with an easily moveable divider. You can customize or build a separator for your workplace by yourself. The DIY room divider screen is better because of flexible movement and making. To make the panels of the separator screen, you can use plywood. You can color this wood with your desired color or paint. ohohdeco
9. Folding Screen and Room Divider

Looking for something more beneficial to do your work without any disturbance? If yes, create a foldable screen and room divider. Excitingly! This divider will not only offer more privacy but also refresh your room style. If you love working on colorful projects, you would love and have fun making this stylish foldable screen. You don’t need to start from scratch. You can use discarded doors for this DIY project. That’s all. You have a great ambiance in your room. onekingslane
10. Ikea Frosted Glass Room Divider

This slidable IKEA frosted room glass divider is a perfect creation to utilize your small space more productively. While living in a small compartment, everyone can enjoy living in their comfort zone by installing this glass separator. Moreover, you can also DIY this glass divider to get more space for hiding unusual or trash storing. So, keep your place up to date and less messy with this modern and trendy partitioner. ikeahackers
11. Build a Room Divider

While living in a small home, offer a little bit of privacy to everyone with this DIY room divider. You don’t need to visit a store for the expensive and ready-made separator. Create it yourself for your comfort without stepping out of your budget. To make this DIY project more budget-friendly, use household and thrift store supplies. You can build a divider on mini wheels. So, you can move it effortlessly to clean up your space. cottagelife
12. Build Your Own Room Divider

Nothing would be more satisfying than working on DIY activities to get something new for your home’s décor. Everyone should start working on themselves to enhance the decor with craft supplies instead of buying every single item. Make your room space more comfortable to share with others by creating a room divider yourself. You only need to adjust the MDF panels and screw them together flexibly to get a stylish separator for your room. homestolove
13. Geometric Wood Art Room Divider

A geometric room divider not only offers more privacy but also an elegant and classy look to your room. So, working on this DIY room divider project might be one of the most favorites to style your home. If you have all supplies and wood boards, you can customize this partitioner according to your own desire and requirements. danikoch
14. Folding Screen Room Divider

Divide your room space more efficiently with the help of a folding screen room divider. Not only for dividing space, but you can also use this DIY partitioner for the makeover of your home. So, choose this DIY project to work on it with more versatility and style. You can make it from scratch or usually recycling the craft supplies. h2obungalow
15. Hanging Fabric Room Divider

Nothing would be more budget-friendly than creating a divider for your room using a simple fabric. It’s the quickest DIY to keep your workout space separate from living. However, you can add more style to your home décor with this separator by using a digitally printed fabric. The attractive print will not give an odd look. You would enjoy hanging it with the ceiling using hooks as a divider. sabrinasorganizing
16. Fabric Covered Room Divider

Create your own DIY room divider to enjoy your gym session at home with more comfort and without any disturbance. Use your hardware store leftovers and supplies to make this fabric-covered divider. You can buy a new frame or utilize an old one to cover it up with a cloth. Later, you can easily use this processed frame as a divider. freshcrush
17. DIY Room Divider Wall

Reuse or recycle wood leftovers in your store in a more environmentally friendly way. You can recycle this scrap for the furnishing and styling of your home with more uniqueness. Creating a DIY room divider wall is the best way to reuse wood leftover creatively. This divider not only offers more space but also helps to enhance your home’s decoration. lushome
18. DIY Plant Room Divider

It’s time to refresh your home’s environment with indoor plants and flowers. You can place these plants in a more stylish way without any mess using a plant room divider. To make this separator, you don’t need to do work or collect supplies a lot. The modest border with fewer tools is a whole thing you need to make this plant separator for your indoor décor. furniturechoice
19. Macrame Room Divider

Put your interior designing and macrame passion into doing something creative and useful for your home. For this, you don’t need to take start on a big scale. You can use your weaving and macrame skills to create a stylish and attractive room divider. Once you have completed this project, you will indeed have an epic piece of décor for your home’s interior. abeautifulmess
20. Homemade Felted Room Divider

want to sit or enjoy doing your work separately in an open office? Get or make these felted room dividers to continue your work with more concentration and comfort. Not only separate your space, but you can also make these dividers to give a modern look to your traditional office. IKEA
21. Lighted Room Divider Tutorial

Instead of buying an expensive divider for your room online, dig into your hardware store supplies to get your hands on a lighted room divider. Make it more perfect by getting help from tutorials and step-by-step instructions. Cheer up your room’ environment with this lighted room separator! instructables
22. How to Build a Room Divider

To build a room divider, you need to have simple tools and supplies. You can make this DIY project more innovative with tutorials and guidelines. Instead of worrying about your small space, you should come up with something more creative. You can use this divider for getting more storing place as well as separating different areas. ana white
23. DIY Hanging Room Divider

Make your space more stylish and trendier with this colorful and fully customized hanging room divider. To make it a more symmetric and powerful addition to your home ambiance, play with switching colored blocks. All you need to do is looking for all parts from your plumbing store to make this great separator. Give a try to your skills and make your hanging room divider! makingitlovely
24. DIY PVC Pipe Room Divider

Have a little budget to spend over the home’s makeover? Don’t worry. Create your own room divider using old PVC pipes from leftovers. The best thing is that you can customize this divider in whatever way you want to do. Make this DIY divider more colorful and chicer using a piece of high-quality fabric. instructables
25. Chic Room Divider with Curtains

Separate your studio stuff from the bed area using the curtain as a chic room divider. To complete this DIY divider, you wouldn’t need to do work more than a half-hour. Within no time, you will have a completely separate space. To uplift your interior décor, you can match the curtains with your decor schemes and combinations. citychicdecor
More DIY Home Decor

33 Cheap And Creative DIY Room Divider Plans
Room dividers are becoming a new trend these days, but they can be expensive. If you don't have money to buy an already made room divider, you can make it yourself with the DIY Room Divider Plans listed below. There are many ways to divide your room without building a wall. A room divider makes it possible to separate your rooms into two and change the layout of your room whenever you want. It doesn't matter if you live in a small house and need more privacy or want to create a partition for your ginseng seedlings or decorative plants, or just want a covered area for your pet — a DIY room divider is always a good option.
DIY Room Divider Ideas

Whatever the situation is, these 33 DIY Room Divider Plans will help you make the most of your space situation. If you opt for an open floor plan, you can use room dividers to delineate space between your living room and kitchen or dining areas. If you don't want to commit to a full-on renovation, adding a bookcase unit is one easy way to divide up your space without making things feel smaller and more cramped. Lastly, if you're looking for a way to bring some privacy into an open floor plan without ruining an airy vibe, adding a tall potted plan is a perfect solution. Ahead are 24 nifty, chic, and clever dividers that will make your small space feel so much larger and even more functional.
Other Ideas
- 15 DIY Basement Flooring Ideas
- 20 DIY Shower Curtain Ideas
How To Make A Geometric Room Divider

This room divider will give your room a more unique interior look because of the extravagant design of the frame. It is simple, strong, sturdy, and inexpensive. Piece together wood boards by screwing them into each other. This will create the frame for the room divider. The size of the frame depends on how big you want your room divider to be.
Cut the plywood sheets to the size of the frame. Screw the plywood sheets into the front and back of the frame. Use a tape measure to mark where you want your geometric cuts to be made on each of the plywood sheets. Make sure they are spaced out evenly across each panel. Draw these marks with a pencil in order to guide you while making these cuts with a jigsaw. Make sure you have protective goggles and gloves on before starting to cut out these shapes with a jigsaw.
Twinkling Branches Room Divider DIY

Have you ever wondered why DIY is more fun than buying readymade? It's because making something with your own hands is not just a hobby, it's an accomplishment. It's a new skill that you can be proud of. We hope this room divider will bring you the same joy! The most important part of this project is the zigzag frame. Once the frame is strong and sturdy, attaching the branches and LED light won't be a problem. It is really a sparkling room divider! You can use this room divider in many ways. For example, you could add some decorations to it for a more festive look, or you could hang other types of lights from it. The possibilities are endless and limited only by your imagination.
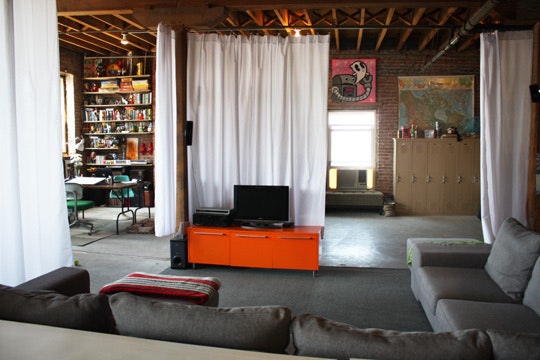
DIY Room Divider With Fabric

Creating a room divider is a fun project that will add privacy to your home. In this guide, we'll show you how to make a room divider using canvas, metal frames, and simple tools you can find at home. This project is perfect for anyone who has a small space they want to divide without spending a fortune on materials.
The materials and tools required for this project include drill, drill bits, screw hooks, screw anchors, staple gun, hammer, tape measure, safety glasses, adjustable connectors, and tape. It's pretty easy once you follow the instructions in the guide! Once you have all of these things ready, it's time to get started with our step-by-step tutorial on how to make a DIY room divider with fabric!
DIY Room Divider Wall
There are many ways to divide a room, and with so many styles out there, you’re sure to find something that fits your taste. This project is one of the most simple and affordable ways to divide a room. And, it serves as both a wall and a decoration! This is made from three pieces of MDF boards, River metallic paint, and blue metallic paint. The first step is to prepare the MDF boards and then paint the upper half in silver metallic paint. Allow the boards to dry and attach them together with glues and nails.
DIY Room Divider
The first step in this project is to gather the materials needed. In this video, the creator started by selecting the stable materials room divider walk. After gathering the materials, she cut the wooden boards into pieces and then started assembly. This was a simple project that can be done in a short amount of time. The only thing you need is to have all of the materials on hand before starting so you don't have to stop once you get started. After assembling, she painted the room divider. The room divider is ready to use and can provide more privacy in any room.
DIY Glass Room Divider

If you're looking for a way to brighten up a space, a glass room divider is a great option. However, traditional sliding glass doors can cost hundreds of dollars. This DIY room divider is an easy and inexpensive way to make a great-looking sliding glass door. It's made from IKEA's PAX sliding cupboard door. The PAX is foldable, cheap, and easy to set up. If you're a beginner, this is a simple room divider project for you.
DIY Sliding Room Divider
You can make a DIY sliding room divider with an inexpensive hardware kit and basic tools. This simple project adds architectural interest to your home, making it an especially great choice for rentals that you'd like to personalize. The guide provides a detailed explanation of each process of the materials and this makes this suitable for beginners as well.
DIY Japanese Divider
The first step in making this Japanese room is dividing us to make the frame assembly. Use glue and stick to assemble the frame then spray paint the frame and allow it to dry. The video tutorial makes building the four dividers easier and faster. The cost of making is very economical as well.
This DIY room divider idea is great for those that have an open floor plan apartment or those that want to create more privacy in a small living space. It’s easy to make and can change how you use your living space, just by moving it around. This one features white curtains attached to a wooden frame, but you can also use fabric if you’d rather not have curtains. If you’re really handy, you could build this whole thing using wooden boards so that it looks more like a wall than a curtain!
Cheap Office Divider DIY

The materials needed for this room divider included PVC pipes, PVC corner pieces, PVC end cap, PVC glue, black plastic spray paint, easy drop canvas, saw drill, grommets, and hooks. The first step is to make a blueprint of the PVC assembly, then start by creating the base with canvas hooks. After this, attach one grommet to the corner of one canvas and buckle it to the frame. Then attach the second grommets to the canvas and you're good to go. Spray paint the door divider in your desired color.
DIY Room Divider Screen With Laser

The guide started by analyzing the importance and uses of door dividers then went ahead with the list of materials needed. After the materials, the first step is to create a sketchy design for the four dividers that will serve as a template for the project. The next step is to cut out the sheets of plywood according to the template and set them aside. Then, using a laser engraver, the creator then engraved his desired designs into each of the dividers. This was followed by mounting a backboard on each of the dividers, painting them, and finally setting up an LED strip on each divider as well. The end product is great and can be used in lighting a room or even as a decorative piece.
IKEA Hack Room Divider

The IKEA Expedit bookshelf is a wonderful piece of furniture and is very useful for holding your book collection, but it’s also great for a lot of other things. Its simple, minimalist design makes it fit in just about any room and location. And it can be used as a room divider. The Expedia shelves are so versatile that they allow you to create dozens of different configurations using just one set. You can combine them with each other or with other furniture pieces to create the perfect system for your home.
DIY Hula Hoop Divider
This will be a great project for people to do during the current lockdowns. Hula hoops are so easy to find at home, and it is super easy to make this divider. The creator of this video made his room divider 6ft tall so that it would be a perfect height for a room partition. The materials needed for this include 13 Hula hoops, 7ft pieces of wood, 4 brackets, good spray paint, and zip ties. In this video, the creator started by making the door assembly using brackets to join the wood pieces together, then he used zip ties to buckle the hula hoops to the frame, and just like that you have the room divider. The last step is to paint the divider.
DIY Folding Screen Room Divider
The video is structured into different sections. The first section states the materials and tools needed for the project, then it proceeds to provide instructions on how to make the screen room divider. In the middle of the video, there are links to where you can get some of the items listed as needed and a link to where you can download instructions for free if you want to follow along with the video.
DIY Photo Room Divider Screen

This is made from a steel rod, welding rod, a sheet of plywood, hollow rid, binder clip, chop saw, tire rim, and paint. With a detailed explanation, you will be able to make this yourself within a few weeks.
The first step was to cut the plywood into two pieces using the chop saw. Then the creator cut two pieces of hollow rod in order to make the stand for it. The hollow rod needed to be bent in order to fit the plywood and it was done by using a tire rim as a template. The welding rod helped to hold the structure in place. Finally, he painted it black and used binder clips to hang my photos and other things on the wall. This project isn't difficult at all and can be done over one weekend. It only took about 2 hours to put together and paint it.
How To Divide A Room With Floor Mats
Who said that the floor mats can only be placed in a room? You can also use them to separate a room or a space. The creator of this beautiful DIY project made it from an IKEA floor cover. The floor was very sturdy and sturdy, so it was easy to assemble. Once the creator finished assembling the floor mat, she then stood the long spread mat unsightly and installed it to the desired location. This is a very simple idea and can be done quickly. You can paint your floor mats with different colours if you wish, or leave them as they are. This will make your home look more unique and original!
DIY Wood Pallet Room Divider

This DIY wood pallet room divider was made from recycled pallets. It is a good project because it uses industrial materials and turns them into something that can be placed anywhere in the house. Pallets have proven to be very good material in the woodworking space. It is very easy to disassemble into various things. This room divider was made from pallet boards. The creator started by disassembling the pallets then removing every nail or hardware on them. Then, he prepares the wood pieces and stains them before reassembling them into a room divider.
DIY 6ft Room Divider
This DIY 6ft room divider is ideal for renters as it can be easily removed with no damage to the walls. When living in an apartment, a room divider can help you make the most of your space by creating separate areas in a shared room. When you have guests over at your home, it can also be used as a temporary wall to block off a section of the room for privacy purposes. A 6ft room divider is ideal for small spaces and can easily be made using simple materials that are available at most hardware stores.
How To Make Your Room Divider
This guide is great! The creator in the video uses a nail to mark the holes on the wood, then uses a drill to make holes through the wood. He then places three-pocket jokes on each piece of lumber, which makes this amazing room divider. This room divider can be used to divide rooms, or as a decoration for your house. It's very nice and practical! Follow the step-by-step instructions in the video to make one for yourself.
DIY Cardboard Room Divider

If you're looking to add a bit of extra privacy to your home, don't want to block out all the light, and are trying to save money, then you may want to try this DIY cardboard room divider. This DIY project is cost-effective and a great way to give your home that extra layer of privacy without breaking the bank. The materials needed for this DIY room divider include a pencil, utility knife, ruler, and cardboard. The first step after gathering the materials is to cut the cardboard into parts, the parts that will later be joined together to form the segment of the room divider.
Steampunk Tri-Fold Room Divider

The room divider is a wall or screen that separates one big room into two small rooms or divides a large open area into smaller areas. If you want to make your own room divider, this tutorial will be helpful for you. The main material we used for the room divider is MDF because it’s a cheap and easy material to work with CNC machines. The MDF board has three layers of different colors: red, light brown, and dark brown. The outer layer has different patterns cut out by the CNC router. The center layer is plain, and the bottom layer is covered with copper paint.
DIY Rope Wall Room Divider
It is always a good idea to invest in dividers for your house, it is a very simple way to divide your room and give yourself more privacy. Having a divider in your room will also add value to your home. If you are looking for something that is easy, cheap, and does not take much time to make, then this DIY Rope Wall Room Divider project is perfect for you. You can make this in less than an hour if you have all the material needed.
Room Divider DIY
If you have a large space that you need to divide, it can be very expensive to do so. The best solution is to make a room divider. It will take about 30 minutes to make and cost less than $40.00, which is much less than buying one from the store. In this video, you will see how to make a room divider out of a bamboo ladder and some canvas fabric. The instructions are very easy to follow that enable you to make one for your home.
DIY Simple Rope Divider
This video tutorial started by cutting the lumber to size and making grooves in some of the wood pieces. The next step is to start assembling the wood pieces to form the room divider. After that, the next step is to add the rope. The rope has been cut in advance and now it is being screwed into the middle of each slat. Now it’s time for a test fitting before adding a finish. The finish chosen was a black enamel paint which was applied with a roller and then wiped off to bring out more of the grain. After it dried, the room divider was ready for use.
Building A Room Divider

This DIY guide will show you a step-by-step process of building a room divider using wood and metal. The divider will be sturdy enough to stand on its own and also be lightweight so you can move it around. The guide started by listing the materials and tools needed for the project and a detailed explanation of the uses of each material and tool. Then the guide went on to describe the process of making the room divider with maximum details. You should check it out.
DIY Room Divider Under $20
Room dividers can be a great way to break up large spaces or create a bit of privacy in a shared room. But many of them are pretty pricey. If you’re looking for an inexpensive way to create the illusion of more space or a little privacy, try your hand at this easy DIY project. This DIY room divider is a great solution for small homes that need a temporary wall to create a separate room or just something to give you more privacy in your space. It’s versatile, easy to make, and very inexpensive.
In this video, the creator started by Identifying the materials required for the project, then she measured and marked the entryway where the curtain will be. After this, she drilled a hole big enough to accommodate the hooks to the marked wall and screw close the hooks. The next step is to cut out fabric for the curtain, sew them together and install them in hooks. She also made a curtain rod using PVC pipes and installed it on top of the hooks. The last step was to hang up the curtain.
Sheet Music Decoupage Pax Room Divider DIY

This is made from boards, screws, primer, white glue, paper, foam brush, wood or metal trim, and adhesive. The first thing you do is to decide on the size of the room divider you want. How tall would it be? How wide would it be? And how many panels would it have? You can answer these questions after taking measurements of your space. Consider also how much space would be left when the divider is in place. Once you have decided on the size and number of panels for your room divider, it is time to buy the materials needed for this DIY project. And then you are good to go!
Room dividers are a great way to organize a room and make it look better. This video will show you how to use electrical conduits and fabric to create a room divider that is both decorative and functional. This is a great DIY project for anyone who wants to add some privacy to their home or office. It can also be used as an accent piece in any space.
DIY Bi-Fold Room Divider

A Bi-Fold room divider is a great tool for creating new spaces in a large room, hiding storage, or dividing up a studio apartment. They are available in a wide variety of styles and can be custom-made to fit your space. The cost can be prohibitively expensive, however, costing hundreds of dollars. You can save money by making your own out of existing doors. In this guide, you'll learn how to make one yourself.
DIY Room Divider For Small Rooms
This video will teach you how to make a unique room divider that can be used in small apartments and studios. The materials needed for this DIY room divider include tent material, gold reflective paper, chrome pipe, chrome pipe holder, pipe corner, gold handle, and wood.
The video started by cutting the gold reflective paper into strips and reducing the size of the tent material to the length of the room. Then he glued the reflective strips on both sides of the tent material using an adhesive spray. Next, he attached the two pipes using a pipe corner. He then drilled two holes on each side of the divider and inserted a handle on each hole. Lastly, he drilled two holes at the bottom of both pipes and added a wooden platform below it to hold it up.
DIY Multifunctional Room Divider

A room divider is a great way to separate your living space into two different areas. For example, you can separate the kitchen and the dining area by using a divider. In this case, it can be used as a partition or an open wall. The DIY room divider is multipurpose. You can set them up anywhere in your home to divide your space and use them for noticeboards, a place to hang photos and pin messages on it, or just as a decorative item to add some drama to any wall.
If you are looking for privacy in some areas of your home, you can use these dividers with curtains that act as private spaces in the room. You can also add wheels to the base of the DIY room divider so that it becomes mobile. The divider can then be moved around easily without much effort.
How To Build A Room Divider Closet
This video is a tutorial to teach you how to build a room divider closet. Here the instructor explains the uses of the room divider and the materials needed for the project. After this, she describes the process of making the frame and joining the whole room divider together. After the joining, she then painted the room divider. In the description box of this video, you will find the link to the cutting list and plan for the room divider.
DIY Macrame Room Divider

Macrame is a craft form that involves using knots to create beautiful pieces of art. A room divider is an item you can use in your home or office to optimize your space and improve the interior design. It's a great idea to create it yourself because you have full control over the design and size of the project. Today we're going to show you how to make a macrame room divider, using some simple knots that you can learn easily. We'll also include some tips on how to customize it. If you've been wishing to overtake in a macrame project before but you don't know where to start from or where to learn from. This is a very great macrame project that will teach you the basics of macrame craft and the process of using it to make a room divider.
myfrenchtwist
Sharing is caring!
- Pinterest 2
- Skip to primary navigation
- Skip to main content
- Skip to primary sidebar

Home Decorating Ideas » 35 DIY Room Divider Plans For Modern, Rustic And Classic Rooms
35 DIY Room Divider Plans For Modern, Rustic And Classic Rooms
Published: May 11, 2021 · Modified: Aug 1, 2021 by Luke Allison · This post may contain affiliate links · This blog generates income via ads
A room divider is a new trend to partition a room these days, but how can you follow the trend if you don't have money to buy an already made room divider and also don't know how to make one yourself?
Thankfully, we have compiled a list of 35 DIY room divider ideas that will teach you how to make different kinds of room dividers, all you have to do is pick a preferred guide, gather necessary materials and tools, and start building.

Table of Contents
1. DIY Room Divider Under $20
A room divider can cost up to $100 in the store, but this guide will show you how to make a room divider by yourself with as little as $20. The guide started by identifying the materials and tools needed for the project then started cutting and assembling.
2. DIY Room Divider
In this video, the creator started by Identifying the materials required for the project, then she measured and marked the entryway where the curtain will be. After this, she drilled a hole big enough to accommodate the hooks to the marked wall and screw close the hooks.
3. DIY 6ft Room Divider
Making a room divider is very simple and straightforward but the process of staining the wood and leaving it to dry before moving on to another step makes it time-consuming. In this guide, you will learn how to make a 6ft room divider with ease.
4. How To Make Your Room Divider
With three-pocket jokes on each piece of the lumber, the creator in this guide makes this amazing room divider. Isn't that great? Follow the step-by-step instructions in the video to make one for yourself.
5. DIY Cardboard Room Divider

The materials needed for this DIY room divider include a pencil, utility knife, ruler, and cardboard. The first step after gathering the materials is to cut the cardboard into parts, the parts that will later be joined together to form the segment of the room divider.
Click for more details
6. Twinkling Branches Room Divider DIY

The most important part of this project is the zigzag frame. Once the frame is strong and sturdy, attaching the branches and LED light won't be a problem. It is a sparkling room divider.
7. DIY Glass Room Divider

This is made from IKEA's PAX sliding cupboard door. The PAX is foldable, cheap, and easy to set up. If you're a beginner, err is a simple room divider project for you.
8. DIY Room Divider With Fabric

The materials and tools required for this project include drill, drill bits, screw hooks, screw anchors, staple gun, hammer, tape measure, safety glasses, adjustable connectors, and tape. It is a very easy and cheap project once you follow the instructions in the guide.
9. DIY Room Divider Wall
This is made from three pieces of MDF boards, River metallic paint, and blue metallic paint. The first step is to prepare the MDF boards and then paint the upper half in silver metallic paint. Allow the boards to dry and attach them.
10. DIY Room Divider
In this video, the creator started by selecting the stable materials room divider walk. After gathering the materials, she cut the wooden boards into pieces and then started assembly.
11. DIY Sliding Room Divider
This contains links to each material and the tools used in the video tutorial. The guide provides a detailed explanation of each process of the materials and this makes this suitable for beginners as well.
12. DIY Japanese Divider
The first step in making this Japanese room is dividing us to make the frame assembly. Use glue and stick to assemble the frame then spray paint the frame and allow it to dry. The video tutorial makes building the four dividers easier and faster. The cost of making is very economical as well.
13. Cheap Office Divider DIY

The materials needed for this room divider included PVC pipes, PVC corner pieces, PVC end cap, PVC glue, black plastic spray paint, easy drop canvas, saw drill, grommets, and hooks. The first step is to make a blueprint of the PVC assembly, then start by creating the base with canvas hooks.
After this, attach one grommet to the corner of one canvas and buckle it to the frame. Then attach the second grommets to the canvas and you're good to go. Spray paint the door divider in your desired color.
14. DIY Room Divider Screen With Laser

The guide started by analyzing the importance and uses of door dividers then went ahead with the list of materials needed. After the materials, the first step is to create a sketchy design for the four dividers that will serve as a template for the project.
The guide includes a downloadable file that contains details on various panels required for the project.
15. IKEA Hack Room Divider

IKEA expedit shelves are a very good item that can serve as a room divider. The bookshelf comes in handy and can be placed anywhere in the room. It is very cheap and inexpensive.
16. DIY Photo Room Divider Screen

This is made from a steel rod, welding rod, a sheet of plywood, hollow rid, binder clip, chop saw, tire rim, and paint. With a detailed explanation, you will be able to make this yourself within a few weeks.
17. DIY Hula Hoop Divider
The materials needed for this include 13 Hula hoop, 7ft pieces of wood, 4 brackets, good spray paint, and zip ties. In this video, the creator started by making the door assembly using brackets to join the wood pieces together, then he used zip ties to buckle the hula hoops to the frame, and just like that you have the room divider. The last step is to paint the divider.
18. DIY Folding Screen Room Divider
This time-lapsed video stated by listing the materials and tools needed for the project then the instructor went ahead to give the step-by-step process of making the screen room divider. He also provides links to some of the materials and a link to down the instructions for free.
19. How To Make A Room Divider With Cardboard Boxes
If you want to make a room divider and your budget is saying another thing, this is a good time for you to achieve your desire. This cardboard room divider didn't require a huge cost of production. The major materials needed are cardboard boxes which you can easily find around the house.
20. How To Divide A Room With Floor Mats
This is made from an IKEA floor cover. The floor was very strong and sturdy and it was simple to assemble. Once the creator finished assembling the floor mat, she then stood the long spread mat unsightly and installed it to the desired location.
21. DIY Wood Pallet Room Divider

Pallets have proven to be very good material in the woodworking space. It is very easy to disassemble into various things. This room divider was made from pallet boards. The creator started by disassembling the pallets then removing every nail or hardware on them. Then, he prepares the wood pieces and stains them before reassembling them into a room divider.
22. How To Make A Geometric Room Divider

This room divider will give your room a more unique interior look because of the extravagant design on the frame. It is simple, strong, sturdy, and inexpensive.
23. DIY Macrame Room Divider

If you've been wishing to overtake in a macrame project before but you don't know where to start from or where to learn from. This is a very great macrame project that will teach you the basics of macrame craft and the process of using it to make a room divider.
24. Steampunk Tri-Fold Room Divider

This instructable guide will show you how to make a room divider using a few materials like an MDF CNC router, hammer, copper spray paint, and saw. Once you follow the guide, you will be able to make a room divider by yourself.
25. DIY Room Divider
Here, a room divider was made from curtain rods, wall brackets, and curtain fabric. The instructor showed every detail needed to understand the concept and also provided links to get the listed materials above.
26. DIY Rope Wall Room Divider
This is made from 2 pieces of light wood, role, ceiling hooks, drill, scissors, spray paint, and tape. It is a very simple project once you follow the instruction given by the creator. Links to each material listed above are given in the description box of the video.
27. Room Divider DIY
This is a very quick and easy room divider made from a bamboo ladder and some canvas fabric. The videos will show you the step-by-step process of making it and the cost of making it is very economical.
28. DIY Simple Rope Divider
This video tutorial started by cutting the lumber to size and making grooves in some of the wood pieces. The next step is to start assembling the wood pieces to form the room divider.
29. Building A Room Divider

The guide started by listing the materials and tools needed for the project and a detailed explanation of the uses of each material and tool. Then the guide went on to describe the process of making the room divider with maximum details. You should check it out.
30. DIY Multifunctional Room Divider

In this instructable guide, you will learn how to build this multipurpose room divider. While the primary function of the divider is to partition the room, the interior part serves as a black chalkboard. Isn't that amazing.
31. DIY Bi-Fold Room Divider

In this guide, the first step is to get the doors that will be merged to give the bifold room divider. The guide then went further to remove the hardware on the door and screw them together with the new set hardware. The guide advised not to use a new brush when painting.
32. Sheet Music Decoupage Pax Room Divider DIY

This is made from boards, screws, primer, white glue, paper, foam brush, wood or metal trim, and adhesive. After listing the materials, the guide describes the process of putting the materials together to form an amazing room divider. It is very simple and inexpensive.
33. DIY Room Divider
This is made from fabric and electrical conduit. This video will teach you how to use these two materials to make a room divider. It is very simple and inexpensive.
34. DIY Room Divider For Small Rooms
The materials needed for this DIY room divider include tent material, gold reflective paper, chrome pipe, chrome pipe holder, pipe corner, gold handle, and wood. The video started by cutting the gold reflective paper into strips and reducing the size of the tent material to the length of the room.
35. How To Build A Room Divider Closet
Here the instructor explains the uses of the room divider and the materials needed for the project. After this, she describes the process of making the frame and joining the whole room divider together. After the joining, she then painted the room divider. In the description box of this video, you will find the link to the cutting list and plan for the room divider.
That’s a wrap! Just before you leave, we would love it if you share this article with your friends or family members that might be interested in making a room divider; as you can see, there are so many options to choose from. Thanks for stopping by!
Reader Interactions

Ask Me Anything Cancel reply
Your email address will not be published.
Save my name, email, and website in this browser for the next time I comment.
- Search Search Please fill out this field.
- Martha's Blog
- Sweepstakes
- Cleaning & Organizing
- Storage & Organization
9 DIY Room Dividers That Will Help You Stylishly Zone Any Space
Tamara is a freelance writer for MarthaStewart.com.
:max_bytes(150000):strip_icc():format(webp)/tamara-rahoumi-contributor-picture_vert-897560db67904315a6be961d333cec46.jpg "diy travel room divider")
If you're like us, you love a good decorative screen. And what's not to like about a chic room divider? As anyone who calls a studio apartment or a space shared with roommates home can attest to, foldable partitions are essential for making the most of a small space living . In fact, they've been doing this job for a long time. Screens have been dividing spaces for more than 2,000 years—they date back to China in 200 BC.
Whether you want to bring a touch of Old-World glamour into your bedroom in the form of a chic changing area or are just looking for an unexpected space to stash coats when company arrives for your next party, a screen can help transform just about any space—and you can make one yourself.
These DIY room dividers make it a cinch to zone your room. Plus, they look pretty stylish doing it.
Wallpaper Room Divider
A pair of sturdy bifold closet doors was the basis for this brilliant decorative screen. Join them with extra hinges, then cover the unfinished wood with wallpaper of your choice—you need only a few strips, so even a designer price will be right. (For a faster result, use the paste-free, peel- and-stick kind .) To finish the raw edges, hot-glue on ribbon in a contrasting color.
- Statement Wall Murals Are One of the Biggest Décor Trends
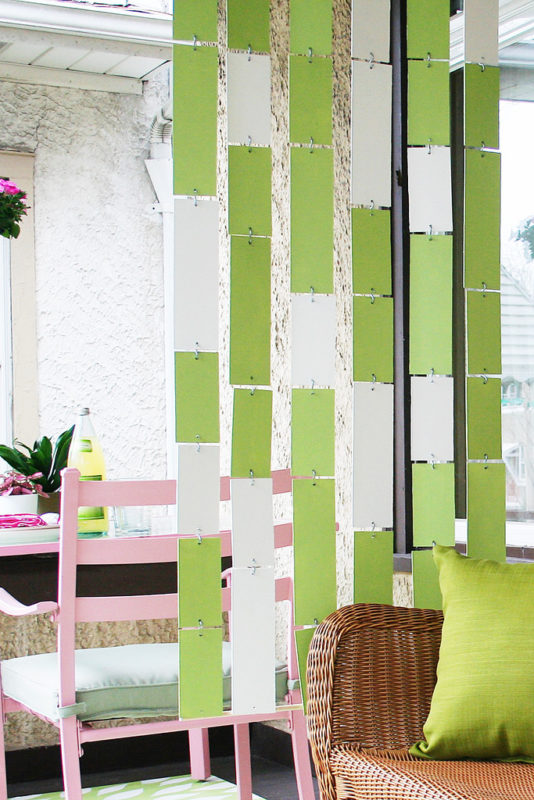
Upholstered Gingham Screen
This fun, easy-to-make gingham folding panel breaks apart an open room while adding a pop of color and texture to an otherwise quiet, monochromatic space. Follow these steps to make the screen:
1. From the plywood, cut three 2 x 6 1/2-foot pieces.
2. Sink pilot holes for bifold hinges: Attach the left-hand panel to the center panel by screwing hinges 6 inches from the top and bottom, and 1/3 in the center. Repeat to attach the center panel to the right-hand panel. Remove hinges; they will be reattached in the same holes in step seven. (If you're using an existing screen, simply remove the hinges.)
3. Cut six pieces of fabric into 2 feet 1 1/2 inches x 6 feet 7 1/2 inches; press.
4. Place one panel flat, and lay a piece of batting over it. Stretch a piece of fabric over the panel, so its four edges just cover the edge of the plywood. Staple the top side, then the bottom, then the sides. Trim any excess fabric. Repeat with the panel's reverse side. Trim again.
5. Repeat step four to cover the other two panels.
6. Cover the staples: Using glue, attach ribbon along the perimeter of each panel.
7. Reattach hinges.
8. Screw two stabilizing feet into the bottom edges of each panel.
Screen Headboard
This pretty floral-print screen looks just as good dividing up a room as it does leaning against a wall as a decorative headboard. Add it behind a basic bed frame to create a plush and personalized effect. Recast one you already own with a favorite print—then all you have to do is put your custom piece in place and dream on.
- 12 DIY Headboard Ideas to Give Your Room a Boost
Stenciled Lace-Print Folding Screen
The delicate lace design on this screen only looks complicated. In a reversal of stenciling norms, the central motif is unpainted; light-gold paper is accentuated by a dappled coat of copper-pink paint. Here's how to make the folding screen:
1. Lay panels side by side on a covered surface. Mix paints in a jar. Prepare palette with some paint, leaving the remainder covered in the jar. Place stencil in the upper-right corner.
2. Use a sponge to apply paint to the stencil. Let it dry for three minutes.
3. Shift the stencil to the left, using the transparent pattern on stencil as a placement guide. Paint as in step two.
4. Below the first painted area, stagger stencil to the right, so its left edge aligns with the center of the pattern above it. Paint as in step two.
5. Continue painting, alternating placement across and down to create staggered, brick-like rows (to minimize lag time as paint dries).
6. Reattach hinges.
Office Space Folding Screen
Struggling to section off a workspace in your home? This DIY room divider not only makes it easy to create a cozy, isolated space for a desk and chair, but it actually functions as part of your office, thanks to a chalkboard panel for your brainstorms and a bulletin board panel for your important papers and reminders.
Drop-Cloth Patio Divider
If your problem area is your patio, you can section off an intimate sitting area in an otherwise open layout by adding a few hanging drop cloths that you can easily roll right up when it's time to head inside.
- Get More Drop-Cloth Décor Ideas
Sheer Curtain Room Divider
If you want to break up a room but are afraid an opaque folding screen or other divider will be too dramatic for your small space, try for a sheer curtain, instead. This DIY room divider helps make different parts of your room feel a little more private without really making each individual space feel smaller or tooclosed off.
Leaf-Motif Screen
Keep this leaf-motif screen perpetually in season by easily rotating out the leaves to coincide with the time of year.
1. Paint screen and picture frames one color. Photocopy real or artificial leaves to desired size. Adhere copies to card stock with spray adhesive. Cut out silhouettes with utility knife.
2. Disassemble each frame, and place cardboard backing over a botanical-print fabric; cut around cardboard, leaving a 2-inch fabric border. Wrap cardboard in fabric, adhering with double-sided tape. Glue leaf silhouette to center, and reassemble frame.
3. Add grosgrain ribbon to frame edges with a glue gun.
4. Hang frames at equal intervals.
Entertainment Center Screen
Sometimes all it takes is tucking away a small component of a room, like a TV, to make it feel like a slightly converted space. So, even if the area you're working with is too tight for a full-on room divider (or if you're just not a fan) consider inserting openable screens where possible to make any room in your home feel a little more versatile.
- Join Insider
Follow This Old House online:
Site search, 23 creative room divider ideas.
Bring more flexibility and functionality home with these cool, creative ways to separate spaces.

As open-plan spaces became more desirable, so did the concept of making them multi-purpose. Now, with so many of us doing, well, everything at home, the notion of designating areas to different activities—or just carving out some privacy—has never been more important.
Fortunately, room dividers offer a simple, stylish way to make your home more flexible, and you can even tailor partitioning preferences to what best suits your needs and lifestyle. Read on to explore 23 ways to divide and conquer beautifully!
Open-and-close room divider ideas
These room dividers are ideal for situations where you want to simply and quickly transition between sectioning off and opening up your space.
Folding Screen
A hallmark of Asian design for centuries, folding screens are simple, lightweight, and attractive. These room dividers hinge together three, four, or more panels that may be translucent (known as shoji in Japanese) or opaque ( fusuma ). A basic four-panel shoji screen can be had for about $100.
DIY Folding Screen
DIY a folding screen by stapling a favorite fabric onto panel frames. Tip: When attaching panels, mount hinges on alternating sides so the screen can fold up. (Check out this blogger’s supply list for specifics.)
For instant space partitioning, call on a curtain. Suspend a rod from the ceiling and use rings or hooks to attach drapery panels. Think velvet for drama or go gauzy for a lighter look. Pull closed for privacy, open for spaciousness. Perfect for sectioning off a sleeping area in a studio apartment or mother-in-law suite.

If a curtain feels too flimsy, jump on the trendy barn door bandwagon, for under $200. Or build your own with guidance from This Old House’s Mark Powers.
Simple Sliding Door
For a simpler sliding door project, make a frame out of 2x2s, nail or glue on Masonite sheets, add wheels to the bottom and hinged loops to the top, then hang from plumbing pipe attached to the wall.
Often used in commercial or professional settings like meeting rooms, accordion doors suspend from an overhead track but eschew a floor track to avoid a tripping hazard. They’re typically manufactured from vinyl, laminates, wood, aluminum, or acrylic.
Wood Divider Screen
Wood divider screens start at around $200, but you can DIY one for less with three sheets of 16″ x 64″ plywood and, for the frame, a dozen pieces of 3/4″x 2″ lumber — half of them 16 inches long and the rest 6 feet long.
Build the frame, attach the plywood boards (painted in your preferred shade), and hinge together. Tip: High quality hinges add stability and look nicer too, so don’t skimp! (Go here for full instructions.)
Storage Room Divider Ideas
Some spaces—like a shared children’s bedroom or makeshift home office—will benefit from a partition with places to put things. These ideas fill the bill:
Any bookcase, set perpendicular to a wall instead of flush against it, becomes an instant room divider. Just be sure to secure it for safety: Attach metal L brackets to the top of the bookcase and a wall stud, then drive a few screws through the side of the unit into the same stud. For further insurance against tipping, anchor the bottom.
Bookcase with locking wheels
A bookcase with locking wheels affords utmost flexibility, especially in larger spaces like a loft or basement. Just roll and lock where you want to separate the space today, and move it to a new location tomorrow.
Tall, Wide Bookcases
The bigger the bookcase, the greater the privacy. Set up a tall, wide pair, back to back, to create storage on both sides of the divided space for books, toys, knickknacks, etc.
Go low with cubbies (a.k.a. cube storage) to delineate a border on the floor while maintaining open space above. This eight-cube organizer got raves from a reviewer who bought two—one placed horizontally for toys, the other vertically for display items.
Prefer to build your own cubbies? This Old House’s Kevin O’Connor shows how in an easy family project tutorial using simple square cuts and basic assembly and finishing.
A high-profile headboard with shelving on both sides can delineate a sleeping area while offering useful storage.
Open Shelving
Open shelving physically divides a space while allowing in some light and offering lots of versatility. Depending on shelf size, you may even be able to install a flat screen TV on a swiveling base.
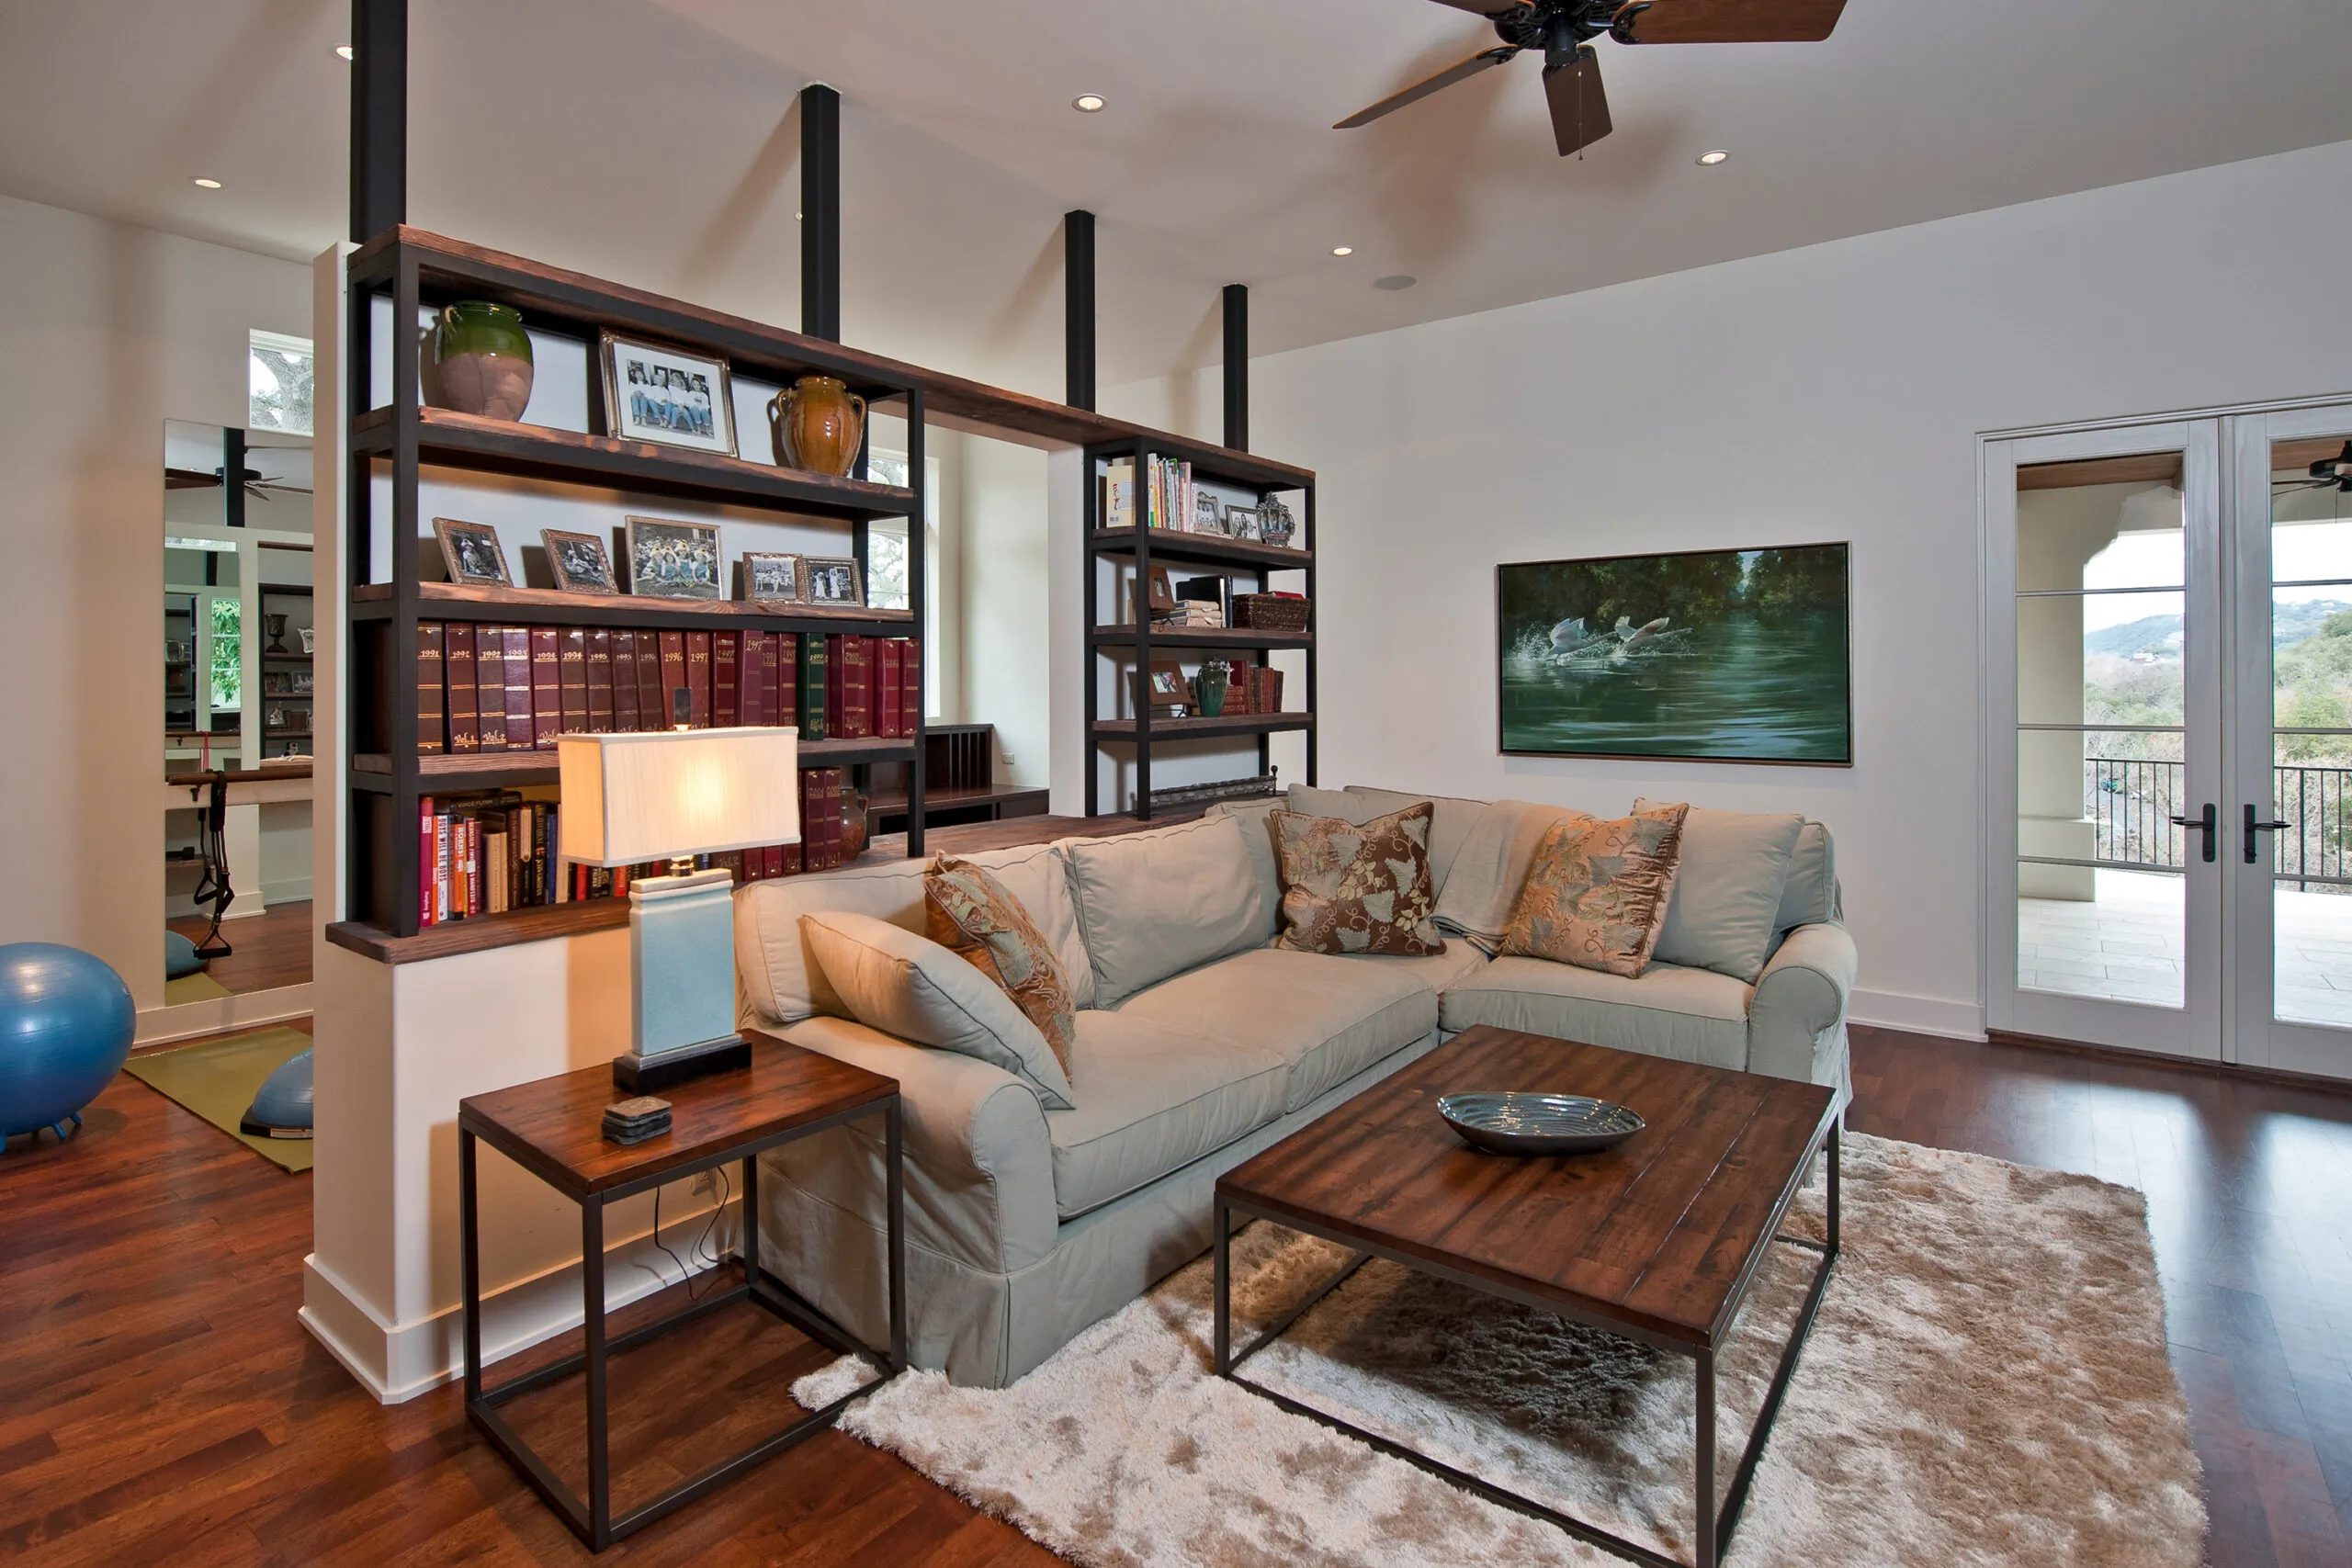
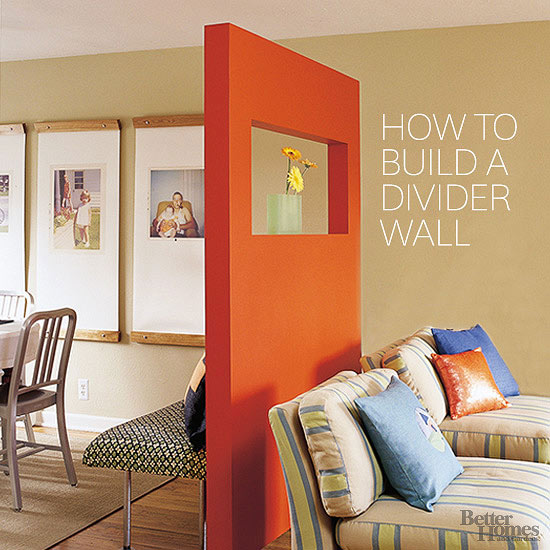
Columned Room Divider
DIY a columned room divider for your home’s entranceway to direct incoming traffic toward a particular area. While you’ll need some solid mitering skills to build this attractive piece, our tutorial takes you through the process step by step.
Best Room Dividers to Let in Light
Some spaces—an exercise or meditation area, say—call for a floor-to-ceiling partition that also lets in light.
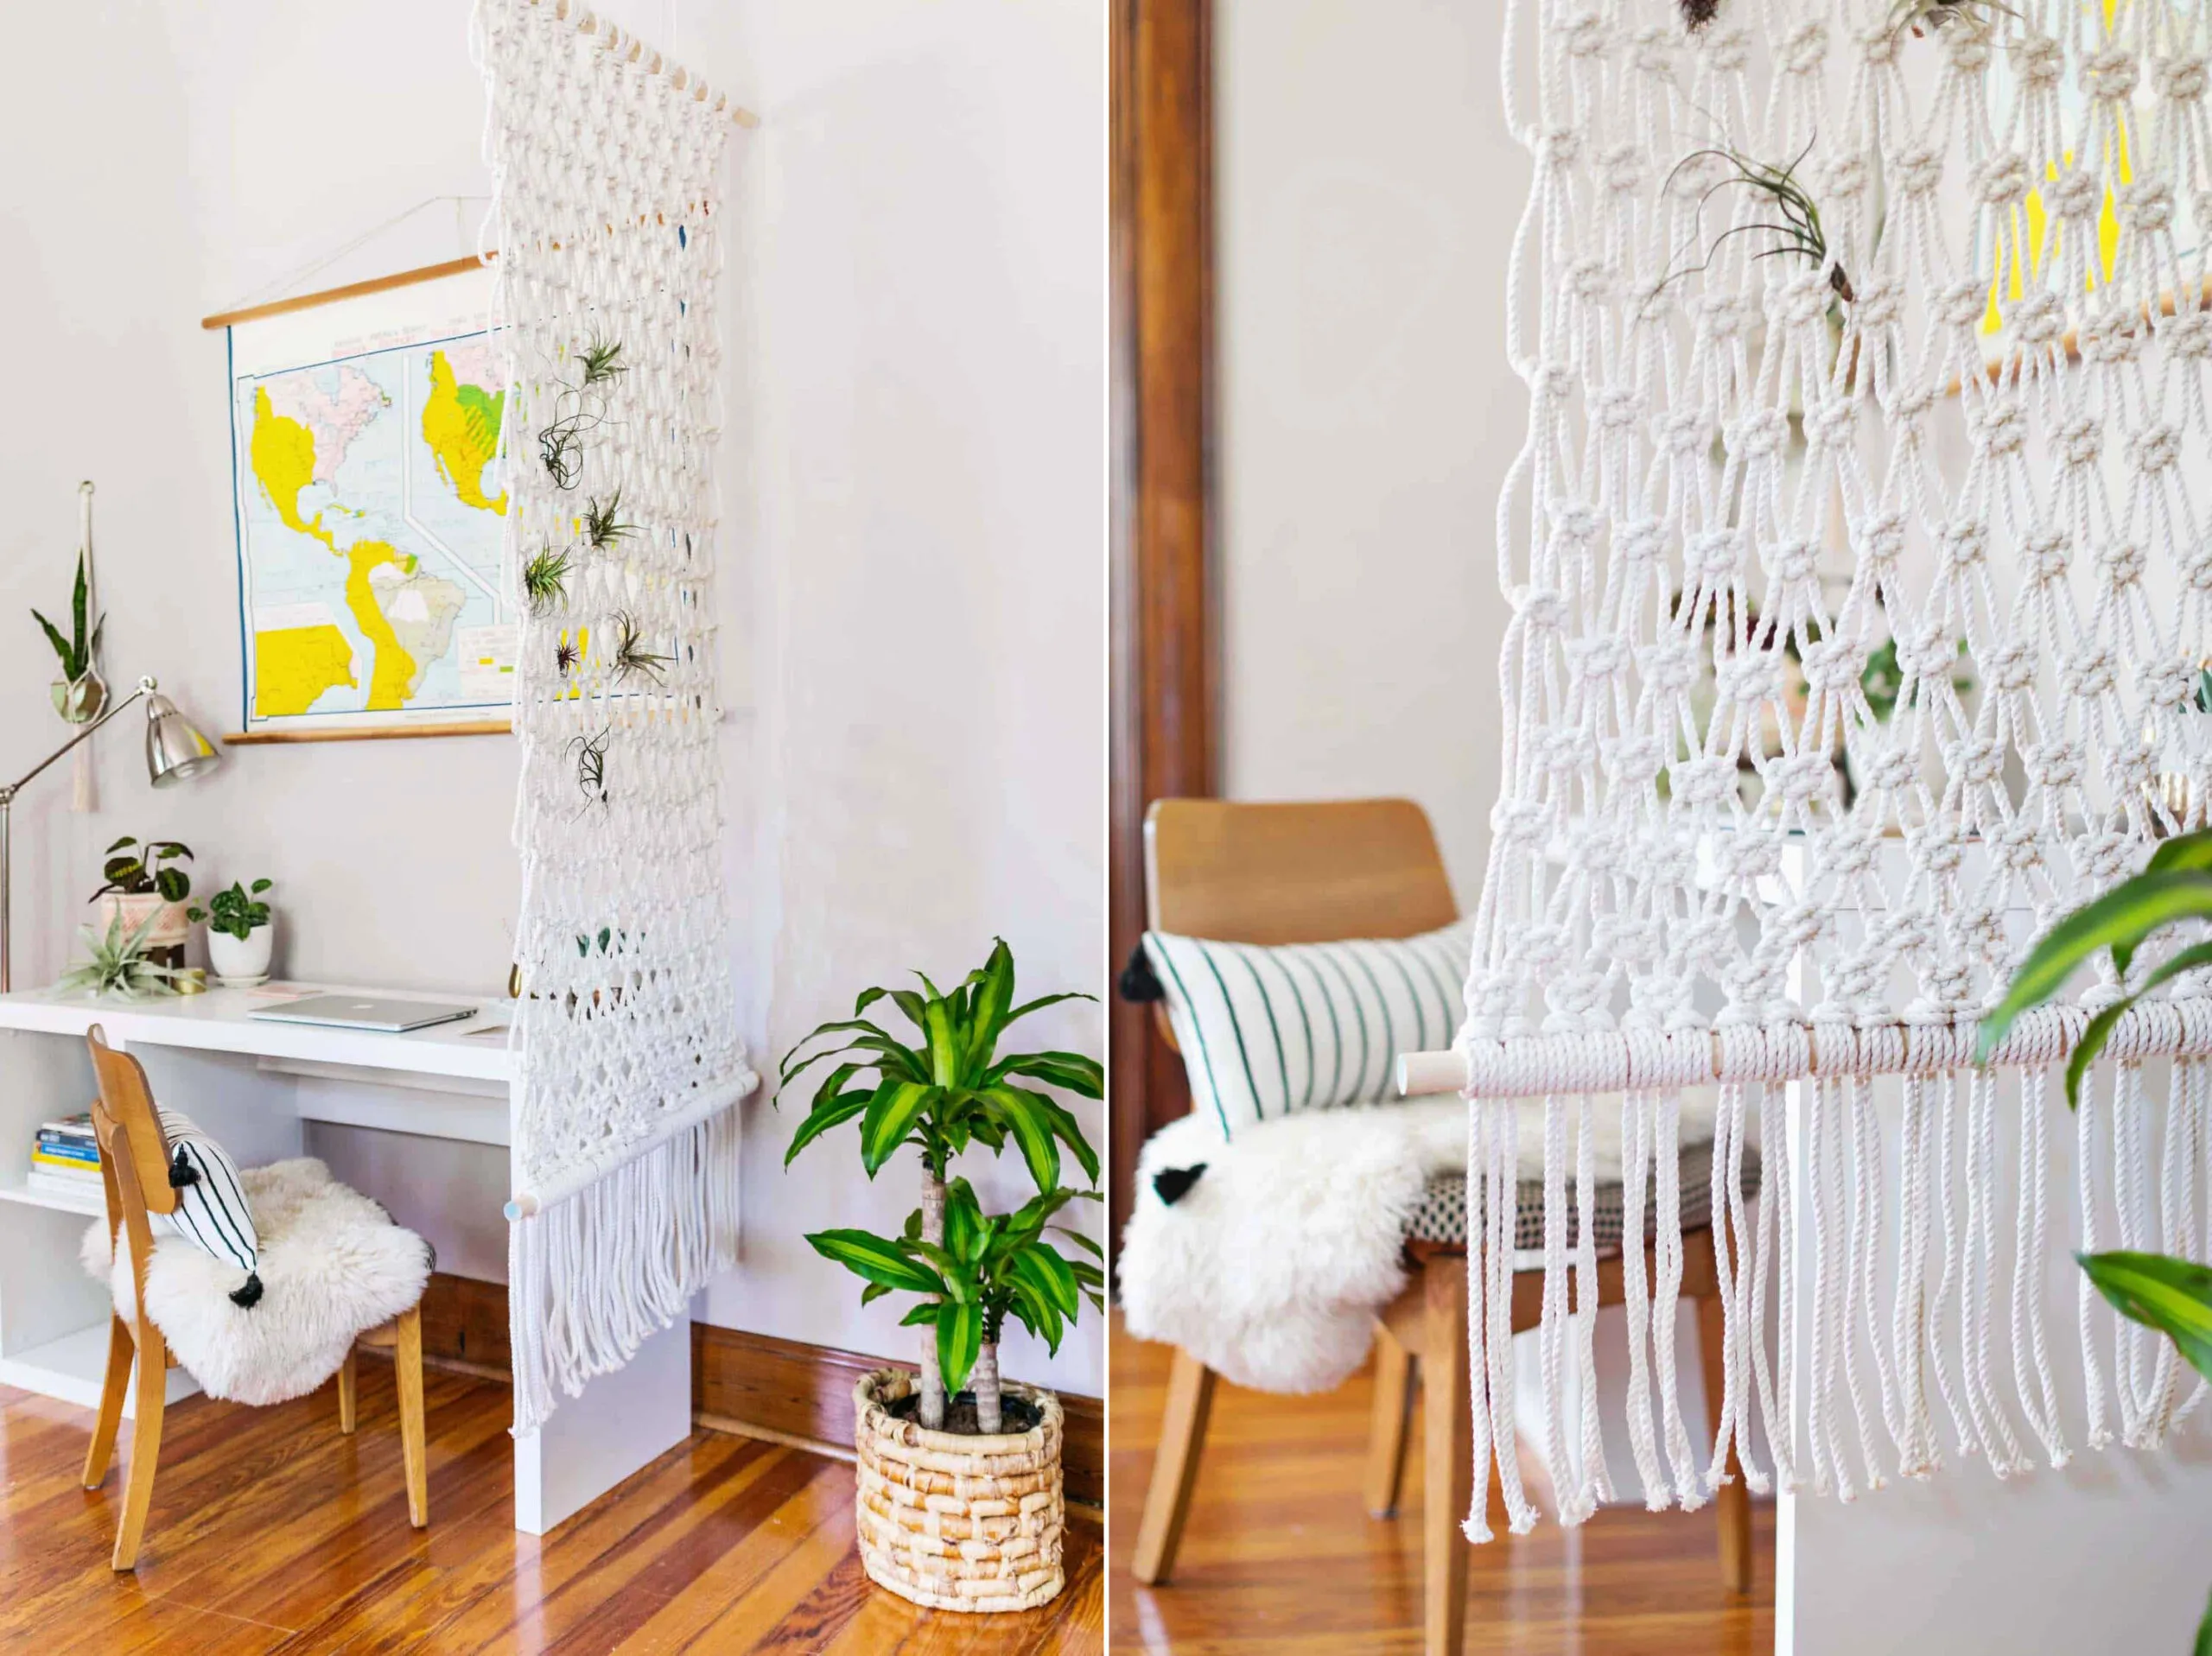
Tie one on! Create a hanging room divider with the macramé, the art of knotting rope to produce textiles. (Check out this blog for a how-to using 700 feet of cotton rope.)
Linen Fabric

For simplicity and elegance in one fell swoop, suspend a piece of sheer linen fabric. Go with a barely there neutral to suit any décor or choose a bold shade, like this red, to make more of a statement.
Stitch a hem top and bottom and insert a rod in each, one to hang the divider from the ceiling and the other to add just enough heft so it won’t waft too much in a breeze.
Wooden Slats
Slat’s the ticket! If you’ve got a pile of wooden boards in your workshop, why not turn them into a slatted partition—simply a row of boards with gaps every few inches. Straight, high-quality lumber yields sturdy results, but imperfections can be part of the partition’s charm. Tip: Make gaps caused by bowed or warped lumber less obvious by spacing them wider apart.
Wooden Blocks
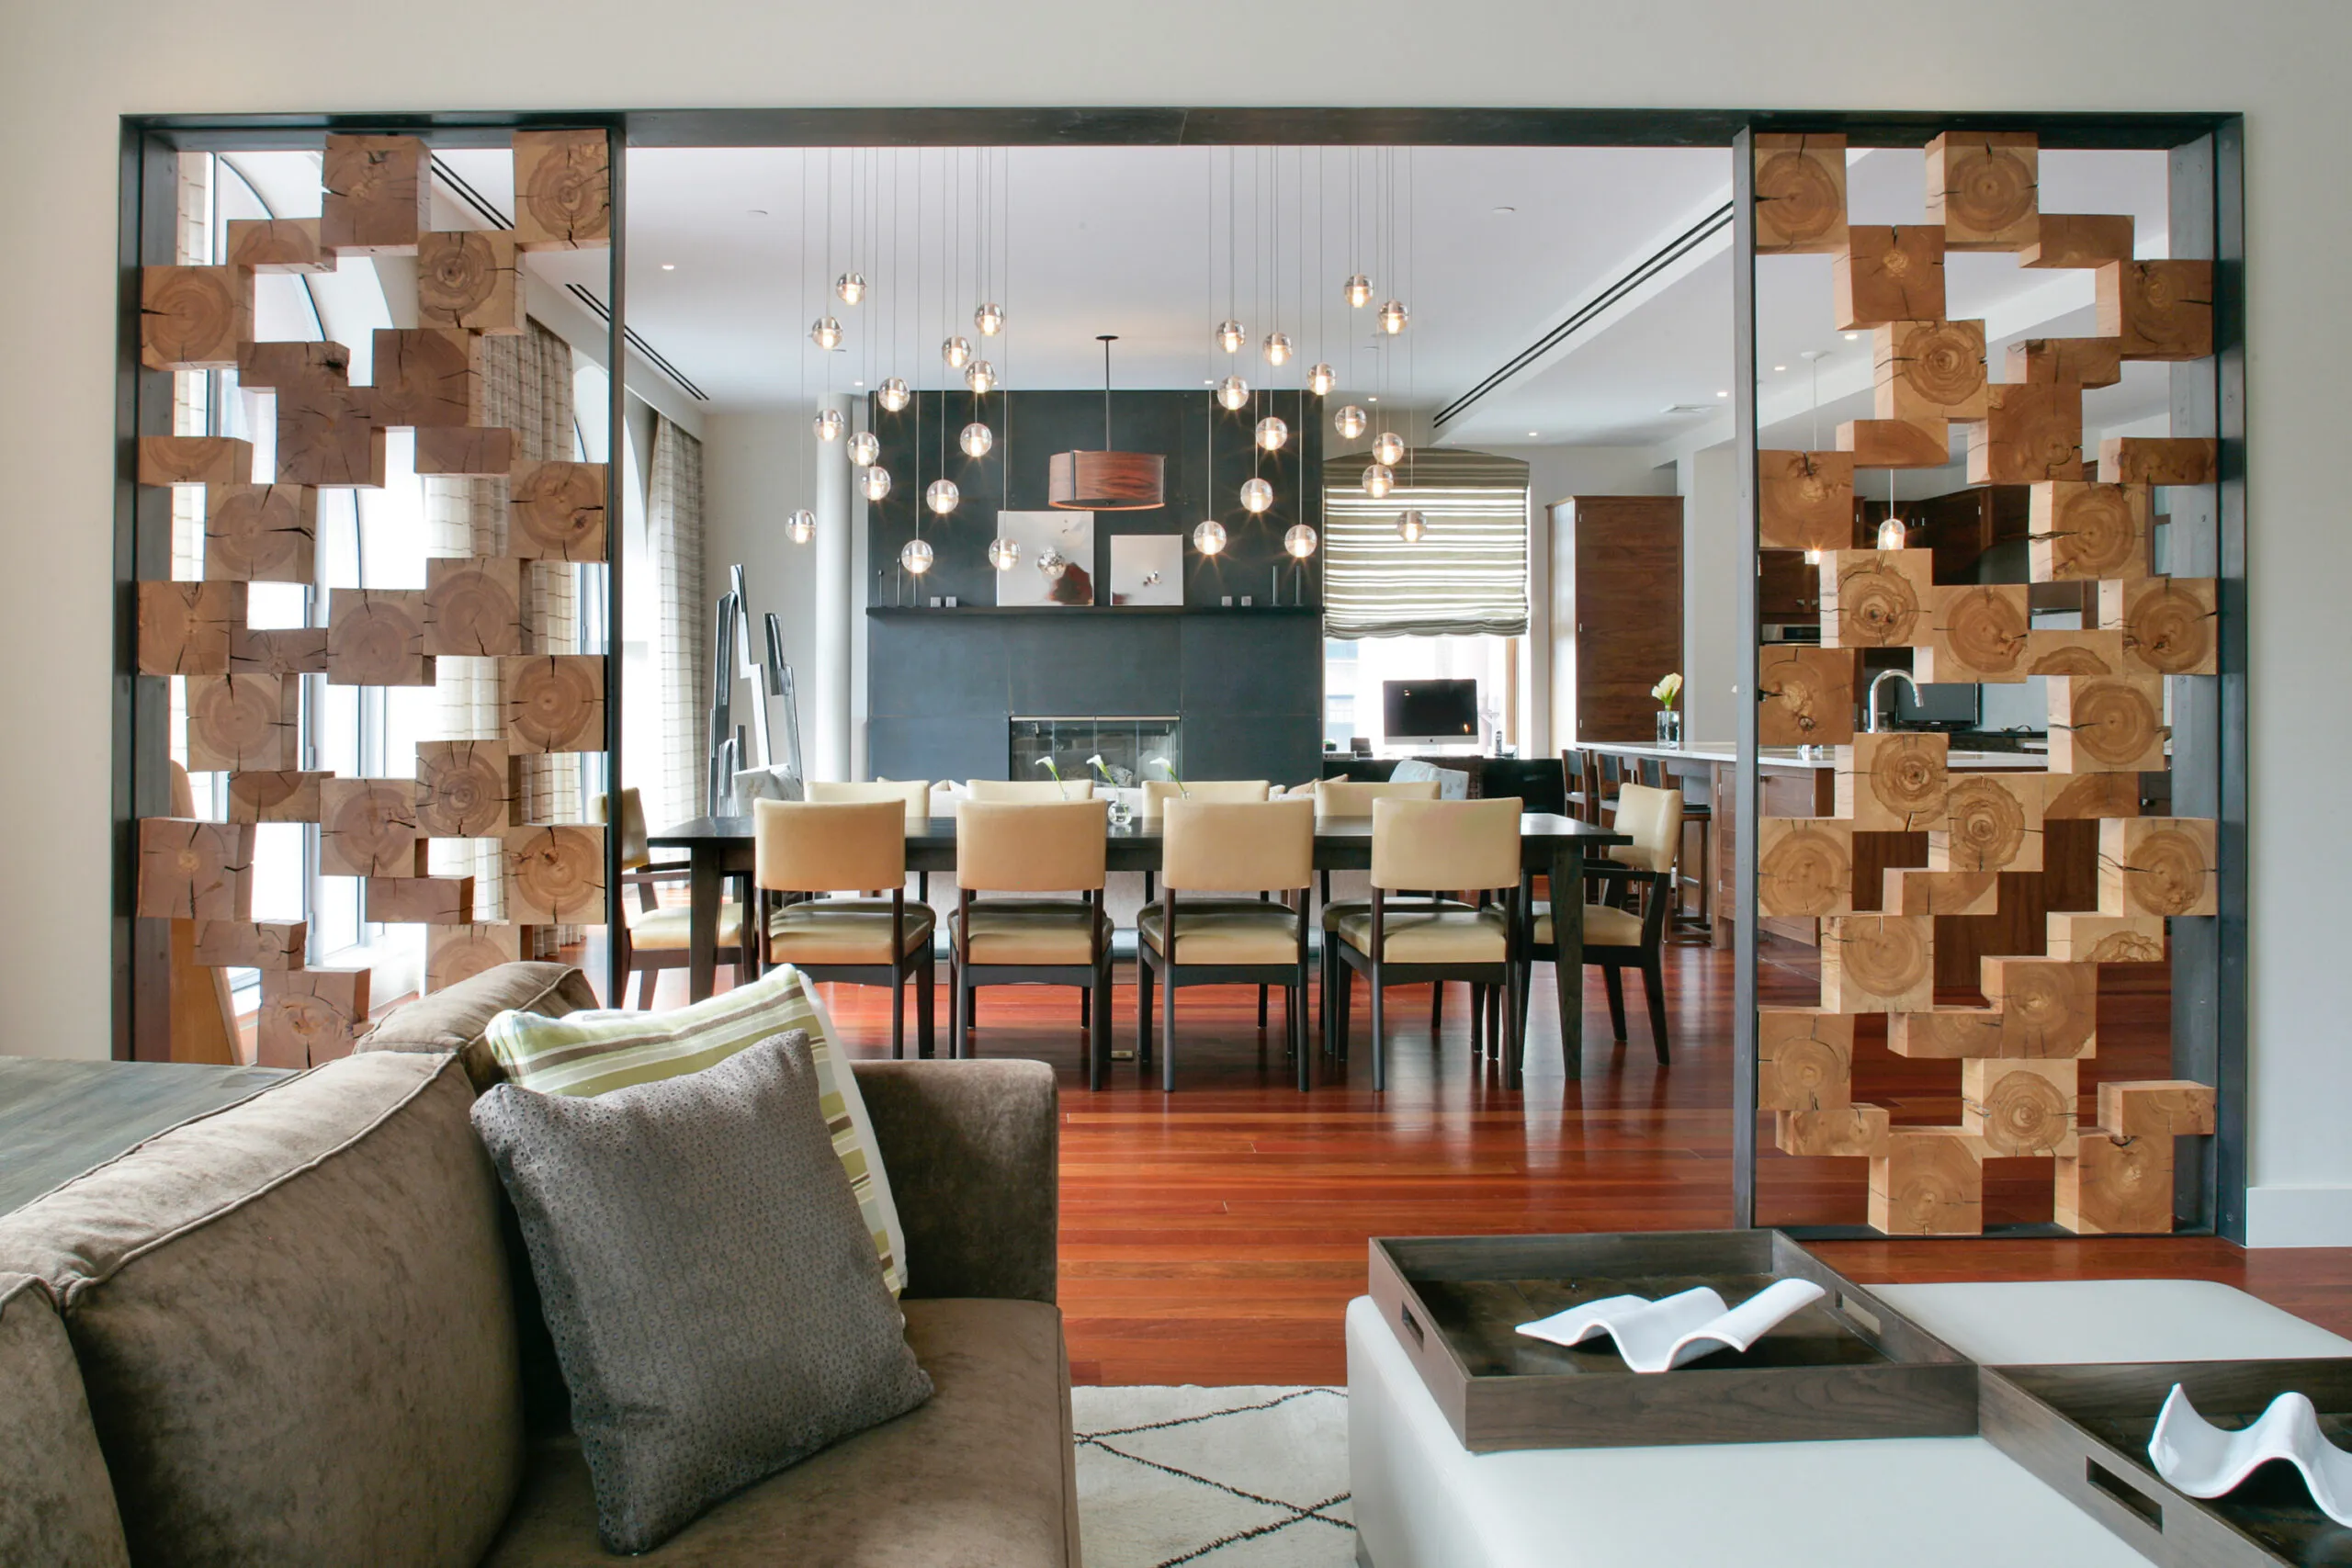
Let the building blocks of style set your place apart—literally and metaphorically. This designer used chunky beech squares and rectangles to fashion a double-sided partition to separate a den from a dining room. The effect is warm and organic, yet modern and chic, and with solid construction it’s a lot more stable than the Jenga game it channels!
Best Room Dividers for Salvagers and Upcyclers
If you’re always ready to remake found objects or yard-sale steals, consider these space-sculpting projects:
Folding Screen Made from Doors or Shutters
DIY a folding screen using discarded doors or shutters as panels. Stain, paint, or keep in as-found condition depending on your decor, then install hinges to connect panels.
Tree Branches
Bring a sense of the outdoors in with a room divider fashioned from fallen tree branches. Insert branches (birch looks particularly beautiful) to a secure base, adding stones at the bottom to enhance the natural look, or twine with twinkling lights for a fairytale forest feel.
Old Window Frames
Old window frames get a new life as light-allowing room dividers. They can hang from from the ceiling or be hinged together as a screen.
Next Up In Living Rooms
- A Family Brings New Life to Spanish Revival in Los Angeles
- Preserving a Home’s Original Character While Remodeling
- Renovating a 1909 Craftsman in Portland, OR—Over Two Decades
- Look Inside this Expanded Shotgun Home in Atlanta, GA
- The 5 Best Coffee Tables (2024 Guide)
- The 5 Best Reclining Sofas (2024 Review)
Sign up for the Newsletter
Get the latest This Old House news, trusted tips, tricks, and DIY Smarts projects from our experts–straight to your inbox.
MorningChores
32 DIY Room Dividers to Create Privacy With Stylish Flair
Looking for a way to bring some privacy to space? Maybe you’re just tired of your open areas? Or maybe you’re just craving a new DIY project for this weekend? Well, whatever your reason, you’re sure to find the DIY room divider project you’re looking for in this list!
There are so many unique ways to separate spaces. You can use recycled materials like rope, twigs, or old doors, or you can build the whole thing from scratch! Or you can build something permanent or something easily movable. You can even create a multifunctional division wall that also works as a chalkboard or a bookshelf.
Get inspired by this list and let’s start crafting!
DIY Room Dividers to Suit Your Style
1. rope wall.

This DIY project has a stunning result. The rope wall gives a nautical feeling while providing some division between spaces.
2. Twinkle Branches
Bring some sparkly light to any room with a room divider made with twinkling branches .
3. Tropical Style

A bamboo mat hung vertically provides an easy-breezy room divider with a tropical style .
4. Rolling Doors
If you want some privacy, try making these rolling doors to close off any room.
5. Screen Rack

Using a clothing rack and a screen you’ve got yourself a screen rack . Pull the curtain to the side to continue hanging your clothes.
6. Folding Screen
A portable room divider so you can have your privacy anywhere in the house. Perfect for a changing room too.
7. Closet Doors

Find some closet doors at a garage sale and give them a stylish makeover!
8. Bookcases
You can use refurbished bookcases to create a modern and functional room divider complete with shelves!
9. Vintage Look

A feminine and vintage look could be just what your room needs.
10. Metal and Rust
Old wooden folding doors were given a cool makeover to have a rusty metal appearance, easily done with metal paint. So chic!
11. Pallets

This budget-friendly room divider makes wonderful use of old pallets not only as a room divider but a display wall too.
12. Suspended Fabric
A perfect and creative way to use up all that old scrap fabric you have lying around!
13. Macrame

I’m in love with a totally bohemian chic room divider made from macrame . Complete with little air plants!
14. Divider Wall
A freestanding wall to bring a bit of division to a room. Separate the kitchen from the dining room with a DIY project.
15. Chicken Wire Screen

Chicken wire doesn’t make the best privacy screen, but it sure does when you cover it with photos and treasures!
A quick way to get some privacy is to staple your favorite fabric to an artist canvas and hang it from the roof!

Pretty blue borders and a fun and vibrant fabric that fills the middle. A wonderful privacy screen or room divider .
18. Geometric
A modern and charming room divider using interesting geometric shapes and beautiful wood tones.

The instructions for this original string art design are not in English but you can use Google Translate, or even better, your imagination!
20. Chalkboard Reverse
On the other side of the already charming room divider is a super useful chalkboard for you to write your daily tasks!
21. Bulletin Board

Not only a room divider but a helpful bulletin board where you can pin up all your flyers, coupons, and photos.
22. Recycling Paper
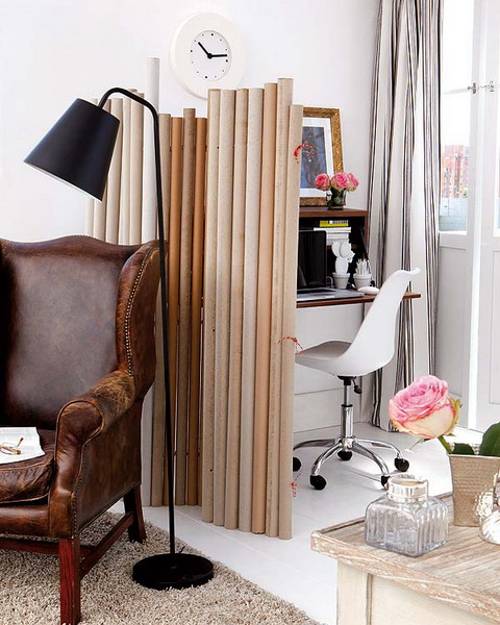
Do you have a bunch of paper, cardboard, or tubes laying around? Here’s how you can use them !
23. Recycled Wood Floor

After you’re done reflooring, don’t throw away the old floorboards, make use of them !
24. Multifunctional
A multifunctional piece working as your master beds headboard, a room divider, and a closet all in one! Use Google Translate for the instructions.
25. Sliding Barn Doors

Here we have the perfect room divider DIY project for the rustic country home!
26. Hanging Divider
A sort-of retro feel is what we get with this fun, bright, and colorful hanging room divider .
27. Compression Shelf

A coat rack, shoe rack, a desk, a bookshelf, this DIY room divider has it all!
28. Curtains
Large curtains are a wonderful idea as a room divider because it allows you to switch between privacy and openness easily!
29. Cardboard

I know it looks complicated but don’t worry! The instructions will walk you through it step by step.
30. Budget-Friendly
On a tight budget but need that extra privacy? A simple clothing rack and some fabric will do the trick!

A very pretty design , perfect for creating a statement art wall or to use for room division.
32. Party Place
Designate the party area by separating it with a super fun room divider made with streamers .
We’ve seen a lot of inspiration! Fun patterns, minimalist designs, multifunctional pieces, bright colors, recycled items, we’ve seen it all!
Creating a division in your open space doesn’t have to be a huge project that breaks your budget. You can easily do it yourself and save money. Not to mention, DIYing your own furniture pieces are always rewarding and fun to do! Get your friends together and make a day of it or do it all on your own and surprise your roommates!
The only thing left to do now is to choose which one you’re going to make. Happy crafting!
Was this article helpful?
What went wrong.
This article contains incorrect information
This article does not have the information I am looking for
How can we improve it?
We appreciate your helpful feedback.
Your answer will be used to improve our content. The more feedback you give us, the better our pages can be.
Follow us on social media:

33 Simple DIY Valentines Cards Perfect for Valentine’s Day this Year
10 Stylish and Productive Ways to Make your Bullet Journal Brilliant

29 DIY Calendars to Keep Your Days and Months Organized

153 Free DIY Pole Barn Plans and Designs That You Can Actually Build

How to Build a Sturdy Wattle Fence with Tree Branches

10 DIY Moonshine Still Plans (and 6 Moonshine Recipes to Try)

How to Make Pine Pitch Glue at Home

How to Carve a Kuksa: Make Your Own Wooden Cup or Bowl

23 Amazing Products to Use as Natural Mosquito Repellent

How to Build an Outdoor Cob Oven for Under $30

The Complete Guide on How to Make a Terrarium (and 4 Ideas to Use)

The Basics of Building a Yurt and How to Start Building One
DIY Folding Indoor Privacy Screen or Room Divider
By: Author Vineta Jackson
Posted on Published: November 5, 2019 - Last updated: April 14, 2024
Home » DIY Projects

Add privacy or hide away clutter with this DIY room divider! This folding screen is easy to make with bifold doors and contact paper!

Our basement family room is full of eyesores! First, we had to deal with the cold, hard floor that was anything but cozy. That tile was covered with carpet within a few months of moving in!
Then we removed a closet to add extra space , but the water shut off valve was exposed in the process. One of my very first woodworking projects was the long floating shelves that hide the knob and access door behind the knickknacks.

Now I finally have a solution to another basement eyesore . . . the electrical panels that stick out like a sore thumb at the end of the room!

For years, we just tried to ignore it. But I spotted these bifold doors at my local architectural salvage store and knew they were destined to become a folding screen! They're shorter than your average door, and the hollow core makes them light and portable.

Best of all, the flat front makes them super easy to decorate with contact paper! I'm totally addicted to this stuff, and I've used it to cover everything from our kitchen counters to cabinets . This time, I used a fun print for one side and a coordinating color on the back so I can switch up the look easily! You can find more creative uses for contact paper here !

Here's how to make a folding screen room divider for yourself!
This post contains affiliate links for your convenience. Purchases made through these links may earn me a small commission at no additional cost to you. Please visit my disclosures page for more information.
Materials Needed for DIY Room Divider Screen
- Check your local Habitat for Humanity or other architectural salvage yard. They usually have plenty of them in stock!
- I used this hexagon pattern contact paper for one side and this solid gray one for the other three sides.
- Razor blade knife
- Smoothing tool
- Screwdriver to remove door hardware
- Cardboard or cutting mat
How to Make a Folding Privacy Screen
Remove the bifold door hinges.
Unscrew the hinges from both doors. It's a lot easier to work with each panel individually.

Cut the Contact Paper to Length
One side of the doors will get a hexagon patterned contact paper, and the others will be a solid gray color. I could have painted those sides, but this is faster and easier!
I started with the solid gray sides, saving the pattern matching for the end. Roll out the contact paper down the length of the door and cut it to size with a little excess just in case.

Peel and Stick Contact Paper to Door
I started with the solid color side first. I planned to wrap the contact paper around to the sides of the doors, so I kept it roughly centered. Just peel off the first few inches of the backing and stick it in place!

This stuff is pretty thick, so I just pressed out any air bubbles with my hand. You can use a smoothing tool , but I was worried it would create lines. This contact paper isn't as durable as the kind I used on my kitchen counters , and every scratch shows on the solid color!

Once the contact paper is in place on the front, crease it along the edges and wrap it around to the sides.

To get a perfectly cut edge, I stood the door up on its side with a piece of cardboard underneath.

Then I used a razor blade to slice away the excess along the edge.

The hexagon side was a little trickier because I had to match up the pattern. First, I lined up the factory cut edge of the contact paper with the side of the door with the hinge holes. Allow the excess to hang off the other side.

Then I flipped the door over so that the patterned contact paper was on the bottom (on top of cardboard). Cut along that edge to remove the excess.

Place the two doors with the hinge holes facing each other. Line up the pattern so that it continues to the next door.

Stick the contact paper in place, then cut off the excess the same way as before.

Reattach the Hinges
Since the original hinge holes were covered with contact paper, I had to feel along the edge to find them. Screw them back into place on one door, then attach the second one.

You could use additional hinges to connect all the doors together for a longer folding privacy screen. But I thought this would be too awkward to move if we needed to get to the electrical box in a hurry, so I just left the doors in pairs.

Stand Up your New Folding Screen Room Divider
Open up the doors to form a V, then stand them up in place.

I played around with the arrangement to see what looked best. You can mix them up and have the pattern showing on one pair, with solid color on the other.

I personally like the hexagon side best. I adjusted the spacing between the two panels so the pattern flows better from one to the next.

Even with the barn door open all the way, there's plenty of room to store the room dividers off to the side when necessary.

I'm so glad I don't have to look at those ugly electrical panels at the end of the family room anymore! 🙂
Check out these other DIY project ideas!

Easy Adjustable DIY Desk Shelf [with plans]

How to Paint a Picture Frame [2 Different Ways]
DIY Arrow Decor Made with Leather

DIY Push Pin Travel Map

DIY Air Plant Wall Holder

DIY Live Edge Floating Shelves
11 DIY room dividers to try that mean you won't need to build walls to create a private sanctuary
These chic DIY room dividers will allow you to experiment with the layout of your space (without breaking the bank)
- Sign up to our newsletter Newsletter

Is your home short on square footage? Budget on the slim side? This roundup of our favorite DIY room dividers will provide the inspiration you need to optimize the space you do have without compromising on style.
Room dividers are a great way to compartmentalize concept living and create a multifunctional space that offers cozy sections for different uses, from separating the living and kitchen areas to creating a WFH area in your bedroom.
Whether you're looking for ways to optimize space as part of your small or studio apartment, or simply want to carve out a cozy nook in a small living room, these our 11 DIY room dividers will provide the perfect inspiration for your next home project.
11 DIY room dividers to partition your space
These DIY room dividers will show you how you can maximize space, without spending a fortune or compromising the overall aesthetic of your home.
1. Work a modern rustic wooden room divider to separate your living space

To add interest, character and privacy, Jessi of @byjessigoldstein , opted to construct a curved wooden DIY room divider to separate her living space.
A room divider is a brilliant small apartment living room idea , and allows you to create separate spaces for different uses. This curved room divider ensures there's a clear distinction between the lounging area and the home office.

Jessi explains how to create the look below:
1. Buy individual timber sticks at two or three inches wide.
2. Make groups of 13 or 14 sticks and lay them down side to side on the floor.
3. Staple one stick with another, all together from only one side. Do the same thing with all the groups.
4. Stand one group with the wave facing one side, and put the next group facing the opposite side. Staple them and repeat.
5. Finish by applying a toner of your preferred color.
2. Introduce curves with an arched room divider

As far as studio apartment ideas go, this arched DIY room divider nails the brief: both chic and practical at the same time.
'I live in an alcove studio and I wanted a separation between the alcove bed area and the living space,' explains Laura of @laura.cattano . 'I didn't like the idea of sitting at the dining table looking at my bed.'
Laura used beautiful birch wood for the project, which worked perfectly within her Scandi-style decor theme. 'I wanted something wooden, freestanding, but light - hence the use of the mirror - which is actually mirrored acrylic,' she says. 'The arc softens the piece and helps to differentiate it from the other walls in the apartment.'
3. Add color and pattern with a striped folding screen

A folding screen is a great idea for a weekend project to add color and pattern to your space. You could use your folding screen to separate any space, but Christy at confessionsofaserialdiyer.com created hers to use a dressing area. She used a stencil to apply a pretty damask pattern, and Frog tape from Amazon to create the stripes, which add a pretty coastal vibe.
She says: 'I picked up the folding screen from a thrift store and paid $26 for it. I always wanted a fancy screen to change behind like in the movies.'
Explaining how she created the look, Christy says: 'To add my stencil, first I measured to see where I wanted to add the stencil and in what pattern. Then I sprayed Loctite Spray Adhesive on the back first to hold it in place. I used a small brush and pure white DIY chalk paint to fill in the stencil, taking care not to brush towards the edges as much as possible.
'I continued to add a quick spray of the adhesive to the back before moving it to the next spot. (After I was finished, I used an old wash cloth and warm running water to wipe down the stencil on the side with the paint in my kitchen sink, then let it lay sticky side up on a paper towel to dry.)
'I sanded generously with 220 grit sandpaper after to smooth it all out.' Christy then used Frog tape to apply her stripes, before sealing it with Annie Sloan’s clear soft wax.
4. Go boho with a rattan DIY room divider

A rattan room divider is a surefire way to inspire a boho living room vibe. Combined with arched tops, and you've got yourself an on-trend piece for a fraction of the store-bought price.
'This room divider was designed with the intent to provide a physical separation between two living spaces, while still letting through ample light,' says Nicolette, of @madebynicolette .
'Three main processes were used to create the DIY room divider. Firstly, the outer frame was made using wood joinery techniques. I turned the spindles at the bottom on a wood lathe, similar to how the process of making balusters for a stair railing. I created five different spindle designs to add a point of interest at the bottom of the divider.'

She continues: 'The woven midsection is done through a process called cane weaving. I was inspired by beautiful and intricate patterns found on vintage chairs with cane seats. The cane strands are naturally very dry and brittle, and so the cane is soaked before weaving, to allow it to gain some elasticity.
'The pattern is then woven with the wet cane, and as the cane dries, the strands shrink and become taut. As a final step, the three panels were joined together using cane.'
5. Create a contemporary Crittall-style room divider for a sleek look

If you're a fan of Crittall-style doors and windows but don't have the budget or the right space, a nod to the look with a DIY room divider is a stylish - and affordable - alternative.
You can easily use matte black paint to create the look, as Floor of @washplate did above.
She says: 'A room divider not only 'divides' the space in half (which is ideal if you want to separate two areas), but it also breaks a larger space. By placing a divider in the room, you create more depth and also create new corners that you can style to give your living room or bedroom extra atmosphere.
'This room divider is not only nice and low-budget but is also a great DIY project that is not too complicated.
'I made our room divider from pine slats and painted it black for the steel effect.'
See exactly how Floor created the look on this blog .
6. Fashion a biophilic living 'green screen'

Decorating with plants is an inexpensive and eco-friendly way to separate a makeshift home office in your bedroom.
'Being around plants can boost productivity and reduce stress,' says Rebecca Snowden, Interior Style Advisor at Furniture And Choice. 'Zone your WFH (working from home) space with a bookshelf filled with a variety of greenery like potted ferns and trailing plants.' In areas that receive little sunlight, faux plants work just as well. Create a fresh and airy workspace with a white desk and chair, and calming green artwork.

You can also use a sleek black clothes rail to fashion your 'green screen' DIY room divider for an industrial, contemporary take on the look.
7. Channel an industrial vibe with an upcycled window frame

Working with industrial interior design ? An upcycled window frame DIY room divider will enhance the look perfectly.
'We purchased this chippy, vintage window for only $20 at an antique market,' explains Jeanette, of snazzylittlethings.com .
'Once our basement remodel was finished we realized we needed to create more defined spaces. This window was a perfect complement to our vintage, industrial vibe and helped create a division between the bar and mantel seating area.'
8. Install an on-trend grey wood slatted style

A room divider doesn't need to be opaque; it's often simply used as a way of zoning a room and delineating different spaces.
The cool, grey slatted wood room divider above shows how you can create a cozy dining space while maintaining an open, airy feel.
So how was it created? 'I started this mini project by purchasing wood from the local sawmill,' says Robyn, of @robynathome_ .
'I used 4 x 1 planed pine for the verticals and some off cuts of 3 x 2 for the top and bottom. A frame was then created with several “test fits” as the ceiling wasn’t level. Once the frame was the right size, I cut and screwed the remaining verticals in place.
'Once built, I was able to hold the divider in place with some clamps. I then used hardwood wedges and clear silicone to secure in place.
'This method required no drilling to the ceiling or new flooring I just had installed. The finish was achieved by using Littlefairs driftwood wood dye.'
9. Craft a fluted room divider for a cool kids bedroom idea

If you don't have space for kids' study room ideas , a DIY room divider is an effective alternative to create the homework area needed as your child gets older.
Laura over @thehappybuild created a cool and creative boy's bedroom idea with her fluted DIY room divider, which is also a clever IKEA hack .

'Now Ralph is heading into secondary school we wanted a dedicated space where he could do homework, and this room divider does the job perfectly, separating a workspace from the bed,' she says.
'I used the back of the headboard to fix a sheet of MDF and this was paneled with cut-down strips of MDF.
'The desktop is from IKEA and sits on small ledges screwed into the wall so that it appears to float.
'Finally, above the desk the paneled strips are taken to the ceiling and the top of the headboard enclosed with an MDF shelf to finish the divider and create a more permanent looking structure'.
Laura adds: 'The whole divider is painted in Farrow and Ball Lichen.'
10. Display a modern rustic aesthetic with a patinated frame

A rustic-chic painted frame room divider will work wonders in a Scandi decor space.
This look was created by Natascha @huisjevannatascha , who wanted to create a definitive separation between her kitchen and living space - an excellent small apartment idea .

Natascha created the frame herself with pine, then applied several layers of paint before sanding it back to create a rustic, patinated effect. The result is a divider that adds a textural element to a creative s pace
11. Style up a DIY room divider with a clever IKEA hack

You can create an ultra-chic rattan DIY room divider with a clever IKEA Ivar hack . The famous cabinet range is actually available as shelving, and its side panels can be bought separately, which makes the product ideal for DIY projects.
When paired with cane webbing, these Ivar side panels create a chic and ultra-handy IKEA room divider idea that serves as an easy and affordable way to add a bohemian atmosphere to any space.
Be The First To Know
The Livingetc newsletter is your shortcut to the now and the next in home design. Subscribe today to receive a stunning free 200-page book of the best homes from around the world.
Ruth Doherty is a lifestyle journalist based in London. An experienced freelance digital writer and editor, she is known for covering everything from travel and interiors to fashion and beauty. She regularly contributes to Livingetc, Ideal Home and Homes & Gardens, as well as titles like Prima and Red. Outside of work, her biggest loves are endless cups of tea, almond croissants, shopping for clothes she doesn’t need, and booking holidays she does.

After a smashing debut last year, H&M Home x Pantone returns back and better than ever, satisfying our dopamine decor cravings just in time for summer
By Julia Demer Published 25 April 24

The multi-talented star is bringing her sense of play and penchant for style to interiors, and we’re absolutely here for it. From coffee makers to decor, here's what this style editor is loving below
Useful links
Buying guides.
- The best wall mirrors
- The best blenders
- Gorgeous children's desks
- The cosiest blankets for autumn
- How to hang wallpaper
- Create the perfect gallery wall
- Tips on painting a room
- Hiring an interior designer
Inspiration
- Grey living room ideas
- Ideas for boy's bedrooms
- Small living room ideas
- Ideas for grey kitchens
- Contact Future's experts
- Terms and conditions
- Privacy policy
- Cookies policy
- Advertise with us
Livingetc is part of Future plc, an international media group and leading digital publisher. Visit our corporate site . © Future Publishing Limited Quay House, The Ambury, Bath BA1 1UA. All rights reserved. England and Wales company registration number 2008885.

- 100 Day Dream Home
- Bargain Block
- Battle on the Beach
- Battle on the Mountain
- Building Roots
- Celebrity IOU
- Christina on the Coast
- Down Home Fab
Farmhouse Fixer
- Fixer to Fabulous
- Help! I Wrecked My House
House Hunters
- Lakefront Empire
- Lil Jon Wants to Do What?
- Love It or List It
Married to Real Estate
My lottery dream home.
- No Demo Reno
- Property Brothers: Forever Home
- Renovation Aloha
- Rico to the Rescue
- Rock the Block
Small Town Potential
- Tough Love With Hilary Farr
- Ugliest House in America
- Unsellable Houses
- Why the Heck Did I Buy This House?
- Zillow Gone Wild
- See Full Schedule
- Stream Full Seasons
- Sign Up for Our Newsletters
- Ideas by Room
- Design Styles
- HGTV Magazine
- HGTV Newsletters
- Flowers and Plants
- Landscaping and Hardscaping
- Outdoor Spaces
- Curb Appeal
- Cleaning and Organizing
- Entertaining
- Healthy Home and Garden
- Real Estate
- Home Improvement
- DIY Projects
- HGTV Handmade
- HGTV Smart Home 2024
- Get Outside $5K Giveaway
- Spring Into Cooking $5K Giveaway
- Spring It Forward $5K Giveaway
- HGTV Dream Home 2024
- HGTV Urban Oasis 2023
- Product Reviews
- Gift Guides
- Sales and Deals
- News and Trends
- Newsletters
- TV Schedule
- Make and Celebrate
How to Make a Multipurpose Room Divider
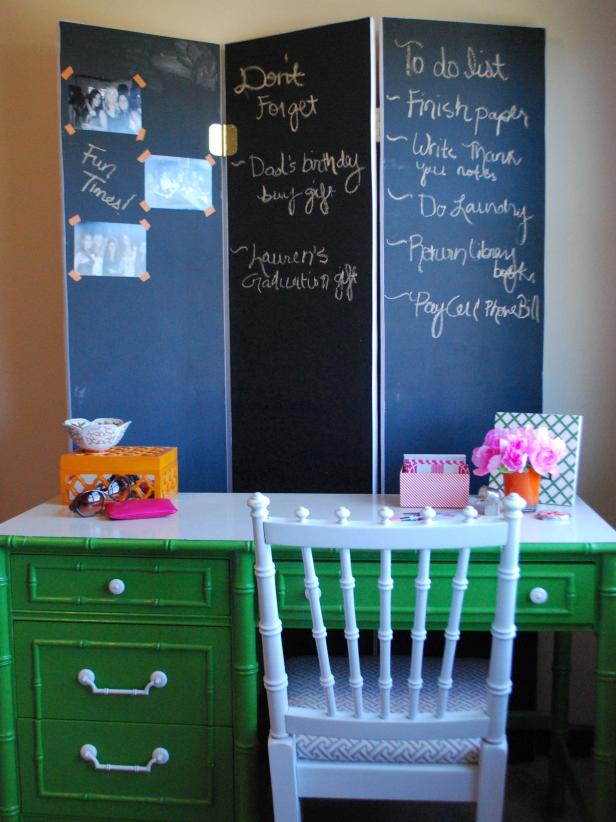
Original_Camila-Pavone-Room-Divider-Beauty2_v
Related to:, materials needed:.
- 3/4-inch-thick MDF board
- 4 door hinges
- 4 yards fabric
- queen-sized quilt batting
- chalkboard paint
- mini foam roller
- 3/4-inch ribbon
- spray adhesive
- fabric glue or hot glue gun
Cut Out Screen Pieces
Take MDF board (standard size 48 x 80 inches) and cut down to the height you would like. For this project we cut ours down to 60 inches and were left with 48 x 60 inches. We then took that board and made three cuts to get three 16-inch-wide pieces. Lightly sand new edges.
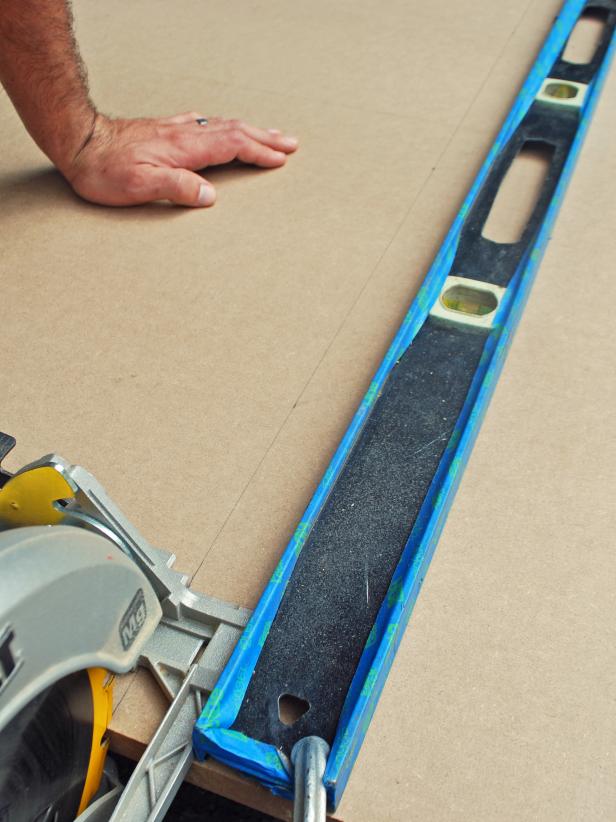
Original_Camila-Pavone-Room-Divider-Step1_v
Apply chalkboard paint.
Since this folding screen will be reversible, you're going to paint one side with chalkboard paint. Use a mini foam roller to apply three layers of chalkboard paint. Let dry.
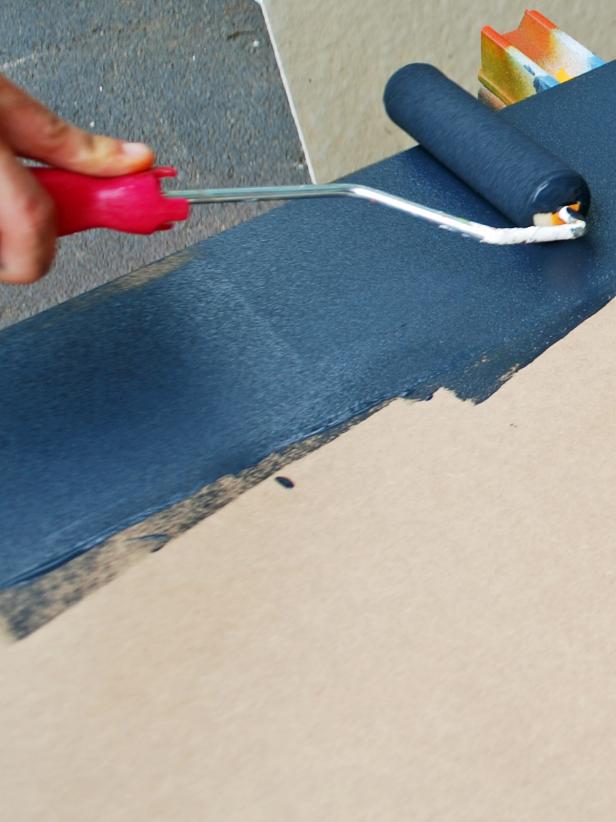
Original_Camila-Pavone-Room-Divider-Step2_v
Upholster reverse side of screen.
Lay out quilt batting and cut to size (Image 1). A razor blade makes it easy to trim excess (Image 2). Use spray adhesive to adhere.

Original_Camila-Pavone-Room-Divider-Step3A_h
Original_camila-pavone-room-divider-step3b_h, apply fabric to screens.
Depending on your fabric, you need to take into account pattern scale for placement. Once you find the perfect placement, make sure to cut three equal panels of fabric with that placement in mind. Once your pieces are cut, place panel over batting and use a staple gun to adhere to the border of the screens.

Original_Camila-Pavone-Room-Divider-Step4A_h
Original_camila-pavone-room-divider-step4b_h, cover staples.
Once you have stapled all the fabric to the screens, you will now have upholstered fabric screens but the edges will be unfinished with exposed staples. Use 3/4-inch-wide ribbon and apply with fabric glue or a glue gun to cover staples.
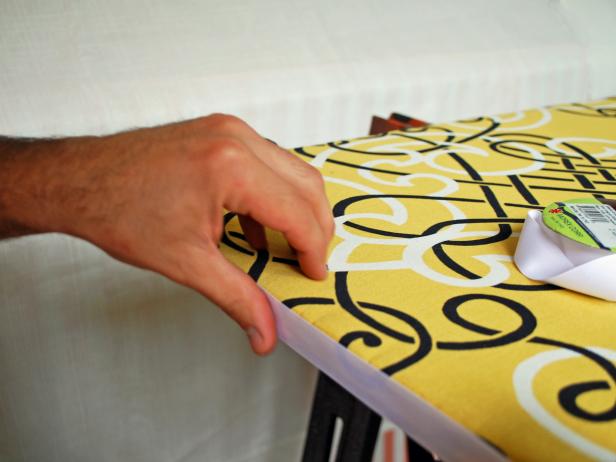
Original_Camila-Pavone-Room-Divider-Step5_h
Apply hinges.
Measure 8 inches down and 8 inches up on each screen and use the hinges as a template to mark the three screw holes. Since we need to make our screen fold you will be placing a set of hinges attaching the first two screens on the fabric-covered side. Then you will flip everything over and attach the second set of hinges to the second and third screens on the chalkboard side. Since you're going to be drilling through fabric/batting make sure to pre-drill the holes with a drill bit that is skinnier than your screw. Also, it's best to run the drill in reverse first and then forward after the bit punctures the fabric.

Original_Camila-Pavone-Room-Divider-Step6B_h
Original_camila-pavone-room-divider-step6a_h, you're finished.
Once complete, you can use the fabric side as a pretty pin board for photographs and inspirational pictures. Or you can use the chalkboard side as a place to jot down homework assignments, to-do lists and reminders.

Original_Camila-Pavone-Room-Divider-Beauty3_v
Original_camila-pavone-room-divider-beauty1_v.
How to Make a Fabric Pouf Ottoman

How to Make a Bulletin Board Headboard

How to Make a Recycled T-Shirt Rug
How to Make a Personalized Wall Photo Mural
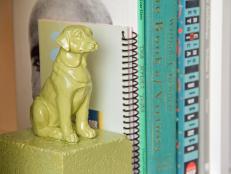
DIY Painted Animal Bookends

How to Ombre Dip-Dye a Duvet Cover

Dorm Life Realities Every Freshman Needs to Know
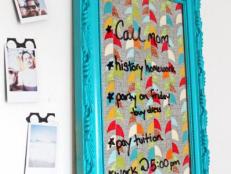
Turn a Flea Market Frame Into a Wipe-Off Board
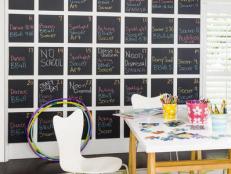
How to Make a Giant Chalkboard Calendar

Customize Store-Bought Curtains With Ribbon Trim
Back to school, hgtv handmade newsletter.
Subscribe now to get our latest craft projects and DIYs delivered to your inbox.
By entering your email address, you agree to our Terms of Use and acknowledge the Privacy Policy . HGTV and its affiliates may use your email address to provide updates, ads, and offers.
To withdraw your consent or learn more about your rights, see the Privacy Policy .
- HGTV Insider
- HGTV Shopping
- HGTV Makeovers
- HGTV This Week
- HGTV Gardens and Outdoors
- HGTV Daily Sweepstakes Reminder
- HGTV Inspiration
- HGTV Weekend Projects
- Sweepstakes Updates
What's New in Handmade

DIY Concrete Planters: A Step-by-Step Guide Apr 12, 2024

This Artist With Synesthesia Painted the Sounds of Wildlife During the Solar Eclipse Apr 12, 2024

How Ceramic Artist Gabo Martinez Preserves and Celebrates Mexican Culture Through Her Vibrant Pottery Mar 22, 2024

How to Make a Hypertufa Pot Feb 14, 2024

See How an Artist Creates 'Hair Gardens' That Fuse Mexican Culture, High-Fashion Millinery and Old Hollywood Feb 9, 2024

Block Print Like a Pro: How to Carve Rubber Stamps for Fabric Printing Oct 17, 2023

Here’s How the Barbie Movie Team Created All Those Fantastic Spaces Feb 29, 2024

Gullah Gift Guide: 12 Gullah Artists, Makers and Brands You Should Follow Jun 13, 2023

Meet the Austin-Based Clothier Who Upcycles Vintage Quilts and Fabrics Into Custom Clothing Apr 20, 2023

This North Carolina Artist and Interior Decorator Has Her Own Fabric Line and Home Decor Collection Mar 28, 2023

How to Start Using Your Cutting Machine Dec 19, 2022

The Best Crafting, DIY and Hobby Books to Buy or Gift Dec 19, 2022

How to Make Wire Shelf Covers That Look Just Like Floating Shelves Mar 1, 2023

Turn a Plywood Board Into Easy DIY Outdoor Art Jun 7, 2022

How to Upcycle a Cutting Board Into an Address Plaque Jun 17, 2022

How to Decoupage a Chinoiserie-Style Planter Pot Jun 17, 2022

DIY Rainbow Doormat Feb 14, 2024

Make Homemade Play Dough May 12, 2022

How to Make Stress-Relieving Glitter Slime May 9, 2022

Make a Mini Blooming Garden Table to Showcase Your Favorite Succulents Mar 22, 2022

How to Build a Floating Shelf With Hidden Charging Station Apr 7, 2022

Upcycle an End Table Into a Cute and Cozy Dog Bed Apr 7, 2022

How to Build a Cozy Cat Hideaway Apr 7, 2022

Upgrade a Bookshelf With Cane Webbing Apr 7, 2022

Make Clay Pinch Pot Hanging Planters to Display Your Fave Succulents Apr 22, 2024

Turn an Old Tomato Cage Into a Storage Basket May 9, 2022

How to Build an End Table With a Built-in Pet Bed Feb 17, 2022

Easy-to-Make DIY Beach Scene Painting May 9, 2022

Turn an Old Laundry Detergent Pod Container Into a Moon Planter for Succulents May 9, 2022

How to Make a Cactus Pincushion May 9, 2022
Follow us everywhere.
Join the party! Don't miss HGTV in your favorite social media feeds.
Related Pages
- Multipurpose Room Ideas
- 40 Clever Room Divider Ideas
- How to Make an Outdoor Privacy Screen From PVC...
- Clever Faux Mantel Wall Hanging for the Holidays
- How to Make a Multi-Functional Room Divider
- Make Your Own Room Divider
- License Plate Room Divider
- Custom Upholstered Room Divider
- How to Create an Upholstered Wood Screen
26 Best Room Divider Ideas to Separate Your Space
Easy Ways to Create Multi-Use Rooms
Lee has over two decades of hands-on experience remodeling, fixing, and improving homes, and has been providing home improvement advice for over 13 years.
:max_bytes(150000):strip_icc():format(webp)/headshots_FINAL_lee-wallender-739d21a7b6ed4aa1b895c684e193494c.png "diy travel room divider")
A room divider is a quick, inexpensive, decorative, and impermanent wall that typically provides visual screening between rooms or divides a large room into smaller areas. Dividers can help you get the most out of your space by giving you privacy when you don't want to build a wall.
The Spruce / Jason Donnelly
Room dividers can also clearly section off spaces, adding functionality to your home without wall construction. Room dividers are the cheapest way to divide a room but can also be used for decorative purposes.
Room dividers come in all designs, sizes, materials, and heights. Unlike do-it-yourself dividers, these room divider ideas were made for dividing a room or serving as a privacy screen. Some go from floor to ceiling, while others may just come up to the top of your head.
Here are 26 room divider ideas to consider for partitioning your open space to create a more usable layout, hiding clutter or a storage area.
Transform a Space With Glass Partitions
vicnt / Getty Images
A sleek and contemporary glass partition with a top or bottom rolling track system gives a room a modern, clean feel. For more privacy, consider using frosted glass for opacity that also allows in some light. Another benefit of glass is its good soundproofing and insulating qualities. Some unique designs include multi-paned window walls or mirror panels.
Splurge on a Ceiling Track Room Divider Kit
vicnt / Getty Images
A premium heavyweight ceiling track room divider kit is a creative and stylish way to divide a space in minutes. Most of these systems use a curtain, giving you many patterns, colors, and fabric options. A ceiling track and rollers allow this kit to open and close easily.
Erect a Freestanding Room Divider
KatarzynaBialasiewicz / Getty Images
Tall and wide privacy screens that may have initially served to divide hospital patient beds have been reimagined. You can find these dividers online and in home department stores. They appear like framed panels of fabric or other materials, supported by stabilizing legs or flat feet. They are thin and can fit easily between two items or into small spaces.
Add a Hanging Panel
Hanging panel systems are made of acrylic, resin, or other materials and are designed to work as modular partitioning systems. They are handy for dividing rooms; some have cutouts and designs that create pleasant decorative elements. They hang from the ceiling from eye-hole hooks or top-mounted track systems. Some can slide open or closed to give you varying degrees of privacy and light.
Use a Japanese Shoji Screen
ZenShui / Getty Images
A common room divider is the Japanese-inspired shoji screen , made from translucent material, such as rice paper, inserted into panels to allow diffused light into a room. You'll find shoji screens in many forms, from freestanding floor dividers to hanging panels.
Install a Sliding Barn Door
A rustic barn door room divider is solid and wonderful for providing privacy. Most operate along a sliding wrought iron track system. Pricing for these systems spans the gamut from $300 to $5,000. Barn door partitions work beautifully in homes with a country farmhouse style or with rustic design elements. A downside is most are made of dark wood and are heavy, giving the room a moody, intense feeling. Use them in a room with many windows and natural light to offset dark wood colors or stain them with a whitewash finish.
Divide a Room With Folding Panels
The Spruce / Francesca Maiolino
Folding or accordion dividers are made with multiple tall panels made of fabric or other materials connected by hinges that allow them to fold to varying degrees. These premade dividers require no installation. Unfold them and stand them up. If you have limited space, you may be unable to fit a folding divider. Another disadvantage is a bump, or strong draft can tip a folding divider.
Separate a Space With a Bookcase
Pickawood / Unsplash
A room divider bookcase is a freestanding bookshelf or a cubby shelving unit used to create visual or physical separation. You pick bookcases with open backs as small peek-a-boo windows to the other side or to allow light to pass through.
This divider can serve as storage for books, decor, and knick-knacks. Bookcases with drawers, doors, or pull-out cubes also keep clutter out of sight. Top-heavy bookshelves can be wobbly, so anchor tall bookshelves to an adjacent wall.
Bookcases filled with books also double as a sound-dampening wall for the space.
Slide Doors to Make a Divider
Mint Images / Getty Images
Sliding doors come in many styles and materials, allowing you to make a private space using unique rolling track systems. These dividers can separate entire areas, such as a dining space from a living room, or give privacy to a sleeping area.
Move Sliding Bookcases Into Place
A bookcase with locking wheels can create a large room out of the corner of an open loft or basement. A versatile bookcase on wheels can separate dining from living spaces and more. Roll and lock your way to total room transformations in minutes.
Wall Off a Space With Wood Slats
The Spruce / Alyssa Vela
Wooden slats are a unique way to separate spaces without fully committing to closing off the area from another part of the home. Slats allow light to pass through, and depending on the space between slats, you can see what's on the other side if you want to know. The slat effect makes a room feel open while allowing you to separate one space from another.
Deafen Sound With Acoustic Panels
Vera Vita / Getty Images
Acoustic panels and screens are uniquely designed with noise-canceling features; some are made of heavy foam cores and acoustic-ribbed fabric. They absorb unwanted sound waves that bounce off and disturb the room's acoustics, like the room's mid- and high-frequency sound waves. These panels are handy for people with hearing difficulties and can wall off a home office from an otherwise lively or noisy home.
Get a Durable Metal Partition
Aleksandar Novoselski / Stocksy
Metal room dividers are made of brass, copper, and aluminum and are the most durable and long-lasting room divider materials. Brass looks elegant and sophisticated but can turn blackish from oxidation. Copper is gorgeous and resists high temperatures and UV damage but it is costly. Aluminum is rustproof, lightweight, inexpensive, and usually easy to install, but it gets dings and dents quickly. Some are painted and finished so unsightly dents aren't as noticeable.
Consider Different Types of Wood Partitions
Vanit Janthra / Getty Images
Wood is a standard partition material that can be carved, painted, slatted, and solid. Wood tones vary in color from red, yellow, brown, orange, and black, depending on the wood used, and range in price from inexpensive to costly. It can be used as a sliding wall, mounted on a track system, hung on hangers, and folded accordion-style. The disadvantages of wood partitions are they are not soundproof or fireproof and are prone to damage from moisture, warping, and insect activity.
Infuse Rustic Feel With Rattan Dividers
@abitare_studio / Instagram
Rattan and wicker furniture pieces are lightweight, usually inexpensive, with a natural, rustic look that makes a space feel cozy. Similarly, rattan privacy screens are handwoven designs made into foldable panels that are easy to install, move around, and effortlessly add to a space.
Shut Out a Space With Shutter Partitions
Liudmila Chernetska / Getty Images
Movable window or louvered shutter panels are an affordable alternative to building a wall, allowing you to wall off a space the way you want. Shutter-style partitions allow light and sound to travel through them. Soundproofing might be preferred for some, but others need to be able to listen for a baby or child crying or have to check in with others who might be in that section of the house.
Shift Around Modular Block Walls
Getty Images
A modular wall kit allows you to make modular block walls and panels. Build the space using stackable blocks designed to wall off areas. Companies like EverBlock make these Lego-like wall-building systems to construct offices, children's rooms, display areas, and more.
Roll Around Whiteboard Panels
Point 3D / Unsplash
Portable whiteboard partitions on wheels work well in offices, children's rooms, classrooms, labs, and homeschools. They divide a space when you want and serve a purpose for doing homework, calculations, and brainstorming.
Get Artsy With a Divider
Rope walls, glass blocks , or hanging canvases can add an artistic flare to your space while dividing a room. Some offer privacy; others add texture to a bland space; they're a design element that elevates a room.
Get Lush With a Living Plant Room Divider
ÐлÑга Симонова / Getty Images
Plant stands come in multiple tiers and sizes, allowing you to divide a room using your living greenery. You can line up several plant stands with multi-level plant shelves to fabricate an entire living wall, separating a space in two. Similarly, if you use vining plants, give them a trellis or wires to grow up and create a living wall.
If you go the live plant route, make sure the plants you choose match the light levels in the room.
Hang a Beaded Strand Wall
piranka / Getty Images
Beaded curtains were all the rage in the 1960s and 1970s, replacing doors and forming transparent walls between spaces. These curtain walls still exist today, made of bamboo, wood or glass beads, shells, macrame, and tassels, allowing light to stream into a room while visually splitting a space in two. These playful curtain walls mesh well with a Bohemian chic aesthetic, an homage to the retro Flower Child style, or a fun, sensory-rich area,
Brighten a Room With a Light Divider
4595886 / Getty Images
LED lighting is inexpensive, versatile, and easy to replace. These lightbulbs last long and have transformed how you can use light. Whether you try an acrylic LED-lit panel or a wall of hanging strands of LEDs to separate a space, this look can give a room an ultra-modern, Art Deco, or retro 80s look while lighting up an area any way you want.
Divide a Room With an Aquarium Wall
Tall, narrow aquariums are attractive, contemporary room dividers that uniquely create privacy and add beauty to your home. Aquarium walls can separate a kitchen from a dining area or living room, give visual interest to an entryway, or divide a large interior into smaller spaces. Wall-dividing aquariums house the equipment in cabinets above or below the aquarium. This option can become a cherished hobby or an enduring chore because the aquarium maintenance must be incorporated into your daily routine.
Install Pocket Doors
Erin Williamson Design
Pocket doors are lovely, out-of-sight room dividers that pop out only when you want to make private spaces out of your open floor plan. These hidden doors recess into a wall, follow a track and pop out with the touch of a button or slide out with a door pull when you need them.
Use Room Dividing Furniture
Pure Salt Interiors
Furniture pieces, like a media console or a long credenza with open shelves and decorative elements, can be an eye-catching alternative to a wall panel separating a space in two. Couches typically rest against a wall, but if you use a long couch perpendicular to a wall, it serves as a room divider and frames out an entertaining space. Adding a long table along the backside of the couch and placing tall planters or items helps give the illusion of room separation.
Go Green With a Faux Plant Wall
Breathe life into a room with an artificial bamboo plant wall or moss greenery wall made from freestanding panels or planters lined up to form a wall facade. If greenery is your thing, but your space doesn't get ample natural light, go the faux plant route.
Choosing a Room Divider
The most important part of choosing a room divider is ensuring it fits. Carefully measure both the height and length of the space you want to partition to determine divider size; double-check the ceiling height as well. When deciding where to put the divider, consider the piece's stability. You may want to invest in anchors, room divider stands, or anti-tip furniture straps to ensure your family's safety.
As with any furniture, you need to consider a few other things before buying. Remember the installation hardware's complexity when choosing a hanging room divider. Decide whether you want the screen to diffuse light or prefer an opaque divider. Lastly, consider whether you want a wall that's easy to open and close or if you choose to stay static and tethered in place.
One of the best ways to split a bedroom into two rooms is by hanging a room divider curtain from the ceiling to the floor. The fabric can help muffle noise, as well. Another good option is to split a room in two with floor-to-ceiling bookcases or furniture that can create a thicker room divider screen.
Sometimes a room divider will also be called a partition, screen, or panel.
In addition to adding straps and stabilizing brackets or stands, you can keep a freestanding or folding room divider from falling over by using other pieces of furniture to help secure and prop it up from one or both sides. If you have a freestanding wall on wheels, it also helps to check and see if you can lock the wheels to prevent movement that could cause tipping.
More from The Spruce
- The 8 Best Room Dividers
- 35 Open Floor Plan Decorating Ideas Designers Love for Great Flow
- How to Soundproof a Room or Apartment Affordably and Easily
- 53 Privacy Fence Ideas You Should Copy for a Quiet Retreat
- 25 Creative DIY Room Divider Ideas
- Target's New Rifle Paper Co. Collection Is Perfect for Spring—Here's What I'm Buying
- 48 Small Sunroom Ideas for a Warm and Happy Space
- 14 Types of Curtains and How to Choose One
- 45 Closet Ideas for Better Design and Storage in Closets of All Sizes
- 42 Small Bedroom Ideas That Do More With Less
- 72 Small Kitchen Ideas With Big Style That Do More With Less
- 27 Ways to Divide a Studio Apartment Into Multiple Rooms
- 20 Backyard Privacy Ideas for a Quiet Retreat
- 102 Best Bathroom Design Ideas You'll Want to Try
- 24 Half-Wall Showers to Add More Privacy to Your Bathroom
- 41 Apartment Decorating Ideas That Will Make Your Compact Space Feel Like Home
- Skip to primary navigation
- Skip to main content
- Skip to primary sidebar
- DIY Projects
- DIY For Animal
- DIY Gym Equipment plans
- DIY Vehicle Projects
40 DIY Room Divider Ideas To Separate Space In Your Rooms
Are you thinking about the best way to divide a shared kids' room? Or, do you need a temporary solution for a studio apartment? A room divider can solve all of these problems and more! They are a great way to multitask and maximize the space in your home. A room divider is an easy and affordable way to create a home office where there wasn’t one before or just turn a studio apartment into one with a bedroom plus a living room. Here are unique and creative ways to use room dividers in your home, office, or studio. Instead of buying one, try these 40 DIY room divider ideas that can help create privacy, hide clutter, act as storage, and become a decorative focal point.

Room dividers are a great way to create a partition in your room and create a new room within the same space. They not only help in dividing bigger rooms but also help in managing small spaces by creating hidden storage and can also be used as a display unit as well. Room dividers can be made from numerous materials such as wood, acrylic, cardboard, or even metal. The right kind of material depends on the style of your home decor. You can also create privacy in an open space. DIY room dividers is a quick, easy and affordable project that works on practically any budget. Check out this list of 40 DIY room divider ideas to maximize your space.
There are 40 DIY Room Divider Ideas that will show you how to make pretty and practical room dividers, just find the DIY that fits your needs.
- 12 DIY Triple Bunk Bed plans For Kid's Room
Benefits of Room Divider
Here are some of the most significant benefits of having a room divider:
- It can serve as a partition between two rooms.
- The room divider can help create separate spaces in an open plan room.
- It can serve as a decorative element in any room.
- They can be used as a closet and storage space.
- It can provide privacy, especially if it has back panels.
When you have a lot of stuff and you live in a small apartment, using dividers is an effective way to create more space and make it less cluttered because you can use them to store your stuff.
Tips to Construct Room Divider
Making a room divider doesn't need to be difficult.
Here are some tips to help you create your own personalized one.
- Start with the best supplies: You can pick up inexpensive items like bamboo or wood, or splurge on something more elegant like black cloth.
- Decide how tall you want your room divider: This will depend on the purpose of your room divider. If you're trying to divide a small space, keeping it short and narrow will be best for convenience and ease of use. If you're looking to separate a full-sized room, opt for a taller divider that won't block views.
- Want to add color? Add it with paint or some fabric swatches and go wild!
- Decide if you want your room divider to be permanent or temporary: If you're looking for something that's easy to put up when company visits but comes down after they leave, try a pop-up option made out of cardboard. If you want something that's going to stay put, pick something that can withstand frequent use and regular abuse.
How To Make A Geometric Room Divider

Transform your space into a multifunctional room with this stylish geometric design room divider. If you want a room divider that will give your room a more unique interior look because of the extravagant design, this project is perfect for you. This geometric design is simple, strong, sturdy, and inexpensive. This project will give your room a more unique interior look because of the extravagant design on the frame, and it’s so simple to do! Built with solid materials and easy to assemble, this room divider is perfect for adding privacy and decor to your home.
DIY Macrame Room Divider

Macrame is the perfect DIY for creative DIYers who love fiber art. Create your own macrame room divider with this kit. Macrame allows you to express your creativity while you're at home, alone, or with friends. By weaving a vibrant rope pattern from the provided materials, you'll learn macrame basics and create a beautiful hanging decoration. Hang it in any corner of the house to divide spaces, create privacy, or simply add a touch of handmade decor. The Macramé Room Divider is great for hanging plants, or as an earthy accent in your home.
Cardboard Room Divider

The easiest way to add a touch of style and privacy to your living space is with this long DIY Cardboard Room Divider Kit. The jumbo kit simplifies the project, making it quick and easy. Simply customize and assemble the room divider to your liking. Easy enough for anyone to take on, the low-cost and lightweight room divider is a perfect addition to your home or office. This DIY room divider is meant to be temporary, but it still provides an easy way to add some style and definition to a room. It's made using simple cardboard boxes that you can paint or cover in fabric, so feel free to customize it as much as you want.
Twinkling Branches Room Divider

A stunning room divider fashioned from nothing but branches and LED lights, the Twinkling Branches Room Divider is an elegant way to divide space and add privacy to any room. You'll love the soft, warm glow of these atmospheric DIY twinkling branches. This is the perfect way to add a peaceful glow to your space. Use twinkle lights and faux branches to create a magical zigzag frame that will transform any room in your home. Despite looking like a piece of art by itself, this project is easy to make and you'll have fun crafting. Use it as a room divider, or hang it up as a stylish wall decoration.
Glass Room Divider

Try your hand at this DIY room divider project and give your home a new look! All you need is to make one door from IKEA's PAX sliding cupboard. In just a few simple steps, you'll have this foldable, cheap, and easy set-up room divider. If you're a beginner, this is one room divider project for you. This DIY glass room divider is sleek and practical, but don't let the professional quality fool you -- it's easier to make than you think. Your friends and family will be impressed. You’re basically looking at a simple DIY room divider that only takes about 30 minutes to put together and is pretty cheap.
DIY Room Divider With Fabric

Divide your room in style with a Wallpaper Room Divider. This easy DIY project allows you to create an artistic feature wall, act as a sound dampener, and add extra privacy, all while showing off your creativity. This room divider project is perfect for an apartment or smaller space and can be customized to fit any area. You can find everything you need for this project at your local hardware store and in your household, so let's get started! Installation is simple and requires no framing or special hardware.
DIY Room Divider Wall
Whether you're building a stage for your band, a new closet, or even just a fun centrepiece for your living room, this DIY Room Divider is the perfect weekend project. If you want to create the perfect serene setting in your room, a DIY screen is a great way to achieve that. You can use any colour of paint you prefer and make a pattern or simply paint it all one color. All you need is three pieces of MDF boards cut to the same size, paint, and a couple of screws; then you are set to go.
DIY Room Divider
Help you create your own personal study or lounge space with this DIY room divider. Made out of durable wooden panels, the wall is not only easy to set up but also can be rearranged at any time or place. Great if you have limited living space or need privacy from other people in your home. This room divider will give you the privacy you need without costing a lot of money.
DIY Sliding Room Divider
A DIY Room Divider that can beautify your home is an easy-to-build project. The sliding room divider is not only functional but can also act as a unique design feature for your interior. The guide provides a detailed explanation of each process of the materials and this makes this suitable for beginners as well. It consists of charming blue curtains It consists of charming blue curtains, which you can use to create and customize your own room divider. Both the beautiful fabric and an easy-to-follow guide are included in the package. As this product comes flat packed, it can be easily translated into unique items and solutions that decorate your home.
DIY Japanese Divider
Dividers are a great way to add privacy and flexibility to a room, but store-bought dividers can be pricey. This DIY Japanese Room Divider gives you the space and mobility you need to complete your project. By creating multiple dividers, you will help to transform a large room into something a little more intimate. Start by assembling the frame, then spray paint the entire piece with a finish of your choice. Once it is dry, the room divider is ready to be enjoyed by you and your guests.
DIY Cheap Office Divider

This room divider gives a refreshing feel to an office. It gives you privacy. Build a divider wall for your office or home with PVC pipes and easy drop canvas for fabric. All that's required is a drill, grommets, and hooks. Once the hooks are attached to the canvas, all you need to do is hook them onto the divider, as well as 'connect' the first and last corners using grommets. Use spray paint to customize your divider. This is a great way to get more privacy in the office, or create some extra rooms in your house!
DIY Room Divider Screen With Laser

A room divider can create privacy in a small space, or define new areas in a large, open space. The beauty of the room divider, as opposed to a wall, is its impermanence. Installing room dividers is an easy project that takes a few hours of your time at most. A door can do more than keep out a draft. In the case of this DIY room divider, the folding screen's four repeating panels create privacy, define spatial zones in an open space (like a loft or studio apartments), or add a dose of interest to any room. Instead of leaving your doors—or your project fate—to chance, follow this guide below and find out how to repurpose them into a folding screen.
DIY Room Divider Under $20
Making a room divider is not only a great way to add extra privacy, but it's also a great way to organize your space. This is a DIY project that shows you how to make your own room divider from the everyday materials found in the store. The total cost of the project is cheap and saves you money, and only takes a few hours to make. It can be used as interior decoration and it can be used as a space divider as well. It is made out of wood, so it can easily be painted to match your current décor. Most of the materials are available in any home center, but if you don't find them there, you should check with a trim carpenter for their availability.
A wooden room divider is not only functional but also stylish and adds a decorative element to your home. These dividers are available for purchase, but why spend extra money when it’s so easy to build one yourself? Follow this tutorial to make your own DIY Room Divider from scratch. All that’s needed are some basic materials and tools like a hammer, nails, a drill, a stud finder, and some wood planks. You can hay paint them too and use tape to make patterns on them if you want.
6ft Room Divider
When it comes to home decor, room dividers are a fine touch. They can bring organization and greatly improve a room's layout. Thankfully, making one isn't that difficult. Learn how to make a quick and easy 6ft wood room divider with this guide. Made out of wood and stained in your preferred color, this room divider is not only beautiful but easy to make as well. The best part? It’s easy to carry and you can use it literally anywhere in your house or apartment! It is easy to build and move, making it a great option for temporary walls for studio apartments or rental homes as well.
How To Make Your Room Divider
Make your room divider more useful by building in three pockets for extra storage. This simple project is great for anyone who wants to have a beautifully designed room divider. The three-pocket construction allows you to place items of differing sizes and weights in each pocket, which means your room divider can be as specific to your needs. This simple project can easily be done in a single day, and with very few tools. All you need is a power drill, some Roman Ogee router bit, and a jigsaw.
IKEA Hack Room Divider

IKEA shelves are a very good item that can serve as a room divider. For example, if you want to transform your office or bedroom into several separate spaces and want them to be easily assembled and disassembled, then this product is just for you. It comes in a variety of sizes and configurations, depending on how you want to arrange it later. The bookshelf is made of particleboard and can be placed anywhere in the room. It is inexpensive and very versatile. Place it anywhere in the room and divide the space into two (or however many). It is very cheap and inexpensive.
Photo Room Divider Screen

Need a simple way to hide your cooking-for-one prep area? Make this easy DIY photo room divider screen from a few PVC pipes, wood, and some photos. You’ll have it whipped up in no time, and be able to quickly reconfigure (or remove) the divider when you need more space. Make yourself a present with this room divider project! This modern DIY tutorial is easily customizable, and you can make a basic frame out of inexpensive birch plywood and steel hardware. The photographic image is printed on fabric and mounted over the frame. The finished pieces are easy to transport, so you can re-use them again and again!
DIY Hula Hoop Divider
A quick and easy Hula Hoop room divider, made using hula hoops attached to a lightweight wood frame so you don’t need professional tools or carpentry skills. All you need is some wood, hula hoops, some brackets, and zip ties. You can use any paint color to customize the divider to your taste. This divider will liven up your living space or bedroom and provide an easy way to create privacy in a shared room. For those who have limited space in the apartment or house, this is the perfect DIY project to have a room divider without spending a huge amount of money buying one.
DIY Folding Screen Room Divider
If you're looking to add a little privacy to your shared living spaces, or just want to hide a corner of a room, this folding screen is the simplest way to make this happen. And if you wanted to get really crafty—and keep on branding your space—you could paint the boards with chalkboard paint, too! Enjoy your privacy in style today with this panel Folding Screen Room Divider. Perfect for use indoors or out, on your patio or decking area, this heavy-duty screen room divider is both stylish and functional.
How To Divide A Room With Floor Mats
This is made from an IKEA floor cover. The floor was very strong and sturdy and it was simple to assemble. Stand the long spread mat upright and install it in the desired location. It's a nice thing to divide my room into two areas. This is a DIY guide on how you could use floor mats to divide a room. The floor mats in question are strong and sturdy and were very easy to assemble. They are the perfect tool for dividing a room.
DIY Wood Pallet Room Divider

This DIY pallet room divider is a great way to help your home multifunction over its square footage. With pallets, you can make a lot of things, including a room divider! Made from recycled materials, this fun project can be added to any room in your home for that little extra something. It is easy to disassemble and reassemble, so anyone can do it. The creator started by dismantling the pallets and removing every nail or hardware from them. Then, he prepared the pieces of wood and stained them before reassembling them into a room divider.
Steampunk Tri-Fold Room Divider

Looking for something to hide the mess in your fancy study? The folks at Lowe's have come up with this simple, Steampunk-style room divider that can be made out of a bunch of easy-to-find materials. This unique tri-fold decorative room divider will make a statement in your home. With a steampunk design, this room divider offers privacy while adding visual interest to the space. Using metal for your room divider will give it a more industrial aesthetic, which is perfect if you have modern furniture and décor in your home. Follow this guide and yours will be ready in just a few hours.
With this simple set of curtain rods, wall brackets, and curtain fabric, you can make a room divider for your home or apartment that's ideal for dividing bedroom or living space out from the kitchen in a studio apartment. Making a room divider can be a great way to separate your living space into different areas, especially if you live in a studio or larger apartment. Check out this tutorial for an easy to follow guide on how to do it effectively. Give it some style with fabric that matches your decor.
DIY Rope Wall Room Divider
A room divider is a great way to divide any room into two. This DIY Rope Wall Room Divider is an update on the classic bead curtain that incorporates both solid and opaque materials. It’s also a great option if you’re looking for a less permanent solution that lets light through. This simple project is easy to make, requires just a few materials, and can be made for any space and in any color, so it will match any aesthetic. Plus, it gives you a place to hang the jewelry you forgot to take off before bed.
Room Divider DIY
Do you have a large room and no way of dividing it? No worries, this tutorial shows you how easy it is to make a simple inexpensive bamboo canopy.This is such a cool and versatile way to separate two areas that are not easily separated. If you are looking for an idea to give your home a bit of contemporary fresh look and feel by adding a quick and easy room divider then this is the perfect project for you. It will turn your room into a chic sanctuary in no time!
DIY Simple Rope Divider
You’ll be able to learn how to make a simple room divider that uses a rope across the front and back. This is a lightweight wood structure with a thick rope that can hold it together. This is an easy project that doesn’t take many materials, just some wood and rope. Cut the lumber to size and make grooves in some of the wood pieces. Then you can start assembling the wood pieces to form the room divider. It's incredibly easy to make and it will add charm to any décor!
Building A Room Divider

Create a stylish room divider using inexpensive materials such as plywood, pegboard, and eye bolts. This step-by-step guide will walk you through how to cut your own panels, build a stable frame, and use eye-screws and wire to securely hold the separate panels together to form an appealing room divider. For those of you wondering what a room divider might be used for, it’s a great way to divide your space and make the room appear more whole. It can also be used to create more privacy or even as a place to display art.
DIY Multifunctional Room Divider

Add a splash of color to any room with this creative room divider! Featuring an interior black chalkboard, the inside of this unique room divider not only serves as a partition but also provides functionality. The outside colors are completely customizable, and the design can be resized to suit your needs. You will need wood, nails, wood glue, different colors of paints, sandpaper filler, and black paint for the chalkboard. This multifunctional room divider allows you to divide any space in a split second without the need to purchase new furniture.
DIY Bi-Fold Room Divider

This bifold door room divider is made by placing two doors together, which makes a door larger than the standard door size. A paintbrush is used to cover the doors with white primer, followed by gold paint that's mixed with water to create a matte finish. Mounting hardware and hinges are attached to the back of each panel, followed by the trim on the inner edge of each panel if you choose to use it. This allows you to divide your bedroom if you don't want to make a permanent wall. Paint and customize the door, then add some furniture.
Sheet Music Decoupage Pax Room Divider

This pax room divider is so simple it's almost unbelievable. You may have a really wonderful room that is divided into separate areas. The problem with a nice room is that you miss out on the fantastic open feel of a single space. If you enjoy the open feel of your room but want to divide off certain areas, a great solution is to install a pax room divider. This is made from recycled boards, screws, primer, and white glue. Paper, foam brush, wood or metal trim, and adhesive are needed to complete the project.
Screen your space with a fabric or paper room divider, like this one created from an electrical conduit and fabric. You'll be amazed at just how flexible these materials can be! Home decor is expensive and oftentimes hard to do on your own, but this video will teach you how to make a room divider with just fabric and an electrical conduit. It is incredibly cheap, easy, and very stylish! To build, bend an electrical conduit into a circle and then screw it to the ceiling. Staple fabric panels to a long piece of wooden molding and, using the wiring kit with hooks, hang it from the conduit or screws.
DIY Room Divider For Small Rooms
Divide your room with a DIY hanging divider! First, measure the size of your room and cut the tent material to create your desired height. Use wallpaper or other crafting supplies to decorate your room divider as you wish with paper, fabric, or any other materials. Finally, hang your new room divider from the ceiling for instant privacy! This simple how-to guide will show you how to create a beautiful, cost-effective divider in less than two hours.
How To Build A Room Divider Closet
Room dividers are a wonderful addition to any space in your home, making it easier to separate the space while still allowing light to pass through. They're great when you don't want to put up permanent walls and need a way to divide the room. So many storage ideas use up so much floor space, or worse yet, they make your room look messy and cluttered. Instead of adding more storage to a room by taking up floor space, you can build this easy overhead storage shelf unit to keep all of your stuff hidden but close at hand.
How To Build A Simple Room Divider

A room divider can act as a makeshift wall, helping to separate your space into distinct areas. If you're on a budget, or are renting and want a more temporary solution, you can make one yourself with inexpensive materials that fit your space and decor. Use this step-by-step guide to building a simple room divider perfect for apartments, small homes, studio spaces, or dorm rooms. The room divider is a foldable white stained wooden room divider. The most interesting thing about the material that is used in making this kind of furniture is that it can be used in different places in the house.
DIY Woven Room Divider

Add privacy and texture to your space with our easy, do-it-yourself woven room divider. When hung from the ceiling or doorway, the wood dowels create a beautiful bending effect. This project is easy enough for anyone to tackle, even novice DIYers. Decorate your space in a unique and playful way with a DIY Woven Room Divider. It adds texture, color, and interest to any room, and makes an easy weekend project that you can finish on your own time. You'll want to hang one in every room once you make your first!
sugarandcloth
DIY Room Dividers

DIY Room Dividers are a great way to break up a space and make your space feel bigger. This beautiful DIY door divider is the perfect way to divide any space! The best part is that it can be customized to fit your unique style. Ready in just a few hours, this divider is crafted from used doors that are recycled and refurbished. A creation that you will definitely be proud of. Use them in your office, to create a dressing room at home, or even in a studio apartment. These DIY Room Dividers will give the illusion of separation while still keeping the open feel to a room.
hallmarkchannel
Build a Hinged Room Divider

Oh-so-stylish, so very useful, this room divider has it all. You can make it yourself from just one sheet of plywood, and the large hinges allow you to fold it open or closed in just seconds. Transform your living space with this DIY hinged room divider. Whether you live in a small space or just want to create the illusion of division, this removable room divider allows you to easily and quickly alter the look and feel of your home. Make it out of fabric, felt, or leather for a more luxurious feel.
Folding Screen And Room Divider

This elegant folding screen will add a decorative touch to your room. This handy, stylish, and durable divider can be used in many different ways. Of course, it can help to define one area from another but if you have an office or even a bedroom in a loft where the space is separated by drapes or curtains, this folding screen can make that area more private. In addition, there are many educational and artistic uses for this folding screen, such as on a stage for performers needing to change outfits quickly.
onekingslane
Build Your Own Room Divider

Featuring stylish, magnetic hinges and a simple, yet striking design, this room divider can be tailored to suit the look and feel of your home by choosing the stain and color of the screen. Create your own folding screen for the room – perfect for dividing space or adding privacy, and in a color to match your décor. This screen will add heaps of character to your home, whether it’s used to section off a hallway or simply hide a bookcase. Go crazy with different stain options to match your home décor. Paint it any color you like or use wood stain. You could even add a funky pattern or decorative fabric panels.
yourhomeandgarden
See Other Projects
- DIY Table Top Ideas
- 25 DIY Medicine Cabinet Ideas
- 28 DIY Light Table Plans
- 15 Rustic Home Decor Ideas to Make Your Home Unforgettable

More DIY Projects

Sharing is caring!

These DIY Room Dividers Can Help Break Up Your Open Floor Plan
I f your open floor plan is a little too open, or if you want to carve out some defined space for focused use, room dividers can come in handy. Since most types of room dividers are much simpler and less expensive than a renovation, they’re a good solution for a tight budget. In addition, room dividers can often be versatile, making them a convertible option if you want to change configurations. Here’s a handy guide to some creative and practical room dividers so you can set up your space for less.
Use a folding privacy screen
The classic type of room divider that most people are familiar with is the folding privacy screen . These are good for separating small areas and they’re one of the most versatile options because of their portability—and they’re cost effective, at around $100 (and up). The downside of a privacy screen is that it will only cover about six feet of linear space.
Use shelving
Using a free-standing bookshelf as a room divider is a good alternative, especially for an office or library space. The nice thing about using a bookshelf is that there are tons of shapes and sizes, allowing access to one or both sides, and a variety of heights and widths to suit your needs. Keep in mind when choosing bookshelves that you’ll need to find one that is designed to stand up without a wall behind it , one that can be anchored to the ceiling , or two bookshelves that you can attach together to widen the base and keep them from toppling. Since there are so many types of shelves, prices vary greatly, but simple shelves will cost between $50 and $300 depending on the size. You can choose different configurations of shelves to meet your needs, but they’re not always customizable, so for an odd-shaped space, they might not work.
Use curtains
A curtain room divider is a versatile option that can be used in almost any space. Using a track that attaches to the ceiling, a hanging rod with brackets , or a tension wire system and a curtain tall enough for your space, you can create nearly any shape of divider for a room. Curtain hanging systems will cost between $35 and $100 depending on the type and size, and curtain panels will range widely depending on the material and size as well. You can choose opaque curtains to achieve more privacy or less distraction.
Use salvaged windows
For an upcycled room divider, hanging salvaged windows is an option to create a room divider. You’ll need to locate a ceiling joist to attach your hanging hardware to, as well as using well-made hardware to hang the salvaged windows. The total cost of this project can range widely, from around $20 worth of hardware and some free salvaged windows to around $300 for salvaged windows from a dealer. It’s important to test your salvaged windows for lead paint—chipping lead paint can be dangerous, especially for children or pets. These dividers have some space between panels and are translucent, so they don’t provide much privacy.
Use wire mesh
Using wire mesh panels hung from the ceiling is a versatile way to create a room divider that can then be set up to hold potted plants using wire hanging hooks , baskets , or to display art . Because the panels can be cut to size, they are a versatile option for creating a room divider. The panels cost between $75 and $100 per panel, so it’s an affordable DIY as long as you don’t have a huge amount of linear feet to cover. The downside to this type of room divider is that it’s not opaque, so if you want privacy, it’s not a great fit.
Sign up for Lifehacker's Newsletter. For the latest news, Facebook , Twitter and Instagram .
Click here to read the full article.
This article may contain affiliate links that Microsoft and/or the publisher may receive a commission from if you buy a product or service through those links.

- Moscow Tourism
- Moscow Hotels
- Moscow Bed and Breakfast
- Moscow Vacation Rentals
- Flights to Moscow
- Moscow Restaurants
- Things to Do in Moscow
- Moscow Travel Forum
- Moscow Photos
- All Moscow Hotels
- Moscow Hotel Deals
- Things to Do
- Restaurants
- Vacation Rentals
- Travel Stories
- Rental Cars
- Add a Place
- Travel Forum
- Travelers' Choice
- Help Center
DIY or travel agency visa application? - Moscow Forum
- Europe
- Russia
- Central Russia
- Moscow
DIY or travel agency visa application?
- United States Forums
- Europe Forums
- Canada Forums
- Asia Forums
- Central America Forums
- Africa Forums
- Caribbean Forums
- Mexico Forums
- South Pacific Forums
- South America Forums
- Middle East Forums
- Honeymoons and Romance
- Business Travel
- Train Travel
- Traveling With Disabilities
- Tripadvisor Support
- Solo Travel
- Bargain Travel
- Timeshares / Vacation Rentals
- Central Russia forums
- Moscow forum

I know this is an exhaustive topic, but I can't seem to find the answer in a forum search. I apologize if this has ben previously covered and I missed it.

It depends on you, not on your itinerary. Anyone able to search, read and understand written text, fill a form can DIY. If the mere idea of searching, reading and filling makes you shudder, hire a helper by all means.

Of all the things you mention, the only thing you may well need some “extra help” with is getting a reasonable set of invite docs (as you correctly state, if you are not staying at a larger, regular hotel, you will be charged maybe $20), you can do this for maybe $20 on ANY reputable site...e-mailed in PDF form back within 24 hours. no need to pay a visa agency likely at least $100 extra per visa. Once you go on the site you are directed to, you will be given all details, and then a link to a web based app completion...one you can save, come back to...if you hit questions, often we can answer here...more often, the answer is here already, just need to do a quick query in the box above...
I'm in the current visa black hole that others are in after doing it myself with ILS which suddenly ceased operations, turning them over to VFS. Read some of the threads like "Another Russia Visa via Washington DC question " below in the forum. I'd pay the extra $100 in a heartbeat for the peace of mind and speed compared to what's going on (or rather NOT going on) with our applications and passports. But that's just my humble opinion.
i believe at this point both DC and NY are fully moved over to being submitted thru VFS...I would agree that indeed back when you did this, had you used an agency, they - with the fact that the larger ones are handling maybe 10s- 100 at any point in time - might have been able to intercede. BUT, if the site now points folks to VFS, less to be gained...
As always, IMHO of course
I ended up speaking to a man with ILS today, who recommended I call World Visit Center in DC to have them handle everything. Now I'm really confused, because if ILS closed, whom did I speak with???
*Edited to say I now see the disclosure on the website about VFS. Yet, the website is the same name. It's confusing!
I spent 2 hours today just trying to get an answer to the question "Do I file for a tourist or a private visa" and even the gentleman on the phone had a few questions before he could give me a final answer. The government consulate websites are incorrect, saying that the Seattle Visa Support office is still open, despite the closure of the consulate....I think I just might spring for the extra $ to save the time and headache.
I am confused...did you end up here? https://www.vfsglobal.com/Russia/USA/
IF you did, then you can simply follow the info as to which type of visa, etc.
I got there by going to the OFFICIAL site...
https://washington.mid.ru/en/consular-services/
https://washington.mid.ru/en/consular-services/citizens-usa/
https://washington.mid.ru/en/consular-services/citizens-usa/visa-to-russia/
After this last one, I chose the FIRST option...”About Russian Visa Center” (this gets you to the first link I posted above...
As for them saying Seattle and San Fran offices are open, I did not fully check, but while the CONSULATES are closed, VFS may still have local presence and office to accept apps...
Also, as to whether tourist or private, unless you have REALLY good friends or close relatives there, you should choose tourist as, which you will find by reading further on the first site, the PRIVATE route involves quite a bit more hassle, not the least of which being you will need to get a PHYSICAL copy of the invitation documents required...what BTW is the main purpose for visiting?
Your links are so much better than what I found today! Google led me on a wild goose chase, and I ended up here, https://seattle.mid.ru/web/seattle-en/russian-visa-centers and https://ils-usa.com/news/175?domain=5&language=10 telling me that Seattle is still open, but then not being able to get through on the phone or via email. I don't even know where else I looked! Like I said, it was a 2 hour affair that just left me frustrated.
I admit it can be confusing especially with a TON of sites saying they are “Russian Consulate”. I have found as the links show IF you get to the real one, you are in pretty good shape. So, in summary, ILS is no longer in play, when in doubt, call or e-mail VFS...and, also, is Bellingham in Washington (state]...if so, then as I wrote, THEY have a physical presence, office...and presumably if you submit app and paperwork thru them (in person or via mail), then they, as the fully authorized AGENT (not simply a “visa agency”) for pretty much all Russian Consulates in the US, will handle the rest!
- Train Booking Moscow to St. Peter Apr 24, 2024
- Planning trip to Russia Apr 09, 2024
- SIM card. Russian SIM cards, do they still work in the UK? Apr 09, 2024
- Union Pay debit card Mar 27, 2024
- Russian trying to book a hotel in Jerusalem Mar 14, 2024
- Dual Citizen Arrested in Russia Mar 12, 2024
- about clothes Feb 27, 2024
- NOTE - border crossing from Finland into Russia closed Feb 09, 2024
- Snow boots in Red Square Feb 04, 2024
- Travelling to Moscow & Murmansk with toddle in winter Feb 02, 2024
- Anyone traveling from London to Moscow this week ? Jan 27, 2024
- Booking accommodation Jan 11, 2024
- Traveling friends (Designers preferred) :) Jan 05, 2024
- Are shops and things closed during Christmas and New Week ? Dec 15, 2023
- Moscow to St Petersburg train or air?? 32 replies
- New Sapsan Express Train from Moscow to St Petersburg 18 replies
- New year's in moscow 8 replies
- Hop on Hop Off Bus Tour 5 replies
- How do you purchase Bolshoi Ballet tickets at a great price? 2 replies
- Select-a-room.com Are they legitimate? 3 replies
- Weather Moscow and St. petersburg in May 8 replies
- Night train to St Petersburg 3 replies
- ATM Access 12 replies
- Visa needed if on layover at Moscow Airport??????? 15 replies
Moscow Hotels and Places to Stay
- Where can I get initial answers to ANY question?
- Popular Professionals
- Design & Planning
- Construction & Renovation
- Finishes & Fixtures
- Landscaping & Outdoor
- Systems & Appliances
- Interior Designers & Decorators
- Architects & Building Designers
- Design-Build Firms
- Kitchen & Bathroom Designers
- General Contractors
- Kitchen & Bathroom Remodelers
- Home Builders
- Roofing & Gutters
- Cabinets & Cabinetry
- Tile & Stone
- Hardwood Flooring Dealers
- Landscape Contractors
- Landscape Architects & Landscape Designers
- Home Stagers
- Swimming Pool Builders
- Lighting Designers and Suppliers
- 3D Rendering
- Sustainable Design
- Basement Design
- Architectural Design
- Universal Design
- Energy-Efficient Homes
- Multigenerational Homes
- House Plans
- Home Remodeling
- Home Additions
- Green Building
- Garage Building
- New Home Construction
- Basement Remodeling
- Stair & Railing Contractors
- Cabinetry & Cabinet Makers
- Roofing & Gutter Contractors
- Window Contractors
- Exterior & Siding Contractors
- Carpet Contractors
- Carpet Installation
- Flooring Contractors
- Wood Floor Refinishing
- Tile Installation
- Custom Countertops
- Quartz Countertops
- Cabinet Refinishing
- Custom Bathroom Vanities
- Finish Carpentry
- Cabinet Repair
- Custom Windows
- Window Treatment Services
- Window Repair
- Fireplace Contractors
- Paint & Wall Covering Dealers
- Door Contractors
- Glass & Shower Door Contractors
- Landscape Construction
- Land Clearing
- Garden & Landscape Supplies
- Deck & Patio Builders
- Deck Repair
- Patio Design
- Stone, Pavers, & Concrete
- Paver Installation
- Driveway & Paving Contractors
- Driveway Repair
- Asphalt Paving
- Garage Door Repair
- Fence Contractors
- Fence Installation
- Gate Repair
- Pergola Construction
- Spa & Pool Maintenance
- Swimming Pool Contractors
- Hot Tub Installation
- HVAC Contractors
- Electricians
- Appliance Services
- Solar Energy Contractors
- Outdoor Lighting Installation
- Landscape Lighting Installation
- Outdoor Lighting & Audio/Visual Specialists
- Home Theater & Home Automation Services
- Handyman Services
- Closet Designers
- Professional Organizers
- Furniture & Accessories Retailers
- Furniture Repair & Upholstery Services
- Specialty Contractors
- Color Consulting
- Wine Cellar Designers & Builders
- Home Inspection
- Custom Artists
- Columbus, OH Painters
- New York City, NY Landscapers
- San Diego, CA Bathroom Remodelers
- Minneapolis, MN Architects
- Portland, OR Tile Installers
- Kansas City, MO Flooring Contractors
- Denver, CO Countertop Installers
- San Francisco, CA New Home Builders
- Rugs & Decor
- Home Improvement
- Kitchen & Tabletop
- Bathroom Vanities
- Bathroom Vanity Lighting
- Bathroom Mirrors
- Bathroom Fixtures
- Nightstands & Bedside Tables
- Kitchen & Dining
- Bar Stools & Counter Stools
- Dining Chairs
- Dining Tables
- Buffets and Sideboards
- Kitchen Fixtures
- Wall Mirrors
- Living Room
- Armchairs & Accent Chairs
- Coffee & Accent Tables
- Sofas & Sectionals
- Media Storage
- Patio & Outdoor Furniture
- Outdoor Lighting
- Ceiling Lighting
- Chandeliers
- Pendant Lighting
- Wall Sconces
- Desks & Hutches
- Office Chairs
- View All Products
- Designer Picks
- Side & End Tables
- Console Tables
- Living Room Sets
- Chaise Lounges
- Ottomans & Poufs
- Bedroom Furniture
- Nightstands
- Bedroom Sets
- Dining Room Sets
- Sideboards & Buffets
- File Cabinets
- Room Dividers
- Furniture Sale
- Trending in Furniture
- View All Furniture
- Bath Vanities
- Single Vanities
- Double Vanities
- Small Vanities
- Transitional Vanities
- Modern Vanities
- Houzz Curated Vanities
- Best Selling Vanities
- Bathroom Vanity Mirrors
- Medicine Cabinets
- Bathroom Faucets
- Bathroom Sinks
- Shower Doors
- Showerheads & Body Sprays
- Bathroom Accessories
- Bathroom Storage
- Trending in Bath
- View All Bath
- Houzz x Jennifer Kizzee
- Houzz x Motivo Home
- How to Choose a Bathroom Vanity

- Patio Furniture
- Outdoor Dining Furniture
- Outdoor Lounge Furniture
- Outdoor Chairs
- Adirondack Chairs
- Outdoor Bar Furniture
- Outdoor Benches
- Wall Lights & Sconces
- Outdoor Flush-Mounts
- Landscape Lighting
- Outdoor Flood & Spot Lights
- Outdoor Decor
- Outdoor Rugs
- Outdoor Cushions & Pillows
- Patio Umbrellas
- Lawn & Garden
- Garden Statues & Yard Art
- Planters & Pots
- Outdoor Sale
- Trending in Outdoor
- View All Outdoor
- 8 x 10 Rugs
- 9 x 12 Rugs
- Hall & Stair Runners
- Home Decor & Accents
- Pillows & Throws
- Decorative Storage
- Faux Florals
- Wall Panels
- Window Treatments
- Curtain Rods
- Blackout Curtains
- Blinds & Shades
- Rugs & Decor Sale
- Trending in Rugs & Decor
- View All Rugs & Decor
- Pendant Lights
- Flush-Mounts
- Ceiling Fans
- Track Lighting
- Wall Lighting
- Swing Arm Wall Lights
- Display Lighting
- Table Lamps
- Floor Lamps
- Lamp Shades
- Lighting Sale
- Trending in Lighting
- View All Lighting
- Bathroom Remodel
- Kitchen Remodel
- Kitchen Faucets
- Kitchen Sinks
- Major Kitchen Appliances
- Cabinet Hardware
- Backsplash Tile
- Mosaic Tile
- Wall & Floor Tile
- Accent, Trim & Border Tile
- Whole House Remodel
- Heating & Cooling
- Building Materials
- Front Doors
- Interior Doors
- Home Improvement Sale
- Trending in Home Improvement
- View All Home Improvement
- Cups & Glassware
- Kitchen & Table Linens
- Kitchen Storage and Org
- Kitchen Islands & Carts
- Food Containers & Canisters
- Pantry & Cabinet Organizers
- Kitchen Appliances
- Gas & Electric Ranges
- Range Hoods & Vents
- Beer & Wine Refrigerators
- Small Kitchen Appliances
- Cookware & Bakeware
- Tools & Gadgets
- Kitchen & Tabletop Sale
- Trending in Kitchen & Tabletop
- View All Kitchen & Tabletop
- Storage & Organization
- Baby & Kids
- Housekeeping & Laundry

- View all photos
- Dining Room
- Breakfast Nook
- Family Room
- Bed & Bath
- Powder Room
- Storage & Closet
- Outdoor Kitchen
- Bar & Wine
- Wine Cellar
- Home Office
- Popular Design Ideas
- Kitchen Backsplash
- Deck Railing
- Privacy Fence
- Small Closet
- Stories and Guides
- Popular Stories
- Renovation Cost Guides
- Fence Installation Cost Guide
- Window Installation Cost Guide
- Discussions
- Design Dilemmas
- Before & After
- Houzz Research
- View all pros
- View all services
- View all products
- View all sales
- Living Room Chairs
- Dining Room Furniture
- Coffee Tables
- Home Office Furniture
- Join as a Pro
- Interior Design Software
- Project Management
- Custom Website
- Lead Generation
- Invoicing & Billing
- Landscape Contractor Software
- General Contractor Software
- Remodeler Software
- Builder Software
- Roofer Software
- Architect Software
- Takeoff Software
- Lumber & Framing Takeoffs
- Steel Takeoffs
- Concrete Takeoffs
- Drywall Takeoffs
- Insulation Takeoffs
- Stories & Guides
- LATEST FROM HOUZZ
- HOUZZ DISCUSSIONS
- SHOP KITCHEN & DINING
- Kitchen & Dining Furniture
- Sinks & Faucets
- Kitchen Cabinets & Storage
- Knobs & Pulls
- Kitchen Knives
- KITCHEN PHOTOS
- FIND KITCHEN PROS
- Bath Accessories
- Bath Linens
- BATH PHOTOS
- FIND BATH PROS
- SHOP BEDROOM
- Beds & Headboards
- Bedroom Decor
- Closet Storage
- Bedroom Vanities
- BEDROOM PHOTOS
- Kids' Room
- FIND DESIGN PROS
- SHOP LIVING
- Fireplaces & Accessories
- LIVING PHOTOS
- SHOP OUTDOOR
- Pool & Spa
- Backyard Play
- OUTDOOR PHOTOS
- FIND LANDSCAPING PROS
- SHOP LIGHTING
- Bathroom & Vanity
- Flush Mounts
- Kitchen & Cabinet
- Outdoor Wall Lights
- Outdoor Hanging Lights
- Kids' Lighting
- Decorative Accents
- Artificial Flowers & Plants
- Decorative Objects
- Screens & Room Dividers
- Wall Shelves
- About Houzz
- Houzz Credit Cards
- Privacy & Notice
- Cookie Policy
- Your Privacy Choices
- Mobile Apps
- Copyright & Trademark
- For Professionals
- Houzz vs. Houzz Pro
- Houzz Pro vs. Ivy
- Houzz Pro Advertising Reviews
- Houzz Pro 3D Floor Planner Reviews
- Trade Program
- Buttons & Badges
- Your Orders
- Shipping & Delivery
- Return Policy
- Houzz Canada
- Review Professionals
- Suggested Professionals
- Accessibility
- Houzz Support
- COUNTRY COUNTRY
New & Custom Home Builders in Elektrostal'
Location (1).
- Use My Current Location
Popular Locations
- Albuquerque
- Cedar Rapids
- Grand Rapids
- Indianapolis
- Jacksonville
- Kansas City
- Little Rock
- Los Angeles
- Minneapolis
- New Orleans
- Oklahoma City
- Orange County
- Philadelphia
- Portland Maine
- Salt Lake City
- San Francisco
- San Luis Obispo
- Santa Barbara
- Washington D.C.
- Elektrostal', Moscow Oblast, Russia
Professional Category (1)
- Accessory Dwelling Units (ADU)
Featured Reviews for New & Custom Home Builders in Elektrostal'
- Reach out to the pro(s) you want, then share your vision to get the ball rolling.
- Request and compare quotes, then hire the Home Builder that perfectly fits your project and budget limits.
Before choosing a Builder for your residential home project in Elektrostal', there are a few important steps to take:
- Define your project: Outline your desired home type, features, and layout. Provide specific details and preferences to help the builder understand your vision.
- Establish a budget: Develop a comprehensive budget, including construction expenses and material costs. Communicate your budgetary constraints to the builder from the beginning.
- Timeline: Share your estimated timeline or desired completion date.
- Site conditions: Inform the builder about any unique site conditions or challenges.
- Local regulations: Make the builder aware of any building regulations or permits required.
- Land Surveying
What do new home building contractors do?
Questions to ask a prospective custom home builder in elektrostal', moscow oblast, russia:.
If you search for Home Builders near me you'll be sure to find a business that knows about modern design concepts and innovative technologies to meet the evolving needs of homeowners. With their expertise, Home Builders ensure that renovation projects align with clients' preferences and aspirations, delivering personalized and contemporary living spaces.
BUSINESS SERVICES
Connect with us.
IMAGES
VIDEO
COMMENTS
While this project won't create a total visual block, it is superb at demarcating and separating spaces. With such simple materials, this DIY divider is a very inexpensive build, costing in the range of $50 to $100. Jute Rope Room Divider from The Brick House. Continue to 10 of 25 below. 10 of 25.
A DIY room divider is a great project for beginner woodworkers. One example of this type of project can be found here, with information on how to make it! This design has an opening in the top middle that lets you see out onto another side while still giving some privacy. With just 7 steps, this gives any beginner enough guidance on how to ...
Measure the distance between the cabinet and your ceiling and cut the four MDF column panels to fit. Two should be the same width as the lower blocking, and the other two 1½ inches wider to capture the edges of the first two. Clamp the base of one of the panels to the blocking, then clamp a 4-foot level to its face.
3. Multipurpose Room Divider. Keep the privacy of your living room and place it at a higher level with this multi-functional room divider. You can use this divider as a storyboard and decoration piece at the same time. You can enjoy your place and chalk down your tasks on the chalkboard paint side of this divider.
DIY Photo Room Divider Screen. This is made from a steel rod, welding rod, a sheet of plywood, hollow rid, binder clip, chop saw, tire rim, and paint. With a detailed explanation, you will be able to make this yourself within a few weeks. The first step was to cut the plywood into two pieces using the chop saw.
Custom Woven Divider. Here's a way liven up a basic room divider—weave in some color. One of the most intricate yet easy room divider ideas, this project features a rattan room divider and yarn in various colors. Yarn is woven through the divider and trimmed to size before being tied around the edge. Check out the how-to for this project here.
1. DIY Room Divider Under $20. A room divider can cost up to $100 in the store, but this guide will show you how to make a room divider by yourself with as little as $20. The guide started by identifying the materials and tools needed for the project then started cutting and assembling. 2.
Cut six pieces of fabric into 2 feet 1 1/2 inches x 6 feet 7 1/2 inches; press. 4. Place one panel flat, and lay a piece of batting over it. Stretch a piece of fabric over the panel, so its four edges just cover the edge of the plywood. Staple the top side, then the bottom, then the sides. Trim any excess fabric.
Wood divider screens start at around $200, but you can DIY one for less with three sheets of 16″ x 64″ plywood and, for the frame, a dozen pieces of 3/4″x 2″ lumber — half of them 16 inches long and the rest 6 feet long. Build the frame, attach the plywood boards (painted in your preferred shade), and hinge together.
2. Twinkle Branches. Bring some sparkly light to any room with a room divider made with twinkling branches. 3. Tropical Style. A bamboo mat hung vertically provides an easy-breezy room divider with a tropical style. 4. Rolling Doors. If you want some privacy, try making these rolling doors to close off any room.
Prepping: Clean the shutters with mild soap and water, removing any dirt or peeling paint. Sand them down if necessary, to create a smooth surface for painting or staining. 3. Painting or Staining: Apply a fresh coat of paint or wood stain to the shutters to suit your room's color palette.
Add privacy or hide away clutter with this DIY room divider! This folding screen is easy to make with bifold doors and contact paper! Add privacy or hide away clutter with this DIY room divider! ... DIY Push Pin Travel Map. DIY Air Plant Wall Holder. DIY Live Edge Floating Shelves. 327 shares. 319; 8; Tags bifold doors upcycling. Post navigation.
2. Make groups of 13 or 14 sticks and lay them down side to side on the floor. 3. Staple one stick with another, all together from only one side. Do the same thing with all the groups. 4. Stand one group with the wave facing one side, and put the next group facing the opposite side. Staple them and repeat. 5.
Apply Hinges. Measure 8 inches down and 8 inches up on each screen and use the hinges as a template to mark the three screw holes. Since we need to make our screen fold you will be placing a set of hinges attaching the first two screens on the fabric-covered side. Then you will flip everything over and attach the second set of hinges to the ...
Pickawood / Unsplash. A bookcase with locking wheels can create a large room out of the corner of an open loft or basement. A versatile bookcase on wheels can separate dining from living spaces and more. Roll and lock your way to total room transformations in minutes. 11 of 26.
DIY Room Divider: How to Make Your Own Room Divider. Written by MasterClass. Last updated: Nov 4, 2021 • 3 min read. Revamping your home décor doesn't have to be an expensive or complicated endeavor. Learn how to give your living space a makeover with a DIY room divider.
1 - All you do is start with a single strand of yarn on one end of the rattan, and start weaving it back and forth (in front and behind) each strand of wicker. 2 - Once you get to one end, repeat the weaving until you get back to the side you started on and then make a knot. 3 - Cut the excess yarn and repeat until you have the design of ...
DIY Hula Hoop Divider. A quick and easy Hula Hoop room divider, made using hula hoops attached to a lightweight wood frame so you don't need professional tools or carpentry skills. All you need is some wood, hula hoops, some brackets, and zip ties. You can use any paint color to customize the divider to your taste.
Dip the tip of a paint brush into paint, dab the extra paint off on a paper towel and run the paintbrush back and forth across the surface. Pounce the brush into the slats to get the paint into the hard to reach spots. Dry brushing gives a layered look. The surface will not have an even coat of paint.
The classic type of room divider that most people are familiar with is the folding privacy screen. These are good for separating small areas and they're one of the most versatile options because ...
Answer 1 of 21: Hi, I know this is an exhaustive topic, but I can't seem to find the answer in a forum search. I apologize if this has ben previously covered and I missed it. I am considering hiring a company to help with securing a visa. We are staying...
In addition to our standard services, Grand Russia offers tours packages to Moscow and St Petersburg. You cannot resist our Two Hearts of Russia (7 Days &6 Nights), Golden Moscow (4 Days &3 Nights), Sochi (3 Days & 2 Nights), Golden Ring (1 Day & 2 Days), and many more. As a leading travel agency specializing in the tour to Russia and Former ...
Search 1,121 Elektrostal' new & custom home builders to find the best custom home builder for your project. See the top reviewed local custom home builders in Elektrostal', Moscow Oblast, Russia on Houzz.
a 3 day travel guide to moscow for first timers.