Sunday, January 20, 2013
Paper bag safari vest tutorial.


5 comments:
This is awesome! I made these with my class last year and I'm trying to find ways to improve the one I put together. Good idea with using leftover scraps as a pocket. I love it.
Awesome! I'm so glad you found it helpful!
Very cool. I'm going to try them at this year's Vacation Bible School where the theme is "Jungle Safari".
That's wonderful!! I love the whole safari theme! I also have a tutorial on how to make some simple inexpensive paper vines that you might want to check out!
Paper Bags Your work here on this blog has been top notch from day 1. You've been continously providing amazing articles for us all to read and I just hope that you keep it going on in the future as well. Cheers!
Free shipping on all fabric orders* Apply
15% off your total purchase* Apply
Pick-Up In-Store & Get $5 off your next In-Store purchase* Learn More
- Projects & Learning
- Project Ideas
- Yarn & Needle Arts
- Crocheting Patterns

How To Make A Safari Vest
By red heart |, how to make it.
TOOLS & SUPPLIES
- RED HEART® Super Saver ®: 1 (1,1, 2) skeins 360 Cafe Latte A; and 1 skein 722 Pretty ‘n Pink or 971 Camouflage B.
- Susan Bates® Crochet Hook : 5.5 mm [US I-9] and 6.0mm [US J-10]_x000B_
- Four 1” (2.5 cm) metal “D” rings Yarn needle
- GAUGE : 6 V-sts and 10 rows = 4” (10 cm) in V-Stitch pattern with Size I/9 hook. CHECK YOUR GAUGE. Use any size hook to obtain the gauge.
- RED HEART® Super Saver®, E300 available in solid color 7 oz (198 g), 364 yd (333 m); multicolor, heather and print 5 oz (141 g), 244 yd (223 m), flecks 5 oz (141g), 260 yds (238 m) skeins
Directions are for size Child’s size Small (2). Changes for sizes Medium (4), Large (6), and X-Large (8) are in parentheses.
Finished Chest: 21½ (24, 26½, 29½)” (54.5 [61, 67.5, 75] cm)
Finished Length: 12 (14½, 15½, 17½)” (30.5 [37, 39.5, 44.5] cm)
Special Abbreviations
V-st: (Hdc, ch 1, hdc) in same st or space. _x000B_ V-st Pattern Stitch (V-st Patt) Row 1 : V-st in 4th ch from hook, *skip next 2 ch, V-st in next ch; repeat from * until 3 ch remain, skip next 2 ch, hdc in last ch, turn. Row 2: Ch 2 (counts as hdc here and throughout), V-st in ch-1 space of each V-st across, ending with hdc in top of beginning ch-2, turn. Repeat Row 2 for pattern.
Vest is made in one piece to armhole, then divided for fronts and back.
With A and smaller hook, ch 97 (109, 121, 133). Work in V-st Patt until piece measures 6 (8, 9, 10)” (15 [20.5, 23, 25.5] cm) from beginning.
Right Front
Row 1 : Ch 2, V-st in next 6 (7, 7, 8) V-sts, hdc in next ch-1 space, turn—6 (7, 7, 8) V-sts. Row 2 : Work even in V-st Patt.
Sizes L and XL Only
Rows 3–4: Work even in V-st Patt.
Row 3 (3, 5, 5): Slip st to first ch-1 space, ch 2, V-st in next 4 (5, 6, 7) V-sts, hdc in next ch-1 space, turn—4 (5, 6, 7) V-sts. Rows 4–6 (4–6, 6, 6): Work even in V-st Patt. Fasten off A. Change to larger hook. Row 7 : With larger hook, join B in next ch-1 space, ch 1, *sc in ch-1 space, sc between next 2 dc’s; repeat from 3 (4, 4, 5) times, turn—8 (10, 10, 12) sc. Rows 8–10 : Ch 1, sc in each sc across, turn. Row 11 : Skip first st, slip st in next sc, ch 1, sc in same st, sc in each sc across, turn—7 (9, 9, 11) sc. Rows 12–14: Ch 1, sc in each sc across, turn. Row 15 : Repeat Row 11—6 (8, 8, 10) sc. Rows 16–18 (16–20, 16–20, 16–18): Ch 1, sc in each sc across, turn.
Size X-Large Only
Row 19 : Repeat Row 11—9 sc. Rows 20–22: Ch 1, sc in each sc across, turn. Row 23: Repeat Row 11—8 sc. Row 24: Ch 1, sc in each sc across, turn. _x000B_
All Sizes Row 19 (21, 21, 25): Ch 1, sc in first 3 (4, 4, 4) sc, slip st in next 3 (4, 4, 4) sts, turn. Row 20 (22, 22, 26): Ch 1, sc in each st across—6 (8, 8, 8) sc. Fasten off. _x000B_
Skip 1 (1, 3, 3) V-sts in last row of Body to the left of Right Front, join yarn in next ch-1 space, Row 1 : Ch 2, V-st in next 13 (15, 15, 17) V-sts, hdc in next ch-1 space, turn—13 (15, 15, 17) V-sts. Row 2 : Work even in V-st Patt.
Rows 3–4 : Work even in V-st Patt.
Row 3 (3, 5, 5): Slip st to first ch-1 space, ch 2, V-st in next 11 (13, 13, 15) V-sts, hdc in next ch-1 space, turn—11 (13, 13, 15) V-sts. Rows 4–6 (4–6, 6, 6): Work even in V-st Patt. Fasten off A. Change to larger hook. Row 7 : With larger hook, join B in next ch-1 space, ch 1, *sc in ch-1 space, sc between next 2 dc’s; repeat from 11 (13, 13, 15) times, turn—24 (28, 28, 32) sc. Rows 8–18 (20, 20, 24): Ch 1, sc in each sc across, turn. Row 19 (21, 21, 25): Ch 1, skip first st, slip st in next 2 (3, 3, 3) sts, sc in next 18 (20, 20, 24) sts, slip st in next 3 (4, 4, 4) sts, turn. Row 20 (22, 22, 26): Ch 1, sc in each sc across, turn—24 (28, 28, 32) sc. Fasten off.
Skip 1 (1, 3, 3) V-sts in last row of Body to the left of Back, join yarn in next ch-1 space. Row 1 : Ch 2, V-st in each V-st across, hdc in top of beginning ch-2, turn—6 (7, 7, 8) V-sts. Row 2: Work even in V-st Patt.
Row 3 (3, 5, 5): Slip st to first ch-1 space, ch 2, V-st in next 4 (5, 6, 7) V-sts, hdc in next ch-1 space, turn—4 (5, 6, 7) V-sts. Rows 4–6 (4–6, 6, 6): Work even in V-st Patt. Fasten off A. Change to larger hook. Row 7 : With larger hook, join B in next ch-1 space, ch 1, *sc in ch-1 space, sc between next 2 dc’s; repeat from 3 (4, 4, 5) times, turn—8 (10, 10, 12) sc. Rows 8–10 : Ch 1, sc in each sc across, turn. Row 11: Ch 1, sc in each st across to last st, turn, leaving remaining st unworked—7 (9, 9, 11) sc. Rows 12–14 : Ch 1, sc in each sc across, turn. Row 15 : Rep Row 11—6 (8, 8, 10) sc. Rows 16–18 (16–20, 16–20, 16–18): Ch 1, sc in each sc across, turn.
Row 19 : Repeat Row 11—9 sc. Rows 20–22 : Ch 1, sc in each sc across, turn. Row 23 : Repeat Row 11—8 sc. Row 24 : Ch 1, sc in each sc across, turn.
Row 19 (21, 21, 25): Ch 1, skip first st, slip st in next 2 (3, 3, 3) sts, sc in next 3 (4, 4, 4) sts, turn. Row 20 (22, 22, 26): Ch 1, sc in each st across—6 (8, 8, 8) sc. Fasten off.
Large Pocket (Make 0 [2, 2, 2]) With A and smaller hook, ch 15. Row 1 : Sc in 2nd ch from hook and in each ch across, turn—14 sc. Rows 2–11 : Ch 1, sc in each across, turn. Do not turn at end of last row. Work now progresses in rnds. _x000B_
Round 1 : Sc evenly around pocket, working 2 sc in each corner, join with a slip st in first sc. Round 2: Slip st in each sc around. Fasten off.
Large Pocket Flap (Make 0 [2, 2, 2]) With A and smaller hook, ch 17. Row 1 : Sc in 2nd ch from hook and in each ch across, turn—16 sc. Rows 2–9 : Ch 1, sc in each across, turn. Finish same as Large Pocket Edging.
Medium Pocket (Make 2) With A and smaller hook, ch 11. Row 1 : Sc in 2nd ch from hook and in each ch across, turn—10 sc. Rows 2–9 : Ch 1, sc in each across, turn. Finish same as Large Pocket Edging. _x000B_
Medium Pocket Flap (Make 2) With A and smaller hook, ch 13. Row 1 : Sc in 2nd ch from hook and in each ch across, turn—12 sc. Rows 2–7 : Ch 1, sc in each across, turn. Finish same as Large Pocket Edging. _x000B_
Small Pocket (Make 2 for size S Only) With A and smaller hook, ch 9. Row 1 : Sc in 2nd ch from hook and in each ch across, turn—8 sc. Rows 2–7 : Ch 1, sc in each across, turn. Finish same as Large Pocket Edging.
Small Pocket Flap (Make 2 for size S Only)
With A and smaller hook, ch 11. Row 1 : Sc in 2nd ch from hook and in each ch across, turn—10 sc. Rows 2–5 : Ch 1, sc in each across, turn. Finish same as Large Pocket Edging. _x000B_
D-Ring Tabs (Make 4)
With A, make a slip knot and place on smaller hook.
Row 1 : Insert hook into D-ring and work a sc, work 4 more sc, turn.
Rows 2–3 : Ch 1, sc in each sc across. Fasten off.
Lightly block all pieces to shape. Sew shoulder seams.
With larger hook, join A in any st along bottom edge. Round 1 : Slip st evenly around entire edge of vest, working 1 st in base of each V-st and 1 st in ch-2 space between V-sts along bottom edge; 1 st in each row-end st along fronts and yokes; 1 st in each st across back neck. Round 2 : Ch 1, sc in each st around, working 2 sc in each corner as needed to keep trim lying flat, join with a slip st in first sc. Round 3 : Slip st in each st around. Fasten off.
Armhole Trim
With larger hook, join A at base of one armhole and work as for Edge Trim. Repeat on other Armhole opening. _x000B_ Position pockets on Fronts as pictured, (larger pockets below, smaller pockets above), sew in place. Fold top edge of pocket flaps under 1/2”, sew in place as pictured. Sew one D-ring tab to center bottom of each top pocket. Sew one D-ring tab to bottom edge of vest centered under each bottom pocket.
ABBREVIATIONS
ch = chain;
dc = double crochet;
sc = single crochet;
st(s) = stitch(es);
* or ** = repeat whatever follows the * or ** as indicated;
( ) = work directions in parentheses as indicated;
[] = work directions in brackets the number of times specified.
Images from our reviewers
More Project Ideas
Exciting Safari Crafts
If you’re looking for exciting safari crafts to make, these will set you up perfectly. Whisk your kids away to magical Africa where they can don safari gear and explore the safari parks, ready to see the wildlife in its natural habitat. With their wearable gear ready, they could take to the backyard to spot wildlife or draw typical wildlife they would see on a safari, like elephants, giraffes, and hippos.
Safari Vest
Supplies you’ll need
- Grocery-sized paper bag
- Pale pink paper or card
Step-by-step tutorial
- Lay your paper bag down on a flat surface with the bottom end pointing up.
- Draw your vest outline on the paper bag with a pencil. Start by drawing the armholes which will begin at the top corners of the bag, come in slightly, and then go back to the edge of the bag. It should cover about 5 inches from the top pencil mark to the bottom. You can make these larger or smaller depending on whether kids are wearing jumpers etc.
- Now you will draw the neckline and front of the vest which will open up. Back at the top of the bag, measure 4 inches from the top left across and draw a slightly curved line down so it meets in the middle of the bag, and then continue the line straight down until it hits the bottom.
- Create a mirror image from the right-hand side and when the line meets the top of the line in the middle you can stop. It will share the same line as the other side so there is just one.
- Flip the bag over, keeping the closed end at the top. Now you want to draw your neckline at the back. Folding the top of the bag toward you slightly, draw a line where you see the neck markings on the front side of the vest. Connect your two lines at the back by drawing a large semi-circle.
- Now you can cut out your vest using scissors. Cut the armholes first. Then cut up the line running up the front middle of the vest. Start cutting from the bottom and follow the line up then around one side where it curves to form the neck. Then cut the other side of the neck hole.
- Flip the vest over and cut out the neck hole at the back.
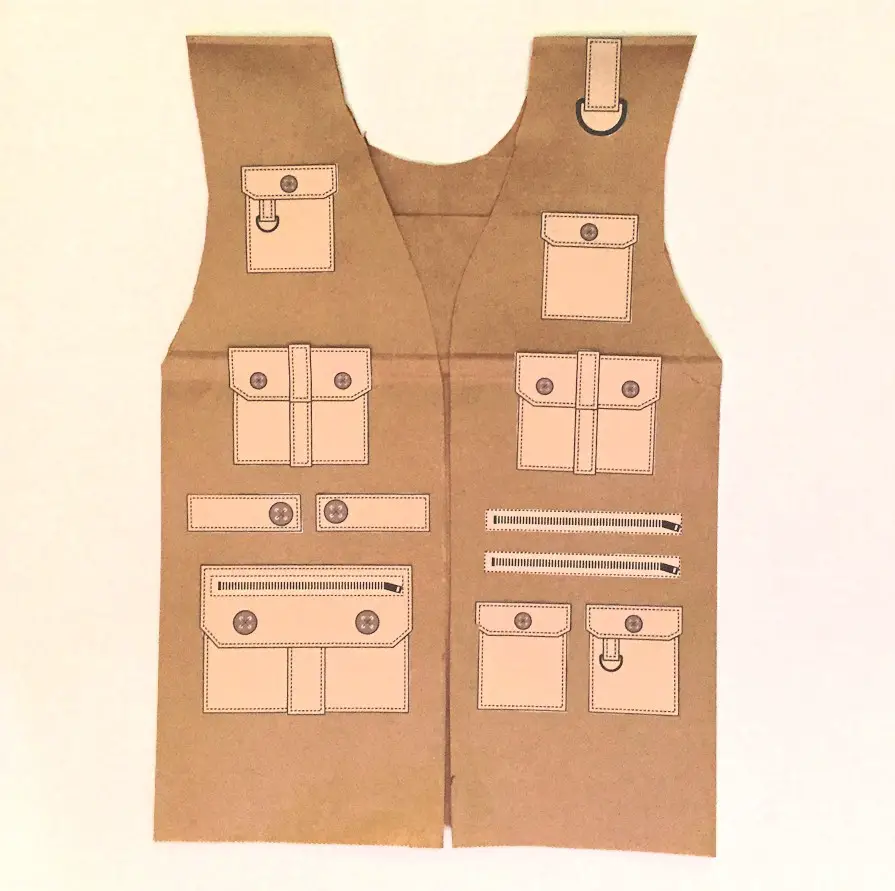
- Take your pink paper/card and draw 7 rectangles in the following sizes (width x height) and (quantity): 5 in x 4 in (1) / 4 in x 4 in (2) / 2 in x 3 in (4). These will be your safari vest pockets. Cut out these rectangles.
- Draw stitching around the edge of the pockets and draw the flap by making little dots or dashes using the black pen. Draw 1 button on the smallest pockets (above the “flap”) and 2 on the larger ones.
- Draw 2 thin rectangles on your pink card 5 in x ½ in. These will be zippers that you can place on the jacket. Cut out your rectangles and then using your black pen, make stitching all around the edges of the card. Then make lots of vertical lines moving across the rectangle, like a zipper pattern. Then draw the zipper pull at one end.
- Now you can assemble your vest. Grab your glue and arrange the pockets on the front of the vest. Place the largest pocket at the bottom right. Glue two of the smallest next to each other on the opposite side. Fix the other two small pockets to the top of the vest, and add your remaining pockets and zippers where you like in between.
Your safari vest is now ready for action. If you have a small child (and a very big bag!), you can leave the middle line on the front of the vest just with a pen outline and don’t cut it (essentially making a sack or t-shirt). You would just cut the armholes and neck hole.
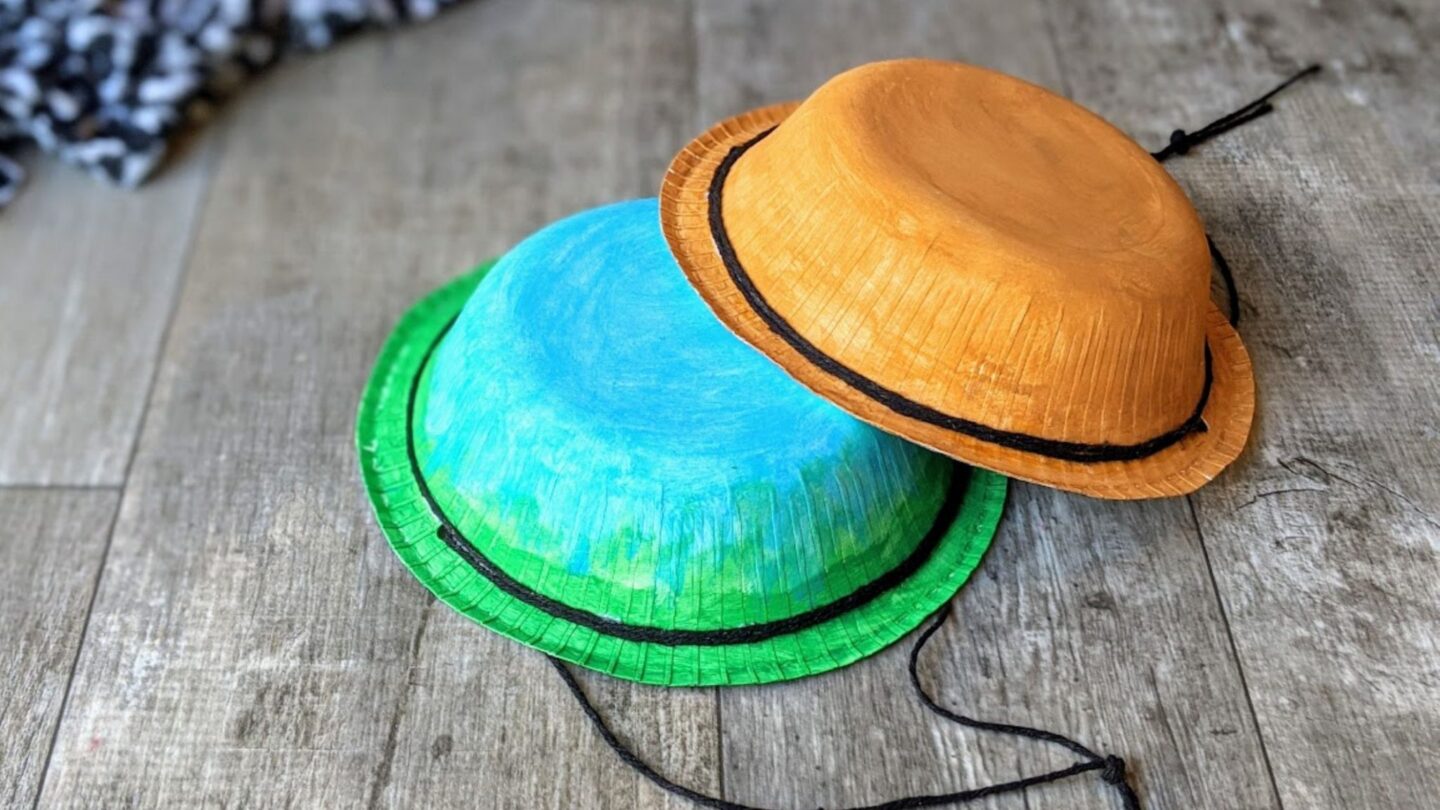
- Paint (beige or green)
- Newspaper or an old sheet
- Black ribbon or thick string
- Choose your workspace and lay down some old newspaper or an old sheet to cover the worktop or floor.
- Grab your paper bowl and fold the edges so they face downward instead of up.
- Paint the outside of the bowl in a khaki-themed color (green or beige tones). Let it dry.
- When the paint has dried, punch one hole on opposite sides of the bowl.
- Take your ribbon and measure it so it can wrap around the hatband/trim area of the hat 1.5 times and then calculate enough extra to go under your child’s chin. Cut the ribbon.
- Thread one piece of the ribbon through the hole from the top downward. Pull enough down so it can easily fit under your child’s chin and tie to the other end when you pull that through.
- Get your glue and squeeze some out around the hatband/trim area. Starting on the side of the hat where you thread the ribbon through, take the ribbon and wrap it around the full circumference.
- You are going to continue to wrap the ribbon around halfway again. Before you do so, add more glue in the same direction you will be laying the ribbon. Take the ribbon and place it on the glue until you meet the other hole that you made. Gently press down on the ribbon that is glued to the top. Let the glue dry.
- When the glue is dry and the ribbon is stuck to the hat, thread the ribbon through the hole on the other side. You will now have two pieces of ribbon hanging down under the inside rim of the hat. Your hat is ready to use.
Place it on your child’s head and tie the two ends of the ribbon together to fasten it so it doesn’t fall off. Alternatively, you can just tie it loosely or leave it hanging as decoration if they don’t want it tight.
Safari Binoculars
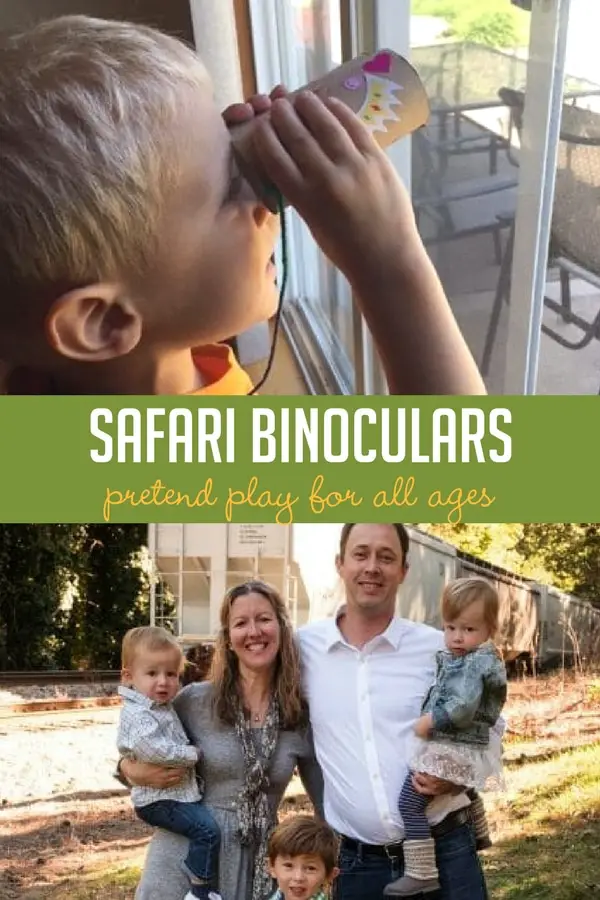
- 2 x empty bathroom tissue rolls
- Paints in black, dark green, light green, and yellow
- Paintbrushes
- Scissors or hole punch
- Thin black ribbon or thick round string
- Paint your tissue rolls in camouflage print, leaving ½ inch blank at both ends which you will paint black. With dark green, light green, and yellow paints, make thick swirls around each other until the rolls are covered (except for the ends). Paint ½ inch of black around each end and leave them to dry.
- Once dry, glue the rolls together down the middle.
- While the glue dries, prepare your ribbon or string. Cut a 16-inch piece off.
- Make a hole – for the ribbon – on each of the tissue rolls which will act as the neck strap. On the outside rim at the back (choose either end as long as you use the same for both holes) make a small hole with a hole punch or scissors.
- Thread your ribbon through and tie it off on itself. Your binoculars are ready for use.
If you want to make this craft faster, you can paint the rolls all in black and skip the colors.

Leave a Comment Cancel reply
By using this form you agree with the storage and handling of your data by this website. *
25 Completely Free Vest Patterns and Tutorials

A vest is one of the easiest and most accessible clothing items to sew. At its simplest, it can be just three pieces and four straight lines, a project that’s perfect for a beginner.
But because it’s so simple, a vest is also fun to embellish and re-engineer to suit your own specific purpose. A vest can be fancy and formal (think about a custom, tailored waistcoat, perhaps hand-embroidered), strictly utilitarian (imagine the ultimate fishing vest, with pockets custom cut for every kind of important little piece of gear), or utterly imaginative (one word: cosplay!).
Below, check out my list of my all-time favorite vest patterns and tutorials. They’re all completely free and suitable for beginning to advanced sewers. Get inspired and get sewing!
1. Copy An Existing Vest

Sometimes you don’t need a brand-new vest pattern to follow–sometimes, all you need to do is copy a favorite vest that you already own . It’s a relatively straightforward process, but in this tutorial, I let you in on a few secret tips and tricks that make the project even easier.
2. Add A Lining To A Vest
Here’s how to add a lining to most of these vest patterns and tutorials.
3. Dress Shirt To Vest
Start with an oversized dress shirt and cut it and shape it until it’s a perfectly fitted, lovely vest!
4. Cape Vest
This tutorial results in a vest that is very roomy and forgiving and is also very warm.
5. Child’s Felt Vest
https://www.instagram.com/p/BU4tGAKBlJ2/
Vests are a great addition to a kid’s dress-up collection and felt vests are super easy to sew . Embellish them in any number of ways and outfit all your kiddo’s dreams!
6. Child’s Five-Button Vest
Because every kid needs a formal vest !
7. Chunky Knit Fabric Vest
Use something very heavy for this tutorial –think wool blanket–and you’ll stay toasty all fall and winter.
8. Cooling Vest
Did you know that cooling vests exist? They make hot days much more comfortable, and you can DIY one with this tutorial !
9. Dress Shirt To Vest
10. easy quilted vest.
https://www.instagram.com/p/BCvEvbfkZpq/
Want to know the easiest way to make a quilted vest? Start with pre-quilted fabric !
11. Faux Fur-Embellished Sweater Vest
Start with a thrifted sweater vest , then learn how to embellish it with faux fur trim.
12. Freebie Vest P attern
Patterns for Pirates is one of my all-time favorite sewing pattern companies, and their freebies are just as good as their other patterns. Make this vest , and then make their leggings to go with it!
13. Hoodie Vest
This tutorial is actually two patterns in one! Learn to make a vest AND learn to make a hoodie, and you’ll never be cold again.
14. Hooded Vest From Fleece
This hooded vest is very different in style from the one above. Which style is your favorite?
15. Hunting Vest
This tutorial does call for the use of a dress shirt pattern to modify, but it’s also got all the details for all the handy little pockets and carriers that you’d want in a hunting vest. If you can’t source a dress shirt pattern, I think it’s worth modifying an existing vest or dress shirt with these embellishments.
16. No-Sew Knit Vest
Remember when I said that you only had to sew four straight lines in order to make a vest? Clearly, I hadn’t yet considered THIS vest , which requires no sewing at all! It does call for a rather large single piece of jersey knit fabric, so if you don’t mind sewing or want a little more variety, you can always piece together smaller pieces of fabric to start this project with.
17. Fringed Vest
https://www.instagram.com/p/BSbHCiWAY7h/
Here’s an interesting vest pattern for a suede-like fabric. Feel free to experiment with other fabrics, but if you do, don’t forget to treat the raw edges so that they don’t fray.
18. No-Sew Lace-Up Vest
Jersey knit fabric is once again the hero here. This vest is especially fun because instead of buttons, you get laces!
19. Paper Bag Safari Vest
Do you have a little explorer? If you do, here’s the perfect little explorer vest to make !
20. Jeans To Waistcoat
You can upcycle jeans into ANYTHING. Here, they turn into a cute waistcoat !
21. Easy Faux Fur Vest
https://www.instagram.com/p/BK_UTGFg_Ps/
This simple DIY pattern allows all of the focus to be placed where it belongs–on the fabulous faux fur! With some resourcefulness, it’s possible to upcycle the faux fur for this vest from other sources; check out the local thrift stores, or ask friends and family if they have any old faux fur blankets, throws, decorative rugs, or even coats that you can re-use.
22. Patagonia-Style Vest
Yes, you actually CAN make yourself one of those puffy vests ! The secret? Puffy fabric for the win!
23. Reversible Waistcoat
I’m a sucker for anything that’s reversible –I love the two-for-one concept, and it doubles my de-stashing!
24. Scarf To Vest
If you have a wide scarf that you never wear, here’s how to transform it into a much more convenient vest .
25. Sweater To Ruffled Vest
I love that even though this is a refashion, there’s more to it than just “cut off the sleeves and chop the sweater down the middle.” Instead, you learn how to add cute ruffles and a tie front to your sweater-to-vest makeover .
Do you have a favorite free vest pattern or tutorial? Tell me about it in the comments below!
Share this page with a friend:
About the author.

Related Posts
Top 5 must-have diy sewing tomes, keep toasty with two diy accessories from cut out + keep, gussy up a blanket for fashionable warmth, make your own stylish and functional reusable bag, martha stewart’s chic denim makeovers, burda open source sewing is the myspace of diy fashion, bridesmaid dresses can be worn again, thanks to martha and others.

Cozy And Recycled Slippers
Leave a comment cancel reply.
Your email address will not be published. Required fields are marked *
Start typing and press enter to search
Friday Fun: Paper Bag Vest Tutorial
Jun 3, 2011 | 4 comments
As my son would say, this is “EASY PEASY!”
The boys are always wanting to play dress-up, and the paper bag vest is a simple way to make a “costume” for many of the roles they dream up!
Big J is obsessed with being a tiger right now, so that was our goal with this project on this particular day.
What do you need for the basic vest?
Yep. Just a paper bag and scissors! The Trader Joe’s bags are a little smaller than most grocery store bags and fit my 3yo and 5yo just perfect. Pick your bag accordingly!
Now let’s get to work…
Cut straight up the middle of one broad side of the bag.
Next, cut an opening for the head and neck at the bottom of the bag.
The size of this opening will depend on the size of your child and it doesn’t have to be perfectly round, but remember to center the hole so it sits nicely on your child!
Arm holes are next. Cut one on each side of the bag {obviously!} and make them big enough for your child to move his/her arms easily!
All of the folds in the paper bag are great for finding the center of panels and such!
The top of these arm openings should be 1/2″ to 1″ from the bottom of the bag. {The bottom of the bag which will be the top of the vest – do I have you confused yet?!}
A front opening, a head opening, two arm openings and…
That’s it! The basic vest is done! Wasn’t that easy peasy?
Now comes the fun – decorating it!
We attempted to paint Big J’s vest orange…
but our paint just wasn’t cutting it on the paper bag…
so we went with gluing on orange construction paper.
Stripes were added and…
We have ourselves a tiger! {He was very proud that he helped make it, if you couldn’t tell!}
**This basic vest would be great to make into a cowboy vest, a spaceman suit {with foil and buttons and the like}, a bird {with lots of feathers glued on} or anything else your creative little ones can dream up!**
They’re not fancy, but these paper bag vests are easy and inexpensive enough to keep up with the ever-changing imaginations of our boys!
Hope you’re doing something fun this Friday! Have a wonderful weekend as well!
Oh my goodness! Love the tiger! I have never seen one of these imagined into a tiger, that is so cool. Now go find some dinner on the African savannah 🙂
p.s. He’s a cutie pie!
I love this! Our boys love to play pretend and this is a great idea that they can help with!!!! Woo Hoo! Gotta get me some brown paper bags!!! 😀
By the way your tiger is adorable!!!! 😀
Building Home with Him,
Trackbacks/Pingbacks
- The Inspired Treehouse - […] More DIY fun! This post from Home With the Boys gives step-by-step instructions for how to turn a paper…
What’s New
- Letting Go of Good Things
- Hy-Vee’s All-New Breakfast {with the Boys}
- Word of the Year: 2021
- Inauguration Day with the Boys
- Favorite Denim Shorts {Summer 2020}
Don't Miss a Post!
Sign up to get every post sent right to your inbox!
Managed by Fistbump Media, LLC.
- Privacy Policy
- Terms and Conditions
Paper Bag Safari Vest
July 14, 2019 Paper Bag Leave a comment 412 Views

This Paper Bag Safari Vest is a fun project for many of the VBS Jungle and Safari themed events. Paper bags are usually available at your grocery store.
DIY Paper Lanterns

Paper lanterns come in diverse sizes and styles and have emerge as the most famous DIY decor idea, of late. They are used to light up apartments, homes, in addition to used as Wedding decorations. Once can use plain copier paper, rice paper, paper doilies or any other translucent decorative paper in their choice. These lanterns are most popular in China, Japan, and other South East Asian nations where they-re used during the Lantern Festival in addition to in conventional places. In Japan, the conventional lighting equipment is composed of: Andon: – This is a lamp which turned into constructed by using stretching paper over a bamboo, metallic or wooden frame. Inside this, turned into a stone or ceramic holder with a cotton wick, which become lit (to light the lamp). Bonbori – This type of a Japanese lantern turned into also constructed with paper stretched over a frame and changed into therefore similar to the Andon, however was smaller, portable as well as has a six-sided cross section. Chochin: – This sort of a lantern consisted of a break up bamboo frame twisted in the shape of a spiral. As an choice to paper, silk was extensively utilized to cover the frame and defend the flame from the wind. This became typically used as a placing lantern and might be collapsed to flatten it.

- Stumbleupon
Tags Bag Paper Safari Vest
Related Articles

unglaublich Recycle Paper Bags Into a Pretty Fall Wreath
October 23, 2019

DIY Fashion Tutorials, die Ihr Leben verbessern werden

8 Tips for Throwing a Party Like a Southern Girl

33 Free PSDs to Mockup Your Packaging Designs
Brown Paper Bag Mockup und viele andere mock up freebies hier! DIY Paper Lanterns Paper …
Leave a Reply Cancel reply
Your email address will not be published. Required fields are marked *
Save my name, email, and website in this browser for the next time I comment.

PAW Patrol Craft: Jungle Pups Jungle Vest
If your kids love PAW Patrol like my kids love PAW Patrol, then you need to check out their newest adventure, Jungle Pups . Out now on DVD, you can follow Tracker, Ryder, Chase and all the pups as they head into the jungle with all new vehicles to save the day.
PAW Patrol Craft: DIY Safari Vest and Binoculars
Vest Instructions:
- With the fold of the grocery bag facing down (typically the side with the grocery store name print on it), cut hole on both side for arms (see picture)
- Cut a space in the middle for head
- Cut away excess paper from arm holes and neck hole
- Cut a slit from the neck all the way down on the front (not printed) side of the bag
- Turn bag inside out (so any printing is on the inside)
- Fashion Pockets from leftover scraps of brown paper bag and glue to front of vest
- Decorate with stitching on pockets, PAW Patrol Badges, compass, etc.
Binocular Instructions:
- Paint the toilet paper tubes
- Once dry, glue them together with the glue stick
- Cut a small hole in both side of the binoculars at one end.
- Attach a piece of string through the holes and knot to use as a neck strap
PAW Patrol: Jungle Pups
Available on DVD Tuesday, February 27, 2024
LOS ANGELES – February 5, 2024 – Get ready for this wild adventure in a hidden Jungle Oasis with the PAW Patrol as they help their new friend Tracker in the all-new DVD PAW Patrol: Jungle Pups ! Join the pups as they help save a sloth, meerkat pirates, giant ants, encounter new animals native to the jungle , and so much more with their all-new jungle gear and animal inspired vehicles! There’s nothing the mighty rescue rangers can’t beat when they work together! PAW Patrol is produced by Spin Master Entertainment and airs on Nickelodeon.
PAW Patrol: Jungle Pups will be available on DVD from Paramount Home Entertainment on Tuesday, February 27, 2024, for the suggested retail price of $10.99.
PAW Patrol: Jungle Pups episodes:
- JUNGLE PUPS : Pups Find a Hidden Jungle
- JUNGLE PUPS : Pups Save the Big, Big Animals
- JUNGLE PUPS : Pups Save the Meerkat Pirates / JUNGLE PUPS : Pups Save a Hum-Hippo
- JUNGLE PUPS : Pups Save a Golden Sweetie / JUNGLE PUPS : Pups Save the Giant Ants
- Pups Save the Wacky Water Skiers / Pups Save the Mayor’s Assistant
- Pups Save a High-Flying Hen / Pups Save a Sloth
PAW Patrol: Jungle Pups synopsis:
Tracker discovers a cave that leads to a lush jungle oasis unlike anything he’s ever seen before. In this forgotten jungle filled with vegetation and untold treasures, Tracker encounters an amazing variety of unique animals, including tigers, elephants, rhinos, falcons, snapping turtles, and crocodiles. But danger lurks around every tree, and that’s when Carlos and Tracker will call in some extra help. Ryder and the pups arrive in all-new jungle gear and animal-inspired vehicles to save the day!
PAW Patrol: Jungle Pups fast facts:
Street Date: February 27, 2024
Catalog: 191329260159 (US)
Audio: Dolby Digital English 5.1, Dolby Digital Spanish 2.0
US Rating: Not Rated
US M.S.R.P.: $10.99
About Nickelodeon
Nickelodeon, now in its 44 th year, is the number-one entertainment brand for kids. It has built a diverse, global business by putting kids first in everything it does. The brand includes television programming and production in the United States and around the world, plus consumer products, digital, location-based experiences, publishing and feature films. For more information or artwork, visit nickpress.com . Nickelodeon is a part of Paramount’s (Nasdaq: PARA, PARAA) global portfolio of multimedia entertainment brands.
About Spin Master
Spin Master Corp. (TSX:TOY) is a leading global children’s entertainment company, creating exceptional play experiences through its three creative centres: Toys, Entertainment and Digital Games. Spin Master Entertainment creates and produces compelling multiplatform content, through its in-house studio and partnerships with outside creators, including the preschool franchise PAW Patrol, it’s spin off series Rubble & Crew, and numerous other original shows, short-form series and feature films.
About Paramount Home Entertainment
Paramount Home Entertainment (PHE) is part of Paramount Pictures Corporation (PPC), a global producer and distributor of filmed entertainment. PPC is a unit of Paramount (NASDAQ: PARA, PARAA), a leading global media and entertainment company that creates premium content and experiences for audiences worldwide. The PHE division oversees PPC’s home entertainment and transactional digital distribution activities worldwide. The division is responsible for the sales, marketing, and distribution of home entertainment content on behalf of Paramount Pictures, Paramount Animation, Paramount Television Studios, Paramount Players, MTV, Nickelodeon, Comedy Central and CBS and applicable licensing and servicing of certain DreamWorks Animation titles. PHE additionally manages global licensing of studio content and transactional distribution across worldwide digital distribution platforms including online, mobile and portable devices and emerging technologies.
About Paramount Pictures
Paramount Pictures Corporation (PPC), a global producer and distributor of filmed entertainment, is a unit of Paramount (NASDAQ: PARA, PARAA), a leading global media and entertainment company that creates premium content and experiences for audiences worldwide. Paramount Pictures controls a collection of some of the most powerful brands in filmed entertainment, including Paramount Pictures, Paramount Animation, and Paramount Players. PPC operations also include Paramount Home Entertainment, Paramount Pictures International, Paramount Licensing Inc., and Paramount Studio Group.
Disclaimer: This post was created in collaboration with Nickelodeon. As an Amazon Associate, we earn from qualifying purchases. This means that we may earn a small commission when you make a purchase through our Amazon affiliate links. This helps support the maintenance of our blog and allows us to continue providing valuable content to our readers.
, cut hole on both side for arms (see picture) Cut…")
Easy to Make Safari Costume

Whether you want to dress like a big-game hunter or a traveler on a camera safari, you can assemble an easy, no-sew safari costume from clothing you already own. When it's time to accessorize the costume, look for safari-style gear at sporting-goods, military-supply and thrift stores. As you assemble your costume, keep the color palette neutral. Real safari-goers know that khaki and beige blend in with the colors of the savanna and hide them from the local wildlife.
Advertisement
Pants, Socks and Boots
Video of the Day
If you have a pair of khakis in your closet, you have the foundation for an easy safari costume. Casual khaki pants do the job, but khaki-colored cargo pants or shorts look even more at home on the African plain. Their pockets give you plenty of storage for props and personal gear. Sturdy boots are also a necessity. If you're dressing like a modern-day safari guide, tuck your pants into a pair of lace-up hiking boots. Wear a pair of long white or neutral-colored socks with your boots if you use shorts for your costume. To create a safari costume with an old-fashioned feel, tuck khaki pants into knee-high leather boots so they look like jodhpurs.
Shirt, Vest and Jacket
For the top half of your costume, choose pieces that mimic the look of safari wear. If you own or can borrow a hunting or fishing vest, wear it over a white or beige button-down cotton shirt. You can also substitute a khaki jacket from a thrift store for the vest. To create classic safari style, wear a long, buttoned khaki shirt with pockets, and let the hem hang over your pants. If you want to create a layered look, wear a T-shirt under the buttoned shirt. Stick to white and neutral colors for the T-shirt. On a real safari, black or bright colors would attract wildlife and pesky insects.
Safari Accessories
A safari guide's accessories are more about function than fashion. A hat provides protection from the savanna's sun and heat. Wear a replica pith helmet from a costume store or substitute another wide-brimmed hat, such as a leather cowboy hat, a khaki-colored rain hat or a straw gardening hat. Tie a neutral-colored cotton scarf or bandanna around your neck to shield your skin from dust and the sun. Wear a utility belt made from leather or nylon webbing to hold your gear. If your shirt is tucked into your pants or shorts, thread the belt through the belt loops. If you wear a long shirt that hangs outside your pants, cinch the belt around your waist over the shirt.
Safari Gear
The savanna can be a dangerous place, and a safari-goer must be prepared for every eventuality. Wear binoculars around your neck so you can watch out for approaching animals. Water is scarce on the plains; carry a canteen on your utility belt. Rope can get you out of all sorts of safari snafus. Sling a coil of hemp rope over your shoulder or hang it from your belt. If you have old maps, roll them up and tuck them into your pockets or a small canvas backpack. Put the compartments of your cargo pants and utility belt to work and fill them with small safari essentials, such as a compass, flashlight and pocket knife.
- Fodors: What to Wear: On Safari
- The Telegraph: Travel Tips: What to Wear on Safari
- Safari Museum: Gallery: Married to Adventure
Report an Issue
Screenshot loading...


You Might Also Like
Top 5 ways to beat a sunburn, diy disneyland t-shirts, diy fall mason jars, no comments, leave a reply cancel reply.
2018 Primetime Emmy & James Beard Award Winner
R&K Insider
Join our newsletter to get exclusives on where our correspondents travel, what they eat, where they stay. Free to sign up.
A History of Moscow in 13 Dishes
Featured city guides.
IMAGES
VIDEO
COMMENTS
Anyone can make a safari vest from a paper bag, as Andrea so skillfully demonstrates.
And it gives you a better scrap to work with for the pockets. Step 7: Turn your vest inside out. I glued down the flaps on the shoulder from what used to be the bottom. of the bag. Step 8: Take some of your scraps and use them to make faux pockets. I just cut I thick strip with one rounded side and folded it into thirds.
Hello Everone! Many of you have asked me how I made the Safari Vest from my newest book "Our BIG Safari Adventure". Watch this video to learn how and enjoy a...
Learn how to make How To Make A Safari Vest at JOANN fabric and craft store online. Find detailed step-by-step instructions to complete your project today!
Line up the pattern with the top of the bag. Staple on the outside of the cutting lines to keep in place. Cutting through all the layers. Cut off the arm holes and back opening. Lay the pattern back in place and cut the front opening only through the front of the bag. Cut out the printable piece. Design your vest and glue pieces in place.
To start, pick two pieces of fabric - one dark and one light - for the main body of the vest. Cut each piece into a circular shape slightly wider than your shoulder blades before attaching them together using hot glue or double-sided adhesive tape around their edges.
SUPPLY LIST:- Paper bag/grocery sack- 2 small envelopes- Scissors- Marker- Glue stick🌎🐾🐶🐱🐮🐑🐐🐤🦅🦎🐍🐢🦋🐛🌳🗻⭐🐾🌎🗺 We hope you've enjoyed these wee...
Sep 19, 2016 - This Paper Bag Safari Vest is a fun project for many of the VBS Jungle and Safari themed events. Paper bags are usually available at your grocery store. Pinterest. Today. Watch. Shop. Explore. ... Diy Vest. Kids Safari Vest. Safari Vest. Costura. Fish Bowl Template Free Printable. Wooden Picture Hanger. Cards And Gifts Wood Sign ...
Many of you have asked me how I made the Safari Vest from my newest book "Our BIG Safari Adventure". Watch this video to learn how and... DIY Safari Vest (Out of a Paper Bag) Tutorial-KIDS CRAFT | Hello Everone!
Create your own safari vest with this easy-to-follow pattern. Perfect for safari-themed parties, camping trips, or just for fun! Get inspired and start crafting today. Pinterest. Today. ... DIY Safari vest and binoculars for a safari themed classroom! / Amber Lenser. Recycled Costumes. Diy Costumes. Moda. Childrens Church. Model. Bebe ...
These will be your safari vest pockets. Cut out these rectangles. Draw stitching around the edge of the pockets and draw the flap by making little dots or dashes using the black pen. Draw 1 button on the smallest pockets (above the "flap") and 2 on the larger ones. Draw 2 thin rectangles on your pink card 5 in x ½ in. These will be ...
Here's how to add a lining to most of these vest patterns and tutorials. 3. Dress Shirt To Vest. Start with an oversized dress shirt and cut it and shape it until it's a perfectly fitted, lovely vest! 4. Cape Vest. This tutorial results in a vest that is very roomy and forgiving and is also very warm. 5.
Cut straight up the middle of one broad side of the bag. Next, cut an opening for the head and neck at the bottom of the bag. The size of this opening will depend on the size of your child and it doesn't have to be perfectly round, but remember to center the hole so it sits nicely on your child! Arm holes are next.
This Paper Bag Safari Vest is a fun project for many of the VBS Jungle and Safari themed events. Paper bags are usually available at your grocery store. DIY Paper Lanterns. Paper lanterns come in diverse sizes and styles and have emerge as the most famous DIY decor idea, of late.
PAW Patrol Craft: DIY Safari Vest and Binoculars. Vest Instructions: With the fold of the grocery bag facing down (typically the side with the grocery store name print on it), cut hole on both ...
Quick and easy paper bag vest tutorial for the kindergarten (or preschool!) classroom. FYI - I forgot to mention: you will need to glue down or staple the fl...
To create classic safari style, wear a long, buttoned khaki shirt with pockets, and let the hem hang over your pants. If you want to create a layered look, wear a T-shirt under the buttoned shirt. Stick to white and neutral colors for the T-shirt. On a real safari, black or bright colors would attract wildlife and pesky insects.
DIY Safari vest and binoculars for a safari themed classroom! / Amber Lenser. American Crafts. Vest Project. Native American Crafts. Camping Vest. Coat. Kids Native American Vest Craft - Mom it Forward. This is one of my all-time favorite fall and Thanksgiving kid crafts! These are great for pretend play, Thanksgiving dinner, or to use during a ...
Welcome to the 628DirtRooster website where you can find video links to Randy McCaffrey's (AKA DirtRooster) YouTube videos, community support and other resources for the Hobby Beekeepers and the official 628DirtRooster online store where you can find 628DirtRooster hats and shirts, local Mississippi honey and whole lot more!
Moscow Mule Gift Basket. Posted on August 28, 2017. Moscow Mules have been a favorite cocktail of mine lately and a go to cocktail to mix up at our parties! If you've never had a Moscow Mule, you need to try one. The Moscow Mule is a very simple cocktail that consists of ginger beer, vodka, lime juice, honey ginger syrup (optional), and mint.
How to sew a vest?How to sew an easy vest?How to make a practical vest cut?5 minute crafts vestHow to sew a simple vest for beginners?easy vest sewing tutori...
1: Off-kilter genius at Delicatessen: Brain pâté with kefir butter and young radishes served mezze-style, and the caviar and tartare pizza. Head for Food City. You might think that calling Food City (Фуд Сити), an agriculture depot on the outskirts of Moscow, a "city" would be some kind of hyperbole. It is not.
#Sancharam #Siberia #SafariTV #Santhosh_George_Kulangara #Lal_JoseStay Tuned : https://www.safaritvchannel.com Enjoy & Stay Connected With Us !!---...