The ultimate hub for all things RVs


How to Install Solar Panels on an RV: The Only Guide You Need
Installing solar panels on an RV enhances your camping experience. Unlike generators, solar panels are noiseless and barely need maintenance or replacement for several years. Before mounting solar panels on an RV, choose between standard or flexible solar panel placements to get the most out of the sun.
Then, create a position for the solar panels on your RV roof and connect mounting brackets to each panel. After that, identify the spots where you need to drill holes in your RV roof. Drill the hole and screw in your mounting brackets.
Using butyl tape, line the bottom edges of each panel and connect the panels to the roof. Then, apply a generous amount of Dicor sealant, and your solar system is ready.
In this article, I’ll walk you through the step-by-step process of mounting solar panels on your RV, including what you need for RV solar panel installations and the required materials for wiring.
Table of Contents
- 1.0.1 Pro Tip
- 2 What You Need for Installing Solar Panels on RV
- 3.1.1 Pro Tip
- 3.2 Step 2: Connect Mounting Brackets to Each Solar Panel and Set them Aside
- 3.3 Step 3: Identify the Spots Where you Need to Drill Holes in your RV Roof
- 3.4 Step 4: Drill a Pilot Hole in Your RV Roof and Screw Your Mounting Brackets
- 3.5 Step 5: Using Butyl Tape, Line the Bottom Edges of Each Panel
- 3.6 Step 6: Use the Screws from the Mounting Kit to Connect the Panels to the Roof
- 3.7 Step 7: Apply a Good Amount of Dicor Sealant
- 4.1 Portable RV Solar Panels
- 4.2 RV Solar Panel Corner Brackets
- 4.3 VHB Tape
- 5.1 100W RV Solar wiring diagram
- 5.2 200W RV Solar wiring diagram
- 5.3 300W RV Solar wiring diagram
- 5.4 400W RV Solar wiring diagram
- 5.5 Large RV solar wiring diagrams (400W or more)
- 6 Materials Needed for Wiring Your Solar Panel into Your RV
- 7 How to Wire the Solar Panels into Your RV
- 8.1.1 Pro Tip
- 8.2.1 Pro Tip
- 8.3 Wiring your RV Solar Panels in Series-Parallel
- 9 Final Words
- 10.1 How do RV solar panels work?
- 10.2 How many solar panels does it take to power an RV?
- 10.3 Can I connect the solar panel directly to the RV battery?
- 10.4 How many batteries do I need for my RV solar system?
- 10.5 Do you need an inverter for RV solar panels?
Installing Solar Panels on an RV

Before installing solar panels on an RV, you should first know how and where you want to mount your panels. Drilling holes into your RV’s roof is critical, so endeavor to get it right on the first try.
Take note that all RV roofs aren’t the same. Also, the solar panel arrangement that worked for others may not work for you. However, you may not have to worry about hole drilling if you’re using a flexible solar panel .
Still, planning for the best positions to place your panels for durability and efficiency is necessary.
Before purchasing your solar panels, ensure to take detailed measurements of your RV roof. Take note of all AC units, vents, and any other items on your roof that could obstruct your RV solar panel installation. For best results, draw a diagram of your entire roof with the measurements and positioning of the panels.
What You Need for Installing Solar Panels on RV
Once you’ve decided on the perfect positions for your RV solar panel mounting, the next step is to get the right supplies and tools to properly secure the panels to the RV roof.
Here’s a list of some of the tools you need:
- Cordless Drill
- Mounting Z Brackets (required: 1 set for each panel)
- Dicor Self-Leveling Lap Sealant
How to Install Solar Panels on RV in 7 Easy Step -By-Step Guide

Installing solar panels on an RV will be seamless if you follow these seven easy steps.
Step 1: Create a Position for the Solar Panels on your RV Roof
Before proceeding with your RV solar panel installation, create a better position for the solar panels on your roof. Double-check if the panels properly fit in the position before drilling holes into your roof.
Keep in mind that the process will differ based on the type of solar panel you have. For instance, rigid panels must be attached to the RV roof using screws. Flexible panels are mounted with adhesive, although they can also be mounted with screws.
It’s worth noting that the material used in building the upper layer of your roof will determine the type of adhesive needed. As a result, many RV solar panel kits don’t come with adhesive. Rather, they only come with the mounting hardware.
Ensure the panels are mounted in a position where air conditioning and vents won’t shade them.

Step 2: Connect Mounting Brackets to Each Solar Panel and Set them Aside
The next step is to attach mounting brackets to each solar panel. As earlier mentioned, the RV solar panel mounting process may differ depending on the panel type.
However, you must install rigid panels with screws by drilling into your roof. They can be fixed tilt-mounted or affixed flat to your RV roof.
Step 3: Identify the Spots Where you Need to Drill Holes in your RV Roof
Identifying the spots where you need to drill holes on your RV roof applies when installing rigid solar panels with a fixed mount. In such a case, you must bolt the brackets tightly based on your panel’s positioning.
Then, apply sealant underneath the brackets to keep the seal airtight and prevent potential roof leakages. However, you don’t have to drill holes if the panels have flexible designs. Such designs can be mounted with adhesive attached directly to the roof surface.
In addition, removable types, like EcoFlow Portable Solar Panels, have a foldable design and portable carry case. They’re easy to set up and require no installation.
Step 4: Drill a Pilot Hole in Your RV Roof and Screw Your Mounting Brackets
Position your solar panels and mark where you need to drill holes. Then, drill small pilot holes into your RV roof where your brackets will be screwed down. Ensure the holes will hit studs in your RV so your panels are secure.
Then, fill the holes with a small quantity of the Dicor sealant to help ensure that everything remains watertight. Although all RVs are different, the studs are usually visible with a 2-3-inch-wide gray line that goes width-wise off the roof.
Step 5: Using Butyl Tape, Line the Bottom Edges of Each Panel
Line the bottom edges of each solar panel with butyl tape and arrange the panels in place. Covering the panels with butyl tape helps add security to your panels and prevents them from flying off.
Step 6: Use the Screws from the Mounting Kit to Connect the Panels to the Roof
Attach the solar panels to your RV roof using the screws from the mounting kit. Ensure that the panels are properly placed in their mapped-out positions.
Step 7: Apply a Good Amount of Dicor Sealant
Apply a generous amount of Dicor sealant around and on top of the mounting brackets to seal everything off. Make sure to apply the adhesive directly to the butt joint in the roof surface and around the mounting brackets to seal them off from sun rays.
Attaching Solar Panels to RV Roof Without Drilling

After deciding the type of solar panel you’d love to use, it’s necessary to consider mounting it. Depending on your chosen type, there are different methods of attaching solar panels to an RV roof without drilling.
Portable RV Solar Panels
Portable RV solar panels are great at harnessing the energy of the sun. They’re great alternatives to traditional installations for RVers willing to undertake a DIY project. These panels require a simple setup and are ready to use.
The two most common portable RV solar panels are foldable and suitcase solar panels. Foldable solar panels have more than two panels and fold up in an accordion style. To set up this solar panel, all you need to do is attach the clamps to the battery terminals, and you’re good to go.
On the other hand, the suitcase solar panels come in a folding set of two 50-watt panels. An adjustable kickstand allows it to stand upright or at the desired angle. To set up this panel, attach the alligator clamps to your RV battery’s negative and positive terminals and connect the panels to the attached solar charge controller.
RV Solar Panel Corner Brackets
One of the most effective methods for mounting solar panels to your RV roof without drilling is using corner brackets. These brackets are made of ABS plastic. They’re usually attached to the four corners of the solar panels and adhered to the RV roof using silicone glue.
Corner brackets are only for aluminum-framed, rigid solar panels. They don’t work with flexible panels. To install these brackets, you’ll need to place them on all spots on the panel, mark holes, and drill them through each marked area.
Then, fasten the brackets to the solar panel using the provided bolts and nuts. Apply silicone adhesive, preferably Sikaflex 252 , to the underside of the brackets and place it in the desired roof’s position.
VHB tape is a lightweight, affordable option for mounting solar panels without drilling. It’s an extremely strong double-sided tape that can be applied quickly and easily to solar panels.
Despite its ease of use, VHB isn’t strong enough to adhere rigid solar panels to an RV roof. Hence, it is strictly used on flexible solar panels only. To apply VHB tape, remove the plastic layer from one side of the tape and stick it to the solar panel’s bottom edges.
Then, remove the plastic layer from the other side of the tape and firmly press the solar panel onto the desired roof location. When applying this tape, ensure that the area is dust-free and isn’t too cold outside.
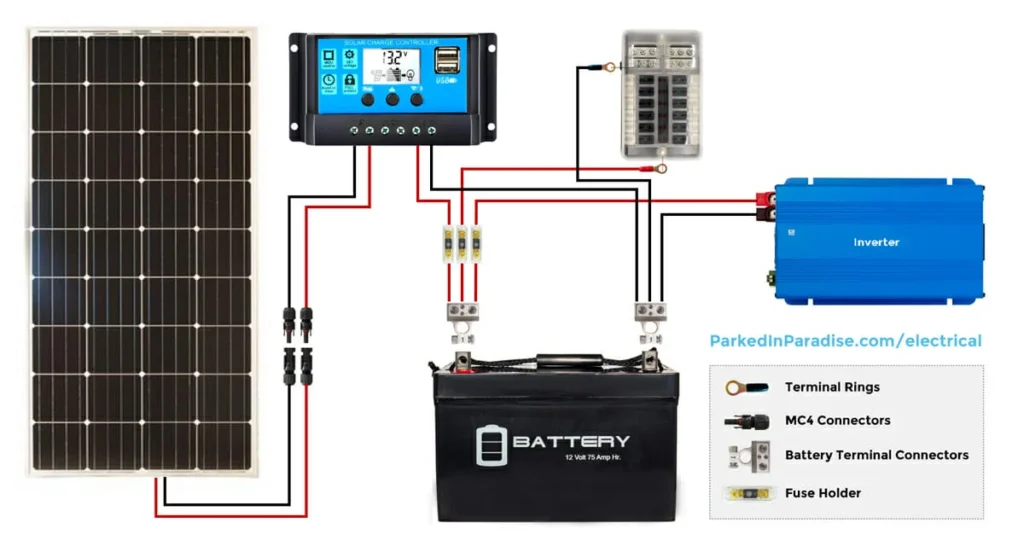
RV Solar Panel Wiring Diagram
After sizing your RV system and the panels, the bulk of work starts! Below are different RV solar panel wiring diagrams. Each diagram illustrates how to connect the solar panels, battery bank, and charge controller.
100W RV Solar wiring diagram
A 100-watt solar system powers small items like a roof vent , LED lights, and a cell phone. It’s more suitable for camper vans but is great at providing supplementary energy on the go.

However, the amount of power a 100-watt solar panel can provide depends on factors like the weather, location, type of charge controller you install, and time of year. A 100-watt solar panel provides about 30-32 amp hours per day.
200W RV Solar wiring diagram

A 200W RV solar panel system is enough to power small 12V appliances, like a sink pump, a cell phone signal booster, and a laptop. It’s less likely to power a portable refrigerator full-time. So, it’s a good setup for supplementary power.

This RV solar panel is relatively small and has an easy setup. Unless you’re considering wild camping in your RV, this panel gives you reliable access to shore power.
Besides, it can run a small, energy-efficient fridge, making it a good option for small campers. However, if your ideal solar system is larger than 2200 watts, build the system with scalability in mind.
300W RV Solar wiring diagram

A 300-watt solar system can support the energy demands of a couple or even a small family in a medium-sized motorhome. Careful use and monitoring can take up to a year without needing other energy sources like hookups or driving.
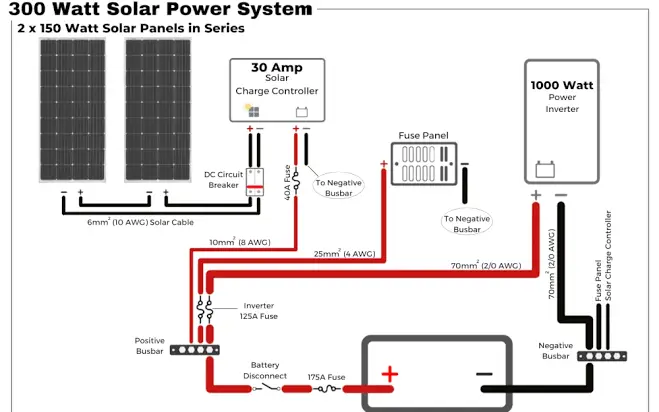
This panel provides approximately 90 to 96 amp hours daily. Since you may be unable to recharge the batteries daily, consider having an alternative (as a contingency) to avoid cycling the batteries more than necessary.
Overall, 300-watt panel systems reserve a day or two, depending on your usage.
400W RV Solar wiring diagram

A 400-watt solar panel system gives you a couple of days in reserve, depending on your usage, without other sources of recharging. It’s enough to run your roof vent during the day and night to stop condensation.
In addition, it can recharge small devices on a USB, like tablets, kindles, and phones.

How much 400 watts of solar panels can power depends on the time of year, the location, the type of charge controller, and the weather. However, they’re capable of providing 120 to 128 amps daily.
Large RV solar wiring diagrams (400W or more)

800 watts of solar power is enough for even the largest RVs and campervans. Large RV solar panels provide about 200 to 256 amp hours daily.
They’re enough to run a large fridge, an inverter for a TV, a coffee maker, and charge laptops. If you plan to live in a camper during the winter , the 800W is a full-service luxury.

With large RV solar panel systems, there’s no need for driving or shore power. Although you’ll always need to monitor the battery levels and usage with a solar system this size, you’ll comfortably have enough energy to meet the needs of four people.
Materials Needed for Wiring Your Solar Panel into Your RV
When wiring your solar panel, there are certain materials you must have in place. Some are batteries, mounting brackets, connectors, solar panels, cables, and an inverter.
All the necessary materials must be available, whether you’re wiring your solar panels in parallel or series. While there are numerous inverters, 300W, 600W, 1000W, and 1500W are the most common for solar panels between 100W and over 400W.
The most commonly used alternator chargers are B2B chargers and battery isolators. Wires and fuses are additional parts for all solar systems. In all, before choosing a solar panel system for your RV, make sure to research all its specifications.
How to Wire the Solar Panels into Your RV
After mounting solar panels on your RV roof, the next procedure is to start wiring them. Below are the actual steps for wiring the solar panels into your RV:
- Mount the RV solar panels to the roof using the parallel or series method.
- Attach the charge controller to the RV’s interior near the battery bank.
- Run wires from the solar panels to the charge controller with a circuit breaker or fuse.
- Connect the charge controller to the battery bank
- Then, connect the solar panels.
- Caulk and seal any holes or exposures created during the installation process. If using an inverter, it should be mounted very close to the battery bank.
Parallel Wiring vs. Series vs. Parallel Series
In series wiring connections, the negative cable of one panel goes to the positive of the second one, the negative of the second goes to the positive of the third, and so on. Then, the two unused cables from the first and last panels go into the charge controller.
Wiring in series means the panel’s amperage remains unchanged, but their voltages are combined. The negative and positive cables often go into a combiner box for parallel wiring connections. One thick positive cable and a negative cable go into the charge controller.
Sometimes, the MC4 branch connectors are used instead of a combiner box. Parallel wiring means the panels’ voltage remains, but their amperages are combined. The series-parallel connection is usually used with numerous panels.
It’s a combination of the two other wiring methods, which allows you to adjust the amps and voltage of your solar array to the properties of your charge controller. For instance, you can create two strings of panels with high voltage but wire them in parallel to combine their amperages.
Wiring your RV Solar Panels in Parallel

Wiring RV solar panels in parallel is when the positive and negative (+ and -) wires are grouped. This type of wiring allows each panel to operate on its own.
Solar panels wired in parallel require higher-gauge wiring because the amperage is the wire gauge’s limit.
Don’t wire your solar panels in parallel for units of over 500 watts because you’ll need to buy expensive, thick wires to make the connection efficient.
Wiring your RV Solar Panels in Series

The lowest-performing panel in series wiring connections sets a limit on the output. All other panels will be removed if one panel is in the shade.
Connecting your solar panels in series doubles the voltage going through the wires while leaving the amperage unchanged.
Use an efficient charge controller. Voltage is the reason why charge controllers have a limit. Hence, RV solar panels wired in series require a more expensive charge controller.
Wiring your RV Solar Panels in Series-Parallel

Wiring RV solar panels in series-parallel means that you have multiple series that you’re wiring in parallel. For example, if you have four solar panels, you could have two sets of two panels.
While one series might be wiped out due to a panel in the shade, the other can still perform at maximum capacity.
You double your voltage and amperage rather than quadruple for a four-panel array wired in series parallel. This allows you to limit the gauge of your wires and the size of your charge controller.
Final Words
The biggest determinants of a solar panel RV installation are your budget and power demands. Although you may consider hiring a professional to take care of the installation, it can also be a seamless DIY project. All you need to do is follow the steps in this article and rest assured of a perfect RV solar panel mounting and a better off-road experience.
If you’re using a flexible panel, you can use adhesive to fix the panels. Run the wiring through a conduit to a cable entry plate and connect it to a charge controller. The installation and wiring materials are affordable and easy to access.
Once your solar panel system is installed, maintain and inspect it regularly to ensure optimal performance. Neglecting routine maintenance can lead to reduced efficiency and potential issues.
Although an RV solar installation can cost about $500 to $2,000, the investment is worth it. So, get started with your RV solar panel installation already. Do you have any questions or suggestions on installing solar panels on an RV? Let us know your thoughts in the comment section!
FAQs on How to Install RV Solar Panel
How do rv solar panels work.
RV solar panels convert solar energy into direct current electricity (12V DC), which charges the RV’s batteries and stores the electricity. Passing the 12V DC through an inverter converts it into 120-Volt AC (alternating current), which powers 120-Volt gadgets like a coffee maker. In short, with solar panels, you can power almost anything.
How many solar panels does it take to power an RV?
Five solar panels are enough to power an RV if your total power consumption is 10,000 Wh. However, the number of panels largely depends on your power consumption needs and environmental conditions.
Can I connect the solar panel directly to the RV battery?
Yes, you can, but it’s not advisable. Connecting the solar panel directly to the RV battery can cause explosions and overheating. Instead, connect it to a charge controller. It’ll help guard the battery against overcharging and improve its lifespan.
How many batteries do I need for my RV solar system?
1 to 4 batteries are enough for your RV solar system. Generally, every 100 amp hours of battery storage capacity is enough for a 300-watt solar panel system. So, if you have two 12V or any combination of batteries that sum up to 200 amp hours, your solar panel output shouldn’t be less than 600 watts.
Do you need an inverter for RV solar panels?
Yes, you do. Residential solar panel setups run on DC, so your RV solar system needs an inverter to convert the DC to AC energy. If you’re using solar panels to power your RV, the energy they collect must first go through an inverter before you can use it.
Leave a Comment Cancel reply
Save my name, email, and website in this browser for the next time I comment.
- More Networks
- skip to Main Content
Go RVing uses cookies on gorving.com in accordance with our privacy policy . By using this site, you consent to the use of cookies. We use cookies for the following purposes: To enable certain functions of the service, to provide analytics, to store your preferences, and to enable advertisements delivery, including behavioral advertising.

- Your Basecamp
- For the Family
- Furry Friends
- All the Amenities
- Working from the Road
- Versatile Vacations
- A Fit for Any Budget
- See All Benefits BENEFITS
- Active Lifestyle
- On the Water
- Winter Sports
- The Great Outdoors
- A Weekend Getaway
- Explore a New City
- Go Glamping
- Foodie Adventures
- Seasonal Camping
- See All Activities ACTIVITIES

- Travel Trailers
- Expandable Trailers
- 5th Wheel Trailers
- Pop-Up Campers
- Teardrop Trailers
- Sport Utility RVs
- Truck Campers
- Learn About Towables TOW IT
- Class A Motorhomes
- Class B Motorhomes
- Class C Motorhomes
- Learn About Motorized RVs DRIVE IT
OTHER RV MODELS
- Park Model RVs
- Horse Trailers
- Ice Fish Houses
EXPLORE RVs
- Learn More EXPLORE RVs

- RV How-to's
Expert Advice
- Recipes for the Road
- On the Road with RVers
- Trip Planning
- Budget Tips
- Meet Our Contributors
- Become a Contributor
- See All EXPLORE

Ryan's Story
Highlining in Moab
Ryan Robinson takes you for a ride in the passenger seat of his RV, off the grid, deep among the dramatic rock formations of the Utah Desert. Robinson and friends chill by the fire, tell stories, and of course, rig a one of a kind highline over the Looking Glass Arch in Moab, UT.

START YOUR JOURNEY
- Buying an RV
- Renting an RV
- Find a Campground
- First-Timers Tool Kit
- RV Shows & Events
- Explore Models & Manufacturers
- Find Services & Parts
- Sign up for RV Information
- Visit our Booth
- Get Started START YOUR JOURNEY
YOUR NEXT ADVENTURE
- Inspiring Trips
- RV Parks & Campgrounds
- National Parks
- Scenic Byways
SIGN UP FOR OUR NEWSLETTER
Send us your email to get helpful tips and useful information from our partners.

RV Solar Panels: A Beginners Guide To Going Solar
Interested in learning more about RV solar power? Jesse and Lauren Stuart share their tips for using solar panels on your RV.

Share this experience
Do you want to install RV solar panels on your camper or RV and don't know where to start? From RV solar systems to inverters, and understanding what kind of solar panels are best for an RV, there’s a lot to consider when purchasing solar panels for your rig.
So why get RV solar panels installed? RV solar panels are a great way to power your RV when you’re looking to break away from electric hookup sites and try dry camping or boondocking . When you have RV solar panels and a solar system set up in your RV or camper, you'll be able to power all or some of your RV’s electrical needs like lights, appliances, and even your RV air conditioner.
Whatever size RV you have, before you purchase your RV solar panels, there are a few things you need to know.
RV Solar Panel Systems: Which Is Right For Me?
You have two options to consider when choosing solar panels for your RV or camper
1) Portable RV Solar Panel System
A portable RV solar panel system is the easiest to set up and use. These systems typically plug into a dedicated solar plug on your RV and include one or more 100-watt solar panels that can be attached to your roof with Velcro straps. Other portable solar panels come in a suitcase. You connect the panels via a cord and place them in an area around your RV that gets the most sun.
The portable RV solar panel system is a great choice for RVers who don’t need a lot of power. Maybe you want to use your lights, charge your devices (i.e. phones, computers), and top off your trailer batteries. This option can also be the lowest overall cost to entry, but note you will probably pay more per watt for the convenience of portability.
2) Permanent RV Solar Panel System
Installing permanent RV solar panels is more expensive up front, but this option is the most efficient. You'll get the best bang for your buck per solar watt, can maximize any unused roof space for panels, the panels will be constantly collecting sunlight (i.e. while driving), and the panels don't require setup once you’re parked.
Permanent RV solar panel systems are typically installed by an RV dealer or professional companies that specialize in RV solar panel installation. These systems are designed for those who are trying to maximize solar power not just to charge devices, but also to operate appliances like refrigerators, microwaves, coffee makers, and even air conditioners.
RELATED: 8 Tips For Off-Grid RV Adventures

How Many Solar Panels Do I Need To Run My RV?
First, you need to determine your RV's power needs. RV solar panels are rated in watts, and you'll need to know the wattage (or watt hours) of all the devices you want to run on solar power — think your refrigerator, microwave, phones, TV, etc. For anything that uses electricity in your RV, you need to calculate watt use.
Calculating Watt Use
Locate the amps (or watts) on your devices to determine their usage. You need to convert everything to watts, so if a device only has amps, multiply it by the volts to get watts.
Example: A 120-volt rice cooker that draws 3 amps converts to 360 watts (120 x 3).
Once you know the watts per device used, determine how long you use it daily and multiply it by that “use rate” to get its daily watt usage or watt-hours.
Example: Using the above rice cooker for 30 minutes or 0.5 hours consumes 180 watt-hours (360 watts x 0.5).
Calculating How Many Solar Panels You Need
Once you determine your watt use, you can calculate the number of RV solar panels and how many watts of solar you need.
Most people think that a 100-watt solar panel produces 800 to 1,000 watts of power per day (8 to 10 hours of daylight). Unfortunately, that’s not the case. A conservative rule of thumb is that per 100-watt solar panel, you'll collect about 350 watts per day due to things like weather, optimum sun angle/exposure, and panel efficiencies.
Example: You have one phone at 5 watts to charge for an hour, you use a rice cooker that uses 360 watts for 30 minutes and you use a blow dryer that uses 1,500 watts for 6 minutes.
Phone: 5 (watts) x 1 (hour) = 5 watts
Rice cooker: 360 (watts) x 0.5 (hours) = 180 watts
Blow dryer: 1,500 (watts) x 0.1 (hours) = 150 watts
Total: 5 (watts) x 180 (watts) x 150 (watts) = 355 watts per day
Given this example, a 100-watt solar panel would be sufficient enough to generate enough power to charge your battery and run your devices each day. (Consult with the company installing your panels to determine the panel amount you need.)

What Else Do I Need For My RV Solar Panels?
You'll need more than just solar panels for your RV. There are a few more pieces to pick up, such as:
- Battery bank
- Charge controller
Battery Bank
Batteries store the electricity produced by the solar panel so that your RV can still be powered when there’s no sunlight available (i.e. at night or during bad weather). Technically, solar panels don’t power devices, the solar panels charge the battery and the batteries are what supply the power.
Most batteries are either 24 volts or 12 volts and rated in amps (or Ah). Ideally, you want a battery that has enough capacity to power all your devices and appliances for a couple of days. That way if you have a day of no or low sunlight, you still have some juice to power your devices and appliances.
RELATED: Boondock Basics: The Only Gear Guide You’ll Ever Need
To find out how much battery you need (amps), calculate your watts and divide by volts.

An inverter charger converts DC power (produced by solar panels) into AC power that can be used by your RV's electrical system. It also can take AC power and convert it to DC power to charge your batteries.
To determine how large of an inverter you need, take the total watts you’ll use at any given time and multiply that number by 1.25.

Charge Controller
Lastly, you’ll need a charge controller. The main purpose of a charge controller is to create a one-way street for energy. The charge controller takes the energy generated from your solar panels and channels it to your battery bank.
The charge controller also monitors and stops potential issues like overcharging or discharge, which can ultimately damage your battery.

Are RV Solar Panels Worth It?
While the answer might be different for each person, there is time and money involved when deciding to add a solar panel system to your RV or camper.
Installing solar panels on your RV is ideal for those who:
- Are looking to get a little more off-grid when RVing; installing solar panels allows your RV to power up, instead of being connected to campground electric hookups/power.
- Are looking for a more sustainable solution to sourcing energy.
- Prefer the quiet collection of solar power over the hum of a gas-powered generator.
With research, time, and investment you can open up the possibilities of where you can go RVing.

The Wandering Stus
Lauren and Jesse Stuart, a travel blogging couple , along with their dog Huey cruise the country in their travel trailer sharing travel tips, itineraries, and their adventures along the way!
More Related Articles

8 Tips for Getting the Most Out of an RV Show
Jayco Class C at an RV show

6 Packing (and Unpacking) Tips for RV Vacations
Person organizing RV

Careers You Can Take on the Road
Man looking at tablet in his RV

Get More News & Inspiration!
Submit your email to get helpful tips and inspiration from Go RVing as well as information from our dealer partners on making your RV dream a reality.
* Indicates the field is required.

Before you go, check this out!
We have lots more on the site to show you. You've only seen one page. Check out this post which is one of the most popular of all time.
The Complete Beginners Guide to RV Solar (Sizing, Design & Installation)
When we think about the freedom and adventure of RVing, it is easy to forget that most campers will not function for long without being connected to some-sort of external power system. This article will walk you though all of the steps required to size, design and install a solar system in a RV. This article is written for the Newbie RV owner that wants to explore the world off-grid without needing to always be connected to a generator or shore power.
The goal of this article is to help you learn what is needed to build a RV solar system from the ground up and get you to the point of being able to confidently discuss off-grid solar systems with anyone. I have done my best to cover every topic in a simple and easy understand way. After reading this you should be armed with all of the info you need to install your own solar system or know what to ask for when hiring someone else to do the installation.
This is a long post that covers everything from definitions to sizing. You may want to save this page to your browser bookmarks so you can find this reference again as you design and build your system.
Table of Contents
- Solar and Electrical Terms
Solar System Components
Series and parallel connections, sizing rv solar systems.
- Charge Controller Options
System Wire Sizing
Choosing house batteries, battery bank sizing, calculating energy consumption, final thoughts, solar and electrical terms we need to know.
If you found your way to this article you likely know what solar is, but let's run through a few key terms to ensure our terminology is the same.
Solar Array
When one sees a group of solar panels installed on a RV, house, building, etc. the term most often used to describe the installation is Solar Array. A Solar Array is made up of a group of two or more Solar Panels that are electrically connected together .

The term Solar Array is an informal reference to a group of connected panels that make up a system — it is not a scientific term.
Photovoltaic Array
When exploring solar, you will encounter the term “ Photovoltaic Array .” Solar Array is a generic term that refers to the installation of solar panels. Photovoltaic Array is the scientific term used when describing power outputs and efficiencies of panels.
It is possible that you will see people interchanging the terms Solar Array and Photovoltaic Array, but Photovoltaic Array is the proper PRO term used to describe power outputs of interconnected cells inside of a single panel or the combined output/efficiency of a complete solar installation. Solar Array should be used when generically referring to a solar panel installation.
A Photovoltaic Array is defined as a grouping of solar cells that make up a single solar panel or group of panels.
Solar cells are the small square sections you see when looking at a solar panel.

The term photovoltaic (PV) originates from two root words: “photo” (light) and “voltaic” (voltage).
When you see the abbreviation PV, they are usually discussing something related to input or output specifications of one or more panels (e.g voltage or amps).
One must carefully read the docs referencing PV to determine what values are being discussed. Sometimes it is one panel and sometimes it is all panels combined.
Watt (W) is a unit of power , and power is the rate at which energy is produced or consumed. Think of watts as a measure of electrical flow. Does an electrical device need a big flow or a small flow to work?
The easiest way I have found to describe Watts is to think about a garden hose. The amount of water that can flow through a hose is similar to Wattage. A small hose cannot move as much water as a larger one. This is the same concept in electricity. Lower wattage devices will not consume as much power as a higher wattage device.
A 100W light bulb, for example, uses energy at a higher rate than a 60W bulb. The 100W bulb is going to require a bigger flow of electrons to work than a lower output bulb.
Watts are calculated by multiplying Voltage times Amps of a device. In the 60W bulb example, we do not know the amperage, but we do know the operating voltage of 120V. We can determine the amps by dividing the rated wattage by 120V.
Watts (W) ÷ Volts (V) = Amps (A) 60 Watt Bulb ÷ 120 Volts = .5 Amps
In the solar context, Watts is the rate that the solar energy flows power from the panels to the RV Charge Controller.
Watt Hours (Wh) / Kilowatt Hours (KWh)
A common term that surfaces when we research solar is Watt Hours (Wh). This can be confusing at first. Watts and Watt Hours can sound similar, but they are different.
A Watt Hour (Wh) is a measurement of the amount of work performed or generated during a period of an hour. RV appliances and electrical devices perform “work” and that requires energy in the form of electricity that is supplied through batteries from a camper if it is not connected to grid (e.g. shore) power.
Watt Hour Example : All electrical components are rated in Watts (W). When seeing the term Watt (W) without Hours (Wh) next to it, the rating is referring to how much power the device will require to operate for one-hour. A 60W lightbulb, for example, will consume 60 watts of energy every hour, which equates to 60 Wh per hour. When discussing Watt Hours, we are looking at how much energy is needed or has been consumed over time. A 60W bulb would consume 600 Wh's in 10 hours of use.
Watts (W) x Hours (H) = Watt Hours (Wh) 60 Watt Bulb x 10 Hrs of use = 600 Watt Hours
Kilowatt Hours (KWh) is Watt Hours that exceed 1,000. Utility company's use KWh to make the numbers easier to read. 1 KWh = 1,000 Wh. In the bulb example above, let's assume it was operating 24 hours a day for 7 days (168 hours). It would have consumed 10,080 Wh's. TO make the larger numbers more manageable, we divide Wh's by 1,000 to get KWh
Watt Hours ÷ 1000 = KWh 10,080 Watt Hours ÷ 1000 = 10 KWh
Megawatt: It is rare to see the term Megawatt used in a RV, but it is possible if calculating a year or more of use. Mega means million. The math works the same as converting to Killowatt. The only difference is you would divide by 1,000,000 instead of 1,000. In our 60W bulb example, it would have to be operating 24 hours a day for 6,849 days to get to 1 Megawatt!
Amps (A) and Amp Hours (Ah)
Amps is an abbreviation for Amperage. Amperage (Amps) is a rating that states how much power a device will require to operate at peak or in the case of a battery how much power it can deliver when fully charged.
Think of amps like water flowing through a garden hose. The amount of water that can flow through a given size hose is like Amps. For example, a big hose found on a fire truck is going to deliver a larger volume of water than a small garden hose at your house. A weather radio may consume 0.2 Amps whereas a space heater may consume 15 Amps.

Every electrical device will have an Amp rating. Most of the time when device manufacturers reference Amps, they will just put the letter “A” by the number. “A” stands for Amperage/Amps. The picture above is the back of the power transformer for a Ring Alarm system. In the Output section lists 2.5A. What this is saying is the Ring transformer can deliver power up to 2.5 amperage. This does not mean it consumes 2.5A 24×7, but it can deliver up to 2.5A without damaging the power supply or whatever may be connected to it.
Amps and Watts can sound the same, but they are different. In our gardenhose example, Amps would be the volume of water flowing through the hose, whereas, Watts would be the power generated by the water running through the hose (i.e. think pressure washer or hydroelectric dam).
Similar to Watt Hours, Amp Hours are the amount of Amps that are delivered in an hour.
Think about the process of filling a swimming pool with water. It could take days to fill a pool with a garden hose and a few hours to fill with a fire hose. Both methods will fill the pool to its max capacity. Larger hoses deliver more water and reduces the amount of time it will take.
In electricity, a 1 amp continuous output device would equal 1 amp hour. A 2.5 Amp device would equate to 2.5 Amp Hour. In the swimming pool example, a small hose may deliver 10 gallons an hour whereas a large fire hose could deliver 100 gallons an hour.
Let's take our 60W bulb example from above. A standard 60W bulb will consume approximately 0.5A in an hour. To find out how many amps a Bulb will consume in 10 hours we just multiply the amperage by time in hours.
Amps (A) x Hours (H) = Amp Hours (Wh) .5A Bulb x 10 Hrs of use = 300 Amp Hours
Voltage (V)
Voltage is a term we use all of the time, but it can be a bit tricky to grasp the concept of what it means. Voltage is potential energy. It is like the amount of water behind a Dam. High voltages are like being behind a large dam. Low voltages are like being behind a small one. The more water there is behind a dam, the more potential energy the dam can deliver.
The term Potential energy can also be a bit tricky to understand as well. It is a bit easier to think about this as water. If you have ever used a siphon hose to move water from one bucket to another then you have experienced how potential energy works. The higher bucket has a higher potential than the lower one that is empty. A siphon hose creates the conduit that will move the water from the higher potential to the lower potential.
Next, think about what happens when the water levels equalize between the two buckets… The siphon hose stops flowing water — the potential energy between the two buckets has equalized. When the potential energy is the same, water — or in the case of electricity — electrons will not move.

The image above is showing what happens when siphoning water. When the two buckets have the same level of water, the siphon stops working. This is what happens in Electricity with Voltage. Higher voltage electrons want to move toward a lower voltage.
A battery, for example, may have a nominal voltage of 12.6 V. A battery charger must be rated for something above that (e.g. 14.6 Volts) to work. The battery charger has a higher potential voltage so the electrons want to move toward the battery until the battery voltage equalizes with the charger voltage. When the voltages equalize a battery will stop charging. This is similar to what happens when water stops flowing in a siphon.
A brief aside about battery chargers. If a battery charger does not reduce its output when the battery it is charging is full, it could damage the battery. Pushing more voltage into a device rated for lower voltage for extended periods of time may cause permanent damage. Always use a battery charger designed for the battery it is charging . Using a constant voltage lithium charger on a lead acid battery will destroy it.
Converter and Inverter
One of the most common terms that get interchanged by new RV owners is Converter and Inverter. They sound the same, but they are different.
A Converter gets its name because it “converts” standard 120 Volt Alternating Current (VAC) house-style electricity down to 12 Volt Direct Current (VDC) automotive voltages. The RV Industry calls these devices Converter/Chargers.
The difference between a Converter/Charger and a standard battery charger is the amperage output. Converter/Chargers are designed to power the 12V items inside of a coach when plugged in then the surplus power is used to charge the on-board batteries. Most standard auto battery chargers are designed to charge the batteries only. They have a lower output current and generally are not designed to power other DC powered devices like lights and a radio.

A Converter/Charger is a simple device. The electrical plug that powers it connects to a normal house-style 120 VAC socket. The other end has 12 VDC positive and negative terminals that connect to the DC Bus of a camper. The Converter/Charger pictured above is manufactured by Progressive Dynamics and rated for an 80 Amp output. Common stock RV converter/chargers generally range from 35-60A.
Inverters are similar to Converters, but they work in the opposite direction. A converter changes AC voltage to DC. An Inverter changes DC voltage to AC. Inverters are used when a standard household-type electrical device needs to be powered from batteries.
It is common to see RV's ship with an inverter if the coach has a residential refrigerator. A residential refrigerator needs AC power to operate. When traveling, a RV needs AC power to keep the refrigerator running. The AC power is supplied by an Inverter.

High-end RV's with upgraded electrical systems may come with larger inverters, but generally larger inverters are installed after-market by owners who upgrade their electrical systems.
Solar systems are actually fairly straightforward. Basic systems have two main components. The Solar Panels that convert light into electricity and a charge controller that transforms the voltage coming in from the solar panels down to something that can charge the batteries.
Solar Panels
Solar panels used in RV's typically come in one of two configurations — Monocrystalline or Polycrystalline.
Monocrystalline and Polycrystalline panels are both made from silicone. Monocrystalline panels are made from a single block of silicone that is cut to a uniform size and shape that are called wafers.
Monocrystalline panels are the most efficient because they are cut from pure-blemish free silicone stock. Mono panels cost more than Poly panels because the Mono manufacturing process is expensive and time consuming.

Polycrystalline panels are also made from silicone, but their construction comes from multiple silicone sources that are bought together to form the cells. The process is less expensive, but the imperfections in the Poly cell lowers its efficiency.

It is easy to identify the differences between Mono and Poly panels.
- Mono Panels are cut at a 45 degree angle at each corner because they are made from a round-stock of silicone. If manufacturers were to cut a perfect square they would have too much loss in material.

- Poly panels are perfect squares. They are manufactured out of multiple sources of silicone so the manufacturers can utilize every inch of space when forming the panel. The square shape provides more surface area that improves cell efficiency. This helps offset some of the loss due to how the panels are made.

Panel Construction (Rigid vs Flexible)
There are two types of construction methods of Solar panels used in the RV industry – Rigid and Flex. Rigid panels are generally what is thought of when someone thinks about a solar panel. They are the rectangular shaped aluminum framed panels that we see everywhere.

We see rigid solar panels everywhere because they are virtually indestructible. Rigid panels have been manufactured for decades. The manufacturing process is efficient and the panels are tested by power companies and large installations worldwide. Rigid panels are proven technology that will withstand years of highway driving, rain, hail, tree limbs bumping them, etc.
The drawback of installing Rigid panels on the roof of an RV is they are bulky and need to be hard-drilled into the roof. Each panel will require 6 to 8 physical mounting points securing it to the RV roof. Every hole has the potential of creating a leak point. Accordingly, Airstream and rigs with metal roofs have the additional challenge of drilling through metal to mount the panels. If they are ever remove or change the panels, there would be unsightly holes in the roof that would not be easy to conceal.
Flexible Solar Panels
Flex panels are starting to show up more on RV's. The flexible nature of the panels make them easy to mount onto unusual shapes like an Airstream roof.

Another advantage to the Flex Solar Panels is they are adhered to the surface with a peal and stick adhesive. If they ever need to be removed, a heat gun and some elbow grease can pull them up without damaging the roof.
Flex panels are not as durable as rigid panels. It is very common to see nicks and cuts in a Flex panels that was caused by a tree limb or something nicking them.
Cuts will not necessarily prevent a Flexible Solar Panel from functioning, but they will reduce their overall efficiency.
Another issue with Flex panels is how the top surface is constructed. Flex panels have a soft plastic surface that covers the silicone wafers (Rigid panels are made with tempered glass). The soft plastic is susceptible to UV damage and will deteriorate over time. The top-surface clouding will cause the the entire panel to lose efficiency.

Flexible Solar panels have their advantages, but they are more expensive and will not last as long as a Rigid panel. Most quality flex panels come with a 10 year warranty, but the warranty does not cover labor to remove and install the replacement. Flex panel manufacturers may not cover panels damaged by nicks and scrapes either. Given the choice, rigid solar panels will work better for most RVs.
Charge Controllers
The second primary component of a RV Solar installation is the Charge Controller. What they do is normalize the electrical power coming in from the solar panel to something that can safely charge the on-board batteries.
There are two different types of Solar Charge Controllers — PWM and MPPT.
PWM Charge Controllers
PWM stands for Pulse Width Modulation. PWM controllers act like on/off switches. When they are on, the voltage coming from the panel feeds directly into the battery bank directly. The power output from the panel is not altered. When a battery is fully charged, a PWM controller will toggle the solar panels on and off to keep the batteries in absorption.
PWM systems required that the solar panels are precisely matched to the batteries being charged. If you have a 12 VDC normal battery bank, the panels will need to output a voltage slightly over 12 VDC ~ something around 18 VDC. If you remember our definition above about voltage potential, this is where it comes into play in solar. As soon as the panel output falls below 12 VDC, it stops charging the batteries. A PWM controller would switch the panel off so the battery doesn't try to feed the panel.
Installing multiple solar panels in a PWM system has to be carefully thought out. PWM controllers have a max input amp rating that cannot be exceeded and the solar panels need to output voltages over 12 VDC to work, but they cannot exceed 18 VDC or it can damage the batteries and components inside of the RV. Most of the time PWM systems have one or two panels.
MPPT Charge Controllers
MPPT stands for Maximum Power Point Tracking. MPPT controllers are basically DC to DC converters. They take input voltage form panels and step it down to a safe voltage for the system being charged. All MPPT controllers are designed to convert higher voltages coming form solar panels down to 12 VDC. The common input voltages for MPPT charge controllers are 50, 75, 100 and 150.

MPPT charge controllers are the most flexible. They let you find the best panel that fits the roof and then it does the conversion required to charge the batteries. Accordingly, by having higher input voltages solar panels can be connected in series that multiplies the voltage of the panels and does not increase amps. The advantage of this is lighter weight wires can be ran between the solar panels and charge controller.
When discussing multiple solar panel configurations, it generally doesn't take long to get into the discussion on how they will be wired together (e.g. Series or Parallel).
The reason the wiring discussion is important is because how you connect the panels determines what charge controller you will need, what types of panels you can use and the gauge (thickness) of the wires running between the solar panels and charge controller.
Parallel Connections
Parallel connections are the most common wiring in the auto and RV industry. RV Batteries, for example, are almost always wired in parallel. What parallel means is all positives connect to each other and all negatives connect to each other.

When batteries or solar panels are wired in parallel, the voltage stays the same. Two 12 VDC batteries that are connected in parallel output 12 VDC to whatever they are connected to. This is the most common configuration in two battery automobiles and RV's.
What happens in a parallel connection is the output doubles. In the picture above, two 12 V 100 Ah batteries were connected. The result is it is now like having one big 12 V 200 Ah battery. The batteries are joined and double their capacity without changing the output voltage.
The challenge with parallel connections in solar arrays, however, is when two panels are connected in parallel their output amperage doubles. The higher amperage needs to be carried through wiring from the panels to the charge controller. In solar installations it is generally better to keep the amperage as low as possible.
Series Connection
Series wiring of batteries connects the positive terminal from one battery to the negative terminal to another battery. The cross connects would continue in the positive to negative configuration until the last battery. There would be one open positive and one open negative. Those would connect into the system.

The batteries in the photo above are 100 Ah 12 VDC. What happens in a Series connection is the voltage doubles to 24 V, but the amperage output remains the same.
Doubling of voltage is what happens to solar panels that are connected in series as well. Two 32 V / 9 A output solar panels would output 64 V at the charge controller when connected in series, but their amperage would remain the same at 9 A. The advantage of this configuration over parallel is that it would take a smaller gauge wire to carry 9 A in a series connection vs 18 A in a parallel connection.
Series-Parallel connections
In large complex solar installations, it is common to see panels wired in a series-parallel configuration. This configuration has to be thought out carefully. Everything needs to be identical in each section to work properly.
Series-parallel is a configuration where there could be groups of panels in series and then the groups combine together to form a parallel connection.

The diagram above shows 4 groups of solar panels (one per row). Each row is connected in series and the outside connections are in parallel. The panels are 19V 8A.
- The total output of the above series-parallel configuration is 38V 32A.
- If all 8 panels were connected in parallel, the output voltage would be 19V at 64A.
- If all 8 panels were connected in series, the output voltage would be 152V at 8A
Series-parallel allows solar installers to get more wattage on the roof while keeping the input voltage and amperage into something that a charge controller can handle. Series-parallel also allows for installers to use smaller sized wires. The 32A output can be used on 10GA wires that are common in RV's that have preinstalled wires. The 64A output of the parallel connection would double the size of the wiring required.
Series wiring in this example would work fine with the standard 10 Gauge wiring in RVs with pre-wired solar connections. The output voltage, however, is too high. 152V output would push it outside of the specs of most charge controllers that cap at 150V input.
When designing a solar array, it is important to calculate the output voltage and amperage based on series, parallel, and parallel-series configurations. This will help you then pick the appropriately sized charge controller and wiring.
The surface area on an RV ultimately defines the capacity of the system. The easiest way to start is to measure the roof and determine approximately where a solar panel could be installed.

Both images above are Grand Design RV's. The layout of OEM components on the roof such as air conditioners and vents determine where panels can be installed. The top photo is a 2020 Grand Design Momentum 376TH. The second is our 2020 Grand Design Momentum 397TH. They are both big rigs, but the roof layout is different.
Our rig was ordered with factory solar. The panel at the bottom of the picture shows the OEM panel. GDRV installed the panel in a location that is off center, but they did not leave room for a second panel. We added two more factory Jaboni panels in the front. The two panels in the front could not be even due to a LCI Cellular LTE antenna.

The image above is a mockup I created to add two panels to the OEM install. The measurements are not exactly to scale, but it helped get in the ballpark. We added two panels, ran larger wiring from the roof to the charge controller, relocated the wiring into a junction box and left the OEM panel in place. This configuration gives us 900W of solar capacity. To achieve more we would have to move the OEM panel and patch the holes in the roof. The panels are wired in series.
Calculating Solar Panel Output
After roughing in the initial lay-out I was able to calculate the output power needed to size the solar charge controller and wiring. The first step was to look at parallel connections. The panels output 9.3A max output. 3 panels in parallel would output 27.9A and maintain 39.85V.
The next step was to look at panel output when wired in series. The panels output 39.85 V maximum open current voltage. 3 panels in parallel would output 119.55V and maintain 9.3A.
Determining Charge Controller Size
The Grand Design Solar install came standard with a Jaboni 30A MPPT charge controller. The easiest solution would be to use the OEM controller; however, when looking at the Jaboni Charge Controller specs , it will not work with 3 300W Solar Panels.
If we refer back to the above calculations, 3 panels in parallel would output 27.9 A. Although this is within the limits of the input amperage, the max size wiring supported is only 10 AWG. 10 AWG is max rated to 30A for solar installations. This configuration would push 10 AWG wiring to its limits, which increases heat and voltage drop.
Next we look at 3 panels in series, which output 119.55V. The max input voltage for the Jaboni Charge Controller is 45V. The Jaboni Charge controller can only support 1 300W solar panels in series.
The OEM charge controller can only support parallel connections due to the limitation of input voltage. Operating 3 panels in parallel is technically possible, it would push the amps on the wiring to the max supported by the Jaboni charge controller. Another limit of the Jaboni Charge controller is it can only output a max of 30A. 3 panels in series has the potential at charging at more amps with a different charge controller. Therefore, we eliminated the OEM Jaboni charge controller from our system.
Victron Charge Controller Options
Victron makes a wide range of solar charge controllers and are frequently used in RVs. It is important to find a charge controller that will fit the system without buying one that is too large or too small. A large system will not be as efficient as a smaller one. A small system can overload and shut down if more power than it can handle is pushed in or out of it.

Victron lists all of their charge controller's on there website. At first glance it may be confusing, but it isn't too hard to narrow down the product needed for our install.
The first item I looked at was what devices support Bluetooth. I wanted a controller that can be programmed and monitored directly from the Victron smartphone app. The devices that have integrated bluetooth are called SmartSolar and have a picture of a smartphone next to them (top row of image above plus the leftmost controller on the second row).
Now that we have narrowed to the Victron SmartSolar devices, we need to determine what controller we need. The output voltages are available in different configurations — 12V/24V/48V. Output voltage is the voltage that the system uses to charge the onboard battery bank. This is not the input voltage from the panels. I chose 12V output.
I like keeping everything at 12V in an RV because that is the standard voltage used in vehicles. Higher voltages are more efficient, but they require step-down DC to DC converters to work with inside RV systems and it increases the risk that an RV tech or someone not familiar with high-voltage systems could accidentally cross wires that could cause significant damage to components.
After determining the output of 12V in our case, the next step is deciding what controller we need based on the specs of the panels. Victron conveniently lists the input and output capability of their controllers in the name. The MPPT 150|70 can handle input voltages up to 150V and will charge at 70A. A MPPT 250|100 can support up to 250V input voltages and charge batteries up to 100A.
To pick the controller we need to refer back to our solar panel specs. The higher voltage input in general is more efficient because we can run smaller gauge cables from the roof. Looking at our 3 panel series connection, we would output a max of 119.55V, which takes us out of the 100V and below input controllers. We can use either the 150V input or the 250V input controllers.
Now we need to look at our charging potential to see what size controller we need. We need a bit of math to get us in the ballpark. In our 3-panel configuration we will be outputting 119.55V at 9.3A. The controller will step down the voltage to 12VDC. When stepping down voltages, the amperage will increase. We need to see how many amps we will be outputting to confirm the approximate controller size we need.
To calculate charging amperage, we need to reference the panel output wattage. Our 3 panel configuration is 900W (300W x 3). 900W output divided by the end-voltage of 12V works out to the maximum amperage output potential of the system (900W ÷ 12V = 75A).
Our 900W system will need a charge controller that can output somewhere around 75A. Next, let's look at the specs of the Victron charge controller specs that are in the 75A range to pick the best one for our system.
Victron controllers are built to compensate for panel and cable loss. When looking at the reference table, the SmartController 150|75 would work for our system. Our 900W panels are below the 1000W rated input specs. Our output voltage of 119.55V is below the 150A input voltage. And our input amperage of 9.3A from the panels is below 50A max limit.
In our 3 panel configuration the Victron 12VDC SmartSolar 150|75 will match our system perfectly. However, we may add another 300W panel to the system. What would happen if we did?
Victron Series Parallel Charge Controller Sizing
Based on our 397TH roof configuration, we could add one more Jaboni panel if we relocate the OEM panel. Adding another panel is somewhat easy, but the math changes if we do. We need to run though the numbers to ensure we have expansion capabilities.
4 300W panels in series would output 1200W at 159.4V. This output voltage would force us into the significantly more expensive 250V charge controller. However, if we configure the panels in series-parallel we can easily keep the output voltage below 150V.
Connecting 2 sets of panels in series and then combining those two panels in parallel changes the math.

To calculate the Series-parallel configuration we start by calculating the series legs. In the image above, each row consists of 2 300W Jaboni panels that output 39.85V at 9.3A each. The 2 pair series panels (row in pic above) works out to 79.7V (39.85 x 2) at 9.3A. The two series pairs are then combined into parallel, which works out to 79.7V at 18.6A.
Series connections add voltages together and leave amps the same. Parallel connections leave the voltage the same and add the amperage. When combining two series connections into a parallel leg the voltage will remain the same as the series pair and the amperage will double.
By changing to a series-parallel configuration, we are able to keep the voltage below 100V. This opens up the option to look at the 100V and up controllers; however, when referencing the 100V Victron Charge Controller specs , they only support panel configurations up to 700W.
Although our voltage output is lower than 100V, the series-parallel configuration will still require a 150V|X system that can handle the output load of the 1200W panels.
The SmartSolar table above shows the Victron Charge Controller specs that may fit. By adding the 4th panel we push outside of the 150|75 controller because our system will output more than 1000W. The 150|85 is now the best fit. It will support a panel configuration up to 1200W and charge at 85A. It would also possible to jump up to the 150|100, but that would additional cost that isn't necessary for the 1200W panel configuration.

I chose the 150|85A controller for our installation. Although we have 900W initially that will work with the 150|75, I will be adding another panel to our system. By stepping up to the next charge controller size I can use the same controller to work with our 900W system and support the expansion to 1200W.
Solar to Charge Controller Wire Sizing
Now that we have landed on the number of panels and the charge controller, we need to calculate the size of wires we need. We will have two connections to cable — the feed from the Solar panels to the Charge Controller and the feed from the Charge Controller to the Batteries.
The system I have been documenting will start with 900W panels, but the plan is to expand it to 1200W in the future. When sizing, we need to look at both configurations and size to the largest wiring requirements.
We need to compare both 900W and 1200W system configurations because it is possible that a smaller system could put a heavier amp load on the wiring. For example, one could have a smaller system in parallel that multiples the amperage on the cables and then move to series in a larger system. In this situation the smaller parallel configuration would put a heavier amperage load on the wires.
We can use tables and reference data to determine wire size, but fortunately there are a number of online calculators that make the process easier. One of the calculators I like to use is hosted on the Renogy website . It is important to keep in mind that not all sizing calculators are designed to compensate for solar. Renogy sells quality solar components. Their calculator is safe to use for sizing solar wiring.

When reaching the Renogy calculator, select Solar Cable Gauge Calculator. Next we need to enter the specifications for the proposed configurations. We can start with the wire size from the panels to the charge controller. I will use the numbers generated for the 900W and the 1200W examples.
900W Configuration (3 300W Series)

For the 900W system, we need to round up to the next full number. I rounded the 119.55V output of the 3 series connected panels to 120V and rounded the 9.3A output to 10A. I entered 40 feet to ensure that I calculate the maximum length possible. Quality cables that are designed for solar have low loss. I used TemCo cables so I entered 2%. After entering the number click calculate button.
The wire gauge size needed for a 900W system would be 14 AWG minimum.
Next, we need to calculate the specs of the 1200W Series-Parallel panels.

In the 1200W Series-Parallel wire calculator, I rounded up the output voltage from 79.7V to 80V and the amperage from 18.6A to 19. I left the distance and the loss the same.
The wire gauge size needed for a 1200W system would be 10 AWG minimum.
Based on our calculations, the 1200W Series-Parallel system will require the largest 10 AWG cables. We need to use the 1200W configuration for sizing the wires.

I like bumping up to the next size cable. Larger cables will improve efficiency and provide for expansion down the road if needed. In our 1200W configuration, the 10 AWG wiring will support a max of 30A. If we jump to 8 AWG, we can safely carry 55A. The one size up adds significant headroom and only marginally changing price and weight.
I chose to run 8 AWG wiring from the roof to the charge controller.
Charge Controller to Battery Bank Wire Sizing
The next step of the process is determining the size of wires needed to charge the battery bank. The Renogy Wire Size Calculator is technically designed for solar panel to Charge Controller, but we can use the calculator to get into the ballpark of what we need to connect to our batteries as well.

Using the Renogy solar calculator for the battery interconnect cable is the easiest since we are on this page already. All that is needed is to change the Solar Array Voltage and Operating Current to the output specs of the Charge Controller. In our case, we are using the Victron 150|85 that has an operating voltage of 12VDC and a max charging amperage of 85A. The distance from the charge controller to the batteries should be as short as possible. I used 6 feet in this calculation, which is about double the actual length of approximately 3 feet.
The Renogy calculator indicates that we need to use a 2 AWG size wire to connect to the battery bank. This will support the max charge amperage and voltage. However, before locking in 2 AWG, we need to reference the Victron Charge Controller documentation . We need to verify that the Charge Controller has terminals large enough to fit 2 AWG wiring.

Based on the Renogy calculator and the Victron Charge Controller documentation, 2 AWG wire size will fit the terminals and carry the 85A max charging load.
Charge Controller Distance to the Battery Bank is Important!
The Charge Controller should be mounted as close as possible to the battery bank. To illustrate why this is important, I changed the battery calculation slightly. I increased the distance from the controller to the battery bank from 6 feet to 10 feet.

Adding 4 more feet to the distance the minimum wire size moved form 2 AWG that will fit the charge controller to 0 AWG that will not fit the output terminals of the charge controller. Mount the Charge Controller as close as possible to the Batteries.
The heart of a RV solar system isn't the solar panels it is the battery bank. The solar panels do not actually operate anything. Their sole purpose is to charge the batteries that store the power required to operate the equipment in the RV.
Battery Bank Voltage
When selecting batteries, the first decision to make is the voltage configuration that will be used. Higher voltage battery banks such as 24V and 48V configurations improve overall efficiency of a solar system, but changing battery voltage from 12VDC adds risk. Most RV's and vehicles in general are built around 12VDC.
Standard 12V configuration enables us to jump start from one vehicle to another without damaging the electrical system. All DC powered components installed in an RV including systems such as the furnace, slide controllers, generator starter, lights, radio, water heater, etc. are designed to solely work off of a 12V system.
When deciding to change from 12VDC to something else, the battery bank must be isolated from all other RV components. A device called a DC to DC converter must be installed between the battery bank and the RV components. DC to DC converters will step down the battery operating voltage to 12V that is safe to use internally.
DC to DC converters function similarly to solar charge controllers. They are reliable, but they do add another point of complexity and failure point in the system.
The further we move from standard, we move further away from what RV techs, mechanics and most RV owners understand. Solar connected systems are complex and have very expensive components. A simple mistake like trying to charge a 24V battery bank with a standard 12V charger can cause permanent damage to parts, blow fuses, and could start a fire!
In a home or off-grid situation, higher voltages are preferred, but in an RV I highly recommend keeping everything 12VDC. Keeping the electrical system as close to standard as possible is safer.
- We may need to leave our rigs at dealers for maintenance,
- We may sell our rigs to someone that doesn't understand the system,
- We may have a breakdown and need to jump start the generator from the tow vehicle,
- We could brake down on the road and a tow truck driver is not familiar with the system.
Battery connections
Similar to solar panels, batteries can be configured in parallel, series and a combination series-parallel. For this discussion I will generally target parallel configurations since we like sticking with 12V in a RV.

It is important to note that there are some RVs that have installed 6V Golf Cart Batteries in their rigs. 6V batteries need to be wired in a Series-Parallel configuration so they output 12V into the RV. Series-parallel is similar to the discussion above regarding solar panels. Two 6V batteries are connected in Series. The output of those two batteries are connected to the the other two-group of batteries in parallel.
The 6V configuration is not as common now that there are more powerful 12V options, but it is possible that you may encounter a 6V parallel-series connected system if you are upgrading an older rig. It is always a good idea to take pictures of existing wiring before changing anything and then test voltages with a multimeter. It can cause significant damage to systems if 6V and 12V systems are inadvertently connected to each other.
Battery Chemistry
There are 3 types of chemistries used in most RV Batteries – Lead Acid/Wet Cell, AGM/Gel Cell and Lithium-Ion. Outside of those chemistries, there are a myriad of marketing differences from one battery manufacturer to another. We may hear about cold craning amps, deep cycle, marine, maintenance free, etc. Regardless of what the batteries are called, they all end up being one of the 3 chemistries.
Lead Acid / Wet Cell
The Lead Acid Battery is by far the most common battery found installed in RVs. The technology has been around for over 100 years. Lead Acid batteries are also routinely called Wet Cell batteries. The reason they are called wet cell is because water needs to be added to the batteries regularly.
Lead Acid batteries require a lot of maintenance from owners. When Lead Acid batteries are charged the internal cells generate heat. The hot plates inside of the battery heats the surrounding water that is intended to keep the cells cool. The water will heat up above its boiling point and create steam that evacuates outside of the battery. When the battery cools, the escaped steam is lost and the water level decreases. This process happens during every charge cycle. The lower water level exposes the internal lead acid plates to air, which exposes them to high-heat during charging. Heat will destroy the charging plates reducing their overall power output. This is why wet cell lead acid batteries must be regularly serviced with water. One charge cycle without water covering the internal plates will cause permanent damage to the battery.
Another disadvantage of lead acid batteries is they are not efficient at storing electrical loads over time. A fully charged battery that is disconnected form everything will lose 5% of its capacity every week. A battery sitting 1-2 months without a trickle charger will be completely dead.
Fully discharged lead acid batteries will destroy them. A fully charged battery pushes the Acid electrolyte that holds the charge into the surrounding water. As the battery discharges, the acid attaches to the lead plates. When removing the Acid from the water the freeze point increases. Frozen water expands and will destroy the lead acid plates and can crack the housing. This is the main reason why car batteries die in winter.
Most of us have been taught to trick charge our batteries when in storage, which is great advice. The problem of trickle charging lead acid batteries; however, is the plates always stay warm. The warm plates evaporate the water in the cells. Batteries being trickle charged still need to be inspected regularly to ensure water level in the cells is sufficient. If water goes unchecked, the cells will be exposed to air and overheat during trickle charging. This is why we find lead acid batteries that will not hold a charge after winter storage even though they were stored in a warm location and trickle charged.
Sealed Lead Acid/Maintenance Free Batteries
Sealed Lead Acid Maintenance free batteries are very common. Battery manufacturers love marketing sealed lead acid batteries as being Maintenance Free. Unfortunately Maintenance free batteries and lead acid batteries are one in the same. They are made up of the exact same chemistry.
The only difference between a sealed lead acid battery vs a standard lead acid battery is accessing the cells. Standard serviceable lead acid batteries have caps that can be removed to enable inspection and water servicing. Sealed battery caps are designed to capture and cool the steam released from the water when the batteries are charged. When the hot steam cools it creates condensation that is directed back into the cell.
Although sealed lead acid batteries will last longer without maintenance, the process of converting water to steam and back does not capture 100% of the water. Over time the water level will decrease and expose the lead plates to air. Maintenance Free batteries that are never serviced will suffer the same fait as standard lead acid batteries that are not serviced properly.
Interestingly, standard lead acid batteries could outlast maintenance free batteries if they are properly maintained.
It is possible to add water to some maintenance free batteries, but this process generally requires removing labels and prying off the covers. When servicing them, however, the water recapture system can be damaged turning them into standard lead acid batteries that need to be regularly serviced.
AGM/Gel Cell Batteries
AGM/Gel Cell batteries and lead acid batteries function basically the same way. The difference is the material that holds the charge (e.g. electrolyte). Lead acid Batteries use water. AGM (Absorbent Glass Mat) batteries use a Fiberglass material that is situated between the lead plates. Gel Cell batteries use a gelatin material that holds the electrolyte. The electrolyte is exchanged between AGM and Gel cell batteries in exactly the same way that Lead Acid and Water works. The main difference is stability. AGM and Gel batteries do not suffer from evaporation like lead acid batteries and are truly maintenance free. They cannot be serviced.
Gel cell batteries are not commonly used in RVs or solar. They do not work well when high charge or discharge rates. Starting generators, moving slides, etc. can overdrive a gel battery and cause it to internally short circuit. Accordingly, fast charging form large solar systems will also damage a gel cell battery. The main reason we see gel cell batteries is they work very well in slow discharge conditions and they can operate in environments that have high heat better than AGM or Lead Acid.
AGM batteries are commonly found in RVs. AGM batteries are sealed and can be mounted in any configuration — sideways or upside down. AGM does not off-gas as much as Lead Acid batteries, but they still create toxic fumes when charging. They cannot be installed inside of a living space and must be vented externally.
AGM batteries will not last as long as a properly maintained Lead Acid Battery and they are more expensive; however, the maintenance free design of an AGM battery and the ability to mount them in any configuration make AGM the most common aftermarket battery used in RVs.
Lithium Ion (LI) Batteries
The new kid on the block is the Lithium Ion battery, which is often abbreviated to LI. Lithium batteries hit the market initially in laptop computers, smartphones, and personal devices. The consumer electronics market drove the initial LI use case because the batteries can be built in virtually any shape or size. LI technology was pushed into high-demand applications by Tesla the electric car manufacturer. Tesla vehicles use a powerful LI battery configuration that carries their vehicles 300 miles or more on a single charge.
Automobile and consumer electronic manufacturers have invested billions of dollars into research and production of stable and safe Lithium Ion battery technology, which has enabled aftermarket battery manufacturers to create drop-in sized batteries that have the exact same shape and voltage output of a normal Lead Acid, AGM or Gel Cell battery.

The drop-in form factor of Lithium batteries has rapidly moved LI into the mainstream market making LI the most common battery chemistry used in solar and high-power applications.
The main advantage of Lithium technology is they can deliver to their full rated power. A 100AH LI battery can deliver a full 100AH at a stable voltage from fully charged to fully discharged. Lead Acid, AGM and Gel Cel batteries all suffer from the same technology limitations. A 100AH traditional battery chemistry, for example, can only safely deliver 50% of its rated capacity (e.g. 50AH). Discharging a traditional battery beyond 50% will decrease its output. Several deep discharges of a traditional battery will destroy them. LI batteries can be fully discharged and recharged thousands of times without damaging the battery. Most quality LI battery manufacturers cover their batteries for 10 years or more. Lion Energy batteries come with a lifetime warranty. They are guaranteed to deliver no less than 80% of their initial rated capacity for 3,500 full charge/discharge cycles.
LI battery chemistry holds voltage consistent as they discharge even when under a significant load. A traditional battery will have a voltage drop when delivering full power and the voltage will drop over time as the battery discharges. Voltage fluctuations of traditional batteries can damage equipment, which is another reason why it is not safe to discharge traditional batteries beyond 50% of their capacity.
LI batteries are also completely sealed and maintenance free. Like AGM batteries, they can be mounted in any configuration — on their sides or even upside down. Where LI batteries further diverge from traditional battery chemistry is they do not off-gas. They can be safely installed inside the cabin of an RV. Mounting inside is critically important for small RVs like an Airstream that does not have large external storage compartments. Many Airstream owners install LI batteries in the storage compartment under the bed. LI chemistry is the only battery option that can be safely used inside a living space.
The final key differentiator between traditional batteries and Lithium ion is the weight. A type 27 lead acid battery will weigh somewhere between 54 to 70 lb. A Lion Energy UT1300 Lithium battery weights 23 lb!
The primary disadvantage of LI batteries is the upfront cost. LI batteries can be 5 to 10 times more expensive than traditional battery technology. It is not uncommon to pay more for LI batteries than all other components of a solar system. The advantages of weight, discharge capacity, safety and stability make them a very good choice for RVers.
I recommend looking close at LI batteries for any solar system build. If you are on a budget, starting off with one or two batteries and expand the battery bank over time might be a better choice than building around traditional battery technology. Adding capacity later is relatively easy if the system is installed in an area that has room to add more batteries.
LI batteries have a better return on investment over time than traditional batteries because traditional batteries need to be replaced every 2-3 years. It also takes 2 traditional batteries to deliver the same output capacity of 1 LI battery.
As I discussed above, the number of solar panels are defined by the size of the roof. RVs do not have an unlimited roof space. There is a limit to the maximum amount of power than can be generated per day. Battery banks are similar. Batteries take up space in the RV and they are expensive. The more power on board, the longer a RV can be powered by the rig, but again there is still a charging limit. We can't fill our coaches with batteries and not have sufficient solar to charge them. We need to size a battery bank with our solar array.
The challenge with battery bank sizing is that if the batteries will only be charged by solar panels, the time to charge plus the consumption rate need to be look at. A small 100W panel charging a 12V battery on paper will charge at 1200Wh in full sun. One Lion UT1300 battery holds 1250 Wh's (105Ah x 12V). In a perfect world it would take a bit over an hour for a 100W panel to charge a UT1300.
Of course, we do not live in a perfect world. We cannot charge batteries at the full panel rate. There are losses in the system from the wiring used to the energy consumed by the charge controller to covert panel voltage to 12VDC. In my 1200W system, I landed on an 85A Victron Charge controller. The max rate I can charge at is 1020W (85A x 12V) per hour.
Another consideration we need to take into account is the hours of sun available. The standard usable solar calculation in the US is 5 hours per day. There will be days where we receive more than 5 hours of sun and there will be overcast and rainy days where there will be no charging whatsoever. We need something to calculate from, so 5 hours is a good baseline to use as an estimate. In my 1200W system, I will generate approximately 5,100Wh's per day (1020W x 5h).
Now that we know the approximate amount of power we can generate per day, we can look at optimal battery bank sizing. A Lion UT1300 holds 105Ah of power, which equates to 1,260Wh (105Ah x 12V). I can effectively charge 4 UT1300's from dead in 5 hours (5100Wh charging ÷ 1260Wh/UT1300).
It isn't a good idea to cycle batteries fully dead and up frequently. The larger we make our battery bank, the less likely we will need to fully discharge the batteries. For planning purposes, we should try to get to 2x more battery bank storage than what a solar array can deliver to keep the battery discharge rate down to approximately 50% of capacity.
Battery life is extended if do not discharge fully regularly. A full discharge would equate to 4 UT1300's in our 1200W solar array (e.g. 5,100Wh used and recharged). If we size the bank somewhere between 6 and 8 LION UT 1300's we will increase the lifespan of the batteries by not fully discharging them and have more reserve power on hand to cover cloudy days.
One needs to balance the size of the battery bank with the amount of energy that will be consumed while taking into account the length of time it will take to charge the batteries.
It may be easier to take the batteries out of the equation for a minute to bring the point home. A 1200W solar array can deliver 5,100Wh of power per day on average. 5,100Wh is our daily consumption limit.
If one consumes more power than a solar array can deliver in a day, then the there will not be sufficient power to charge the battery bank. Every watt consumed form a battery bank over what the panels can push back into energy storage will slowly deplete the battery bank to the point where they will eventually be fully discharged and disconnect.
In a perfect world, one would just add solar panels and batteries to cover everything, but as we have been discussing RVs have limited space. It isn't possible to make our roofs bigger. What we need to do is to limit our energy usage based on the amount of charging power the panels can provide.
RV solar sizing is a different approach than what would be done for a home install where we build a system to fit the consumption. We do not have the space in a RV to satisfy max consumption, so we have to fit our consumption into what our system can deliver.
Getting back to 5,100Wh's of max daily consumption, we need to estimate what it will take to get there. It can get a bit tricky to do the calculations since some components operate on 12 VDC and some use an inverter to convert to 12 VAC that has an overhead loss. We don't need to worry too much about all of that. We just need to get into a rough estimate of what we can consume per day and make sure we are looking at the same numbers.
We can back into the numbers by looking at amps per hour or by watts per hour. I find it easier to convert to watts per hour first so we are looking at solar panel output through to the batteries using the same numbers.
The quick way to convert into Watt Hours (Wh) is to reference amp rating of the appliance on its label and multiply by the operating voltage. For example, a computer is rated for .2A at 120 works out to 24 Watts per Hour (.2A x 120V = 24). That same computer would consume 576 Wh per day (24Wh x 24 Hours).
Some always on appliances like a refrigerator are not technically running 24 hours per day. The inside temp stabilizes and power consumption is reduced. For calculations, let's assume a fridge runs for 12 of the 24 hours consuming 480 watts per hour. That works out to 5,760 Wh's consumed by the refrigerator per day!
A Refrigerator operating for 12 hours per day consuming 480 Watts per Hour will exceed our solar power generating capacity in a single day! For those of you who are planning on operating off-grid, a RV fridge running on propane is a more efficient use of power.
We all have dreams of living off-grid with no external power running our Air Conditioners all day, but the reality is that it isn't possible in a RV. We need to strike a balance of what we absolutely need to power off of electricity and use alternative power sources such as propane whenever possible. It is also important to unplug any component that isn't being used. Every plugged in electrical device will consume small amounts of power even when turned off.
On the surface solar looks to be complicated, but the reality is there are only 4 main parts that make up the system — solar panels, wires, charge controller and battery bank.
For those powering AC appliances like an Air Conditioner or Microwave, there is one more component called an inverter that turns battery power to standard household appliance power. I will write more about inverters in a future post.
We can spend a lot of time doing an energy audit trying to calculate the exact power needed, but the reality is the max solar power is limited to the space on the roof. Solar panels are cheap. Find a panel that will fit the roof the best and get as many of them as you can fit on the roof. Then take the specs of the panel and move forward though the system calculating everything needed from the wire size to the battery bank.
Jim Kerr is a entrepreneur that has founded several businesses including Orbitz , Team Convergence , Assure Flight , and Passion Highway . He is an airplane pilot, PADI SCUBA Dive Master and adventure traveler. Along with his wife Lisa, they travel North America in their 2020 Grand Design Momentum 397TH Toy Hauler with their cat Dexter. To find out more about Jim, visit JamesNKerr.com
Recent Posts
EAA AirVenture Oshkosh 2021
The EAA AirVenture Oshkosh annual event brings aviators and aerospace enthusiasts together from around the world. Over 608 thousand people attended AirVenture 2021 generating $170 million economic...
Easy Step by Step Guide to Winterize a RV
It is the time of the year that many of us need to winterize our beloved RVs and put them in storage. You may have your RV Tech on speed-dial, but before you give them a call check out this article...
7 Best Solar Panels for RV: A Complete Beginner’s Guide
Written by : Nikola Gemeš , Updated by: Eunice Rodriguez | Last Updated: February 7, 2024

Renogy 175 Watt 12 Volt Flexible Monocrystalline Solar Panel

BLUETTI PV200 200W Solar

Renogy 100 Watt 12 Volt Flexible Monocrystalline Solar Panel

Jackery SolarSaga 100W Solar Panel

Renogy 800W 12V/24V Monocrystalline Solar Premium Kit

Topsolar Solar Panel Kit 100 Watt 12 Volt Monocrystalline Off Grid System

WindyNation 100 Watt Solar Panel Off-Grid RV Boat Kit
A gimmick or free electricity on the road? We present you with the best solar panels for RV and answer the ultimate question: Are they worth it at all?

When I first saw solar panels slapped on an RV I immediately thought of one of my all-time childhood movies “Race the Sun." It’s about teenagers who build their solar car to race across Australia.
Now, as a camping and RVing enthusiast, I realize that solar panels can’t power the RV but can make my trip much more convenient and sustainable.
But what sort of problems will solar panels solve in your RV?
Coupled with a capable solar battery, I use them to power the appliances and lighting in my RV. This allows me to camp away from crowded campsites and become fully independent of the grid.
What is more, it allows me to camp sustainably and offset the carbon emissions of my RV by using a renewable source of electricity.
The 7 Best Solar Panels for an RV or Camper Van (Reviewed by An Electrical Engineer)
1. renogy 175 watt 12 volt flexible monocrystalline solar panel (best overall).
Wattage: 175 watts | Panel Type: Monocrystalline | Water Resistance: IP67 | Weight: 6.2 lbs
What’s thin as a coin and bends up to 248 degrees? It’s my favorite solar panel for RV on this list.
The Renogy 175 Watt 12 Volt Monocrystalline Solar Panel has everything I expect from a top-shelf solar panel for RV use.
It weighs only 6.2 lbs so I confidently fixed six of these to my RV roof.
What is more, they are extremely flexible, so they’ll adapt to any trailer style. That’s a big consideration for me.
Scroll down to the Flexible vs. Rigid Solar Panels section to read my opinion, but in short, if you have the budget — go for flex.
The Renogy 175W has great solar efficiency thanks to transparent dots on the surface that capture the sun's rays even when coming at an angle.
In my use, even on a hazy day on Washington state shore, two of these panels provided well over 200 watts.
- Extremely flexible
- Ultra lightweight
- Resistant to high winds
- IP68 water and dust resistant
- Anti-scratch surface
- Easy to install
- Mounting eyelets too small
- Connection leads could be longer
Why Do I Like It?
I glued four of these panels to my RV roof while the remaining two are movable — I use mounting eyelets to rig them on the trailer side that receives the most sunlight.
2. BLUETTI PV200 200W Solar (Runner up)
Wattage: 200 watts | Panel Type: Monocrystalline | Water Resistance: IP65 | Weight: 16.1 lbs
Following excellent solar generators like the AC200P and the beastly EP500 , Bluetti strikes back with a formidable portable solar panel kit that can make a perfect RV solar panel system.
On a bright su nny day, the Bluetti PV200 200W Solar charges my AC200P solar generator in about 5 hours.
If you’re not big on DIY and mounting stuff, you’d be happy to hear that you can get these up and running in less than 30 seconds.
Unfold, connect, and prop it up.
Now, this can be a deal-breaker to some — there are no mounting eyelets or any other way to fix this panel permanently to your RV roof.
I guess you could glue it with silicone or use EternaBond tape , but since there’s no rim, you’ll have to cover some of the solar cells as well.
So why is this solar panel on the list at all?
Because not every camper needs a mini solar power plant on the roof. Most users only need to charge a few gadgets like a laptop, camera, phone, and drone.
These people use portable solar generators and pair them with portable solar panels, which they prop up on a sunny spot, while their RV stays in the shade.
- High-efficiency panel
- IP65 water and dust resistant
- Super easy to install
- No mounting eyelets
- Portable use only
Not all places are accessible by RV nor they should be. I can take these solar panels down to the beach and keep the party going.
3. Renogy 100 Watt 12 Volt Flexible Monocrystalline Solar Panel (Best Lightweight)
Wattage: 100 watts | Panel Type: Monocrystalline | Water Resistance: IP67 | Weight: 4.2 lbs
This solar panel for RV is just 0.08 inches thick which is 90% thinner than any rigid solar panel in the 100-watt range.
The best way to fix this to your RV roof is to use silicone adhesive or EternaBond tape.
Like on the 175W version, there are six eyelets but they are too small for mounting screws.
So you best use them with rigging cords for non-mobile applications.
If you want lightweight and reliable RV solar panels that will power your basic devices, you won’t find a better-priced option.
- Easy to install
- 100 watts might not be enough for some users
These solar panels are just 48 x 21 inches which gives me plenty of options to combine and mount them, either along or across the roof axis.
4. Jackery SolarSaga 100W Solar Panel (Most Versatile)
Wattage: 100 watts | Panel Type: Monocrystalline | Water Resistance: IP65 | Weight: 9.1 lbs
There’s this thing about Jackery products that make them similar to Apple gadgets:
They are reliable, compatible only with other Jackery products, and have an army of loyal customers.
The Jackery Solar Saga 100W Solar Panel is beautifully designed, just like every Jackery product. It folds in half and has two comfortable carrying handles in case I need to deploy them away from my RV.
Keep in mind that the Solar Saga is a 100% portable solar panel, just like the Renogy PV200.
This makes it perfect for boondockers who prefer to keep their vehicle in shade and need to power only a few essential gadgets.
I’ve used two Solar Saga 100W solar panels with my Jackery Explorer 1000 and after 8 hours of charging I could run a mini fridge for 17 hours.
Unlike the Renogy PV200, this solar panel for RV comes with four mounting eyelets so you can fix it to your RV roof or side.
Unfortunately, these panels are only compatible with Jackery power stations.
- Super easy to install
- USB ports for direct device charging
- Works only with Jackery solar generators
- Only 4 solar panels can be connected
The Solar Saga 100W comes with USB-A and USB-C cables. In a pinch, I can charge my phone and laptop directly from the panel.
5. Renogy 800W 12V/24V Monocrystalline Solar Premium Kit (Best Premium)
Wattage: 800 watts | Panel Type: Monocrystalline | Water Resistance: IP32 | Weight: 112.8 lbs
Renogy made an offer I could hardly refuse.
They packed 8 rigid-frame 100-watt monocrystalline panels with the Ro ver 60A charge controller and a Bluetooth module.
With this kit on your RV roof, you’ll be able to harvest about 3.5-4 kWh of sunlight a day. The panels have a heat-dissipating back sheet that ensures smooth output performance without hotspots.
I was happy to discover that every panel comes with pre-drilled holes in the back frame and Z-brackets for mounting solar panels on the RV roof. When you mount it on the roof, this panel doesn’t go anywhere.
But it was the charge controller that sweetened the deal. If you have a large RV and want every convenience of a mobile home, the Rover 60A allows you to slap another 8 solar panels and boost your system to 1.600 watts!
Using the Renogy DC Home App I can always check what’s going on there, as the controller sends power data directly to my phone via Bluetooth.
This way I can always tell how much power is produced, how much I use, and even if there’s something wrong with the system. Pro-level baby!
- 8 x 100W panels
- Solar charge controller
- Bluetooth module
- Automatically detects system voltages
- Compatible with all kinds of batteries
- Rigid-frame panels
Apart from making my RV virtually independent from the grid, these solar panels for RV make a great home outage solution. When the power goes out, just move to your RV and continue whatever you were doing.
6. Topsolar Solar Panel Kit 100 Watt 12 Volt Monocrystalline Off Grid System (Best on A Budget)
Wattage: 100 watts | Panel Type: Monocrystalline | Water Resistance: IP65 | Weight: 15.8 lbs
The price of solar gear is dropping, and now you can get decent RV solar panels for less than $150.
When I saw the price range of the Topsolar Solar Panel Kit I was suspicious at first. Especially since you get all the cables, Z-brackets, and — listen to this — a 20A charge controller.
The heart of this system is a rigid-frame monocrystalline solar panel with a waterproof IP65-rated junction box.
It means your wiring is completely protected from dust particles and low-pressure water jets.
Still, as with all IP65-rated panels here, you don’t want to leave the junction box or connectors in the rain.
Remember: The panels are weatherproof but the rest of the equipment are not.
So why isn’t this solar panel for RV on the top of the list?
First, I wasn’t aware till I tried it that the charge controller it comes with works only with lead acid batteries. Also, the wiring connectors look and feel flimsy, so I don’t know when I’ll need to replace them.
And, the screws that hold in the charge controller wires are so tiny and so tight that I can hardly unscrew them without stripping them.
All in all, with a few tweaks this could be a solid and inexpensive RV solar panel for someone getting into the world of solar power.
- Very sturdy panel
- Fast charging
- Inexpensive
- Cheap wiring hardware
- Works only with lead acid batteries
- Menu button labeled “Mune”
With a more versatile controller and new wiring, the Topsolar 100W solar panel can be an inexpensive building brick for a full-size RV solar system.
7. WindyNation 100 Watt Solar Panel Off-Grid RV Boat Kit (Budget Alternative)
Wattage: 100 watts | Panel Type: Polycrystalline | Water Resistance: N/A| Weight: 19 lbs
The problem with these low-cost RV solar panels is that they often run out of stock. So if you can’t find a good deal on a Topsolar 100W panel, the next best choice in this category is the WindyNation 100 Watt Solar Panel .
This solar panel is even cheaper and comes with a better 30A charge controller, so you can add more solar panels in the future.
The P30L charge controller that is in the box can handle up to 4 x 100W solar panels in a 12V system and up to 8 x 100W panels in a 24V system.
On the downside, when my panel arrived, it came without any connectors and mounting hardware.
I’ve emailed customer service and they sent the missing stuff with no questions asked.
Still, I had to buy at least two fuse holders and fuses (automotive ATC-type will do) and the 30-amp gauge wires to connect the P30L to my battery bank.
- 30A charge controller included
- No water and dust resistance
- No fuse holders included
If you want to stick a couple of solar panels on your RV roof that will survive whatever weather throws at them and still have enough money for the next 3 road trips, these are the panels for you. Just keep that electric gear tucked inside.

7 Best Solar Generators For RV: Reviews & Buyer’s Guide
What Are RV Solar Panels?
RV solar panels are similar to home solar panels. But instead of powering your home, they use the power of the sun to charge your RV battery.
When your RV is on the road or parked in a sunny spot, the solar panels on the roof absorb energy from the sun.
Then you can use the RV battery to power lights and small appliances in your camper.
If you add more batteries that the solar panels can charge, you have more electricity available when camping.
Do You Need To Use RV-Specific Solar Panels?
Whatever vendors want you to believe, there is no such thing as solar panels that are strictly for RV use. Many companies market their products as RV solar panels but only because those panels are suitable for RV use.
These include both portable solar panels which have multiple ways of permanent or semi-permanent attaching to your RV roof as well as flexible solar panels that you can fix to curved surfaces. Flexible solar panels are a bigger investment but provide a higher ROI with high-efficiency rates.
I also want to say that solar panels are not a magic pill.
Not so Free Energy
This “free” and clean power sounds much better than the fuel generator.
But when I say free I mean the sunshine. The hardware can be quite expensive. Sure, prices of solar equipment have gotten a bit more reasonable in recent years, but if you want quality, you still need to pay a hefty sum.
You need a couple of pairs of 100-watt panels and deep-cycle solar batteries to store power and charge the controller that keeps them from overcharging. Then there’s the inverter that turns the DC power into AC power that most appliances use.
When you add those up, you can be looking at a $1,500+ investment up front.
Also, collecting solar power is much more complicated than hooking up to shore power at a campsite. You need to know how much power you'll need on a daily basis and size your system accordingly.
No Shade Where I’m Going
It also means you’ll have to park in full sunshine for most of the day. In other words, you can forget about parking your RV in a nicely shaded campsite where you can throw a barbie and pass a few cold ones.
Don’t get me wrong, solar power is great and worth the investment, especially if you like to boondock on public land away from the grid.
It’s just that for the most part, if you want the maximum power, you need to:
- Open your wallet
- Leave your rig in the blistering hot sun
Are Solar Panels Worth It? Opinions of An Electrical Engineer
How Much Energy Do You Need for an RV?
First, you need to know how much energy you use in your RV in a day. There are two ways to do this. The first one is easier and the second one is free.
1. Use a battery meter
The easiest way to tell your daily consumption is to install a battery meter like this Renogy 500A Battery Monitor . Before installing solar panels, go camping without hookup charging along the way and the monitor will give you the amount of energy you use with ±1% accuracy.
2. Calculate your energy use
This way is 100% but requires a bit of math and planning. In short, you need to find out what each appliance or device in your RV consumes and multiply that by the number of hours you expect to use it.
For example, you have one TV that consumes 100 watts. You guess that you’ll watch TV for about 2 hours per day. So 100W x 2h = 200Wh a day.
You can do the same for every electrical device you want to power while you’re boondocking and you’ll get a rough estimate of the total watt-hours you need. Add a 20% for safety and from there you can estimate how many panels you need.
If you plan to cook outside and only use electricity for things like lighting, TV, and charging your phone or laptop, two or three 100W solar panels and a 1,200Wh battery will do.
However, if you want to power your fridge or AC you’ll need more panels and batteries.
How Many Solar Panels Do I Need For My RV?
Now when you’ve measured or calculated the amount of energy you need daily, there is one more thing to consider:
How much energy do solar panels provide to your battery?
You need to achieve a balance here.
Install too many solar panels without enough battery storage and you're wasting both money and energy that can’t be stored nor used.
On the other hand, slap one solar panel and a row of batteries, and you won't be able to charge them all while the sun's up.
Let’s now calculate energy generation and storage needs.
For example, a high-end 100W solar panel will generate an average of 350Wh per day. Keep in mind that this varies by location and time of year.
You also need to know how many batteries you need to store the power that your RV solar panels generate. One 100Ah 12V battery has about 1,200Wh storage capacity.
I say it again: Your solar panels for RV will only give you the listed number of watts under perfect conditions.
Perfect conditions = direct sun shining directly at the panel
On a rainy day, you’ll be lucky to get 100 watt-hours from your 100W solar panels. The same goes for parking in the shade.
It’s also challenging to estimate the amount of energy you’ll use in a day because days are different. One day you might be outside from dawn to dusk, enjoying nature, hiking, canoeing, and whatnot. The next day might be rainy and you’ll stay inside your RV working on your laptop or watching TV for hours in the evening.
So whatever you do, estimate high.
How Much Do RV Solar Panels Cost?
How much your RV solar panel system will cost depends on what you expect from your solar system. Setting up your RV with solar power is not a cheap project.
On the bright side, there are great solar panels for RV that are available at any price point.
Weekend RVers — Solar System Around $1,000
If you mainly use your RV over the weekend, you most certainly don’t need a solar system that can power a house.
In that case, I recommend buying a solar system that will allow you to use the sun to charge phones, turn on the lights, and power a few outlets.
If you’re not confident about using your RV's original wiring, you can pair your solar panels with a solar generator that already has multiple outlets for both 110V and 12V power.
Solar generators already have a battery and inverter inside, so you only need to plug in the appropriate solar panels for RV.
Here are a few good combos:
Combo 1: The Bluetti Combo

Combo 2: The Jackery Combo
Combo 3: The Renogy Combo
Cost Of Solar Panels: A Walkthrough Guide
Hardcore RVers
If you like to spend several weeks traveling in your RV, I recommend you build a more capable RV solar system.
Higher-end components are better built which leads to fewer maintenance issues. Manufacturers often offer RV solar panel kits that contain everything you need to build a full-fledged solar system for your RV.
For example, the Renogy 800W 12V/24V Monocrystalline Solar Premium Kit costs $1,399.99 and includes eight 100-watt solar panels and a Rover 60A MPPT Charge Controller.
But then you also need an inverter like this Renogy 1000W 12V Pure Sine Wave Inverter for $254.99.
And you need a deep cycle discharge battery. If you want to make the most out of those 3.4 or 4 hours that the sun is directly above, you’ll need at least a 2,000Wh battery. For example, this Renogy 12V 200Ah Lithium Iron Phosphate Battery costs $1,129.
How to Install Solar Panels on Your RV
Now let’s take a look at how to set up RV solar panels in the simplest possible way.
For starters, a solar system for RV has a few basic components:
- Solar panels for RV
- Charge controller
- Solar battery
- Battery monitor with a shunt
- Fuses and breakers
And that’s it.
But how do you hook up solar panels to RV batteries?
You can’t charge the RV battery with solar panels directly. First, you need to hook solar panels to a charge controller and put a battery monitor in between the controller and the RV battery.
It might sound complicated but it isn’t.
Let’s begin with the RV solar panel installation.
Step 1: How to Mount Solar Panels on Your RV Roof
Depending on the kit you bought, you’ll either have to use Z-brackets or screws or silicone adhesive.
If you’re going with screws, mount the brackets and set your panel where you want it, and mark the holes for drilling.
Now, this part is super important. You’ll be drilling through your RV roof so you don’t want any water to leak inside.
I used a Dicor Roof Sealant . Just apply some sealant over the markings so that when the screw goes in it pulls into that membrane and makes a watertight seal.
If you're gluing the panels or using the tape make sure the adhesive makes a complete seal around the edges as you don’t want any moisture or dust to accumulate under your flexible solar panels.
Step 2: How to Connect the Panels
If the wires you got in the solar panel kit are too short, you can use an extra IP65-rated junction box.
From there, lead the wires into a circuit breaker . I prefer circuit breakers to fuses because I can disconnect the panels from the rest of the system with a flick of a switch.

Step 3: How to Connect the Battery
Now, remember, you don’t want to hook your panels to the charge controller until you’ve hooked up the battery.
Connecting the battery is quite simple. You’ll need a fuse in between there, so from the positive side of the charge controller go to the fuse and form there to the positive side of the battery.
And on the negative side, first, lead a wire from the battery monitor shunt to the charge controller and then from the battery monitor to the negative side of the battery.
Once you hook up the charge controller to the battery, it’s going to power up the display. From there you can finish hooking up the solar panels to the charge controller and turn on that little breaker.
And that’s pretty much it. Now you can see what’s coming from solar panels into your battery.
Rigid vs. Flexible Solar Panels: Which One Is Best for RVs?
Both rigid and flexible solar panels have the same job but they are built for different applications.
Rigid Solar Panels
Usually have a metal frame and are encased in sturdy glass. This makes them much heavier, but also much more durable.
In the past, rigid solar panels were considered more efficient than their flexible counterparts. However in recent years, technology has advanced, so now they’re an equal match.
However, two things haven’t changed:
- The rigid solar panels will take up less square footage than flexible panels.
- Rigid solar panels are usually less expensive .
Finally, rigid solar panels have a less tendency to overheat. Flexible panels sit directly on the RV roof so there’s nowhere for the heat to escape. Rigid solar panels have raised mounts that allow airflow all around them.
On the downside, the mounts produce more drag on the road, which translates to more fuel spent.
So to sum up:
- More durable
- More efficient (in general)
- Less expensive
- Better cooling
Flexible Solar Panels
Flexible solar panels are much thinner and built like laminate materials so they are bendable to an extent. This makes them perfect for curved or streamlined surfaces like boat hulls, RV roofs, etc.
Since they are glued or screwed down to the RV roof they don't create any drag while on the road.
Flexible panels also weigh much less, which makes them perfect for RV and marine use. No one wants to put more weight than they already haul around.
These perks combined make flexible solar panels for RV much easier to install on your rig. In some cases, you won’t need any tools but a tube of silicone adhesive or EternaBond tape.
Flexible solar panels are also more portable. Removing and storing rigid solar panels is much harder. I’ve never heard of anyone in my RV community doing that.
On the other hand, you can easily remove flexible panels from your RV roof to slide them into any bay for storage.
So what do we have so far?
- Lightweight
- Fits any surface
- Easier to mount
- More portable
- More expensive
- More tendency to overheat
Verdict: Rigid vs. Flexible Solar Panels
If you ask me, solar panels for RV have to be either flexible or portable. Rigid solar panels are not just 70% heavier, but also require more complicated mounts, not to mention the additional drag on the road.
Can you run an RV on solar power?
Yes, you can run an RV on solar power. If you need to power just basic RV systems, you can start with solar systems and a battery bank. However, if you want to power the appliances you’d use in your home, you need an inverter to allow you to use a 110-volt system.
What is the hardest part of boondocking in your RV?
The hardest part about boondocking in my RV is water conservation and power conservation. Solar panels can help with the latter.
Can you run an RV air conditioner with solar power?
Yes, you can run RV air conditioners with solar power. But keep in mind that Ac units suck up a lot of power so you’ll need lots of solar panels and a large battery bank.
How many solar panels do I need to run 50 amps in my RV?
You need two 100-watt solar panels to run 50 amps a day in your RV.
Can off-grid solar systems work 24 hours every day?
Yes, off-grid solar systems are designed to work day and night 24/7.
Which is better for the money: RV solar panels or generators?
A generator is always cheaper upfront, but then you have to stop to refuel it, plus you get constant noise and the smell of diesel. RV solar panels are more expensive upfront, but once you clear the bill they keep giving as the power source is 100% free. In addition, you’ll rarely have to do anything about them, while the generators need regular maintenance.
Are RV Solar Panels Worth It?
RV solar panels are definitely worth the investment.
Some of you will choose an inexpensive RV solar “starter pack” with a simple charge controller and a lead acid battery.
Enough for charging a few devices between shore hookups.
Or you may want full independence from the grid and splurge on 8x100W flexible solar panels + pure sine inverter and LiFePO4 battery with 3,500+ discharge cycles.
Others will go for maximum flexibility and rig up portable solar panels for RV and use a solar generator unit that is both an inverter and a battery in one.
Let’s be honest — in any case, the upfront price is higher than what you’d pay for the fuel generator.
But once you’re past the price point, everything is pure gain — both for you and the environment.
So, let me ask you this:
What price are you willing to pay to ditch the nasty exhaust fumes and harness the clean and free energy of the sun?
My Recommended Solar Panel for RV
Out of all the solar panels on this list the Renogy 175 Watt 12 Volt Monocrystalline Solar Panel takes the cake for sure. Its feather-light 6.2 lbs allows for easy installation atop any RV, without sacrificing durability or power.
What sets it apart? The innovative transparent dots on its surface that efficiently capture sunlight from various angles, ensuring superior performance even under the diffuse light on a cloudy day. This panel not only meets but exceeds expectations with its remarkable flexibility, adapting seamlessly to any RV design. For those contemplating the leap between flexible and rigid solar panels, the Renogy 175W is a testament to how flexibility can significantly enhance your RV's energy solution without compromising on efficiency.
Ready to revolutionize your RV travels? Invest in the Renogy 175W today.
I Recommend
The RENOGY 175 WATT 12 VOLT MONOCRYSTALLINE SOLAR PANEL
Nikola Gemeš
Nikola, an electrical engineer, simplifies intricate sustainability subjects for his audience. A staunch environmental conservationist, he embodies his beliefs daily through recycling and cultivating his own food.
Quick Links
Green Living Guides
Inspiring Green News
- Green Directory
- Green Store
Electronics Recycling
Category: Green Blog , Product Review , Renewable Energy , Solar Power
Leave a Reply Cancel reply
Your email address will not be published. Required fields are marked *
GreenCitizen is an environmental conservation company providing you with information, services, and products to help you live a sustainable life.
Join Our Newsletter
- Most Popular
- Sustainable Living
- Renewable Energy
- Business & Polices
- Environment
- Product Review
Services (United States)
For businesses.
- Business Pickups
- Data Destruction
- Build Wide Pickups
- Product Destruction
- Electronics Recycling Drop-off
- Mail-in Recycling
- Hard Disk Destruction
- How to Recycle ?
Useful Links
- Customer Reviews
- Our Customers
- In The News
- LEED Reporting
- E-waste Crisis
- Data Security
- Global Dumping
- Harmful Effects
- Styrofoam Recycling
- Polyurethane Foam Recycling
- Why Data Security ?
Copyright © 2024 · All Rights Reserved · GreenCitizen
Privacy Policy | Affiliate Disclosure
Beginners Guide to RV Solar Panels

Sharing is caring!
Thanks for your support! If you make a purchase using our links in this article, we may make a commission. And, as an Amazon Associate, I earn from qualifying purchases. See the full disclosure here .
Thinking about adding an RV solar panel system to your motorhome or travel trailer but don’t know where to start? We understand. RV Solar panel power systems are a complex topic – it can be a little intimidating. There’s a lot to understand like wattages, types of RV solar panels, and the installation process. We’ll cover all that and more in our beginner’s guide to RV solar panels.
Let’s get started by talking a little bit about the science behind RV solar panels and how they work.

RV Solar Panel Basics: How Do They Work?
First thing’s first: how does an RV solar panel even make electricity (Don’t worry – you don’t have to be an electrical engineer to get the basic idea)?
The sun is constantly bombarding our planet with energy. In fact, it provides enough power to fill our entire planet’s energy needs 10,000 times over!
Using an RV solar panel, we can collect some of that energy and put it to use. A solar panel is actually made of several smaller solar cells . These cells aren’t very powerful on their own, but when combined together, they collect a significant amount of power.
You can think of a solar cell as a layered “sandwich,” where each thin layer is made out of silicon. The top layer has extra electrons that have a negative charge; the bottom layer has fewer electrons. This difference in charge creates an electrical field.
When sunlight hits the top layer of the cell, one of those extra electrons “jumps” free. Then the free-electron flows through the electrical field to a conductive metal plate. This plate collects the electrons and transfers them into the wires.
BOOM! You have electricity. From here, the electricity is stored in your RV batteries with the help of a charge controller. Filled up with solar power, your batteries power your RV.
But not all RV solar panels are created equal. There are actually a few different solar panel technologies available.
Types of RV Solar Panels
When you’re shopping for RV solar panels , you’ll notice two different kinds: monocrystalline and polycrystalline. Either one can be a great choice for RVers, but there are some important differences between them.
Monocrystalline RV Solar Panels

Like the name implies, monocrystalline panels are made out of one single silicon crystal. Or more accurately, a “slice” or “wafer” cut from a single huge silicon crystal. You’ll know when you’re looking at a monocrystalline panel because the cells will be black and octagonal.
Monocrystalline panels are the most efficient solar panels out there. They’ve got efficiency ratings between 15% and 20%. In other words, 15-20% of the sunlight hitting the panels converts to electricity.
This electrical efficiency also allows them to be slightly more compact than other panels. So, they’re also the most space-efficient option.
Polycrystalline RV Solar Panels

With a polycrystalline panel, instead of one big crystal, you have a bunch of smaller crystals melted together. These panels are recognizable by their blue, rectangular cells.
Polycrystalline panels are cheaper than monocrystalline panels, but they’re also less efficient. They’re only 13-16% efficient, compared to the 15-20% of a monocrystalline panel.
This lower efficiency isn’t the end of the world. In fact, a polycrystalline panel can still fulfill your power needs. Going with a polycrystalline RV solar panel setup can save you a few dollars on your solar setup.
Rigid vs Flexible Solar Panels

One last kind of solar panel is the flexible solar panel also known as a “thin-film” panel. Your “classic” RV solar panels are hard and rigid. Just like the name says, flexible solar panels can be bent into (almost) any shape or position.
The flexible nature makes these RV solar panels great for all kinds of applications. Plus, they’re much easier to install because you can use an adhesive. With rigid panels, you have to drill holes.
The big drawback of flexible panels is their low efficiency. Rigid panels – monocrystalline and polycrystalline – will have an efficiency somewhere between 13-20%. Meanwhile, flexible panels, are only 7-15% efficient.
Another potential problem is that flexible panels are more prone to damage. For example, driving through a wooded area and hitting a stray tree branch could scratch through the panel. You have to be a little more careful with flexible panels.
The big upside of flexible panels is their flexibility. And not just the literal kind; a flexible solar panel can be used in lots of situations where a rigid panel might not work as well. For example, attached to the curved side of a teardrop camper.
Roof Mounted vs Portable RV Solar Panels

When you think of RV solar panels, you probably think about them being permanently installed on the roof of a motorhome or travel trailer. But did you know that there are solar panels you don’t have to install?
Enter the portable RV solar panel. Rather than being permanently attached to your RV, these solar panels fold up for storage when they’re not in use. When you get parked at your sunny destination, you simply pull them out and attach them to your battery whenever you need them.
Portable solar panels have a bunch of advantages:
- There is no need for installation which can involve hours of hard work
- You don’t have to worry about where your RV is parked; the solar panel can be moved for the best sunlight
- Portable solar panels are often more affordable than a full, RV rooftop solar install
However, there are some drawbacks to portable solar panels too:
- You’ll need space to store your panel when you’re not using it
- Every time you need to power up your battery, you have to take out the portable panels and set them up
- If you’re RVing in a shaded area, you might have to move the panels throughout the day to chase the sun
- If you need a lot of power, portable panels might not be sufficient
Portable RV solar panels might not replace a full rooftop array of solar panels but they’re a great (easy) way to get started with solar power.
How Many Solar Panels Do You Need to Run An RV?

You’re probably wondering, how many solar panels you’ll need for my RV? The exact number depends a lot on the panels you’re using and your power needs. Some people might only need one or two panels, but others will need six or more!
An important thing to remember is it’s not really the number of panels that matter – it’s the number of watts. Three 100-watt panels are the same as one 300-watt panel. So, what you really want to know is how many watts you need.
You’ll notice when you look at RV solar panels that they all have a certain wattage rating. Your average RV solar panel is rated between 100 and 400-watts. You can find higher and lower ratings too.
To put it simply, more watts mean more power. Keep in mind that these ratings are under ideal conditions. Your RV solar panels will give you less power if it’s not a perfectly sunny day or if it’s under shade.
But wait, then how many watts do you even need? There are two main ways to calculate your power needs.
Calculating How Many Solar Panels Does an RV Need?
When calculating how many solar panels your RV needs, the best option is to do a power audit. This means calculating how much power everything in your camper is consuming.
Method 1: Boondocking
The best way to calculate your power needs is to spend some time boondocking. With this method, you can see just how much power you’ll need in a real-world scenario (Plus, you can cut loose off-grid and take a probably much-needed break).
Take your RV out and go for a camping trip, using everything as you normally would. Be sure not to use a generator. During the trip, you can track how long it takes you to drain your batteries.
To track your charge level, use a battery monitor or multimeter. If yours doesn’t display the battery level, you can calculate it using the voltage readout. When the voltage readout shows about 12.2-volts, your batteries are around 50% discharged.
To get the most accurate values, it’s helpful to take multiple trips. That way you can get a good average of your power consumption.
How to Calculate Battery Capacity
Battery capacity is measured in amp-hours or Ah.
For this example, let’s say you have 200Ah of usable battery power.
If you used 50% of the capacity in 20 hours, that’s 5Ah per hour (50% of 200= 100. 100Ah divided by 20 = 5Ah). Then multiply this by 24 hours to see a full day’s use: 5Ah x 24 hours = 120Ah per day.
As a general rule of thumb , a 100-watt solar panel will give you 30 amp-hours a day. So in order to get 120Ah per day (the amount of power calculated you need per day), you’d need at least 400-watts of solar panels.
Method 2: Adding up Your Electronics
Another way to estimate your power needs is by adding up the power you’ll consume every day through the electronic devices you commonly use. This is a more time-consuming method and not as accurate. If you can’t take your RV out boondocking then it might be your only option.
There are plenty of wattage worksheets and tools online to help you calculate your power consumption. Parked in Paradise has a comprehensive version that accounts for how much power you have coming in and the devices you use. It’s fully interactive, so you can just input the information and it will give you the numbers. Whatever worksheet you use, the general process is the same.
You’ll want to round up all the electronics in your RV and put them on the list (ex. your coffee maker, hairdryer, air conditioner, fans, laptop chargers, etc.). Then you’ll need to find the wattage of each device. This information should be written somewhere on the device or its power source.
Once you have the wattage, you’ll need to estimate how many hours a day you’ll use each device. Then fill in the worksheet with this information. You’ll also need to know if the device runs off AC or DC power.
Once you’ve input everything, most worksheets should do the math for you. Viola! You’ll know how much power you need in a day.
From here, matching the solar panels is the same as before. A 100-watt panel will give you about 30 amp-hours per day. So, for every 30-amps consumed, you’ll want another 100-watts of power.
What Other Components Do You Need for an RV Solar Panel System?

There are other components you’ll need for your RV solar panel system. So far, you’ve figured out how many RV solar panels you need and decided what type of panel you want. Getting the energy to the house batteries requires additional equipment.
You need somewhere to store electricity (your house batteries) and something to control charging (the aptly named charge controller). And if you want to power 120v AC devices, you’ll also need an inverter.
Battery Bank
While the RV’s solar panels make the electricity, house batteries (not the engine battery) are what actually powers your motorhome and the electronics. All the batteries together are referred to as your RV’s “battery bank.” There are two different kinds of batteries used in RVs: lead-acid and lithium batteries.
Lead-acid batteries are cheaper, but they’re also less efficient. You can only discharge them to about 50%. They also need to be replaced every few years (more frequently if you habitually discharge them below 50%).
There are a few different kinds of lead-acid batteries, but absorbed glass mat (AGM) batteries are usually the best choice. Deep-cycle or marine-grade AGM batteries are specifically designed to work as house batteries. These batteries can be discharged the most, last the longest, and don’t require any maintenance.
Lithium-ion batteries are pricier, but they’re more than worth it. These batteries can be discharged almost completely and can last up to 10 years before needing replacement.
Your RV is probably already equipped with a battery bank. But it might be worth considering an upgrade. Upgrading to lithium and/or adding more batteries can give you more power and let you stay out boondocking for longer.
RV batteries will have an Ah rating showing how much power they can supply on a single charge. Adding together the amp hours of all your batteries will tell you how much power you can draw before needing to recharge them. When combining batteries, always make sure they’re the same type.
Charge Controller
You can think of the charge controller as the “brains” of your solar setup. It takes the high voltage coming from your RV solar panels and throttles it down to something your RV battery can actually use. The charge controller also ensures your batteries get charged properly and don’t get damaged.
There are two different kinds of charge controllers:
- Pulse width modulation (PWM)
- Maximum power point tracking (MPPT)
PWM controllers are more affordable, but they’re also less efficient. A PWM controller is really only recommended if you have a smaller setup (200-watts or less).
MPPT charge controllers are the more efficient option. With an MPPT controller, you’ll always get the perfect charge. They’re well worth the investment and if you have a larger system, you definitely want an MPPT charge controller.
When you’re picking a charge controller, you’ll also need to match it to your solar panels and batteries. The exact process depends on what type of controller you choose. Thankfully, Renogy has a great guide to choosing your charge controller.
With solar panels and a charge controller, you can charge your batteries. But you’ll need an inverter if you want to power most of your electronics.
But why can’t I just run my electronics off the battery? Because the power coming from your battery is 12 volt DC (“direct current”). Many components in your RV, like lights and the 12v fridge, can use that 12v DC power without a problem. But other devices, like TVs, phone chargers, and coffee makers need to use 120-volt AC (“alternating current”) power. Simply, an inverter takes your battery’s 12v DC power and “inverts” it into 120v AC.
When choosing an inverter, you’ll need to know how many watts of power your electronics consume in a day. Then add 15% to have a bit of a safety buffer and find an inverter that’s rated for (at least) that number of watts.
When you’re looking at inverters, you’ll see “modified sine wave” and “pure sine wave” inverters . Modified sine wave inverters are less expensive than a pure sine wave. But if you want to power modern electronics like TVs, laptops, and phones, you’ll need a pure sine wave inverter.
How to Install Solar Panels on Your RV Camper

Installing solar panels on your RV camper has four main steps:
- Mount your RV solar panels
- Run your wires
- Connect the charge controller
- Install your inverter (if needed)
We’ll go over the basic process for each step. But keep in mind that this is just a general guide. Every part of your solar system should come with installation instructions; you should always read and follow them closely. Consult with a professional if you need help.
Step 1: Mounting Your Solar Panels
Before installing anything, you should measure, plan, and mark out the space where you’ll install your RV solar panels. It’s a good idea to also arrange the solar panels on the roof before doing any installation. That way, you can make sure everything fits properly.
When planning the layout of your solar panels, make sure they won’t get shaded by things like air conditioners or other components on your RV roof. If they aren’t exposed to full sun, your panels won’t be able to perform at maximum efficiency.
Once you’ve got everything planned out, it’s time to install.
If you’re using flexible panels, you can attach them with screws or an adhesive. This is as simple as cleaning your roof and carefully sticking your panels on with the adhesive. If you screw them in, remember to use some sort of waterproof seal to prevent moisture from getting through the hole the screws are using.
For rigid panels, you’ll have to attach them to the roof with brackets. In most cases, this means you’ll have to do some drilling. If it concerns you out to drill holes into your RV roof (and that’s normal), there are no-drill brackets that use an adhesive instead.
There are also brackets that will allow you to rotate your panels to meet the sun for maximum power converting abilities. These are pricier but can help you maximize your solar efficiency.
If you’re going to drill, make sure you carefully mark everything first. Attach the brackets to the RV solar panels first and then use them as a guide. Keep your RV roof watertight by applying sealant below the bracket to create a watertight seal.
Step 2: Running Your Wires
After mounting your new panels, you’ll need to wire your RV solar panels to your charge controller and the charge controller to the battery bank. The provided wires on solar panels are commonly too short for this. So you’ll need what’s called an “MC4 connector” to extend your cables.
To connect the wires to the charge controller, you’ll need to get the wires inside your RV.
The best and easiest option is to run them through your refrigerator vent. This way you don’t have to put any extra holes in your RV. You can also use any pre-existing holes where plumbing enters the RV. Check your owner’s manual; some of today’s motorhomes and travel trailers come prewired for RV solar systems, so the wiring may already be in place.
If the refrigerator vent or plumbing lines aren’t an option, you’ll need to pull out the drill again and make an entryway for the wires. Consider doing this above a cabinet or interior wall so you can hide the wiring.
Before wiring everything up, it’s a good idea to have a wiring diagram. You can draw this up yourself. Another option is using one of these wiring diagrams from EXPLORIST.life to get you started.
Step 3: Connecting Your Charge Controller
Next, you need to connect to your charge controller. You’ll want to mount your charge controller as close to your battery bank as possible. This minimizes the voltage drop over the length of the wire and ensures your batteries get enough juice to charge.
Once your charge controller is mounted, it’s time to connect your wires. Make sure to follow the instructions provided with your charge controller. Some might recommend connecting the solar panels first, while others recommend connecting the batteries first.
Make sure to clearly mark the polarity of your wires (red=positive and black=negative). (You can test them with a multimeter.) Then connect everything according to the instructions.
If you’ve done everything correctly, you shouldn’t see any flashes or sparks. Hurray! Your batteries can now be charged with the power of the sun! If you want to use your 120v devices, you’ll need to do one more thing: install an inverter.
Step 4: Installing Your Inverter
Your inverter will take the power from your batteries and make it usable by most of your electronics.
There’s a decent chance your RV already has an inverter. It’s not strictly a part of your solar system, but you’ll need one if you want to get the most out of your new RV solar panels.
Your inverter connects directly to your batteries and should be installed close to them. Just like with everything else, you should carefully follow the instructions for installing your inverter. The basic process will look like this:
- Attach the positive and negative wires to the inverter
- Connect the negative side to the battery posts first
- Connect the positive side
Once everything is attached, you’ll be able to use your inverter to power all your 120v AC devices.
RV Solar Panel Wiring: Series vs Parallel
When you’re wiring multiple solar panels, you’ll have to decide if you want to wire them “in series” or “in parallel.”
In Series Wiring
In series means that the positive terminal of each panel connects to the negative terminal of the next, one after the other.
When solar panels are wired in a series, you get a higher voltage because the voltage of each panel is combined. For example, if you have three 18-volt panels, you’ll get 54-volts in optimal conditions.
This is important because your batteries will need a certain voltage in order to charge. For example, this BattleBorn LiFePO4 battery needs at least 14.2-volts. If the voltage drops below this value, the batteries won’t charge.
Wiring in series has a major downside though. If shade covers just one panel in the series, it reduces the power output from every other panel along with it. When wiring in series, every panel is important.
In Parallel Wiring
To wire the panels in parallel, you connect all the positive terminals together, then do the same with the negative terminals.
When you wire in parallel, the output voltage for all the panels is the same as a single panel. So, you could have eight 18-volt panels and the output would still be 18-volts.
However, solar panels wired in parallel are less affected by shade. Because they can operate independently, if one panel goes down, the rest will continue to work just fine.
It’s worth keeping in mind, however, that when wiring in series, you have a lot more voltage to spare. With only 18-volts, you need at least 80% efficiency to charge your batteries. But with the 54-volts from our series example, you could charge the batteries at only 30% efficiency.
Those that have 30-amp RVs may want to choose parallel wiring. Your electrical system might not handle the higher voltage that series wiring offers. Consult with a professional before you get started to avoid damaging your RV’s electric system.
One last thing to consider is your charge controller. If you have a PWM controller, it’s recommended you connect your panels in parallel. But with MPPT controllers, in series is better.
What Are The Benefits of an RV Solar Panel System?
There are a ton of benefits to having an RV solar panel system!
Solar Energy is Eco Friendly
Solar power is a clean, renewable energy source. You’re taking just a little bit of the massive amount of power generated by the sun ( 384.6 septillion watts !) and putting it to use.
Your other options for electricity in an RV aren’t nearly as good for the Earth. Shore power overwhelmingly comes from fossil fuels ( about 60% ). A generator also requires you to burn fuel (gas, diesel, or propane), creating emissions. But with solar panels, you can rest easy that your electricity is 100% eco-friendly.
You Can Go Anywhere and Still Have Power
With solar panels on your RV, as long as there’s sunlight, there’s power. You’ll be able to really get away and get the most out of secluded spots. If you enjoy boondocking, you’ll love the freedom of solar power.
You Can Get Off The Grid For Longer
You can use a generator when boondocking, but you’re limited to how much fuel you can bring. With solar panels, the only limit is good weather. That means you can keep your batteries charged and stay off the grid for as long as you want.
Solar Panels Are Low Maintenance
Your solar system has no moving parts and is practically zero maintenance. The only thing you’ll need to do is clean your panels every so often.
This means that once your system is installed, you’ll never have to worry about a thing. Your solar panels will keep powering your RV for years.
Solar Panels Are Completely Silent
Ah, the sound of silence.
Even the quietest generator is going to make some noise. This can be frustrating for you and anyone near your RV. And in some places, such as state parks, you can only use your generator at certain times.
But you’ll never have to worry about noise pollution with solar panels. They don’t make a sound; you’ll barely even notice they’re there!
It’s Easy to Upgrade Later
Want to upgrade to a solar system, but don’t have a big budget? No worries! A solar system is easy to upgrade further down the line.
Whenever you’re ready to upgrade an existing system, all you’ll have to do is add more solar panels and redo the wiring. Then you’ll be able to enjoy even more solar power from your panels.
How Much Does RV Solar Power Cost?
Get out the checkbook. There’s a huge price range for RV solar power systems. The price will depend on a few things like:
- The amount of wattage output of your solar panels
- Type of charge controller (PWM vs MPPT)
- Your existing battery bank (if installing new batteries or upgrading your existing ones)
- DIY installation vs professional installation
For a small, DIY solar system, you could get it done for around $600 or maybe even less. But for a larger system, especially with a professional install, you’ll probably spend anywhere from $2,000 to upwards of $5,000. An especially powerful solar system could even cost more than $10,000.
One option for those trying to save money is a portable solar panel. A portable solar panel with a charge controller can be purchased for between $200 and $350. These won’t replace a full solar system, but it is a great budget option to get you started.
Are RV Solar Panel Kits a Good Idea?

RV solar panel kits will include everything you need for a solar power system (except the batteries). With a kit, you won’t have to worry about choosing all the different parts of your solar setup. Panels, a charge controller, wires, brackets, and sometimes even an inverter will be included.
Because of this, RV solar panel kits aren’t just a good idea, they’re a great idea! Take the guesswork out of your solar setup. With a kit, you can be sure all the different parts will work together. And you can save time because you don’t need to select everything individually.
Our Top RV Solar Panel Recommendations
Here are our top RV solar panel recommendations to help you navigate through all of the options.
Renogy 200-Watt Monocrystalline Solar Panel

Renogy is one of the biggest names in solar power. They’re well known for their durable, high-quality solar panels. That’s why we recommend their 200W 12V monocrystalline solar panel as a great foundation for a powerful solar system.
This solar panel is nice and sturdy. They’re designed to resist high winds, snow, and rain. Plus, they have a 25-year warranty that guarantees the panels will maintain 90% efficiency after 10 years and 80% after 25 years.
If you need a smaller panel, Renogy’s 100-watt panel is also a great choice. Renogy also sells full solar kits, like this solar panel kit that includes a 100-watt panel, charge controller, cables, and mounting brackets.
Renogy 175 Watt Flexible Monocrystalline Solar Panel

If you need a little flexibility, we recommend Renogy’s 175-watt flexible monocrystalline panel . Just like Renogy’s rigid panels, this flexible panel is powerful, sturdy, and long-lasting. It’s also super lightweight (only about 6 pounds) and slim (only 1/10th of an inch).
Renogy also makes 50-watt and 100-watt flexible solar panels. And of course, they also sell kits with everything you need, like this 100 watt kit.
Windynation 100 Watt Polycrystalline Solar Panel

Polycrystalline panels aren’t quite as efficient but they’re more affordable. This 100 watt polycrystalline panel from Windynation is highly recommended for a less expensive solar build.
The Windynation panels are highly rated and sturdy. Plus they’ve got a 5-year warranty for parts, labor, and a 25-year power warranty.
HQST 100W Polycrystalline Solar Panel

Another great budget option is the HQST 100-watt polycrystalline solar panel . They’re one of the most affordable solar panels you’ll find, but they don’t sacrifice quality.
These panels are waterproof, sturdy, and designed to withstand the elements. At only 14 pounds, they’re also fairly lightweight.
Renogy 100 Watt Monocrystalline Foldable Solar Suitcase

If you want a portable solar solution, we recommend the Renogy 100-Watt Monocrystalline Solar Suitcase . This foldable solar panel comes equipped with a charge controller and a protective case. Just unfold it, attach it to your batteries, and you’re ready to go.
Just like Renogy’s other panels, these are heavy-duty and fully waterproof. If you need more power, they also make a 200-watt version .
Are RV Solar Panels Worth It For You?
RV solar panels can be worth it for you and there are a ton of great reasons to install them on your RV. It’s a clean and quiet source of energy that gives you freedom from shore power and fuel sources. But, are they right for you?
Of course, it’s going to depend on your situation. If you only take your RV out for a few days at a time, it might not be worth investing in a full solar setup. The same is true if you mostly stay at RV parks and don’t care about going off-grid.
Solar panels aren’t cheap, and installing them means hard work (or paying someone to do the work for you). If you’re on a tight budget, you might want to hold off on making the jump to solar.
On the other hand, if you think you’re ready to take advantage of solar panels, then it’s well worth the investment. If you want to go farther and stay out longer in your RV, you’ll love the freedom solar power gives you. For those that want to get serious about boondocking, solar panels are a must-have power source.
In fact, even if you’re on a budget or don’t need a lot of power, there are still solar options for you. Portable solar panels are a great and super easy solar solution that’s usually cheaper than a full setup. And flexible panels are also a great choice because they’re both cheaper and easier to install.
It’s Time to Harness The Power of The Sun!
If you want a flexible and eco-friendly power source you can use everywhere, it’s hard to beat solar. Solar panels let you harness the sun’s natural energy to charge up your batteries, anywhere you go.
Flexibility and freedom are huge reasons that adding solar panels to your RV is so popular. With solar power, you’ll be able to really get away and you won’t have to worry about finding a shore power hookup. As long as the weather is good, you’ll be able to keep your batteries charged indefinitely.
Solar panels are a bit of an investment, but they’ll let you truly maximize your RVing experience. With solar power, there’s no limit to where you can go!
Related Reading:
– Can Solar Panels Really Power an RV Air Conditioner? – 5 Best Portable Solar Generators for RV Life and Camping – Do You Need an Inverter to Run a 12v RV Fridge? – RV Boondocking Beginner Tips and “How-To” Guide – Do I Need a Battery for My Travel Trailer? – Green RVing: Sustainable Tips For RVers
Jennifer and Kendall are avid RVers and part-time van lifers who share their years of experience both as full-time RVers and nomads through writing.
Jenn and Kendall have explored Canada, the USA, and Mexico while RVing and living full-time in all 3 countries.
They have been fortunate to work not only as part of the RVBlogger team but also with RVLife, DIY RV, Camper Report, RV Magazine, Rootless Living, Vanlifers, and more.
They have also shared their RV experience through DashboardDrifters.com and are the founders of RVSpotDrop, a web service for full-time RVers.

1 thought on “Beginners Guide to RV Solar Panels”
Super useful and also well explained Many thanks.
Leave a Comment Cancel reply
Save my name, email, and website in this browser for the next time I comment.
- Last updated on October 9, 2023
RV Solar: Lighting Up Your Mobile Adventures with Sustainable Energy
Living the RV lifestyle provides the freedom to travel and enjoy the outdoors. However, maintaining access to power on the go can be challenging. RV solar power offers a renewable solution to produce electricity anywhere the sun shines. Installing RV solar panels allows RVs to take advantage of solar energy. RV solar systems allow RVs to charge batteries, run appliances, and enjoy modern conveniences without being plugged into shore power.
This article will explore the ins and outs of solar power for RVs. We’ll discuss the benefits of RV solar panels for energy independence and cost savings. The key components of a solar system will be covered, including solar panels, charge controllers, and batteries. You’ll learn to assess your RV’s electrical needs and select the correct size solar panel setup.
We’ll review RV solar panel installation options, solar panel types, charge controllers, and best maintenance practices. By the end, you’ll have a solid understanding of utilizing solar power on your RV. The freedom of the open road awaits with RV Solar!

Why Go Solar For Your RV?
Going solar can offer major perks for RV and van life. Several vital benefits make RV solar power systems an intelligent investment.
Save Money on Energy Costs
Solar power allows RVs to generate their own electricity and reduce energy costs. Most campgrounds provide electrical hookups to pay for. While convenient, these shore power connections get expensive for long-term stays. Installing solar panels and batteries to store solar energy removes the need to rely on campground electrical hookups. This can save hundreds per month for RVers who make extended stops.
Solar also cuts back on generator fuel costs. Running a generator constantly for power draws a lot of gas or propane. By tapping into solar energy from the sun with solar panels, RVs can turn off generators for free electricity instead. Even just using solar to offset some generator runtime helps reduce fuel usage.
Gain Energy Independence
RV solar systems provide a renewable power source. RVs can produce their own off-grid electricity by installing solar panels and charging batteries directly from the sun. This energy independence allows travel to remote areas without electrical hookups. Solar panels are compact and travel-friendly. Wherever there is sunlight, solar power provides a personal source of renewable electricity.
Enjoy Conveniences Anywhere
Solar energy allows RVers to use appliances and devices wherever they are parked. Microwaves, air conditioning, TVs, CPAP machines, and more can run on solar power. This freedom allows the comforts of home while off the grid. With enough stored solar energy, RVs can function like a house with modern amenities. But unlike at home, solar electricity on the road is available anywhere the RV goes.

RV Solar System Components
Solar panels.
The solar panel kit is the foundation of any RV solar system. Solar panels capture sunlight and convert it into usable DC electricity. They utilize photovoltaic (PV) cells to take in solar energy photons and generate electrical currents. RV solar panels typically range from 50W to 400W or more. More panels can be added to increase power production, including the use of a portable solar panel for added flexibility.
RV solar panels come as either flexible panels or rigid glass panels.
Flexible panels are thinner, lighter, and can curve to fit irregular surfaces. Rigid glass panels are heavier but more durable. Rigid RV solar panels are commonly installed on roofs, while flexible panels work well on sides or angled surfaces. Monocrystalline silicon solar panels are the most efficient but cost more than polycrystalline silicon panels.
When determining how many solar panels to install, consider the total RV energy usage and battery bank size. Plan for future power needs too. 100 watt solar panels are popular for modest RV solar kits, while multiple 100W or 200W RV solar panels can combine to form larger solar systems. Positioning panels to optimize sun exposure is key to harvesting the most solar energy.
Charge Controller
The solar charge controller is the brain of the RV solar system. It regulates how much power flows from the solar panels to the batteries. Without a controller, batteries could overcharge and become damaged. The controller protects batteries and draws maximum power from the panels, including the use of a battery charger when needed.
Deep-cycle lead acid, AGM batteries , or lithium batteries store the energy produced by solar panels for use when needed. Lead acid batteries are the most affordable, while lithium batteries are lighter, longer-lasting, and can discharge more deeply. Multiple RV batteries can connect to form a larger battery bank and extend the storage capacity.
A quality RV battery is essential for solar system performance. Review battery specs like usable capacity, cycle life, depth of discharge, and temperature ratings when selecting batteries, including lead acid battery options. Proper battery care also ensures longevity – avoid overcharging/discharging, maintain water levels on flooded batteries, and don’t expose them to extreme temperature changes.
The battery bank stores solar energy during the day and powers the RV at night. Choose enough battery capacity to meet nighttime energy needs until the panels recharge each morning. RV solar batteries provide the power independence that makes solar worthwhile.
Calculate Your RV’s Solar Needs
Determine daily power consumption.
The first step in designing an RV solar system is calculating your power needs. List all lights, appliances, devices, and electronics you want to run. Determine the wattage for each. Things like lights may use meager watts, while an air conditioner can draw 1000+ watts. Total up the wattage to estimate your RV’s daily power consumption in watts.
Also, factor in future energy needs. Will you be adding more devices down the road? Planning for expansion now prevents having to upgrade the solar system later. Understanding your complete energy use allows for adequately sizing a solar system.
Size Solar Array Based on Usage
Use the RV’s estimated daily wattage demand to determine the solar panel array size needed. The solar panels must produce enough watts to meet the RV’s requirements. Also, consider the average peak sunlight hours for your travel locations.
More sun = more solar recharging time. Choose enough solar panels so the watts generated during peak sun sufficiently top off the battery bank to fulfill nighttime power needs. Battery maintenance is essential to get the most out of your system. Aim to build in a 20-30% cushion too. Properly sizing the solar panels and batteries ensure your RV solar system can deliver sufficient, reliable energy.
Selecting RV Solar
Panels output wattage.
The output wattage is a top consideration when selecting solar panels for an RV. Standard options include 100W, 200W, and 300W panels. More watts means more power production from each panel. Evaluate your RV’s electricity needs and choose enough total watts to meet that demand. For a smaller RV, a solar kit with 100W panels may suffice. Larger rigs and energy loads may benefit from 200 Watt or 300W panels for sufficient output.
Aim to build in some extra wattage buffer too. More panels and watts make it easier to recharge batteries and provide excess power. Wattage needs also depend on expansion plans – will more panels be added down the road? Leave room to grow.
Panel Efficiency
Solar panel efficiency impacts how much electricity is produced from a given surface area. Monocrystalline silicon panels are the top efficiency performers, with 18-22% typical ratings. This means nearly a fifth of available sunlight is converted into usable energy.
Polycrystalline silicon panels are slightly less efficient at 15-18%. Thin film flexible solar panels are on the lower end of the spectrum, with 8-13% efficiency ratings. While less efficient, flexible RV solar panels make up for it in convenience and adaptability to unconventional surfaces.
Rigid vs. Flexible Panels
Rigid glass solar panels are heavy and fragile but deliver higher wattage per square foot. Most RV rigid panels install easily on roofs with brackets. Rigid panels excel for flat installation areas and maximum energy density. Flexible panels are lighter, thinner, and tolerate curved surfaces like walls or odd angles. Flexible panels adhere well via adhesive and withstand vibration. While less efficient per square foot than rigid, flexible solar panels provide versatility in RV mounting options.
Weigh the pros and cons of panel types to select the best match for your RV’s needs and installation plans.

Installation Options for RV Solar
Roof mounting .
The roof is the most common and effective place to install solar panels on an RV. Mounting panels on the roof provide ample open space for total sun exposure. Many RVs come solar-prepped from the factory with reinforced areas ready for panel installation.
Proper roof mounting involves securing RV solar panels with mounting brackets and rails specifically designed for RVs. Brackets elevate panels above the roof surface to allow airflow to cool the panels. Use lap sealant around mounting hardware holes to prevent leaks—wire panels together near the roof edge for a clean installation.
Careful wiring management maintains roof integrity against leaks. Leave some slack in cables to account for RV shifting and vibration. Well-mounted roof solar panels can withstand travel vibrations and extreme weather.
Ground or Pole Mounting
RV solar panels can alternatively install on the ground or a stationary pole mount for more mounting flexibility. This freestanding setup allows tilting panels to follow the sun’s arc for peak exposure. Ground or pole mounts work well for portable solar kits and keep panels off the RV exterior.
Position freestanding panels in a sunny spot near the RV parking location. Keep the wire run as short as possible to the batteries to minimize power loss. Allow enough wire slack for RV repositioning as needed.
Alternative Surfaces
Beyond the roof or ground mount, smaller RV solar panels can mount on other surfaces. Vents, hoods, or curvy areas can utilize adhesive flexible panels. Even portable briefcase panels can connect to RVs when rolled out. Get creative in finding unused real estate suitable for solar exposure. Every little bit of extra generation helps.
Solar Charge Controllers for RVs
When it comes to charging the batteries in an RV using solar energy, the right charge controller is key to managing the process efficiently. Here’s a look at the two main types of controllers used:
Pulse Width Modulation (PWM)
PWM solar charge controllers are the most affordable and commonly used controllers for RV solar systems. They work by pulsing the current from solar panels to the batteries to regulate the charging voltage. This prevents battery overcharging while delivering power from the solar array.
PWM controllers are simple to operate and provide essential charge regulation. They work well for typical small to mid-size RV solar panel setups. Just connect the solar panel inputs and battery outputs. PWM controllers get the job done by regulating solar power at a low cost.
Maximum Power Point Tracking (MPPT)
For larger solar arrays, MPPT controllers maximize efficiency. MPPT controllers track the optimal voltage and current levels to draw maximum wattage from solar panels. This allows them to harvest more power than PWM, especially in cold or low-light conditions.
The added efficiency of MPPT comes at a higher price. But for an RV with, say, 400 watts of solar panels or more, an MPPT solar charge controller is worth the investment. They also deal with shading better by optimizing each panel individually. MPPT controllers squeeze every available watt out of an RV solar system.
RV Solar Maintenance Tips
Check electrical connections.
Inspect all wiring connections occasionally to ensure they are clean, tight, and corrosion-free. Loose or corroded connections cause power loss. Examine plugs and cords for damage and dirt when plugging in mobile solar kits. Proper electrical connections keep solar electrons flowing.
Clean Panels Regularly
Dirt, dust, snow, and debris will accumulate on solar panels over time, blocking sunlight. Periodically clean panels with a soft brush and mild soap and water. Rinse gently. Even a thin layer of grime can noticeably reduce output. Keep those PV cells clean and clear.
Watch for Shading and Adjust
Watch for trees or objects that may shade your solar panels as conditions change. Even partial shading causes a significant drop in power production. Trim overgrowth as needed or reposition portable panels frequently to maximize sun exposure.
Check Charge Controller Settings
Most RV solar charge controllers have adjustability options for charging and load control modes. Check settings periodically to ensure they are configured optimally for your power needs and battery type. Adjust as needed to keep the controller working at peak efficiency.
Expanding Your RV Solar System
As your power needs grow, RV solar systems can quickly expand. Adding more 100W solar panels increases total wattage. Wire additional panels in parallel to the existing array. More panels also provide redundancy if one fails. Doubling solar panels can approximately double the available power.
Over time, upgrading RV batteries is another way to grow a solar system. Switching from lead acid to lithium batteries boosts storage capacity in the same physical space. Lithium batteries are lighter and withstand more charging cycles than lead acid—upgrade batteries one at a time since they should match in an array. Expanding panels and batteries enables RV solar systems to scale up as needed.
Installing solar on an RV opens up off-grid freedom and sustainability. RV solar panels provide clean power anywhere the sun shines without relying on hookups or generators. Solar technology allows RVers to enjoy modern conveniences while harnessing renewable energy.
Solar panels can adequately charge batteries to run appliances, lights, and electronics with total sun exposure. Choose monocrystalline panels and MPPT controllers for optimal efficiency. Follow proper mounting, wiring, and maintenance procedures for best performance. RV solar power gives freedom and convenience whether boondocking in nature or parked in an asphalt jungle. Go solar to keep your batteries charged and power flowing no matter where the open road leads.
Like this article?

Best Screen Room For RV

Best Washer Dryer Combo For RV

Best RV Ovens: Cooking On the Go Made Easy

Best RV Generator 30 Amp

Discover The Best Whisper Quiet RV Air Conditioner

Best Hotspots For RV
Save 30% on your next amazon order.
We have partnered with Amazon.com to offer the best deals at the best prices. Click the button below to go to their exclusive discount page!
Leave a Comment Cancel reply
Save my name, email, and website in this browser for the next time I comment.
Subscribe To Our Newsletter
Find us here.
My RV is Solar Ready – What Do I Need? A Simple Guide For The DIYer

Solar power is becoming increasingly popular among RV enthusiasts, as it offers an environmentally friendly and cost-effective source of energy while on the road. If your RV is already solar-ready, you might be wondering what steps you need to take to make the most of this sustainable energy source. In this article, we will discuss the necessary components and practical considerations for harnessing solar power in your recreational vehicle.
To begin with, you’ll need to have a basic understanding of the solar power system and the essential components involved. A typical solar power setup for an RV will consist of solar panels, a charge controller, a battery bank, and an inverter. These components work together to collect, store, and convert solar energy into usable electricity for your RV’s appliances and electronics.
Some SRRV’s can harness a rooftop system or a portable system. To learn more about these types view this post: What is a Solar Ready RV?
But before you dive into buying solar for your solar ready RV, it’s time to evaluate your energy requirements. Assessing your daily power consumption will help you determine the appropriate solar panel system, battery capacity, and inverter specifications to meet your specific needs. Keep in mind that these components will vary based on factors such as your RV’s size, the number of appliances you use, and the desired duration of off-grid camping. It will also help you understand the cost associated with solar-RVing and if it makes sense for you. By understanding your usage you’ll be able to estimate your system size. Read: Solar Sizing: Three Ways to Estimate Electrical Usage for an idea on how much power you might use.
Additional SRRV Resources:
- Is RV Solar Worth It? A Friendly Guide to Weighing the Pros and Cons
- Portable Solar Panels for Your RV: Weighing the Pros and Cons

Understanding Solar Ready RVs
What is a solar ready rv.
A solar ready RV is a recreational vehicle that has been pre-wired for solar panels by the manufacturer. This means that the RV comes equipped with the necessary wiring and connections to support a solar power system. This feature makes it easier for RV owners to install solar panels themselves or have them professionally installed, as the essential infrastructure has already been put in place by the builders.
Popular RV Manufacturers Providing Solar Ready Options
Many RV manufacturers have recognized the growing demand for solar power and have started offering solar ready options. Here are some popular RV manufacturers providing solar ready RVs:
- Forest River : This manufacturer has a variety of RV lines that come pre-wired for solar, making it more convenient for owners to add solar panels and accessories.
- Airstream : Known for their iconic aluminum travel trailers, Airstream now offers solar ready options for some of their models, which allows for easy solar system integration.
- Jayco : Another reputable RV manufacturer, Jayco has also started offering solar ready RVs in their lineup. Their solar-ready package includes pre-installed wiring and rooftop connectors, simplifying the solar panel installation process.
Components of a Solar Power System
Solar panels.
Solar panels convert sunlight into electricity, enabling your RV to harness solar energy. Panels come in various sizes and wattages, depending on your power needs and roof space. Mounting solar panels on the roof is optimal as it ensures maximum exposure to sunlight.
More About:
- RV Rooftop Solar Systems : A Guide for Efficient and Sustainable Travel
- Portable Solar Systems : The Ultimate Portable Power Solution for Off-Grid Living
Charge Controller
A charge controller regulates the voltage and current coming from the solar panels, ensuring your batteries don’t overcharge or discharge excessively. Two types of charge controllers are commonly used: Pulse Width Modulation (PWM) and Maximum Power Point Tracking (MPPT). MPPT charge controllers are usually more efficient but also more expensive than PWM controllers.
Read up on solar controllers:
- Introduction to Charge Controllers for RV Solar Systems
Battery Bank
The battery bank stores the electricity generated by the solar panels, allowing you to use the power when your rig is not in direct sunlight. Selecting the right size and type of battery helps make your solar RVing experience all that much better. Deep-cycle batteries, such as lead-acid or lithium-ion, are typically used for RV solar systems due to their durability and higher capacity. Sizing a battery too small can also render you without power when you need it most. Learn more about batteries with out Battery Basics Series . We go over how to size them, how to test them, how to wire them, how to care for them and more.
An inverter converts the direct current (DC) produced by the solar panels and stored in the battery bank into alternating current (AC), which is required to power most electrical devices. Think of AC power as household power. Devices that plug in at home need AC to run. There are two types of inverters: modified sine wave and pure sine wave. A pure sine wave inverter is considered superior as it provides cleaner power, but is also more expensive than a modified sine wave inverter.
An inverter is a device that helps power your RV’s electrical system using your batteries. To connect it, you’ll need to wire it directly to your batteries and then to your RV’s electrical system. This can be tricky and requires a good understanding of AC and DC electrical.
Alternatively, some inverters come with a plug that you can just connect to your battery and plug your devices into. It’s much easier! But, if you want to power your RV’s outlets with your batteries, you’ll need to do some wiring.
If you’re not comfortable with electrical work, it’s best to call in a professional. Electricity can be dangerous, so it’s better to be safe than sorry.
Preparing Your Solar Ready RV for Solar
If you own a solar-ready RV or camper, you’re already ahead in the game for setting up an off-grid energy source. Solar-ready vehicles are usually pre-wired for solar panels, making it easier and more cost-effective to install a solar system for your mobile abode. In this section, we will discuss the necessary steps and equipment needed for preparing your solar-ready RV for harnessing solar power.
First and foremost, you should consult your RV’s manual to understand the specific configurations and details of your vehicle’s solar wiring. Manuals typically provide information on existing wiring, proprietary plug types, and other necessary components. This information will help you choose the right solar equipment to fit your RV’s pre-wired system. But also, some RV manufactures don’t do the best job at showing you the configurations. If this happens, it’s likely a good idea to consult the solar manufacture to get additional details.
Three brands of SRRV suppliers we know well are:
- Zamp Solar : The pioneers to RV solar and Solar Ready RVs
- GoPower Solar : Zamp and GoPower are now owned by Dometic. GoPower uses Solar on the Side for their SRRV setups.
- Renogy : These guys kick out a ton of solar kits and generally adapt to what’s going on in the industry with quick Chinese manufacturing.
Your solar installation will require a solar charge controller to manage electrical current between solar panels and battery banks. Most portable systems have an integrated solar charge controller, but double check. You will also need solar panels, either in the form of portable solar panels or a roof-mounted system. Portable panels, like a solar suitcase or a Renogy solar suitcase, offer flexibility, while roof-mounted panels provide a more permanent solution. Additionally, some solar-ready RVs might be equipped with a plug-and-play port, such as a Zamp or Go Power! port, which simplifies the installation process.

SIDE NOTE: When connecting your solar system to the RV, check the polarity, even manufactures make mistakes. This can be done using a voltmeter, which should indicate the positive lead (red wire) and the negative lead. If the polarity needs to be reversed, it’s as simple as reversing the wires on the battery, or getting an adapter.
An important aspect of setting up your solar system is determining the available energy you’ll need for your RV. This can be measured in amp hours (Ah) or watt hours (Wh). Your solar equipment, including the solar charge controller and panels, should be capable of providing the required amp hours to adequately power your motorhome. We’re a fan of just converting everything over to watt hours as there is a push to go from smaller voltage (12-volt panels) solar panels to larger voltage ones (24 or 48-volts). Most MPPT charge controllers to best with higher voltage and automatically convert it to charge a 12-volt battery bank.
Selecting the Right Solar Panels
When choosing solar panels for a solar-ready RV, consider the RV’s roof size and configuration. The roof space will determine the maximum size and number of panels that can be mounted. But you might not need to cover the entire surface for light use.
High-quality panels from a good manufacture will have a more extended lifespan and better efficiency. Look for panels with a reputable brand name and good customer reviews. We are not a fan of most of the flexible panels on the market. They look like a good idea but lose their efficiency in just a few years and can burn the top of your RV. If you were to look at any flexible panel we urge you to consider only CIGS technology flexible panels .
Another thing to keep in mind is the pre-wired setup of the RV. Most solar-ready rigs come with plug-and-play systems that make installing panels a breeze. Look for solar panels that can easily connect to the existing wiring of your RV, which will save time and effort during installation.

Installation and Wiring Considerations
When it comes to setting up a solar-ready RV, there are some important wiring and installation aspects to consider. First and foremost, it’s important to make sure the wiring is done correctly. Double-check that the polarity of the wiring matches the portable solar panels you will be using. Incorrect polarity can lead to a lack of power flow and can potentially damage the solar panels.
To connect the solar wiring to your RV’s pre-wire, identify the positive lead (usually red) and the negative lead (usually black). When making modifications, always connect the positive lead to the positive terminal and the negative lead to the negative terminal. Note that some solar-ready RVs may also have red and black wires pre-installed. Using a voltmeter will help to verify the correct polarity before making the connections.
Pay attention to the gauge of the wiring. Thicker wiring provides lower resistance and will be more efficient when it comes to transferring energy from the portable solar panels to your RV’s battery. The gauge of the pre-wiring installed in a solar-ready RV should be sufficient, but if it isn’t, consider upgrading the wiring before connecting your solar panels.
Portable solar panels are a user-friendly option for harnessing solar energy. They usually come with easy-to-fit mounting brackets, making it simple for anyone to install them on an RV without the need for professional assistance. Be sure to secure the panels properly when they are in use and during travel.
Lastly, it’s important to keep in mind that a solar-ready RV comes with pre-wiring, which is a great starting point for adding solar power to your rig. However, it doesn’t necessarily guarantee compatibility with all solar panels available in the market. It’s essential to research and find a solar panel setup that is a perfect match for your particular RV’s pre-wiring configuration.
Common Issues and Troubleshooting
When setting up a solar-ready RV, there can be a few common issues that may arise. In this section, we will discuss some of these problems and how to troubleshoot them.
One common issue is related to polarity . Incorrect wiring can result in reverse polarity , which means that the positive and negative wires were connected the wrong way. To check if this has occurred, use a voltmeter to measure the voltage on the terminals. If the measured voltage is negative, reverse the connections to fix the polarity. Remember that the red wire typically represents the positive connection.
Another potential problem involves modifications made to the RV’s electrical system. Some owners may have made changes to the wiring, which can cause complications for solar-ready setups. Before installing the solar panels, make sure to inspect the electrical system and fix or update any incorrect wiring.
Sometimes, the installed solar panels might not be producing power as expected. In such cases, bypassing the faulty panel(s) temporarily by using jumper cables can help restore power to the remaining panels. However, it is essential to identify the problem and permanently fix the non-functioning panel(s) to avoid lasting issues.
Dealing with issues related to wiring can also be quite common. Loose connections or damaged wires can result in the loss of power or decreased efficiency. Inspect the wiring and connections periodically to ensure they are secure and in good condition. Replace any damaged sections promptly to maintain optimal performance.
More Resources
This is a simple look at Solar Ready RVs and the solar solutions you can use. Solar is constantly changing and so are the manufactures. If your RV has a feature that we haven’t covered emails us. We’d be happy to shine some light on it. k
Related Posts
Are rv solar panels worth it, how to use a hydrometer battery tester.
Where Travel and Learning Come Together

Looking for a place to camp? Check out Hipcamp and come stay with us! Hipcamp
Our RV Solar Set up Explained
Prior to April of 2018, our only boondocking experience in the first 20 months of traveling the country in our RV, was 3 nights at a state park in Rhode Island, and one night at a truck stop parking lot in Laramie Wyoming. The weekend spent in George Washington State Park near Providence Rhode Island was spent outside, playing in a lake, enjoying the warm summer weather, and our only electrical needs were for the lights. On the other hand, the 1 night in the Laramie Pilot’s parking lot was a cold Wyoming October night in which running our furnace to stay warm killed the one battery we had. The furnace draws a lot of energy, and running all night would kill any single 12v battery in a matter of hours. That wasn’t the moment we decided to get more batteries or anything like that, it was just our only experience with camping off grid for any amount of time with our Cyclone . Now don’t get me wrong, I would have loved to upgrade that system immediately, but we had bigger plans for the following year. FYI, this post does include affiliate links!
It’s no secret that we went to Alaska in the summer of 2018, and because we chose to buy an old small motorhome (dubbed the Summer House) to take, so any upgrades or modifications to the Cyclone were on hold. We also used the “ Summer House ” as a test for our solar needs. We went very simple and cheap in that system since it would be a 4 to 5 month trip, and it would be sold right away.
The Summer House’s System:
- 3 x Costco Deep Cycle Batteries, the cheapest they had!
- 3 x 100 watt Windy Nation solar panels (with tilting brackets that I didn’t tilt even once)
- 30 Amp Windy Nation Solar Charge Controller
- 3000 Watt Windy Nation Inverter

I’m sure you can see a trend forming here. I bought as much as I could from Amazon, which kept the project as cheap as possible. Windy Nation seemed to have the market cornered on Amazon RV Solar, so I went with them.
To get the power out of the batteries, I added 2 standalone outlets directly to the inverter, one in the kitchen for our Instant Pot, and the other in an easy spot to access for charging and whatever else we needed it for. This system was very simple, and definitely worked great in this application. Even though the sun never sets in Alaska, we definitely struggled with the 3 panels on the roof since it was overcast and cloudy most of the time. Luckily we could charge the batteries a few different ways:
- Solar panels, when the sun happen to be out
- Alternator, when the motorhome’s engine was running
- With the on board generator

We traveled in the Summer House from April 15 th to August 25 th and in those 4 ½ months I definitely learned a lot about powering an RV solar off the grid. If I were to go back and design a Summer House system again, I would do it very similarly. Maybe an additional battery (and better batteries), another panel or 2, and be more conscious of the size and length of wiring I used for the various connections throughout the system. Overall it was a great cheap solution that worked.
What did we learn?
The main takeaway from that experience was we did NOT want to be dependent on 2 isolated outlets; we wanted our RV to function the same whether it was plugged in or not. At least as long as there was battery life!
What did we want?
So I had my solar mission statement, and now the research phase started. This is a rabbit hole like you have never seen! There are so many ways to skin this cat that my head was spinning. I was researching panels, inverters, inverter/chargers, charge controllers, batteries, wiring, breakers, battery monitors, etc…. There is a wealth of information out there, but it was all in some foreign language that talked in terms of watts, ohms, volts, amps, gauge wiring, hybrid, assist, bluetooth, Wi-Fi, and the list goes on and on!
We bought a Kill-a-watt electricity usage monitor, started measuring our energy consumption and completed an energy Audit.
*If you are thinking about putting together a system for your RV, an energy audit should be the first thing you do!
So I figured out something that was not surprising to me, although there are many of us, and we have a large RV, we are not particularly heavy users. But we have the capability very quickly to use a lot of electricity.
When thinking through the process, and what we wanted to accomplish with the system, I kept thinking back to our solar mission statement from the Summer House, we wanted our RV to function the same whether it was plugged in or not!
My disclaimer: I am great with DC electrical systems, but know only enough about AC systems to be dangerous. I am not afraid to ask questions (I asked many) and find out the right answers! I spent countless hours reading blogs and resources about RV solar power builds. This blog is NOT meant to be an absolute resource for powering your RV, but more to document our build and journey to being energy independent.
I mentioned above, our 40’ toy hauler 5 th wheel came from the factory with a single 12 volt battery. We had replaced it in the previous year, and honestly hadn’t really used it for much since we were always plugged in. Since solar was still in very early planning phases, I did not want to spend too much on a battery bank that would probably be upgraded sooner or later. I opted to go with 4 x 6 volt Trojan T-105 golf cart batteries for the time being. They are rated at 225 amp hours each at 6 volts, so 2 sets of 2 wired in series then together in parallel, gives us 450 amp hours at 12 volts. This isn’t super spectacular by any means, but these are very good, reliable batteries, and fit well into our existing battery compartment.
What did we start with?
Our 2011 Heartland Cyclone 3612 toy hauler is a 50 amp RV, if you know anything about RV electrical systems, you know that there are 2 types of systems, 30 amp, and 50 amp. Here is a very basic rundown of the differences between the 2 systems:
- A 30 amp RV can only provide a maximum of 3,600 watts.
- A 50 amp RV can provide a maximum of 12,000 watts.
- Even with an adapter, your 30 amp RV plugged into 50 amps won’t receive more power than the 3,600 watts it can handle.
- Conversely, if you use a 30 amp “dogbone” adapter for a 50 amp RV, you will be limited to the same 3,600 watts.
With that being said, our 50 amp RV has 2 x 120-volt hotlines going into the RV’s main AC distribution panel. They are separated into 2 “lines”, Line 1 and Line 2. Line 1 is the primary portion of the panel. It feeds 120 volts of AC to the important circuits of the RV. Our panel is separated as follows:
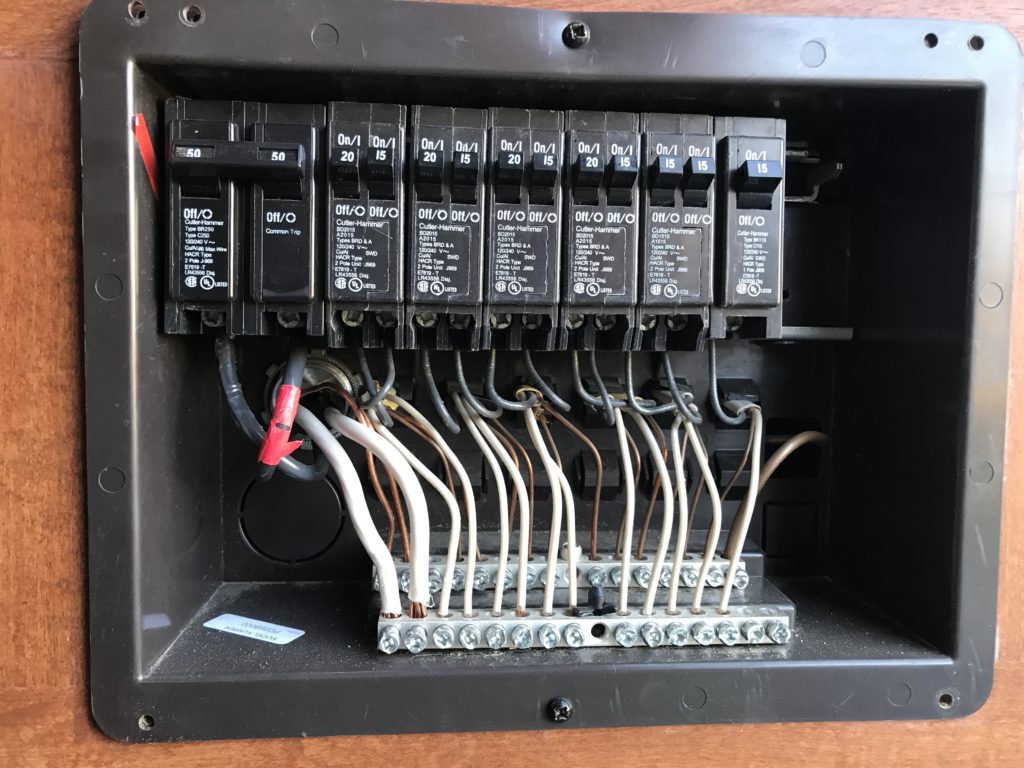
Line 1 feeds:
- Refrigerator
- Main AC Unit
- The converter that charges the battery
- About half of the outlets throughout the RV including all the outlets in the garage
Line 2 feeds the rest:
- The second AC Unit
- The electric water heater
- The remaining outlets around the rv
I have seen installs where people have only powered line 1, and just don’t use the line 2 circuits when boondocking, and in some of those installs, I have seen where they will move specific circuits to line 1 and/or line 2, to get power to where they want (or don’t want) when off-grid. I referred back to my solar mission statement, “everything just works”, and this didn’t work for me!
In the inverter world, there doesn’t seem to be an inverter that is specifically designed (or capable) to feed the 2 separate lines (or doesn’t cost as much as a new RV), so I started reading up on builds that used 2 inverters, with one feeding each line. That really appealed to me, it did more of what I wanted, and everything would just work (at least as long as the battery bank had power).

Many of the installs that I was following, all seemed to circle back to a couple of different manufacturers, Magnum and Victron seemed to be leading the way. Several of my friends were using Victron components with a lot of success and high praise, so I chose their equipment for the core of the system. One of the main reasons is the way these components all integrate together and share information. But we will get to that later! Lucky for me, a good friend of ours is a Victron Dealer, and I was able to get a good deal on the meat and potatoes of the system.
Our system:
- These are true sine wave inverter/chargers, and take the place of the existing converter charger already in the RV. In addition, they have power assist when plugged in (or the generator is running) if there isn’t enough current coming from shore power to power the loads applied.
- They take the energy coming in from the solar panels and convert it to stored energy in the battery bank.
- This system monitor ties in all of the Victron components, and allows monitoring and control.
- This works with the shunt on the negative battery side, and measures not only the amount of energy in the battery bank, but also all usage from the batteries.
- Measures the battery voltage and temperature, and communicates it via Wi-Fi network. Not sure how essential this piece was, I was having some problems with battery % on the monitor, and a blog that I was reading said to add one of these, so I did!
- Victron MK3-USB for programming
Check out many of the components in our system here> ht tps://kit.co/Roadschool/our-solar-set-up
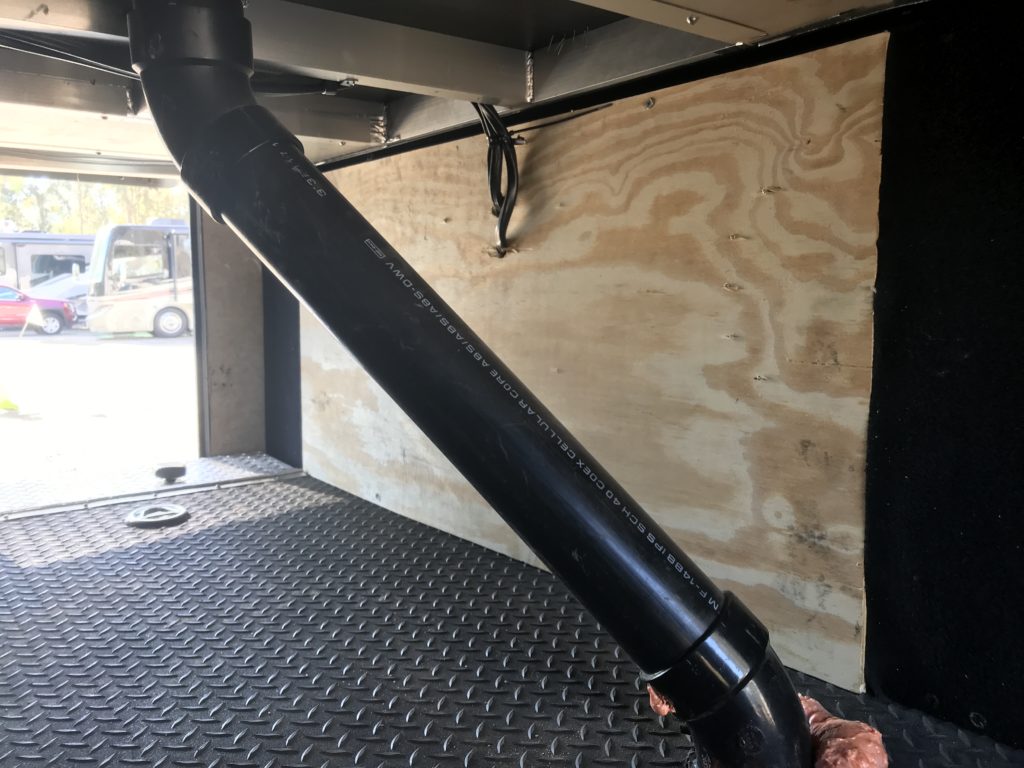
Mounting the components was going to be tricky if I did not want to lose valuable storage space in our pass through. I wanted to mount them in the forward most compartment, above the onboard generator. But space was a premium up there, and the inverters had specific air gap requirements. The Generator has a sheet metal shroud separating it from the rest of the compartment, so I opted to cut that shroud down 6” to get the additional space I needed. I cut around the shroud, dropped it down, and put pop rivets to hold it in place.
There was a one-piece wall going all the way across the compartment that I also cut into 2 pieces, giving me a removable, accessible section for mounting the inverters and the other components. According to the Victron Manual, the inverters can be mounted horizontally or vertically, so I opted to mount them horizontally on their sides on the wall. In doing this, I met all of the required air gaps. The original wall was only ½” particle board, so to support the 70lbs that each of the inverters weigh, I added a piece of ¾” plywood across the back of the wall behind them. The charge controllers, and other various fuses, busbars and switches all mounted tightly around the other section of wall.
Since we are talking solar system, of course we needed solar panels. There are many different options out there for solar panels; in the end I chose to go with Continuous Resources for a few different reasons.
- First and foremost was the cost. These panels are $185 each shipped for 200 Watt Panels, and that is about as good a price you will find for that size panel, new and shipped to your door (or in our case Walgreens)!
- Next was reputation. I know many RVers (including many friends) that are using these panels and haven’t heard a single negative comment about them. One of my friends has one that was cracked during installation, and it still worked well!
- Something I liked about the particular panels I went with is that I could get the same specs in a square or rectangular panel. In the end, I went with all rectangles, but had I wanted to (or when I want to) add more panels, I can get the different shapes and make better use of my roof space.
- Check them out here: https://www.continuousresources.com/collections/solar-panels-and-hardware/products/200w-36-cell-12v-nominal-solar-panel-5-busbar?aff=34
For mounting the solar panels, I chose to use standard Z-type mounting brackets instead of the tilting brackets that I had used on the Summer House. We hadn’t tilted once, and 1 set of the tilting brackets cost more than the complete set of the Z brackets. So I went budget on the mounting brackets.
A friend of mine that helped me install most of the system taught me a great way to mount the panels. We cut squares of eternabond tape just larger than the base of the Z brackets, adhered it to the rubber roof under the bracket. We drilled pilot holes, put dicor in the hole, screwed them down and then covered the base of the bracket and surrounding roof with dicor. The eternabond tape gave it an added layer of water seal, and protected the rubber from being tore if the metal Z bracket happened to wiggle or move at all.
So now I had everything mounted, next I needed to link it all together. It’s important to have a plan in place for the wiring. When you start dealing with cutting and crimping lugs onto the cables, it gets very expensive, and you do NOT want to have to crimp, cut, and crimp again. That will cost you $5 or more for every time you miscalculate wire length and waste a wire lug.
I used a sticker wire label system. Since I was installing 2 inverters and 2 charge controllers, it was important to keep those 2 systems separate. I used red and blue wire labels to identify wiring so I wouldn’t get them confused. I also applied the same red and blue stickers on the components themselves to help keep things straight. Red was line 1 or the master system, and blue was line 2, or the slave system. (Note: for the charge controllers there is no master or slave, just 2 separate circuits that I didn’t want to get the positive or negative wires mixed up)
What tools did I use?
In addition to your normal tools, there are some other tools you might want to help you with your installation:
- Wire Cutter & Stripper, you will quickly see that the wiring for this type of installation gets expensive. You do not want to be damaging and cutting down wire more than you have to. Get yourself a good set of cutters and a stripper for heavy gauge wiring.
- Hydraulic crimping tool. I was lucky enough to have a friend helping me through most of the installation that had this crimping tool, and when he left, I struggled to find a crimping tool to finish the project that didn’t involve just beating the lugs with a hammer. Remember, those lugs are $5 or more apiece. Spend the $50 on Amazon for the crimper.
- MC4 connector crimper/tool kit was also great to have. I got it off Amazon for less than $30, and it made making my connections between the panels much easier.
- Digital Multi Meter. It doesn’t have to be super fancy, but the ability to measure resistance/continuity and both AC and DC voltage is important. This is something that any Do It Yourself RVer should have in his toolbox anyway.
The install
Let’s get this all wired up! With your plan in place, measure 3 times so you only have to cut one time! I didn’t exactly follow that rule, but it all worked out with some wire to spare!

There are many different calculators out there that will tell you the diameter and maximum lengths of wire you need for the voltages you’re going to be running, I opted to go overkill on the wiring and have the room to grow as the system evolves.
- 10 AWG wiring to connect the panels together on the roof
- 6 AWG running from the roof to the charge controllers, and onto the busbar/battery bank
- 4/0 welding cable connecting the batteries to one another, and the batteries to the inverters
- I used 6/3 wire from the transfer switch to the inverters for the AC in (I shared the neutral and ground between the 2 inverters)
- 2 runs of 6/2 from the inverters to the RV’s AC distribution panel
There are many solutions out there for roof combiner boxes, I chose to make my own, and try to save some money this way. From Home Depot I got a waterproof electrical box about 8”x8”x6”. I covered the entire bottom of the box with dicor and screwed it down. To finish the box, I applied a bead of dicor all the way around the box. I drilled 5 holes into the box:
- 1” hole in the bottom leading the wires through the roof into the walls of the RV
- Inside the box the 10 AWG wires from the panels were spliced onto 6 AWG wires for its trip through the RV to the solar charge controllers
Victron components all work very well together and share information. The charge controllers, battery monitor, and smart sense are all Bluetooth individually but are all tied together via various methods that allow them to all talk to one another. I used the following wires to connect the system together:
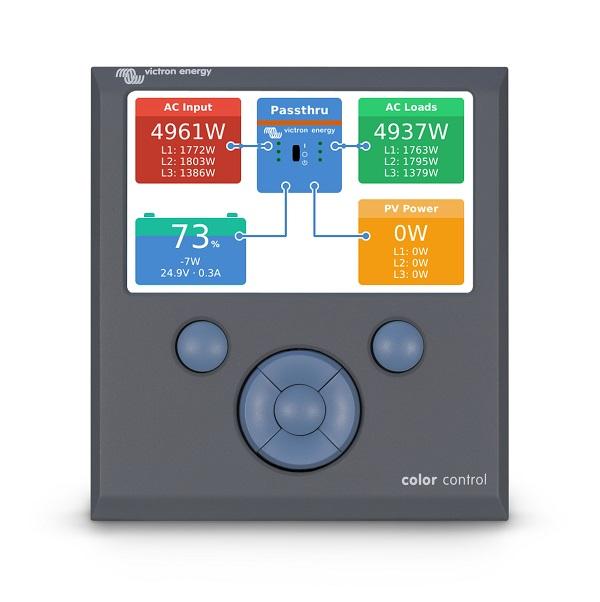
- I have yet to get the Color Control GX set up on our Wi-Fi network, so when doing a firmware upgrade or a major system configuration; I do have to plug directly into the master inverter using the MK3-USB adapter. I bought a small cheap Wi-Fi adapter, and it does not work with the system. You can connect a Cat5 cable from the Color Control GX directly to your router and gain access that way as well; unfortunately my CCGX and router are not in very convenient locations to each other.
- The BMV-712 battery monitor came with its own network cable that runs from the shunt to the BMV, and I needed a VEdirect to USB cable to hook it up to the CCGX since the charge controllers fill both VeDirect ports.
- Each SmartSolar Charge controller is hooked to the CCGX via Victron’s VeDirect Cables.
- In addition to all of this wiring, the Inverters and the Battery monitor came with voltage sense and temperature sense wires that had to be connected to the battery bank accordingly.
Protection: Any electrical system, whether its AC or DC needs protective pieces in place.

Let’s start with the solar circuit. I am running 6 x 200 watt panels configured into 2 x 3 panel legs wired in series. Each leg feeds into its own charge controller therefore I am running 2 sets (positive and negative) of wiring from the roof to the controllers. I found it more cost effective to run 2 separate smaller controllers than 1 larger controller capable of handling the amount of power coming from the panels. In addition, since the 2 strings are running independent of each other, if there is shade or lack of angle to the sun on 1 of the 2 strings, it will not hinder the energy production of the other string. For circuit protection I used:
- The panel wiring enters the RV through the roof and immediately goes into 2 x 50 amp switchable circuit breakers. Keep in mind; once the panels are in sunlight, they are producing electricity, so I used the circuit breakers in this position to give me the ability to isolate them completely from the rest of the system.
- From there the wiring runs into the solar charge controllers in the front compartment near the battery bank.
- From the charge controllers, the circuit runs into a matching set of 2 x 50 amp switchable circuit breakers. Again the point is to not only protect, but to give me a place to isolate the system if need be.
- The last leg of wiring in the solar circuit goes from the circuit breakers into the positive and negative busbars that are directly tied into the battery bank.
Let’s keep going with the DC (12 volt) system. We talked about RV electrical systems being 30 amp or 50 amp, but I failed to mention that in addition to the RV’s AC system, there is also a DC system that provides 12 volts to operate the slides, jacks, hydraulic system, lights, radio and the refrigerators control board (when running on propane it still needs 12 volts). A DC system is more similar to the type of electrical system found in an automobile. The RV’s 12 volt system has its own protection and control in place, so I did not modify it any way; I merely powered it from the positive and negative busbars from the battery bank.
The battery bank supplies DC power to the inverters that create the AC electricity that powers the RV. This part of the circuit can run extremely high amounts of electricity depending on what you are powering, so this needs substantial protection.
- From the Battery Bank, I ran huge 4/o wiring into a 400 amp fuse. This catastrophic failure fuse is meant to protect the wiring between the inverters and the battery bank.
- After the catastrophic fuse, there is a battery disconnect switch. This enables me to disconnect the battery bank from the positive busbar, in turn disconnecting the inverters, the solar charge controllers, and anything else connected to the bank.
- 2 separate 4/o cables run from the positive busbar directly into both inverters.
- In addition, I used an empty spot in the RV’s DC fuse panel to run power to the Color Control GX. It needs 12 volts to operate; luckily I had one empty spot, and just needed to get a 2.5 spade fuse to get it powered up.
The negative side of the DC circuit doesn’t require protection; all the protection is on the positive (hot) side. I will mention that the negative side is wired similarly to the positive site, but instead of a fuse and switch, the shunt for the battery monitor is directly between the battery bank and the negative busbar.
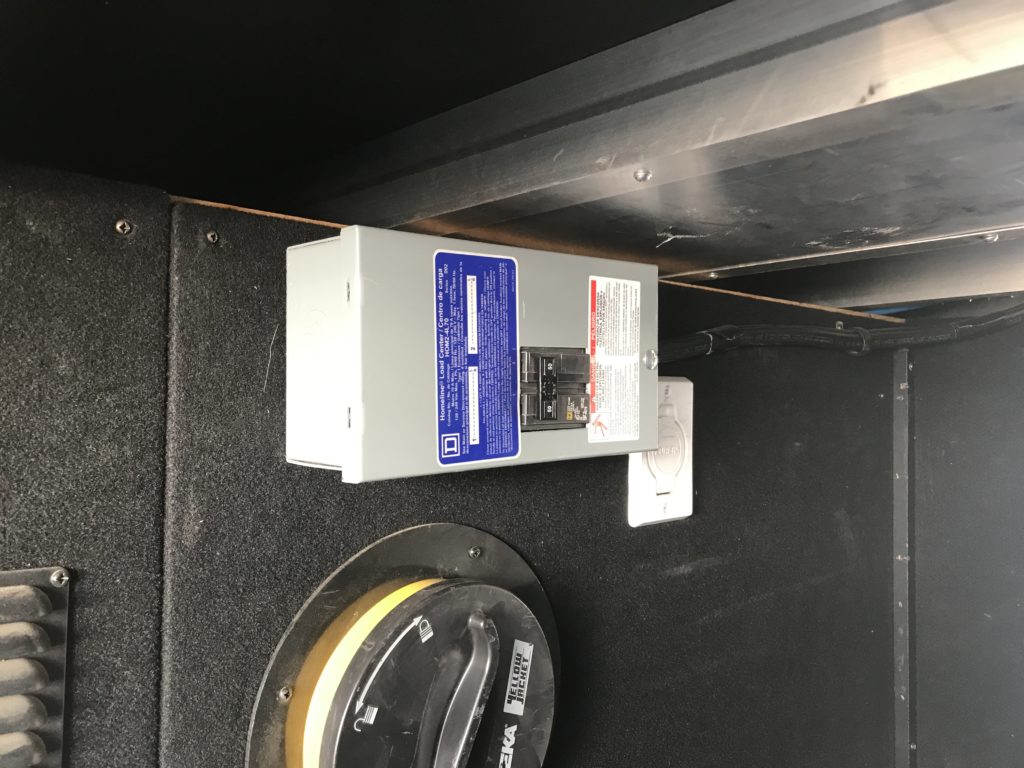
Now let’s talk about the AC electrical system. The AC system is like the electrical system in a house running on 120 volts. This system typically starts outside the RV as shore power at the pedestal, or coming from a generator. Our RV was equipped with a transfer switch that takes power from either shore power, or the generator, and decides which one to pass onto the RV’s panel. It’s an easy decision; as shore power has the priority. Our generator has its own built in protection system, so I did NOT add any type of breaker between it and the transfer switch. If I want to isolate the system from the generator, I just turn it off. I use a portable surge protector/EMS on my shore power cable, so I did NOT add any breaker there (if I want to isolate it, I can always unplug the cable).
I took the existing 6/3 wiring from the transfer switch and split it into the 2 inverters, but I did have to share the neutral and ground between the two.
- I ran 2 strings of 6/2 wiring from the inverters (1 each) into a 2 position breaker box (2 positions, 1 for line 1, the other for line 2) mounted along the way in the pass through, and onto the RV’s AC distribution panel. This protects the RV’s electrical system, and gives me the ability to isolate one or both of the AC legs running into the panel.
- Prior to me disconnecting the power from the panel, line 1 and line 2 shared a neutral and ground via the 6/3 wiring, but since I ran 2 runs of 6/2 from the inverters, I just used empty spots on the panels ground and common bars to accommodate the extra wires.

The system is now in place, wired, and ready to go! The first thing I did was hook up my laptop to each of the inverters separately and updated the firmware. *Something to keep in mind, anytime you update the firmware on these Multiplus’, it will erase any settings you already have in place. Make sure to save these settings on your computer to re-apply them after updating! The charge controllers and the battery monitor do their updates via Bluetooth and the app on my phone and the CCGX can do it online if connected to the internet, but I have done it via micro SD card in the slot provided.
Configuring these was pretty simple; the software walked me through setting them up in parallel and was a snap. I did have to find out the specs on the Trojans to set the charge curves correctly to prevent any over or undercharging.
Something to note, with the way that the inverters are configured, if I am running my generator or plugged into 30 amp service everything works normally, but if I plug into 50 amp service I need to go in and reconfigure them to split phase, otherwise the slave inverter goes into an overload state. Rather than go in and switch programs when going between the 2, I have opted to just use an adapter, and use 30 amp services. I have the inverters set to not draw more than 40 amps per inverter, and assist if the load goes over that. I haven’t had any problems with this configuration, and have been running this way since being fully online.

About Doug Boudreaux
5 comments on “ our rv solar set up explained ”.
Hi , I found your solar setup online, very interesting. I have been thinking on doing the same. I was wondering if you dont mind ,what your total cost was. Thanks Ivan from Canada [email protected]
I honestly dont remember, but a great resource is my friends at https://panelsupsolar.com/
I understand that you had people helping you. It looks like a system that we can use on our class A. Could you tell me what you spent in panels, cables, connections, switches, batteries, etc.? Labor is something else I need to figure. Yours have been the best system and most understandable. Appreciate any and all help. Thanks Darlene
Darlene I honestly dont remember, a grear resource is my friends over at Panels up Solar. https://panelsupsolar.com/
Very good solar discussion, As electricity is not your profession, your article is very impressive. Having retired from coal fired 1740 megawatt power plant as a maintenance electrician this should be cake. To make this worse for me, I was in charge of the massive battery back up systems. I would have paralleled the collectors (solar panels) and chargers on one bus. Is there a specific reason you didn’t, are your chargers incompatible or did YOU need the systems divided for ease. I am not knowledgeable on collectors, but they should act just like another charger I would think. I am living in my RV full time and will be purchase/installing a system early 2022. My problem is I will be mostly in AZ dessert during the summer. Trying to collect enough power during the day to run 2 Air Conditioning units, a non anhydrous ammonia refrigerator (standard house 120V 4amps fridge) and the rest of the RV with outside accessories is becoming a challenge to design and still keep it on the RV. An insight of how much you use air conditioning would be helpful.
Leave a Reply Cancel reply
Your email address will not be published. Required fields are marked *
What can I help you find?

Roadschool’s RVer Dictionary

Stay Connected:
- Custom Link
The 6 Best RV Solar Panels for Sustainable Power On All Your Adventures
Stay powered up on the road, at national parks, and even at the most remote campsites.

Gear-obsessed editors choose every product we review. We may earn commission if you buy from a link. Why Trust Us?
Along with solar power generators, solar panels are a quiet alternative for keeping your appliances working without lugging around spare gas cans or stopping at the gas station to fuel up for your traditional generator. RV solar panels come in different sizes and wattages for various needs, and you can even buy adjustable ones for paring down or expanding to suit the trip at hand.
What to Consider
Materials and set-up.
The two most common solar panel materials are monocrystalline and polycrystalline. Monocrystalline panels use a single silicon crystal to capture solar energy, while polycrystalline panels rely on multiple silicon crystal fragments. Monocrystalline is more efficient so we only recommend this type.
Solar panels come in rigid and flexible models. This matters when deciding where you are going to use your panels and whether or not you plan on mounting them permanently on top of your RV or camper. Flexible panels are ideal if you’re mounting on a curved or uneven surface, but if your RV is flat up top, a rigid panel will work just fine.
Decide whether you want to mount your panels or go the portable route. Mountable panels come with hardware and instructions for self-installation, like our best overall pick from Renogy . Mountable RV solar panels are more durable than portable ones, fit with waterproofing and wind resistance, since they are always outside braving the elements.
Portable solar panels fold up for compact storage, designed for easy set-up and tear-down from site to site. They are scratch-resistant and can handle a light shower, but they’re not meant to stay outside permanently and will get damaged if you do so. Some portable picks have features like integrated kickstands and handles to make setting them up at the optimal angle as smooth as possible, no matter where you’ve posted up for the night.
Wattage and Efficiency
Most RV and camper rigs require 100 to 500 watts of solar power depending on what you need powered. 100 watts will power a small fridge along with a toaster and coffee maker, but if you have a full on electric stove, a fridge, and multiple appliances, you’ll need more power.
We recommend you start small and expand to more wattage if needed as multiple panels can be wired together for more energy. Keep in mind product descriptions describe watts in optimal conditions—sunny day, no shade, no clouds—and typically pull less than this. The efficiency rate is a better sign of how well the solar panel works—the best ones are 23 percent or higher.
How We Selected
To choose the best RV solar panels, we used our expertise from testing and recommending solar power generators , as well as reviews from other travel outlets like Treehugger and SolarReviews . We considered the different uses for RV solar panels, ultimately presenting a range of options that work for different RV electrical needs. After pooling together the top products, we scoured user reviews to ensure that the quality and efficiency of these solar panels adheres to the performance the manufacturers promise. Here are out top picks for RV solar panels to keep you powered up and on the road.
Renogy Monocrystalline RV Solar Panel Kit

This kit has almost everything needed for easy installation on any RV or camper. (It doesn’t include a battery, though most kits don’t.) It’s made especially for those who have never installed solar panels, so the components are straightforward and user-friendly. This setup works best for small to medium set-ups like Sprinter vans, camper trailers, and medium-sized RVs.
The two 100-watt solar panels are rigid, but relatively lightweight at 18 pounds, and the included Z brackets and pre-drilled holes on the hardware make mounting easy atop any RV or van.
The included charge controller has LED indicators that let users monitor the status of their Renogy setup. Pro tip: Regulating the amount of energy flowing into the battery reduces the risk of overcharging, overloading, and short-circuiting.
The indicators on these panels also alert you to input changes due to weather conditions like rain, clouds, or nightfall. The aluminum frame panels are UV- and corrosion-resistant to withstand high winds, rain, snow, and blazing heat. For anyone looking to install their first RV solar panels on their own, this kit is an excellent pick.
GoPower Overlander 190W Solar Kit for RVs

This is the largest single 12-volt panel on the market, drawing up to 190W of power to keep any battery charged on long trips, camping, or on the road. All of the mounting hardware and cables needed to connect to your battery are included, making installation easy.
It’s made with an anodized aluminum frame to hold up against weather and durable tempered-glass panels. The panel is on the heavier side at 26 pounds, but packs a lot of power with a wattage of 190.
If you need more power, the company sells an expansion kit that doubles the output. It’s designed for seamless connectivity between your existing solar power system and the panels you want to add for more power.
Customers report easy installation and that the panel maintains power in their RVs even in less-than-ideal conditions like partly cloudy skies and rain.
Renogy Flexible Monocrystalline RV Solar Panel

This RV solar panel is great for uneven surfaces like Airstreams and vans, or propped up facing the sun at your campsite. It weighs only four pounds and can withstand high winds, rain, and snow.
It mounts using silicon adhesives for permanent installation , so there’s no need to worry about drilling holes. It can flex up to 248 degrees without any micro-cracks forming, which is handy for hitting the right angle after midday.
Customers like the slim profile of these panels and say the output is great for such lightweight panels. These are best suited for small camper set-ups or as expansions to larger RV solar energy systems, as just one or two of these isn’t enough for a large RV with a lot of appliances.
BLUETTI Monocrystalline Portable Solar Panel PV200

This powerful solar panel folds up to a slim 25 by 23 inches and weighs just 16 pounds for easy storage and portability. The integrated kickstand allows you to angle the panel to most efficiently catch sunlight.
It’s designed for durability with a scratch and splash-resistant coating, but it isn’t waterproof and you shouldn’t leave it out in the rain. This portable panel is good for adding power to your RV or camper set-up without taking up a lot of room.
While customers are satisfied with the power output, some notice that ancillary components—like carrying handles and wire straps—aren’t as durable as the panel. Still, the majority of customers report this works as expected and the portability and easy deployment of the panel make this a worthy buy.
Rockpals Monocrystalline Foldable Solar Panel with Kickstand

This Rockpals panel folds up to 17 by 15 inches and weighs only nine pounds, making it the most lightweight option we recommend. That doesn’t mean it isn’t powerful, though, giving you 100 watts of power wherever you need it. It can charge all types of batteries and has the option to deliver power directly to your devices with the integrated USB-C and USB-A ports.
The included cable connection is versatile, with two different-sized DC jacks and an Andersen connector. There’s also a parallel connector cable included if you want to buy another solar panel for a total of 200 watts of power.
Our deputy editor, Zoë Hannah, uses two of these panels to charge up her portable power stations, and while she’s never used them to power an RV, they’re supremely easy to store and set up. The one drawback is the lack of a kickstand—you’d be surprised how much less power you can draw when the panel isn’t angled toward the sun.
Customers also report that service from Rockpals is remarkably helpful with questions or any spare parts you may need.
Jackery Solar Generator 500 with Panel

This combo from Jackery includes both the solar panel and a portable power station, so you get an entire power system—one that works in and out of your RV—in one purchase. The generator houses the lithium-ion battery and inverter and is small enough to carry with one hand.
The 100-watt solar panels folds up and includes integrated handles for portability. At 11 pounds, it doesn’t weight down your camper and isn’t too heavy to move and maneuver.
It has a USB-C and USB-A port built into the back, so you can charge small devices by plugging directly into the solar panel without needing extra adapters. The kickstand adjusts to different angles for the optimal amount of direct sunlight.
Danny Perez is a Commerce Editor for Popular Mechanics with a focus on men's style, gear, and home goods. Recently, he was coordinator of partnership content at another product journalism outlet. Prior to that, he was a buyer for an independent men's shop in Houston, Texas, where he learned all about what makes great products great. He enjoys thrifting for 90s Broadway tees and vintage pajama sets. His spare time is occupied by watching movies and running to impress strangers on Strava.

.css-cuqpxl:before{padding-right:0.3125rem;content:'//';display:inline;} The Perfect Road Trip .css-xtujxj:before{padding-left:0.3125rem;content:'//';display:inline;}

10 Great Gadgets For Your Next Road Trip

What It's Like to Drive Across the Top of Alaska

The No-GPS Road Trip

10 of America's Must-See UFO Destinations

The Best GPS Units For Your Next Hike or Road Trip

How to Prepare Your Car for a Road Trip in One Day

I Took a Road Trip in a Supercar

Surviving the Inevitable Summer Power Outage

The 9 Best Solar-Powered Generators

The 7 Best Camping Lanterns to Light Up the Night

15 Countries Worth Visiting for an Epic Drive

Basic Parts of a DIY Camper Solar Setup
As an Amazon Affiliate, EXPLORIST.life earns from qualifying purchases.
Building a DIY solar setup for a Camper Van, RV , Truck Camper, or Travel Trailer requires quite a few parts to work in harmony. This blog post will lay out all of the individual components at a 101 level so that, by the end of the post, you’ll have a good understanding on what the individual parts are, and a good direction to go to learn more about those pieces of your Camper Solar Setup. If you have any questions about any of this, there is a comment section at the bottom where we will answer any questions you may have.
Quick note before we get started. This is just one part of an overarching “How to Install a DIY Camper Van Electrical System” series. If you’ve just stumbled on this article directly without seeing that, there are likely some things we’ve already covered. If you want to check out that step by step guide, you can do that here: https://www.explorist.life/diy-campervan-solar
Also, we have interactive solar wiring diagrams that are a complete, A to Z solution for teaching you exactly what parts go where, what size wires to use, fuse size recommendations, wire lug sizes, and all kind of other stuff to help save you time and frustration. You can check that out here: https://www.explorist.life/solarwiringdiagrams/
What are the Basic Parts of a Camper Solar Setup?
The basic parts of a Camper Solar Setup are:
Solar Panels
Charge controller.
- Inverter /Charger
Battery Isolator
Battery monitor.
- 12v Distribution Block
AC Breaker Box
Shore power plug, 12v switches.
- 12v Outlets .
Video: Basic Solar Parts Needed for a DIY Install

What do Solar Panels Do?
Solar panels are the most obvious component in a solar system. Their job is to gather solar energy from the sun and send it down the wires to the solar controller .
What are the two types of Solar Panels?
There are two main types of solar panels . They are Monocrystalline and Polycrystalline, and the MAIN difference between the two is their efficiency.
Monocrystalline vs Polycrystalline Solar Panels
Take these two solar panels from the same company for example. The first one is the Polycrystalline and the 2nd one is the Monocrystalline.
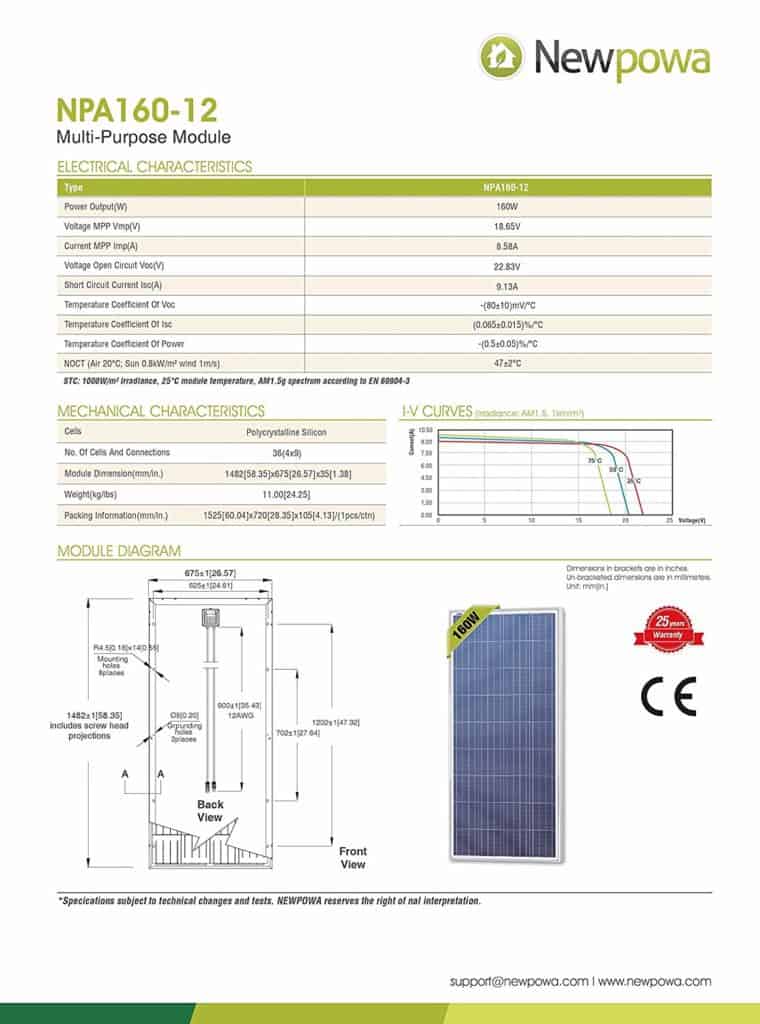
Take these two solar panels from the same company for example. The one on the left is the Polycrystalline and the one on the right is the Monocrystalline. The Polycrystalline is rated at 160 watts and has dimensions of 58″ x 26″. The Monocrystalline is rated at 175 watts and has dimensions of 57″ x 26″.
The two are within an inch in physical size, but the monocrystalline panel is capable of producing 15 more watts per panel. Which means (depending on conditions) you could be potentially gaining an extra 5-10 amps per day per panel if you opt for Monocrystalline over Polycrystalline.
Monocrystalline vs Polycrystalline in the Shade
I’ve seen articles and videos talking about how these two technologies of panels function in terms of shading or cloudy days. There have been lots of opinions given on this, but I have yet to see anything definitive and conclusive to make a blanket statement one way or the other; which leads me to believe… neither one really does a good job in the shade and, perhaps, solar panels just work better in the sunlight. Don’t overthink this.
What Solar Panels are Best for a Camper?
Since roof space on camper vans is extremely limited, go with the monocrystalline solar panels . You’ll get more power out of the same space leaving more room for vent fans and rooftop dance parties.
The Polycrystalline will also be fine if you are really trying to pinch pennies, but maybe the solar panel isn’t the place to skimp as it would be, likely, one of the more difficult components to replace on down the road.
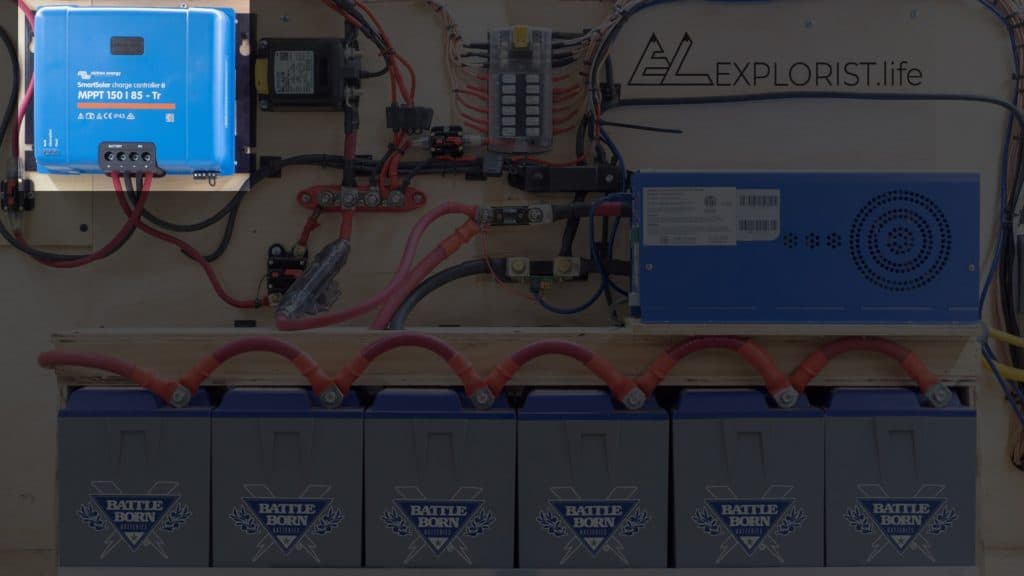
What does a Charge Controller Do?
The Charge Controller takes the solar power from the solar panels and then converts it into a form of more ‘organized’ and useful power. The power is coming from the solar panels at varying voltages. Anywhere from 16 volts to, potentially in the hundreds of volts depending on the setup. The charge controller regulates that voltage down to the 12-15 volt ballpark (if you are on a 12v battery bank) to properly charge, said battery bank.
What are the types of Charge Controllers?
There are two main types of charge controllers on the market. MPPT and PWM. Those stand for Maximum power point tracking and Pulse width Modulation.
MPPT vs PWM Charge Controllers
PWM is an older technology. Your solar panels must be within a fairly narrow set of parameters to even be compatible with a PWM controller. They are less efficient as they are, pretty much, just a regulator. The only ‘pro’ to a PWM controller is that they are less expensive.
MPPT Controllers are a newer, MUCH more sophisticated technology and have more ‘processing power’ behind them which lets them do more calculations depending on the input voltage to optimize the output voltage to the maximum amount of amps possible to be stored in the batteries for use.
Is an MPPT Controller Worth It?
The ‘buy-in’ fee is a higher, but the added flexibility and performance will give you more bang for your buck in the long run. Get the MPPT controller. Unless you are strapped for cash… then… save up, and get the MPPT charge controller .
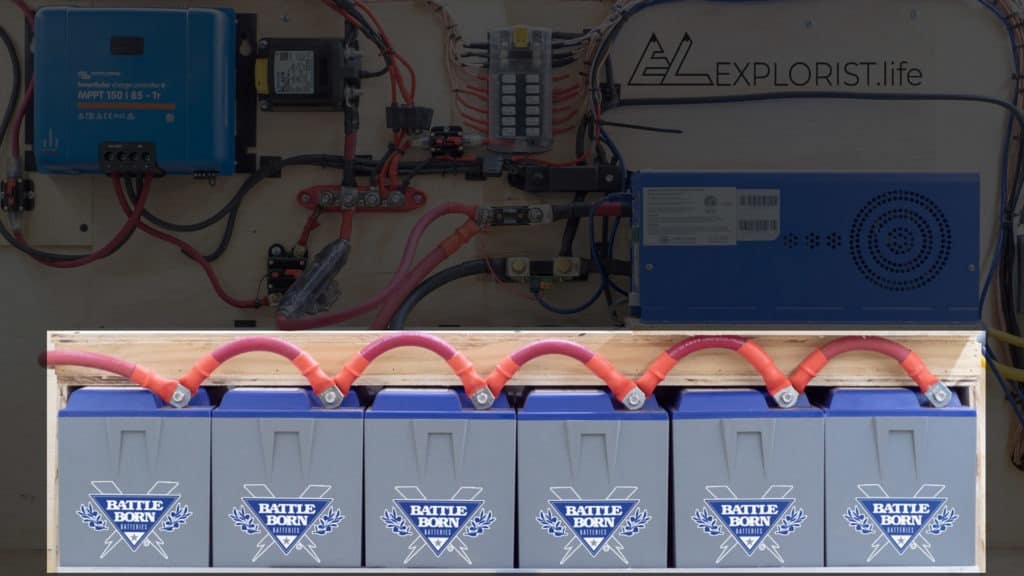
What do Solar Batteries Do?
Batteries are simply ‘storage tanks’ for power. They store the power that the solar panels and charge controller have made until it’s ready to be used to run computers, charge phones, brew coffee …or whatever.
What are the Main Types of Solar Batteries?
There are three main types of batteries on the solar market. Lead Acid, AGM, and Lithium.
Lead Acid vs AGM vs Lithium for Camper Solar
These require maintenance and they vent corrosive hydrogen gas. They were the standard for a while, but then technology caught up. Although they can work in some setups, IMO, they are generally more hassle than they’re worth.
AGM & Lithium
AGM & Lithium are the two more commonly used types of batteries in campers currently. Lithium batteries are significantly more expensive up front, but they are cheaper over the long run. Related: AGM vs Lithium – A cost-benefit analysis
What’s the Best Battery for a Camper Van?
Go with lithium. It’s lighter, more powerful, bigger bang for your buck in the long run. But, here’s my Recommendation if you can’t afford Lithium: Go with the …BUT!!… Get the SIZE of AGM battery that you can switch out to lithium in the future if you happen to change your mind.
To Clarify, a Battle Born Lithium Battery is about 12 ¾ x 7 x 9 inches and a Renogy AGM battery is 13 x 7 x 9 inches (so, nearly identical). If you’re living for the moment and need to go with AGM batteries now, you can buy, say, 3 of the AGM batteries now. Once they wear out, or you need more capacity. You can swap in 3 lithium batteries directly in their place, bolt them up, change a few parameters on your charge controller , and you’ll be good to go. Effectively tripling your capacity with the same battery footprint.
Plan for the upgrade now, and it’ll make the upgrade less expensive and easier when it’s time.
Inverter/Charger
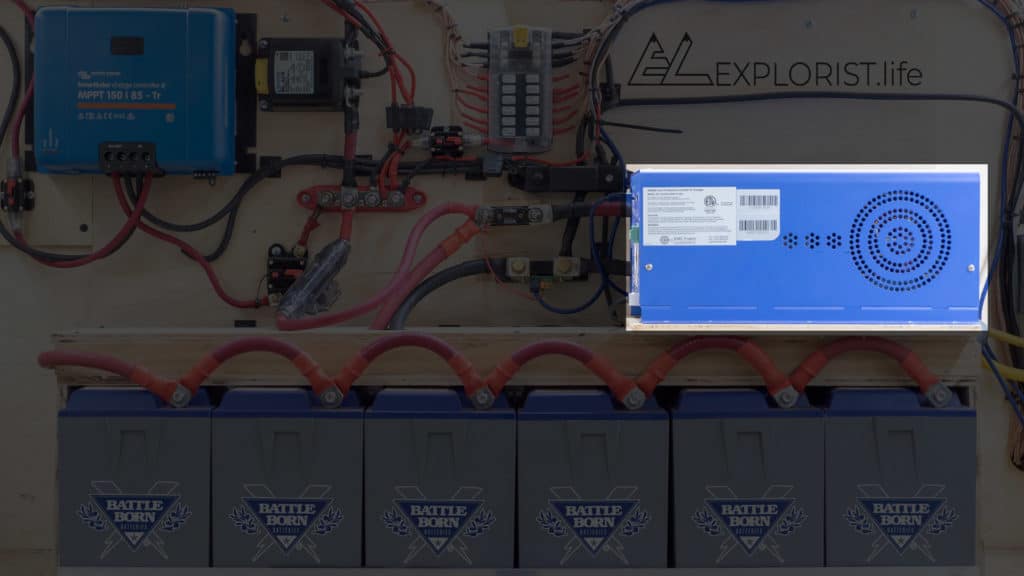
What is an Inverter Charger?
Inverter /Charger combo units are, pretty much just that, an inverter and a charger all wrapped up into one nice and neat package.
What does an Inverter Do?
Your battery bank stores power at 12 volts. If you have something, say, a coffee maker or an instant pot… you will need 110 volts a.k.a. A normal household plug. The inverter takes the 12v power stored in the batteries and converts it into 110v power so you can power those household appliances.
What are the Different Types of Inverters?
Inverters come in a few different types. Square Wave, Modified Sine Wave, and Pure Sine Wave.
What kind of Inverter is best for a Camper?
You’ll be looking for a Pure Sine Wave Inverter . This inverter does the best job of mimicking the power that is ACTUALLY coming through a standard plug you can find in any on-the-grid wall. Square Wave and Modified Sine Wave aren’t recommended, because, the power they ‘Make’ isn’t a ‘clean’ power and can damage certain electronics and I can’t recommend those because I don’t like recommending products that have an inherent risk of damaging other equipment.
What size of Inverter do I need for my Camper?
Pure Sine Inverters come in sizes from small and portable 300w models all the way up to… a lot. To get by with “Modest Usage” like running a coffee pot, Instant pot, or induction stove, the most common size I’ve seen AND the size we have in OUR campervan is a 2000w inverter , but if you want to learn, in more detail, how to accurately size an inverter for YOUR setup, you should click here to learn more.
What is Shore Power?
This is how you can charge your batteries via ‘shore power’: Which is a campground power pedestal or even – simply a plug-in at someone’s house. Shore power is simply an external plugin… somewhere on the grid. There’s not too much to say about these. You can get these in a separate unit, but typically, it’s easier and cheaper to just get the all-in-one inverter /charger combo package. They charge your batteries at a rapid rate. Anywhere from 40-70 amps DC.
Do I need an Inverter for my Camper?
For anybody looking for the comforts of home, an inverter is a MUST. If your rig is JUST for the random weekend outing… Perhaps run a 12v refrigerator and charge cameras, drones, and such; perhaps you can go without. You really just have to ask yourself ‘What do I plan on powering’ and how much like ‘home’ do I want this to feel.
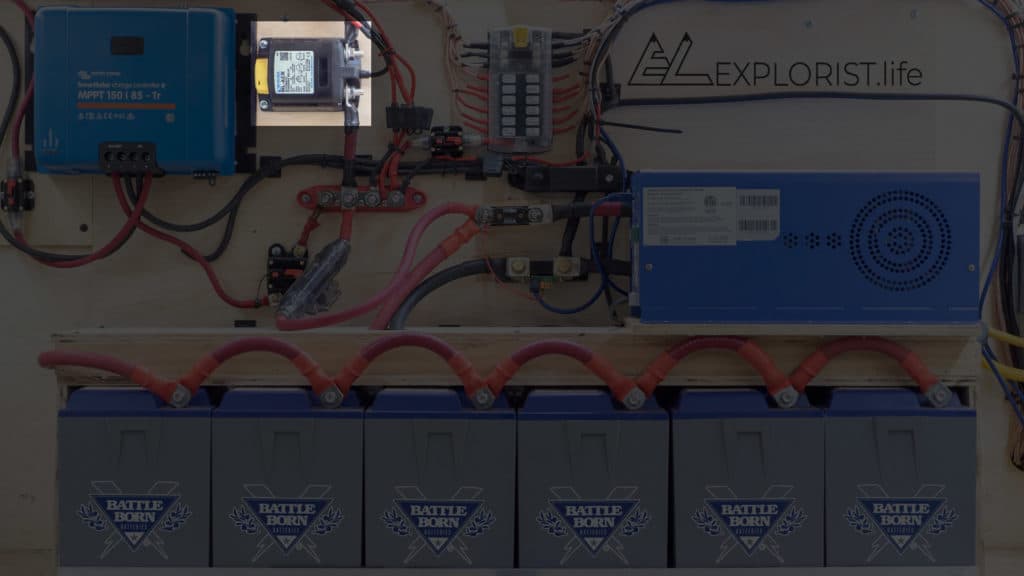
What is a Battery Isolator in a Camper Van?
This is the device that lets you charge your solar battery bank with the engine alternator. It let’s power pass when the engine is running and it closes when its engine is off so you don’t drain your starting battery as you use your solar batteries .
That’s ‘basically’ how it works, but to learn the picky details of installation and what systems you can use it with, there’s more to know…
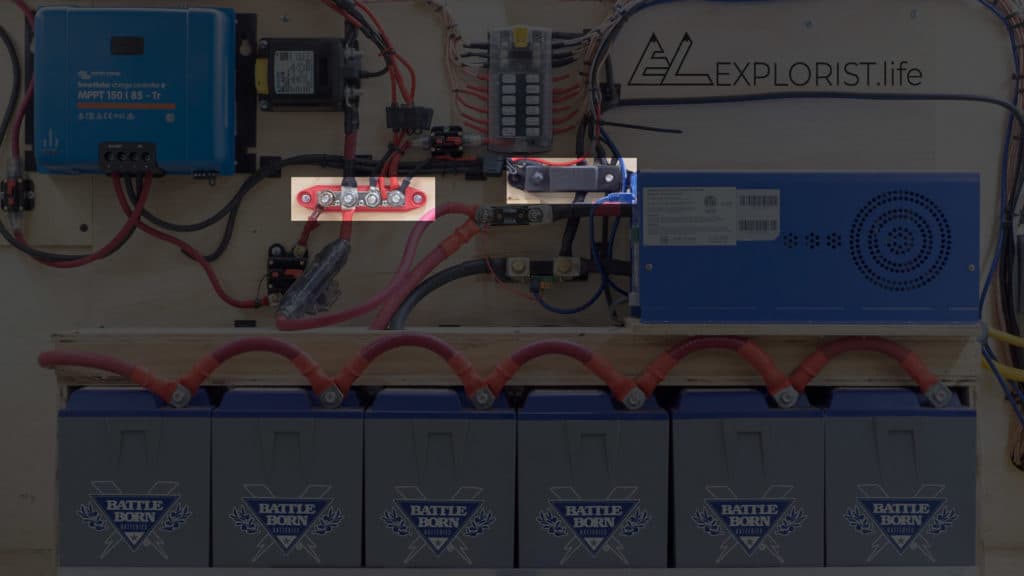
What is a Busbar?
The Busbar is an extension of your battery terminals. When we’ve got a dozen different wires and components that need to be connected to the battery ‘directly’, the top of the battery terminal can turn into a giant birdsnest of wires in a hurry. These just give you a little more room to work with your wiring AND make it easier to see exactly what you’ve got going on and what wires are going to where.
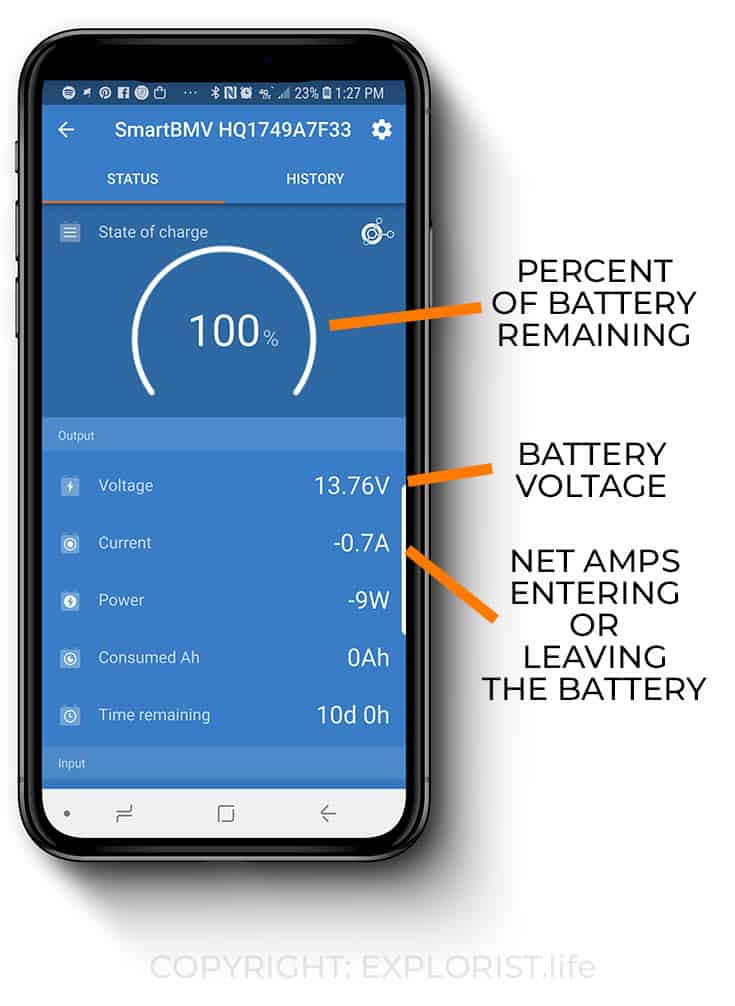
What is a Solar Battery Monitor?
The battery monitor tells you the status of your batteries . Like, their capacity, voltage, and how much power is ACTIVELY being generated or lost. The monitor is able to tell us this information by the information provided by the shunt .
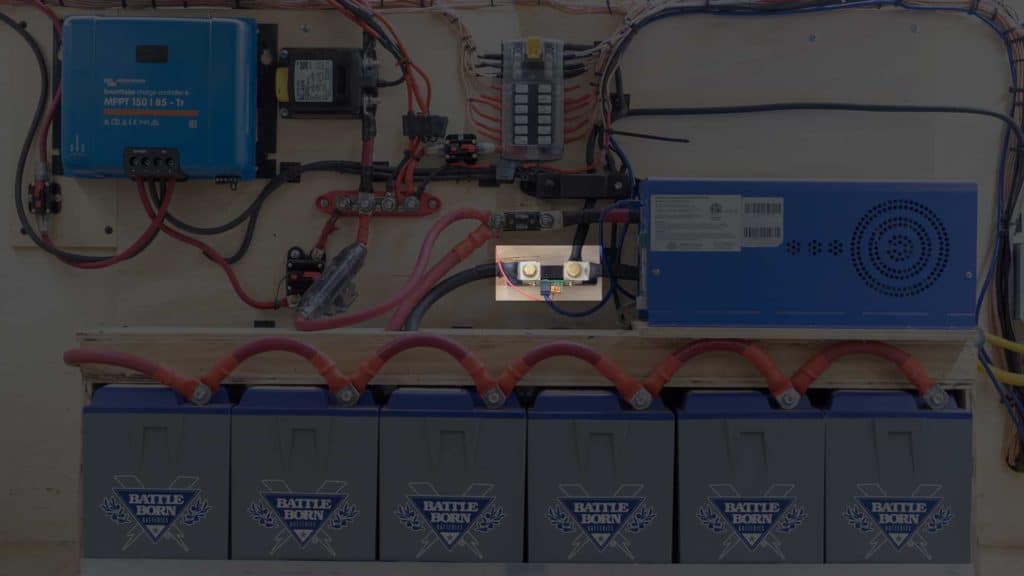
What is a Shunt?
The shunt is physically responsible for ‘counting’ the amps that are either coming or going in either direction and reporting that to the battery monitor. If the Battery Monitor is the brain, the Shunt is the body. The Shunt sits in line of the negative battery terminal and the bus bar . ALL loads should be on side of the shunt that’s away from the battery .
These are typically included with the battery monitor
12v Distribution Block (Fuse Block)
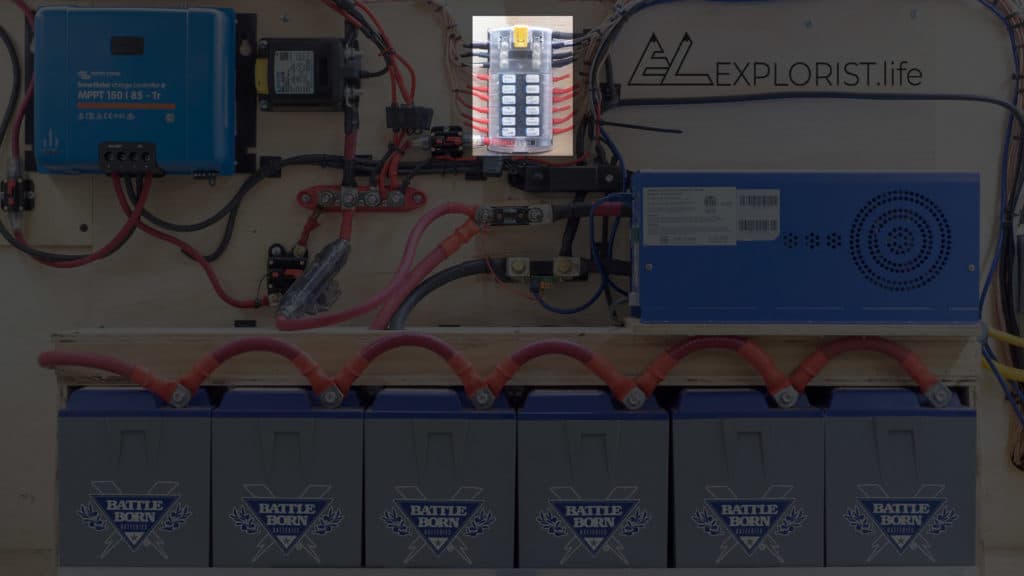
What is a 12v Fused Power Distribution Block?
This fuse block is the easiest way to make fused connections to those low amperage devices and keep everything safe, tidy and organized. This is how you will run all of your wires to your accessories like lights, fans , 12v outlets , 12v refrigerator , USB ports, etc.
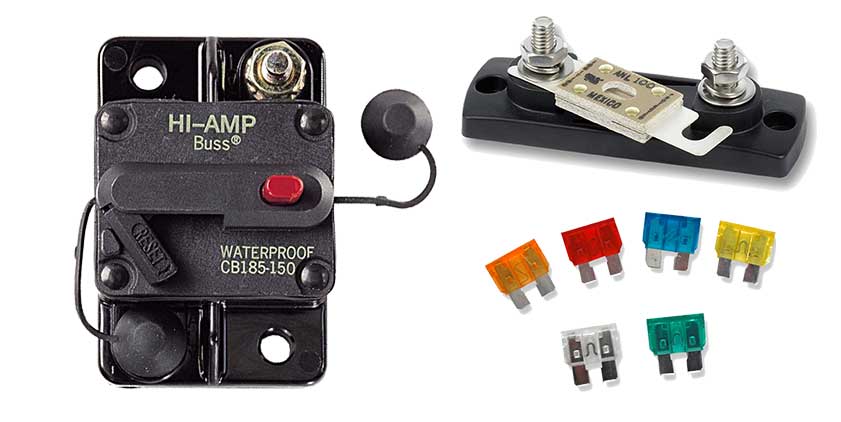
What is a Fuse?
Fuses are what protect your wires in case of an over-current situation a.k.a. a malfunction. If there are too many amps flowing through too small of a wire (or if something is malfunctioning), the wire can melt and possibly start a fire. The fuse is designed to ‘blow’ or ‘trip’ at a current lower than that point which will cut the flow of power, effectively shutting off the hazard.
What are the Different Types of Fuses?
There are 3 types of DC fuses I find myself using.
- Spade Fuses
- Resettable Breakers
The type of fuse I pick varies on how it’s being used, the current going through it and the size of wire it’s attached to.
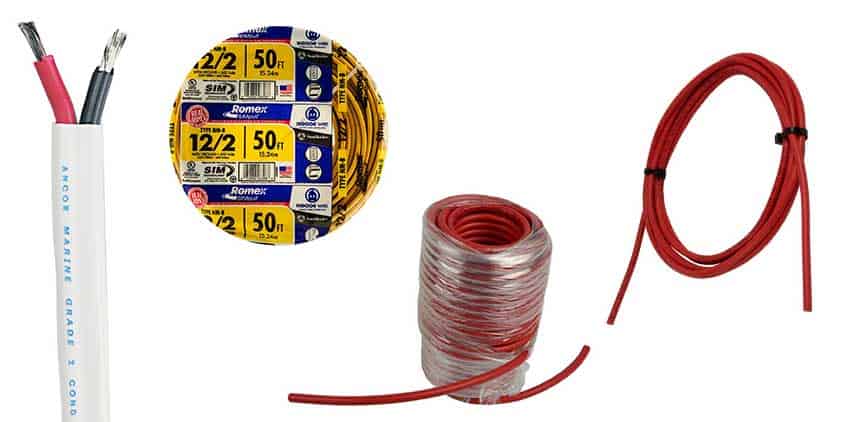
What do Wires do in a Solar Setup?
Wires transport power from one component to the next. The come in various sizes. “Small wire” for use on lights and fans would be somewhere in the 12-18 gauge realm
What is Wire Gauge?
Gauge is the measurement unit for wires. There’s a more technical way to explain it, but we don’t need to. It’s just like inches, centimeters, miles, or whatever. It’s fairly relative. Just know that 12-18 gauge is pretty small
Oh, and the higher the number goes, the smaller the wire is.
Once you get into BIG wire for carrying BIG currents like required by the inverter , it gets tricky. As the wire gets bigger, the gauges go 8, 6, 4, 2, 0, 1/0, 2/0, 3/0, 4/0.
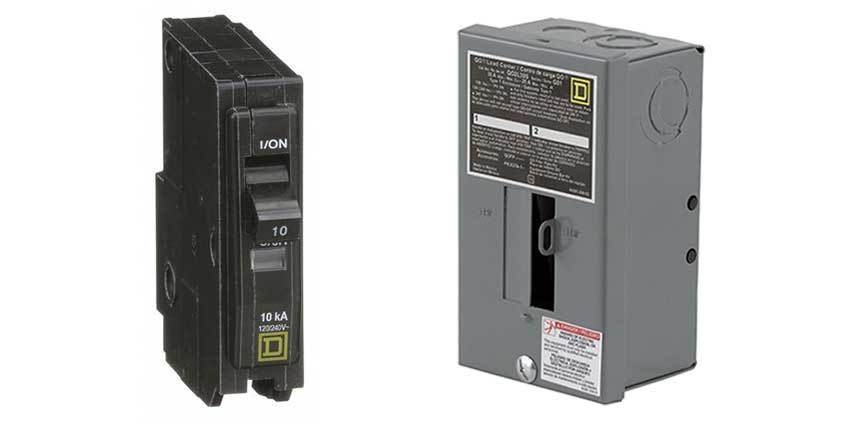
What is an AC Breaker box in a Camper Solar Setup?
The AC breaker breaks the flow of electricity to an AC (alternating current) circuit to protect the wire from melting.
Do I need an AC Breaker Box in my Camper Solar System?
Depending on the inverter /charger you get, it may or may not come with an AC breaker installed. If not, and you are wanting to hard wire 110v plugs throughout your camper, you will need to add an AC breaker .
You will need the breaker box , as well as a breaker to protect the wiring and 110v circuits.
What is a 110v Plug?
It’s the household 110v plug and the box you install it into. Sometimes, people use the plugin that’s commonly found on their inverter to plug in directly. This plug and box is for if you want to have 110v plugs throughout your camper build.
How do I add Shore Power to my Camper Van?
Add an exterior power port onto your camper so you can plug in directly into the van. It looks a little less sketchy than slamming the extension cord between the door and the door jam.
You can get a 30a plug, or a 15a plug.
I’d recommend a 30a plug if you are planning running an air conditioner … or you just never want to have to question anything regarding shore power capacity.
What is a 12v Switch?
These break the power going to lights, fans , outlets or whatever you are trying to control. If you get a REALLY big swtich, you can kill power to your entire system (which is a nice feature to have…)
12v Outlets
What is a 12v Outlet?
This is where you can plug in USB adapters, computer chargers, small inverters or led Christmas lights for some sweet #vanlife Instagram pictures.
12v Outlet vs USB Outlet for Camper Van
Something to consider: On Amazon, a lot of these 12v outlets may come with a USB plug pre-installed in it. I don’t like that because USB Technology changes every single year. They are always coming out with faster ways to charge our devices. My recommendation? Don’t install hard-wired USB outlets. Install 12v outlets and have flush mount USB adapters on hand. This is INFINITELY more versatile if you are trying to future proof your build.
Keep Learning:
Now that you’ve learned about the individual components of a camper van electrical setup, the next thing I’d recommend is learning how much battery capacity you’ll need in your camper van electrical system. Check that out here: https://www.explorist.life/what-size-of-solar-system-is-needed-to-power-a-camper/
Everything that you are learning here is put to use in our FREE Interactive Solar Wiring Diagrams . If you haven’t yet, check them out as they are a complete solution for a camper van electrical system. Check them out here: https://www.explorist.life/solarwiringdiagrams/
Remember, this is just one part of a full camper van electrical educational series. To see all of the individual guides, click here: https://www.explorist.life/diy-campervan-solar
Finally, If you found this guide helpful, It’d truly mean the world to us if you’d share it with somebody who can use it, pin it to pinterest for later reference, or share it to a facebook group when somebody has a question about this subject. Click the bubble in the lower right corner to subscribe to be notified of future updates and as always, leave any questions you’ve got in the comments below.
The EXPLORIST.life shop has everything you need for your DIY camper electrical upgrade, retrofit, or complete system.
Subscribe to the EXPLORIST.life weekly newsletter for updates, events, new tutorials & more oppourtunities.

Nate Yarbrough
63 responses.
Does anyone know if there’s a good reason to swap out my old solar isolator which is Nate’s older breaker box idea for one of the solar isolators? Wondering if the solar isolator might be smaller.
The solar isolator is not smaller, no. If you have the older breaker in place and wired up correctly and it’s not giving you issues, there is no reason to replace.
Hi Nate. Thanks for the use of your Power Audit Spreadsheet! It took some time, yet worked flawlessly. This being said, our power needs are short footprint on the top of the campervan. We will mostly be off grid without access to shore power, and may eliminate shore power completely. Can we over compensate our battery storage for the shortcoming of solar power? Is it worth it with DC-DC mostly? Looking at your Camper Wiring Diagram 2000w INVERTER | 200-400Ah Lithium | 200 TO 700W SOLAR. Any thing we would need to beef-up to add 200Ah more?
I would never recommend a system without shore power. Shore power is absolutely necessary in a well-built system, if for nothing else, troubleshooting and commissioning the system as it is a ‘guaranteed’ source of power.
Hey thanks for all the info.but for the moment i need to go on minimals (euros).so my question is…if i jave a lighter battery charger conect to a 90A battery chargin while i drive for the moment i need to suply a 12v friezer box a 12v water pomp and a coffie machine 700watts.can i use a small inverter? Is that ok just for some weekends? Thank you and grettings from holland
With properly sized fuses, wires, and components, you can indeed design your own system. Unfortunately there is not enough info in your question for me to vouch for your plan as-is.
Glad to have discovered this treasure trove.. thank you Explorist Life. We havejust started.. learning.. to add DIY goodies to a MB GL450 4matic.
Cool! Glad you found us! 🙂
Just purchased a used truck pop up. We want to go 100% electrical as we are not comfortable with gas. All research I have attempted to find always talks about off the grid. We do not plan on ANY off the grid, other than an occasional parking on the street because the campground was full. So with that I have been finding it difficult to determine needs. I will check out battery capacity above. We are only 11ft by 6ft to heat or cool, so your articles are a god send.
Thank you, will be signing up and intend to read everything you have
Great! Glad it’s helped.
Great info. I am handy enough with household electrical and this gives me a great jumping off point to learn about mobile solar. So looking forward to pouring through everything your site has to offer. Thanks so much for putting this out there.
Great! Glad it helped!
Appreciate the post. Very informative. We want to outfit our Hike camper and would love to have a rough cost estimate for a moderate sized system including all things you mention. The dealer gave us a price of $6,000.00+ for 2 lithium batteries and an all inclusive 2000 watt inverter,labor etc. No solar panels. Seems high based on what we’ve read. Could you share your thoughts?
Sure! I have a diagram and shopping list that you can check out and start pricing out all of the bits and pieces that you would need. This would give you an accurate cost of what It would cost to DIY a system like that: https://www.explorist.life/2000w-inverter-200-400ah-lithium-200-to-700w-solar-camper-wiring-diagram/
As far as if the installer is too expensive… I have no clue. I teach people how to do this stuff themselves, so I am not in-tune with what an installer would charge.
The BlueSea systems ML-ACR 7422 (?) relay that you’re using in the photo is not compatible with LiFeP04 batteries. It will never turn on/off at the correct times and the batteries will not fully charge. I have the same relay, and have spent several months tracking that down to be a problem with the system. I’ve verified this with BlueSea, and there is no way to reprogram it for lithium voltage cutoffs, and there is no replacement from BlueSea. The options I’ve seen are Victron Cyrix or the Batter Isolation Mangager (BIM) sold by Battleborn.
Yes. That is correct. That particular device is indeed, not compatible with Lithium as the voltage set points for when it connects/disconnects are too low. I covered this a bit more in depth here: https://www.explorist.life/how-to-charge-diy-camper-van-batteries-with-vehicle-alternator/
Invaluable resource here! Question, my van has a built-in 115v, 100w inverter with a standard US 2-prong Household outlet that only operates when the van is running. Seems easy enough to connect it straight to an AGM battery to charge it while I’m driving, but are there any considerations, like running it through a control first? Or does it make more sense just to charge the battery off the 12v DC cigarette lighter outlets that also only work when the vehicle is on?
If you could find a battery charger that is under 100w; you could, indeed, go that route. But the ‘more correct’ way to charge the house battery bank is by using a DC-DC charger like shown in this diagram: https://www.explorist.life/3000w-inverter-400-600ah-400-to-1200w-solar-camper-solar-kit
This post is extremely helpful! Perhaps I am missing it, but how did you configure the charge settings on the Victron Inverter Charger? Some sites say you need a computer, others say you can do it from the device….
Thanks for all the great material!
If it came from Battle Born, they USUALLY change the charge parameters in-house before sending it out. If you want to change the settings yourself, you can dive into the manual to decode the DIP switches or you can program via computer by way of the MK3 – USB adapter: https://amzn.to/3hm1kcv
I inherited a rudimentary solar set up that I’m updating/changing. My question is that I have 2 RV/marine starting/cycling batteries in this system and I have no idea, what the amp hours would be. The information on the batteries are: CCA 650 @ 0F, CA 810 @ 32F and 23 amp ave. 175 min. This set up just runs a few lights and an RV water pump. Can you tell me what the amp hours are on these batteries and if I should keep them or replace them?
Starting batteries don’t ‘really’ have amp hours. They are made to be used and high rates for very short periods of time so they don’t have the same metrics of batteries that are designed to run low loads for long periods of time.
Thank you so much, this post was really helpful in getting me ready for what I will need in my upcoming build! The side by side comparisons really have me a good direction to go in
Hi, I’m starting to design and install a system in our 5thwheel. My goal is to have about 600watts of solar panels and a 1000 watts capacity battery bank. I want to use as much of the existing electrical system is possble. Already bought a MPP Inverter/charger which includes the solar controler and automatic transfer switch. I’m building a battery bank out of Headway 38120 8amp/hours 200amp capacity cells wired in series and parallel to buid a 24v system. Can you point me to your video that would help me the most.
Sounds like a cool project! I think this video will be the most helpful as it may give you some ideas on connecting into your existing electrical system: https://www.youtube.com/watch?v=Ht1kl37pJ2E&list=PLmvhcyi4n0TU6HlMaQiCUwC20DBlyv6s_&index=10&t=4s
I love the write-up. I am currently designing a system for my MB Sprinter 144″ 2WD. I am building my own roof rack. Should be done this weekend fingers crossed.
I am going to be running two of the zamp solar 90 watt long panels and a single 80 watt panel in front of them. I found them on sale at (link deleted). They said the panels would have cosmetic blems. I just got them yesterday and can’t see where the blem is. Super stoked.
My question is this… I do a lot of winter camping. Do you think it would be worth it to create a system to lift the panels up at an angle for better efficiency? I have seen others do it but noticed all of your panels are fixed.
Either way. Our initial plan was to have them able to tilt but Aluminess built our rack incorrectly and was a month late on delivery making our initial plan much more difficult.
I’ve read hundreds of articles in the past month while researching….if only I had found this one first! This answers so many of my original questions, truly a thorough walkthrough of some basic must-knows. Thanks for the excellent content!
Looked into a lot of information on solar setups and am an engineer myself – I have to note that our presentation of facts and know how is easy to follow and understandable thank you for your efforts
Great! Glad it helped! 🙂
Nate, I am buying a trailer from WeeRoll that is already rigged out for AC (2 plugs) and 15v shore plugin. Do I tie into that somehow or just keep my solar separate? And if I do keep separate how do I charge my batteries through shore power? Thanks.
This video may help: https://www.youtube.com/watch?v=Ht1kl37pJ2E&list=PLmvhcyi4n0TU6HlMaQiCUwC20DBlyv6s_&index=11&t=3s
Nate, you have gone to a lot of effort to help the not so informed. I take what a salesman tells me with a pinch of salt. Your information and knowledge has helped me so much. Again, Thank You.
Great! Glad it’s helped! 🙂
Great job. Thanks
Hello! I’m learning a lot in your blog thank you for the useful info! I have a question, will I need an extra battery monitor using the smartsolar charge controller? Or can I just use the smart phone? Thank you
They are different. The Smartsolar charge controller measures different metrics than the BMV, but they work in conjunction with each other and IMO, both are VERY nice to have.
Thanks for breaking it all down like that. Love the new design of the site. I was curious how you connect wall outlets to the inverter. I was just going to run an extension cord/wall outlet but it looks like you have a more traditional box and outlet. Thanks again!
I’ll be doing a video over this soon. If you’re subscribed here, you’ll be notified when it goes live.
This name Victron MultiPlus Compact 12/2000/80-50 120V VE.Bus Inverter Charger Has the word bus in it- does that mean it has built in busbars? Also I read the product description for this device at the manufacturers site and I still can’t tell if it includes a built in 110 v circuit breaker?
the VE.Bus is not a busbar. That’s referring to something different. It also does not have built in 110v breakers.
Hi Nate, really appreciate all you do for us diy’s. My question is on lithium battery’s and how they perform in cold temperatures? Not sure if I should use AGM or Lithium. Planning on doing some part time winter camping and chasing powder at ski resorts. I don’t plan on heating the van all day while skiing but just at night when sleeping with my wabasco d2 heater. Thanks for your time, best Dave
Thanks! Lithium batteries won’t charge below freezing, but AGM batteries will have severely decreased capacity when they are below freezing. Point is: batteries like moderate temperatures, so try your hardest to keep your batteries in the climate controlled portion of your camper.
Really great article. Simple and very informative.
This entire solar panel thing is blowing my mind lol what size solar panel and how many ah battery do I need to run just a maxxair fan?
Hey Christina! I’d HIGHLY recommend you start here to do a power audit and determine how much power you’ll be using on a daily basis: https://www.explorist.life/what-size-of-solar-system-is-needed-to-power-a-camper/
I would like to have the option of plugging in a remote solar panel when I am parked in the shade. Where would I wire the remote panel to (through a remote plug mounted to the outside), do I tie it in to the permeant solar panels wiring or directly to the solar controller? Thanks
You should wire a 2nd charge controller into your system that would be dedicated to the external, portable panels.
I’m planning on buying a Jayco Eagle HT Fifth Wheel 28.5RSTS and I want to add solar. Is it possible to add enough solar power to run the AC?
How many watts of panels can you fit on your roof?
How many hours per day do you want to be able to run your air conditioner?
Hello Nate i am looking in to a solar setup and gathering materials for a bus conversion. i would like my solar panels to be portable. meaning i can move them around when needed. i will not be full time. do you have any portable Solar panel recommendations. thank you for the great diagram and materials list.
Hey Michelle! To be totally honest, any panel can be a portable panel if you don’t mount it. Fabbing up some basic lean-to legs on the back of a panel is pretty straight forward with a bit of ingenuity. That being said, any of the panels we recommend are the same ones we’d use for a portable recommendation.
Just saying hello and would like to also say what a great job you’ve done. Thank you. P.s. if you’re ever in mammoth skiing drop me an email. Or hiking in the summer.( maybe not this summer with all the snow though.
I’ll have a lot of comments/questions to your great work. Will this submit of comments enable me to comment/question?
I need to applaud you for your efforts. The value you provide to the DIY Vanlifers with your videos and website is priceless. The professionalism of interactive diagrams is amazing, too. I have never subscribed to any YouTube channel, but you may be my first. You’re a cut above with your content. I’m hoping to follow in your footsteps and build a ski, surf, and race car tow vehicle on the Transit platform. When the stars align for me to get started, I plan to purchase your diagrams in support of your Vanlife. Thank you. -Andrew
Hey, awesome! Thanks for all of the kind words, Andrew!
Hey there we just started RVing and we have a solar set up and I was wondering if you’d be able to help us? I watch your YouTube and we set up our solar system and we aren’t able to have one night with full charge ? we have 400 watts of solar panels a 3000w inverter and 300 ah lithium ion batteries and we have been plugged into shoe power from almost a week with everyday fully sunny so I just figured maybe you would be willing to help us understand what we are doing wrong? Or any info at all would help us. Thank you so muh for your videos! Hope to hear from you.
Darn! I’d be first reaching out to tech support from the manufacturers/distributers of your components as I don’t have enough info on your system to help diagnose, but you’re looking for a phone call from me, you can always book a 1 on 1 consultation with me here and I could attempt to help the best I could: https://www.explorist.life/consulting
Great post and video! Thanks so much!
Best video I’ve seen thank you so much I learned quite a bit from it, I am setting up 2019 hummingbird Jayco 19 foot I will be needing help again.
Awesome! Glad it helped!
Leave a Reply Cancel reply
Your email address will not be published. Required fields are marked *
sign up for our weekly newsletter
Sign up for our weekly newsletter

How to Use Solar for RV Boondocking (Setup, Best Kits)

- BEGINNERS GUIDE / BUYERS GUIDE
G. Yoganand
Boondocking or dry camping refers to RV camping without hookups. You don’t get water connection, no sewer hose connection and also no electricity. In such a scenario, you are dependent on your battery bank, generator and propane for power or energy requirements.
Another way to meet your power requirements is to use solar panel system. In this article, we will discuss the pros, cons of solar power for RV boondocking. We will see if its a best option and how one can get it installed.
Read : Learn on the basics of solar for RV
Is solar a good option while boondocking in an rv?
Some campsites have electric hookups available for campers who need it as they include it in the cost, or for a fee, you can have electricity when you go camping. But when you go off the grid Aka boondocking, it is an entirely different game.
Having solar panels may be your brightest idea yet when you go boondocking in an RV . When you go boondocking, and there are no electric hookups, you can use solar panels for your extra-source of energy.
Although the RV comes equipped with RV batteries, it needs steady recharging. This is true, especially if you have a lot going on inside your RV, such as having air conditioners, fridge, TV, and other electronic devices or gadgets.
For some, this is a great idea if you have a ready solar panel for when you suddenly need to leave and go someplace unheard of. But for others who rarely go to any remote places that do not have electric hookups, it may be an added expense that they can go without.
How many solar panels watts would you need?
Factors such as electronic equipment you have in your RV and other devices will also gauge how much you will need.
Low to Medium power consumers include laptop computers, fans, microwaves, toasters, light, water pumps, coffee makers, hair dryers.
While air conditioners, space and water heaters, heat pumps are all high-power consumers.
The number of solar panels and watts you will need will depend on your electronics usage in your RV meaning if you have the usual coffee maker, hair blower, a microwave perhaps, and a TV the estimated wattage you will need is between 400 to 600 watts of solar panels.
If you need to have some heavy electronic usage, such as a fridge plus other essential electronic devices and equipment, the watts you will need are between 3,000 to 4,000 watts.
But if you just have basic electronics in your RV, such as laptops, light, and a TV, you will need between 200-300 watts of solar panels.
So if a 100-watt solar panel can produce 30 amp-hours daily, this can determine how many solar panels you will need in your RV.
What can you run
Common appliances such as a light bulb, microwave, mini-fridge, and TV can run with solar on the RV. If you are an RV user that depends more on numerous electric appliances you may need to have a higher watt or additional solar panels installed.
Some can get by with minimal electric consumption, these people can use simple Led lightings, they charge their electronic devices, a heater perhaps, also water pump, and one to two hours of TV usage.
The other consumers can use additional electronics such as a crock-pot, small fridge, toaster, and use the TV for four to five hours.
And then some RVers cannot get by without multiple TVs, a coffee maker that is usually on for hours, a large fridge, also a large microwave oven and an AC. They usually require high watts that can go beyond 600 watts.
There will be two types of appliances or items inside your RV. One that will run on AC power and the other on DC battery power. Also, you will have some things that can run on propane as well.
Propane is a great option for boondocking. Refrigerator, furnace, stove can run on propane. Refrigerator can also work on DC battery or generator AC power.
With solar you will be basically storing the power in battery which can be directly used or you can convert it to AC via an inverter.
We run our 48 inch TV on inverter for around 2-3 hours daily on solar. Plus we also charge mobiles, laptops using the pure sine wave inverter. We also run other appliances that run intermittently for very short period of time like crock pot, egg boiler.
We do not run bigger high consumption appliances on inverter like the hair dryer, microwave or toaster. These appliances have higher watts consumption and also run for little longer. AC again is high watts consumption appliance.
For these we utilize our portabel generator. Thats the best option.
The solar charged DC battery powers various components in our RV. The LED lights, multiple fans in bedroom, kitchen, bathroom are powered by battery. The DC battery also provides power for carbon monoxide detector, furnace, refrigerator, stereo and few other items.
To summarize, solar is good enough to run most of the appliances in RV except for air conditioner, Refrigerator, microwave, hair dryer and other high watts long running appliances.
Can you run Air conditioner
Air conditioners in RV run on generator or the campground electricity connection. Its not practical to run them on battery. Therefore most RVers will have generator to run the AC when boondocking.
A inverter will convert the DC power from battery to run some of the appliances but its not really for the bigger appliances like air conditioner which need more watts.
Also Read : Average watts consumption by RV Air conditioner How Many watts do RV furnace consumes Average watts requirements of RV
To run a 13,500 BTU air conditioner you will need at least 2000 watts for starting and 1500 watts for running. To produce that many watts you will need bigger inverter probably more than 2500 watts. Usually, the inverter that you get for RV range between 1000 to 2000 watts.
So, to answer the question, yes it is possible to run the Air conditioner on battery power but not an ideal or practical way.
What about lithium batteries and a solar combination
Lithium batteries can be used much longer and without affecting their long term operations. But, even with such batteries you are looking at a lot of batteries. For example, say you want to run the air conditioner for around 6-8 hours, you would need 6-8 batteries delivering 100 AH.
And with these many batteries the weight will also be high. Each of these 100 AH batteries will weigh a minimum of 50 pounds and with 6-8 batteries it will be close to 250 pounds. That’s with the weight.
Cost again is going to shoot with those many batteries. One word. Not practical.
Get a generator that is good enough to power your 13500 BTU or even 15000 BTU air conditioner.
Setting-up your rv solar panels
You can either have a professional do the installation of the solar panels for you or if you are more of a DIY person and can tinker easily with the tools you have, you can set up the solar panels yourself.
Before you buy your solar panels, consider how many watts you will need, and from there, you will know how many solar panels you should purchase.
Since there are also sellers of solar panel kits willing to help with their buyers, it would be best to ask for advice and tips from these sellers.
Before you go home and bring your solar panels with you read the instruction that comes with the solar panel kit so you will understand the step-by-step process of installation.
Check what they include in your solar kits as the screws, brackets, and solar cable connectors for your panels should be there. Adhesives are also a must, ask the seller if they have any available.
Important steps in installing
You need to measure your roof, then the panels, but first, conclude the panel layout that you prefer. You need not waste time on bringing everything up on the roof while you don’t have the measurement in place yet.
Make sure you are placing the solar panels away from A/c units, TV antennas, or coverings of the vent fan. You need to keep in mind about shades and shadows, which can hamper your solar panel from absorbing solar energy.
Measure the solar cable as it should not be over twenty-five feet from the solar panel directly to the battery bank, ensuring that you don’t have a cable that is too long will prevent loss of charging power.
The gauge should not be smaller than ten gauges, choosing a larger, and thicker wire may benefit you more since there is a better power transference.
Do not forget to purchase an amp breaker as well. You can either wire your solar panels in parallel or series. Installers may also assist you on this one as they know more about the benefits of having the solar panels in parallel or series.
Make sure that your solar panel installation is watertight around the edges.
Solar controller or remote for your inverter will make things a lot easier for you when you need to monitor battery charging. Remotes should also be accessible.
Where to install them
You can either have it installed on your RV roof or just buy a portable and easy to place on the ground solar panel.
Having your solar panels on your RV roof can be helpful and disadvantageous at the same time. Beneficial because you don’t need to keep on placing it on the ground just to absorb the sun’s rays as it is just sitting there on your roof doing its thing.
We have our solar panels installed on the roof. The reason why we did that is because:
- You don’t have to pack and unpack the panels every time you are set for the camping. The panels rest there at the top and provide the power needed.
- The exposure to sun is maximum at the top of the roof. Sun is all you need for your panels so that works great.
- Your panels are safe. Less likely to be stolen wen they are there at that height.
- It isn’t taking your storage space. Roof otherwise would have been empty and underutilized anyways.
- Not much efforts when you have them on the roof. We do have brackets installed for titling them wherever needed though. Its not much of effort though. We did our own brackets instead of going for solar kits. It saved money for us. You can either build your own or for solar kits that are much easy to install. The cost would be higher though.
The negative aspect of having your solar panel on the roof is you tend to forget to clean them, and hence it makes the solar panel less effective.
Another drawback is that it needs space on your roof, and with that, if you need to take a peek atop your roof, make sure that you don’t step on the solar panels.
Solar panels that you can place on the ground are manageable, and you can tilt them to face the sun at an angle. With it being portable, you can also clean it more often.
However, since it is a portable solar panel, you need to set it up all the time and find a fitting spot to place it on.
It is ideal also for those RVers with only a small electricity consumption, with powerful winds portable solar panel can topple over or can also be run over by other vehicles in cases of untoward incidents.
A great idea to deal with where to place them is actually to employ both. Yes, get the basic setup done on the roof and have folding panels that can setup on the ground whenever the need arises to boost the power.
Basic Working
The solar panels absorb the sun’s rays, transform the energy from the sun to create electricity, and recharges your RV battery. Learn here on how the solar charges the DC battery in your RV.
The weather is not always ideal, so a sunny camping spot can do the trick, and your solar panel’s clear line directly to the sun is a must.
The battery bank in your RV saves the electricity that is being formed by your solar panels. The Power inverter then converts the power from the direct current, which is from the batteries to be used to power RV electronic appliances and devices.
With the charging of your RV batteries, there is also a danger of overcharging, so an automated switch must be installed to control the flow of solar energy into your RV’s battery. This is a must to maintain safety in your RV.
Issues you may face
Some RV users find it expensive to buy and also not a breeze to install. Although there are professional installers available, they are not keen on paying more to have it installed after paying thousands to purchase solar panels.
Also, issues with buying the components separately for those who are just saving up enough money to complete their solar panel set, there is the issue of incompatible components, so it can also bring in some additional stress for the RV users.
Other RVers don’t have the patience to learn about the ins and outs of having solar panels . Thinking of how many panels to install, checking their electronic usage, and managing the overall solar panel system is taxing for others.
Worrying about not getting enough electricity from the solar panel is another thing, if they veered too far where there are not enough sun rays or there are shades where they parked, or the weather is not just ideal is another concern for RV users.
Repair and Maintenance is another issue for RV owners. On top of having to maintain their RV and spend money on repairs, there is also the issue of solar panels bogging down and can be daunting for others to even think of.
There are also solar panels getting stolen , such as the portable solar panels that you place on the floor, this is another consideration of RV users that makes them think twice about getting their RV installed with a solar panel.
Its important to have efficient panels because the more panels you get more will be the area occupied on the roof. Your roof may not be able to accommodate many panels. So, get the ones that are compact and efficient, that is what we have done too.
Monocrystalline panels are more efficient as compared to polycrystalline panels. Check all the advantages and disadvantages for Monocrystalline and polycrystalline .
Best Solar Panels you can buy
Before we look into which are your best options in this space lets check out some of the important things to look for.
Efficiency : This is the main aspect that you should focus on. High efficiency is important because otherwise you will end up having those panels that will belying there and just taking up the space.
Weight : Be sure you aren’t buying those bulky ones out there. Weight is critical when you talk about anything related to RVs.
Design : When buying a solar kit be sure to have a design that will facilitate the ease of use and yet give you option like tilting, folding and less weight. Its should reliable and easy to setup or install.
Cost : Installing solar can be high on cost. Its going to be free after you install though. But, to get quality panel kit you may have to spend a little higher specially if you want better design and features. Look for value for money rather than saving on money. Its going to be free for life after you install. If you are full timing with RV then you need to consider this fact into consideration.
Brand/Quality : Obviously this has to be taken into account. Solar is a emerging thing and you don’t want to spend your money on something that will stop working or become less efficient with time.
1. Renogy Solar Power Starter Kit
This includes monoscrytaline 100 watts 12 Volts panels. This is a highly rated solar kit that is used many RVers. It weighs around 16 pounds. It provides an ideal output of around 500 wh per day and fully charge a 50Ah battery in around 3 hours (from 50%).
The panels can last very long due to the aluminum frame that is corrosion free. Making the panels great for outdoor use. These are great for RVers who are just starting due to the easy installation.
The full package include all the necessary tools. It include a 100 W 12 Volt monocrystaline panel, renogy wanderer 30A PWM charge controller, mounting Z brackets, adapter kit and tray cable.
2. Renogy Monocrystalline
This panel is multi layered that provide improved performance and also last very long. They have corrosion resistant aluminum frame which facilitates better durability. Other features include better transparency and low iron tempered glass.
Their weight is also on lower side. They weigh around 16.5 lbs. The bundle kit include 100 w 12 V monocrytaline panel, adapter kit, charge controller and extension cable. Its a value for money product and great for new RV owner for boondocking.
3. WindyNation Complete
This include a polycrstaline panels weighing around 19 pounds. Other components in the package are 30 Amp controller with battery temperature sensor, connectors, solar mounting hardware and the manual.
It provides clean renewal solar power and the panels are quality built/ This too is great if you are just starting with solar for your RV. Its a perfect solar kit to get back up power in your camper.
In Conclusion:
Solar for Boondocking or even for RV in general is a great option to go to. Its a clean and free energy. Overall the advancements have made it easy to install and use. The efficiency is also much better and you can certainly rely on it.

You Might Also Like

Why do RV Roofs Leak? And How to Fix it

Tankless water heater for rv – things you need to know

13 Best Small Camper Trailers With Bathroom

Is Allstays App Worth For RVers? (Honest Review)
Solar For RVs: The Ultimate Solution To The Best Solar Setup
We believe we have found the perfect RV and solar combination! Having solar for our RV is always important to us as we like to have the freedom to boondock and go without shore power. It is an RV upgrade we always recommend and a top 5th wheel accessory to add to your rig.

Now getting solar on your rig isn’t always an easy process…until now.
Table of Contents
Keystone RV Solar Prep

Have you heard that Keystone Montana and Keystone Montana High Country rigs come with a full-on solar prep. I mean a legit solar prep. Not just a 2 prong plug that accepts a portable solar panel and a sticker on the side of the rig that says it is solar ready, but a true pre-wired setup from your roof to your batteries meaning that half the work is done for you as soon as you buy the RV.
On the roof of the Montanas, there is an MC4 connector for both the positive and negative wires that would come from the solar panels for your RV. This connector is fully weather proof and sealed nicely to prevent any water from seeping in. The connector is then pre-wired through the coach into a storage bay where the solar charge controller can be installed.
The fact the wire is done in the factory when they’re building the coach and it doesn’t have to be snaked down the wall or holes drilled in your rig is a game changer. This is definitely the hardest part when doing a solar install. Plus it makes it easy to install the solar panels.
From that area in the storage bay, 2 other wires are there that are pre-wired to the battery bay. Again, having the wires already run is great. There is also a communication cable that goes from the solar controller area to an inside cabinet in the coach so you can easily install a remote display to monitor the charge controller.
This is huge and makes the process of actually installing the solar system components that much easier.
Future Solutions Solar Install

Now you have the rig and you have the solar prep, but what about the solar? This is where Future Solutions in Elkhart Indiana come into play!
They are experts in RV solar and really take the time to talk to you and understand your lifestyle and what it is that you want to be able to do with your solar setup. This isn’t a “rush and get it done” conversation. This is a “let’s put time and effort into the planning phase” conversation so they really figure out what you need.
Let’s face it, installing a solar system on your RV is a pretty big investment. Depending on how big of a system you go with, it can be a major investment. Future Solutions realizes this and wants to be sure you are investing in the right configuration and components for your lifestyle. This way when you hit the road and put your brand new system to use, you know exactly what to expect.
Future Solutions also works closely with Keystone. This makes the install process even smoother. They know Keystone rigs inside and out, literally. Now, if you have a rig that isn’t a Keystone, don’t worry, they can work with any rigs out there and have been up-fitting them for years. The Keystone solar prep just helps make the process go quicker and in-turn, cost less.
Keystone SolarFlex
One really cool thing is that Keystone does offer a factory option called SolarFlex for their Montana High Countries. You can get a fully warranted solar set up from the manufacturer right off the factory floor that comes with:
- 1 300 watt solar panel
- Jaboni 30 amp MPPT charge controller
- 2000 watt Magnum pure sine wave inverter
- 4 pre-wired inverted outlets
Future Solutions Custom Solar Install
In our case we needed something more than that, so we went with a custom configuration from Future Solutions. We have 4 kids who all have PC’s, laptops, phones, etc. We also work from the road on our laptops and with having a big family, we just use a lot of power.
Our 335BH Montana High Country also has an 18 cubic foot energy efficiency residential fridge. That meant we would need more battery capacity and solar capability to keep the fridge running when we were boondocking.
We talked to Future Solutions after getting our Montana to kick off the discussion on what we could do to get a solar set up to meet our needs. After describing what kind of rig we had, our power needs and where we plan to boondock, they had a good idea of the system we’d need.
Of course with our full time travel lifestyle, we were only planning on being in the Indiana area for a few days. Since it was summer of 2020 when RV’s were literally flying off the lots, Future Solutions was pretty slammed with work. However, since we had the solar prep from Keystone and since Future Solutions is awesome, they squeezed us in to get a preliminary setup installed with the plan of us coming back when we had more time and expand on that preliminary setup.
We drove the rig to Elkhart, Indiana and met with Matt Wolkins, Josh Atwood and Courtney Harris to get the install kicked off. They have a state of the art facility where your RV is parked inside their shop, secure and out of the elements while it’s being worked on.

We left our RV there for about 2 and a half days while the work was being done. We opted to upgrade our battery bank from 2 lead acid RV batteries to 4 Battle Born lithium ion batteries . This basically increased our battery capacity ten-fold without adding much additional weight. Each of the lithium batteries have a 100 amp hour capacity.
We also upgraded the inverter from the factory installed 1000 watt inverter (used to only power the fridge) to a 2000 watt Magnum MS2000 inverter/charger unit. This inverter is enough to power the fridge along with a several outlets in our rig. Talking with Future Solutions, we wanted to be sure a few outlets in the rig would work off the inverter.
Due to our time constraints, we knew they wouldn’t be able to wire the whole coach, but they were able to tap into the GFI circuit to power it off the inverter. Lucky for us, there are quite a few outlets in our RV that are on that circuit. This inverter is also used as a charger, so it can be programmed to the specific voltages the lithium batteries need when they’re being charged off shore power.
Solar Panels

Up on the roof, we had 2 300 watt panels installed. Along with a Victron MPPT 100 volt/50 amp charge controller to regulate the panels. These 2 panels were installed very easily thanks to the pre-wiring done by Keystone. It made the panel setup simple and all that was really needed was mounting hardware and to plug them in. We know this is something we will be expanding when we head back to be able to charge our batteries faster, but for now, the 600 watts is great.
When the sun is shining, this setup will pull in about 500 watts. There are a lot of different solar panels for RVs. We went with the JPP solar panels.
The Victron controller has a really great app that you can connect to via Bluetooth. With this, I can monitor our usage and adjust any settings right from my phone. A Victron SmartShunt was also installed so I can see a very accurate state of charge for the batteries, which is nice to keep an eye on.
Future Solutions told us that with the Keystone Solar Prep we saved hours on the solar install.
We couldn’t be happier with our experience with both the Keystone solar prep and the the job Future Solutions did to get our solar system installed. We have a great system currently installed. And we are looking forward to expanding that set up to power even more in our rig including being able to run the air conditioner!
Plus while we were out traveling, the Future Solutions team was amazing at customer service. They were consistently available to answer any questions that we had. This part is so important to us. We want to be sure we understand our system and that it is working the way it should!
Our Solar Install
Summary of what we had installed:
- 4 BattleBorn GC2 Lithium Batteries
- Magnum Remote Display
- Magnum MS2000 Inverter
- Victron MPPT Solar Controller
- Precision Circuits Battery Guard Auto
- JPP Solar Panels (2X300W)
Future Solutions is a great choice for getting solar power system setup on your rig. They are total professionals and have a ton of knowledge when it comes to solar energy and the construction of RV’s. They’re a great choice for your solar install!
Pin This Post:

More RV Content:
Keystone Montana – 7 Owners Share What They Love About It
RV Living – 68 Things You Will Want To Know [Free eBook]
40+ Helpful Tips For Planning An RV Trip
The Ultimate RV Packing List To Make Your Trip A Success
Fun And Simple RV Remodel Ideas For Your 5th Wheel
- Recent Posts

- 26 Epic Things To Do In Key West [Including Where To Stay] - March 18, 2024
- Top 11 Best Beaches In The Florida Keys [Map Included] - January 16, 2024
- Why AN RV Slide Topper Is An Amazing Accessory For Your RV - November 30, 2023
DISCLOSURE : This post may contain affiliate links, meaning I get a commission if you decide to make a purchase through my links, at no cost to you. Please read my disclosure for more info.
- Deals and Promotions
The best RV solar panels of 2024
Use the sun to your advantage with these rv solar panels.
Autoblog may receive a share from purchases made via links on this page. Pricing and availability are subject to change.
Whether taking an RV on a camping trip or spending some time off-grid, you’ll need something to keep your appliances running. With the help of an RV solar panel kit , you can have electricity almost anywhere you find yourself. Once the panels are set up in direct sunlight, plug them into a portable battery or power system and give it time to charge. Solar panels can be used to operate your lights, refrigerator, water pump, or any other electric appliances depending on the power of the panels. Here are the best RV solar panels available at Amazon.
Renogy 2PCS Solar Panels 100 Watt 12 Volt - $175.99 (26% off)
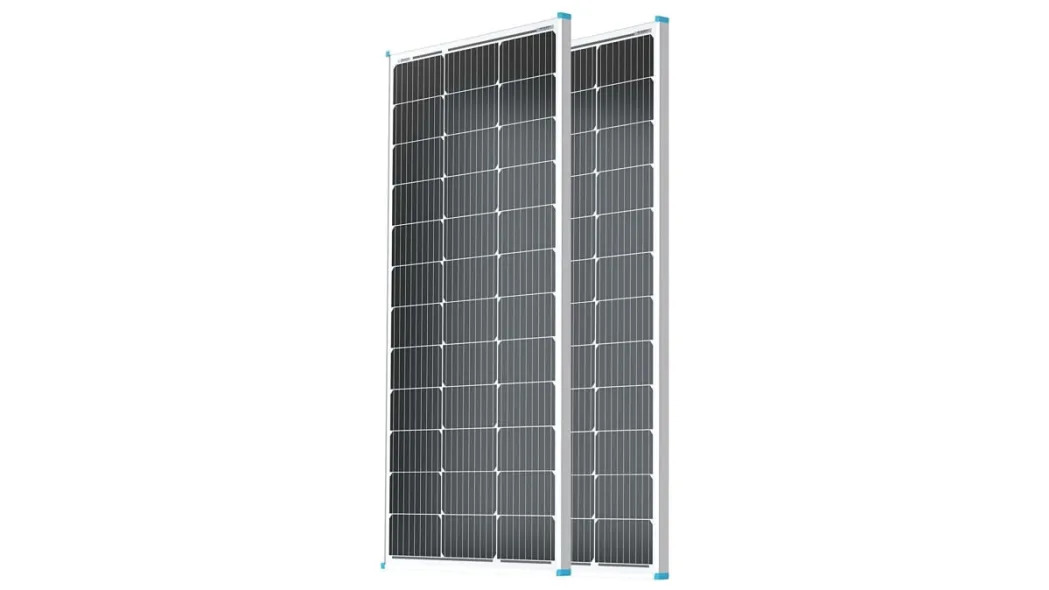
$175.99 at Amazon
Key Features
- Compact and powerful design
- 500Wh of power per day
- Durable aluminum frame
- 3.2mm low-iron tempered glass
- 5-year workmanship warranty
These Renogy Solar Panels have a compact design that provides a lot of power. They are made with 3.2mm low-iron tempered glass and have a durable aluminum frame. These panels can deliver up to 400Wh of electricity per day on average depending on how much sunlight is being received. A 5-year workmanship warranty is included with your purchase.
ECO-WORTHY 200 Watts 12 Volt/24 Volt Solar Panel Kit - $154.99 (18% off)
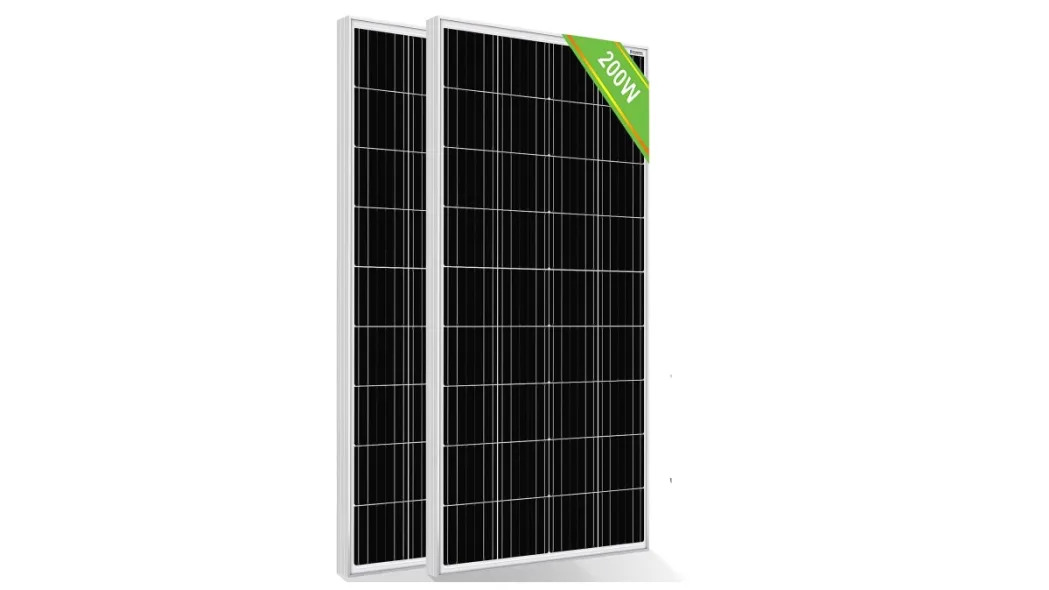
$154.99 at Amazon
- Includes 2 panels
- 800Wh output per day
- High-efficiency monocrystalline cells
- Aluminum alloy frame
- 30A PWM Charge Controller
- 1-year warranty
The ECO-WORTHY 200w Solar Panel Kit can supply up to 800Wh per day with the proper amount of sunlight. It’s made with highly efficient monocrystalline cells and an aluminum alloy frame that has an IP65 waterproof rating and is rust and corrosion-resistant. There is a 1-year warranty and 24/7 tech support included with the purchase of these panels.
ALLPOWERS SP035 200W Portable Solar Panel Kit - $229.20 (w/ 40% off digital coupon)
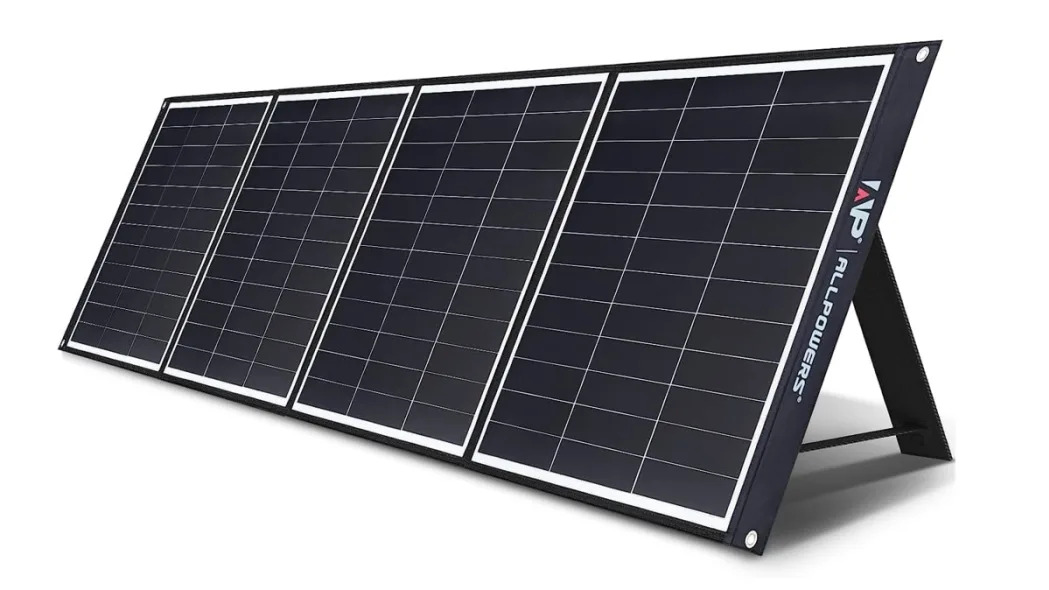
$229.20 at Amazon
Key Features
- Monocrystalline solar cells
- IP67 waterproof rating
- Adjustable kickstand
- Compatible with most solar generators and portable power sources
- 18-month warranty
The ALLPOWERS SP035 Portable Solar Panel Kit is made with monocrystalline cells and ETFE (ethylene tetrafluoroethylene) material which can survive extreme hot and cold temperatures and is corrosion resistant. It has an MC-4 output that delivers 25A and a DC port that carries 10A. These panels come with an 18-month warranty.
DOKIO 160W 18V Portable Solar Panel Kit - $151.45 (11% off)
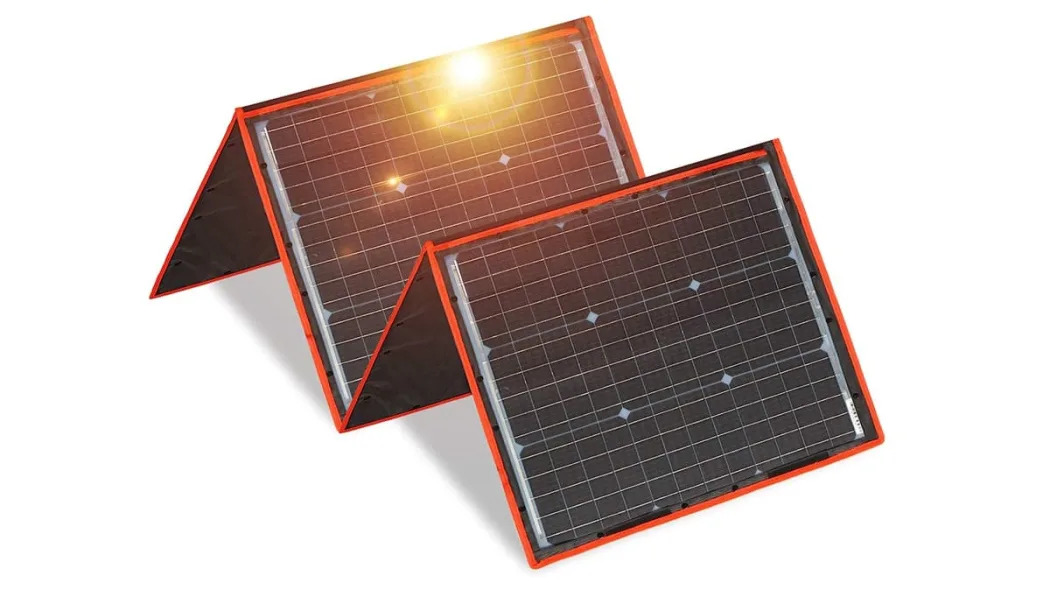
$151.45 at Amazon
- IP65 waterproof rating
- Foldable and portable
- Compatible with many portable power stations
The DOKIO 160w 18v Portable Solar Panel Kit comes with folding solar panels that are lightweight and weigh only 9 pounds. These panels have 160w of power and are compatible with most portable power stations. They have an IP65 waterproof rating and have added protection to prevent overloading, overcharging, and short-circuits. A 30-day money-back guarantee and 1-year warranty are included with your purchase.
EF ECOFLOW 220 Watt Bifacial Foldable Solar Panel - $549.00 (15% off)
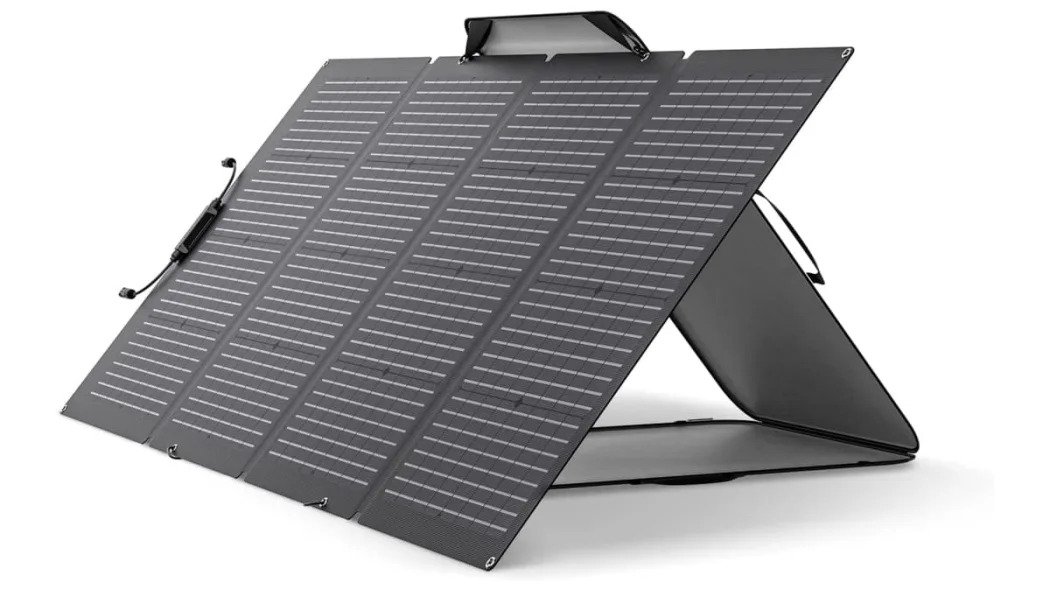
$549.00 at Amazon
- 1.5mm One-piece tempered glass
- 220w front side
- 155w rear side
- IP68 waterproof rating
- Energy conversion rate up to 23%
- High-efficiency monocrystalline cells
The EF ECOFLOW 220 Watt Bifacial Foldable Solar Panel has 220w on the front side and 155w in the rear. It’s made with a 1.5mm one-piece tempered glass and high-efficiency monocrystalline cells. It has a IP68 waterproof rating, IP ratings are given to electronic devices to test how much resistance they have to water and other elements.
How to choose the right solar panels?
When figuring out which solar panels to buy, consider how many appliances you use in your camper and find panels with large enough power outputs to keep your appliances running. Another thing to consider is how often you will be using your solar panels and if the purchase is worth it to you.
What are the benefits of solar panels?
Solar panels offer many amazing benefits. The most important being one of the cleanest ways to collect renewable energy and the sun will always be there to use its energy during daylight . They are also easy to use. Once they are set up just let them sit and plug in any batteries you need to charge then let the sun do its thing. They also last a very long time if kept in good condition. According to Renogy, “Adding solar panels to any home, RV or van is a smart investment that enhances its value, as most solar panels can last up to 30 years”.
Are there any disadvantages of solar panels?
One downside to solar panels is the cause, sometimes the kit you buy isn’t enough power and you may need to buy more. Another downside is they will struggle in overcast conditions and aren’t very effective during sundown.
See our other guides to the best RV products
- The best RV mattress options
- Best RV covers
- Best RV battery options
- Best RV roof sealants
- Best RV generator options
- Best RV tankless water heaters
- Parts and Accessories
- License License
- Facebook Share
- Twitter Share
- Tumblr Share
- Twitch Share
- Flipboard Share
- Instagram Share
- Newsletter Share
- Youtube Share
- Feeds Share

Popular Vehicles
Popular new vehicles.
- 2023 Ford Bronco
- 2023 Toyota Camry
- 2023 Toyota Tacoma
- 2023 Ford F-150
- 2024 Toyota RAV4
- 2024 Ford Bronco
- 2023 Jeep Wrangler
- 2024 Toyota Camry
- 2024 Lexus GX 550
- 2023 Toyota 4Runner
Popular Used Vehicles
- 2022 Ford F-150
- 2021 Jeep Grand Cherokee
- 2022 Toyota 4Runner
- 2022 Honda Accord
- 2020 Honda Civic
- 2014 Chevrolet Silverado 1500
- 2014 Honda Civic
- 2018 Chevrolet Camaro
- 2014 Honda Accord
- 2021 Toyota Tundra
Popular Electric Vehicles
- 2023 Tesla Model 3
- 2017 Tesla Model S
- 2016 Tesla Model S
- 2024 Rivian R1T
- 2023 GMC HUMMER EV Pickup
- 2022 Tesla Model 3
- 2023 Rivian R1T
- 2024 Tesla Model 3
- 2020 Tesla Model 3
- 2024 GMC HUMMER EV Pickup
Popular Truck Vehicles
- 2024 Chevrolet Silverado 1500
- 2024 Chevrolet Silverado 2500HD
- 2024 Toyota Tacoma
- 2024 Ford F-150
- 2023 Toyota Tundra
- 2023 Chevrolet Silverado 1500
Popular Crossover Vehicles
- 2023 Ford Bronco Sport
- 2024 Honda CR-V
- 2024 Hyundai Santa Fe
- 2024 Chevrolet Trax
- 2024 Honda Pilot
- 2023 Toyota RAV4
- 2024 Subaru Outback
- 2024 Kia Telluride
Popular Luxury Vehicles
- 2024 Porsche 911
- 2024 Lexus RX 350
- 2024 Land Rover Defender
- 2024 Land Rover Range Rover Sport
- 2014 Mercedes-Benz C-Class
- 2021 Lexus RX 350
- 2022 Lexus IS 350
- 2024 Mercedes-Benz GLC 300
- 2023 Porsche 911
Popular Hybrid Vehicles
- 2023 Ford Explorer
- 2024 Toyota Sienna
- 2022 Ford Explorer
- 2024 Toyota Tundra Hybrid
- 2024 Toyota RAV4 Hybrid
- 2023 Toyota Sienna
- 2024 Ford Explorer
Popular Makes
Featured makes, product guides.
- The Best Electric Bikes
- The Best Car Covers
- The Best Portable Air Compressors
- The Best Car GPS Trackers
Choose a Display Name
Please enter a display name

Sign in to post
Please sign in to leave a comment.

Solar Powered RV: How To Run Your Camper Off Solar
O ne of the greatest things about RV travel is the ability to go off-grid and totally immerse yourself in nature. The thing is, you will eventually run out of battery power doing so. Many people turn to generators to solve this problem, but generators are noisy and are not even allowed in some areas. You certainly don’t want to be running one 24/7, either.
For this reason, we much prefer the idea of creating a solar powered RV for your boondocking adventures.
The only problem? Many people are intimidated by the idea of putting solar power on RV campers. This is understandable; putting solar power in RV trailers and motorhomes can be a huge, expensive, and technical process. Fortunately, there are ways to make solar powered RVs more accessible to the average joe.
In this article, we will teach you how to run your RV off solar, breaking the process down and simplifying things so you can tackle the project with confidence.
Note: This is a very simplified version of an RV solar power system. There are many things you can do differently to make the system work best for you, but this will get you started.
THIS ARTICLE MAY CONTAIN COMPENSATED LINKS. PLEASE READ OUR DISCLAIMER FOR MORE INFO. THIS POST WAS WRITTEN BY JILL GREISING-MURSCHEL , A FAMILY TRAVEL AND RV LIVING EXPERT.
Don’t have time to read a bunch of RV travel posts and reviews? Here are some of our top picks for RV living:
Our Favorite RV Resources:
- Ultimate RV Living eBook
- Harvest Hosts : (save 15% off your first year and stay overnight at one of the many farms, breweries, and wineries across the country)
- Romely Insurance – (sign up for full timer’s RV insurance and save big)
- Rent An RV With Outdoorsy – (the Airbnb of RVs)
- CampScanner – (Snag reservations at sold-out campgrounds!)
- RV Sheets – (Camping World Queen Short sheets made just for RV mattresses)
- Best Sewer Hose – (popular sewer hose for RVs)
- Best RV Vacuum – (small but mighty vacuum)
- Berkey Water Filters – (the travel Berkey is used by so many RV owners to get clean drinking water)
How to Run Your RV Off Solar: What You Need
First, let’s talk about the RV solar supplies needed to get your off-grid electrical system up and running. Gather these items and you’ll be ready to jump into your solar project.
Solar Panels
First, you will want to grab some solar panels. Many people put a lot of thought into figuring out how many panels to buy based on their electricity usage. Our advice? Skip the complicated math for now and simply get 2–4 panels, depending on what your budget can handle. It’s easy to add more panels down the line.
We recommend this kit from Renogy , as it is incredibly easy to install and get wired into your system.
Charge Controller
Another must-have piece of RV solar equipment is your solar charge controller. Without a charge controller, you can’t really connect your panels to your battery safely. The panels linked above come with a controller, but these components can be bought separately from one another if you prefer.
We recommend an MPPT charge controller over a PWM option because it will be a bit more efficient. However, either one will be fine as long as you get one that can handle the amperage put out by your solar panels.
You’ll also need a bank of batteries in order to store the solar power your panels pull in. This may leave you wondering which is the best battery for RV solar.
In our opinion, the best battery for a camper is definitely a LiFePO4 (lithium-ion phosphate) battery. Fortunately, these are becoming more and more affordable as time goes on, and in our experience, even off-brand lithium battery options such as these work just fine.
We like lithium batteries because they are 100% maintenance-free, relatively lightweight, and can be discharged completely without issues. They are also far safer to store in enclosed spaces where there’s little ventilation.
That said, if you need to cut costs somewhere, traditional flooded batteries should work fine, assuming you have the weight capacity and the ability to stay on top of battery maintenance, as well as a safely ventilated place to store them.
We also recommend investing in an inverter. As long as you connect your battery bank to your RV, you can use your solar power via your RV’s DC electrical system, which includes your fridge, lights, and vent fans. However, without an inverter, you will not be able to use anything on the AC side of things—meaning the air conditioner, microwave, and power outlets.
There are a couple of options here: You can choose to purchase a large inverter charger (see next paragraph) to take the place of your existing RV converter and wire the new inverter into your RV’s breaker box, or you can choose a smaller portable inverter that you will need to plug things into directly. There are also inverters that do not charge the batteries but can be hardwired into the RV’s system.
We personally chose to install this inverter charger from Sungold , and it is very convenient when it works correctly, as it automatically switches between inverter mode and charger mode when we connect/disconnect shore power. Unfortunately, the inverter broke after only a month of use, meaning we couldn’t use the inverter or charge our batteries for a couple of months while we fought the warranty folks to fix our issue. Because of this, we kind of regretted this choice and don’t necessarily recommend this product.
On top of the troubles we had with our inverter charge, installing such an inverter is a bit more advanced. Therefore, for this article, we will be focusing on using a more basic inverter such as this one .
No matter what inverter you buy, make sure it is a pure sine wave inverter rather than a modified sine wave version. (If you buy a small inverter from, say, AutoZone, chances are it will be modified sine wave and of no use for this application.) You will also need to make sure your batteries can provide enough power to get the inverter running. Three 100 amp hour batteries are just enough to run our 3000-watt inverter.
Related post: 34 RV Must Haves
Breakers and Wires
You will also need some breakers and wires.
These include:
- Battery cables — Bigger is better, so we went with 4/0 gauge wiring for our bank of three 100-amp-hour batteries.
- DC circuit breaker — This goes between the solar panels and the charge controller. Choose the amperage accordingly. If you’re installing the two 100-amp-hour panel kit linked above, this 25-amp breaker will work.
- Manual reset inline fuse/circuit breaker — This goes between the charge controller and the battery. Choose amperage accordingly. If you’re installing the two 100 amp hour panel kit linked above, this 40 amp breaker will work.
- Wiring from the solar panel kit — You might need to add additional 10-gauge wire depending on the length of the runs.
Creating Your Solar Powered RV Setup
Now that you have all of the things you need, the next thing to do is actually install your solar power for RV living. We’ve tried to keep everything simple and provided easy-to-follow instructions below.
Related Post: Pros and Cons of RV Living Full Time
Create Your Battery Bank
The first thing you will need to do is get your battery bank hooked up and ready to go. If possible, choose a place that is near the location of your factory-installed battery in order to make it easy to tie the new bank into the RV’s DC system. Connect the batteries together in parallel using the battery cables mentioned above.
This video will help you do that:
From there, you will just need to connect the battery bank to the RV’s electrical system using the same cables that were used to hook up the old batteries, using the positive post on one end of the bank and the negative post on the opposite end. If this is not possible due to the location of the battery bank, you will need connect the bank to the RV’s fuse panel, which is a bit more complicated.
How to Mount Solar Panels to RV Roof
The next thing you’ll need to do to install solar power for an RV is learn how to mount solar panels to RV roof.
Start by figuring out where you will mount the panels. Clean the area well. Attach the brackets included in the panel kit to the panels using the included screws. Place the panels on the roof—ideally with the brackets resting on top of frame studs—and create pilot holes using a drill. Move the one panel out of the way, put RV roof sealant in each pilot hole, replace the panel, screw the panel onto the roof, and cover the screw and the bottom of the bracket in sealant. You can completely coat the top of the bracket with sealant as well if you want more peace of mind.
Repeat this process with all other panels you install, then give the sealant a day or two to fully cure.
Connecting the Panels to the Charge Controller
Using the included cables, plug the panels into one another using the instructions in the video below. We recommend connecting them in parallel rather than series.
Next, run your solar panel cables into the RV to the place where your charge controller will be mounted (Preferably near the battery bank). Many people will drill a hole in the roof, but we just ran the cable through a gap in our slide seal, using cord covers to keep everything tidy and in place. You could also go through an existing hole in the roof.
Connect wires to the DC breaker, add a wire of the same size to each side of the breaker output, and connect these wires to the charge controller using the instructions included in the kit. Be sure you screw them down tight, but be careful not to overtighten as this can irreparably damage the inserts.
Linking the Charge Controller to the Batteries
Run a 10-gauge wire from the positive output of the charge controller to the inline fuse/breaker and then to the battery bank, connecting the positive to the same positive terminal/post you used to connect to the DC system. Do the same on the negative side but without the breaker in the middle.
Once this is done, your solar panels should be charging your batteries and you will officially have an RV with solar power. If you wish to be able to monitor your battery charge level, we recommend a battery monitor. We have this one from Renogy and it has served us well.
Adding an Inverter to the Mix
The last step in creating your solar powered camper? Your inverter. As mentioned above, an inverter is not entirely necessary, but it sure does make your solar RV power system more usable, and the GIANDEL product linked above is incredibly easy to hook up and use.
All you have to do is connect the cables from the positive side of the inverter to the main positive post on your battery bank and do the same with the negative.
From there, you can choose to plug anything you need to use directly into the inverter, or you can plug the entire RV into the inverter using a 20-amp adapter. Plugging the RV in will allow you to use your outlets and possibly your microwave (depending on the inverter chosen and your microwave’s wattage). If you have a soft starter installed on your RV air conditioner, you may also be able to use that (though it will drain your battery bank very quickly). Keep in mind, you won’t be able to run everything in the RV at once.
If you prefer an inverter charger, you will need to learn how to hardwire it in. Many RVers seem to like the Victron inverter charger .
There you have it, everything you need to know to create a very basic solar powered RV setup. If you’ve been dreaming of having RV solar, why not order the supplies you need and get started right away? You won’t regret it!
The post Solar Powered RV: How To Run Your Camper Off Solar appeared first on Let's Travel Family .

IMAGES
VIDEO
COMMENTS
Getting Started with RV Solar Before we start, it's important to note that the specifics of your setup will depend on your rig and solar kit—what type of panels you have (flexible, rigid, etc.), your roof size and type (flat, curved, fiberglass, rubber, etc.), whether you have an RV or a trailer, where your battery bank is located, etc. Be sure to consult the instructions provided with any ...
Solar system parts. The most basic RV solar system comes with three main parts: solar panels, a charge controller, and a battery bank. RV's that are solar-ready typically come with pre-installed wiring but not the components.. Pre-built RV solar panel kits are a good way for beginners to purchase a semi-complete system that comes with compatible parts. ...
Mount the RV solar panels to the roof using the parallel or series method. Attach the charge controller to the RV's interior near the battery bank. Run wires from the solar panels to the charge controller with a circuit breaker or fuse. Connect the charge controller to the battery bank. Then, connect the solar panels.
You have two options to consider when choosing solar panels for your RV or camper. 1) Portable RV Solar Panel System. A portable RV solar panel system is the easiest to set up and use. These systems typically plug into a dedicated solar plug on your RV and include one or more 100-watt solar panels that can be attached to your roof with Velcro ...
Here are the steps to connecting your solar panels to your batteries: Mount your solar panels on the roof of your RV. Mount your charge controller inside the RV as close to your batteries as possible. Run your wiring from the solar panels into the RV and over to the charge controller. (You can run your wiring through a refrigerator vent or ...
The term Solar Array is an informal reference to a group of connected panels that make up a system — it is not a scientific term.. Photovoltaic Array. When exploring solar, you will encounter the term "Photovoltaic Array."Solar Array is a generic term that refers to the installation of solar panels.Photovoltaic Array is the scientific term used when describing power outputs and ...
Following excellent solar generators like the AC200P and the beastly EP500, Bluetti strikes back with a formidable portable solar panel kit that can make a perfect RV solar panel system.. On a bright su nny day, the Bluetti PV200 200W Solar charges my AC200P solar generator in about 5 hours.. If you're not big on DIY and mounting stuff, you'd be happy to hear that you can get these up and ...
Going with a polycrystalline RV solar panel setup can save you a few dollars on your solar setup. Rigid vs Flexible Solar Panels. One last kind of solar panel is the flexible solar panel also known as a "thin-film" panel. Your "classic" RV solar panels are hard and rigid. Just like the name says, flexible solar panels can be bent into ...
RV solar systems provide a renewable power source. RVs can produce their own off-grid electricity by installing solar panels and charging batteries directly from the sun. This energy independence allows travel to remote areas without electrical hookups. Solar panels are compact and travel-friendly.
3. The battery stores the charge as DC power which can be used to power your appliances even when the sun isn't hitting the solar panels. So, its not that when the sun isn't their at night you wont have solar energy for your use. The point here is its the batteries that will be powering your RV appliances.
A typical solar power setup for an RV will consist of solar panels, a charge controller, a battery bank, and an inverter. These components work together to collect, store, and convert solar energy into usable electricity for your RV's appliances and electronics. Some SRRV's can harness a rooftop system or a portable system.
Stepping up to a multi-panel 200-watt, 30-amp kit could easily double the price. To get a 200-400-watt system professionally installed, plan on spending $3,000-$5,000, while a 600-watt or bigger solar system typically costs $7,000-$15,000. Price depends on the application, components, battery type and labor involved.
A 50 amp plug has four prongs - two 120 volt hot wires, a neutral wire, and a ground wire - that supply two separate 50 amp, 120 volt feeds. A 50 amp RV can provide a maximum of 12,000 watts. Even with an adapter, your 30 amp RV plugged into 50 amps won't receive more power than the 3,600 watts it can handle.
The Renogy 400-Watt 12-Volt Solar Premium Kit comes with four 100-Watt solar panels and charge controllers. It also has the electrical wiring, fuses, and monitoring you'll need for your off-grid setup. This kit produces approximately 1.6 to 2.5 kWh of electricity per day, depending on the sun.
RV Solar 101: Everything you need to know about the typical RV solar charging set up. By far, the most common RV solar charging set up includes a couple hund...
The two 100-watt solar panels are rigid, but relatively lightweight at 18 pounds, and the included Z brackets and pre-drilled holes on the hardware make mounting easy atop any RV or van. The ...
Solar System to Power Off-Grid Adventures. To summarize, here is the equipment we have in our Class A solar setup: Solar Panels. Cable Combiner Box houses all solar panel output cables. Solar Charge Controller gathers and transfers energy from solar panels to batteries. Lithium-Ion Batteries.
Building a DIY solar setup for a Camper Van, RV , Truck Camper, or Travel Trailer requires quite a few parts to work in harmony. This blog post will lay out all of the individual components at a 101 level so that, by the end of the post, you'll have a good understanding on what the individual parts are, and a good direction to go to learn more about those pieces of your Camper Solar Setup.
The Professor shows how to run a 15k BTU RV air conditioner and other major appliances for free on solar when dry camping / boondocking off the grid in a RV ...
RV Solar is not as difficult as it might first seem. When you can understand RV electrical in the roles they play it is easier to understand how it all works...
Average watts requirements of RV. To run a 13,500 BTU air conditioner you will need at least 2000 watts for starting and 1500 watts for running. To produce that many watts you will need bigger inverter probably more than 2500 watts. Usually, the inverter that you get for RV range between 1000 to 2000 watts.
Precision Circuits Battery Guard Auto. JPP Solar Panels (2X300W) Future Solutions is a great choice for getting solar power system setup on your rig. They are total professionals and have a ton of knowledge when it comes to solar energy and the construction of RV's. They're a great choice for your solar install!
Basic Solar Panel System Install, including Inverter, wiring, Control Panel and Solar Panel.
Here are the best RV solar panels available at Amazon. Renogy 2PCS Solar Panels 100 Watt 12 Volt - $175.99 (26% off) $175.99 at Amazon. Key Features. Compact and powerful design; 500Wh of power ...
The ECO-WORTHY 200w Solar Panel Kit can supply up to 800Wh per day with the proper amount of sunlight. It's made with highly efficient monocrystalline cells and an aluminum alloy frame that has ...
O ne of the greatest things about RV travel is the ability to go off-grid and totally immerse yourself in nature. The thing is, you will eventually run out of battery power doing so. Many people ...