- Create account
- Assassin's Creed IV Visit old friends

Assassin's Creed IV: Visit old friends
- What links here
- Related changes
- Special pages
- Printable version
- Permanent link
- Page information
"Visit old friends" is an optional mission objective in Sequence 11 / Memory 01: To Suffer Without Dying
Walkthrough [ edit ]
There are 2 old friends for Edward to meet with. The first is found to the East of the second Alarm bell. Look at the cage nearby the building (close to the Animus Fragment). There you will find the first friend. Interact with them
The second found is found inside the prison. Make your way through the first few rooms. When you get to the first big room, look to the right of the entrance. You will hear rambling coming from that corner. There you will find another friend languishing in prison. Just hit the interact butt
- Assassins Creed 4 Black Flag
- Assassins Creed 4 Sequence 11 Mission Objectives
- Assassins Creed 4 Optional Objectives
- Rarity Guides
- Encyclopedia
- Modern Games
- Game Guides
Assassin's Creed 4: Black Flag Walkthrough Part 68 – Sequence 11 “To Suffer Without Dying” Part 2
- By Douglas Shepard (Editor in Chief, RarityGuide.com)
- Published 12/5/2013
- Rating: Unrated
Spread The Word
- del.icio.us it
- Yahoo! this!
- StumbleUpon
- Google Bookmarks
- Live Favorites
Article Series
- Assassin's Creed 4: Black Flag Walkthrough Part 1 – Sequence 1: Edward Kenway Assassin's Creed 4: Black Flag Walkthrough Part 1 – Sequence 1: Edward Kenway
- Assassin's Creed 4: Black Flag Walkthrough Part 2 – Present: Day 1 (Part 1) Assassin's Creed 4: Black Flag Walkthrough Part 2 – Present: Day 1 (Part 1)
- Assassin's Creed 4: Black Flag Walkthrough Part 3 – Present: Day 1 (Part 2) Assassin's Creed 4: Black Flag Walkthrough Part 3 – Present: Day 1 (Part 2)
- Assassin's Creed 4: Black Flag Walkthrough Part 4 – Sequence 2: Lively Havana Assassin's Creed 4: Black Flag Walkthrough Part 4 – Sequence 2: Lively Havana
- Assassin's Creed 4: Black Flag Walkthrough Part 5 – Sequence 2: “... And My Sugar?” Assassin's Creed 4: Black Flag Walkthrough Part 5 – Sequence 2: “... And My Sugar?”
- Assassin's Creed 4: Black Flag Walkthrough Part 6 – Sequence 2: “Mister Walpole, I Presume?” Assassin's Creed 4: Black Flag Walkthrough Part 6 – Sequence 2: “Mister Walpole, I Presume?”
- Assassin's Creed 4: Black Flag Walkthrough Part 7 - Sequence 2: “A Man They Call The Sage” Assassin's Creed 4: Black Flag Walkthrough Part 7 - Sequence 2: “A Man They Call The Sage”
- Assassin's Creed 4: Black Flag Walkthrough Part 8 – Sequence 2: “Claiming What's Due” Assassin's Creed 4: Black Flag Walkthrough Part 8 – Sequence 2: “Claiming What's Due”
- Assassin's Creed 4: Black Flag Walkthrough Part 9 – Sequence 2: “The Treasure Fleet” Assassin's Creed 4: Black Flag Walkthrough Part 9 – Sequence 2: “The Treasure Fleet”
- Assassin's Creed 4: Black Flag Walkthrough Part 10 – Sequence 3: “This Tyro Captain” Assassin's Creed 4: Black Flag Walkthrough Part 10 – Sequence 3: “This Tyro Captain”
- Assassin's Creed 4: Black Flag Walkthrough Part 11 – Sequence 3: “Now Hiring” Assassin's Creed 4: Black Flag Walkthrough Part 11 – Sequence 3: “Now Hiring”
- Assassin's Creed 4: Black Flag Walkthrough Part 12 – Sequence 3: "Prizes and Plunder" Assassin's Creed 4: Black Flag Walkthrough Part 12 – Sequence 3: "Prizes and Plunder"
- Assassin's Creed 4: Black Flag Walkthrough Part 13 – Sequence 3: “Raise the Black Flag” Assassin's Creed 4: Black Flag Walkthrough Part 13 – Sequence 3: “Raise the Black Flag”
- Assassin's Creed 4: Black Flag Walkthrough Part 14 – Sequence 3: “Sugarcane and Its Yields” Assassin's Creed 4: Black Flag Walkthrough Part 14 – Sequence 3: “Sugarcane and Its Yields”
- Assassin's Creed 4: Black Flag Walkthrough Part 15 – Sequence 3: “Sugarcane and Its Yields” Assassin's Creed 4: Black Flag Walkthrough Part 15 – Sequence 3: “Sugarcane and Its Yields”
- Assassin's Creed 4: Black Flag Walkthrough Part 16 – Sequence 3: “Proper Defenses” Assassin's Creed 4: Black Flag Walkthrough Part 16 – Sequence 3: “Proper Defenses”
- Assassin's Creed 4: Black Flag Walkthrough Part 17 – Sequence 3: “A Single Madman” Assassin's Creed 4: Black Flag Walkthrough Part 17 – Sequence 3: “A Single Madman”
- Assassin's Creed 4: Black Flag Walkthrough Part 18 – Sequence 3: “A Single Madman” Part 2 Assassin's Creed 4: Black Flag Walkthrough Part 18 – Sequence 3: “A Single Madman” Part 2
- Assassin's Creed 4: Black Flag Walkthrough Part 19 – Sequence 3: “A Single Madman” Part 3 Assassin's Creed 4: Black Flag Walkthrough Part 19 – Sequence 3: “A Single Madman” Part 3
- Assassin's Creed 4: Black Flag Walkthrough Part 20 – Present Day 2 Assassin's Creed 4: Black Flag Walkthrough Part 20 – Present Day 2
- Assassin's Creed 4: Black Flag Walkthrough Part 20 – Present Day: Part 2 Hacking Assassin's Creed 4: Black Flag Walkthrough Part 20 – Present Day: Part 2 Hacking
- Assassin's Creed 4: Black Flag Walkthrough Part 21 – Sequence 4: “This Old Cove” Assassin's Creed 4: Black Flag Walkthrough Part 21 – Sequence 4: “This Old Cove”
- Assassin's Creed 4: Black Flag Walkthrough Part 22 – Sequence 4: “Nothing Is True...” Assassin's Creed 4: Black Flag Walkthrough Part 22 – Sequence 4: “Nothing Is True...”
- Assassin's Creed 4: Black Flag Walkthrough Part 23 – Sequence 4: “Nothing Is True...” Part 2 Assassin's Creed 4: Black Flag Walkthrough Part 23 – Sequence 4: “Nothing Is True...” Part 2
- Assassin's Creed 4: Black Flag Walkthrough Part 24 – Sequence 4: “The Sage's Buried Secret” Assassin's Creed 4: Black Flag Walkthrough Part 24 – Sequence 4: “The Sage's Buried Secret”
- Assassin's Creed 4: Black Flag Walkthrough Part 25 – Sequence 4: “Overrun and Outnumbered” Assassin's Creed 4: Black Flag Walkthrough Part 25 – Sequence 4: “Overrun and Outnumbered”
- Assassin's Creed 4: Black Flag Walkthrough Part 26 – Sequence 4: “Overrun and Outnumbered” Part 2 Assassin's Creed 4: Black Flag Walkthrough Part 26 – Sequence 4: “Overrun and Outnumbered” Part 2
- Assassin's Creed 4: Black Flag Walkthrough Part 27 – Sequence 5: “The Forts” Assassin's Creed 4: Black Flag Walkthrough Part 27 – Sequence 5: “The Forts”
- Assassin's Creed 4: Black Flag Walkthrough Part 28 – Sequence 5: “Traveling Salesman” Assassin's Creed 4: Black Flag Walkthrough Part 28 – Sequence 5: “Traveling Salesman”
- Assassin's Creed 4: Black Flag Walkthrough Part 29 – Sequence 5: “Unmanned” Assassin's Creed 4: Black Flag Walkthrough Part 29 – Sequence 5: “Unmanned”
- Assassin's Creed 4: Black Flag Walkthrough Part 30 – Sequence 5: “Unmanned” Part 2 Assassin's Creed 4: Black Flag Walkthrough Part 30 – Sequence 5: “Unmanned” Part 2
- Assassin's Creed 4: Black Flag Walkthrough Part 31 – Sequence 6: “Diving For Medicines” Assassin's Creed 4: Black Flag Walkthrough Part 31 – Sequence 6: “Diving For Medicines”
- Assassin's Creed 4: Black Flag Walkthrough Part 32 – Sequence 6: “Devil's Advocate” Assassin's Creed 4: Black Flag Walkthrough Part 32 – Sequence 6: “Devil's Advocate”
- Assassin's Creed 4: Black Flag Walkthrough Part 34 – Sequence 6: “The Siege of Charles-Towne” Assassin's Creed 4: Black Flag Walkthrough Part 34 – Sequence 6: “The Siege of Charles-Towne”
- Assassin's Creed 4 Black Flag Walkthrough Part 35 – Present Day: Part 3 Assassin's Creed 4 Black Flag Walkthrough Part 35 – Present Day: Part 3
- Assassin's Creed 4 Black Flag Walkthrough Part 36 – Present Day: Part 3 (Hacking) Assassin's Creed 4 Black Flag Walkthrough Part 36 – Present Day: Part 3 (Hacking)
- Assassin's Creed: 4 Black Flag Walkthrough Part 37 – Sequence 7 “We Demand Parlay” Assassin's Creed: 4 Black Flag Walkthrough Part 37 – Sequence 7 “We Demand Parlay”
- Assassin's Creed 4: Black Flag Walkthrough Part 38 – Sequence 7 “The Gunpowder Plot” Assassin's Creed 4: Black Flag Walkthrough Part 38 – Sequence 7 “The Gunpowder Plot”
- Assassin's Creed 4: Black Flag Walkthrough Part 39 – Sequence 7 “Commodore Eighty-Sixed” Assassin's Creed 4: Black Flag Walkthrough Part 39 – Sequence 7 “Commodore Eighty-Sixed”
- Assassin's Creed 4: Black Flag Walkthrough Part 40 – Sequence 7 “The Fireship” Assassin's Creed 4: Black Flag Walkthrough Part 40 – Sequence 7 “The Fireship”
- Assassin's Creed 4: Black Flag Walkthrough Part 41 – Templar Hunt: Vance Travers “Oh Brother ...” Assassin's Creed 4: Black Flag Walkthrough Part 41 – Templar Hunt: Vance Travers “Oh Brother ...”
- Assassin's Creed 4: Black Flag Walkthrough Part 42 – Templar Hunt: Vance Travers “The Other Brother” Assassin's Creed 4: Black Flag Walkthrough Part 42 – Templar Hunt: Vance Travers “The Other Brother”
- Assassin's Creed 4: Black Flag Walkthrough Part 43 – Templar Hunt: Vance Travers “Upton's Sorrow” & “Queen of Pirates, King of Fools” Assassin's Creed 4: Black Flag Walkthrough Part 43 – Templar Hunt: Vance Travers “Upton's Sorrow” & “Queen of Pirates, King of Fools”
- Assassin's Creed 4: Black Flag Walkthrough Part 44 – Templar Hunt: Rhona Dinsmore “Bureau Under Attack” & “A Thief in the Market” Assassin's Creed 4: Black Flag Walkthrough Part 44 – Templar Hunt: Rhona Dinsmore “Bureau Under Attack” & “A Thief in the Market”
- Assassin's Creed 4: Black Flag Walkthrough Part 45– Templar Hunt: Rhona Dinsmore “Arms Race” & “Flint's End” Assassin's Creed 4: Black Flag Walkthrough Part 45– Templar Hunt: Rhona Dinsmore “Arms Race” & “Flint's End”
- Assassin's Creed 4: Black Flag Walkthrough Part 46 – Templar Hunt: Opia Apito “The Taino Assassin” & “Templar Ships” Assassin's Creed 4: Black Flag Walkthrough Part 46 – Templar Hunt: Opia Apito “The Taino Assassin” & “Templar Ships”
- Assassin's Creed 4: Black Flag Walkthrough Part 47 – Templar Hunt: Opia Apito “Right-Hand Man” & “The Trail of Lucia Marquez” Assassin's Creed 4: Black Flag Walkthrough Part 47 – Templar Hunt: Opia Apito “Right-Hand Man” & “The Trail of Lucia Marquez”
- Assassin's Creed 4: Black Flag Walkthrough Part 48 – Templar Hunt: Anto “The Maroon Assassin” & “Recruiting Maroons” Assassin's Creed 4: Black Flag Walkthrough Part 48 – Templar Hunt: Anto “The Maroon Assassin” & “Recruiting Maroons”
- Assassin's Creed 4: Black Flag Walkthrough Part 49 – Templar Hunt: Anto “Under Attack” & “The Commander's Ruse” Assassin's Creed 4: Black Flag Walkthrough Part 49 – Templar Hunt: Anto “Under Attack” & “The Commander's Ruse”
- Assassin's Creed 4: Black Flag Walkthrough Part 50 – Sequence 8 “Do Not Go Gently” Assassin's Creed 4: Black Flag Walkthrough Part 50 – Sequence 8 “Do Not Go Gently”
- Assassin's Creed 4: Black Flag Walkthrough Part 51 – Sequence 8 “Vainglorious Bastards” Assassin's Creed 4: Black Flag Walkthrough Part 51 – Sequence 8 “Vainglorious Bastards”
- Assassin's Creed 4: Black Flag Walkthrough Part 52 – Sequence 8 “Marooned” Assassin's Creed 4: Black Flag Walkthrough Part 52 – Sequence 8 “Marooned”
- Assassin's Creed 4: Black Flag Walkthrough Part 53 Shipwrecks & Caves: “Devil's Eye Cavern” Assassin's Creed 4: Black Flag Walkthrough Part 53 Shipwrecks & Caves: “Devil's Eye Cavern”
- Assassin's Creed 4: Black Flag Walkthrough Part 54 – Naval Contracts Part 1 Assassin's Creed 4: Black Flag Walkthrough Part 54 – Naval Contracts Part 1
- Assassin's Creed 4: Black Flag Walkthrough Part 55 – Naval Contracts Part 2 Assassin's Creed 4: Black Flag Walkthrough Part 55 – Naval Contracts Part 2
- Assassin's Creed 4: Black Flag Walkthrough Part 56 – Sequence 9 “Imagine My Surprise” Assassin's Creed 4: Black Flag Walkthrough Part 56 – Sequence 9 “Imagine My Surprise”
- Assassin's Creed 4: Black Flag Walkthrough Part 57 – Sequence 9 “Trust Is Earned” Assassin's Creed 4: Black Flag Walkthrough Part 57 – Sequence 9 “Trust Is Earned”
- Assassin's Creed 4: Black Flag Walkthrough Part 58 – Sequence 9 “Trust Is Earned” Part 2 Assassin's Creed 4: Black Flag Walkthrough Part 58 – Sequence 9 “Trust Is Earned” Part 2
- Assassin's Creed 4: Black Flag Walkthrough Part 59 – Sequence 9 “Trust Is Earned” Part 3 Assassin's Creed 4: Black Flag Walkthrough Part 59 – Sequence 9 “Trust Is Earned” Part 3
- Assassin's Creed 4: Black Flag Walkthrough Part 60 – Sequence 10 “Black Bart's Gambit” Assassin's Creed 4: Black Flag Walkthrough Part 60 – Sequence 10 “Black Bart's Gambit”
- Assassin's Creed 4: Black Flag Walkthrough Part 61 – Sequence 10 “Black Bart's Gambit” Part 2 Assassin's Creed 4: Black Flag Walkthrough Part 61 – Sequence 10 “Black Bart's Gambit” Part 2
- Assassin's Creed 4: Black Flag Walkthrough Part 62 – Sequence 10 “Murder and Mayhem” Assassin's Creed 4: Black Flag Walkthrough Part 62 – Sequence 10 “Murder and Mayhem”
- Assassin's Creed 4: Black Flag Walkthrough Part 63 – Sequence 10 “The Observatory” Assassin's Creed 4: Black Flag Walkthrough Part 63 – Sequence 10 “The Observatory”
- Assassin's Creed 4: Black Flag Walkthrough Part 64 – Sequence 10 “The Observatory” Part 2 Assassin's Creed 4: Black Flag Walkthrough Part 64 – Sequence 10 “The Observatory” Part 2
- Assassin's Creed 4: Black Flag Walkthrough Part 65 – Sequence 10 “The Observatory” Part 3 Assassin's Creed 4: Black Flag Walkthrough Part 65 – Sequence 10 “The Observatory” Part 3
- Assassin's Creed 4: Black Flag Walkthrough Part 66 – Present Day 4 Assassin's Creed 4: Black Flag Walkthrough Part 66 – Present Day 4
- Assassin's Creed 4: Black Flag Walkthrough Part 67 – Sequence 11 “To Suffer Without Dying” Assassin's Creed 4: Black Flag Walkthrough Part 67 – Sequence 11 “To Suffer Without Dying”
- Assassin's Creed 4: Black Flag Walkthrough Part 68 – Sequence 11 “To Suffer Without Dying” Part 2 Assassin's Creed 4: Black Flag Walkthrough Part 68 – Sequence 11 “To Suffer Without Dying” Part 2
- Assassin's Creed 4: Black Flag Walkthrough Part 69 – Sequence 11 “Delirium” & “… Everything Is Permitted” Assassin's Creed 4: Black Flag Walkthrough Part 69 – Sequence 11 “Delirium” & “… Everything Is Permitted”
- Assassin's Creed 4: Black Flag Walkthrough Part 70 Shipwrecks & Caves: “Antocha Shipwreck” Assassin's Creed 4: Black Flag Walkthrough Part 70 Shipwrecks & Caves: “Antocha Shipwreck”
- Assassin's Creed 4: Black Flag Walkthrough Part 71 Shipwrecks & Caves: “Kabah Ruins” Assassin's Creed 4: Black Flag Walkthrough Part 71 Shipwrecks & Caves: “Kabah Ruins”
- Assassin's Creed 4: Black Flag Walkthrough Part 72 – Sequence 12 “A Governor No More” Assassin's Creed 4: Black Flag Walkthrough Part 72 – Sequence 12 “A Governor No More”
- Assassin's Creed 4: Black Flag Walkthrough Part 73 – Sequence 12 “Royal Misfortune” Assassin's Creed 4: Black Flag Walkthrough Part 73 – Sequence 12 “Royal Misfortune”
- Assassin's Creed 4: Black Flag Walkthrough Part 74 – Sequence 12 “Tainted Blood” Assassin's Creed 4: Black Flag Walkthrough Part 74 – Sequence 12 “Tainted Blood”
- Assassin's Creed 4: Black Flag Walkthrough Part 75 – Sequence 12 “Ever a Splinter” Assassin's Creed 4: Black Flag Walkthrough Part 75 – Sequence 12 “Ever a Splinter”
- Assassin's Creed 4: Black Flag Walkthrough Part 76 – Present Day Epilogue (Part 1) Assassin's Creed 4: Black Flag Walkthrough Part 76 – Present Day Epilogue (Part 1)
- Assassin's Creed 4: Black Flag Walkthrough Part 77 – Present Day Epilogue Part 2 Assassin's Creed 4: Black Flag Walkthrough Part 77 – Present Day Epilogue Part 2
- Assassin's Creed 4: Black Flag Walkthrough Part 78 Shipwrecks & Caves: “Ambergris Key” Assassin's Creed 4: Black Flag Walkthrough Part 78 Shipwrecks & Caves: “Ambergris Key”
- Assassin's Creed 4: Black Flag Walkthrough Part 79 Shipwrecks & Caves: “The Black Trench” Assassin's Creed 4: Black Flag Walkthrough Part 79 Shipwrecks & Caves: “The Black Trench”
- Assassin's Creed 4: Black Flag Walkthrough Part 80 Shipwrecks & Caves: “The Blue Hole” Assassin's Creed 4: Black Flag Walkthrough Part 80 Shipwrecks & Caves: “The Blue Hole”
- Assassin's Creed 4: Black Flag Walkthrough Part 81 Shipwrecks & Caves: “La Conception” Assassin's Creed 4: Black Flag Walkthrough Part 81 Shipwrecks & Caves: “La Conception”
- Assassin's Creed 4: Black Flag Walkthrough Part 82 – Naval Contracts Part 3 Assassin's Creed 4: Black Flag Walkthrough Part 82 – Naval Contracts Part 3
- Assassin's Creed 4: Black Flag Walkthrough Part 83 – Naval Contracts Part 4 Assassin's Creed 4: Black Flag Walkthrough Part 83 – Naval Contracts Part 4
- Assassin's Creed 4: Black Flag Walkthrough Part 84 Shipwrecks & Caves: “Jiguey” & “Petite Caverne” Assassin's Creed 4: Black Flag Walkthrough Part 84 Shipwrecks & Caves: “Jiguey” & “Petite Caverne”
- New eBay users
- Advanced eBay users
- Pokemon Platinum Walkthrough
- Pokemon HeartGold SoulSilver Walkthrough
- Pokemon HeartGold SoulSilver Kanto Walkthrough
- Pokemon Black White Walkthrough
- Pokemon Black White Version 2
- Old School Video Games
- Super Nintendo Entertainment System (SNES)
- Nintendo Entertainment System (NES)
- Sega Genesis
- Commodore 64
- Sega Saturn (Saturn)
- Playstation 2 (PS2)
- Nintendo 64 (N64)
- Gamecube (GC)
- Gameboy Advance (GBA)
- Playstation One (PSX)
- Computer Games
- Music Simulation
- MMORPGs and Virtual Worlds
- Star Trek Online (STO)
- World of Warcraft (WOW)
- Other MMORPGs
- Lego Universe
- DC Universe Online (DCUO)
- Guild Wars 2
- The Elder Scrolls Online (ESO)
- Academy BASIC
- Event Coverage
- WonderCon 2009
- Fanime 2009
- Wondercon 2010
- Fanime 2010
- WonderCon 2011
- Comic Con 2011
- Wondercon 2012
- Baycon 2012
- Comic Con 2012
- Comic-Con 2013
- Magic: The Gathering
Article Options
- Email to Friend
- Print Article
- Remove from Favorites
- Add to Favorites
- Remove from 'Articles to Read'
- Add to 'Articles to Read'
Popular Authors
- chronodev (Ron)
- Douglas Shepard (Editor in Chief, RarityGuide.com)
- Nick M. Facer
Popular Articles
- Skyrim Walkthrough: The Golden Claw Quest
- Assassin's Creed Brotherhood - Subject 16 Puzzle Solutions
- Mass Effect 3 Endings Guide - HEAVY SPOILERS
- Skyrim Walkthrough: College of Winterhold - Under Saarthal
- Pokemon Platinum Evolution Levels Guide
Our Newsletter
© Copyright 2008-2012 RarityGuide, Inc. All rights reserved.
- Assassin's Creed IV: Black Flag Achievements
- Assassin's Creed IV: Black Flag News
- Walkthrough *
3. Assassin's Creed IV: Black Flag Story walkthrough
Story walkthrough.
Sequence One
Memory One – Edward Kenway
This mission has no other constraints apart from finishing it. The only noteworthy thing to do is find the chest located on the island for a quick and easy achievement. After you kill Ducan, go to the nearest viewpoint and activate it. This should reveal a map on the beach, so clear the area of men and pick it up. Now turn around and head towards the caves in the other direction; it is located at the end.
Complete memory sequence 1.
Sequence Two
Memory One – Lively Havana
Synchronisation Objectives:
- Tackle the pickpocket.
- Use smoke bombs to escape combat.
Memory Two - And My Sugar?
- Hire dancers to distract the guards
- Stay out of combat
Once the mission starts, follow the guards and as you pass some nearby dancers, hire them to follow you as this will make it harder for them to spot you. Once they head inside the building, continue around with the dancers; you need to keep line of sight on them as best as you can.
When the guards begin to run, follow behind them, keeping a good distance — they won't look back until the end of the chase, when they will stop in front of a door. They will continue to walk again, so if you can, hire dancers again as they class you as hidden to make it easier for you. Once that is complete, follow the Captain to his location, using the dancers to keep you hidden.
Once the Captain is in the restricted area, use the dancers to force his guards to leave. Take him out and loot his key. Once this has happened, you'll need to make your way into the keep. Head to the left of the keep and follow the wall up to the top.
I must remind you that this part requires you to stay out of combat; if guards detect you, then you will need to reload the checkpoint and try again. There are two walls you can reach the top from, the north east and north west. However, the second is further away, but it means you can take your time getting to the objective.
So for this I picked the north west. Take out the two guards patrolling, climb up and call the third one on the left, behind the crate, and then take him out. Head around the north wall, past the two guards talking and take the final patrolling one out, keeping an eye out for the guard on the roof, and then head inside. After this, jump off the castle wall and into the sea below, and return to meet Stede.
Memory Three – Mister Walpole, I presume?
- Complete Roger's shooting challenge
- Pickpocket all Templars x3
Upon starting of this mission, you will meet two new people. After the conversation and learning how to use the gun you have, you have the option to challenge Rogers — simply talk to him to begin. Before starting, ensure your pistol is reloaded, and manually aim and shoot. While reloading, move into view of the remaining ones; you can do this as many times as you need.
Memory Four – A Man They Call The Sage
- Tackle the Sage from above
- Use the pistol I combat
Follow the escort until you get attacked. The first thing you should do is shoot your pistol to get the synchronisation complete and then continue to fight off the waves of enemies until the Sage bolts. This can be extremely tricky as it is sometimes only achieved under certain circumstances.
The best place I found is nearby a large house: he jumps on a vine terrace and then goes on the ground. There is a balcony nearby, so follow it around and tackle him. Looking at the map from the viewpoint of the large building where the chase started, look west to a small building near some stairs — the small building to the left is the place.
If you are still struggling, you can run ahead of him and wait on the ambush path to catch him, which should make it easier.
Memory Five – Claiming What's Due
- Kill Guards from stalking zones x3
Once you gain control, head straight for the grass in front of you, taking the two guys on your left out for credit towards the objective above. Now, head towards the right of the map, behind the building and take another one out. You can also whistle to help lure them near the grass.
Continue on the path, using your eagle vision to spot the guard with the key, and relieve him of it. From here I would suggest sticking to the ground and using grass patches, staying on the outside of the map. When you reach the tower with the gunner in it, to the left there is a cart you can run up, so do so when his back is turned, and hide once more after this. It is a brisk job while their back is turned to the location.
Memory Six – The Treasure Fleet
- Free 23 pirates
- Kill guards from behind corners x3
When the mission starts, free yourself from your binds, then head for the first corner and whistle to lure a guard in and kill him. Head to the shelving in the next area and whistle the next guard, killing him also. After your friend takes out the next, head to the next corner and whistle again for the final one needed.
Once you have your gear, head to the upper deck to continue to free the pirates. You can, if you wish, be as reckless or as stealthy as you like for this part. Once you have boarded the ship, you can simply sail away from the fleet, taking out only the gun boats since the others don't seem to follow. The rest is just sailing your ship.
Complete memory sequence 2.
Sequence Three
Memory One – This Tyro Captain
- Shoot an iguana
- Air assassinate an Ocelot
Sail to the island highlighted. Your two main tasks are the objectives above — the second is the worst, the best thing to do is hide up in a tree and wait for one to come nearby, then pounce on it. The first objective is simple. There is another achievement to earn here, which is to do all activities in a location, so it might as well be here.
Memory Two – Now Hiring
- Disarm and kill guards x3
- Shoot the rope to save the pirate
Upon opening your map and when you get control again, head to the dancers to the north east. Hire them and then head to the pirates behind the tavern on the west. Sneak around the back of the nearest red circle on the southern approach and use the dancers to distract them. This will net you another achievement (if you fail, reload try again. For more details, see the miscellaneous achievements section).
Now, head to the nearest south pirate spot, creep behind the guy and take him. Now head to the next nearest one, located south of where you obtained the dancers, and help the pirates out. Head to the final location (the largest red area on the map) and head south of the fort for another set of pirates.
If you are still short of pirates, find another patch and free them, and then head for the fort. This is where you need to save the pirate from hanging, so before you go there, ensure your pistol is equipped. You will have a timer to shoot him down within, so you should aim to do this before you enter combat as you will have time before they rush you; just manually aim.
Memory Three – Prizes and Plunder
- Use a swivel to kill sailors x3
- Plunder 20 rum
This one is rather simple and won't require as much explaining as the one before. Once you gain control, search for a schooner and shoot it. As soon as you can board it, switch to your swivel cannons either side of the wheel and shoot the men on the ship.
Plundering this ship, I managed to obtain 20 rum. If you do not get it, simply take a ship on the way to your location where you should see plenty. Just remember to spot them with your spyglass to see what cargo they contain.
Memory Four – Raise the Black Flag
- Plunder a hunter ship
- Plunder 30 sugar
When you start the mission, you will begin to sail out to sea. If you wait long enough, a hunter ship will appear, so take it down, board it and then plunder it for its cargo. Head back to sea and find a ship with sugar; do the same and once you have enough sugar for the above mentioned synchronisation objective, head back and remove your wanted level. This will end the mission.
Memory Five – Sugar cane and its Yields
- Sabotage two bells x2
Once you start the mission, locate your target and then follow him back to his ship. Once you are in the restricted area, head towards the small building and kill the guard on the right. Once there, you are tasked with going to your ship, so do so and follow it to its location.
While on the sea, you are tasked with staying out of combat, so ideally you want to stay out of the ships field of view which you can see on the map. Just take your time with it and don't rush; you have plenty of time. Once you reach your location you have a timer to reach your target, so go with haste. On your way you should spot a bell with a guard. Deal with him and then sabotage the bell for a credit.
You now need to listen to the conversation while trailing the target. When the Captain talks to the drunken guard, sneak behind and take him out and then sabotage the bell. Once you reach the warehouse, you will need to head back to the main plantation area, using eagle vision to find the man with the key.
Memory Six – Proper Defenses
- Use one broadside to sink two boats
- Use heavy shot to sink ships x2
This one can require some luck and skill in order to line up ships correctly, but before that you need to tail it. If you get detected, it will end badly for you. Some ships will engage it, causing it to begin firing, so you need to focus to avoid its fire. If the mortar hits you it will tear your ship apart.
Memory Seven – A Single Madman
- Air assassinate Du Casse
Climb the cliff face as soon as you hit the jungle. Stay in the jungle, avoiding the forces as you do not want to engage in open conflict. There is really not much I can say, I would highly suggest staying on the ground since being in the air, you are exposed. It is hard to avoid them, so I would suggest thinning them out when you can.
The area with the first gunner drove me nuts. To do it without alerting them, I would suggest shooting the gunner and hiding from the enemies when all but two are left. When you come to the town you will need to head to the boat at the back. I would suggest going down the right side of the town and then heading for the front of the ship.
Once there, head to the northern back edge of the ship and climb the rigging to the upper level and wait on the mast for him to pass and then assassinate him.
Complete memory sequence 3.
During the present day mission, there are no side objectives. Simply complete the objectives of the mission and during this time, hack any computers you can see on the map represented by a computer icon.
Complete present day mission 2.
Sequence Four
Memory One – This Old Cave
There really should not be much for me to mention about this one as it is rather straightforward. You learn about Mayan statues and the introduction of Templar missions, which you can find more about in the Miscellaneous section.
Memory Two – Nothing is True
- Knock out assassin's x3
- Loot treasure chests x4
From the start of the mission, loot the chest nearby and then swim south along the beach. There will be plenty of grass patches to hide in and take out the assassin. There is one point where you will need to use the shipwreck to pass them undetected as they become paired off.
One thing to remember during this mission is to keep an eye out for chests as they are scattered around. If you collect viewpoints, finding them will be a much simpler task. After the shipwreck, there is one assassin patrolling under a stone arch. There is a chest near him, then continue onwards.
When you get to the area with ruins, take the left side and follow it around until you see a staircase in front of you. Head up there and follow the path to the next checkpoint. In the large ruins area, head left up the wall and follow this path, leading past your second chest and continue onwards.
You should continue until you hit an assassin gunner. After this, take the right path around the assassins, then head towards the small ruins as there is another chest nearby. After this, you can talk to Kidd to end the mission.
Memory Three – The Sage's Buried Secret
This is rather straightforward. The only confusing thing here is the puzzle at the end — you must align each block of a colour with the matching floor. You can accomplish this by using the side blocks to raise unwanted blocks to swap.
Memory Four - Overrun and Outnumbered
- Use berserk darts on guards x2
- Use sleep darts on guards x8
You will gain a new tool for your uses, and in my opinion, it will probably be the one you use the most. You will want to do this mission as stealthily as you can because if guards are alerted, they may panic and kill the hostages. I would also advise you never to use berserk darts on gunners as they tend to have a habit of shooting hostages, which is unwise, so save them for melee guards.
You do not have to rescue all locations; however you must rescue enough in order for the objective to be completed, so stick to the ones close to you. If you rescue assassins, they will help you by giving you restocks of your darts which are handy to have.
You should, once you have cleared the upper level, proceed down the northern edge as there are more to rescue on this side. However, you will need to take the gunners out in the tower or they will spot you.
Complete memory sequence 4.
Sequence Five
Memory One – The Forts
- Use the mortar to damage the fort
- Use a running assassinate to kill the officer
For this mission you will learn the basics of how to take forts. I would suggest you ensure you have mortar ammo before starting this mission, as you can see above, you'll need it. Sail with haste towards the keep, using your mortar to damage it. As soon as you are within range, use your side cannons.
Head inside the fort and once inside there will be a marked target. You will need to run and assassinate him to gain it, if he stops and turns around to fight you, chances are you won't be able to. If this happens, reload the checkpoint.
Memory Two – Travelling Salesman
- Kill gunners x4
- Kill guards stunned by smoke bombs x5
This mission involves you tailing your target. Only take out the guards when you can to avoid being detected, I would suggest sticking to the rooftops so you can take the gunners out while you are tailing them.
When the eavesdropping begins, you will need to stay much closer, so I would suggest following on foot at this point; I had three gunner kills while following them around. During the last part when they enter a large restriction zone, there is a gunner just outside on a rooftop, so take him out.
From this point, dive into the hay for your entrance into the compound. Keeping close to the pair of them, I would suggest equipping your smoke bombs now. After a short cutscene, this is part for your second optional objective: get them to gather, drop a bomb and kill them. Once you have five, escape.
Kidd will kill some while in combat, so during the chase you will need to kill a few on your way. Tackle him and end the mission.
Memory Three – Unmanned
- Use Berserk darts on Brutes x2
- Use Sleep darts on Gunners x2
Before starting this mission, I would highly suggest doing the 'Silence Fool' achievement as this is the best chance to obtain it, so I would refer you to find it under the Miscellaneous section of the guide, and do that first, and then proceed.
Now that you have done this, disable the bell that he was ringing, or if you have to restart due to being detected, remember to use two berserk darts on the two brute guards and one sleep dart on the gunner in the tower.
Now head towards the western bell. Next there will be another gunner in the tower, so put him to sleep to ensure your synchronisation objectives are completed. Slowly thin the herd at this area and then disable the bell. Heading towards the last, you will need to lure them into the crops by whistling. Once it is clear, do the last bell (there is one guard stood in front of the haystack; he will spot you for sure if you don't take him out).
Once inside, he is located at the back, near a gazebo. I would suggest heading over the building, killing the brute on the ground and heading to the left side. Take the guy patrolling on the upper level and climb up. Once on the roof, take the gunner out on the left side and from here you should spot him. Leap off into the hay and flank him.
After this, I would just suggest legging it for your boat. There is really no need to engage anyone as you have everything else completed.
Complete memory sequence 5.
Sequence Six
Memory One – Diving for Medicines
- Loot treasure chests x3
- Avoid being attacked by a shark
This is a rather simple mission, so I will not go too far in-depth with it. However, two things to always take note of: 1) Sharks use line of sight to avoid them detecting you by hiding in reefs 2) Remember your air supply. There are barrels around which can replenish your air while you are down there.
So, while you're searching for the medicine, you should be able to avoid being eaten by a shark and gain three chests. When you are done, return to the bell. If you fail, simply reload and try again.
Memory Two – Devil Advocate
- Rescue survivors x5
- Kill guards stunned by smoke
Now that you have done that, Blackbeard is located nearby on one of the islands. To be more exact, Mariguana Island, so sail here to rescue Blackbeard. Once you get on the island, ensure you have smoke bombs equipped so you can kill guards for the objectives.
The last part of the mission requires you to take down the ship. Blackbeard's will be far better than your own, so you will need to dodge the mortar fire and brace from his cannon fire, otherwise it will rip you to shreds. As soon as you begin boarding the ship, jump to the other ships mast and then leap assassinate the Captain. This should finish the mission.
Memory Three – The Siege of Charles -Towne
- Use sleep darts on crocodiles
- Skin a crocodile
The start of this mission will require you to follow a ship while avoiding detection. You will come to a point where you must get off to sabotage the bell, so do so without getting noticed and continue. Now is the part where you need to sleep dart crocodiles; the first one is just as you get off near the pier — I would skin this one also. Once you are done climbing the ship, there should be a break so you can drop down. In the water are another two crocodiles, so sleep them and then continue.
Continue to follow the boat by taking the high ground until you come to an eavesdrop. You will need to stick close to them so you can listen in on their conversation. When the guy bolts, chase him down and assassinate him which will end the mission.
Complete memory sequence 6.
During the present day mission there is no side objectives. Simply complete the objectives of the mission, and during this time, hack any computers you can see on the map (represented by a computer icon.)
Complete present day mission 3.
Sequence Seven
Memory One – We Demand a Parlay
- Sabotage the alarm bell
- Kill guards while hanging from a ledge x3
The first part of the mission is to tail your target, so you should stick to the rooftops as best as you can to avoid them detecting you. Once your target heads inside, look to the left of the door, past the gallows and climb the walls to the top. On your way you should find a guard on the north tower. Pull him from the ledge as your first kill.
Once at the top of this tower, there is another two. Do the same again for that objective, then look down and make your way down, assassinating the two guards below, and then dive off into the haystack. From here is the alarm bell you need to sabotage. You will need to take several of the guards out before going for this and then go for the plans.
Memory Two – The Gunpowder Plot
- Kill four guards in one kill streak x4
- Use blowpipes darts on guards x10
Head towards the smalls rectangle, then use a sleeping blow dart on the patrolling one and then take him out. Get the other four to attack you to get a four person kill streak. If you fail this, reload and try again. After this, head inside and follow the path to loot some gunpowder. There should be three guys down here — I would suggest using a sleep dart on all three of them for credit (if you need more, you can craft them using bones in your start menu).
If you follow the path around, it will lead you to your next area. Take the two guards out that are guarding the entrance, then use Berserk darts to have them kill each other and then head to the south east objective. I would personally use Berserk darts here to thin their numbers, along with sleep-targeting the gunners in the tower, and then steal the gun powder.
Once again, head to the closest and use the ambush spots to make your way to the gunpowder in the middle. Once again, Berserk darts are handy here. Now, head to the final location using sleep darts to sneak around and obtain the last of the gun powder.
Memory Three – Commodore Eighty-Sixed
- Kill guards from stalking zones x3
- Air assassinate Chamberlaine
Right at the start of the mission, as you tail your target, there is a lone guard by the bushes. Start with him and then follow behind them. When they enter the restricted area, take the high ground using sleep darts on gunners so you can tail them properly.
Continue to use the high ground and keep following them until they come to a camp area. During this time, a brute guard will walk the path. If you're hiding in the bushes, this should be your second; your last will turn his back on a pile of leaves. Once he does, jump in and kill him.
Once you are done tailing him you will need to kill Chamberlaine. It is best to approach from the aft of the ship, getting there by sea. If you need to, dive under the water to avoid being spotted; I personally climbed the rigging up to the mast (north side).
Memory Four – The Fireship
- Use the mortar to sink ships x3
- Use barrels to sink a ship
At the start of the mission you have to escort the ship to its objective. When enemy ships appear, get close to them and try to kill them with fire barrels before doing anything else and then use your mortar to kill them. After this, continue sailing close to the escort ship, sailing past some. Hopefully they will chase after you and die on a barrel. This, however, can be based on luck, so it might take a few tries.
Now the ship is blown up, focus on escaping. There is no reason to fight, so simply sail off into the sunset.
Complete memory sequence 7.
Sequence Eight
Memory One – Do Not Go Gently
- Use heavy shot to incapacitate the man of war x1
- Kill guards x4
Tail the target to his meeting and creep inside. Then follow him — there are plenty of guards around, so killing four within a minute is not really hard; within a minute I already had three. Continue on with another two in the courtyard, taking one of them and then continuing.
Before you board, use your swivel cannons to, ideally, destroy the power reserves as trying to do so with enemies on the ship is quite hard. Once done, escape the combat to end the mission. The Jackdaw will have a low amount health, so avoid any fire.
Memory Two – Vainglorious Bastards
- Damage the Royal African Pearl with an upgraded ram
- Use the fort's defenses to sink a ship
For this one, you need your ram to be upgraded; otherwise it will not allow the achievement to be earned. So, to ensure this, make sure your ram has been upgraded twice. If you need to go out and farm items to do so then do it before the mission. I would also capture the fort at (566, 390)
Try to avoid other ships until you reach your target. Once you do, the first thing to do is ram it with your ship to do the objective, then weaken it until you can board and then leave it. Once you have done this, open your map, look for the nearest fort (566, 390) and sail towards it. Your aim is to have the two other nearby ships get killed by the mortars. Give it time and it will happen.
Head back to the ship, then board it, taking the two gunners out first and then the rest of the crew.
Memory Three – Marooned
- Skin animals x3
- Air assassinate Vane
As you go on your path chasing vane, a black panther will begin to hunt you. Try and lose it and then air assassinate it from above which is probably the only way you can kill it without a gun. Once Vane has eluded you and after you've climbed up, continue to chase until Vane begins to shoot you. When a bomb icon appears, move; when a crosshair icon appears, hide.
After you climb the log broken by Vane, another black panther is down below. Jump down and kill it, then search the area for the third panther. If you proceed much further, you will not be able to return (if you go past the ruins with a small waterfall, you have gone too far).
In the final area with Vane, you need to get around him, so using the same tactics as before and approach him from behind, climbing the nearby building and killing him from the air.
Complete memory sequence 8.
Sequence Nine
Memory One – Imagine My Surprise
- Kill brutes x4
- Sabotage alarm bells x2
Head into the compound (hole in left wall near the road), then at the first bell, whistle and lure the guard into it, killing them should least be a single brute and then sabotage the bell. I would suggest sticking down the left side of the map since there are two brutes guarding the wall near the house at the end for another two kills (you'll need to take out the two single patrols plus gunner on roof).
Continue around, following the wall. You should spot the pair across from you; as soon as you do they will begin walking off. You can sabotage the bell and your remaining guard on the way (one located near a stalking zone).
Continue to follow them until they come to a restricted area. Try and follow them around the fence of the compound to the rafters of the buildings, which is hard to do as they move rather quickly. The mission will shortly end after a small fight with an escape.
Memory Two – Trust Is Earned
- Double assassinate Cockram and Burgess
- Free pirates x2
After a short naval battle, land on the shore and then head up. Use your pistol to shoot the barrel to wipe them out and then climb the trees to be treated to a cut scene. The first set of pirates close in on your ship; you will want to stealthily take them out either using darts or stealth spots. Once the pirates are in sight, take them out with your blade so as not to spook them.
Now, head to the second pirate area using the cover to advance behind them. Ideally, take them out using your blade as it will draw less attention. Then head to your objective — it is imperative you save the pirates before you do the next bit as if you don't, you will have to re-save the pirates every time.
This next part can be extremely tricky to pull off as the best time to do this is right at the start of their patrol path. So, when you slide down, head left and then go on the rooftops, heading down the buildings towards the sea to a camp where there is a tree. You can hide here and when they are close enough, assassinate them.
Complete memory sequence 9.
Sequence Ten
Memory One – Black Bart's Gambit
- Use a rope swing to kill the captain
During the first part of the mission, you will need to manoeuvre your ship through some tight spots. I would suggest sailing at half-mast for most of it so you can keep control, along with stealing a flag. Approach from the water, the opposite side from your ship, and climb straight up; just watch the gunners at the top.
The next bit can be quite hard as ships will constantly be sailing in the fog. If you hit one, you will be discovered, so take it half sail all the way. You are now asked to head ashore. Use the bushes, along with berserk darts, to clear your path until you loot the chest and then rejoin with your ship.
Once again, take control of the ship, avoiding other ships, so take it slow and steady until you reach land again. This part is by far the most annoying bit of the game, as the final part with killing the Captain with a rope swing, can be a struggle.
I generally do the whole part up to the ship with extreme speed, just because it is a pain to have to redo it every time, so run up the tree to the first tower, taking the guys down and then continue on the path, using the trees to head back down to the ground and hide while the guards pass.
Now, with your new ship, it is time to sail away. Use the Mortar at range and when they are close engage, use the broadside cannons.
Memory Two – Murder and Mayhem
- Stay out of combat while finding Hornigold
- Air assassinate Hornigold
This first part can be extremely frustrating as there are ships everywhere, hindering your movement. I would suggest speeding through and when no ships are nearby, use your spyglass to spot him. I would also suggest sailing north around the island, however it is blocked, so you will need to manoeuvre your way through (he is located just north of the island).
To reach Hornigold, there is a second ruins linked to his location by a tree, so make your way there, using the grass cover to hide yourself. Under the island you are heading to, there is a small cave under it, bringing you to the other side.
Now that you are there, you want to head up the eastern side, going west to the other ruins. Once here, head along the southern edge until you reach the west and then climb the building from behind. This gives you a great spot to jump onto him from above (it is the viewpoint).
Memory Three - The Observatory
- Incapacitate all guardians while unarmed
- Incapacitate guardians from stalking zones x5
Before you start this mission, take off your blade as you only want to use your fists. It's a requirement for the objective which can be tricky as they have good eyesight and generally spot you quite easily, unless you get them from behind.
Once you come to a large open jungle, take some time use your eagle vision and spot your targets (five in total). From here, take the trees down the middle as your path, going behind them. So, in this order: one far back path and then take the two down by the river; this will then cause you to move to the next area. If they are not in your line of sight, they will vanish (this gives you a free take down so for me I obtained four here).
Enter the next area using the trees to get behind them. Using the right tree path, one will spot you so deal with him. Then, either way is another one to kill, giving five in total. You can engage with your fists, providing you have line of sight on the ones that will flee. They will stay in the stalk zone for you to kill.
In the third area there is one on the upper platform with at least three on the ground. Take these out stealthily or hand-to-hand. if you have the credit needed, head onwards. Head into the caves; this place is a little harder to gain stalking zone kills, so by now you should have enough for it, however there is one right at the start.
For the caves, I would suggest taking the high road so you can see the cave better, aiming to take the range users out first and then defeating the entire cave, which will allow you to progress to the last area. Once here, follow the right path around using the platforms on the side to get to the upper ground and then beat them down. By now, you shouldn't need any stalking zone kills.
Over your conversation, you'll need to escape the place, so head from the water and back up to where you were. Take the right wall upwards, towards the opening in the roof and the memory will end shortly after this.
Complete memory sequence 10.
During the present day mission, there is no side objectives; simply complete the objectives of the mission and during this time, hack any computers you can see on the map that is represented by a computer icon.
Complete present day mission 4.
Sequence Eleven
M emory One - To Suffer Without Dying
- Sabotage alarm bells x3
- Visit old friends x2
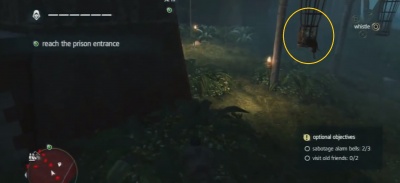
When you are freed, head towards the entrance and you should spot your first bell. When no eyes are looking, disable it and then head right; you should see a second bell for you to sabotage. Head to the well, take him out, then the other two and keep heading along the wall. Shortly after, you should spot a British flag in front of you. From here, look right to a skeleton in a cage and interact with it.
Now use Berserk darts to clear some of the enemies in your path and then head to the objective. On the way, get the last bell you need and then head inside. Once inside, take out the first group of guards, check the cells where one of them contains a friend of yours and then continue on; you can be as stealthy or violent as you wish here.
Once you escape, I would suggest running as quickly as you can because as soon as you get to your objective, the mission ends anyway, so there is no need to waste any time.
Memory Two – Delirium
This is rather straightforward — there is really nothing I need to explain here, so just play the mission and enjoy the break.
Memory Three – Everything is Permitted
- Use Rope darts to hang guards x2
- Use the Rope dart to pull guards x3
Using your new weapon, you need to kill some enemies. Hanging enemies is far harder than pulling guards, so begin with this. Head to the jungle and while the assassin's engage on foot, dart and hang him. If you are quick you can also rope pull three guards (but it must be three different guards) before heading out; if not, there are plenty more ahead.
Keep clearing the enemies out, countering them if you want, and rope pulling some for credit towards your Synchronisation Objectives. Head to the beach, kill the first guard that notices you, then head into the trees and do the second hanging. From here, you can kill them however you wish. I would suggest killing the Captain first while the assassin's deal with the soldiers on the beach.
Complete memory sequence 11.
Sequence Twelve
Memory One – A Governor No Longer
- Kill the diplomat from a haystack
- Kill Rogers from a bench
Head to the location and follow your target until he begins to patrol around the location. Head to the tallest building nearby, take a leap of faith into the hay and then assassinate him (if you take too long, he will begin to walk again which you don't want).
Once you reach the party, he will begin to walk. The best bench to kill him from is left of where you entered the party, on the porch as he passed down here, then when the time is right, kill him. Escape the party and head back to the bureau.
Memory Two – Royal Misfortune
- Use the Rope dart to kill Roberts
- Kill guards by destroying powder barrels x8
Jump off your ship and swim to the shore. During this first section, use your pistols to shoot barrels near enemies. You can lure them nearby and then shoot them. Doing this, I gained all eight easily and then continued on to the green circle. You will find Roberts on the cliff near the ship.
Take chase after Roberts, using your mortar when you can to damage his ship and trying to avoid the mortar fire from his ship. Once he is weakened enough, climb up your own mast, then hop over to his ships mast and then use the dart on him to hang him (the small planks sticking out of the mast work the best).
If you think you have messed it up, reload the checkpoint and then try the boarding action once more.
Memory Three – Tainted Blood
- Use guards as a human shield x2
Head across the rooftops, take the guard out and then head to the east side of the church. Here, there should be a tailing event, so follow these men around. Once the tail ends by them heading into the fort, head to the south of it and swim through the water. Approach the north east wall from the water and climb up.
Once you get to the top, assassinate the guy patrolling and then head north, clearing as you go. When you have a clear section of wall, look down to your target, jump down as he patrols and kill him. The next thing to do is use guards as shields, as your main target will fire his pistol at you. Once done, start shooting him with your pistol as it is the only way to beat him. After this, escape to complete the mission.
Memory Four – Ever a Splinter
- Free the guardian hostages x7
- Use the observatory's defenses to kill guards x4
When you leave your ship, continue inland until you hit the beach where the buildings are. Along the beach there are people to rescue, so take your time and explore the beach to save them. Now, head inside the cave for another two sets of hostages to rescue; they should be easy to find as they are being guarded.
After this, you need to climb the moving platforms up in order to reach Torres, so you will need to follow this around. The first part can be a little confusing; jump to the left of the platform he is stood on and after that, follow the path. When you reach the end, make sure that when you assassinate Torres, there is no yellow glow around him and that you are close enough to reach him.
Complete memory sequence 12.
During the present day mission, there are no side objectives, so simply complete the objectives of the mission, and during this time, hack any computers that you see on the map which is represented by a computer icon.
Complete present day mission 5.
This consists of watching cut scenes. There is an achievement that is related to this, so simply let them play out.
Complete memory sequence 13.
Complete 100% of all main mission constraints.
- Privacy Policy
- Corrections Policy
- Ethics Policy
- Fact-checking Policy
- Ownership Policy
- Looking for Eguides?

Assassin’s Creed 4: Black Flag Guide- How to Complete Sequence 11
Memory 01: To Suffer Without Dying
Sidebar: Optional Objectives
– Sabotage alarm bells (3)
– Visit old friends (2)
You find yourself back in Abstergo. Head down the hallway, following the location marker. When you reach the security camera, enter the code: 5, 7, 7, 3. Walk down the hall to the left until you reach the terminal location, then enter the code: 7, 7, 7, 3. Initiate remote hacking to play Frogger again! Head back to your desk to get your pirate on once more.
After an interesting cut scene, press any button to shake your cage until another cut scene begins. Now that you’re free, it’s time to play Metal Gear again. Follow your savior, staying hidden from the guards, and stopping to disable the alarm bells if you wish to complete the optional objective.
The plan is to make it to the prison door. It’s in your best interests to take out a few guards on the way there and loot them for ammo and weapons, but you should have darts available as well. Once you’re inside the prison, you’re tasked with finding Mary and Anne.
You’ll find Vane in the southeast corner of the first big room. Interact with him to partially fulfill the optional objective. Make your way through the prison, using stealth tactics to take down the guards until you spot Mary and Anne. Interact with their cell to initiate a cut scene. Head toward the exit with Mary to initiate another cut scene. Head out of the prison and meet up with the others for one last cut scene to complete the mission.
Memory 02: Delirium
Stumble forward during the save screen, then again as Roberts walks away. Crawl toward Roberts during the next cut scene. As you find yourself underwater, swim to the top, ignoring the sharks. Walk toward the man talking, then walk around the area killing all of the images of Roberts in the crowd to complete the mission.
Memory 03: …Everything Is Permitted
– Use the rope dart to hang guards (2)
– Use the rope dart to pull guards (3)
When you finally awake in Kingston, head to the wheel of the Jackdaw, then on to Tulum. You can fast travel there, or take your time plundering and pillaging. When you reach Tulum, head toward the mission start point to begin.
Follow Al Tabai to obtain the rope dart, then head for the shore. Kill any soldiers you come across along the way. When you reach the beach, you are tasked with killing 20 soldiers and the captain. If you use your rope dart, you can complete the optional objectives.
To skip the mayhem on the beach, head to the side and dive in the water. Make your way toward the ship, but use stealth swim as you get close. Take out the captain and the soldiers on the ship (start with the gunman to make it easier), then go back to the beach if you’re still shy of the 20 soldier target. Once the captain and 20 soldiers are dead, the mission is complete.

- PlayStation 3
- PlayStation 4
- PlayStation 5
- Xbox Series
- More Systems
- Revisit old friends (spoilers)?
- Assassin's Creed IV: Black Flag
PlayStation 4 PC PlayStation 3 Stadia Wii U Xbox 360 Xbox One
- Topic Archived
More Topics from this Board
- Multiplayer game lab 1 post, 2/11 5:46PM
- Anyone down to help for a single trophy? 2 posts, 12/10 11:56PM
- DLC not available with Gold Edition? 1 post, 11/23 9:58PM
- PS4 Player List (Fleet push, Moby, Comm. Chest) 2 posts, 11/23 8:41AM
- New player please.... 2 posts, 10/14 8:06PM
GameFAQs Q&A
- Where can i find elite hull plan? Side Quest 2 Answers
- Is PS PLUS mandatory for Platinum? Tech Support 1 Answer
- Where can I find the fifth templar key? Side Quest 2 Answers
- What button is the spyglass in assassin creed rogue on Nintendo switch? Tech Support 1 Answer
- Can you dig up Buried Treasure without getting their maps first? Side Quest 4 Answers
To Suffer Without Dying
- View history
- 1 Description
- 4 Behind the scenes
- 6 References
Description [ ]
Edward, having been imprisoned, worked with Ah Tabai to rescue Mary Read and Anne Bonny .
Dialogue [ ]
Edward was led to Mary and Anne's joint trial.
- Judge: The charges, sir. I'll hear them again.
- Official: Milord. His Majesty 's Court contends that the defendants, Mary Read and Anne Bonny, did piratically , feloniously, and in an hostile manner, attack, engage, and take seven certain fishing boats ... Secondly, this court contends that the defendants lurked upon the high seas and did set upon, shoot at , and take, two certain merchant sloops, thus putting the captains and their crews in corporeal fear of their lives.
Woodes Rogers , Laureano de Torres y Ayala , and El Tiburón entered the trial and sat behind Edward.
- Rogers: Edward James Kenway. Born of motley parentage in Swansea ... to an English father and Welsh mother . Married at eighteen to Miss Caroline Scott , now estranged.
- Torres: She is a beautiful woman, I'm told. But not at all well these days.
- Edward: If you touch her, you bastards, I'll—
Rogers drew a flintlock pistol and aimed it in Edward's lower back
- Torres: Quite a surprise finding you here, rotting in a Jamaican prison. We heard rumors that you had taken up with the pirate Roberts .
- Rogers: If you know the Observatory 's location , tell us now and you'll be out of here in a flash.
Torres stood up and spoke over Edward's shoulder.
- Torres: Rogers can hold these British hounds at bay for a time. But this will be your fate if you fail to cooperate.
Torres, Rogers, and
- Judge: ...You, Mary Read and Anne Bonny, are to go from hence to the place from whence you came, and from thence to the place of execution, where you shall be severally hanged by the neck till you are severally dead, dead, dead.
- Anne: O rot!
- Judge: May God in his infinite mercy be merciful to each of your souls...
Mary and Anne interrupted the judge by announcing their pregnancies to the people of Kingston .
- Mary: We're pregnant! Do you all hear that?
- Judge: What the devil did she say?
- Official: They plead their bellies , Milord.
- Anne: Aye! You can't hang a woman quick with child, can ya?
The jury and the lawyers reacted in an uproar.
- Judge: Quiet! Quiet! If what you claim is true, then your executions will be stayed, but ONLY until your terms are up.
- Anne: Then I'll be up the duff the next time you come knocking!
- Judge: Remove them!
Four months after the trial, Edward was locked in one of Port Royal 's gibbets .

Edward distracting the guards
- Soldier 1: What's your name, pillock? Kenmore? Conway?
- Soldier 2: It's Walpole , ain't it?
- Soldier 1: Walpole? Where'd you get that?
- Soldier 2: That's the rumor going 'round. As dirty and daft a pirate as ever sailed these West Indies .
- Soldier 1: Well, whatever his name, you're to make sure he suffers without dying. Orders from the governor. And back to the prisons at sundown.
- Soldier 2: And massage his feet if he's aching, shall I?
- Soldier 3: Jaysus , a shit detail as ever was.
- Soldier 2: Can't they kill the bastard? Ain't been a good hanging in months, since Rackham got his.
- Soldier 3: Eh, hard to understand how it works. I've heard it said they scooped up Captain Vane near a year ago, and he's not seen the end of a rope.
- Soldier 2: I can't fathom it. Some men they stretch for days after capture. Others they sit on.
As Ah Tabai hid in the bushes, Edward rattled his cage to distract the guards.
- Edward: Oy! Hey! Ahhhhhhhh! Oy! Water! Hey! Open this gibbet.
- Soldiers: Quiet! Quiet you! Oy! You stop that! Oy! Stop that. Stop your twaddle! This is a warning!
Ah Tabai assassinated the guards.

Ah Tabai rescuing Edward
- Ah Tabai: Good morning, captain Kenway. I have a gift for you.
Ah Tabai took the cage key from one of the soldiers' bodies and tossed it to Edward, who released himself.
- Ah Tabai: Do not mistake my purpose here. I have come for Anne and Mary, and you owe me nothing for this. But if you would lend me your aid, I can promise you safe passage from this place.
- Edward: I'll need weapons.
- Ah Tabai: You are comfortable with these, I am told...
Edward was given two Hidden Blades , a blowpipe , and a supply of darts .
- Ah Tabai: We must hurry.
- Soldier 4: Why 'aven't they killed that other one? Walpole, or some such idiot name.
- Soldier 5: Maybe he has friends looking out for him.
- Soldier 4: Or money. Like Stede Bonnet from Barbados .
- Soldier 5: Naw, naw. They hanged him too.
- Soldier 4: Did they?
- Soldier 5: Aye. Blubbering and bawling, he collapsed at the gallows. Weeping like a little lamb .
- Soldier 4: Serves the bastard right.
Edward found Jack Rackham's skeleton in a gibbet.
- Edward: You weren't much of a friend, Jack Rackham. Nor an able sailor neither. But you were strange and lively, and you made me laugh more than once. And that's enough to make me sorry for seeing you like this. I hope you found a lasting peace, down there, among the dead.
Edward and Ah Tabai entered the prison complex, where they found a delirious Charles Vane in a cell again singing " Down Among the Dead Men " as he did when marooned.
- Vane: Here's a health to the king and a lasting peace / To faction an end, to wealth increase; / Come, let us drink it while we have breath, / For there's no drinking after death, / and he that will this health deny, down among the dead men, / Down among the dead men, / Down, down, down, down, / Down among the dead men let him lie.
- Edward: Hello, Vane. I caught wind you'd been discovered and brought here. Didn't hear what happened after though.
Vane shouted unintelligibly.
- Edward: Best of luck to you mate. I wish we'd parted as friends.
In a nearby cell, Anne Bonny shouted for help from the guards.
- Anne: You spineless cockrobin! Help her, for God's sake. Fetch help, somebody! Mary's ill! Somebody please!
- Soldier 6: Hush your pie hole, bloody mick!
- Anne: Fuck off, you! Ahoy! My friend's just had a child, and she's... and she's poorly now! Help, somebody!
- Soldier 7: Shut your bleeding trap, or I'll fill it my own way!
- Anne: Sassenach (English) bastards! Murderers! Grown men, the pair of you, standing over a dying lady like she was a piece of meat!
- Soldier 6: A dying pirate! There's your difference!
- Soldier 7: Aye. If she dies from childbirth, all the better, eh? God carries out her sentence and our hands are clean.
- Anne: You bastards! Somebody help!
Edward and Ah Tabai dispatched the two guards.

Edward and Ah Tabai rescuing Mary and Anne
- Edward: Mary? Mary, it's me! Edward!
- Anne: Edward? Who's this fella!
- Edward: It's all right, Anne. He's a friend. What's wrong with Mary?
- Anne: She's ill.
- Edward: And her child?
- Anne: They took her. No idea where. Ah!
- Ah Tabai: I know it pains, M'lady. But we must be silent.
- Edward: Can you walk? Lean on me, Mary. Come on.
- Mary: I can't...
- Soldier 8: Search every cell!
- Edward: Come on. That's it. You're all right.
- Mary: Stop! Stop. Please.
- Edward: I ain't leaving you, dammit! Lift your arm!
- Mary: It's no good.
- Soldier 9: There's no one here!
- Edward: I ain't leaving you nowhere! No bloody way!
- Mary: Put me down, Edward! Don't die on my account. Go.
- Edward: You're such a pain in the arse. Damn it, you should have been the one to outlast me.
- Mary: I've done my part. Will you?
- Edward: If you came with me, I could. Mary?
- Mary: I'll be with you, Kenway. I will.
Mary passed away and Edward carried her body outside.

Edward bringing Mary's body to the others
- Soldier 8: Fan out! Search every nook and cranny!
Edward met with Ah Tabai and Anne Bonny.
- Anne: What's happened to Mary? What's wrong?
- Ah Tabai: Is she gone?
- Anne: Oh, no... Oh, God!
- Ah Tabai: What will you do now?
- Edward: Nothing sensible.
Ah Tabai returned Edward's robes to him.
- Ah Tabai: You haven't earned these, but they suit you. Good fortune to you, Edward Kenway.
Outcome [ ]
Edward escaped captivity, along with Anne Bonny, but Mary Read died after childbirth.
Behind the scenes [ ]
Even if Edward does not rattle his cage, the game does not wait for the player and still lets Ah Tabai kill the guards and free Edward.
It is possible to leave Mary's body behind, resulting in a slightly altered ending cutscene. [ citation needed ]
If players have Edward head in the opposite direction of Ah Tabai's boat immediately after being freed from the gibbet, a glitch can [ citation needed ] occur where Edward is able to free roam in Port Royal wearing his prison rags.
Gallery [ ]
")
References [ ]
- Assassin's Creed IV: Black Flag
- Assassin's Creed
- 1 Assassin's Creed (series)
- 2 Basim Ibn Ishaq
Hero's Adventure: Road to Passion

Report this post
COMMENTS
Here are the optional objectives: You are now being held in a cage. Keep shaking the cage, acting as a distraction for your old assassin buddy to come save the day. Once you are freed, sneak up to ...
This is a quick tutorial on how to visit the two old friends in sequence 11 memory 1 for the main mission constraints/optional objectives
OPTIONAL OBJECTIVE- visit the two old friends. In this mission, you do not need to sneak. Still, moving quickly among covers should make the mission faster and easier. Right next to the cart that you are in, there is the first alarm bell. Once of the guards patrols the area next to the cart . Deal with him.
How to find the 2 old friends you need for the Visiting Old Friends challenge in Assassin's Creed IV Black Flag
Quickly duck around the corner and interact with the flashing cage here to visit with an old friend ( Friend 1 of 2 visited). Return to the corner. Now wait for all of the guards to look away from your position. When this happens, we are going to run across the small street directly to our left and jump into the bush on the opposite side.
Visit old friends. Visit old friends. "Visit old friends" is an optional mission objective in Sequence 11 / Memory 01: To Suffer Without Dying. Walkthrough edit. There are 2 old friends for Edward to meet with. The first is found to the East of the second Alarm bell. Look at the cage nearby the building (close to the Animus Fragment).
- Visit old friends. *Note: "Visit old friends" refers to the caged skeleton of Jack Rackham, located outside to the right of the forts entrance, and Charles Vane, captive inside the prison.
Warning: Optional Objectives: Sabotage three alarm bells. Visit two old friends. Subscribe to Premium to Remove Ads Part 1: Infiltrate¶…
Warning: Optional Objectives: Sabotage three alarm bells. Visit two old friends. Subscribe to Premium to Remove Ads Part 1: Infiltrate¶…
Lets play together Assassin's Creed IV Black Flag walkthrough pt_ 24 Visit Old FriendsSubsciribe for more videos and give a 👍Suport me for more videoshttp...
Assassin's Creed 4: Black Flag Walkthrough Part 68 - Sequence 11 "To Suffer Without Dying" Part 2. Optional Objectives: Visit 2 old friends. On the rooftop you have a number of Soldiers to evade. Go over to the right and take a corner position. Wait for the patrolling guard to move away. After that duck into the Stalking Zone that is ...
Visit old friends . After the cutscene, you have to rattle the cage until another assassinate frees you. You'll get your equipment back, except for your dual swords and pistols. Make your way to the prison entrance and eliminate/avoid the guards along the way. ... 2 months ago. Pistol Whip Cheats & Cheat Codes for PlayStation 5, Windows, and ...
Visit two old friends; When the scene starts you can choose to rattle the cage to help in your escape or simply wait for events to unfold naturally. Once you have control, head left up the crates and into the trees to a Leap of Faith into a hay cart and then assassinate the guard that walks by. Wait for the Captain and nearby guards to turn ...
- Visit 2 old friends. Shake the cage by pressing any button, do this until an assassin releases you. You'll get your hidden blade and blowpipe back which will allow you to sneak in the fortress and utilize stealth. For your first optional objective, you have to sabotage three alarm bells before reaching the prison building. The alarm bells are ...
KS2 Maths & English SATS complete exam walkthroughs & revision:https://www.youtube.com/@DrYacineKoucha/playlists?view=50&shelf_id=7 GCSE & IGCSE Maths comple...
- Visit old friends x2 When you are freed, head towards the entrance and you should spot your first bell. When no eyes are looking, disable it and then head right; you should see a second bell for ...
- Visit old friends (2) You find yourself back in Abstergo. Head down the hallway, following the location marker. When you reach the security camera, enter the code: 5, 7, 7, 3. Walk down the hall to the left until you reach the terminal location, then enter the code: 7, 7, 7, 3. Initiate remote hacking to play Frogger again!
official grand master assassin of north america/united states and all the assassins creed boards gotenks2004ss4 10 years ago #3 The other is the guy who was sailing with the2 girls and got busted, he gets killed and placed in a hanging swing cell like Edward was in, it's on the border outside the castle by an alarm bell.
To Suffer Without Dying was a virtual representation of one of Edward Kenway's genetic memories, relived by a research analyst at Abstergo Entertainment in 2013 through the Animus Omega. Edward, having been imprisoned, worked with Ah Tabai to rescue Mary Read and Anne Bonny. Edward was led to Mary and Anne's joint trial. Judge: The charges, sir. I'll hear them again. Official: Milord. His ...
Edward pays his respects to an old friend and adversary...
Memory 4 - The Fireship. Sync -. Use the mortar to sink 3 ships. Use barrels to sink a ship. -Escort the fireship. Get behind the ship and follow it, take out any ships you see as you want ...
Assassin's Creed Black Flag - Sequence 11 Memory 1 - To Suffer Without Dying - Locations in order to visit 2 old friends.Video contains no spoilers of who th...
Ikabud Cream Nov 24, 2023 @ 4:18am. If you're in your own sect just follow the quest of your sect with the old man and eventually you will meet the person that the sect master of the melody house is inquiring about. after you meet that person, just report back to the melody house. Also that person she is seeking is only involved in the Three ...