Pre- and Post-Trip Inspection Dos and Don’ts

Minimizing over-the-road breakdowns and preventing out-of-service violations are two of the many benefits of pre- and post-trip inspections. Use this list of dos and don'ts to complete your inspections the right way.

Don't: Think they're optional.
They're the law. Federal Motor Carrier Safety Administration (FMCSA) regulation 392.7 requires pre-trip inspections, while regulation 396.11 mandates post-trip inspections.
Do: Know what to check.
For a pre-trip inspection, check:
- parking brakes
- service brakes
- tires and rims
- steering system
- fluid levels
- belts and hoses
- electrical and air lines
- coupling devices
- air brake warning system
- emergency kit
- lights, reflectors and signals
- all applicable paperwork
Check the same items for post-trip inspections minus the fluid checks — don't touch anything that might be hot!
Don't: Kick-check the tires.
Thump checks don't work, because a tire sounds empty only if it's nearly 100% out of air. Use a calibrated tire gauge instead. Also, make sure all tires have the proper tread depth and that all lug nuts are tight.
Do: Double-check the brakes.
More than 1 out of every 4 vehicle out-of-service violations in the U.S. during the 2023 Commercial Vehicle Safety Alliance's (CVSA's) International Roadcheck were due to brake system violations.
Don't: Do an inspection differently each time.
Instead, develop a routine, and go in the same order with each pre- and post-trip check. Consider starting at the cab, then inside the cab, the front of the vehicle, then around the truck starting at the driver's side.
Do: Take your time.
There's no rush. Budget 10-15 minutes for a proper pre-trip inspection.
Don't: Forget the interior.
A clean cab tells an inspector that the rest of the vehicle is in good shape. A dirty cab says the opposite.
Do: Check your wheels.
It's the best way to make sure your truck doesn't accidentally move when you're doing a pre- or post-trip check. Forgetting to do so could cause a serious injury — or worse.
Do: Keep accurate logs.
Whether you use electronic or paper logs, keep them updated regularly, and make sure all other paperwork (driver's license, inspection, insurance) is current.
Don't: Ignore potential problems.
If you spot something out of the ordinary during your post-trip inspection, report it to dispatch immediately.
Download and share a PDF of this Safety Bulletin with your drivers.
English Español Français

At this time the Penske website requires that you enable JavaScript in order to take advantage of our website features. Please enable JavaScript and retry.
For assistance with other Penske services, please use the numbers below.
Truck Rental
- Household Rentals: 1-800-GO-PENSKE
- Business Rentals: 1-844-906-3404
Used Trucks
- 1-866-309-1962
Truck Leasing
- 1-888-234-4201
Penske Logistics
- 1-800-529-6531
Join 100,000+ Drivers
- Sponsorship
- Thinking of Becoming a Truck Driver?
- Getting a CDL License
- Trucking Driving Jobs Guide
- Trucking Company Guide
- Trucker Life
- Paid CDL Training
- CDL Schools
- Professional Driving Skills + Knowledge
- Owner Operator
- Latest Articles
- Truck Driver Skills
The Pre-Trip Inspection: A Practical Guide For the Truck Driver
Updated February 24th, 2022

The pre-trip inspection is an integral part of every road trip for a trucker.
It’s probably the most disliked and most often overlooked part of the job of the professional truck driver in the trucking industry.
This inspection is meant to be a thorough check of the truck, trailer and load.
The check is to ensure that everything is in correct working order, prior to the truck and driver, departing on a trip.
Any damage or issues found during the pre-trip inspection which needs attention, must be addressed before departure.
CDL Test Pre-Trip Inspection
If you just came through the process of getting your CDL, you can breathe a sigh of relief.
You don’t have to check all 500 or so items that you had to memorize for the test every single day.
Out on the road, a thorough pre trip shouldn’t take more than 10 to 15 minutes.
DVIRs – Daily Vehicle Inspection Report
According to federal law ( FMCSR Section 396.11 ), every day, a driver must submit a Daily Vehicle Inspection Report (DVIR) for each power unit he operates. Multiple trailers can go in one report.
DVIRs are either paper or electronic.
Not every trucking company (ahem) enforces this policy, so some truck drivers can go months or years without submitting a DVIR.
Minimum DOT Pre-Trip Inspection Requirements
- Service brakes including trailer brake connections
- Parking brake
- Steering mechanism
- Lighting devices and reflectors
- Windshield wipers
- Rear vision mirrors
- Coupling devices
- Wheels and rims
- Emergency equipment
Your trucking company’s DVIR might be more thorough.
This is a thorough Q&A on DVIRs which you can refer to.

Inspecting a New Truck
When you are assigned a new truck (either daily or just once), there are a few additional things you need to check for on the pre-trip inspection.
Truck Compliance
- Cab card and book – This is a book containing the registration, inspection, permits, cab cards, IFTA paperwork, and any other important papers for the truck. Make sure it is in the truck and all the paperwork is up to date.
- Inspection sticker – This is outside the truck. Find it and make sure the truck is not overdue.
- IFTA stickers – These are the fuel tax compliance stickers. They are on both sides of the truck. Make sure the current year is displayed.
- Elog device – Most trucks are required to have a working elog device.
- Required permits – These are in the cab card book. The most common permits are Heavy Motor Vehicle Trip Permit (Oregon) and the Weight Distance Tax Permit (New Mexico).
- New York HUT sticker – This is usually on the front of your truck. It’s a type of permit.
- License plate – Make sure the license plates on the front and back of the truck match.
- FMCSA Safety Regulations and Hazardous Materials book – These will be given to you by your company. They must stay in your truck within arms reach from the driver’s seat.
- Paper logbook – If your e-log stops working, you must log your hours in a paper logbook, which must be kept in your truck.
- Medical card – You must keep your current medical card in your truck. Always have your CDL on you as well.
- Orange triangles – You must have 3 triangles for when you break down.
- Fire extinguisher – Must be charged and secured to the truck. No rolling around on the floor.
- Extra fuses – If your truck doesn’t use circuit breakers, you must have spare fuses.
- Load bars and/or straps
- Extra oil, coolant, and windshield washer fluid
- Line antifreeze and diesel anti-gel
- Chains and bungees
- Gladhand seals
- Hammer, wrench, wire cutters, cable cutters, knife with glass-breaker
The Class A Pre-Trip Inspection Process
Unless I have to bobtail to pick up my trailer, I inspect my truck and trailer together.
The best way to memorize a thorough pre trip is to do it the same way each time.
Your process will look different from mine, but as long as you are consistent, you will be less likely to miss anything.
I do the inspection first thing each morning as well as every time I swap trailers.
Paperwork and Trailer
- Check the paperwork. It should be the first thing checked when you get to your truck.
- Match the trailer number to your paperwork. If your trailer has a seal, make sure it matches too.
- Unsealed trailer. If your trailer does not have a seal, open it and confirm the product matches the bills. If you are picking up an empty trailer, open it and make sure it’s actually empty.
- Confirm your destination. Ensure the destination is the same as on your trip sheet or load assignment. If there is a discrepancy, call your dispatcher.

I personally like to start with checking under the hood of the rig. Not everyone does, but I do.
Under the Hood of the Truck
I walk around the front of the truck, making sure all the lights work. Then I open the hood.

- Fluid levels – Check all fluids: coolant, oil, power steering fluid, and windshield washer fluid. Make sure caps are tight for the rad, oil filler, power steering fluid and the dip-stick is seated properly.
- Alternator, water pump, power steering pump –Make sure these are in good working order, and the belts are not worn or have too much slack.
- Observe at the engine block. Check for leaks, fluid running down the side of the engine. Check for wear, cracking or fraying. Inspect fan belts for proper tension and signs of wear.
- Hoses – Check all hoses for leaks, cracks, and tears.
- Wiring – Check wiring for wear.
- Steering linkage – Check linkage for worn or missing parts.
- Tires – Tires should be properly inflated and have decent tread. If there are flat spots on the tire, it needs to be replaced.
- Hub seal – Make sure it’s not leaking and wiped with oil if transparent.
- Brakes – Brake chambers should not be out of round and should be free of grease. Shoes should not be worn down too much.
- Slack adjusters – Pull slack adjuster. If it travels more than an inch, it needs to be adjusted.
- Suspension – Shocks should be in good condition, and not covered in grease or oil.
Back of the Truck
Next, I check the back of my truck because it’s easier to check this before hooking to a trailer.
- Tires – Tires should be properly inflated and have decent tread. If the tires have flat spots, the tire needs to be replaced.
- Suspension – Shocks and airbags should be in good condition, and not covered in grease or oil.
- Drive shaft – Driveshaft should be undamaged and free of grease. Make sure there is no debris in the u-joints.
- Frame – The frame should not have any welds and not cracked or significantly rusted.
- Fifth wheel – The fifth wheel should be properly greased and not broken.
- Fuel tanks – Fuel tanks should not be leaking.
- Stairs and catwalk – Stairs and catwalk should be free of debris and not broken.

Tires should be checked with a tire gauge.
Tip . This is especially if you are slip seating. Tire thumpers aren’t very accurate. If you use a tire thumper, still check with a tire gauge from time to time.
Drives and tandems should be inflated to 100-110 psi and have a minimum tread or 2/32in. Steer tires should be inflated to 110-120 psi and have a minimum tread of 4/32in.
Tires under 50 psi should be replaced, as they can’t retain enough air pressure.
Flat spots can occur from dragging tandems in the winter or when trying to slide the tandems. Tires with flat spots should be replaced.
Check tires for damage, nails, and punctures.

Next, I jump in my cab and start my truck.
- Gauges – Make sure air, oil, and water temperature gauges rise to normal levels.
- Mirrors – Adjust mirrors before moving your truck.
- Windshield wipers – Make sure they work and sit flat against the windshield.
- Horn – Make sure the city and air horns both work.
- Heat and A/C – Check to see if heat and/or air conditioning is working.
- Seat belt – Seat belt should not be frayed and should move freely.
Coupling and Air Lines
This is what could happen if you don’t do the tug test.
The pre-trip inspection is a pretty important thing to do.
Learn your pre-trip procedure and do it when required.
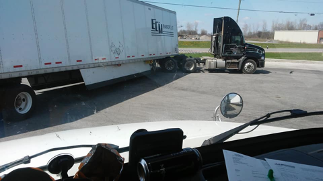
This is why you should always do a tug test when picking up a trailer. The passenger side of the front of the trailer is resting on the frame of the truck and NOT hooked up to the 5th wheel.

The front left corner of the trailer is supported by retracted landing gear only. (Not good!)
The truck driver in this photo (hopefully) learned how critical a pre-trip is. Don’t end up in a pickle like this guy.
Next, I hook up to my trailer.
- Tug test – I back under my trailer until I hear a click, and then immediately do a tug test.
A tug test tests both your coupling and your brakes. If you pull away from your trailer, you aren’t hooked properly.
If you pull your trailer with you, your trailer brakes are out of adjustment. Be absolutely sure to write it up and have it corrected before departure.
- 4 Ways + Headlights. I also turn on my four-way flashers and headlights.
- Airlines and pigtails – Next, hook up airlines and pigtails (electrical connection). Inspect to make sure they aren’t leaking or ripped.
- Visual check of Fifth wheel – Look at the fifth wheel arm under the trailer to make sure it is coupled. The arm should be in.
- Landing gear – Raise the landing gear and check for damage.

Next, I check the bulkhead (front of the trailer).
- Wall – Make sure the wall is not damaged.
- Inspection sticker – Check the DOT inspection sticker to make sure it’s not out of date.
- Registration paperwork – Check the front trailer box to make sure the registration is good.
- Reefer unit – If you are pulling a reefer, select the pre trip function on the unit and run it. It should be completed by the time you are finished your pre trip inspection.
Next step for the pre-trip inspection is to check the side of the trailer and the tandems.
- Lights – Lights should be on and flashing.
- Suspension – springs or airbags should be in good condition, and not covered in oil or grease.
- Tandem pins – Tandem pins should be locked in position, and slider arm should be in its cradle.
- Cables – Make sure the tandem cables aren’t dragging on the ground.
- Underbelly – Make sure there are no damaged beams under the trailer. Check the entire length.
- Mudflaps – Mud flaps should not be torn and hanging.
Back of Trailer
Next, I check the back of the trailer.
- Doors – Doors and hinges should not be damaged.
- Door latches – Doors should be closed and secured.
- Seal – Seal should be intact and match paperwork.
- DOT bumper – DOT bumper should not be damaged
- License plate – Check for the license plate. They tend to wear out and fall off.
Passenger Side
Next, I check the passenger side.
- Brakes – Brake chambers should not be out of round and should be free of grease.
- Suspension – Springs or airbags should be in good condition, and not covered in grease or oil.
- Mudflaps – Mud flaps should not be torn.
Ready to Roll

Finally, I jump in my truck and double check my paperwork and destination.
I release my air brakes, roll forward, and push the service brake.
If everything is good, I’m ready to roll.
Post-Trip Inspection
When I’m done for the day, and every time I swap trailers, I do a post-trip inspection. If I am swapping trailers, I do a pre-trip on the new trailer as well.
A post-trip includes:
- lowering the landing gear
- removing the airlines
- uncoupling, and walking around the trailer checking tires, lights, seal, and mudflaps
Then I finish my paperwork and go home.
Slip Seating
If you slip seat (meaning you are in a different truck each shift), your pre- trip check should be more thorough than if you are permanently assigned a truck.
This also applies to the first inspection after being assigned a truck.
Please be courteous and write up any problems or issues found, so the next driver of the vehicle doesn’t have to deal with it.
Side Note: Clean out your truck and throw away any trash. Common courtesy goes a long way in trucking, between drivers.
Pre-Trip Inspection F.A.Q.
Most breakdowns can be avoided with proper preventative measures, such as daily inspections.
Thorough inspections should be done at the start of each shift. Inspections of trailers should be done every time you swap trailers.
Each driver should do a thorough pre-trip every time they swap drivers.
It should take about 10-15 minutes to perform a pre trip inspection.
The DOT. Make sure you stay in compliance so you don’t end up with hefty fines and an out of service.
The best way to memorize your pre trip inspection routine, is to do it the same way every time. That way you’re less likely to miss something. If you have questions, ask your safety team at your company.
Fluids in the engine, engine hoses and wires, brakes and suspension, mudflaps, trailer registration and inspection paperwork, and license plates.
A Few Trip Planning Tips

- Buy and learn to read a trucker’s atlas. It’s useful to plan routes and avoid restricted roads. I find this road atlas a necessity as a professional truck driver.
- Buy a decent trucking GPS , but don’t rely on it 100%. Use common sense.
- Don’t use the GPS in your elog device. It will put you in a lake.
Please note that minimum requirements for the inspection are established by the FMCSA.
But these may vary by state, trucking company, truck type, and trailer type.
It is your duty as a professional truck driver to perform a thorough pre-trip inspection before each trip and before you drive.
You’ll save yourself from headaches, fines and unnecessary accidents.

More Articles You May Like
- Trucking Terms – A Guide to Our Industry’s Lingo
- The 18 Wheeler – A Comprehensive Guide to Big Rigs
CDL Truck Driver Skills – Tips, Tricks + Knowledge to Kick Your CDL Skills Up a Notch!
- The D.O.T. Physical- A Guide For the Truck Driver

Everything You’ll Want To Know About Paid CDL Training

Custom Big Truck Sleepers Photo Gallery Collection

The Best Trucking Companies to Work For 2024 USA

5 Best GPS For Truckers – A Professional Driver’s Guide
Twice a month we email you the best tips and new articles to help you better navigate the trucking industry..

10 Truck Driving Safety Tips Every Professional Driver Should Follow
A veteran 40+ years truck driver shares 10 of the all time, tried and true truck driving safety tips ALL professional truckers should know AND follow! If every driver of EVERY vehicle on the road followed these safety tips, our roads would be SO much safer.

Trucker Tips Master Guide: Expert Advice From Experienced Truck Drivers
A collection of trucker tips from million milers and experienced drivers. These are gold nuggets for the new truck drivers!

Instruction, clear advice, videos and photos for truck driver skills, maneuvers and information for all professional truck drivers.
A practical guide to paid CDL training programs. Recommended Company Sponsored Schools, Requirements, pros + cons, what to expect from company-sponsored cdl training programs.
Is a Career As a Department of Defense Truck Driver For You?
As a Department of Defense (D.O.D.) truck driver, your role is integral to the logistics and supply chain operations of […]
Navigating Fair Truck Driver Pay: Are You Earning Enough?
Ready to take control of your truck driver pay? Discover key factors impacting your earnings and ensure you’re compensated appropriately […]
The Best Tanker Trucking Companies to Work, U.S., 2024
Top Tanker Trucking Companies in the US To Work For Tanker work typically falls to the ‘better carriers’. Tanker carriers […]
Best Flatbed Trucking Companies, US, 2024: Our Top Picks
There are over 1 million truck drivers working for flatbed trucking companies in the U.S. trucking industry. However, not all […]
Best Trucking Companies For New Drivers in the U.S., 2024
For new drivers entering the trucking industry, diving into the right pool can make all the difference. The foundation of […]
Follow Smart Trucking
- Free Practice Tests
Commercial Driving
- Introduction
Getting a CDL
- Fees and costs
CDL Types & Permits
Endorsements & Restrictions
CDL Exam Preparation
Written exams
Practical exams
- Skills test
- Pre-trip inspection
- TSA background check
- Retake policy
CDL Maintenance
ELDT Training & Certification
CDL how-to guides
Mastering the CDL Pre-Trip Inspection Exam: A Complete Guide
Learn how to conduct thorough pre-trip inspections with our guide, a critical component for commercial vehicle safety.

Written by Andrei Zakhareuski. With over 16 years of expertise, Andrei leads Driving-Tests.org, a top online resource for driver education. His leadership has established vital partnerships with over 2,600 libraries, educational bodies, and state agencies.
The CDL Pre-Trip Inspection Exam is an integral part of obtaining your commercial driver’s license. This guide covers Class A and Class B pre-trip inspections, provides a checklist, and offers tips for memorizing the inspection process.
Start a free Pre-Trip Inspection practice test:
- Alabama - AL - Alabama Pre-Trip Inspection Practice Test
- Alaska - AK - Alaska Pre-Trip Inspection Practice Test
- Arizona - AZ - Arizona Pre-Trip Inspection Practice Test
- Arkansas - AR - Arkansas Pre-Trip Inspection Practice Test
- California - CA - California Pre-Trip Inspection Practice Test
- Colorado - CO - Colorado Pre-Trip Inspection Practice Test
- Connecticut - CT - Connecticut Pre-Trip Inspection Practice Test
- Delaware - DE - Delaware Pre-Trip Inspection Practice Test
- District of Columbia - DC - District of Columbia Pre-Trip Inspection Practice Test
- Florida - FL - Florida Pre-Trip Inspection Practice Test
- Georgia - GA - Georgia Pre-Trip Inspection Practice Test
- Hawaii - HI - Hawaii Pre-Trip Inspection Practice Test
- Idaho - ID - Idaho Pre-Trip Inspection Practice Test
- Illinois - IL - Illinois Pre-Trip Inspection Practice Test
- Indiana - IN - Indiana Pre-Trip Inspection Practice Test
- Iowa - IA - Iowa Pre-Trip Inspection Practice Test
- Kansas - KS - Kansas Pre-Trip Inspection Practice Test
- Kentucky - KY - Kentucky Pre-Trip Inspection Practice Test
- Louisiana - LA - Louisiana Pre-Trip Inspection Practice Test
- Maine - ME - Maine Pre-Trip Inspection Practice Test
- Maryland - MD - Maryland Pre-Trip Inspection Practice Test
- Massachusetts - MA - Massachusetts Pre-Trip Inspection Practice Test
- Michigan - MI - Michigan Pre-Trip Inspection Practice Test
- Minnesota - MN - Minnesota Pre-Trip Inspection Practice Test
- Mississippi - MS - Mississippi Pre-Trip Inspection Practice Test
- Missouri - MO - Missouri Pre-Trip Inspection Practice Test
- Montana - MT - Montana Pre-Trip Inspection Practice Test
- Nebraska - NE - Nebraska Pre-Trip Inspection Practice Test
- Nevada - NV - Nevada Pre-Trip Inspection Practice Test
- New Hampshire - NH - New Hampshire Pre-Trip Inspection Practice Test
- New Jersey - NJ - New Jersey Pre-Trip Inspection Practice Test
- New Mexico - NM - New Mexico Pre-Trip Inspection Practice Test
- New York - NY - New York Pre-Trip Inspection Practice Test
- North Carolina - NC - North Carolina Pre-Trip Inspection Practice Test
- North Dakota - ND - North Dakota Pre-Trip Inspection Practice Test
- Ohio - OH - Ohio Pre-Trip Inspection Practice Test
- Oklahoma - OK - Oklahoma Pre-Trip Inspection Practice Test
- Oregon - OR - Oregon Pre-Trip Inspection Practice Test
- Pennsylvania - PA - Pennsylvania Pre-Trip Inspection Practice Test
- Rhode Island - RI - Rhode Island Pre-Trip Inspection Practice Test
- South Carolina - SC - South Carolina Pre-Trip Inspection Practice Test
- South Dakota - SD - South Dakota Pre-Trip Inspection Practice Test
- Tennessee - TN - Tennessee Pre-Trip Inspection Practice Test
- Texas - TX - Texas Pre-Trip Inspection Practice Test
- Utah - UT - Utah Pre-Trip Inspection Practice Test
- Vermont - VT - Vermont Pre-Trip Inspection Practice Test
- Virginia - VA - Virginia Pre-Trip Inspection Practice Test
- Washington - WA - Washington Pre-Trip Inspection Practice Test
- West Virginia - WV - West Virginia Pre-Trip Inspection Practice Test
- Wisconsin - WI - Wisconsin Pre-Trip Inspection Practice Test
- Wyoming - WY - Wyoming Pre-Trip Inspection Practice Test
CDL Class A Pre-Trip Inspection
Engine Compartment Inspection
Includes checking for leaks, belt tension, and the condition of hoses, among other components.
Cab Check/Engine Start
Involves inspecting the cab’s interior, gauges, and starting the engine to check for abnormalities.
Brake Check
Focuses on air brake systems, including air brake checks and the parking brake test.
CDL Class B Pre-Trip Inspection
Vehicle Overview
Begin with a general overview of the vehicle, checking for obvious signs of damage or issues.
External Inspection
Inspect all external components, including tires, lights, and mirrors.
Internal Inspection
Check all internal controls, ensuring everything is functional and within reach.
Pre-Trip Inspection Checklist
- Lights and reflector s: Ensure all are clean and functional.
- Engine oil and coolant levels : Check for adequate levels.
- Steering mechanism : Ensure it’s secure and functioning.
- Horn : Test for functionality.
- Windshield wipers : Check for operability and condition.
- Mirror s: Adjust for optimal visibility.
- Emergency equipment : Ensure presence and accessibility.
- Air brake system : Test for leaks and proper pressure.
Tips for Memorizing the Pre-Trip Inspection for CDL
- Create a Routine : Develop a consistent order in which to conduct your inspection.
- Use Mnemonics : Create acronyms or phrases to help remember the steps.
- Practice Regularly : Hands-on practice is the most effective way to memorize the inspection process.
- Visual Aids : Use diagrams or checklists as visual reminders.
Pro Tip : Practice the pre-trip inspection in a real-world setting. The more you perform the inspection in a practical environment, the more natural it will become.
Remember, the pre-trip inspection is not just a test requirement – it’s a fundamental safety practice every commercial driver should master. For more resources and detailed guides, visit Driving-Tests.org .
Secure your CDL with confidence!
Our exclusive CDL Premium program offers comprehensive online training with an ELDT certificate, authentic exam questions, and a solid Pass Guarantee, starting at only $49. Ideal for first-time applicants, seasoned drivers, and those new to the U.S. road rules.
Explore CDL Premium
Was this page helpful?
- Start a free Pre-Trip Inspection practice test:
- CDL Class A Pre-Trip Inspection
- CDL Class B Pre-Trip Inspection
- Pre-Trip Inspection Checklist
- Tips for Memorizing the Pre-Trip Inspection for CDL
PGT Trucking’s Guide to Pre- and Post-Trip Inspections
A proper pre- and post-trip inspection is what separates the average truck driver from a true professional! Federal law requires that a driver of a commercial motor vehicle completes an inspection every day on each vehicle operated (truck and/or trailer). More importantly, a thorough truck and trailer inspection helps truck drivers keep their equipment in safe working order, protecting everyone out on the road. Don’t skip your pre-trip! Follow PGT Trucking’s guide to pre- and post-trip inspections.
What is a pre-trip inspection?
A pre-trip inspection is a thorough check of the vehicle to ensure everything is in working order before you take off down the road. Flatbed truck drivers should check their tires, brakes, lights, engine fluid levels, securement (if loaded) and more. By completing a general observation of all equipment before leaving, flatbed truck drivers know their truck and trailer are safely ready for the day ahead.
When should I do a vehicle inspection?
Flatbed truck drivers at PGT are required to complete an inspection on their truck and trailer at the start of their day, at the end of their day, and any time they drop or hook to a different trailer. Walk around inspections and load checks should also be completed at every change of duty status (fueling, 30-minute break, loading, unloading, etc.).
Why should I do post-trip inspection?
A post-trip inspection will help a flatbed truck driver identify any defects that may have occurred since the pre-trip inspection. Any repairs that are needed can be addressed immediately instead of delaying the start of a driver’s next trip. For flatbed truck drivers who drop and hook, a post-trip inspection is common courtesy – don’t leave issues for the next driver to find. It’s not safe!
How long should a pre/post-trip inspection take?
A thorough pre/post-trip inspection should take about 15 minutes to complete. It doesn’t take long, but it will save a flatbed truck driver valuable time in the long run. Don’t be stuck on the side of the road with a blown-out tire. Get any problems quickly addressed during the pre/post-trip inspection.
What is the goal of a pre/post-trip inspection?
The purpose of a pre/post-trip inspection is safety ! When equipment fails over the road, it places the truck driver and other motorists at risk. By examining the vehicle at the start and end of a trip, flatbed truck drivers can catch any defects before they cause a bigger problem over the road.
If I find something wrong during my pre/post-trip inspection, what should I do?
Any defects in the truck or trailer must be noted on the Driver Vehicle Inspection Report (DVIR), and flatbed truck drivers should call the PGT maintenance hotline and their Fleet Manager . Any item considered out-of-service by the Department of Transportation (DOT) must be repaired immediately before the vehicle can move. Any defect that is not considered an out-of-service DOT violation must be repaired before that truck or trailer can be dispatched on another load. Drivers should not operate the vehicle if they feel it is in an unsafe condition or has any out-of-service defects!
What are the most common defects found during a pre/post-trip inspection?
At PGT, the most noted defects during a pre/post-trip inspection are related to the tires, brakes or lights. While all equipment should be reviewed for possible safety concerns, flatbed truck drivers should pay extra attention to these problem areas.
Do I need to wear any personal protective equipment (PPE) while doing a pre/post-trip inspection?
Yes! You should have your safety vest, gloves, appropriate footwear, goggles, and hard hat on while performing safety functions. Other tools for the inspection include a flashlight, tire depth gauge and tire pressure gauge.
Should I do a pre-trip inspection on my personal vehicle?
Yes! While it’s not legally required to do a pre-trip inspection, all non-commercial vehicles should still be routinely checked to confirm they are in good operating condition. It’s a great habit to get into, and for flatbed truck drivers, practice makes perfect. Do a pre-trip on every vehicle, every time!
How to Complete a Truck and Trailer Inspection
Step 1: Front of the Tractor
- Complete a visual inspection. Are all numbers and stickers present and clearly visible? Is there any damage or visible leaks?
- Open the hood and check all fluid levels and belt tension.
Step 2: Cab
- Enter the cab and start the engine. Test the horns, inspect the windshield (is it dirty? – clean it!), check the seatbelt and fire extinguisher.
- Is your ELD tablet securely mounted on the dash? Do you have all required documentation in the cab and readily accessible?
Step 3: Air and Lights
- Turn the engine off. Press and hold the brakes, listening for any air leaks or drop in pressure.
- Start the light check and observe all lights during your truck and trailer walk around.
Step 4: Left Front and Right Front Tractor
- Check the tires, brakes, and hub oil levels and look for exhaust leaks.
- When checking tires, check the air pressure, tread depth, sidewall, rims and lug nuts.
- When checking brakes, look for any extreme wear, cracks, soaked/contaminated oil, broken springs or anything out of adjustment.
Step 5: Front of Trailer and Mid Tractor
- Check the fuel cap.
- Look at the catwalk, headache rack, and bulkhead. Is everything clear of debris? Is all equipment properly secured? Remember, bungee cords have no working load limit and should never be used to secure tarps, chains, binders, lumber or pipe stakes.
Step 6: Right Forward and Rear Drive Wheel Ends
- Check both the inside and outside tires. Inspect the brakes, shocks and air lines.
Step 7: Rear of Tractor
- Check the rear light panel.
- Inspect the mud flaps.
- Confirm the fifth wheel jaws are fully closed.
Step 8: Trailer Right Mid Inspection
- Check the dolly legs, winches and straps.
- Check the lights down the trailer.
- Check your load securement!
Step 9: Trailer Right Forward and Rear Wheel Ends
- Check hub oil and grease levels.
- Look at the inside and outside rims and tires.
- Check the brakes, shocks and air lines.
- Drain trailer air tanks.
Step 10: Rear of Trailer
- Check the lights and mud flaps.
- Confirm the DOT tape is visible.
- Look for any damages to the ICC bumper.
Step 11: Trailer Left Forward and Rear Wheel Ends
Step 12: Trailer Left Mid Inspection
- Confirm the inspection, registration and insurance.
Step 13: Tractor Left Forward and Rear Driver Wheel
Step 14: Tractor Left Mid and Trailer Front
- Check the driver stairs.
- Inspect the bulkhead and headache rack.
- Drain the tractor air tanks.
Note: This list is meant to be a guideline only and is not fully comprehensive. Contact your Safety Manager, Fleet Manager or Training Department if you have any questions or need clarification.
Safety is Everyone’s Job – All the Time
PGT Trucking is committed to being a safe and reliable carrier , driven by the best flatbed truck drivers in the industry. We want our Proud Professionals to get home safely after every trip, and that starts with thorough trip inspections. PGT understands that details matter, and we provide multiple resources to equip our flatbed truck drivers with the tools they need to do the job well.
Want to join the company that values your safety above all else? Apply to PGT today !
We have Company Flatbed Truck Driver positions available, averaging $84,000 in gross pay a year. Other benefits include medical, dental, and vision insurance, 401(k) retirement plan, company-paid life insurance, vacation time, and paid holidays. Find out what makes PGT Trucking a 2023 Best Fleets to Drive For® Top 20 Company .
Do you want to haul freight at competitive rates while maintaining your independence? PGT is partnering with experienced Owner-Operators and has one of the best Lease Purchase Programs in the industry. Apply now !

Related posts
When to transition to an owner-operator
Considering a career as an owner-operator/independent contractor? With the ever

Flatbed Trucking Jobs – A Guide for Truckers
With the national truck driver shortage, the demand for truck drivers is at an a

Million Mile Driver Spotlight #8
PGT Trucking introduces our new Million Mile Drivers this year, celebrating thei
- Skip to main content
- Skip to primary sidebar
- Skip to footer
Truckers Training
Everything you need to know to become a truck driver
The Importance of Doing a Thorough Pre and Post Trip Inspection

by Geoff Craig, MBA
Keeping your drivers, customers and the public safe is one of the most important parts of a transport business. This is especially the case when the business involves putting drivers in one of your vehicles on the public roads.

Modern vehicles have so many mechanical parts that require maintenance and care. They also have many electronic components that can potentially go wrong. As a result, the role of keeping a vehicle safe for everyone is a vital commitment. It should not in any way be undermined or underestimated.
Just because a vehicle is safe to drive one day, does not mean that it is safe to drive another day. And just because a vehicle has been returned safely with no obvious mechanical or structural issues, does not mean that the vehicle is safe to drive the next day.
This means that the role of pre-trip and post-trip inspections is absolutely vital. Vehicles accrue not only miles but potential issues that can make them dangerous for drivers and put your business in a precarious situation. This is true both from the point of view of the safety of the vehicles that are going out. It is also true in terms of protecting the business from potential lawsuits or financial losses through negligence or loss of trade.
Taking Inspections Seriously

A vital part of fleet management, therefore, is taking pre-trip and post-trip inspections seriously. Many fleet managers will know a driver or drivers in their fleet who don’t tend to take these inspections seriously, as they take up time and rarely flag up a serious problem. However, they are a vital part of the successful running of a fleet and the safety of all involved. There is also a wide range of factors that should be considered.
Staying Legal
For any successful business, legal compliance is a key issue that should always be at the forefront of planning and execution. Fleet managers should make sure that they are aware of any national or local legislation or regulations that exist with regards to pre-trip or post-trip inspections.
Legislation may be general, or it may be specific to different industries. For example, a vehicle that carries passengers is required to do a post-trip inspection at the end of the working day. This follows a particular format and with a fresh report generated for each vehicle.
Although this could be considered by some to be an onerous task, it effectively generates a paper trail that can tell the story of a particular vehicle. It also enables the business to keep on top of both any individual problems the vehicle occasionally has but also any persistent issues that occur.

These end of day inspections will typically include:
- A test of the braking system
- A test of all vehicle lights
- A test of the windshield wipers
- An inspection of emergency equipment
- A test of tire condition
- A test of the steering
- A test of any coupling equipment
A quick glance at this list and it is obvious that these are daily tests of the most important equipment on the vehicle in terms of safety.
Failure to do these daily tests and log them in the appropriate manner could be detrimental for the business. This is in terms of legal issues and compliance as well as opening up the business to potentially damaging lawsuits in cases of an accident. More importantly, failure to conduct these checks could lead to an unsafe vehicle being on the road and injury or loss of life as a result of such negligence.
Driver Education

A major part of fleet management is not just about managing the vehicles but about managing the personnel. It’s about managing one of the most important resources in the business, that is, the drivers.
Many drivers will be confident in the safety of their vehicles. However, they may not immediately understand the importance of pre-trip and post-trip inspections on a daily basis. This is certainly the case if the inspections can seem time-consuming either at the beginning or the end of the day.
It is important, then, to educate drivers on the importance of these inspections, although not just for legal compliance. It is also important for reassuring them of the safety of the vehicles and the safety of the business for passengers and the drivers.
Safety checks are something that can easily lapse over time as people get lazy or forget to do them. Therefore, it is important that regular education of drivers takes place regularly. Whether through training sessions, mock inspections, and check-ups of drivers’ inspections. This ensures that everyone is on the same page in terms of the importance of regular pre-trip and post-trip inspections.
Educating Staff

As well as educating drivers, it is also vital to educate workers who work in-house about these inspections. They need to understand:
- How important the inspections are, and
- How important the results of the inspections are, and that those results need to be taken seriously.
In the aviation industry, if an inspection indicated that a problem existed on an aircraft, however small, that inspection would be taken seriously, examined, and fixed. Exactly the same should be the case within the automotive industry.
Staff should take all inspection reports seriously. They should also act on the results of any inspections seriously and without prejudice. If not carefully managed, small issues can easily become large issues if they are not taken care of.
Good channels of communication between drivers, fleet managers, and the shop workers will help to keep these processes running smoothly. It will also help the fleet run more smoothly.
What is a Pre-Trip Inspection?

Although both kinds of inspection are important, both serve a slightly different purpose. Arguably the pre-trip inspection is the more important of the two. This is for the reason that it decides whether the vehicle is in a fit or safe enough condition to be driven that day.
As a result of this, the inspection should be considered very seriously and should not be taken lightly. The impact of a careless or cursory pre-trip inspection could be to send a vehicle on the roads that are not safe for use. This could result in loss of life, injury, or damage to the reputation of the business.
What Will A Pre-Trip Inspection Cover?
It will cover a number of important items that will involve determining whether a vehicle is safe to take out onto the roads that day. This is broadly the same as the list produced earlier, but also considering any damage to the vehicle.
A business will need to consider a number of factors:
- How is the pre-trip inspection conducted?
- Who conducts the pre-trip inspection?
- In what format is the pre-trip inspection report produced – for example, on paper, using a tablet, or an app?
- How are the reports to be accessed – for example by those in the shop who may need to work on the vehicle should there be any problems?
A pre-trip inspection will neither be effective nor efficient if the information is not readily available to those who will need to examine it. That is, drivers, fleet managers, in-house staff, etc.
Any problems that may be spotted during the inspection, for example, problems with seat belts, tires, windshield wipers, brakes, etc., should be reported in a standard way.
Many businesses that use pre-trip inspections will have standard forms. These can be particularly valuable for marking external issues, perhaps on a 2D top-down model of the car. Additionally, a similar system will need to be in use also for internal issues.
Mutual Understanding

Whatever terminology is used, or whatever reporting method is used, it is important that all members of the team are on the same page. In that, there is a common understanding of how problems are defined and described. This will help those who are working on the vehicle for repairs to have as clear an understanding as possible as to what problems need fixing. This may require regular training or refreshers on what is required.
Reducing Liability
There also needs to be an understanding of what may be considered a minor problem. A minor problem that needs reporting but the vehicle can go out that day and be repaired at a convenient point, and a major problem that requires immediate repairs.
For example, a minor problem such as a small dent on the side of the, as long as it is noted and scheduled to be repaired, need not stop that vehicle being used that day. However, a noted failure in the operation of the brakes, the windshield wipers, or the tires would be considered more major problems. These problems will require immediate repair before the vehicle can be used safely to transport goods or passengers.
The pre-trip inspection is therefore seeking to answer the question, ‘Is this vehicle safe to take out today, right now?
What is a Post-Trip Inspection?

By contrast, the post-trip inspection is seeking to answer a different condition:
‘Does this vehicle have any damage or failures to its operation that means it needs repairs before the vehicle is taken out again’?
This may be damage caused as a result of it being out for operation that day. For example, a crash or if there has been a problem during the day in operating the vehicle. Examples could also be a broken windshield wiper or punctured tire. Or, general wear and tear on the vehicle over time that has now become noticeable.
As post-trip inspections are undertaken at the end, rather than the beginning of the day, they raise the issue of any vehicles that need remedial work done on them before they are taken out again.
Post-trip inspections and reporting procedures are also important as the vehicle may not be driven by the same drivers on two consecutive days. Efficient reporting methods in relation to these post-trip inspections mean that all drivers and relevant staff can be aware of any issues relating to particular vehicles. Drivers then taking up a vehicle for the day can be assured of good and constant checking procedures on that vehicle over time.
As with the pre-trip inspections, post-trip inspections may flag up issues that need resolving before that vehicle can be used again. This allows fleet managers to manage the vehicles available to their drivers over time. At the same time, they will then be aware of which vehicles are currently off the road for maintenance or repair.
Other Considerations
The question is sometimes asked as to whether it would be adequate to have only pre-trip inspections. However, the answer from a safety and fleet management perspective is a resounding no.
Pre-trip inspections will only flag up a potential issue with a vehicle at the last possible moment and may not give enough time for a repair to take place. There also may not be an available vehicle at such short notice. This can result in a loss of trade, profit, and reputation for the business.
Having both pre-and post-trip inspections doubles the number of eyes on the vehicle and allows for potential problems to be flagged up ahead of time. This makes it easier to arrange alternative transport and minimize loss of trade, profit, or reputation for the business.
Businesses may also consider where they park their vehicles. Vehicles awaiting maintenance or repair could be parked in a different area from those that are waiting to go out. This will help the fleet to run more efficiently and minimize the possibility of a vehicle awaiting repair accidentally being taken out on a job.
Successful pre-and post-trip inspection processes ensure that the appropriate vehicles are on the road. With clear reporting methods used consistently by all, regular training for those who need to inspect and report can increase the efficiency of the vehicle fleet. Vehicles requiring maintenance and repair are well documented and returned to the fleet in good time. This maximizes the efficiency of the business whilst keeping customers and the general public as safe as possible.

Geoff Craig, MBA
Geoff is a freelance writer at TruckersTraining.com with 20+ years of experience driving trucks and buses, dispatching, supervising, and training commercial driving teams. His expertise is writing topics on the transportation and trucking industry, and information technology trends.
- Geoff Craig, MBA https://www.truckerstraining.com/author/geoffcraig/ How to Become a Walmart Truck Driver
- Geoff Craig, MBA https://www.truckerstraining.com/author/geoffcraig/ Best Semi Trucks of the Future Revealed
- Geoff Craig, MBA https://www.truckerstraining.com/author/geoffcraig/ Can You Get a CDL License Without Going to School?
- Geoff Craig, MBA https://www.truckerstraining.com/author/geoffcraig/ Top 10 Highest Paid CDL Jobs
- How to become Truck Driver
- CDL Training
- Best CDL Schools by State
- Truck Driver Salary Guide
- CDL Scholarships Guide
- Paid CDL Training
- Veterans Grant
- Trade Adjustment Assistance (TAA) Grant
- Privacy Overview
- Strictly Necessary Cookies

This website uses cookies so that we can provide you with the best user experience possible. Cookie information is stored in your browser and performs functions such as recognising you when you return to our website and helping our team to understand which sections of the website you find most interesting and useful.
Strictly Necessary Cookie should be enabled at all times so that we can save your preferences for cookie settings.
If you disable this cookie, we will not be able to save your preferences. This means that every time you visit this website you will need to enable or disable cookies again.

- Register / Login
- Trucker's Forum
- Paid CDL Training
- Truck Driving Jobs
- CDL Practice Tests
- High Road Training
Pre-Trip Inspection Study Guide

Our Pre-Trip Inspection Study Guide has everything you need to prepare for the Class A CDL Pre-Trip Inspection Exam . Our study guide will cover the pre-trip inspection terminology as well as a thorough list of all of the parts you will be inspecting on the vehicle. For each part you will be inspecting there will also be a list of items you will be checking for. Our study guide is broken down into the following sections:
- What You Need to Know About Pre-Trip Inspection
Pre-Trip Inspection Practice Questions
- Pre-Trip Inspection Checklist
Pre-Trip Inspection Videos
Pre-trip inspection printable resources, what you need to know about the pre-trip inspection.
The Pre-Trip Inspection is a thorough inspection of the vehicle and all of its major systems. Inspecting the vehicle before driving each day is a Federal requirement and normally takes about 15 minutes. It must be logged in your logbook as "on duty not driving."
You will have to do thorough safety inspections of the coupling system, the vehicle lights, engine compartment, tires and brakes, the chassis, the fuel tanks, and an in-cab inspection.
The following information is a brief summary of Daniel's Complete Pre-Trip Inspection taken from our oustanding free PDF download:
Engine Compartment

You will be checking the engine compartment for any sort of leaks. You will also be checking to see if all components are properly mounted and secured. None of the mounts must be cracked, bent, or broken.
You will be checking all hoses to make sure they aren't leaking, frayed, or sliced and the fluid levels including the oil level, the coolant, and the power steering fluid.
You must check the components like the water pump, the power steering pump, and the alternator to make sure nothing is leaking, the belts are not frayed, and that everything is properly mounted and secured.
From inside the engine compartment you will also find the steering system, the front suspension system, and the front brake system. All components of these systems must be properly mounted and secured without anything being cracked, bent, or broken. Finally you will be checking the tires, rims, and axle seals to make sure the tires are properly inflated, the rim isn't bent or cracked, and the axle seals are not leaking.
Fuel Tank And Battery Area

You will be standing along the side of the tractor doing a series of checks on the mirrors, fuel tanks, batteries, exhaust system, and more. You will check to make sure nothing is bent, cracked, broken, or leaking.
Check the mirrors, door hinges, door handle to make sure nothing is cracked, bent, or broken. Check to make sure there is no fuel leaking and that the fuel cap is secured and the gasket is not missing.
Check the exhaust system to make sure nothing is cracked, bent, or broken. Check the driveshaft, cat walk, and steps to make sure nothing is cracked, bent, or broken.
Check the frame and crossmembers for structural integrity. Check the air lines going to the trailer to make sure they're properly connected and that there are no abrasions, bulges, or cuts. Make sure the gaskets are present.
Check the suspension system and brakes on the drive axles, making sure nothing is cracked, bent, or broken. Make sure the brake linings are the proper thickness and that the air bags and properly inflated. Inspect the brake chambers, slack adjusters, and pushrods are properly mounted and secure. Not Cracked, Bent, or Broken. With the brakes released and pulled by hand, the Push Rod should not move more than 1 inch.
Check the rims, tires, and axle seals of the drive tires for proper inflation, no leaks around the seal, and the lugs are all present and secured.
Coupling System

You will be standing where the tractor and trailer are connected and you'll start by checking the electrical line and air lines to make sure they're properly mounted and secure at both ends. No abrasions, bulges or cuts. Not leaking air. Make sure the electrical line has no wires exposed. Check the gladhands to make sure the seals are in good condition, no cracks or signs of dry rotting. Not leaking air.
Check the skid plate of the fifth wheel and the apron of the trailer to make sure there is no debris and nothing is cracked, bent, or broken. Make sure the fifth wheel is properly greased. Also make sure there is no gap in between the fifth wheel and the trailer apron once the tractor and trailer are coupled. Make sure the kingpin of the trailer is properly mounted and not cracked, bent, or broken and that the locking jaws of the fifth wheel are properly secured when the tractor and trailer are coupled.
Check the mounting bolts where the fifth wheel attaches to the tractor frame. Make sure there are no missing bolts and that everything is secured properly. Check the locking pin if you having a sliding fifth wheel to make sure it's properly locked into place.
Make sure that there is the proper clearance space between the tractor mudflap and the trailer landing gear so that they don’t hit each other when making a turn.

You will start inspecting the trailer at the head board, which is the front wall of the trailer. Make sure there are no holes or missing rivets. Check the landing gear to make sure it is properly mounted and secure. Not cracked, bent, or broken. Make sure the fully raised and the handle is secure in the cradle when the tractor and trailer are coupled.
Check the frame and crossmembers under the trailer to make sure they're not cracked, bent, or broken. Check the tandem frame and release pins to make sure the frame is in good condition and the release handle and locking pins are in the fully locked position.
You will check the entire suspension and brake system for the trailer tandems the same way you did for the drive axles of the tractor. You will also make sure the mudflaps are properly secured. For dual tires check to see that there is proper space between the tires and there is nothing stuck between the tires.
Check the rear door and hinges to make sure they are properly mounted and nothing is cracked, bent, or broken. Make sure the door seals are not worn, torn, or dry rotted.
Light Check

You will be checking all of the lights and reflectors on both the tractor and the trailer. Check the reflectors and reflective tape to make sure they are properly mounted and secure, not cracked, bent, or broken, and clean and illuminated. Check that you have the proper color of amber to the front and sides, and red to the rear.
Start by turning on your marker lights and headlights. Now walk around the entire truck and trailer and point out the lights. Give the function of the light and the location. You should then ask your examiner to help you check your five functions.
While you're sitting in the drivers seat, the examiner will stand to the front of the truck, then behind the trailer. He will then check your Turn Signals, Four Way Flashers and Brake Lights. You must do each function at every location.
The five locations that you must check your lights:
- Front of the Truck
- Both sides of the Truck
- Rear of the Truck
- Both sides of the Trailer
- Rear of the Trailer
The Five Functions you are checking for:
- Left Turn Signal
- Right Turn Signal
- Four Way Flashers
- High Beams/Low Beams
- Brake Lights
In-Cab Inspection

The in-cab inspection and air brake check will cover the various gauges and systems inside the cab along with several tests to make sure you air brake system is working properly.
You will start by checking the following:
- Seat Belt- Properly Mounted and Secure. Not ripped or frayed Adjusts and latches properly.
- Fire Extinguisher- Properly Mounted and Secure. Fully charged
- Three Red Reflective Triangles- My three red reflective triangles are GIVE LOCATION
- Spare Electrical Fuses- My spare electrical fuses are GIVE LOCATION
- Volmeter, Oil Pressure Gauge, Water Temperature Gauge, and Air Pressure Gauge all show proper operation
- City horn and air horn functioning properly
- The windshield and mirrors are clean, no cracks or breaks, no obstructions. The mirrors are in proper adjustment.
- Windshield Wipers and Washers - Demonstrate that the washers work by spraying the windshield. The Wipers are: Properly Mounted and Secure and operate smoothly. The blades aren't cracked or dry rotten.
- Heater and Defroster - Demonstrate that both the Heater and Defroster are working properly.
- Lighting Indicators - Left Turn, Right Turn, Four Way Flashers, and High Beams.
Trailer Parking Brakes - Set the Trailer Brake, release the tractor brake, and then tug lightly on the trailer.
Tractor Parking Brakes- Then set the Tractor Brake, release the trailer brake, and then tug lightly on the tractor.
Service Brake Check - Release both Tractor and Trailer Brakes. Now drive at idle speed. Apply the Service Brake to make sure you come to a complete stop, and that it doesn't pull to the left or right when applying the brakes.
Air Brake Test

The air brake test will consist of a leakdown test to make sure your air brakes aren't leaking air and losing pressure. It will also test the warning lights and buzzer to make sure the driver gets the proper warning if the air pressure drops too low.
There are three stages to an Air Brake Test
#1: Applied Pressure Test
#2: Warning Light and Buzzer
#3 Tractor/Trailer Protection Valve Pop Out
Applied Pressure Test: Build the air pressure to governor cut out. Put the truck in the lowest gear. Then turn off the engine Immediately turn the engine back on. Push in both the tractor and trailer valves. (This will release the parking brakes.) Push and hold the Brake pedal fully. Allow the gauges to stabilize. Announce the gauges have stabilized and the Primary and Secondary PSI. With the Brakes fully pressed, you should not lose more than 4 PSI in one minute. Announce that you are listening for air leaks during that minute.
Warning Light and Buzzer Test: Pump down on the Brake pedal until the warning light and buzzer comes on, at or before 60 PSI.
Tractor/Trailer Protection Valve Pop Out Test: Pump down on the brake pedal until both the tractor and trailer protection valves pop out. They should both pop out between 40 and 20 PSI.
We have a ton of Pre-Trip Inspection Practice Questions along with the answers and a complete scoring system in our Free Online CDL Practice Tests :
The Engine Compartment Section will include questions about checking the oil level and coolant levels, inspecting belt-driven engine components (like the water pump, alternator, and air compressor), and the safety devices required in the cab. There will also be questions regarding the windshield wipers and free play in the steering wheel.
The Lights And Brakes Section will include questions about dashboard indicator lights, inspecting the parking brakes, and doing a leakdown test on the air brakes. It will also include questions about the low air pressure warning signal and testing your air horn and city horn.
The Suspension And Steering Section will include questions about the tractor protection valve, inspecting the steering box, and inspecting many suspension system parts. It will also include questions about welds being present on tire rims and the minimum tread depth required on steering axle tires.
The Tires And Coupling Devices Section will include questions about shiny trails or rusty threads on lug nuts, inspecting the battery box and cover, and inspecting electrical lines. It will also contain questions about inspecting the coupling devices and the fifth wheel skid plate.
The Emergency Equipment And Fifth Wheel Section will include questions about additional emergeny equipment required by school buses, inspecting the gap between the kingpin apron and the fifth wheel skid plate, and the landing gear securement. It will also contain questions about inspecting driver mirrors and the trailer frame.
Pre-Trip Inspection Checklist - Class A
Our pre-trip inspection checklist covers every part of the truck from front to back, both inside and outside of the truck. It covers the air brakes, suspension parts, steering components, wheels and rims, fuel tanks, batteries, lights, and more. It also covers the air brake tug test and checks for everything under the hood including alternator, water pump, fuel pump, fluids, and more.
This is a super handy checklist to study anytime you have a few minutes to spare:
Pre-Trip Inspection Checklist - Free Word Document Download (Editable Version)
Pre-Trip Inspection Checklist - Free PDF Download (Print Version)
Pre-Trip Inspection Video By Apex CDL Institute
Jeff from Apex Institute does an in-depth explanation of the entire pre-trip inspection process. This video is loaded with tips that go beyond the CDL test to help drivers really understand how to identify problems.
Pretrip Inspection Self-Test By CDL College
The Pretrip Inspection Self-Test By CDL College is really unique. It's a silent video which will show you the part you're inspecting and then gives you a few seconds to figure out what you should be checking for before giving you the answer. Definitely check this one out. Great for practicing before the CDL exam.
Pre-Trip Inspection Video By Averitt Express
This is a complete back to front pre-trip inspection of a truck and trailer by Averitt mainentance associate Kevin Breeding. This thorough pre-trip inspection covers all inportant points of inside the cab, lights, engine, the tractor itself and the trailer.
We have included two print versions of the pre-trip inspection process from Daniel. The first is the entire pre-trip inspection and the second is an abbreviated checklist for the inspection.
- PDF: Daniel's Pre-trip Inspection (Print Version)
- PDF: Daniel's Pre-trip Inspection Checklist (Print Version)

Why Join Trucking Truth?

- The High Road Training Program
- The High Road Article Series
- The Friendliest Trucker's Forum Ever!
- Email Updates When New Articles Are Posted
Apply For Paid CDL Training Through TruckingTruth
Did you know you can fill out one quick form here on TruckingTruth and apply to several companies at once for paid CDL training? Seriously! The application only takes one minute. You will speak with recruiters today. There is no obligation whatsoever. Learn more and apply here:
- Privacy Policy

- Fleet Training
- CDL Training
- Insurance Discount
- Court Diversion
- Our Courses
- What is the SPIDER Method?
Pre-Trip Inspection: An Essential Guide for Commercial Drivers
Why are pre trip inspections essential, and how can they make a difference in the daily lives of truck drivers? With safety, regulatory compliance, and preventative maintenance on the line, pre trip inspections are a crucial aspect of ensuring smooth and efficient operations on the road. In this blog post, we dive into the critical components of pre trip inspection and provide valuable tips and resources to help drivers stay ahead of potential hazards and costly repairs.
- Pre-trip inspections are essential for promoting safety, compliance, and cost savings while on the road.
- The pre-trip inspection process should take approximately 10–15 minutes and include items such as braking systems, steering & suspension systems, emergency equipment & engine compartment.
- Establishing a routine for pre-trip inspections with sufficient time to check all components is key to ensuring vehicle safety and regulatory compliance. Accurate records must also be kept.
The Importance of Pre-Trip Inspections

- Lessen accident risks
- Comply with regulations
- Maintain the vehicle’s condition
- Avert expensive repairs and downtime
Frequent inspections, such as periodic inspection, are important for maintaining safety and preventing costly issues.
The benefits of conducting pre-trip inspections include:
- Ensuring safety and compliance with regulations like DOT inspections
- Preventing fines, penalties, and potential harm to the driver’s or company’s reputation
- Acting as preventative maintenance, catching minor issues before they escalate
- Saving time, reducing repair costs, and minimizing downtime
Safety Concerns
Ensuring the vehicle’s safety is of paramount importance when conducting pre-trip inspections. A thorough examination of various components is necessary, including:
- Fire extinguishers
- Brake lights
This enables drivers to spot potential hazards and affirm the vehicle’s operational readiness, ultimately reducing the risk of accidents, in line with the goals of the Commercial Vehicle Safety Alliance.
However, the consequences of neglecting a thorough pre-trip inspection can be severe. Overlooking potential hazards may render the vehicle unfit for operation, increasing the risk of collisions. An inspection focused solely on the vehicle can spot these hazards and confirm the vehicle’s safety, underlining the significance of a thorough pre-trip inspection.
Regulatory Compliance
The Federal Motor Carrier Safety Administration mandates pre-trip inspections as part of DOT inspections for commercial motor vehicles, requiring drivers to acknowledge and certify that appropriate repairs have been made before commencing a trip. Non-compliance with pre-trip inspection regulations can result in fines, penalties, and harm to a driver’s or company’s reputation. Conducting periodic inspections can help maintain compliance and ensure the vehicle’s safety.
A Driver Vehicle Inspection Report (DVIR) is an essential tool to guarantee regulatory adherence. Watching a pre-trip inspection video can help drivers understand the process and ensure they follow the correct procedures, further emphasizing the need for thorough pre-trip inspections.
Preventative Maintenance
Preventative maintenance is an essential aspect of vehicle upkeep, aiming to prolong the lifespan of corporate assets, equipment, and infrastructure. By inspecting, cleaning, lubricating, adjusting, and replacing parts as necessary, drivers can detect minor issues before they escalate into major problems, saving time and money on repairs and reducing downtime.
The advantages of preventative maintenance include enhanced safety, increased efficiency, and minimized downtime. By incorporating pre-trip inspections into a regular maintenance routine, drivers can ensure their vehicles remain in optimal condition and avoid unexpected breakdowns or costly repairs.
Pre-Trip Inspection Process

Conducting pre-trip inspections at the start of each shift and each time a trailer swap occurs is integral. Such regularity aids in upholding the vehicle’s safety, roadworthiness, and regulatory compliance while also acting as preventative maintenance. The average inspection should last between 10-15 minutes, allowing enough time for a thorough examination of all components.
Engine Compartment
Inspecting the engine compartment is a critical part of the pre-trip inspection process. Drivers should examine the engine for leaks, fluid levels, belts, hoses, and other critical components to ensure optimal performance and prevent breakdowns. This includes checking the water pump, power steering pump, and alternator for any signs of leakage, fraying of belts, and ensuring that all components are securely mounted.
Additionally, drivers should verify the location of the dipstick and the appropriate oil level, as well as inspect the coolant system for proper levels, hose conditions, and secure mounting at both ends. By carefully examining each part of the engine compartment, drivers can maintain their vehicle’s performance and avoid unexpected issues on the road.
Exterior and Tires
A thorough inspection of the vehicle’s exterior and tires is crucial for ensuring its safety and roadworthiness. This includes checking the lights, reflectors, fuel tank, battery, and tires for any damage or wear that could impact safety or performance. Tires should be inspected for adequate tread, cuts, bubbles, or gouges, and to make sure there are no foreign objects, such as stones or large debris, between the wheels and no space between tires and rims.
Moreover, it is vital to check and maintain the appropriate air pressure in the tires to ensure optimal performance and prevent tire-related accidents. By carefully inspecting the exterior and tires, drivers can guarantee a safer and more efficient driving experience.
cabin and Controls
The cabin and controls of a commercial vehicle play a crucial role in the driver’s safety and comfort on the road. During a pre-trip inspection, drivers should examine the cabin for proper functioning of:
- other essential equipment
They should also ensure the availability of emergency equipment.
In addition to checking seatbelts, mirrors, seat position, steering wheel, pedals, windshield, lights, turn signals, ABS lights, gauges, windshield wipers, and horns, it’s essential to verify that all required emergency equipment, such as fire extinguishers, warning devices, and first aid kits, are present and in good working condition.
By thoroughly inspecting the cabin and controls, drivers can ensure a safe and comfortable driving experience.
Essential Items on a Pre-Trip Inspection Checklist

In addition to the aforementioned items, a pre-trip inspection checklist should also include the engine compartment, exterior and tires, and cabin and controls, as previously discussed. Combining all these components in a well-structured checklist ensures a thorough and effective pre-trip inspection that promotes safety and compliance.
Braking System
The braking system is a vital component of any vehicle, and a thorough inspection is necessary to ensure proper functionality and safety. During a pre-trip inspection, drivers should examine all components of the braking system, including air brakes, parking brakes, and hydraulic systems.
Specifically, drivers should inspect the following parts of the service brake system for any signs of wear or damage:
- Brake chamber
- Slack adjuster
By carefully examining each part, drivers can guarantee the vehicle’s safe operation and prevent potential accidents due to brake failure.
Steering and Suspension
A vehicle’s steering and suspension systems play a significant role in ensuring proper handling and a smooth ride. During a pre-trip inspection, drivers should inspect the steering components, suspension system, and wheel alignment to guarantee the vehicle’s optimal performance.
Specifically, drivers should examine the following components of the steering and suspension systems:
- Ball joints
- Tie rod ends
- Strut mounts or shock towers
- Steering effort for both manual and power systems
By thoroughly inspecting these components, drivers can maintain the vehicle’s handling capabilities and provide a comfortable driving experience.
Emergency Equipment
Ensuring the presence and proper functioning of emergency equipment is a crucial part of a pre-trip inspection. Drivers should verify that all required emergency equipment, such as fire extinguishers, warning devices, and first aid kits, are present and in good working condition.
In addition to these items, drivers should also be familiar with the location and operation of any other emergency equipment required by law or their specific company. By confirming the availability and functionality of emergency equipment, drivers can be prepared for unforeseen situations and enhance the overall safety of their vehicle.
Digital Tools and Resources for Pre-Trip Inspections

- Mobile apps that provide checklists and guides for conducting pre-trip inspections
- Online videos and tutorials that demonstrate best practices for inspecting different parts of the truck
- Websites and forums where drivers can stay updated with the latest regulations and requirements for pre-trip inspections
By leveraging these digital tools, truck drivers can enhance their knowledge and efficiency when it comes to pre-trip inspections.
These digital resources not only simplify the pre-trip inspection process but also help drivers maintain compliance with regulations and support preventative maintenance efforts. By leveraging technology, drivers can enhance their pre-trip inspections and promote safety and efficiency on the road.
Mobile Apps
Mobile apps designed for pre-trip inspections can greatly benefit truck drivers by creating checklists, tracking progress, and storing records digitally for easy access and compliance. Some popular mobile apps for pre-trip inspections include iAuditor, Whip Around DVIR software, Teletrac Navman Pre-trip Checklist tool, and Titan GPS Digital Pre-trip Inspection.
By utilizing these apps, drivers can:
- Generate checklists tailored to their specific vehicle and requirements
- Monitor their progress throughout the inspection
- Maintain digital records for future reference and compliance purposes
This not only simplifies the driver only inspection process but also ensures that drivers are following a thorough and effective routine.
Online Videos and Tutorials
Online videos and tutorials serve as valuable resources for truck drivers looking to enhance their pre-trip inspection skills and knowledge. By accessing these resources, drivers can learn best practices for conducting pre-trip inspections and stay updated on regulations and requirements.
Drivers can find online resources on websites, YouTube channels, and other digital platforms that provide informative and instructional content on pre-trip inspections. By staying informed and utilizing these resources, drivers can ensure they are conducting thorough and effective pre-trip inspections that promote safety and compliance.
Tips for a Successful Pre-Trip Inspection
To ensure a thorough and effective pre-trip inspection, truck drivers should establish a routine, take their time, and keep accurate records. Following these tips allows drivers to boost safety, comply with regulations, and bolster preventative maintenance efforts.
Adopting a consistent routine for pre-trip inspections helps ensure that all components are checked and nothing is overlooked. Here are some tips to follow:
- Allow sufficient time for a thorough inspection, typically between 15-30 minutes, to prevent missed issues and potential safety hazards.
- Check all essential components, including tires, brakes, lights, mirrors, and fluid levels.
- Keep detailed records of the inspections, including any issues identified and actions taken.
Regularly review and update your inspection checklist to ensure it covers all necessary items. By following these tips and maintaining a consistent pre-trip inspection routine, you can demonstrate compliance and support preventative maintenance efforts.
Establish a Routine
Developing a consistent routine for conducting pre-trip inspections is crucial for ensuring all components are checked and nothing is overlooked. Adhering to a systematic process lets drivers ensure the vehicle’s safety, roadworthiness, and regulatory compliance.
Some recommended components to include in a pre-trip inspection routine are:
- The engine compartment
- Exterior and tires
- Cabin and controls
- Braking system
- Steering and suspension
- Emergency equipment
By incorporating all of these components into a well-structured routine, drivers can guarantee a thorough and effective pre-trip inspection.
Take Your Time
Allowing sufficient time for a thorough pre-trip inspection is essential to prevent missed issues and potential safety hazards. An average inspection should last between 15-30 minutes, giving drivers enough time to examine all components in detail and ensure the vehicle’s safety and roadworthiness.
Allocating time for pre-trip inspections helps drivers reduce the risk of missing critical issues and affirm the vehicle’s operational readiness. Remember, a thorough vehicle only inspection is not only essential for safety but also for compliance with regulations and preventing costly repairs down the line.
Keep Accurate Records
Maintaining detailed records of pre-trip inspections is essential for demonstrating compliance with regulations and supporting preventative maintenance efforts. Drivers should document any issues identified during the inspection, along with the actions taken to address them.
Maintaining accurate records enables drivers to easily refer back to past inspections and monitor the vehicle’s maintenance history. This not only helps ensure compliance with regulations but also supports proactive maintenance initiatives that can prevent major issues and costly repairs.
In Conclusion
Pre-trip inspections are an essential aspect of ensuring safety, compliance, and preventative maintenance for truck drivers. By following a systematic process, utilizing digital tools and resources, and implementing practical tips, drivers can guarantee thorough and effective inspections that promote safety and efficiency on the road. Remember, a well-executed pre-trip inspection not only minimizes risks but also contributes to a smoother and more enjoyable driving experience.
Frequently Asked Questions
Which of these items should be checked in a pre-trip inspection.
A pre-trip inspection should include thorough safety inspections of the coupling system, vehicle lights, engine compartment, tires and brakes, chassis, fuel tanks, and an in-cab inspection, and must be logged in your logbook as “on duty not driving.” This inspection should be done before every trip to ensure the safety of the driver and other motorists. It is important to check the coupling system for any signs of wear or damage, as well as the vehicle lights, engine compartment, tires and brakes, chassis, and fuel tanks. Additionally, an in-cab inspection should be conducted to ensure that all safety requirements are met.
What is the first step in the pre-trip inspection?
The first step of the pre-trip inspection is to check under the hood, starting at the front of the vehicle and inspecting the various components of the truck’s engine compartment. Begin by checking the oil level, coolant level, and power steering fluid level. Make sure all hoses and belts are in good condition and that all fluid levels are at the proper levels. Check the battery terminals and cables for corrosion and make sure the battery is connected and functioning.
What are the ABSC in a pre-trip inspection?
Pre-trip inspections involve inspecting all parts of a truck and trailer for abrasion, bruises, cuts, bent, broken or cracked parts, and ensuring all air and liquid-holding parts are not leaking. It’s recommended to do the inspection in order, starting with the truck and then the trailer, touching each part and working from the top down and from the center out while wearing gloves.
Which is not checked during an exterior pre-trip inspection?
The reservoir sight glass of the coolant level is not checked during an exterior pre-trip inspection, whereas the oil pressure gauge, wiper arms and blades, horn and heater/defroster should all be checked.
What does DOT mean in inspection?
DOT stands for U.S. Department of Transportation and a DOT inspection is conducted to ensure that commercial motor vehicles are up to standards and safe for public use.

Everything You Need to Know About CDL Medical Requirements

CDL Hours of Service Regulations – Everything You Need to Know
- All Companies
- Driver Training
- All Freight Types
- Lease/Purchase
- Message Board
- Truck Driver Salary
- How to Become A Truck Driver
- Will I Be Successful?
- Truck Driving Schools
- CDL Practice Tests
- Get Your CDL
- Get Your First Truck Driving Job
- Your First 100,000 Miles
- Advanced Tips
- Sign Up Here
Select Location x
Please tell us your location.
Location not set
The Complete Pre-Trip Inspection Checklist

Due to heavy memorization, the pre-trip inspection is one of the hardest aspects of the CDL test. Also called the “Vehicle Inspection Test,” the pre-trip is one of the tests that trucking students fail the most.
With this pre-trip inspection checklist, we tell you everything you need to know and what you need to check for.
Engine Compartment – What to Check For:
When checking the engine compartment, you always want to make sure the following components are properly mounted and secured. You should also make sure they are not cracked, bent, or broken. The items you need to check for include:
Belt-Driven Alternator
All of the wires are connected. The belt is not cracked or frayed, and the free play on the belt is between ½ to ¾ of an inch.
Belt-Driven Water Pump
The free play on the belt is between ½ to ¾ of an inch, and all the hoses running to and from the water pump are tightly clamped. Ensure nothing is leaking.
Brake Chamber
The brake chamber is not leaking air.
The brake drum is properly mounted and secure.
The brake hose is rubber; it is not cracked and is not leaking air.
Brake Lining
Check for oil or debris on the lining. There should be at least ¼ of an inch of friction material.
Caste Nuts and Cotter Pins
All three caste nuts and cotter pins are present.
Coolant Reservoir

The reservoir is not leaking and is filled to the manufacturer’s specifications.
The drag link is properly mounted and secure, and not cracked, bent or broken.
Gear Box and Hoses
The gear box and hoses have no abrasions, bulges or cuts, and are not leaking.
Gear-Driven Air Compressor
The air compressor is properly mounted and does not leak.
Gear-Driven Power Steering Pump
The steering pump is properly mounted and not leaking.
General Hoses (Passenger and Driver’s Side)
The hoses are secure at both ends and are not leaking. There are no abrasions, bulges, or cuts.
The hub seal (or axle seal) is leaking and is filled to the manufacturer’s specifications.
Leaf Springs
None of the leaf springs have shifted or are bent or broken.
There are no signs of leaks under the truck.
There are no lug nuts missing. There are no rust trails, powder residue, or cracks around the bolt holes.
The oil level is filled to the manufacturer’s specifications.
The pitman arm is properly mounted and secure. It is not cracked, bent, or broken.
Power Steering Fluid Reservoir
The power steering reservoir is not leaking and is filled to the manufacturer’s specifications.
The rim does not have any unauthorized welds.
Shock Absorber
The shock absorber is not leaking. If it is leaking, the leak will be at the point where the top and bottom portion of the shock meet.
Slack Adjuster and Push Rod
With the brakes released and pulled by hand, the push rod does not move more than one inch.
Spring Hanger
The spring hanger is properly mounted and secure.
Steering Column
The steering column is properly mounted and secure. It is not cracked, bent, or broken.
There are no abrasions, bulges, or cuts on the tread or sidewalls. Tread depth should have a depth no less than 4/32 of an inch. Tires are properly filled to the manufacturer’s specifications. This can be checked with an air gauge.
The tie rod is properly mounted and secure, not cracked, bent, or broken.
Make sure all are accounted for.
Driver Door Fuel Area-What to Check For:
Remember – during the pre-trip inspection, you want to make sure these items are properly mounted and secure. Look for cracks, bends, and breaks.
The actual airbag has no abrasions, bulges, cuts, or leaks. The airbag is not missing mounting bolts.

The axle seal is not leaking and is filled to the manufacturer’s specifications.
The brake drum is secured properly and has no cracks, bends or breaks.
Check the brake hose at both ends to make sure it is not leaking air.
There is no oil or debris on the brake lining. There is at least ¼ of an inch of friction material.
Catwalk and Steps
The cat walk and steps are clear of any loose objects.
Door and Hinges
The doors open, close, and latch properly. Door seals should not be worn, torn, or rotten.
Drive Shaft
The drive shaft is not twisted, and the u-joints are free of any debris.
The tread and sidewalls have no abrasions, bulges, or cuts. The tread depth is no less than 2/32 of an inch. Tires are properly filled to the manufacturer’s specifications. This can be checked with an air gauge.
Exhaust System
The exhaust system shows no signs of leaks.
Frame and Cross Members
There are no unauthorized holes or welds. Bundle up the cross members to ensure none are missing.
Fuel is not leaking from the tank, and the cap is on tight.
There are no rust trails, loose bolts, powder residue, or cracks around the bolts.
Mirrors are clean, with no cracks or chips.
The mud flap is secured properly, with no cracks, bends and breaks.
There are no unauthorized welds.
The shock absorber is secure at both ends and not leaking. If it does leak, it is preferable to leak in the middle.
There is proper spacing between the tires and there is nothing stuck.
The spring arm is secure at both ends.
Spring Mount
The spring mount is secure at both ends.
The torque arm is secured properly, with no cracks, bends or breaks.
No u-bolts are missing.
Coupling Area-What to Check For:
Air lines should be secure at both ends with no abrasions, bulges, or cuts. They should not be leaking, dragging, or tangled.
Make sure the apron is properly mounted and secure. Look for cracks, bends, and breaks.
Make sure there is enough space between the tractor mud flap and the trailer landing gear, so that they don’t hit each other when making a turn.
Electric Line
The electric lines are secure at both ends. There are no abrasions, bulges, cuts, or exposed wires.
There is no space between the apron and the skid plate.
The seals are in good condition with no cracks, signs of rotting, or leaking air.
The king pin is properly mounted and secure, without cracks, bends and breaks.
Locking Jaws
Physically check that the locking jaws are fully locked around the king pin.
Mounting Bolts
No mounting bolts are missing.
The platform is properly mounted and secure, without cracks, bends and breaks.
Release Arm
The release arm is in the fully locked position.
The skid plate is properly lubed.
Sliding Fifth Wheel Locking Pin
The pin is in the fully locked position.
Trailer- What to Check For :
The airbag has no abrasions, bulges, cuts or leaks, not missing any mounting bolts.
The brake chamber is properly mounted and does not leak air.
The brake hose is secure at both ends with no abrasions, bulges, cuts, or leaks.
No oil or debris on the brake lining and at least ¼ of an inch of friction material.
No missing cross members.
Header Board
The header board does not have any holes or missing rivets.
Landing Gear
The landing gear is fully raised and the cradle handle secure.
No rust trails, powder residue, or cracks around the bolt holes.
The rims do not have any unauthorized welds.
Rear Door and Hinges
The rear door opens, closes, and latches properly. Door seals are not worn, torn, or dry rotten.
The shock absorber is secure at both ends with no leaks.
When the brakes are released and pulled by hand, the push rod does not move more than one inch.
Tandem Frame and Release
Release handle and locking pins are in the fully locked position.

Trailer Tire
There are no abrasions, bulges, or cuts to the tread or sidewalls. Tread depth is no less than 2/32 of an inch. The tire is properly filled to manufacturer’s specifications and checked with an air gauge.
Light Check
There are five locations where you must check your lights. These include:
- Front of the truck
- Both sides of the truck
- Rear of the truck
- Both sides of the trailer
- Rear of the trailer
The five functions are:
- Left turn signal
- Right turn signal
- Four way flashers
- High/low beams
- Brake lights
Inspection and Brake Tests-What to Check For: In-Cab
The last section is In-Cab Inspection and Brake Tests. For the In-Cab Inspection you once again want to make sure all of the following components are properly mounted and secure. As well as the following:
Air Brake Test
There are three stages to an air brake test:
- Applied Pressure Test – When doing the Applied Pressure Test, you want to build the air pressure to governor cut out. Put the truck in the lowest gear, turn the engine off and immediately turn it back on. Push in the tractor and trailer valves which then release the parking brakes. Push and hold the brake pedal, allowing the gauges to stabilize. When the gauges have stabilized, announce the Primary and Secondary PSI. Listen for air leaks while doing this.
- Warning Light and Buzzer – Pump down on the brake pedal until the warning light and buzzer comes on. This is typically at or before 60 PSI.
- Tractor/Trailer Protection Valve Pop Out – Pump down on the brake pedal until the tractor and trailer protection valves pop out, this will be between 20 and 40 PSI.
Air Pressure Gauges
The air pressure gauges build to governor cut out.
Emergency Equipment
Truck has a fire extinguisher, three red reflective triangles, and spare electrical fuses.
Heater and Defroster
Demonstrate both the heater and defroster are working properly.
Horns (Air Horn and City Horn)
Blow both horns to make sure they are working.
Lighting Indicators
Check the left turn, right turn, four way flashers and high beams; also point these out on the dashboard.
With the transmission in neutral, fully depress the clutch. Turn the key on, check the ABS light, announce when it comes on and off, and start the engine.
The seat belt is not ripped or frayed and adjusts and latches properly.
Oil Pressure Gauge
The engine oil pressure gauge should rise to normal operating range.
Parking Brake
- Trailer Parking Brakes – Set the trailer brake, release the tractor brake, and tug lightly on the trailer.
- Tractor Parking Brakes – Set the tractor brake, release the trailer brake, and tug lightly on the trailer.
Service Brake Check
Release both the tractor and trailer brakes. Drive at idle speed. Apply the service brake to make sure you come to a complete stop and that it doesn’t pull to the left or right when applying the brakes.
The voltmeter is charging between 13 and 14 volts.
Water Temperature Gauge
The water temperature gauge rises to normal operating range.
Windshield and Mirrors
The windshield and mirrors are clean, with no obstructions and in proper adjustment.
Windshield Wipers and Washers
Demonstrate the wipers and washers are working properly by spraying the windshield.

This is a really nice complete list, very useful.
Comments are closed.
Contact ClassADrivers.com
Please use the form below to contact our customer service or sales team.
You can also reach us at (888) 830-2326. Our normal business hours are Monday-Friday 8 a.m. to 5 p.m. (Pacific Time).
Our business address is: Attn: Class A Drivers MH Sub I, LLC dba Internet Brands 909 N Pacific Coast Highway, 11th Floor El Segundo, CA 90245
By clicking the ["Send"] button, you agree to our Terms of Use and Privacy Policy , and to the use of cookies described therein, and you also consent to the collection, storage, and processing of your data in the United States where the level of data protection may be different from that in your country.
How To Prepare for a Post Trip Inspection
Completing a post trip inspection is as important as the pre-trip inspection and should be the last thing you do for the business day. When completing this end-of-day roadside truck inspection , your goal is to ensure safety, prevent accidents and help your company control its expenses while hauling a load.
Learn more about what’s involved in the 5-step post trip inspection, as well as how and why you should complete each of the steps.
Streamline your fleet management business with Trimble ELD
What is a post trip inspection .
You may have heard it referred to as a Driver Vehicle Inspection Report. That’s because, during the inspection, you’re looking for vehicle weaknesses or signs that something could be wrong.
Drivers complete the report at least every 24 hours on hauls that require more than a day of service. If you’re stopping at a truck stop for the night, you can likely get a paper version of the form, or you can plan for a trip by downloading the necessary forms online.
During the inspection, you’ll examine all components of your truck. The driver of the truck then signs the report stating if they found any faults or concerns. In the case of finding something concerning the truck, the driver should contact their mechanic or supervisor to discuss options for the condition.
Then, the mechanic or supervisor will sign off on the form. In addition to completing the post-trip inspection each day, you should complete an inspection before ending your shift and transitioning the truck to another driver.
Fleet managers should maintain the record for no less than 90 days. But if you’re an owner-operator, you’ll be expected to maintain these records.
How Do Post Trip Inspections Work?
During these exams, you’ll review a post trip inspection checklist that ensures you examine the crucial aspects of your truck’s mechanics. The post trip inspection should include reviewing the status of the following areas of the truck.
- Coupling devices
- Emergency equipment
- Steering system
- Tires, wheels, and rims
- Turn signal lights
- Windshield and wipers
5 Steps for How To Prepare for a Post Trip Inspection
Preparing for a post-trip inspection is fairly simple and involves 5 steps. Here’s a look at how to improve your trucking company’s compliance, safety, and cost-control.
Step 1: Create an Inspection Form
When creating your company’s inspection form, think through how to make it as smooth as possible by organizing it in the same order that a driver would pass by the truck’s mechanisms while completing a full walk around the truck’s exterior.
You want the form to be cohesive, simple, and clear. A checklist format is something that most people recognize and provides a simple checkbox or location for notes about concerning conditions the driver observes.
Step 2: Give Drivers Proper Training
You must include pre and post trip inspection training in your truck driver onboarding process. Because each company handles it a bit differently, you cannot assume that your new drivers know how to complete your inspections.
Walk each new driver through the process slowly, taking time for questions and showing the driver what to look for as they walk around the vehicle. Do regular workshops and refresher courses for existing drivers to ensure everyone is giving the post-trip inspection the time and attention it deserves.
Step 3: Oversee Inspections
Post-trip inspections will happen inside your facility as the driver prepares to hand over the truck to the next driver. This offers an opportunity for you to observe a driver’s inspection process.
Plus, you can also get the chance to intervene if you’re seeing anything missing or concerned about how the driver completes the inspection. Coach the driver through those missing processes.
Also, ensure that the driver knows what they are looking for when inspecting the various aspects of the vehicle. Finally, you want to make sure the driver knows how to report an issue or vehicle concern if they were to find one.
Step 4: Create Clear Processes
Even once you have a solid post-trip inspection form, your work isn’t done yet. You need to put processes in place so that drivers know what to do when they encounter a mechanical problem.
Drivers need a clear understanding of mechanical problems that should make them stop and talk to a mechanic versus one that just needs to be monitored throughout a trip.
You should have clear processes for the following aspects of vehicle inspections.
- Park trucks awaiting maintenance in a separate area from those ready for their next trip.
- Have clear processes for what a driver should do if the truck they expected to drive for a shipment today is now out of service due to a maintenance issue the previous driver found during the inspection.
- Put notification processes in place to help guide drivers about whether their upcoming truck is ready for its next shipment or if they should be talking to dispatch about a different truck.
- File post-inspection paperwork in a specific location where you can easily reference it and where drivers know to turn it in at the end of each trip.
Step 5: Implement Electronic DVIR
Use an electronic driver vehicle inspection report (DVIR) to make the process simple for your drivers and for your administrative team who has to house and maintain these reports.
Your software for your digital telematics system likely has an option for a digital vehicle inspection report. And your drivers will already be logging into this app for routes, information, and hour of service compliance.
Implementing a digital process helps you save time, report issues to the relevant party quickly, build efficiencies, and foster communication to ensure smooth processes.
Importance of Post Trip Inspections
Completing a daily vehicle inspection isn’t just about meeting compliance regulations . It helps ensure that you and other drivers remain safe on the roadways. Here are the top reasons to be fully focused and tuned in during a post inspection.
Time To Repair Damages
Completing an inspection can help you complete transporting goods without an issue, which means more on-time deliveries for your customers and more repeat business. When you catch damage early, it allows time for your mechanic to fix the issue before it becomes a roadside problem that strands you for several hours, causing delays.
Problems are Noted and Reported
Mechanics can only help drivers when they know there is a problem. Having important details about what a driver sees on the vehicle can help inform the mechanic to decide whether the maintenance needs to be done right away or if it can wait until the truck reaches the next terminal. The inspection keeps everyone informed and ensures open, timely communication among parties.
More Eyes on the Vehicle
Because a driver must complete the inspection before handing over the truck to the next driver and then that driver must complete a pre-trip inspection, it helps put more eyes on the vehicle to ensure no one misses anything. Two drivers checking all crucial truck mechanisms are better than one.
Catching Potential Violations
Completing thorough pre-and post-trip inspections can prevent your business from facing costly violation fees. From there, you’ll also have the cost-benefit of avoiding breakdowns and costly roadside repairs. So, overall, the exercise is an excellent cost-containment practice and ensures driver safety and compliance with all regulations.
Detecting Issues Before They Become Roadside Breakdowns
Driver vehicle inspection reports help ensure safety and efficiency in the trucking process. You’ll be able to prevent most roadside breakdown scenarios and meet all compliance regulations for trucking. Put the five-step process in place to ensure you have clear procedures to follow and documentation methods in case of an audit.
Pre- and post-trip inspections help detect mechanical issues before they fail and cause an accident or roadside breakdown. They are also required to comply with federal regulations.
A DVIR helps drivers and mechanics collaborate on the safety and drivability of a vehicle. It helps protect all motorists and the truck driver from a mechanical failure that could cause an accident.
A post-trip inspection could include reviewing the following aspects of the vehicle: brakes, coupling devices, emergency equipment, headlights, steering system, tail lights, tires, wheels, and rims, turn signal lights, windshield, and wipers.
Sign up for a FreightWaves e-newsletter to stay informed of all news and trends impacting supply chain careers and operations.
More From Education
How to implement a fleet safety program, best team driving companies, 7 freight truck types & what they haul, does curb weight include fuel.
FreightWaves Ratings reference a list of approved sources for use of research to support editorial research and drafting. These include the Federal Motor Carrier Safety Administration, U.S Department of Transportation, Better Business Bureau®, International Fuel Tax Association, Inc, Federal Highway Administration, additional Federal, State, and Local government websites, internal data compiling, original research, and commentary from industry experts.
With Trimble, you're more than a customer. We partner with clients across the U.S. and Canada to implement holistic technology solutions that connect every part of the supply chain.
Trimble ELD – Maximize the ROI of your technology investment
- OTR Flatbed Company
- OTR Van Company
- Regional/Dedicated Van Company
- OTR Heavy Haul Company
- OTR Flatbed Lease
- OTR Van Lease
- Regional/Dedicated Van Lease
- OTR Heavy Haul Lease
- Owner-Operator
- Career Path
- Available Positions
- Hiring Areas
- Job Matcher
- Learning Center

« View All Posts
Do I Have to Do a Post-Trip Inspection? [The Importance of Post-Trip Inspections]
March 10th, 2023
![Do I Have to Do a Post-Trip Inspection? [The Importance of Post-Trip Inspections]](https://blog.drive4ats.com/hubfs/Images/Blog/Post-Trip/SteeringWheelFeatured.png "post pre trip")
Kelli Bloom
Kelli has been in the trucking industry since 2003. She got her start working in compliance for a trucking carrier that specialized in government freight. She has been the compliance manager with ATS since 2017.
Is there anything worse than waking up to a flat tire on your tractor or trailer? It puts a wrench in your entire plan for the day. By now you should understand a pre-trip is essential, but do you know why a post-trip inspection is also important?
Post-trip inspections are often overlooked. They work hand-in-hand with pre-trips to ensure your tractor and trailer are in good working order every time you get on the road. When you catch something in a post-trip inspection, you have extra time to get it fixed.
Failing to do a pre-trip and post-trip inspection every day you’re out on the road can result in dire consequences or a violation on your driving record.
Here at ATS, we’re safety driven. We have several safety programs in place to keep our drivers and the motoring public safe. That’s why, in this article, we'll explore the reasons why post-trip inspections are so important and we'll provide some tips for how you can conduct a thorough and effective inspection.
You'll have a better understanding of why post-trip inspections matter and how they can help keep you and others on the road safe.

Why is a Post-Trip Inspection Important?
This safety check is essential to ensure your truck is safe to drive when you start it up again for your next trip. Your truck and trailer undergo some wear and tear when you drive. Issues that weren’t there when you did your pre-trip may arise.
While a pre-trip helps you ensure your truck is roadworthy and nothing was stolen or damaged overnight, a post-trip helps you identify issues after you drive. This allows you to have them addressed before you drive again.
During a post-trip inspection, you should examine various parts of the vehicle, including the tires, brakes, steering and suspension, lights, mirrors and other safety features.
In addition to safety, post-trip inspections are important for maintenance and repair purposes. By identifying issues early on and reporting them to the appropriate department, you can take care of repairs quickly.
Call your driver manager or the maintenance team. Don’t let the issue go unfixed for you or another driver to deal with later. Taking care of issues right away, rather than letting them lie, can help reduce the likelihood of more extensive repairs being required down the line.
Post-trip inspections are also often required by your trucking company, as they’re considered a best practice. You’ll stay in compliance with your company’s rules and regulations by doing a daily post-trip.
Related: How to Prevent Costly Breakdowns
When Should I Do a Post-Trip Inspection?
It’s best practice to do a post-trip inspection once you’re done driving for the day. Really, you should be taking a good look at your truck every time you stop — when you fuel, when you take a break, when you stop at a customer’s site, etc.
If you notice something is wrong, catching it during a post-trip is ideal. Many drivers would rather not catch anything wrong with their truck at all, sure, but when you catch an issue during your post-trip, you have more time to get it fixed.
If you catch it during a pre-trip, you’re ready to start your day. Now, you have to make an entirely new plan. You might be waiting hours for someone to come and assist you or hours for a shop appointment. It can lead to a domino effect where you then miss a delivery or pickup window. You’ll also probably be using up a lot of your valuable drive-time hours.
But if you catch it during a post-trip, you can call your company to help you get a shop appointment immediately in the morning. You can grab the part to fix it after you’ve taken your legal 10-hour break (if you’re allowed to fix the truck).
Related: Can Drivers Do Their Own Truck Repairs?
Or, while you’re on your 10-hour break, you can wait for someone to arrive with the part and tools to fix it for you. You’re utilizing your rest time, rather than the time you’d be using to drive if you catch it during a pre-trip.
Remember: If you’re helping to fix the truck in any way, you should be tracking your Hours of Service.
Let’s put it this way: If I notice I have a flat tire when I get to work, do you think I’m going to get it fixed during the day? Or do you think I’m going to wait until I have to leave for the night to get someone out to fix it? I’m going to make sure it’s taken care of during the day so I can drive home right away after my shift.

What to Check During a Post-Trip Inspection
During a post-trip inspection, be thorough. It may take you around 10 to 15 minutes to do a complete post-trip inspection. Essentially, you want to make sure nothing is leaking, everything is bolted on properly and securely and everything is in good working order.
Here’s a list of the parts and components you should be looking at on each section of the tractor and trailer:
Front of Vehicle
- Lights
- Potential leaks
- Vehicle levelness
- Engine
Engine Compartment
- Fluid levels
- Air and water hoses
- Alternator belt/wires
- Steering linkage/components
- Wheel assembly
Driver Side/Fuel Area
- Door and mirror
- Catwalk/steps
- Drive axles
Rear of Vehicle
Coupling System
- Air/electrical lines
- Fifth wheel
- Front lights/reflectors
- Landing gear
- Cross members
- Side lights/reflectors
- Tandem slide/release arm
- Trailer axle
- Back of trailer.
- Safety equipment
- Heater/defroster
- Turn signal indicators
- Glass (windshield, mirrors, windows)
For a thorough list of what you should look for when examining each of these parts, and to learn how to do a three-step air brake test, visit our pre-trip inspection checklist .

Extend the Life of Your Truck and Prevent Violations
Post-trip inspections are a crucial component of safe and effective vehicle operation. By taking the time to conduct a thorough inspection after every trip, you can help ensure the safety of everyone on the road and help keep your tractor and trailer in good working order.
If you notice something, say something. Drivers often let things go when they catch them in their pre- or post-trip inspections. You can get caught for the simplest issues, like having an in-cab light out or a burned-out trailer light. When you get a violation, there are consequences.
Learn more about CSA scores and ISS scores and how they negatively impact you.
Remember: If you have a breakdown as an ATS driver, call Road Service and then your driver manager.
Platform Overview
The Connected Operations Cloud
Apps & Driver Workflows
Messaging, dispatch, documents, ELD
Video-Based Safety
AI cameras, driver coaching, safety reports, in-cab alerts
Equipment Monitoring
Location tracking, utilization, continuous diagnostics
Vehicle Telematics
Real-time GPS, routing, fuel, maintenance, electrification
Site Visibility
Remote visibility, proactive alerting, on-the-go access
Integrations
Developer API
Start building with our API
App Marketplace
Install turnkey integrations
OEM Integrations
Unlock embedded telematics data
Experts Marketplace
Find certified Samsara experts
By Business Need
Reduce costs across your business
Automate regulatory compliance
Ensure safety wherever you operate
Identify and eliminate risks
Sustainability
Prepare for transition to renewables
Customer Experience
Build customer loyalty and retention
By Industry
Transportation & Logistics
Food & Beverage
Field Services
Construction
K-12 Schools
Higher Education
Passenger Transit
Customer Success
Customer Stories
Education & Training
Customer Support
Help Center
Developer Portal
Customer Tips
Case Study Highlight

DHL consolidates 7 separate point solutions with Samsara’s integrated platform
Read more ➔

Nutrien Ag Solutions
Nutrien Ag Solutions cuts distracted driving in half 90 days after installing AI Dash Cams
Video Library
Product Tours
Fleet Safety Guide
Business Resilience

State of Connected Operations
See how leaders are adopting cutting-edge technologies, empowering their workforce, and unlocking new revenue streams.
Optimization

Make More Possible
Find ways to make more possible across your organization to empower your workers, increase efficiency, and reduce operational costs.

Build Your EV Fleet
Get the essentials on fleet electrification and better understand how an EV fleet can benefit your business.
Investor Relations
Samsara Ventures
Brand Assets
Featured News

Apply for the 2024 Connected Operations Awards
Samsara's 2023 Environmental, Social, and Governance (ESG) report
What is a Pre-Trip Inspection for Class B CDL?
October 22, 2021

Get Started With Samsara
Key Takeaways
Pre-trip inspections are an important part of a driver’s daily routine. For Class B commercial driver’s license (CDL) holders — many of whom drive passenger-carrying vehicles — a pre-trip inspection can help ensure everyone stays safe. Learn more about what’s involved in a Class B pre-trip inspection.
What is a pre-trip inspection?
A pre-trip inspection is a thorough review and examination of a commercial vehicle's major systems and parts before heading out on a route. Completing the pre-trip inspection is one of the most common and important tasks commercial drivers must perform. Drivers have to perform this vehicle inspection at the start of a new day, every 24-hours, and whenever they change vehicles. After completing this inspection, drivers must complete a driver vehicle inspection report (DVIR) recording the completed inspection.
Pre-trip inspections for class B licensees
The class B commercial driver’s license (CDL) covers both passenger carrying and non-passenger vehicles. These might include straight trucks, box trucks, large passenger buses, dump trucks, waste collection trucks, tractor-trailers and more. Depending on the vehicle driven, the class B pre-trip inspection may have slight variations.
The Department of Transportation (DOT) requires drivers to perform a pre-trip inspection before driving a commercial vehicle. Similar to Class A CDL holders, the actual daily pre-trip inspection takes about 15 minutes or less. Typically, the inspection includes the following with employer and business-specific inspections.
Brakes and air system
Steering mechanism
Lights and reflectors
Tires, wheels, and rims
Windshield wipers
Rearview mirrors
Emergency equipment
Class B CDL pre-trip inspection checklist
When getting a CDL, passing the pre-trip inspection test is much more intensive than the pre-trip inspections drivers perform while on the job. This pre-trip inspection checklist for a Class B CDL gives drivers an overview of what and how to perform an inspection. Check your state’s CDL manual for a complete list of inspection requirements.
See Class A pre-inspection checklist here.
Engine compartment
Fluids - coolant, oil, and power steering : Reservoirs and tanks should not leak. Check hoses for splits or cuts and that they are securely mounted on both ends. Verify proper fluid levels with a dipstick.
Belts - alternator, pumps, compressor : All belts should be securely mounted without cracks or frays. Belt should have no more than 1/2" to 3/4" of play.
Hoses (passenger and driver’s sides) : All hoses, including the power steering hose and coolant hose, should be secured on both ends. They should not have splits, cuts, or leaks.
Air compressor: May be difficult to see. Ensure it’s securely mounted, not broken, cracked or leaking.
Alternator : All wires are properly connected.
Water pump : All hoses are properly connected and not leaking.
Front of vehicle
Steering gearbox and hoses : No damage or leaks. Hose should be secured on both ends. They should not have splits, cuts, or leaks.
Steering shaft/steering column : Not bent or broken.
Pitman arm : All caste nuts and cotter pins are present and tight.
Drag link : Rubber is not split and properly greased.
Upper and lower control arms and tie rod : Tie rod should be secure, not cracked or bent.
Front suspension
Spring mounts/spring hanger : Not cracked or broken
Leaf springs : None are cracked, broken, or shifted.
U-bolts : All accounted for.
Shock absorber : No visible leaks. Leaks will show at the point where the top and bottom of the shock meet. Rubber is not split or shows signs of dry rot.
Airbag : Check rubber for abrasions, cuts or audible leaks plus any missing bolts.
Side of cab and under vehicle
Mirrors and bracket: Hardware attached properly. Mirror should be clean and not broken.
Door and hinges : Demonstrate door operations, latching properly, hinges intact. Door seals should not be torn or rotten.
Steps : Mounted properly and can hold weight.
Fuel tank: Not leaking; cap is tight with seal intact.
Catwalk (if applicable) : Properly mounted and clear of loose objects.
Baggage compartment (if applicable) : Demonstrate door operations, latching properly, hinges intact. Door seals should not be torn or rotten.
Drive shaft : Not twisted, U-joints not broken and free of debris.
Exhaust system: Not loose, no sign of leaks (exterior soot).
Frame : Nothing broken or unauthorized welds.
Brake system (both tractor and trailer)
Brake hose : Securely mounted on both ends. No splits, cuts, and not leaking audibly leaking air.
Brake chamber : Not audibly leaking air.
Slack adjuster and push rod : When brakes are released and pulled by hand, the push rod should have no more than 1” of play. It should stay at a 90° angle to the brake chamber.
Brake drum : No bluing from excessive heat.
Brake pads/brake lining : Check for oil and debris on the lining. Minimum brake pad thickness is ¼.”
Wheel system
Wheel rims : No unauthorized or illegal welds.
Steer tires : Look for cuts, bulges, and abrasions on the tread and sidewalls. Tread depth should be a minimum of 4/32”. Tread should be evenly worn. Check inflation levels on tires with an air gauge, filled to manufacturer’s specifications.
Drive tires : Look for cuts, bulges, and abrasions on the tread and sidewalls. Tread depth should be a minimum of 2/32”. Tread should be evenly worn. Check inflation levels on tires with an air gauge, filled to manufacturer’s specifications.
Valve stem . Properly secured, metal cap in place. Not audibly leaking air.
Lug nuts : All accounted for. Check for rust or cracks.
Hub seal/axle seal : Should not be loose. No visible leaks.
Spacing (if applicable) : There must be proper spacing between the tires if equipped with duals.
Rear suspension
Airbag : Check rubber for abrasions, cuts or audible leaks, plus any missing mounting bolts.
Torque arm/radius rod : Secure mounting, bushings intact.
Rear of vehicle
Doors and hinges (if applicable): Secured and should open, close and latch properly. Door seals have no separation, no rubber tubing sticking out.
Mudflap : Secured, not missing or broken. At the right height.
Check all lights on the front, both sides, vehicle rear. Turn on to ensure lights and reflectors are working.
Running lights : Walk around the vehicle to examine all.
High beams/low beams: Walk around the vehicle to examine all.
Turn signals : Signal both right turn and left turn. Walk around the vehicle to examine all.
Hazards/4-way flashers and clearance light : Walk around the vehicle to examine all.
Brake lights : Ask the examiner to watch brake lights. Confirma they worked using the side mirror.
License plate lights : Walk around the vehicle to examine all.
Reflector tapes : Clean and not worn. Walk around the vehicle to examine all.
Passenger items
Doors and hinges (if separate from driver door) : Secured and should open, close and latch properly. Door seals have no separation, no rubber tubing sticking out.
Wheelchair lift: No wear, damage, or other abnormal conditions.
Handrails and step lights : Handrail mounted firmly, bolts accounted for. Step lights are all working.
Emergency exits : Labeled and able to open and close. If there is an alarm for the door, ensure it works when the door is open.
Seating : Not torn, securely mounted.
School bus items
Student loading lights: Walk around the vehicle to examine all. None cracked or broken. All lights able to flash.
Stop/safety arm : Able to fully extend with lights
Student mirror : Secure, not cracked or broken. No obstructions and properly adjusted.
First aid and body fluid cleanup kit : Labeled and stocked with supplies. Nothing expired.
In-cab inspection and air brake test
Seat belt: No rips or frays and should adjust and latch properly.
Lighting indicators : See lights and reflectors section
Oil pressure indicator : Demonstrate normal operating range.
Water temperature gauge : Demonstrate normal operating range.
Air pressure gauges : Build to governor cut out.
Ammeter/voltmeter : Charging between 13 and 14 volts.
Mirrors : Secure, not cracked or broken. No obstructions and properly adjusted.
Windshield : No more than a 1” crack is permitted. Clean and free of debris.
Windshield wipers and washers: Turn on to show they are working properly.
Horns (city and air) : Show they are working properly.
Heater/defroster : Turn on to show they are working properly.
Safety/emergency equipment : Must have fire extinguisher, three red reflective triangles and spare electrical fuses. Extinguisher must be fully charged and secured.
Steering wheel : Secured to steering column.
Foot pedals : Free of grease and debris. No obstructions.
Hydraulic brake check : Pump the brake pedal several times. Apply pressure to the pedal and hold for five seconds. The pedal should not move.
Air brake check : Air brake devices vary. Drivers must test three components of the air brake check correctly: applied pressure, warning lights and buzzers, and valve pop-outs.
Parking brake: Apply and put the vehicle in low gear and try to move. Drivers must test separate brakes (tractor and trailer) individually.
Service brake : Release brakes. Drive 3 – 5 mph. Apply the service brake and come to a complete stop. Ensure steering does not pull to the left or right when applying the brakes.
Are you a student trying to take a class? Click here...
Email Address Password
Register | Forgot your logon info?
By logging into J. J. Keller Training, you agree to the Terms of Use . For information about how we use any personal information we collect for our own purposes, please review our Notice at Collection .
- Construction
- HR & Legal
- Workplace Safety
- Recordkeeping
Entry-Level Driver Training: Pre- and Post-Trip Inspections: Post-Trip Vehicle Inspections:

Per Seat Cost: 25 Points
Material Code: 65291
Cancel
Deleting this Training Reminder will remove all existing occurrences of this reminder and will stop all scheduled future reminders for this course.
About Us | Terms of Use | Privacy and Security | FAQ's | Contact Us
Copyright 2024 J. J. Keller & Associates, Inc.
Visit www.jjkeller.com for other products and services. (Web-47E)
Access to this function has been disabled by your Training Coordinator. If you have questions, please contact:
Complete post-trip inspection checklist for CDL drivers

By The Schneider Guy
Estimated reading time: 5 minutes
Performing a post-trip inspection is one of the most important daily tasks a professional truck driver does . Post-trips allow drivers to ensure their tractor and trailer are in good , safe condition after completing a trip .
Keep reading to learn more about post-trip inspections and see what needs to be on your post-trip inspection checklist.
What is a post-trip inspection?
A post-trip inspection is a mandatory inspection performed after driving to ensure nothing went wrong with the equipment while operating it. These inspections must be performed on every piece of equipment a driver operates throughout the day.
A thorough inspection could take anywhere from 30 minutes to one hour and should be logged as on-duty, not driving (line 4).
Post-trip inspection requirements
A driver is required to complete a post-trip inspection :
- Whenever a trailer is dropped.
- At the end of each day.
Post-trip inspections are required by Federal Motor Carrier Safety Association (FMCSA) regulation 396.11 . If any faults or defects are found during the inspection , drivers are required to submit a Driver Vehicle Inspection Report (DVIR) .
Complete p ost-trip inspection checklist
1. passenger - side engine : .
- Air filter housing: Secure mounting, cover in place.
- Windshield washer fluid reservoir: No leaks, proper fluid level.
- Turbo charger: No oil or exhaust leaks.
- Engine air duct work: No cuts, clamps secured.
- Alternator: Mounting secured, no broken or loose wire.
- Accessory drive belt: Not cracked or frayed.
- Air conditioner compressor: Mounting secure.
2. Front brakes (covers all five brake components) :
- Brake drum: No cracks.
- Brake lining: No cracks or damage.
- Inner oil seal (not visible): Check for leaks (look for oil running down brake drum or tire).
- Slack adjuster: Proper angle to the brake chamber, clevis and cotter pin intact.
- Brake air line: No bulges or cuts, fitting tight.
- Brake chamber: Mounting bolts secured, band clamp secured.
3. Front wheel :
- Tire: ABCs (abrasions, bulges, cuts), pressure = 120 PSI, tread depth = 5/32 mins, 4/32 DOT.
- Wheel: Not cracked or bent.
- Hub oil: Not leaking, at proper level – if sealed unit, can’t check level.
- Oil seal (outer): Not leaking.
- Valve cap: Not missing.
- Lug nuts: None missing, no streaks or shiny areas, none loose.
4. Driver side of engine :
- Radiator brace: No cracks, no missing bolts.
- Radiator: Not leaking, secure mounting.
- Water pump: No cracks, not loose or leaking.
- Fuel water separator/filter: Not leaking, secure mounting.
- Pitman arm/drag link: Not cracked, castle nut secured with cotter pin.
- Steering gear box: Secure to frame, not leaking.
- Power steering reservoir: Secured mounting, no leaks, proper level.
- Dipstick: Right level, secured after check.
- Steering shaft: Secure, not loose or damaged.
- Fuel pump: No cracks, not loose or damaged.
- Brake master cylinder: Correct fluid level, no leaks.
- Oil filler cap: Secure, no cracks.
- Engine coolant reservoir: No leaks, proper fluid level.
5. Steer axle suspension :
- U-bolts: No cracks, no loose or missing nuts.
- Leak spring: No cracks, not loose or shifting.
- Tie rod: Secured with castle nuts and cotter pins.
- Shock absorber: Secure mounting, not leaking oil.
- Axle: Not cracked
6. Rear suspension :
- Spring mount: No cracks, secure mounting.
- Tire: ABCs (abrasions, bulges, cuts), pressure = 110 PSI, tread depth = 3/32 min, 2/32 DOT.
- Air bag (bellows): Fully inflated, secure mounting, not ruptured.
7. Side of cab :
- Mirrors: Mounting secure, no broken glass.
- Doors: No damage, glass not broken, hinges secured, opens and closes well.
- Lights and turn signals: Working, not cracked.
- Steps: Mounted, secured to skirting.
- Battery box: Mounting secured, cover latched.
- DEF cap: Cap secured.
- Fuel cap/tank: Gasket in place, vent in place, chain secures cap to the tank secure.
- Side skirting: No damage, panels secure.
- Side box: Secured, safety triangles present.
- Side of sleeper berth: No body damage.
- Sleeper berth window: No cracks.
8. Rear of cab :
- Electrical cord: No bare wire, no corrosion, check plug at end of cord.
- Air line: Not tangled or worn, rubber grommets not worn, fittings tight.
- Cab shock absorber: Secure mounting, not leaking oil.
- Cab air bag (bellows): Not ruptured, securely mounted.
9. Drive shaft/rear frame :
- Drive shaft: Not cracked.
- Universal joint: Not cracked, not missing bolts, no shiny areas.
- Differential: Not leaking oil.
- Frame: Straight, no non-factory welds.
10. Fifth wheel area :
- Pivot pin: Keeper pin and cotter key intact.
- Slider lock pins: Fully engaged.
- Release arm: Not bent.
- Slider rail: No broken welds, no missing bolts.
- Slider stop blocks: Welds not broken, not missing bolts.
- 5th wheel platform: Well-greased, tilted down.
11. Front of trailer :
- Top rail: No cracks or collision damage.
- Clearance lights: Not broken, working properly.
- Registration: Not missing, readable.
- Document box: Not missing or loose.
- Air line /glad hands: No bulges or cuts in air lines, rubber grommets not damaged on glad hands.
- Electric hook up: No broken pins, cover intact.
- PM sticker: Current, legible.
- Height sticker: Legible, legal for route.
- Placard holder: Not broken or missing rivets.
- Tracking device: No cracks or collision damage.
12. Side of trailer :
- Top rail: Not cracked, no collision damage.
- Clearance light: Not broken, operational.
- Bottom light: Not cracked, no collision damage, no missing bolts.
- Landing gear: Legs straight, no broken welds in bracing, sand pads secured and clean handle in cradle.
- Reflector tape: Clean.
- Placard holder: Not broken, all rivets intact.
- Side panels: No holes or cuts, no missing rivets.
13. Rear of trailer :
- Latches: Secured, not damaged.
- Placard holders: Not broken, no missing rivets.
- Lights: Not broken or missing, operational.
- Splash guard: Brackets and guard secured.
- License plate: Secure and clean, light working.
- Bumper: Not damaged, no broken welds.
- Door hooks: Not loose, no missing bolts.
- Hinges: Not cracked, no missing bolts on both sides.
- Door seals: No separation, no rubber tubing sticking out.
14. Trailer suspension :
- Air line: No bulges or cuts, fittings are tight and not rubbing.
- Axle: Not bent or broken.
- Clevis pin/cotter key: Not missing.
- Slack adjuster: Proper angle, clevis pin and cotter pin intact.
- Brake linings: Minimum of ¼ thick, not cracked.
- Brake drum: Not cracked.
- Tire: (ABCs), tread depth = 3/32, air pressure = 110 PSI.
- Spring: Not broken, not shifted.
- Spring mount: No broken welds.
- U bolts: Not loose, not cracked.
- Torque rod: Secure mounting, bushings intact.
- Spring brake chamber: Mounting secure, band clamp secure.
15. Gauges/inside the truck :
- Tachometer: 1000-1500.
- Water temp : 180-205 degrees.
- Fuel: Matches visual when looking in tank.
- Def level: Maintain a minimum of one light bar.
- Oil pressure: 25-50 PSI.
- Speedometer: 0-60 MPH.
- Air pressure: 90-120 PSI.
Get more great driving tips and guides.
Schneider Guy loves the "Big Orange." He's passionate about the trucking industry and connecting people to rewarding careers within it. He's been the eyes and ears of our company since our founding in 1935, and he's excited to interact with prospective and current Schneider associates through "A Slice of Orange."
Related posts

Sliding tandems on a trailer: 16 simple steps to follow

How to safely complete a pre-trip inspection as a truck driver

How to release frozen air brakes on a semi-truck

Recommended
- Click to share on Facebook (Opens in new window)
- Click to share on Twitter (Opens in new window)
- Click to email a link to a friend (Opens in new window)
- Click to copy URL
How Dominic West, wife Catherine joke about ‘deeply stressful’ Lily James PDA scandal 4 years later
- View Author Archive
- Follow on Twitter
- Get author RSS feed
Thanks for contacting us. We've received your submission.
Dominic West and his wife, Catherine FitzGerald, have learned to laugh about his affair with Lily James four years ago.
“I hesitate to speak on my wife’s behalf because it was obviously horrible, particularly for her,” the “Wire” alum told London’s Sunday Times in a profile published April 21, “but we do joke about it sometimes.”
West explained that he and FitzGerald would be running mundane errands and the press would describe the pair as “putting on a show of unity.”

“Even if we’d just been rowing about parking the car or whatever, even if that couldn’t be further from the truth,” he quipped. “And so when we go out we do sort of say, ‘Shall we go and have a show of unity up in London?’”
The “Crown” star, 54, and Fitzgerald, 52, have been married since 2010.
Their marriage was put under a magnifying glass in 2020 when the actor was caught kissing James , who was his “Pursuit Of Love” co-star, in Rome.

“It was an absurd situation. It was deeply stressful for my wife and my kids, but there were lighter moments,” he added . “That was the best that came out of it, really.”
For more Page Six you love…
- Listen to our weekly “We Hear” podcast
- Shop our exclusive merch
When West returned home to the UK, he and the landscape architect insisted their marriage was “strong” in a message posted to paparazzi outside their home.

“Our marriage is strong and we’re very much still together,” read the note, which was signed by both West and FitzGerald. “Thank you.”
Meanwhile, the “Cinderella” star, 35, subsequently canceled her press appearances until May 2021 when she said there was “a lot to say” about the affair but declined to elaborate.
Two weeks later, FitzGerald told The Independent that she and West were “totally devoted to each other” and their “full, vibrant family life together.”
Share this article:

Advertisement
Politics latest: 'When they start caring about us, maybe we'll care back': Why have politicians lost people's trust - and can they win it back?
A special edition of the Politics Hub With Sophy Ridge - live from Grimsby - explores the issue of trust in politicians with a studio audience.
Thursday 25 April 2024 21:20, UK
Please use Chrome browser for a more accessible video player
- 'When they start caring about us, maybe we'll care back': Politics Hub special explores breakdown in trust between voters and politicians
- Boris Johnson 'absolutely' bears some responsibility for breakdown in trust, Tory MP acknowledges
- Audience asked to describe Starmer | And the prime minister
- Scottish Greens will back motion of no confidence in first minister
- Connor Gillies on why the balance of power now potentially rests with one MSP
- Live reporting by Samuel Osborne (now) and Charlotte Chelsom-Pill (earlier)
Another Tory leadership contest would be a "catastrophically bad idea," James Cleverly has said, as he warned Conservative MPs thinking of submitting no-confidence letters in Rishi Sunak not to "jump out of an aeroplane" without a parachute.
The prime minister has insisted he intends to call a general election in the second half of the year - but there has been speculation he could call one sooner to thwart a possible Tory leadership battle.
Asked for his message to wavering colleagues, Mr Cleverly told reporters: "If you're going to jump out of an aeroplane, please make sure you've got a parachute before you leave the aeroplane. And don't say 'no, we'll work that out on the way down'.
"I think those people who think that another leadership campaign, as truncated as it might be between now and the election, is anything other than a catastrophically bad idea - I don't get it."
Mr Cleverly said Mr Sunak inherited a "really difficult situation" because of COVID and the Ukraine war.
He conceded the "disruption" at the end of 2022, when Liz Truss was prime minister for 49 days, was "a disruption of our own making".
By Nick Martin , people and politics correspondent
June gives me a wry smile when I ask her if she trusts politicians. But it soon fades.
"They promise you the Earth, and you don't see anything. And it's soul destroying," she says.
I meet her and husband Joe as they tuck into fish and chips in the town's oldest chippy, the Peabung, which has served this town since 1883.
June tells me she really wants to trust politicians but they "just mess it up every time". I ask Joe if he thinks politicians care about him? "Well hopefully they do. I'm not sure really."
He stops to think for a moment. "I don't really trust politicians," he says.
The findings of a Sky News/YouGov poll are stark and echo how voters like June and Joe feel. The findings suggest voters no longer believe what politicians say.
In some places, there appears to be a deep loss of faith in British politics.
Shannon Donnelly has nearly 200,000 followers on TikTok and has used the platform to develop her Grimsby-based business selling personal safety equipment, such as panic alarms. I ask her if she trusts politicians.
"No - I think things like Brexit has massively changed people's opinion. I won't forget when they said all that money would go to the NHS.
"Now we seem to be in a worse position, but they still expect us to trust them. It's crazy."
Read more here:
The polling was really stark - a collapse in trust in politicians and any faith that they're in it for the right reasons.
In Grimsby, we got an audience together of around 20 to 25 people who are engaged, they care about politics, but they just didn't feel as though they've got anyone to vote for, there's no one that is exciting them at the next election.
So we got them to put their points to the two main candidates for the seat, the Conservative MP Lia Nici and the former Labour MP who wants it back this time around, Melanie Onn.
I think what I found was that people are desperate for a reason to vote for someone.
So whether that is improving the town centre, whether that is doing action on immigration or the economy, they want to vote but they're just not that convinced by the main parties right now.
The person who stood out for me the most tonight was a girl called Sarah, she's 26, she lives with her mum and dad, and she admitted that if she had the chance, she'd leave Grimsby.
She was really echoing that point that the further you get away from London, the more distrustful you are of politicians.
Grimsby is certainly somewhere that we are going to be returning to in the months ahead of the all-important general election.
With a general election looming, what counts as gains and losses for the main parties in next week's locals?
Sky's election analyst Michael Thrasher tells us what to look out for:
Thank you for watching the special edition of our weeknight politics show Politics Hub With Sophy Ridge .
The Target Towns special saw Sophy discuss trust in politicians with a live audience and speak to Conservative MP for Great Grimsby, Lia Nici and her Labour challenger, Melanie Onn .
That's all for now, stick around on the Politics Hub for the latest political updates.
Watch Politics Hub With Sophy Ridge from Monday to Thursday on Sky channel 501, Virgin channel 602, Freeview channel 233, on the Sky News website and app or on YouTube .
Sophy asks the candidates what their pitch to Grimsby voters would be.
Labour challenger Melanie Onn says: "The reason I got into politics was to give back to my community. I was helped when I was homeless when I was 17 by a charity in this community.
"I understand the challenges that people face and I think people want to know that there is some compassion in their politics.
"I think people are tired of the tit-for-tat. And there is an awful lot in the community that I would like to continue to champion and work alongside people."
Conservative MP Lia Nici says: "The tit-for-tat that you see, PMQs, that isn't really what happens. That's the theatre bit. What your MP does is go out, have a look at the legislation and then fight for your town.
"I love Grimsby, I've lived here all of my life, I grew up here. And I stood never thinking that I would become the MP, but I work hard every day to make sure that I'm listening to what you want and to be able to represent that at the heart of government.
"Grimsby is absolutely the top priority for me and it's a great place to be and it's going to grow and it's going to be even better in the future."
Sophy asks the audience if anyone has changed their mind or been persuaded to vote after the show tonight - but no one puts their hand up.
Conservative MP Lia Nici says there will be a "massive cut" in immigration figures when the next figures are released.
"I've challenged the prime minister, each prime minister," she tells Sophy.
"Last autumn I went to see Rishi Sunak and said 'we want to see 'illegal migration halved', he listened to us, and now when we see the next figures coming through you'll see a massive cut."
She admits the number will not actually be halved, but says she expects it to be around 350,000.
The Reform Party is "not a fully formed political party," Tory MP Lia Nici says, adding she is "not worried about any opposition".
"I'm probably more Reform than most Reform candidates, to be honest," she tells Sophy when asked if she was concerned the party could take Conservative votes.
"I'm constantly called a rebel, but that's because most people in Grimsby think in a similar way to the way I do, so I hold our government to account on that."
She adds: "Reform have got a lot of ideas that people locally do like, but are they a fully formed political party? No they are not."
Patrick, the owner of one of the earliest fish smokers in Grimsby tells Sophy he thinks the town is "often dumbed down".
He adds "particularly by the media, who come with a narrative because they see this place and they want to agree with some sort of narrative."
Instead he says the town is doing well, adding: "All the major fish processing companies are thriving, they're successful, they're where. We have the only protected food name in all of Lincolnshire - that's worth shouting about.
"And we're a bit too keen to dumb ourselves down."
He says there should be half as many MPs and they should be paid three times as much, to "get some good ones".
One audience member says she feels nobody cares about Grimsby.
Sarah, who voted Conservative in 2019, tells Sophy: "At the end of the day you can vote for any politician, but when they start caring about us, maybe we'll care back."
She says the town needs a more diverse economy, especially for younger people.
Great Grimsby MP Lia Nici disagrees and says there are opportunities in the town.
"We manufacture seafood here, we are the biggest centre for seafood processing. We've got new opportunities. The Humber and the south of the Humber in particular is seen by the government and Rishi Sunak as the biggest opportunity."
Responding to Sarah, Labour candidate Melanie Onn says she is seeing loads of people in the community "who are pulling together, who are trying to make this a much better place to be".
Be the first to get Breaking News
Install the Sky News app for free

IMAGES
VIDEO
COMMENTS
Don't: Ignore potential problems. If you spot something out of the ordinary during your post-trip inspection, report it to dispatch immediately. Minimizing breakdowns and preventing violations are two of the many benefits of pre- and post-trip inspections. Use this list of dos and don'ts to complete your inspections the right way.
A proper pre-trip inspection will include inspecting the brake system both in-cab and externally. Truck drivers should check the brake adjustment with the slack adjuster for proper alignment. Check brake linings for appropriate thickness. Ensure your truck's air lines aren't damaged, don't leak, and are properly sealed.
In this episode: 00:00 Intro to Trucking Law myths. 00:31 Myth 1:- Pre-trip inspection report. 01:21 Myth 2: Must perform a pre-trip inspection. 01:58 Myth 3: Must record at least 15 minutes on ...
Post-Trip Inspection. When I'm done for the day, and every time I swap trailers, I do a post-trip inspection. If I am swapping trailers, I do a pre-trip on the new trailer as well. A post-trip includes: lowering the landing gear; removing the airlines; uncoupling, and walking around the trailer checking tires, lights, seal, and mudflaps
This includes checking the engine compartment, brake system, fuel system, and more. The CDL Pre-Trip Inspection Exam is an integral part of obtaining your commercial driver's license. This guide covers Class A and Class B pre-trip inspections, provides a checklist, and offers tips for memorizing the inspection process.
A proper pre- and post-trip inspection is what separates the average truck driver from a true professional! Federal law requires that a driver of a commercial motor vehicle completes an inspection every day on each vehicle operated (truck and/or trailer). More importantly, a thorough truck and trailer inspection helps truck drivers keep their equipment in safe working order, protecting ...
A good pre-trip inspection keeps the driver from leaving your facility with a vehicle that has an existing problem. A good post-trip inspection gives the shop time to react to a problem that has ...
Successful pre-and post-trip inspection processes ensure that the appropriate vehicles are on the road. With clear reporting methods used consistently by all, regular training for those who need to inspect and report can increase the efficiency of the vehicle fleet. Vehicles requiring maintenance and repair are well documented and returned to ...
As a truck driver, performing a CDL pre-trip inspection is one of the most common and repeated tasks you will complete. Pre-trip inspections help truck drivers ensure their tractor and trailer are safe to operat e before hitting the road. Keep reading to learn what a p re-trip inspection is and what should be on a p re-trip inspection checklist.
According to 49 CFR §396.11, each commercial motor vehicle driver (whether passenger-carrying driver or property-carrying ) must prepare and submit a report if a "defect or deficiency is discovered by or reported to the driver.". This means that if a driver operates three commercial motor vehicles during the day and each one has a defect ...
Truck Pre Inspection Checklist. Download free template. Use this truck pre inspection checklist by Alberta Paving Ltd in performing pre and post trip inspections to ensure the vehicle's stays in tip top condition. Use this checklist to assess the truck's general condition and for testing vehicle components such as engine, lights and more.
Pre- and post-trip inspections are among the most important tasks your drivers perform. With our safety guides, checklists, and videos, you can ensure your drivers have all the information they need to keep their vehicles in safe condition. Watch this video to see why respected, experienced drivers believe all truckers should inspect their ...
Pre-Trip Inspection Study Guide. Our Pre-Trip Inspection Study Guide has everything you need to prepare for the Class A CDL Pre-Trip Inspection Exam. Our study guide will cover the pre-trip inspection terminology as well as a thorough list of all of the parts you will be inspecting on the vehicle. For each part you will be inspecting there will ...
In this blog post, we dive into the critical components of pre trip inspection and provide valuable tips and resources to help drivers stay ahead of potential hazards and costly repairs. Key Points. Pre-trip inspections are essential for promoting safety, compliance, and cost savings while on the road.
Push and hold the brake pedal, allowing the gauges to stabilize. When the gauges have stabilized, announce the Primary and Secondary PSI. Listen for air leaks while doing this. Warning Light and Buzzer - Pump down on the brake pedal until the warning light and buzzer comes on. This is typically at or before 60 PSI.
Pre-trip Inspection (396.13) Before operating the vehicle, the driver must inspect the vehicle and be satisfied that it is in safe operating condition. If the last vehicle inspection report notes any deficiencies, the driver must review and sign to acknowledge and certify that the required repairs were made. Periodic Inspection (396.17, 396.21)
Completing a post trip inspection is as important as the pre-trip inspection and should be the last thing you do for the business day. When completing this end-of-day roadside truck inspection, your goal is to ensure safety, prevent accidents and help your company control its expenses while hauling a load.. Learn more about what's involved in the 5-step post trip inspection, as well as how ...
During a post-trip inspection, you should examine various parts of the vehicle, including the tires, brakes, steering and suspension, lights, mirrors and other safety features. In addition to safety, post-trip inspections are important for maintenance and repair purposes. By identifying issues early on and reporting them to the appropriate ...
A pre-trip inspection is a thorough review and examination of a commercial vehicle's major systems and parts before heading out on a route. Completing the pre-trip inspection is one of the most common and important tasks commercial drivers must perform. Drivers have to perform this vehicle inspection at the start of a new day, every 24-hours ...
Regs Covered: Unit A1.1.3 Pre- and Post-Trip Inspections inspections as specified in §392.7 and §396.11. This unit must teach the driver-trainees to conduct pre-trip and post-trip inspections as specified in §392.7 and §396.11, including appropriate inspection locations. Instruction must also be provided on enroute vehicle inspections.
Complete post-trip inspection checklist. 1. Passenger-side engine: Air filter housing: Secure mounting, cover in place. Windshield washer fluid reservoir: No leaks, proper fluid level. Turbo charger: No oil or exhaust leaks. Engine air duct work: No cuts, clamps secured. Alternator: Mounting secured, no broken or loose wire.
Choose the inspection type (Pre-Trip or Post-Trip). Inspect your vehicle for any defects. At a minumum, complete all Required fields. To report an issue or damage to the vehicle, select the applicable defects and enter a description and optional photo. There is a three photo limit for trailers, and a four photo limit for vehicles.
China's coming May Day holiday already has the makings of a major tourism rush, with early bookings exceeding pre-pandemic levels and the travel boom likely to fuel a much-desired round of ...
"It was an absurd situation. It was deeply stressful for my wife and my kids, but there were lighter moments," the "Crown" star shared in a profile.
Earlier, the prime minister's spokesperson said an initial cohort of people who will be put on flights to the African nation had been identified and the first flight booked (see 12.33 post). 16:28:18