

Can You Put Freon in an RV Air Conditioner?
RV air conditioners are expensive to repair or replace. Over time, you may notice that your RV air conditioning system becomes less efficient and does not cool you down like it used to. But can you put Freon in an RV air conditioner?
It is possible to put Freon in an RV air conditioner by welding a charging port into the air conditioning system. This is a highly skilled job, and it can be expensive. So if an RV AC system is leaking and requires frequent refilling, repairing or replacing the unit is a better long-term solution.
The ease and cost of this procedure depend on your type of air conditioning unit and where the unit is located in your RV.
Freon is a refrigerant that your AC unit uses to cool down your RV.
Over time, the levels of refrigerant in your RV can drop. Let’s have a look at how you can recharge your RV air conditioner , how to know when your AC is low on Freon, and how to improve the performance of your current AC unit.

Can RV air conditioners be recharged?
You can recharge your RV air conditioner with refrigerant; however, it is not as easy as recharging a normal portable AC unit you may have at home. Some RV air conditioners have to be recharged more frequently than others. A well-maintained air conditioner won’t need recharging as frequently.
Some RV air conditioners are easy to recharge, some are difficult, and some are almost impossible unless you’re an expert. It all depends on the type of air conditioner you have and where it is located in your RV. Let’s have a look at how you can recharge your RV refrigerant.
Firstly, make sure you have the right refrigerant – you can check this by using the owner’s manual of your RV. Then turn off the power for safety reasons.
After turning the breaker off, begin dismantling your AC.
RV AC units are hard to open, unlike home AC units. That’s because they are not designed to be opened. You will have to look at your owner’s manual for the AC or check on YouTube. Another great way to get tips for your specific AC unit is to check on forums with people that own the same AC unit as you.
Once you’re in, check the current levels of refrigerant.
Most RV AC units don’t have a specific place where you can check the levels of refrigerant. Therefore, you may have to buy a line tap, to which you attack your refrigerant gauge to check.
After that, check your AC user manual to find out how much refrigerant your AC unit should hold. Then add your refrigerant by unscrewing the refrigerant port (sometimes called coolant port) and slowly adding the refrigerant until you have reached the levels stated in the user manual.
Finally, reassemble the unit, go back inside your RV, and run the AC to test it.
How to Recharge Your RV’s Air Conditioner With Freon
1. what kind of freon to buy.
When selecting Freon for your RV air conditioner , opt for R-410A, commonly used in newer RV AC units. Unlike its predecessor R-22, R-410A is environmentally friendlier and offers better cooling efficiency. Always check your RV AC’s specifications or consult the manufacturer to ensure compatibility. Purchasing the right Freon ensures optimal performance and longevity for your unit.
2. Turn Off Power
Before working on your RV air conditioner , safety first! Locate the RV’s main breaker panel and switch off the breaker labeled for the AC unit. If unsure, turn off the main breaker to cut power to the entire RV. Always double-check by trying to turn the AC on from its control panel to ensure it’s powered down.
This step ensures a safe environment while recharging.
3. Open Your Air Conditioner
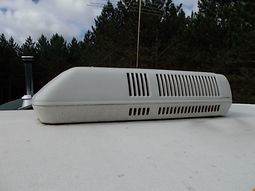
To access your RV’s rooftop air conditioner, first, ensure you have a stable ladder or platform. Once on the roof, locate the AC unit’s shroud or outer cover. Typically, there are screws around the base of this cover. Using a screwdriver or drill, remove these screws and carefully lift off the shroud. This will expose the internal components, allowing you to proceed with maintenance or recharging tasks.
Always handle with care to avoid damage.
4. Check the Current Freon Levels
To check the freon in your RV’s rooftop air conditioner, you’ll need a set of AC gauges.
Connect the gauges to the service ports: the low side (blue) to the larger tube and the high side (red) to the smaller one. Read the pressures. If they’re lower than the recommended range for your specific model, it indicates a potential freon shortage.
Always refer to your AC’s manual for precise pressure levels and safety precautions.
5. Add the Freon
To add freon to your RV’s rooftop air conditioner, first, connect the freon canister to the service hose of your AC gauge set. Open the valve on the canister and release freon into the system via the low-side port. Monitor the gauge readings to ensure you don’t overcharge. Add freon slowly, allowing the compressor to pull in the refrigerant. Once you reach the desired pressure, close the canister valve, disconnect the hose, and cap the service port. Always wear safety gloves and goggles.
6. Re-assemble the AC unit
7. restore power, what is freon.
Freon is a brand name that has become synonymous with refrigerants used in air conditioning systems, including those in RVs. It’s a chlorofluorocarbon (CFC), hydrochlorofluorocarbon (HCFC), or hydrofluorocarbon (HFC) compound, which are chemicals that can efficiently absorb and release heat, making them ideal for cooling processes.
Historically, the most common type of Freon used in RV air conditioners was R-22, an HCFC.
However, due to environmental concerns, particularly its potential to deplete the ozone layer, the production of R-22 has been phased out in favor of more eco-friendly alternatives. Today, many RV air conditioners use R-410A, an HFC, which doesn’t have the ozone-depleting properties of its predecessor.
It’s essential to know which type of refrigerant your RV AC unit uses because mixing different types can lead to system damage. The type is typically labeled on the unit itself or found in the owner’s manual.
Freon, in its liquid form, absorbs heat from the surrounding environment, turning it into gas. As it circulates through the AC system, it releases the absorbed heat and reverts back to its liquid state, ready to start the process again. This cycle of evaporation and condensation is what cools the air blown into your RV.
While Freon itself is non-toxic and non-flammable, it can become harmful if exposed to open flames, producing toxic gases. It’s also crucial to handle it with care, ensuring no leaks, as it can contribute to greenhouse gas emissions. Proper maintenance and regular checks of your RV’s AC system can prevent such issues and ensure efficient cooling during your travels.

How Do You Know If Your Air Conditioner Is Low on Freon?
You can check if your RV AC is low on Freon by opening the AC, attaching a line tap to a refrigerant gauge, and then checking the reading and comparing it to what the AC user manual says it should be.
Some signs your RV AC is low on Freon include the AC taking a long time to cool down your RV, the vents inside your AC are not blowing cold air as fast as they used to, and your AC is using more energy.
When there is not enough refrigerant in your RV AC unit, the performance decreases. This means your RV has to use more energy to cool you down, as an RV AC with less refrigerant is less efficient than one with sufficient levels.
The biggest giveaway of low Freon levels is that the RV doesn’t cool down as much as it used to, or it takes a longer time for the RV to cool down.
Let’s have a look at some other problems with RV AC units and how to improve the performance of your AC. Not all RV AC units run on Freon. Some brands run on other refrigerants.
But if you have to replace your AC unit, is one brand better than another?
If you want to learn more about the best RV AC brands, check out this recent article on my site, where I explain what the most high-performance and efficient RV AC units are.
Just click that link to read it on my site.
Other ways you might notice your RV’s AC unit is low on freon:
1. Use a Freon Gauge
To check the Freon level in an RV’s rooftop air conditioner, using a Freon gauge is essential. Attach the gauge to the unit’s low-pressure service port. A reading within the unit’s specified range indicates an adequate Freon level.
However, a low reading suggests the system might be undercharged and may require a top-up. Always refer to the RV AC’s manual for specific pressure ranges and ensure the system is off before attaching the gauge.
2. You Notice Low Airflow
Low airflow from your RV’s vents can be a telltale sign that the AC unit might be low on Freon.
When the refrigerant level drops, the system struggles to produce and circulate cool air effectively. This reduced efficiency manifests as weak or diminished airflow. If you observe this, it’s a good idea to check the Freon levels and inspect for potential leaks or blockages in the system.
3. You Feel Warm Airflow
Feeling warm air from your RV’s vents, especially when the AC is set to cool, can indicate a potential Freon shortage. Insufficient Freon hampers the system’s ability to cool the air effectively. If the air isn’t as cold as it should be or feels lukewarm, it’s advisable to check the Freon levels and ensure the system is operating optimally.
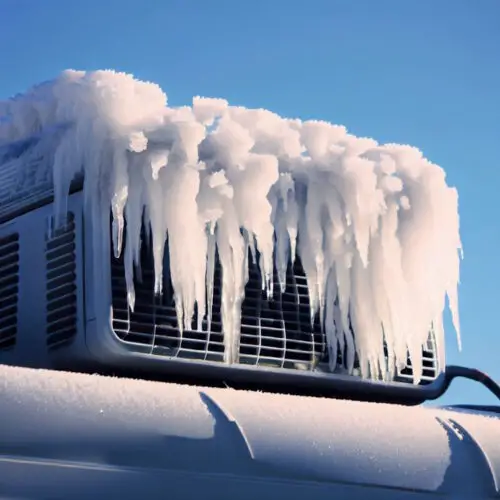
4. You See Ice Buildup
Ice buildup on your RV’s AC unit is a telltale sign of potential Freon issues.
When Freon levels drop, the cooling system can become imbalanced, causing condensation to freeze on the coils. Regularly inspecting the unit for ice or frost can help detect low Freon levels early, preventing further complications and ensuring efficient cooling performance.
5. It Takes Longer to Get Cold (or doesn’t)
If your RV’s AC unit takes an unusually long time to cool down or fails to cool altogether, it could indicate low Freon levels. Freon is essential for the cooling process, and when it’s insufficient, the system struggles to achieve the desired temperature.
Monitoring the time it takes for your AC to reach optimal coolness can help identify potential Freon deficiencies and ensure consistent comfort during your travels.

How Much Freon Does Your RV Air Conditioner Need?
RV AC units require 2-4 lbs of refrigerant per ton of power. So, if you have a small unit with 2 tons of power, you will need at least 4 lbs of refrigerant. If you have a unit with 4 tons of power, you will need about 8 lbs of refrigerant.
The only way to be certain of how much Freon your RV AC needs is to consult your owner’s manual and then check the refrigerant levels in your AC unit using the method we discussed previously.
Troubleshooting Your RV AC Before Adding Freon
Check the filter(s).
Inspecting the filter(s) in your RV’s AC unit is a crucial troubleshooting step.
A clogged or dirty filter restricts airflow, reducing the system’s efficiency and cooling capability. Regularly checking and cleaning or replacing filters ensures optimal performance and can prevent unnecessary strain on the unit. A well-maintained filter can often resolve cooling issues without resorting to adding Freon.
Is It Freezing Up?
If your RV’s AC unit is freezing up, it’s a clear sign of an issue.
This can result from restricted airflow, low refrigerant levels, or malfunctioning components. Ensure filters are clean and vents aren’t obstructed. A frozen unit can’t cool efficiently and may lead to more significant problems. Before considering adding Freon, address and resolve any freezing issues.
Are There Air leaks?
Air leaks in your RV’s AC unit can significantly reduce its cooling efficiency.
It’s essential to inspect the unit for any gaps or cracks that might allow cool air to escape or warm air to enter. Sealing these leaks with appropriate materials ensures the AC operates at peak performance, conserving energy and maintaining desired temperatures.
Before adding Freon, always check for potential air leaks.
Should You Defrost Your RV’s Air Conditioner?
Defrosting your RV’s air conditioner might not be the first maintenance task that comes to mind, but it’s an essential one.
Over time, AC units can accumulate ice due to various reasons, including low refrigerant levels, restricted airflow, or continuously running the system in cold temperatures. This ice buildup can hinder the unit’s efficiency, making it work harder and consume more energy.
When you notice reduced cooling or see visible ice on the coils or vents, it’s a clear indication that defrosting is needed. Ignoring this can lead to more significant issues, such as damage to the unit’s components or even a complete system breakdown. Moreover, a frozen AC unit can’t effectively dehumidify the air, leading to increased moisture inside your RV, which can cause mold or mildew growth.
To defrost the unit, simply turn it off and allow the accumulated ice to melt naturally.
Avoid using any sharp objects to speed up the process, as this can damage the coils. Ensure proper drainage for the melted ice to prevent water damage inside your RV. Once defrosted, inspect the unit for any underlying issues that might have caused the freezing in the first place.
It might be a good idea to consult with an RV AC specialist if the problem persists.
Final Thoughts
Most RV air conditioners can be recharged with refrigerant. However, recharging an RV AC is not as easy as recharging a household AC unit. To recharge your RV AC, you have to use the correct refrigerant and recharging kit.
The main giveaway that your AC is low on refrigerant is that the performance of your AC decreases. To make your RV AC colder, check the refrigerant levels, clean your filter, ensure there are no air leaks, park in the shade, and keep windows closed when the AC is running.
Most of the time, campgrounds have at least 30-amp service, if not 50-amp. But what happens if they only have a standard 15 or 20 amp household outlet and breaker?
Check out this recent article on my site about RV campground power pedestals and what the minimum requirements would be for powering an AC unit.
Frequently Asked Questions
How do i make my rv air conditioner colder.
To make your RV air conditioner colder, you should ensure it is well-maintained. Clean the filter of the AC, ensure there are no air leaks, tidy up and replace old and damaged wires, clean the part of the AC unit that is outside the RV, and check if there is no rust, dust, or debris in the unit.
If the filter of your AC unit is covered in dust, it can cause electrical problems, and reduce airflow, so your AC won’t cool you down as fast. Also, dust in the filter can cause respiratory problems and worsen asthma symptoms.
Make sure your AC is not leaking air.
Again, if there is air leaking, you are wasting energy. You need to check the ducts and vents of the AC. If you notice there are holes anywhere, or if things are not fitted tightly together, you can simply turn off the power, screw things back together, and cover holes with a strong, high-quality duct tape.
If you have had your RV AC for a few years, you should check that the wiring is in good condition. Wires that are worn out or that are damaged from accidents won’t be able to carry the power to the unit, as well as new wires in optimum condition.
To make your RV air conditioner colder, you should also get on top of your RV, open the cover, and remove dust, debris, and leaves from the air conditioner. These all reduce airflow, making the AC less efficient.
You can also park in the shade, make sure all windows are closed, and close the curtains to make sure no heat comes into your RV while your AC is on.
As a final point, make sure to be careful running your AC if you aren’t connected to shore power.
Check out this recent article on my site where I talk about how long you can run your RV AC off batteries or a generator.
Do they sell an RV air conditioner recharge kit?
You can buy an RV air conditioner recharge kit online. It is important to select the right refrigerant for you and make sure the kit is easy to use.
RV air conditioner units can have hard-to-reach charging ports, so selecting a refrigerant recharge kit that has a long hose is essential.
My favorite kit is the AC Pro Car Air Conditioner refrigerant kit. It has everything you need – a long hose, a great trigger, a reusable dispenser, and even a built-in pressure gauge.
It’s the real deal in a simple package, and like most things, you can buy it today on Amazon.
Image by Siggy Nowak from Pixabay
Jeff Campbell
Jeff Campbell travels on and off with his 3 daughters in a Newmar Baystar Class A Motorhome. He writes extensively on both RVs, campgrounds, parenting on the road tips, remote learning & schooling, and much more! Click Here to learn more about me. Click Here to learn more about my site. Editorial Policies.
Top Related Posts
Can You Run an RV Air Conditioner on a 20 Amp Breaker?
Sometimes, you may find yourself at a campground that only offers 20 amp service. This has some people wondering: can you run an RV air conditioner on a 20 amp breaker? Here’s what I know from...
How Long Can You Run an RV Air Conditioner?
Sometimes, you want to boondock or camp where there isn’t any available electricity. This has some people wondering how long can you run an RV air conditioner? You can run your RV air...
- You are here:
- Home »
- Blog »
- RV Air Conditioner
- » How to Recharge an RV Air Conditioner: Helpful Guide + Tips

How to Recharge an RV Air Conditioner: Helpful Guide + Tips
- June 21, 2019 /
- RV Air Conditioner /
- By R. Geraldi /
RVs are a good vacation option. They help you bring a little of your home with you when you leave your home. They have extra room, home necessities and of course, a little air conditioning. Air conditioning while on the road is almost a must. You need to learn how to care for it to get all the full benefits from an RV air conditioner
How to Recharge an RV Air Conditioner: RV air conditioners run on the same principle as many home air conditioning units. To recharge an RV air conditioning unit, you just need to replace the coolant.
Having an air conditioner in your RV helps make your vacation more enjoyable. To keep it working at top levels so your vacation is not ruined, just continue to read our article. It is filled with tips and helpful hints to keep your RV unit in top working order.
Tip #1 ; before you add a second air conditioner, make sure you have the space and the right materials to vent it properly. Also, make sure you upgrade your fuses so you do not lose power at the wrong time
Tip #2 : Direct sunlight will heat up the air temperature inside the AC unit and your RV. Make sure to park in the shade so you get accurate temperature readings
Can I Recharge my RV Air Conditioner
It is possible to recharge your RV air conditioner. The thing you have to watch out for is the coolant levels. If the unit is not completely empty, then you may only have to add a little coolant to get the air conditioner at peak levels.
Here are 5 steps to take to recharge your RV air conditioning unit:
- First , lower the power being sent to your RV’s air conditioner
- Second , check your RV’s owner manual to find out the specific brand of coolant you need top use. You can’t mix and match
- Third , remove the plastic lid guarding the air conditioner. Lift straight up so you do not damage the coils
- Fourth , get a coolant gauge to measure the level of the coolant inside. Once you know the levels unscrew the port using a wrench. Then add the coolant and tighten the port back down
- Fifth , take your time and slowly add the coolant. Monitor the temperature levels of the air in the AC and the air in your RV. When you have reached full, the temperature difference between the air in your RV and AC should be about 20 degrees F
- Finally , put the plastic case back on and restore the power to the AC unit. Continue to monitor the air temperature to make sure you did it all correctly. Once that has been done, tighten the plastic lid down securely
Tip #3 : If you only need to add a little coolant, that is called topping up. If you need to fill an empty chamber, that is called recharging
Does RV Air Conditioner Need Freon
Not necessarily. Different Air conditioning units use different types of coolant to lower the air temperature. You would have to check your owner’s manual to see the exact coolant specifications your RV air conditioner uses before buying freon.
But in most cases, RV air conditioners are designed to be a one use system. That means that for the most part, they do not come with the ports and other attachments needed to recharge them with coolant.
To recharge your RV in most cases, you would need to have valves installed. Usually the RV air conditioner is hermetically sealed. That means you have to break the seal in order to recharge it., That can be costly and if the technician doesn’t know what they are doing, you may have to replace the unit
Put Freon in RV Rooftop Air Conditioner
When you are putting freon in your RV’s AC you need to be careful. It is not a job for those who do not have patience and are not careful when they work. You have to be careful because there are a lot of fragile parts inside.
The ports you need to use are usually located on the side with the largest copper tubing. Attach the manifold gauge to the suction side of the unit, this is the large copper tubing.
Turn the air conditioner on by putting it on the lowest setting possible. Read the gauge to make sure you need to top up or recharge. Once you see that it does, attach the coolant container to the suction tubing and open it up.
It should only take about 1 minute to fill your RV’s coolant chamber. For best results, you may want a professional mechanic to handle the process.
Tip #4 : if you are not mechanically inclined then it is not recommended that you handle this issue yourself. Take it to a professional mechanic who has the experience and knowledge to do a good job.
RV Air Conditioner Recharge Kit
It is possible to get a RV recharge kit. That is if you want to do it yourself and save a little money. Inside these kits you should have a valve, a hose and several cans of coolant. The hose is easy to use and should attach to the AC port with a click of the handle.
On the hose is the AC pressure gauge. This gauge will let you know if your AC unit is full, needs topping up or needs to be recharged. Once you learn the AC coolant level then you know how much coolant you should put in the chamber.
Make sure you hook the hose and gauge to the correct valve or you will not get an accurate reading. If you do not find any ports on your RV AC unit, then that means it was not designed to be recharged.
When you are in this situation, you will have to think about replacing the unit with a new one.
Tip #5 : before you rush out and buy your AC recharge kit, make sure you know your RV’s make, model, engine and location. Different RVs have different levels of charges needed to fill up the unit.
RV Air Conditioner Freon Type
Most RVs come with sealed Ac units. That means that the coolant inside is designed to last the lifetime of the AC unit. This is not always going to be the case because things happen and leaks develop,
When you are going to add or replace the freon inside your RV AC unit, you will want to use freon R-22. The good news is that this freon is common. The bad news is that there are strict regulations governing its handling.
You need one of 3 licenses to buy and handle R-22 coolant. In brief, here are those licenses:
- Certified Refrigerant Technicians approved by the E.P.A.
- A buyer of refrigerant for resale to a Certified Refrigerant Technician
- Automotive Certified Refrigerant Technicians approved by the E.P.A.
- There are some exceptions but those exceptions do not authorize you to purchase R-22. It is best to check the regulations in your area but the safe way to go is to hire a professional to handle the recharging task.
- Other types of freon used in RVs are R-134a, R-410A.
RV Air Conditioner Freon Capacity
The amount of freon or any coolant you put in your RV’s AC depends a lot on the make,model and engine type or its location. There is not a one size fits all capacity that simplifies this process.
Each RV has its own capacity with some using the same amount. Also, they may not use the exact same type of coolant. The range of charge needed to recharge your empty AC unit is quite wide.
Some units take as little a 1 1/4 pounds while others will need up to 8 pounds. There are quite a few in the 4 and 5 pound capacity range. If you want a look at a more specific chart to see where your RV lies, click here
You do not want to come to your recharge duty unprepared and not knowing how much freon to put inside the unit.
Dometic RV Air Conditioner Recharge

When trying to do a dometic recharge, you need t be aware of the cost involved. It is quite high and may be the same price as buying a new Air conditioning unit. But with that said you can buy bullet piercing valves to help do the job.
The thing about using bullet piercing taps is that they might spring a leak or tow after you have installed them. You need to be very careful when you tap the air conditioning line to install those valves.
Then if you do not have a license top buy the freon you won’t be able to recharge it. Yet, if you can get R-410A, then it must be recharged in liquid form. The attempts to recharge this type of RV air conditioning unit are not brand specific.
There are no other tricks to use if you have a different brand than a family friend has in their RV. Each one needs an access valve installed to recharge it properly. When it comes to recharging this type of RV air conditioner or any other model, you want to check the other parts first.
It may be a simple issue that stops the air conditioner from doing its cooling job properly.
Duo Therm RV Air Conditioner Recharge
This model is like any other RV air conditioner model. If you do not have a license to buy the freon then it is going to be difficult to recharge it yourself. To get an A/C tech to do the job, you may be looking at some very high labor costs
Those costs make the price to replace the unit a lot more attractive. If you still want to recharge your Duo Therm Av unit, then you need to know it is a sealed system and you need to install access valves,
Coleman RV Air Conditioner Recharge
As has been stated already, most RV air conditioners are designed to not be recharged. They are sealed systems and the freon inside is made to last the life time of the unit. That is if it doesn’t spring a leak.
Coleman is also a sealed system and the only way to recharge them is to buy access valves and a RV air conditioner recharge kit. Then you will need the right license to purchase the freon.
Going to a professional RC AC technician may cost you more than you want to spend. RV air conditioners are not like other air conditioners. Why it is this way is anyone’s guess.
Other Reasons why an RV AC Blow Warm Air
Most people who own an RV come to the conclusion that it must be the freon that is the problem when their air conditioner starts blowing warm or hot air. While it may be people’s first thought, it may not be the first reason for that situation.
When your air conditioner stops blowing cold air, there are other parts that may have broken or worn out. Some of these reasons could be the air filter is dirty and clogged. The amp fuse is not the right size, the capacitor has broken, the condenser fins are not straight and on it goes.
A lot of these issues are easy and inexpensive to fix. They should be checked first before assuming you are low or out of freon.
Some Final Comments
Addressing air conditioner issues in your RV is not going to be the same as doing it for your car or your home air conditioner. These units are built differently and normal home or car fixes may not apply.
With the closed system employed by RV manufacturers, it may be easier and cheaper to replace the AC unit than it is to try to top up or recharge the old one. With government regulations concerning freon so strict, you may have to hire a professional to make sure you get the right coolant inside .
Save yourself a lot of time and frustration and let the professionals handle your RV air conditioner repairs.
Related Posts
Airxcel 48000 Series Troubleshooting (RV AC Not Cooling)
RV AC Water Runoff: Why Is My RV AC Dripping Water Outside?
RV AC Hums But Won’t Turn On (Why and How To Fix It)
Leave a Comment:
How to put freon in rv rooftop air conditioner
Table of Contents
RVs are the ultimate choice for those who love to go on vacations. With an RV, you can basically have your home with you even if you are away from home. Of course, your trips will never be comfortable without your RV’s AC. This is why learning how to put Freon in an RV rooftop air conditioner will help you enjoy the full benefits of the unit during your travels.
Steps for putting freon in your RV rooftop AC
The AC works by passing air over the evaporator coil that is cooled using a refrigerant. Freon is the most common and popular refrigerant. This brand name is actually under the ownership of DuPont and is universal although incorrectly used ass a generic term.
Lower refrigerant levels will lead to reduced efficiency of the machine. Rooftop units don’t often come with user-serviceable ports since most of the time, the systems are already sealed right at the factory. In order to put in Freon, an expert must weld a charging port to the system.
Below are the steps you need to follow for putting in Freon in the rooftop AC of your RV.
- Lift and release the outer shroud of the rooftop AC. A series of fasteners surrounding the lower rim holds this shroud in place. Use a socket, wrench, or screwdriver depending on the specific fasteners that the manufacturer used. Be sure that you don’t get into contact with the fragile equipment inside as you lift the case away.
- Check the machinery to determine if a refrigerant port is present. If ever there is one, you can find this on the side of the machine containing the bigger of the two copper tubes running from the compressor to the interior of the RV and its evaporator coil. It is referred to as the system’s suction side.
- Consult the machine’s data tag or manufacturer’s literature to know the specific type of required refrigerant. Older vehicles often use R22 that has now become difficult and expensive to source. The newer vehicle models use some other types. Be sure to get a recharge kit of the suitable refrigerant.
- Use the thermostat for measuring the ambient temperature in the RV’s interior. Look for the AC’s chart that is often fixed within the shroud. This chart indicates a series of temperatures that are noted together with a series of the ideal refrigerant pressures, with one for every specific temperature.
- Connect the manifold gauge hose visibly labeled to be for the port’s suction side, often the left-hand hose. Screw the female hose end to attach it in clockwise direction to the port’s male threads.
- Switch on the AC to activate it through going for the thermostat’s coldest setting.
- Check the gauge clearly indicated to be for the suction side to verify the need for a recharge or top-up. Read the pressure of the refrigerant within the AC and compare it to the ambient temperature figure in the chart that matches the reading from the RV’s interior. If the pressure of the refrigerant is lower than optimum for the measured temperature inside the RV, a recharge or top up of the system is necessary.
- Attach the recommended refrigerant’s container to the hose visibly labeled to be for this specific purpose that is often the central hose. The gauges can be purged through a brief opening and closing of the valve visibly labeled for that purpose, typically the right hand valve.
This clearly labeled charge valve should be opened to let the Freon get inside the AC for a minute. Be sure to close the valve then wait for another minute before you recheck the gauge. You can do this process again as needed until you reach the refrigerant pressure level indicated as optimum for the measured temperature inside the RV.
Do RV air conditioners need freon?
Every air conditioning unit uses a different type of coolant to reduce the air temperature. It is important to check the owner’s manual to know the exact specifications of the coolant being used by your RV’s AC unit before you buy Freon.
However, there are instances when RV ACs are meant to be a single-use system. It means that most of the time, these don’t come with ports as well as other attachments required for recharging them with coolant.
When recharging your RV in many instances, there is a need to install valves. The RV air conditioner is often hermetically sealed. It means that the seal must be broken to recharge it. This can be a bit expensive and the unit may need to be replaced if the technician has no idea about how to do it.
Different types of freon for RV air conditioners
Most RVs have sealed air conditioning units. It indicates that the coolant within is meant to last for as long as the aircon lifespan . It is not the case all the time since things can happen and some leaks may form.
If you need to replace or add Freon in the AC unit of your RV, Freon R22 should be used. Thankfully, it is a common Freon although there are stringent regulations when it comes to handling it. You will need one of the three licenses to handle and buy R22 coolant.
Two other Freon types used in RVs include R-410A and R-134a . How often to top up aircon gas ?
Other pointers to remember when putting freon in an RV rooftop air conditioner
You have to be extra careful when you put Freon in the air conditioning unit of your RV. This is not the kind of job for people who don’t really have the patience as well as those who are not that careful with the work they do. Being extra careful is necessary since there are lots of fragile parts and equipment found inside.
If you are not confident with your mechanical skills, it is not advisable that you try to do this task on your own. Be sure to take your RV to a professional mechanic with the knowledge and experience in doing a good job.
If you need help troubleshooting your RV air conditioners, our previous why rv air conditioner won’t turn on guide may help.
You may also like

75 toshiba AC error codes + troubleshooting (FULL LIST)

21 panasonic aircon error codes (FULL LIST)
Denko air conditioner troubleshooting, akira air conditioner error codes + troubleshooting.
Can You Recharge Your RV Air Conditioner and How Do You Do It?
Summer is a fantastic time to go camping since the weather is warmer, there are less rainy days, and there are more recreational opportunities in the great outdoors.
Most people go camping in the summer , which means campsites are likely to be busier and more booked, and you’ll need to prepare early to enjoy a relaxed, stress-free camping experience.
When you camp in an RV or trailer, you have additional conveniences and luxuries in your home away from home, which makes camping even more pleasurable throughout the summer.
The air conditioner is undoubtedly the most important of these—what better way to unwind after a long, hot day in the sun than to go inside your camper and turn on the air conditioning?
But what happens if the air conditioner in your RV breaks down? Is it possible to recharge the air conditioner in an RV?
Your camper air conditioner must be recharged with Freon as needed in order to function properly. Fortunately, you can recharge the air conditioner in your RV! However, depending on the sort of A/C unit you have in your RV and where it is positioned, it may be simpler or more difficult.
In this post, I’ll go over how to recharge your air conditioning unit, as well as the many sorts of problems you could have with your RV’s air conditioning system and RV A/C maintenance advice.
View this post on Instagram A post shared by Pacific RV Paint Inc. (@pacificrvpaint)
How to Recharge the Air Conditioner in Your RV
Because RV A/C systems are not normally meant to be opened and fiddled with, recharging the one in your RV may be a little more difficult and complex if you have an air conditioning unit at home.
In fact, depending on the type and its placement in your camper, opening it may cause harm to the A/C mechanics or unit casing.
A top-off is merely adding extra refrigerant to your A/C unit, however a complete recharge of your RV Air Conditioning system involves replacing and/or filling up an empty coolant tank.
Because the amount of coolant or refrigerant liquid might impair the A/C unit’s performance, a top-off may be necessary.
Follow these instructions to recharge your RV’s air conditioner and replenish the refrigerant:
- Turn off the electricity to your RV’s air conditioner. Before working on the air conditioner, make sure the electricity is turned off. Locate the breaker panel in your camper and turn off any breaker that gives (or may supply) electricity to your RV A/C.
- To determine the brand of refrigerant or coolant to use, see your RV’s owner handbook. A/C Pro ACP-100 is a popular model, however your RV may need a different brand or model. (Note: Do not mix and match brands, as this may result in irreversible harm to your device.)
- Remove the plastic lid or cover for your air conditioner from the top of your RV and raise straight up to avoid damaging the system coils. Keep an eye out for bees or wasps departing the unit, since these insects are known to build nests within. If you come upon a nest, you must remove it as quickly as possible.
- Find out how much refrigerant is left in the system by using a coolant gauge. With certain A/C models, this may be easier said than done. You may need to install a line tap, which is a device that enables you to access the coolant line and connect a gauge, if there is no convenient method to monitor the refrigerant levels. You’ll be able to tell whether your refrigerant levels are low or empty once you can check them. If the refrigerant evaporation temperature on your gauge falls below 30 or 40 degrees, it’s definitely low and has to be recharged. If the levels are not below average, the RV air conditioner may have another problem.
- Pour in the coolant. While you add the coolant, turn on your air conditioner and have a buddy stand inside the RV to check the air temperature levels. Unscrew the coolant port with a tool and gently fill it with refrigerant until it is full. Monitor to see how much coolant your A/C unit can carry before adding the refrigerant, and be sure to check refrigerant levels as you add the fluid. When you’re finished, your companion should notice a difference in the temperature inside the RV. The temperature differential between the air in your RV and the air in the A/C unit should be about 20 degrees.
- Put the unit back together . Replace the plastic cover on the RV air conditioning unit and tighten the coolant port cap using a tool.
- Turn it on and put it to the test . Reconnect the electricity to your air conditioner, switch it on, and keep an eye on the temperature for several hours to ensure it’s operating correctly.
If recharging the unit does not resolve the problem, you should see a mechanic or RV professional.
However, there might be another typical problem preventing the air conditioner from working correctly.
Read more: 8 Best RV Air Conditioners To Buy In 2024
View this post on Instagram A post shared by Greater Wilmington CVB (@visitwilmingtonde)
Other RV Air Conditioner Problems and How to Fix Them
Before you disassemble your RV air conditioner to recharge it, you could discover that it’s suffering from one of these typical problems that reduce the unit’s performance.
A Filter in Your Air Conditioner That Is Dirty
Fortunately, one of the most frequent reasons of difficulties with an RV air conditioner is a filthy filter, which can typically be cleaned or replaced cheaply and easily if necessary.
If there’s a lack of ventilation within your RV, the A/C unit is freezing up (which I’ll explain next), or the A/C isn’t giving out enough cold air, even when the power is turned up, you could have a filthy filter.
It’s critical to clean or replace a filthy filter as soon as you spot a problem, since it may create electrical issues, which can harm your RV air conditioner or transmit allergies or germs throughout the vehicle.
You must first switch off the electrical power to the unit and remove the plastic cover on top before cleaning or changing the air conditioning filter in your RV.
To prevent harming the filter or the A/C system, read the user manual for your RV’s A/C unit before removing it, and never switch on the air conditioner without one.
If your filter is reusable, you may clean it using the following methods:
- Vacuum – Set your vacuum to a medium or low setting and point the nozzle or brush towards any visible dust or filth. To prevent denting or shattering it, don’t push too hard.
- Submerge – Soak the filter in a sudsy solution of lukewarm water, mild detergent, and dish soap. Submerge the filter and stir it about a little to make sure it’s well coated, then set it aside for 10 minutes (or up to 2 hours if it’s really filthy). Scrub the surface of the filter with a light brush if necessary.
- Disinfect – Bacteria may still be on the filter, which you don’t want to contaminate the air quality inside your RV. Prepare a solution of equal parts white vinegar and water and spray it on both sides of the filter to disinfect it. Before washing the filter, let it rest for approximately 10 minutes.
After you’ve finished cleaning your filter, let it air dry for several hours before reinstalling it in your RV air conditioner.
View this post on Instagram A post shared by Dicor Products (@dicor_products)
6 Reasons Why Your RV’s Air Conditioner Is Frozen
Some air conditioner problems might cause the unit to “freeze up,” resulting in ice chunks around the vents or within the unit (you may notice water or condensation forming and dripping).
When your RV’s air conditioner freezes, it’s an issue that has to be addressed right once. It may be caused by a variety of factors, including:
- Refrigerant or coolant levels that are low or empty
- Filters that are dirty
- There is a lot of dampness in your surroundings.
- Flow dividers that are not working
- Condenser or evaporator coils that are dirty
- Thermostat has failed.
Ice may form if there is too much humidity.
Your air conditioner may freeze if there is too much humidity in your area.
This is due to the A/C unit’s inability to keep up with the quantity of moisture in the air, causing the condensation to freeze.
However, there are several things you can do to avoid this or deal with it if it happens:
- When you’re in a high-humidity environment, turn up the fan or add more fans to the RV to keep the air flowing.
- If you haven’t done so lately, clean your air conditioner .
- If you often camp in humid areas, invest in a dehumidifier to remove moisture from the air within your RV.
The A/C unit may freeze due to faulty Flow Dividers.
Bad flow dividers are another cause of freezing. Flow dividers, also known as baffles, keep the hot and cold air apart.
Cold air might seep into the hot air input if the flow divider is not correctly sealed or positioned, causing ice to build on your A/C unit.
Repositioning the flow divider and resealing it with HVAC foil tape is the best method to remedy it.
Freezing may be caused by dirty evaporator or condenser coils.
The majority of reasons why RV air conditioners freezing up have to do with airflow, and the majority of airflow issues are caused by filthy condenser or evaporator coils.
To avoid problems, you should clean these coils on a regular basis. Your A/C unit will have to work harder to move heat out of your RV (condenser coils) and chill the air inside if the coils are dirty (evaporator coils).
Follow these methods to clean your condenser and evaporator coils:
- Turn off the electricity . Unplug your RV from the electrical connection at your campground, switch off your generator and unhook your batteries, or simply turn off the air conditioner breaker. The trick is to make sure the A/C unit isn’t getting any electricity.
- Take the blankets off . Remove the plastic cover for the air conditioner from the top of your RV – be cautious, as wasps and bees prefer to establish nests in these units. The condenser coils are at the rear of the device, while the evaporator coils are at the front, after the main cover is removed (covered with a sheet metal housing). Remove the housing with a screwdriver, being cautious not to harm the gasket that keeps water out of your RV.
- The coils should be vacuumed . To prevent trash from entering into your RV, seal any air openings, then carefully vacuum both sets of coils with a gentle brush attachment.
- Coils should be cleaned . In a spray bottle, combine dish soap and water and spray both coils until they are moist. Allow them to rest for a few minutes before wiping them down with a gentle cloth or brush. To eliminate any leftover dirt, give them a last once-over with the vacuum cleaner. If the coils were really unclean, you may need to repeat steps three and four.
- Reassemble after inspecting, drying, and cleaning . Examine the fins for any bent or damaged regions after cleaning the evaporator and condenser coils. You may use a fin comb or a screwdriver to straighten them out. After the coils have dried, scrub down the interior of the A/C unit’s plastic cover to make sure it’s clean as well. Then, reinstall the evaporator coils’ sheet metal casing and replace the (now) clean plastic cover.
Your A/C may be freezing due to a broken thermostat.
If you have a damaged thermostat, your RV air conditioner may freeze up. You can typically tell if this is the case if your A/C only works when you keep turning down the thermostat.
If your thermostat is faulty or outdated, you may need to replace it. Check your thermostat’s reading with a thermometer to see whether it’s correct, then compare the two.
If they’re the same or extremely close, your A/C problem isn’t caused by the thermostat; but, if they’re not, you may need to replace it.
Read more: Solar Power for RV Air Conditioner: Is It Possible?
View this post on Instagram A post shared by Chelsea & Bryce (@exploringwithfinnegan)
Air leaks may wreak havoc on your air conditioner.
Air leaks might be one of the difficulties you’ll identify as the reason when your RV’s air conditioner isn’t operating correctly, since airflow issues are the most prevalent source of problems with an RV’s air conditioner.
There might be a leak in the air duct system if the A/C unit does not provide a strong airflow.
If you remove the cover and look for any holes or cracks in the air ducts, you should be able to detect the leak. You may quickly and simply address the issue by covering them with HVAC tape.
Wiring damage may reduce the efficiency or operability of an air conditioner.
If you’ve examined all of the other frequent problems I’ve outlined, you could have an electrical problem with your air conditioner’s wiring.
Water damage, overheating, animals nibbling on the wires, and natural wear and tear are all potential causes of wiring issues.
Remove the plastic cover on top of your RV to determine if any of the wires are broken if any of the plugs stop functioning.
You can change them yourself, but if you’re not sure, it’s best to see an RV mechanic or electrician.
If you’ve tried all of the do-it-yourself alternatives and still can’t get your RV’s air conditioner to work, you may need to hire a service specialist to diagnose and repair the issue.
View this post on Instagram A post shared by Hillary (@mysweetfamilyhome)
Defrosting the Air Conditioner in Your RV
I’ve previously covered how to change a filthy air filter and what to do if your refrigerant is low. You’ll need to thaw your RV air conditioner before you can address most of the other issues:
- Step 1 : Remove the cover from your RV’s air conditioner and turn on the fan (not the cooling feature).
- Step 2 : Turn on the fan on high to melt the ice buildup (this may take a few hours), and put a bucket and towels below to collect any dripping water.
- Step 3 : After the ice has melted and the air conditioner has been defrosted, let it dry overnight (leave the towels and bucket to catch any remaining drips).
Tips for Maintaining Your RV’s Air Conditioner
You probably noticed some things that seem like maintenance as you read through the different problems that could cause your air conditioner to stop working or function inefficiently as you read through the different problems that could cause your air conditioner to stop working or function inefficiently as you read through the different problems that could cause your air conditioner to stop working or function inefficient
You may really prevent these difficulties if you arrange regular maintenance for your RV’s air conditioner.
Maintenance should be performed before and after each trip, particularly if you only use your RV for a few of trips each season.
Regardless, if you check the air conditioner and other important systems before and after your camping trip, you may identify a lot of typical problems before they occur, or at the very least before they become more major concerns.
A/C Filters Should Be Cleaned
As I previously said, a filthy air filter in your air conditioner may create a variety of issues, including freezing, poor air quality, and a malfunctioning air conditioner.
It’s also one of the simplest and most cost-effective ways to keep your air conditioner functioning efficiently.
Check both the filter inside your RV and the filter inside the plastic cover on your camper’s roof when inspecting your A/C filter.
Vacuum, clean, and disinfect the filter on a semi-regular basis using the techniques outlined above (at least once per camping season).
Replace it as soon as possible if it begins to break down or becomes damaged.
The A/C Unit Should Be Cleaned
I discussed how to clean the evaporator and condenser coils of your air conditioner earlier in this post.
Because water, filth, insects, and other small creatures might get inside and impact the unit’s performance or efficiency, it’s a good idea to clean these and other components of the upper rooftop compartment of your air conditioning unit on a regular basis.
The condenser and evaporator coils must be kept clean because clean metal fins inside the coils enable air to travel through more freely.
You should also examine and clean other sections of your rooftop air conditioning equipment, such as the motor, fan, and fluid lines, after you’ve cleaned the evaporator and condenser coils.
As you travel, these components gather rust, moisture, dirt, and other debris.
First, wipe any debris or grime from the unit and lubricate the motor bearing on your A/C unit (but never spin it yourself, since you could cause damage).
Next, clean the fan and fluid lines of any dirt or filth, and treat any rusted areas. Re-seal the air conditioning unit after you’re finished, and you’re ready to go.
Published on April 17, 2024

Meet Bob & Sarah

We're Bob & Sarah, the RVers behind RVing Beginner. We love RV travel, useful gear, and all things nature. Read more…
Popular Content
Best rv air conditioner, best air conditioner for pop up camper, best air conditioner for campervan, best portable air conditioner for rv, best 12v rv air conditioner, smallest portable air conditioner for rv, best quiet rv air conditioner.
About Us - Contact Us - Privacy Policy - Terms Of Service - Affiliate Disclosure - Sitemap
Copyright © RVing Beginner 2022

How to Add Freon to Your RV AC Unit
Are you facing issues with your RV’s air conditioning unit?
If your RV isn’t cooling properly or the airflow seems weak, it may be time to recharge the refrigerant, commonly known as Freon.
In this article, we’ll guide you through the process of adding Freon to your RV AC unit, ensuring that you can enjoy cool and comfortable journeys on the road.
Whether you’re a seasoned RVer or new to the world of recreational vehicles, this step-by-step guide will help you keep your AC unit running smoothly.
Understanding the Importance of Freon for RV AC Units
Freon, also known as refrigerant, plays a crucial role in the cooling process of your RV’s air conditioning unit.
It absorbs heat from the indoor air and transfers it to the outside, allowing for a comfortable and cool environment inside the RV.
Over time, due to normal wear and tear or leaks, the Freon levels in the AC unit can become depleted, resulting in decreased cooling efficiency.
Adding Freon to your RV AC unit is essential to maintain optimal performance and ensure a pleasant indoor temperature during your travels.
Safety Precautions Before Adding Freon
Before you begin the process of adding Freon to your RV AC unit, it’s important to prioritize safety.
Here are a few essential precautions to follow:
- Turn off the power : Before working on the AC unit, make sure to turn off the power supply to avoid any electrical mishaps.
- Wear protective gear : Put on safety goggles, gloves, and a mask to protect yourself from any refrigerant leaks or debris.
- Work in a well-ventilated area : Ensure that the area where you’re working has proper ventilation to prevent the accumulation of potentially harmful fumes.
- Read the manufacturer’s manual : Familiarize yourself with the specific guidelines and instructions provided by the AC unit manufacturer.
Gathering the Necessary Tools and Supplies
To successfully add Freon to your RV AC unit, gather the following tools and supplies:
- Refrigerant : Purchase the appropriate type and amount of Freon compatible with your RV AC unit. Refer to the manufacturer’s manual for the correct specifications.
- Refrigerant can tap : This tool will allow you to connect the refrigerant canister to the AC unit.
- Pressure gauge : A pressure gauge will help you monitor and maintain the correct pressure levels while adding Freon.
- Safety goggles, gloves, and mask : As mentioned earlier, protect yourself by wearing safety gear.
- Screwdrivers and wrenches : These tools will assist in accessing the AC unit and refrigerant lines.
Locating the AC Unit and Accessing the Refrigerant Lines
Before you can add Freon, you need to locate the RV’s AC unit and access the refrigerant lines.
Follow these steps:
- Find the AC unit : Typically, the AC unit is located on the roof of the RV. Use a ladder or a stable platform to safely access the rooftop.
- Remove the AC unit cover : Unscrew or unclip the cover to gain access to the internal components of the AC unit.
- Identify the refrigerant lines : Look for two copper lines that connect the AC unit to the RV. One line is smaller and insulated, while the other is larger and uninsulated.
Determining the Type and Amount of Freon Needed
The next step is to determine the type and amount of Freon required for your RV AC unit.
Consult the manufacturer’s manual or the specifications plate on the AC unit for this information.
Different AC units may require different types and quantities of refrigerant.
It’s crucial to adhere to the recommended guidelines to avoid any complications or damage to the AC system.
Preparing the AC System for Freon Charging
Before adding Freon, it’s important to prepare the AC system properly.
- Clean the area around the refrigerant access valves : Use a cloth or a brush to remove any dirt or debris from the valves.
- Check for leaks : Inspect the refrigerant lines and connections for any visible leaks or damage. If you notice leaks, it’s recommended to consult a professional technician before proceeding.
Connecting the Refrigerant Canister to the AC Unit
To begin adding Freon to your RV AC unit, you need to connect the refrigerant canister to the system.
- Attach the refrigerant can tap : Connect the refrigerant can tap to the top of the Freon canister.
- Connect the tap to the AC unit : Locate the low-pressure refrigerant access valve on the AC unit and connect the tap to it.
Adding Freon to the RV AC System
Now that the refrigerant canister is connected to the AC unit, it’s time to add Freon.
- Open the refrigerant canister valve : Slowly turn the valve on the refrigerant canister counterclockwise to allow the Freon to flow into the AC system.
- Monitor the pressure gauge : Keep an eye on the pressure gauge and ensure that it remains within the recommended range specified by the manufacturer.
Checking for Leaks and Proper Cooling
After adding Freon to the RV AC unit, it’s essential to check for any leaks and verify the cooling performance.
- Inspect for refrigerant leaks : Apply a soapy water solution to the refrigerant connections and valves. If you notice any bubbles forming, it indicates a leak that needs to be addressed.
- Test the cooling performance : Turn on the RV’s AC unit and verify if it’s cooling efficiently. Measure the temperature of the air blowing from the vents and compare it to the desired temperature.
Reassembling and Testing the AC Unit
Once you have completed the Freon charging process and verified the cooling performance, it’s time to reassemble and test the AC unit.
- Turn off the AC unit : Disconnect the power supply and switch off the AC unit.
- Reattach the AC unit cover : Securely screw or clip the cover back onto the AC unit.
- Test the AC unit : Turn on the AC unit and ensure that it operates smoothly and provides adequate cooling.
Can I add Freon to my RV AC unit without professional help?
Yes, you can add Freon to your RV AC unit if you follow the proper guidelines and safety precautions. However, if you’re unsure or uncomfortable with the process, it’s recommended to seek professional assistance.
How often should I add Freon to my RV AC unit?
The frequency of adding Freon depends on various factors, including the age of your RV AC unit and any potential leaks. It’s best to consult the manufacturer’s recommendations or have a professional inspect your AC system to determine the appropriate intervals for Freon recharge.
What are the signs that my RV AC unit needs Freon?
Some common signs that your RV AC unit may need Freon include inadequate cooling, weak airflow, unusual noises, or an AC compressor that frequently cycles on and off. If you experience these issues, it’s advisable to check the Freon levels.
Can I use any type of Freon for my RV AC unit?
No, it’s crucial to use the type of Freon specified by the AC unit manufacturer. Using the wrong type can lead to system damage and reduced cooling efficiency. Consult the manufacturer’s manual or seek professional guidance to ensure you’re using the correct Freon.
What if I accidentally overcharge the AC system with Freon?
Overcharging the AC system with Freon can cause damage and affect its performance. If you suspect an overcharge, it’s best to consult a professional technician to rectify the issue and ensure proper functionality.
Is it possible to recharge the AC unit if there’s a major leak?
In case of a major refrigerant leak, it’s recommended to address the issue and fix the leak before recharging the AC unit. Recharging without fixing the leak will only result in a temporary solution and further refrigerant loss.
Adding Freon to your RV AC unit is a relatively simple process that can greatly enhance the cooling performance of your recreational vehicle.
By following the step-by-step guide provided in this article, you can confidently recharge your AC system and ensure a comfortable and enjoyable journey on the road.
Remember to prioritize safety, adhere to manufacturer’s guidelines, and consult professionals if needed.
With a properly functioning AC unit, you can beat the heat and create lasting memories during your RV adventures.
- Skip to main content
- Skip to secondary menu
- Skip to primary sidebar
- Skip to footer

Jeffsetter Travel
Travel Consultants and Travel Tips
How To Recharge Your RV Air Conditioner?
August 24, 2022 by Stephanie Lane
Last updated on July 7th, 2023 at 01:34 pm

All of our reviews are based on exhaustive research, industry experience and whenever possible, hands-on testing. When you make a purchase using one of our chosen links we’ll get a small percentage of the proceeds. This supports the site and keeps Jeffsetter running. You can read more here .
Summer trips can be great fun, the sun is out and the ocean is calling, but then your air conditioner starts to sputter out. After even a few minutes, the heat inside of your RV can feel suffocating.
Knowing how to troubleshoot, defrost and recharge your air conditioner is vital for comfortable travel. Recharging the AC can seem an especially daunting task if you’ve never had to do it before.
So, how do you recharge your RV’s air conditioner?
If your RV’s air conditioner needs recharging you’ll need to determine the type of refrigerant it needs first. Before you start working remember to turn off the power, then open up the unit and pour in the refrigerant. After this, you’ll want to do regular maintenance on your unit to keep it in good shape.
This article will explain in detail how to figure out what’s wrong with your RV’s air conditioner, how to recharge it, and whether it actually needs it.
How to Recharge Your RV’s Air Conditioner?
Recharging your air conditioning unit refers to the process of replacing or refilling its refrigerant. RV air conditioner units aren’t typically built to be messed with, so you’ll want to be careful when doing this.
Consult your owner’s manual to figure out the exact type of air conditioner you have and its specifications before continuing. Some units, like Dometic RV air conditioners, are not recommended for DIY recharging and you’ll want to get a professional to weigh in.
After this step-by-step guide, you’ll find a list of problems to test before recharging your air conditioner. It’s possible that your air conditioner isn’t working properly because of an easier-to-solve problem and you’ll want to exhaust all of those possibilities before recharging your air conditioner.
Once you’ve figured out that you can do this project safely on your air conditioner, follow the steps below.
1. Buy Refrigerant & Supplies
You might be tempted to buy just any kind of refrigerant, but I recommend buying the exact kind as referenced by your owner’s manual. If you don’t have the manual, you can reach out to an RV dealer and they should be able to provide the information for you.
If your RV isn’t already equipped with a refrigerant gauge, you might need to set this up by installing a tap line. A tap line is a mechanism that you place in your refrigerant line so that you can attach a refrigerant gauge to it.
2. Shut Off Power
Once you’ve purchased your refrigerant, make sure you cut all power to your air conditioning unit. This is necessary to avoid a nasty shock when you go to replace or refill the refrigerant.
3. Open Your Air Conditioner
The air conditioner needs to be opened up if it even can be. How you open the unit up will depend on the kind of unit you have. This is another case of wanting to reference your owner’s manual.
You may be able to do a visual check on the unit to figure out how it opens. There might be clips or clasps on the lid that you can unhook.
When removing the lid, you should also be mindful that bees and wasps like to build their hives inside. If you do run into any nests or hives, make sure you remove them before continuing.
4. Check the Levels
Use a refrigerant gauge to see where the levels of your refrigerant are. As I mentioned before, this can be easy or difficult depending on the kind of air conditioner you have and you may need to install a line tap.
If your gauge registers below 30 or 40 degrees then it is probably low. If they are not below normal, it’s time to go back to the drawing board to figure out what else might be wrong with your unit.
5. Add the Refrigerant
Adding the refrigerant needs to be done carefully. Pour it in slowly, taking your time, until it is full.
You can do this while the unit is on, and have a friend inside of the RV checking the air temperature levels. There should be a noticeable difference in the temperature inside of the RV. The difference between the air in your RV and the air in the air conditioning unit should be about 20 degrees.
Turn the power back off after you’ve completed this step. It may seem redundant, but when working with electricity you should always take extra precautions.
6. Put It Back Together
Make sure to put the lid back on tightly as well as the coolant port cap using a wrench.
7. Turn It Back On
You should feel comfortable restoring power to your air conditioning unit now. After adding new refrigerant you should closely monitor your air conditioner to make sure it’s working properly.
If it’s still not working, you may need to reach out to a mechanic to find out what the issue is and get it fixed correctly.
If you find out that your air conditioning unit needs replacement, we reviewed the most efficient air conditioners for your RV in a previous article.
How Do You Know if Your Air Conditioner Is Low on Freon?
Freon is often used interchangeably with refrigerant. It’s a trademarked name for a refrigerant, and typically refers to a specific type of air conditioner freon known as R-22. This type of freon is actually no longer allowed to be produced or imported into the United States .
I want to point out that while the name is used in this article, it refers to the generic term and not the specific product.
Above we went over how to recharge your air conditioner by adding refrigerant. Here we’ll look at a few ways you can tell if your air conditioner is running low or freon/refrigerant.
Use a Gauge
We discussed installing a tap line to use a gauge when recharging your air conditioner. This can also be used to tell you if you are low or not. As I mentioned above, only install one if you are confident in your abilities, otherwise, call a professional to do the job for you.
Low Airflow
If you’re low on freon, you might notice that your air conditioner doesn’t blow as hard as it used to. If it’s very low, you may even notice that you have no airflow at all.
Warm Airflow
In my opinion, warm airflow is even worse than no airflow. The last thing I want when I turn my air conditioner on to cool down is a blast of warm air. If you experience this, then you are likely low on freon.
Ice Buildup
Ice buildup happens when you are low on freon because there isn’t enough of the refrigerant flowing through the coils of your air conditioner to cool down the warm air from outside as it flows around the cold coils. This forms condensation that will freeze over .
There are a few other issues that can cause ice to form inside of your air conditioning unit which are detailed later in this article.
High Electric Bills
Being low on freon makes it so that your air conditioner runs less efficiently. It will need to be on longer and more frequently to get as cool as you want it to, which results in higher costs over time .
Long Cooling Time
Long cooling time goes hand in hand with other signs of low freon in your air conditioner that we mentioned above.
If it’s sputtering out little bits of hot air and working less efficiently, you can definitely expect your air conditioner to take a much longer time to cool off your RV than it would if you were topped up with freon.
How Much Freon Does Your Air Conditioner Need?
RV air conditioners need some kind of freon or refrigerant to run. Without it, you would have an air conditioner that doesn’t work and only puts out warm and even hot air.
You might not be sure how much freon or refrigerant you need or what kind to purchase when you’re looking to recharge your air conditioner.
Typically, an RV air conditioner will use between 2 and 4 pounds of refrigerant per ton of power. A smaller unit of 2 tons of power would need 4 pounds of refrigerant and so on. I would always recommend looking in your owner’s manual for guidelines for your specific air conditioner
Trouble Shooting Before Recharging
Before going through the trouble of recharging your RV air conditioner, make sure that it isn’t one of these easier-to-fix problems.
Dirty Filter
This is probably the most common problem you’ll face with your air conditioner and luckily it has a simple solution.
Cleaning or replacing your dirty air filter when you find out this is a problem is important because a dirty air filter can lead to some bigger electrical problems that can damage your RV. Not to mention a dirty filter means you’re breathing in dirty air, which can actually make you sick .
If you have a reusable filter you can clean it in a couple of different ways.
One method is to vacuum it. Be gentle, you don’t want to dent or break the filter. I would use a low setting and if you have a brush nozzle, put that on before starting.
You can submerge the filter in a mixture of lukewarm water and mild detergent or dish soap. Agitate the filter after you’ve placed it in this mixture so that it’s completely covered. Then use a soft brush to clean the surface of the filter.
You’ll want to disinfect your filter after you’ve cleaned the dirt and debris from it. To do this, just spray a mixture of white vinegar and water onto the filter.
Let your filter air out for a few hours before putting it back into your RV’s air conditioner.
Freezing Up
Your RV air conditioner might show signs of freezing up, which means that it’s developed frozen chunks of ice inside of the unit. You may notice some condensation and water dripping from the unit when this happens.
There are a few reasons why this might occur.
Your refrigerant levels might be too low or even empty. Replacing the refrigerant is what is referred to as recharging your air conditioner, which this article talks in-depth about.
Dirty air filters can also cause this issue, as can high humidity, bad flow dividers, dirty condenser coils, and broken thermostats.
We’ve already touched on air filters. Humidity can be combated with a dehumidifier , and by running your fans on high when you’re in high humidity climates.
Bad flow dividers or baffles keep the hot air separated from the cold. If they are positioned or sealed improperly then the cold air can leak into the hot air and cause ice to form. You can reposition and reseal the flow divider with HVAC foil tape.
Dirty evaporator or condenser coils can also cause freezing in your air conditioner unit. Cleaning these is a bit involved, but the basic steps would be to shut off power, open your air conditioner unit, and then vacuum and clean the coils.
The video below is a great guide on how to clean these coils.
Broken thermostats can cause this problem as well. If this is the case, you’ll want to replace your thermostat.
Air leaks
Air leaks can cause a lot of problems with your air conditioner. To test if you have any air leaks, you should remove the cover and inspect your air ducts for any holes or cracks. If you find them, HVAC tape can solve the problem pretty easily.
Consider Defrosting Your Air Conditioner
Before you can do just about anything to fix your air conditioner, if you’ve been dealing with it freezing up then you’ll likely need to start by defrosting the unit.
To do this, remove the cover inside of your RV and turn on the fan. Note, don’t turn on the cold air, just the fan.
Let the fan run on high in order to melt the ice. I recommend using a bucket and plenty of towels to catch the water as it melts. After the ice has all melted away, you should let it dry overnight before starting your repairs.
Regular Maintenance
Making repairs to your RV’s air conditioner is no easy task. There are a lot of things to consider before recharging your air conditioner or testing for other problems when it’s not running smoothly.
Performing regular maintenance on your air conditioner will help prevent these issues from building up.
Keep It Clean
The air filters in your air conditioner unit are important to keep clean and well maintained. I went over how to take care of them briefly earlier on in this article.
This short video goes over how to clean the air filters and gives a couple of extra tips.
This type of maintenance on your air conditioner is easy and inexpensive. I would try to clean the filters at least once every camping season. It’s not a bad idea to do the same with the condenser and evaporator coils.
The other parts of your air conditioning unit that will need cleaning include the motor, the fan, and the fluid lines. It’s easy for these parts to get rusty and dirty while you travel.
You’ll want to keep your air conditioner unit in your RV running smoothly all summer to avoid uncomfortable or even dangerous travel.
Proper maintenance is key in making sure it runs well and keeps you cool. In addition to this, knowing how to fix minor problems and recharge your air conditioner is vital in owning an RV that can run comfortably in the summer months.
Important Links
- Advertising Policy and Affiliate Disclaimer
- Privacy Policy
- Contact Jeffsetter Travel Blog
- Ask Jeffsetter a Question
Recent Posts
- Two Local Companies Vie for Lanai EAS
- Is the NoMad Las Vegas Joining Marriott Bonvoy?
- CBP Trusted Traveler Fees Are Increasing
- Manhattan Congestion Fee
- 8 Airlines Joined TSA PreCheck
Does RV Air Conditioner Need Freon? 7 Easy Steps to Recharge
Written by: Mohammad Sameer
Published on: November 26, 2023
To keep your RV air conditioner working well on your camping trip, it’s important to take care of the condenser coils and refrigerant line. Use a gauge to check the refrigerant levels regularly.
The refrigerant line carries Freon, which is needed to cool the air inside your RV. If there’s not enough Freon, the coils can freeze and the air conditioner will blow warm air.
So, make sure to keep the coolant levels right by charging it when needed. Also, check the plastic cover for any damage.
We’ll explain more about why coolant is important, what can happen if there’s not enough, and how to maintain your air conditioner in the next sections.
Table of Contents
Does RV Air Conditioner Need Freon?

Yes, RV air conditioners do need freon. Freon, or refrigerant, is a vital coolant component in the cooling process of an air conditioner.
It helps to cover and filter the air, ensuring efficient cooling. Air conditioning units help to absorb heat from inside the RV and release it outside, creating a cool and comfortable environment.
The air conditioner unit ensures cold air is circulated effectively while preventing air leaks. Over time, the freon in an RV air conditioner may become depleted or leak out, resulting in reduced cooling efficiency.
One way to address this issue is to regularly clean or replace the filter. By doing so, you can ensure that the air conditioner operates at its optimal level and maintains a consistent cooling performance.
In such cases, it is necessary to recharge the air conditioner by adding freon through a filter.
Understanding Freon’s Role in RV Air Conditioning
Basics of freon in cooling systems.
Freon is a type of refrigerant commonly used in cooling systems, including RV air conditioners. It plays a crucial role in the cooling process by absorbing heat from the indoor air and releasing it outside. This cycle allows for the creation of cool air inside the RV.
Freon, also known as R-22 or R-410A , is a colourless gas used in air conditioning units. It transforms into a liquid when compressed.
Its unique properties make it an ideal choice for air conditioning systems as it can efficiently absorb and release heat.
Freon, a common refrigerant used in air conditioning units, has low toxicity levels and does not pose significant health risks when handled properly.
The significance of Freon in air conditioning unit cooling processes cannot be overstated. Without this refrigerant, an RV air conditioner would not be able to effectively cool down the interior space during hot summer days.
The air conditioning unit acts as the medium through which heat is transferred from one area to another, allowing for efficient temperature regulation inside the vehicle.
How Freon Cycles Through an RV AC
Understanding how Freon circulates within an RV air conditioner can help demystify its role further. The process begins with the air conditioning unit’s compressor compressing gaseous Freon, causing it to turn into a high-pressure and high-temperature vapour.
This hot vapour then flows through air conditioning unit coils where it releases heat to become a cooler vapour.
Next, this cooled vapour passes through an expansion valve or capillary tube, which reduces the pressure significantly in the air conditioning unit.
As a result, the refrigerant evaporates into a cold gas while absorbing heat from the surrounding air inside the evaporator coil.
The cold gas from the air conditioning unit then returns to the compressor to repeat the cycle once again.
This continuous circulation of Freon allows for consistent cooling within your RV’s air conditioning system.
To visualize this process better, imagine water flowing through pipes: it gets compressed by an air conditioning unit at one end (like in a water pump ), releases heat as it flows through the pipes, and then expands at the other end.
Similarly, Freon follows a similar cycle within an RV air conditioner.
The Lifespan of Freon in RV Air Conditioners
The lifespan of Freon in RV air conditioners can vary depending on several factors. On average, an air conditioning unit’s Freon can last for 10-15 years before it needs to be replaced.
However, certain factors such as leaks or malfunctions in the air conditioning unit can significantly reduce its lifespan.
Signs that indicate it may be time to check or replace the refrigerant include reduced cooling efficiency, longer cooling times, or unusual noises coming from the AC unit.
Checking Freon Levels in Your RV Air Conditioner
To ensure optimal performance of your RV air conditioner, it is important to regularly check the levels of refrigerant , commonly known as Freon.
By doing so, you can identify if there is a need for a recharge or if there may be any leaks in the air conditioning unit.
Tools for Measuring Freon Levels
You’ll need specific tools designed for this purpose. One such tool is a pressure gauge. This handy air conditioning unit device allows you to measure the pressure inside the system and determine if it falls within the recommended range.
Another useful tool for maintaining an air conditioning unit is an electronic leak detector. This device helps identify any leaks in the system by detecting traces of refrigerant.
It’s important to note that these tools vary in terms of accuracy and functionality. To ensure accurate measurements, it is advisable to invest in reliable and high-quality tools specifically designed for HVAC systems .
Brands like Fieldpiece, Yellow Jacket, and Testo are well-known for producing reliable gauges and leak detectors that can provide accurate readings.
Step-by-Step Guide to Checking Freon
Before proceeding with checking the Freon levels in your RV air conditioner, always prioritize safety first. Make sure to turn off all power sources connected to the unit before starting any maintenance work.
- Locate the service valves on your AC unit. These are typically found near the compressor or condenser unit.
- Attach a pressure gauge manifold set to both service valves.
- Open both valves slowly and allow pressure from both sides of the system to equalize.
- Observe the pressure readings on both gauges.
- Compare these readings with manufacturer specifications or consult an HVAC professional who can advise you on acceptable pressure ranges.
- If the pressure readings are lower than recommended, it may indicate that your system needs a recharge. In this case, it is best to contact a certified HVAC technician to handle the refrigerant refill.
- If the pressure readings are significantly higher or fluctuate abnormally, it could be an indication of a leak in the system. Use an electronic leak detector to locate any potential leaks and take appropriate action.
Remember, working with refrigerants requires expertise and proper certification.
It is always advisable to consult a professional HVAC technician for any major repairs or maintenance work on your RV air conditioner.
By regularly checking the Freon levels in your RV air conditioner, you can ensure that it operates efficiently and provides optimal cooling during your travels.
Recharging Your RV Air Conditioner
Can rv ac units be recharged.
Wondering if it’s possible to recharge the refrigerant (Freon) in your RV air conditioner system ? Well, the answer is yes! Just like any other air conditioning unit, RV AC units can be recharged.
However, there are a few things you need to consider before proceeding with the recharge process.
There are situations where recharging may be necessary. If your RV air conditioner isn’t cooling as effectively as it used to or if you notice that the air coming out of the vents is warm instead of cool, it could be an indication that your refrigerant levels are low.
In such cases, recharging the system can help restore its cooling efficiency.
However, it’s important to note that not all RV AC units can be re charged. Some newer models come with sealed systems that do not require recharging. Certain limitations or conditions may make recharging impractical or ineffective.
For example, if there is a major leak in the system or if the compressor is faulty, simply adding more refrigerant won’t solve the underlying issue.
Preparing for the Recharge Process
Before diving into the recharge process itself, it’s crucial to take some preparatory steps and ensure your safety. Here’s what you need to do:
- Turn off your RV’s power supply and disconnect from any external power source.
- Put on protective gear such as gloves and safety goggles.
- Gather all necessary equipment including a manifold gauge set and a canister of compatible refrigerant (Freon) .
- Familiarize yourself with any specific instructions provided by your RV manufacturer or AC unit manual.
- Take precautions when handling refrigerants as they can be harmful if exposed directly to skin or eyes.
During this preparation stage, it’s essential to understand the potential risks involved in handling refrigerants and take appropriate precautions accordingly. By doing so, you can ensure a safe and successful recharge process.
Step-by-Step Recharging Instructions For RV Air Conditioners
Recharging your RV air conditioner is a simple process that can help ensure optimal cooling performance during those hot summer road trips.
Follow these step-by-step instructions to recharge your RV air conditioner and keep your vehicle cool and comfortable.
- Refrigerant: Check your RV’s owner’s manual to determine the correct type and amount of refrigerant needed for your air conditioner.
- Safety goggles and gloves: Protect yourself from any potential refrigerant leaks or spills.
- Screwdriver or wrench: You may need these tools to remove any access panels or covers on your air conditioner unit.
- Turn off the power: Before you begin recharging your air conditioner, make sure to turn off the power to the unit. This will prevent any electrical accidents or damage.
- Locate the service valves: The service valves are typically located on the refrigerant lines near the air conditioner unit. They may be covered by a protective cap that needs to be removed.
- Attach the refrigerant canister: Connect the refrigerant canister to the service valve using the appropriate hose or adapter. Make sure the connection is secure.
- Open the service valve: Slowly open the service valve to allow the refrigerant to flow into the air conditioner unit. Monitor the pressure gauge on the canister to ensure you are adding the correct amount of refrigerant.
- Monitor for leaks: While recharging, keep an eye out for any signs of refrigerant leaks, such as hissing sounds or oil stains. If you notice any leaks, stop the recharging process and consult a professional.
- Close the service valve: Once you have added the appropriate amount of refrigerant, close the service valve on the canister.
- Replace any access panels or covers: Use a screwdriver or wrench to securely fasten any access panels or covers that were removed during the recharging process.
- Turn on the power: After completing the recharging process, turn on the power to your RV air conditioner and test the cooling performance. If necessary, make any adjustments to the temperature settings.
- Regular maintenance : To ensure your RV air conditioner continues to operate efficiently, it is important to perform regular maintenance tasks such as cleaning or replacing air filters and checking for any signs of wear or damage.
By following these step-by-step instructions, you can recharge your RV air conditioner and enjoy cool and comfortable travels on the open road.
Remember to always prioritize safety and consult a professional if you have any concerns or difficulties during the recharging process.
Adding Freon to Your RV Air Conditioner

Safety Precautions for Handling Freon
It’s crucial to prioritize safety. Handling refrigerant can be hazardous if not done properly. To ensure your well-being, there are a few important safety precautions you should follow.
First and foremost, always wear the appropriate protective gear when working with Freon. This includes safety goggles, gloves, and a respirator mask.
These items will shield you from potential health risks associated with exposure to refrigerants.
It’s essential to work in a well-ventilated area. Open windows or doors to allow fresh air circulation and prevent the buildup of harmful fumes.
If possible, consider wearing a ventilated hood or working outdoors to further minimize any potential risks.
Furthermore, make sure you have a clear understanding of the health hazards associated with mishandling Freon.
Refrigerants contain chemicals that can cause skin irritation, respiratory issues, and even frostbite if they come into contact with your skin or eyes. Take extra care when handling these substances and avoid direct contact at all costs.
Detailed Process for Adding Freon
Now that we’ve covered the necessary safety precautions let’s dive into the detailed process of adding or replacing refrigerant in your RV air conditioner system.
- Purging: Begin by purging any existing refrigerant from the system using specialized equipment designed for this purpose. This step ensures that any residual gas is removed before proceeding further.
- Vacuuming: Once the system has been purged, vacuuming is necessary to eliminate moisture and contaminants from the lines. Connect a vacuum pump to draw out any remaining air and moisture from the system thoroughly.
- Charging: After completing the vacuuming process successfully, it’s time to charge your RV air conditioner with a new refrigerant. Follow the manufacturer’s guidelines carefully to determine the appropriate amount of refrigerant required for your specific unit.
- Testing: Once you’ve added the refrigerant, it’s essential to test the system to ensure it is functioning correctly. Monitor the pressure and temperature levels to verify that they are within the recommended range.
Remember, accuracy is key when adding Freon to your RV air conditioner. It’s crucial to follow each step diligently and adhere strictly to the manufacturer’s instructions. If you’re unsure about any aspect of this process, it’s always best to consult a professional who can guide you through it safely and effectively .
Troubleshooting Common RV Air Conditioner Issues

Identifying Low Freon Symptoms
If you’re wondering whether your RV air conditioner needs freon, there are a few common symptoms to look out for.
Low levels of refrigerant , commonly referred to as freon, can lead to poor cooling performance. Signs of low freon in an RV AC unit include:
- Weak or Insufficient Cooling : If your air conditioner is not providing the same level of coolness as before, it could be due to low freon levels. The reduced refrigerant can impact the system’s ability to generate cold air effectively .
- Longer Cooling Cycles : Another symptom is extended cooling cycles where the AC unit runs for longer periods than usual without achieving the desired temperature. This can occur because the system is struggling to extract heat from the indoor air due to insufficient refrigerant.
- Frozen Evaporator Coils : In some cases, low freon levels can cause ice buildup on the evaporator coils inside the AC unit. This happens when there isn’t enough refrigerant flowing through the coils, leading to condensation freezing and obstructing proper airflow.
It’s important to note that these symptoms may also indicate other issues with your RV air conditioner unrelated to freon levels.
To differentiate between low freon symptoms and other AC-related problems, consider factors such as unusual noises or strange odours coming from the unit.
If you suspect low freon levels in your RV air conditioner, it’s best to consult with a professional HVAC technician specializing in mobile units.
They will have the expertise and tools necessary for diagnosing and resolving any issues related to refrigerant levels.
Other AC Problems Unrelated to Freon
While low freon levels can certainly affect an RV air conditioner’s performance, it’s essential to understand that not all AC problems stem from insufficient refrigerant.
Here are a few other common issues that may arise:
- Dirty Air Filters : Clogged or dirty air filters can restrict airflow and reduce the overall efficiency of your RV air conditioner. Regularly cleaning or replacing the filters is crucial for maintaining optimal cooling performance.
- Faulty Thermostat : A malfunctioning thermostat can cause temperature inconsistencies, such as the AC unit not turning on or off when it should. Checking and calibrating the thermostat settings can help resolve this issue.
- Electrical Problems : Wiring issues, blown fuses, or tripped circuit breakers can disrupt the proper functioning of your RV air conditioner. It’s important to check for any electrical problems and ensure all connections are secure.
Maintaining Your RV Air Conditioner for Optimal Performance
To keep your RV air conditioner running smoothly, routine cleaning and inspection are essential. Regular maintenance helps prevent issues and ensures optimal performance.
Here are some practical tips to help you maintain your RV air conditioner:
Routine Cleaning and Inspection Tips
Keeping your RV air conditioner clean is crucial for its efficiency. Start by turning off the power supply and removing any debris from the unit’s exterior. Use a soft brush or cloth to gently clean the coils, fins, and vents. Avoid using harsh chemicals that could damage the components.
Mild soap mixed with water works well for most parts of the air conditioner. However, be cautious not to get water into electrical components as it can cause damage . Consider using a fin comb to straighten bent fins for better airflow.
Inspecting your RV air conditioner regularly is equally important. Check for any signs of wear or damage on the coils, fins, and fan blades. Look out for leaks or unusual noises during operation. If you notice any issues, it’s best to address them promptly before they worsen.
As a general rule of thumb, aim to clean your RV air conditioner at least once every season or more frequently if you use it extensively in dusty or humid environments.
Defrosting the AC Unit Properly
Defrosting your RV air conditioner is an often overlooked but critical maintenance task. Over time, ice can build up on the evaporator coils due to condensation and temperature fluctuations. Neglecting defrosting can lead to reduced cooling efficiency and potential damage to the unit.
To defrost your AC unit properly:
- Turn off the power supply and allow the ice on the coils to melt naturally.
- Place towels or absorbent material beneath the unit to catch any dripping water .
- Once all ice has melted, wipe down any excess moisture from the coils with a soft cloth.
- Allow the unit to dry completely before turning it back on.
Regularly defrosting your RV air conditioner not only improves its performance but also extends its lifespan. Make it a part of your routine maintenance schedule to ensure optimal cooling during your travels.
Enhancing the Efficiency of Your RV Air Conditioner
Tips for improved cooling performance.
To ensure your RV air conditioner operates at its best, there are some practical tips you can follow to enhance its cooling performance. First and foremost, proper insulation is key.
Insulating your RV effectively helps to keep the cool air inside and prevents hot air from seeping in.

This not only improves the efficiency of your air conditioner but also helps maintain a comfortable temperature inside your vehicle.
Another important factor to consider is optimizing airflow. Make sure that all vents are open and unobstructed so that cool air can circulate freely throughout the space.
Keeping the area around the air conditioning unit clean and clear of any debris or obstructions will help improve airflow and overall cooling performance.
Utilizing shade can also make a significant difference in how well your RV air conditioner works. Parking your vehicle under a tree or using awnings or shades can provide protection from direct sunlight, reducing heat buildup inside your RV.
This means your air conditioner won’t have to work as hard to cool down the space, resulting in improved energy efficiency .
Energy-Saving Practices for RV Owners
As an RV owner, it’s important to be mindful of energy consumption while still maintaining comfort.
There are several energy-saving practices you can implement to reduce power usage without compromising on cooling effectiveness .
One common misconception is that lowering the thermostat temperature will cool down your RV faster. However, this isn’t true.
Setting the thermostat at a moderate temperature (around 78°F) allows the unit to operate more efficiently while still providing sufficient cooling.
Regularly cleaning or replacing air filters is another simple yet effective way to optimize energy efficiency.
Dirty filters restrict airflow, causing the system to work harder and consume more power. By keeping them clean, you ensure better airflow and reduce strain on the unit.
Proper maintenance of your RV’s air ducts is equally important for energy efficiency. Inspect the ducts for any leaks or damage and seal them properly to prevent cool air from escaping.
This ensures that the cool air is directed where it’s needed most, maximizing cooling efficiency .
Identifying Signs of AC Problems Beyond Freon Issues
Recognizing electrical and mechanical faults.
To ensure your RV air conditioner is running smoothly, it’s crucial to be able to identify electrical and mechanical faults that may occur.
These issues can lead to a variety of symptoms that indicate a problem with your AC system. By recognizing these signs, you can take appropriate troubleshooting steps or seek professional assistance when needed.
Electrical faults in an RV air conditioner can manifest in various ways. One common symptom is the AC unit not turning on at all, despite power being supplied. This could indicate an issue with the thermostat or a faulty electrical connection.
Another sign is if the air conditioner turns on but fails to cool the interior properly. This could be due to a malfunctioning compressor or capacitor.
Mechanical faults are also important to watch out for. A loud and unusual noise coming from the AC unit while it’s running could suggest a problem with the fan motor or blower wheel.
If you notice water leaking inside your RV near the air conditioner, it might indicate a clogged drain line or damaged condensate pan.
When encountering these electrical and mechanical faults, there are troubleshooting steps you can take before seeking professional help.
For electrical issues, check if there are any loose connections or blown fuses in the circuit breaker box. You can also inspect the thermostat settings and make sure they’re properly configured.
In case of mechanical problems, clean or replace dirty air filters as they can restrict airflow and impact cooling performance.
Check if any debris has accumulated around the outdoor unit and remove it carefully. However, it’s essential to remember that not all problems can be resolved through DIY efforts.
When to Seek Professional Help

While some AC issues can be resolved independently, there are situations where it’s best to seek professional assistance for your RV air conditioner problems.
Complex electrical or mechanical problems may require expert knowledge or specialized equipment that only professionals possess.
Attempting to fix these issues without proper expertise can lead to further damage or potential safety hazards.
If you’re unsure about the root cause of the problem or if your troubleshooting attempts haven’t yielded satisfactory results, it’s advisable to contact a professional HVAC technician.
They have the expertise and experience to diagnose and repair complex AC issues efficiently and safely.
Seeking professional help is crucial when dealing with refrigerant-related problems . Handling refrigerants requires specialized training and equipment due to its potential environmental impact and health risks.
If you suspect a refrigerant leak or low levels of freon in your RV air conditioner, it’s best to leave it to the professionals for proper diagnosis and repair.
Remember, your safety should always be a priority.
Legal and Environmental Considerations of Using Freon
Regulations on freon usage.
There are several important regulations that need to be considered. These regulations aim to ensure the safe handling and disposal of refrigerants like Freon.
RV owners must be aware of these guidelines to avoid any legal issues and contribute to environmental protection.
The Environmental Protection Agency (EPA) has set specific rules regarding the usage of Freon in air conditioning systems.
These rules include requirements for proper training and certification for individuals who handle refrigerants, as well as guidelines for leak detection, repair, and record-keeping.
It is important for RV owners or technicians to comply with these regulations to prevent harm to themselves and the environment.
Recently, there have been updates in regulations related to the phase-out of certain types of refrigerants, including Freon.
The EPA has been gradually phasing out hydrochlorofluorocarbons (HCFCs), which are commonly used in older models of air conditioners.
This phase-out is part of an international effort to protect the ozone layer and reduce greenhouse gas emissions.
Eco-Friendly Alternatives to Traditional Freon
To address the environmental concerns associated with traditional Freon, there are now eco-friendly alternatives available for RV air conditioners.
These alternatives offer a more sustainable option while still providing effective cooling performance.
One popular alternative is R-410A, which is a hydrofluorocarbon (HFC) refrigerant that does not contribute to ozone depletion. It has become widely used in new air conditioning systems due to its superior cooling properties and lower environmental impact compared to Freon.
Another option is R-32, another HFC refrigerant that offers similar benefits.
When transitioning from a traditional Freon-based system to an eco-friendly alternative, there are a few considerations RV owners should keep in mind. it’s important to ensure that the system is compatible with the new refrigerant.
Some modifications or upgrades may be necessary to make the switch. It’s crucial to follow proper procedures for handling and disposing of the old Freon refrigerant to comply with regulations.
By choosing eco-friendly alternatives, RV owners can contribute to environmental sustainability and reduce their carbon footprint.
These alternatives not only provide effective cooling but also align with global efforts to protect the ozone layer and combat climate change.
understanding the role of Freon in your RV air conditioner is crucial for maintaining optimal performance.
Checking and recharging Freon levels regularly can help ensure that your air conditioner is functioning efficiently and effectively.
Troubleshooting common issues and implementing proper maintenance practices can extend the lifespan of your RV air conditioner.
It is important to note that using Freon in your RV air conditioner comes with legal and environmental considerations. As regulations surrounding Freon continue to evolve, it is essential to stay informed about the proper handling and disposal methods.
Consider exploring alternative refrigerants that are more environmentally friendly and comply with current regulations.
By following these guidelines and taking proactive measures, you can enhance the efficiency of your RV air conditioner while minimizing its impact on the environment.
Remember to consult a professional if you encounter any significant issues or have questions regarding the use of Freon in your specific RV air conditioning system.
Does an RV air conditioner need freon?
RV air conditioners do not require freon. They use a refrigerant called R410A, which is more environmentally friendly. It is important to ensure that your RV’s air conditioner has the correct amount of refrigerant and that any leaks are promptly repaired by a professional technician.
How often should I recharge the refrigerant in my RV air conditioner?
Recharging the refrigerant in your RV air conditioner is not a routine maintenance task. If you notice a decrease in cooling performance or suspect a refrigerant leak, it is advisable to contact a qualified technician who can assess and address the issue appropriately.
Can I recharge the refrigerant myself?
Recharging the refrigerant in an RV air conditioner requires specialized equipment and knowledge. It is not recommended for inexperienced individuals to attempt this task themselves, as it could lead to further damage or safety hazards. Always consult with a professional technician for any refrigerant-related concerns.
What are common signs of low refrigerant levels in an RV air conditioner?
Common signs of low refrigerant levels in an RV air conditioner include reduced cooling efficiency, longer cooling cycles, insufficient airflow, and unusual noises coming from the unit. If you experience any of these symptoms, it may indicate low refrigerant levels and should be addressed by an expert technician.
How can I maintain the optimal performance of my RV air conditioner’s refrigeration system?
To maintain optimal performance of your RV’s air conditioning system, ensure proper airflow by regularly cleaning or replacing filters. Schedule periodic inspections by a qualified technician to check for potential leaks or other issues that may affect the efficiency of the unit’s refrigeration system.
RV Air Conditioner Not Cooling? 6 Tips for Better Cooling
How to reduce toilet flush noise: 5 effective solutions.
No Comments
home improvement
© 2024 Soundproofgears LLC. All Rights Reserved. Privacy Policy .

AC All Solutions
Blog by Skilled About Air Conditioners
Do RV Air Conditioners Take Freon? Ultimate Guide
Yes, RV air conditioners do use Freon. RV air conditioners rely on Freon for cooling.
Understanding the role of Freon in these systems is essential for maintenance and repairs. We’ll explore how RV air conditioners use Freon, what to do if you suspect a Freon leak, and some tips for keeping your RV air conditioning system running smoothly.
Whether you’re a new RV owner or a seasoned traveler, this information can help you stay cool and comfortable on the road. So, let’s dive in and learn all about the role of Freon in RV air conditioners.
Table of Contents
Understanding The Cooling Process
The cooling process of RV air conditioners is essential for ensuring a comfortable and pleasant indoor environment during your travels.
Understanding the mechanism behind how these cooling systems work and the common cooling agents used is crucial for maintaining and troubleshooting your RV air conditioner.
Let’s delve into the intricate process of RV air conditioning and gain a better insight into the cooling process.
What Are Rv Air Conditioners?
RV air conditioners are compact cooling systems designed specifically for recreational vehicles. They are tailored to provide optimal cooling in the confined space of an RV, ensuring a comfortable temperature for passengers during long journeys or camping trips.
Overview Of How Rv Air Conditioners Work
RV air conditioners function by drawing warm air from inside the vehicle, passing it through the cooling process within the air conditioner unit, and then releasing the cooled air back into the RV.
The process involves several components, including an evaporator, condenser, compressor, and expansion valve, working in tandem to regulate the indoor temperature.
Common Cooling Agents Used In Rv Air Conditioners
The cooling agents used in RV air conditioners play a significant role in the cooling process. While traditional systems might have utilized Freon as the cooling agent, modern RV air conditioners often employ more environmentally friendly alternatives such as R-410A, also known as Puron.
This shift reflects a sustainable approach while maintaining efficient cooling capabilities for RV occupants.
Exploring Refrigerants In Cooling Systems
When it comes to RV air conditioners, understanding the role of refrigerants in cooling systems is important.
Exploring the types of refrigerants, their impact on cooling efficiency, and the environmental considerations is crucial for RV owners to make informed decisions about maintaining and optimizing their air conditioning units.
Different Types Of Refrigerants In Rv Air Conditioners:
RV air conditioners utilize various types of refrigerants to facilitate the cooling process. Common refrigerants include R-410A , R-134a , and R-22 . Each type has unique thermal properties and is compatible with specific cooling systems.
Understanding the differences between these refrigerants can help RV owners make informed choices when servicing their air conditioners.
The Impact Of Refrigerants On Cooling Efficiency:
The choice of refrigerant in an RV air conditioner significantly influences its cooling efficiency. The thermal conductivity, heat absorption, and pressure characteristics of a refrigerant directly affect the cooling capacity and energy consumption of the air conditioning unit.
Selecting the right refrigerant is essential for maintaining optimal cooling performance and energy efficiency in RV air conditioners.
Environmental Considerations Of Refrigerants:
Environmental concerns surrounding refrigerants in RV air conditioners revolve around their global warming potential (GWP) and ozone depletion potential (ODP).
Transitioning to environmentally friendly refrigerants , such as R-410A, which has a lower GWP and zero ODP, can mitigate the environmental impact of cooling systems.
RV owners should prioritize the proper disposal and handling of refrigerants to minimize their ecological footprint.
Addressing The Freon Misconception
Tackling the Freon misconception surrounding RV air conditioners is crucial for understanding their refrigeration systems and the refrigerants they use.
There is often confusion about whether RV air conditioners take Freon, so let’s delve into the subject and clarify the role of Freon in these systems, the evolution of refrigerants in RV air conditioners, and the alternatives to Freon in modern units.
Clarifying The Role Of Freon In Rv Air Conditioners
In the past, many RV air conditioners used to rely on Freon, also known as R-22, as the primary refrigerant. Freon is a chlorofluorocarbon (CFC) that was widely used due to its excellent cooling properties.
However, due to its detrimental impact on the ozone layer, it has been phased out and is no longer used in modern RV air conditioners.
Evolution Of Refrigerants In Rv Air Conditioners
With the environmental concerns surrounding CFCs, the industry has shifted towards more eco-friendly refrigerants. Refrigerants like R-410A, also known as Puron, have replaced Freon in newer RV air conditioners.
These modern refrigerants provide efficient cooling without compromising the environment, making them the preferred choice for air conditioning systems in RVs.
Alternatives To Freon In Modern Rv Air Conditioners
Aside from R-410A, RV air conditioners also utilize other alternatives such as R-134a and R-1234yf. These refrigerants are designed to meet environmental regulations while delivering optimal cooling performance.
Additionally, newer units may incorporate advanced technologies and design features to maximize energy efficiency and minimize environmental impact, ensuring a greener and more sustainable operation.
Maintaining And Servicing Cooling Systems
Proper care and regular servicing of RV air conditioners are crucial for ensuring optimal cooling performance and longevity. One essential aspect of maintaining these cooling systems is managing refrigerant levels to keep the air conditioner running efficiently.
Understanding the importance of refrigerant levels and knowing how to troubleshoot common refrigerant-related issues is key to preserving the functionality of RV air conditioners.
Proper Care For Refrigerant Levels In Rv Air Conditioners
Maintaining adequate refrigerant levels in RV air conditioners is essential for optimal cooling performance. Regularly checking and replenishing refrigerant is important to ensure that the air conditioner functions efficiently and effectively, especially during hot weather or extended use.
Ignoring proper care for refrigerant levels can lead to diminished cooling capacity and potential system malfunctions.
Troubleshooting Common Refrigerant-related Issues
Identifying and addressing refrigerant-related problems is crucial for maintaining the functionality of RV air conditioners. Common issues such as refrigerant leaks and improper pressure can hamper the cooling performance.
Understanding the signs of low refrigerant levels and knowing how to detect leaks ensures that any issues are promptly addressed to prevent further damage to the cooling system.
Importance Of Professional Maintenance For Rv Air Conditioners
Seeking professional maintenance and servicing for RV air conditioners is vital for ensuring that refrigerant levels are managed correctly.
Professional technicians have the expertise and tools to inspect, refill, and troubleshoot refrigerant-related issues effectively, maintaining the efficiency and longevity of the air conditioning system.
Regular professional maintenance helps prevent costly repairs and ensures that the RV air conditioner operates at its best.
Compliance And Safety In Cooling Systems
When it comes to RV air conditioners, compliance with regulatory guidelines and ensuring safety in handling refrigerants are paramount.
The refrigerant used in these systems is crucial for their cooling effectiveness, but it also poses environmental and safety concerns.
It’s essential for RV owners and technicians to adhere to industry best practices and regulatory standards to maintain safety and sustainability in RV air conditioner refrigerant management.
Regulatory Guidelines For Refrigerants In Rv Air Conditioners
Regulatory bodies, such as the Environmental Protection Agency (EPA), have established guidelines for the use and management of refrigerants in RV air conditioners.
These guidelines primarily focus on the responsible handling, disposal, and replacement of refrigerants to minimize environmental impact and ensure compliance with environmental regulations.
RV owners should be aware of these regulations and work with certified technicians to ensure that their air conditioning systems are compliant with the established standards.
Industry Best Practices For Handling Refrigerants In Rv Air Conditioners
Industry best practices encompass proper training for technicians in refrigerant handling, leak detection, and safety protocols during maintenance and repairs.
It’s essential for RV service providers to prioritize the use of environmentally friendly refrigerants and have measures in place to prevent the release of harmful gases into the atmosphere.
By following these best practices, the industry can contribute to sustainability and environmental preservation.
Ensuring Safety And Sustainability In Rv Air Conditioner Refrigerant Management
Ensuring safety and sustainability in RV air conditioner refrigerant management involves proactive measures to minimize leaks, proper disposal of old refrigerants, and the use of eco-friendly alternatives.
By adopting efficient and environmentally responsible refrigerant management practices, RV owners and service providers can contribute to a healthier environment and prolong the lifespan of their air conditioning systems.

Credit: www.dumpsters.com
Frequently Asked Questions Of Do Rv Air Conditioners Take Freon?
Do rv air conditioners require freon to function.
Yes, RV air conditioners use a refrigerant, typically R-410A, rather than freon to cool the air.
How Often Should The Refrigerant In An Rv Air Conditioner Be Checked?
It is recommended to have the refrigerant level checked during annual maintenance to ensure optimal performance.
Can I Add Freon To My Rv Air Conditioner Myself?
Adding refrigerant to an RV air conditioner requires specialized equipment and should be done by a certified technician.
In sum, understanding the refrigerant requirements of RV air conditioners is crucial for their optimal performance. While not all RV air conditioners use Freon, it’s essential to ensure the correct refrigerant is used when recharging.
By staying informed and following manufacturer guidelines, you can maintain a comfortable and efficient RV cooling system.
Related posts:

Leave a Comment Cancel reply
Save my name, email, and website in this browser for the next time I comment.
RV Zone is reader-supported. When you buy through links on our site, we may earn an affiliate commission. Learn more
How to Quiet RV Air Conditioner: An Easy Step-by-Step Guide for Beginners

Writen by Tom Hank

Fact checked by Joseph Varney

Have you wondered how to make your RV air conditioner quieter? Do you dream of a quiet RV AC instead of a noisy cooling machine? If you said ‘yes’ to either of these questions, keep reading to know how to quiet RV air conditioner.
The first step to obtaining a quiet RV AC unit is to find the source of the problem. A few reasons that can produce too much noise from a faulty or old AC include faulty fan blades and greasy ducts.
After finding the source of the problem, you should continue with the recommended steps. Continue reading to know more about how to make your RV air conditioner quieter than before.
Table of Contents
What You’ll Need

In many cases, you do not need special tools to reduce or eliminate loud noises from your RV air conditioner system . But the troubleshooting-and-repair air conditioning unit project may require certain items for proper results.
Some of the equipment you may need are:
Freon is a non-combustible refrigerant used in RV air conditioners to provide cold and comfortable air. Too little of this substance can cause unwanted air conditioner noise.
If the AC unit has a lack of Freon, it is most likely not blowing cold air. Therefore, the RV’s air conditioner exerts more effort and power to reach normal cooling temperatures.
Take note that handling Freon can be quite dangerous. You should call a certified technician to help you with this RV air conditioner noise reduction project to avoid health hazards and costly mistakes.
Current Clamp
Like many other mechanical appliances, an efficient and quiet air conditioner will pull the right amount of power from the vehicle’s battery. A low-power output can cause an annoying AC noise.
Achieving the quietest RV air conditioner means checking the cooling system to pull enough power from the mains. Use a reliable current clamp for this purpose.
This piece of equipment allows you to measure the AC’s amperage without breaking the electrical circuit. Many variants of this particular tool can even work on older air conditioners.
Remember to check the user manual to know the right places in the air conditioner to connect the current clamp.
Vacuum Cleaner
Dirty fan blades, an unclean duct system, a grimy air vent, and other filthy parts in travel trailer AC units can become the main reasons for the unpleasant noises coming from these systems.
Use a vacuum cleaner with a reasonably small attachment to suck up the dust, dirt, and filth from the whole unit. It is not advisable to use a large attachment since many RV AC units usually have fairly compact dimensions.
Take note that some air conditioners, particularly if the unit is a rooftop air conditioner, can gather more unclean substances than others. If so, you may need to use the vacuum cleaner for regular maintenance and as a deep-cleaning tool.
RV AC Noise Reduction Kit
Sometimes it can be tough to achieve satisfying results from an RV air conditioner noise reduction project. An air conditioner silencer can be appropriate for this cause.
An RV AC silencer, like the Wacko RV air conditioner silencer, helps reduce and perhaps eliminate the loud noise coming from the cooling unit.
This tool works by eliminating and preventing dust, lint, and pollen from entering the RV AC. Also, the device can help reduce noise levels from many ACs, including those from GE and other models.
Step-by-Step Instructions

In this section, you will know about how to achieve a quiet AC unit for your recreational vehicle based on the problem’s source.
Add Freon to Reduce RV AC Noise
Remember that you should only add Freon to an RV AC if you can handle the substance.
Use an amp or current clamp to check if the AC pulls enough power from the vehicle’s main power source. If it does not, it should signify that the AC does not have enough Freon.
If you cannot find an expert nearby, here are the steps to replace the Freon yourself.
Step 1: Remove the AC’s cover. You may also need to remove the rubber gasket to gain access to the internal components.
Step 2: Use an adjustable wrench to take off the unit’s refrigerant service port cap. You can usually find this part on the suction side.
Step 3: Attach the suction side hose of the Freon’s manifold gauges to the cooling unit’s service port.
Step 4: Connect the Freon to the middle hose of the refrigerant gauges.
Step 5: Test the AC by turning it on while setting the appliance to the coldest setting. At this post, it should now be a quiet RV air conditioner. If it still produces some sound, the additional Freon should help reduce noise significantly.
Clean the AC Unit to Reduce Noise Level
An undesirable racket from an RV AC might be the cause of unclean parts, especially if it is an old air conditioner. Cleaning the unit can help and perhaps remove the annoying sounds from the system. Here are the steps to clean an air conditioner for travel trailers.
Step 1: Disconnect the AC unit from the vehicle’s power source to avoid electric shocks during the cleaning operation.
Step 2: Clean the filter using a vacuum cleaner . This appliance can help pull out loose particulates.
Step 3: Wash the filter using water and a mild detergent solution.
Step 4: Apply a mixture of equal parts vinegar and water. Spray this solution on different parts to prevent bacteria growth.
Step 5: Put the parts back in their original places.
You may also choose to do routine maintenance on the AC’s parts while cleaning the system. For instance, check if the AC mounting is secure or if you need to tighten a loose nut or other loose hardware. Also, make sure to lubricate the motor or clean the coil fins and air filters more thoroughly.
Also, ensure that you have a tightly mounted air conditioner. A rattling AC unit can also make a racket.
Install an RV Air Conditioner Silencer
Adding an AC silencer can help reduce the noise from the cooling system. But take note that the sound reduction might not be significant.
Here are the steps to help you install this kit to your RV’s air conditioner.
Step 1: Disconnect the AC from the RV’s power supply and remove the air filter.
Step 2: Remove the screws of the AC’s case and set them aside.
Step 3: Use aluminum tape to cover the rectangle air duct hole on the mounting plate, along with any other holes.
Step 4: Screw in the black base to the mounting holes lining up the air intake.
Step 5: Insert the electrostatic filter using the kit’s included screws.
Step 6: Return the AC’s base to the main unit and secure it.
So, How to quiet RV air conditioner? You need to find the source of the problem that is creating more noise inside the RV air conditioner than necessary. These issues could be anything from a lack of Freon or an unclean fan motor. Then, follow the appropriate steps to fix the noise.
Did you like this guide to proper noise reduction for RV air conditioners? Make sure to share this post with other RVers to help them in reducing noise from their vehicles’ cooling units.
What do you think about this article? Leave a comment to tell us your experiences and thoughts.
Hi, I am Joseph. Carpe diem! Seize the day! That’s always been my life motto. If you haven’t seen some of the most beautiful places in the country, you are missing out on incredible adventures.

- Types Of RVs
- Tow Vehicles
- Maintenance & Repairs
- RV Power & Electrical Supplies
- RV Appliances
- Living In An RV
- Travel & Destinations
- RV Gear Buyer’s Guides

RV Air Conditioner Not Blowing Cold: Here’s How To Fix It
- Last Updated: April 9, 2024
- 8 minutes read
RV air conditioners are a well-known source of breezy comfort in your RV, but how well they perform can be affected by lots of different factors, like:
- Low refrigerant levels
- Dirty/clogged air filters
- Electrical issues
- Condenser problems
If you enjoy those RV trips in summer, you are likely to encounter problems with your RV air conditioner’s cooling, as I did. In this article, I’ll share my research and knowledge on air conditioners, with actionable steps to solve common issues that you might encounter.
Mechanism Of An RV Air Conditioner

One must understand how the RV air conditioner works to identify the problems based on the symptoms accurately. An RV air conditioner works on principles similar to a home air conditioning unit. It consists of two main components which are the evaporator unit inside the RV and the condenser unit outside.
A refrigerant gas is pressurized by the condenser unit’s compressor into a high-temperature, high-pressure state. After that, the superheated gas travels to the internal evaporator unit, where a fan circulates warm air from the RV over refrigerant-containing coils. The refrigerant absorbs heat from the air as it flows through evaporating into a low-pressure gas.
When the refrigerant gas evaporatively cools the surrounding air, it absorbs heat from it. After cooling, the air is blasted back into the RV. The cycle is then repeated when the low-pressure refrigerant gas enters the compressor.
Your RV air conditioner functions essentially as a heat exchanger, moving heat from within the car to the outside through the refrigeration cycle. Even when the summer sun tries to convert your RV into an oven on wheels, this ongoing process maintains the cool and comfortable.
Common Causes Of An RV Air Conditioner Not Blowing Heat

Different factors can affect the cooling process of your RV’s Air Conditioner. In the table below, I will describe these factors as to solve the problem you must know and identify the problem.
Troubleshooting Guide

Let me take you through the step-by-step troubleshooting process to identify the cause of your RV air conditioner’s inability to blow cold air:
Always put safety first and don’t hesitate to get professional help if you have any questions about any step. You should be able to recognize and take care of the most frequent problems influencing the cooling efficiency of your RV air conditioner by following this advice.
When Should You Seek Professional Help?

While DIY troubleshoots are easy for fixing common problems like a bad thermostat or an airflow obstruction, certain problems need professional expertise for accurate diagnosis and fixing.
- Refrigerant Handling:
Handling refrigerants requires special knowledge and tools. The system needs to be precisely recharged to confirm optimal function and leakage of refrigerant might be hazardous to one’s health. To confirm the safety of both the environment and the RV owner, professionals are trained to handle refrigerants.
- Electrical Complications
Intricate electrical problems include wiring, capacitors, relays, and compressors, components that require specific expertise. Neglecting electrical maintenance might result in shocks or damage to the RV’s electrical system, among other safety risks. Experts are qualified to identify and securely resolve these problems.
- Comprehensive System Diagnosis
An expert inspection offers a comprehensive understanding of the RV air conditioning system. A comprehensive inspection by an expert guarantees inspection by an expert guarantees that all potential faults are found and resolved, preventing further difficulties, if DIY troubleshooting is unable to identify the issue or if there are several problems.
- Unit Replacement Or Upgrade
Consulting a professional is crucial when dealing with an outdated, irreparable, or inefficient RV air conditioner. Experts can evaluate the unique demands of your RV and help you choose a new unit or suggest upgrades based on your needs and RV’s characteristics.
- Cooling Performance Issues Persists
If do-it-yourself fixes aren’t able to resolve the cooling performance, there may be a more serious problem. Experts are equipped with the resources and know how to carry out comprehensive diagnostics, pinpoint the source of problems, and apply exact fixes to guarantee optimal performance from the air conditioner.
- Specialized Repairs
To repair or replace components like the compressor or motor, certain equipment and knowledge are frequently needed. Experts are better suited to manage these complex jobs with efficiency, reducing the possibility of additional harm and guaranteeing the system’s longevity.
- Warranty Concerns
To adhere to the conditions of your RV air conditioner warranty, you must seek professional assistance during that time. While specialists make sure that any interventions follow manufacturer requirements and maintain warranty coverage, DIY repairs might void the warranty.
In summary, looking for professional experts in these scenarios not only prioritizes your safety but also ensures precise repairs and increases the RV air conditioner’s longevity.
Preventative Maintainance Tips List

Take into consideration these preventative maintenance suggestions to keep your RV air conditioner operating efficiently and avoid problems down the road:
- Regular Filter Maintenance: Change or clean the filters regularly, ideally every one to three months, or as directed by the manufacturer. This guarantees efficient and ideal airflow.
- Condenser Coil Cleaning: To keep your RV’s exterior condenser coils clear of debris and confirm optimal heat dissipation, clean them regularly. Include this in your regular maintenance.
- Inspect And Seal Ductwork: Examine the seals and ductwork, to confirm there are no leaks and obstructions. Use foil tape to plug any leaks so that the cool air doesn’t escape.
- Thermostat Calibration: To guarantee accurate temperature readings, calibrate the thermostat. Your air conditioner’s overall performance can be improved with this easy improvement.
- Regular Inspection: Conduct a visual inspection of the entire air conditioner system, including wiring and connections to find any signs of wear, damage, or loose components to avoid unwanted disruption.
- Confirm Proper Ventilation: Establish proper airflow by keeping the vents inside the RV unblocked. Avoid placing any furniture or objects in a position that could obstruct the vents.
- Monitor Refrigerant Levels: Even though handling refrigerant may call for expert help, cooling problems can be avoided by monitoring refrigerant levels and quickly fixing any leaks that can also occur from exposure to rain.
- Manage Heat Load: Pay attention to the amount of heat your RV is producing. When the temperature is at its highest, keep windows closed, park in shaded spots whenever you can, and limit your activity that generates heat.
- Schedule professional inspection: Take into account setting up a yearly or biannual professional technician inspection. They can verify your system is in optimal shape and spot possible upcoming problems before they become serious.
- Follow Manufacturer’s Recommendations: Adhere to the manufacturer’s maintenance guidelines and recommendations outlined in your RV air conditioner’s user manual. This confirms the correct measures taken for your specific unit.
You can greatly lower the possibility of experiencing cooling problems with your RV air conditioner and make travels consistently comfortable by implementing these preventative maintenance guidelines into your routine.

About Author / Aaron Richardson
Aaron Richardson is an expert RVer and the co-founder of RVing Know How. Aaron, along with his wife Evelyn, has been living and traveling in their Keystone Fuzion RV since 2017. Their adventures span across the country and beyond, including memorable RVing experiences in Mexico. Aaron's passion for the outdoors and RVing shines through in his writings, where he shares a blend of travel stories, practical tips, and insights to enhance the RV lifestyle.

Can I Dump RV Waste Into A Septic Tank?
How long does rv air conditioner last .

11 Comments

James Hafey
I bought a 1999 allegro bay. It has a Owen generator. The generator makes a click sound when the start button is pushed. My A/C on on but it doesn’t blow cold air. I put 5gal. Of gas in the tank. Generator wouldn’t start but the A/C worked great for about an hour. I never owed one before and I’m not a mechanic….any help is appreciated.

Aaron Richardson
You definitely have low batteries if all your getting is a clicking sound as you attempt to start the generator, use jumper cables (or jump box), or just start the rv (main engine) and let it idle for a bit then start the generator as normal, don’t forget to prime the generator as this will help it to start a little easier. Then allow both to run and charge up those house batteries or you can always plug it into shore power and allow the batteries to charge that way then start generator.

Air conditioner working but air isn’t blowing into master bedroom
Usually, when you have one room in particular that is not cooling what you have is a duct problem, a duct design problem, poor air flow can make you think that the air is coming hot because the room is hot when what really happens is that you don’t have enough air to lower the temperature.

Jerry Berry
Conpresser trys to kick in but doesn’t. Have replaced 2 capacitor on the unit

Dale Krueger
Air conditioner runs and can hear compressor kick on. But blows hot air. Camper is plugged into a 30 amp.

Diane Kelly
My Coleman Mach comes on, runs cold for a few hours then no more cold air. Thinking I just need to charge the freon?

Christian Withey
I have a 2021 37 for coleman lantern travel trailer. The air conditioner seems to be working fine, but when I divert the flow to the bedrooms, it never actually gets to the bedrooms. You can feel cool air at the vents, but it’s not blowing. It’s almost as if it’s being blocked. Is there something I’m missing?

My ac is blowing cool air but not cold air. When the temp outside warms up the temp in the camper goes up also.

Dalton Bourne
My air conditioner is quite old so it makes a lot of noise. Is there any way to make the air conditioner run quieter? Thanks for this helpful article!

I have a 2022 Thor Chateau 27R. I had set my A/C to 78 while leaving it in my driveway, hooked to shore power. Recently, we out to my RV and it is blowing warm air. It sounds like the compressor is kicking on, but the air is not cold…not even cool. 80 degrees to be exact. Thought it might have froze up due to extended use. Let it sit, off…for a day and a half, still no luck. Could something else have burned up from excess use in oppressive heat?
Leave a Comment Cancel reply
Your email address will not be published.
Save my name, email, and website in this browser for the next time I comment.
You Might Also Like
 4")
How To Remove An RV Refrigerator? (Step-By-Step Guide)
 5")
How to Avoid RV Tire Blowouts (And What to Do If It Happens)

My RV Refrigerator Not Cooling But Freezer Is? Here’s How To Fix
Start typing and press Enter to search
RV Trips & Travel
Advise to Keep you and your RV in Good shape
RV's · October 20, 2021
Does an RV Air Conditioner Need Freon?
Going on an RV trip means you are probably going to some warm places. Many RV travelers actually use their RVs to find temperate places to stay in the winter and fall. Their home states contend with snow and ice when they are gone.
While in warmer climates, you’ll likely want your air conditioner on. But does your air conditioner need maintenance? Does it seem like it’s blowing less cold air than it used to?
Yes, RV air conditioners need Freon. If your air conditioner isn’t cooling sufficiently, we have some tips and knowledge for you about rv air conditioners in general. There are ways to check whether it’s your freon or a different problem with your air conditioner.
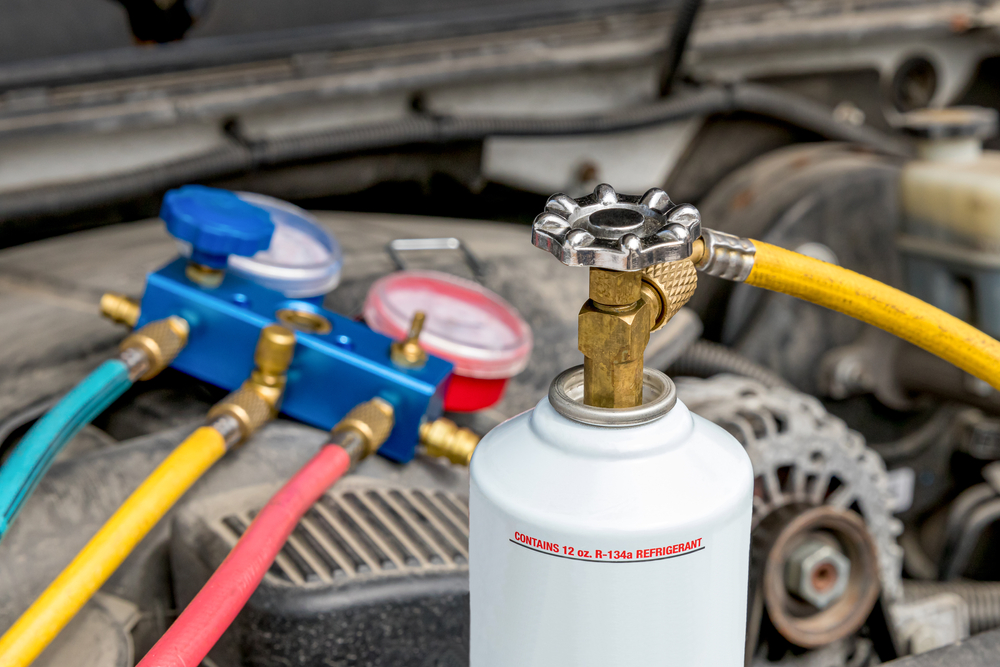
What happened to my freon? Does my RV air conditioner need a freon recharge?
You might need a recharge. Freon is a unique chemical that pulls the heat out of warm air. Your air conditioner uses a fan to blow the now cooled air into your space.
Freon is not supposed to wear out over time but can gradually lose performance for cooling. You might notice this more when you are in a hotter place or when it’s been years since your last recharge.
The container for Freon is generally quite well sealed. It can, however, degrade itself and leak over time. This is a more common cause of needing additional freon instead of the chemical itself wearing out.
How do I recharge the freon in my RV air conditioner?
Before you begin the process of recharging your freon by yourself, there are a couple of things you should know. First, since freon is in a sealed container – you might actually have a leak. The seals that keep freon inside and cold might be worn out and another crack has formed.
In this case, you are probably going to want to have a professional come look at it and fix the freon container itself.

Please also note that while freon is a tasteless, odorless chemical – you shouldn’t touch it or attempt to inhale it. It’s a chemical designed to intake air and output cold. You don’t want it in your lungs!
To begin replacing freon by yourself, you’ll need to be prepared with a couple things.
- Wear protective equipment. This includes glasses, gloves, and preferably something to cover your mouth in the event of a slash.
- Check with your RV manual to ensure you have the right kind of freon for your air conditioner. Do not mix brands or types. Only use what the RV asks for.
- Turn off the power to your air conditioner unit
- You will probably want to consult with the RV manual again in regards to finding and opening the freon part of your AC unit.
- You’ll want to use a coolant gauge to measure the level of existing refrigerant.
- If there isn’t enough, add coolant slowly.
- At this point, you can turn the RV AC back on to check to see if it’s getting cooler.
- Add more as necessary to maintain the desired cool.
- Reassemble your AC unit.
If this sounds complicated to you, or you have protective equipment, you may want to consult a professional. Also, consider that your AC is likely on your roof. Do not climb on the roof if you are not physically able!
Is there another way to know if I need freon in my RV?
Air conditioners are relatively simple machines, so it’s possible to accurately diagnosis your RV air conditioner and a need for freon.
The fan on your air conditioner can be a telltale sign. Does it start up right away when the air conditioner comes on? Does the fan go fast enough that its basically a blur and has some wind coming off it? These are good signs that the fan and motor are doing fine.

It is possible for the battery, or capacitor, within the air conditioner to be too weak. This can cause the fan to go too slow and not provide the desired cooling.
Is a freon leak dangerous?
Leaked freon can be harmful, especially if you don’t know you are being exposed to it. In addition, it’s chemicals are amongst causes of depletion to the o-zone layer.
Since the air conditioner is often on top of the Rv, you are unlikely to even know you have freon leaking until your RV is warmer than desired. Wear protective glasses, gloves, and a mask if you can. Otherwise you may want to just stay away and call a pro.
While freon is not meant to wear down, other problems can make you wonder whether or not your air conditioner is functioning. Your RV probably doesn’t need freon unless another problem has occurred, or it’s been a significant time since the air conditioner was last seen by a pro.
Please also be cautious. Freon is not a joke and should be kept out of your body and off your skin. If you don’t feel confident or don’t have protective gear, have a professional handle the situation for you.
So to answer the initial question, your RV air conditioner should not need freon. It is possible that there are other issues within your air conditioner that are causing a problem, or that it’s leaking.
That said, enjoy your trips to warmer climates. Being able to get up and go is one of the best parts of having an RV.
Get on the List
You’ll also love.

Coleman RV Air Conditioner Troubleshooting
Copyright © 2024 RV Trips & Travel

RV AC Not Cooling? 11 Tips to Troubleshoot and Fix It

Is your RV AC not cooling? If your air conditioner isn’t blowing cold air, don’t panic. The problem could end up being simple and easy to fix!
However, in some cases, the problem isn’t so easy.
In this article, we are covering 6 of the most common reasons for an RV air conditioner blowing warm air. We walk you through troubleshooting the problems from easiest to hardest – because it’s always smart to start with the easiest thing first.
Then, we give you 5 tips to help your RV air conditioner run more efficiently and blow colder air.
Let’s get started.
This article may contain affiliate links. This means that if you click a link on this page and purchase a product, we may earn a commission at no extra cost to you. Thanks for supporting RVHQ!
Table of Contents
Why Is My RV AC Not Cooling? 6 Possible Reasons For RV AC Blowing Lukewarm Air
If your RV air conditioner isn’t blowing cold air, you’re likely feeling hot and frustrated. If the AC is powered on and running but blowing lukewarm air, here are 5 common problems you may be facing.
- Dirty RV AC Unit – coils, fins, or compressor.
- Problems with the thermostat.
- Low freon levels.
- Problems with the fan or blower.
- An issue with the RV AC compressor.
- Problems with the AC capacitor.
It’s a good idea to start with the easiest potential problems first. In many cases, a dirty RV AC unit is the culprit – and it’s easy to clean and fix!
Let’s learn more about the RV air conditioner and dive deeper into troubleshooting each individual problem.
How RV Air Conditioners Work
Most RV air conditioners are the same. These roof-mounted appliances work by circulating Freon, a cooling fluid, through the fins and coils in the unit.
As it does this, a fan blows warm air past the coils and fins, cooling the air. The air is then circulated and blows back into your RV through your air conditioner vents.
The entire system is controlled by a switch in the thermostat in your RV – almost everyone is familiar with a thermostat!
The thermostat has a thermometer inside it, and when the RV temperature reaches the desired temp, it automatically shuts the AC off.
Since there are so many different components that make the RV air conditioning system work, the problem could be anywhere.
What To Do If Your RV Air Conditioner Isn’t Blowing Cold Air – Check the Power
First, if your RV air conditioner isn’t blowing cold air, it’s best to start with the easiest troubleshooting items.
If the unit is on and running but it’s only blowing lukewarm air, the first thing you should do is make sure you have enough power.
In the event that you don’t have enough power for the compressor to kick on, it will only run the fan, and the fan just blows warm or lukewarm air.
If you’re at a campground and are plugged into shore power, you should have enough power to run the AC. Make sure that you don’t have any other high-power-draw appliances running like a blow dryer or the microwave. Sometimes these appliances can draw too much power for your AC compressor to kick on.
If you know that you have enough power to run the AC, the first thing to check it the thermostat.
RV Thermostat Troubleshooting

If your thermostat is set at a lower temperature but your RV still isn’t blowing cold air, you may have a problem with the temperature sensor or the thermostat itself.
One way to tell if your thermostat is bad is by looking at the display – if the on/off switch is powering the fan but the display isn’t on, this is an indicator you need to replace your thermostat.
Sometimes, though, the problem is as simple as a loose wire or dead batteries. Some RV thermostats are hard-wired in. If this is the case for you, open the thermostat and make sure all the wires are properly connected.
And if it runs on batteries, you may just need to replace them!
If you need to replace your thermostat altogether, this is a pretty easy fix and you should be able to do it yourself. There are plenty of forums and vidoes on YouTube that can help you DIY it.
Clean & Inspect The Coils, Fins, and Condenser on Your AC Unit
If your thermostat isn’t the problem, the next easiest item to troubleshoot is to take a look at the air conditioner unit itself.
Most RVs have roof-mounted air conditioning units, so you’ll need to get on top of your RV.
Sometimes a dirty AC unit is the culprit behind an RV AC not cooling. And this is one of the easiest fixes there is!
Dirty coils, fins, or a dirty condenser unit can cause your air conditioner to blow lukewarm air. It can also cause it to freeze up entirely, which will prevent your air conditioner from cooling.
Your rooftop air conditioner unit is covered by a shroud that you need to remove to access the coils and fins to clean them.
This is a maintenance task that you should do once or twice a year to keep everything running smoothly.
All kinds of dirt and debris can get inside and hinder the operation of your AC.
Editor’s Note: We had the unfortunate experience of having to clean active wasps nests out of our RV AC unit when we first bought it. Anything can get in there and gunk it up!
How to Clean Your RV AC Unit
Supplies Needed:
- Screwdriver or drill to remove the shroud
- AC Coil cleaning spray
- A soft bristled brush
- AC fin comb
- A hose or water bucket
- Towels or paper towels
There are two sets of coils: an exterior set of condenser coils and a set of evaporator coils inside the AC. Both sets should be inspected and cleaned if they’re dirty!
- Turn off all power to your RV AC unit. Find the breaker that powers the AC and turn it off. Or, you can remove your RV from shore power and turn the battery disconnect switch to remove all 120v and 12v power to the AC.
- Remove the exterior AC shroud with your screwdriver or drill. Put the screws somewhere safe – a ziploc baggie or a zippered pocket are the best place!
- Remove the interior AC shroud with the screwdriver and put those screws in a separate safe place.
- Cover any electrical connections with plastic and be sure to cover the vent that goes into your RV to avoid pushing any dirt or water inside.
- Gently brush away any loose dirt and leaf debris before getting started.
- Then, using your AC coil cleaner or just soap and water, clean the coils and fins of your RV AC. Follow the directions on the coil cleaner if using it for best results.
- Be extra gently on the fins. They should all be straight. If they’re bent or crooked, use your AC fin comb to straighten them.
- Re-attach the interior and exterior shrouds and try your AC again.
Here’s a great video from RV Tips & Travels about how to clean your AC coils and fins.
Low Freon Levels
If your air conditioner isn’t blowing cold and you get up on the roof and notice ice or frost buildup on your RV AC, it may be frozen up or you may need to have it recharged with Freon.
Depending on your air conditioner model, it may be easy or difficult to recharge it with Freon.
You can purchase Freon refrigerant at some automotive stores or you can purchase it online. If you choose to do this yourself, be sure to research your RV air conditioner model to be sure you know what you’re doing.
Although this isn’t a particularly difficult task, it can be dangerous if you don’t know how to do it properly. If you do choose to add refrigerant yourself, you can find plenty of tutorials online.
If you feel unsure, you can always consult a professional to do it for you.
RV Air Conditioner Fan Troubleshooting
If the problem with your air conditioner is related to the fan, you may notice things like:
- The fan not coming on.
- It only works on the low setting.
- The fan is making strange noises or has a strange smell.
- The RV lights dim when the fan comes on.
Any of these symptoms may be a sign that your air conditioner fan is going out. It could be a problem with the fan motor, the capacitor, or the bearings. If you notice a bad or burning smell, turn it off immediately – this could be a fire hazard.
AC Compressor Troubleshooting
The compressor is basically the engine of the air conditioner. This part of the AC can freeze up and cause the air conditioner to blow out warm or lukewarm air. It can also go bad entirely.
Compressor issues can range from low Freon levels to dirty coils and fins. Sometimes, the compressor itself can go bad. If this is the case, you may need to replace the air conditioner altogether – but we definitely recommend consulting a professional first!
Air Conditioner Capacitor Troubleshooting
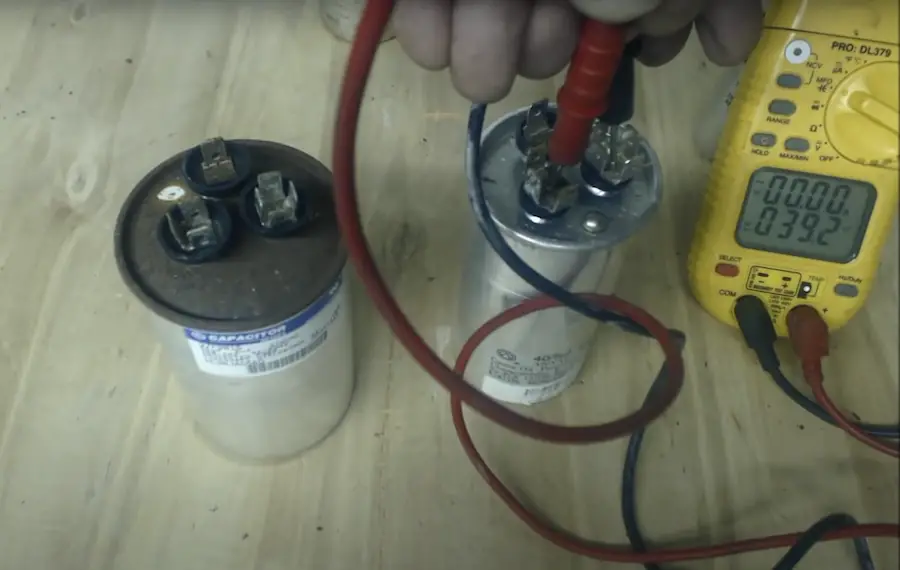
The capacitor is another essential piece of the RV air conditioner system. There are two capacitors in the AC: a motor run capacitor and a motor start capacitor. Problems with either of these will spell trouble for your air conditioner function.
These devices provide a boost of electricity to help kick your AC on and run the compressor. And sometimes they can go bad.
To diagnose whether or not you have a problem with your capacitor, there are certain signs and symptoms to keep an eye or ear out for.
- The air conditioner constantly trips a breaker or blows a fuse after only running for a few minutes.
- The fan only blows hot, warm, or lukewarm air – because the compressor isn’t kicking on.
- The AC unit hums when it tries to start.
Depending on how handy you are and how comfortable you are with DIY projects, you can try to test and replace your capacitors yourself.
You can test the capacitors with a multimeter. If you end up deciding to replace your capacitor, you should replace both of them. If one is going bad, it’s likely that the other one is also or may fail soon.
When to Consult a Professional RV AC Repair Service
When dealing with problems with your RV air conditioner unit, you should consult a professional any time you feel the problem is beyond your skill level or comfort level.
Things like replacing a thermostat and cleaning your RV AC unit are pretty easy to do yourself. But other things like working with wires, replacing capacitors and fans, or replacing the unit altogether are definitely more tricky.
Consult a professional RV air conditioner repair service if:
- You have tried troubleshooting and diagnosing but can’t fix the problem.
- You suspect the air conditioner needs repairs.
- You smell burning when you try to run the air conditioner.
- You feel uncomfortable diagnosing or doing DIY repairs.
Tips to Help Your RV Air Conditioner Run More Efficiently
Sometimes your RV air conditioner doesn’t cool your RV because it’s just too hot outside.
Summer in certain regions seems to get hotter and hotter every year, and the air conditioner has to do a lot of work to cool your RV down.
Before dumping a bunch of time and money into trying to repair your air conditioner, try these tips to see if it helps. Sometimes all your AC needs is a little help from you!
Some things, like not cooking or showering in your RV as much when it’s really hot, seem pretty obvious. Here are the top tips to help keep your RV cool in the heat.
Related: Do Pop Up Campers Have Air Conditioning? Does it Actually Work?
Park Your RV in the Shade
If you can park your RV in a shaded area or at least under one tree, this will help the air conditioner blow cold air and cool down the RV better. If your AC isn’t cooling and the RV is parked in full sun, this could be the culprit!
While the temperature might not feel much lower in the shade, the AC unit will greatly benefit from not being in direct sunlight.
Insulate Your Windows and Roof Vents
Some RVs are full of windows – and motorhomes have huge windshields and cab windows that allow tons of heat in.
To help your air conditioner run more efficiently, insulate your RV windows and roof vents.
You can use room-darkening curtains to prevent sunlight from getting into your RV, or you can use window covers or reflective insulation cut to fit the windows.
For motorhomes, you can purchase windshield covers to help keep the cab area cooler. Or, install curtains and block the cab area from the rest of the coach to help keep it cooler.
Clean and Replace Your RV AC Air Filters Regularly
Your RV air conditioner has a small foam filter on the inside of the RV. You should regularly check and clean the interior filter and replace it when necessary.
It’s easy to access this filter. Some slide right out, but on some models, you may need to remove a panel to access it.
Regularly Inspect, Clean, and Maintain Your RV Air Conditioner
In addition to regularly checking and cleaning the interior filter, you should also regularly inspect and clean your rooftop RV air conditioning unit.
As we discussed above, getting up on the roof and removing the AC shroud to clean the coils and fins will help keep your RV AC working effectively.
This maintenance should be done a couple of times per year. And watch out for wasps and bees’ nests!
Feeling Humid? Use a Dehumidifier
Some regions are extremely humid, and no matter how long your air conditioner runs, it still feels hot inside your RV.
This is likely due to the humidity. To help your RV air conditioner work more efficiently and help yourself feel cooler, consider using a dehumidifier inside your RV.
Dehumidifiers in RVs are useful in both the winter and summer months, especially if you’re in a humid location.
Wrapping Up
Nobody wants to have problems with their air conditioner. If your RV AC isn’t cooling, you probably want to find a solution… and fast!
If you can’t figure out the problem and have a big trip coming up, you can always buy a portable air conditioner until you have time to have the AC repaired.
But hopefully, after reading this article you have successfully diagnosed the problem… and we hope it’s an easy fix and your AC starts blowing cold air soon!
RVing Headquarters Team
RVing Headquarters is operated by long-time RV enthusiasts with over 8 years of RV industry expertise and full-time and part-time RV ownership experience. From motorhomes to trailers and campervans, we've done it all. Our Mission: to inspire, educate, and entertain anyone who is interested in the RV lifestyle.
Recent Posts
Should I Leave My Black Tank Open or Closed? Waste Tank Tips
Full hookup RV parks and campsites are the creme-de-la-creme of campsites, providing all the convenience of a sticks-and-bricks house in nature, with an ever-changing backyard. If you’re on full...
Why Are Campers 5th Wheel and Not Gooseneck Hitches?
Fifth wheel RVs are the largest towable campers with the most amenities and features. As you’re RV shopping or researching, you may be wondering: why are campers 5th wheel and not...
IMAGES
VIDEO
COMMENTS
It is possible to put Freon in an RV air conditioner by welding a charging port into the air conditioning system. This is a highly skilled job, and it can be expensive. So if an RV AC system is leaking and requires frequent refilling, repairing or replacing the unit is a better long-term solution. The ease and cost of this procedure depend on ...
How do I know if my RV air conditioner has enough freon? How to test the freon level in an RV AC. paypal.me/allseasonsmobilervpatreon.com/hillbillyrvMerchand...
RV Air Conditioner Freon Type. Most RVs come with sealed Ac units. That means that the coolant inside is designed to last the lifetime of the AC unit. This is not always going to be the case because things happen and leaks develop, When you are going to add or replace the freon inside your RV AC unit, you will want to use freon R-22.
Use a wrench to unscrew the coolant port, and add the refrigerant slowly until it is full. Before you add the refrigerant, check to find out how much coolant your A/C unit should hold, and be sure to check refrigerant levels as you add the fluid. When you're done, your friend should notice cooler air inside the RV.
In order to put in Freon, an expert must weld a charging port to the system. Below are the steps you need to follow for putting in Freon in the rooftop AC of your RV. Lift and release the outer shroud of the rooftop AC. A series of fasteners surrounding the lower rim holds this shroud in place. Use a socket, wrench, or screwdriver depending on ...
Updated regulations under Section 608 of the Clean Air Act finalized in 2017 stepped in and now have a say in how to add freon to RV AC. No longer is it a DIY project. Instead, it's a bit more complicated. Fixing Your Air Conditioning. The repair depends on the type of refrigerant that your AC unit uses. That, in turn, rests with its age.
Follow these instructions to recharge your RV's air conditioner and replenish the refrigerant: Turn off the electricity to your RV's air conditioner. Before working on the air conditioner, make sure the electricity is turned off. Locate the breaker panel in your camper and turn off any breaker that gives (or may supply) electricity to your ...
To begin adding Freon to your RV AC unit, you need to connect the refrigerant canister to the system. Follow these steps: Attach the refrigerant can tap: Connect the refrigerant can tap to the top of the Freon canister. Connect the tap to the AC unit: Locate the low-pressure refrigerant access valve on the AC unit and connect the tap to it.
Before we begin, it helps to have a basic grasp of the components found on an RV air conditioner. Here are a few you'll run into: COMPRESSOR: Compresses the vapor refrigerant (such as Freon) and heats it before the vapor travels to the condenser. CONDENSER: Cools the vapor and condenses it into a liquid. The condenser can be seen from the rooftop after removing the AC shroud.
Adding the refrigerant needs to be done carefully. Pour it in slowly, taking your time, until it is full. You can do this while the unit is on, and have a friend inside of the RV checking the air temperature levels. There should be a noticeable difference in the temperature inside of the RV.
The model and size of the air conditioner in an RV will determine how much refrigerant (Freon) is needed. An RV air conditioner unit typically needs between 1 and 2 pounds of refrigerant. For accurate information on the necessary refrigerant amounts, it is crucial to refer to the manufacturer's specifications for your particular air ...
The refrigerant line carries Freon, which is needed to cool the air inside your RV. If there's not enough Freon, the coils can freeze and the air conditioner will blow warm air. So, make sure to keep the coolant levels right by charging it when needed. Also, check the plastic cover for any damage.
Adding refrigerant to an RV air conditioner requires specialized equipment and should be done by a certified technician. Conclusion. In sum, understanding the refrigerant requirements of RV air conditioners is crucial for their optimal performance. While not all RV air conditioners use Freon, it's essential to ensure the correct refrigerant ...
Step 3: Attach the suction side hose of the Freon's manifold gauges to the cooling unit's service port. Step 4: Connect the Freon to the middle hose of the refrigerant gauges. Step 5: Test the AC by turning it on while setting the appliance to the coldest setting. At this post, it should now be a quiet RV air conditioner.
The Coleman 13500 BTU RV Air Conditioner. This is the standard RV air conditioner type installed in many RVs. Although it's a large unit, it can easily be installed on the roof of your RV near the ceiling vent. Coleman RV air conditioner reviews state that it's long-lasting, durable, and easy to use.
Look for tripped breakers in the circuit breaker panel of the RV. Reset any air conditioner-related tripped breakers. Inspect Refrigerant Levels. If at ease, listen for any hissing noises and look for any accumulation of ice on the coils of the evaporator.
In this RV how to video learn how easy it is to test your RV air conditioner's cooling performance.Happy Camping,Mark Polk RV Education 101 http://rveducatio...
Does my RV air conditioner need a freon recharge? You might need a recharge. Freon is a unique chemical that pulls the heat out of warm air. Your air conditioner uses a fan to blow the now cooled air into your space. Freon is not supposed to wear out over time but can gradually lose performance for cooling. You might notice this more when you ...
If you want to know what type of Freon needs to go into your air conditioner, you will have to check the instruction manual. In most cases, it will either be R-22 or R410-A. Make sure that you put the right one in, otherwise the system won't work. References. Hi, I'm Mike, co-founder, and editor of RV and Playa.
RV Air Conditioner Parts. If you plan to dive into any RV AC repair, it's a good idea to know what you're looking at. An RV air conditioner is made up of a few key parts. Knowing what these parts are and what they do will help you repair the unit properly: Compressor - A compressor compresses a vapor refrigerant and heats it. This happens ...
Remove the interior AC shroud with the screwdriver and put those screws in a separate safe place. Cover any electrical connections with plastic and be sure to cover the vent that goes into your RV to avoid pushing any dirt or water inside. Gently brush away any loose dirt and leaf debris before getting started.