

Weight Weenies
Skip to content
- Active topics
- Board index Discussion Road
Trek Emonda creaky bottom bracket
Moderator: robbosmans
Post by Boardman » Tue Nov 08, 2016 6:08 am --> by Boardman on Tue Nov 08, 2016 6:08 am

by » Tue Nov 08, 2016 6:08 am --> by Weenie on Tue Nov 08, 2016 6:08 am

Post by oldnslow2 » Tue Nov 08, 2016 12:02 pm --> by oldnslow2 on Tue Nov 08, 2016 12:02 pm
Post by Boardman » Tue Nov 08, 2016 4:24 pm --> by Boardman on Tue Nov 08, 2016 4:24 pm
Post by oldnslow2 » Tue Nov 08, 2016 4:53 pm --> by oldnslow2 on Tue Nov 08, 2016 4:53 pm
Post by Valbrona » Tue Nov 08, 2016 5:22 pm --> by Valbrona on Tue Nov 08, 2016 5:22 pm

Post by Calnago » Tue Nov 08, 2016 6:15 pm --> by Calnago on Tue Nov 08, 2016 6:15 pm
Post by nemeseri » Tue Nov 08, 2016 6:28 pm --> by nemeseri on Tue Nov 08, 2016 6:28 pm
Post by Calnago » Tue Nov 08, 2016 6:40 pm --> by Calnago on Tue Nov 08, 2016 6:40 pm
Post by nemeseri » Tue Nov 08, 2016 6:50 pm --> by nemeseri on Tue Nov 08, 2016 6:50 pm
Calnago wrote: Yes, I should have mentioned what Nemeseri did in that even though BB90 is a "slipfit" versus an interference fit, a proper press with the right bushings will help ensure the bearings are actually aligned with each other. This is a step you don't do with the Campy install since the bearings are pressed onto the cranks themselves. Also, I'd not use Morgan Blue Aquaproof paste anywhere around actual moving bearings. That is definitely not what it is intended for. It is really a high adhesion kind of antiseize, which if you could isolate its application to just the surface between the outer bearing and the inside of the BB shell, then fine, but in the case of this BB, it may be a little more difficult to accomplish that. It's really for things like pressed in headset cups, and pressfit cups of Bottom Brackets, but not moving bearings.
Post by Boardman » Tue Nov 08, 2016 7:38 pm --> by Boardman on Tue Nov 08, 2016 7:38 pm
Post by Calnago » Tue Nov 08, 2016 8:08 pm --> by Calnago on Tue Nov 08, 2016 8:08 pm
Post by Boardman » Wed Nov 09, 2016 6:25 am --> by Boardman on Wed Nov 09, 2016 6:25 am
Post by cth6 » Thu Nov 10, 2016 12:41 pm --> by cth6 on Thu Nov 10, 2016 12:41 pm
Post by Boardman » Thu Nov 10, 2016 8:28 pm --> by Boardman on Thu Nov 10, 2016 8:28 pm
cth6 wrote: Make sure you don't need one of the plus sized bearings. As soon as the grease wears out they creak. Easy way to tell is to see if you can remove the bearing by hand (no drift) with minimal force. It comes out too easy and you many try the larger bearing.
Post by goodboyr » Fri Nov 11, 2016 1:06 am --> by goodboyr on Fri Nov 11, 2016 1:06 am
by » Fri Nov 11, 2016 1:06 am --> by Weenie on Fri Nov 11, 2016 1:06 am
Return to “Road”
- ↳ Weight Weenies
- ↳ Introduce Yourself / Gallery - Please use metric weights.
- ↳ Catch all // Gallery threads
- ↳ MTB
- ↳ Road
- ↳ Wheelsets & Tires (Road)
- ↳ Bike Travel, Cycling Tourism, Destinations & Events
- ↳ Cycling Kits
- ↳ Racing
- ↳ CX & Gravel
- ↳ Randonneurring, Bikepacking, Commuting, E-Bikes
- ↳ Training
- ↳ Cycle Chat
- Marketplace
- ↳ For sale - Pictures are mandatory 22-3-13
- ↳ Wanted
- ↳ Hero or Villain
- ↳ Comments
- Board index
- All times are UTC
Powered by phpBB ® Forum Software © phpBB Limited
Privacy | Terms
Popular blog postings
Latest blog postings.
- Advertising

- Forum Listing
- Marketplace
- Advanced Search
- Classic Forums
- Bikes, Frames and Forks
Trek Emonda SL BB?
- Add to quote
I've posted in the Trek forum with no response. Since Trek is having a sale, with some very attractive pricing, I am considering an Emonda SL and would like to hear about BB problems in the Emonda SL frame, if any? Thanks in advance for your help.

BB90 is a press fit system that uses the bearings you'd normally see in Shimano or SRAM, or Campy bottom bracket cups. It works w/ 24mm axles, so no BB/PF30 cranks. I've been working on them and have owned them for years. No problems if they're installed correctly. If they're not, and the shell is slightly loose there is always the 'V2' bearing available that is .1mm oversize. I'd love it if manufacturers went back to threaded shells, but the Trek BB90 works fine in my opinion.
I just wish I could get more people to respond.

A guy I work with had his BB90 shell un-bond from the frame. He also ate bearings for lunch. I'd forget Trek.

I owned a Scott with the same system and echo everything CX said. If you want Shimano or Sram cranks it's fine and lighter than BSA. The only downside is you can't use most 30mm axle cranks and the ones you can use (Lightning on my bike) have tiny bearings that wear out quickly. This isn't too much of a concern though since if your priority is performance the Sram Red GXP crank is pretty light and stiff.
ANY crank you get from ANY 'major' manufacturer will more than stiff enough for your needs. Weight...? You can make that decision.
Anyone else?

I have a Madone and my friend has an emonda. No troubles with ours. He hasn't changed his out since he has had it, that i know of. Mine i changed twice. Easy to do and no troubles with all three sets
Why did you change it?
I have the Madone with BB90 and using Shimano crank. No problem, no creaking. I also have another bike with BB90 and Shimano crank, and no issues here too. Of all the various pressfit bottom bracket systems out there, BB90 is probably one of the better ones, better then the BB30, PF30, Specialized pressfit. Having said that, I have 4 other bikes with threaded bb, and I'd say threaded BSA bb is still king when it comes to minimizing creaking noise. Recently I did have one of these bikes develop a creaking noise bb after 4 years of hard use in the mountains (it's my climbing bike), so I put in some new Shimano Ultegra bottom bracket, cheap and easy to replace, creaking noise gone. It don't get much easier

My current Domane frame has 12,000 miles on it and the BB90 has never been serviced - still smooth with no creaking. Previous Domane frame had the BB DS bearing replaced around 4000 miles due to it getting a bit rough, not creaking.
So, I know this is an old thread but just to ensure the feedback goes in the right place on this huge WW web....Just for the record: My 2016 Emonda SL6 with approx. 4500 miles (i'm 6' x 180lbs) has developed a problem and I think Trek has agreed to warranty it, although I don't have a new frame in hand yet. The problem is a small crack growing around the drive side of the BB. Also the bearings were already in need of replacement, which is what led me to look close enough to find the crack. Non drive bearing was indexing and the drive side bearing is loose fitting now. Replacement bearings were $50.
Attachments

GeojeRider said: My 2016 Emonda SL6 with approx. 4500 miles (i'm 6' x 180lbs) has developed a problem and I think Trek has agreed to warranty it, although I don't have a new frame in hand yet. The problem is a small crack growing around the drive side of the BB. Click to expand...
Since we're updating I'll update my two year old post where I said very few BBs exist that fit a 30mm crank (BB386 size) in a Trek BB90 shell and my experience with Lightning's was not great. Since then Raceface and others have come out with BBs that do this and while still having small bearings the durability of my Raceface has been good. I've been running a Next SL G4 crankset in a Scott MTB with BB86 for a year now and it still feels like new.
- ?
- 205.1K members
Top Contributors this Month

T47 Bottom Brackets Guide – 24mm, 30mm (& Unique T47 EBB)
- by Johnson Li
I take a close look at the T47 standard including a variety of models brands can choose from.
2021 is the year the cycling world got serious about the T47 bottom bracket standard.
Specialized released their S-Works Tarmac SL7 2021 ; Trek, their Emonda SLR and SL . Trek will also use T47 more widely across their road range in the future.
Introduced as ‘yet another standard’ in 2015, T47 looks like becoming an increasingly important bottom bracket type in the years ahead.
What is a T47 Bottom Bracket? Can You Cut T47 from PF30? T47 BB Survey—what are the types? T47 Bottom Bracket Installation Techniques & Issues T47 24mm Spindle T47 Eccentric Bottom Bracket (Unique Design)
WHAT IS A T47 BOTTOM BRACKET?

A T47 BB is a PF30 BB shell into which threads have been cut.
A PF30 bottom bracket shell’s internal diameter is 46mm. Cutting threads into it gives you an official specification of M47 x 1.0mm.
The drive-side cup is a left-hand thread; the non-drive side is a right-hand thread—an English-threaded setup in other words.
Threaded Bottom Brackets are Rock-Solid
I have argued elsewhere that threaded bottom brackets (mainly BSA/English at 34.8mm diameter BB shell ) are the best bottom brackets.
The extended helical ridge that defines the thread of a screw or bolt is one of the most important advances in the history of mechanics.
A threaded screw or bolt stays where it is put until you remove it or where extreme stress strips away the ridges.
Stripping thread is extremely unlikely when you are installing a nut onto a bolt, but more likely when installing a bottom bracket’s broader surfaces (shell and BB unit) into the BB shell, where due care is not taken.
As long as simple steps are taken to avoid cross threading,T47’s turning the largest press fit bottom bracket available to date into a threaded model may turn out to be a defining moment in bottom bracket design.
Nightmare of Proliferating Standards
Press fit bottom bracket design copies integrated headset design where bearings are inserted directly into the frame.
The original BB30 was a direct translation of this concept from the head tube into the bottom bracket shell.
When problems with BB30 emerged, a solution was to place the bearings in cups and press these into the shell, just as cups were pressed into head tubes prior to the integrated headset revolution.
Thus we’ve ended up with 41, 42, and 46mm bottom bracket shells, an evolution which has taken us from the original BSA 34.8mm ID BB shell to a 46mm shell.
If anyone had set out to design a new standard prior to this evolution taking place, it’s doubtful that 46mm would have been the size selected. The ideal diameter would have had to be larger—but probably not this large.
Boutique frame builders, notably those using titanium and steel (see the extended section on installation below into a steel frame) were early adopters of T47 BBs although the bigger brands are slowly releasing models using T47.
And despite the limited adoption of T47 aluminum shells into carbon frames to date, bonding alloy shells into carbon frames is a mature process, so expect to see an uptick in offerings from carbon frame makers in the near future.
CAN YOU CUT THREADS into a 46mm SHELL to CREATE a T47 BB?
A lot of T47 commentary claims you can “simply” or “easily” cut threads into a PF30 shell into which you can then install a T47 BB.
The problem here is that carrying out the procedure will cancel out your warranty in most cases.
Altering the BB shell in this way is a significant alteration of the frame. Few if any manufacturers would continue to honor warranty under those conditions.
The idea of cutting threads usually comes about in the context of fixing ill-fitting press fit bottom brackets and the oft-reported creaking problem.
Commentators lay the blame on sloppy manufacturing tolerances. If manufacturers would produce bottom brackets with the standardized precision the bring to headset manufacturing, there would be no problem.
However, you can’t equate headsets in head tubes to bottom brackets in bottom bracket shells. An integrated headset’s sealed bearing drops into place on top and snugs into position at the fork crown—hardly precise.
In contrast, a press fit bottom bracket by definition must be pressed into the shell. Tolerances are tight, although not tight enough for the critics.
The force exerted on the bottom bracket/frame interface during pedaling is extreme, and it must endure stresses that exceed the strain exerted on headsets many times over.
Threaded bottom brackets were a non-problem solved with the introduction of press fit. T47 arguably improves on press fit …. by eliminating press fit.
And this return of threaded BBs via T47 improves on the BSA standard by giving us larger bearings and a beefier connection amongst the shell and the chain stays, seat tube, and down tube.
The larger surface area at this junction also cancels out a possible weight gain as it allows tubing with thinner walls, opening up a new frontier of frame design possibilities.
T47 BOTTOM BRACKET SURVEY
In this section I cover several T47 Bottom Bracket types.
FIRST Components makes designs for both traditional 24mm spindles and 30mm spindle cranks, for either internal or external installation.

Each model comes with variously sized spacers in order to accommodate a wider range of cranks.
The 24mm crank range pictured is divided into the BBs with aluminum sleeves at the top, and plastic sleeves below.
Plastic sleeves can be drilled which enables internal cables to be more easily routed through the BB shell.

Internal vs External (Outboard) Installation

T47 bottom bracket bearings are either installed into the the bottom bracket shell or located externally as “outboard” bearings (the unit on the right).
Which is better comes down to personal preference.
The advent of integrated cranks, 24mm spindles, and bearings mounted in externally located cups allowed the use of larger bearings in the BB and thus greater bearing longevity. The spindle was also stiffer due to the hollow design’s larger diameter.
The only upgrade to make for a 34.8 (“BSA”) BB shell was originally from a solid-spindle cartridge to an integrated spindle with external bearings which provided a noticeable performance boost.
But the 46mm T47 internal diameter gives you an extra 11.2mm of diameter as well as the larger externally mounted bearing.
A cartridge BB sealed bearing’s outer diameter is 30mm; an outboard bearing’s OD is 40mm; a T47 internal BB sealed bearing’s OD is 42mm giving a 2mm advantage over the traditional outboard bearing.
Thus, although there’s no clear advantage to installing the external unit compared with the internal unit, you have the option nonetheless.

The aluminum sleeve on these internal cups screws into the drive side.
If weight is an issue, you could do away with the sleeve, although losing the protection against the entry of water and grit is not a good trade off for the minimal weight saving.
T47 BOTTOM BRACKET INSTALLATION
The great news is you no longer need one of the often complicated press-fit toolkits to seat the bearing cups in the BB shell.
Beware Cross Threading
Provided your frame maker’s bottom bracket shell is precisely machined to spec, you screw the T47 BB cups into the shell, then tighten with the correctly fitting wrench.

The danger with threaded bottom brackets is cross-threading the cup into the shell. You need to seat the bearing cup exactly into the shell’s threads before screwing the cup very far into the shell.
Even if a threaded bottom bracket cup appears to be perfectly aligned with the BB shell and turns with just a little resistance, it could still be cross-threaded.
T47 bottom brackets, much larger than their threaded cartridge cousins and noticeably shift onto an angle, out of square to the BB shell.
One technique that works well to seat the BB cup in the BB shell making sure the threads are aligned on the drive side is to turn the cup to the left, first of all, then to the right, against the thread.
You will feel, as well as hear, a ‘click’ or a ‘clunk’ as the cup threads align with the BB shell threads.
It often takes several turns to the left and right before you feel the alignment; then you proceed to turn the cup smoothly to the left all the way into the shell.
With the non-drive side turn the cup to the right first, then the left.
Once you feel that the alignment is right, complete the installation.

These are the wrenches FIRST Components supplies with T47 bottom brackets, and any of the non-standard designs in our range for that matter.
What About Torque?
For the internal T47 BB we use the tool on the far right; the tool (Y30) to the left fits the external BB cups which I’ll look at below.

The flange offers 2mm of surface which means you must hold the tool square to it to gain maximum leverage.
The recommended torque is standard for threaded bottom brackets: a minimum of 35 Nm, maximum of 45 Nm.
How do you know you’ve reached tolerance? A person of average strength exerting full force will reach a torque of 35+ Nm.
You will never over-tighten with this tool. Using a glove or soft cloth on the handle in conjunction with a good pull, the cup will be tight enough.

An example of the plastic sleeve available in place of the aluminum sleeve. Plastic is lighter if weight really is a concern.
24mm External T47 BB

The external or outboard bearing version has two cups and an alloy sleeve.
The sleeve screws into the drive side. Or you could opt to just install the the cups.

Unlike the internal T47 BB’s 1mm for the tool to slot into, a 5mm surface is available on the external T47 cup.

Fully assembled with the 30mm crank fitted.
T47 24mm ADAPTER
The option exists to add 24mm adapters to a 30mm spindle unit. Each adapter has a 30mm outer diameter, and 24mm inner diameter.

Applying even pressure on alternate sides of an adapter maneuvers the adapting piece into the 30mm ID cup.

The fit is tight, but not too tight. To remove you need a vice to hold the cup, then lightly tap the inside face from the opposite side evenly the way round.

An alloy sleeve either screws into, or is permanently attached to the drive-side cup.
An important part of the sleeve-to-cup connection on the non-drive side is the rubber seal which fits into the end-groove. Without the seal, the connection is too loose and would rattle in use.
The seals are durable, but can be easily stretched into position should one perish.
T47 ECCENTRIC BOTTOM BRACKET
An eccentric bottom bracket enables you to raise and lower the spindle height, and thus the crank and pedal height.
Raising and lowering in this way also changes the chain tension.
So an EBB can be used for either purpose.
T47’s large size makes it perfect for a wide range of niche bikes such as tandems.

This design mimics FIRST Components’ popular BSA EBB .
An off-center core housing the sealed bearings rotates within the main, hexagonally shaped, shell.

Here it’s rotated almost to the top.
The technique is to rotate both sides together as one so both ends of the spindle remain parallel. If not, one side gets ahead of the other the result being neither will turn.

Rotated almost to the bottom.

Tightening the 2mm Allen bolts equidistant on three of the hexagon’s six vertices, prevents the inner housing from rotating.

The large holes on the hexagon’s alternate vertices are for the tool used to tighten the cups into the BB shell—the curved end of the tool hooks into them providing leverage against the flattened edges.
PARTING THOUGHTS
In 2015 when T47 Bottom Brackets were first launched as ‘yet another standard’, plenty of people dismissed the return of threaded bottom brackets in this form.
Five years later with a cycling public fed up with the shortcomings of press fit BBs, the new standard is set to take off, simplifying and rationalizing bottom bracket design, making life easier for cyclists, brands, and manufacturers.
Like this post? Please share!
Leave a Comment Cancel Reply
Your email address will not be published. Required fields are marked *
SIGN ME UP!
Unique B2B insights from inside the Taiwan Bike Industry.
How To Remove & Fit A BB90 Press Fit Bottom Bracket
In this post, complete with video, I show you how to remove and fit a BB90 Bottom Bracket on a Trek road bike (in this case my carbon Trek Domane 4.3, which I bought in 2013).
You will learn:
🔨 what tools you need to remove a set of seized BB90 bottom bracket bearings
🔩 how to use a bottom bracket press tool to fit new Trek BB90 bearings
🔧 how to avoid the plastic dust cover being pushed out when you reinstall the crankset
I filmed the video as part of a series where I stripped down and then renovated my 7-year-old Trek Domane 4.3 endurance road bike.
You can watch all of the videos in the series, in order by checking out this playlist .
How To Remove & Fit A BB90 Press Fit Bottom Bracket
This was actually the first and so far only time I’ve removed and fitted a bottom bracket (of any sort), so whilst the video will likely include things you shouldn’t do, at least you can see that it’s doable by someone with only a very modest amount of bike mechanic acumen.
Things You Will Need
Let’s start with the bike. Clearly this post/video is most relevant for bikes with press fit bottom brackets. In my case that’s a 2013 Trek Domane 4.3.
The BB90 bottom bracket standard, which is a proprietary Trek design, involves two sealed bearings being pressed directly into the bottom bracket shell within the (carbon) frame.

The bearings have actually done quite well, lasting 6.5 years of all year riding on the muddy roads of Derbyshire and a cleaning regime that I would describe as, er, sporadic.
However, during a deep clean that was meant to be ahead of replacing just the headset bearings, I realised that one of the bottom bracket bearings was also a bit ‘grindy’. A full bike refurb was on the cards. By the time I’d acquired all the bits to do this, the bearing had totally seized up.
New BB90 Bottom Bracket Bearings
A light Googlewacking suggests that no one’s a particular fan of the BB90 standard . As mentioned, the bearings are pressed directly into the carbon shell and if they don’t fit exactly then it can cause creaking.
Apparently, over time, the carbon shell into which the bearings fit can get worn, increasing the diameter of the cups (so many random words…). It seems the power I am throwing down is insufficient to cause such wear, so this wasn’t an issue in my case.

Despite this, whilst you can buy equivalently sized sealed cartridge bearings, I decided to play it safe and buy the official Trek BB90 kit (which is also suitable for BB95 bottom brackets).

The kit which comes with two sealed bearings and a plasticky inner ‘sheath’.
Step 1: Remove the Pedal Cranks
Erm, I don’t appear to have shown this in the video (or indeed in any of the other videos in the bike renovation series).
You can Google this to work it out for the groupset you use.
I’ve got Shimano 105, so it was a case of using a hex (or Allen) key to remove the pinch bolts on the non drive side crank. I used the specific Hollowtech plastic circular tool to remove the plastic ‘preload adjuster’ and the non-drive side crank could be slid off the spindle. Then, said spindle, which is attached to the chainrings, could be pulled out of the bottom bracket from the drive side.
Finally, the fox (amateur mechanic) could see its prey (the bearings…).
Step 2: Get The Old Bearings Out
For this I invested in the correct tool, a Park Tool BBT 90.3 press fit bottom bracket bearing, er, tool.

(Extra tip in brackets: for this whole job, use the right tools. Trying to hack either the removal or insertion of press fit bearings is a recipe for disaster, with a risk of doing irreparable – or at least expensive-to-fix – damage to your bike frame.)
You basically insert the pointy end of the BBT 90.3 through the middle of the bearing you are seeking to remove and then pull it as it pokes out from the other side of the bottom.

As you pull it through, the splayed splines of the tool compress together until there is a click as it passes fully through the bearing. The splines of tool are then sat against the inside rim of the bearing. Stop pulling.

Now you need to hammer (yes, hammer) the pointy end of the BBT 90.3 tool such that it pops out the bearing.

You can either do this carefully, and try to catch the escaping bearing and tool. Or you can whack it with gay abandon and delight in the clanging sound as the BBT 90.3 bounces along your garage floor.

Repeat for the bearing on the other side.
Step 3: Clean Out The Bottom Bracket Shell/Housing
The real step 3 is probably to remove the plastic inner ‘sheath’ (in my top ten favourite words), because a replacement comes in the Trek BB90 kit.

However, mine (my sheath) seemed in pretty good nick, so I just left it in there and gave it a good clean. Ahem.

The remainder of step 3 is to give the whole bottom bracket region, particularly where the new bearings will be seated a good clean. I used kitchen roll and lashings of GT80. Sue me.

Step 4: Apply Grease
A key step in any velomech scenario: a liberal application of grease.

As per the video, I applied grease around the inside of the bottom bracket cups, where the bearings were about to be seated.

My trusty Zinns Road Bike Maintenance book recommends also coating the outside of the new bearings. I don’t remember whether I did this.
Step 5: Press In The New Bearings
It’s time for another specialist tool.
The key thing (as I understand it) when inserting press fit bearings is to make sure they go in straight. This is all the more important for carbon frames when you ab-so-lutely, pos-i-tively do not want to crack your bottom bracket (or any bit of your frame).

So you’ll want a press tool.

This is a threaded metal rod with handles that spin on the thread. You put the metal rod through the middle of the bottom bracket and then slide the new bearings onto the rod (in the orientation in which you want them pushing into the BB housing).

You then slide specifically-sized metal discs (known as drifts) onto the threaded rod and then tighten the handles such that the drifts push inwards on the bearings, applying a consistent force such that the bearings are pushed straight into the bottom bracket.

And here we see me turning the handles and pushing the new bearings into place (without cracking the carbon frame…):

I bought a Wheels Manufacturing Universal Bottom Bracket Press tool. It wasn’t super cheap but it is good quality and comes with specially designed reversible drifts that can push in bearings with a range of different diameters.

As it happens, the BBT 90.3 bearing removal tool came with a pair of BB90-sized drifts, so I could have got away with buying a cheaper press. However, I plan to press many more things in my quest for bike mechanic mastery, so I was happy to invest in a more whizzbang tool.
And thus the new bearings were installed:

Step 6: Reinstall The Crankset
Again, exactly how you do this will depend on the groupset you are using.
I do have one twop twip to think about when you are reinstalling the spindle through the new bearings.

The Trek BB90 kit that I bought differed slightly from the original bearings that I removed in that the new ones have a plastic insert that both reduced the inner diameter of the bearing and (I assume) acts as a bit of a cover to protect it from the elements.

If you use the official Trek kit (or similar), when you push the spindle through the bottom bracket, make sure to press against the cover-cum-reducer on the opposite side to avoid it being pushed out. Once the cover has been popped out from the bearing, it is a devil to get back into place without cracking or creasing it.
Step 7: Bask In The Warm Glow Of Your Own Smugness
That’s pretty much it. Whilst it took a bit of time, and a reasonably significant investment in new tools, I successfully managed to install two new bearings in my BB90 bottom bracket.
Both the removal of the old bearings and the insertion of the new ones was pretty straightforward. I actually found that I enjoyed it. And, yes, there is a certain amount of smug satisfaction derived from tackling, and completing, a non-run-of-the-mill bike maintenance task.
Tools and Parts
Here are the tools and parts I used in completing this job:
- Trek BB90/95 Bottom Bracket kit
- Park Tool BBT 90.3 Bottom Bracket Bearing Tool
- Wheels Manufacturing Bottom Bracket Press
A full list of all the tools and components I used to fully overhaul my bike can be found on this page .

Subscribe to Sportive Cyclist
I write entertaining articles about road cycling: gear reviews, training advice. All from a MAMIL perspective. Subscribe below and I will send you enjoyable and helpful cyclo-info straight to your inbox.
Leave a comment Cancel reply
This site uses Akismet to reduce spam. Learn how your comment data is processed .
- MAGAZINE OFFERS
- BIKE INSURANCE
- Best Products
- Maintenance
- Accessories
- Long-Term Reviews
- BikeRadar Podcast
- First Look Friday
- Bike of the Week
- Tech Features
- Routes and Rides
- Bike Galleries
- BikeRadar Bargains
- Buyer's Guides
- Fitness & Training
- Sizing & Fit
- Mountain Biking UK
- Cycling Plus
I won’t miss BB90, the worst bottom bracket standard
Is Trek all-in on T47?
Matthew Loveridge
Trek’s revamped Domane is a sleek and modern endurance bike and I’m confident it will be an excellent ride. Indeed, our own Rob Spedding was certainly very impressed by it at the launch.
Its clever bump-absorbing tech naturally grabs the headlines, but it’s also notable for its bottom bracket: where high-end Treks have used a proprietary standard called BB90 for more than a decade, the third-generation Domane makes use of the much more recent T47 threaded design , first introduced by Chris King in 2015.
T47 resembles a traditional BSA bottom bracket but goes a good deal bigger, offering better compatibility with the latest large-spindle cranks. BB90, on the other hand, is an awkward sorta-press-fit which relies on ultra-fine tolerances and is highly susceptible to the kind of creaks that can ruin a perfectly good ride.
I happen to think BB90 is one of the worst bottom bracket standards in existence and I’m delighted that Trek appears to be phasing it out. Here's why.
- The 2020 Trek Domane gets more aero, more adjustable and goes disc-only
- Trek Domane SLR 9.9 Project One first ride review
Is Trek actually abandoning BB90?

The reality is that we don’t know, but it seems highly likely. Trek’s UK representative couldn’t give a definitive answer either way.
The Domane isn’t the first Trek to get T47 — that honour was bestowed on the 2020 Crockett cyclocross bike .

The Domane is one of Trek’s most important bikes, however, so the decision to ditch BB90 on this model feels far more significant.
For the time being, the upper tiers of the Emonda and Madone ranges still have BB90, so we’ll be watching keenly when they next receive an update.
What is BB90 anyway?

Often confused with the ‘Shimano standard’ BB86/92 (which a number of Trek’s bikes do use), BB90 (and its MTB counterpart BB95) is a proprietary Trek standard wherein cartridge bearings sit directly in moulded carbon seats in the bottom bracket shell. You can read our complete guide to bottom brackets here .
BB90 bearing placement is the same as that of BB86/92 (and it accepts the same cranks), but the bearing cups effectively form part of the frame rather than the bottom bracket.
With BB86/92 (and the larger but conceptually similar PF30 design), the bottom bracket cups are disposable, but if the bearing seats of a BB90 frame suffer damage or wear, that’s a much bigger problem.
Park Tool describes BB90 bearings as “a mild press fit” — they typically don’t require as much force to insert as a conventional press-fit and, in some frames, the bearings will actually slip in by hand.
If they get too loose, creaking is all but inevitable, and that’s why some maintenance guides endorse the use of Loctite-style compounds to prevent bearing movement.

A few years ago, Trek released a ‘V2’ bottom bracket bearing as a solution for frames where the bearing fit had gone a bit baggy.
These are oversized cartridge bearings that measure 0.1mm more in diameter than the standard part; it’s a simple solution, but one that, in my opinion, is a product of an inherently flawed design.
Is T47 genuinely better?
BB90 is a system that looks elegant on paper, but one that relies on very tight tolerances and liable to problems if the bearing seats suffer from wear.
T47 should, at least in principle, be easier to live with. It’s essentially a super-sized version of the familiar BSA threaded bottom bracket and with that comes easy user-serviceability and a frame-cup interface that isn’t inherently liable to creaking.
The larger bore diameter means broader crank compatibility (standard BSA is best suited to thinner 24mm spindles as space is limited).

Having threads does, of course, mean that T47 necessitates a metal bottom bracket shell. For carbon frames, bike makers need to use a bonded-in metal insert, which inevitably adds weight.
Bikes have been made this way for years, but it is a potential weak point if designers try to shave off too much weight, or if production quality control isn’t up to scratch. De-bonded bottom bracket shells aren’t exactly common, but it can happen.
Nevertheless, I’m all for the switch to T47. I have personal experience with BB90, having spent a summer working in a now-defunct Trek dealer, and I honestly despised the design.
If it were up to me we’d all stick with a Hollowtech II-style design and 24mm spindles for the sake of simplicity, but I understand why bike makers would want the versatility offered by T47.
Will you be buying a Trek with T47? Do you care about your bottom bracket standard? Let us know your thoughts in the comments.
Share this article

Contributor

- Terms & Conditions
- Subscribe to our magazines
- Manage preferences
Trek Émonda goes aero, gains T47 BB, Aeolus RSL integrated bar-stem & sub-700g frame!

- Click to share on Facebook (Opens in new window)
- Click to email a link to a friend (Opens in new window)
Have you seen Bontrager’s new Aeolus carbon wheel lineup? Spanning the gap between budget and race ready, the aerodynamic hoops are the perfect complement to another new Trek product launching today – the all new Émonda.
Fans of super light, efficient climbing bikes needn’t worry. The Émonda is still as light as ever, but now it just got a serious aerodynamic boost to make it faster both up and down the mountain.

After spending plenty of time in the Walter H Beech Wind Tunnel in Wichita, Kansas, the Trek team came up with a new aero tubing package that saves up to 183g of drag. That works out to something like 60 seconds faster per hour on flats compared to the previous generation, and 18 seconds per hour faster at an 8% grade.

The highest level Émonda SLR frames use 800 Series OCLV Carbon fiber to keep the weight below 700g for a frame (size not specified). This premium level carbon material is 30% stronger, which means Trek can use less of it in the layup to drop 60g compared to OCLV 700.
Integration for the win(d)

The high end bikes also gain another aero advantage – the new Aeolus RSL Handlebar/stem combo.

Integrated cable management keeps them out of the wind and out of sight, and the OCLV carbon bar/stem includes a Blendr base and Mono and Duo mounts to mount Ion lights and Garmin computers.

Even if the Émonda you’re buying doesn’t include the Aeolus Bar/Stem, it will still be Blendr compatible with a standard Bontrager stem and bar.

The cable management on the frame is the same as well, with any cables or brake hoses tucking into the frame at the headset and disappearing.

What else is new with the Émonda? How about a T47 threaded bottom bracket? We’ve been seeing Trek use this new standard on a number of their newest bikes, and it continues here. Compatible with all internal-bearing T47 bottom brackets on the market, the design maintains a wide bearing stance within the frame that allows Trek’s engineers to maximize the carbon structure while also including a bottom bracket with threads.
2021 Trek Émonda geometry chart

Along with the SLR version , Trek is offering a lower tier Émonda SL. This bike still gets all of the same aero features as the SLR, but uses OCLV 500 carbon fiber which makes it a bit heavier, but also more affordable.

In terms of fit, Trek uses their H1.5 geometry which was developed with the Trek-Segafredo pro team. This fairly aggressive geo is all about getting the rider in the proper aero position. Since the frame uses the Trek seat mast design, you’ll be limited to a certain minimum and maximum saddle height with each frame based on the seat mast cap that you’re using.
2021 Trek Émonda models, colors & pricing

Available models:
- Émonda SL 5
- Émonda SL 6
- Émonda SL 6 Pro
- Émonda SL 7
- Émonda SL 7 eTap
- Émonda SL Disc Frameset
- Émonda SLR 6
- Émonda SLR 7
- Émonda SLR 7 eTap
- Émonda SLR 9
- Émonda SLR 9 eTap
- Émonda SLR Disc Frameset
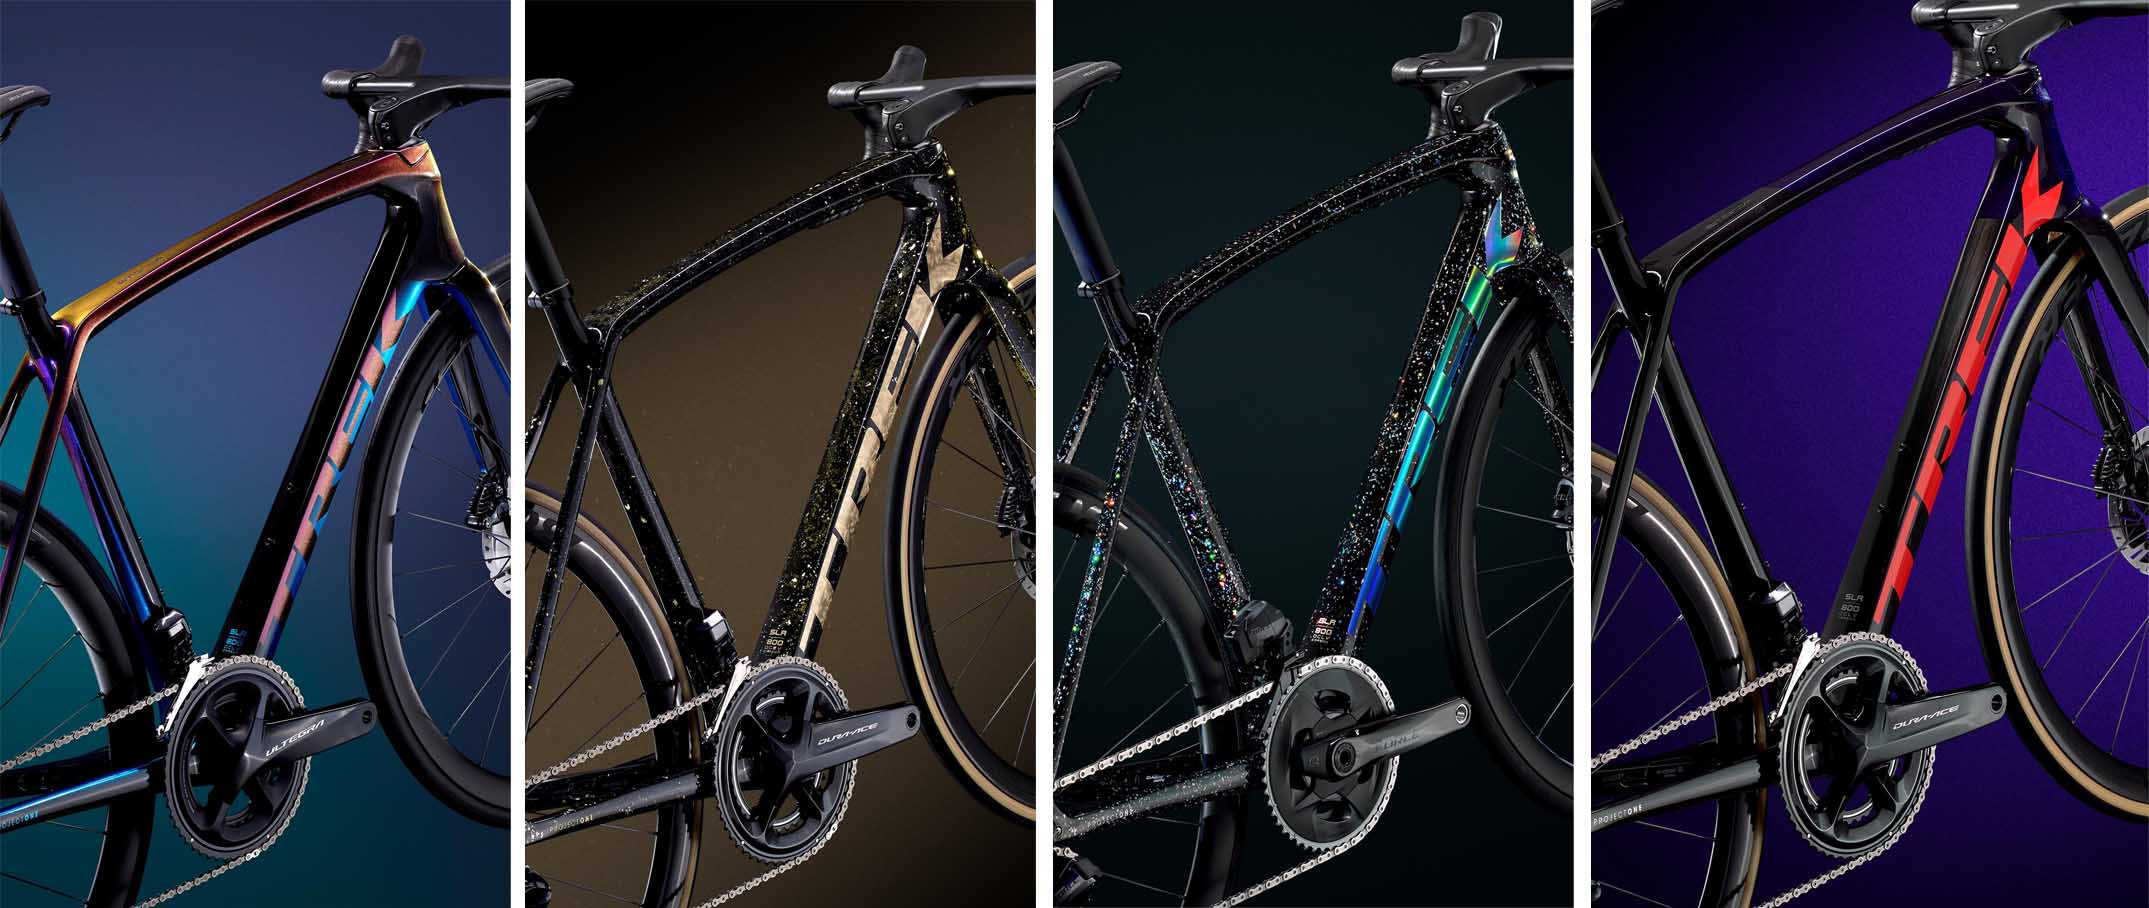
Of course Trek’s Project One customization program is an option too, with new ICON paint schemes as well as the KOM paint scheme.
Learn more at TrekBikes.com .
Disclosure: Some of these links are affiliate links that may earn a small commission for Bikerumor if you click on them and buy something. This helps support our work here without costing you anything extra. You can learn more about how we make money here . Thanks!

Zach Overholt is the Editor in Chief of Bikerumor . He has been writing about what’s new in the bicycle world for 12+ years. Prior to that, Zach spent many years in the back of a bicycle shop building and repairing nearly every type of bike, while figuring out how to (occasionally) ride them.
Based in Ohio, Zach is now slowly introducing a new generation to cycling and still trying to figure out how to fit the most rides into a busy schedule as a new dad.

This site uses Akismet to reduce spam. Learn how your comment data is processed .

what about Emondas ALR?

It’s still there. No changes for it from the 2020 model yet.

T47 – Thank you Trek for making a solid BB choice and not going proprietary. You just increased the likelihood that I would by this bike.

Good looking bike.
They claim the bikes is “something like 60 seconds faster per hour on flats compared to the previous generation, and 18 seconds per hour faster at an 8% grade”. What speed/distance is that at?

rider weight 70kg, keep 350w.

Fine print: sub 700g is the unpainted frame. And that silver does not look like a lightweight paint.

Sub 700g will not include, water bottle bolt, der hangers, paint, etc .

“7 watts while riding at 28mph with a 7mph average wind speed” What about at 43 mph in a 12 mph crosswind from 17 degrees at negative 200 feet elevation (Death Valley, Utah)?
The front center distances are way too short.
The T47 says to me that Trek can’t get their subcontractor to hold decent enough manufacturing tolerances to implement BB386EVO.

“The T47 says to me that Trek can’t get their subcontractor to hold decent enough manufacturing tolerances to implement BB386EVO.”
Well heck: there’s no way an assumption like that with no supporting evidence could be wrong! After all there’s no way that the public clamor for threaded BB option could have any influence on their decision at all.

Pretty much the only reason T47 exists is because manufacturers couldn’t manage to get press-fit BBs engineered/manufactured right. It’s more expensive to do press-fit correctly than to just throw a threaded insert in.

T47 exists because even though most manufacturers did get press fit right, those who had creaking issues (hint: threaded bb’s creak too), complained so loudly that general opinion gradually followed. I wonder where we’ll go when these creak a little too?
Uhhh… If they had consistent creaking issues they *didn’t* get it right. What exactly did you think I meant they got wrong?
They don’t have consistent creaking issues. A small number of people do. A small number of people also experienced creaking with threaded bb’s too.
Small numbers of defects escape all manufacturers. As consumers demand ever lighter weight products, the margins get tighter.
Lol, ok, Pedantic Patty. Creaking is a byproduct of bad design, bad production tolerances, or bad assembly. It can happen to any bike if any of those requirements are met. How come most other industries gets by with press-fit bearings but the bike industry needs threads to hold them, even now that high quality cartridge bearings are ubiquitous? Sh*tty engineering and/or poor tolerances and/or an abundance of hack mechanics. Doing junk like this because you’re desperate to chase weight at the expense of competent design is stupid. Especially at higher price points where this stupid new standard is common.
To my original point, T47 only exists because people like you seem to think threading a cup into the frame is a magical cure for a problem caused by corners being cut somewhere along the line. It’s lame, heavy, and a solution that Gary Fisher would love. Took cheap to do it correctly? Make it bigger.

Most PF systems with a direct frame interface on CF frames can’t really be corrected without a new frame. Can they stop creaking? Sure but I bet the bearing alignment is poor. An insert that can be machined after installation is what everyone should be asking for. T47 doesn’t require that but the frame insert will typically be machined and threaded in one pas, minimizing misalignment and out of round (hard to cut threads out of round) The could mess it up by pressing in the already machined t-47 insert but I am not sure How this is actually done at trek

Glad to see the the use of T47 bottom bracket. I greatly prefer a threaded bottom bracket over a pressfit (less problems with creaking, easier to install and uninstall, compatibility seems less confusing to me).
Almost 200 g less drag than the old Emonda, quite the leap. Wonder if it says more about how good this bike is or how much of an aero dog the old Emonda is. Would love to see how it stacks up against the Madone.
Nice offering, not in the market for a new road bike this year, but if I was this would be very high on my list.

It’s Trek T47. It is proprietary. Look it up

Seriously? Is it really proprietary? So now not only will I not buy a Trek because of their proprietary seat mast and ugly giant Trek downtube graphics but I also wont buy one because the bb is proprietary.
It’s only proprietary because it’s 1 mm narrower than the standard T47 spec. You can use a regular T47 BB in a Trek bike with the Trek T47 BB. You just can’t use a Trek T47 BB in a bike with a standard T47 BB.

Is this a joke? If you think that the shape of the tubes on your frame translates into any real world advantage, you need help. (deleted)
A little education, in cycling wind speed is most often too low and wind direction too mixed to make small aero advantages translate into real world gains. Ask any REAL engineer that does not work in the cycling industry. (search Hambini on YouTube)

I’m still riding my Émonda SLR 9 with direct mount rim brakes. While I’m really interested in this new bike and disc brakes, it’s much heavier than my 14 pound rim brake bike. I was hoping it’d be a tad lighter.
Follow Us On
Subscribe Now
Sign up to receive BikeRumor content direct to your inbox.
Gear-obsessed editors choose every product we review. We may earn commission if you buy from a link. How we test gear.

The New Trek Émonda Is Faster Than Ever
Already one of the fiercest climbing bikes available, the new Émonda is even faster thanks to a dose of aero.
The Takeaway: The Émonda SLR is a benchmark pro race bike—and it’s surprisingly rider friendly.
- It has 183 grams less drag than the previous generation, but the frame is only 33 grams heavier
- There are 10 models starting at $2,699
- SL models ($2,699 to $5,999) have the aerodynamic shaping and features but in a frame that’s about 400 grams heavier than the SLR
- SLR models ($6,699 and up) use a new carbon fiber composite that’s 30 percent stronger than Trek’s previous top-of-the-line carbon.
For Émonda SLR bicycles, Trek will provide an individual handlebar and stem until an updated handlebar/stem combo is available.
Additionally, all customers who bring in their handlebars for replacement will also receive a $100 in-store credit that can be used toward any Trek or Bontrager merchandise through December 31, 2022.
Remember professional road racing ? It’s that thing where super skinny people go unbelievably fast up and down hills and fly over flat roads for hours at a time. It’s been a while since the pros have beat up on each other for our entertainment, but there might, hopefully, be some races on the horizon. When the races do resume, Trek’s pro riders will be aboard its new third-generation Émonda climbing bike. The new Émonda isn’t lighter, but it is faster thanks to a dose of aerodynamic tuning.
.css-1hhr1pq{text-align:center;font-size:1.1875rem;line-height:1.6;font-family:Charter,Charter-roboto,Charter-local,Georgia,Times,Serif;}.css-1hhr1pq em{font-style:italic;font-family:Charter,Charter-styleitalic-roboto,Charter-styleitalic-local,Georgia,Times,Serif;}.css-1hhr1pq strong{font-family:Charter,Charter-weightbold-roboto,Charter-weightbold-local,Georgia,Times,Serif;font-weight:bold;} —Five Cool Details—

Now With Aero
The new Émonda gets a major drag reduction with a tiny weight gain.

Simple Seat Mast
The seat mast has lots of adjustment range, and an easy-to-use saddle clamp.

Light and Slippery
The new Bontrager Aeolus RSL 37 wheels are light, sleek, and stable.

Wide and Threaded
The T47 bottom bracket has a wide stance, and user-friendly threads.

A built-in chain watcher prevents unwanted derailments.
Making the new Émonda frame more aerodynamic wasn’t exactly a tough hurdle as the previous Émonda had virtually zero aerodynamic optimization. But adding meaningful aerodynamic benefit while achieving the frame stiffness expected of a pro-caliber race bike, maintaining the well-regarded handling properties of the previous Émonda, and adding rider-friendly features like a threaded bottom bracket—all with adding only 33 grams (SLR frame, claimed)—is quite a feat.
Below you’ll find my review of the Émonda SLR—I’ve been on it since early March—followed by a dive into the technology and features of the new bike, and a brief model breakdown.
Ride Impressions: Émonda SLR 9 eTap

The Émonda SLR is a tool made to fulfill the needs of some of the world’s best road racers. This bike will never be as comfortable or versatile as a gravel bike. Going fast on pavement and climbing performance are its only goals. These are obvious facts, but that’s the lens through which it must be viewed. And through this lens, it is one of the very best.
The new Émonda was born out of a request from Trek’s pro racers and pitched as the company’s “fastest climbing bike ever.” So little surprise they set me up with the lightest model (the SLR 9 with SRAM Red eTap ), which also has a build kit almost identical to the team’s bikes. It’s also, excepting customized Project One builds, the most expensive model at a buck under 12 grand.
That massive pile of clams gets you an aerodynamic frame with disc brakes, power meter, and wireless electronic shifting that weighs less than 15 pounds (54cm). And that’s with a hefty T47 threaded bottom bracket unit, lustrous paint , clincher wheelset, a chain-watcher, standard butyl tubes, 37mm deep rims, 160mm disc rotors front and rear, and SRAM’s largest Red cassette (10-33). That’s “Holy shit!” impressive.
By cutting drag a ton without adding much weight, it’s hard to argue with Trek’s claim that the new Émonda is faster than the outgoing generation. But if you have any doubts, they’ll be erased when you ride it. This is an explosive bike: it feels as light as a feather and as solid as a steel girder at the same time.

Trek’s Émonda has always been a raw and rowdy bike that feels a little wild and a bit dangerous in precisely the ways you want a race bike to feel: That’s not lost with the added aerodynamics. If anything, the new Émonda is even crisper and punchier than before, which is saying something.

A small downside to all this fury is the Émonda’s smoothness. Light and stiff race bikes aren’t a smooth-riding lot to begin with, but even measured against a stiffer riding genre, the new Émonda is on the firmer end of the scale. Still, it escapes harsh or punishing labels—I did a six-hour ride on the Émonda on the stock 25 tires and didn’t feel worn down by its ride. Swapping to 28s helped a lot (no surprise) and were on the Émonda for the bulk of my testing. I’d suggest reserving the lighter and more aerodynamic stock 25s for racing or PR attempts—assuming good roads—and use 28s as daily drivers.
The Émonda’s handling is excellent. Well, let me caveat that: Road racing geometry is pretty uniform, so whether I’m on a current race bike from Trek, Specialized, Cannondale, Cervélo, Canyon, Colnago, Wilier, Pinarello, BMC, Giant (etc., etc.), I find the broad strokes of their handling feel and performance quite similar. There wasn’t anything about the Émonda’s handling or cornering performance that set any new benchmarks for me, but there wasn’t anything to dislike either.

It was quick and accurate, diving into corners with a light touch. It offered great feedback, so I always knew where I was relative to its and my limits, and I could count on it to be consistent and predictable. It was maybe a touch less settled in bumpy corners than the Specialized Tarmac, but the Émonda never broke traction or skipped. Overall, for such a light bike, the Émonda is remarkably solid and drama free. I’d have no qualms barreling down a technical alpine descent on the Émonda.
I received this test bike in early March, giving me plenty of time to ride it back to back with its primary competition—a Specialized S-Works Tarmac , what I consider the benchmark for aero-ized lightweight bikes. The Tarmac is smoother over the bumps and has a silkier feel overall, but the new Émonda feels more efficient, like it can go faster more easily.
I’ve also ridden a good slice of the Émonda’s competition, including the Canyon Ultimate CF SLX , Colnago V3Rs, Cannondale SuperSix Evo , Cervélo R5, Wilier Zero SLR , Pinarello Dogma F12 . These are all superb bikes, but I feel the Émonda is the class leader. It feels sharper and more explosive than all of them. It feels faster, and that’s what matters most in a race bike. But I also like that the Émonda is pretty straightforward and rider-friendly.

For example, I swapped the stock one-piece bar/stem for a standard stem and round bar. One, I could run a standard bar and stem on this bike, which you can’t say about every modern race bike. And two, I didn’t have to pull any cables, wires, or hoses to make the swap: Again, something you can’t say about all race bikes. For the record, the shape of the one-piece Aeolus bar/stem is great, and the tops are the most comfortable to grab of all the aero-topped bars I've used. The only reason I swapped is my preferred length and width combination (110x40) wasn't available yet.
The BB is threaded, which makes it easier to service and replace than a press-fit (however, I was getting some noise out of the BB area, which I never resolved). The wheels employ standard offset, and it uses regular thru-axles. It’s compatible with pod-style power meters and mechanical shifting. Its signature seat mast is pretty much the only non-standard thing about this frame, and even then, it’s pretty user-friendly. There’s no cutting necessary, height adjustment is ample, the saddle clamp is easy to use, and it’s travel-case friendly.

I expect so much from a modern high-end pro-level road racing bike that it’s hard to exceed those expectations. It’s rare when a bike does: The Émonda SLR is one of those rare bikes.
Team Request
The new Émonda is partially a result of a request from the Trek-Segafredo race team. “They are one of our primary customers,” said Jordan Roessingh, Trek’s director of road product. “And they started to realize that it’s not just weight, it’s not just stiffness and responsiveness, there’s this other thing—aerodynamics and speed—that’s also really important to be competitive and be faster on the bike. They had been one of the loudest voices saying, ‘We need the lightest-weight, stiffest bike possible.’ And now they started coming back saying ‘We need those things, but we also need the bike to be faster in order for us to be really competitive.’ ”
It is (comparatively) easy to make a light frame, it is easy to make a stiff frame, it is easy to make an aerodynamic frame. Making a frame that’s two of those three things is more challenging: Making a bike more aerodynamic usually makes it heavier, making a bike lighter typically makes it less stiff, etc. Making a frame that is light AND stiff AND aerodynamic enough to satisfy the demands of a top-level professional race team is extremely difficult.

But not impossible. Many brands already make a light, stiff, and aero bike. The Specialized Tarmac is one, as are the Canyon Ultimate, the Cannondale SuperSix Evo, the Cervélo R5, the Wilier Zero SLR, the Pinarello F12, the Scott Addict, and the new Giant TCR . All of them seek to balance the three qualities—light, stiff, and aero—in the pursuit of the ideal race bike, and they all manage the balance differently. The common thread between these bikes: They’re all used by teams that compete against Trek-Segafredo.
Still Light, Now With Aero
The previous generation Émonda SLR Disc , launched in 2017, was an extremely light frame at 665 grams (claimed). But when a frame is already that light, it is much harder to make it even lighter. At least lighter enough to make a meaningful difference.

So, Trek took a different approach to making its climbing bike faster—instead of lighter, it made it more aerodynamic. The new Émonda frame is a touch heavier—yet still extremely light at 698 grams—but the bike has 183 grams less drag than the previous generation.
The important thing to note here is that, though the frame is more aerodynamic, the 183 gram drag reduction is not from the frame only. New wheels and a new aero bar (more info on both below) play a role. The specific setups Trek used to get that 183 gram number are: 2018 Émonda with 28mm-deep Bontrager XXX 2 wheels, and Bontrager XXX Bar/Stem Combo compared to the 2021 Émonda with 37mm deep Bontrager Aeolus RSL 37 Wheels and Bontrager Aeolus RSL Bar/Stem Combo.

Another drag saving upgrade: the housing, hoses and wires for the controls are almost fully inside the frame. They dive into the frame at the head tube passing through the upper headset bearing. The front brake hose runs into the fork steerer and down the left leg before popping out just above the brake caliper. The fork steerer’s flattened sides provide room for the rear brake hose and derailleur control lines to travel down and into the frame. Though it has flattened sides, the fork steerer is still compatible with standard 1 1/8” stems.
The overall drag reduction results in a bike that is 18 seconds per hour faster when climbing an 8.1 percent grade (the average grade of Alpe d’Huez ), and 60 seconds per hour faster on flat roads than the previous Émonda. Trek also claims the new Émonda is 13 seconds per hour faster than a Specialized Tarmac when climbing an 8.1 percent grade (all assuming the rider maintains a constant 350 watts).
Eight Point One Percent
With three qualities—aero, stiffness, weight—that work in opposition to each other, how do you decide how much to optimize one quality when you know it will negatively affect the other two? How aero is aero enough? At what point is improved aerodynamics offset by the weight added to get there?
The team behind the Émonda used a legendary climb to help them decide: Alpe d’Huez. “It represents an extreme example of what most people see on a regular basis when they’re doing a big climbing ride,” said Roessingh, “It’s around an 8 percent grade, and it’s about an hour-long climb for the pros—amateurs might go a little slower. It gives us a good understanding of what the benefit of a drag savings is relative to a weight savings.”

By optimizing the weight and aerodynamic balance around this climb, Roessingh claims the Émonda is faster on Alpe d’Huez and also faster on everything shallower than the famous climb, “which is the vast majority of the environments that most riders are going to ride in, including the team,” said Roessingh. “So if we can say it’s faster up Alpe d’Huez, it’s going to be significantly faster everywhere because the flatter it is, the more aerodynamics benefit you.”
Computer-Aided Optimization
Achieving the weight to the aerodynamic balance of the new Émonda required careful design of each tube shape. Aiding the Émonda’s team was supercomputing horsepower. The abridged and simplified version of the process goes like this: into the computer was fed a rough draft of the shape based on Trek’s aerodynamic experience and other information like UCI regulations. The program then varies the tube’s parameters within a predefined range and spit back several iterations of the shape, each with a different weight to aerodynamic balance. The Émonda’s team evaluated the alternatives and picked the one most suited to its location in the frame and best able to help the frame achieve its overarching goal.
Roessingh says that Trek cannot afford to buy the computing hardware necessary to run the CFD and FEA optimizations (in a timely manner) that helped shape the new Émonda’s tubes. The processing happens in the cloud where Trek rents time on Google, Microsoft, or Amazon’s supercomputers. It’s more affordable than buying a supercomputer. Even so, it is not cheap, “Cloud computing is becoming a relatively significant budget line item for us because we’re doing so many of these optimizations in CFD and FEA and all that processing happens in the cloud.”

The new Émonda’s fork legs, head tube, down tube, seat tube, and seat stays all use a variation of a truncated airfoil. The top tube and chainstays, which have virtually no effect on drag, are optimized almost entirely for stiffness to weight.
In Trek’s line, the new Émonda’s aerodynamic performance is equal to the third generation Domane ; the Madone is still significantly more aero. But while the more aerodynamic Madone is faster in flatter terrain, once the climb hits about 5.5 percent, the lighter Émonda becomes the faster bike. And for many of the Trek-Segafredo team riders—and many amateurs—that means the Émonda is fastest when it matters most: the hardest part of a race or ride, which is almost always on a steep climb.

OCLV 800 Carbon
Getting the new Émonda SLR to be as light as it is while adding aerodynamic shaping would not be possible without employing a new carbon-fiber composite, said Roessingh. The new OCLV 800 composite is 30 percent stronger than Trek’s previous top-of-the-line composite (OCLV 700). Because it is stronger, they can use less: By using OCLV 800, Trek’s team was able to make the Émonda SLR frame 60 grams lighter than if they used OCLV 700.

The Émonda SLR is very cool, but it’s also very expensive (bike prices start at $6,699). For the 99 percenters, there’s the Émonda SL (models start at $2,699).
The SL uses OCLV 500 composite, and the frame is quite a bit heavier than the SLR’s. The SL’s frame comes in at 1,142 grams, with a 380-gram fork (SLR fork weight: 365 grams).
But material (and weight) are the only difference between the SL and SLR.
Aeolus Bar Stem
While a ton of work made the Émonda’s frame tubes faster, a big chunk of the new bike’s drag savings comes from the one-piece Aeolus bar stem. It alone is responsible for 70 grams of the Émonda’s 183-gram drag reduction. This means that if a traditional stem and round bar are installed on the new Émonda, its drag advantage over the previous-generation bike drops to 113 grams. And it means that you can make any bike with a round bar and traditional stem significantly more aerodynamic by merely installing the Aeolus. Retail price is $650.

The integrated Aeolus is made of carbon-fiber composite, of course, with a claimed weight of 297 grams (42x120). It’s offered in 14 length and width combinations, from 44x120 to 38x80. Hoses, housing, and wires run externally for easier service and repairs, but in a groove that keeps them out of the wind. A bolt-on plate keeps the control lines tucked and organized where they turn off the bar tops to run in line with the stem.
The Aeolus employs a mount that works with Bontrager’s line of Blendr accessories for mounting computers and lights.
Aeolus 37 Wheels
Another new Bontrager product rolling out with the Émonda is the Aeolus 37 wheelset. It comes in two models: the Aeolus RSL 37 (1,325 grams/pair, $2,400) and the Aeolus Pro 37 (1,505 grams/pair, $1,300).

The RSL 37 is claimed to be lighter than Zipp’s 32mm-deep 202, yet more aerodynamic and more stable than Zipp’s 45mm-deep 303. Both wheels are disc brake only (only Center Lock interface), tubeless compatible, use DT-Swiss internals, have no rider weight limit, and come with a lifetime warranty.
Surprisingly Rider Friendly
Though the new Émonda is clean and integrated looking and uses high-performance standards, it is also remarkably rider-friendly. Cables, hoses, and housing run externally on the one-piece Aeolus bar/stem for easier repair and service (with one exception: wiring for a Shimano Di2 or Campagnolo EPS bar-end junction box runs partially inside the bar). If you prefer a more traditional cockpit, it can be run with a standard bar and stem with 1⅛-inch steerer clamp.
The bottom bracket uses the threaded T47 standard , which is compatible with almost all common crank-axle standards.

Front and rear thru-axles are standard 12x100 and 12x142mm, and the wheels employ a standard dish. The standard flat mounts for the brake calipers are compatible with 140, 160, or 180mm rotors.
Tire clearance is officially 28mm, but that’s with a ton of extra space. I fit 32mm tires in the Émonda with ease.
And though all models do use a seat mast, it’s a no-cut variety with lots of adjustment range.
H1.5 Geometry
Trek did offer its top-of-the-line race bikes in the aggressive H1 geometry for riders seeking an ultra-long and low geometry, or H2 which was an endurance fit. The new Émonda is offered only in H1.5, which splits the difference between H1 and H2. The result is pretty typical dimensions for a modern race bike—a 54cm Émonda H1’s geometry is remarkably similar to a 54cm Specialized Tarmac.
There are eight sizes starting at 47cm and topping out at 62cm.

There are 10 models of the new Émonda. SL models start at $2,699 and are priced up to $5,999. SLR models start at $6,699 and go up to $11,999.
Only SLR models come with the Aeolus integrated bar/stem stock; and only the Émonda SL 7 ($5,499) and up come with the Aeolus 37 wheelset.
The new Émonda is a disc brake-only platform.
Project One
The new Émonda is in Trek’s Project One paint and parts personalization program. If that’s not luxe enough for you, Trek’s Project One Ultimate program allows you to work with a designer to come up with a one-of-a-kind finish, and Trek will source any parts you want for your new bike.

Trek Émonda SLR 9 eTap

A gear editor for his entire career, Matt’s journey to becoming a leading cycling tech journalist started in 1995, and he’s been at it ever since; likely riding more cycling equipment than anyone on the planet along the way. Previous to his time with Bicycling , Matt worked in bike shops as a service manager, mechanic, and sales person. Based in Durango, Colorado, he enjoys riding and testing any and all kinds of bikes, so you’re just as likely to see him on a road bike dressed in Lycra at a Tuesday night worlds ride as you are to find him dressed in a full face helmet and pads riding a bike park on an enduro bike. He doesn’t race often, but he’s game for anything; having entered road races, criteriums, trials competitions, dual slalom, downhill races, enduros, stage races, short track, time trials, and gran fondos. Next up on his to-do list: a multi day bikepacking trip, and an e-bike race.
.css-1t6om3g:before{width:1.75rem;height:1.75rem;margin:0 0.625rem -0.125rem 0;content:'';display:inline-block;-webkit-background-size:1.25rem;background-size:1.25rem;background-color:#F8D811;color:#000;background-repeat:no-repeat;-webkit-background-position:center;background-position:center;}.loaded .css-1t6om3g:before{background-image:url(/_assets/design-tokens/bicycling/static/images/chevron-design-element.c42d609.svg);} Bike Reviews

The Best Beach Cruisers for Leisurely Rides

The Best Hardtail Mountain Bikes

Best Hybrid Bikes You Can Buy Right Now

The 14 Best Road Bikes of 2024

The Best Commuter Bikes for Getting Around Town

The 10 Best Electric Bikes, Tested by Our Editors

These Folding Bikes Can Go Everywhere

Smoother and Faster: The New Pivot Switchblade

The Best Beginner Mountain Bikes

Reviewed: Colnago's Italian Made C68 Gravel

The 6 Best Kids’ Bikes in 2024
+ 0% Finance Available + Over 20,000 Happy Riders + Next Day Delivery Available + Over 15 Years Experience + Worldwide Delivery + Over 700 E-Bikes In Stock + Best Support & Advice + Access To Spares
Electric Bikes
Parts & Spares
Accessories
Help & Guides
E-Bike By Type
- MTB Full Suspension
- MTB Hard Tail
- Trekking & Hybrid
- Electric Road Bikes
- Folding Electric Bikes
E-Bikes By Brand
Which Rider Are You?
- Tracks & Trails
- Commuter & Town
- View all E-Bikes +
E-Bikes By Motor
- Bosch E-Bikes
- Yamaha E-Bikes
- Shimano E-Bikes
- Mahle E-Bikes
- Fazua E-Bikes
VIEW SALE BIKES
BUYERS GUIDE
Types of spares
- Brake Spares
- Gear Spares
- E-Bike Tools
- Tyres & Tubes
Brand Spares
- Haibike Parts
- Orbea Parts
- Scott Parts
- Gocycle Parts
E-Bike Specific
Bosch e-bike spares
Yamaha e-bike spares
Shimano e-bike spares
For the bike
- Bottle Cages
- Handlebar Grips
- Handlebar Stems
- Saddles & Posts
For the rider
- Luggage & Racks
- Security & Locks
- Car Cycle Racks
Maintenance
- Cleaning & Lube
- Inner Tubes
- Bike Stands
- Handy Tools
- Bike Covers
Stay Secure
- Cycle to Work Schemes
- Electric Bike Finance
- Electric Bike Insurance
- Corporate E-Bike Guide
- E-Bike User Guides
- E-Bike Buyers Guide
- E-Bike Setup Guide
- Find The Right Size
fast delivery
Electric Bike Parts & Spares

At e-bikeshop we hold most of the common required eBike & ordinary spares in stock for our customers with quick delivery.
Navigate directly to what you are looking for: It could be spares for Brakes , Gears , Speed Kits , E-Bike Tools or Tyres & Tubes ? If you know the brand of bike, you may be looking for spares for Cube , Orbea , Haibike , Gocycle or Scott . If you're looking for E-Bike specific parts jump straight to Bosch , Yamaha , Shimano or Flyon ebike spares.
Which E-Bike spares do you stock?
Here you will find parts and spares for all of our electric bikes. This includes ebike specific spares for Bosch, Yamaha, Shimano & Gocycle and other eBike systems sold by e-Bikeshop and includes chargers, batteries, head units/controllers and of course our exclusive eBike Tuning Kits.
Why do we hold E-Bike parts and spares?
In the rare event of a problem we hold spares so you can be back on your way quickly. This is rare for eBike retailers in the UK - Often dealers have to order in spares on request from Europe, adding huge lead times to getting your electric bike back on the road quickly. Most spares held in stock are delivered next business day.
Why are some products restricted?
You will notice some of these parts are marked as “This product is restricted to 'Our bike customers' ”. Due to production rates or product availability, these items are only available to customers who purchased their bike direct from us for a quick and convenient solution. We do not supply these products to those who have bought their bikes from others dealers.
The ADD TO CART button will appear to pre-approved customers when logged in to their account. If this doesn't appear and you purchased your bike directly from us, please email us with a copy of your bike purchase receipt and we’ll be very happy to add you to our approved customer list.
Latest E-Bike Arrivals
ROAD ELECTRIC BIKES
MTB FULL SUSPENSION
TREKKING, TOWN & HYBRID
HARD TAIL MOUNTAIN BIKE
FOLDING ELECTRIC BIKES
"Ordered a spare battery on Tuesday at 11am received the battery on Wednesday at 10am. Considering I live in North Wales, what an absolutely brilliant service. Hassle free and so efficient, I would recommend anyone to look at E-bikes before anyone else"
Next business day UK mainland delivery on bike parts and spares
NEXT DAY DELIVERY
Happy days! We're rated excellent on TrustPilot & Judge.me
OVER 20K HAPPY RIDERS
We deliver electric bike parts and spares to over 150 countries worldwide
DELIVERY WORLDWIDE
Parts dispatched same business day if ordered before 1pm
SAME DAY DISPATCH
2018 Primetime Emmy & James Beard Award Winner
In Transit: Notes from the Underground
Jun 06 2018.
Spend some time in one of Moscow’s finest museums.
Subterranean commuting might not be anyone’s idea of a good time, but even in a city packing the war-games treasures and priceless bejeweled eggs of the Kremlin Armoury and the colossal Soviet pavilions of the VDNKh , the Metro holds up as one of Moscow’s finest museums. Just avoid rush hour.
The Metro is stunning and provides an unrivaled insight into the city’s psyche, past and present, but it also happens to be the best way to get around. Moscow has Uber, and the Russian version called Yandex Taxi , but also some nasty traffic. Metro trains come around every 90 seconds or so, at a more than 99 percent on-time rate. It’s also reasonably priced, with a single ride at 55 cents (and cheaper in bulk). From history to tickets to rules — official and not — here’s what you need to know to get started.
A Brief Introduction Buying Tickets Know Before You Go (Down) Rules An Easy Tour
A Brief Introduction
Moscow’s Metro was a long time coming. Plans for rapid transit to relieve the city’s beleaguered tram system date back to the Imperial era, but a couple of wars and a revolution held up its development. Stalin revived it as part of his grand plan to modernize the Soviet Union in the 1920s and 30s. The first lines and tunnels were constructed with help from engineers from the London Underground, although Stalin’s secret police decided that they had learned too much about Moscow’s layout and had them arrested on espionage charges and deported.
The beauty of its stations (if not its trains) is well-documented, and certainly no accident. In its illustrious first phases and particularly after the Second World War, the greatest architects of Soviet era were recruited to create gleaming temples celebrating the Revolution, the USSR, and the war triumph. No two stations are exactly alike, and each of the classic showpieces has a theme. There are world-famous shrines to Futurist architecture, a celebration of electricity, tributes to individuals and regions of the former Soviet Union. Each marble slab, mosaic tile, or light fixture was placed with intent, all in service to a station’s aesthetic; each element, f rom the smallest brass ear of corn to a large blood-spattered sword on a World War II mural, is an essential part of the whole.
The Metro is a monument to the Soviet propaganda project it was intended to be when it opened in 1935 with the slogan “Building a Palace for the People”. It brought the grand interiors of Imperial Russia to ordinary Muscovites, celebrated the Soviet Union’s past achievements while promising its citizens a bright Soviet future, and of course, it was a show-piece for the world to witness the might and sophistication of life in the Soviet Union.
It may be a museum, but it’s no relic. U p to nine million people use it daily, more than the London Underground and New York Subway combined. (Along with, at one time, about 20 stray dogs that learned to commute on the Metro.)
In its 80+ year history, the Metro has expanded in phases and fits and starts, in step with the fortunes of Moscow and Russia. Now, partly in preparation for the World Cup 2018, it’s also modernizing. New trains allow passengers to walk the entire length of the train without having to change carriages. The system is becoming more visitor-friendly. (There are helpful stickers on the floor marking out the best selfie spots .) But there’s a price to modernity: it’s phasing out one of its beloved institutions, the escalator attendants. Often they are middle-aged or elderly women—“ escalator grandmas ” in news accounts—who have held the post for decades, sitting in their tiny kiosks, scolding commuters for bad escalator etiquette or even bad posture, or telling jokes . They are slated to be replaced, when at all, by members of the escalator maintenance staff.
For all its achievements, the Metro lags behind Moscow’s above-ground growth, as Russia’s capital sprawls ever outwards, generating some of the world’s worst traffic jams . But since 2011, the Metro has been in the middle of an ambitious and long-overdue enlargement; 60 new stations are opening by 2020. If all goes to plan, the 2011-2020 period will have brought 125 miles of new tracks and over 100 new stations — a 40 percent increase — the fastest and largest expansion phase in any period in the Metro’s history.
Facts: 14 lines Opening hours: 5 a.m-1 a.m. Rush hour(s): 8-10 a.m, 4-8 p.m. Single ride: 55₽ (about 85 cents) Wi-Fi network-wide
Buying Tickets
- Ticket machines have a button to switch to English.
- You can buy specific numbers of rides: 1, 2, 5, 11, 20, or 60. Hold up fingers to show how many rides you want to buy.
- There is also a 90-minute ticket , which gets you 1 trip on the metro plus an unlimited number of transfers on other transport (bus, tram, etc) within 90 minutes.
- Or, you can buy day tickets with unlimited rides: one day (218₽/ US$4), three days (415₽/US$7) or seven days (830₽/US$15). Check the rates here to stay up-to-date.
- If you’re going to be using the Metro regularly over a few days, it’s worth getting a Troika card , a contactless, refillable card you can use on all public transport. Using the Metro is cheaper with one of these: a single ride is 36₽, not 55₽. Buy them and refill them in the Metro stations, and they’re valid for 5 years, so you can keep it for next time. Or, if you have a lot of cash left on it when you leave, you can get it refunded at the Metro Service Centers at Ulitsa 1905 Goda, 25 or at Staraya Basmannaya 20, Building 1.
- You can also buy silicone bracelets and keychains with built-in transport chips that you can use as a Troika card. (A Moscow Metro Fitbit!) So far, you can only get these at the Pushkinskaya metro station Live Helpdesk and souvenir shops in the Mayakovskaya and Trubnaya metro stations. The fare is the same as for the Troika card.
- You can also use Apple Pay and Samsung Pay.
Rules, spoken and unspoken
No smoking, no drinking, no filming, no littering. Photography is allowed, although it used to be banned.
Stand to the right on the escalator. Break this rule and you risk the wrath of the legendary escalator attendants. (No shenanigans on the escalators in general.)
Get out of the way. Find an empty corner to hide in when you get off a train and need to stare at your phone. Watch out getting out of the train in general; when your train doors open, people tend to appear from nowhere or from behind ornate marble columns, walking full-speed.
Always offer your seat to elderly ladies (what are you, a monster?).
An Easy Tour
This is no Metro Marathon ( 199 stations in 20 hours ). It’s an easy tour, taking in most—though not all—of the notable stations, the bulk of it going clockwise along the Circle line, with a couple of short detours. These stations are within minutes of one another, and the whole tour should take about 1-2 hours.
Start at Mayakovskaya Metro station , at the corner of Tverskaya and Garden Ring, Triumfalnaya Square, Moskva, Russia, 125047.
1. Mayakovskaya. Named for Russian Futurist Movement poet Vladimir Mayakovsky and an attempt to bring to life the future he imagined in his poems. (The Futurist Movement, natch, was all about a rejecting the past and celebrating all things speed, industry, modern machines, youth, modernity.) The result: an Art Deco masterpiece that won the National Grand Prix for architecture at the New York World’s Fair in 1939. It’s all smooth, rounded shine and light, and gentle arches supported by columns of dark pink marble and stainless aircraft steel. Each of its 34 ceiling niches has a mosaic. During World War II, the station was used as an air-raid shelter and, at one point, a bunker for Stalin. He gave a subdued but rousing speech here in Nov. 6, 1941 as the Nazis bombed the city above.
Take the 3/Green line one station to:
2. Belorusskaya. Opened in 1952, named after the connected Belarussky Rail Terminal, which runs trains between Moscow and Belarus. This is a light marble affair with a white, cake-like ceiling, lined with Belorussian patterns and 12 Florentine ceiling mosaics depicting life in Belarussia when it was built.
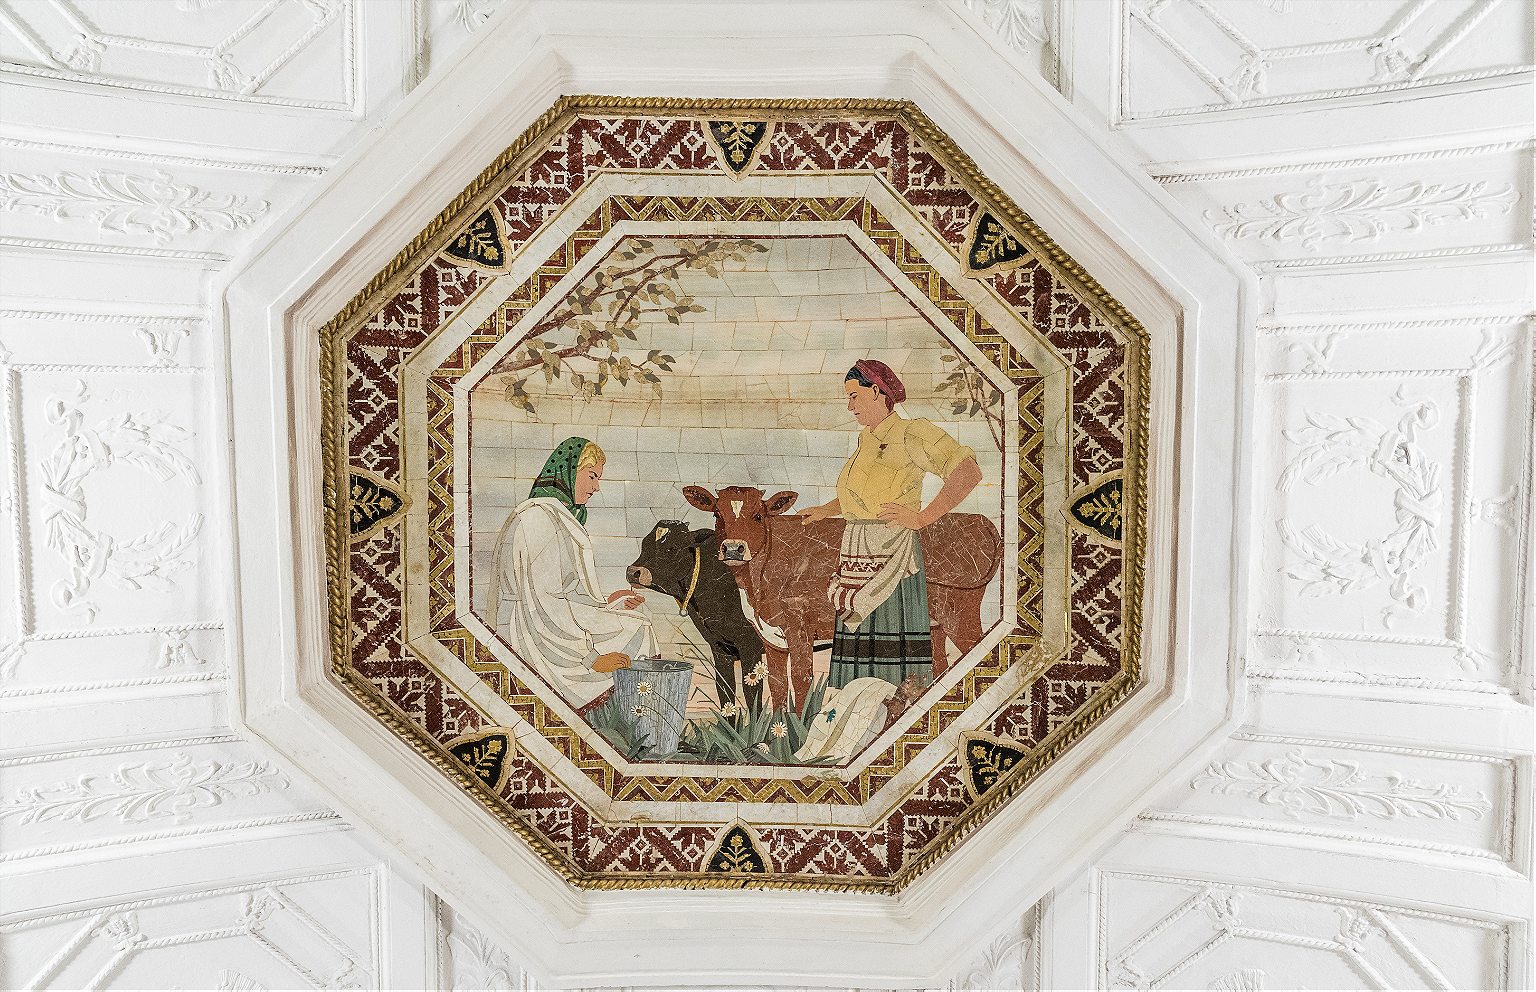
Transfer onto the 1/Brown line. Then, one stop (clockwise) t o:
3. Novoslobodskaya. This station was designed around the stained-glass panels, which were made in Latvia, because Alexey Dushkin, the Soviet starchitect who dreamed it up (and also designed Mayakovskaya station) couldn’t find the glass and craft locally. The stained glass is the same used for Riga’s Cathedral, and the panels feature plants, flowers, members of the Soviet intelligentsia (musician, artist, architect) and geometric shapes.
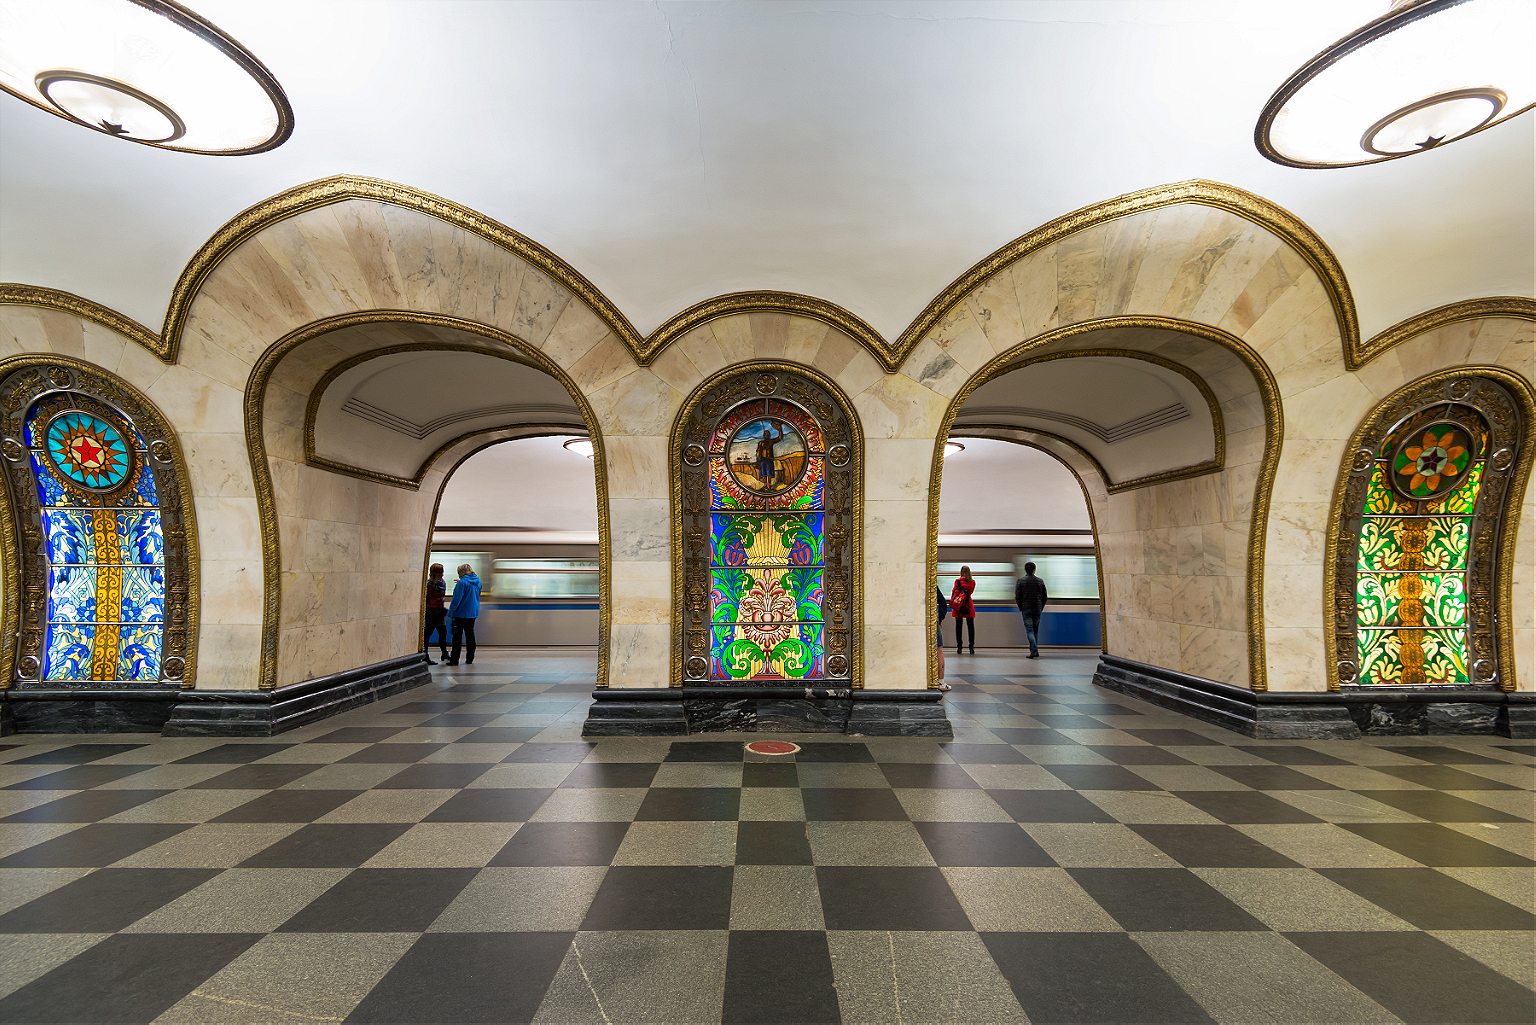
Go two stops east on the 1/Circle line to:
4. Komsomolskaya. Named after the Komsomol, or the Young Communist League, this might just be peak Stalin Metro style. Underneath the hub for three regional railways, it was intended to be a grand gateway to Moscow and is today its busiest station. It has chandeliers; a yellow ceiling with Baroque embellishments; and in the main hall, a colossal red star overlaid on golden, shimmering tiles. Designer Alexey Shchusev designed it as an homage to the speech Stalin gave at Red Square on Nov. 7, 1941, in which he invoked Russia’s illustrious military leaders as a pep talk to Soviet soldiers through the first catastrophic year of the war. The station’s eight large mosaics are of the leaders referenced in the speech, such as Alexander Nevsky, a 13th-century prince and military commander who bested German and Swedish invading armies.
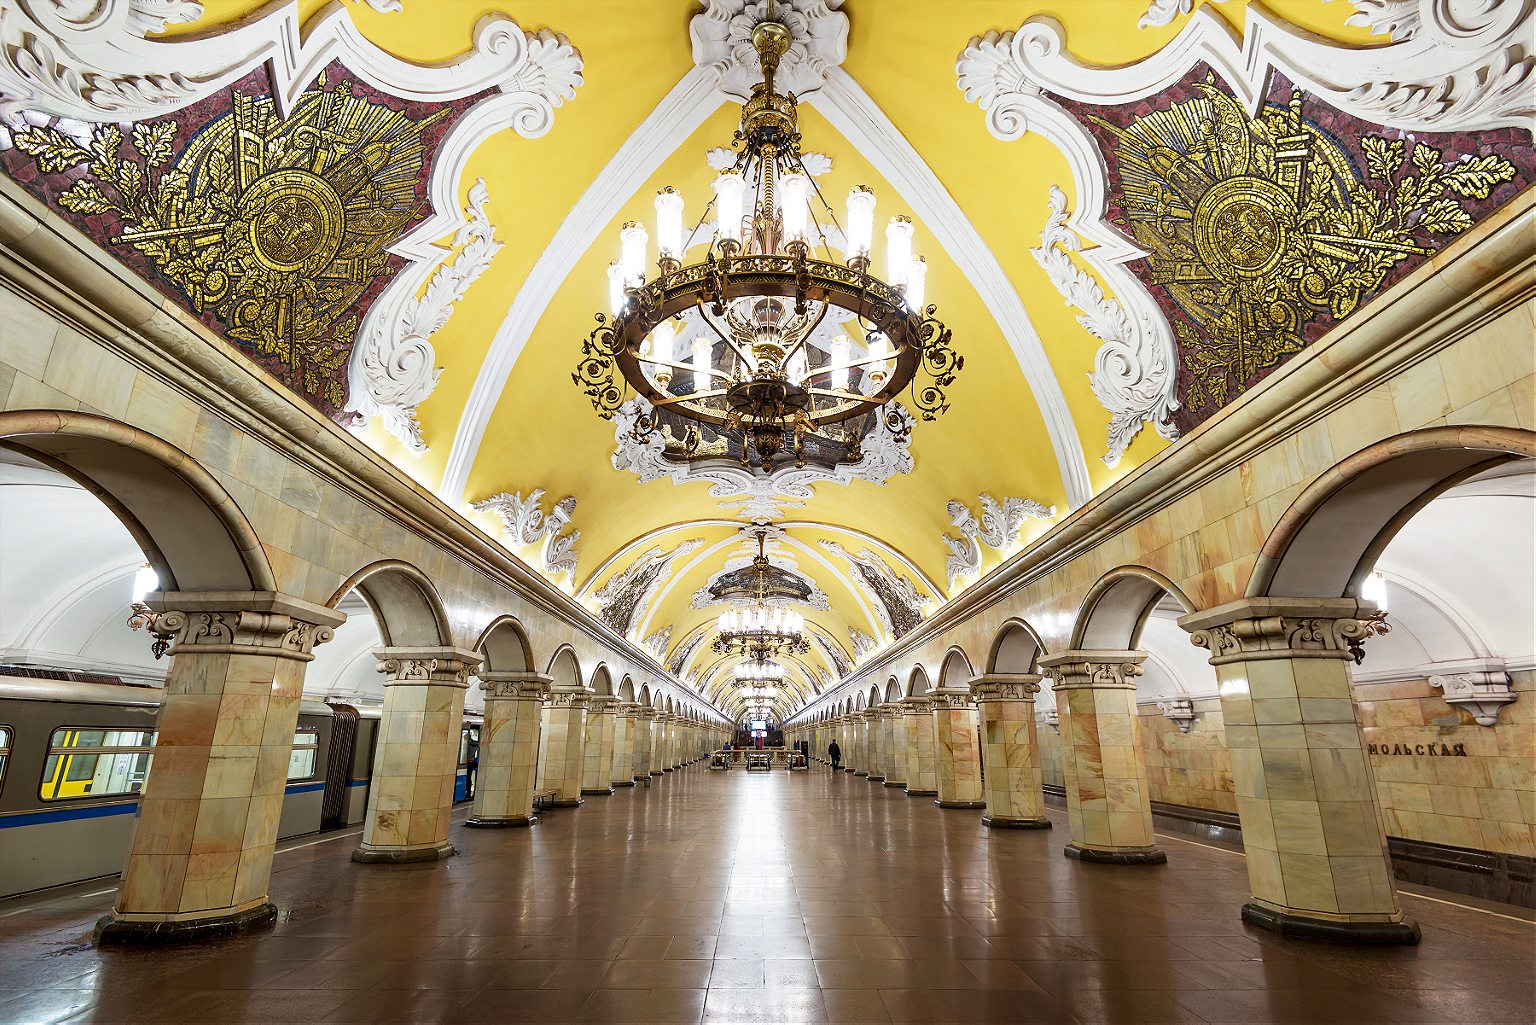
One more stop clockwise to Kurskaya station, and change onto the 3/Blue line, and go one stop to:
5. Baumanskaya. Opened in 1944. Named for the Bolshevik Revolutionary Nikolai Bauman , whose monument and namesake district are aboveground here. Though he seemed like a nasty piece of work (he apparently once publicly mocked a woman he had impregnated, who later hung herself), he became a Revolutionary martyr when he was killed in 1905 in a skirmish with a monarchist, who hit him on the head with part of a steel pipe. The station is in Art Deco style with atmospherically dim lighting, and a series of bronze sculptures of soldiers and homefront heroes during the War. At one end, there is a large mosaic portrait of Lenin.
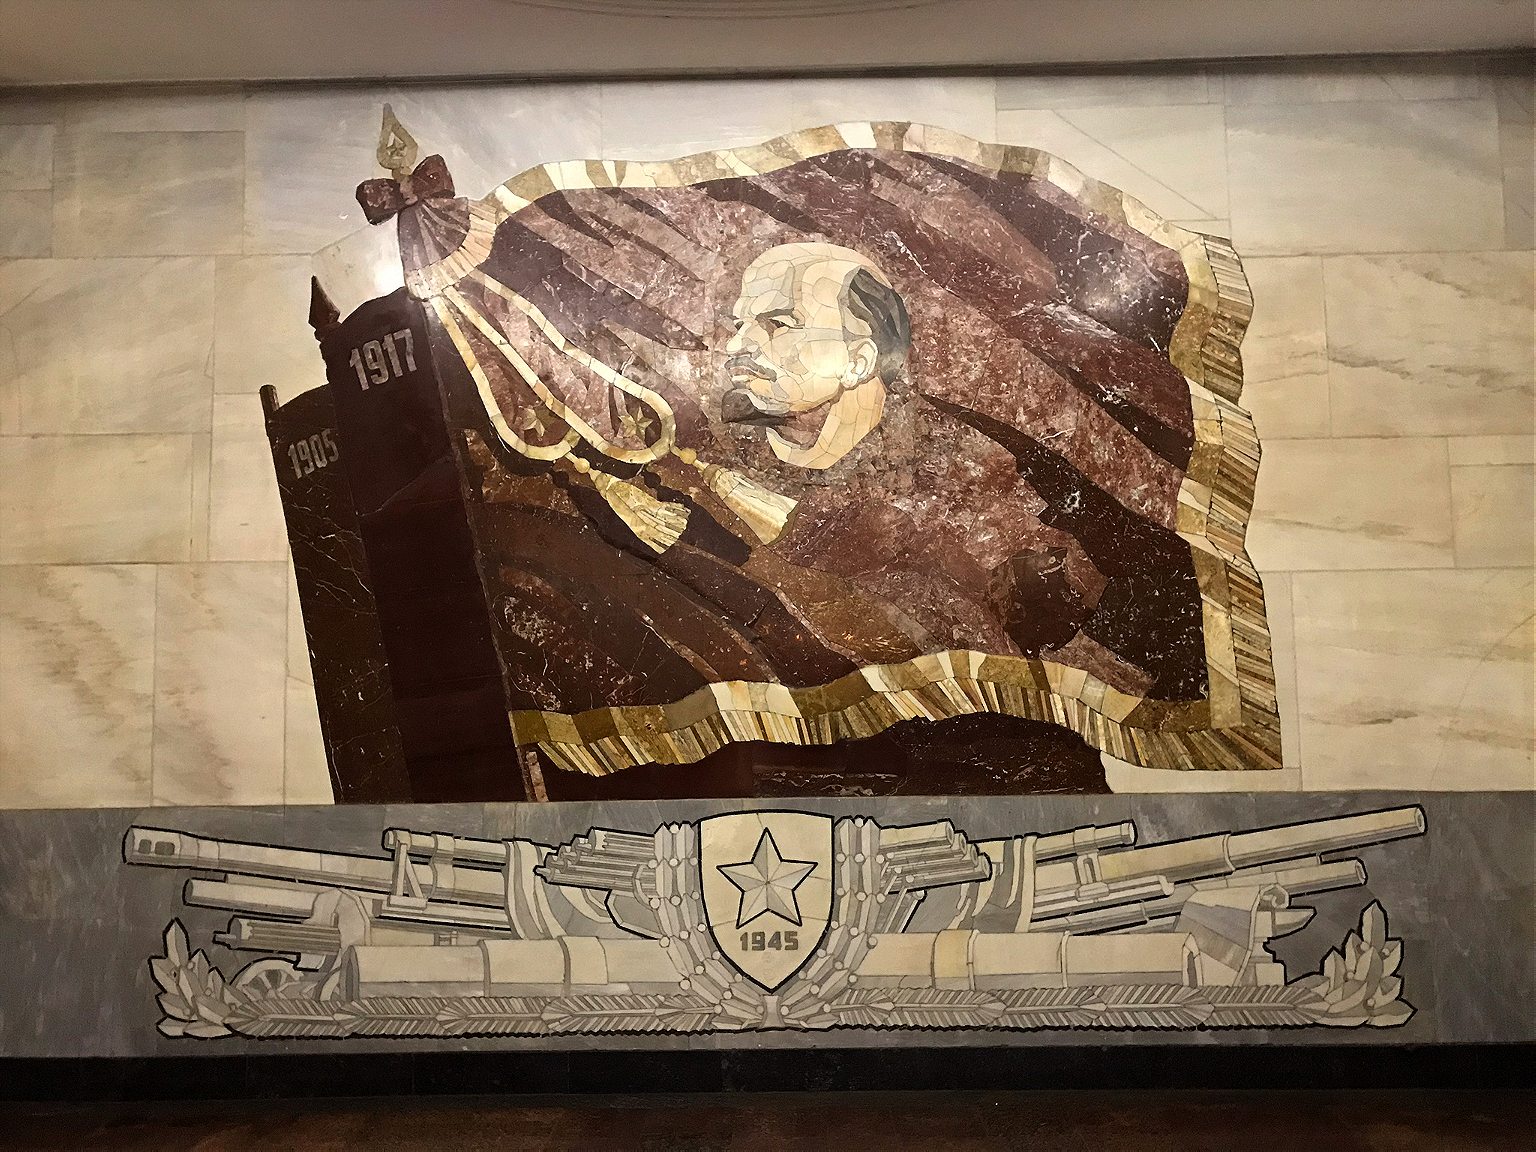
Stay on that train direction one more east to:
6. Elektrozavodskaya. As you may have guessed from the name, this station is the Metro’s tribute to all thing electrical, built in 1944 and named after a nearby lightbulb factory. It has marble bas-relief sculptures of important figures in electrical engineering, and others illustrating the Soviet Union’s war-time struggles at home. The ceiling’s recurring rows of circular lamps give the station’s main tunnel a comforting glow, and a pleasing visual effect.
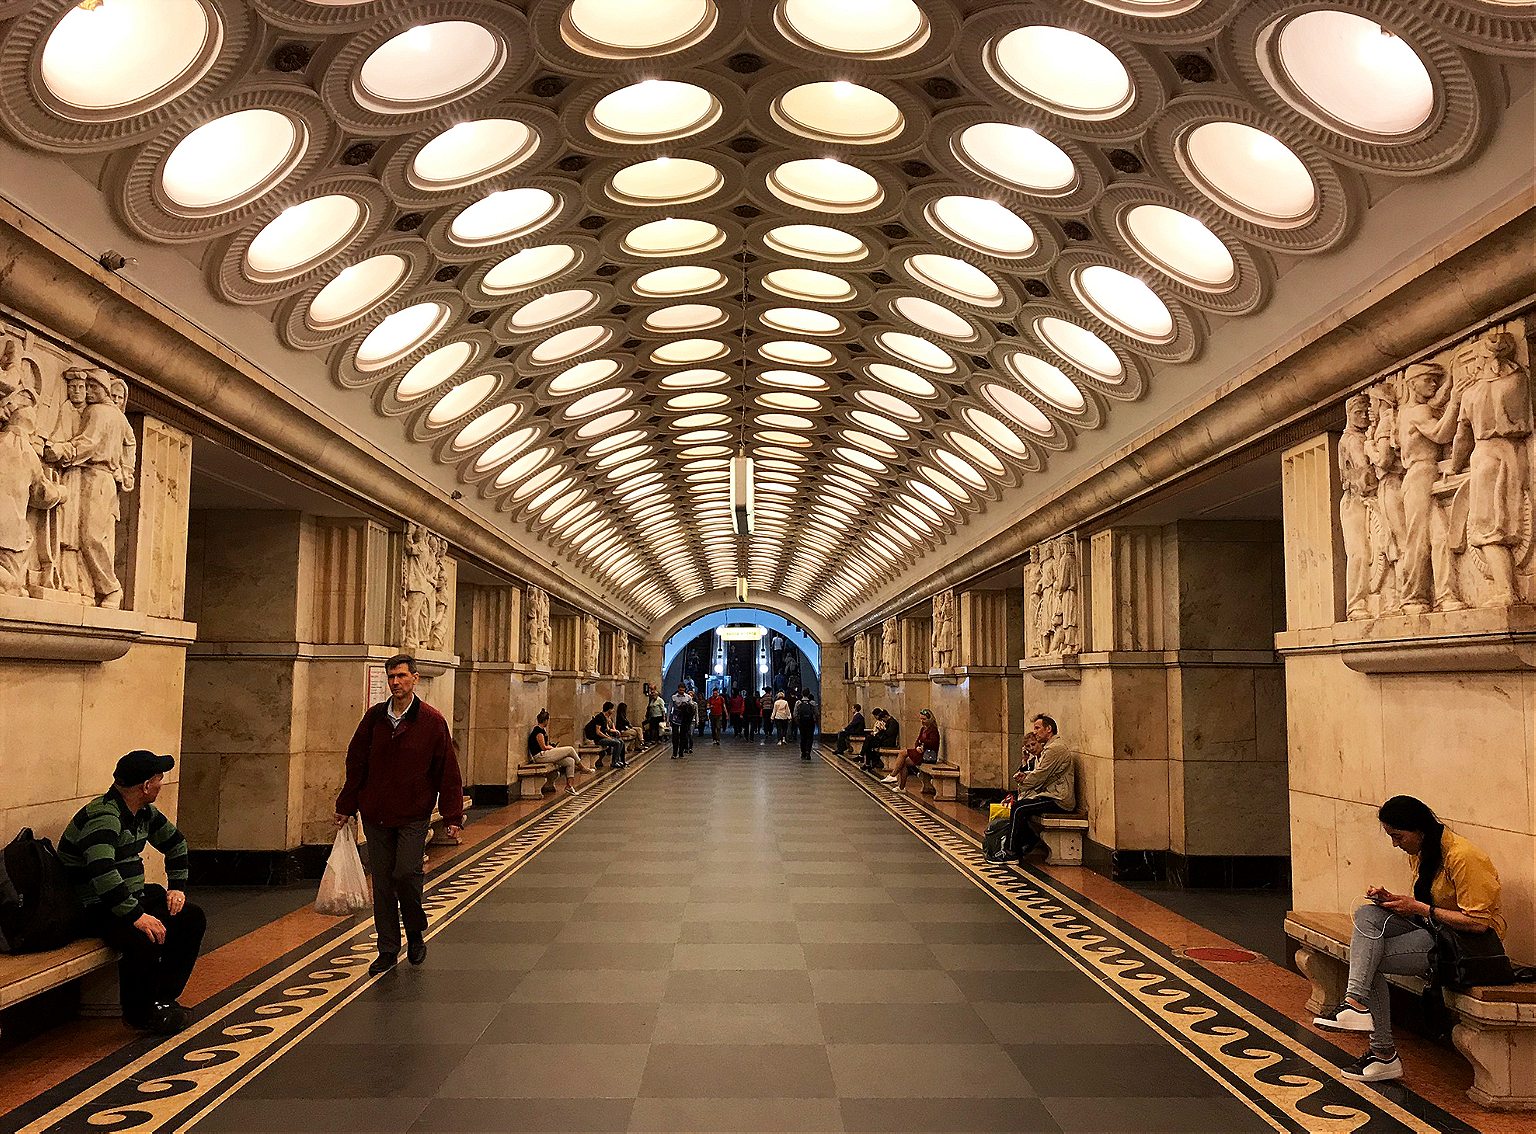
Double back two stops to Kurskaya station , and change back to the 1/Circle line. Sit tight for six stations to:
7. Kiyevskaya. This was the last station on the Circle line to be built, in 1954, completed under Nikita Khrushchev’ s guidance, as a tribute to his homeland, Ukraine. Its three large station halls feature images celebrating Ukraine’s contributions to the Soviet Union and Russo-Ukrainian unity, depicting musicians, textile-working, soldiers, farmers. (One hall has frescoes, one mosaics, and the third murals.) Shortly after it was completed, Khrushchev condemned the architectural excesses and unnecessary luxury of the Stalin era, which ushered in an epoch of more austere Metro stations. According to the legend at least, he timed the policy in part to ensure no Metro station built after could outshine Kiyevskaya.
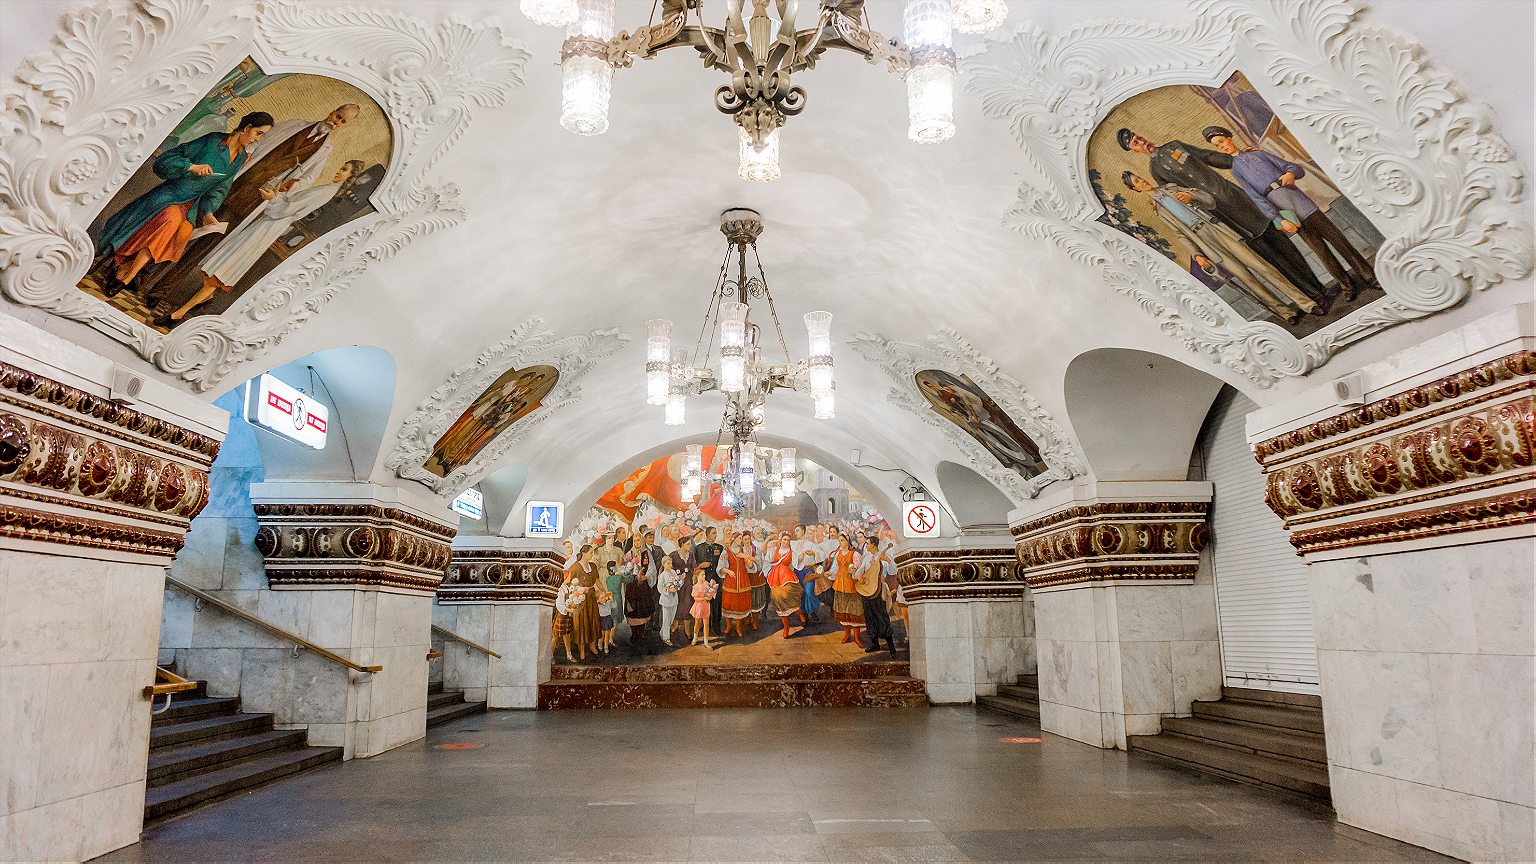
Change to the 3/Blue line and go one stop west.
8. Park Pobedy. This is the deepest station on the Metro, with one of the world’s longest escalators, at 413 feet. If you stand still, the escalator ride to the surface takes about three minutes .) Opened in 2003 at Victory Park, the station celebrates two of Russia’s great military victories. Each end has a mural by Georgian artist Zurab Tsereteli, who also designed the “ Good Defeats Evil ” statue at the UN headquarters in New York. One mural depicts the Russian generals’ victory over the French in 1812 and the other, the German surrender of 1945. The latter is particularly striking; equal parts dramatic, triumphant, and gruesome. To the side, Red Army soldiers trample Nazi flags, and if you look closely there’s some blood spatter among the detail. Still, the biggest impressions here are the marble shine of the chessboard floor pattern and the pleasingly geometric effect if you view from one end to the other.
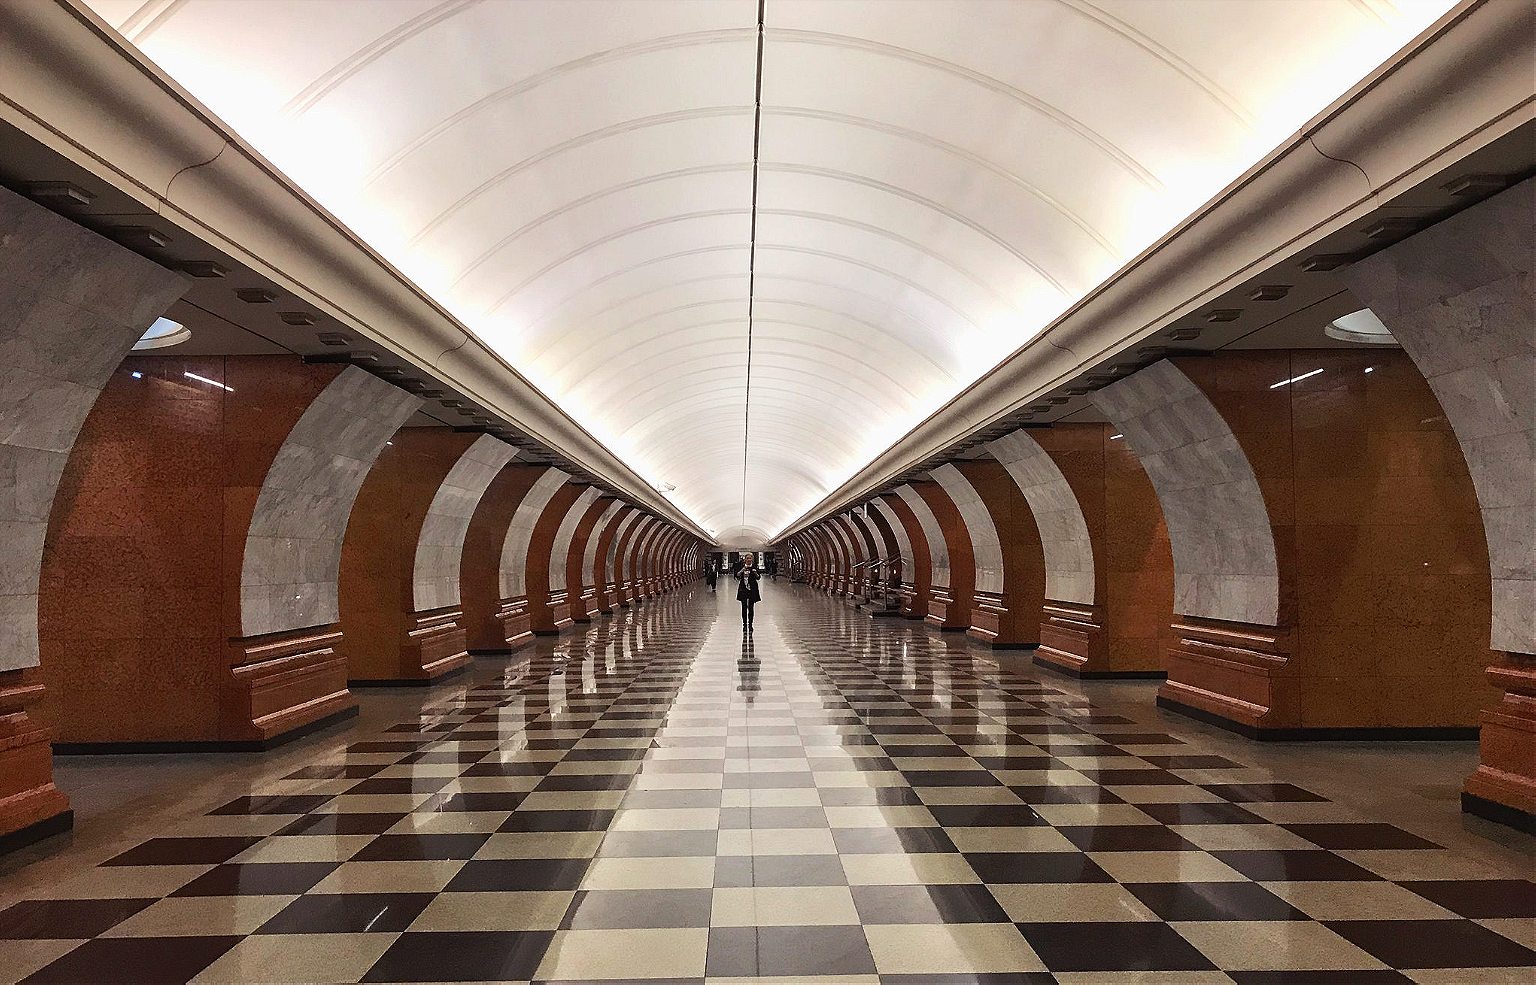
Keep going one more stop west to:
9. Slavyansky Bulvar. One of the Metro’s youngest stations, it opened in 2008. With far higher ceilings than many other stations—which tend to have covered central tunnels on the platforms—it has an “open-air” feel (or as close to it as you can get, one hundred feet under). It’s an homage to French architect Hector Guimard, he of the Art Nouveau entrances for the Paris M é tro, and that’s precisely what this looks like: A Moscow homage to the Paris M é tro, with an additional forest theme. A Cyrillic twist on Guimard’s Metro-style lettering over the benches, furnished with t rees and branch motifs, including creeping vines as towering lamp-posts.
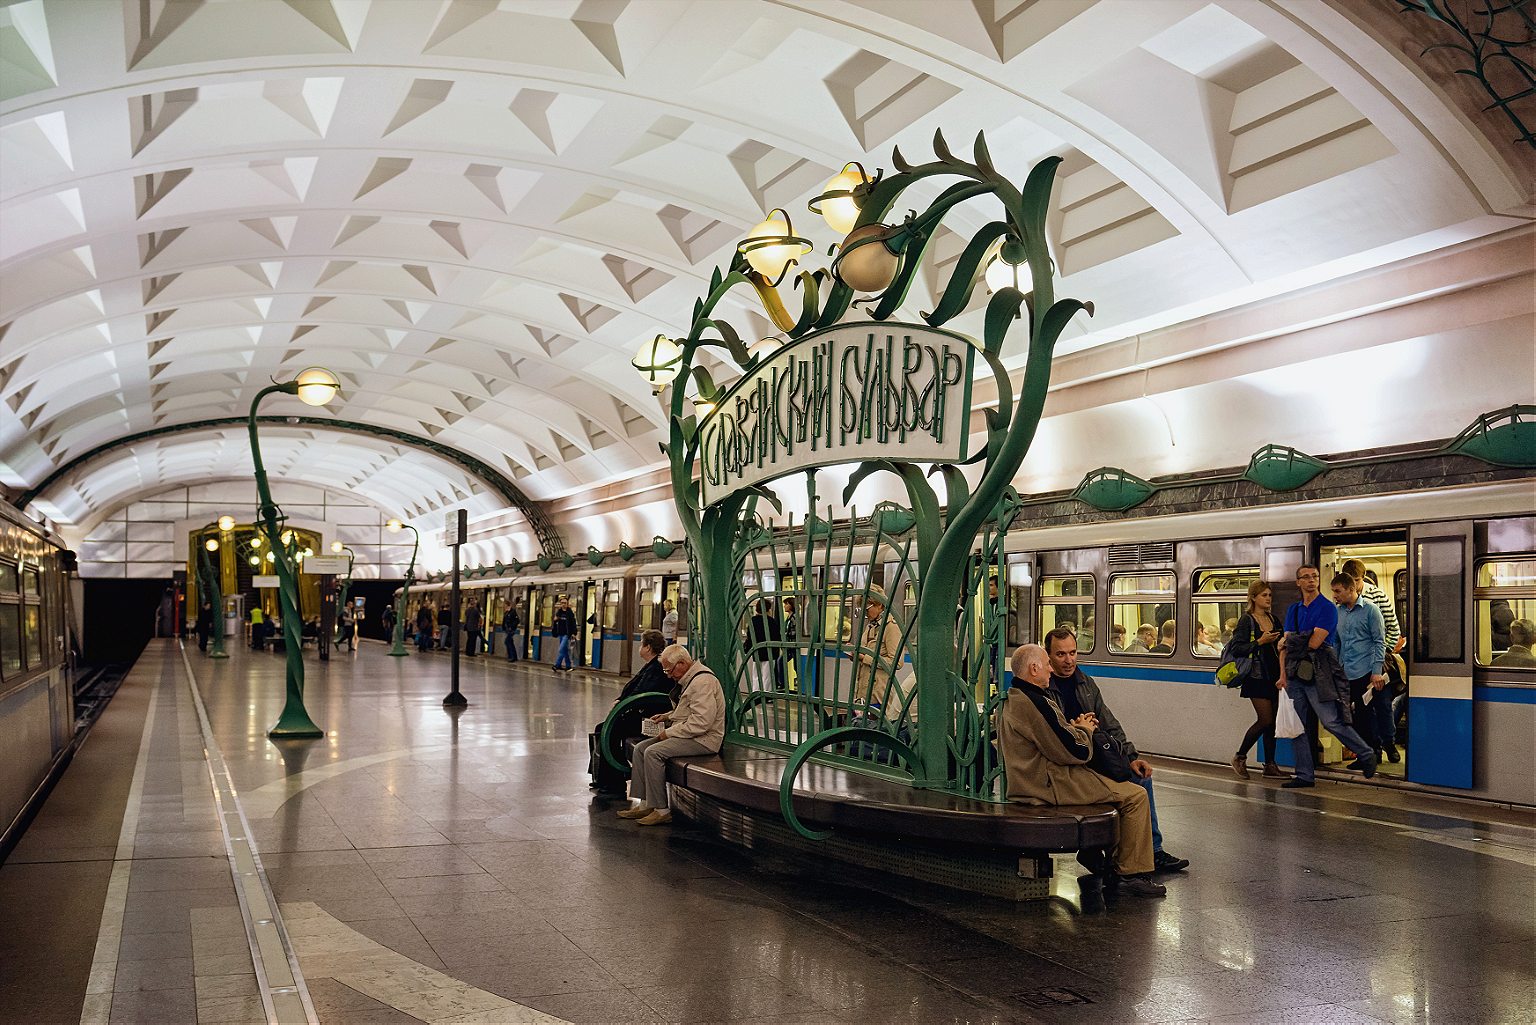
Stay on the 3/Blue line and double back four stations to:
10. Arbatskaya. Its first iteration, Arbatskaya-Smolenskaya station, was damaged by German bombs in 1941. It was rebuilt in 1953, and designed to double as a bomb shelter in the event of nuclear war, although unusually for stations built in the post-war phase, this one doesn’t have a war theme. It may also be one of the system’s most elegant: Baroque, but toned down a little, with red marble floors and white ceilings with gilded bronze c handeliers.
Jump back on the 3/Blue line in the same direction and take it one more stop:
11. Ploshchad Revolyutsii (Revolution Square). Opened in 1938, and serving Red Square and the Kremlin . Its renowned central hall has marble columns flanked by 76 bronze statues of Soviet heroes: soldiers, students, farmers, athletes, writers, parents. Some of these statues’ appendages have a yellow sheen from decades of Moscow’s commuters rubbing them for good luck. Among the most popular for a superstitious walk-by rub: the snout of a frontier guard’s dog, a soldier’s gun (where the touch of millions of human hands have tapered the gun barrel into a fine, pointy blade), a baby’s foot, and a woman’s knee. (A brass rooster also sports the telltale gold sheen, though I am told that rubbing the rooster is thought to bring bad luck. )
Now take the escalator up, and get some fresh air.
R&K Insider
Join our newsletter to get exclusives on where our correspondents travel, what they eat, where they stay. Free to sign up.
21 Things to Know Before You Go to Moscow
Featured city guides.
- Accessories
- Find Our Dealer

NCM Moscow Plus
An e-mountain bike equipped with high-end brake and drive systems, the NCM M5 is for adventurous riders who want to hit the trails comfortable in the knowledge that their ebike can handle whatever they throw at it.
BIKE COMPONENTS
Frame: Alu. 6061, 26"*17.3 inches / Alu. 6061, 27.5"*18.9 inches / Alu. 6061, 29"*20.5 inches
Suspension Fork: Suntour, XCM-HLO-26/27.5/29, with hydraulic lock system
Brake: F/R: Tektro Hydraulic Disc Brakes,HD-E350
Freewheel: LY, 8 Speed, 11-32T, Silver
Tire: Schwalbe, Black Jack, 26"*2.1/Smart Sam, 27.5"*2.35/29"*2.35, Black
Saddle: Selle Royal, Lookin-A200UR, Black
Crank: Das-Kit, CM48,28/38/48T
Derailleur: F: Shimano, Altus, FD-M310, R: Shimano, Acera, RD-M360
ELECTRIC COMPONENTS
Battery: Das-Kit, i5-4816, 48V 16AH, 768WH
Motor: Das-Kit, X15, Rear drive motor, 48V 500W, 32KM/H
Controller: Das-Kit, CT-i5, 48V 18A
Charger: Das-Kit, 48V3A
Display: Das-Kit, C7
Net Weight (with battery): 26.0kg
Battery Weight: 4.0kg
Max Load (driver+bike): 125.0kg
- Share Share on Facebook Opens in a new window.
- Tweet Tweet on Twitter Opens in a new window.
- Pin it Pin on Pinterest Opens in a new window.
Our on-line store is open 24/7 and we ship Monday through Friday, excluding some holidays. Orders received for products without shipping restrictions on its product page will ship the same business day when received before 12:00 p.m. PST. Orders in high demand will have an estimated production time listed on its product page and will ship according to the date listed.
Customer Reviews
I like my mountain plus bike.The only problem i have, the third speed jump when i put some pressure . Its not an adjustement, everything is fine. The problem is with the freewheel .I did 70 kilometer with the bike and it attenuate the problem a little.
Bike assembled easy and ride good.
We purchased the NCM Moscow 29 E bike from Leon Cycles earlier this month. Communication was via 'Whatsapp' which I initially thought a little odd but worked out well. Once communication established the transaction was completed quickly and easily. We were able to arrange for the team to assemble the bike for us and we picked it up from the warehouse without an issue. We love the bike and are continuing to find new places to discover using it. Competitive price and great service.
Been riding the trails both road and mountain for a few months. Great power and no issues with components
I ordered the bike 4 days ago and today it arrived. Now my first impressions: it is easy to assemble, looks great, is cleanly finished and after a first short driving test I have to say, the hammer. It's totally easy to drive. If it stays that way, I can only say thank you Leon Cycle. Now I can cycle again, despite knee problems. Price-performance top

Highlighted Features

Das-Kit 500W Motor

Ergonomic handlebar grips

Moscow 48V disc brake
Product specifications.
Frame: Alu. 6061, 26"*17.3 inches / Alu. 6061, 27.5"*18.9 inches / Alu. 6061, 29"*20.5 inches
Suspension Fork: Suntour, XCM-HLO-26/27.5/29, with hydraulic lock system
Brake: F/R: Tektro Hydraulic Disc Brakes,HD-E350
Freewheel: LY, 8 Speed, 11-32T, Silver
Tire: Schwalbe, Black Jack, 26"*2.1/Smart Sam, 27.5"*2.35/29"*2.35, Black
Saddle: Selle Royal, Lookin-A200UR, Black
Crank: Das-Kit, CM48,28/38/48T
Derailleur: F: Shimano, Altus, FD-M310, R: Shimano, Acera, RD-M360
Battery: Das-Kit, i5-4816, 48V 16AH, 768WH
Motor: Das-Kit, X15, Rear drive motor, 48V 500W, 32KM/H
Controller: Das-Kit, CT-i5, 48V 18A
Charger: Das-Kit, 48V3A
Display: Das-Kit, C7

Featured products
Sign up to get the latest updates on sales, news release, and more.
Region/Country
- United States
INFORMATION
- Contact Information
- Terms of Service
- Shipping Policy
- Refund Policy
- Privacy Policy
© 2024, NCMBike CA
Thanks for subscribing
- Praxis Shimano T47 Inboard Bottom Bracket
We'll take care of you. Period.
It's our mission to provide you with world-class hospitality every time you visit us online or in-store. We're always here to help you. It's the Trek way.
30 Day Unconditional Guarantee
Ride it and love it, or we'll take it back. If for any reason you're not 100% happy with your trekbikes.com purchase, you can send it back within 30 days for a refund - no questions asked.
Free shipping on all orders over $49
Simple, free delivery options for however you prefer to shop. Orders over $49 ship to your home for free, and all orders ship free to your local retailer for in-store pickup
More options
IMAGES
VIDEO
COMMENTS
7 INSTALL THE T47 BOTTOM BRACKET 8 REFERENCE Emonda-specific torque specifications Component Torque value Rear derailleur hanger screws 0.7Nm Chain keeper screw 3Nm Front derailleur mounting bolt 5.2Nm Steer stop bolt 0.7Nm Bottom bracket - Shimano 40Nm Bottom bracket - SRAM 50Nm Mechanical cable lengths in mm Emonda 5 Frame size Front ...
Trek Integrated Campagnolo BB90/BB95 Steel Bottom Bracket Kit. $41.99. SALE. Compare. Select a color.
A couple of tips: 1., Order some high quality grease and put as much on the side of the bearings and BB shell as possible. (for example morgan blue aquaproof paste or white lightning crystal grease) 2., use proper bearing press bushings to align the bearings properly.
Tutorial cara-cara upgrade standard Trek Emonda SL bottom bracket kepada ceramic bottom bracket.How to upgrade from standard T47 Praxis bottom bracket to CEM...
Trek Integrated Shimano BB90/BB95 Steel Bottom Bracket Kit. $42.00. Model 524555. Retailer prices may vary. Proprietary replacement bottom bracket for the Trek family of bikes. Compare. Color / Grey. Select a color. Shell width x axle length.
Fitting a BB30 crank to your Trek emonda ALR? YES! Buy the 4130 bottom bracket cups here and voila! https://amzn.to/2z8C8pw
GeojeRider said: My 2016 Emonda SL6 with approx. 4500 miles (i'm 6' x 180lbs) has developed a problem and I think Trek has agreed to warranty it, although I don't have a new frame in hand yet. The problem is a small crack growing around the drive side of the BB. Not uncommon with recent Trek OCLV frames.
A T47 BB is a PF30 BB shell into which threads have been cut. A PF30 bottom bracket shell's internal diameter is 46mm. Cutting threads into it gives you an official specification of M47 x 1.0mm. The drive-side cup is a left-hand thread; the non-drive side is a right-hand thread—an English-threaded setup in other words.
Quick video showing the new Trek emonda 2021 on test ride. Walking around and showing the paint and new features off. For Coaching inquiries contact me at h...
I'm trying to replace the bottom bracket assembly on my 98' trek 820. The current one grinds and needs replacement. ... Replacement bottom bracket for Shimano XT FC-M785 crankset. 3. Trek Emonda ALR bottom bracket drag. 3. Replacing bottom bracket. 0. 2010 Specialized Tricross BB size. 4.
Step 3: Clean Out The Bottom Bracket Shell/Housing. The real step 3 is probably to remove the plastic inner 'sheath' (in my top ten favourite words), because a replacement comes in the Trek BB90 kit. However, mine (my sheath) seemed in pretty good nick, so I just left it in there and gave it a good clean. Ahem.
Trek Open Groove Bottom Bracket Cable Guide. 4 Reviews / Write a Review. $4.99. Model W438534. Retailer prices may vary. For proper assembly. Compare. Color / Black. Select a color.
Trek has used the BB90 bottom bracket standard for years in their Madone and Domane road bikes. BB90 is a standard used on Trek carbon road bikes only. Bearings drop directly into the frame shell, which is 90.5mm wide and has an inner diameter of 37mm. The bearings are pressed directly into the carbon and only leave room for Shimano or GXP cranks.
In this video I show you how to remove and fit a BB90 Bottom Bracket on a Trek road bike (in this case my carbon Trek Domane 4.3, which I bought in 2013). 👉...
With the news that Trek's new Domane has a T47 bottom bracket, it's looking highly likely that BB90 is being abandoned
What bottom bracket do I have. To find out the size of bottom bracket needed, measure the inside of the bottom bracket shell in your frame, it will be 73mm, 70mm or 68mm. Some older frames may have Italian threaded bottom brackets, instead of the more modern English.
2021 Trek Émonda models, colors & pricing. Offered in a wide range of builds, the Émonda will be available with both Shimano and SRAM eTap builds, many of which include the all new Aeolus carbon wheels. Pricing starts at $2,999.99 for the 2021 Émonda SL 5, and tops out at $12,499.99 for the SLR 9 models.
The Trek Crossrip has a BSA threaded bottom bracket shell that is 68mm wide, which is very common for a midrange aluminum road bike. The current crankset (given that your bike has the stock components outfitted) is a compact Shimano Tiagra. This is a Hollowtech 2 type that features external bearing cups and the 24mm spindle attached to the ...
The wide and large-diameter T47 bottom bracket shell provides lots of real estate to attach a big down tube. But not impossible. Many brands already make a light, stiff, and aero bike.
Which E-Bike spares do you stock? Here you will find parts and spares for all of our electric bikes. This includes ebike specific spares for Bosch, Yamaha, Shimano & Gocycle and other eBike systems sold by e-Bikeshop and includes chargers, batteries, head units/controllers and of course our exclusive eBike Tuning Kits.
Or, get an app. Download Yandex Metro. This app has bilingual maps and a route planner that works offline. The Moscow Metro app has a route planner, and you can use it to top up a Troika card and get updates on delays and maintenance work. Disabled passengers can also use it to request an escort or assistance.
An e-mountain bike equipped with high-end brake and drive systems, the NCM M5 is for adventurous riders who want to hit the trails comfortable in the knowledge that their ebike can handle whatever they throw at it. BIKE COMPONENTS Frame: Alu. 6061, 26"*17.3 inches / Alu. 6061, 27.5"*18.9 inches / Alu. 6061, 2
Praxis Shimano T47 Inboard Bottom Bracket. $52.99. Model 593089. Retailer prices may vary. No more creaking. Smooth operation. Fast bearing replacement. Compare. This product is currently unavailable online.