How do I reset the "Maint Reqd" light located on the instrument panel?
After the required maintenance is performed according to the maintenance schedule, the light will need to be reset. for many vehicles you can follow the below procedures. instructions can also be found in the owner's manual by following the link... apr 20, 2023 • knowledge, new section, only answer.
After the required maintenance is performed according to the maintenance schedule, the light will need to be reset.
For many vehicles you can follow the below procedures. Instructions can also be found in the Owner's Manual.
1. Select the Settings Icon on the multi-information display.
2. Press the Up Arrow or Down Arrow on the meter control switch located on the steering wheel, select the "Scheduled Maintenance" screen and then press and hold the Select Icon.
3. Select the "Yes" and push the Select Icon.
4. A message will be displayed on the multi-information display when the reset procedure has been completed.

Related Articles
- How can I reset my User Profile PIN?
- What does the light near my SOS button mean?
- What are some common reasons why the "BRAKE" indicator light is illuminated?
Not finding your answer?
Or you can chat with us if we are online..
Instrument cluster
Gauges and meters

1. Hybrid System Indicator. Displays hybrid system output or regeneration level. 2. Multi-information display. 3. Speedometer. Displays the vehicle speed. 4. Fuel gauge. Displays the quantity of fuel remaining in the tank. 5. Odometer and trip meter. Odometer: Displays the total distance the vehicle has been driven. Trip meter: Displays the distance the vehicle has been driven since the meter was last reset. Trip meters “A” and “B” can be used to record and display different distances independently. 6. Shift position and shift range display. 7. Engine coolant temperature gauge. Displays the engine coolant temperature.
Changing the display

Switches between odometer and trip meter displays. When the trip meter is displayed, pressing and holding the button will reset the trip meter.
Instrument panel light control
The brightness of the instrument panel lights can be adjusted.

1. Darker. 2. Brighter.
The meters and display illuminate when
The “POWER” switch is in ON mode.
Hybrid System Indicator
By keeping the indicator within the Eco area, more environment-friendly driving can be achieved. The Charge area indicates regeneration* status. Regenerated energy will be used to charge the hybrid battery (traction battery). *: When used in this manual, “regeneration” refers to the conversion of energy created by the movement of the vehicle into electrical energy.
NOTICE: To prevent damage to the engine and its components The engine may be overheating if the engine coolant temperature gauge is in the red zone (H). In this case, immediately stop the vehicle in a safe place, and check the engine after it has cooled completely.
Indicators and warning lights
The indicator and warning lights on the instrument cluster and center panel inform the driver of the status of the vehicle’s various systems.
- Instrument cluster.

- Center panel (without a navigation system).

- Center panel (with a navigation system).

The indicators inform the driver of the operating state of the vehicle’s various systems.

*: These lights turn on when the “POWER” switch is turned to the ON mode to indicate that a system check is being performed. They will turn off after the hybrid system is on, or after a few seconds. There may be a malfunction in a system if a light does not come on, or if the lights do not turn off. Have the vehicle inspected by your Lexus dealer.
Warning lights
Warning lights inform the driver of malfunctions in any of the vehicle’s systems.

*: These lights turn on when the “POWER” switch is turned to ON mode to indicate that a system check is being performed. They will turn off after the hybrid system is on, or after a few seconds. There may be a malfunction in a system if a light does not come on, or if the lights do not turn off. Have the vehicle inspected by your Lexus dealer.
CAUTION: If a safety system warning light does not come on Should a safety system light such as the ABS and SRS airbag warning light not come on when you start the hybrid system, this could mean that these systems are not available to help protect you in an accident, which could result in death or serious injury. Have the vehicle inspected by your Lexus dealer immediately if this occurs.
Multi-information display
The multi-information display presents the driver with a variety of drivingrelated data including the current outside air temperature.
Multi-information switches

1. Menu switch. Changes modes to electronic features control mode, customization mode or back to normal display mode 2. “ENTER” switch. Changes trip information items. This switch is also used to turn on/off electronic features controls and to change customization settings.
Display contents
Display order may vary depending on vehicle condition.

Trip information
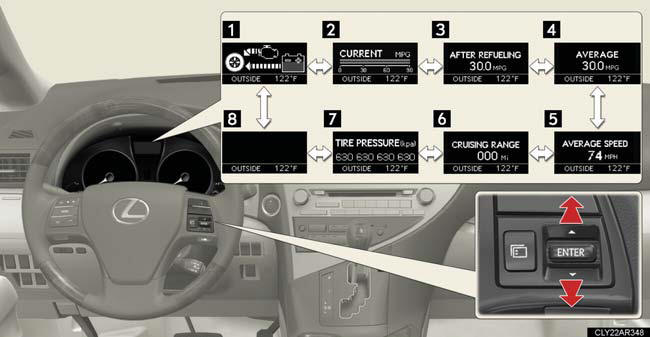
Energy monitor
Displays the status of the hybrid system.
Current fuel consumption
Displays the current rate of fuel consumption.
Average fuel consumption after refueling
Displays the average fuel consumption since the vehicle was last refueled.
Average fuel consumption
Displays the average fuel consumption since the function was reset The function can be reset by pushing the “ENTER” switch for longer than one second when the average fuel consumption is displayed.
Average vehicle speed
Displays the average vehicle speed since the function was reset The function can be reset by pushing the “ENTER” switch for longer than one second when the average vehicle speed is displayed.
Cruising range
Displays the estimated maximum distance that can be driven with the quantity of fuel remaining. • This distance is computed based on your average fuel consumption. As a result, the actual distance that can be driven may differ from that displayed. • When only a small amount of fuel is added to the tank, the display may not be updated.
Tire inflation pressure
Displays inflation pressure of each tire. There is no correlation between the order of the displayed values and the tire positions. If the inflation pressure of any tire drops a certain amount below the tire inflation pressure value currently memorized in the system, the displayed values will be highlighted. It may take a few minutes to display the tire inflation pressure after the “POWER” switch is turned to ON mode. It may also take a few minutes to display the tire inflation pressure after inflation pressure has been adjusted. If the tire pressure warning light is on or flashing, a message describing the situation will be displayed.
Electronic features control can be turned on/off when
Conditions for ending electronic features control
In the following situations, the electronic features control will end: The menu switch is pressed. The radar cruise control is operated. Intuitive parking assist starts operating. No action is performed for some time after the electronic features control screen is displayed. A warning message appears after the electronic features control screen is displayed.
Outside temperature display
In the following situations, the correct outside temperature may not be displayed, or the display may take longer than normal to change. When stopped, or driving at low speeds (less than 15 mph [25 km/h]). When the outside temperature has changed suddenly (at the entrance/exit of a garage, tunnel, etc.).
Customization
Settings (e.g. available languages) can be changed.
CAUTION: Caution while driving When operating the electronic features control while driving, take extra notice of the vehicle's surrounding area.
NOTICE: The multi-information display at low temperatures Allow the interior of the vehicle to warm up before using the liquid crystal information display. At extremely low temperatures, the information display monitor may respond slowly, and display changes may be delayed.
Head-up display
The head-up display can be used to project vehicle speed and other information onto the windshield.

1. Head-up display. Display brightness will change automatically according to the brightness of the surrounding area. 2. Head-up display main switch. 3. Display contrast adjustment switch. Display brightness can be adjusted to the desired level.. 4. Display position adjustment switch.
Head-up display contents
In addition to vehicle speed, the following information will be displayed:

1. Audio display. Displays audio information for approximately 3 seconds when the audio system is operated. 2. Dynamic radar cruise control (if equipped). Displays the approach warning message. 3. Turn-by-turn navigation*. Displays a notification of upcoming intersections during navigation system route guidance. 4. Vehicle speed display. *: Refer to “Navigation System Owner’s Manual”.
Head-up display main switch

Pressing the button turns the head-up display on/off and changes the vehicle speed display units as follows: - Vehicles sold in the U.S.A. OFF → ON (mph) → ON (km/h) → OFF. - Except vehicles sold in the U.S.A. OFF → ON (km/h) → ON (mph) → OFF.
Display adjustment
- Adjusting display contrast

1. Brighter. 2. Darker.
- Adjusting display position

1. Higher. 2. Lower.
Display customization
The audio mode display can be shown or hidden.

Pressing and holding the head-up display main switch button for more than 2 seconds changes the display to audio display on/off mode. Press the head-up display main switch button to turn the audio display on/off. Customization can be performed when the head-up display is on and the vehicle is traveling at less than 5 mph (8 km/h).
Brightness of the head-up display
The headlight control sensor detects the brightness of the area surrounding the head-up display and adjusts the brightness accordingly.
The head-up display may seem dark and hard to see when viewed through sunglasses, especially polarized sunglasses. Adjust the brightness of the head-up display or remove your sunglasses.
CAUTION: Before using the head-up display Check that the position and brightness of the head-up display image does not interfere with safe driving. Incorrect adjustment of the image's position or brightness may obstruct the driver's view and lead to an accident, resulting in death or serious injury.
NOTICE: To prevent damage to components Do not place anything on the head-up display opening.

If an object falls into the opening of the head-up display, remove it immediately. Also, avoid spilling water or other liquids near the head-up display opening as this may cause mechanical damage.
Garage door opener The garage door opener can be programmed to operate garage doors, gates, entry doors, door locks, home lighting systems, security sys- tems, and other devices. The garage door opener (HomeLink® Un ...
Using the storage features List of storage features 1. Glove box. 2. Auxiliary boxes (if equipped). 3. Bottle holders/door pockets. 4. Cup holders. 5. Console box. 6. Under tray. Glove box The glove box can be opened ...
Do-it-yourself service precautions If you perform maintenance yourself, be sure to follow the correct procedure given in these sections. CAUTION The engine compartment contains many mechanisms and fluids that may move sud- ...
- All manuals
- Lexus RX 2010-2024 Owners Manual
- Lexus GX 2010-2024 Owners Manual
- Lexus LX 2008-2024 Owners Manual
Lexus RX (RX 350L, RX450h) 2016-2024 Owners Manual: Using the multi-information display
Using the content display area
The content display area is operated using the meter control switches.

:Change displayed content, scroll up/down the screen and move the cursor
- Press: Enter/Set Press and hold: Reset
- Return to the previous screen Pressing and holding the switch will display the first screen of the selected menu icon.
- Press: Display the top screen Press and hold: Register current screen as the top screen

■ Registering a top screen The displayed top screen can be changed to a registered screen of your choice.

- A message asking to confirm if registration is desired will be displayed. If the selected screen cannot be registered, a registration failure message will be displayed.
- When no screen has been registered, the drive information screen will be displayed.
If both of the displayed items are resettable, a message will be displayed asking which item(s) to reset.
Using the odometer/trip meter display area
Items in this area are operated using the "ODO/TRIP" switch.
Press: Change displayed item Each time the switch is pressed, the displayed item will be changed.
Press and hold: Reset Display the desired trip meter and press and hold the switch to reset the trip meter.

Summary of functions
Other materials:.
Lexus RX (RX 350L, RX450h) 2016-2024 Repair Manual > Generator (for 150 A Type): Installation INSTALLATION PROCEDURE 1. INSTALL GENERATOR ASSEMBLY (a) Install the wire harness clamp bracket with the bolt. Torque: 8.4 N·m {86 kgf·cm, 74 in·lbf} (b) Type A: (1) Install the generator assembly with the 2 bolts. Torque: 43 N·m {438 kgf·cm, 32 ft·lbf} (2) Temporarily install the generator ...
Lexus RX (RX 350L, RX450h) 2016-2024 Owners Manual > Using the driving support systems: LKA (Lane-Keeping Assist) Summary of functions When driving on highways and freeways with white or yellow lines, this function alerts the driver when the vehicle might depart from its lane and provides assistance by operating the steering wheel to keep the vehicle in its lane. Furthermore, the system also provides st ...
Lexus RX (RX 350L, RX450h) 2016-{YEAR} Owners Manual
- For your information
- Pictorial index
- For safety and security
- Instrument cluster
- Operation of each component
- Lexus Display Audio system
- Interior features
- Maintenance and care
- When trouble arises
- Vehicle specifications
Lexus RX (RX 350L, RX450h) 2016-{YEAR} Repair Manual
- Audio & Visual & Telematics
- Engine & Hybrid System
- Power Source & Network
- Vehicle Exterior
- Vehicle Interior

OilReset.com Blog
2008 lexus rx – series maintenance light reset instructions.
1. Turn the ignition to run (one position before starting engine). 2. Bring up the odometer reading using the trip meter reset knob then the turn ignition off. 3. Hold down the trip meter reset knob while turning the ignition key to the run position (one position before starting engine). 4. Hold down the button for 5 seconds or more. The odometer indicates “000000” and the light goes off. 5. Turn the ignition off and then start the engine to verify the indicator has been reset.
Related Posts
2021 dodge ram 1500 oil life reset.
Your vehicle’s engine oil change indicator system is a feature that helps you keep track of when your engine oil needs to be changed. This…
2018 Honda CR-V Oil Life Reset
The 2018 Honda CR-V Oil Life system or Maintenance Minder reminds the driver the vehicle is due or past due for a service. This is…
2001 Mercedes SL600 Service Light Reset
2001 Mercedes SL600 Service Light or Flexible Service System (FSS):Sometimes referred to as the service or oil change light. The FSS permits a flexible service schedule…
2001 Mercedes SL500 Service Light Reset
2001 Mercedes SL500 Service Light or Flexible Service System (FSS):Sometimes referred to as the service or oil change light. The FSS permits a flexible service schedule…
2002 Mercedes SLK 32 AMG Service Light Reset
2002 Mercedes SLK 32 AMG Service Light or Flexible Service System (FSS):Sometimes referred to as the service or oil change light. The FSS permits a flexible…
2002 Mercedes SLK 230 Service Light Reset
2002 Mercedes SLK 230 Service Light or Flexible Service System (FSS):Sometimes referred to as the service or oil change light. The FSS permits a flexible service…
News and information from the automotive industry

Saturday Service

Vehicle Reviews

Cabin Filters

Friday Gadgets
Instructions.
Launching soon. Signup for updates.
Members Only

- Lexus Manuals
Lexus RX350 2023 Manual
- page of 604 Go / 604
Table of Contents
- Emergency Driving Stop System
- For Your Information
- Reading this Manual
- How to Search
- Pictorial Index
- For Safe Use before Driving
- For Safe Driving
- SRS Airbags
- Front Passenger Occupant Classification System
- Exhaust Gas Precautions
- Child Safety
- Riding with Children
- Child Restraint Systems
- Connected Services
- Safety Connect
- Remote Connect
- Service Connect
- 1-4. Theft Deterrent System
- Engine Immobilizer System
- Vehicle Status Information and Indicators
- 2-1. Instrument Cluster
- Warning Lights and Indicators
- Gauges and Meters
- Multi-Information Display
- Head-Up Display
- Displayed Content
- Before Driving
- 3-1. Key Information
- Digital Key
- 3-2. Opening, Closing and Locking the Doors
- Power Back Door
- Smart Access System with
- Smart Access System with Push-Button Start
- Push-Button Start
- 3-3. Adjusting the Seats
- Front Seats
- Head Restraints
- 3-4. Adjusting the Steering Wheel and Mirrors
- Steering Wheel
- Inside Rear View Mirror
- Digital Rear-View Mirror
- Outside Rear View Mirrors
- 3-5. Opening, Closing the Windows and Moon Roof
- Power Windows
- Panoramic Moon Roof
- 3-6. Favorite Settings
- Driving Position Memory
- My Settings
- 4-1. before Driving
- RCD (Rear Camera Detection) Function
- Driving the Vehicle
- Cargo and Luggage
- Vehicle Load Limits
- Trailer Towing (Vehicles Without Towing Package)
- Trailer Towing (Vehicles with Towing Package)
- Trailer Towing (Vehicles with Tow- Ing Package)
- Dinghy Towing
- 4-2. Driving Procedures
- Engine (Ignition) Switch
- Transmission
- Turn Signal Lever
- Parking Brake
- 4-3. Operating the Lights and Wipers
- Headlight Switch
- AHS (Adaptive High-Beam System)
- AHB (Automatic High Beam)
- Fog Light Switch
- Opening the Fuel Tank Cap
- 4-5. Using the Driving Support Systems
- Lexus Safety System + 3/Traffic Jam Assist Software Update
- Lexus Safety System + 3
- Driver Monitor
- PCS (Pre-Collision System)
- LTA (Lane Tracing Assist)
- LCA (Lane Change Assist)
- LDA (Lane Departure Alert)
- PDA (Proactive Driving Assist)
- FCTA (Front Cross Traffic Alert)
- RSA (Road Sign Assist)
- Dynamic Radar Cruise Control
- Cruise Control
- Traffic Jam Assist
- Stop & Start System
- BSM (Blind Spot Monitor)
- Safe Exit Assist
- Intuitive Parking Assist
- RCTA (Rear Cross Traffic Alert) Function
- PKSB (Parking Support Brake)
- Lexus Teammate Advanced Park
- Driving Mode Select Switch
- Downhill Assist Control System
- Downhill Assist Control System365
- Driving Assist Systems
- Driving Tips
- Winter Driving Tips
- Utility Vehicle Precautions
- Interior Features
- 5-1. Lexus Climate Concierge
- Lexus Climate Concierge
- Using the Air Conditioning System and Defogger
- Front Automatic Air Conditioning System
- Rear Air Conditioning System
- Heated Steering Wheel/Seat Heat- Ers/Seat Ventilators
- 5-3. Using the Interior Lights
- Interior Lights List
- Using the Storage Features
- List of Storage Features
- Luggage Compartment Features
- 5-5. Using the Other Interior Features
- Other Interior Features
- Garage Door Opener
- Maintenance and Care
- Cleaning and Protecting the Vehicle Exterior
- Cleaning and Protecting the Vehicle Interior
- 6-2. Maintenance
- Maintenance Requirements
- General Maintenance
- Emission Inspection and Mainte- Nance (I/M) Programs
- 6-3. Do-It-Yourself Maintenance
- Do-It-Yourself Service Precautions
- Positioning a Floor Jack
- Engine Compartment
- Tire Inflation Pressure
- Air Conditioning Filter
- Electronic Key Battery
- Checking and Replacing Fuses
- Headlight Aim
- Light Bulbs
- When Trouble Arises
- 7-1. Essential Information
- Emergency Flashers
- If Your Vehicle Has to be Stopped in an Emergency
- If the Vehicle Is Submerged or Water on the Road Is Rising
- Steps to Take in an Emergency
- If Your Vehicle Needs to be Towed
- If You Think Something Is Wrong
- Fuel Pump Shut off System
- If a Warning Light Turns on or a Warning Buzzer Sounds
- If a Warning Message Is Displayed
- If You Have a Flat Tire
- If the Engine will Not Start
- If You Lose Your Keys
- If the Electronic Key Does Not Operate Properly
- If a Door Cannot be Opened Using the Door Opener Switch
- If the Vehicle Battery Is Discharged
- If Your Vehicle Overheats
- If the Vehicle Becomes Stuck
- Fuel Information
- Tire Information
- Customization
- Customizable Features
- Initialization
- Items to Initialize
- Reporting Safety Defects for U.S. Owners
- U.S. Owners
- Reporting Safety Defects for Canadian Owners
- 9-1. for Owners
- Seat Belt Instructions for Canadian Owners (in French)
- Seat Belt Instructions for Cana- Dian Owners (in French)
- SRS Airbag Instructions for Canadian Owners (in French)
- Headlight Aim Instructions for Canadian Owners (in French)
- What to Do if
- Alphabetical Index
Advertisement
Quick Links
Related manuals for lexus rx350 2023.

Summary of Contents for Lexus RX350 2023
Page 1: emergency driving stop system, page 2: table of contents.
- Page 3 4-6. Driving tips 4-5. Using the driving support systems Winter driving tips....... Lexus Safety System + 3/Traffic Utility vehicle precautions..Jam Assist software update .. Lexus Safety System + 3 ... Interior features Driver monitor....... PCS (Pre-Collision System)..238 5-1. Lexus Climate Concierge LTA (Lane Tracing Assist)..248...
- Page 4 TABLE OF CONTENTS Rear air conditioning system...390 Checking and replacing fuses ............Heated steering wheel/seat heat- ers/seat ventilators....Headlight aim ........ Light bulbs........5-3. Using the interior lights Interior lights list......When trouble arises 5-4. Using the storage features List of storage features....7-1.
- Page 5 TABLE OF CONTENTS Vehicle specifications 8-1. Specifications Maintenance data (fuel, oil level, etc.) ..........Fuel information......Tire information......8-2. Customization Customizable features....543 8-3. Initialization Items to initialize ......559 For owners 9-1. For owners Reporting safety defects for U.S. owners ........... Reporting safety defects for Cana- dian owners .........
Page 6: For Your Information
- Page 7 (images from the front/rear cameras), cated computers that record certain and position information is recorded by data regarding vehicle controls and the Lexus Safety System + 3 in the fol- operations. lowing situations. Toyota obtains this Data recorded by the computers ■...
- Page 8 In addition to the above, Toyota may dis- To learn more about the vehicle data close the data recorded by the Lexus collected, used and shared by Lexus, Safety System + 3 to a third party in the fol- lowing situations: please visit http://www.lexus.com/pri-...
- Page 9 However, other parties, such If you wish to stop the collection of Lexus as law enforcement, could combine the Safety System + 3 data by the Toyota serv- ers for the purpose of research and devel-...
- Page 10 Driver distraction: Always give your full and disposed of by a qualified service attention to driving. Anything that dis- shop or by your Lexus dealer before tracts the driver, such as adjusting con- trols, talking on a cellular phone or you scrap your vehicle.
Page 11: Reading This Manual
Page 12: how to search, page 13: pictorial index.
- Page 14 Pictorial index Windshield wipers ....................P.219 Precautions for winter season..................P.373 To prevent freezing (windshield wiper de-icer) ..........P.386 Precautions for car wash ....................P.423 Fuel filler door......................P.225 Refueling method ......................P.225 Fuel type/fuel tank capacity ..................P.525 Tires..........................P.445 Tire size/inflation pressure ................P.445, 530 Winter tires/tire chains ....................
- Page 15 Pictorial index Stop lights/rear turn signal lights ............P.204, 210 Back-up lights Shifting the shift position to R..................P.199 License plate lights ....................P.210 : If equipped...
- Page 16 Pictorial index ■Instrument panel Engine switch ......................P.194 Starting the engine/changing the modes..............P.194 Emergency stop of the engine ..................P.470 When the engine will not start..................P.508 Warning messages ......................P.489 Shift lever........................P.198 Shifting the shift position ....................P.199 Precautions for towing ....................P.473 Meters..........................P.78 Reading the meters/adjusting the instrument panel light......P.78, 84 Warning lights/indicator lights ..................
- Page 17 Pictorial index Headlight switch......................P.210 Headlights/parking lights/tail lights/side marker lights/license plate lights/daytime running lights ........................P.210 Front fog lights ........................P.218 Windshield wiper and washer switch............. P.219, 223 Usage........................... P.219, 223 Adding washer fluid......................P.444 Warning messages ......................P.489 Emergency flasher switch ...................P.470 Hood lock release lever..................P.435 Tilt and telescopic steering control switch............
- Page 18 Pictorial index ■Switches “ODO TRIP” switch ....................P.83 Instrument panel light control switches ............P.84 Advanced Park (parking assist system) main switch ....... P.338 *1, 2 Camera switch Power back door switch..................P.112 Fuel filler door opener switch................P.226 Driving position memory switches ..............
- Page 19 Pictorial index Outside rear view mirror switches..............P.152 Door lock switches ....................P.107 Power window switches..................P.155 Window lock switch ....................P.157 Paddle shift switches....................P.201 Meter control switches ....................P.91 Cruise control switch Dynamic radar cruise control..................P.272 Cruise control ........................P.283 Audio remote control switches LTA (Lane Tracing Assist) switch ..............
- Page 20 Pictorial index P position switch......................P.199 Brake hold switch....................P.207 Stop & Start cancel switch ..................P.296 DAC switch ......................P.365 Parking brake switch ................... P.204 Applying/releasing ......................P.204 Precautions for winter season..................P.374 Warning buzzer/messages..................P.489 Trail Mode switch ....................P.364 VSC OFF switch....................P.368 : If equipped...
- Page 21 Pictorial index ■Interior Head restraints......................P.138 Assist grips ......................... P.411 Seat belts ........................P.26 SRS airbags........................ P.30 Floor mats........................P.24 Cup holders ......................P.398 Console box......................P.398 Front seats.........................P.130 Rear seats........................P.131...
- Page 22 Pictorial index ■Ceiling Interior light ......................P.395 Personal lights ......................P.395 Moon roof switches .................... P.157 Panoramic moon roof switches ..............P.160 Door-linked interior light switch ...............P.395 “SOS” button ......................P.65 Auxiliary box......................P.400 Vanity mirrors ......................P.413 Sun visors........................P.413 Inside rear view mirror ..................P.142 Digital Rearview Mirror ...................P.143 Garage door opener switches................P.414...
- Page 23 For safety and security 1-1. For safe use Before driving.........24 For safe driving......Seat belts ......... SRS airbags ........Front passenger occupant classifi- cation system ......Exhaust gas precautions ....42 1-2. Child safety Riding with children..... Child restraint systems ....1-3.
Page 24: For Safe Use Before Driving
Page 25: for safe driving, page 26: seat belts.
- Page 27 (P.26) ■ Seat belt extender If your seat belts cannot be fastened securely because they are not long enough, a personalized seat belt extender is avail- able from your Lexus dealer free of charge.
- Page 28 1-1. For safe use Fastening and releasing the seat belt WARNING Using a seat belt extender ■ Observe the following precautions to reduce the risk of injury in the event of sudden braking, sudden swerving or an To fasten the seat belt, push the accident.
- Page 29 SRS warning light will illuminate. In this event of a sudden stop, sudden swerve or situation, the seat belt cannot be used accident. and must be replaced by your Lexus dealer. Seat belt pretensioners (front and outboard rear seats) When the vehicle is subjected to a...
Page 30: Srs Airbags
- Page 31 1-1. For safe use Your vehicle is equipped with ADVANCED AIRBAGS designed based on US motor vehicle safety standards (FMVSS208). The airbag sensor assembly (ECU) controls airbag deployment based on information obtained from the sensors, etc., shown in the system components diagram above. This information includes crash severity and occupant information.
- Page 32 1-1. For safe use The SRS airbags deploy in a side impact The SRS side airbags will not deploy ■ ■ when when ● The following SRS airbags will deploy in ● The following SRS airbags will not nor- the event of an impact that exceeds the mally deploy in side or rear collisions, set threshold level (level of force corre- vehicle rollovers, or low speed frontal...
- Page 33 In the following situations, the vehicle will covers a SRS curtain shield airbag is require inspection and/or repair. Contact scratched, cracked, or otherwise dam- your Lexus dealer as soon as possible. aged. ● When any of the SRS airbags have been...
- Page 34 The seat should be adjusted Lexus strongly recommends that all as recommended by the NHTSA, infants and children be placed in the while still being able to control the...
- Page 35 1-1. For safe use ● Do not attach anything to areas such WARNING as the doors, windshield, side windows, Do not lean against the door, roof side ● front or rear pillars, roof side rails and rail, or front, side, or rear pillar. assist grips.
- Page 36 If a part where an SRS airbag is stored ● • Front fender is damaged or cracked, have it replaced by your Lexus dealer. • Front bumper ● Do not place anything, such as a cush- • Sides of the vehicle interior ion, on the front passenger’s seat.
Page 37: Front Passenger Occupant Classification System
- Page 38 1-1. For safe use System components SRS warning light Front passenger’s seat belt reminder light “AIR BAG OFF” indicator light “AIR BAG ON” indicator light ● Make sure the “AIR BAG OFF” indica- WARNING tor light is not illuminated when using Front passenger occupant classifica- ■...
- Page 39 Do not kick the front passenger seat or subject it to severe impact. Otherwise, the SRS warning light may come on to indicate a malfunction of the front pas- senger occupant classification system. In this case, contact your Lexus dealer immediately.
- Page 40 1-1. For safe use Front passenger occupant classification system conditions and opera- tion Adult ■ “AIR BAG ON” and “AIR BAG OFF” indi- “AIR BAG ON” cator lights Indicator/warning light SRS warning light Front passenger’s seat belt reminder light or flashing Front passenger airbag Activated Devices...
- Page 41 1-1. For safe use Unoccupied ■ “AIR BAG ON” and “AIR BAG OFF” indi- “AIR BAG OFF” cator lights Indicator/warning light SRS warning light Front passenger’s seat belt reminder light Front passenger airbag Devices Deactivated Seat cushion airbag in the front passenger side System malfunction ■...
Page 42: Exhaust Gas Precautions
Page 43: child safety.
- Page 44 Keep the child restraint system prop- ● ● Lexus strongly urges the use of a erly secured on the seat even if it is not proper child restraint system that con- in use. Do not store the child restraint...
- Page 45 1-2. Child safety attached to the child restraint sys- Child restraint system compati- tem. bility for each seating position (for Puerto Rico) Child restraint system compatibil- ■ ity for each seating position Compatibility of each seating position with child restraint systems (P.46) displays the type of child restraint sys- tems that can be used and possible seating positions for installation using...
- Page 46 1-2. Child safety • “vehicle specific” *2, 3 *2, 3 Suitable for “universal” category : UN(ECE) R44 and UN(ECE) R129 child restraint system fixed with are U.N. regulations for child restraint the seat belt. systems. Suitable for fixed installing a for- : The child restraint systems mentioned in ward-facing child seat with vehicle the table may not be available outside of...
- Page 47 1-2. Child safety Otherwise, put the head restraint in the upper most position. : Use only a front-facing child restraint system. : If the head restraint interferes with your child restraint system, and the head restraint can be removed, remove the head restraint.
- Page 48 1-2. Child safety Fixture Description Full-height, forward-facing child restraint systems Reduced-height forward-facing child restraint systems Reduced-height forward-facing child restraint systems Full-size, rearward-facing child restraint systems Reduced-size, rearward-facing child restraint systems Reduced-size, rearward-facing child restraint systems Rearward-facing infant seat Left lateral-facing (carrycot) infant seat Right lateral-facing (carrycot) infant seat Junior seat Junior seat...
- Page 49 1-2. Child safety When installing a junior seat, if the child in your child restraint system is in a very upright position, adjust the seatback angle to the most comfort- able position. And if the seat belt shoulder anchor is ahead of the child seat belt guide, move the seat cushion forward.
- Page 50 1-2. Child safety Installation method Page Except for Puerto Rico: Child restraint LATCH anchors attachment P.58 For Puerto Rico: ISOFIX lower anchorage attach- ment Except for Puerto Rico: Anchor brackets (for top tether strap) attachment P.63 For Puerto Rico: Top tether anchorage attachment ...
- Page 51 1-2. Child safety ● Do not allow the child to lean his/her WARNING head or any part of his/her body Never install a rear-facing child ● against the door or the area of the seat, restraint system on the front passenger front or rear pillars, or roof side rails seat even if the “AIR BAG OFF”...
- Page 52 1-2. Child safety Place the child restraint system on Child restraint system fixed with the rear seat facing the rear of the a seat belt vehicle. A child restraint system for a small child or baby must itself be properly restrained on the seat with the lap por- tion of the lap/shoulder belt.
- Page 53 1-2. Child safety until the child restraint system is raise it to the uppermost position. securely in place. After the shoulder belt has retracted to a point where there is no slack in the belt, pull the belt to check that it cannot be extended.
- Page 54 1-2. Child safety mode. In lock mode, the belt cannot Booster seat ■ be extended. If installing the child restraint sys- tem to the front passenger seat is unavoidable, refer to P.50for the front passenger seat adjustment. High back type: Remove the head restraint if it interferes with your child restraint system.
- Page 55 1-2. Child safety High back type WARNING Sit the child in the child restraint When installing a child restraint sys- ■ system. Fit the seat belt to the child restraint system according to the Observe the following precautions. manufacturer’s instructions and Failure to do so may result in death or serious injury.
- Page 56 1-2. Child safety Child restraint system fixed with WARNING a child restraint LATCH anchor When securing some types of child ● restraint systems in rear seats, it may (except for Puerto Rico) not be possible to properly use the seat belts in positions next to the child Child restraint LATCH anchors ■...
- Page 57 1-2. Child safety raise it to the uppermost position. With rigid lower attachments Latch the buckles onto the LATCH anchors. For owners in Canada: The symbol on a child restraint sys- tem indicates the presence of a lower connector system. Widen the gap between the seat cushion and seatback slightly.
- Page 58 1-2. Child safety inboard LATCH anchors of the out- ● Never attach two child restraint system board seats, which are 18.5 in. (470 attachments to the same anchor. In a collision, one anchor may not be mm) apart, can be used if the child strong enough to hold two child restraint system manufacturer’s restraint system attachments and may...
- Page 59 1-2. Child safety When installing in the rear out- With flexible lower attachments ■ board seats Latch the hooks of the lower attachments onto the lower If the child restraint system on hand is anchorages. not within the “universal” category (or the necessary information is not in the table), refer to the “Vehicle List”...
- Page 60 1-2. Child safety With rigid lower attachments anchors with the anchor spacing stated. Latch the buckles onto the lower anchorages. Child restraint systems with rigid lower attachments cannot be installed in the center seat. This type of child restraint system can only be installed in the out- board seat.
- Page 61 1-2. Child safety Outboard rear seats WARNING Never attach two child restraint system ● attachments to the same anchor. In a collision, one anchor may not be strong enough to hold two child restraint system attachments and may break. If the lower anchorages are already in use, use the seat belt to install a child restraint system in the center seat.
- Page 62 1-2. Child safety raise it to the uppermost position. Rear center seat Open the anchor bracket cover, Hook latch the hook onto the anchor Top tether strap bracket and tighten the top tether strap. ■ Laws and regulations pertaining to Make sure the top tether strap is securely anchors latched.
- Page 63 1-2. Child safety Top tether strap WARNING Rear center seat When installing a child restraint system ● in the rear center seat, adjust both seat cushions to the same position and align both seatbacks at the same angle. The seatbacks must be adjusted to the same angle.
- Page 64 1-2. Child safety When installing the child restraint system ● Follow all installation instructions pro- with the head restraint being raised, be vided by the child restraint system sure to have the top strap pass underneath manufacturer. the head restraint. When installing the child restraint sys- ●...
Page 65: Connected Services
- Page 66 FOSS can ● Safety Connect is available beginning Fall be found at the following URL. 2009 on select Lexus models (in the https://opensource.lge.com/osSch/ contiguous United States only). Contact list?types=ALL&search=TL21BNU with the Safety Connect response center...
- Page 67 (RF) signals. cumstances, be shared with third par- ties to locate your vehicle. Further In August 1996, the Federal Commu- information is available at Lexus.com. nications Commission (FCC) adopted RF exposure guidelines with safety lev- Emergency Assistance Button ■...
Page 68: Remote Connect
Page 69: service connect, page 70: 1-4. theft deterrent system, page 71: alarm.
- Page 72 1-4. Theft deterrent system will be deactivated or stopped after a few seconds.) Alarm-operated door lock ■ In the following cases, depending on the sit- uation, the door may automatically lock to prevent improper entry into the vehicle: When a person remaining in the vehicle ●...
Page 73: Vehicle Status Information And Indicators
Page 74: warning lights and indicators.
- Page 75 2-1. Instrument cluster Warning lights Electric power steering system warning light (P.481) Warning lights inform the driver of mal- (yellow) Low fuel level warning light functions in the indicated vehicle’s sys- (P.482) tems. Driver’s and front passenger’s seat belt reminder light Brake system warning light (P.482) (P.479)
- Page 76 Cruise control indicator not come on, or turn off. Have the vehi- (P.283) cle inspected by your Lexus dealer. (green/whit : This light illuminates on the multi-infor- mation display. Dynamic radar cruise control indicator (P.275)
- Page 77 Parking brake indicator not come on, or turn off. Have the vehi- (P.204) cle inspected by your Lexus dealer. (U.S.A.) : This light comes on when the system is Parking brake indicator turned off.
Page 78: Gauges And Meters
- Page 79 2-1. Instrument cluster Odometer and trip meter display (P.83) Vehicles with a head-up display Engine coolant temperature gauge Displays the engine coolant temperature. Outside temperature Displays the ambient temperature within the range of -40°F (-40°C) to 140°F (60°C). Tachometer/Analog speedometer Tachometer: Displays the engine speed in revolutions per minute.
- Page 80 2-1. Instrument cluster Background color changes according to the driving mode. Odometer and trip meter display (P.83) Locations of gauges and meters (F SPORT models) ■ Depending on the shift position or current drive mode, the meter displays or posi- tion of some gauges will change.
- Page 81 2-1. Instrument cluster Distance to empty Displays the driving range with remaining fuel. Multi-information display Presents the driver with a variety of vehicle data and displays warning messages if a mal- function occurs. (P.85, 489) Background color of driving mode Background color changes according to the driving mode.
- Page 82 2-1. Instrument cluster Displays the quantity of fuel remaining in the tank. Distance to empty Displays the driving range with remaining fuel. Multi-information display Presents the driver with a variety of vehicle data and displays warning messages if a mal- function occurs.
- Page 83 When “--” or “E” is displayed, the system To prevent damage to the engine and ■ may be malfunctioning. Take your vehicle its components to your Lexus dealer. Do not let the indicator needle of the ● Distance to empty ■...
- Page 84 2-1. Instrument cluster been driven. The display will change between a digital speedometer and/or analog speedometer Trip meter A/trip meter B depending on the meter display type set- Displays the distance the vehicle has been ting. driven since the meter was last reset. Trip Vehicles with a head-up display ...
Page 85: Multi-Information Display
- Page 86 2-1. Instrument cluster If the navigation system linked-display is gauge not displayed in the content display area, G-force route guidance will be displayed. Gear Position Driving support system informa- Driving support system information tion display area When driving support system information display is not displayed in the content display area, ...
- Page 87 2-1. Instrument cluster NOTICE While setting up the display ■ To prevent battery discharge, ensure that the engine is running while setting up the display features.
Page 88: Head-Up Display
- Page 89 2-1. Instrument cluster brightness of the head-up display or ● Do not place anything on or put stick- remove your sunglasses. ers onto the head-up display projector. Doing so could interrupt head-up dis- ■ The tachometer/eco driving indicator is play indications. displayed when When the following conditions are met, the Do not touch the inside of the head-up...
Page 90: Displayed Content
- Page 91 2-1. Instrument cluster Vehicles with a head-up display Center display Steering switch The function of each switch differs depending on the conditions and settings. When a switch is touched, the function of each switch is displayed on the head-up display. If the head-up display is off, or when it is not possible to display content on the head-up dis- play, the functions will be displayed on the multi-information display.
- Page 92 2-1. Instrument cluster Switch function change switch Each time this switch is pressed, the functions will change. Switch icon display The icon of each switch will be displayed. The touched switch will be highlighted. ( Switch function guide display The function guide for the touched switch will be displayed. Switching the display of the increased.
- Page 93 2-1. Instrument cluster Drive information 2 The following items can be displayed on the multi-information display. Average vehicle speed Total driving time Drive information 3 (vehicles without a head-up display) The following items can be displayed on the multi-information display. Eco Driving Indicator Light ...
- Page 94 2-1. Instrument cluster power. (P.362) cle on the multi-information display. ● The vehicle speed is approximately 80 Displays around the periphery of the mph (130 km/h) or higher. G-force display, the left and right steering amount, accelerator pedal Boost gauge/engine oil tempera- input, and brake fluid pressure.
- Page 95 2-1. Instrument cluster Current fuel consumption screen ■ G-force display ■ The G-force values may not be zero even ● when the vehicle is parked, such as when it is parked on an incline. ● Depending on the vehicle usage condi- tions, the brake fluid pressure display may not reach its maximum reading even though the brake pedal is fully depressed.
- Page 96 2-1. Instrument cluster Use the displayed average fuel consump- tion as a reference. The image is an exam- ple only, and may vary slightly from actual conditions. Updating the history data ■ Update the latest fuel consumption by selecting “Update” to measure the current fuel consumption again.
- Page 97 2-1. Instrument cluster (U.S.A. only) the content display area of the multi-infor- mation display. Street name Compass Pop-up display information Pop-up displays will be displayed on Display position (vehicles with a ■ head-up display) the multi-information display or the head-up display (if equipped) when Depending on the display settings of the head-up display, some content may be dis-...
- Page 98 2-1. Instrument cluster Hands-free system status ■ Items displayed when the engine Displayed when the hands-free system switch is turned off is operated. The following items will be displayed Suggestion function ■ on the multi-information display when Displays suggestions to the driver in the engine switch is turned off.
Page 99: Before Driving
Page 100: keys.
- Page 101 If this message is displayed but you have not tion properly. had a new electronic key registered, ask your Lexus dealer to check if an unknown In case of a smart access system with ■ electronic key (other than those in your push-button start malfunction or possession) has been registered.
- Page 102 3-1. Key information : These settings must be customized at your Lexus dealer. Theft deterrent panic mode ■ When is pressed for longer than about one second, an alarm will sound intermittently and the vehicle lights will flash to deter any person from trying to break into or damage your vehicle.
Page 103: Digital Key
- Page 104 3-1. Key information key. With the digital key alone, no vehicle lights will illuminate when approached to the vehicle. Also, with the digital key alone, some functions, such as the power back door's close & lock (walk-away) function, etc., cannot be used.
Page 105: 3-2. Opening, Closing And Locking The Doors
- Page 106 3-2. Opening, closing and locking the doors the security feature automatically locks the Multi-information Unlocking function vehicle again. display/Beep ■ When the door cannot be locked by the Holding the driver’s lock sensor on the surface of the door handle door handle unlocks only the driver’s When the door cannot be locked even if the...
- Page 107 3-2. Opening, closing and locking the doors Rear seat reminder function ■ ● Do not press an inside door opener As the first reminder so as not to forget lug- switch while driving. gage, etc. in the rear seat, when the engine Be especially careful with the front doors, switch is turned off after any of the following as it can be opened even when the doors...
- Page 108 3-2. Opening, closing and locking the doors Unlocks the doors Opening the doors from inside The indicator turns off. the vehicle Opening the doors from outside the vehicle Press the front side of the door opener switch to open the door. Driver’s door: The door will open even if it Press the door opener switch of the...
- Page 109 3-2. Opening, closing and locking the doors Function Operation All doors are automati- Shift position cally locked when shift- linked door lock- ing the shift position ing function out of P. Shift position All doors are automati- linked door cally unlocked when unlocking func- shifting the shift posi- Rear door child-protector lock...
Page 110: Power Back Door
Page 111: smart access system with.
- Page 112 3-2. Opening, closing and locking the doors Pressing and holding the switch again for Opening/closing the power back approximately 1 second will operate the door power back door in the opposite direction. Opening/closing the power back ■ door using the wireless remote control Press and hold the switch for approxi- mately 1 second.
- Page 113 : This setting can be customized by your lower part of the back door. Lexus dealer. A different buzzer than the normal one will Press the switch. sound and the close & lock (Walk-Away) function will go into standby.
- Page 114 3-2. Opening, closing and locking the doors Type A Closing the power back door using ■ the back door handle Kick sensor Lower the power back door using the Hands Free Power Back Door back door handle, then a buzzer will operation detection area sound and the power back door will Smart access system with...
- Page 115 3-2. Opening, closing and locking the doors within 1 second. : This setting can be customized by your Lexus dealer. The Hands Free Power Back Door While carrying an electronic key, will not start operating while a foot is stand within the smart access sys- detected under the rear bumper.
- Page 116 3-2. Opening, closing and locking the doors push-button start operation detec- lock (Walk-Away) function will go tion area (P.126) into standby. Perform a kick operation by mov- While the buzzer is sounding, move ing your foot to within approxi- away from the back door. mately 3.9 in.
- Page 117 3-2. Opening, closing and locking the doors Power back door operating conditions sors are pushed due to an object being ■ caught, etc., the jam protection function will If the following conditions are met with the operate. power back door operation enabled, the power back door can be opened and From that position the door will automati- closed automatically.
- Page 118 If the back door does not fully close due : This setting can be customized by your ● to the operation of the jam protection Lexus dealer. function, etc., while the back door is auto- Situations in which the close & lock ■...
- Page 119 When an object is moved from under the ● rear bumper : This setting can be customized by your Lexus dealer. ● If someone is swinging their legs while sit- ting on the rear bumper Situations in which the Hands Free close ■...
- Page 120 ● does not operate properly. Turn the cover. : If equipped : This setting can be customized by your Lexus dealer. If the power back door stops the auto- ■ matic operation When the automatic operation of the power back door is enabled and the power back door is left open for a long time , it may Move the lever.
- Page 121 If anyone is in the vicinity, make sure ing an accessory part to the power they are safe and let them know that back door, using a genuine Lexus part the power back door is about to open is recommended.
- Page 122 Door, be careful not to touch the ● Do not attach any accessories other exhaust pipe. than genuine Lexus parts to the power back door. ● Do not operate the Hands Free Power Do not place your hand on the spindle Back Door if there is little space under ●...
- Page 123 If the Hands Free Power Back Door does been locked. not operate in the following situations, have the vehicle inspected by your Lexus Before leaving the vehicle, make sure dealer. that the operational signals have oper- ated and that all of the doors are locked.
- Page 124 3-2. Opening, closing and locking the doors Select (ON)/ NOTICE (OFF). Do not paint the rear bumper. ● When OFF is selected and the operations ● If a bicycle carrier or similar heavy object is attached to the power back of the Hands Free Power Back Door is door, disable the Hands Free Power made to stop from the center display,...
Page 125: Smart Access System With Push-Button Start
- Page 126 3-2. Opening, closing and locking the doors Effective range (areas within which the ■ Correction electronic key is detected) Situation procedure The engine switch was turned to ACC while the Turn the engine driver’s door was open switch off and (The driver’s door was close the opened when the engine...
- Page 127 3-2. Opening, closing and locking the doors When carrying the electronic key ● . Confirm that the electronic key indica- together with the following devices that tor flashes 4 times. emit radio waves While the battery-saving mode is set, the •...
- Page 128 3-2. Opening, closing and locking the doors the instrument panel or near the door with push-button start. (P.126) pockets when exiting the vehicle. ● If the electronic key is inside the vehicle Depending on the radio wave reception and a door handle becomes wet during a conditions, it may be detected by the car wash, a message may be shown on antenna outside the cabin and the door...
- Page 129 (P.510) However, if the mechanical key is used while the alarm system is set, Ask your Lexus dealer for details on dis- the warning will sound. (P.71) abling the entry function. ●...
Page 130: 3-3. Adjusting The Seats
Page 131: rear seats.
- Page 132 3-3. Adjusting the seats ■ Jam protection function (power seat) WARNING If the seat is reclined excessively, the lap Observe the following precautions. belt may slide past the hips and apply Failure to do so may result in death or restraint forces directly to the abdomen, serious injury.
- Page 133 3-3. Adjusting the seats Seatback angle adjustment lever Power seat Seatback angle adjustment switch ■ The rear seatbacks can be adjusted when (power seat) When the rear seatback is in a position within the range shown in the illustra- tion, the rear seat operation switch (rear seat) can be used to adjust the rear seat- back.
- Page 134 3-3. Adjusting the seats Lower the rear seat head restraints. side of the rear seat operation switch of the operating seat. Any rear seat operation (P.138) switch for the operating seat, regardless of Folding down the rear seatbacks ■ location, can be used to stop the operation. (manual seat) (A buzzer may sound depending on the position that the rear seatback is stopped.)
- Page 135 3-3. Adjusting the seats Rear seat operation switch (rear seat) Returning the rear seatbacks ■ (power seat) When operating the rear seat seat- Rear seat operation switch (luggage back, put the seatbelt in the seatbelt compartment) guide . Make sure that the seat- belt is not jammed between the seat and vehicle body.
- Page 136 3-3. Adjusting the seats raised when the engine switch is in either of seatback is in a position within the range the following modes: shown in the illustration with the back door open ● When the engine switch is turned off or in The other seat operation switch for the ●...
- Page 137 3-3. Adjusting the seats To stop the seatback return operation part- WARNING way, select “Cancel” stop on the center dis- play. Operation of the rear seats from the ■ front seats Operating all of the seats Have rear seat passengers exit the vehi- Select on the center display.
Page 138: Head Restraints
- Page 139 3-3. Adjusting the seats Make sure that the head restraints are adjusted so that the center of the head restraint is closest to the top of your ears. ■ Adjusting the rear center seat head restraints Always raise the head restraint one level from the stowed position when using.
- Page 140 3-3. Adjusting the seats Rear center seat ■ Align the head restraint with the instal- lation holes and push it down to the lock position. Press and hold the lock release button when lowering the head restraint.
Page 141: 3-4. Adjusting The Steering Wheel And Mirrors
Page 142: inside rear view mirror, page 143: digital rear-view mirror.
- Page 144 If it is difficult to see the displayed image change to optical mirror mode and have the due to light reflected off the Digital vehicle inspected by your Lexus dealer. Rear-view Mirror, the camera being dirty or covered with water droplets, dust, etc.,...
- Page 145 3-4. Adjusting the steering wheel and mirrors ture. Icons Settings Change to optical mirror mode, adjust- Select to adjust the bright- ing the height of the rear view mirror by ness of the display. moving it up and down. Select to adjust the area displayed up/down.
- Page 146 3-4. Adjusting the steering wheel and mirrors The icons will be displayed. Icons Settings Select to change the lan- ® guage of the Homelink Training Tutorial. The anti-glare function of the digital mirror can be enabled/disabled. When enabled, image on the digital mirror at night- time will be displayed at a Press...
- Page 147 Stop using the system immediately glass, do not apply it to the area in front and contact your Lexus dealer. of the camera. If film is applied to the area in front of the camera, the image from the camera may not display prop- erly.
- Page 148 ● impact as this could cause a malfunc- tion. If this happens, have the vehicle inspected by your Lexus dealer as soon as possible. ● Do not block the vent holes of the mir- ror. Otherwise, the mirror may be hot, leading to a malfunction or a fire.
- Page 149 3-4. Adjusting the steering wheel and mirrors Symptom Likely cause Solution Clean the mirror surface The mirror surface is dirty. gently, using a soft dry cloth. Change to optical mirror mode. (If the light is coming through Sunlight or headlights are shining the moon roof [if equipped] directly into the Digital Rear-view or panoramic moon roof [if...
- Page 150 The image is out of The camera or its surrounding mode and have the vehicle alignment. area has received a strong inspected by your Lexus impact. dealer. The display is dim and Change to optical mirror The system may be malfunction- mode and have the vehicle is displayed.
- Page 151 Digital Rearview Mirror will even though the mirror is turn off.) cool, have the vehicle inspected by your Lexus dealer. Change to optical mirror mode and have the vehicle inspected by your Lexus dealer.
Page 152: Outside Rear View Mirrors
- Page 153 3-4. Adjusting the steering wheel and mirrors WARNING When the mirror defoggers are oper- ■ ating Do not touch the rear view mirror sur- faces, as they can become very hot and burn you. Folding and extending the mir- rors When disconnecting and reconnecting ■...
- Page 154 3-4. Adjusting the steering wheel and mirrors The adjusted angle will be memorized and the mirror will automatically tilt to the memorized angle whenever the shift position is shifted to R from next time. The memorized downward tilt position of the mirror is linked to the normal position (angle adjusted with the shift position in other than R).
Page 155: 3-5. Opening, Closing The Windows And Moon Roof
- Page 156 Check to make sure that all passen- closed or opened, have the vehicle gers do not have any part of their body inspected by your Lexus dealer. in a position where it could be caught when a window is being operated.
Page 157: Moon Roof
- Page 158 : These settings must be customized at switch. your Lexus dealer. If the moon roof does not fully close even When the moon roof does not close nor- ■...
- Page 159 3-5. Opening, closing the windows and moon roof Customization ■ ● When using the wireless remote con- Some functions can be customized. trol or mechanical key and operating (P.543) the moon roof, operate the moon roof after checking to make sure that there is no possibility of any passenger hav- WARNING ing any of their body parts caught in...
Page 160: Panoramic Moon Roof
- Page 161 Lexus ● The panoramic moon roof is closing or dealer.
- Page 162 3-5. Opening, closing the windows and moon roof ● Check to make sure that all passen- WARNING gers do not have any part of their body Observe the following precautions. in a position where it could be caught Failing to do so may cause death or seri- when the panoramic moon roof is ous injury.
- Page 163 3-5. Opening, closing the windows and moon roof WARNING The jam protection function may not ● work if something gets caught just before the panoramic moon roof or electronic sunshade is fully closed. Also, the jam protection function is not designed to operate while the switch is being pressed.
Page 164: 3-6. Favorite Settings
- Page 165 3-6. Favorite settings Adjust the driver’s seat, steering Turn the engine switch to ON. wheel, outside rear view mirrors Press one of the buttons for the and head-up display (if equipped) driving position you want to recall to the desired positions. until the buzzer sounds.
- Page 166 3-6. Favorite settings contact your Lexus dealer. make entering the vehicle easier. If the driving position is in a position that ■ Using the voice control system has already been recorded, the driving : If equipped position will not move.
- Page 167 3-6. Favorite settings has already been recorded, the driving mately 3 seconds. position will not move. Memory recall function cancelation procedure Delete face information from the face authentication system. For information on deleting fingerprintin- formation, refer to the “MULTIMEDIA OWNER’S MANUAL”.
Page 168: My Settings
- Page 169 3-6. Favorite settings Individual identification by face authentica- or ON. tion is prioritized than by electronic Meter displays , head-up dis- key/digital key , if the latter has identified play , and center display with another registered driver. When an individual is identified, the vehicle ®...
- Page 170 3-6. Favorite settings...
Page 171: Driving
Page 172: rcd (rear camera detection) function, page 173: driving the vehicle.
- Page 174 A warning message is displayed on the ■ Eco-friendly driving multi-information display while the sys- P.93 tem is operating. Breaking in your new Lexus ■ WARNING To extend the life of the vehicle, observing Observe the following precautions. the following precautions is recommended:...
- Page 175 4-1. Before driving ● Do not drive across a river or through WARNING other bodies of water. • Depress the brake pedal using your This may cause electric/electronic right foot. Depressing the brake pedal components to short circuit, damage using your left foot may delay the engine or cause other serious response in an emergency, resulting in damage to the vehicle.
- Page 176 • Soft drink cans may fracture, causing the contents to spray over the interior Have the brake pads checked and of the vehicle, and may also cause a replaced by your Lexus dealer as soon as short circuit in the vehicle’s electrical possible. components.
- Page 177 4-1. Before driving ● If the brake booster device does not WARNING operate, do not follow other vehicles Do not attach adhesive discs to the ● closely and avoid hills or sharp turns windshield or windows. Do not place that require braking. containers such as air fresheners on In this case, braking is still possible, but the instrument panel or dashboard.
- Page 178 NOTICE road and the vehicle is flooded, be sure Avoiding damage to vehicle parts ■ to have your Lexus dealer check the fol- lowing: ● Do not turn the steering wheel fully in either direction and hold it there for an Brake function ●...
Page 179: Cargo And Luggage
- Page 180 : E =Available cargo and luggage load (P.182) As shown in the example above, if the Vehicles without towing package: Lexus number of occupants increases, the does not recommend towing a trailer with cargo and luggage load will be your vehicle.
- Page 181 4-1. Before driving ● If loading long or wide cargo, never WARNING exceed the vehicle overall length or Do not stack cargo and luggage in the ● width. ( P.524) luggage compartment higher than the seatbacks. Before driving, make sure the cargo is ●...
Page 182: Vehicle Load Limits
Page 183: trailer towing (vehicles without towing package).
- Page 184 [AWD models], rear differential [AWD models] or wheel ● Ensure that your vehicle’s tires are prop- bearing), Lexus recommends that you do erly inflated. (P.530) not tow a trailer until the vehicle has been Trailer tires are inflated according to the ●...
- Page 185 4-1. Before driving miles (1000 km) of trailer towing. WARNING ■ If trailer sway occurs Trailer towing precautions ■ One or more factors (crosswinds, passing vehicles, rough roads, etc.) can adversely To tow a trailer safely, use extreme care affect handling of your vehicle and trailer, and drive the vehicle in accordance with causing instability.
- Page 186 ■ descending steep or long downhill Use only the position recommended by grades. Do not make sudden down- your Lexus dealer. Do not install the shifts while descending steep or long trailer hitch on the bumper; this may downhill grades.
- Page 187 4-1. Before driving and any optional equipment installed ger, towing package (if available), hitch on the vehicle) and the tongue weight. and hitch systems (if required). Additional optional equipment, passengers and cargo in the vehicle will reduce the trailer weight rating so as not to exceed GCWR, GVWR and GAWR.
- Page 188 4-1. Before driving gross combination weight, gross vehi- cle weight, gross axle weight and tongue weight are all within the limits. GCWR ■ • 2WD models: 8965 lb. (4066 kg) • AWD models: 9120 lb. (4136 kg) ■ 3500 lb. (1585 kg) Weight limits Unbraked TWR ■...
- Page 189 Hitch Trailer hitch assemblies have different Selecting trailer ball weight capacities. Lexus recommends Use the correct trailer ball for your the use of Lexus hitch/bracket for your application. vehicle. For details, contact your Lexus dealer. Typical trailer ball Trailer class ...
- Page 190 Use the wire harness stored in the rear ate normally. end under body. If the lights do not operate normally, have the vehicle inspected by your Lexus dealer. Trailer towing tips Your vehicle will handle differently when towing a trailer. Help to avoid an...
- Page 191 4-1. Before driving Avoid sudden braking as you may Lexus recommends that the vehi- cle-trailer speed limit is 65 mph skid, resulting in the trailer jackknif- (104 km/h) on a flat, straight, dry ing and a loss of vehicle control. This is especially true on wet or slippery road.
- Page 192 4-1. Before driving grades. With the transmission in P, start the engine. Be sure to keep the brake Avoid holding the brake pedal down pedal depressed. too long or applying the brakes too frequently. This could cause the Shift into a forward gear. If revers- brakes to overheat and result in ing, shift into R.
Page 193: Dinghy Towing
Page 194: 4-2. driving procedures.
- Page 195 Contact your Lexus malfunction See owner’s manual” is dis- dealer immediately. played on the multi-information display The system may be malfunctioning. Have Stopping the engine the vehicle inspected by your Lexus dealer immediately. Stop the vehicle completely. ■ Electronic key battery P.460 Set the parking brake.
- Page 196 4-2. Driving procedures after approximately 1 hour if it has been ■ When parking left running while the shift position is in P. Exhaust gases include harmful carbon ● The timer for the automatic engine shut monoxide (CO), which is colorless and off feature will reset if the brake pedal is odorless.
- Page 197 4-2. Driving procedures When ACC customization is in off ■ ● With the engine switch is turned off, the center display can still be used for a cer- tain time until the battery saving function starts operating. ● When the safe exit assist is operating, a buzzer will sound and a voice guidance will be given.
Page 198: Transmission
- Page 199 When shifting from P to N, D or R, from N, place on level ground, apply the parking D, M or R to P, from D or M to R, or from R brake, and then contact your Lexus to D, ensure that the brake pedal is being dealer.
- Page 200 4-2. Driving procedures pedal, the buzzer will sound and the shift- When attempting to change the shift ● ing operation will be disabled. position to D while the vehicle is moving backward ● When selecting the shift position, make sure that the shift position has been When driving at a low speed, the shift posi- changed to the desired position by tion may change to D.
- Page 201 For the shift lever ■ P.362 ● Do not remove the shift lever knob or use anything but a genuine Lexus shift Selecting shift ranges in the D lever knob. Also, do not hang anything on the shift lever. position...
- Page 202 4-2. Driving procedures Downshifting restriction warning ■ buzzer To help ensure safety and driving perfor- mance, downshifting operation may some- times be restricted. In some circumstances, downshifting may not be possible even when the paddle shift switch is operated. (A buzzer will sound twice.) Selecting gears in the M position Upshifting...
- Page 203 4-2. Driving procedures shift only). When Done” is displayed on the multi-information display. When it is necessary to protect the engine or automatic transmission In order to shift to a position other when the engine coolant tempera- than N, first press the P position ture is low, the automatic transmis- switch to change the shift position to sion fluid temperature is high or low,...
Page 204: Turn Signal Lever
- Page 205 In ● The shift position is in a position other this situation, apply the parking brake man- than P or N ually. (P.204) (Vehicles with Lexus Teammate Advanced Park: The shift position is in P during Advanced Park operation.)
- Page 206 Have the vehicle ous injury. inspected by your Lexus dealer. Parking brake switch ■ ■ Parking brake operation sound...
Page 207: Brake Hold
- Page 208 3 minutes after the sys- The system may be malfunctioning. Have tem has started holding the brake, the the vehicle inspected by your Lexus dealer. parking brake will be set automatically. In ■ Warning messages and buzzers...
- Page 209 4-2. Driving procedures WARNING Also, the system may not activate depending on the angle of the slope. When stopped on a slippery road ■ The system cannot stop the vehicle when the gripping ability of the tires has been exceeded. Do not use the system when stopped on a slippery road.
Page 210: 4-3. Operating The Lights And Wipers
- Page 211 4-3. Operating the lights and wipers operate and automatically turn off all the lights after approximately 20 minutes. When the engine switch is turned to ON, the battery-saving function will be disabled. When any of the following are performed, the battery-saving function is canceled once and then reactivated.
Page 212: Ahs (Adaptive High-Beam System)
- Page 213 4-3. Operating the lights and wipers nate. Area illuminated by the high beams Area illuminated by the low beams ■ System operating conditions According to the distance to a pre- ● When all of the following conditions are met, the high beams will illuminate and ceding vehicle, the illuminated area the system will operate: of the low beams is adjusted.
- Page 214 4-3. Operating the lights and wipers a far lane lights or tail lights in the surrounding area • When a vehicle ahead is far away • When headlights or tail lights of vehicles • When a vehicle ahead has no lights ahead are turned off, dirty, changing •...
Page 215: Ahb (Automatic High Beam)
- Page 216 4-3. Operating the lights and wipers Turn the headlight switch to the side trees • When a vehicle ahead approaches from position. a far lane • When a vehicle ahead is far away When the headlight switch lever is in the •...
- Page 217 4-3. Operating the lights and wipers color, or not aimed properly Pull the lever to its original position to • When the headlights are repeatedly enable the Automatic High Beam system changing between the high beams and again. low beams. •...
Page 218: Fog Light Switch
- Page 219 4-3. Operating the lights and wipers Windshield wipers and washer Operating the lever can switch between automatic operation and manual operation, or can use the washer. NOTICE When the windshield is dry ■ Do not use the wipers, as they may dam- age the windshield.
- Page 220 4-3. Operating the lights and wipers The following operation can be performed using the voice control system. ● Operating the windshield wipers only once ● Operating the windshield washer (it can be performed only when the vehicle is stopped) For details regarding the voice control sys- tem, refer to the “MULTIMEDIA OWNER’S MANUAL”.
- Page 221 ■ When a nozzle becomes blocked In this case, contact your Lexus dealer. Do not try to clear it with a pin or other object. The nozzle will be damaged. To prevent battery discharge ■...
- Page 222 4-3. Operating the lights and wipers Operating the windshield wipers and ■ washer using the voice control system : If equipped For the U.S.A. The windshield wipers can be moved to the service position using the voice control system. (Operation is possible only when the vehicle is stopped with the wiper switch For Canada ...
- Page 223 4-3. Operating the lights and wipers Rear window wiper and washer NOTICE When the rear window is dry ■ Do not use the wiper, as it may damage the rear window. Washer/wiper dual opera- Operating the wiper lever tion Pushing the lever operates the wiper and Operating the switch operates washer.
- Page 224 Do not operate the switch continually as the washer fluid pump may overheat. When a nozzle becomes blocked ■ In this case, contact your Lexus dealer. Do not try to clear it with a pin or other object. The nozzle will be damaged. ■...
Page 225: Refueling
- Page 226 WARNING When replacing the fuel tank cap ■ Do not use anything but a genuine Lexus fuel tank cap designed for your vehicle. Doing so may cause a fire or other inci- dent which may result in death or serious injury.
Page 227: 4-5. Using The Driving Support Systems
- Page 228 Lexus Safety System + 3/Traffic Jam ● Assist can still be used while a software update is being performed. ■ What can be checked using the Lexus The following items can be checked or per- formed. ● Software version, update details, precau- tions, use methods, etc.
Page 229: Lexus Safety System + 3
- Page 230 AHB (Automatic High Beam) ■ P.236 P.215 : If equipped : If equipped PCS (Pre-Collision System) ■ Sensors used by Lexus Safety P.238 System + 3 LTA (Lane Tracing Assist) ■ Various sensors are used to obtain the P.248 necessary information for system LDA (Lane Departure Alert) operation.
- Page 231 Do not subject a radar sensor or its ● surrounding area to impact. If a radar sensor, the front grille, or front bumper has been subjected to a impact, have the vehicle inspected by your Lexus dealer.
- Page 232 (shaded area in the illus- ● Do not modify or paint the radar sen- tration). sors or radar sensor cover, or replace them with anything other than Lexus genuine parts. ● In the following situations, recalibra- tion of the radar sensors will be neces- sary.
- Page 233 Vehicles with a 9 inch display audio: It is Precautions for the driver monitor ■ necessary to enter a connected services camera (if equipped) contract, provided by Lexus, to use these functions. For details, contact your Lexus Observe the following precautions. dealer. Radar Cruise Control: Extended resume ●...
- Page 234 4-5. Using the driving support systems • Large trucks P.272 • Manhole covers ● Traffic Jam Assist (if equipped) • Guardrail P.290 • Metal plates Situations in which the sensors may not ■ ● When near a step or protrusion operate properly ●...
- Page 235 4-5. Using the driving support systems • Roads with changes in grade, such as When a lane line is on a curb ● sudden inclines or declines ● When driving on a bright, reflective road • Roads which is sloped to the left or right surface, such as concrete •...
Page 236: Driver Monitor
- Page 237 4-5. Using the driving support systems For information about how to use the be restored. It is necessary to register face information again. face identification function, priorities ■ Situations where face identification may among other devices of individual not be performed correctly identification, and linked vehicle set- This system is designed for use to identify tings, see “My Settings”.
Page 238: Pcs (Pre-Collision System)
- Page 239 4-5. Using the driving support systems If the detectable object is a vehicle, lowing conditions are met, assistance moderate braking will be performed will be provided to help enhance vehi- with the warning. cle stability and prevent lane depar- ture. During assistance, in addition to the pre-collision warning, the following icon will be displayed on the multi-information display.
- Page 240 4-5. Using the driving support systems Depending on the intersection, assis- tance may not operate correctly. When turning left/right at an inter- section and crossing the path of an oncoming vehicle Acceleration Suppression at Low ■ Speed When driving at a low speed, if the accelerator pedal is strongly depressed and the system determines that there is a possibility of a collision,...
- Page 241 4-5. Using the driving support systems ■ Emergency steering assist WARNING Pre-collision braking The emergency steering assist will be ■ ● canceled when the system determines ● When the pre-collision braking func- that lane departure prevention control tion is operating, a large amount of has completed.
- Page 242 4-5. Using the driving support systems When the vehicle has not been driven a certain amount after a terminal of the battery has ● been disconnected and reconnected ● When the shift position is in R When the VSC OFF indicator is illuminated (only the pre-collision warning function will ●...
- Page 243 4-5. Using the driving support systems Pre-collision braking ● Relative speed between your Detectable objects Vehicle speed vehicle and object Preceding vehicles, stopped Approximately 3 to 110 mph Approximately 3 to 110 mph vehicles (5 to 180 km/h) (5 to 180 km/h) Approximately 20 to 110 Approximately 50 to 130 Oncoming vehicles...
- Page 244 4-5. Using the driving support systems Relative speed Oncoming vehicle Detectable objects Vehicle speed between your vehi- speed cle and object Approximately 3 to Approximately 3 to Approximately 7 to Oncoming vehicles 25 mph (5 to 40 45 mph (5 to 75 70 mph (10 to 115 km/h) km/h)
- Page 245 4-5. Using the driving support systems lights are flashing. Relative speed between your Detectable objects Vehicle speed vehicle and object Preceding vehicles, stopped Approximately 0 to 9 mph Approximately 0 to 9 mph vehicles, Pedestrians, Bicy- (0 to 15 km/h) (0 to 15 km/h) cles, Wall While the Acceleration Suppression at Low Speed function is operating, if any of the follow-...
- Page 246 4-5. Using the driving support systems • When passing through a location with a Situations in which the system may not ■ structure above the road (traffic sign, bill- operate properly board, etc.) ● In certain situations, such as the following, a detectable object may not be detected by the front sensors, and the system may not operate properly:...
- Page 247 4-5. Using the driving support systems • When a pedestrian is pushing a stroller, obstruction exists in the evasion direction wheelchair, bicycle or other vehicle • When there is an oncoming vehicle • When a detectable object blends in with ●...
Page 248: Lta (Lane Tracing Assist)
- Page 249 4-5. Using the driving support systems When the function is operating, if WARNING the vehicle is likely to depart from its Before using the LTA system ■ lane, the driver will be alerted via a display and buzzer. Do not overly rely on the LTA system. ●...
- Page 250 4-5. Using the driving support systems cles. not holding the steering wheel, a mes- sage urging the driver to grip the steering ● The dynamic radar cruise control is oper- wheel and the icon shown in the illustra- ating. tion will be displayed on the multi-infor- The lane width is approximately 10 to 13 ●...
- Page 251 4-5. Using the driving support systems across the steering wheel ● When a preceding or surrounding vehicle changes lanes (Your vehicle may follow the preceding or surround- Enabling/disabling the system ing vehicle and also change lanes) The LTA will change between ON/OFF each time the LTA switch is pressed.
- Page 252 4-5. Using the driving support systems Operation display of steering wheel operation support The operating state of the LTA system is indicated. Indicator Lane display Steering icon Situation LTA is on standby White Grey/White Grey LTA is operating Green Green Green The vehicle is departing the lane toward the side which the lane display is flashing...
Page 253: Lca (Lane Change Assist)
- Page 254 4-5. Using the driving support systems When the operating conditions • When a steering wheel cover is installed ● (P.253) are no longer met • When the driver is wearing gloves • When foreign matter is attached to the ● When the system can no longer detect steering wheel lane lines...
- Page 255 4-5. Using the driving support systems First position: LCA is operational ● When there is no broken white line between the current lane and the lane Second position: LCA is not opera- to be changed to tional WARNING Enabling/disabling the system ■...
Page 256: Lda (Lane Departure Alert)
- Page 257 4-5. Using the driving support systems WARNING Before using the LDA system ■ ● Do not overly rely on the LDA system. The LDA system is a system which pro- vides automated assistance in driving. However, as it is not a system which reduces the amount of attention nec- essary for safe driving.
- Page 258 4-5. Using the driving support systems • When the VSC or TRAC system is not Hands off steering wheel warning oper- ■ turned off. ation : Boundary between the asphalt and In the following situations, a message urging the driver to operate the steering wheel and grass, soil, etc., or structures, such as a an icon will be displayed and a buzzer will curb, guardrail, etc.
- Page 259 ● Situations in which the sensors may not tries and areas of each region may be operate properly: P.234 different. Contact your Lexus dealer for Situations in which some or all of the ● details. functions of the system cannot oper- ate: P.235...
- Page 260 4-5. Using the driving support systems Except for Puerto Rico Indicator Lane display Steering icon Situation Not illumi- Not illumi- Not illumi- System disabled nated nated nated Not illumi- Lane lines are not detected by the system nated White Grey Not illumi- Lane lines are detected by the system...
- Page 261 4-5. Using the driving support systems Indicator Lane display Steering icon Situation Not illumi- Lane departure alert function is operating nated for the side which the lane display is flashing Orange Orange Flashing Flashing Lane departure prevention function is oper- ating for the side which the lane display is illuminated Green...
Page 262: Pda (Proactive Driving Assist)
- Page 263 4-5. Using the driving support systems Function Conditions Operation Detectable objects Assistance with some A detectable object is brake operations is pro- Pedestrians detected crossing the vided in order to reduce Bicyclists road the possibility of a colli- sion.
- Page 264 4-5. Using the driving support systems tance WARNING Approximately 15 mph (20 km/h) or more Situations in which the system may ■ Curve deceleration assistance ● not operate properly Approximately 15 mph (20 km/h) or more ● Situations in which the lane may not be ...
- Page 265 4-5. Using the driving support systems ● When a pedestrian is pushing a WARNING stroller, wheelchair, bicycle or other When there is a structure above a ● vehicle detectable object When a detectable object blends in ● ● When part of a detectable object is with the surrounding area, such as hidden by another object (large lug- when it is dim (at dawn or dusk) or...
- Page 266 4-5. Using the driving support systems System operation display Depending on the situation, the following indicators or icons will be displayed. Some icons cannot be displayed unless the display is changed to the driving safety support function information screen. Icon Meaning ...
Page 267: Fcta (Front Cross Traffic Alert)
- Page 268 4-5. Using the driving support systems The accelerator pedal is not being ● strongly depressed ● The brake pedal is not being strongly depressed Situations in which the system may ■ operate even though no vehicles are approaching In certain situations, such as the following, the system may operate even though no vehicles are approaching: ●...
- Page 269 4-5. Using the driving support systems P.235 Changing FCTA settings The FCTA can be enabled/disabled through a customize setting. (P.543) When an oncoming vehicle approaches ● The following settings of the FCTA and passes can be changed through customize ●...
Page 270: Rsa (Road Sign Assist)
- Page 271 4-5. Using the driving support systems When the navigation system map data is ● Types of road signs supported out of date ● When the navigation system cannot be The following types of road signs used can be displayed. In this case, the speed limit signs displayed on the multi-information display and navi- However, non-standard or recently intro-...
Page 272: Dynamic Radar Cruise Control
- Page 273 4-5. Using the driving support systems WARNING Details of support provided for the ● driver’s operation The dynamic radar cruise control does not include functions which will prevent or avoid collisions with vehicles ahead of your vehicle. Therefore, if there is ever any possibility of danger, the driver must take immediate and direct control of the vehicle and act appropriately in order to...
- Page 274 4-5. Using the driving support systems Basic functions Constant speed cruising: When there are no vehicles ahead The vehicle drives at the speed set by the driver. If the set vehicle speed is exceeded while driving down a hill, the set vehicle speed display will blink and a buzzer will sound.
- Page 275 4-5. Using the driving support systems follow-up cruising (start off operation). If a start off operation is not performed, the con- trolled stop will continue. Vehicles with Traffic Jam Assist: While driving on a highway or expressway, if a preceding vehicle stops, your vehicle will stop accordingly.
- Page 276 4-5. Using the driving support systems the driving assist switch to set the “+” switch set vehicle speed. “-” switch The set vehicle speed will be displayed on Vehicle-to-vehicle distance switch the multi-information display. Cancel switch The vehicle speed at the moment the switch is released will be the set vehicle speed.
- Page 277 4-5. Using the driving support systems Vehicles without a head-up display Depress the accelerator pedal to accelerate the vehicle to the desired vehicle speed. Press the “+” switch. Canceling/resuming control Vehicles without a head-up display Increase set vehicle speed Decrease set vehicle speed Vehicles with a head-up display ...
- Page 278 4-5. Using the driving support systems vehicle-to-vehicle distance setting will Illus- Approximate Dis- Vehi- change as follows: tration tance (Vehicle cle-to-vehicle Num- Speed: 60 mph If a preceding vehicle is detected, the pre- distance [100 km/h]) ceding vehicle mark will be displayed. Approximately Vehicles without a head-up display ...
- Page 279 • Approximately 3 minutes have elapsed ● Vehicles with a display audio: The con- since the vehicle was stopped nected service that Lexus provides is The parking brake may be actived automat- subscribed to. Contact your Lexus dealer ically. for details.
- Page 280 4-5. Using the driving support systems approaches a preceding vehicle and the system cannot provide sufficient deceleration, such as if a vehicle cuts in front of the vehicle, a warning display will flash and a buzzer will sound to alert the driver. Depress the brake pedal to ensure appropriate vehi- cle-to-vehicle distance.
- Page 281 4-5. Using the driving support systems the location of the steering wheel in the more and the lane is changed to that vehicle (left-hand drive/right-hand drive). If with a vehicle traveling slower than the vehicle is driven in a location where the your vehicle, when the turn signal lever passing lane is on the opposite side of that is operated the vehicle will gradually...
- Page 282 4-5. Using the driving support systems Indicator Multi-information display Situation Vehi- cle-to-vehicle distance set- ting: Blue Follow-up Set vehicle cruising Green speed: Green Preceding vehicle: White Vehi- cle-to-vehicle distance set- ting: Orange flashing Approach Set vehicle warning speed: Green Green Preceding vehicle: Orange flash-...
Page 283: Cruise Control
- Page 284 4-5. Using the driving support systems Vehicles with a head-up display Using the cruise control Setting the vehicle speed Press the driving assist mode select switch to select cruise control. The cruise control indicator will illuminate. Vehicles without a head-up display ...
- Page 285 4-5. Using the driving support systems Vehicles without a head-up display Vehicles with a head-up display Vehicles with a head-up display Increase set vehicle speed Decrease set vehicle speed The set vehicle speed will increase or decrease as follows: Fine adjustment: By 0.6 mph (1 km/h) or 1 mph (1.6 km/h) each time the switch is pressed...
- Page 286 4-5. Using the driving support systems Vehicles with a head-up display Automatic cancellation of the cruise ■ control In the following situations, the cruise control will be canceled automatically: ● When the vehicle speed drops approxi- mately 10 mph (16 km/h) or more below the set vehicle speed When the vehicle speed drops below ●...
- Page 287 4-5. Using the driving support systems Indicator Multi-information display Situation Set vehicle Constant speed: Green speed cruising Green Set vehicle Set vehicle speed: Green speed being in reverse dis- exceeded Green play...
Page 288: Emergency Driving Stop System
- Page 289 4-5. Using the driving support systems the vehicle speed. If the system deter- Warning phase 1 mines the driver is not responsive, it will operate in control state “Deceleration If driving operations are not detected stop phase” and “Stop hold phase” and after the hands off steering wheel decelerate and stop the vehicle.
Page 290: Traffic Jam Assist
- Page 291 4-5. Using the driving support systems Extended resume time of WARNING Dynamic radar cruise control For safe use ■ ● Driving safely is solely the responsibil- P.272 ity of the driver. Do not overly rely on this system, and pay careful attention Traffic Jam Assist Function to the surrounding conditions in order to ensure safe driving.
- Page 292 4-5. Using the driving support systems ■ Situations in which Traffic Jam Assist WARNING Function should not be used Even if Traffic Jam Assist is operating ● properly, the surrounding conditions Do not use Traffic Jam Assist Function in as recognized by the driver and situations such as the following.
- Page 293 4-5. Using the driving support systems subscribed to. WARNING ● The driver’s door is closed. When there is a significant difference ● ● The driver’s seat belt is fastened. in speed between your vehicle and the other vehicle Customized setting of the Traffic Jam ●...
- Page 294 4-5. Using the driving support systems can be operated. If the steering wheel is Changing Traffic Jam Assist set- operated more than a certain amount, con- tings trolled driving will be cancelled. When a warning message is displayed ■ The setting of Traffic Jam Assist can be enabled/disabled through a cus- ●...
- Page 295 4-5. Using the driving support systems Display Status Action to be taken The driver must operate the Indicates that driving actions are steering wheel, accelerator necessary to cope with cut-in or pedal and brake pedal in accor- other behavior of surrounding dance with the surrounding envi- (Yellow) vehicles...
Page 296: Stop & Start System
- Page 297 Stop & Start system. Contact ■ Automatic enabling of the Stop & Start your Lexus dealer for details. system ● When stopping the vehicle for a longer If the Stop & Start system is disabled using period of time, turn the engine switch off the Stop &...
- Page 298 4-5. Using the driving support systems • The driver’s door is closed. • The accelerator pedal is depressed. • The windshield defogger is off. • The vehicle starts to roll on an incline. • The accelerator pedal is not being ●...
- Page 299 The battery may be deteriorated. Con- will operate when the air conditioning sys- tem is on can be changed on the center dis- tact your Lexus dealer for details. play. (The length of time the Stop & Start system will operate when the air condition- “Stop &...
- Page 300 • The air conditioning system is being used. multi-information display • The windshield defogger has been The system may be malfunctioning. Have turned on. the vehicle inspected by your Lexus dealer. “Battery Charging” WARNING • The battery charge may be low. ■...
Page 301: Bsm (Blind Spot Monitor)
- Page 302 10 minutes. If the warning mes- Driving assist information indicator sage does not disappear, have the vehicle inspected by your Lexus dealer. Illuminates when the Blind Spot Monitor is turned off. At this time, “Blind Spot Monitor OFF” will be displayed on the multi-infor- mation display.
- Page 303 If a sensor or the rear bumper needs to ● be removed/installed or replaced, When the Blind Spot Monitor is off, the contact your Lexus dealer. driving assist information indicator ● The sensors are likely to be affected by (P.76) will illuminate. At this time, paint on the rear bumper.
- Page 304 4-5. Using the driving support systems The range of each detection area is: Approximately 1.6 ft. (0.5 m) to 11.5 ft. (3.5 m) from either side of the vehicle Approximately 3.3 ft. (1 m) forward of the rear bumper Approximately 9.8 ft. (3 m) from the rear bumper Approximately 9.8 ft.
- Page 305 4-5. Using the driving support systems and similar stationary objects • When there is a significant difference in ● Following vehicles that are in the same height between your vehicle and the lane vehicle that enters the detection area • Immediately after the Blind Spot Monitor ●...
Page 306: Safe Exit Assist
- Page 307 4-5. Using the driving support systems after driving for egress. Outside rear view mirror indicator visi- ■ Opening of a door can be canceled ■ bility when In strong sunlight, the outside rear view mir- Opening of a door can be canceled only ror indicator may be difficult to see.
- Page 308 4-5. Using the driving support systems Vehicle or bicycle which has a high possibility of colliding with a door (other than the back door) when opened The safe exit assist detection areas ■ The areas that vehicles can be detected in are outlined below. Approximately 145 ft.
- Page 309 4-5. Using the driving support systems mined to have a low possibility of colliding • When driving on a road surface that is with a door (other than the back door) wet with standing water during bad weather, such as heavy rain, snow, or fog when opened •...
Page 310: Intuitive Parking Assist
- Page 311 4-5. Using the driving support systems F SPORT models Front center sensor detection Rear corner sensor detection Rear center sensor detection Front side sensor detection (vehi- cles with Advanced Park) Rear side sensor detection (vehi- cles with Advanced Park) Turning intuitive parking assist Front corner sensors on/off...
- Page 312 If “Parking Assist Unavailable Sensor jected to an impact, have the vehicle Blocked” is displayed on the multi-infor- inspected by your Lexus dealer. If the mation display front or rear bumper needs to be A sensor may be covered with water drops, removed/installed or replaced, con- ice, snow, dirt, etc.
- Page 313 4-5. Using the driving support systems • There will be a short delay between static object detection and display (warning buzzer sounds). Even at low speeds, there is a possibility that the object will come within 1.0 ft. (30 cm) before the display is shown and the warning buzzer sounds.
- Page 314 4-5. Using the driving support systems When a tire chains or compact spare tire motorcycle engines, air brakes of large ● is used vehicles, the clearance sonar of other vehicles or other devices which produce ■ Situations in which the system may ultrasonic waves are near the vehicle operate even if there is no possibility of a ●...
- Page 315 4-5. Using the driving support systems The range of the sensors may change System detection range depending on the shape of the object, etc. Detection range of the sensors ■ Detection range of the sensors ■ (vehicles without Advanced Park) (vehicles with Advanced Park) Approximately 3.3 ft.
- Page 316 4-5. Using the driving support systems The distance and buzzer (vehicles with Advanced Park) ■ Approximate distance to obstacle Buzzer Front center sensor: 6.6 ft. to 3.3 ft. (200 cm to 100 cm) Rear center sensor: 6.6 ft. to 4.9 ft. (200 cm to 150 cm) Does not sound (Display only) Side sensor: 6.6 ft.
- Page 317 4-5. Using the driving support systems assist, RCTA and RCD (if equipped) When there is malfunction in a sen- function will be muted simultaneously. sor or the system is temporarily unavailable. Mute will be canceled automatically in the following situations: ...
- Page 318 4-5. Using the driving support systems Even though the objects are outside of the detection area of the side sensors or side cameras, a warning is displayed and a buzzer sounds. ● When starting off shortly after the Object warning function operating con- ■...
Page 319: Rcta (Rear Cross Traffic Alert) Function
- Page 320 4-5. Using the driving support systems Hearing the RCTA buzzer Rear side radar sensors ■ ■ The RCTA buzzer may be difficult to hear P.302 over loud noises, such as if the audio system volume is high. RCTA function Operation of the RCTA function ■...
- Page 321 4-5. Using the driving support systems The buzzer can alert the driver of RCTA, and RCD (if equipped) all together. faster vehicles approaching from far- Mute will be canceled automatically in the following situations: ther away. When the shift position is shifted. ●...
- Page 322 4-5. Using the driving support systems Vehicles approaching from the parking ● spaces next to your vehicle ● The distance between the sensor and approaching vehicle gets too close : Depending on the conditions, detection of a vehicle and/or object may occur. ■...
- Page 323 4-5. Using the driving support systems Situations in which the system may ■ operate even if there is no possibility of a collision Instances of the RCTA function unneces- sary detecting a vehicle and/or object may increase in the following situations: When the parking space faces a street ●...
Page 324: Function
- Page 325 4-5. Using the driving support systems Each time the engine switch is turned Pedestrian detection icon: Blinks to ON, the RCD function is enabled. The rear camera detection function is ■ operational when When a pedestrian is detected The engine switch is in ON. ●...
- Page 326 4-5. Using the driving support systems • Pedestrians who suddenly enter the the detection area, some objects, such as detection area the following, may be detected, possibly • People riding a bicycle, skateboard, or causing the rear camera detection func- other light vehicle tion to operate.
Page 327: Pksb (Parking Support Brake)
- Page 328 4-5. Using the driving support systems ● When loading the vehicle onto a boat, WARNING truck or other transport vessel Cautions regarding the use of the sys- ■ If the suspension has been modified or ● tires of a size other than specified are Do not overly rely on the system, as installed doing so may lead to an accident.
- Page 329 4-5. Using the driving support systems When the PKSB (Parking Support Engine output restriction control is Brake) function is off, the driving assist operating (output restricted as information indicator (P.76) will illu- much as possible) minate and a message will be displayed The system has determined that stron- on the multi-information display.
- Page 330 4-5. Using the driving support systems Additionally, if the accelerator pedal continues to be depressed, the brakes will be applied automatically to reduce the vehicle speed. (Brake control: See figure 3.) Figure 1 When the PKSB (Parking Support Brake) is not operating Engine output Braking force Time...
- Page 331 4-5. Using the driving support systems Figure 3 When brake control operates Engine output Braking force Time Engine output restriction control begins operating (System determines that possibility of collision with detected object is high) Brake control begins operating (System determines that possibility of collision with detected object is extremely high) Brake) when it has been disabled due to ■...
- Page 332 4-5. Using the driving support systems vehicle and the system determines that a collision may occur due to the vehicle suddenly moving forward due to an accidental accelerator pedal operation, the vehicle moving the unintended direction due to the wrong shift position, or while parking or traveling at low speeds, the system will operate to lessen the impact with the detected static object and reduce the resulting damage.
- Page 333 4-5. Using the driving support systems When the vehicle moves in the unintended direction due to the wrong shift ■ position Types of sensors • The PKSB (Parking Support Brake) ■ determines that a stronger-than-normal P.310 brake operation is necessary to avoid a collision.
- Page 334 4-5. Using the driving support systems • The static object is no longer approxi- Situations in which the system may ■ mately 6 to 13 ft. (2 to 4 m) away from the operate even if there is no possibility of a vehicle or in the traveling direction of the collision vehicle.
- Page 335 4-5. Using the driving support systems right or left at the rear of the vehicle at a • The collision becomes avoidable with traveling speed of approximately 5 mph normal brake operation. (8 km/h) or more. • A vehicle is no longer approaching from •...
- Page 336 4-5. Using the driving support systems Center display • The vehicle speed is 9 mph (15 km/h) or ■ less. Displays a message to urge the driver • The shift position is in R. • A pedestrian is behind the vehicle. to take evasive action when a pedes- •...
- Page 337 4-5. Using the driving support systems The system will operate in the following situations when a stationary object isde- tected in the surrounding area. When moving forward and a collision with a stationary object on the inner ■ side of a turn is likely When reversing and a collision with a stationary object on the outer side of a ■...
Page 338: Lexus Teammate Advanced Park
- Page 339 4-5. Using the driving support systems Functions ● As with a normal vehicle, take care to observe your surroundings while the vehicle is moving. Perpendicular parking (for- ■ ward/reverse) function Always pay attention to the vehicle’s ● surroundings while the system is oper- Assistance is provided from the posi- ating and depress the brake pedal as tion the vehicle is stopped near the tar-...
- Page 340 4-5. Using the driving support systems ● As the steering wheel will turn while WARNING this system is operating, pay attention Even if there is an object in the target ● to the following. parking space, it may not be detected •...
- Page 341 Cameras and sensors are used to lines or box displayed on the screen detect parked vehicles, making it eas- may become incorrect. When replac- ing the tires, contact your Lexus dealer. ier to identify parking spaces.
- Page 342 For details on the following, refer to “Pan- snow or de-icing agent oramic view monitor (Vehicles equipped • When there marks from repairs or other with Lexus Teammate Advanced Park)” of marks on the road surface, or there is a “Peripheral monitoring system” in the...
- Page 343 (such as shadows from the sor may be misaligned. Have the vehi- grille, side step, etc.) cle inspected by your Lexus dealer. • When accessories which obstruct the • Do not install any accessories near the view of the camera are installed detection area of the sensors.
- Page 344 4-5. Using the driving support systems canceled. Guidance screen (When assistance starts) ■ Operating conditions of the Advanced Park Target parking space box (blue) Assistance will begin when all of the follow- Advice display ing conditions are met: Parking type change button The brake pedal is depressed ●...
- Page 345 (yellow) and approxi- starting the engine again, have the vehicle mately 1 ft. (0.3 m) (red) from the vehicle. inspected by your Lexus dealer. Moving object warning icon Perpendicular parking (for- Emergency support brake control ward/reverse) function operation display “Brake”...
- Page 346 4-5. Using the driving support systems If there is an adjacent parked vehicle Parking using the perpendicular parking (forward/reverse) func- tion Stop the vehicle at a position close and perpendicular to the center of the target parking space. If there are parking space lines ...
- Page 347 4-5. Using the driving support systems parking space is displayed on the display, and assistance will begin operating. center display. When the brake pedal is released, “Moving Forward…”, “Backing Up…” will be displayed and the vehicle will begin moving forward/reverse. ...
- Page 348 4-5. Using the driving support systems completion screen will rotate. ● When parking in a narrow parking space, the vehicle may closely approach an adjacent parked vehicle. If a collision seems likely, depress the brake pedal to stop the vehicle. If a detected parked vehicle is narrow ●...
- Page 349 4-5. Using the driving support systems selection screen is displayed on the Perform operations as indicated by center display. the advice displays until the vehicle is in a position where exit is possi- ble. When the vehicle reaches a position where exit is possible, “You can exit by moving the steering wheel”...
- Page 350 4-5. Using the driving support systems When a vehicle which is waiting to park is If there are parking space lines ● in the exit direction ● When a wall, column, or person is detected as near a front or rear center or corner sensor When the brakes have been operated ■...
- Page 351 4-5. Using the driving support systems If there is an adjacent parked vehicle parking space is displayed on the center display. If a space which your vehicle can be parked is detected, a target parking space box will be displayed. Approximately 3.3 ft.
- Page 352 4-5. Using the driving support systems display, and assistance will begin operating. If you feel that the vehicle is approach- ■ ing close to a surrounding vehicle, object, person, or gutter P.348 “No available parking space” is dis- ■ played Even if the vehicle is stopped parallel to a parking space, an adjacent parked vehicle may not be detected.
- Page 353 4-5. Using the driving support systems Leaving a parking space using the NOTICE parallel exiting function If an adjacent parked vehicle is narrow ● or parked extremely close to the curb, With the brake pedal depressed the position at which assistance will park the vehicle will also be close to and P shift position selected, press the curb.
- Page 354 4-5. Using the driving support systems is in a position where exit is possi- Situations in which the parallel exiting ■ function will not operate ble. In situations such as the following, the paral- When the vehicle reaches a position where lel exiting function will not operate: exit is possible, “You can exit by moving the ●...
- Page 355 4-5. Using the driving support systems the vehicle Continuously select and hold ● When there is excessive space between the front of the vehicle and a parked vehi- When the brakes have been operated ■ P.348 Advanced Park memory func- tion The memory function can be used to park in a previously registered parking...
- Page 356 4-5. Using the driving support systems son, or gutter: P.348 Using the arrow buttons, adjust the position of the parking space to be registered, and then select “OK” button. Perform operations as indicated by the advice displays until the vehicle stops in the target parking space.
- Page 357 4-5. Using the driving support systems The amount that the position of the parking function. parking spot to be registered can be adjusted is limited. When parking in a parking space registered to the memory func- tion Stop the vehicle with it aligned near the center of the target parking space.
- Page 358 4-5. Using the driving support systems ● If a parking space has been registered in situations such as the following, assistance may not be able to be started later or assistance to the regis- tered position may not be possible. •...
- Page 359 4-5. Using the driving support systems ● When using the memory function, NOTICE make sure to stop immediately in front • When the registered parking space of the stop position. Otherwise the cannot be reached due to the exis- parking space may not be able to be tence of parking blocks, etc.
- Page 360 4-5. Using the driving support systems The TRAC, VSC or ABS operates Changing the Advanced Park The engine switch is pressed settings The system determines assistance Select on the center display, and cannot be continued in the current then select “Advanced Park”.
- Page 361 4-5. Using the driving support systems Camera view when parking vehicle, the length of the rear of the ■ vehicle can be adjusted to help avoid The display angle of the camera image colliding with objects to the rear of the when using the perpendicular parking vehicle.
Page 362: Driving Mode Select Switch
- Page 363 4-5. Using the driving support systems and engine to provide quick, powerful Display of the multi-information display ■ according to selected driving mode acceleration. This mode also changes the steering feel, making it suitable for when According to the driving mode selected, the gauges displayed on the multi-informa- agile driving response is desired, such as tion display may change.
Page 364: Trail Mode
Page 365: downhill assist control system, page 366: downhill assist control system365, page 367: driving assist systems.
- Page 368 4-5. Using the driving support systems Adaptive Variable Suspension Sys- ■ and release the switch. tem (if equipped) The “Traction Control Turned OFF” will be By independently controlling the shown on the multi-information display. damping force of the shock absorbers Press the switch again to turn the sys- for each of the 4 wheels according to...
- Page 369 ABS is activated. TRAC is temporary deactivated. If the infor- mation continues to show, contact your ■ Active Cornering Assist operation Lexus dealer. sounds and vibrations Operating conditions of hill-start assist ■ When the Active Cornering Assist is oper-...
- Page 370 If the message disappears after a while, there is no problem. If the message remains, Directional control and power may not have the vehicle inspected by your Lexus be achievable while driving on slippery dealer immediately. road surfaces, even if the TRAC/VSC ●...
- Page 371 Active Cornering vehicle. Assist may temporarily stop operating Contact your Lexus dealer for further to ensure proper operation of the information when replacing tires or brakes, TRAC and VSC. wheels.
- Page 372 4-5. Using the driving support systems WARNING Secondary Collision Brake ■ Do not rely solely upon the Secondary Collision Brake. This system is designed to help reduce the possibility of further damage due to a secondary collision, however, that effect changes according to various conditions.
Page 373: Driving Tips
- Page 374 4-6. Driving tips immediately to prevent it from Park the vehicle and shift the shift freezing. position to P without setting the parking brake. The parking brake To ensure proper operation of the may freeze up, preventing it from climate control system fan, remove being released.
- Page 375 4-6. Driving tips Side chain (0.12 in. [3 mm] in diam- Windshield wipers eter) To enable the windshield wipers to be Side chain (0.43 in. [10.8 mm] in lifted when heavy snow or icy condi- width) tions are expected, change the rest Side chain (0.98 in.
Page 376: Utility Vehicle Precautions
- Page 377 4-6. Driving tips owner’s permission before entering ● After driving through tall grass, mud, private property. rock, sand, rivers, etc., check that there is no grass, bush, paper, rags, stone, Do not enter areas that are closed. sand, etc. adhering or trapped on the Honor gates, barriers and signs that underbody.
- Page 378 4-6. Driving tips NOTICE Inspection after off-road driving ■ ● Sand and mud that has accumulated around brake discs may affect braking efficiency and may damage brake sys- tem components. ● Always perform a maintenance inspection after each day of off-road driving that has taken you through rough terrain, sand, mud, or water.
Page 379: Interior Features
Page 380: lexus climate concierge, page 381: using the air conditioning system and defogger.
- Page 382 5-2. Using the air conditioning system and defogger 9.8-inch center display model Left-hand side temperature control switch Airflow mode control switch Option screen switch Shortcut screen switch Select to display shortcut icons for various functions. Right-hand side temperature control switch “SYNC”...
- Page 383 5-2. Using the air conditioning system and defogger tem will blow ambient temperature air or heated air. : Air flows to the feet and the When the front passenger’s side and the windshield defogger operates rear seats side temperature adjustment switch is operated, adjust the temperature for the driver, front passenger and rear ■...
- Page 384 5-2. Using the air conditioning system and defogger reduce fuel consumption. engine is started and at other times depending on the outside temperature. ● Recirculated air mode is selected as a default mode when the engine switch is ● After the engine is started, if passengers turned to ON.
- Page 385 5-2. Using the air conditioning system and defogger Warming the interior quickly (Max Select the “MAX cool” switch. ■ heat) The temperature setting of the air When “MAX heat” is turned on, in conditioning system will be set to order to warm the interior quickly, the “Lo”...
- Page 386 5-2. Using the air conditioning system and defogger Set the outside/recirculated air mode but- Select the option screen switch. ton to outside air mode if the recirculated (P.381) air mode is used. (It may switch automati- Select the “Deicer” switch. cally.) The windshield wiper de-icer will automati- To defog the windshield and the side win-...
- Page 387 5-2. Using the air conditioning system and defogger “AUTO” switch is turned on, the seat heaters and seat ventilators of the front seats, and the heated steering wheel will be operated automatically according to the temperature setting. Each function can also be adjusted to the ●...
- Page 388 Have repair/replacement performed by surface of the windshield to fog up, your Lexus dealer. blocking your vision. When a part of the air conditioning sys- tem, such as the evaporator, is to be ●...
- Page 389 5-2. Using the air conditioning system and defogger Front side Direct air flow to the left or right, up or down Turn the knob to open or close the vent Rear Direct air flow to the left or right, up or down Turn the knob to open or close the vent...
Page 390: Rear Air Conditioning System
- Page 391 5-2. Using the air conditioning system and defogger Rear air conditioning system con- ■ NOTICE trol panel To prevent battery discharge ■ Do not leave the air conditioning system on longer than necessary when the engine is off. Adjust the rear seats temperature set- ting Press to increase the temperature...
Page 392: Heated Steering Wheel/Seat Heat- Ers/Seat Ventilators
- Page 393 5-2. Using the air conditioning system and defogger Hi (3 segments lit)Mid (2 segments The level indicator (blue) lights up during lit)Lo (1 segment lit)Off operation. “AUTO” indicator lights up during automatic operation. The level indicators (yellow) light up during operation.
Page 394: 5-3. Using The Interior Lights
- Page 395 5-3. Using the interior lights Operating the interior lights Turning the interior lights on/off ■ Touch the light Turning the rear personal lights ■ on/off Touch the light The rear interior lights turn on/off together the front interior lights. Turning the door position on ■...
- Page 396 Never remove the lens for the interior light and personal lights. Otherwise, the lights will be damaged. If the lens need to remove, contact your Lexus dealer. ■ To prevent battery discharge Do not leave the lights on longer than necessary when the engine is not run- ning.
Page 397: Using The Storage Features
- Page 398 5-4. Using the storage features Type B Glove box Press the button, lift up and open the lid. The console box can be opened from either side. Open (pull the lever) Lock with the mechanical key Unlock with the mechanical key ■...
- Page 399 5-4. Using the storage features down the button. ■ When not in use (rear cup holder) Keep the cup holders closed. Injuries may result in the event of an acci- dent or sudden braking. NOTICE To prevent damage to the rear cup ■...
- Page 400 5-4. Using the storage features Overhead NOTICE Press in the lid. Items unsuitable for the bottle hold- ■ Do not place open bottle, glass or paper cups containing liquid in the bottle hold- ers. Otherwise, contained liquid may be spilled.
Page 401: Luggage Compartment Features
- Page 402 5-4. Using the storage features Pull out the luggage cover and Grocery bag hooks hook it onto the anchors. To use the grocery bag hook, push it in. Removing the luggage cover ■ Lift the rear portion of the cover to NOTICE release the left and right anchors ■...
- Page 403 5-4. Using the storage features When closing, reverse the stepslisted. WARNING Luggage cover ■ ● Do not place anything on the luggage cover. In the event of sudden braking or turning, the item may go flying and strike an occupant. This could lead to an unexpected accident, resulting in death or serious injury.
Page 404: 5-5. Using The Other Interior Features
- Page 405 5-5. Using the other interior features Name for all parts ■ NOTICE To prevent damage to external ■ devices ● Do not leave external devices in the vehicle. The temperature inside the vehicle may become high, resulting in damage to an external device. ●...
- Page 406 5-5. Using the other interior features Depending on the portable device, the elapsed since charging completed charging coil may not be located in the and the portable device has not center of the device. In this case, place the been moved, the wireless charger portable device so that its charging coil is will restart charging.
- Page 407 5-5. Using the other interior features Operation indicator light Conditions Charging tray Center display When placing the portable device on the charging Orange (comes area (detecting the portable device) Blue Charging : Charging power will not be output during standby. A metallic object will not be heated, if it is placed on the wireless charger in this state.
- Page 408 5-5. Using the other interior features Operation indicator light Suspected causes/Handling method Charging tray Center display Foreign substance detection: A metallic foreign substance is in the charge area, and so the abnormal heating prevention function of the metallic foreign object operated ...
- Page 409 5-5. Using the other interior features (including the certain genuine manufacture When there is a foreign object between ● parts) and/or accessory attached, it may not the charging area and portable device be possible to charge the portable device. If ●...
- Page 410 ● Do not charge portable devices with aluminum stickers or other metallic Contact your Lexus dealer. objects attached to the side which ■ If the smartphone OS has beenupdated touches the charging area.
- Page 411 5-5. Using the other interior features NOTICE To prevent failure or damage to data ■ ● Do not place magnetic cards, such as a credit card, or magnetic recording media, close to the wireless charger while charging. Otherwise, data may be erased due to the influence of mag- netism.
- Page 412 5-5. Using the other interior features Coat hooks The coat hooks are provided with the rear assist grips. In the luggage compartment Open the lid. WARNING Items that must not be hung on the ■ hook Do not hang coat hangers or other hard or sharp objects on the hook.
- Page 413 5-5. Using the other interior features NOTICE To prevent battery discharge ■ To prevent the battery from being dis- ■ If the vanity lights remain on when the charged engine switch is turned off, the lights will go off automatically after 20 minutes. Do not use the power outlet longer than necessary when the engine is not run- NOTICE...
Page 414: Garage Door Opener
- Page 415 5-5. Using the other interior features Vehicles with auto anti-glare inside ® Codes stored in the HomeLink mem- ■ rear view mirror The registered codes are not erased even ● if the battery cable is disconnected. ● If learning failed when registering a dif- ®...
- Page 416 5-5. Using the other interior features objects are clear of the garage door Vehicles with auto anti-glare inside or other devices to prevent injury or rear view mirror other potential harm. It is recommended that a new bat- tery be placed in the remote control transmitter for more accurate pro- gramming.
- Page 417 5-5. Using the other interior features Vehicles with Digital Rearview Mir- ® when a HomeLink button is pressed and released. ® HomeLink indicator light flashes rapidly: The garage door opener motor or other device is equipped with a rolling code. To complete programming, firmly press and hold ®...
- Page 418 5-5. Using the other interior features Press and release the “Learn” or Vehicles with Digital Rearview Mir- “Smart” button. Perform within 30 seconds after performing 2. Enabling 2-way communication ■ with a garage door (only available Press and hold the desired Home- for compatible devices) ®...
- Page 419 5-5. Using the other interior features Within 1 minute of pressing the ® button. The HomeLink indicator light ® HomeLink button, after the should turn on. garage door operation has The status of the opening and closing stopped, press the “Learn” or of a garage door is shown by the indi- “Smart”...
- Page 420 5-5. Using the other interior features Vehicles with auto anti-glare inside Color Status rear view mirror Currently open- Orange (flashing) ing/closing Opening/closing has Green completed Feedback signals Red (flashing) cannot be received The indicators can operate within approximately 820 ft. (250 m) of the garage door.
Page 421: Maintenance And Care
Page 422: cleaning and protecting the vehicle exterior.
- Page 423 6-1. Maintenance and care Brake pads and calipers ■ WARNING Rust may form if the vehicle is parked with When washing the vehicle ■ wet brake pads or disc rotors, causing them to stick. Before parking the vehicle after it is Do not apply water to the inside of the washed, drive slowly and apply the brakes engine compartment.
- Page 424 Wash carefully. Do not use organic tems may not function correctly. If this ● substances or scrub with a hard brush. occurs, consult your Lexus dealer. This may damage the surfaces of the ● Lexus Safety System + 3 lights.
Page 425: Cleaning And Protecting The Vehicle Interior
- Page 426 6-1. Maintenance and care ● Do not use polish wax or polish WARNING cleaner. The instrument panel’s or Water in the vehicle ■ other interior part’s painted surface may be damaged. ● Do not splash or spill liquid in the vehi- cle.
- Page 427 Allow the leather to dry in a shaded and ventilated area. Caring for leather areas ■ Lexus recommends cleaning the interior of the vehicle at least twice a year to maintain the quality of the vehicle’s interior. Cleaning the synthetic leather areas ...
Page 428: 6-2. Maintenance
Page 429: general maintenance.
- Page 430 6-2. Maintenance Items Check points Items Check points The radiator, con- • The vehicle should Radiator, con- denser and inter- not pull to one side denser and inter- cooler radiator should when the brakes are cooler radiator be free from foreign applied.
- Page 431 6-2. Maintenance Items Check points Items Check points • Do the seat controls • Is the tire inflation Seats operate properly? pressure correct? • The tires should not • Does the steering be damaged or wheel rotate excessively worn. smoothly? Tires •...
Page 432: Emission Inspection And Mainte- Nance (I/M) Programs
Page 433: 6-3. do-it-yourself maintenance.
- Page 434 6-3. Do-it-yourself maintenance Items Parts and tools ■ When working near the electric cool- ing fan or radiator grille Radiator, con- Be sure the engine switch is off. denser and inter- With the engine switch in ON, the elec- cooler radiator tric cooling fan may automatically start to (P.441)
Page 435: Hood
- Page 436 6-3. Do-it-yourself maintenance Rear ■...
Page 437: Engine Compartment
- Page 438 When the outside temperature is low When checking the engine oil, make sure that the engine is warmed up. If the engine oil level exceeds the refill upper limit mark, contact your Lexus dealer. NOTICE To prevent serious engine damage ■...
- Page 439 Call your Lexus dealer, service station or auto parts store for information concerning recycling or disposal. ● Do not leave used engine oil within the reach of children.
- Page 440 6-3. Do-it-yourself maintenance Type B NOTICE When replacing the engine oil ■ ● Be careful not to spill engine oil on the vehicle components. ● Avoid overfilling, or the engine could be damaged. Check the oil level on the dipstick ●...
- Page 441 If you cannot find a leak, have your Lexus dealer test the cap and check for leaks in your Lexus dealer. the cooling system.
- Page 442 6-3. Do-it-yourself maintenance NOTICE If the fluid level is low or high ■ It is normal for the brake fluid level to go down slightly as the brake pads wear out or when the fluid level in the accumulator is high. If the reservoir needs frequent refilling, there may be a serious problem.
- Page 443 If the system will not start even after multiple attempts at all the methods above, contact your Lexus dealer. WARNING ■ Chemicals in the battery Batteries contain poisonous and corro- sive sulfuric acid and may produce If the “UPPER LEVEL”...
- Page 444 6-3. Do-it-yourself maintenance ■ When adding distilled water WARNING Keep children away from the battery. Avoid overfilling. Water spilled during ● battery recharging may cause corrosion. Where to safely charge the battery ■ Always charge the battery in an open Washer fluid area.
Page 445: Tires
- Page 446 If you are not sure, consult with your Lexus dealer. heavy or loose snow. Also, all season tires fall short in acceleration and handling per- ■...
- Page 447 Do not mix differently constructed tires (radial, bias-belted or bias-ply To equalize tire wear and extend tire life, tires). Lexus recommends that tire rotation is car- Do not mix summer, all season and ● ried out at the same interval as tire inspec- snow tires.
- Page 448 A warning with the tire pressure warning erly. light and warning buzzer when there is an • If non-genuine Lexus wheels are used. unknown level of low tire pressure with the • A tire has been replaced with a tire that is appearance of the tire due to natural air not an OE (Original Equipment) tire.
- Page 449 ● If tire position information is not correctly Lexus dealer as the tire pressure warn- displayed due to the radio wave condi- ing valves and transmitters may be tions, the display may be corrected by damaged if not handled correctly.
- Page 450 6-3. Do-it-yourself maintenance The wheel position registration procedure registering the wheel position, the next cannot be performed while the vehicle is time the engine switch is turned to ON, moving. the wheel position registration will resume and it will not be necessary to Select on the center display.
- Page 451 6-3. Do-it-yourself maintenance the tire inflation setting procedure by multi-information display. selecting specified inflation pressure on the center display. (P.451) When the tire inflation pressure is to be other than specified, such as when tires other than the specified size are used, etc., set the tire inflation pressure using the current pressure.
- Page 452 6-3. Do-it-yourself maintenance the above procedure, contact your Lexus Warning performance of the tire pres- ■ dealer. sure warning system (Setting using the current tire inflation pressure) WARNING ● When performing the tire pressure set- When setting using the current tire ting using the current tire inflation pres- ■...
- Page 453 6-3. Do-it-yourself maintenance Check if the desired wheel set (“Set Drive straight (with occasional left 1” or “Set 2”) is displayed. and right turns) at approximately 25 mph (40 km/h) or more for ID codes will be registered to the displayed approximately 10 to 30 minutes.
- Page 454 ● If the ID codes cannot be registered even wheel sets. when performing the above procedure, contact your Lexus dealer. Changing ID codes between dif- ■ ferent wheel sets Canceling ID code registration Install the desired wheel set.
Page 455: Tire Inflation Pressure
- Page 456 Damage to the drive train ● expansion joints, sharp edges in the If a tire needs frequent inflating, have it road, etc.) checked by your Lexus dealer. Instructions for checking tire inflation ■ pressure When checking tire inflation pressure, observe the following: ●...
Page 457: Wheels
- Page 458 Wheel bolts ■ Observe the following precautions to Aluminum wheel precautions reduce the risk of death or serious injury: Use only Lexus wheel bolts and ● Do not over tighten. wrenches designed for use with ● Never use oil or grease on the wheel your aluminum wheels.
Page 459: Air Conditioning Filter
Page 460: electronic key battery.
- Page 461 ● stop using the electronic key and stow the key in the place where children cannot reach, and then contact your Lexus dealer. ● If you accidentally swallow a battery or put a battery into a part of your body, get emergency medical attention immediately.
Page 462: Checking And Replacing Fuses
- Page 463 Never use a fuse of a higher amperage ● rating than that indicated, or use any other object in place of a fuse. ● Always use a genuine Lexus fuse or equivalent. Never replace a fuse with a wire, even as a temporary fix. ●...
Page 464: Headlight Aim
Page 465: light bulbs.
- Page 466 The lights other than the front turn signal lights (bulb type) each consist of a number of LEDs. If any of the LEDs burn out, take your vehicle to your Lexus dealer to have the light replaced. Condensation build-up on the inside of ■...
- Page 467 6-3. Do-it-yourself maintenance Remove the light bulb. ■ Replacing light bulbs Turn off the lights. Do not attempt to ● replace the bulb immediately after turning off the lights. The bulbs become very hot and may cause burns. Do not touch the glass portion of the ●...
- Page 468 6-3. Do-it-yourself maintenance...
Page 469: When Trouble Arises
Page 470: emergency flashers, page 471: if the vehicle is submerged or water on the road is rising.
- Page 472 Laminated glass cannot be shattered with an emergency hammer : Contact your Lexus dealer or aftermar- ket accessory manufacturer for further information about an emergency ham- mer. : If equipped ■...
Page 473: Steps To Take In An Emergency
- Page 474 7-2. Steps to take in an emergency From the rear AWD models Be sure to transport the vehicle with all four wheels raised off the ground. If the vehicle is towed with the tires contacting the ground, the drivetrain or related parts may be damaged, the vehicle may fly off the truck.
- Page 475 7-2. Steps to take in an emergency vehicle, the towing eyelet must be NOTICE installed to your vehicle. Install the tow- ing eyelet using the following proce- dure. Except F SPORT models: Take out the towing eyelet. (P.501) F SPORT models: Take out the flat- head screwdriver and towing eye- let.
- Page 476 7-2. Steps to take in an emergency Insert the towing eyelet into the WARNING hole and tighten partially by hand. Observe the following precautions. Fail- ure to do so may result in death or seri- ous injury. ■ While towing ●...
Page 477: If You Think Something Is Wrong
Page 478: fuel pump shut off system, page 479: if a warning light turns on or a warning buzzer sounds.
- Page 480 ■ Warning light Details/Actions Indicates a malfunction in the vehicle’s charging system Immediately stop the vehicle in a safe place and contact your Lexus dealer. : This light illuminates on the multi-information display. Low engine oil pressure warning light (warning buzzer) ■...
- Page 481 ■ Warning light Details/Actions Indicates a malfunction in: (U.S.A.) The ABS; or The brake assist system Have the vehicle inspected by your Lexus dealer immediately. (Canada) Inappropriate pedal operation warning light (warning buzzer) ■ Warning light Details/Actions When a buzzer sounds: ...
- Page 482 7-2. Steps to take in an emergency Low fuel level warning light ■ Warning light Details/Actions Indicates that remaining fuel is approximately 2.8 gal. (10.5 L, 2.3 Imp. gal.) or less Refuel the vehicle. Driver’s and front passenger’s seat belt reminder light (warning buzzer) ■...
- Page 483 Stop & Start cancel indicator (warning buzzer) ■ Warning light Details/Actions Indicates a malfunction in the Stop & Start system Have the vehicle inspected by your Lexus dealer immediately. (flashes) Intuitive parking assist OFF indicator (warning buzzer) ■ Warning light...
- Page 484 7-2. Steps to take in an emergency LTA indicator (warning buzzer) ■ Warning light Details/Actions Indicates a malfunction in the LTA (Lane Tracing Assist). Follow the instructions displayed on the multi-information display. (orange) LDA indicator (warning buzzer) ■ Warning light Details/Actions Indicates a malfunction in the LDA (Lane Departure Alert).
- Page 485 The Trailer Sway Control; The Trail Mode function ; or (illuminates) The hill-start assist control system Have the vehicle inspected by your Lexus dealer immediately. : If equipped Parking brake indicator (warning buzzer) ■ Warning light...
- Page 486 Brake hold operated indicator (warning buzzer) ■ Warning light Details/Actions Indicates a malfunction in the brake hold system Have the vehicle inspected by your Lexus dealer immediately. (flashes) If it is, fill the fuel tank immediately. Warning buzzer ■...
- Page 487 If the vehicle tires deteriorate, you Stop your vehicle in a safe place immedi- could lose control of the steering ately and contact your Lexus dealer. wheel or the brakes. The vehicle will become extremely If a blowout or sudden air leakage ■...
- Page 488 7-2. Steps to take in an emergency Your vehicle has also been equipped with WARNING a TPMS (tire pressure warning system) Maintenance of the tires ■ malfunction indicator to indicate when the system is not operating properly. The Each tire, including the spare (if pro- TPMS (tire pressure warning system) vided), should be checked monthly when malfunction indicator is combined with...
Page 489: If A Warning Message Is Displayed
- Page 490 If after driving for a while the message does not dis- appear or it comes on and off frequently, contact your Lexus dealer. If “Auto Power OFF to Conserve Battery” is displayed ■ Cause...
- Page 491 ■ Owner’s Manual” is displayed Cause Actions Immediately stop the vehicle and contact your Lexus It may indicate a malfunction. dealer. Continuing to drive the vehicle may be dan- gerous. If “Tire Set Switching Incomplete Try Tire Set Registration Again See Owner’s ■...
- Page 492 Have the vehicle checked by your Lexus dealer. tion relating to the charging system or the battery may be deteriorating. If a message that indicates the need for visiting your Lexus dealer is displayed ■ Cause Actions...
- Page 493 If “Shift System Malfunction Apply Parking Brake Securely When Parking ■ See Owner’s Manual” is displayed Cause Actions Have the vehicle inspected by your Lexus dealer It may indicate a malfunction. immediately. If “P Switch Malfunction Apply Parking Brake Securely When Parking See ■...
- Page 494 7-2. Steps to take in an emergency If “Battery Low Shifting Unavailable See Owner’s Manual” is displayed ■ Cause Actions Have the vehicle inspected by your Lexus dealer It may indicate a malfunction. immediately. If “System Malfunction Visit Your Dealer” is displayed ■...
- Page 495 AHS (Adaptive High-beam System) Check the voltage of the battery Dynamic radar cruise control system Check the sensors that the Lexus RSA (Road Sign Assist) Safety System+ 3 uses for foreign PDA (Proactive Driving Assist) matter covering them.
- Page 496 7-2. Steps to take in an emergency If “System Stopped Front Camera Low Visibility See Owner’s Manual” is dis- ■ played Cause Actions Indicates one of the following systems is disabled. Follow the following correction PCS (Pre-Collision System) methods. ...
- Page 497 7-2. Steps to take in an emergency If “System Stopped Front Radar Sensor Blocked Clean Radar Sensor” is dis- ■ played Cause Actions Follow the following correction methods. Check if there is any foreign mat- Indicates one of the following systems is disabled. ter attached to the radar sensor or ...
- Page 498 7-2. Steps to take in an emergency If “System Stopped Front Radar In Self Calibration See Owner’s Manual” is ■ displayed Cause Actions Follow the following correction Indicates one of the following systems is disabled. methods. PCS (Pre-Collision System) ...
- Page 499 7-2. Steps to take in an emergency If “Driver Monitor Unavailable See Owner’s Manual” is displayed (on some ■ models) Cause Actions The lens of the driver monitor cam- When there is dirt on the camera lens, clean it with a era may be dirty.
Page 500: If You Have A Flat Tire
- Page 501 7-2. Steps to take in an emergency Location of the spare tire, jack and tools Spare tire Screwdriver Jack handle Towing eyelet Wheel bolt wrench Guide pin Wheel bolt socket Jack Only use the tire jack that comes with ● WARNING this vehicle for replacing a flat tire.
- Page 502 7-2. Steps to take in an emergency Taking out the spare tire WARNING Do not raise the vehicle while some- ● Secure the deck board using the one is inside. hook. (P.403) ● When raising the vehicle, do not put an Loosen the center fastener that object on or under the jack.
- Page 503 7-2. Steps to take in an emergency Install the wheel bolt wrench to the Wheel chock posi- Flat tire jack handle. tions In front of the front Rear left-hand side right-hand side tire In front of the front Rear right-hand side left-hand side tire Using a wheel bolt wrench, slightly loosen the wheel bolts (approxi-...
- Page 504 7-2. Steps to take in an emergency avoid scratching the wheel surface. Securely set the spare tire so that its wheel is touching the contact surface. WARNING Loosely tighten each wheel bolt by ■ Replacing a flat tire hand or using a wheel bolt socket Do not touch the disc wheels or the area around the brakes immediately after the Push the spare tire to prevent it from falling.
- Page 505 7-2. Steps to take in an emergency Lower the vehicle. When the spare tire is equipped ■ The vehicle becomes lower when driving with the spare tire compared to when driv- ing with standard tires. If you have a flat front tire on a road cov- ■...
- Page 506 Also, do not use any wheel braking. bolts other than Lexus Genuine wheel bolts. ■ When the spare tire is attached ●...
- Page 507 7-2. Steps to take in an emergency ■ Driving with tire chains and the spare WARNING tire • Lexus parking assist monitor (if equipped) Do not fit tire chains to the spare tire. Tire chains may damage the vehicle body • Panoramic view monitor (if equipped) and adversely affect driving perfor- mance.
Page 508: If The Engine Will Not Start
Page 509: if you lose your keys, page 510: if the electronic key does not operate properly.
- Page 511 (P.196) Ensure that the shift position is in P and depress the brake pedal. Touch the Lexus emblem side of the electronic key to the engine switch.
Page 512: If A Door Cannot Be Opened Using The Door Opener Switch
- Page 513 7-2. Steps to take in an emergency Enabling outside manual release handle cannot be used to open the doors. ■ operation using the mechanical key When operation is enabled by operating a Operation of a manual release handle can manual release handle or using a mechani- be enabled by unlocking a door with the cal key, operation will be disabled automat- mechanical key.
Page 514: If The Vehicle Battery Is Discharged
- Page 515 Start the engine of the second vehi- Once the engine starts, have the vehi- cle. Increase the engine speed cle inspected at your Lexus dealer as slightly and maintain at that level for soon as possible. approximately 5 minutes to recharge the battery of your vehi- ■...
- Page 516 To avoid damage, do not apply excessive ● Information stored in the ECU is cleared. When the battery is depleted, have the vehicle inspected at your Lexus dealer. Some systems may require initialization. ● (P.559)
- Page 517 Also, battery perfor- mance may decrease and the engine may Charging the battery ■ not be able to restart. Contact your Lexus The electricity stored in the battery will dis- dealer for details. charge gradually even when the vehicle is ●...
- Page 518 7-2. Steps to take in an emergency For details, consult your Lexus dealer. ● Do not lean over the battery. In the event that battery fluid comes ● WARNING into contact with the skin or eyes, immediately wash the affected area When removing the battery terminals ■...
Page 519: If Your Vehicle Overheats
- Page 520 Water can be used in an emergency if peratures.) coolant is unavailable. If the fan is not operating: Stop the engine immediately and contact your Lexus dealer. If the fan is operating: Have the vehicle inspected at the nearest Lexus dealer. Check if “Engine Coolant Temp...
- Page 521 Avoid contaminating the coolant with multi-information display. foreign matter (such as sand or dust, etc.). If the message does not disappear: Stop the engine and contact your Lexus Do not use any coolant additive. ● dealer. If the message is not displayed: Have the vehicle inspected at the nearest Lexus dealer.
Page 522: If The Vehicle Becomes Stuck
- Page 523 Vehicle specifications 8-1. Specifications Maintenance data (fuel, oil level, etc.) ..........Fuel information......Tire information......8-2. Customization Customizable features....543 8-3. Initialization Items to initialize ......559...
Page 524: Etc.)
- Page 525 8-1. Specifications Label. On some models, this number is also stamped under the right-hand front Engine number ■ seat. The engine number is stamped on the engine block as shown. This number is also on the Certification Engine Model T24A-FTS 4-cylinder in line, 4-cycle, gasoline (with tur- Type bocharger)
- Page 526 ■ starting of the engine in cold “Toyota Genuine Motor Oil” is used in weather. your Lexus vehicle. Use Lexus • The 20 in 0W-20 indicates the vis- approved “Toyota Genuine Motor Oil” cosity characteristic of the oil when or equivalent to satisfy the following the oil is at high temperature.
- Page 527 Do not use plain water alone. : The coolant capacity is a reference quantity. If replacement is necessary, contact your Lexus dealer. Ignition system (spark plug) Make NGK DILZKAR8E7H 0.03 in.
- Page 528 Oil type and viscosity or equivalent Your Lexus vehicle is filled with “Toyota Genuine Differential Gear Oil” at the fac- tory. Use Lexus approved “Toyota Genuine Differential Gear Oil” or an equivalent of matching quality to satisfy the above specification. Please contact your Lexus dealer for further details.
- Page 529 8-1. Specifications tory. Use Lexus approved “Toyota Genuine Differential Gear Oil” or an equivalent of matching quality to satisfy the above specification. Please contact your Lexus dealer for further details. Brakes 4.2 in. (106 mm) Min. Pedal clearance Pedal free play 0.04 ...
- Page 530 8-1. Specifications Tires and wheels Type A Tire size 235/60R19 103V, T165/90D18 107M (spare) Front 33 psi (230 kPa, 2.3 kgf/cm or bar) Rear 33 psi (230 kPa, 2.3 kgf/cm or bar) Spare Tire inflation pressure (Recommended cold tire 60 psi (420 kPa, 4.2 kgf/cm or bar)
- Page 531 8-1. Specifications Type C Tire size 235/50R21 101V, T165/70D20 119M (spare) Front 33 psi (230 kPa, 2.3 kgf/cm or bar) Rear 33 psi (230 kPa, 2.3 kgf/cm or bar) Spare Tire inflation pressure (Recommended cold tire 60 psi (420 kPa, 4.2 kgf/cm or bar) inflation pressure)
Page 532: Fuel Information
- Page 533 8-1. Specifications driving uphill. This is normal and there is no need for concern. NOTICE Notice on fuel quality ■ ● Do not use improper fuels. If improper fuels are used, the engine will be dam- aged. ● Do not use leaded gasoline. Leaded gasoline can cause damage to your vehicle’s three-way catalytic con- verters causing the emission control...
Page 534: Tire Information
- Page 535 8-1. Specifications A radial tire has “RADIAL” on the sidewall. A tire not marked “RADIAL” is a bias-ply tire. TUBELESS or TUBE TYPE A tubeless tire does not have a tube and air is directly put into the tire. A tube type tire has a tube inside the tire and the tube maintains the air pressure.
- Page 536 This information has been prepared in accordance with regulations issued by the National Highway Traffic Safety Administration of the U.S. Department of Transportation. It provides the purchasers and/or pro- spective purchasers of Lexus vehicles with information on uniform tire quality Section width grading.
- Page 537 8-1. Specifications Your Lexus dealer will help answer any ahead) traction tests and does not include questions you may have as you read this cornering (turning) traction. information. Temperature A, B, C ■ DOT quality grades ■ The temperature grades are A (the...
- Page 538 8-1. Specifications Glossary of tire terminology Tire related term Meaning Tire pressure when the vehicle has been parked for Cold tire inflation pressure three hours or more, or has not been driven more than 1 mile or 1.5 km under that condition The maximum cold inflated pressure to which a tire Maximum inflation pressure may be inflated, shown on the sidewall of the tire...
- Page 539 8-1. Specifications Tire related term Meaning A metal support for a tire or a tire and tube assem- bly upon which the tire beads are seated Rim diameter (Wheel diameter) Nominal diameter of the bead seat Rim size designation Rim diameter and width The industry manufacturer’s designation for a rim Rim type designation by style or code...
- Page 540 8-1. Specifications Tire related term Meaning Any parting within the tread, sidewall, or innerliner Cracking of the tire extending to cord material A pneumatic tire with an inverted flange tire and rim system in which the rim is designed with rim flanges pointed radially inward and the tire is designed to fit on the underside of the rim in a manner that encloses the rim flanges inside the air cavity of the...
- Page 541 8-1. Specifications Tire related term Meaning Outer diameter The overall diameter of an inflated new tire The linear distance between the exteriors of the Overall width sidewalls of an inflated tire, including elevations due to labeling, decorations, or protective bands or ribs A tire intended for use on passenger cars, multipur- pose passenger vehicles, and trucks, that have a Passenger car tire...
- Page 542 8-1. Specifications Tire related term Meaning The rim on which a tire is fitted for testing, and may Test rim be any rim listed as appropriate for use with that tire That portion of a tire that comes into contact with Tread the road A tread section running circumferentially around a...
Page 543: Customization
- Page 544 8-2. Customization Definition of symbols: O = Available, — = Not available Gauges, meters and multi-information display (P.74, 78, 91) ■ The language, units of measure, etc. of some items displayed on the meter or multi-information display will be changed according to settings on the center dis- play.
- Page 545 8-2. Customization Function Default setting Customized setting Climate Left steering wheel switch Audio — favorite functions Custom Switch sensor high sensitivity — mode (winter glove mode) High Sensitivity for starting display Standard — Short Time-out period Standard — Long : This setting changes in accordance with My Settings Door lock (P.105, 510) ■...
- Page 546 8-2. Customization Function Default setting Customized setting 0.6 Seconds Operating from inside the cabin: 0.6 Seconds Operating from out- side: Unlatch while Inside/outside door opener Unlatch while Push- Pushing switch — switch operating method ing switch Operating from inside the cabin: Unlatch while Push- ing switch Operating from out-...
- Page 547 8-2. Customization Function Default setting Customized setting The function that validates the switch of the wireless — remote control when locking the door Close & lock (walk away) func- — tion Hands free close & lock func- — tion : Configured by operating the switch of the lower back door.
- Page 548 8-2. Customization Function Default setting Customized setting Number of consecutive door 2 times As many as desired — lock operations Time elapsed before unlocking all the door when gripping and 2 seconds 1.5 seconds — holding the driver’s door han- 2.5 seconds Wireless remote control (P.100, 105, 110) ■...
- Page 549 8-2. Customization : This setting changes in accordance with My Settings Outside rear view mirrors (P.152) ■ Function Default setting Customized setting Linked to the lock- Automatic mirror folding and ing/unlocking of the — Linked to operation extending operation doors of the engine switch Power windows, and moon roof or panoramic moon roof...
- Page 550 8-2. Customization Lights (P.210) ■ Function Default setting Customized setting — Daytime running lights Welcome lighting — : This setting changes in accordance with My Settings : Except for Canada Adaptive High-beam System (P.212) ■ Function Customized setting Adaptive High-beam System —...
- Page 551 8-2. Customization : This setting changes in accordance with My Settings Lane Departure Alert system (P.256) ■ Function Customized setting ON/OFF — Lane Departure Alert system Default/Earlier — Alert timing Vibration/Audible — Alert options : This setting changes in accordance with My Settings Lane Change Assist (P.253) ■...
- Page 552 8-2. Customization : This setting changes in accordance with My Settings Road Sign Assist (P.270) ■ Function Customized setting ON/OFF — Road Sign Assist None/Visual/Visual and Audible — Excess speed notification method None/Visual/Visual and Audible — Other notifications method 5 mph (10 km/h) / 3 mph (5 km/h) / 1 —...
- Page 553 8-2. Customization Stop & Start system (P.296) ■ Function Default setting Customized setting Change the Stop & Start sys- tem duration when the A/C is Standard Extended — BSM (Blind Spot Monitor) (P.301) ■ Function Default setting Customized setting BSM (Blind Spot Monitor) —...
- Page 554 Default setting Customized setting PKSB (Parking Support Brake) — function : If equipped : This setting changes in accordance with My Settings *1, 2 Lexus Teammate Advanced Park (P.338) ■ Function Default setting Customized setting Slow Vehicle speed during opera- Normal —...
- Page 555 8-2. Customization Function Default setting Customized setting Park position adjustment (for- -3 (Rearward) to 3 0 (Centered) — ward) (Frontward) Park position adjustment -3 (Rearward) to 3 0 (Centered) — (reverse) (Frontward) 3.9 in. (10 cm) 7.9 in. (20 cm) Rear accessory setting —...
- Page 556 8-2. Customization Engine switch (P.194) ■ Function Customized setting ACC customization On/Off Enabling/Disabling ACC mode Rear seat reminder (P.107) ■ Function Default setting Customized setting — Rear seat reminder function : This setting changes in accordance with My Settings Front automatic air conditioning system (P.381) ■...
- Page 557 8-2. Customization Heated steering wheel (P.392) ■ Function Default setting Customized setting Steering wheel heating prefer- Standard -2 (low) to 2 (high) ence in automatic mode : If equipped : This setting changes in accordance with My Settings Illumination (P.394) ■...
- Page 558 8-2. Customization Function Default setting Customized setting Operation of the outer foot — lights when a door is opened Fading out of the outer foot Long Short — lights when they turn off Operation of interior lights and outer foot lights after the doors —...
Page 559: Initialization
- Page 560 8-3. Initialization...
Page 561: For Owners
Page 562: u.s. owners, page 563: seat belt instructions for canadian owners (in french), page 564: srs airbag instructions for canadian owners (in french).
- Page 565 9-1. For owners • Peut contribuer à empêcher les occupants d’être éjectés du véhicule en cas de tonneau Votre véhicule est équipé de COUSSINS GONFLABLES INTELLIGENTS conçus selon les normes de sécurité américaines applicables aux véhicules à moteur (FMVSS208). L'ensemble des capteurs de coussins gonflables (ECU) régule le déploiement des coussins gonflables sur la base des informations qu'il reçoit des capteurs, etc., indiqués ci-dessus dans le schéma illustrant les com- posants du système.
- Page 566 Lexus recom- et de votre cou. Réglez votre siège mande vivement d'installer tous les selon les recommandations de la nourrissons et enfants sur les sièges...
- Page 567 9-1. For owners ● Ne fixez rien et ne posez rien sur des AVERTISSEMENT emplacements tels que la planche de Les occupants des sièges avant ne ● bord, la garniture du volant et la partie doivent en aucun cas tenir d'objets sur inférieure du tableau de bord.
- Page 568 Évitez de faire subir des chocs ou des suivantes sans consulter votre conces- pressions excessives aux composants sionnaire Lexus. Les coussins gonflables des systèmes de coussins gonflables SRS peuvent ne pas fonctionner cor- SRS, aux portes avant ou à leur zone rectement ou se déployer involontaire-...
Page 569: Headlight Aim Instructions For Canadian Owners (In French)
- Page 570 Réglage du faisceau des phares Si vous n'arrivez pas à régler le phare en procédant de la sorte, confiez le véhicule à votre concessionnaire Lexus pour qu'il À l'aide d'un tournevis cruciforme, règle le faisceau des phares. tournez le boulon A dans n'importe Véhicules sans phares à...
Page 571: Index
Page 572: what to do if.
- Page 573 What to do if... (Troubleshooting) The engine switch is turned off A warning buzzer sounds when automatically leaving the vehicle The auto power off function will be Is the message displayed on the operated if the vehicle is left in ACC multi-information display? or ON (the engine is not running) Check the message on the multi-informa-...
Page 574: Alphabetical Index
- Page 575 Alphabetical Index Brightness control Rear door child-protectors ....109 Instrument panel light control ....84 Seat belt extender precautions....28 BSM (Blind Spot Monitor)......301 Seat belt precautions ........43 Buzzer Child-protectors........... 109 Driver monitor..........236 Cleaning Exterior............422 Interior .............425 Radar sensor..........231 Camera Seat belts............425 Driver monitor..........
- Page 576 Alphabetical Index Display Driving position memory......164 center display............91 Memory recall function......166 Dynamic radar cruise control ..... 275 Power easy access system ....164 Head-up display ........88, 91 Driving range ........... 92 Intuitive parking assist......... 311 Driving support system information ..97 Multi-information display....85, 91 DSC (Drive-Start Control) .......178 RCD (Rear Camera Detection)..
- Page 577 Alphabetical Index If your vehicle becomes stuck..... 522 Event data recorder (EDR)......9 If your vehicle has to be stopped in an emergency ..........470 If your vehicle needs to be towed..473 FCTA (Front Cross Traffic Alert)..267 If your vehicle overheats......519 Fixed with an ISOFIX lower anchorage58 Engine Flat tire...
- Page 578 Alphabetical Index Wattage............531 Heaters Fuel Front automatic air conditioning system Capacity............525 ................381 Fuel gauge ..........78, 80 Heated steering wheel......392 Fuel pump shut off system ....478 Outside rear view mirrors....386 Information............532 Rear air conditioning system ....390 Refueling ............225 Seat heaters ..........392 Type..............525 High mounted stoplight...
- Page 579 Turn signal lever .........204 Electronic sunshade........161 Wiper lever.............219 Moon roof ............158 Lexus climate concierge ......380 Panoramic moon roof........ 161 Lexus Safety System + 3 Power back door...........117 AHS (Adaptive High-beam System) 212 Power windows........... 155 Driver monitor..........236 Rear seats ............132 Dynamic radar cruise control....
- Page 580 Alphabetical Index Rear personal lights........395 AWD Control ..........96 Replacing light bulbs........466 Boost gauge............94 Turn signal lever.........204 Drive information .......... 92 Vanity lights ............413 Driving information display...... 92 Wattage............531 Driving support system information..97 LTA (Lane Tracing Assist) Dynamic radar cruise control....275 Operation............248 Eco Driving Indicator........93 Luggage cover ..........
- Page 581 Alphabetical Index BSM (Blind Sport Monitor) ....301 PKSB (Parking Support Brake)..... 327 Folding ..............153 Pop-up display information......97 Linked mirror function when reversing Power back door..........110 ................153 Hands Free Power Back Door ..... 114 Mirror position memory......164 Smart access system with push-button Outside rear view mirror defoggers386 start ..............111 RCTA function..........319...
- Page 582 Alphabetical Index Turn signal lever.........204 Seat belt pretensioners ......29 Wattage............531 SRS warning light........480 Rear view mirror Seat heaters ........... 392 Digital Rear-view Mirror......143 Seat position memory........164 Inside rear view mirror......142 Seat ventilators..........392 Outside rear view mirrors ......152 Seating capacity..........182 Rear window defogger ......386 Seats...
- Page 583 Alphabetical Index Side mirrors Automatic High Beam system..... 215 Adjustment............152 Brake Hold switch........207 BSM (Blind Sport Monitor) ....301 Digital Rear-view Mirror control switches Folding ..............153 ................143 Linked mirror function when reversing Door lock switches ........107 ................153 Driving mode select switch ....362 Mirror position memory......164 Driving position memory switches ..
- Page 584 Alphabetical Index Snow tires ............373 Spare tire............500 Tachometer..........78, 80 Tire inflation pressure display function Rev indicator........... 82 ................447 Rev peak ............82 Tire pressure warning system .....447 Tail lights Warning light ..........483 Light switch.............210 Tools..............501 Replacing light bulbs........466 Top tether anchorage........
- Page 585 Alphabetical Index Vehicle Stability Control (VSC) ... 367 Intuitive parking assist OFF indicator Ventilators (seat ventilators)....392 ................. 483 VSC (Vehicle Stability Control) ... 367 LDA indicator..........484 Low engine oil pressure......480 Low fuel level ..........482 LTA indicator ..........484 Warning buzzers Malfunction indicator lamp....
- Page 586 Alphabetical Index For information regarding the equipment listed below, refer to the “MULTIMEDIA OWNER’S MANUAL”. · Voice control system · Navigation system · Audio/visual system · Panoramic view monitor · Lexus parking assist monitor...
- Page 587 Alphabetical Index...
- Page 588 Certifications Smart access system with push-button start ...
- Page 590 Digital Key ...
- Page 593 Tire pressure warning system ...
- Page 595 Millimeter wave radar sensor ...
- Page 596 Smart access system with push-button start and engine immobilizer system ...
- Page 598 Safety Connect ...
- Page 599 Wireless charger ...
- Page 601 Blind Spot Monitor ...
- Page 602 Intuitive parking assist Garage door opener ...
- Page 604 GAS STATION INFORMATION Auxiliary catch lever (P.435) Fuel filler door (P.225) Hood lock release lever (P.435) Tire inflation pressure (P.530) Fuel filler door opener (P.225) Fuel tank capacity (Ref- 17.8 gal. (67.5 L, 14.8 Imp. gal.) erence) P.525 Fuel type Unleaded gasoline only P.532 Cold tire inflation pres-...
Rename the bookmark
Delete bookmark, delete from my manuals, upload manual.
- / Questions
- / WHERE is the Odometer Trip B reset device in my new 2017 RX350?
WHERE is the Odometer Trip B reset device in my new 2017 RX350?
Asked by Premio_3066 Mar 04, 2017 at 08:11 AM about the 2017 Lexus RX
Question type: General
I have found 2 pages in manual , neither of which has helped me figure out how to reset the odometer trip meter fro Trip A to Trip B.
Premio_3066 answered 7 years ago
Duh! Anyone else who has experience inside the 2017 RX 350? I'VE SEARCHED MANUAL AND THE INFO IT GIVES MIGHT APPLY TO MY 2012 , BUT DOESN'T APPLY TO 2017.
HappyGoLucky1978 answered 7 years ago
Hi, It's right next to the vent on Driver side. You have to bend over the steering to look at it :). Awkward, I agree ;) Thanks and Regards Sagi

Guru5BV6G answered 6 years ago
OMG that is NOT where the manual shows it to be ! They need to correct the book ! Thanks, I found it !
GuruY4B4L answered 6 years ago
My odometer reading on my new Lexas 350 is 9876.what does this mean.
GuruWCL5B answered 5 years ago
Thank U! I couldn't find it either. In my next life, I am going to be a CORRECT Manual Writer !
GuruV7KMF answered 5 years ago
Thank you, I have a 2016 and that was very helpful.
lori answered 5 years ago
There is a small button on the dashboard to the left of the steering wheel that says “Trip Odo.” Push the button to view different trip odometers and also the total mileage. Very user unfriendly car.
CluelessLexusOwner answered 5 years ago
Thanks! This is very helpful where the car manual WAS NOT! You guys rock!
MustafaSuhail answered 4 years ago
It is right here

2017is300 answered 4 years ago
Thanks for the info, guys. This has been driving me nuts for weeks. I have a 2017 IS300. It's located to the left of the steering wheel, just below the AC vent.

Your Answer:
Related questions, where is the odometer trip b reset device in my new 2017 rx350 11 answers.
I have found 2 pages in manual , neither of which has helped me figure out how to reset the odometer trip meter fro Trip A to Trip B.
2017 Lexus RX
I own a 2017 RX350. Why is higher off the ground than other RX's ? 3 Answers
I own a 2017 RX350 Lexus. Why is it higher off the ground than other RX350's ?
2017 Lexus RX 350 AWD
2017 RX350 Ipod compatible models 1 Answer
I've recently upgraded by 2004 RX350 to a 2017 RX350. The owner's manual is specific in listing which ipod touch generations are compatible. The list stops at ipod touch generation 5. The last ge...
I bought the 2013 lexus RX350 at Hendrick in Frisco. Is there a way that I could get a copy of the photos for that car? 1 Answer
I bought the 2013 lexus RX350 at the Hendrick in Frisco. Is there a way that I could get a copy of the photos for that car?
2013 Lexus RX 350 AWD
on a 2012 RX350, when you set the 4 x 4 in lock position is it truly in 4 wheel drive or is it in AWD on demand. 2 Answers
I want to take the vehicle on access roads in Sedona AZ that lead to trails which can have some large rocks. I tried driving this road with a Ford Edge AWD and it didn't work.
2012 Lexus RX 350 AWD

Looking for a Used RX in your area?
CarGurus has 13,890 nationwide RX listings starting at $900 .
Own this car?
Share your experience with others..
Review another car
- Lexus RX Questions
- All Questions
- Ask a Question
- Lexus RX Reviews
- Lexus RX For Sale
Search Lexus RX Questions
Cargurus experts.
- #1 tenspeed Reputation 8,290
- #2 Papaobewon Reputation 5,460
- #3 Nicolaos Vlachos Reputation 5,040
Know more, shop wisely
Related models for sale, used cars for sale.
Content submitted by Users is not endorsed by CarGurus, does not express the opinions of CarGurus, and should not be considered reviewed, screened, or approved by CarGurus. Please refer to CarGurus Terms of Use . Content will be removed if CarGurus becomes aware that it violates our policies.

- Remember me Not recommended on shared computers
Forgot your password?
Or sign in with one of these services
- 10 - 15 Lexus RX350 / RX450h
Reset Oil Maintenance Required Light
By lexus843 July 1, 2010 in 10 - 15 Lexus RX350 / RX450h
- Reply to this topic
- Start new topic
Recommended Posts
Could someone please adivse me on how to reset the oil maintenance required light on the car. Thanks!
Link to comment
Share on other sites.
The answer is in the manual. I don't remember the exact details, but they are like "keep the car on ODO, press button, keep pressed as you turn ignition on, let it show change, then let go button, turn off." Not difficult and, as I said , in the manual.
The procedure to reset the oil maintenance log is included in the manual. I just changed my oil at 2300 miles; followed the procedure for resetting and it worked! Good luck!

With the car off hold down the trip meter reset button and switch the car on while holding the trip meter. You will see a count down on the center of the dash. When it has finished, release. You have to start with odo in display not trip A but not a 100% sure about that. It may be you have to start in trip A when you start. One or the other.
- 2 months later...
The procedure that worked for me on my 2010 RX 350 is as follows:
1. Make sure the trip/odo is in the Trip A selection.
2. Hold down the ODOD/TRIP button while turning the car on.
3. It immediately goes to resetting oil maintenance message and quickly reset it.

Most customers want that we do Professions Power Leveling, Honor killing Power Leveling and Reputation Power Leveling for them. Now we offer the special prices that get 10% off. Thanks our loyal customers choose our service and we will still offer more specials RuneScape Gold for you. We still focus on the speed of trading RuneScape Gold . So we are collecting wow gold to our stock 24/7 non-stop. And we are so happy that there are many loyal customers choose our service for the . We will still do the fastest delivery to our lovely customers. Come on ,chick it to Buy WOW Gold .
This guy is posting this(what is it?) all over the forum. My advice is to disregard. If you can figure out what it is let me know!
- 3 weeks later...
I must be dense. First of all I searched the manual for a half-hour and couldn't find the oil maintenance required reset procedure. I searched because the very clear and concise procedures offered above didn't work. I tried leaving the ODO display on each choice and then turned the car off. With the ODO button pushed in I turned the car back on. The Oil Maintenance Required display is still on. Any other suggestions? (If you know what page in the 2010 RX350 owners manual the procedure is I would sure appreciate it). This is very frustrating for what appears to be a small, seemingly simple, thing. Please don't take the time to confirm that I'm dense, my family already knows that, and I'm trying to avoid the truth.
If it's like my 09RX350: ODO must be on total miles. Turn motor off. Hold the ODO button down and keep it down. Turn key to ignition setting while still holding ODO button down. The odometer reading will indicate it is re-setting and when it is reset - and only then - you release the ODO button. Turn key off. Then turn engine on and maintenance light should be 'out'. Good luck!
[i don't have the 2010 manual, so cannot indicate page. If you want to know page in 2009 manual, I could probably look it up.}
Thanks for the effort. There's no key, just the ignition button on the 2010's. No matter what display I leave the ODO on the procedure doesn't work. Guess I'll have to call the dealer. Thanks everyone.
- 2 weeks later...
Finally THE ANSWER. For all who want to know. I fyou have a 2010 RX350 with push button start here's the way to reset the Oil Maintenance Required light:
1. Odometer Must be in Trip A display
2. Turn the car off
3. Hold the Odometer button down and continue to hold throught all steps to follow
4. Do NOT put your foot on the brake
5. Push the ignition button twice. Do not hold
6. Watch the display (continue to hold the Odometer button)
7. The Oil Maintenance light will reset after a few seconds
8. FInally, release the odometer button.
- 1 month later...
In my 2010 manual on lower half of page 461 are 4 steps to reset.
- 2 years later...

simplyadditions
There's 2 really good videos on Youtube that show you how to reset the oil maintenance warning messages. I'll post both video links below.
I personally played the Youtube video from my iPhone while sitting in my car after I realized that the dealer forgot to do this for me after they just completed the engine misfire CSP (recall) on my 2006 GS300.
One of these how-to videos should work for you :whistles:
2010 Lexus ES350 Reseting the Oil Maintenance Rquired Light
2006 Lexus GS300 Clearing the Oil MAINT REQD Light
- 5 years later...
This weekend was quite calm, with a couple of videos about upcoming content and a Podcast coming out. Many players also took full advantage of the third Mega May Weekend, which offered some very attractive bonuses to those starved for Slayer XP. Some dedicated players took full advantage of it, Buy FIFA Coins and CSGO Skins for sale earning several million Slayer XP over the promotion and getting their Slayer skill up-to-snuff.First of all, the developers answered some questions and generally talked about the Void Knight Outpost rework. They were quite proud of a ship they made to switch with an old abomination, which looked like it was made of plywood. Who knows, they might change all ships in the zone.The whole zone also received several changes, which resulted in a dark and moody “feel” when there. It looks like there’s a perpetual storm raging over the Void Knight Outpost. We have to point out that there are plans to include other weather patterns if some new content around the area comes out.The developer who presented the changes and asked the questions said that he would prefer if the number of players required to enter the zone went down, as the zone is quite old, current RuneScape players overgear it, while also having higher Combat level. If the developers’ reasoning turns out to be sound, this change should turn out to be successful.Being a purely graphical update, the rework of the Void Knight Outpost will not overly alter any quests taking place there. Granted, some action taking place in the beach was moved to The Hearth, so SOME rs 3 gold things will be different; however, it’s will not be too difficult to figure it out and adapt.Where this rework is concerned, there is one final point of interest: no lore changes aimed at bringing the zone into the Sixth Age are planned; however, it would be a welcome change, according to developers.If that wasn’t enough, Jagex released a trailer for the Kindred Spirits Quest. You can see it right here. We found it very dark and interesting. To tell you the truth, we actually can’t wait to try it out.
On 7/2/2010 at 3:26 AM, pauljcl said: The answer is in the manual. I don't remember the exact details, but they are like "keep the car on ODO, press button, keep pressed as you turn ignition on, let it show change, then let go button, turn off." Not difficult and, as I said , in the manual.
Lol, I was thinking I am the only one who doesn't read manually.
Join the conversation
You can post now and register later. If you have an account, sign in now to post with your account.

× Pasted as rich text. Paste as plain text instead
Only 75 emoji are allowed.
× Your link has been automatically embedded. Display as a link instead
× Your previous content has been restored. Clear editor
× You cannot paste images directly. Upload or insert images from URL.
- Insert image from URL
- Submit Reply
Join The Club
Join the Lexus Owners Club and be part of the Community. It's FREE!
AdamMis · Started March 8
Rusty Bucket · Started 21 hours ago
DLM1965 · Started 12 hours ago
MarkG1976 · Started March 12, 2023
JeffFreeman · Started January 16, 2015
Recent Achievements

- Existing user? Sign In
- Online Users
- Members Gallery
- Latest Posts
- All Activity
My Activity Streams
- Leaderboard
- Create New...

How To Check Total Mileage On Lexus Rx 350
The meter control switches are used to control the content display area.
- Enter or Set.
- Go back to the previous page
- Tap to make the upper screen visible.
- There will be a notification asking if registration is wanted.
- The drive information screen will be displayed if no screens have been registered.
In This Article...
What does a Lexus RX 350 have high mileage?
The Lexus RX is a tough, dependable SUV that, with routine maintenance and prudent driving, can travel between 250.000 and 3000.000 kilometers. Your RX should last 1620 years based on 15,000 miles traveled annually before needing expensive maintenance or breaking down.
Where can I reset the Lexus trip meter?
How to Turn Off the Maintenance Light on a Lexus
- When the entire miles is shown, press the trip odometer button.
- Switch off the ignition.
- To reset the trip meter, press and hold the button.
- Without starting the engine, turn the ignition switch to the “ON/II” position.
Is premium fuel required for the Lexus RX 350?
Only unleaded fuel with an octane level of 87 or higher is permitted in the RX. As the premium octane rating is 91 or higher, the Lexus RX does not require premium fuel. Of course, you are welcome to fill up your Lexus RX with premium fuel if you want better performance, but it is not necessary.
Does an RX350 require premium fuel?
The 2020 Lexus RX 350 is a spotless luxury car, but it also gets surprisingly good gas mileage. Although it doesn’t require premium gas, it provides premium performance. Fuel with an octane rating of 87 is advised for all options.
Which issues does the Lexus RX 350 have?
Lexus RX 350 Typical Issues There have been few complaints about the older Lexus RX 350 generation, which was produced from 2007 to 2009. However, some owners have mentioned that the dashboard is vulnerable to cracking in hotter temperatures, and others have griped about leaks developing in the power steering rack and engine oil cooler pipe.
- The 2010 RX, a model from the first generation, has 148 complaints filed against it. Compared to 2011, there are more than three times as many of them.
- Those from 2014 and 2018 are the top RX models most likely to deliver a great experience. Compared to previous years, these vehicles had less reported issues.
- The 2018 Lexus RX is the greatest year to have in your driveway since it costs $10,000 less than a 2020 model and probably still has factory coverage.
- Six distinct recalls total for the 2016 and 2017 second-generation RX SUVs. Most frequently, severe issues with the fuel pump or airbags are raised.
- The benchmark for the premium crossover market is set by the Lexus RX. The majority of first and second generation SUV models are incredibly dependable.
Are there digital speedometers in Lexus RXs?
A single large TFT dial with a digital speedometer, power meter, and information center to its left dominates the instrument panel. The large 12.3-inch infotainment screen, steering wheel, and touch pad controller are all within easy reach of the driver.
How can the maintenance light on a Lexus RX 350 be reset?
Can the Lexus Maintenance Light be reset?
- Start your car’s engine.
- Depending on the model, switch your odometer/trip display to ODO mode or TRIP A mode.
- Turning the ignition switch back on while holding down the Trip Meter Reset button.
- Watch for the maintenance light to start blinking, then solidify before turning off.
How can I find out my car’s mileage?
An odometer is the name of that instrument. The word dates back to the late 18th century and is derived from French odomtre, Greek hodos ‘path,’ and meter.
Over the years, odometer gauge accuracy has evolved. In the past, a cable connected the speedometer head to the transmission; today, it is electronic. This cable moved a mechanical set of wheels that displayed the necessary numbers when the transmission rotated. As a result, odometer readings were susceptible to manipulation. With the odometers we have now that feature LED displays, that is not conceivable.
The odometer gauge accurately displays the number of miles on a car, but it also serves additional purposes like assessing fuel efficiency and distances covered in a certain amount of time. Simply note the mileage reading when you fill up with fuel and then again when you next fill up to get exact fuel mileage. Calculate the distance traveled, then divide it by the quantity of fuel consumed at the second fill-up. The most exact miles per gallon result can be obtained by repeating the process numerous times, using the total miles traveled from beginning to end and dividing that number by the total gallons consumed during that time.
On a highway, you may determine whether your odometer is reading accurately by paying close attention to the mile markers and the reading. As you pass the first and fourth mile markers on your four-mile journey, keep an eye on the odometer’s reading. The tenths of miles need to line up perfectly. If not, there may be a problem, or the most likely case is that a change in tire size has resulted in a slightly erroneous odometer reading.
What distinguishes a mileage reading from an odometer reading?
Mileage and the odometer are two distinct things. The odometer is used to record the distance traveled, while the mileage gauge records the amount of fuel used each kilometer. Finding out the miles is made easier by considering the distance you have driven. If you’re wondering how to use it to compute miles, read on. Here is your response.
How do you calculate mileage with an odometer?
Divide the distance traveled by the amount of fuel consumed to obtain the mileage with an odometer using a straightforward mathematical method. How do you go about that?
Let’s say the reading that is currently visible is A. N gallons of fuel should be added to the tank. Now, note the displayed reading when you see the same fuel gauge reading after adding N amount of fuel.
Traveling a longer distance in your car is preferable to driving a little distance each day. You may manage your travel expenses by tracking your miles with the aid of this straightforward method.
Does a car’s odometer measure position or displacement?
No. The definition of displacement is a shift in position. The odometer, on the other hand, measures the total distance a vehicle has been travelled, or the distance from point A to point B. Displacement, however, is just a shift in location from point A to point B.
What is the role of the odometer in buying/selling a used vehicle?
A buyer looks at value indicated by the odometer before making a decision. Your car is a machine, and machines have parts that experience a lot of wear and tear. The distance a car has traveled affects the average life of most of its parts. The value shown on the odometer is used to calculate the ultimate selling price regardless of the car’s components or overall appeal.
The performance of the car is assessed using the odometer mileage statement, which is a crucial consideration when purchasing or selling a used car. Make sure you educate your friends about the importance and use of the odometer now that you are knowledgeable about everything related to it.
What distinguishes an odometer from a trip meter?
Odometer rollover, which occurs when an odometer or trip meter resets to zero after reaching the maximum value, Digital clocks might not roll over. [15]
There is usually a trip meter in newer vehicles (trip odometer). Since a trip meter, unlike an odometer, may be reset at any time throughout a trip, it is possible to record the distance covered during any specific trip or segment of a trip. It used to be a wholly mechanical device, but the majority of current cars now have electronic versions. There are frequently many trip meters on many modern vehicles. The maximum value that most mechanical trip meters will display is 999.9. A frequent application of the trip meter is to reset it to zero at each instruction in a series of driving directions so that one is certain when they have arrived at the next turn. This makes it very simple to precisely track the energy efficiency of the car.
How do the dash lights on a Lexus get turned on?
1 Response. The dash lights are controlled by a cylindrical switch that may be turned clockwise or counterclockwise on the dash board (bottom left).
IMAGES
VIDEO
COMMENTS
Find The Odometer Trip Button In Your #Lexus | A quick tutorial from Tessa, a Technology Specialist at Lexus of #OrangePark, on where to locate and how to ch...
In this video our Team demonstrates how to use the Lexus Odometer and Trip Button. For questions or to schedule an in-person demo, call (904) 777-5100 or vis...
Watch as Tech Specialist, Rick Barnicoat, shows us how to utilize the trip odometer on the new 2018 Lexus RX!Follow us!Facebook: https://bit.ly/2CZ4faoTwitt...
Press the Up Arrow or Down Arrow on the meter control switch located on the steering wheel, select the "Scheduled Maintenance" screen and then press and hold the Select Icon. 3. Select the "Yes" and push the Select Icon. 4. A message will be displayed on the multi-information display when the reset procedure has been completed.
trip meter displays. When the trip meter is displayed, pressing and holding the button will reset the trip meter. Instrument panel light control. The brightness of the instrument panel lights can be adjusted. 1. Darker. 2. Brighter. The meters and display illuminate when. The "POWER" switch is in ON mode. Hybrid System Indicator
Odometer rollover, which occurs when an odometer or trip meter resets to zero after reaching the maximum value, Digital clocks might not roll over. [15] There is usually a trip meter in newer vehicles (trip odometer). Since a trip meter, unlike an odometer, may be reset at any time throughout a trip, it is possible to record the distance ...
View and Download Lexus RX 350 service manual online. RX 350 automobile pdf manual download. ... Tire Pressure Warning Reset Switch * If equipped RX350/450h RX350/450h ... Page Headlight Cleaner Switch* Power Back Door Switch* Fuel Filler Door Opener Instrument Panel Light Control Odometer/Trip Meter and Trip Meter Reset Button Height Control ...
Trip meter A/trip meter B Displays the distance the vehicle has been driven since the meter was last reset. Trip meters A and B can be used to record and display different distances independently. ... Lexus RX (RX 350L, RX450h) 2016-2024 Repair Manual > Vehicle Stability Control System: Multi-axis Acceleration Sensor Module "A" Signal Compare ...
Display the desired trip meter and press and hold the switch to reset the trip meter. Summary of functions The multi-information display presents the driver with a variety of driving-related data, such as the current outside temperature. ... Lexus RX (RX 350L, RX450h) 2016-2024 Repair Manual > Power Back Door System (w/ Outside Door Control ...
How To Reset Odometer On Lexus Rx 350. Lexus / By The GearShifters Team. How to Turn Off the Maintenance Light on a Lexus. When the entire miles is shown, press the trip odometer button. Switch off the ignition. To reset the trip meter, press and hold the button. Without starting the engine, turn the ignition switch to the "ON/II" position.
Switch your Odometer/Trip Display to ODO mode or TRIP A mode. Turn the ignition switch to the off position. Press and hold the Trip Meter Reset button as you turn the ignition switch back to the on position. Wait for the Lexus maintenance light to blink, turn solid, and then turn off. Release the Trip Meter Reset button.
2011 LEXUS RX - Series Maintenance Light Reset Instructions. February 24, 2020 / Instructions. 1. Turn the ignition to run (push START/STOP button once). Use the trip meter switch to bring up the trip meter A reading. Turn the ignition off. 2. While pressing the "ODO/TRIP" button, set the engine switch to run (push START/STOP button once). 3.
Download this manual. 2016 RX 350/450h Pre-Delivery Service Manual. Lexus Technician: Before you perform Pre-Delivery Service (PDS) on this vehicle, be sure you: • Read and understand this PDS Manual. • Read and understand all applicable PDS Technical Service Information Bulletins (TSIBs) for this vehicle.
I wanted to review how to reset Trip A and Trip B on a Lexus 2010 RX350. Video was filmed in Madison WI. Lexus of Madison 8000 Airport Rd, Middleton, WI 5356...
Simply follow these steps: Turn your engine on. Depending on your model, you will either switch your Odometer/Trip Display to ODO mode or Trip A mode. Turn the ignition off, and hold the Trip Meter Reset button while turning the ignition back to on. At this point, the Lexus Maintenance Required light will blink, turn solid, and turn off.
To reset the 2015 Lexus RX series maintenance light, please follow these instructions: 1. Turn the ignition to run (push START/STOP button once). Use the trip meter switch to bring up the trip meter A reading. Turn the ignition off. 2. While pressing the "ODO/TRIP" button, set the engine switch to run (push START/STOP button […]
3. Hold down the trip meter reset knob while turning the ignition key to the run position (one position before starting engine). 4. Hold down the button for 5 seconds or more. The odometer indicates "000000" and the light goes off. 5. Turn the ignition off and then start the engine to verify the indicator has been reset.
View and Download Lexus RX350 2023 manual online. RX350 2023 automobile pdf manual download. ... Odometer and trip meter display ( P.83) Locations of gauges and meters (F SPORT models) Depending on the shift position or current drive mode, the meter displays or posi- tion of some gauges will change. ... trip meter B depending on the meter ...
Press and hold the ODO reset / readout button while the engine is off. If the car is on, turn it off. Turn the key in the ignition while maintaining pressure on the ODO button. till the dash lights turn on. Avoid starting the car. Release the ODO button once it starts to show zeros, then flip the key back to the "off" position.
3 people found this helpful. Mark helpful. 160. lori answered 5 years ago. There is a small button on the dashboard to the left of the steering wheel that says "Trip Odo.". Push the button to view different trip odometers and also the total mileage. Very user unfriendly car.
After the necessary maintenance has been carried out in accordance with the maintenance schedule, proceed as follows: 1. Switch the "engine start/stop switch or trip meter-activated engine shutoff a reading appeared, 2. Turn the trip meter reset switch while pressing the "engine switch ON, engine START STOP switch, etc. 3.
With the car off hold down the trip meter reset button and switch the car on while holding the trip meter. You will see a count down on the center of the dash. When it has finished, release. ... 10 - 15 Lexus RX350 / RX450h ; Reset Oil Maintenance Required Light Theme . IPB 4.6 (Default) IPB 4.6.1 Theme .
Where can I reset the Lexus trip meter? How to Turn Off the Maintenance Light on a Lexus. When the entire miles is shown, press the trip odometer button. Switch off the ignition. To reset the trip meter, press and hold the button. Without starting the engine, turn the ignition switch to the "ON/II" position. Is premium fuel required for the ...