How to enable Safari push notifications on iPhone or iPad
iOS 16.4 lets you optionally receive Safari push notifications, but the process isn't straightforward.
Back in 2022, Apple promised to introduce a long-overdue feature in 2023: Safari push notification support on newer versions of iOS 16 and iPadOS 16 . And the day has finally come.
If you have a recent iPhone , such as the iPhone 14 Pro Max , or an iPad running version 16.4 or later, you can follow the steps below to enable Safari push notifications for specific websites. By doing so, you will receive alerts similar to those of native iOS apps, helping you know when your favorite websites publish timely content.
- Launch the Settings app on your iPhone or iPad running iOS/iPadOS 16.4 or later.
- Scroll down and navigate to Safari.
- Click Advanced and then Experimental Features .
- You will find a Push API toggle at the bottom of the list. Make sure it's enabled.
- Now launch the Safari app and visit the website you'd like to receive push notifications from. Note that the website has to support push notifications for this feature to work. For demonstration purposes, we will be choosing Twitter.
- Tap on the Share button in the middle of the bottom bar
- Choose Add to Home Screen .
- Optionally rename the web app, then tap Add in the top right corner.
- It will now appear on your Home Screen as a native app. Launch the newly-added web app.
- Find the website's notifications settings and enable push notifications.
- iOS will ask for your permission to enable them.
Now, the web app will be able to notify you as long as you keep it on your Home Screen. If you delete it, then the permission is revoked automatically, and you won't be able to receive alerts from it until you add it again.
As you can see, the process to enable Safari push notifications on iOS and iPadOS is more complex when compared to macOS because you need to add the web app to the Home Screen for it to work. On new Macs , you can just allow or deny website permissions without needing to bookmark it in any way. Regardless, it can be done now on newer versions of iOS 16.
- Become a Contributor

Enable Safari Push Notifications on iOS: Step-by-Step Guide
Last updated on aug 08, 2023.
Push notifications are the most efficient and fastest way for publishers to reach out to their readers. These notifications have been pretty straightforward to enable and access on the desktop and on Android smartphones. However, iOS didn’t offer this ability. Things have changed now and Apple has introduced Safari push notifications in iOS 16.4 .
So, why should you care you ask? A significant chunk of website visitors use an Apple iPhone, and can now be reached via push notifications. According to StatCounter, iPhones account for 28% market share globally, now that’s a healthy chunk of the audience you can reach out to. If you are a US-based news publisher, the metrics are completely different. In the US, iOS accounts for over a whopping 56% market share followed by Android at 42%. If iPhone users are a sizeable chunk of your audience, here is how you can help them receive push notifications on their smartphones.
Enabling Safari Push Notifications on iOS
If you want to reach out to your audience on iOS devices such as the iPhone and the iPad, you will need them to enable Push API in Safari settings and then add your website to their home screen. I’ll break this down into two steps.
Enable Push API on Safari
For readers to receive push notifications they need to enable the Push API toggle in Safari settings. This is a one-time step and isn’t required to be done for every website.
- Go to Settings and then scroll down to Safari .
- Click Advanced and then Experimental Features
- The reader has to switch on the Push API toggle.

- The reader must use the Safari browser on an Apple iPhone running iOS 16.4 or above.
- In Safari, get them to click the Share button and scroll down to the Add to home screen option.
- Users can then save the app to their home screen.
- Once the app is on their home screen they can now click it to access your website.
- They need to click subscribe, followed by accepting the default iOS prompt for notifications.
- All done, your subscriber can now receive notifications on their iPhone.
This is a complex process and will need you to handhold your reader through this process. For starters, you can add a banner on the website prompting iPhone users to enable push notifications. You can reach out to your repeat users using an iPhone first since they are more likely to be willing to go through this entire process. They are your loyal users after all.
Getting your readers to add your website to the home screen is a big win in itself and is likely to increase repeat visits to your website.
You can try a bottom banner for Safari on iOS like the one we see here. Check it out on GitHub

Aditya Shenoy
Lists by Topic
- Browser Push Notification (83)
- Publisher Strategies (46)
- iZooto Updates (43)
- audience engagement (10)
- App push notifications (8)
- Push Notifications (6)
- wordpress (6)
- Messenger Push Notifications (5)
- iOS push notifications (3)
- web push notifications (3)
- wordpress plugins (3)
- Android push notifications (2)
- audience development (2)
- Spotlight (1)
- Website Monetization (1)
- audience growth (1)
- audience retention (1)
- best seo plugins (1)
- best wordpress seo plugins (1)
- content management (1)
- iZooto Updates (1)
- mobile ad network (1)
- seo plugins (1)
- startups, startup culture (1)
Get More Stuff Like This In Your Inbox
Stay up-to-date on topics of your interest. Subscribe now to join 10,000+ marketers who receive high-quality articles every fortnight.

Join The List!
Subscribe to join our list of 10,000+ marketers and receive high-quality articles on topics of your interest in your inbox every fortnight
Related Posts
5 ways publishers can monetize newsletters.
Newsletters are owned channels that allow publishers to reach their au[...]
- Vaishnavi Ramkumar
- Apr 03, 2024
Diversify Revenue Streams: 5 Monetization Alternatives for Media Publishers
There are around nine different monetization options considered as the[...]
- Mar 27, 2024
What is Comscore? What is it Used for?
The primary focus of news publishers or advertisers today is to attrac[...]
- Punya Batra
- Mar 22, 2024

- Steller Subscription Experience
- Audience Engagement Guide
- Content Engagement
- Website Engagement Tools
- Web Push Notifications Guide
- Messenger Push Notifications Guide
- App Push Notifications Guide
- Push Notification Marketing
- Push Notifications Examples
- Best Time To Send Push Notifications
- Understanding Your Audeince
- Engaging Your Audience
- Push Notifications Advertising Guide
- Overcoming Monetization Challenges
- Checklist For Push Monetization
- Monetization Strategies
- Dynamic Paywall
- Best Paywall Solutions
- Exit-Intent Recommendations
- Show Latest
- Magic Notifications
- Segmentation
- Personalization
- RSS Automation
- Web Push Notifications
- Messenger Push Notifcations
- App Push Notifications
- Email Newsletter
- On-Site Interactions
- iZooto vs OneSignal
- iZooto vs Feedify
- iZooto vs Push Engage
- iZooto vs SendPulse
- iZooto vs Aimtell
- iZooto vs Pushnami
- iZooto vs Pushly
- Switch To iZooto
- Success Stories
- Testimonials

© 2023 Copyright iZooto. All rights reserved.
- Copyright Terms
- Privacy Policy

- PRO Courses Guides New Tech Help Pro Expert Videos About wikiHow Pro Upgrade Sign In
- EDIT Edit this Article
- EXPLORE Tech Help Pro About Us Random Article Quizzes Request a New Article Community Dashboard This Or That Game Popular Categories Arts and Entertainment Artwork Books Movies Computers and Electronics Computers Phone Skills Technology Hacks Health Men's Health Mental Health Women's Health Relationships Dating Love Relationship Issues Hobbies and Crafts Crafts Drawing Games Education & Communication Communication Skills Personal Development Studying Personal Care and Style Fashion Hair Care Personal Hygiene Youth Personal Care School Stuff Dating All Categories Arts and Entertainment Finance and Business Home and Garden Relationship Quizzes Cars & Other Vehicles Food and Entertaining Personal Care and Style Sports and Fitness Computers and Electronics Health Pets and Animals Travel Education & Communication Hobbies and Crafts Philosophy and Religion Work World Family Life Holidays and Traditions Relationships Youth
- Browse Articles
- Learn Something New
- Quizzes Hot
- This Or That Game New
- Train Your Brain
- Explore More
- Support wikiHow
- About wikiHow
- Log in / Sign up
- Computers and Electronics
- Smartphones
How to Enable Push Notifications on iOS
Last Updated: February 26, 2024 Tested
This article was written by Bryzz Tortello and by wikiHow staff writer, Nicole Levine, MFA . Bryzz Tortello is a Phone Repair Specialist and the Owner & CEO of Tortello Repair Services. With over ten years of experience, she specializes in iPhone and iPad ranging from screen and battery replacements to microsoldering and data recovery. Bryzz attended The College of the Canyons. The wikiHow Tech Team also followed the article's instructions and verified that they work. This article has been viewed 161,941 times.
Want to receive instant push notifications from apps on your iPhone or iPad? Turning on notifications is super easy, and you can even customize how they appear on the screen. This wikiHow article will teach you how to enable notifications for apps like Mail, Messages, and social media apps, as well as emergency notifications from your local authorities.
Enabling Push Notifications for Apps

- Select Always to allow all notifications to show previews.
- Select When unlocked to only show notification previews when your screen is unlocked. This is a good option if you don't want people to see your notifications on your locked phone screen.
- Select Never if you just want to see the name of the app that has a notification available without any identifying details.

- Check Lock Screen to see push notifications on the lock screen.
- Check Notification Center to see notifications when you pull down the Notification Center from the top of your iPhone's or iPad's screen.
- Check "Banners" to see pop-up notifications each time the app wants to notify you.
- Tap Banner Style to choose Persistent notifications (notifications that stay on the screen until you swipe them away or Temporary (notifications go away after displaying for a few seconds on the screen).

- You can choose custom notification sounds for many Apple apps, including FaceTime and Messages.

Enabling Government and Emergency Notifications

- Depending on your region, you may be able to enable or disable notifications that can alert you to emergencies, such as extreme weather and conditions or imminent threats to your safety. These notifications are enabled by default, but you can turn them on or off as needed. [4] X Research source
- Some regions do not allow you to disable government alerts.

Expert Q&A
- If you're not receiving notifications, make sure you haven't enabled a Focus Mode. Open the Control Center by swiping down from the top-right of the screen (or swiping up from the bottom), and then tap the moon icon to disable the current Focus Mode. Thanks Helpful 0 Not Helpful 0
- Some apps have additional push notification settings within the app itself. For example, there are many ways to customize your Twitter notification in the Twitter app that you won't be able to manage in your iPhone or iPad's Settings app. Thanks Helpful 0 Not Helpful 0
- Depending on your Focus Mode preferences, you may not receive notifications while you're in Sleep, Driving, or other Focus Modes. Thanks Helpful 0 Not Helpful 0

You Might Also Like

- ↑ https://support.apple.com/guide/iphone/change-notification-settings-iph7c3d96bab/ios
- ↑ https://support.apple.com/en-us/HT201925
- ↑ https://support.apple.com/en-us/102516
- ↑ https://www.ready.gov/alerts
About This Article

1. Open Settings . 2. Tap Notifications . 3. Tap an app. 4. Toggle on "Allow Notifications" for that app. Did this summary help you? Yes No
- Send fan mail to authors
Is this article up to date?

Featured Articles

Trending Articles

Watch Articles

- Terms of Use
- Privacy Policy
- Do Not Sell or Share My Info
- Not Selling Info
Keep up with the latest tech with wikiHow's free Tech Help Newsletter
iOS 16 enables web push notifications and extension syncing with Safari update
iOS 16 was announced today at WWDC 2022 with several new features, including a completely redesigned lock screen with widgets and enhancements to several system apps. Specifically speaking about Safari, Apple’s web browser will now support web push notifications, extension syncing, and more with the update.
One of the biggest complaints about the iOS version of Safari is that it lacks push notifications for web apps, so websites are unable to notify a user if they’re running Safari in the background – although this is already possible on the Mac.
Now with iOS 16, this will become a reality. The first signs of push notifications for web apps appeared in iOS 15.4 , but the feature never worked since it was labeled as “experimental.” Now, according to Apple’s website , iOS 16 and iPadOS 16 will finally enable web push notifications – but there’s a catch.
Apple says the feature will come in 2023 with a future update of iOS 16, so it won’t be available at launch. At least the company has now finally confirmed that it is working on web push notifications.
Apple’s web browser is also getting extension syncing support, so that you can have the same extensions enabled on your iPhone, iPad, and Mac. It also supports image translation using Live Text, new password settings for websites, and shared Tab Groups. iOS 16 also adds FIDO support to Safari , so users can sign-in with Touch ID or Face ID instead of an alphanumeric password.
Developers can now download the first beta of iOS 16 via the Apple Developer website . A public beta version will be available next month with the official release expected this fall.
More about iOS 16
- Apple debuts iOS 16 with customizable lock screen, Messages updates, more
- Get iOS 16: Here’s how to install the beta
- iOS 16 brings haptic feedback to the iPhone’s keyboard for the first time
- You can finally lock your hidden photos album with Touch ID or Face ID in iOS 16
FTC: We use income earning auto affiliate links. More.

Check out 9to5Mac on YouTube for more Apple news:

Filipe Espósito is a Brazilian tech Journalist who started covering Apple news on iHelp BR with some exclusive scoops — including the reveal of the new Apple Watch Series 5 models in titanium and ceramic. He joined 9to5Mac to share even more tech news around the world.
How To Get Notifications From Safari On IPhone

- Software & Applications
- Browsers & Extensions

Introduction
Safari, the default web browser for Apple devices, offers a seamless and intuitive browsing experience. It allows users to access a wide range of websites and web applications while ensuring a secure and efficient browsing environment. One of the key features of Safari is its ability to deliver notifications, keeping users informed about important updates, messages, and alerts from their favorite websites.
In this article, we will explore the process of enabling and managing notifications from Safari on your iPhone. Whether you want to stay updated on the latest news, receive real-time updates from your favorite blogs, or stay connected with your social media accounts, Safari notifications can enhance your browsing experience by providing timely and relevant information.
By understanding how to effectively manage Safari notifications, you can tailor your browsing experience to suit your preferences and stay informed about the content that matters most to you. Additionally, we will address common troubleshooting steps to help you overcome any potential issues related to Safari notifications, ensuring a smooth and uninterrupted browsing experience.
Let's delve into the world of Safari notifications and discover how you can make the most of this feature to stay connected and informed while browsing the web on your iPhone.
Enabling Notifications for Safari
Enabling notifications for Safari on your iPhone is a straightforward process that allows you to stay informed about updates and alerts from your favorite websites. By enabling this feature, you can receive timely notifications for a variety of content, including news updates, social media interactions, and website-specific alerts. Here's how you can enable notifications for Safari on your iPhone :
Accessing Safari Settings : To begin, open the "Settings" app on your iPhone and scroll down to find "Safari" in the list of installed apps. Tap on "Safari" to access its settings.
Enabling Notifications : Within the Safari settings, locate the "Notifications" option and ensure that it is toggled on. This step activates the notification feature for Safari, allowing websites to send you notifications.
Website-Specific Notifications : To receive notifications from specific websites, you can further customize your preferences. Navigate to the "Websites" section within Safari settings and select "Notifications." Here, you can manage notifications for individual websites by allowing or blocking them from sending notifications.
Permission Requests : When you visit a website that offers notifications, Safari will prompt you to allow or block notifications from that site. You can choose to enable notifications for websites that you frequently visit and wish to stay updated on.
Notification Preferences : Safari also allows you to customize notification preferences for each website, giving you control over the type of notifications you receive. You can choose to receive alerts for new articles, updates, messages, or any other relevant content based on the website's offerings.
By following these steps, you can effectively enable notifications for Safari on your iPhone, empowering you to stay connected and informed while browsing the web. Once notifications are enabled, Safari will seamlessly deliver updates and alerts from your preferred websites, enhancing your browsing experience and keeping you in the loop with the latest content.
Enabling notifications for Safari is a valuable feature that enhances your browsing experience, ensuring that you never miss out on important updates and alerts from the websites you frequent. With notifications enabled, Safari becomes a powerful tool for staying informed and connected, providing a personalized browsing experience tailored to your interests and preferences.
Managing Safari Notifications
Once you have enabled notifications for Safari on your iPhone, it's essential to understand how to effectively manage and customize the notifications you receive. Managing Safari notifications allows you to tailor your browsing experience, ensuring that you receive timely updates and alerts from your preferred websites while minimizing any potential distractions. Here's how you can manage Safari notifications to suit your preferences:
Customizing Notification Settings
Safari provides comprehensive options to customize notification settings for individual websites, giving you control over the type and frequency of notifications you receive. To access these settings:
- Access Safari Settings : Open the "Settings" app on your iPhone and navigate to the "Safari" section.
- Manage Website Notifications : Within the Safari settings, select "Websites" and then choose "Notifications." Here, you can view a list of websites that have requested to send you notifications. You can customize the notification settings for each website, including allowing or blocking notifications, and adjusting the notification style.
Notification Preferences
Safari allows you to specify your notification preferences for each website, ensuring that you receive relevant and timely updates based on your interests. You can choose to receive notifications for new articles, messages, alerts, or any other content offered by the website. By customizing these preferences, you can ensure that the notifications you receive align with your browsing habits and interests.
Managing Notification Alerts
To prevent notification overload and maintain a seamless browsing experience, it's important to manage notification alerts effectively. Safari offers options to control how notifications are displayed, including banners, alerts, or none. You can choose the notification style that best suits your preferences, ensuring that you stay informed without being overwhelmed by excessive alerts.
Reviewing Notification History
Safari maintains a notification history, allowing you to review past notifications and stay updated on the content you may have missed. By accessing the notification history, you can revisit previous alerts and ensure that you stay informed about important updates from your favorite websites.
By effectively managing Safari notifications, you can personalize your browsing experience and stay informed about the content that matters most to you. Customizing notification settings, specifying your preferences, and reviewing notification history empowers you to make the most of Safari's notification feature, ensuring that you receive relevant and timely updates while maintaining control over your browsing experience.
Troubleshooting Safari Notifications
While Safari notifications are designed to enhance your browsing experience, you may encounter occasional issues that affect the delivery or functionality of notifications. Understanding how to troubleshoot these issues can help you overcome potential obstacles and ensure that you continue to receive timely updates and alerts from your preferred websites. Here are some common troubleshooting steps to address Safari notification issues:
Check Notification Settings
Start by verifying that Safari notifications are enabled in your iPhone settings. Navigate to the "Settings" app, select "Safari," and ensure that the "Notifications" option is toggled on. Additionally, review the notification settings for individual websites within the Safari settings to confirm that notifications are allowed for the websites from which you expect to receive updates.
Clear Website Data
In some cases, accumulated website data or cache may interfere with Safari notifications. Clearing website data for specific sites or all websites can help resolve notification issues. To do this, go to "Settings," select "Safari," and choose "Advanced" followed by "Website Data." From here, you can clear data for individual websites or remove all website data to refresh Safari's notification functionality.
Update Safari and iOS
Ensuring that your Safari browser and iOS operating system are up to date is crucial for maintaining optimal performance, including notification delivery. Check for any available updates for Safari and iOS by navigating to "Settings," selecting "General," and choosing "Software Update." If updates are available, install them to benefit from the latest improvements and bug fixes that may address notification-related issues.
Restart Safari and iPhone
Sometimes, a simple restart can resolve temporary glitches affecting Safari notifications. Close the Safari app and restart your iPhone to refresh the system and potentially resolve any underlying issues that may be impacting notification delivery.
Reset Notification Permissions
If you are experiencing issues with receiving notifications from specific websites, you can reset the notification permissions for those sites. Navigate to "Settings," select "Safari," and choose "Notifications." From here, you can review and reset the notification permissions for individual websites, allowing you to refresh the notification settings and potentially resolve any issues.
By following these troubleshooting steps, you can address common Safari notification issues and ensure that you continue to receive timely updates and alerts while browsing the web on your iPhone. Implementing these measures can help you overcome potential obstacles and maintain a seamless notification experience, keeping you informed about the content that matters most to you.
In conclusion, Safari notifications offer a valuable means of staying informed and connected while browsing the web on your iPhone. By enabling and managing Safari notifications, users can personalize their browsing experience, receive timely updates from their favorite websites, and ensure that they stay informed about the content that matters most to them. The ability to customize notification settings, specify preferences for individual websites, and review notification history empowers users to tailor their browsing experience and make the most of Safari's notification feature.
Enabling notifications for Safari is a straightforward process that allows users to receive alerts and updates from a wide range of websites, including news sources, social media platforms, and other web applications. By accessing the Safari settings on their iPhone, users can toggle on notifications and further customize their preferences for individual websites, ensuring that they receive relevant and timely updates based on their interests.
Managing Safari notifications is equally important, as it allows users to control the type and frequency of notifications they receive. By customizing notification settings, specifying preferences, and managing notification alerts, users can prevent notification overload and maintain a seamless browsing experience. Additionally, the ability to review notification history enables users to revisit past alerts and ensure that they stay informed about important updates from their preferred websites.
Furthermore, understanding how to troubleshoot Safari notification issues is essential for overcoming potential obstacles and ensuring uninterrupted notification delivery. By checking notification settings, clearing website data, updating Safari and iOS, restarting Safari and the iPhone, and resetting notification permissions, users can address common notification-related issues and maintain a reliable notification experience.
In essence, Safari notifications on the iPhone offer a valuable tool for staying informed and connected while browsing the web. By leveraging the capabilities of Safari notifications and understanding how to manage and troubleshoot potential issues, users can enhance their browsing experience, receive timely updates, and stay connected with the content that matters most to them. Whether it's staying updated on the latest news, receiving real-time alerts from favorite websites, or staying connected with social media, Safari notifications empower users to stay informed and engaged while browsing the web on their iPhone.
Leave a Reply Cancel reply
Your email address will not be published. Required fields are marked *
Save my name, email, and website in this browser for the next time I comment.
- Crowdfunding
- Cryptocurrency
- Digital Banking
- Digital Payments
- Investments
- Console Gaming
- Mobile Gaming
- VR/AR Gaming
- Gadget Usage
- Gaming Tips
- Online Safety
- Software Tutorials
- Tech Setup & Troubleshooting
- Buyer’s Guides
- Comparative Analysis
- Gadget Reviews
- Service Reviews
- Software Reviews
- Mobile Devices
- PCs & Laptops
- Smart Home Gadgets
- Content Creation Tools
- Digital Photography
- Video & Music Streaming
- Online Security
- Online Services
- Web Hosting
- WiFi & Ethernet
- Browsers & Extensions
- Communication Platforms
- Operating Systems
- Productivity Tools
- AI & Machine Learning
- Cybersecurity
- Emerging Tech
- IoT & Smart Devices
- Virtual & Augmented Reality
- Latest News
- AI Developments
- Fintech Updates
- Gaming News
- New Product Launches
- AI Writing How Its Changing the Way We Create Content
- How to Find the Best Midjourney Alternative in 2024 A Guide to AI Anime Generators
Related Post
Ai writing: how it’s changing the way we create content, unleashing young geniuses: how lingokids makes learning a blast, 10 best ai math solvers for instant homework solutions, 10 best ai homework helper tools to get instant homework help, 10 best ai humanizers to humanize ai text with ease, sla network: benefits, advantages, satisfaction of both parties to the contract, related posts.

How To Turn Off Safari Notifications

How To Add Honey To Browser On IPhone

How To Completely Remove Safari From IPhone

How To Use Safari On Apple Watch

How To Update Apple Safari

How To Check RAM On IPhone

How To Add Safari To Apple Watch

How To Unblock Pop-Ups On IPhone Safari
Recent stories.

How to Find the Best Midjourney Alternative in 2024: A Guide to AI Anime Generators

How to Know When it’s the Right Time to Buy Bitcoin

How to Sell Counter-Strike 2 Skins Instantly? A Comprehensive Guide

10 Proven Ways For Online Gamers To Avoid Cyber Attacks And Scams

- Privacy Overview
- Strictly Necessary Cookies
This website uses cookies so that we can provide you with the best user experience possible. Cookie information is stored in your browser and performs functions such as recognising you when you return to our website and helping our team to understand which sections of the website you find most interesting and useful.
Strictly Necessary Cookie should be enabled at all times so that we can save your preferences for cookie settings.
If you disable this cookie, we will not be able to save your preferences. This means that every time you visit this website you will need to enable or disable cookies again.
iOS 16.4 will let web apps on your homescreen send push notifications
I’ll probably be turning them off, but at least they’ll be an option..
By Jay Peters , a news editor who writes about technology, video games, and virtual worlds. He’s submitted several accepted emoji proposals to the Unicode Consortium.
Share this story
:format(webp)/cdn.vox-cdn.com/uploads/chorus_asset/file/24438207/Web_Push_on_iOS_1024x576.png "allow notifications safari iphone")
Apple’s new iOS and iPadOS 16.4 betas will let Safari web apps on your homescreen send you push notifications, according to a new post on the WebKit blog .
As far back as the first iPhone, you’ve been able to add a shortcut to websites to your homescreen represented as app-like icons, but the web apps haven’t been able to send you notifications or show notification badges. With iOS and iPadOS 16.4, however, that will change.
Here’s how the push notifications will work, according to the blog post by Brady Eidson and Jen Simmons — though it sounds a lot like how they work with native apps already:
A web app that has been added to the Home Screen can request permission to receive push notifications as long as that request is in response to direct user interaction — such as tapping on a ‘subscribe’ button provided by the web app. iOS or iPadOS will prompt the user to give the web app permission to send notifications. The user can then manage those permissions per web app in Notifications Settings — just like any other app on iPhone and iPad. The notifications from web apps work exactly like notifications from other apps. They show on the Lock Screen, in Notification Center, and on a paired Apple Watch.
Web apps will also be able to set a notification badge count, according to the blog, and the notifications will support Focus modes, too. And if you have multiple versions of a web app on your homescreen, they can have different settings, which might be useful to help separate personal and work use, for example. I’m personally glad we can manage the notifications on a per-web-app basis; that should make it a lot easier to keep them under control.
These web push notification changes were actually promised quite a long time ago, as Apple first announced web push notifications were on the way back at WWDC 2022 in June . That said, like on desktop, I don’t think I’ll be turning on any web push notifications — I already have turned most of my notifications for native apps off.
It’s not just Safari that’s getting some web app improvements: starting with iOS and iPadOS 16.4, you can save websites and apps from third-party browsers to your homescreen, too.
The Google One VPN service is heading to the Google graveyard
Discord is nuking nintendo switch emulator devs and their entire servers, humane ai pin review: not even close, apple’s latest sci-fi series is the trippy dark matter, sony’s new headphones and speakers are all about skull-rattling bass.
More from Apple
:format(webp)/cdn.vox-cdn.com/uploads/chorus_asset/file/19336098/cwelch_191031_3763_0002.jpg "allow notifications safari iphone")
The best Presidents Day deals you can already get
:format(webp)/cdn.vox-cdn.com/uploads/chorus_asset/file/25289245/VST_0216_Site_post.jpg "allow notifications safari iphone")
The shine comes off the Vision Pro
:format(webp)/cdn.vox-cdn.com/uploads/chorus_asset/file/23932923/acastro_STK108__01.jpg "allow notifications safari iphone")
Apple unbanned Epic so it can make an iOS games store in the EU
:format(webp)/cdn.vox-cdn.com/uploads/chorus_asset/file/25255207/246965_vision_pro_VPavic_0081.jpg "allow notifications safari iphone")
Why does Apple make it so hard to share the Vision Pro?
How-To Geek
How to turn safari website notifications on or off.
If you're a Mac user and you've noticed that Safari sometimes shows you website notifications, you might have wondered how to turn them off, and conversely, on again.
If you're a Mac user and you've noticed that Safari sometimes shows you website notifications, you might have wondered how to turn them off, and conversely, on again. It's very simple and can be accomplished in just a few key presses.
You will see these notifications slide out from the top-right corner like other OS X notifications. They will usually inform you when a website has posted a new article or of breaking news. Usually they disappear within a few seconds but on busy days, you might get one after another.
When you click on the Notification Center icon in the upper-right corner of the OS X desktop, you can see a history of these website notifications, just in case you missed any and, of course, you can remove them one by one if you prefer. We talked at length about the Notification Center in an earlier article , so we recommend you read that if you want to know more about it.
The reason you're even seeing these alerts in the first place is because you likely agreed to allow a website to send you push notifications at one time or another.
Luckily, if you don't want to receive notifications from a particular website (or none at all), you can easily turn them off in Safari's preferences by either clicking on the Safari menu or using the keyboard combination "Command + ,".
Once you've opened the preferences, click on the "Notifications" tab to see the websites that have asked for permission to display alerts in the Notification Center.
You need to go through and click "Allow" or "Deny" next to each one you want to affect. Alternatively, you can click on a single website and then "Remove" it or you can simply "Remove All" of them in one go.
If you want a website to keep showing you notifications, but you would like to change how it shows them, then click on the "Notifications Preferences..." button in the bottom-right corner of the Safari preferences tab.
This will open the Notifications system preferences, which will allow you to go through and change each website's notification style, such whether it displays none, as a banner, or as an alert.
When you go through these notifications, you'll notice that any and all websites that you see in your Safari notifications can also be found here, in fact, using the Notifications system preferences ensures that you have a lot more control over how each notification acts.
As we said, you can choose whether notifications appear as banners, alerts, or not at all. You can also choose to show them on the lock screen and decide how many recent items appear in the Notification Center.
We hope that you found this article useful, especially if you have been noticing website push notifications and weren't sure exactly how to deal with them. If you have an questions or comments you would like to contribute, please leave them in our discussion forum.
iOS 16.4 adds Web App Push Notifications: here’s how you can use and manage them
Set up and manage push notifications for web apps with this simple guide!
Progressive Web Apps (or PWAs) provide a quick and unique way to access websites and their services without installing a dedicated application. Now, this means they come without occupying a large chunk of storage on your phone and are an easy solution to quickly visit your favorite sites that don't have an app.
Despite iOS letting users create and use web apps for a long time, they have some limitations. And one popular missing feature was support for Push Notifications. But users running iOS 16.4 (and iPadOS 16.4) can now enable these for PWAs, and here we will look into how to set up and manage such notifications.
How to set up and manage Push Notifications for Progressive Web Apps on iOS
When it comes to receiving alerts from Progressive Web Apps, the setup procedure can range from being as simple as a single tap or involve more steps.
For this guide, we are using the web app for Twitter, which has a few steps to enable push notifications.
Once you've created the Twitter Web App and logged into your account, head into its Settings and Support section and follow the steps listed below:
- Choose the Notifications options.
- On the next screen, tap on Preferences.
- Then choose Push notifications and enable the feature.
- After enabling the feature within the web app, head into Settings on your iPhone and tap on the Notifications submenu.
- If you already had the Twitter app on your phone – as I did – you will now see another option for Twitter.
- Tapping on this option will allow you to manage notifications exactly how you would for any application installed from the App Store.
Deleting the PWA from your phone will also remove the configured settings.
Progressive Web Apps are now more useful on iPhone and iPad
Notifications for PWAs were a feature Apple announced last year at WWDC 2022, alongside a release date set for sometime in 2023. With iOS 16.4, Apple has finally delivered its promise, making web apps more useful and user-friendly. You may find this feature extremely convenient if you use communication apps like WhatsApp, which has a PWA but no dedicated application on iPad.
Want to highlight a helpful answer? Upvote!
Did someone help you, or did an answer or User Tip resolve your issue? Upvote by selecting the upvote arrow. Your feedback helps others! Learn more about when to upvote >
How to enable website notifications for Safari
I have notifications switched on in System Preferences and Safari, but 'website permissions' appear in every Safari preferences category, but not in Notifications.
I have a website asking me to allow their notifications - but no way of allowing them, as they don't show up in notifications box when the webpage is active.
Below is my screenshot, on the right they are asking permissions, and showing how to allow them, and on the left, my Notifications box with no websites in it...
Can anyone advise how to enable website notifications - or even get them to show up??
OS is Big Sur 11.7.10 Many thanks
[Re-Titled by Moderator]
MacBook Pro 15″, macOS 11.7
Posted on Mar 8, 2024 5:58 AM
Loading page content
Page content loaded

Mar 11, 2024 4:02 PM in response to davey17x
imho :The judgement of the feature and the way it works is a matter of opinion.
Your Mac is using an earlier MacOS version than my Mac ... things change.
The way Apple has it set up, that is the way it is ... seems to me: you switch sites off from asking to send notifications, and when sites send you notifications without having to ask first, you get to see a list of the sites, so you can choose to allow or deny the notifications from that site.
Apple Support have an article online about website notifications in Safari on Big Sur:
Customize website notifications in Safari on Mac - Apple Support
Change preferences for notifications
- Stop receiving notifications from a website: Choose Safari > Preferences, click Websites, then click Notifications. Find the website in the list, then select Deny.
- Stop seeing requests for permission to send you notifications in Safari: Choose Safari > Preferences, click Websites, then click Notifications. Deselect “Allow websites to ask for permission to send push notifications.”
- From now on, when you visit a website that wants to send you notifications, you aren’t asked."
Mar 10, 2024 1:44 PM in response to davey17x
Yes, seems so. Investigating further from the ?
- From now on, when you visit a website that wants to send you notifications, you aren’t asked.
Mar 9, 2024 12:06 AM in response to davey17x
Re: How to enable website notifications for Safari
Try clicking the tiny question mark (shown at bottom right in the small "Websites" window in your screenshot.)
This will reveal more info. on the settings ... ie: scroll down to "Notifications"
eg: I have not selected the "Allow websites to ask" ...
So I do see a list of those that have asked ... some I chose to "Allow" ... and some I chose to "Deny"
______________________________
Re: ... "even get them to show up"
Sites you "allow" to send notifications are also listed in Notifications settings.
Mar 9, 2024 5:03 PM in response to brbo
but clicking on the question mark doesn't do anything - simply explains the options available for the website listed in the notifications box: ASK, DENY etc - since they aren't visible, I don't have ANY options to choose from.
"Sites you "allow" to send notifications are also listed in Notifications settings." But you miss the point, I can't allow them if they aren't visible to allow, and that was the original question - how do I get them to show in the notifications to make my choices??
Mar 11, 2024 2:47 AM in response to davey17x
brbo: Yes, seems so.
Really? do you know, or are you guessing here??
I tried unchecking 'allow websites to ask permission for notification', but as I suspected - it's basically switched off notifications - like switching off the car engine, to drive into town... it's gotta be switched on to work...
Mar 9, 2024 6:01 PM in response to davey17x
Try unchecking the "Allow notifications to ask for permission to send notifications" that you have enabled, so you may get the choice of allowing or denying the sites.
Mar 10, 2024 1:10 AM in response to brbo
Doesn't that appear a little counter-intuitive, since I want websites to ask permission? 🤔
View in English
Safari Push Notifications
Use the Apple Push Notifications Service to send notifications to your website users, right on their Mac desktop — even when Safari isn’t running. Safari Push Notifications work just like push notifications for apps. They display your website icon and notification text, which users can click to go right to your website.

Reference and Videos
- Notification Programming Guide for Websites
- Local and Push Notification Programming Guide
- Troubleshooting Push Notifications
Related Resources
- Certificates, Identifiers & Profiles
- Certificates FAQs
Post questions and discuss Safari Push Notifications with other developers and Apple engineers.
- Tech Gift Ideas for Mom
- Hot Tech Deals at Target Right Now
How to Manage Website Push Notifications in Safari for OS X
Control which notifications you receive from websites
:max_bytes(150000):strip_icc():format(webp)/ScottOrgera-f7aca23cc84a4ea9a3f9e2ebd93bd690.jpg "allow notifications safari iphone")
What to Know
- In the Safari menu, select Preferences > Websites . Choose Notifications in the left pane.
- Use the menu next to any website that has requested permission to send notifications to allow or deny the request.
- Clear the box next to Allow websites to ask for permission to send push notifications to prevent sites from asking permission.
This article explains how to manage website push notifications in Safari for OS X. It includes information on viewing notification-related settings in the Notification Center . This information applies to Safari 9.x and above on Mac OS X.
Change the Safari Permissions
A website must ask your permission before it can push notifications to your desktop, usually as a pop-up question when you visit the site. While useful, these notifications can prove unwieldy and intrusive.
Here's how to deny or allow permissions for push notifications:
Go to the Safari menu and select Preferences .
Select Websites .
Click Notifications in the left menu pane.
The right side of the window contains a list of the sites that asked for permission to send you notifications. Use the menu to the right to either allow or deny those requests.
The Allow websites to ask for permission to send push notifications option is enabled by default. This option allows websites to ask you if you want notifications, usually when you first visit their site. To disable this option and prevent sites from asking permission to show alerts, clear the check box.
To reset a site's permissions, select it and click Remove . The next time you visit the URL, it asks for permission again, assuming you left the previous option active.
Change Notification Settings
To view more notification-related settings in the Notification Center:
Open System Preferences either by clicking its icon in the Dock or selecting it from the Finder's Apple menu.
Click Notifications .
Select Safari from the list of applications in the left menu pane.
Notification preferences specific to the browser appear on the right side of the window. To turn off all notifications, turn off the Allow Notifications from Safari toggle switch.
The Safari alert style section contains three options, each accompanied by an image.
- None : Disables Safari alerts from displaying on the desktop while keeping notifications active in the Notification Center.
- Banners : Informs you when a new push notification is available.
- Alerts : Notifies you and includes relevant buttons. Alerts stay on the screen until you dismiss them.
Below this section are five more settings, each accompanied by a check box and enabled by default. These settings are as follows:
- Show notifications on lock screen : When enabled, push notifications generated by your allowed websites display when your Mac is locked.
- Show notification preview : Specify whether macOS shows previews (which contain more detail about the alert) always or only when the computer is unlocked.
- Show in Notification Center : Leave this option on to see alerts you might have missed by opening the Notification Center in the upper-right corner of the Finder.
- Badge app icon : When enabled, the number of Safari alerts to be viewed displays in a red circle overlaying the browser's icon on the Dock.
- Play sound for notifications : When enabled, an audio alert plays each time you receive a notification.
Get the Latest Tech News Delivered Every Day
- How to Manage Push Notifications in Your Web Browser
- How to Turn off Notifications on Chrome in Windows 10
- How to Manage Edge Notifications
- Allow or Deny Access to Your Physical Location Settings
- Manage Smart Search in Safari for Mac
- How to Manage Tabbed Browsing in Safari for macOS
- How to Avoid Notification Overload on Apple Watch
- How to Turn Off Notifications on a Mac
- How to Pin Sites in Safari and Mac OS
- How to Manage Plug-Ins in the Safari Web Browser
- Select a New Mail Notification Style in Mac OS X Mail
- Speed Up Safari With These Tuneup Tips
- How to Manage Push Notifications on the iPad
- Set up Your Mac to Integrate With Facebook
- What Are Push Notifications on Facebook?
- How to Enable Cookies in Your Browser
Join 25,000+ Business Owners and Grow Your Business Faster with Push Notifications
See All Features
Documentation, Reference Materials, and Tutorials for PushEngage
Setting Up Web Push Notifications on iOS and iPadOS
Notice: There is no legacy documentation available for this item, so you are seeing the current documentation.
Apple has released iOS and iPadOS 16.4, which supports web push notifications for web apps added to the Home Screen on iPhone and iPad devices. In this guide, we help you set up your website to send notifications to iPhone and iPad users visiting your website.
Web Push Notifications are available for Safari browser, Google Chrome, and Edge on iPhone and iPad with iOS and iPadOS 16.4. iOS requires the user to add your website to their Home Screen and then open the Web App by tapping its icon. The web app opens like any other native app on iOS or iPadOS instead of opening in a browser. Users can grant permission to receive push notifications and then manage those permissions in Notifications Settings just like any other app on iPhone and iPad.
Before You Start
You require a few things to have the web push campaigns running on iOS devices.
- Your web app must serve a Web Application Manifest file (manifest.json) with its display member set to standalone or fullscreen.
- The users must be on iOS or iPadOS 16.4 or later.
- The user needs to install the web app to their Home Screen by tapping the Share button to open the Share menu, and then tapping “Add to Home Screen”.
- A user gesture, such as a click or tap on a button is required to show the native permission prompt and allow the permission to receive push notification.
If your website is already a Progressive Web App (PWA), you do not need to make additional updates to prepare for iOS/iPadOS Web Push. If unsure whether your website is a PWA, check with your development team or use Lighthouse in Chrome DevTools .
Setting up your Website for iOS and iPadOS Web Push Notification
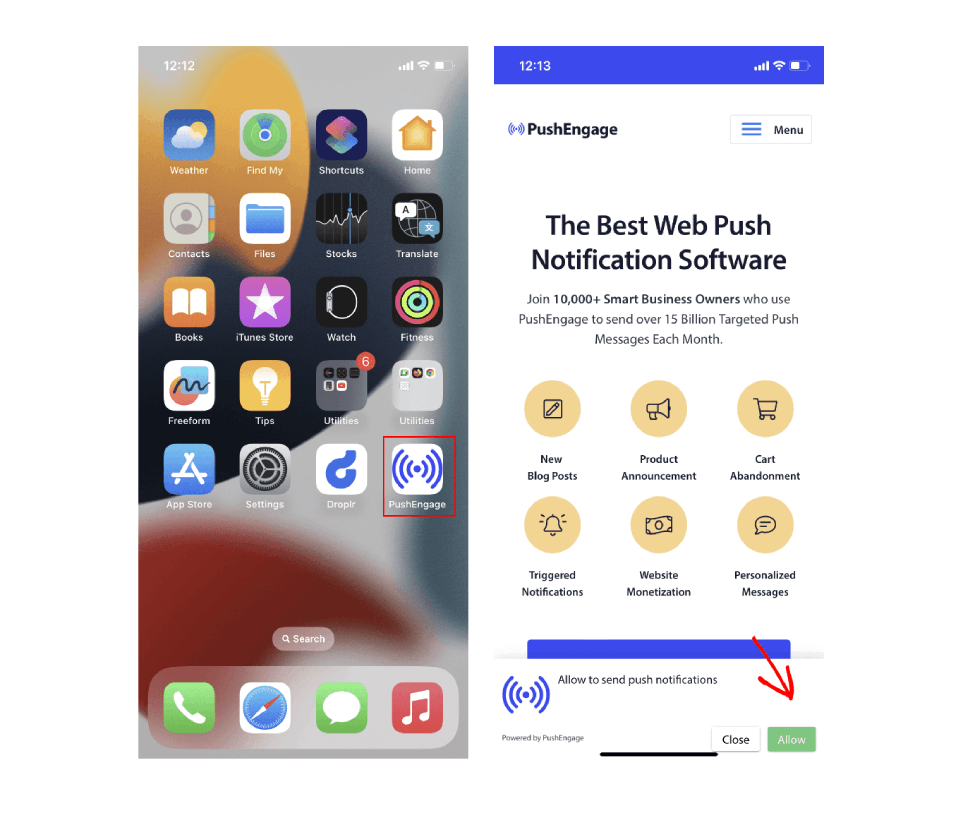
Follow the steps to enable and send push notifications to Safari on iPhone and iPad:
- 1. Add a Web App Manifest file to your website.
- 2. Integrate PushEngage on your website.
- 3. Deploy and test your website manifest.
- 4. Test Subscription Dialog Box modal and permission prompt.
1. Add a Web App Manifest file to Your Website
The web app manifest is a JSON file that tells the browser about your Progressive Web App (PWA) and how it should look and behave when installed on the user’s desktop or mobile device. It contains metadata such as your web app’s name, description, icons, color scheme and the URL that should be opened when the app is launched.
You can use any online tool to generate a manifest file quickly. The manifest file can have any name but is commonly named manifest.json and should be uploaded to the root directory of your website. If you need help adding code to your WordPress site, try the WPCode plugin.
A typical manifest looks something like this:
Note: The value of display member in the manifest must be set to either standalone or fullscreen .
After creating the manifest file, reference the manifest in the HTML page of your website using a <link> tag in the <head> section of the page.
For Example:
2. Integrate PushEngage on Your Website
The next step is to integrate PushEngage on your website to handle registering and installing Service Worker on the page.
If you have not completed the installation, here is the guide to installing PushEngage. If you are a WordPress user, you can use PushEngage WordPress Plugin , which will handle the service worker registration.
You can follow the steps mentioned here if you already have your service worker and need to merge it with PushEngage’s service worker .
3. Deploy and Test Your Website Manifest
Once you have uploaded the manifest and integrated the PushEngage, the next step is to test your web app to ensure that your web app manifest was implemented correctly. You can test your website on various devices and browsers by adding it to your home screen.
Follow these steps:
- 1. Open the website in Safari browser running on iOS 16.4 or later
- 2. Click on the “Share” button to open the share menu.
- 3. Click on the “Add to Home Screen” option.
- 4. Save the app on your Home Screen.

If your website has been successfully configured for web push, it will open the web app like any other app on iOS or iPadOS instead of opening in a browser and acting merely as a shortcut.
You should inform your user by showing a banner on the app screen, prompting the user to add your app to the home screen of their iOS device and subscribe to the web push notifications.
4. Test Subscription Dialog Box
A Home Screen web app on iOS and iPadOS requires direct user interaction, such as tapping on a button on the page to display the Subscription Dialog Box for permission. Follow these steps to test that the permission prompt is working:
- 1. Open the web app by tapping the app icon from the home screen on your device.
- 2. Wait for the PushEngage Subscription Dialog Box to appear on the page.
- 3. Click the “Allow” button on the PushEngage Popup modal to display the permission prompt.
- 4. Click the “Allow” button on the permission prompt.
Note : The Subscription dialog box will only appear if your website is HTTPS and the app has been launched from the home screen. You can customize the design and behavior of the Subscription Dialog Box from the PushEngage dashboard.
Send Web Push Campaign to iOS and iPadOS users
Once you have completed the above steps required for iOS and iPadOS web push notifications, you can now begin sending a push notification using the PushEngage dashboard .
Web Push Notifications on iOS works similar to other native apps. Web Push notifications are displayed on the screen as a heads-up notification, in the notification center and also on the lock screen. Users can also manage their notification preferences from iOS Settings. Once you click on the notification, it will take you to the desired landing page within the web app.
The Structure of an iOS Web Push Notification
iOS Safari push notifications do not currently support rich media, animated GIFs or videos. Once these features are added, we will enable them as well. Please follow the guidelines below to craft your notifications for iOS users.

Web push notifications on iOS and iPadOS include the following elements:
- 1. Icon – The icon specified in the manifest file. It can’t be changed for individual messages.
- 2. Title – The title is restricted to 30-40 characters, after which it gets truncated.
- 3. App Name – The app name is given in the manifest file and cannot be changed for individual messages.
- 4. Message – The text is restricted to 120-150 characters, after which it gets truncated.
- 5. Timestamp – This shows how long ago the notification was delivered to the device.
This is all you need to start collecting subscribers and sending campaigns to your iPhone & iPad users.
If you run into any issues, please contact us by clicking here. Our support team will be able to help you.
Engage and Retain Visitors AfterThey’ve Left Your Website
Increase the value of every web visit with Push Notifications that are hard to miss.
- Forever Free Plan
- 5 Star Support
Over 100 billion notifications sent
100% Secure and GDPR Compliant
Trusted by customers in 150+ countries
Apple details how superfast Safari upgrades help developers make web apps bigger and faster than ever before
Safari is now faster than ever.

Apple might have finally agreed to allow things like game streaming apps into the App Store but there are still plenty of apps that are only available via web-based alternatives in Safari. Those apps need to be bigger and faster than ever before and making that possible means being at the forefront of web-based technology and performance. Safari has historically been pretty quick, especially on the iPhone, and now the team behind it has detailed some recent speed improvements.
Safari is based on the WebKit web browser engine and it's the WebKit team that has detailed some changes that have been made to the underlying technology to enable web developers to build the kinds of experiences that they wouldn't normally be able to do.
Specifically, the Apple WebKit team says that it has been able to improve performance by around 60% of late, although it did take multiple different updates to the Safari app over the course of months in order to make that happen. Regardless, the upshot is the same — Safari is now faster than ever, and that's good news for developers and users alike.
Faster than fast
According to the blog post on the WebKit website, the speed improvements were made thanks to the introduction of the Speedometer 3.0 benchmarking system which in turn allowed WebKit developers to get a better understanding of how its software performs.
Discussing the tool, the WebKit team said that "these tooling improvements allowed us to quickly identify bottlenecks" with those bottlenecks then giving the team something to aim for.
The blog post then continued to detail what Apple was able to do including building a "shared understanding of web performance so that improvements can be made to enhance the user experience."
So how successful was it? As it turns out, pretty successful. "With all these optimizations and dozens more, we were able to improve the overall Speedometer 3.0 score by ~60% between Safari 17.0 and Safari 17.4," the post explains. "Even though individual progressions were often less than 1%, over time, they all stacked up together to make a big difference." The post continued, adding that the team is " thrilled to deliver these performance improvements to our users allowing web developers to build websites and web apps that are more responsive and snappier than ever."
Master your iPhone in minutes
iMore offers spot-on advice and guidance from our team of experts, with decades of Apple device experience to lean on. Learn more with iMore!
It's important to note that the improvements to performance when using Speedometer 3.0 don't just mean a better score for those running the tests, but rather real-world improvements that users of web apps across the world — and across Apple's platforms — can expect to be of benefit when running real apps.
It's also worth noting that outside the EU, all web browsers available for download via the best iPhone and iPad App Stores use the same WebKit browser engine at their core. That should ensure that these speed improvements will also benefit those who use other browsers on their devices, no matter which company makes them.
More from iMore
- How to manage privacy and security settings in Safari on iPhone and iPad
- This quick iPhone Safari trick will help you close all tabs and master Apple's mobile browser
- How to use tabs and private browsing in Safari for iPhone and iPad

Oliver Haslam has written about Apple and the wider technology business for more than a decade with bylines on How-To Geek, PC Mag, iDownloadBlog, and many more. He has also been published in print for Macworld, including cover stories. At iMore, Oliver is involved in daily news coverage and, not being short of opinions, has been known to 'explain' those thoughts in more detail, too. Having grown up using PCs and spending far too much money on graphics card and flashy RAM, Oliver switched to the Mac with a G5 iMac and hasn't looked back. Since then he's seen the growth of the smartphone world, backed by iPhone, and new product categories come and go. Current expertise includes iOS, macOS, streaming services, and pretty much anything that has a battery or plugs into a wall. Oliver also covers mobile gaming for iMore, with Apple Arcade a particular focus. He's been gaming since the Atari 2600 days and still struggles to comprehend the fact he can play console quality titles on his pocket computer.
Sick of sending "Sent from my iPhone"? Here's how to remove the annoying email signature for good
A major iPhone spyware attack hits users in 92 countries — find out if you've been affected
Severance season 2 filming has finished for one of its main stars as release date draws closer
Most Popular
By Joe Wituschek April 10, 2024
By Oliver Haslam April 10, 2024
By Daryl Baxter April 10, 2024
By Callum Booth April 10, 2024
By Stephen Warwick April 10, 2024
By James Bentley April 10, 2024
By Gerald Lynch April 10, 2024
- 2 A major iPhone spyware attack hits users in 92 countries
- 3 Apple's next major chip upgrade looks on track for iPhone 17 series next year
- 4 Apple unveils its answer to Wordle, but you'll need to be an Apple News Plus subscriber
- 5 Does Apple keep your data as private as it says? A new study suggests it might not
iPhone User Guide
- iPhone models compatible with iOS 17
- R ' class='toc-item' data-ss-analytics-link-url='https://support.apple.com/guide/iphone/iphone-xr-iph017302841/ios' data-ajax-endpoint='https://support.apple.com/guide/iphone/iphone-xr-iph017302841/ios' data-ss-analytics-event="acs.link_click" href='https://support.apple.com/guide/iphone/iphone-xr-iph017302841/ios' id='toc-item-IPH017302841' data-tocid='IPH017302841' > iPhone X R
- S ' class='toc-item' data-ss-analytics-link-url='https://support.apple.com/guide/iphone/iphone-xs-iphc00446242/ios' data-ajax-endpoint='https://support.apple.com/guide/iphone/iphone-xs-iphc00446242/ios' data-ss-analytics-event="acs.link_click" href='https://support.apple.com/guide/iphone/iphone-xs-iphc00446242/ios' id='toc-item-IPHC00446242' data-tocid='IPHC00446242' > iPhone X S
- S Max' class='toc-item' data-ss-analytics-link-url='https://support.apple.com/guide/iphone/iphone-xs-max-iphcd2066870/ios' data-ajax-endpoint='https://support.apple.com/guide/iphone/iphone-xs-max-iphcd2066870/ios' data-ss-analytics-event="acs.link_click" href='https://support.apple.com/guide/iphone/iphone-xs-max-iphcd2066870/ios' id='toc-item-IPHCD2066870' data-tocid='IPHCD2066870' > iPhone X S Max
- iPhone 11 Pro
- iPhone 11 Pro Max
- iPhone SE (2nd generation)
- iPhone 12 mini
- iPhone 12 Pro
- iPhone 12 Pro Max
- iPhone 13 mini
- iPhone 13 Pro
- iPhone 13 Pro Max
- iPhone SE (3rd generation)
- iPhone 14 Plus
- iPhone 14 Pro
- iPhone 14 Pro Max
- iPhone 15 Plus
- iPhone 15 Pro
- iPhone 15 Pro Max
- Setup basics
- Make your iPhone your own
- Take great photos and videos
- Keep in touch with friends and family
- Share features with your family
- Use iPhone for your daily routines
- Expert advice from Apple Support
- What’s new in iOS 17
- Turn on and set up iPhone
- Wake and unlock
- Set up cellular service
- Use Dual SIM
- Connect to the internet
- Sign in with Apple ID
- Subscribe to iCloud+
- Find settings
- Set up mail, contacts, and calendar accounts
- Learn the meaning of the status icons
- Charge the battery
- Charge with cleaner energy sources
- Show the battery percentage
- Check battery health and usage
- Use Low Power Mode
- Read and bookmark the user guide
- Learn basic gestures
- Learn gestures for iPhone models with Face ID
- Adjust the volume
- Find your apps in App Library
- Switch between open apps
- Quit and reopen an app
- Multitask with Picture in Picture
- Access features from the Lock Screen
- View Live Activities in the Dynamic Island
- Perform quick actions
- Search on iPhone
- Get information about your iPhone
- View or change cellular data settings
- Travel with iPhone
- Change sounds and vibrations
- Use the Action button on iPhone 15 Pro and iPhone 15 Pro Max
- Create a custom Lock Screen
- Change the wallpaper
- Adjust the screen brightness and color balance
- Keep the iPhone display on longer
- Use StandBy
- Customize the text size and zoom setting
- Change the name of your iPhone
- Change the date and time
- Change the language and region
- Organize your apps in folders
- Add, edit, and remove widgets
- Move apps and widgets on the Home Screen
- Remove apps
- Use and customize Control Center
- Change or lock the screen orientation
- View and respond to notifications
- Change notification settings
- Set up a Focus
- Allow or silence notifications for a Focus
- Turn a Focus on or off
- Stay focused while driving
- Customize sharing options
- Type with the onscreen keyboard
- Dictate text
- Select and edit text
- Use predictive text
- Use text replacements
- Add or change keyboards
- Add emoji and stickers
- Take a screenshot
- Take a screen recording
- Draw in documents
- Add text, shapes, signatures, and more
- Fill out forms and sign documents
- Use Live Text to interact with content in a photo or video
- Use Visual Look Up to identify objects in your photos and videos
- Lift a subject from the photo background
- Subscribe to Apple Arcade
- Play with friends in Game Center
- Connect a game controller
- Use App Clips
- Update apps
- View or cancel subscriptions
- Manage purchases, settings, and restrictions
- Install and manage fonts
- Buy books and audiobooks
- Annotate books
- Access books on other Apple devices
- Listen to audiobooks
- Set reading goals
- Organize books
- Create and edit events in Calendar
- Send invitations
- Reply to invitations
- Change how you view events
- Search for events
- Change calendar and event settings
- Schedule or display events in a different time zone
- Keep track of events
- Use multiple calendars
- Use the Holidays calendar
- Share iCloud calendars
- Camera basics
- Set up your shot
- Apply Photographic Styles
- Take Live Photos
- Take Burst mode shots
- Take a selfie
- Take panoramic photos
- Take macro photos and videos
- Take portraits
- Take Night mode photos
- Take Apple ProRAW photos
- Adjust the shutter volume
- Adjust HDR camera settings
- Record videos
- Record spatial videos for Apple Vision Pro
- Record ProRes videos
- Record videos in Cinematic mode
- Change video recording settings
- Save camera settings
- Customize the Main camera lens
- Change advanced camera settings
- View, share, and print photos
- Use Live Text
- Scan a QR code
- See the world clock
- Set an alarm
- Change the next wake up alarm
- Use the stopwatch
- Use multiple timers
- Add and use contact information
- Edit contacts
- Add your contact info
- Use NameDrop on iPhone to share your contact info
- Use other contact accounts
- Use Contacts from the Phone app
- Merge or hide duplicate contacts
- Export contacts
- Get started with FaceTime
- Make FaceTime calls
- Receive FaceTime calls
- Create a FaceTime link
- Take a Live Photo
- Turn on Live Captions in a FaceTime call
- Use other apps during a call
- Make a Group FaceTime call
- View participants in a grid
- Use SharePlay to watch, listen, and play together
- Share your screen in a FaceTime call
- Collaborate on a document in FaceTime
- Use video conferencing features
- Hand off a FaceTime call to another Apple device
- Change the FaceTime video settings
- Change the FaceTime audio settings
- Change your appearance
- Leave a call or switch to Messages
- Block unwanted callers
- Report a call as spam
- Connect external devices or servers
- Modify files, folders, and downloads
- Search for files and folders
- Organize files and folders
- Set up iCloud Drive
- Share files and folders in iCloud Drive
- Share your location
- Meet up with a friend
- Send your location via satellite
- Add or remove a friend
- Locate a friend
- Get notified when friends change their location
- Notify a friend when your location changes
- Add your iPhone
- Add your iPhone Wallet with MagSafe
- Get notified if you leave a device behind
- Locate a device
- Mark a device as lost
- Erase a device
- Remove a device
- Add an AirTag
- Share an AirTag or other item in Find My on iPhone
- Add a third-party item
- Get notified if you leave an item behind
- Locate an item
- Mark an item as lost
- Remove an item
- Adjust map settings
- Get started with Fitness
- Track daily activity and change your move goal
- See your activity summary
- Sync a third-party workout app
- Change fitness notifications
- Share your activity
- Subscribe to Apple Fitness+
- Find Apple Fitness+ workouts and meditations
- Start an Apple Fitness+ workout or meditation
- Create a Custom Plan in Apple Fitness+
- Work out together using SharePlay
- Change what’s on the screen during an Apple Fitness+ workout or meditation
- Download an Apple Fitness+ workout or meditation
- Get started with Freeform
- Create a Freeform board
- Draw or handwrite
- Apply consistent styles
- Position items on a board
- Search Freeform boards
- Share and collaborate
- Delete and recover boards
- Get started with Health
- Fill out your Health Details
- Intro to Health data
- View your health data
- Share your health data
- View health data shared by others
- Download health records
- View health records
- Monitor your walking steadiness
- Log menstrual cycle information
- View menstrual cycle predictions and history
- Track your medications
- Learn more about your medications
- Log your state of mind
- Take a mental health assessment
- Set up a schedule for a Sleep Focus
- Turn off alarms and delete sleep schedules
- Add or change sleep schedules
- Turn Sleep Focus on or off
- Change your wind down period, sleep goal, and more
- View your sleep history
- Check your headphone levels
- Use audiogram data
- Register as an organ donor
- Back up your Health data
- Intro to Home
- Upgrade to the new Home architecture
- Set up accessories
- Control accessories
- Control your home using Siri
- Use Grid Forecast to plan your energy usage
- Set up HomePod
- Control your home remotely
- Create and use scenes
- Use automations
- Set up security cameras
- Use Face Recognition
- Unlock your door with a home key
- Configure a router
- Invite others to control accessories
- Add more homes
- Get music, movies, and TV shows
- Get ringtones
- Manage purchases and settings
- Get started with Journal
- Write in your journal
- Review your past journal entries
- Change Journal settings
- Magnify nearby objects
- Change settings
- Detect people around you
- Detect doors around you
- Receive image descriptions of your surroundings
- Read aloud text and labels around you
- Set up shortcuts for Detection Mode
- Add and remove email accounts
- Set up a custom email domain
- Check your email
- Unsend email with Undo Send
- Reply to and forward emails
- Save an email draft
- Add email attachments
- Download email attachments
- Annotate email attachments
- Set email notifications
- Search for email
- Organize email in mailboxes
- Flag or block emails
- Filter emails
- Use Hide My Email
- Use Mail Privacy Protection
- Change email settings
- Delete and recover emails
- Add a Mail widget to your Home Screen
- Print emails
- Get travel directions
- Select other route options
- Find stops along your route
- View a route overview or a list of turns
- Change settings for spoken directions
- Get driving directions
- Get directions to your parked car
- Set up electric vehicle routing
- Report traffic incidents
- Get cycling directions
- Get walking directions
- Get transit directions
- Delete recent directions
- Get traffic and weather info
- Estimate travel time and ETA
- Download offline maps
- Search for places
- Find nearby attractions, restaurants, and services
- Get information about places
- Mark places
- Share places
- Rate places
- Save favorite places
- Explore new places with Guides
- Organize places in My Guides
- Delete significant locations
- Look around places
- Take Flyover tours
- Find your Maps settings
- Measure dimensions
- View and save measurements
- Measure a person’s height
- Use the level
- Set up Messages
- About iMessage
- Send and reply to messages
- Unsend and edit messages
- Keep track of messages
- Forward and share messages
- Group conversations
- Watch, listen, or play together using SharePlay
- Collaborate on projects
- Use iMessage apps
- Take and edit photos or videos
- Share photos, links, and more
- Send stickers
- Request, send, and receive payments
- Send and receive audio messages
- Animate messages
- Change notifications
- Block, filter, and report messages
- Delete messages and attachments
- Recover deleted messages
- View albums, playlists, and more
- Show song credits and lyrics
- Queue up your music
- Listen to broadcast radio
- Subscribe to Apple Music
- Play music together in the car with iPhone
- Listen to lossless music
- Listen to Dolby Atmos music
- Apple Music Sing
- Find new music
- Add music and listen offline
- Get personalized recommendations
- Listen to radio
- Search for music
- Create playlists
- See what your friends are listening to
- Use Siri to play music
- Change the way music sounds
- Get started with News
- Use News widgets
- See news stories chosen just for you
- Read stories
- Follow your favorite teams with My Sports
- Listen to Apple News Today
- Subscribe to Apple News+
- Browse and read Apple News+ stories and issues
- Download Apple News+ issues
- Listen to audio stories
- Solve crossword puzzles
- Search for news stories
- Save stories in News for later
- Subscribe to individual news channels
- Get started with Notes
- Add or remove accounts
- Create and format notes
- Draw or write
- Add photos, videos, and more
- Scan text and documents
- Work with PDFs
- Create Quick Notes
- Search notes
- Organize in folders
- Organize with tags
- Use Smart Folders
- Export or print notes
- Change Notes settings
- Make a call
- Answer or decline incoming calls
- While on a call
- Set up voicemail
- Check voicemail
- Change voicemail greeting and settings
- Select ringtones and vibrations
- Make calls using Wi-Fi
- Set up call forwarding and call waiting
- Avoid unwanted calls
- View photos and videos
- Play videos and slideshows
- Delete or hide photos and videos
- Edit photos and videos
- Trim video length and adjust slow motion
- Edit Cinematic mode videos
- Edit Live Photos
- Edit portraits
- Use photo albums
- Edit, share, and organize albums
- Filter and sort photos and videos in albums
- Make stickers from your photos
- Duplicate and copy photos and videos
- Merge duplicate photos and videos
- Search for photos
- Identify people and pets
- Browse photos by location
- Share photos and videos
- Share long videos
- View photos and videos shared with you
- Watch memories
- Personalize your memories
- Manage memories and featured photos
- Use iCloud Photos
- Create shared albums
- Add and remove people in a shared album
- Add and delete photos and videos in a shared album
- Set up or join an iCloud Shared Photo Library
- Add content to an iCloud Shared Photo Library
- Use iCloud Shared Photo Library
- Import and export photos and videos
- Print photos
- Find podcasts
- Listen to podcasts
- Follow your favorite podcasts
- Use the Podcasts widget
- Organize your podcast library
- Download, save, or share podcasts
- Subscribe to podcasts
- Listen to subscriber-only content
- Change download settings
- Make a grocery list
- Add items to a list
- Edit and manage a list
- Search and organize lists
- Work with templates
- Use Smart Lists
- Print reminders
- Use the Reminders widget
- Change Reminders settings
- Browse the web
- Search for websites
- Customize your Safari settings
- Change the layout
- Use Safari profiles
- Open and close tabs
- Organize your tabs
- View your Safari tabs from another Apple device
- Share Tab Groups
- Use Siri to listen to a webpage
- Bookmark favorite webpages
- Save pages to a Reading List
- Find links shared with you
- Annotate and save a webpage as a PDF
- Automatically fill in forms
- Get extensions
- Hide ads and distractions
- Clear your cache
- Browse the web privately
- Use passkeys in Safari
- Check stocks
- Manage multiple watchlists
- Read business news
- Add earnings reports to your calendar
- Use a Stocks widget
- Translate text, voice, and conversations
- Translate text in apps
- Translate with the camera view
- Subscribe to Apple TV+, MLS Season Pass, or an Apple TV channel
- Add your TV provider
- Get shows, movies, and more
- Watch sports
- Watch Major League Soccer with MLS Season Pass
- Control playback
- Manage your library
- Change the settings
- Make a recording
- Play it back
- Edit or delete a recording
- Keep recordings up to date
- Organize recordings
- Search for or rename a recording
- Share a recording
- Duplicate a recording
- Keep cards and passes in Wallet
- Set up Apple Pay
- Use Apple Pay for contactless payments
- Use Apple Pay in apps and on the web
- Track your orders
- Use Apple Cash
- Use Apple Card
- Use Savings
- Pay for transit
- Access your home, hotel room, and vehicle
- Add identity cards
- Use COVID-19 vaccination cards
- Check your Apple Account balance
- Use Express Mode
- Organize your Wallet
- Remove cards or passes
- Check the weather
- Check the weather in other locations
- View weather maps
- Manage weather notifications
- Use Weather widgets
- Learn the weather icons
- Find out what Siri can do
- Tell Siri about yourself
- Have Siri announce calls and notifications
- Add Siri Shortcuts
- About Siri Suggestions
- Use Siri in your car
- Change Siri settings
- Contact emergency services
- Use Emergency SOS via satellite
- Request Roadside Assistance via satellite
- Set up and view your Medical ID
- Use Check In
- Manage Crash Detection
- Reset privacy and security settings in an emergency
- Set up Family Sharing
- Add Family Sharing members
- Remove Family Sharing members
- Share subscriptions
- Share purchases
- Share locations with family and locate lost devices
- Set up Apple Cash Family and Apple Card Family
- Set up parental controls
- Set up a child’s device
- Get started with Screen Time
- Protect your vision health with Screen Distance
- Set up Screen Time
- Set communication and safety limits and block inappropriate content
- Charging cable
- Power adapters
- MagSafe chargers and battery packs
- MagSafe cases and sleeves
- Qi-certified wireless chargers
- Use AirPods
- Use EarPods
- Apple Watch
- Wirelessly stream videos and photos to Apple TV or a smart TV
- Connect to a display with a cable
- HomePod and other wireless speakers
- Pair Magic Keyboard
- Enter characters with diacritical marks
- Switch between keyboards
- Use shortcuts
- Choose an alternative keyboard layout
- Change typing assistance options
- External storage devices
- Bluetooth accessories
- Share your internet connection
- Allow phone calls on your iPad and Mac
- Use iPhone as a webcam
- Hand off tasks between devices
- Cut, copy, and paste between iPhone and other devices
- Stream video or mirror the screen of your iPhone
- Start SharePlay instantly
- Use AirDrop to send items
- Connect iPhone and your computer with a cable
- Transfer files between devices
- Transfer files with email, messages, or AirDrop
- Transfer files or sync content with the Finder or iTunes
- Automatically keep files up to date with iCloud
- Use an external storage device, a file server, or a cloud storage service
- Intro to CarPlay
- Connect to CarPlay
- Use your vehicle’s built-in controls
- Get turn-by-turn directions
- Change the map view
- Make phone calls
- View your calendar
- Send and receive text messages
- Announce incoming text messages
- Play podcasts
- Play audiobooks
- Listen to news stories
- Control your home
- Use other apps with CarPlay
- Rearrange icons on CarPlay Home
- Change settings in CarPlay
- Get started with accessibility features
- Turn on accessibility features for setup
- Change Siri accessibility settings
- Open features with Accessibility Shortcut
- Change color and brightness
- Make text easier to read
- Reduce onscreen motion
- Customize per-app visual settings
- Hear what’s on the screen or typed
- Hear audio descriptions
- Turn on and practice VoiceOver
- Change your VoiceOver settings
- Use VoiceOver gestures
- Operate iPhone when VoiceOver is on
- Control VoiceOver using the rotor
- Use the onscreen keyboard
- Write with your finger
- Use VoiceOver with an Apple external keyboard
- Use a braille display
- Type braille on the screen
- Customize gestures and keyboard shortcuts
- Use VoiceOver with a pointer device
- Use VoiceOver for images and videos
- Use VoiceOver in apps
- Use AssistiveTouch
- Adjust how iPhone responds to your touch
- Use Reachability
- Auto-answer calls
- Turn off vibration
- Change Face ID and attention settings
- Use Voice Control
- Adjust the side or Home button
- Use Apple TV Remote buttons
- Adjust pointer settings
- Adjust keyboard settings
- Adjust AirPods settings
- Turn on Apple Watch Mirroring
- Control a nearby Apple device
- Intro to Switch Control
- Set up and turn on Switch Control
- Select items, perform actions, and more
- Control several devices with one switch
- Use hearing devices
- Use Live Listen
- Use sound recognition
- Set up and use RTT and TTY
- Flash the LED for alerts
- Adjust audio settings
- Play background sounds
- Display subtitles and captions
- Show transcriptions for Intercom messages
- Get Live Captions (beta)
- Type to speak
- Record a Personal Voice
- Use Guided Access
- Use built-in privacy and security protections
- Set a passcode
- Set up Face ID
- Set up Touch ID
- Control access to information on the Lock Screen
- Keep your Apple ID secure
- Use passkeys to sign in to apps and websites
- Sign in with Apple
- Share passwords
- Automatically fill in strong passwords
- Change weak or compromised passwords
- View your passwords and related information
- Share passkeys and passwords securely with AirDrop
- Make your passkeys and passwords available on all your devices
- Automatically fill in verification codes
- Automatically fill in SMS passcodes
- Sign in with fewer CAPTCHA challenges
- Use two-factor authentication
- Use security keys
- Manage information sharing with Safety Check
- Control app tracking permissions
- Control the location information you share
- Control access to information in apps
- Control how Apple delivers advertising to you
- Control access to hardware features
- Create and manage Hide My Email addresses
- Protect your web browsing with iCloud Private Relay
- Use a private network address
- Use Advanced Data Protection
- Use Lockdown Mode
- Use Stolen Device Protection
- Receive warnings about sensitive content
- Use Contact Key Verification
- Turn iPhone on or off
- Force restart iPhone
- Back up iPhone
- Return iPhone settings to their defaults
- Restore all content from a backup
- Restore purchased and deleted items
- Sell, give away, or trade in your iPhone
- Erase iPhone
- Install or remove configuration profiles
- Important safety information
- Important handling information
- Find more resources for software and service
- FCC compliance statement
- ISED Canada compliance statement
- Ultra Wideband information
- Class 1 Laser information
- Apple and the environment
- Disposal and recycling information
- Unauthorized modification of iOS
View and respond to notifications on iPhone
Notifications help you keep track of what’s new—they let you know if you missed a call, if the date of an event moved, and more. You can customize your notification settings so you see only what’s important to you.
Unless you have notifications silenced with a Focus , iPhone displays them as they arrive—they roll in from the bottom of the screen to minimize distraction. You can view them on the Lock Screen in an expanded list view, stacked view, or count view. Pinch the notifications on the Lock Screen to change the layout.
Note: While you’re using an app, you might be asked how you want to receive notifications from it—immediately, not at all, or in a scheduled summary . You can change this setting later in Settings > Notifications.
Find your notifications in Notification Center
To see your notifications in Notification Center, do any of the following:
On the Lock Screen: Swipe up from the middle of the screen.
On other screens: Swipe down from the top center. Then you can scroll up to see older notifications, if there are any.
To close Notification Center, swipe up from the bottom with one finger or press the Home button (on an iPhone with a Home button).
Respond to notifications
When you have multiple notifications in Notification Center or on the Lock Screen, they’re grouped by app, which makes them easier to view and manage. Notifications from some apps may also be grouped by organizing features within the app, such as by topic or thread. Grouped notifications appear as small stacks, with the most recent notification on top.
Do any of the following:
To expand a group of notifications to see them individually: Tap the group. To close the group, tap Show Less.
To view a notification and perform quick actions if the app offers them (on supported models): Touch and hold the notification.
To open a notification’s app: Tap the notification.
Schedule a notification summary
You can reduce distractions in your day by scheduling your notifications to be delivered as a summary—you choose which notifications to include in the summary and what time you want to receive it.
The notification summary is personalized to you and intelligently ordered by priority, based on your current activity, with the most relevant notifications at the top. The summary is especially useful because it allows you to engage with notifications on your own time. You can take this even further by using Focus to filter notifications while you focus on an activity.
Select the apps to include in your summary.
Set a time for your summary. If you want to receive another summary, tap Add Summary.
Tap A to Z below Apps in Summary, then make sure the apps you want to include in your summary are turned on.
View, dismiss, clear, and mute notifications
When notifications appear on your iPhone, do any of the following:
Handle a notification you receive while using another app: Tap to view it, then swipe up to dismiss it.
Clear notifications: Swipe left on a notification or group of notifications, then tap Clear or Clear All.
Mute notifications for an app: Swipe left on the notification or group of notifications, tap Options, then tap an option to mute the app’s notifications for an hour or a day. This sends them directly to Notification Center and prevents them from appearing on the Lock Screen, playing a sound, lighting up the screen, or presenting a banner.
To see and hear these notifications again, swipe left on the notification in Notification Center, tap Options, then tap Unmute.
Turn off notifications for an app or notification group: Swipe left on a notification or group of notifications, tap Options, then tap Turn Off.
Change how an app displays notifications: Swipe left on a notification, tap Options, then tap View Settings. See Change notification settings to learn about the settings you can change.
Silence all notifications: Turn on Do Not Disturb. See Turn on or schedule a Focus on iPhone .
When you haven’t used an app for a while, you may see a suggestion that you turn off notifications for that app.
Show recent notifications on the Lock Screen
You can allow access to Notification Center on the Lock Screen.
Enter your passcode.
Scroll down and turn on Notification Center (below Allow Access When Locked).

How to Silence Notifications on Your Mac
Quick links, disable notifications for specific apps via settings, temporarily mute app-specific notifications, silence imessage conversations on your mac, silence notifications for websites on a mac, silence mac notifications with a focus mode.
- You can temporarily mute app-specific notifications from the Notification Center.
- Head to your browser settings if you want to disable notifications from specific websites.
- You can create a custom Focus mode to silence notifications from specific contacts or apps at certain times or locations.
Whether you're busy with work or binge-watching a TV show, getting notifications every few minutes can be frustrating. Fortunately, it's easy to silence incoming notifications on your Mac. You can either disable alerts entirely or silence notifications from websites.
You may notice you're receiving too many notifications from one specific app. In such situations, the best thing to do is disable notifications for that app. To do so, follow these steps:
- Click the Apple logo in the top-left corner of the menu bar and go to System Settings > Notifications .
- Find the app for which you want to silence notifications under the Application Notifications section.
- If you'd like to stop receiving audio alerts from the app, toggle off the switch next to Play sound for notification . However, if you'd like to stop receiving notifications from the app entirely, toggle off the switch next to Allow notifications .
If you want to stop receiving notifications from a certain app for only a specific period, macOS lets you do that as well. Here's what you need to do:
- Open the Notification Center by clicking the date and time in the top-right corner of the menu bar.
- Control -click on a notification you've received from the app you'd like to temporarily mute. Once you do, depending on how long you'd like to mute notifications, choose either Mute for 1 Hour or Mute for Today .
If you keep getting pings from one of your friends while you're busy with work, you can also silence notifications from them directly in the Messages app like you can on an iPhone .
To do so, open the Messages app and select the conversation with the person you'd like to mute. Click the Info (i) button in the top-right corner of the screen and check the box next to Hide Alerts .
Alternatively, you can Control -click on the conversation thread you want to silence and select Hide Alerts from the menu.
If you'd like to stop receiving notifications from the Messages app entirely, head to System Settings > Notifications > Messages and toggle off the switch next to Allow notifications .
While you can disable browser notifications entirely by heading to System Settings > Notifications > [Your Browser] and toggling off the switch next to Allow notifications , what if you'd like to stop receiving notifications from one particular website? In this case, you will need to head to your browser's settings.
Here's how to disable notifications for a specific website in Safari:
- Launch Safari and click Safari in the menu bar.
- Select Settings from the dropdown menu, and go to the Websites section.
- Choose Notifications from the sidebar on the left.
- Find the website you'd like to silence and click the option next to the website's name. Choose Deny from the dropdown menu to revoke its permissions.
Google Chrome
Here's how to stop receiving notifications from a website on Google Chrome:
- Launch Google Chrome and click the three dots in the top-right corner of the screen.
- Choose Settings from the dropdown menu.
- Select Privacy and security in the left sidebar and then click Site settings on the right.
- Now, scroll down and click Notifications under the Permissions secction.
- Find the website you want to silence under the Allowed to send notifications section. Once you do, click the three dots next to the website's name and select Block from the dropdown menu.
Mozilla Firefox
Here's how to stop receiving notifications from a website on Mozilla Firefox:
- Launch Mozilla Firefox and click the three-line icon in the top-right corner of the screen.
- Choose Settings from the dropdown menu and select Privacy & Security from the sidebar on the left.
- Scroll down until you see the Permissions section. Now, click the Settings... button next to Notifications .
- Find the website you want to silence and click the Allow text under Status . Finally, select Block from the dropdown menu.
One of the best ways to minimize distractions on your Mac is by using a Focus mode . Here's how to create one:
- Go to System Settings > Focus from the sidebar on the left.
- Tap the Add Focus... button to create a new Focus preset. You can also choose an existing one. Select Custom when prompted to choose what you'd like to focus on.
- Enter a name for your Focus mode and choose an icon and color to customize it. Once you're done, click OK .
- Now, if you'd like to silence incoming notifications from a certain person, click Allowed People under the Allow Notifications section. Now, click the option next to Notifications and set it to Silence Some People .
- Tap the plus (+) icon and select the contacts. Click Done once you've selected all the contacts you want to silence.
Similarly, you can also choose to stop receiving notifications from specific apps. Click Allowed Apps under the Allow Notifications section, set Silence Some Apps for the option next to Notifications , click the plus (+) icon below, and select all the apps you'd like to silence.
Do you have a designated time to focus on tasks? Or, do you focus better when you're at a particular location, like a café or library? If so, we recommend scheduling your Focus mode to turn on automatically, depending on the time or your location.
To do so, select the Focus mode you just created and click Add Schedule under Set a Schedule .
If you'd like your Focus mode to turn on at a designated time, select Time on the next screen and enter the time you'd like the Focus mode to turn on and off.
If you'd like your Focus mode to turn on when you're at a specific location, select Location instead and enter your desired location in the search bar on the next screen.
However, if you'd much rather manually enable and disable your Focus mode when you need to focus, click the Control Center icon in the menu bar, select Focus , and choose the Focus mode you want to enable.
One of the key benefits of using this feature is that you can sync Focus across all your Apple devices when logged into the same Apple ID. This means that if you turn on a Focus mode on your Mac that silences incoming notifications from a specific person, you won't receive notifications from that person on your iPhone as well.
Unlike iPhones, Macs do not have a dedicated mute switch or Action button that you can use to silence alerts immediately. Fortunately, disabling notifications on your Mac only takes a few seconds. If you'd rather silence notifications for a set period instead of disabling them entirely, creating a Focus mode is your best bet!

How to manage all web browser notifications on your Mac
In this tutorial, we will show you how to allow, block, customize, and turn off website notifications in popular browser apps like Safari, Chrome, and Firefox on your Mac.

These tips will be helpful if you’re getting too many notifications or not receiving alerts from sites that are important to you.
But before you do that, remember that not all websites are designed to send notifications. And ones that do have this feature will probably show you a banner to allow notifications when you visit them for the first time, after a few weeks, or after clearing all your web browser data .
Allow browser notifications
When you install a browser app like Chrome, Firefox, Brave, or Opera, you will get an alert in the top right corner of your Mac’s screen asking your permission to allow notifications from this app. Click Options to Allow (or block) alerts.

If you don’t get that automatic alert, visit a website like bennish.net , Slack , or something similar that can send notifications. Then, you may see the macOS notification asking your permission to send browser notifications.
- Visit bennish.net and click Authorize > Allow .
- Now, if you see the macOS notification for browser notification, click Options > Allow and confirm if prompted.
Manage browser notifications for a specific website
Once the browser app in question is permitted to send notifications, you can decide which websites can send you notifications and which cannot.
Allow notifications
When you visit a website that is designed to send notifications, you will see a popup. Allow that and then confirm if prompted. Remember that websites use different popup styles.

Block notifications
You can prevent a website from sending notifications when it asks for the first time. If you have already allowed it, you can block it later by following these steps.
Open the app and click Safari > Settings from the top menu bar. Now, go to the Websites tab and select Notifications . Here, you’ll see all the websites that you have allowed or blocked from sending notifications. Click the dropdown menu next to an allowed site to block it.

Visit the website that sends you notifications and click the settings icon from the top address bar. Now, turn off the Notifications switch. If you don’t see it, that means you did not permit this site to send notifications, or it does not have that feature.

Additionally, you can go to chrome://settings/content/notifications or click Chrome > Settings from the top menu bar and then go to Privacy and security > Site settings > Notifications . From here, click the three dots icon next to a website under the “Allowed to send notifications” and block it.

Visit the website that sends you notifications. Now, click the settings icon and hit Allowed next to Send notifications to block it. Don’t forget to reload the page for changes to take effect.

In addition to that, you can click Firefox > Settings from the top menu bar. Then select Privacy & Security and scroll down to the Permissions heading. From here, click Settings next to Notifications to see all allowed or blocked sites. Click the dropdown menu next to a site listed here to block (or allow) notification privileges for it.

Customize browser app notifications
A third-party web browser does not offer many per-website notification customization options. You are pretty much limited to allowing or blocking alerts from that site.
However, macOS offers handy notification settings for web browser apps. Furthermore, when you allow a website to send you notifications in Safari, macOS treats that website as an app in its notification settings. So, you can customize that website’s notifications as if it were an app.
Here’s how to mute, change style, block previews, and do other personalizations for your web browser notifications on Mac:
1) Open System Settings and click Notifications .
2) You will see your browser apps like Safari , Chrome , Firefox , etc. Additionally, as mentioned, websites that are permitted to alert you in Safari may also be listed here. Click a browser app or Safari website.

3) Now, you can customize it like you would with a regular Mac app.
You can change the notification style, block it from appearing on the locked Mac screen, prevent it from stacking in your Notification Center , turn off the red number badge on the app’s icon in Launchpad and Dock, turn off the notification sound, display or hide the preview, and decide a grouping style.

Turn off all browser notifications
Go to Mac’s System Settings > Notifications and select the browser app. Now, turn off the Allow notifications switch from the top. After this, you won’t receive notifications from this browser at all. It will even block alerts from websites you had previously allowed to send notifications.
Check out next: Not getting app notifications, banners, or sound on Mac? Here’s how to fix it
- a. Send us an email
- b. Anonymous form
- Buyer's Guide
- Upcoming Products
- Tips / Contact Us
- Podcast Instagram Facebook Twitter Mastodon YouTube Notifications RSS Newsletter
Browser Companies Criticize Apple's EU Choice Screen in iOS 17.4
Several third-party browser companies have experienced a spike in iPhone installs since Apple made major changes to iOS in order to comply with the Digital Markets Act in the European Union, but many are not happy with Apple's implementation of its default browser choice screen.

The change has led to a sharp increase in third-party browser usage, based on several reports. On Wednesday, Reuters reported that users of privacy-first browser Aloha had jumped 250% in March. The jump in users largely came in France, Belgium (3x growth), Germany, The Netherlands, Spain and Sweden (2.5x growth), and Denmark, Italy and Poland (2x growth).
Aloha browser markets itself as a privacy focused alternative to browsers that earns its money through paid subscriptions rather than selling ads by tracking users. The Cyprus-based company says it has 10 million monthly average users.
"Before, EU was our number four market, right now it's number two," Aloha CEO Andrew Frost Moroz said in an interview with Reuters .
Norway's Vivaldi browser, Germany's Ecosia and U.S.-based Brave have all seen user numbers rise following the new regulation. U.S.-based DuckDuckGo, which has about 100 million users, and its more popular rival, Norway-based Opera, have also reported substantial increases.
To be eligible for consideration in the alternative browsers list, companies must have the Default Browser Entitlement that is available to developers. Apple also requires that the app has been downloaded by at least 5,000 iPhone users across all 27 EU countries in the prior calendar year. Apple selects up to 11 of these for the browser choice screen in addition to Safari, updating the list once per calendar year.
Google has also updated its Pixel software to show alternative browser choices, and says that new Android devices made by other companies will also display the choice screen in the coming months.
Despite users increasingly choosing alternative options, browser companies have criticized Apple and Google for the slow rollout of the change, and believe it is hampering the migration away from Safari and Chrome. Mozilla, which owns Firefox, estimates that only around a fifth of iPhone users in the EU have received the iOS update, and claims that the rollout is much slower than Apple's previous software updates.
Some alternative browser makers are also concerned that the design of choice screens is sub-optimal at best. For example, Vivaldi CEO Jon Stephenson von Tetzchner notes that Apple's choice screen only appears when iPhone users open Safari, while the list of browsers provides no additional information.
"The process is just so convoluted that it's easiest for (users) to select Safari or potentially some other known name," he told Reuters .
Vivaldi is also unhappy with the design. "The list of browsers does not show additional information and that does not help users to make a meaningful choice," a company spokesperson told TechCrunch . "If the user has already selected a browser of their own choice, the choice screen can actively try to push them away from it, and may not even include it in the list that it presents to the user."
Ecosia has also been critical, and says Apple's implementation involves an "overly complex installation process" and keeps Safari front and center on the user's iPhone Home screen.
The European Commission is currently investigating Apple's choice screen design for suspected noncompliance. The probe is being conducted in consultation with browser companies, who are likely to encourage regulators to push for a stronger implementation to level the competitive playing field.
Get weekly top MacRumors stories in your inbox.
Top Rated Comments
Is there anything the EU is happy with and not investigating?

Popular Stories

iPhone 16 Plus Rumored to Come in These 7 Colors

When to Expect a New Apple TV to Launch

Macs to Get AI-Focused M4 Chips Starting in Late 2024

iOS 18 May Feature All-New 'Safari Browsing Assistant'

Review: Six Months With the iPhone 15 Pro

Alleged iPhone 16 Battery Details Show Smaller Capacity for One Model
Next article.

Our comprehensive guide highlighting every major new addition in iOS 17, plus how-tos that walk you through using the new features.

App Store changes for the EU, new emoji, Podcasts transcripts, and more.

Get the most out your iPhone 15 with our complete guide to all the new features.
A deep dive into new features in macOS Sonoma, big and small.

Revamped models with OLED displays, M3 chip, and redesigned Magic Keyboard accessory.

Updated 10.9-inch model and new 12.9-inch model, M2 chip expected.

Apple's annual Worldwide Developers Conference will kick off with a keynote on June 10.

Expected to see new AI-focused features and more. Preview coming at WWDC in June with public release in September.
Other Stories

10 hours ago by MacRumors Staff

13 hours ago by Joe Rossignol

14 hours ago by Tim Hardwick

1 day ago by MacRumors Staff

2 days ago by Tim Hardwick
IMAGES
VIDEO
COMMENTS
Launch the Settings app on your iPhone or iPad running iOS/iPadOS 16.4 or later. Scroll down and navigate to Safari. Click Advanced and then Experimental Features . Close. You will find a Push API ...
By Corbin Davenport. Published Jun 6, 2022. Apple will finally allow websites to send notifications on iPhone and iPad. Apple's Safari web browser has lagged behind some features in recent years, especially with background services. After years of waiting, it seems like Safari will finally support web push notifications on all platforms.
Go to Settings > Notifications. Choose how you want notifications displayed on the Lock Screen: View just the number of notifications: Tap Count. View the notifications grouped into stacks by app: Tap Stack. View the notifications in a list: Tap List. When notifications arrive, you can change the layout by pinching the notifications on the Lock ...
Go to Settings and then scroll down to Safari. Click Advanced and then Experimental Features. The reader has to switch on the Push API toggle. The user is now ready to receive push notifications on Safari. They now have to add your website to get notifications. Follow these steps to get users to get your readers to add your website to their ...
4. Tap the app you want to manage. Each app on your iPhone has its own push notification settings. 5. Toggle the "Allow Notifications" switch to On . As long as this switch is enabled, you'll receive push notifications for this app. 6. Choose your alert preferences. By default, all three alert types are enabled.
Now, according to Apple's website, iOS 16 and iPadOS 16 will finally enable web push notifications - but there's a catch. Apple says the feature will come in 2023 with a future update of iOS ...
By following these steps, you can effectively enable notifications for Safari on your iPhone, empowering you to stay connected and informed while browsing the web. Once notifications are enabled, Safari will seamlessly deliver updates and alerts from your preferred websites, enhancing your browsing experience and keeping you in the loop with ...
Apple's new iOS and iPadOS 16.4 betas will let Safari web apps on your homescreen send you push notifications, according to a new post on the WebKit blog. As far back as the first iPhone, you ...
Luckily, if you don't want to receive notifications from a particular website (or none at all), you can easily turn them off in Safari's preferences by either clicking on the Safari menu or using the keyboard combination "Command + ,". Once you've opened the preferences, click on the "Notifications" tab to see the websites that have asked for ...
Touch and hold a notification to view the notification and perform quick actions if the app offers them. To show the contents of notifications on the Lock Screen without unlocking your device, go to Settings > Notifications > Show Previews, and select Always. In iOS 17 and later, you can also view notifications while your iPhone is in StandBy.
Choose the Notifications options. On the next screen, tap on Preferences. Then choose Push notifications and enable the feature. After enabling the feature within the web app, head into Settings ...
Change preferences for notifications. "In the Safari app on your Mac, do any of the following: Stop receiving notifications from a website: Choose Safari > Preferences, click Websites, then click Notifications. Find the website in the list, then select Deny. Change how website notifications appear: Choose Apple menu > System Preferences, click ...
Safari is adopting several new web features. Safari will support push notifications from web apps such as Google Maps, Uber and Instagram. Once approved, web notifications will show up in the Notification Center and on the Lock Screen, just like notifications from native apps. Third-party web browsers like Google Chrome can now add web apps to ...
Here are the 5 steps to enable and send push notifications to Safari on iPhone and iPad: Create a Web Application Manifest for your website (manifest.json) Prompt and encourage users to install your web app to their iPhone or iPad Home Screen. ... Followed by on-screen prompts to allow notification permission within the saved web app. For a ...
On a Mac, go to System Preferences > Notifications. Each app on your device that can display notifications is listed here; click one to see its options. In the screenshot above, you see the settings for 1Password. Here are you options: Allow Notifications: if you don't need notifications from an app, toggle this off.
Use the Apple Push Notifications Service to send notifications to your website users, right on their Mac desktop — even when Safari isn't running. Safari Push Notifications work just like push notifications for apps. They display your website icon and notification text, which users can click to go right to your website.
In the Safari app on your Mac, do any of the following:. Stop receiving notifications from a website: Choose Safari > Preferences, click Websites, then click Notifications.Find the website in the list, then select Deny. Change how website notifications appear: Choose Apple menu > System Preferences, click Notifications , select Safari on the left, then change the Safari alert style and other ...
Here's how to deny or allow permissions for push notifications: Go to the Safari menu and select Preferences . Select Websites . Click Notifications in the left menu pane. The right side of the window contains a list of the sites that asked for permission to send you notifications. Use the menu to the right to either allow or deny those requests.
The built-in help describes it simply: Stop seeing notification permission requests in Safari: Choose Safari > Preferences, click Websites, then click Notifications. Deselect "Allow websites to ask for permission to send push notifications.". From now on, when you visit a website that can send you notifications, you aren't asked.
Follow the steps to enable and send push notifications to Safari on iPhone and iPad: 1. Add a Web App Manifest file to your website. 2. Integrate PushEngage on your website. 3. Deploy and test your website manifest. 4. Test Subscription Dialog Box modal and permission prompt.
Double-click the Safari icon. Click the Safari menu and select Preferences. (Alternately, you can hold down the command button and type ,. Click the Notifications button in Safari's preferences. Select the site you'd like to change the status of. Click the Allow or Deny button as you'd like.
Zeppozz. • 4 yr. ago. There is no way to enable notifications for iOS Safari. I'm sure you checked Settings -> Safari. The web page notifications are technically totally different to how app notifications work. For web notifications to work reliably the web page or rather the "web app" would need to be running all the time in the ...
Apple's iPhone 16 Plus may come in seven colors that either build upon the existing five colors in the standard iPhone 15 lineup or recast them in a new finish, based on a new rumor out of China.
iOS 18 is expected to be the "biggest" update in the iPhone's history.Below, we recap rumored features and changes for the iPhone. iOS 18 is rumored to include new generative AI features for Siri ...
Safari has historically been pretty quick, especially on the iPhone, and now the team behind it has detailed some recent speed improvements. Safari is based on the WebKit web browser engine and it's the WebKit team that has detailed some changes that have been made to the underlying technology to enable web developers to build the kinds of ...
Apple's iPhone 16 Plus may come in seven colors that either build upon the existing five colors in the standard iPhone 15 lineup or recast them in a new finish, based on a new rumor out of China.
You can allow access to Notification Center on the Lock Screen. Go to Settings > Face ID & Passcode (on an iPhone with Face ID) or Touch ID & Passcode (on other iPhone models). Enter your passcode. Scroll down and turn on Notification Center (below Allow Access When Locked). On the iPhone Lock Screen, view and respond to notifications of ...
Safari . Here's how to disable notifications for a specific website in Safari: Launch Safari and click Safari in the menu bar.; Select Settings from the dropdown menu, and go to the Websites ...
Manage browser notifications for a specific website. Once the browser app in question is permitted to send notifications, you can decide which websites can send you notifications and which cannot. Allow notifications. When you visit a website that is designed to send notifications, you will see a popup. Allow that and then confirm if prompted.
Apple's iPhone 16 Plus may come in seven colors that either build upon the existing five colors in the standard iPhone 15 lineup or recast them in a new finish, based on a new rumor out of China.