- Great Tech Gifts for Any Occasion
- The Best Gadgets for The Beach or Pool

How to Reset Safari to Default Settings
Restoring default settings is a multistep process
:max_bytes(150000):strip_icc():format(webp)/ScottOrgera-f7aca23cc84a4ea9a3f9e2ebd93bd690.jpg "reset safari default settings")
What to Know
- First, remove the browser history: Select Safari in the menu bar > Clear History , then select All History > Clear History .
- Remove cookies: Safari > Preferences . Select the Privacy tab > Manage Website Data > Remove All .
- Clear cache: Safari > Preferences . Advanced > Select Show Develop menu in menu bar . Exit. Develop > Empty Caches .
This article explains how to reset Safari to default settings by removing Safari's history and cookies, clearing the cache, and disabling extensions. Instructions apply to Safari versions 11 through 14 and iOS.
Remove Browser History
The first step when resetting Safari is to remove your browser history. When you clear your browsing history, Safari removes data such as recent searches, the frequently visited site list, web page icons, the history of web pages you've visited, and more.
From Safari's menu bar, select Safari > Clear History
In the drop-down menu, select All History .
Select Clear History to complete the process.
To clear a particular website instead, navigate to History > Show History , select the website you want to clear, and press Delete .
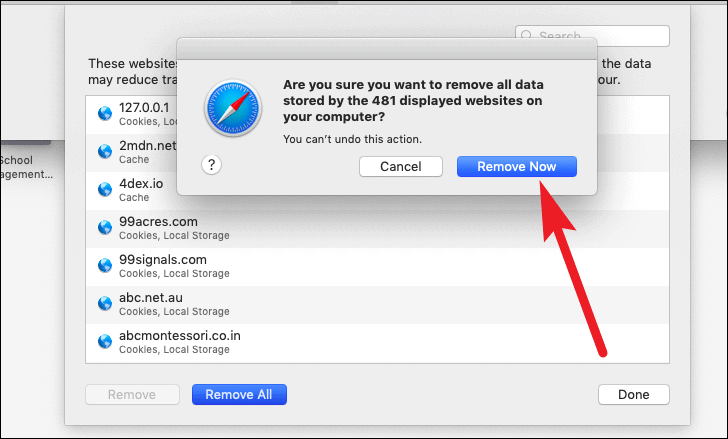
Remove Cookies
When you remove all cookies from Safari, you'll lose personal registration data such as your name and address, shopping cart contents, preferred web page layouts, and more.
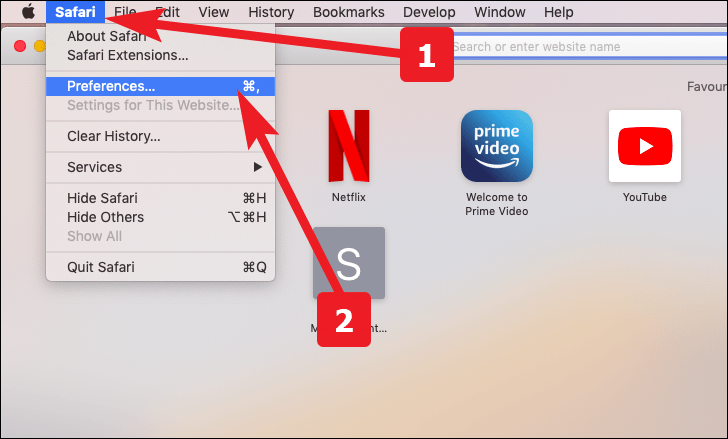
From Safari's menu bar, select Safari > Preferences .
Select the Privacy tab.
Select Manage Website Data .
Select Remove All .
Select Remove Now .
Select Done .
Clear Safari's Cache
When you clear Safari's cache, you're removing stored website data.
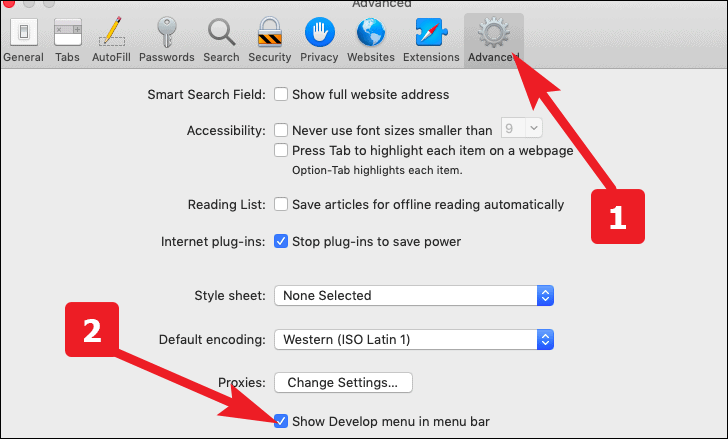
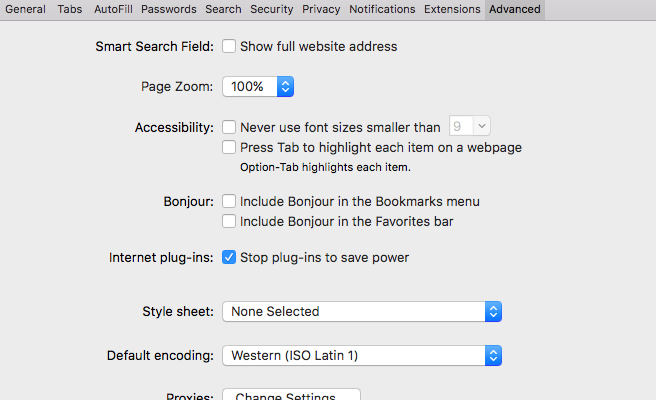
Select the Advanced tab.
Place a check next to Show Develop menu in menu bar , and then exit out of Preferences.
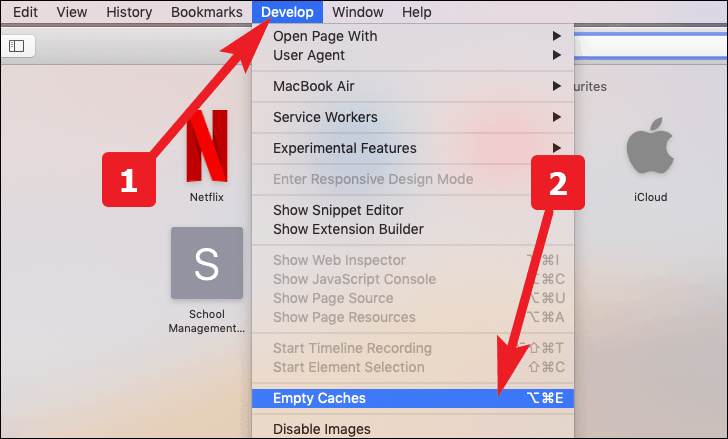
From Safari's menu bar, select Develop > Empty Caches .
Disable or Uninstall Extensions
Safari extensions are like mini-apps that add functionality to the browser. If you're trying to reset Safari, you'll want to disable or uninstall any extensions.
Select the Extensions tab.
Select an extension, and then deselect the checkbox next to the extension to disable it.
Many extensions have several sub-extensions, so you'll need to uncheck all of them.
After you've disabled an extension, you can uninstall it. Select Uninstall .
You'll see a message that the extension is part of an application, and that you'll need to remove the application. Select Show in Finder .
Finder will open with the app selected. Right-click on the application and select Move to Trash .
Enter your password and select OK . You've deleted the extension.
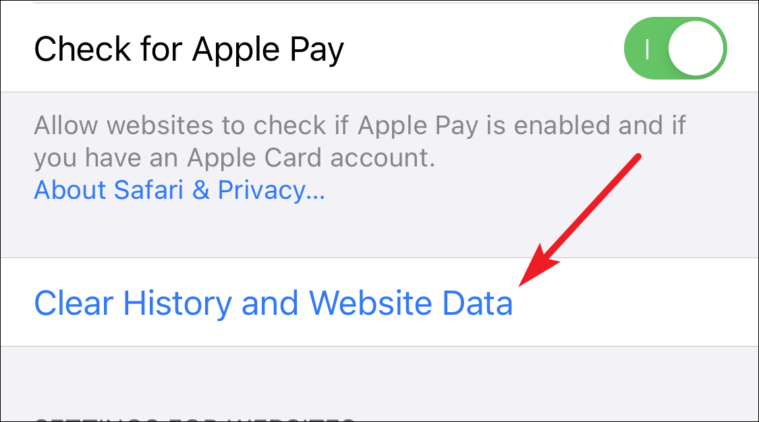
Clear Website Data on Safari for iOS
To clear Safari's settings on an iPhone or iPad:
Open the iOS device's Settings app.
Scroll down and select Safari .
Under Privacy & Security , select Clear History and Website Data .
Select Clear History and Data to confirm.
Get the Latest Tech News Delivered Every Day
- How to Clear Private Data, Caches, and Cookies on Mac
- How to Manage Browsing History on Safari for iPad
- Speed Up Safari With These Tuneup Tips
- How to Delete and Clear Cookies on an iPhone
- How to Manage Cookies in the Safari Browser
- How to Clear Your Search Bar History
- How to Clear Internet Cache in Every Major Browser
- How to Clear Cookies for a Specific Site
- How to Delete Cookies in Every Major Browser
- How to Clear Search History on iPhone
- 3 Ways to Clear Cache on an iPad
- How to Clear Cache on Samsung S10
- Add More Features by Turning on Safari's Develop Menu
- How to Clear Your iPhone Cache
- How to Manage Your Browsing History in Safari
- Managing History and Other Private Data in Safari for macOS
How to Reset Safari to Default Settings on Your Mac
If Safari runs slow or fails to open a page on your Mac, we will show you how to reset the browser to its default state to fix those issues.
Safari helps you feel at home while browsing the web on a Mac. The latest iterations of Safari always bring improvements, but no browser is perfect. Over time, Safari tends to slow down, become sluggish, and feel unresponsive.
While Chrome and Firefox pack a reset button, this feature is missing from Safari. We will show you how you can reset Safari to default settings on your Mac.
First, Back Up Your Bookmarks
After you've used Safari for a while, you probably have a lot of sites saved in your Bookmarks and Favorites. It's a good idea to make a copy of your Bookmarks before you proceed. Since you'll remove every bit data related to Safari, you probably don't want to erase all your bookmarks.
To do this, launch Safari, select the File tab in the top menu bar, and click Export Bookmarks . You can either set a new name or let it use the default one if you don't mind it. Click Save to save a copy of those bookmarks.
You may also want to edit, organize, and manage those bookmarks that you've collected over years.
After you've reset Safari by following the methods below, you can import the HTML copy of your Bookmarks by going to File > Import From and selecting Bookmarks HTML File . Make sure to save the file somewhere safe in the meantime.
Clear the Browsing History in Safari
To start, you should run Safari's built-in history cleaner. This will remove cookies and other browsing data from everywhere you've visited. Thankfully, the process to remove your browsing history manually from Safari is quite straightforward.
Related: How to Clear Your Safari Browsing History and Data
After opening Safari, click on the Safari item in the top menu bar and select Clear History . A window will pop up; select All History from the dropdown list. Then click on the Clear History button to erase all that data from Safari.
Remove the Temporary Files and Cache
To improve your browsing efficiency, Safari stores the data for sites that you visit regularly as cache on your Mac and uses that to load elements faster than downloading them again. That cache takes up disk space and often contributes to Safari's performance woes.
It's thus a good idea to get rid of that old data when you're resetting Safari to its defaults. Here's how to clear Safari's temporary files and cache:
- While you have Safari running, open Safari > Preferences from the menu bar.
- A window will pop open. Head to the Advanced tab and select the check box for Show Develop menu in menu bar .
- The Develop menu will appear next to Bookmarks on the menu bar. Select Develop > Empty Caches or use Option + Cmd + E to quickly clear the web cache.
Delete All Cookies
Like other browsers, Safari stores site cookies whenever you visit websites. These cookies contain details about your interactions with the site, such as registration and form data, your cart contents, and similar. It's a good idea to remove those cookies when starting fresh.
Here's how you can clear all cookies from Safari:
- Launch Safari and in the menu bar at the top of the screen, go to Safari > Preferences .
- In the window that pops up, go to the Privacy tab and click the Manage Website Data button. That'll pop open a window showing the list of cookies in Safari.
- You can hold down Cmd to select cookies to remove individually, or click Remove All to delete the entire list.
Turn Off Website Access/Delete Safari Plugins
While Apple builds Safari for efficiency, some outside plugins and website access rules can cause Safari to slow down. It's best to ensure that those plugins ask you before Safari runs them. You can also confirm which sites can access your Mac's camera, microphone, and other settings.
With Safari open, go to Safari > Preferences in the menu bar on the top of the screen. Go to the Websites tab and check each item in the sidebar for website access. We recommend disabling Auto-Play , Camera , Microphone , Location , and Pop-Ups , unless you have some reason not to do so.
If you're using an older version of Safari that doesn't have these options, you can head to Safari > Preferences and click on Security > Plug-In Settings . Then set all the plugins to Ask before Safari runs them, and disable the ones you don't need.
Disable or Uninstall Safari Extensions
Unlike Chrome and Firefox, Apple allows only a handful of extensions to work with Safari. Even with this filtering, some of them might impact your browsing performance and slow everything down. Whether you use extensions for saving articles to Pocket or applying dark mode on every website, they could affect Safari.
You can disable these extensions by going to Safari > Preferences and clicking the Extensions tab. Uncheck each extension listed to disable it. To remove all of them, you'll need to select each extension and click on the Uninstall button in the adjacent pane.
You can always find and install new Safari extensions later after resetting the browser. Try to only install high-quality ones you absolutely need.
Reset Safari Using Terminal
Even after removing cookies, cache, browsing history, and extensions, Safari still has some underlying metadata. To wipe everything in a true sense, you can use the Terminal app.
Using the Terminal to reset Safari to its default state means you'll have to use a series of commands. Refer to our beginner's guide to the Mac Terminal for using it effectively.
To reset Safari using Terminal:
- Open the Terminal app (you can find it easily using Spotlight with Cmd + Space ).
- Next, open the Apple menu at the top-left corner of your screen. Click Force Quit and select Safari to completely close it.
- Enter the below commands commands, one line at a time. After you run each command, the Terminal will prompt for confirmation to delete said files. Type y to confirm, then hit Enter .
Reset Safari for a Fresh and Fast Browser Experience
Now you know how to effectively reset Safari to factory settings. It should feel faster after this—though all the sites you visit at first will take a couple of seconds to load completely, since they'll create new cookies and cache.
To get even more out of Safari, make sure you're applying the best Safari tweaks for a better experience.
How to Reset Safari to Default Settings on Mac and iPhone
Scratching your head to reset Safari to default settings? Don't know where to begin? Well don't worry, we have got your back!

Safari is an exceptional browser and there are no two ways about it. With Apple leading the charge against ad trackers on the internet with its anti-tracking policy, Safari has been a safe haven for users who want to protect their privacy.
That being said, while Safari might win the race when it comes to protecting its users but more often than not is not able to match up to its competitors in the game of extensible features.
However, many of us are extensively using safari on a daily basis. Some want to hold on to that last ounce of privacy on the net, and others do not want to install a 3rd party browser on their Macs or iPhones.
Whatever may be your case for using Safari. One thing is for sure, with years of use, Safari accumulates tons and tons of website data which might slow down your browser or in worst cases, your devices as well.
Reset Safari to Default Settings on Mac
To everybody’s shock, there’s no ‘Reset Safari’ button on any of the apple devices. As a result, we are bound to perform a list of steps not every user might be comfortable with. Anyways, resetting Safari consists of resetting 3 components :
- Website Data
We are going to reset the components on a first-come-first-serve basis. So let’s get started.
Reset History
First, Launch Safari from the Launchpad or from dock of your Mac.

Next, click on the ‘History’ tab from the menu bar. Next, click on the ‘Clear History…’ option from the list.

After that, choose ‘all history’ option from the drop-down. Then, click on ‘Clear History’ button.

Reset Website Data
First, Launch Safari from the Launchpad or from the dock of you Mac.

Next, click on the ‘Safari’ tab present on the menu bar. Now, click on the ‘Preferences’ option from the list.

After that, go to the ‘Privacy’ pane and click on ‘Manage Website Data’ button.

Now, click on ‘Remove All’ button from the bottom left corner of the pane.

Next, click on ‘Remove Now’ button to confirm.
Reset Cache

Next, click on the ‘Safari’ tab from the menu bar. Then, click on the ‘Preferences’ option from the list.
After that, go to the ‘Advanced’ pane. Now, check the ‘Show Develop menu in the menu bar’ option.
As a result, the ‘Develop’ tab would now be visible in the menu bar. Click on it, and then choose the ‘Empty Caches’ option from the list.
Reset Safari to Default Settings on iPhone
Resetting safari is pretty straight forward on iPhone and requires just couple of steps.
Launch the ‘Settings’ app on your iPhone from the home screen.

Next, scroll down and locate ‘Safari’ from the list and tap on it.

After that, scroll down till you find the ‘Clear History and Website Data’ option on the screen and then tap on it, once located.
Now, tap ‘Clear History and Data’ from the pop-up alert menu to confirm.

How to Use Gemini Code Assist in VS Code

How to Code Using AI

Microsoft Copilot Pro Review: There is a lot of Unrealized Potential
Get all the latest posts delivered straight to your inbox., member discussion.

How to Play Retro Games with Delta on iPhone

Everything You Need to Know About the Third-Party iPhone App Store, AltStore PAL

How to Fix "Location Not Available" Issue on iPhone

How to Disable 'iPhone May Be Too Close' Screen Distance Alert

How to Find Hidden Photos on iPhone
How to reset all of your Safari browser's settings on a Mac, including clearing your cache and removing plugins
- Knowing how to reset your Safari browser on a Mac can help speed up the browser and fix issues.
- However, resetting Safari will also cause you to lose browser-saved data, including login credentials and browser extensions.
- Here's what you need to know to reset the Safari browser on your Mac computer.
- Visit Business Insider's homepage for more stories .
Resetting your Safari browser on a Mac computer can help speed it up and get rid of any issues you may have encountered.
But before you start, be aware that it will delete your installed extensions, as well as any auto-fill data, including saved usernames and passwords.
So you may want to take note of those before getting started, so that you can get your browser back to the way that you're accustomed to using it.
Once that's done, here's how to reset the Safari browser on your Mac .
Check out the products mentioned in this article:
Macbook pro (from $1,299 at apple), how to reset safari on a mac.
Resetting your Safari browser consists of several steps (like clearing your cache and history), rather than a simple button. So it will take a while to accomplish. Here's what you need to do:
Clear your Safari history
Keep in mind that the process is different for Safari on an iPhone or iPad , in case you want to do a reset across all of your devices.
1. Launch Safari
2. In the top toolbar, select "Safari" and then "Clear History."
3. Select "All History" in the dropdown and then click "Clear History."
Clear your Safari cache
1. With Safari open, go up to the top toolbar.
2. Select "Safari" and then "Preferences."
3. Toggle over to the "Advanced" tab and tick the box next to "Show Develop menu in menu bar" — you should see "Develop" appear in the top toolbar.
4. Click "Develop" and then select "Empty Caches."
Get rid of your Safari extensions
1. Go back into your Safari Preferences (located in that top toolbar)
2. Toggle over to the "Extensions" tab
3. Go through all of your extensions and select "Uninstall"
Turn off plugins within Safari
1. With the Safari Preferences window still open, toggle over to the "Websites" tab
2. Untick the box next to each plugin (listed at the bottom of the left sidebar)
Delete those plugins
These are stored in two separate areas, so your work will feel a bit redundant, but it's necessary to get the job done.
1. Tap your Finder to open it (it's the half-toned face icon in your bottom toolbar).
2. Under the "Go" menu of the top toolbar, select "Go to folder."
3. In the pop-up search menu, type "~/Library" and hit "Go."
4. Locate and go through the "Internet Plug-ins" folder and delete your plug-ins (you may want to keep your Safari Preferences open to "websites" so you can view your installed plugins) by dragging them over to the Trash.
5. Go up to the "Go" tab in your top toolbar and select "Go to folder".
6. Enter "/Library" in the search bar and hit "Go."
7. Locate and open the "Internet Plug-ins" folder again.
8. Select and delete or drag your undesired plugins into the Trash.
Related coverage from How To Do Everything: Tech :
How to set your browser's homepage on a mac, with instructions for safari, chrome, and firefox, how to block pop-ups on a mac computer's safari browser, and avoid fraudulent websites, how to add websites to your favorites list on a mac's safari browser, making them easily accessible at any moment, how to save and delete webpages on the reading list in your mac computer's safari browser.
Watch: Apple just launched a $6,000 Mac Pro, available this fall
- Main content
How To Fully Reset Safari On Mac
This article explains how you can fully reset Safari on your Mac. You might need to do this if Safari on your Mac runs very slowly, crashes often, acts bizarre, or functions incorrectly.
See also: Your System Is Infected With (3) Viruses
Safari is included with the macOS operating system.
How to reset Safari
1-Remove site history
There are two ways to do this. If you want to remove particular web sites (e.g., a web site is giving you problems whenever you visit) then try the second option. Please also note that if you are using other Apple devices (iOS devices or other Macs), if you turn on Safari in iCloud preferences with the same Apple ID, your site browsing history will be removed from all of them.
See also: How To Change Default Search Engine in Safari
When you do this, you will be removing history of web sites you visited, recent searchers, list of download items, frequently visited sites list, web sites that asked to use your located and to send you notifications.
- Open Safari
- Click Safari located in the menu bar in the top left hand corner of your screen
- Click Clear History

- Click the Clear History button
- Click Preferences
- Click the Privacy tab
- Click the manage Website Data button
- Here you can remove everything, or you can remove specific web sites. You can also search to find a specific web site.
2-Clear web caches
Here is how you can clear Safari’s caches. Caches are images and videos, or the layouts for entire web pages you browsed.
- In the Safari app, click Safari
- Click the Advanced tab

- Close the Preferences window
- Now you will see a new menu bar item called ‘Develop’
- Click Develop

Disable Safari extensions
Extensions are small programs that extends your Safari’s functionalities. They add new features to let you enhance and customize your browsing experience. But some may have bugs and thus cause problems. And you may want to turn them off. Here is how:
- Choose Safari from the Safari menu bar
- Click the Extensions tab
- For each extension, you can use the checkbox to enable or disable that particular extension.
- You can also uninstall extensions.
Disable Safari plugins
Please note that Safari is no longer supporting most plugins. You can however view and manage the plugins you have installed. Here is how:
- Click Safari
- Click the Websites tab

- When you are done, close the window
See also: How To See The Full Web Site Address In Safari URL Bar
Dr. Serhat Kurt worked as a Senior Technology Director specializing in Apple solutions for small and medium-sized educational institutions. He holds a doctoral degree (or doctorate) from the University of Illinois at Urbana / Champaign and a master’s degree from Purdue University. He is a former faculty member. Here is his LinkedIn profile and Google Scholar profile . Email Serhat Kurt .
Similar Posts

How to Check Your Cellular Data Usage on iPhone and iPad
It is easy to use a lot of data on your iPhone or iPad. Unless you are connected to a Wi-Fi network, your iPhone or iPad will use cellular data to access the…
My iPad Is Running Slow, How Can I Fix It?
Are you having issues with a slow iPad? Does your iPad take longer than expected to respond? Trying to get work done on your slow iPad can be annoying and frustrating, but it doesn’t…

How to Use a Second External Monitor with an M1 or M2 MacBook
The latest MacBook Air and MacBook Pro have come with the M2 chip. Many Mac enthusiasts have already figured out that the M1 MacBooks are limited to just one external monitor. Now, I…
Messages Won’t Open On Mac, Fix
This article explains how you can fix if you are unable to open the Messages app on your Mac. You can use Messages with your Mac to send and receive iMessage. You can…
What is Website Data on iPhone, iPad & What Happens If you Clear It
If you go to Settings > General > iPhone (iPad) Storage > Safari, you will see an option called Website Data. If you open that option, you will see a red button saying…
How to Add Apple Gift Card to iPhone, iPad or Mac to Redeem
This article explains how you can add a physical Apple gift card to your account so that you can easily redeem it later. An Apple gift card can be used to purchase Apple…
I Have been having this for about a week now. I Have tried getting rid of the Cookies and what not, restarted Safari, everything still doesn’t work. Did Apple do something to Safari? Like I Can use Chrome and everything is fine, but I go to Youtube on Safari and login and I get a blank screen. I am not logged in I Can see the page it’s only when I login is when I can’t see anything. Again not the case with Chrome. Does anyone one know what is going on?
I have the same problem
Safari 14 I cannot attach photos into facebook, its takes forever to open any websites, i have cleared the history and still takes forever, its like something is running in the background making my computer run slow. We don’t even use this computer very much as we do most surfing on our iPad, we have att wifi which shows 4 bars on the wifi icon. Can the problem be to many files on the computer or in the iCloud?
No facebook or youtube since updating to Big Sur 11.0 Safari is not working properly.
Safari not working at all…i couldn’t even open http://www.google.com
Hi, I have done all steps recommended, YouTube still does not play on MacBook Air. YouTube opens alright, but when I try playing a video, it won’t play, just that circle on the screen that keeps rotating. Can you please help me solve this problem. I am not computer savvy. Thank you, Liviu
Leave a Reply Cancel reply
Your email address will not be published. Required fields are marked *
Categories:
How To Reset Safari In Mac

- Software & Applications
- Browsers & Extensions

Introduction
Resetting Safari on your Mac can be a helpful solution when you encounter issues such as slow performance, unexpected crashes, or unresponsive web pages. By resetting Safari, you can clear out accumulated data, remove problematic extensions, and restore the browser to its default settings. This process can effectively resolve various browsing issues and enhance the overall performance of Safari.
Whether you're experiencing frequent crashes, encountering persistent pop-up ads, or noticing unusual behavior while browsing, resetting Safari can often provide a fresh start and resolve these issues. It's important to note that resetting Safari will clear your browsing history, cookies, and other website data, so it's essential to back up any important information before proceeding with the reset.
In this guide, we'll walk you through the step-by-step process of resetting Safari on your Mac. By following these instructions, you can effectively troubleshoot common browsing issues and ensure that Safari functions smoothly and efficiently. Let's dive into the details and learn how to reset Safari to optimize your browsing experience.
Step 1: Open Safari Preferences
To initiate the process of resetting Safari on your Mac, the first step is to access the Safari Preferences . This can be done by launching the Safari browser and locating the "Safari" option in the top menu bar. Upon clicking on "Safari," a drop-down menu will appear, and you should select "Preferences" from the list. Alternatively, you can use the keyboard shortcut "Command + ," to directly open the Preferences window.
Upon accessing the Preferences window, you will be presented with a range of customizable settings and options for Safari. This is where you can modify various aspects of the browser, including privacy settings, security preferences, and extensions. The Preferences window is a central hub for managing Safari's behavior and appearance, making it a crucial starting point for the process of resetting the browser.
Once you have opened the Preferences window, you are ready to proceed to the next step in the process of resetting Safari. This initial step sets the stage for the subsequent actions that will ultimately lead to a refreshed and optimized browsing experience. By accessing the Preferences window, you gain access to the underlying settings and configurations that govern Safari's functionality, allowing you to make informed adjustments to enhance the browser's performance.
In the following steps, we will delve deeper into the process of resetting Safari, leveraging the options and tools available within the Preferences window to ensure a comprehensive and effective reset. By navigating through the Preferences window and making the necessary adjustments, you can pave the way for a smoother and more efficient browsing experience with Safari on your Mac.
With the first step completed, you are now prepared to move on to the subsequent stages of the reset process, each of which plays a pivotal role in restoring Safari to its default state. As we progress through the remaining steps, you will gain a deeper understanding of the intricacies involved in resetting Safari and optimizing its performance for seamless browsing.
Next, we will explore the second step in the process, which involves navigating to the Advanced tab within the Safari Preferences window. This step is essential for enabling additional options that are instrumental in the comprehensive reset of Safari on your Mac. Let's continue our journey toward resetting Safari and revitalizing your browsing experience.
Step 2: Choose the Advanced Tab
After accessing the Safari Preferences window, the next crucial step in the process of resetting Safari on your Mac is to navigate to the Advanced tab. This tab houses a range of advanced settings and options that are integral to the comprehensive reset of the browser.
Upon entering the Advanced tab within the Safari Preferences window, you gain access to a plethora of advanced configurations that govern the behavior and functionality of the browser. These settings delve into the intricacies of Safari's operations, allowing for fine-tuned adjustments that can significantly impact the browsing experience.
One of the key features within the Advanced tab is the option to enable the Develop menu. This menu provides access to a variety of developer-oriented tools and functionalities that are typically hidden from the standard Safari interface. By enabling the Develop menu, you unlock a suite of powerful tools that can aid in troubleshooting and optimizing the browser's performance.
Enabling the Develop menu is essential for the subsequent steps in the reset process, as it grants access to critical options that facilitate the comprehensive restoration of Safari to its default state. These options include the ability to clear caches, disable extensions, and reset various aspects of the browser that may be contributing to performance issues.
In addition to enabling the Develop menu, the Advanced tab also offers the option to manage website data. This feature allows you to view and remove specific data stored by websites, including cookies, cached files, and other site-specific information. By managing website data, you can effectively clear out accumulated browsing data that may be impacting Safari's performance.
Furthermore, the Advanced tab provides access to a range of other advanced settings, such as those related to security, privacy, and website permissions. These settings offer granular control over how Safari interacts with websites and handles various types of content, empowering you to tailor the browser's behavior to align with your preferences and security requirements.
By choosing the Advanced tab within the Safari Preferences window, you position yourself to leverage the advanced configurations and options that are pivotal to the comprehensive reset of Safari on your Mac. This step sets the stage for the subsequent actions that will ultimately lead to a refreshed and optimized browsing experience, ensuring that Safari functions smoothly and efficiently.
With the Advanced tab explored and its significance in the reset process elucidated, you are now prepared to proceed to the next step, where you will enable the Develop menu and unlock a suite of powerful tools that will aid in the comprehensive restoration of Safari. Let's continue our journey toward resetting Safari and revitalizing your browsing experience.
Step 3: Enable the Develop Menu
Enabling the Develop menu within Safari is a pivotal step in the process of resetting the browser on your Mac. The Develop menu unlocks a suite of powerful tools and functionalities that are instrumental in troubleshooting, optimizing, and customizing the browsing experience. By enabling this menu, you gain access to a range of developer-oriented features that are typically hidden from the standard Safari interface, empowering you to delve into the inner workings of the browser and make informed adjustments to enhance its performance.
To enable the Develop menu, you will navigate to the Advanced tab within the Safari Preferences window, as outlined in the previous step. Once in the Advanced tab, you will find the option to "Show Develop menu in menu bar." By checking this option, you effectively enable the Develop menu, causing it to appear in the Safari menu bar alongside other standard options.
The Develop menu offers a wealth of tools and functionalities that cater to developers, power users, and individuals seeking to optimize their browsing experience. One of the key features within the Develop menu is the ability to access the Web Inspector, a powerful tool that allows you to inspect, debug, and modify the structure and behavior of web pages. The Web Inspector provides invaluable insights into the underlying code and elements of web pages, enabling you to diagnose issues, optimize performance, and customize the display of content.
In addition to the Web Inspector, the Develop menu grants access to options for disabling caches, disabling extensions, and resetting various aspects of the browser. These options are instrumental in the comprehensive reset of Safari, as they allow you to clear out accumulated data, remove problematic extensions, and restore the browser to its default settings. By leveraging the functionalities within the Develop menu, you can effectively troubleshoot common browsing issues and ensure that Safari functions smoothly and efficiently.
Enabling the Develop menu within Safari empowers you to harness the full potential of the browser, providing access to advanced tools and functionalities that are essential for the comprehensive reset and optimization of Safari on your Mac. By enabling this menu, you position yourself to leverage a suite of powerful features that can aid in troubleshooting, customizing, and enhancing the browsing experience, ultimately leading to a refreshed and optimized Safari browser .
With the Develop menu enabled, you are now prepared to proceed to the next step in the reset process, where you will utilize the functionalities within the Develop menu to initiate the comprehensive reset of Safari on your Mac. Let's continue our journey toward resetting Safari and revitalizing your browsing experience.
Step 4: Reset Safari
Resetting Safari on your Mac involves a series of critical actions that collectively restore the browser to its default state, effectively clearing out accumulated data, removing problematic extensions, and optimizing its performance. This process is instrumental in troubleshooting common browsing issues and ensuring that Safari functions smoothly and efficiently. By following the steps outlined below, you can initiate the comprehensive reset of Safari and revitalize your browsing experience.
Clear Browsing History and Data
The first step in resetting Safari involves clearing the browsing history and data. This action effectively removes the record of websites visited, searches conducted, and other browsing activities. To accomplish this, you will navigate to the "History" menu in the Safari menu bar and select "Clear History." Upon doing so, a window will appear, allowing you to choose the time range for which you wish to clear the history. Selecting "Clear History" will remove the specified browsing history, contributing to the comprehensive reset of Safari.
Remove Website Data and Cookies
In addition to clearing the browsing history, it is essential to remove website data and cookies to further optimize Safari. This action involves accessing the "Privacy" tab within the Safari Preferences window and clicking on "Manage Website Data." Here, you can view and remove specific data stored by websites, including cookies and cached files. By removing this data, you effectively clear out accumulated browsing data that may be impacting Safari's performance, contributing to the comprehensive reset of the browser.
Disable Extensions and Plug-Ins
Another critical step in resetting Safari is to disable extensions and plug-ins that may be contributing to browsing issues. This action involves accessing the "Extensions" tab within the Safari Preferences window and unchecking the boxes next to each installed extension. Additionally, you can navigate to the "Security" tab to manage website plug-ins and disable any that may be causing issues. By disabling extensions and plug-ins, you eliminate potential sources of browsing problems, paving the way for a refreshed and optimized browsing experience.
Reset Safari Settings
The final step in the reset process involves resetting Safari's settings to their default configurations. This action is carried out by navigating to the "General" tab within the Safari Preferences window and clicking on "Reset Safari." A window will appear, allowing you to choose which settings to reset, including clearing the cache, removing cookies, and resetting the top sites. By selecting the desired options and proceeding with the reset, you effectively restore Safari to its default state, resolving common browsing issues and optimizing its performance.
By following these steps to reset Safari on your Mac, you can effectively troubleshoot common browsing issues and ensure that the browser functions smoothly and efficiently. This comprehensive reset clears out accumulated data, removes problematic extensions, and restores Safari to its default settings, ultimately revitalizing your browsing experience and enhancing the overall performance of the browser.
In conclusion, resetting Safari on your Mac is a valuable troubleshooting technique that can effectively address a range of browsing issues and optimize the performance of the browser. By following the step-by-step process outlined in this guide, you can initiate a comprehensive reset that clears out accumulated data, removes problematic extensions, and restores Safari to its default settings, ultimately revitalizing your browsing experience.
Through the process of resetting Safari, you gain the ability to clear browsing history and data, remove website data and cookies, disable extensions and plug-ins, and reset Safari's settings to their default configurations. These actions collectively contribute to the restoration of Safari to a pristine state, free from the clutter and issues that may have been impacting its performance.
Upon completing the reset process, you can expect to experience a smoother and more efficient browsing experience with Safari. The removal of accumulated data and cookies, coupled with the disabling of problematic extensions and the restoration of default settings, can lead to improved stability, faster page loading times, and a more responsive browsing interface.
Furthermore, the ability to access the Develop menu and leverage advanced tools within Safari empowers you to take control of the browser's behavior and optimize its performance according to your preferences. This level of customization and fine-tuning ensures that Safari aligns with your specific browsing needs, providing a tailored and optimized experience.
It's important to note that resetting Safari will clear your browsing history, cookies, and other website data, so it's essential to back up any important information before proceeding with the reset. Additionally, after completing the reset, you may need to reconfigure certain preferences and re-enable desired extensions to tailor Safari to your specific requirements.
By incorporating the insights and techniques presented in this guide, you are equipped to effectively troubleshoot common browsing issues and ensure that Safari functions smoothly and efficiently. The comprehensive reset process enables you to revitalize your browsing experience, setting the stage for seamless and enjoyable interactions with the Safari browser on your Mac.
In essence, resetting Safari serves as a valuable maintenance practice, allowing you to refresh the browser and optimize its performance, ultimately enhancing your overall browsing experience and productivity. Embracing the process of resetting Safari empowers you to take proactive steps in maintaining a smooth and efficient browsing environment, ensuring that Safari remains a reliable and effective tool for accessing the web on your Mac.
Leave a Reply Cancel reply
Your email address will not be published. Required fields are marked *
Save my name, email, and website in this browser for the next time I comment.
- Crowdfunding
- Cryptocurrency
- Digital Banking
- Digital Payments
- Investments
- Console Gaming
- Mobile Gaming
- VR/AR Gaming
- Gadget Usage
- Gaming Tips
- Online Safety
- Software Tutorials
- Tech Setup & Troubleshooting
- Buyer’s Guides
- Comparative Analysis
- Gadget Reviews
- Service Reviews
- Software Reviews
- Mobile Devices
- PCs & Laptops
- Smart Home Gadgets
- Content Creation Tools
- Digital Photography
- Video & Music Streaming
- Online Security
- Online Services
- Web Hosting
- WiFi & Ethernet
- Browsers & Extensions
- Communication Platforms
- Operating Systems
- Productivity Tools
- AI & Machine Learning
- Cybersecurity
- Emerging Tech
- IoT & Smart Devices
- Virtual & Augmented Reality
- Latest News
- AI Developments
- Fintech Updates
- Gaming News
- New Product Launches
- AI Writing How Its Changing the Way We Create Content
- How to Find the Best Midjourney Alternative in 2024 A Guide to AI Anime Generators
Related Post
Ai writing: how it’s changing the way we create content, unleashing young geniuses: how lingokids makes learning a blast, 10 best ai math solvers for instant homework solutions, 10 best ai homework helper tools to get instant homework help, 10 best ai humanizers to humanize ai text with ease, sla network: benefits, advantages, satisfaction of both parties to the contract, related posts.

How To Reset Safari 8.0.4

How To Allow Camera Access On Safari Mac

What Does It Mean When Safari Cannot Connect To The Server

How To Restart Safari On Macbook

How To Check History On Safari On Mac

What To Do If Safari Keeps Crashing

What Is Reset Safari

Why Does Safari Not Work On My Mac
Recent stories.

How to Find the Best Midjourney Alternative in 2024: A Guide to AI Anime Generators

How to Know When it’s the Right Time to Buy Bitcoin

How to Sell Counter-Strike 2 Skins Instantly? A Comprehensive Guide

10 Proven Ways For Online Gamers To Avoid Cyber Attacks And Scams

- Privacy Overview
- Strictly Necessary Cookies
This website uses cookies so that we can provide you with the best user experience possible. Cookie information is stored in your browser and performs functions such as recognising you when you return to our website and helping our team to understand which sections of the website you find most interesting and useful.
Strictly Necessary Cookie should be enabled at all times so that we can save your preferences for cookie settings.
If you disable this cookie, we will not be able to save your preferences. This means that every time you visit this website you will need to enable or disable cookies again.
The Tech Edvocate
- Advertisement
- Home Page Five (No Sidebar)
- Home Page Four
- Home Page Three
- Home Page Two
- Icons [No Sidebar]
- Left Sidbear Page
- Lynch Educational Consulting
- My Speaking Page
- Newsletter Sign Up Confirmation
- Newsletter Unsubscription
- Page Example
- Privacy Policy
- Protected Content
- Request a Product Review
- Shortcodes Examples
- Terms and Conditions
- The Edvocate
- The Tech Edvocate Product Guide
- Write For Us
- Dr. Lynch’s Personal Website
- The Edvocate Podcast
- Assistive Technology
- Child Development Tech
- Early Childhood & K-12 EdTech
- EdTech Futures
- EdTech News
- EdTech Policy & Reform
- EdTech Startups & Businesses
- Higher Education EdTech
- Online Learning & eLearning
- Parent & Family Tech
- Personalized Learning
- Product Reviews
- Tech Edvocate Awards
- School Ratings
Reading Groups: Everything You Need to Know
Product review of the ultenic p30 grooming kit, reading anxiety in children: everything you need to know, iep meetings and parent-teacher conferences: everything you need to know, college disability services and accommodations: everything you need to know, spam vs. phishing: how are these unwanted messages different, how to charge your iphone properly, encouraging your teenager to read: everything you need to know, 8 ways to service an air conditioner, 3 ways to stop a baby from vomiting, how to reset safari to default settings on your mac.
Safari is Apple’s default web browser for Mac OS. It is known for its speed and user-friendly interface. However, sometimes due to various reasons like browser crashes or bugs, the browser might perform sluggishly or behave erratically. Moreover, there may be privacy and security issues if the browser is not configured properly. In such situations, it may be necessary to reset Safari to its default settings to restore its functionality. Here are the steps to reset Safari to default settings on your Mac.
Step 1: Open Safari on your Mac
To reset Safari to its default settings, you must first open the browser on your Mac.
Step 2: Backup Your Data
Before resetting Safari, you should back up any important data like bookmarks, saved passwords, and browsing history. This will make it easier for you to get back to your previous settings and prevent any data loss.
To backup bookmarks, go to the File menu and click on “Export Bookmarks”. Choose where you want to save the exported file and click “Save”.
To backup passwords, go to System Preferences and then click on “Accounts”. Select your account and then click on “Login Items”. Choose Safari and then click on the “Add” button. Restart your Mac.
To backup browsing history, go to the History menu and then click on “Show All History”. Click on a date range and then click on “Export” to save it to your Mac.
Step 3: Reset Safari to Default Settings
Once you’ve backed up your data, you can now reset Safari to its default settings. Here’s how:
Go to the Safari menu and click on “Preferences”.
Click on “Advanced”.
Click on “Show Develop menu in menu bar”.
Go to the Develop menu and click on “Empty Caches”.
Go back to the Safari menu and click on “Reset Safari”.
Choose the checkboxes for the items you want to remove, like history, bookmarks, and saved passwords.
Click “Reset” to complete the reset process.
Step 4: Restore Your Data
Once Safari has been reset to its default settings, you can restore your backed-up data. Here’s how:
To restore bookmarks, go to the File menu and click on “Import Bookmarks”. Select the file you exported earlier and click “Import”.
To restore passwords, go to System Preferences and then click on “Accounts”. Select your account and then click on “Login Items”. Choose Safari and then click on the “Remove” button. Restart your Mac.
To restore browsing history, go to the History menu and then click on “Import”. Select the file you exported earlier and click “Import”.
How to Fix the “No Audio Output ...
What is a nas drive, and how ....

Matthew Lynch
Related articles more from author.

Quickest EVs From 0-60 MPH

An Explanation of Read and Write Speeds

Best Sites for Buying Bulk Items at Wholesale Prices

Top Remote Access Software to Control Your Windows PC From Anywhere

How to Turn Off Emergency and Amber Alerts on iPhone

How to Fix Folders Reverting to Read-Only Mode in Windows 10 and 11

How to Reset Safari and Restore Default Settings?
Safari is a popular web browser used by many Mac users. If you’re experiencing issues with Safari or simply want to start fresh, resetting it to its default settings can be a helpful solution. In this article, we’ll guide you through the steps to reset Safari and provide some additional tips to optimize your browsing experience.
Resetting Safari can resolve various problems, such as slow performance, frequent crashes, or unexpected behavior. It’s important to note that resetting will remove your browsing history, website data, cookies, and other preferences. However, bookmarks and saved passwords will not be affected. Now, let’s dive into the steps to reset Safari to its default state.
1. Open Safari: Launch Safari by clicking on its icon in the dock or by searching for it in the Applications folder.
2. Access Preferences: Once Safari is open, click on the “Safari” menu located in the top-left corner of the screen. From the drop-down menu, select “Preferences.”
3. Navigate to the Privacy settings: In the Preferences window, click on the “Privacy” tab located at the top.
4. Clear website data: Within the Privacy tab, you will find the option to manage website data. Click on the “Remove All Website Data” button to delete all stored data from websites you’ve visited.
5. Confirm the action: A confirmation prompt will appear, asking if you are sure you want to remove all website data. Click on “Remove Now” to proceed. Please note that this action cannot be undone, so make sure you have any necessary data backed up before proceeding.
6. Reload the page: After clearing the data, it’s a good practice to reload any open web pages. You can do this by clicking on the “View” menu in Safari’s menu bar, then selecting “Reload Page.” Alternatively, you can use the keyboard shortcut Command-R.
By following these steps, you have successfully reset Safari to its default settings. Now, let’s explore some additional tips to optimize your browsing experience.
– Update Safari: Keeping Safari up to date ensures you have the latest features and security enhancements. To check for updates, go to the “Safari” menu and select “About Safari.” If an update is available, follow the prompts to install it.
– Clear cache regularly: Safari stores temporary files and website data in its cache to load pages faster. However, over time, a large cache can slow down the browser. To clear the cache, go to the “Develop” menu (if it’s not visible, enable it in Safari preferences) and select “Empty Caches.”
– Disable unnecessary extensions: Extensions can enhance your browsing experience, but having too many can also slow down Safari. Go to the “Safari” menu, select “Preferences,” and click on the “Extensions” tab to manage and disable any unnecessary extensions.
– Customize search engine: Safari uses a default search engine for web searches, but you can change it to your preferred search engine. To do this, go to “Safari” > “Preferences,” click on the “Search” tab, and choose your preferred search engine from the drop-down menu.
– Enable pop-up blocker: Pop-up windows can be annoying and potentially harmful. To prevent them, go to “Safari” > “Preferences,” click on the “Security” tab, and ensure the “Block pop-up windows” option is checked.
Resetting Safari to its default settings can help resolve various issues and improve your browsing experience. However, if you continue to experience problems, you may want to consider contacting Apple Support or seeking assistance from a professional technician.
Remember, resetting Safari is just one step towards optimizing your browsing experience. Regularly updating the browser, clearing the cache, and managing extensions can further enhance its performance. Keep exploring the settings and preferences to personalize Safari according to your needs. Happy browsing!

How Do You Reset Safari Back to Normal?
To reset Safari back to its default settings, you can follow these detailed steps:
1. Open Safari and click on the “Safari” menu located in the top left corner of your screen. 2. From the drop-down menu, choose “Preferences…” to open the Safari Preferences window. 3. In the Preferences window, you will see several tabs at the top. Click on the “Privacy” tab. 4. Once you are on the Privacy tab, you will notice a section called “Cookies and website data.” 5. To remove all the data stored by websites on your computer, click on the “Remove All Website Data” button. 6. A confirmation window will appear asking if you are sure you want to remove all website data. Click on the “Remove Now” button to proceed. 7. Safari will now remove all the stored data, including cookies, cache, and other website-specific information. 8. After the process is complete, you can close the Preferences window.
By following these steps, you will effectively reset Safari back to its default settings, clearing any stored data from websites you have visited.
How Do You Reset Your Safari Page?
To reset your Safari page, you can follow these steps:
1. Open Safari on your device. 2. From the menu bar at the top of the screen, click on “View.” 3. In the drop-down menu, select “Reload Page.” Alternatively, you can press the Command-R keyboard shortcut. 4. Safari will then reload the current page, refreshing its content and clearing any cached data.
In case you encounter any issues or the page doesn’t reset as expected, you can try a force refresh by holding down the Shift key while clicking on the “Reload Page” option or by pressing Command-Shift-R. This will bypass the cache and load the most up-to-date version of the page.
By resetting or refreshing your Safari page, you can ensure that you are viewing the latest content and eliminate any temporary glitches or errors that may have occurred.
How Do You Reset Safari Search Settings?
To reset the search settings in Safari, you can follow these steps:
1. Open Safari on your device. 2. Click on “Safari” in the top menu bar. 3. Select “Preferences” from the drop-down menu. 4. In the Preferences window, navigate to the “Search” tab. 5. Here, you will see a section labeled “Search engine.” 6. Click on the drop-down menu next to “Search engine” to see the available options. 7. Choose the search engine you want Safari to use for web searches. 8. If you want to remove any search engines from the list, you can click on the “-” button next to the search engine name. 9. To add a new search engine, click on the “+” button and enter the required details. 10. Once you have made your desired changes, close the Preferences window.
By following these steps, you will be able to reset the search settings in Safari and choose the search engine of your preference.
Resetting Safari to its default settings is a straightforward process that can help resolve various issues and enhance your browsing experience. By following the steps outlined above, you can easily clear all website data stored on your computer and restore Safari to its original state.
Resetting Safari can be particularly useful if you are experiencing slow performance, frequent crashes, or if you want to start fresh with a clean slate. It allows you to remove any unwanted extensions, cookies, cache, and other data accumulated over time, which can help improve browser speed and stability.
Additionally, resetting Safari also enables you to change your default search engine. By accessing the Safari preferences and selecting the desired search engine, you can tailor your browsing experience to suit your preferences and needs.
Remember to reload the page after resetting Safari to ensure that the changes take effect. You can do this by clicking the reload button or using the shortcut Command-R.
Resetting Safari to its default settings can be a helpful troubleshooting step and a way to customize your browsing experience. By following the steps provided and making use of the various options available in the Safari settings, you can optimize your browser’s performance and enjoy a smoother and more personalized web browsing experience.
Related posts:

Sanjeev Singh
- Skip to primary navigation
- Skip to main content
- Skip to primary sidebar
Technology Simplified.
How to Reset Safari Settings on Mac
By: Waseem Patwegar | Filed Under: Mac
Unlike Google Chrome , the Apple Safari browser on Mac does not provide the option to Reset Settings. However, it is still possible to Reset Safari browser on Mac to default Settings using steps as provided below.

Reset Safari Settings on Mac
Sometimes, you may find the default Safari browser on your MacBook running slow, getting stuck, quitting unexpectedly or repeatedly crashing.
These problems in Safari browser can be caused due to a variety of reasons, ranging from browser extensions becoming incompatible to the browser cache getting filled up with expired/corrupted data to other reasons.
Hence, the quickest way to fix browser related issues on a computer is to Reset browser to its default or original settings.
Since, the Safari browser on Mac does not have a Reset button, the only way to Reset Safari is to manually Clear History and website data, remove browser extensions and clear Safari Cache.
1. Clear Safari History and Website Data
1. Open Safari Browser > click on Safari tab in the top-menu bar and select Clear History… option in the drop-down menu.

2. On the pop-up, click on the Arrow button and select All history option.

3. Once All History option is selected, click on Clear History button.

This will permanently delete your entire browsing history from MacBook and totally prevent the possibility of anyone taking a look at your browsing habits.
2. Clear Safari Cache
Follow the steps below to first enable the “Develop” menu on Mac and use Develop Menu to clear Safari Browser Cache on Mac.
1. Open Safari browser > click on the Safari tab in the top menu-bar and select Preferences… in the drop-down menu.

2. On the next screen, switch to Advanced tab and select Show Develop Menu in Menu Bar option.

This will enable the Develop option in the top menu-bar on your MacBook.
3. Next, click on the Develop tab in top menu-bar and select Empty Caches option in the drop-down menu.

This will clear Safari Browser Cache on your Mac.
3. Remove Safari Extensions
1. Open Safari Browser > select Safari tab in the top-menu bar and click on Preferences… in the drop-down menu.
2. On next screen, switch to Extensions tab > select the Safari Extension that you want to remove and click on the Uninstall button.

3. On the confirmation pop-up, click on the Uninstall button to confirm.

Similarly, you can repeat the above steps to remove other Safari Browser Extensions installed on your Mac.
After completing these steps, you should find the Safari browser on your MacBook running faster and opening webpages without slowing down, getting stuck or crashing.
- Prevent Safari From Unzipping Downloaded Files on Mac
- How to Disable Form AutoFill in Safari Browser on Mac

2 Ways to Reset Safari to Default Settings on Mac

Summary : We will walk you through how to reset your Safari browser to its default settings on your Mac.
Safari is a built-in browser on Mac. If your Safari browser quits unexpectedly , lags in working, or has problems loading pages, you may need to reset it.
In earlier versions of macOS, Safari had a reset feature. But unfortunately, in recent macOS versions, this feature is gone forever. So, what should you do when you need to reset your Safari browser?
Don't worry. We have collected two ways to reset the Safari browser on Mac for you. Let's get started.

How to Clear Cache on Mac
How to Manually Reset Safari on Mac
As we mentioned, the Safari browser no longer has a one-click reset feature. To reset it, you can follow the steps below.
- Clear Safari Cache
- Delete Safari History and Cookies
- Disable/Uninstall Safari Extensions
- Disable Safari Plugins
- Remove Plug-ins from Library Folders
Let's take a closer look at the detailed steps.
Step 1. Clear Safari Cache
- Open Safari on your Mac.
- Click on the Safari menu and choose Preferences.
- Click the Advanced tab, and check the box next to the Show Develop menu in the menu bar. (Ignore this step if you have already checked the box.)

Related Article: How to Clear Cache in Safari on Mac, iPhone and iPad
Step 2. Delete Safari History and Cookies
- Click the History menu in Safari and choose Clear All History.
- You will see a new window, which clears all history and data by default. Click the Clear History button, and all the history and web cookies will be wiped out.

Step 3. Disable/Uninstall Safari Extensions
- Click Safari menu > Preferences > Extensions.
- To disable an extension, uncheck the box in front of the extension.
- To uninstall an extension, click the Uninstall button and follow the onscreen instructions to delete it from your Mac in the Finder.

Step 4. Disable Safari Plug-ins
- Click Safari menu > Preferences.
- Click the Security tab and uncheck the check box next to Allow Internal Plug-Ins.

Step 5. Remove Safari Plug-ins in Library Folder
You can disable plug-ins in Safari, but you cannot delete them. Safari plug-ins are usually stored in the ~/Library and Library folders. To delete them, follow these steps.
- On your desktop, press Shift+Command+G keys to open the Go to Folder window.
- Paste the file path ~/Library into the search box and hit Return.
- Find the folder named Internal Plug-Ins and drag the extensions related to Safari to the Trash.
- Repeat steps 2 and 3 to delete the Safari extensions in /Library folder.

How to Reset Safari on Mac Using Terminal
If you know Terminal well, you can use it to reset your Safari browser. Here's what you need to do.
- Quit your Safari browser.
- If your Safari browser is still in use, use the Force Quit feature in the Finder to quit it. Just click Apple menu > Force Quit.
- Launch Terminal via Spotlight or Launchpad.
- Run the commands below and follow the onscreen instructions to complete the reset steps.
Hopefully, you have successfully reset Safari to its default settings on your Mac. If you are still having problems with Safari, you may need to reinstall Safari by updating your macOS.
Found this article helpful? We would appreciate it if you could share it on your social media platforms.
I'm Robert Hunt, a tech-savvy fan with the love of all things Apple. As a hobbyist of gardening and meditation, I'm also a seasoned writer covering a wide array of Apple products, like iPhone, iPad, iOS and more.
Trending Story: Messages App Tips & Tricks | Spring Wallpapers | Easter Wallpapers | iOS 17.4 New Emojis
How to Reset Safari on Mac to Default (Completely – Sonoma)
Key Takeaway: Resetting the Safari browser on your Mac can significantly improve its performance by clearing junk files such as caches, browsing history, website data, extensions, and plug-ins. While there's no Reset button, you can achieve this by individually clearing these aspects following simple steps outlined in the article.
Safari is arguably the best web browser for MacBook and Mac computers. This may be attributed to the numerous improvements it has received over the years—especially in security and privacy. However, your Safari browser may start running slowly with time.
IN THIS ARTICLE
This is often caused by the accumulation of junk and temporary files created by the browser over time. Resetting the browser clears such files, allowing it to run much faster. As you may be aware, the Safari browser on Mac no longer has a Reset button for this purpose.
However, you can still reset the browser to its defaults by individually clearing the history, caches, plug-ins, and extensions on the browser. Get to know how you can reset the Safari browser on your Mac in just a few steps.
How Do I Reset Safari Browser?
Since the unveiling of the OS X Mountain Lion 10.8 , Apple no longer adds a Reset button to the Safari browser. As such, you cannot just reset the Safari browser in a single click as you would other popular browsers.
Instead, you need to clear the following aspects individually:
- The Browsing History
- Website Data
- Browser Cache
- Extensions
- Plug-ins
Note : Clearing such temporary files on the Safari browser will cause you to lose important auto-fill data, including usernames and passwords.
Here are the five things you need to do to reset the Safari browser on your Mac:
Reset the Safari Cache
Whenever you visit a web page, the browser saves the media files on that page as caches in a temporary folder—within the Library folder. Leveraging this saved information, Safari can reopen such web pages much faster.
While this is a beneficial functionality, these files accumulate over time and may occupy a significant amount of disk space. If not checked, this may slow or even cause the browser to crash. As such, it is advisable to clear your Safari browser cache as follows:
Method 1: Clearing the Safari Cache from Its Preferences
To clear the cache files from Safari preferences, proceed as follows:
Step 1 : Launch the Safari browser from the Launchpad on your Mac. Step 2 : Click on Safari —located towards the top-left corner of the browser homepage. Step 3 : Select Settings/Preferences from the drop-down menu that comes up.

Step 4 : Now navigate to the Advanced tab, then click on the checkbox adjacent to the Show Develop menu on the menu bar to enable it. This should display a Develop tab on the menu bar.

Step 5 : Click on this Develop menu command and choose the Empty Caches for all Profiles option (macOS Sonoma added the Feature of Create Profile in Safari & Save Cache for Different Profile).

Alternatively, you could also press the Command + E + Option key shortcut to clear the cache after enabling the Develop tab in Step 4 above. Once the Develop menu command is activated on your Safari browser, you can access it anytime you need to clear the cache.
Method 2: Manually Clear Safari Cache
If you are running macOS 10.14 or earlier macOS version on your Mac, you could also clear Safari Cache. These operating systems save all temporary files within the Library folder. To manually clear Safari Caches:
Step 1 : Open Finder Using Spotlight Search on Mac.

Step 2 : From the top menu Go > Go to Folder .

Step 3: Navigate to ~/Library/Caches hit the return and open the Caches folder.

Step 4 : Delete Only Safari Cache folders, use the search box in the finder window > Select Caches folder > Select Folders and Move to the bin .
Note : Be careful while deleting files from the Library folder, as removing essential files may end up damaging the system.

Or, select and then remove all the unnecessary files.

Clear Safari Browsing History
Just as is the case with other browsers, Safari keeps a history of the web pages you have visited in the recent past. To reset Safari on Mac, you need to clear this History as well. To clear the Safari browsing history on Mac:
Method 1: Manually Clear the Browsing History on Safari
The first option is to just wipe the history out manually, as illustrated below:
Step 1 : From the Launchpad , open the Safari browser. Step 2 : From the Menu bar , select the History tab.

Step 3 : Choose the Clear History option from the drop-down menu that appears. Step 4 : Now select the time frame to clear, it is advisable to clear all history .

In Addition, we can clear the safari cache for specific profiles, Options showing ‘ From ‘. Select Profile and Clear Cache for Specific Profile.

Step 5 : Finally, click on the Clear History button to initiate the process.
Note : If you happen to have enabled Safari in iCloud settings under the same Apple ID, a change in your browser history will be reflected across your other Apple devices using the same ID. Deleting Safari’s browsing history on one device will automatically clear the browsing history on the other Apple devices logged in under the same Apple ID.
Method 2: Configure Safari to Clear Browsing History Automatically
You could also set up the Safari browser in such a way that it automatically deletes your browsing history after a specified period. To do this:
Step 1: Open the Safari app on your Mac and then open Safari Settings/Preferences.

Step 2: Navigate to the General Settings tab on your Safari browser. Step 3: Select the Set up Remove history items option.

Step 4: Select your preferred clearing frequency for the automatic history removal. Step 5: Once set up, Safari will automatically be clearing your browsing history after the period you selected.

Reset Your Safari Website Data
Having cleared the cache and browsing history, now you should reset the website data to reset the Safari browser on Mac. To clear your Safari website data, you should:
Step 1: Launch the Safari browser on your Mac. Step 2: Click on Safari—towards the top-left corner of the Safari homepage. Step 3: Select the Settings/Preferences option and then navigate to the Privacy tab. Next, click on Manage Website Data

Step 4: before clicking Remove All —at the bottom-left corner.

Step 5: Finally, click on the Remove Now button to confirm this operation.

Reset, Uninstall, or Disable Safari Extensions and Plug-ins
Both extensions and plug-ins add to the functionality of the Safari browser. However, some may malfunction and affect the functioning of the browser. When that happens, you need to troubleshoot and uninstall or disable problematic extensions or plug-ins.
To fully reset Safari, you need to get rid of the extensions and plug-ins that have been added to the browser as well.
To Remove Extensions on Safari:
Launch the Safari browser then click on Safari —positioned on the top-left corner. Next, select the Settings/Preferences option then open the Extensions tab. This should display a list of extensions that are currently installed on Safari. Click on any one of them then click the Extensions button.

Follow on-screen prompts to uninstall the extension. Repeat this for each extension until you have uninstalled all the extensions on this list.
To Remove Safari Plug-Ins:
Launch the Safari browser, then click on Safari —on the top-left corner of the homepage. Select Preferences and then navigate to the Security tab. Click on the Allow Plug-ins option to untick it.
How Do You Reset Safari on Mac Terminal?
If you fancy running some commands in Terminal, you can use this method to reset the Safari browser to default settings on Mac. If you’d rather use Terminal to reset Safari on Mac, here is how you should go about it:
Step 1: Launch a new Terminal window on your Mac as follows: Applications > Utilities > Terminal Step 2: To avoid losing data, you could save your bookmarks before resting Safari. In this regard, you need to run the following command on the new Terminal window:
Step 3: You can now begin resetting Safari by force quitting the browser. To do this, run the following command on the Terminal:
Step 4: With this method, you also need to clear Safari cookies, Cache, and folders to reset the browser. You can do that by running the following commands, one after the other, on your Mac Terminal:
Press the Return key to run the command.
Hit the Return key to run it.
Press Return to run this command.
Step 5: Now that you’ve cleared your Safari cookies, cache, preferences, you can proceed to clear the more stubborn files. To accomplish this, run the following commands on your Mac Terminal, one after the other.
Note : Remember to press the Return key after entering each of the commands into Terminal and them wait for it to execute before running the next command.
These are the commands you should run to reset the Safari browser using Terminal:
Copy and paste each of the lines onto Terminal separately and run it before entering the next line.
Step 6: At this point, the browser should have been successfully reset to factory settings. Now you can restore the bookmarks you saved in step #2 above. However, this step is optional. If you’d like to restore your saved bookmarks, run the filling commands:
Press Return to execute this command. Once your Mac is done running this command, copy and paste the following onto your Mac Terminal:
You have successfully reset Safari on Mac Terminal. Launch the Safari app and start afresh as though it was newly installed onto your Mac.
Final Verdict
With time, the temporary files created by Safari may accumulate on your Mac or become corrupted. This may cause the browser to malfunction. For instance, it may cause the browser to become slow and sluggish, or even crash.
To fix such issues, you need to reset the browser to its default settings. Since Safari no longer has a built-in Reset button, you just have to do it manually. In this regard, you need to clear Safari preferences, extensions, plug-ins, cookies, and cache files separately.
This may sound painstakingly slow, but this guide includes the commands you can use to reset Safari on Mac Terminal.

Leave a Comment Cancel reply

How To : Reset Safari's Experimental Features to the Defaults to Fix or Troubleshoot Browsing Issues
Safari's advanced experimental features give you access to new browser initiatives, upcoming web tools, element changes, behavior adjustments, and other preliminary feature tests in development by Apple. If you use them on your iPhone, you can either improve your Safari experience or wreck it. Resetting the flags provides a fresh start.
Why Use Safari's Experimental Features?
Web developers and WebKit engineers benefit the most from Safari's experimental features menu since they can try out new features in development. They can then provide feedback to Apple to help the company refine and eventually implement those features in a future Safari release. However, regular iPhone users can use all the experimental features just the same.
Experimental Safari WebKit flags that are disabled by default are still being tested internally by Apple and aren't always ready for developer use. In contrast, the enabled ones are fair game for anyone. Many experimental features are useful, like preloading responsive images for faster display, lazy-loading images to reduce bandwidth, and making jump links smoother .
I'm particularly excited about "Scroll to Text Fragment," which would make Safari recognize links that highlight specific text within the webpage like Chrome currently does. Another is "Link Sanitizer," which would presumedly either remove bloat from hyperlink redirects or invalidate hyperlinks for security analysts to avoid opening up malicious content.
How Do You Reset Safari's Experimental Features?
If you like playing around in Safari's advanced experimental settings, whether you're a web developer or just a regular user trying to up your browsing game, things can get out of control fast.
For years , you could easily reset all of Safari's experimental flags back to their defaults on macOS; just go to "Develop" in Safari's menu bar, then choose "Reset All to Defaults" from the "Experimental Features" menu. On iPhone and iPad, it didn't show up until iOS 15.4 and iPadOS 15.4 . Before that, users would resort to asking for screenshots of the default flag settings so they could manually change them back one by one.
Navigate to Settings –> Safari –> Advanced –> Experimental Features, and then scroll to the bottom and tap "Reset All to Defaults." There is no confirmation prompt to deal with, so it immediately returns all the settings to the defaults.

Just updated your iPhone? You'll find new emoji, enhanced security, podcast transcripts, Apple Cash virtual numbers, and other useful features. There are even new additions hidden within Safari. Find out what's new and changed on your iPhone with the iOS 17.4 update.
Be the First to Comment
Share your thoughts, how to : apple has a killer new word game puzzle called quartiles hiding on ios 17.5, how to : 10 features coming to apple news on your iphone with ios 17.5 — including some big ones, how to : make siri say whatever you want every time you connect your iphone to a charger, how to : your iphone's status bar can actually be customized — here's how, how to : install facebook lite on your iphone, how to : the easiest way to convert videos to gifs on your iphone, how to : dial these secret codes to see if someone is hijacking calls & texts on your iphone, how to : clear your frequently used and recent emoji from your iphone's keyboard, how to : trigger imessage effects with just a keyword, how to : there's an easy way to see all the unsent messages in your imessage conversations, how to : make custom text tones for your iphone using itunes, how to : the not-so-obvious way to bold & italicize text on your iphone, how to : change your facetime caller id to an email address or phone number, how to : keep your night vision sharp with the iphone's hidden red screen, warning : sensitive info you black out in images can be revealed with a few quick edits on your iphone, how to : 16 harry potter spells for siri that turn your iphone into a magical elder wand, how to : turn gifs into live photos on your iphone, how to : the simple way to stop your iphone from sending unwanted audio messages, how to : turn any website into a full-screen app on your iphone, how to : 34 new features and changes for your iphone on ios 17.4.
- All Features
- All Hot Posts
How to Reset Safari on iPhone, iPad and Mac

Safari no longer has a reset button. This means that if you want Safari to return to its default settings, you would have to find a workaround.
This workaround will require that you take multiple steps to remove the history, clear the cache and disable extensions and plugins, and other aspects of the browser.
In this guide, we share with you how to take all these steps and effectively reset Safari to its default settings.
1. Reset Safari on iPhone and iPad
To reset Safari settings on your iPhone or iPad, follow these simple steps:
Step 1: Open the Settings from the Home screen.
Step 2: Scroll down and tap “Safari”.
Step 3: Then tap “Clear History and Website Data”.
Step 4: Tap “Clear History and Data” again to confirm.

2. Reset Safari on Mac
2.1. remove browser history.
While your browser history can help you auto-complete URLS and other items while browsing, it is often a good idea to clear your browser history for privacy reasons. Deleting your browser history resets the browser by deleting the following:
- All webpage history
- The sites that aren’t marked as permanent
- All cookies and website data
- A list of all the downloads
- Recent searches
- Any sites added to Quick Website Search
To remove the browser history, follow these simple steps:
Step 1: Open Safari and then select “History > Clear History and Website Data”. Then click “Clear history” in the popup that appears. You can also click on Safari > Clear History to do it.
Step 2: If you would like to clear the history for a particular period of time, then you must select a value in the “Clear” dropdown menu.
Step 3: If you want to clear a particular website, go to History > Show History and then select the website before clicking “Delete”.
2.2. Clear Your Safari Cache
You can also clear your Safari cache. When you do this, Safari will forget any websites stored and reloads each page you visit. Here’s how to do it:
Step 1: Go to Safari > Preferences > Advanced and then click on “Show Develop menu in menu bar”.
Step 2: Go back to the browser window and then click “Develop > Empty Caches.
2.3. Turn Off Plugins within Safari
To turn off the plugins within Safari, follow these simple steps:
Step 1: Open the Preferences window in Safari and then click on the “Websites” tab.
Step 2: Uncheck the box next to each plugin to turn them off.
2.4. Delete Extensions
Finally, you may want to disable or delete the extension. Disabling them is much easier than deleting them since all you have to do is go to Safari > Preferences > Website and deselect the plugins you no longer want to use.
But if you want to delete them completely, follow these simple steps:
Step 1: Close Safari.
Step 2: Go to this path: “/Library/Internet Plug-Ins/” or “~/Library/Internet Plug-Ins/”.
Step 3: Use Cmd-A to select all plugins and then press “Delete” to remove them.
- What Is Realme UI Recovery? How to Solve Realme UI Recovery Problems?
- How to Unlock Bootloader on Xiaomi with Mi Flash Unlock Tool
- Export Chat History LINE with These 2 Ways!
- [Worked!]Try These 6 Ways to Back up Chat LINE
- 5 Simple Ways to Fix LINE Chat Backup Failed
Leave a Comment Cancel reply
Your email address will not be published. Required fields are marked *
Save my name, email, and website in this browser for the next time I comment.
- Full Guide for Xiaomi Recovery Mode
- [FAQ] How To Turn Off Samsung Without Password?
- How to Send Fake Location on WhatsApp for iOS and Android
- Solved! iPhone & iPad Says Incorrect WiFi Password but It Correct!
- How Pokémon Go Cooldown Works? Pokemon Go Cooldown Chart 2024


How To Reset Safari To Default Settings
Published: August 23, 2023
Modified: January 8, 2024
Clearing Cache and Cookies
One of the first steps you can take to reset Safari to its default settings is to clear the cache and cookies. Cache and cookies are temporary files that websites store on your device to improve loading times and remember your preferences. However, over time, these files can accumulate and cause issues with browser performance.
To clear the cache and cookies in Safari, follow the steps below:
- Open Safari on your device.
- Click on the “Safari” menu in the top-left corner of the screen and select “Preferences”.
- In the Preferences window, go to the “Privacy” tab.
- Click on the “Manage Website Data” button.
- A list of websites will appear. Click on “Remove All” to clear all the cache and cookies.
- Confirm the action by clicking “Remove Now” when prompted.
Once you have cleared the cache and cookies, Safari will be free of any stored data from websites. This can help resolve issues caused by corrupted or outdated cache files. However, keep in mind that clearing your cache and cookies will also log you out of any websites you are currently signed in to, so make sure to remember your login credentials before proceeding.
This step is often effective in resolving various browser-related issues, including slow loading times, unresponsive pages, or incorrect website data. It provides a fresh start for Safari, allowing it to load webpages faster and function more efficiently.
Removing Extensions and Plugins
If you’re experiencing issues with Safari, such as unexpected pop-ups, slow performance, or unusual behavior, one possible cause could be conflicting or malicious extensions or plugins installed in your browser. Removing these extensions and plugins can help reset Safari to its default settings and improve its overall performance.
Follow the steps below to remove extensions and plugins from Safari:
- In the Preferences window, go to the “Extensions” tab.
- A list of installed extensions will appear. Review the list and click on the extension you want to remove.
- Click on the “Uninstall” or “Remove” button to delete the extension from Safari.
- Confirm the action by clicking “Uninstall” or “Remove” when prompted.
- Repeat the process for any other unwanted extensions.
To remove plugins from Safari, follow these additional steps:
- In the Preferences window, go to the “Websites” tab.
- On the left-hand side, you will see a list of plugins. Click on the plugin you want to remove.
- On the right-hand side, uncheck the box next to “Enable” to disable the plugin.
- Alternatively, click on the dropdown menu next to the plugin and select “Off” to disable it.
By removing unnecessary or problematic extensions and plugins, you can optimize Safari’s performance and ensure a smoother browsing experience. It’s a good practice to regularly review and remove any unwanted or suspicious extensions to maintain the security and efficiency of your browser.
Restoring Default Search Engine
If you’ve noticed that your default search engine in Safari has been changed without your knowledge or consent, it’s important to restore it to its default settings. Restoring the default search engine can help improve search results accuracy and eliminate any unwanted redirects or advertisements that may be associated with a modified search engine.
To restore the default search engine in Safari, follow the steps below:
- In the Preferences window, go to the “Search” tab.
- Select the search engine you want to set as the default from the dropdown menu. Safari offers popular options like Google, Bing, and Yahoo.
Once you have selected the preferred search engine, Safari will use it as the default for all your future search queries. This change will affect the search bar located in the Safari toolbar and the search feature within the “New Tab” page.
Restoring the default search engine can help ensure that your search results are accurate and reliable. It also helps you avoid potential security risks associated with unauthorized modifications to your browser’s settings. By keeping your search engine preferences up to date, you can have a safer and more efficient browsing experience with Safari.
Disabling AutoFill and Siri Suggestions
AutoFill and Siri Suggestions are convenient features in Safari that can save you time by automatically filling in forms and suggesting relevant information. However, if you prefer more privacy or want to reset Safari to its default settings, disabling AutoFill and Siri Suggestions can be a good option.
To disable AutoFill in Safari, follow these steps:
- In the Preferences window, go to the “AutoFill” tab.
- Uncheck the options you want to disable, such as “Using info from my contacts” or “User names and passwords”.
- If desired, you can also click on the “Edit” button to review and delete any stored AutoFill information.
To disable Siri Suggestions in Safari, follow these additional steps:
- Uncheck the box next to “Enable Siri Suggestions”.
By disabling AutoFill and Siri Suggestions, you can prevent Safari from automatically populating forms with your personal information and suggesting search queries based on your browsing history. This can be useful if you want to reset Safari or if you value privacy and prefer to manually enter information when needed.
Note that disabling AutoFill and Siri Suggestions may require you to manually enter information on websites and perform searches without personalized suggestions. However, it can give you more control over your browsing experience and help restore Safari to its default settings.
Resetting Safari Preferences
If you are experiencing persistent issues with Safari, such as frequent crashes, unresponsive behavior, or unusual settings, resetting Safari preferences can help resolve these problems. Resetting preferences will restore Safari to its default configuration, allowing you to start fresh with a clean slate.
Follow the steps below to reset Safari preferences:
- In the Preferences window, go to the “General” tab.
- At the bottom of the window, click on the “Reset” button.
- A dialog box will appear, asking if you want to reset Safari. Click on “Reset” to confirm.
By resetting Safari preferences, you will restore the default settings for various options, including the homepage, default search engine, new windows, and tabs. Keep in mind that this action will also remove any exceptions or customizations you have made to Safari preferences, so make sure to note down any important settings before proceeding.
Resetting Safari preferences can be an effective solution for various issues, such as persistent crashes, performance problems, or unexpected behavior. It can help eliminate any conflicting settings and restore Safari to a stable state.
However, it’s important to note that resetting preferences does not remove your browsing history, bookmarks, or saved passwords. If you want to clear this data as well, you will need to follow the appropriate steps for clearing cache and cookies, history, or other related data within Safari.
Resetting Safari on Mac
If you’re using Safari on a Mac and experiencing persistent issues that haven’t been resolved with other troubleshooting methods, resetting Safari may be the solution. Resetting the browser will restore it to its original state, helping to resolve various performance issues or unexpected behavior.
Follow the steps below to reset Safari on a Mac:
- Open Safari on your Mac.
- Click on the “Safari” menu in the top-left corner of the screen.
- Select “Clear History…” from the dropdown menu.
- In the Clear History window, choose the desired time range or select “all history” to remove all browsing history.
- Click on the “Clear History” button to confirm the action.
- Next, click on the “Safari” menu again and select “Preferences”.
- Click on “Manage Website Data…” and then “Remove All” to clear the cache and cookies.
- Confirm the action by clicking “Remove Now”.
- Finally, go to the “Extensions” and “Plug-Ins” tabs in the Preferences window and remove any unwanted or problematic extensions or plugins.
By following these steps, you will reset Safari on your Mac, clearing the browsing history, cache, and cookies, as well as removing any unwanted extensions or plugins that may be causing issues.
Keep in mind that resetting Safari will also remove your saved passwords, bookmarks, and other personalized settings. If you want to retain this information, make sure to back it up before resetting the browser.
Resetting Safari on your Mac can help resolve various issues, such as slow performance, frequent crashes, or unexpected behavior. It provides a fresh start for the browser, allowing you to enjoy a smooth and optimal browsing experience.
Resetting Safari on iPhone and iPad
If you’re experiencing persistent issues with Safari on your iPhone or iPad, such as slow loading times, crashes, or unresponsive behavior, resetting the browser may help resolve these problems. Resetting Safari will restore it to its default settings and can often alleviate various performance issues.
Follow the steps below to reset Safari on your iPhone or iPad:
- Open the Settings app on your device.
- Scroll down and tap on “Safari”.
- On the Safari settings page, scroll to the bottom and tap on “Clear History and Website Data”.
- A warning message will appear, informing you that clearing the history and data will remove browsing history, cookies, and other website data. Tap on “Clear History and Data” to confirm.
- Next, scroll back to the top of the Safari settings page and tap on “Advanced”.
- Tap on “Website Data” and then “Remove All Website Data”.
- A confirmation message will appear. Tap on “Remove Now” to complete the process.
After following these steps, Safari on your iPhone or iPad will be reset to its default settings, clearing the browsing history, cookies, and other website data.
Resetting Safari is often effective in resolving issues such as slow performance, crashes, or unexpected behavior on iOS devices. By clearing the accumulated data and restoring the browser to its original state, you can enjoy a smoother and more reliable browsing experience.
Keep in mind that resetting Safari will also remove your saved passwords, bookmarks, and other personalized settings. If you want to retain this information, make sure to back it up before proceeding with the reset.
Resetting Safari on Windows
If you’re using Safari on a Windows computer and encounter persistent issues, resetting the browser to its default settings can help resolve performance problems or unexpected behavior. Resetting Safari on Windows will clear your browsing history, cache, and other data, providing a fresh start for the browser.
Follow the steps below to reset Safari on Windows:
- Open Safari on your Windows computer.
- Click on the “Gear” icon in the top-right corner of the Safari window.
- In the dropdown menu, select “Reset Safari…”.
- A dialog box will appear, showing the various reset options. Check the options you want to reset, such as “Clear history”, “Empty the cache”, and “Clear Downloads window”. You can also choose to remove saved names and passwords, autofill form data, and website icons.
- Click on the “Reset” button to initiate the reset process.
By performing these steps, Safari on your Windows computer will be reset to its default settings. This includes clearing the browsing history, cache, downloads, and other selected data. It helps eliminate any problematic settings and provides a clean slate for the browser.
Resetting Safari on your Windows computer is a useful troubleshooting step when encountering persistent issues like slow performance, frequent crashes, or unresponsive behavior. It can help restore the browser to its optimal state and provide a seamless browsing experience.
Important Considerations before Resetting Safari
Resetting Safari to its default settings can be a helpful solution for resolving various issues. However, before proceeding with the reset, there are a few important considerations to keep in mind:
1. Data Backup: Resetting Safari will remove your browsing history, cookies, saved passwords, bookmarks, and other personalized settings. If you want to retain this information, it is crucial to back it up before initiating the reset process. You can export your bookmarks, save passwords in a secure location, and take screenshots of important settings for reference.
2. Personalized Settings: Resetting Safari will revert all settings to their default values. This includes preferences such as default search engine, homepage, autofill data, and extensions. Take note of any customizations you have made so that you can easily reconfigure them after the reset.
3. Signed-In Accounts: Resetting Safari will log you out of any websites you are currently signed in to. Make sure to remember your login credentials, particularly for important accounts, to avoid any inconvenience or data loss.
4. Troubleshooting Alternatives: Resetting Safari should be considered as a last resort if other troubleshooting methods have failed. Before proceeding with the reset, try clearing the cache and cookies, disabling extensions, or updating Safari to the latest version. These steps may resolve the issue without the need for resetting the browser.
5. Impact on Extensions: Resetting Safari will remove all installed extensions and plugins. If you rely on specific extensions for your workflow, make sure to note them down or take screenshots of your current setup. You can reinstall them after the reset if needed.
6. System Compatibility: It’s important to ensure that you are using a compatible version of Safari with your operating system. Make sure to update both Safari and your operating system to their latest versions to avoid any compatibility issues or limitations.
By considering these factors before resetting Safari, you can ensure a smoother transition and minimize any potential data loss or inconvenience. Resetting Safari can be an effective troubleshooting step, but it’s essential to be prepared and understand the implications before proceeding.

Related Stories
Manage Smart Search In Safari For Mac
How To Fix It When Safari Is Not Working On An IPad
How To Remove Malware From Safari
How To Remove Safe Finder From Mac
Storage Optimization: Clearing Cache On IPhone 13
How To Get Rid Of Bing
How To Enable Cookies On iPhone
How To Manage Browsing History On Safari For IPad

Enhancing Employee Integration for Efficiency

Understanding SA Interest Rates

Revolutionizing Lead Generation: How Software Solutions Are Redefining Sales Strategies

The Benefits of E-Transfer Loans

Making The Right Choice While Buying A Property

Top 100 Christmas Songs for the Best Christmas Music

The Life and Career of Dean Haglund: A Journey from Canada to the Paranormal and Beyond

16 Best Ad Blocker For Every Browser and Device

Different Types of Aesthetics: 30 Outfit Ideas to Step Up Your OOTD Game

Watch Guide: 20 Best Limited Series on Netflix
iPhone User Guide
- iPhone models compatible with iOS 17
- R ' class='toc-item' data-ss-analytics-link-url='https://support.apple.com/guide/iphone/iphone-xr-iph017302841/ios' data-ajax-endpoint='https://support.apple.com/guide/iphone/iphone-xr-iph017302841/ios' data-ss-analytics-event="acs.link_click" href='https://support.apple.com/guide/iphone/iphone-xr-iph017302841/ios' id='toc-item-IPH017302841' data-tocid='IPH017302841' > iPhone X R
- S ' class='toc-item' data-ss-analytics-link-url='https://support.apple.com/guide/iphone/iphone-xs-iphc00446242/ios' data-ajax-endpoint='https://support.apple.com/guide/iphone/iphone-xs-iphc00446242/ios' data-ss-analytics-event="acs.link_click" href='https://support.apple.com/guide/iphone/iphone-xs-iphc00446242/ios' id='toc-item-IPHC00446242' data-tocid='IPHC00446242' > iPhone X S
- S Max' class='toc-item' data-ss-analytics-link-url='https://support.apple.com/guide/iphone/iphone-xs-max-iphcd2066870/ios' data-ajax-endpoint='https://support.apple.com/guide/iphone/iphone-xs-max-iphcd2066870/ios' data-ss-analytics-event="acs.link_click" href='https://support.apple.com/guide/iphone/iphone-xs-max-iphcd2066870/ios' id='toc-item-IPHCD2066870' data-tocid='IPHCD2066870' > iPhone X S Max
- iPhone 11 Pro
- iPhone 11 Pro Max
- iPhone SE (2nd generation)
- iPhone 12 mini
- iPhone 12 Pro
- iPhone 12 Pro Max
- iPhone 13 mini
- iPhone 13 Pro
- iPhone 13 Pro Max
- iPhone SE (3rd generation)
- iPhone 14 Plus
- iPhone 14 Pro
- iPhone 14 Pro Max
- iPhone 15 Plus
- iPhone 15 Pro
- iPhone 15 Pro Max
- Setup basics
- Make your iPhone your own
- Take great photos and videos
- Keep in touch with friends and family
- Share features with your family
- Use iPhone for your daily routines
- Expert advice from Apple Support
- What’s new in iOS 17
- Turn on and set up iPhone
- Wake and unlock
- Set up cellular service
- Use Dual SIM
- Connect to the internet
- Sign in with Apple ID
- Subscribe to iCloud+
- Find settings
- Set up mail, contacts, and calendar accounts
- Learn the meaning of the status icons
- Charge the battery
- Charge with cleaner energy sources
- Show the battery percentage
- Check battery health and usage
- Use Low Power Mode
- Read and bookmark the user guide
- Learn basic gestures
- Learn gestures for iPhone models with Face ID
- Adjust the volume
- Find your apps in App Library
- Switch between open apps
- Quit and reopen an app
- Multitask with Picture in Picture
- Access features from the Lock Screen
- View Live Activities in the Dynamic Island
- Perform quick actions
- Search on iPhone
- Get information about your iPhone
- View or change cellular data settings
- Travel with iPhone
- Change sounds and vibrations
- Use the Action button on iPhone 15 Pro and iPhone 15 Pro Max
- Create a custom Lock Screen
- Change the wallpaper
- Adjust the screen brightness and color balance
- Keep the iPhone display on longer
- Use StandBy
- Customize the text size and zoom setting
- Change the name of your iPhone
- Change the date and time
- Change the language and region
- Organize your apps in folders
- Add, edit, and remove widgets
- Move apps and widgets on the Home Screen
- Remove apps
- Use and customize Control Center
- Change or lock the screen orientation
- View and respond to notifications
- Change notification settings
- Set up a Focus
- Allow or silence notifications for a Focus
- Turn a Focus on or off
- Stay focused while driving
- Customize sharing options
- Type with the onscreen keyboard
- Dictate text
- Select and edit text
- Use predictive text
- Use text replacements
- Add or change keyboards
- Add emoji and stickers
- Take a screenshot
- Take a screen recording
- Draw in documents
- Add text, shapes, signatures, and more
- Fill out forms and sign documents
- Use Live Text to interact with content in a photo or video
- Use Visual Look Up to identify objects in your photos and videos
- Lift a subject from the photo background
- Subscribe to Apple Arcade
- Play with friends in Game Center
- Connect a game controller
- Use App Clips
- Update apps
- View or cancel subscriptions
- Manage purchases, settings, and restrictions
- Install and manage fonts
- Buy books and audiobooks
- Annotate books
- Access books on other Apple devices
- Listen to audiobooks
- Set reading goals
- Organize books
- Create and edit events in Calendar
- Send invitations
- Reply to invitations
- Change how you view events
- Search for events
- Change calendar and event settings
- Schedule or display events in a different time zone
- Keep track of events
- Use multiple calendars
- Use the Holidays calendar
- Share iCloud calendars
- Camera basics
- Set up your shot
- Apply Photographic Styles
- Take Live Photos
- Take Burst mode shots
- Take a selfie
- Take panoramic photos
- Take macro photos and videos
- Take portraits
- Take Night mode photos
- Take Apple ProRAW photos
- Adjust the shutter volume
- Adjust HDR camera settings
- Record videos
- Record spatial videos for Apple Vision Pro
- Record ProRes videos
- Record videos in Cinematic mode
- Change video recording settings
- Save camera settings
- Customize the Main camera lens
- Change advanced camera settings
- View, share, and print photos
- Use Live Text
- Scan a QR code
- See the world clock
- Set an alarm
- Change the next wake up alarm
- Use the stopwatch
- Use multiple timers
- Add and use contact information
- Edit contacts
- Add your contact info
- Use NameDrop on iPhone to share your contact info
- Use other contact accounts
- Use Contacts from the Phone app
- Merge or hide duplicate contacts
- Export contacts
- Get started with FaceTime
- Make FaceTime calls
- Receive FaceTime calls
- Create a FaceTime link
- Take a Live Photo
- Turn on Live Captions in a FaceTime call
- Use other apps during a call
- Make a Group FaceTime call
- View participants in a grid
- Use SharePlay to watch, listen, and play together
- Share your screen in a FaceTime call
- Collaborate on a document in FaceTime
- Use video conferencing features
- Hand off a FaceTime call to another Apple device
- Change the FaceTime video settings
- Change the FaceTime audio settings
- Change your appearance
- Leave a call or switch to Messages
- Block unwanted callers
- Report a call as spam
- Connect external devices or servers
- Modify files, folders, and downloads
- Search for files and folders
- Organize files and folders
- Set up iCloud Drive
- Share files and folders in iCloud Drive
- Share your location
- Meet up with a friend
- Send your location via satellite
- Add or remove a friend
- Locate a friend
- Get notified when friends change their location
- Notify a friend when your location changes
- Add your iPhone
- Add your iPhone Wallet with MagSafe
- Get notified if you leave a device behind
- Locate a device
- Mark a device as lost
- Erase a device
- Remove a device
- Add an AirTag
- Share an AirTag or other item in Find My on iPhone
- Add a third-party item
- Get notified if you leave an item behind
- Locate an item
- Mark an item as lost
- Remove an item
- Adjust map settings
- Get started with Fitness
- Track daily activity and change your move goal
- See your activity summary
- Sync a third-party workout app
- Change fitness notifications
- Share your activity
- Subscribe to Apple Fitness+
- Find Apple Fitness+ workouts and meditations
- Start an Apple Fitness+ workout or meditation
- Create a Custom Plan in Apple Fitness+
- Work out together using SharePlay
- Change what’s on the screen during an Apple Fitness+ workout or meditation
- Download an Apple Fitness+ workout or meditation
- Get started with Freeform
- Create a Freeform board
- Draw or handwrite
- Apply consistent styles
- Position items on a board
- Search Freeform boards
- Share and collaborate
- Delete and recover boards
- Get started with Health
- Fill out your Health Details
- Intro to Health data
- View your health data
- Share your health data
- View health data shared by others
- Download health records
- View health records
- Monitor your walking steadiness
- Log menstrual cycle information
- View menstrual cycle predictions and history
- Track your medications
- Learn more about your medications
- Log your state of mind
- Take a mental health assessment
- Set up a schedule for a Sleep Focus
- Turn off alarms and delete sleep schedules
- Add or change sleep schedules
- Turn Sleep Focus on or off
- Change your wind down period, sleep goal, and more
- View your sleep history
- Check your headphone levels
- Use audiogram data
- Register as an organ donor
- Back up your Health data
- Intro to Home
- Upgrade to the new Home architecture
- Set up accessories
- Control accessories
- Control your home using Siri
- Use Grid Forecast to plan your energy usage
- Set up HomePod
- Control your home remotely
- Create and use scenes
- Use automations
- Set up security cameras
- Use Face Recognition
- Unlock your door with a home key
- Configure a router
- Invite others to control accessories
- Add more homes
- Get music, movies, and TV shows
- Get ringtones
- Manage purchases and settings
- Get started with Journal
- Write in your journal
- Review your past journal entries
- Change Journal settings
- Magnify nearby objects
- Change settings
- Detect people around you
- Detect doors around you
- Receive image descriptions of your surroundings
- Read aloud text and labels around you
- Set up shortcuts for Detection Mode
- Add and remove email accounts
- Set up a custom email domain
- Check your email
- Unsend email with Undo Send
- Reply to and forward emails
- Save an email draft
- Add email attachments
- Download email attachments
- Annotate email attachments
- Set email notifications
- Search for email
- Organize email in mailboxes
- Flag or block emails
- Filter emails
- Use Hide My Email
- Use Mail Privacy Protection
- Change email settings
- Delete and recover emails
- Add a Mail widget to your Home Screen
- Print emails
- Get travel directions
- Select other route options
- Find stops along your route
- View a route overview or a list of turns
- Change settings for spoken directions
- Get driving directions
- Get directions to your parked car
- Set up electric vehicle routing
- Report traffic incidents
- Get cycling directions
- Get walking directions
- Get transit directions
- Delete recent directions
- Get traffic and weather info
- Estimate travel time and ETA
- Download offline maps
- Search for places
- Find nearby attractions, restaurants, and services
- Get information about places
- Mark places
- Share places
- Rate places
- Save favorite places
- Explore new places with Guides
- Organize places in My Guides
- Delete significant locations
- Look around places
- Take Flyover tours
- Find your Maps settings
- Measure dimensions
- View and save measurements
- Measure a person’s height
- Use the level
- Set up Messages
- About iMessage
- Send and reply to messages
- Unsend and edit messages
- Keep track of messages
- Forward and share messages
- Group conversations
- Watch, listen, or play together using SharePlay
- Collaborate on projects
- Use iMessage apps
- Take and edit photos or videos
- Share photos, links, and more
- Send stickers
- Request, send, and receive payments
- Send and receive audio messages
- Animate messages
- Change notifications
- Block, filter, and report messages
- Delete messages and attachments
- Recover deleted messages
- View albums, playlists, and more
- Show song credits and lyrics
- Queue up your music
- Listen to broadcast radio
- Subscribe to Apple Music
- Play music together in the car with iPhone
- Listen to lossless music
- Listen to Dolby Atmos music
- Apple Music Sing
- Find new music
- Add music and listen offline
- Get personalized recommendations
- Listen to radio
- Search for music
- Create playlists
- See what your friends are listening to
- Use Siri to play music
- Change the way music sounds
- Get started with News
- Use News widgets
- See news stories chosen just for you
- Read stories
- Follow your favorite teams with My Sports
- Listen to Apple News Today
- Subscribe to Apple News+
- Browse and read Apple News+ stories and issues
- Download Apple News+ issues
- Listen to audio stories
- Solve crossword puzzles
- Search for news stories
- Save stories in News for later
- Subscribe to individual news channels
- Get started with Notes
- Add or remove accounts
- Create and format notes
- Draw or write
- Add photos, videos, and more
- Scan text and documents
- Work with PDFs
- Create Quick Notes
- Search notes
- Organize in folders
- Organize with tags
- Use Smart Folders
- Export or print notes
- Change Notes settings
- Make a call
- Answer or decline incoming calls
- While on a call
- Set up voicemail
- Check voicemail
- Change voicemail greeting and settings
- Select ringtones and vibrations
- Make calls using Wi-Fi
- Set up call forwarding and call waiting
- Avoid unwanted calls
- View photos and videos
- Play videos and slideshows
- Delete or hide photos and videos
- Edit photos and videos
- Trim video length and adjust slow motion
- Edit Cinematic mode videos
- Edit Live Photos
- Edit portraits
- Use photo albums
- Edit, share, and organize albums
- Filter and sort photos and videos in albums
- Make stickers from your photos
- Duplicate and copy photos and videos
- Merge duplicate photos and videos
- Search for photos
- Identify people and pets
- Browse photos by location
- Share photos and videos
- Share long videos
- View photos and videos shared with you
- Watch memories
- Personalize your memories
- Manage memories and featured photos
- Use iCloud Photos
- Create shared albums
- Add and remove people in a shared album
- Add and delete photos and videos in a shared album
- Set up or join an iCloud Shared Photo Library
- Add content to an iCloud Shared Photo Library
- Use iCloud Shared Photo Library
- Import and export photos and videos
- Print photos
- Find podcasts
- Listen to podcasts
- Follow your favorite podcasts
- Use the Podcasts widget
- Organize your podcast library
- Download, save, or share podcasts
- Subscribe to podcasts
- Listen to subscriber-only content
- Change download settings
- Make a grocery list
- Add items to a list
- Edit and manage a list
- Search and organize lists
- Work with templates
- Use Smart Lists
- Print reminders
- Use the Reminders widget
- Change Reminders settings
- Browse the web
- Search for websites
- Customize your Safari settings
- Change the layout
- Use Safari profiles
- Open and close tabs
- Organize your tabs
- View your Safari tabs from another Apple device
- Share Tab Groups
- Use Siri to listen to a webpage
- Bookmark favorite webpages
- Save pages to a Reading List
- Find links shared with you
- Annotate and save a webpage as a PDF
- Automatically fill in forms
- Get extensions
- Hide ads and distractions
- Clear your cache
- Browse the web privately
- Use passkeys in Safari
- Check stocks
- Manage multiple watchlists
- Read business news
- Add earnings reports to your calendar
- Use a Stocks widget
- Translate text, voice, and conversations
- Translate text in apps
- Translate with the camera view
- Subscribe to Apple TV+, MLS Season Pass, or an Apple TV channel
- Add your TV provider
- Get shows, movies, and more
- Watch sports
- Watch Major League Soccer with MLS Season Pass
- Control playback
- Manage your library
- Change the settings
- Make a recording
- Play it back
- Edit or delete a recording
- Keep recordings up to date
- Organize recordings
- Search for or rename a recording
- Share a recording
- Duplicate a recording
- Keep cards and passes in Wallet
- Set up Apple Pay
- Use Apple Pay for contactless payments
- Use Apple Pay in apps and on the web
- Track your orders
- Use Apple Cash
- Use Apple Card
- Use Savings
- Pay for transit
- Access your home, hotel room, and vehicle
- Add identity cards
- Use COVID-19 vaccination cards
- Check your Apple Account balance
- Use Express Mode
- Organize your Wallet
- Remove cards or passes
- Check the weather
- Check the weather in other locations
- View weather maps
- Manage weather notifications
- Use Weather widgets
- Learn the weather icons
- Find out what Siri can do
- Tell Siri about yourself
- Have Siri announce calls and notifications
- Add Siri Shortcuts
- About Siri Suggestions
- Use Siri in your car
- Change Siri settings
- Contact emergency services
- Use Emergency SOS via satellite
- Request Roadside Assistance via satellite
- Set up and view your Medical ID
- Use Check In
- Manage Crash Detection
- Reset privacy and security settings in an emergency
- Set up Family Sharing
- Add Family Sharing members
- Remove Family Sharing members
- Share subscriptions
- Share purchases
- Share locations with family and locate lost devices
- Set up Apple Cash Family and Apple Card Family
- Set up parental controls
- Set up a child’s device
- Get started with Screen Time
- Protect your vision health with Screen Distance
- Set up Screen Time
- Set communication and safety limits and block inappropriate content
- Charging cable
- Power adapters
- MagSafe chargers and battery packs
- MagSafe cases and sleeves
- Qi-certified wireless chargers
- Use AirPods
- Use EarPods
- Apple Watch
- Wirelessly stream videos and photos to Apple TV or a smart TV
- Connect to a display with a cable
- HomePod and other wireless speakers
- Pair Magic Keyboard
- Enter characters with diacritical marks
- Switch between keyboards
- Use shortcuts
- Choose an alternative keyboard layout
- Change typing assistance options
- External storage devices
- Bluetooth accessories
- Share your internet connection
- Allow phone calls on your iPad and Mac
- Use iPhone as a webcam
- Hand off tasks between devices
- Cut, copy, and paste between iPhone and other devices
- Stream video or mirror the screen of your iPhone
- Start SharePlay instantly
- Use AirDrop to send items
- Connect iPhone and your computer with a cable
- Transfer files between devices
- Transfer files with email, messages, or AirDrop
- Transfer files or sync content with the Finder or iTunes
- Automatically keep files up to date with iCloud
- Use an external storage device, a file server, or a cloud storage service
- Intro to CarPlay
- Connect to CarPlay
- Use your vehicle’s built-in controls
- Get turn-by-turn directions
- Change the map view
- Make phone calls
- View your calendar
- Send and receive text messages
- Announce incoming text messages
- Play podcasts
- Play audiobooks
- Listen to news stories
- Control your home
- Use other apps with CarPlay
- Rearrange icons on CarPlay Home
- Change settings in CarPlay
- Get started with accessibility features
- Turn on accessibility features for setup
- Change Siri accessibility settings
- Open features with Accessibility Shortcut
- Change color and brightness
- Make text easier to read
- Reduce onscreen motion
- Customize per-app visual settings
- Hear what’s on the screen or typed
- Hear audio descriptions
- Turn on and practice VoiceOver
- Change your VoiceOver settings
- Use VoiceOver gestures
- Operate iPhone when VoiceOver is on
- Control VoiceOver using the rotor
- Use the onscreen keyboard
- Write with your finger
- Use VoiceOver with an Apple external keyboard
- Use a braille display
- Type braille on the screen
- Customize gestures and keyboard shortcuts
- Use VoiceOver with a pointer device
- Use VoiceOver for images and videos
- Use VoiceOver in apps
- Use AssistiveTouch
- Adjust how iPhone responds to your touch
- Use Reachability
- Auto-answer calls
- Turn off vibration
- Change Face ID and attention settings
- Use Voice Control
- Adjust the side or Home button
- Use Apple TV Remote buttons
- Adjust pointer settings
- Adjust keyboard settings
- Adjust AirPods settings
- Turn on Apple Watch Mirroring
- Control a nearby Apple device
- Intro to Switch Control
- Set up and turn on Switch Control
- Select items, perform actions, and more
- Control several devices with one switch
- Use hearing devices
- Use Live Listen
- Use sound recognition
- Set up and use RTT and TTY
- Flash the LED for alerts
- Adjust audio settings
- Play background sounds
- Display subtitles and captions
- Show transcriptions for Intercom messages
- Get Live Captions (beta)
- Type to speak
- Record a Personal Voice
- Use Guided Access
- Use built-in privacy and security protections
- Set a passcode
- Set up Face ID
- Set up Touch ID
- Control access to information on the Lock Screen
- Keep your Apple ID secure
- Use passkeys to sign in to apps and websites
- Sign in with Apple
- Share passwords
- Automatically fill in strong passwords
- Change weak or compromised passwords
- View your passwords and related information
- Share passkeys and passwords securely with AirDrop
- Make your passkeys and passwords available on all your devices
- Automatically fill in verification codes
- Automatically fill in SMS passcodes
- Sign in with fewer CAPTCHA challenges
- Use two-factor authentication
- Use security keys
- Manage information sharing with Safety Check
- Control app tracking permissions
- Control the location information you share
- Control access to information in apps
- Control how Apple delivers advertising to you
- Control access to hardware features
- Create and manage Hide My Email addresses
- Protect your web browsing with iCloud Private Relay
- Use a private network address
- Use Advanced Data Protection
- Use Lockdown Mode
- Use Stolen Device Protection
- Receive warnings about sensitive content
- Use Contact Key Verification
- Turn iPhone on or off
- Force restart iPhone
- Back up iPhone
Return iPhone settings to their defaults
- Restore all content from a backup
- Restore purchased and deleted items
- Sell, give away, or trade in your iPhone
- Erase iPhone
- Install or remove configuration profiles
- Important safety information
- Important handling information
- Find more resources for software and service
- FCC compliance statement
- ISED Canada compliance statement
- Ultra Wideband information
- Class 1 Laser information
- Apple and the environment
- Disposal and recycling information
- Unauthorized modification of iOS
You can return settings to their defaults without erasing your content.
If you want to save your settings, back up iPhone before returning them to their defaults. For example, if you’re trying to solve a problem but returning settings to their defaults doesn’t help, you might want to restore your previous settings from a backup.
Choose an option:
WARNING: If you choose the Erase All Content and Settings option, all of your content is removed. See Erase iPhone .
Reset All Settings: All settings—including network settings, the keyboard dictionary, location settings, privacy settings, and Apple Pay cards—are removed or reset to their defaults. No data or media are deleted.
Reset Network Settings: All network settings are removed. In addition, the device name assigned in Settings > General > About is reset to “iPhone,” and manually trusted certificates (such as for websites) are changed to untrusted.
Cellular data roaming may also be turned off. (See View or change cellular data settings on iPhone .)
When you reset network settings, previously used networks and VPN settings that weren’t installed by a configuration profile or mobile device management (MDM) are removed. Wi-Fi is turned off and then back on, disconnecting you from any network you’re on. The Wi-Fi and Ask to Join Networks settings remain turned on.
To remove VPN settings installed by a configuration profile, go to Settings > General > VPN & Device Management, select the configuration profile, then tap Remove Profile. This also removes other settings and accounts provided by the profile. See Install or remove configuration profiles on iPhone .
To remove network settings installed by MDM, go to Settings > General > VPN & Device Management, select the management, then tap Remove Management. This also removes other settings and certificates provided by MDM. See “Mobile device management (MDM)” in the Deployment Reference for iPhone and iPad .
Reset Keyboard Dictionary: You add words to the keyboard dictionary by rejecting words iPhone suggests as you type. Resetting the keyboard dictionary erases only the words you’ve added.
Reset Home Screen Layout: Returns the built-in apps to their original layout on the Home Screen.
Reset Location & Privacy: Resets the location services and privacy settings to their defaults.
If you want to completely erase your iPhone, see Use Settings to erase iPhone . If you want or need to use a computer to erase your iPhone, see Use a computer to erase iPhone .

How to access router settings
D o you want to take control of your home or office network? Accessing your router settings opens up a world of possibilities, allowing you to customize and manage various aspects of your network experience.
By navigating through your router's configurations, you can fine-tune wireless settings, strengthen security, troubleshoot issues, and create a network tailored to your needs. In this guide, we'll walk you through the steps to access your router settings, including how to find your IP address. Are you ready to optimize your network for peak performance? Let's dive in!
Tools and requirements
- A router
- A device connected to the router via Ethernet or Wi-Fi
- Your IP address
You can find your IP address by looking at the router itself or checking your computer or mobile phone. We'll cover seven of the most common options: Router, Windows, Linux, Chromebook, Mac, Android, and iPhone.
Step-by-step guide for how to access router settings
1. find password.
Next, you'll need your username and password. If you haven't changed these, the default credentials are usually found in the router's manual or on a sticker on the router itself.
Some routers also use a WPS (Wi-Fi Protected Setup) PIN as a security feature to facilitate connecting devices to a Wi-Fi network. If your router has this, make a note of this as well.
If you can't find your username, password, or PIN, there are a few other options you can try.
You can visit the official website of the router manufacturer. Many manufacturers provide default login information for their routers on their websites. If you can't find the information online, contact the manufacturer's customer support, who may be able to provide you with the default login credentials.
If all else fails, you can perform a factory reset on your router. Keep in mind that this will erase all custom configurations, and you'll need to set up your router again. To reset the router, locate the reset button on your router. It is usually a small button that may require a paperclip or a similar tool to press. Press and hold the reset button for about 10-15 seconds until the router lights flash. Release the reset button, and the router will reboot to its factory settings.
3. Open your router settings page
Open a web browser like Chrome, Firefox, or Safari, and type the router's IP address into the address bar of your web browser.
You should now see the login page for your router. The example in the screenshot shows the Virgin Media Super Hub. You will see the router access page for your provider.
Enter your password and username or PIN.
4. Access router settings and make changes
Once logged in, you will have access to the router's settings. The layout and options may vary, but common settings include wireless settings, security options, and network configurations.
You can configure various settings, such as Wi-Fi passwords, security protocols, port forwarding, and more. Be cautious while making changes, as incorrect settings can affect your network's functionality.
After making any changes, remember to log out of the router's interface for security reasons.
How to find your IP address
Check on your router itself to see if it displays the router IP address we need to access the settings page. You should also make a note of the password and PIN, as we're going to need that later on.
You can find your router IP address on a Windows device in the command prompt window.
To open the Windows Command Prompt, click the Start button (Windows icon) in the bottom-left corner of your screen. Type Command Prompt or cmd into the search bar. Select Command Prompt from the search results.
Type ipconfig /all and press enter. Under the heading Wireless LAN or similar, you'll see an IP address next to Default Gateway. This is your router IP address.
To find out your Router IP address, you'll need to open the terminal.
Methods for opening the terminal vary slightly depending on which Linux distro you're using, but you should be able to access it from your applications or by entering Ctrl + Alt + T.
Once inside the terminal, type ip r and hit return. The first IP address returned will be your Router IP address.
4. Chromebook
To get your router's IP address on a ChromeOS device, click the clock at the bottom right of your screen and select the gear icon. Click Network, then Wi-Fi. Select your Wi-Fi router. You'll find the router's IP address next to Gateway.
If you're using a MacOS device, go to System Settings and Network: Wi-Fi. Click Details on your connection, and you'll find the address next to Router.
Open the Settings app on your Android device and select the Wi-Fi or Network and Internet option. Find the connected Wi-Fi network and tap on it, then look for an option like Network details. The exact wording may vary depending on your device. Your router IP address will be displayed here. It may be called the Gateway or Router IP.
Open the Settings app on your iPhone and navigate to Wi-Fi Settings. Find the connected Wi-Fi network and tap the (i) icon next to its name. This icon is typically located on the right side of the network name. In the network details, look for the Router or Gateway field. This field contains the IP address of your router.
Final thoughts
Now that you've successfully accessed your router settings, you can take a closer look at your network settings and modify them to suit your preferences and requirements.
You can strengthen your network's security by updating Wi-Fi passwords, changing security protocols, and enabling features like MAC address filtering. You can also keep an eye on the list of connected devices to your network. This enables you to detect unauthorized devices and troubleshoot any connectivity issues.
You can also set up port forwarding, check firmware, and prioritize network traffic using Quality of Service (QoS) settings.
However, you should remember that making changes to your router settings should be approached with caution. Incorrect configurations can impact your network's functionality. Always refer to your router's documentation for guidance, and if in doubt, consult your router manufacturer's support. After making adjustments, ensure you log out of the router's interface to uphold security measures.
You might also like...
- What is an IP address?
- The best Wi-Fi routers
- How to build a VPN router

10 Tips & Tricks To Declutter Your Smartphone Without A Factory Reset

The days are long gone of people regularly upgrading their phones each year or two. In 2013, Americans changed smartphones about once every two years, but by 2023 some sources suggest that number had climbed to 3.6 years. Perhaps understandably, smartphone shipments have been declining for years: About 61% of iPhone users keep their phones for at least two years, compared to 43% on Android. Manufacturers, to keep their market share, have been pledging ever-longer phone lifespans. Google promised a whopping seven years of security updates for Pixel phones , and soon after Samsung did the same. Apple continues to be the gold standard; as of 2023, it was still issuing security updates to the iPhone 6S, which was released way back in 2015. Kudos to anyone patient enough to make a phone last that long, but whether you're keeping your phone for two years or 10, it's going to become a pain to use without regular decluttering.
By decluttering, we don't mean using those misleading cache-cleaning apps that tell you they've magically freed up a gigabyte of space every time you press the button. We're talking about dusting away the "cobwebs" that hog your phone's storage, slowing it down, and leaving it feeling congested. The nuclear option — a factory reset — would be the most effective way to get a new phone experience, but if you'd rather not deal with that hassle, here are 10 easy ways to declutter your device.
Delete your old downloaded media
One of many tricks to make your Android phone run faster is, surprisingly, freeing up its storage — the same is true for iPhones, too. The closer you get to filling up your drive, the worse the device performance becomes. Google says your phone can "start having issues when less than 10% of storage is free." Apple recommends always keeping at least a gigabyte of space free, though users often experience issues before that point. Removing old downloaded media is the easiest way to trim down bloat — you'd be surprised how quickly it can pile up.
Open your preferred streaming service (Netflix, HBO Max, Amazon Prime, etc.) and delete any unwatched movies and shows — on iPhone, you can do this directly from Settings. Do the same for podcasts and music playlists (in your app of choice) that you don't frequently listen to. Check anywhere that you've downloaded offline entertainment for later; YouTube Premium users, for example, might have the odd downloaded video that never got watched.
Check apps you rarely use: Voice Memos may have a fair amount of extra recordings collecting dust. There may be long videos in your photo album — such as that one time you filmed yourself opening a package for liability reasons — that can go in the trash, too. Make sure to enable automatic deletion if it's not on already by default (such as Netflix's smart downloads) to mitigate future buildup.
Delete old messages and app data
Your messaging apps can quickly become bloated with messages, photos, and videos that remain in the app's sandbox — not in your camera roll or elsewhere in internal storage. There's a good chance you can free up several gigabytes just by deleting years of old conversations, voice messages, and sent media. Using Whatsapp, as one example, you can easily decide what to remove in Chats > Storage and data > Manage storage. It will give you the option to sort chat media from newest to oldest, or largest to smallest — perfect for eliminating old convos or that one long TikTok video your friend sent you years ago.
Some apps, like Telegram, let you limit how large the cache can be, and how often it automatically gets deleted. iMessage has the useful feature of deleting audio messages once you've listened to them and it automatically deletes messages after 30 days. Every app handles things differently, so go through your chosen messenger's media storage settings with a fine-toothed comb. Bonus tips: Go to your map app of choice and remove any old, offline maps you no longer use; a single city map can easily take up half a gigabyte. Tons of other apps also squirrel away their own offline data that doesn't get deleted automatically with time, such as offline languages in Google Translate.
Check for duplicate photos and files
Both Android and iPhone offer easy ways to remove unintentional copies of photos and files congesting your device. Google Photos on Android detects duplicates automatically and removes them in the background; duplicates in your photo album are likely just nearly identical shots from the same photoshoot. Some photos may creep into your local storage, though, such as if you saved a photo to your Downloads folder to upload to a website. In that case, Files by Google can, in a few taps, remove any duplicate files (photos or otherwise) it identifies. Files is an excellent app for decluttering, in general, so open it every couple of months to trim all the excess.
The iPhone does not have automatic duplicate removal. Head to the Photos app, then to Albums > Utilities > Duplicates. There, you can merge duplicates to retain the highest-quality image and metadata of both images. Note: iPhone uses on-device processing to find duplicates, so it may take a couple of days after taking them before they show up on your device.
You'll have to find duplicate files on your iPhone manually, or download a third-party app; the platform does not have a Files by Google equivalent. If you have a cloud storage app for backing up photos or videos on either device, consider enabling Smart Storage (for Android) or Optimize Storage (for iPhone). Both automatically free up space by offloading photos and videos, downloading them only when you need them later.
Organize your photos
Before you leave your digital albums to go onto the next step (assuming you've got time on your hands) organize and delete what you can. Setting aside 30 minutes each month, you can easily trash dozens of images wasting storage space: copies of receipts, old screenshots, or that one time you snapped a picture of your car to remember your parking spot. Be on the lookout for RAW photos (which can take up to 100MB a pop) or less useful photo formats — like iPhone's Live Photos — that you can probably delete without much hesitation. Use Android and iPhone's built-in album organization tools to sort your library into images from work, events, vacations, and so on. Use Google's smart search bar (or iPhone's nearly identical search feature) if you're looking for specific moments. For example, you might search for a vacation destination and group the results containing that metadata into one album folder.
Both Android and iPhone automatically recognize faces, perfect for sorting couples' pictures, family photos, and friend group pics. Go to Google Photos' Search > View all, then assign names to the identified faces. This feature also conveniently identifies pets. On your iPhone, go to Albums > People & Pets to do the same. Once you've named people and pets on both platforms, your camera roll will intelligently recognize these individuals in all future pictures. Once organized, it's a lot easier to share your new albums with friends .
Clear app caches
The cache is where your apps store needed files temporarily so they don't have to redownload them, which speeds up your phone. Unfortunately, app caches often get bloated over time and accumulate corrupted files and sensitive, vulnerable user data. Cache cleaning apps can't help here, because the ability to access another app's cache was removed as of Android 6 way back in 2015. So instead, clear app caches manually a couple of times per year. If you're on Android, head to Settings > Apps, then select an app and choose "Clear cache." Avoid "Storage and cache" unless you're having issues with an app since this removes all user data. For browsers, you'll get more options (such as deleting the cache without removing login cookies) within the browser itself.
iOS does not have a Settings-level cache-clearing tool. You can only clear Safari's browser cache in Settings. Some apps, like Telegram, allow you to clear their caches from within the app. If a particular app lacks such a feature, then your last remaining option is to go the nuclear route. Head to Settings > General > iPhone storage, choose an app, then select "Offload App." This will remove the app from your phone (including your cache and user data) after which you can immediately redownload it. If you like, you can enable Offload Unused Apps to let iPhone do this automatically, which will also save storage space.
Disable all unnecessary notifications
Most apps treat your phone like their own free Times Square, bombarding you with push notifications — sales reminders, limited-time offers, review requests, account alerts — and turning your notification center into a trash bin you have to sort through at the end of each day. Switching off unneeded push notifications not only makes your phone feel cleaner and less distracting, it often improves battery life. Plus, you likely only need major notifications like messages and emails.
Disabling app notifications on Android is easy; go to Settings > Notifications > App settings and choose an app. Most apps will have multiple notification channels, making it easy to disable nuisances while leaving important notifications untouched. You probably don't care if YouTube, for example, notifies you about Livestreams and Comments and replies. Later, if an unwanted notification pops up you forgot to toggle off, touch and hold it and you should be able to disable that specific notification channel type without going to Settings. If that doesn't work, check the in-app settings for notification tick boxes.
Phone users don't have notification channels yet, so you'll have to enable or disable all notifications for an app in the Settings. We're hoping the iPhone changes this in iOS 18, among other things. In-app settings are the only option for notification customization at the time of writing. While you're ridding yourself of pestering notifications, this is a good chance to unsubscribe from all those annoying emails , too.
Uninstall (or restrict) unused apps
We've all got that random app we hang onto in case we need to use it someday, even though that someday ends up being virtually never. Just like real-life decluttering, the best choice here is probably just to toss it in the trash and get it again when you actually need it. If for whatever reason you can't uninstall, at least restrict what an app can do in the background for privacy's sake — and to save on battery.
Head to Settings > Apps on Android and remove all permissions. The app can request them again when it next launches. Better yet, enable Android's Adaptive Battery feature in Settings > Battery > Battery Saver > Adaptive Battery. Adaptive Battery learns which apps you use most and puts the relatively untouched ones into "hibernation." Or, try Android's Auto Archive feature as an alternative to Apple's Offload App.
iPhone's style of background app management is all manual. Pop into Settings > General > Background App Refresh and you'll get a list of toggles for all your apps. Gray out the toggle for those lesser-used apps and anything else you'd rather not be draining the battery in the background. If you want to go a step further, use the Offload Apps option we mentioned earlier at Settings > General > iPhone storage > [Your App] > Offload App. The app icon will remain on your phone, and the next time you tap it, it will download again.
Reorganize the home screen
What better way to declutter a phone than to tackle the place you visit dozens of times a day: your home screen? How you choose to organize is up to you; this writer prefers keeping most-used apps on a single home screen page divided into relevant folders and leaving the rest in the App Drawer/App Library. Even if you change nothing, a quick wallpaper refresh helps breathe new life into any smartphone. Let's discuss additional tips for organizing.
On Android, you can find a comprehensive home and lock screen-tweaking suite in Settings > Wallpaper & Style. Here, you can increase the grid size, change the color accent scheme, set a daily wallpaper, theme your icons, and more. You can access these settings quickly from the home screen by touching and holding on the empty space until you get a popup.
To change the background on your iPhone, touch and hold the Lock Screen. From there, you can add new wallpapers, change the date and clock, and widgets. On the home screen, touch and hold the empty space to quickly get the apps to jiggle for editing. One really useful hack is to hold down on a single app — while the apps are jiggling — and then tap on other apps with a different finger. This adds them to a stack you can easily put into a folder. Bonus tip: Remove any unused widgets since these do drain the battery.
Update privacy settings and old passwords
Your favorite apps might be stealing a lot more data than you realize , and giving them excessive permissions helps them do it. If an app doesn't need a specific permission — or you don't use that permission very often — restrict it, and you'll likely save some battery to boot. On Android, head to Settings > Security and Privacy > Privacy and make changes from the privacy dashboard. Android can also intelligently remove unused permissions over time in Settings > Apps > [Your App] > Pause app activity if unused.
On iPhone, do the same from Settings > Privacy & Security. Remove any permissions an app doesn't need or use frequently. We highly recommend removing any app from the Tracking permissions section, since (let's be honest) no app has good reason to track you. Likewise, be judicious about which apps get your location data.
In the meantime, your passwords likely could use some freshening up. If you're one of those people who uses the same password everywhere, now is the time to quit this (incredibly risky) practice and get on the password manager train. Android integrates Google's Password Manager for free, though it doesn't offer an easy password-update option. We recommend you start using a third-party password manager instead, like Dashlane. iPhone's password manager is more feature-rich and has a Change Password option that takes you straight to the site to do it yourself. While you're updating passwords, definitely enable two-factor authentication , too.
Do a full notes decluttering
Your notes app of choice can quickly become a rat's nest of old booking numbers and grocery lists, so it's the next target on our decluttering spree. And we're not doing this solely for organizational peace of mind; many people store sensitive information in their notes, like passwords, and that just so happens to be a way criminals empty your bank accounts after stealing your phone. If you have anything you wouldn't want someone else to stumble upon, we recommend locking it with a password or biometric authentication — a built-in feature for apps like Apple Notes.
Removing old notes may only save you a handful of megabytes, but the main focus here is creating an organized system for later. Divide things up into folders according to subject, and subfolders if your notes app supports it. If you're naturally a bit disorganized and struggle to keep up with sorting notes into folders, consider a notes app that lets you organize on the fly. Take Obsidian, which lets you link notes together with simple wiki tags, or Bear, which organizes notes in folders according to tags.
Want to highlight a helpful answer? Upvote!
Did someone help you, or did an answer or User Tip resolve your issue? Upvote by selecting the upvote arrow. Your feedback helps others! Learn more about when to upvote >
after upgrading to ventura 13.6.6 login to Teams is impossible and Safari complains about non standard compliant certificates
After upgrading to Ventura 13.6.6 (on an Macbook Pro 14.2 (2017) it's no longer possible to login to Microsoft Teams.
I'm able to choose the account to use, but after a short period of time I always get back to the page where I can select the account to use.
If I try to create a new account - the result is "No Network Connection Please check your network settings and try again. [2604]"
Due to Microsoft Support forums this is because of TLS 1.2 being disabled.
But there's no possibility on a Mac to enable this explicitly, because it's enabled by default since Safari 7 ...
The second strange phenomenon I see is Safari complaining about many non "standard-compliant" certificates and thus rejecting to establish a connection to the website. The certificates themselves are absolutely okay as they were accepted by Safari before the update - and are still accepted by all (i.e. Chrome, Chrome Canary, Firefox, Opera) other browsers after the update ...
Any help on this would be highly appreciated.
Thanks in advance,
MacBook Pro (2017 – 2020)
Posted on Apr 15, 2024 3:09 AM
Loading page content
Page content loaded
There are no replies.
IMAGES
VIDEO
COMMENTS
This article explains how to reset Safari to default settings by removing Safari's history and cookies, clearing the cache, and disabling extensions. Instructions apply to Safari versions 11 through 14 and iOS. Remove Browser History . The first step when resetting Safari is to remove your browser history. When you clear your browsing history ...
Refer to our beginner's guide to the Mac Terminal for using it effectively. To reset Safari using Terminal: Open the Terminal app (you can find it easily using Spotlight with Cmd + Space ). Next, open the Apple menu at the top-left corner of your screen. Click Force Quit and select Safari to completely close it.
1. Open the Settings app on your iPhone. 2. Search for or scroll down to Safari and open it. 3. Tap Clear History and Website Data in blue about halfway down the page. 4. A prompt menu will pop up ...
Reset Cache. First, Launch Safari from the Launchpad or from the dock of you Mac. Next, click on the 'Safari' tab from the menu bar. Then, click on the 'Preferences' option from the list. After that, go to the 'Advanced' pane. Now, check the 'Show Develop menu in the menu bar' option. As a result, the 'Develop' tab would now ...
Clear your Safari cache. 1. With Safari open, go up to the top toolbar. 2. Select "Safari" and then "Preferences." 3. Toggle over to the "Advanced" tab and tick the box next to "Show Develop menu ...
How To Reset Safari to Default Settings ( Mac Guide) Before we reset Safari to its factory settings if you have any bookmarks that you want to save, launch Safari, select the File tab in the top menu bar, and click Export Bookmarks. Set a name for your backup and Click Save to save a copy of those bookmarks. To reset your Safari settings on a ...
Open Safari; Click Safari located in the menu bar in the top left hand corner of your screen; Click Clear History; You can choose different time period options: last hour, today, today and yesterday, all history. Select one. Click the Clear History button; Option # 1. Open Safari; Click Safari located in the menu bar in the top left hand corner ...
Step 1: Clear Safari history. If you want to clear the history manually, follow the steps: Open Safari and click on the Safari menu. Select History > Clear History…. Click the menu next to clear and choose a time period — if you want to completely reset Safari, choose all history. Click Clear History.
Step 2: Choose the Advanced Tab. After accessing the Safari Preferences window, the next crucial step in the process of resetting Safari on your Mac is to navigate to the Advanced tab. This tab houses a range of advanced settings and options that are integral to the comprehensive reset of the browser. Upon entering the Advanced tab within the ...
Select your account and then click on "Login Items". Choose Safari and then click on the "Add" button. Restart your Mac. To backup browsing history, go to the History menu and then click on "Show All History". Click on a date range and then click on "Export" to save it to your Mac. Step 3: Reset Safari to Default Settings.
To reset Safari back to its default settings, you can follow these detailed steps: 1. Open Safari and click on the "Safari" menu located in the top left corner of your screen. 2. From the drop ...
Follow the steps below to first enable the "Develop" menu on Mac and use Develop Menu to clear Safari Browser Cache on Mac. 1. Open Safari browser > click on the Safari tab in the top menu-bar and select Preferences… in the drop-down menu. Advertisement. 2. On the next screen, switch to Advanced tab and select Show Develop Menu in Menu ...
On your desktop, press Shift+Command+G keys to open the Go to Folder window. Paste the file path ~/Library into the search box and hit Return. Find the folder named Internal Plug-Ins and drag the extensions related to Safari to the Trash. Repeat steps 2 and 3 to delete the Safari extensions in /Library folder.
Customize your start page. When you open a new tab, you begin on your start page. You can customize your start page with new background images and options. Open the Safari app on your iPhone. Tap , then tap . Scroll to the bottom of the page, then tap Edit. Favorites: Display shortcuts to your favorite bookmarked websites.
Step 1: Open the Safari app on your Mac and then open Safari Settings/Preferences. Open Safari Settings on Mac. Step 2: Navigate to the General Settings tab on your Safari browser. Step 3: Select the Set up Remove history items option. Remove Safari History Automatically on Mac.
This Tutorial will guide you through the best method to reset Safari to default settings on Mac/iPhone. For More Information, Visit Our Article - https://wha...
Before that, users would resort to asking for screenshots of the default flag settings so they could manually change them back one by one. Navigate to Settings -> Safari -> Advanced -> Experimental Features, and then scroll to the bottom and tap "Reset All to Defaults."
To reset Safari settings on your iPhone or iPad, follow these simple steps: Step 1: Open the Settings from the Home screen. Step 2: Scroll down and tap "Safari". Step 3: Then tap "Clear History and Website Data". Step 4: Tap "Clear History and Data" again to confirm. 2. Reset Safari on Mac. 2.1. Remove Browser History.
I was just wondering how to reset safari to its natural, out-of-the-box, default state. Show more Less MacBook, OS X Yosemite (10.10.5)
Resetting Safari will restore it to its default settings and can often alleviate various performance issues. Follow the steps below to reset Safari on your iPhone or iPad: Open the Settings app on your device. Scroll down and tap on "Safari". On the Safari settings page, scroll to the bottom and tap on "Clear History and Website Data".
If you want to save your settings, back up iPhone before returning them to their defaults. For example, if you're trying to solve a problem but returning settings to their defaults doesn't help, you might want to restore your previous settings from a backup. Go to Settings > General > Transfer or Reset iPhone > Reset. Choose an option:
iPhone 14 Plus. Posted on Jul 5, 2023 8:04 PM. Best reply. John Galt. Level 10. 140,948 points. Posted on Jul 6, 2023 4:55 AM. Settings > Safari > Advanced > Experimental Features >. Scroll all the way to the bottom of Experimental WebKit Features where you will find Reset All to Defaults.
Return to the Safari and check whether the zoomed out issue has resolved or not. Step 7 - If the webpages are still zoomed out, come back to the same Safari settings. Step 8 - In the Page Zoom page, tap "Edit". Step 9 - Use the "Clear All Settings" to reset the zoom level on every webpage on Safari. This must fix the zoom issue in ...
Open a web browser like Chrome, Firefox, or Safari, and type the router's IP address into the address bar of your web browser. You should now see the login page for your router. The example in the ...
One really useful hack is to hold down on a single app — while the apps are jiggling — and then tap on other apps with a different finger. This adds them to a stack you can easily put into a ...
after upgrading to ventura 13.6.6 login to Teams is impossible and Safari complains about non standard compliant certificates. After upgrading to Ventura 13.6.6 (on an Macbook Pro 14.2 (2017) it's no longer possible to login to Microsoft Teams. I'm able to choose the account to use, but after a short period of time I always get back to the page ...