
Sign up for Pure Virtual C++ 2024; the free, one-day, virtual conference for the whole C++ community.

Introducing Time Travel Debugging for Visual Studio Enterprise 2019

Mark Downie
April 3rd, 2019 11 0
The Time Travel Debugging (TTD) preview in Visual Studio Enterprise 2019 provides the ability to record a Web app running on a Azure Virtual Machine (VM) and then accurately reconstruct and replay the execution path. TTD integrates with our Snapshot Debugger offering and allows you to rewind and replay each line of code however many times you want, helping you isolate and identify problems that might only occur in production environments.
The most effective type of debugging often occurs in what we call the “inner loop”. While you’re in the act of reviewing and debugging code locally, before you’ve pushed to version control. The problems we encounter during inner loop development are usually easier to understand and diagnose because they are accessible and repeatable.
Today, we’re excited to announce the release of the Time Travel Debugging (TTD) in Visual Studio Enterprise. With TTD, we are giving you the power to record code executed in production and replay the execution path inside Visual Studio. TTD also gives you the ability to move forward and backwards in time as if you were performing “inner loop” debugging locally. You also get access to important debugging features like locals and the call stack.
Today’s debuggers typically allow you to stop at a specific breakpoint by halting the entire process and then only move forward. Even with a more advanced debugging tool like IntelliTrace , you record events and data at discrete moments in time. TTD has a significant advantage over snapshots, logging or crash dump files, as these methods are generally missing the exact details of the execution path that led up to the final failure or bug.
What is the Time Travel Debugging?
Time Travel Debugging (TTD) is a reverse debugging solution that allows you to record the execution of code in an app or process and replay it both forwards and backwards. TTD improves debugging since you can go back in time to better understand the conditions that lead up to a specific bug. Additionally, you can replay it multiple times to understand how best to fix the problem. TTD technology was recently introduced in a preview version of WinDbg for native code scenarios .
We have extended the Snapshot Debugger with TTD to allow you to record your applications as it executes. That recording can then be played back in Visual Studio 2019 Enterprise where you can rewind and replay each line of code as many times as you want. TTD records on the thread that matches the snappoint conditions and will generally run until the end of the method. If there is an “await” after the snappoint but before the end of the method, we will stop recording where the await occurs. This feature will be in preview for the release of Visual Studio 2019 with a go live license. We plan to add more TTD scenarios in future updates.
Getting started with TTD
The Time Travel Debugging preview can be enabled in the latest version of Visual Studio Enterprise 2019 for Azure Virtual Machines on the Windows OS running ASP.NET (4.8+) .
After installing the latest version of Visual Studio Enterprise, complete the following steps:
1. Open the project you would like to Time Travel Debug – ensure that you have the same version of source code that is published to your Azure Virtual Machine.
2. Choose Debug > Attach Snapshot Debugger and select the Azure Virtual Machine your project is deployed to along with an Azure storage account. You will be required to install the Snapshot Debugger site extension the first time an attach is attempted.
3. Select the Time Travel Debugging option and then click Attach . Once Visual Studio is in Snapshot Debugger mode it will be capable of recording using TTD.
4. Create a snappoint and configure it to enable time travel debugging. Click Start\Update Collection .
5. Once your Snapshot has been collected click on View Snapshot and you can use the command bar to step forwards and backwards within the recorded method.
TTD preview limitations
During the initial preview stage of TTD we will be supporting AMD64 Web apps running on a Azure Virtual Machine (VM). We expect that recording will add significant overhead to your running process, slowing it down based on process size and the number of active threads. We also anticipate a degraded debugging experiences in some of the following scenarios: –
- During a GC compacting phase.
- Stepping through an optimized method e.g. when you step into a method that does not contain a snappoint.
- If your application internally loads or unloads app domains.
- Recording only occurs on the thread that was triggered by the snappoint, code that subsequently impacts alternate threads will also be degraded.
Please Note: we will also not record the async causality chains.
During preview testing we found that the TTD file sizes ranged from several hundred megabytes up to several gigabytes depending on how long your session lasts and how long the web app runs. However, files created by TTD will be cleaned up once the Snapshot Debugger session ends, and an app pool recycle is initiated. For our preview release we also recommend using a VM with a minimum of 8GB RAM.
Try out TTD now!
We are incredibly excited about how this preview feature can help enhance your debugging experiences in Azure, but this is just the beginning. Our team continues to design and build additional TTD capabilities that we plan to add in upcoming Visual Studio releases.
We are counting on your feedback via our Developer Community and the Feedback Hub, you can help us prioritize what improvements to make because we genuinely value all the responses you provide.
Mark Downie Principal Program Manager, Visual Studio

11 comments
Discussion is closed. Login to edit/delete existing comments.
Doesn’t it work on Azure App Service?
Hi Iain, The Time Travel Debugging preview targets only Azure Virtual Machines for now, but as we develop this feature we plan to expand to other Azure scenarios including App Services.
A. Mazing. I could do this on IBM mainframes 25 years ago.
Hi Derek, The concepts pertaining to Time Travel Debugging have been around for some time and we are happy to be able to bring them to the Azure cloud.
This looks very cool for those using Azure. For those working on desktop apps like me, here’s some info on using the WinDbg version of TTD on a local .Net Framework/Core application: https://devblogs.microsoft.com/dotnet/debugging-net-apps-with-time-travel-debugging-ttd/ I’ve not tried it yet, but it looks amazing.
Good Stuff! As a Development Team who extensively use Snapshot Debugging in App Insights, we are eagerly awaiting this for App Services.
Is there a roadmap for multi-cloud support (GCP, AWS)?
Our current feature focus will be exclusively on Azure scenarios. Thx!
Does the reoadmap include web apps on IIS / Apache with .Net Core?
Hi Michael,
Our current support includes IIS with .NET 4.8 and going forward we will also plan support for .NET Core 3+.
This is very cool. Any plans to allow this to be used on a standard Windows Server running IIS (without Azure)?

DEV Community
Posted on Aug 8, 2023
Time-Travel Debugging Production Code
In this post, I’ll give an overview of time travel debugging (what it is, its history, how it’s implemented) and show how it relates to debugging your production code.
Normally, when we use debuggers, we set a breakpoint on a line of code, we run our code, execution pauses on our breakpoint, we look at values of variables and maybe the call stack, and then we manually step forward through our code's execution. In time-travel debugging , also known as reverse debugging , we can step backward as well as forward. This is powerful because debugging is an exercise in figuring out what happened: traditional debuggers are good at telling you what your program is doing right now, whereas time-travel debuggers let you see what happened. You can wind back to any line of code that executed and see the full program state at any point in your program’s history.
History and current state
It all started with Smalltalk-76, developed in 1976 at Xerox PARC . ( Everything started at PARC 😄.) It had the ability to retrospectively inspect checkpointed places in execution. Around 1980, MIT added a "retrograde motion" command to its DDT debugger , which gave a limited ability to move backward through execution. In a 1995 paper, MIT researchers released ZStep 95, the first true reverse debugger, which recorded all operations as they were performed and supported stepping backward, reverting the system to the previous state. However, it was a research tool and not widely adopted outside academia.
ODB, the Omniscient Debugger , was a Java reverse debugger that was introduced in 2003, marking the first instance of time-travel debugging in a widely used programming language. GDB (perhaps the most well-known command-line debugger, used mostly with C/C++) added it in 2009.
Now, time-travel debugging is available for many languages, platforms, and IDEs, including:
- Replay for JavaScript in Chrome, Firefox, and Node, and Wallaby for tests in Node
- WinDbg for Windows applications
- rr for C, C++, Rust, Go, and others on Linux
- Undo for C, C++, Java, Kotlin, Rust, and Go on Linux
- Various extensions (often rr- or Undo-based) for Visual Studio, VS Code, JetBrains IDEs, Emacs, etc.
Implementation techniques
There are three main approaches to implementing time-travel debugging:
- Record & Replay : Record all non-deterministic inputs to a program during its execution. Then, during the debug phase, the program can be deterministically replayed using the recorded inputs in order to reconstruct any prior state.
- Snapshotting : Periodically take snapshots of a program's entire state. During debugging, the program can be rolled back to these saved states. This method can be memory-intensive because it involves storing the entire state of the program at multiple points in time.
- Instrumentation : Add extra code to the program that logs changes in its state. This extra code allows the debugger to step the program backwards by reverting changes. However, this approach can significantly slow down the program's execution.
rr uses the first (the rr name stands for Record and Replay), as does Replay . WinDbg uses the first two, and Undo uses all three (see how it differs from rr ).
Time-traveling in production
Traditionally, running a debugger in prod doesn't make much sense. Sure, we could SSH into a prod machine and start the process handling requests with a debugger and a breakpoint, but once we hit the breakpoint, we're delaying responses to all current requests and unable to respond to new requests. Also, debugging non-trivial issues is an iterative process: we get a clue, we keep looking and find more clues; discovery of each clue is typically rerunning the program and reproducing the failure. So, instead of debugging in production, what we do is replicate on our dev machine whatever issue we're investigating and use a debugger locally (or, more often, add log statements 😄), and re-run as many times as required to figure it out. Replicating takes time (and in some cases a lot of time, and in some cases infinite time), so it would be really useful if we didn't have to.
While running traditional debuggers doesn't make sense, time-travel debuggers can record a process execution on one machine and replay it on another machine. So we can record (or snapshot or instrument) production and replay it on our dev machine for debugging (depending on the tool, our machine may need to have the same CPU instruction set as prod). However, the recording step generally doesn't make sense to use in prod given the high amount of overhead—if we set up recording and then have to use ten times as many servers to handle the same load, whoever pays our AWS bill will not be happy 😁.
But there are a couple scenarios in which it does make sense:
- Undo only slows down execution 2–5x , so while we don't want to leave it on just in case, we can turn it on temporarily on a subset of prod processes for hard-to-repro bugs until we have captured the bug happening, and then we turn it off.
- When we're already recording the execution of a program in the normal course of operation.
The rest of this post is about #2, which is a way of running programs called durable execution .
Durable execution
What's that.
First, a brief backstory. After Amazon (one of the first large adopters of microservices) decided that using message queues to communicate between services was not the way to go (hear the story first-hand here ), they started using orchestration. And once they realized defining orchestration logic in YAML/JSON wasn't a good developer experience, they created AWS Simple Workfow Service to define logic in code. This technique of backing code by an orchestration engine is called durable execution, and it spread to Azure Durable Functions , Cadence (used at Uber for > 1,000 services ), and Temporal (used by Stripe, Netflix, Datadog, Snap, Coinbase, and many more).
Durable execution runs code durably—recording each step in a database, so that when anything fails, it can be retried from the same step. The machine running the function can even lose power before it gets to line 10, and another process is guaranteed to pick up executing at line 10, with all variables and threads intact. 1 It does this with a form of record & replay: all input from the outside is recorded, so when the second process picks up the partially-executed function, it can replay the code (in a side-effect–free manner) with the recorded input in order to get the code into the right state by line 10.
Durable execution's flavor of record & replay doesn't use high-overhead methods like software JIT binary translation , snapshotting, or instrumentation. It also doesn't require special hardware. It does require one constraint: durable code must be deterministic (i.e., given the same input, it must take the same code path). So it can't do things that might have different results at different times, like use the network or disk. However, it can call other functions that are run normally ( "volatile functions" , as we like to call them 😄), and while each step of those functions isn't persisted, the functions are automatically retried on transient failures (like a service being down).
Only the steps that require interacting with the outside world (like calling a volatile function, or calling sleep('30 days') , which stores a timer in the database) are persisted. Their results are also persisted, so that when you replay the durable function that died on line 10, if it previously called the volatile function on line 5 that returned "foo", during replay, "foo" will immediately be returned (instead of the volatile function getting called again). While yes, it adds latency to be saving things to the database, Temporal supports extremely high throughput (tested up to a million recorded steps per second). And in addition to function recoverability and automatic retries, it comes with many more benefits , including extraordinary visibility into and debuggability of production.
Debugging prod
With durable execution, we can read through the steps that every single durable function took in production. We can also download the execution’s history, checkout the version of the code that's running in prod, and pass the file to a replayer (Temporal has runtimes for Go, Java, JavaScript, Python, .NET, and PHP) so we can see in a debugger exactly what the code did during that production function execution. Read this post or watch this video to see an example in VS Code. 2
Being able to debug any past production code is a huge step up from the other option (finding a bug, trying to repro locally, failing, turning on Undo recording in prod until it happens again, turning it off, then debugging locally). It's also a (sometimes necessary) step up distributed tracing.
I hope you found this post interesting! If you'd like to learn more about durable execution, I recommend reading:
- Building reliable distributed systems
- How durable execution works
and watching:
- Introduction to Temporal
- Why durable execution changes everything
Thanks to Greg Law, Jason Laster, Chad Retz, and Fitz for reviewing drafts of this post.
Technically, it doesn't have line-by-line granularity. It only records certain steps that the code takes—read on for more info ☺️. ↩
The astute reader may note that our extension uses the default VS Code debugger, which doesn’t have a back button 😄. I transitioned from talking about TTD to methods of debugging production code via recording, so while Temporal doesn’t have TTD yet, it does record all the non-deterministic inputs to the program and is able to replay execution, so it’s definitely possible to implement. Upvote this issue or comment if you have thoughts on implementation! ↩
Top comments (0)
Templates let you quickly answer FAQs or store snippets for re-use.
Are you sure you want to hide this comment? It will become hidden in your post, but will still be visible via the comment's permalink .
Hide child comments as well
For further actions, you may consider blocking this person and/or reporting abuse

Announcing Mini Micro 1.2.1
JoeStrout - Apr 3

2024 Cheat Sheet Collection
Travis - Mar 17

The difference between '||' and '??' in JavaScript.
Emmanuel (Emmo00) - Apr 12

Implementing Microfrontends
Kartik Mehta - Apr 15

We're a place where coders share, stay up-to-date and grow their careers.
Time-Travel Debugging Production Code

Loren Sands-Ramshaw
Developer Relations Engineer
In this post, I’ll give an overview of time-travel debugging (what it is, its history, how it’s implemented) and show how it relates to debugging your production code.
Normally, when we use debuggers, we set a breakpoint on a line of code, we run our code, execution pauses on our breakpoint, we look at values of variables and maybe the call stack, and then we manually step forward through our code’s execution. In time-travel debugging , also known as reverse debugging , we can step backward as well as forward. This is powerful because debugging is an exercise in figuring out what happened: traditional debuggers are good at telling you what your program is doing right now, whereas time-travel debuggers let you see what happened. You can wind back to any line of code that executed and see the full program state at any point in your program’s history.
History and current state
It all started with Smalltalk-76, developed in 1976 at Xerox PARC . ( Everything started at PARC 😄.) It had the ability to retrospectively inspect checkpointed places in execution. Around 1980, MIT added a “retrograde motion” command to its DDT debugger , which gave a limited ability to move backward through execution. In a 1995 paper, MIT researchers released ZStep 95, the first true reverse debugger, which recorded all operations as they were performed and supported stepping backward, reverting the system to the previous state. However, it was a research tool and not widely adopted outside academia.
ODB, the Omniscient Debugger , was a Java reverse debugger that was introduced in 2003, marking the first instance of time-travel debugging in a widely used programming language. GDB (perhaps the most well-known command-line debugger, used mostly with C/C++) added it in 2009.
Now, time-travel debugging is available for many languages, platforms, and IDEs, including:
- Replay for JavaScript in Chrome, Firefox, and Node, and Wallaby for tests in Node
- WinDbg for Windows applications
- rr for C, C++, Rust, Go, and others on Linux
- Undo for C, C++, Java, Kotlin, Rust, and Go on Linux
- Various extensions (often rr- or Undo-based) for Visual Studio, VS Code, JetBrains IDEs, Emacs, etc.
Implementation techniques
There are three main approaches to implementing time-travel debugging:
- Record & Replay : Record all non-deterministic inputs to a program during its execution. Then, during the debug phase, the program can be deterministically replayed using the recorded inputs in order to reconstruct any prior state.
- Snapshotting : Periodically take snapshots of a program’s entire state. During debugging, the program can be rolled back to these saved states. This method can be memory-intensive because it involves storing the entire state of the program at multiple points in time.
- Instrumentation : Add extra code to the program that logs changes in its state. This extra code allows the debugger to step the program backwards by reverting changes. However, this approach can significantly slow down the program’s execution.
rr uses the first (the rr name stands for Record and Replay), as does Replay . WinDbg uses the first two, and Undo uses all three (see how it differs from rr ).
Time-traveling in production
Traditionally, running a debugger in prod doesn’t make much sense. Sure, we could SSH into a prod machine and start the process handling requests with a debugger and a breakpoint, but once we hit the breakpoint, we’re delaying responses to all current requests and unable to respond to new requests. Also, debugging non-trivial issues is an iterative process: we get a clue, we keep looking and find more clues; discovery of each clue is typically rerunning the program and reproducing the failure. So, instead of debugging in production, what we do is replicate on our dev machine whatever issue we’re investigating and use a debugger locally (or, more often, add log statements 😄), and re-run as many times as required to figure it out. Replicating takes time (and in some cases a lot of time, and in some cases infinite time), so it would be really useful if we didn’t have to.
While running traditional debuggers doesn’t make sense, time-travel debuggers can record a process execution on one machine and replay it on another machine. So we can record (or snapshot or instrument) production and replay it on our dev machine for debugging (depending on the tool, our machine may need to have the same CPU instruction set as prod). However, the recording step generally doesn’t make sense to use in prod given the high amount of overhead—if we set up recording and then have to use ten times as many servers to handle the same load, whoever pays our AWS bill will not be happy 😁.
But there are a couple scenarios in which it does make sense:
- Undo only slows down execution 2–5x , so while we don’t want to leave it on just in case, we can turn it on temporarily on a subset of prod processes for hard-to-repro bugs until we have captured the bug happening, and then we turn it off.
- When we’re already recording the execution of a program in the normal course of operation.
The rest of this post is about #2, which is a way of running programs called durable execution .
Durable execution
What’s that.
First, a brief backstory. After Amazon (one of the first large adopters of microservices) decided that using message queues to communicate between services was not the way to go (hear the story first-hand here ), they started using orchestration. And once they realized defining orchestration logic in YAML/JSON wasn’t a good developer experience, they created AWS Simple Workfow Service to define logic in code. This technique of backing code by an orchestration engine is called durable execution, and it spread to Azure Durable Functions , Cadence (used at Uber for > 1,000 services ), and Temporal (used by Stripe, Netflix, Datadog, Snap, Coinbase, and many more).
Durable execution runs code durably—recording each step in a database, so that when anything fails, it can be retried from the same step. The machine running the function can even lose power before it gets to line 10, and another process is guaranteed to pick up executing at line 10, with all variables and threads intact.[^1] It does this with a form of record & replay: all input from the outside is recorded, so when the second process picks up the partially-executed function, it can replay the code (in a side-effect–free manner) with the recorded input in order to get the code into the right state by line 10.
Durable execution’s flavor of record & replay doesn’t use high-overhead methods like software JIT binary translation , snapshotting, or instrumentation. It also doesn’t require special hardware. It does require one constraint: durable code must be deterministic (i.e., given the same input, it must take the same code path). So it can’t do things that might have different results at different times, like use the network or disk. However, it can call other functions that are run normally ( “volatile functions” , as we like to call them 😄), and while each step of those functions isn’t persisted, the functions are automatically retried on transient failures (like a service being down).
Only the steps that require interacting with the outside world (like calling a volatile function, or calling sleep('30 days') , which stores a timer in the database) are persisted. Their results are also persisted, so that when you replay the durable function that died on line 10, if it previously called the volatile function on line 5 that returned “foo”, during replay, “foo” will immediately be returned (instead of the volatile function getting called again). While yes, it adds latency to be saving things to the database, Temporal supports extremely high throughput (tested up to a million recorded steps per second). And in addition to function recoverability and automatic retries, it comes with many more benefits , including extraordinary visibility into and debuggability of production.
Debugging prod
With durable execution, we can read through the steps that every single durable function took in production. We can also download the execution’s history, checkout the version of the code that’s running in prod, and pass the file to a replayer (Temporal has runtimes for Go, Java, JavaScript, Python, .NET, and PHP) so we can see in a debugger exactly what the code did during that production function execution. Read this post or watch this video to see an example in VS Code.[^2]
Being able to debug any past production code is a huge step up from the other option (finding a bug, trying to repro locally, failing, turning on Undo recording in prod until it happens again, turning it off, then debugging locally). It’s also a (sometimes necessary) step up from distributed tracing.
💬 Discuss on Hacker News , Reddit , Twitter , or LinkedIn .
I hope you found this post interesting! If you’d like to learn more about durable execution, I recommend reading:
- Building reliable distributed systems
- How durable execution works
and watching:
- Introduction to Temporal
- Why durable execution changes everything
Thanks to Greg Law, Jason Laster, Chad Retz, and Fitz for reviewing drafts of this post.
[^1]: Technically, it doesn’t have line-by-line granularity. It only records certain steps that the code takes—read on for more info ☺️. [^2]: The astute reader may note that our extension uses the default VS Code debugger, which doesn’t have a back button 😄. I transitioned from talking about TTD to methods of debugging production code via recording, so while Temporal doesn’t have TTD yet, it does record all the non-deterministic inputs to the program and is able to replay execution, so it’s definitely possible to implement. Upvote this issue or comment if you have thoughts on implementation!
Move fast without breaking things.
Meet Replay, the first browser with instant replay. It lets you capture your tests in CI, debug failures with browser DevTools, and find the moment something went wrong.
“ Before Replay, some test flakes were simply not debuggable: we didn't have the information required for anything better than an educated guess. Now, we always have a perfect reproduction, and our tests have a 99.9% pass rate.
David Jackson
Senior Engineer, Weights and Biases
“ Adding Replay to our Cypress tests has helped us catch and easily fix the most difficult flaky tests that only occur in CI without endless guessing and frustration.
Simeon Cheeseman
Principal Engineer, TableCheck
“ Recording and debugging flaky tests with Replay.io feels like hopping in Doc Brown’s DeLorean and flying back to the time of the crash!
Gleb Bahmutov
Distinguished Engineer, Cypress
Trusted by top engineering teams
Say goodbye to “works on my machine”.
The worst part of fixing hard-to-reproduce issues is figuring out how to replicate them locally. With Replay you can skip that step and start debugging your app with time travel enhanced browser DevTools as if the test is consistently failing.
Debug with instant console logs.
Add console logs in your code with a single click with messages that “automagically” appear in the Console. You’ll love how fast the feedback loop is.
Fix flaky Cypress + Playwright tests.
Replay’s built in test timeline helps you inspect test step details and jump from test step actions into your application’s React event handlers.
Inspect React components
Bugs can appear at any point in time. Replay’s React panel helps you find the component with first visible issues, inspect its props, and work backwards to the root cause.
View network requests
The majority of E2E test failures are caused by backend issues. Replay’s Network monitor helps you find the bad request and inspect the application state at the time.
CI Workflow
Replay gives developers the tools needed to fix the tests that are failing today and keep the suite healthy over time.
Tests Dashboard
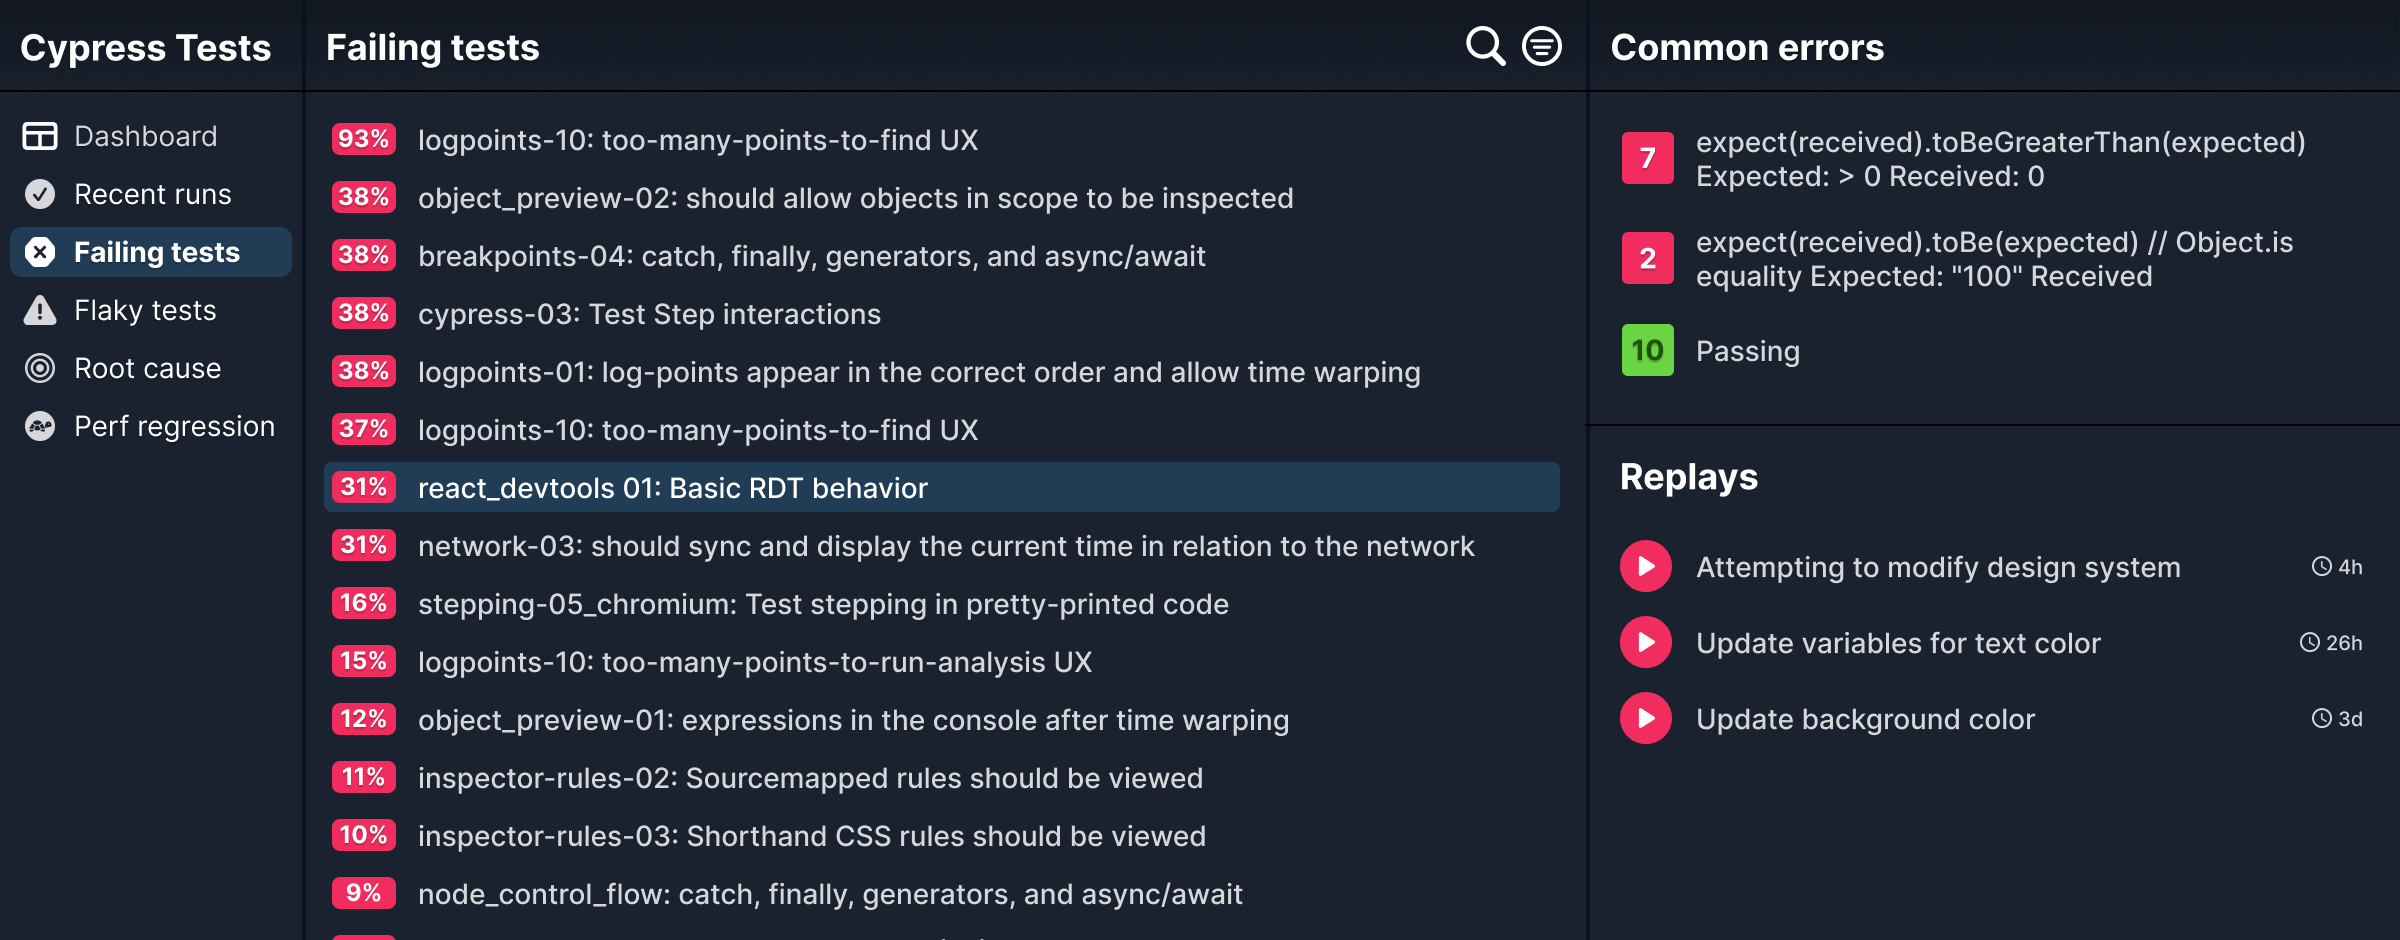
Drive test flakes to zero.
Replay’s Tests Dashboard helps your team prioritize the worst performing tests, identify new regressions, and celebrate fixes.
Runs Dashboard
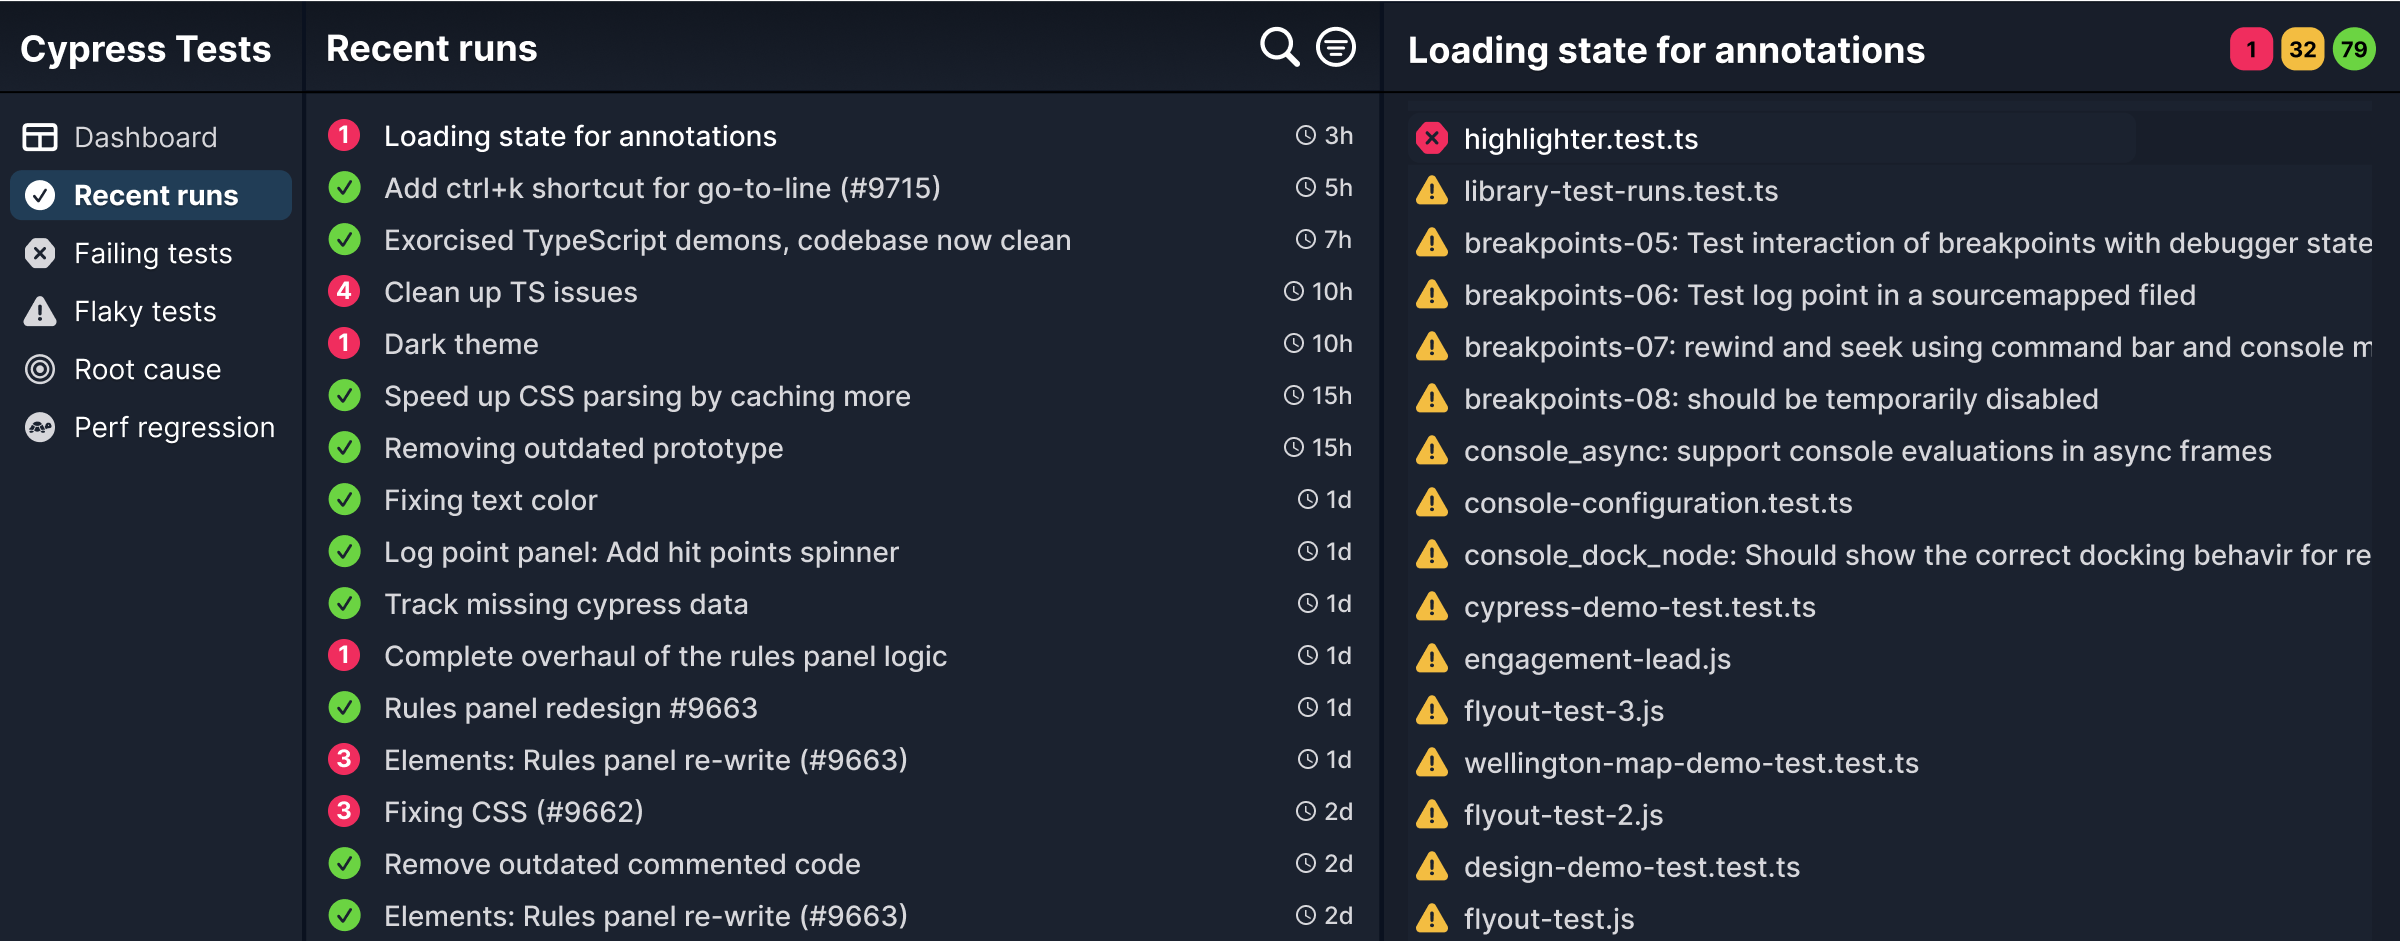
Spot regressions quickly.
Replay’s Test Run Dashboard alerts you to new issues in your test suite so you can see which run introduced the problem and address it quickly.
Testsuites Dashboard
Get actionable insights
Replay's Test Suite dashboard gives you meaningful insights into the health of your test suite

PR Comments
Merge with confidence.
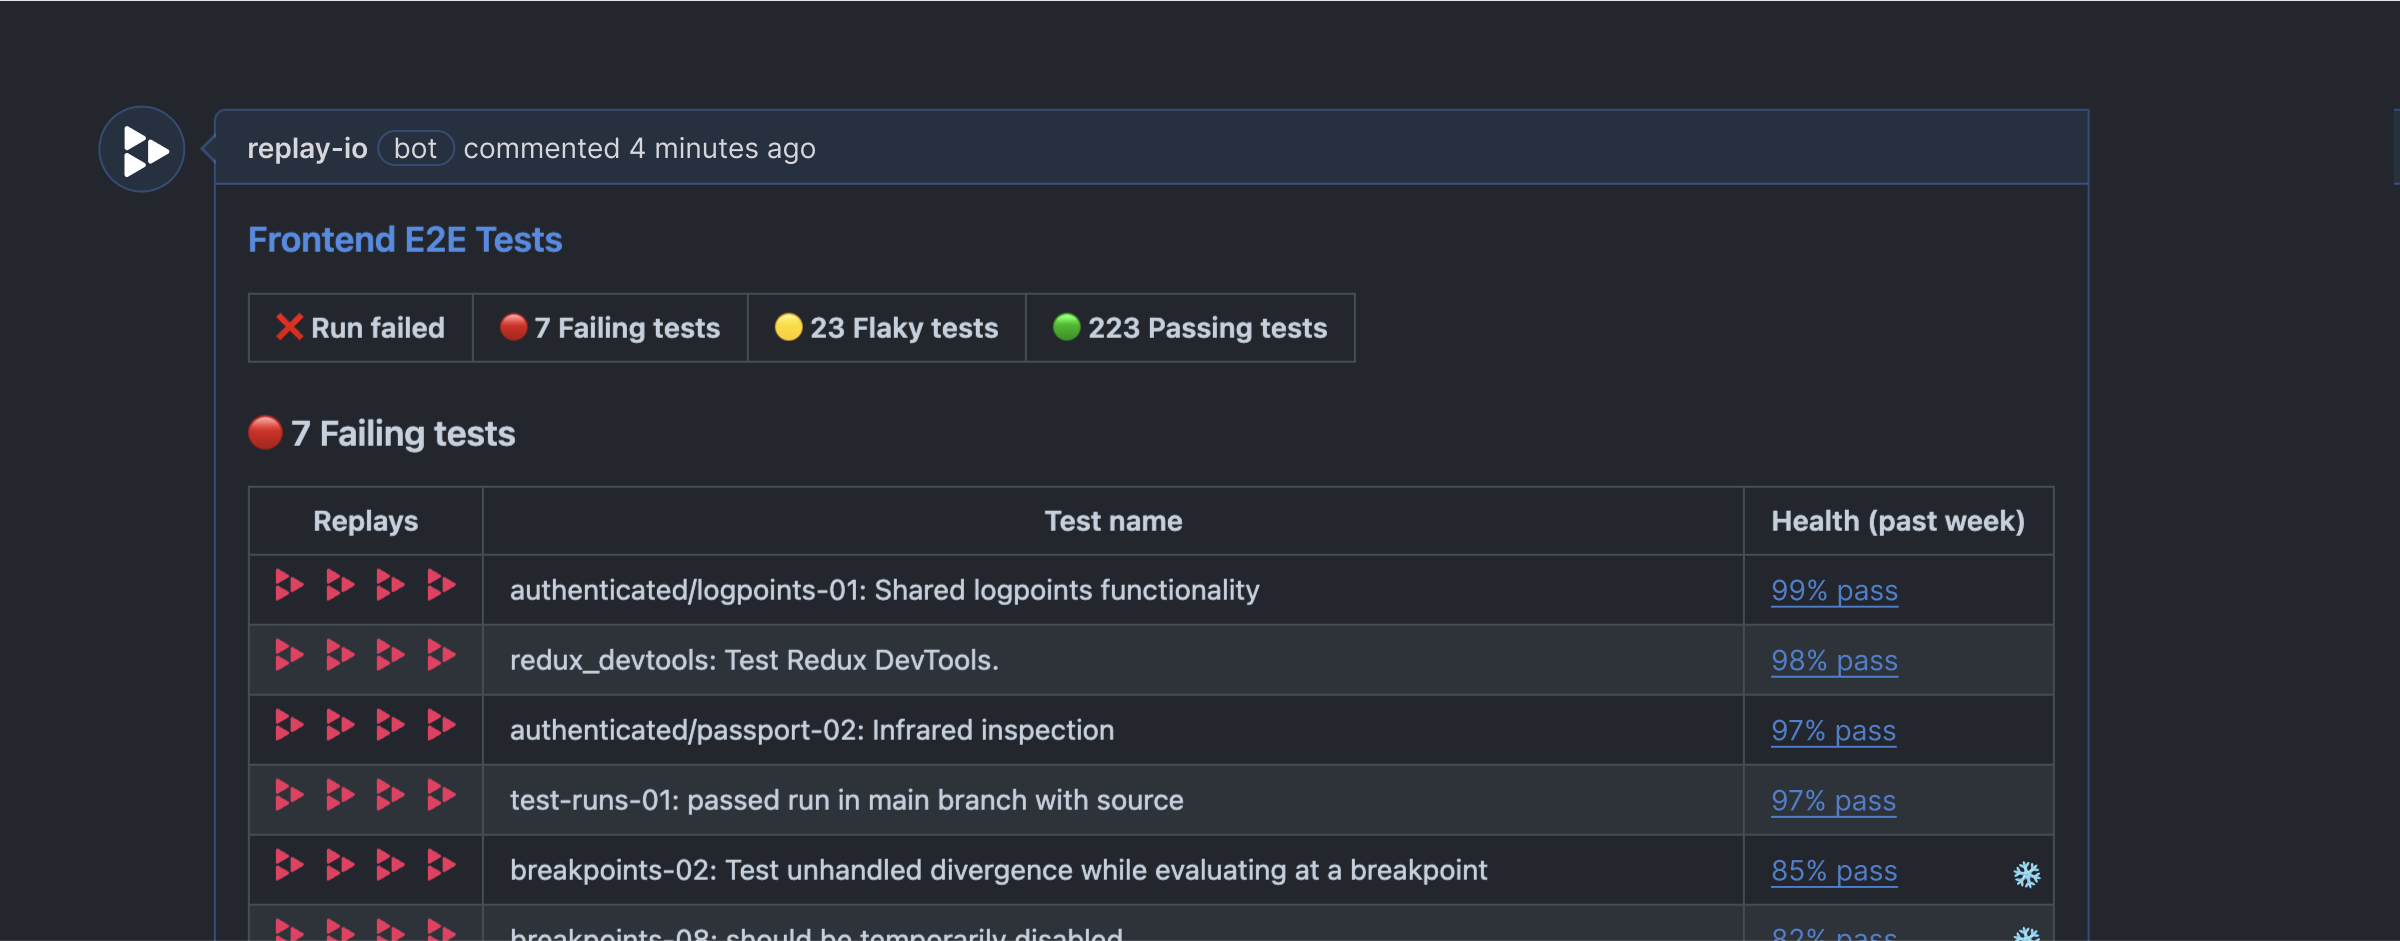
Replay’s PR Comments helps developers see if their change is safe to land. And if there are new failures, jump directly into the replay and see what went wrong.
Battle tested.
Replay helps some of the largest companies record their E2E tests at scale and verify the correctness of mission critical software.
Dynamic analysis
Replay started off as collaborative Browser DevTools, but is quickly becoming a Dynamic Analysis Engine that automates away the debugging process, finds the bugs for you, and identifies regressions missed by the test.
Fix the root cause. Tired of meaningless test failures? Replay will analyze your passing and failing tests and find the fundamental problems in your application causing all of the test failures.
Catch perf issues. Your application can be 10X slower and your tests will still probably pass. Replay analyzes your recent runs and alerts you to performance issues.

Start recording your E2E tests today and unf%#k, sorry unflake your tests.
Case Studies
Start time traveling today.
“Before Replay We spent somewhere between 1–2 hours per day per dev in this reproducibility purgatory. The toll this was taking on our development velocity and our ability to respond and resolve issues was huge. We thought there must be a better way.” Read full case study

Mark Probst
@VP Eng, Glide

“If I didn’t have Replay, it would have taken me several days or even weeks getting the debugger to run properly in all the dynamically loaded scripts, which is not easy. With Replay it took me half a day to figure it out and get a fix ready.” Read full case study

@Tablecheck, Principal Engineer

“The tools that we were using before were barely better than useless. You’d say thanks for the console log screenshot and spend 2–3 days trying to recreate the issues and finding it in the code. With Replay, all that wasted time has been eliminated.” Read full case study

@Pantheon, Front End Lead

Testimonials
Hear from time travelers directly
“Next.js App Router is now stable in 13.4. Wouldn’t have been possible without Replay, we investigated so many (over 20) super complicated bugs that using traditional debugging would have cost us days to investigate.”

Tim Neutkins
@Co-author of Next.js
“I think Replay has a very good chance of creating a new category around collaborative debugging”

Guillermo Rauch
@Founder of Vercel
“When I see a hard-to-reproduce issue in GitHub, I ask for a replay.”

“If I don't immediately know the answer to a bug, I immediately reach for replay.io. It's like HMR for repros.”

Sebastian Markbåge
@React Maintainer
““Replay.io is galaxy brain tooling. Real gamechanger””

Dan Abramov
“Programmers typically reach for debuggers when they run out of ideas on how to fix their code. Now coders reach for time-travel debugging to understand their programs and not just when they want fix a bug.”

Amjad Masad
@Founder Replit
“Fast forwarding and rewinding to breakpoints has saved me days(weeks??) while hunting down issues in @solid_js interruptible concurrent rendering.”

Ryan Carniato
@Solid Founder
“Replay.io gives me the tools I need to solve seemingly impossible bugs. It’s like the Redux DevTools, but for every line of code in your app.”

Mark Erikson
@Redux Maintainer
“Replay.io allows me to debug problems that would be impossible to debug by traditional means - it has saved me from countless hours of confusion and frustration.”

Lenz Weber-Tronic
@Redux Toolkit Maintainer
“I’m not sure if we could’ve shipped the last major version of RedwoodJS without Replay.”

@Maintainer of RedwoodJS
“Replay.io is so great! Today I had a hard-to-repro flow in development, so I recorded a replay to see how it works. I didn’t only find the bug, I discovered a performance improvement using Replay.”

Ives van Hoorne
@Co-Founder CodeSandbox
“Current status: time-travel debugging Typescript's compiler. Replay is the hero tool I don't deserve. My dev life consists of 2 major eras now - I call them pre-Replay and post-Replay.”

Mateusz Burzyński
@OSS Contributor to Typescript
““Replay.io is from another planet where bug reports save you time, instead of eating up hours of debugging.”

Matt Pockock
@Full-time TypeScript educator
“Time travel is the obvious next step for the future of collaboratively inspecting and debugging applications.”

David Khourshid
@Founder of Stately.ai
“People use the word "game-changer" waaaaay too often. Very rarely does anything change the game. But this just might! I'm sharing it to all of my teams.”

Erik Rasmussen
@Author of Redux form and final form
““Replay.io is one of these experiences that first feels like magic – but after squashing your first bugs with it, you will quickly wonder how you ever worked without it”

Harald Kirschner
@Product Manager, VS Code
“Replay.io is the most significant leap forward for debugging since we introduced the step debugger”

Kenneth Auchenberg
@Developer Products, Stripe
“If a picture is worth a thousand words, a replay is worth a thousand pictures”

@CEO of Pantheon
“Recording and debugging flaky tests with Replay.io feels like hopping in Doc Brown’s DeLorean and flying back to the time of the crash!”

@Distinguished Engineer, Cypress
“Before Replay.io, we spent somewhere between 1–2 hours per day per dev in this reproducibility purgatory”
@Glide apps, VP Eng
Getting started with Replay
Our YouTube channel
Replay Course
Drive down your debugging time from hours to minutes. Learn how to use Replay.io from A to Z in this free and simple course.

Featured essays from the Replay.io blog
From Flaky to Flawless: Metabase’s Journey.

The Truth Behind False Positives

Replay's Flaky Test Fix: Debugging Done Right

Navigation Menu
Search code, repositories, users, issues, pull requests..., provide feedback.
We read every piece of feedback, and take your input very seriously.
Saved searches
Use saved searches to filter your results more quickly.
To see all available qualifiers, see our documentation .
- Notifications
A attempt to implement a viable record/replay debugger.
airportyh/time-traveling-debugger
Folders and files, repository files navigation, time traveling debugger.
This project is an attempt to build a usable, practical, useful and viable time-travel debugger.
A time-traveling debugger works by recording the each state in the execution of a program into a database - we call that the history file - and then allowing the programmer to navigate through this file to investigate the cause of bugs.
Subprojects
- Python Rewind - a modified version of Python (fork) that generates a log file as a program is executed. That log contains info that is needed to recreate the past states of the program.
- recreate - a C-based program (replacement for recreate.py) that reads the log file created by Python Rewind and generates the history of the program in a SQLite-based history file.
- timenav - a Python-based terminal UI debugger based on the SQLite-based history file. It also aims to be a use case for the debugger itself as the debugger will be developed with the help of the debugger itself - a case of dog-fooding.
- Oui - a terminal UI toolkit in Python
- history-api (deprecated) - a Node.js/Express-based REST API endpoint which returns a program's past states based on its SQLite-based history file. Debugger frontends are driven off this API.
- term-debugger (deprecated) - a terminal-based step debugger frontend written in Node.js and EcmaScript modules.
- zoom-debugger (deprecated) - a HTML5 Canvas-based ZUI debugger frontend written in TypeScript with Webpack as the bundler.
- json-like (deprecated) - a parser for a JSON-like data format with features specific to the time-traveling debugger, written in JavaScript.
- play-lang (deprecated) - a small programming language with built-in time-travel support. A program executed written in Play automatically generates a SQLite-based history file.
- rrui (deprecated) - a wrapper debugger around rr
- det-replay - a simple demonstrate of deterministic replay
This section is for developers who want to test out or modify the code. This has only been tested on OSX and Linux, apologies to Windows users. If you are on an unsupported platform and is interested in testing this out, let us know by submitting an issue.
- Clone this repo and cd into the project directory.
- . add-path - this will add the project's bin directory to your path.
- Get Python Rewind via git submodule: get-python
- ./configure
- Now the command line tools below should be available.
Command-Line Tools
Once setup is complete, you are provided with a set of command-line tools:
- pyrewind - used exactly like the python command, it invokes the modified version of Python with time-travel support if used with .py files. When you execute a .py file, a log file with the .rewind suffix is created. For example: pyrewind fib.py will generate a file called fib.rewind . Time-travel support is turned off when pyrewind is used as a REPL or used to execute a built-in module.
- recreate - this program takes a .rewind file as input and generates a SQLite-based history file as output with the .sqlite suffix. For example: recreate fib.rewind will create a SQLite database called fib.sqlite . This database file can in turn by used to debug the originating program using one of the debugger frontends.
- debug - starts the terminal-based step debugger. This command takes a .rewind log file or a history file as input. For example: debug fib.sqlite or debug fib.rewind . If the input is a .rewind log file, it will call the recreate command to convert it to a .sqlite file before launching the debugger. This debugger has a ncurses-style GUI and is controlled using one-stroke keyboard commands similar less and nano. It also supports mouse and scroll-wheel interactions for terminals that support it.
- zoom - starts the zoom debugger (deprecated). This command also takes a history file as input. For example: zoom fib.sqlite . Running this command spawns a browser window within which the HTML5 canvas-based debugger executes.
Videos about the Time Traveling Debugger
I have been documenting work on the time-traveling debugger in video format. You can find all the videos in this playlist . Notable videos are:
- Time Travel Debugging (in Python)
- Dream of the Time Machine
- Introducing the Deep-Zoom Debugger (5 minutes)
- Deep Zoom Debugger Demo with Huiqi
- How Time-Traveling Works
- Time Traveling Debugger for Python
- rr and Record Replay Debuggers
Dependencies
This project is dependent on the following technologies:
- Node.js / Express
- better-sqlite3
- Nearley.js / Moo.js
- HTML5 Canvas
- gcc / automake
Other Projects, Products and Papers on Time Travel Debugging
- Replay.io - time-travel debugger for JavaScript webapps based on Firefox. [ Talk ], [ Reading ].
- rr - time-travel debugger for C and C++. [ Talk ], [ Paper ].
- Timelapse - a time-travel debugger for JavaScript webapps based on Safari. [ Video ], [ Reading ], [ Paper ].
- ozcode - a replay debugger for .NET
- ODB (Omniscient Debugger) - an omniscient debugger for Java. [ Talk ], [ Paper ].
- Arnold an eidetic Linux-based system. [ Paper ]
- Paper: A Review of Reverse Debugging
- Sayid - Omniscient debugger for Clojure. [ Video ].
- Time Traveling in Microsoft WinDBG (Windows Debugger) . [ Video ], [ Talk ].
- Time Traveling Debugger in Microsoft's Chakra JS Engine. [ Talk ], [ Docs ].
- Paper: Repeatable Reverse Engineering for the Greater Good with PANDA
- Python 41.1%
- JavaScript 30.6%
- TypeScript 9.0%
- Nearley 1.2%
Introduction: Time Travel Debugger
Wallaby’s Time Travel Debugger allows you to move forward and backwards through your code to understand the conditions that led to a specific bug. The Time Travel Debugger accelerates your edit, compile and debug loop by allowing you to jump to a specific line of code, view runtime values, edit-and-continue and step into, over and out of your code.
Select your editor
The information on this page is adjusted to your editor of choice. Please select your editor by clicking on your editor’s logo below before proceeding with the tutorial:

Starting the Debugger
Once Wallaby has started, the time-travel debugger is available at any time. The debugger can be started from any of your project’s tests. Navigate to the line of code where your test starts and run the command, Wallaby.js: Debug Test (Shift + F5) .

Once Wallaby has started, the time-travel debugger is available when your cursor is focused on any line of code with a Wallaby coverage indicator that shows the line was executed by Wallaby. The debugger can be started from any of your project’s tests. Navigate to the line of code where your test starts and run the intention action, Debug test or else start the debugger from the IntelliJ Run Tool Window.

In addition to being able to start the debugger on the line of code where your test starts, you may also start the debugger on any line of your code that is executed by your tests. When you start the debugger from a line other than the start of your test, the debugger will start and automatically progress to that line. If you start the debugger from a line of code that is covered by multiple tests, you will be prompted to select which test you want to debug.
Debugger View
After starting the debugger, Wallaby’s Debugger View will automatically open. You may also launch the Debugger View at any time using the command Wallaby Tools: Focus on Debugger View .
The Debugger View displays all information related to your debug session. Debug actions are displayed when your mouse is positioned anywhere over the Debugger View.

After starting the debugger, Wallaby’s Debugger View will automatically be focused in the Wallaby Run Tool Window.
The Debugger View displays all information related to your debug session. Debug actions are displayed at the top of the Wallaby Run Tool window.

The Debugger View shows the number of steps that were executed as a part of your debug session and also shows the current step and percentage executed. Note: in many cases, multiple execution steps may map to one displayed statement or expression due to transpilation and other testing framework behaviours.
The Debugger View’s Jump to menu provides the ability to quickly navigate to important parts of your project that were detected during the test run. You may navigate to the start of the test by clicking on the Test node. You may also jump to the first statement of any files used by your tests by clicking on one of the Loaded Files nodes.
To see the call stack for the current step, expand the Call Stack node of the Debugger View.
Debug Actions
Debug Actions are available from from the Debugger file actions and Debugger View header, as well as via keyboard shortcuts.
Debug Actions are available from from the header of the Wallaby Run Tool window as well as via keyboard shortcuts. Keyboard shortcuts may be remapped in your IntelliJ Editor’s Settings.

Run Back to Breakpoint Ctrl + F8
Run back to breakpoint alt + shift + f9.
Runs backwards from the current debugger step and stops when a breakpoint is encountered.
Run Back to Active Line Ctrl + F5
Run back to active line alt + shift + f6.
Runs backwards from the current debugger step to the line of code where the cursor is currently positioned.
Step Back Out Ctrl + Shift + F11
Step back out alt + shift + f8.
Returns back to the line before the current function was called.
Step Back Into Ctrl + F11
Step back into shift + f7.
If the line does not contain a function it behaves the same as “Step Back Over” but if it does the debugger will enter the function and continue line-by-line debugging there.
Step Back Over Ctrl + F10
Step back over shift + f8.
Steps backward over a given line. If the line contains a function the function will be executed and the result returned without debugging each line in the function.
Start/Stop Debugger Shift + F5
Start/stop debugger alt + f5.
Starts or stops the debugger.
Step Over F10
Step over f8.
Steps forward over a given line. If the line contains a function the function will be executed and the result returned without debugging each line in the function.
Step Into F11
Step into f7.
If the line does not contain a function it behaves the same as “Step Over” but if it does the debugger will enter the function and continue line-by-line debugging there.
Step Out Shift + F11
Step out alt + f8.
Returns to the line after the current function was called.
Run to Active Line F5
Run to active line alt + f6.
Runs forward from the current debugger step to the line of code where the cursor is currently positioned.
Run to Breakpoint F8
Run to breakpoint alt + f9.
Runs forward from the current debugger step and stops when a breakpoint is encountered.

Inspecting Runtime Values
Inspecting runtime values during time-travel debug sessions is quick and easy. All you need to do is select the object, object property, parameter, expression or variable that you want to view. When you do this, Wallaby will display the value that you selected. If your selection is invalid (e.g. you only selected part of a variable) then no output will be displayed. For nested expressions statements (e.g. myObject.a.b.c ), you do not need to select the entire expression (selecting only b will output myObject.a.b ).
The example below shows the output of selecting operand1 on line 11 of a code file when the current execution step is on the same line.

Note: your selection must be either on the current step or a previous step for the value to be displayed.
In addition to displaying selected expression values beside your code, selected expressions are also available in Wallaby Value Explorer in an easy-to-navigate, real-time tree view. Nested properties can be expanded to any depth, and values/paths may be copied to the clipboard.
In addition to displaying selected expression values beside your code, selected expressions are also available in the Debugger view’s Value Explorer in an easy-to-navigate, real-time tree view. Nested properties can be expanded to any depth, and values/paths may be copied to the clipboard.
Edit-and-continue
While the Wallaby debugger is on, you may edit your code at any time and continue debugging it.
Default Limits
By default, Wallaby limits the number of steps that are recorded during a debug session to ensure system resources (memory and CPU) are not adversely affected by the Time Travel Debugger feature. If required, this can be adjusted using the maxTraceSteps setting .
Tips and Tricks
Classical debugger vs. time travel debugger.
While similar to classical debugging, the ability to step forward/backward through code provides a new way to consider using a debugger. Instead of starting the debugger at the start of your test, start at your failed expectation and use the Step Back Into command.
Breakpoints
Wallaby’s Time Travel Debugger does not have traditional breakpoints, you may instead use the Run to Active Line and Run Back to Active Line commands; for a single breakpoint, these are equivalent in functionality.
Quickly inspecting runtime values
To quickly inspect a runtime value, use the keyboard command Add Selection to Next Find Match (Ctrl + D) , or instead double-click on the code that you wish to inspect (the selection will be automatically set to what you want to inspect).
To quickly inspect a runtime value, use the keyboard command Extend Selection (Ctrl + W) , or instead double-click on the code that you wish to inspect (the selection will be automatically set to what you want to inspect).
During a debug session, Wallaby’s Advanced Logging features ( console.log , live comments, identifier expressions) are also available when current debugged line is the line with the log/comment/expression.
Unable to navigate
Wallaby debugger can only be used on files instrumented by Wallaby (those will have coverage gutter indicators when opened). When deciding what files to instrument the tool respects its configuration and testing framework specific settings (for example Jest’s collectCoverageFrom setting).
Sometimes you may select a navigation option that is unavailable (e.g. a Step Into request when on the last execution step). When unable to navgiate, the code selected by the debugger will change to a red color.
Changing Debugger Highlight Colors
The colors used to highlight Wallaby's Debugger context can be altered by changing your JetBrains editor settings:
- Current Execution Context: Color Scheme -> Debugger -> Execution point
- Stack Trace Line: Color Scheme -> Debugger -> Not top frame
- Unable to Navigate: Color Scheme -> General -> Popups and Hints -> Error hint
This browser is no longer supported.
Upgrade to Microsoft Edge to take advantage of the latest features, security updates, and technical support.
Time Travel Debugging - JavaScript Automation
- 1 contributor
You can use JavaScript automation to work with TTD traces in a number of ways, such as command automation or using queries to locate event data from the trace file.
For general information about working with JavaScript see JavaScript Debugger Scripting . There are also JavaScript Debugger Example Scripts .
JavaScript TTD Command Automation
One way to use JavaScript for TTD automation, is to send commands to automate working with time travel trace files.
Moving in a trace file
This JavaScript shows how to move to the start of a time travel trace using the !tt command.
We can make this into a ResetTrace function, and save it as ResetTrace.js, using the JavaScript UI in WinDbg.
After a TTD file is loaded in WinDbg, call the function ResetTraceCmd() function using the dx command in the debugger command window.
Limitations of sending commands
But for all but the simplest situations, the approach of sending commands has drawbacks. It relies on the use of text output. And parsing that output leads to code that is brittle and hard to maintain. A better approach is to use the TTD objects directly.
The following example shows how to use the objects directly to complete the same task using the objects directly.
Running this code shows that we are able to move to the start of the trace file.
In this example ResetTraceEnd function, the position is set to the end of the trace and the current and new position is displayed using the currentThread.TTD Position object.
Running this code displays the current and new position.
In this expanded sample, the starting and ending position values are compared to see if the position in the trace changed.
In this example run, a message is displayed that we were all ready at the start of the trace file.
To test the script use the !tt command to navigate half way in the trace file.
Running the script now displays the proper message that indicates that the position was set to the start of the TTD trace.
Indexing a time travel trace file
If just a trace file is copied over to a different PC, it will need to be re-indexed. For more information, see Time Travel Debugging - Working with Trace Files .
This code shows an example IndexTrace function that displays how long it takes to re-index a trace file.
Here is the output from a small trace file.
Adding a try catch statement
To check to see if errors were raised when the indexing was run, enclose the indexing code in a try catch statement.
Here is the script output if the indexing is successful.
If the trace can not be indexed, for example if the trace is not loaded in the debugger, the catch loop code is run.
JavaScript TTD Objects Queries
A more advanced use of JavaScript and TTD is to query the time travel objects to locate specific calls or events that have occurred in the trace. For more information about the TTD objects see:
Introduction to Time Travel Debugging objects
Native Debugger Objects in JavaScript Extensions - Debugger Object Details
The dx command displays information from the debugger data model and supports queries using LINQ syntax. Dx is very useful to query the objects in realtime. This allows for the prototyping of the desired query that can be then automated using JavaScript. The dx command provides tab completion, which can be helpful when exploring the object model. For general information on working with LINQ queries and debugger objects, see Using LINQ With the debugger objects .
This dx command, counts all the calls to a certain API, in this example GetLastError .
This command looks in the entire time travel trace to see when GetLastError was called.
String comparisons for TTD.Calls Object to locate calls
This example command, shows how to use string comparisons to locate specific calls. In this example, the query looks for the string "OLE" in the lpFileName parameter of the CreateFileW function .
Add a .Select statement to print Timestart and the value of the lpFileName parameter.
This generates this output, if a TTD.Calls object is found that contains the target information.
Displaying the number of calls in a trace
After you have used the dx command to explore objects you want to work with, you can automate their use with JavaScript. In this simple example, the TTD.Calls object is used to count calls to kernelbase!GetLastError .
Save the script in a TTDUtils.js file and call it using the dx command to display a count of the number of kernelbase!GetLastError in the trace file.
Displaying the frames in a stack
To display the frames in a stack, an array is used.
In this sample trace, the one stack entry is displayed.
Locating an event and displaying the stack
In this code all of the exceptions events are located and a loop is used to move to each one. Then the currentThread.ID of the TTD Thread Objects is used to display the thread ID and currentThread.Stack is used to display all of the frames in the stack.
The output shows the location of the exception event, the TID and the stack frames.
Locating an event and sending two commands
Querying TTD objects and sending commands can be combined as necessary. This example locates each event in the TTD trace of type ThreadCreated, moves to that position, and sends the ~ Thread Status and the !runaway commands to display the thread status.
Running the code displays the thread status at the moment in time that the exception occurred.
Chaining utility functions together
In this final sample, we can call the utility functions that we created earlier. First we index the trace using IndexTraceTry and then call ThreadCreateThreadStatus . We then use ResetTrace to move to the start of the trace and lastly call HardwareExceptionDisplayStack .
Running this script on a trace file that contains a hardware exception, generates this output.
Time Travel Debugging - Overview
JavaScript Debugger Scripting
JavaScript Debugger Example Scripts
Was this page helpful?
Coming soon: Throughout 2024 we will be phasing out GitHub Issues as the feedback mechanism for content and replacing it with a new feedback system. For more information see: https://aka.ms/ContentUserFeedback .
Submit and view feedback for
Additional resources

Time Travel Debug in VS Code

We’re happy to announce that time travel debugging is now available in Visual Studio Code (VS Code) via the Time Travel Debug for C/C++ plugin.
Time Travel Debug for C/C++ places time travel debugging capabilities at the fingertips of developers using VS Code. The technology is based on the UDB time travel debugger .
With this plugin, developers can now travel forward and backward through full code execution in order to:
- Get full visibility into the state of the code they’re working on – at any point in its execution
- Understand complex code and how it all hangs together
- Accelerate root cause analysis and reduce bug-fix time
By debugging this way, programmers can conduct effective root-cause analysis (without needing to predict ahead of time what to log), and avoid disruptive redeployments.
How does it work?
The plugin adds a time travel debugging toolbar to your VS Code interface so that you can step through the code forward and backward and watch variable and memory changes as your navigate forward and in reverse to understand what the software did.

How to get started with Time Travel Debug for C/C++
Key features
Here’s a summary of the key feature capabilities added to VS Code:
- Navigate backward and forward through code execution: Reverse Step In/Out/Over joins the familiar Step In/Out/Over
- Launch, Attach, or Replay a LiveRecorder recording
- Continue and Reverse Continue , stopping at Breakpoints / Conditional Breakpoints / Watchpoints
- Inspect global and local variable values at any point in your program’s execution history
- Timeline – visually navigate and zoom through the execution flow
- Bookmarks – set bookmarks at any point in your program’s execution history. These appear on the timeline and can be easily jumped to
- Undo your last navigation action
- Evaluate expressions and call functions in the Debug Console at any point in your program’s execution history
Making VS Code better for developers
Microsoft’s IDE provides a rich development environment, including debugging capabilities such as variable inspection, stepping into code, and displaying the call stack. The great thing about VS Code is that it is highly extensible. With this integration we’ve taken advantage of that extensibility, and by adding time travel debugging superpowers, we’ve made it substantially quicker and easier to understand complex C/C++ codebases and the conditions that led to a specific error.
Try it out for yourself
Give it a try and don’t forget to leave your review on the VS Code marketplace.
Get the extension

Stay informed. Get the latest in your inbox.
Hit enter to search or ESC to close
IMAGES
VIDEO
COMMENTS
Time Travel Debugging is integrated with WinDbg, providing seamless recording and replay experience. To use TTD, you need to run the debugger elevated. Install WinDbg using an account that has administrator privileges and use that account when recording in the debugger. In order to run the debugger elevated, select and hold (or right-click) the ...
Time travel debugging or time traveling debugging is the process of stepping back in time through source code to understand what is happening during execution of a computer program. Typically, debugging and debuggers, tools that assist a user with the process of debugging, allow users to pause the execution of running software and inspect the current state of the program.
Time Travel Debugging (TTD) allows you to record the code execution of an app or process and save it in a trace file. The file can be played back in the Windows debugger to locate an issue with code execution. For many scenarios, the easiest way to use TTD to record an app or process is directly from the WinDbg UI.
To attach to a process and record a TTD trace, follow these steps. In WinDbg, select File > Start debugging > Attach to process. Select the user mode process that you wish to trace. For information about working with Attach to a process menu in WinDbg, see WinDbg - Start a user-mode session. Check the Record Process with Time Travel Debugging ...
However, this varies hugely depending on the method of time travel debugging used. The time travel debugging function of GDB, for example, can slow a program down 50,000x, which is far too slow to be considered by most developers. UDB, typically causes a slowdown of 2-3x (though for large complex code systems, this can be greater).
The Time Travel Debugging preview can be enabled in the latest version of Visual Studio Enterprise 2019 for Azure Virtual Machines on the Windows OS running ASP.NET (4.8+). After installing the latest version of Visual Studio Enterprise, complete the following steps: 1. Open the project you would like to Time Travel Debug - ensure that you ...
Debugging as a database. Breakpoint debugging lets you pause a program at a point in time and explore the current state. Time travel debugging lets you pause at any point in time and explore. At a higher-level, time travel lets you query the state of the program across time. This is how we build Replay DevTools and how anyone can extend our ...
ODB, the Omniscient Debugger, was a Java reverse debugger that was introduced in 2003, marking the first instance of time-travel debugging in a widely used programming language. GDB (perhaps the most well-known command-line debugger, used mostly with C/C++) added it in 2009. Now, time-travel debugging is available for many languages, platforms ...
Time travel debugging (TTD) is the ability to wind back the clock to any point in an application's execution and see exactly what it was doing. Integral to TTD is the ability to reverse debug through program execution history. This transformative debugging capability allows developers to observe and understand the precise conditions that led ...
This lab introduces Time Travel Debugging (TTD), using a small sample program with a code flaw. TTD is used to debug, identify and root cause the issue. Although the issue in this small program is easy to find, the general procedure can be used on more complex code. This general procedure can be summarized as follows.
Debuggers can call functions in your programs directly and tell you what they returned — how does this interact with time travel…. Hello, Java World. Hello, LiveRecorder for debugging Java ...
Time travel debugging is the idea of recording execution so you can "time travel" backward and forward through the program to find pesky bugs, or better understand the program. We'll be introducing you to some debugging tools, and working through an example so you can take these time travel debugging concepts to your own projects.
Time travel debugging is also known as reverse debugging. In layman terms, you can debug the same lines again and again (without stopping/restarting the app). For example, you're debugging a method which threw an exception at line 10, to find the cause of exception you can again execute that method from a prior point let's say line 4 without ...
ODB, the Omniscient Debugger, was a Java reverse debugger that was introduced in 2003, marking the first instance of time-travel debugging in a widely used programming language. GDB (perhaps the most well-known command-line debugger, used mostly with C/C++) added it in 2009. Now, time-travel debugging is available for many languages, platforms ...
Replay - Time Travel Browser DevTools. Move fast. without. breaking things. Meet Replay, the first browser with instant replay. It lets you capture your tests in CI, debug failures with browser DevTools, and find the moment something went wrong. npx replayio@latest record. Or check out our Quickstart Guide. Schedule a demo ->.
For more information, see Time Travel Debugging - Navigation commands. Ribbon button time travel navigation. Alternatively, use the ribbon buttons to navigate in the trace. Example TTD Trace Replay. Use the g- command to execute backwards until either an event or the beginning of the TTD trace is reached. The events that can stop backward ...
Time Traveling Debugger. This project is an attempt to build a usable, practical, useful and viable time-travel debugger. A time-traveling debugger works by recording the each state in the execution of a program into a database - we call that the history file - and then allowing the programmer to navigate through this file to investigate the ...
The killer feature for JS/TS platforms. If you are building a JavaScript/TypeScript based platform, time-travel debugging is a killer feature. Users add breakpoints, then can step-through to see the internal state change line-by-line. This lets devs move fast and fix things. But more importantly it's a delightful developer experience.
Time travel debugging (also sometimes called reversible debugging) is a handy feature of some debuggers that allows you to step back through the execution of a program and examine the data prior to an exception being thrown or a breakpoint being reached (as opposed to only being able to view data at that time and onwards). ...
Method Description; Data.Heap() A collection of heap objects that were allocated during the trace. Note that this is a function that does computation, so it takes a while to run. Calls() Returns a collection of calls objects that match the input string. The input string can contain wildcards.
The Time Travel Debugger accelerates your edit, compile and debug loop by allowing you to jump to a specific line of code, view runtime values, edit-and-continue and step into, over and out of your code. Select your editor. The information on this page is adjusted to your editor of choice. Please select your editor by clicking on your editor ...
Introduction to Time Travel Debugging objects. Native Debugger Objects in JavaScript Extensions - Debugger Object Details. The dx command displays information from the debugger data model and supports queries using LINQ syntax. Dx is very useful to query the objects in realtime. This allows for the prototyping of the desired query that can be ...
Time Travel Debug for C/C++ places time travel debugging capabilities at the fingertips of developers using VS Code. The technology is based on the UDB time travel debugger. With this plugin, developers can now travel forward and backward through full code execution in order to: