- Gameumentary
- Review in 3 Minutes
- Design Delve
- Extra Punctuation
- Zero Punctuation
- Area of Effect
- Escape the Law
- In the Frame
- New Narrative
- Out of Focus
- Slightly Something Else
- Terms of Service
- Privacy Policy

Unlock Powerful White Robes in Journey With Every Symbol Location
Now that Journey is out on Playstation 4, take a return trip and collect every glowing symbol with our locations guide, helping your mysterious pilgrim unlock the powerful white robes outfit.
Finding these rare glowing symbols upgrades the wanderer’s scarf power, allowing them to glide and leap further across the desolate landscape of Journey . Collect them all, and there’s a bonus costume in your future — the white robes instantly refill your scarf after a landing, making exploration easier than ever before.
Check out the entries below for tips, showing you how to find every glowing symbol and where to collect your reward, the white robes, when you’re done.
Symbol Locations – How to Unlock White Robes
To unlock the powerful White Robe outfit, you’ll need to collect every symbol. Glowing symbols upgrade your scarf.
Once every symbol is collected, return to the Hub and go up the steps to the area that shows how many symbols you’ve collected. Travel to the glowing white thread and press [Circle] to change into the white robes. Change back into your normal robes by returning to this location and pressing [Circle].
The white robes, when worn, instantly regenerate scarf jumping energy after landing.
Locations Guide
- Symbol #1 : The first glowing symbol is right in front of your starting point.
- Symbol #2 : After crossing the sands in the lower area, you’ll reach a three-story platform that you circle to reach the top. On the second level, continue past the partially-crumbled top to find a symbol to the left.
- Symbol #3 : There’s a small platform sticking out of the sand to the right of the three-story platform, between it and the building with stairs. Jump and glide to it or run across the valley.
Broken Bridge Area
- Symbol #1 : The first symbol is near the starting point of this area. It’s found on a ledge to the right where there’s a sandfall, before reaching the broken bridge in the distance.
- Symbol #2 : Return to the starting point and travel northwest. Watch the rock wall for a cave hidden behind another sandfall, partially obscuring the glowing symbol inside.
- Symbol #3 : At the start of the area, travel left and look next to a rocky outcropping between the staggered broken bridges.
Desert Area
- Symbol #1 : Travel right from the starting point through the dunes to find a small ruin of pillars with the glowing symbol sitting on top of a column.
- Symbol #2 : From the start, move toward the mountain in the far, far distance. Eventually, beams of light will shoot out from the mountain’s direction and land in the desert. The first leads straight to a small ruin with a symbol glowing above a wrecked wall.
- Symbol #3 : Leave the start of the desert, moving left until you come across flying clothe creatures near ruins buried deep in the sand. Move toward the mountain to spot another ruin with an Ancient Glyph. Moving toward the mountain again, across one more dune, there’s a tall tower with stairs containing the next symbol at the top.
- Symbol #4 : Inside the massive sandstorm, travel up to the top of the tower. Before going up the steps to the shrine, check out the ledge to the left.
Sunken City Area
- Symbol #1 : Just as you start sliding through the city, follow the arches on the left path. Once you pass through five, move right to a ruined hallway in the center of the path. There’s a glowing symbol inside.
- Symbol #2 : After jumping through a sandfall and appearing over a massive canyon, look to the right. There’s a platform jutting out from the rock wall with an easily visible glowing symbol.
- Symbol #3 : During the second sliding sequence, stick to the center of the desert and move through the three arches. After ramping off a rock, you should see a large rock mountain sticking out of the sand ahead with a building on top. Move slightly left and use the rock ramp to leap to a narrow canyon in the central rock formation ahead.
Underground Passage Area
- Symbol #1 : At the start of the underground passage, you’ll find square-ish tubes stuck in the sand. Eventually, you’ll find one tube on the left sticking up. Look inside it to get the symbol.
- Symbol #2 : Past the previous symbol, you’ll enter a larger area with arches holding up more tubes. Follow the flowing clothe to a tube suspended over the sand on the right with an opening pointing toward the entrance. Glide into the tube to see it.
- Symbol #3 : In the following room, you’ll find strange jellyfish-shaped floating clothe creatures. Midway across the chamber, you’ll find a series of these jellyfish positioned straight upward, allowing you to continue leaping up to a very high glowing symbol.
- Symbol #4 : Entering the dark area near the end, stick to the left wall and explore toward the last slope. There’s a wall of archways, with the glowing symbol right behind it.
Temple Area
- Symbol #1 : After activating the glowing mural, raising the lights on the central tower, look on a ledge attached to the middle tower, on the left.
- Symbol #2 : Using more murals to raise the glowing energy, you’ll eventually reveal a clothe dragon. Ride it up and watch the central tower. There’s a hidden opening in one of the walls on the way up containing your next symbol.
- Symbol #3 : Enter the clothe dragon’s mysterious chamber filled with hanging clothe flags along the exterior edge. There’s a narrow area behind these flags, glide behind them to find a hidden symbol.
- Symbol #4 : Once the glowing energy has reached the top level of the temple, search the exterior temple walls parallel with the clothe jellyfish. There’s a small room directly above the temple entrance hall, high up from the starting point.
Trophies Unlocked
Transcendence (Gold): Collect all unique glowing symbols across one or more journeys.
Source: [ 1 ]
Kevin Thielenhaus is a freelance writer for The Escapist. Find him on Twitter here.
Journey Wiki
Journey's 12th Anniversary Poster Winner! Congratulations Kbak! Join players around the world in celebration of Journey's 12th Anniversary fan event on March 13th!
- Basics Guides
- View history
Symbols are a visual representation of the in-game civilization's language as well as its written form used by the in-game species. They are one of the key elements of the game's art style and design.
- 1 Alternative Names
- 2 Basic information
- 3 Collectible symbols
- 4 Primary and Secondary alphabets
- 5 Other alphabets
- 6 Player symbols
- 7 Glitches with symbols
- 8.1 About the symbol "alphabet"
- 8.2 Development Symbols
- 8.3 Game Textures
- 8.4 More trivia
- 10 See also
- 11 References
Alternative Names [ ]
- Shinies, Shiny Things
Some players refer to symbols as glyphs; such use is discouraged on this Wiki to avoid confusion with Ancient Glyphs (visual elements that reveal parts of the story line, also commonly called "glyphs").
Basic information [ ]
Symbols appear everywhere in the game:
- On the chest of the Wayfarer , and in their chirp
- Collectible symbols and ancient glyphs to be found during the course of the game
- Particles in the air and in the magic goo/mist (Tower and Paradise levels)
- Small particles floating around the wayfarer when glowing with a companion or another cloth creature
- Glowing on certain tombstones when the wayfarer approaches them
- On your Scarf
- Written on various pieces of architecture, glowing and otherwise
In some cases, for example on certain gravestones, symbols look worn off and barely recognizable (they still follow the familiar square pattern, but individual symbols cannot be picked out).
Some stones have clean square placeholders but no symbols on them; this is most prominent in the Tower around various shrines. Further details can be found in the Tombstone article.
Collectible symbols [ ]
Little brightly glowing symbols are hidden in various parts of the game. Those can be picked up by touching them or flying by close enough.
- They will extend your scarf , therefore granting the ability to fly (first symbol) or extending the flying range.
- Symbols with a shiny circle around them mean that you didn't find that symbol in previous journeys.
- For every new Journey, you need to pick them up "again" to extend your scarf, if you want a long scarf.
- There are guides on how to find all of them for the Trophies .
- The locations of each symbol are also described here , and in each level-article (shown on each of the level maps).
- Symbols you have collected will light up on a small display beneath the statue at the end of each level, as well as on a larger display in the chapter select area.
- While the symbol is being collected, small glowing particles fly from it into the Wayfarer, recharging the scarf. This extends flying ability for a brief period of time (this feature is often exploited by speedrunners).
A collectible symbol in-game
Primary and Secondary alphabets [ ]
There are several alphabets in the game, which can be found on buildings, scarves , cloth creatures , etc.
A subset of the full alphabet, dubbed the "primary" alphabet, is used only for players, graves, and the wardrobe , implying these symbols are names or proper nouns. Whereas the rest of the alphabet is seemingly random, these 21 symbols are designed with a good amount of symmetry, making their nametags easier to identify after the credits .
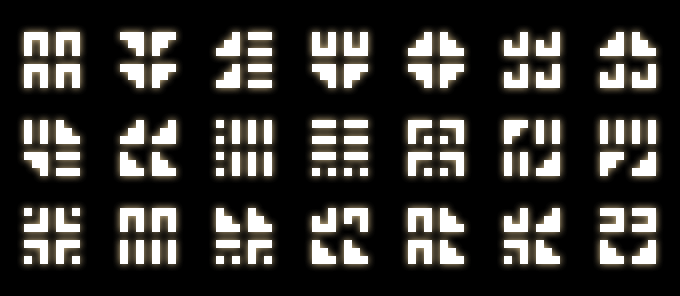
Symbols used for wayfarers, gravestones, and the collection wall
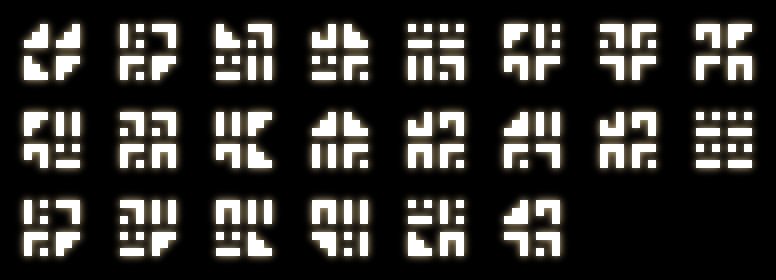
Symbols used in various environment textures
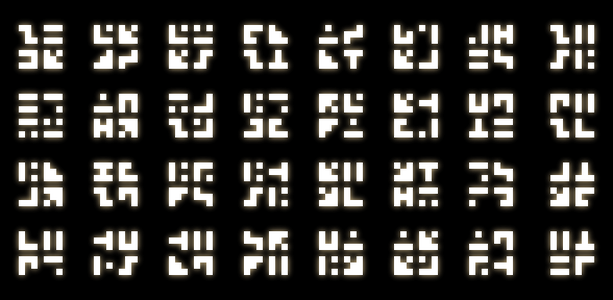
Symbols used for various particle effects
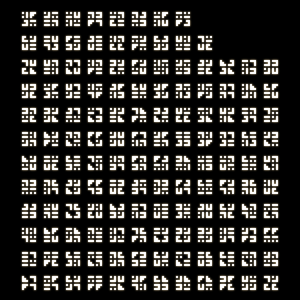
Symbols used for the various cloth creatures and bridges throughout the game

The unique symbol on the player's scarf
Other alphabets [ ]
In addition to the primary and secondary alphabets, a third alphabet appears on one ancient glyph in the graveyard , as well as a few other murals throughout the game.
This alphabet is completely different from the first two; its symbols are more random and complex and have no defined "quadrants". A similar alphabet appears in glowing runes on the level-end statues , though it is not known whether they are intended to be part of the same alphabet.
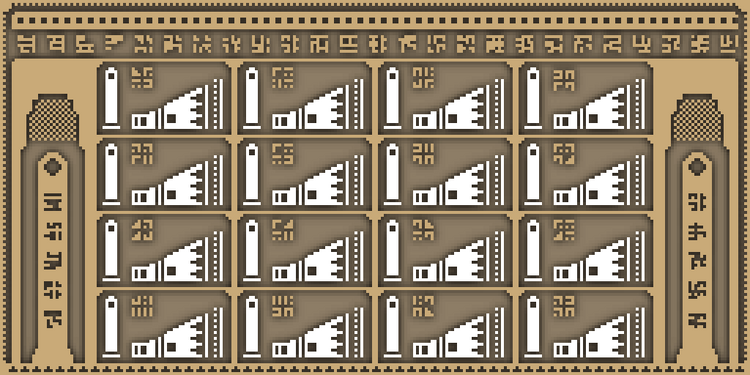
This ancient glyph features both the standard alphabet and a different, otherwise unknown alphabet.
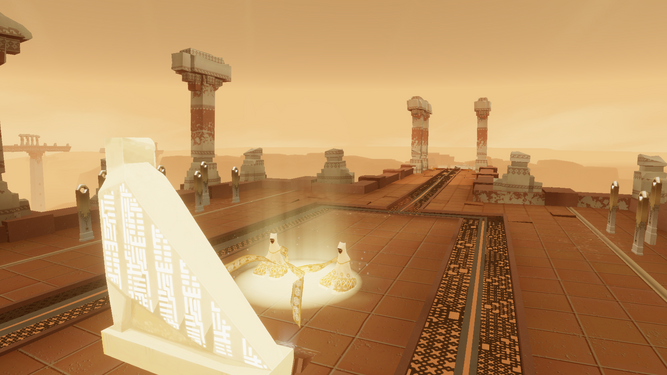
This level-end shrine features glowing symbols that are not used anywhere else in the game.
Player symbols [ ]
Your symbol, seen on your chest and when you chirp , will be one of the Primary symbols.
- The symbol you see yourself using will not be the same on other players' screens.
- During a Journey, a Companion's Symbol normally stays the same, even if you lose each other and meet later again. Though there are exceptions, see Chirp .
Most of the primary symbols have nicknames assigned to them by the community.
These names can be descriptions of their appearance, names of well-known players who used them, or simply inside jokes. Some of these names are listed below.
Some of these symbols, namely "Bucktoothed skull," "Fishing Hooks," and "Inky, Pinky, Blinky and Clyde" are referred to by some as "red robe symbols" due to their simplicity, though any correlation between a player's symbol and robe is likely coincidence.
"Snowflake" or "Schneeflocke"
"Bucktoothed Skull"
"Collector's Item" - named for how it appears to be rare.
"Doppelganger" - named for how it appears twice at the collected symbols area in Chapter Select.
"New York, New York"
"belovedklowny" or "Klowny" - after the player Klowny
"Robot & Elf Feet"
"Scandinavia" or "Broken Symmetry"
"Stealth Fighters" or "Stealth Bombers"
"Morse Code"
"Morse Code 2"
"Monster Eyes"
"Unbroken Symmetry"
"Raised Fist"
"Fishing Hooks"
"Blinky, Pinky, Inky & Clyde" - after the Pac-Man Ghosts
"War Machines" or "Angel Wings"
"Speeding Thrones"
"Horned War Machine"
"The One That Got Away" - named for the fact that it doesn't seem to be in the game, despite being on the official playable symbols list
[1]
Glitches with symbols [ ]
Here is a video showing a glitch with the collectible symbol inside the Whale Room (Tower level):
About the symbol "alphabet" [ ]
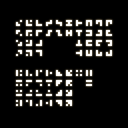
- The main alphabet in Journey features symbols assembled from 15 basic characters, each 3x3 pixels in size.
- That's a whopping 13,845,841 possible symbols, though in practice only about 200 of these are found in the game's files.
- If you would like to assemble your own symbols, a list of parts can be found here:
Development Symbols [ ]
Information about the Development of Journey. Once, Ancestors had Symbols on their chest.
Game Textures [ ]
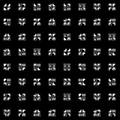
used in gravestones? tower
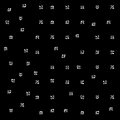
used in tower history lesson?

snippet of the raw particle textures used in goo, comets?

Wayfarer specific used for chirp and chest
Altered version of the wayfarer symbols for improved visibility
More trivia [ ]
- The symbols were first named by Klowny. Including the Klowny symbol.
- It was changed after a German player said it would be offensive in certain countries.
- Similarly, "Monster Eyes" was originally called "Four Eyes", which could be seen as offensive.
- Developers referred to the collectible symbols simply as "Secrets".
- While the collectibles displayed in the level select area use the 21 "Primary" symbols, the collectibles in-game simply cycle through random characters.
- Going back and picking up this symbol "for real" will appear to give you the symbol, but will not give you any more scarf.
- As the wayfarer usually faces away from the camera, this brief moment is not visible to the player, but with a good camera angle it's hard to miss; the symbol is more prominent on a red robe but can observed on a white robe as well.
See also [ ]
- Symbol Locations
- Category:Objects
- Category:Non playable characters (NPC) / entities
- Category:Gameplay Basics
References [ ]
- ↑ rebi 2020-04-14 About the "The one that got away-Symbol": In the game files it is Symbol #20, you cant get it normally.
- 1 Wayfarers
- 3 How to play guide for Journey
- MASTERCLASS
- Remember me Not recommended on shared computers
- Sign in anonymously
Forgot your password?
Season of Discovery Rogue: Rune Slots and Rune Locations
On this page, you will find all information about the Rogue Runes in WoW Classic - Season of Discovery.
- 1. Overview
- 2. Quality of Life Skill Locations
- 3. Rune Engravings
The single largest new feature of Season of Discovery is the addition of Rune Engravings for your gear. Runes will allow you access to new abilities, the ability to augment your current spells and in some case unlock entirely new possibilities for your class such as being able to Tank or Heal when your class otherwise may not be able to. At this point in time Rune Engravings are limited to seven slots, the Chest, Helm, Boots, Wrist, Belt, Gloves, and Pants. listed below are all of the currently available Rune Engravings for Rogue.
Quality of Life Skill Locations
There are various quality of life spell books found throughout Azeroth that have been added in Season of Discovery to improve the experience compared to the original version of vanilla. While these are not considered Runes you will still need to discover them to unlock their abilities.
Rogues can currently obtain:
Rune Engravings
Rune description.
- 1 point: 27 to 41 damage, 1 second Stun
- 2 points: 43 to 66 damage, 2 second Stun
- 3 points: 59 to 91 damage, 3 second Stun
- 4 points: 76 to 116 damage, 4 second Stun
- 5 points: 92 to 141 damage, 5 second Stun
Unlock Information
As a Human, it can be found in Cutthroat Alley in Stormwind. Go to the end of the alley and into the house. Upstairs next to the bed there is a chest; open it and two Level 10 enemies will spawn. Dispatch them and you will receive this Rune.
As Undead, it can be found in a chest underwater near the Northern coast of Tirisfal Glades, almost directly north from Brill. Pickpocket the key from any Murloc in the area.
As a Dwarf or Gnome, it can be found in a Dusty Crate located just outside of the building where the Rogue training in the Fornlorn Cave in Ironforge is, just to the right of the stairs inside of a small cubby.
As an Orc or Troll, this can be found in The Drag in Orgrimmar, look for the NPC Zilzibin Drumlore and next to his house you will find the chest containing this Rune.
- 1 point: 14 seconds, 6% parry
- 2 points: 18 seconds, 7% parry
- 3 points: 22 seconds, 8 % parry
- 4 points: 26 seconds, 9% parry
- 5 points: 30 seconds, 10% parry
As a Night Elf, kill Naga at the Cliffspring River Cave in North Western Darkshore. In the back of the cave, there will be a ledge and atop that ledge you will see a chest with the Rune inside.
- 1 dose: 40 damage
- 2 dose: 80 damage
- 3 dose: 120 damage
- 4 dose: 160 damage
- 5 dose: 200 damage
As a Human, pickpocket Garrick Padfoot. The note you recieve will lead you to the location at the wall.
As a Night Elf, this Rune drops off of Lord Melenas in the cave north of Dolanaar.
As an Undead, pickpocket Captain Perrine, then take his signet ring to the Brill town hall to create a forged document. Take this to Jamie Nore to receive the Rune.
As an Orc or a Troll, you will acquire the Rune from the troll Ba'so in Durotar. Pickpocket the members of the Burning Blade north of Razor Hill and you will get a note. Return to Ba'so and turn it in.
As a Human, this Rune can be found in a chest by the outhouses near the vineyard in Northshire.
As a Dwarf, this Rune can be found in a chest in the frost troll cave in Coldridge Valley. The chest can be found towards the back of the cave just below the ledge where Grik'nir spawns.
As a Night Elf, this can be found on the roof above the inn inside of Shadowglen.
As an Orc or a Troll, Rogue Shadowstrike is a reward from the quest Atop the Cliffs, which will have you jump onto nearby cliffs. It is mere feet from your initial spawn point in the Valley of Trials.
As a Undead, you will be tasked with killing/pickpocketing Scarlet Converts which will drop the rune.
As Alliance, this can be found in Loch Modan, Darkshore and Westfall.
In Loch Modan, this Rune can be looted from a toolbox found near the Dwarf NPCs located towards the middle of the Stonewrought Dam which is located at the very north of the Loch.
In Darkshore, this Rune can be looted from a small pile of dirt you can find beneath the tree near the lighthouse in Auburdine.
in Westfall, on the hill directly behind the Sentinel Hill Inn, there is an Elite Defias Scout with an Escape Plan buff, which will cause them to flee if they you get too close. Use Stealth to avoid detection and Pickpocket Defias Scout and this will reward you with this Rune.
As Horde, this Rune can be found in both the Barrens and Silverpine Forest.
In The Barrens, head over to Northwatch Hold, when you pass the main gate, look to your left; you will see a stable with a chest on the roof. You will have to complete a small jumping puzzle to get your Rune. Go around to the right and jump down onto the wall behind the stable. Once there, you can jump to the roof and loot the chest for the Rune. You will need 80 Lockpicking skill to open this chest.
This Rune can be purchased from Grizzby in Ratchet. In order to unlock Grizzby as a vendor you must be level 20 and complete a series of tasks to earn his favor. There are three quests to complete, these can be completed in any order.
As any race, upon reaching level 20 you will receive a letter in the mail that will instruct you to go to Pyrewood Village in Silverpine Forest. Next to the the ramp leading to Shadowfang Keep you will find a hut with a chest inside; opening the chest will begin The Horn of Xelthos quest.
This quest will have you go to find Veenix who is located in the western part of the Windshear Crag in Stonetalon Mountains. He will ask you for a work order, which you can be pick pocketed or kill from Venture Co Operators to obtain. When you return the Venture Co. Work Order to Veenix, he will give you the Breaching Charge needed for the next part of the quest.
Next, head back to Shadowfang Keep and enter the dungeon alone You must enter solo in order for the rare elites you need to spawn. With the Breaching Charge you can open the gate straight ahead of you when you enter the dungeon, allowing you access to the entire instance without having to kill the first boss.
You will need to stealth around the dungeon and pick pocket the two rare elites, Gemela and Gefell, for the Sister's Half-Key and Brother's Half-Key. Make sure to be careful, as there are many areas in the instance that the halls are filled with mobs so navigating without being pulled out of stealth can be quite difficult.
When you have both halves, find a safe spot to create the Twin Key this action will pull you out of stealth. Head back to the stables found in the courtyard near to the entrance and use the key on the chest found there and inside you will find the horn. Exit the instance and return to the original hut where you can turn in the quest.
After re-entering a major city you'll receive a mail which prompts you to head back to the same hut where you will finally be able to receive the Rune.
At Honored reputation standing with the Azeroth Commerce Authority you will be able to purchase this Rune from the Commerce Authority Reputation in your faction's major city.
As a Human, loot or pickpocket Treasure Map Fragments to create an Elwynn Treasure Map. These come from Gnolls, Kobolds, Defias NPCs and Murlocs. You can then use the Elwynn Treasure Map to reveal the treasure.
As a Dwarf, loot or pickpocket Treasure Map Fragments to create an Dun Morogh Treasure Map. These come from Leper Gnomes, Dark Iron Dwarves and Trolls found throughout the zone. You can use the Dun Morogh Treasure Map to reveal the treasure.
As a Night Elf, loot or pickpocket Treasure Map Fragments to create a Teldrassil Treasure Map. You can then use the Teldrassil Treasure Map to reveal the treasure in the hollow stump behind the building in Rutheran Village.
As an Undead, loot or pickpocket Treasure Map Fragments to create a Tirisfal Treasure Map. These come from Gnolls, Scarlet Crusade members and Murlocs throughout the zone. You can then use the Tirisfal Treasure Map to reveal the treasure under the bridge in Tirisfal Glades.
As an Orc or a Troll, pickpocket pieces of the Treasure map from Kultirans in Tirisgarde Keep, Burning Blade Members, Quilboar, and Trolls in Echo Isles. Combine the pieces to create Durotar Treasure Map, which has you dig up treasure in the southern most Echo Isles.
As a Human, there is a jump puzzle at the house just northeast of Goldshire. Use the crates to climb on the roof; there will be a chest on the roof containing the Rune.
As a Dwarf or a Gnome, there is a jump puzzle to get atop Kharanos Inn go around to the north side of the inn and head up the mountain to get there.
As a Night Elf, kill Furbolgs inside Banethil until you receive a key. The chest is located randomly inside the Barrows.
As an Undead, it will be found inside a chest in Tirisfal Glades at Agamand Family Crypt; Agamand Relic Coffer Key can be looted from nearby mobs to open the chest.
As an Orc or a Troll, it will be found inside a chest in Durotar at Drygulch Ravine.
Poisoned Knife — Instantly throw your off-hand weapon to deal normal off-hand weapon damage with a 100% chance to apply the poison from your off-hand weapon to the target. Awards 1 combo point. Poisoned Knife benefits from all talents and effects that trigger from or modify Sinister Strike.
Head to Desolace to start the Highway Robbery quest at the extinguished Campfire. (found at 47, 54) This quest will task you with finding someone who knows about the pillaged campsite, you will need to head to Bibbly F'utzbuckle who you can turn in the Highway Robbery Quest to and he will begin your second part of this quest, On the Lam. (Bibbly can be found at 63, 39 near Kormek's hut.)
Shadowstep — Attempts to step through the shadows and re-appear behind your enemy and increases movement speed by 70% for 3 seconds.
Upon reaching level 30 you will receive a mail that will task you with heading to Pyrewood Village in Silverpine.(found at 47.1, 71.1) Loot the chest and it will begin the quest The Eye of Bhossca . The first step of this quest being finding a disguise to enter the Scarlet Monastery, this disguise can be found in a box in the stables found a bit to the west of Scarlet Monastery but still within the rocky ridge.
Return back to a major city and check your mail, there will be a letter from the same person who originally started this quest for you and you will then one final time have to return to the Dead Drop in Pyrewood Village to recieve your rune.
Shuriken Toss — Throw a shuriken at your enemy dealing damage equal to 25% of your Attack Power, and also strike up to 4 additional nearby targets. Awards 1 combo point.
Master of Subtlety — Attacks made while stealthed and for 6 seconds after breaking stealth cause an additional 10% damage.
Head to the Kurzen camp in northern Stranglethorn Vale (around 44.8, 8.6) once there enter the large stone tower. Inside of the tower you will find Wendel Mathers inside of a cage, talk with him and he will begin your quest for the rune with your first task of getting the key to free him.
With both items now we will return to Wendel Mathers and free him from the cage. After this head back to Booty Bay and meet with Captain Aransas (who can be found at roughly 27.8 76.6) they will then award you with the Rune.
Waylay — Your Ambush and Backstab hits unbalance your target, increasing the time between their melee attacks by 10%, and reducing movement speed by 50% for 8 sec.
Please note that the Dark Riders do have a small patrol area and the coordinates recommend below are a rough approximation, if you walk around the recommend location you should quickly be able to find them.
The closest Dark Rider to your starting point can be found in Deadwind Pass at (43, 29)
The second Dark Rider can be found at (69, 28) in the Swamp of Sorrows.
The third Dark Rider can be found in Duskwood at (22, 51)
The fourth Dark Rider can be found in The Badlands at (58, 54)
the fifth Dark Rider can be found in the Arathi Highlands at (60, 40)
Next we will need to head to Kalimdor, the sixth Dark Rider can be found at (52, 36) in the Barrens.
The 7th and final Dark Rider we need can be found in Desolace at (65, 25).
Return to the Dalaran Agent in Deadwind Pass with the 7 relics you have acquired and turn in their respective quests and the Rune will be your reward!
Rolling with the Punches — Each time you Dodge or Parry, you gain 6% increased Health, stacking up to five times.
Head to Camp E'thok in northern Thousand Needles (Follow the ridge going west/north west). Once there head into the largest of the tents and inside you will find a lockbox on the floor, open it and it will award you with a smaller lockbox you must lock pick, continue lock picking the boxes that come from this box and eventually you will be awarded with the Rune.
Honor Among Thieves — When any player in your party critically hits with a spell or ability, you gain a combo point on your current target. This effect cannot occur more than once every second.
After reaching level 45 and returning to any of your factions capital cities, you will receive a mail sending you to Ravenholdt Manor in the Alterac Mountains. In order to receive this mail, you must have completed the quest The Manor, Ravenholdt .
The first quest, Fool Me Twice will task you with speaking to Fahrad who can be found at Ravenholdt Manor. Fahrad will then send you to Zul'Farrak to complete the quest The Talisman of Kazdor . You must head through the instance portal without being in a group to be phased into the solo version of this instance that is required to complete the quest.
Finally return to Fahrad at Ravenholdt Manor and he will reward you with this Rune.
Combat Potency — You have a 20% chance to gain 15 Energy every time you deal melee damage with your off-hand weapon.
The first step in unlocking this Rune is heading to the Emerald Sanctuary in southern Felwood and starting the quest The Wild Gods from the Shadowtooth Emissary . This quest will task you to head all over Azeroth to collect a series of items for the Shadowtooth Emissary .
Focused Attacks — You gain 2 Energy every time you deal a melee or ranged critical strike.
This Rune is purchased from the Emerald Wardens reputation vendor at Friendly standing.
Carnage — Your abilities deal 20% increased damage to targets afflicted by one of your Bleed effects.
Head over to the Blasted Lands to the tower located at (45.3, 16.4), head inside and, at the top of the tower, you will find a lockbox that requires 225 Lockpicking to open. Unlock the box and a level 46 Murderous Lost One will spawn. Kill the mob and you will be able to loot this Rune from it.
- 03 Mar. 2024: Updated with new level 50 Rune information.
- 02 Feb. 2024: Updated with new Level 40 Rune information.
- 25 Nov. 2023: Guide added.
In The Same Category
This guide has been written by Sellin, a former top 10 US raider and current season and several time Gladiator, long time WoW Player and passionate about all things Warcraft and Theorycrafting. You can follow him on Twitter and watch him on Twitch .
- Rogue Goldmaking Guide
- Combat Rogue DPS Enchants and Consumables
- Tier 2.5 Rogue Set
- Assassination Rogue DPS Leveling
- Subtlety Rogue DPS Guide
- Combat Rogue Tank Stat Priority
- Combat Rogue DPS Stat Priority
- Subtlety Rogue DPS Gear and Best in Slot
- Rogue DPS Frost Resistance Gear
- Assassination Rogue DPS Stat Priority
- Additional Hunter Tuning in Season of Discovery: April 23rd
- Damage Reduction Testing in PvP
- Periodic Free Realm Transfers Coming to Season of Discovery
- Season of Discovery Class Tuning: April 23rd
- Righteous Orbs No Longer Drop in Phase 3
- Honorable Kills Granted This Week Related to Bloodstained Commendations
- Season of Discovery Phase 3 Class Tuning: April 16th
- Dragonflight 10.2.6 and SoD Hotfixes, April 11th
- Latency Issue of Wow!
- WoW foreign language
- Fire mage bug??
- Macro and/or Vuhdo help...
- Power Word: Shield Macro
- Path of Exile Build Guides
- Path of Exile Guides
- Path of Exile League Starters
- Path of Exile Leveling Guide
- Path of Exile Gameplay Hub
- The Forbidden Sanctum Hub
- Class guides
- Mythic+ guides
- Dragonflight guides
- Dungeon & Raid guides
- Leveling guides
- Barbarian builds
- Druid builds
- Necromancer builds
- Rogue builds
- Sorcerer builds
- Tank builds
- Bruiser builds
- Ranged Assassin builds
- Melee Assassin builds
- Healer builds
- Support builds
- Raids & Dungeon guides
- Profession guides
- Reputation guides

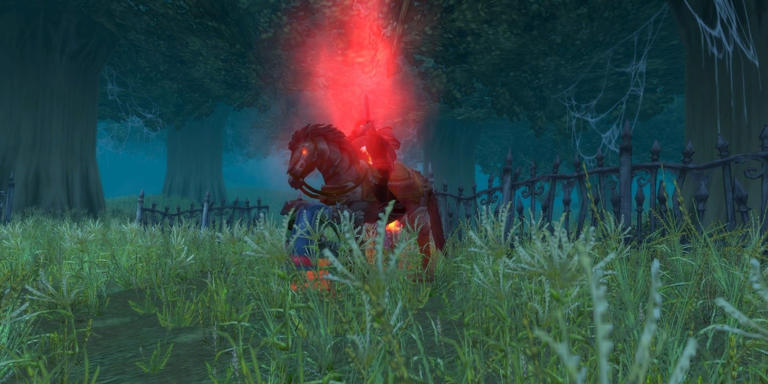
How To Get Dark Rider Runes In WoW: SoD
Quick links, the rune rewards, where to start the dark riders quests, how to use ariden's sigil, all dark rider locations, the dalaran relics.
The plethora of runes added to World of Warcraft: Classic during its Season of Discovery all have new and intriguing ways of obtaining them. The methods of obtaining these ability-granting items include: finding hidden treasures, killing unique monsters, and performing obscure rituals. Additionally, some runes can be discovered through doing covert favors for NPCs, or even completing secret quests.
World Of Warcraft: Season Of Discovery - How To Get To The Sunken Temple
Unlike some other rune-rewarding quests, the Dark Rider questline is not class specific, nor does it reward only one or two certain runes. The final quest of this line awards a rune specific to the class of the character that completes it.
Each class can add a powerful rune to their collections by completing the quests tied to the Dark Riders. Depending on your character's build, some of these runes can be a must-have for your adventures.
The runes, listed by class, are:
In order to find the Dark Riders and obtain your precious runes, you first need to travel to the place of their inception: Deadwind Pass in the Eastern Kingdoms .
The tower looming in the south of this zone, Karazhan, was where these former con-artist salesmen were cursed into their current state by Medivh, the last Guardian of Tirisfal. Suitably, the quests that send you to seek them out begin in the abandoned camp of their leader, Ariden's Camp.
Ariden's Camp is found at the back of a crag in the northeast corner of Deadwind Pass , just north of the road running through the zone. The entrance to this crag has direct access to said road, and the crag itself is short and free of any hostile mobs.
Once you reach this abandoned camp, you will find a friendly human mage NPC investigating the site. This Dalaran Agent will lament the theft of certain Dalaran Relics from the Kirin Tor's magical city by the Dark Riders, and will ask you if you'd like to help her recover these artifacts.
If you agree to her offer through her dialogue options, she will give you the Ariden's Sigil trinket ,
which will allow you to find and confront the Dark Riders.
There are seven Dark Riders to find, and seven Dalaran Relics to retrieve from them. They are scattered across both the Eastern Kingdoms and Kalimdor.
While the Dalaran Agent doesn't offer any official quests concerning the Dark Riders, she does say that they have dispersed across Azeroth, and that they normally will only be seen if they wish to be. Luckily, the trinket she gives you, Ariden's sigil, will force the Dark Riders to reveal themselves and become attackable when you use it .
All the Dark Riders are level 41 elite mobs, so bring a friend or two on your journey, or be several levels higher than them.
At each location where a Dark Rider lurks, they will be invisible. You will only know that they are present by two subtle phenomena occurring if you have Ariden's Sigil equipped. First, a greenish-purplish ghostly face will flash above your character's head .
Second, a buff will appear in the top right of your screen called Dark Presence . If you encounter these, use Ariden's Sigil to pull the lurking Rider out of hiding, and be prepared to fight.
With each Dark Rider dropping a different Dalaran Relic, we thought that a list of which Rider drops which Relic would be helpful in tracking which ones you need, should you split your journey up into different play sessions.
The Dalaran Relics are:
While none of these relics start a quest to bring them back to the Dalaran Agent in Deadwind Pass, upon bringing them to her, she will offer seven versions of the "Curious Dalaran Relic" hand-in quest.
Once all seven are handed over to her, she will then offer the quest "A Service to Dalaran" . This quest is simply her showing you her thanks, as just talking to her completes it, awarding you one gold coin and a Supply Bag . Within this bag is your runic treasure.
You do not need to hand-in all of the Dalaran Relics at once. "A Service to Dalaran" only becomes acceptable once all seven are accounted for, however.
World Of Warcraft: Dragonflight - How To Access Classic Naxxramas
- Privacy Policy
God of War Nornir Chests: All Locations and Puzzle Solutions
Nornir Chests are just one of many different chest types to collect in God of War on the PS4 and PC. Most contain hacksilver, while others will contain runes. Nornir Chests, however, contain upgrades for Kratos, such as health and rage boosts. You’ll want to take advantage of these upgrades, but their boons are locked behind rune puzzles .
To unlock Nornir Chests in God of War , you’ll need to solve the puzzles guarding them by breaking the three seals locking them. Some runes will be easy to find, while others will take some ingenuity to destroy. This guide will show you how to find each Nornir Chest, as well as where to find each and every rune-covered seal.
Jump to a specific location by clicking the links below:
- River Pass + Witch’s Cave
- The Mountain
- Lake of Nine
- Fafnir’s Storeroom
- Tyr’s Temple
- Veithurgard
All God of War Nornir Chest Locations and Rune Puzzle Solutions
Wildwoods: 1 nornir chest, nornir chest #1: after your first battle (health upgrade).
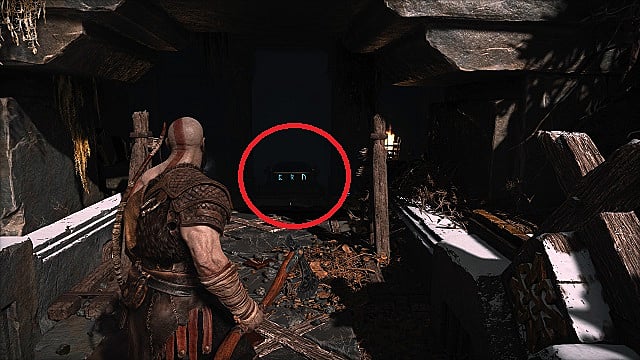
Once you’ve defeated your first set of Draugr in the Wildwoods, head straight ahead. Go past the life stone on the ground and toward the blocked passage in front of you. Break through the wood to find this Nornir chest.
- Seal 1: As you walk into the alcove, the first rune seal is immediately to your right — on the other side of the stairs. Throw your ax to break it.
- Seal 2: The second rune is to the right of the Nornir Chest, sitting against the wall.
- Seal 3: The third rune is on the left-hand side of the room in a stone sarcophagus.
River Pass and Witch’s Cave: 5 Nornir Chests
Nornir chest #1 after the revenant (health upgrade).
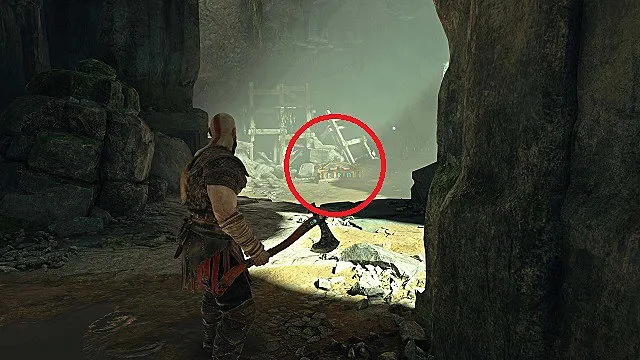
Just like with the first artifact in this area , it will take you a while to get to the first Nornir Chest in the River Pass. After you fight the Revenant, who will come after the Heavy Draugr, climb up to the second story and turn right. You’ll see the chest among some debris straight ahead.
Note: If you turn left instead of right, you’ll find a shrine.
- Seal 1: In the top right-hand corner when facing the Nornir Chest.
- Seal 2: Turn around and look upward. To the left of the bridge in the distance (not the one closest to you) and past the chain, you’ll see a second rune.
- Seal 3: Lower the bridge closest to you and go across. Once you cross over, stop and look up and left. The third rune seal is in an alcove there.
Nornir Chest #2: After the Spiked Ceiling Puzzle (Rage Upgrade)
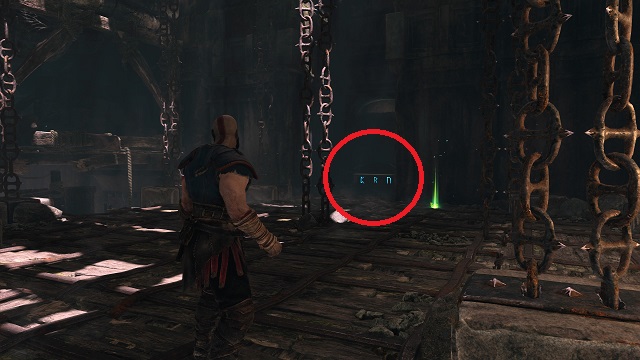
After completing the spiked ceiling puzzle (and after Atreus joins you on the other side), turn around and climb on the spike contraption. Look right and find the Nornir Chest.
- Seal 1: Turn around from the Nornir Chest and see the rune seal on a rock.
- Seal 2: From 1, turn left and look up.
- Seal 3: This one is a bit tricky. From 2, look left again and see the blue wisps of the seal behind a beam. Raise the platform you’re on to get a good angle from which to throw your ax.
Nornir Chest #3: After the Sand Puzzle and Troll Fight (Health Upgrade)

Once you’ve completed the sand puzzle, you’ll go through a cavern and fight a troll on the other side. Defeat them and look to the left of the area. At the edge, you’ll find this Nornir Chest. The seals here are bells, and you must ring them in quick succession to open it.
- Bell 1: Just above the chest.
- Bell 2: Look left and up. This bell is right behind you on the cliff overlooking the waterfall.
- The easiest method is to hit the bells in this order: 3,1,2 . You’ll only have a few seconds to strike each bell. You’ll get an Idunn Apple for your troubles.
Nornir Chest #4: In the Witch’s Cave (Cannot Reach on First Visit)
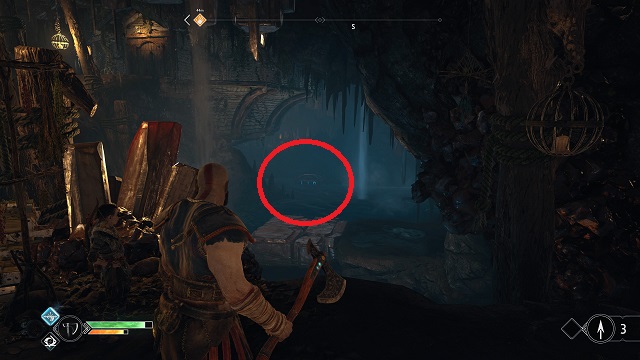
This Nornir Chest can be found in the witch’s cave after you beat the nightmares. From the bridge, turn around and look toward the back of the area (toward the witch’s house). Down below, you’ll see the chest in the water.
You can’t get this Nornir Chest yet, though. You can revisit when Atreus can build bridges.
Nornir Chest #5: Exiting the Cave Through the Well (Cannot Reach on First Visit)
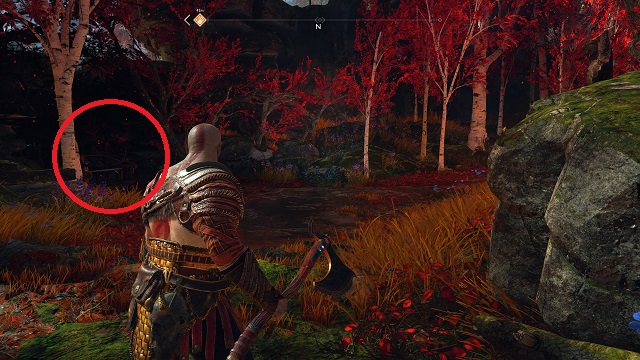
Since you’ll also need Atreus to get you across the water in the cave, you won’t be able to exit through the well the first time you visit this area. But once you can reach the Nornir Chest, you’ll need the Winds of Hel to open it. We’ll update this guide with a screenshot and steps when we access this area.
Foothills: 1 Nornir Chest
Nornir chest #1: after meeting sindri.

Eventually, you’ll meet Brok’s brother, Sindri. After speaking with him, leave his camp and go straight ahead. Enemies will spawn and a protracted conflict will ensue. Once you’ve defeated all of the enemies, head up the hill and go right. In the back of the area, you’ll find this Nornir chest.
To open it, you’ll need to align each of three turnable poles to the runes on the chest. It does matter which poles show which runes since each pole doesn’t have all of the runes carved into them. Here’s what you need to do:
- Pole 1: Directly to the left of the Nornir Chest. This one should be turned to the “squiggly” symbol .
- Pole 2: Turn around and go back down the hill. Turn left, and you’ll see this pole nestled in the cliff just above eye level. This one should be turned to the “P” symbol .
- Pole 3: Turn right and follow the path around to the fallen tree. This pole will be mostly obscured by the poisonous fog. Throw your ax at the fog pole to reveal the rune. This one should be turned to the backward “B” symbol .
Alfheim: 4 Nornir Chests
Nornir chest #1: light elf sanctuary (health upgrade).
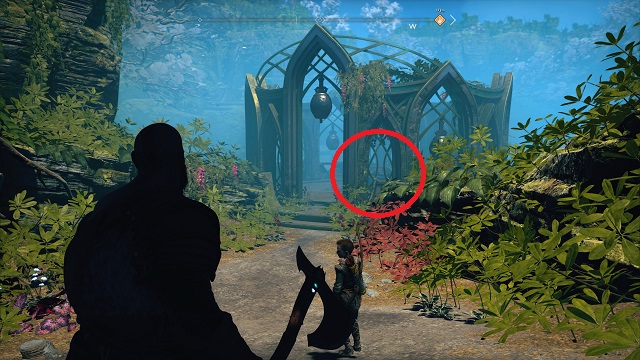
After defeating the enemies on the beach at Light Elf Sanctuary, follow the path until it forks. Take a left and you’ll come to the area pictured above. The Nornir Chest is inside the shelter.
There are no runes on the bells in this area, but the sequence to open the chest is this:
- The bell above the doorway
- Turn left and ring the third bell
- Turn left and ring the sixth bell
Inside the Nornir Chest, you’ll find an Idunn Apple .
Note: If you don’t know how to get to Light Elf Sanctuary, turn right as soon as you enter the Lake of Light. Go all the way to the end. Then turn right and follow the channel around. You’ll find the shore and can dock there.
Nornir Chest #2: Ringed Temple Trench (Health Upgrade)
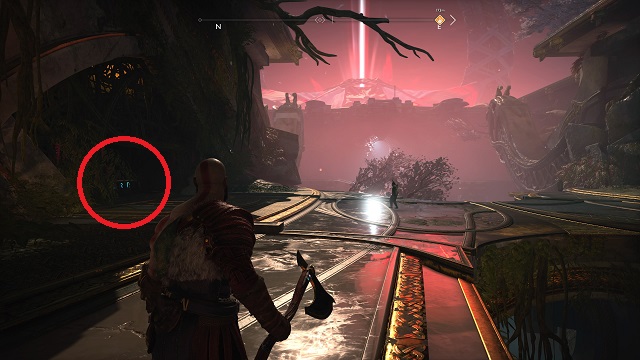
After you enter the Ringed Temple, prepare yourself for a fight against the Dark Elves. Once you’ve defeated them, continue along the trench on the left side. Eventually, you’ll come across the next Nornir Chest nestled in the wall.
Go to the right side and activate the wheel so that the middle section in front of you descends. Throw your ax to cement it into place.
- Seal 1: Drop down. Across the platform in front of you.
- Seal 2: Turn around. On the wall behind the wheel.
Now climb back up and turn the wheel all the down so that both pieces of the floor (the middle part and the part you’re standing on) descend. Throw your ax to cement it into place.
- Seal 3: Turn around. Climb up the ledge to find it nestled in the wall.
You’ll get an Idunn Apple for all your efforts.
Nornir Chest #3 Ringed Temple Sealed Doors (Rage Upgrade)
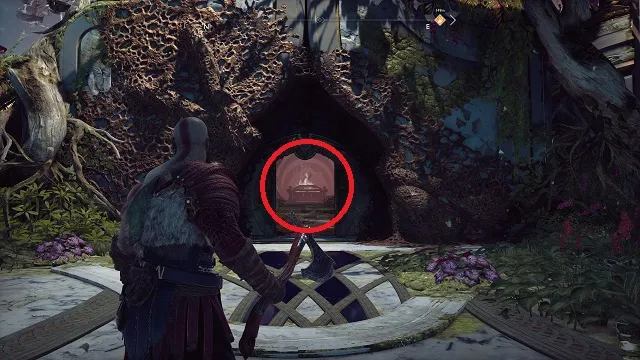
When you reach the Ringed Temple proper, the blue doors in front of you will be locked. Before continuing with the story, turn left and follow the steps downward toward a Nornir Chest. At the bottom, turn right, and you’ll see a gate with two nodes, one holding it shut and the other hanging from the ceiling behind. Throw your axe and destroy both at the same time.
Once the gate is open, you’ll need to ring three bells in quick succession.
- Bell 1: At the end of the corridor above the chest.
- Bell 2: To the left of the gate, nestled in the wall.
- Bell 3: Behind you, turned at an angle.
There’s no easy way to open this chest other than being fast. We found that the sequence 3,2,1 was most effective . Claim your Horn of Bloodmead .
Nornir Chest #4: At the Gate (Rage Upgrade)
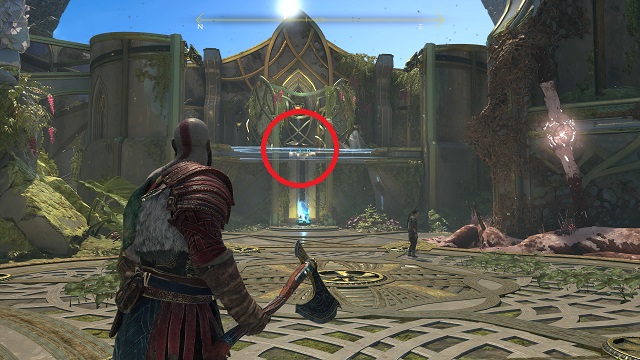
After Atreus receives the ability to build light bridges, you’ll eventually make it back to the temple’s main doors, the ones you could not near Nornir Chest 3. But don’t go through the doors just yet! Instead, turn around and place the crystal in the socket under the shelter.
Once the light bridge is created, climb to the top to find the fourth Nornir Chest. Opening this one is another test of speed and accuracy.
- Bell 1: Inside the shelter, just above the chest.
- Bell 2: Above the stairs on the right (where you climbed up).
- Bell 3: Outside the window on the opposite side of Bell 2.
A Horn of Bloodmead will be inside.
The Mountain: 2 Nornir Chests
Nornir chest #1 inside the mountain (rage upgrade).
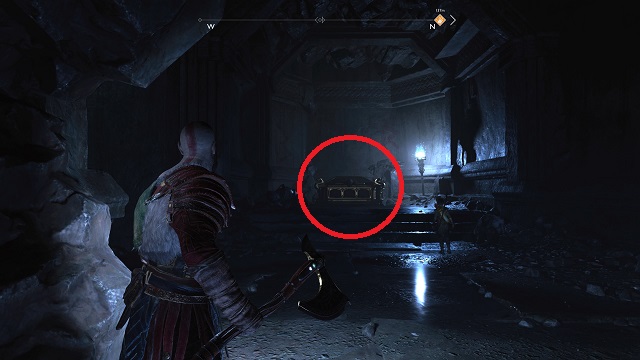
After you complete the light puzzle when you first enter the mountain (where the deer god sits on the throne), a passageway will open on the right side of the room. Go through and follow the path. After fighting the Revenant, climb up the ledge and defeat all of the Draugr.
From the ledge you originally climbed to get into this area, go left. Have Atreus create a lightbridge and go up it. You’ll find this Nornir Chest there. And like the chest in the Foothills, you’ll need to align runes on three turnable poles.
- Pole 1: At the foot of the bridge to your right. This pole should show the “R” symbol.
- Pole 2: Go to the ledge you climbed to get in this area. Look up and left to find it nestled on the cliff above. This pole should show the “B” symbol.
- Pole 3: Drop down off the ledge from Pole 2 and turn immediately right. This pole should show the “N” symbol.
You’ll be rewarded with a Horn of Bloodmead .
Nornir Chest #2: After Getting Shock Arrows, Where Hel-Walkers Worship (Health Upgrade)
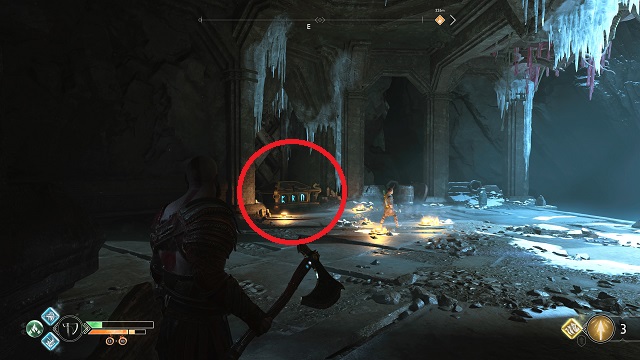
After finding Artifact 3 at the bridge and using the sap bucket there to make a new path, you’ll pass an alcove covered in sap. It won’t have a crystal to shoot.
However, move toward the Hel-Walkers worshiping ahead. You’ll they are worshiping the next Nornir Chest. Defeat them and use the sap dispenser to open the alcove that was previously locked (there is also a Shrine in the alcove).
- Seal 1: In the room with the shrine. Turn right and look up.
- Seal 2: Go back to the room with the sap dispenser and use the sap to lower the bridges. As you cross the bridge, look right. There is an opening with the Seal inside.
- Seal 3: After defeating the enemies across the bridge, use the wheel to raise the bridge to the next level. Freeze the gears next to it. Go up the bridge and look right. The Seal is along the wall.
You will receive an Idunn Apple for your efforts.
Lake of Nine: 4 Nornir Chests
Nornir chest #1: lookout tower’s spike trap (health upgrade).
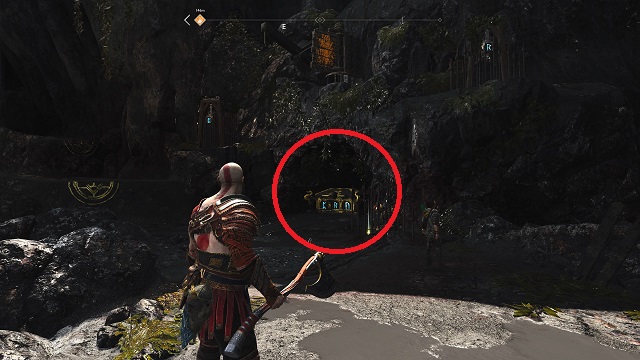
Go to the end of Tyr’s Bridge (toward the Foothills) and take a right. Drop down and head straight. After a few steps, you’ll see a Nornir Chest on your left. You’ll need to ring three bells to open this one — but they’re stuck behind three spike traps. To lower the spikes, hit the turnable pole above the chest.
- Bell 1: To the left of the turnable pole.
- Bell 2: Up and right of the Nornir Chest.
- Bell 3: Right of Bell 2.
Claim your Idunn Apple .
Nornir Chest #2: On the Shore at Forgotten Caverns (Health Upgrade)
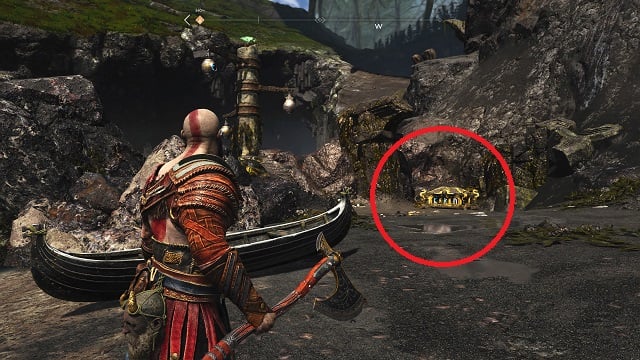
You really can’t miss this Nornir Chest. You’ll see it on the shore as soon as you dock at Forgotten Caverns. Take out the enemies first, then head to the left to find the seals. They’re all in one place this time, but the puzzle is a bit different.
The seals are on individual rotating arms. Hit one, and all of the arms will spin. Hit another, and the arms will spin faster. You only have a few seconds to hit all of them, so the best sequence is: Bottom, Middle, Top or Top, Middle, Bottom.
Hitting the middle seal second stops all of the seals from spinning . Complete the puzzle and open the Nornir Chest to get an Idunn Apple .
Nornir Chest #3: Light Elf Outpost After Water Descends Second Time
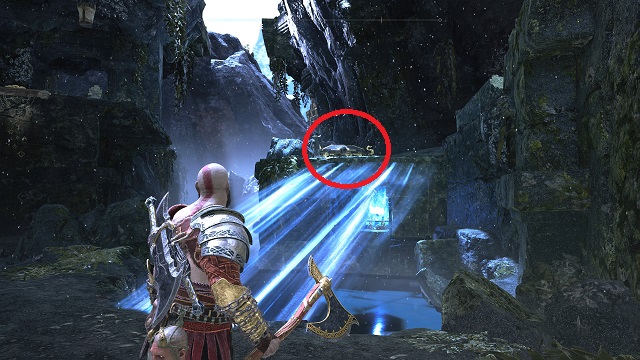
After the water in the Lake of Nine descends a second time, Light Elf Outpost will be revealed. It’s to the left of Helheim Tower — the area with the ruins in the water. There’s a Level 5 Troll on the island, as well as a handful of high-level poison enemies.
Defeat your adversaries and look to the left of the gate. Smash the boards to reveal a crystal. Create a light bridge up to the Nornir Chest.
- Seal 1: Look toward the cliff behind the Nornir Chest. The seal is at eye level on the opposite side of the ruins.
- Seal 2: From the chest, turn right. Go through the gate and stop. Turn right again and look out to the broken bridge in the water. The seal is on the column closest to you.
- Seal 3: From there, go left and down the path. Follow it all the way around — until you can either climb up the wall or down the chain. The seal will be nestled in the gate wall in front of you.
Nornir Chest #4: Cliffs of the Raven Using Winds of Hel

Another area that will be revealed after the water in the Lake of Nine descends a second time. Dock at the new landing at the Cliffs of the Raven. Make your way around the path, and you’ll eventually come to the Nornir Chest naturally. To destroy the seals, you’ll need to clear out the growth found here, as well as use the Winds of Hel to select the correct runes.
Note: To select the runes on the pillars around the area, activate each pillar with the Winds of Hel and let the runes rotate. When the rune you want appears, remove the Winds of Hel from the node to another node. That final step will lock the rune into place, ultimately giving access to the Nornir Chest .
- Seal 1: To the right of the Nornir Chest up on the highest cliff. Should show the “R” symbol.
- Seal 2: To the right of the Nornir Chest, but on the same level as the Nornir Chest. Should show the sideways “N” symbol.
- Seal 3: To the left of the Nornir Chest, up on the cliff. Should show the “P” symbol.
Fafnir’s Storeroom: 1 Nornir Chest
Nornir chest #1: the forest area before the storeroom (rage upgrade).
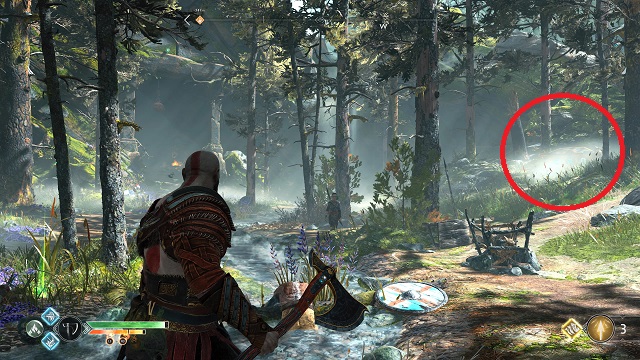
After passing Sidnir, you’ll crawl through a cliff and exit in a forest area. As you make your way up from the crawlspace, you can find a Raven perched on a branch in the stream (on the left side, before you climb the first ledge).
Continuing forward, you’ll encounter Reavers. Defeat them and look to the right side of the area for the Nornir Chest. The seals for this chest are once again bells.
- Bell 1: Directly above the Nornir Chest.
- Bell 2: Up and to the right of the chest.
- Bell 3: Above the waterfall at the far end of the area.
The reward for opening this Nornir Chest is a Horn of Bloodmead .
Helheim: 1 Nornir Chest
Nornir chest #1: after you get the “round 2” trophy (rage upgrade).
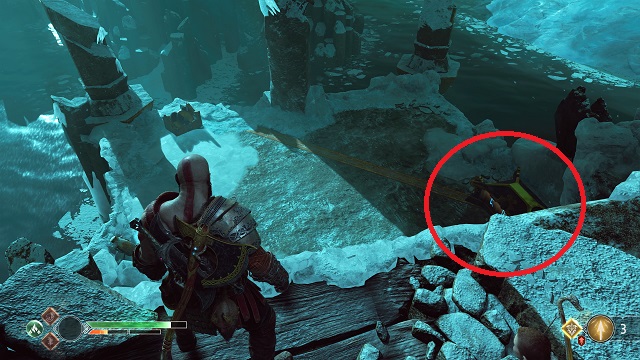
When you return to Helheim, go straight ahead and look down. This chest is below on the right-hand side of the screen. You can’t get this one quite yet, but follow the story path for a few more minutes, and you’ll be able to nab it.
Eventually, you’ll come to a ship. But instead of boarding it and continuing your journey, follow the path. You’ll end up at the Nornir Chest.
- Seal 1: There’s a giant block to the right of the Nornir Chest. Move it halfway out and then step into the gap to the left. The back of the block will be open and the seal will be inside.
- Seal 2: Move the block all the way out. This seal is behind the block.
- Seal 3: Climb the block after moving it completely out. Look to the right of the chest. The seal is on the pillar in the water.
Tyr’s Temple: 1 Nornir Chest
Nornir chest #1: behind the spiked traps in tyr’s vault (symbol of bounty).
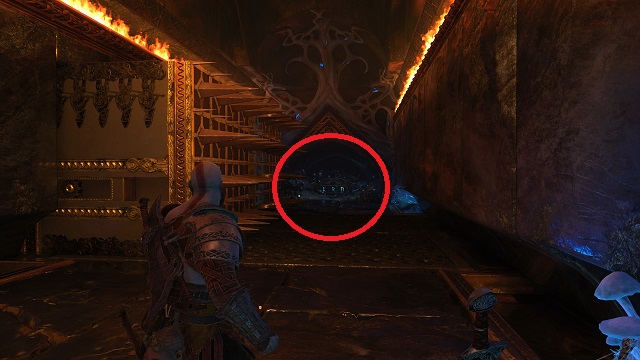
As you move through the story, you’ll come to Tyr’s Vault. The security here is intense and stands in your way. The main hall has three concentric rings that require you to use Hel’s Wind to get past. Each time opens a new area of challenges.
When you use Hel’s Wind on the second ring, you’ll open two doors. The one on your right will have a Nornir Chest, which is pretty hard to miss.
- Seal 1: In the room with the wheel. Turn around from the wheel to find it nestled in the wall behind you.
- Seal 2: Go into the room with the spiked traps coming down from the ceiling. Look on the right arm of the first trap.
- Seal 3: Go to the Nornir Chest and turn around. The seal is in a small hole at the bottom of the first spiked contraption.
Veithurgard: 1 Nornir Chest
Nornir chest #1: to the left of the dragon on a cliff.
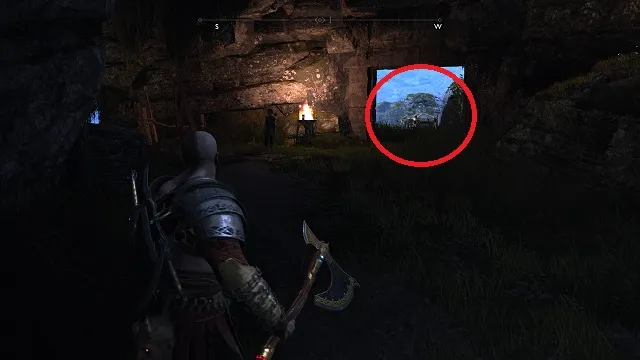
Go to the dragon tether and turn left. Continue up the path past the bridge and through the Stonehenge-like worship area. Turn right, up the steps, and right again. Climb up the small ledge and the Veithurgard Nornir Chest will be straight ahead on the cliff.
- Seal 1: As you approach the Nornir Chest, turn right as you get to the doorway. The seal will be in the wall.
- Seal 2: Continue past the Nornir Chest until you get to the small bridge. Turn right and the seal is nestled in the rocks.
- Seal 3: Continue from the last seal and turn right when the path branches. Go to the end of the path, which overlooks the water. The last seal is out in the rocks.
Konunsgard: 1 Nornir Chest
Nornir chest #1: after collecting the mythic items.
The Nornir Chest at Konunsgard is by far the most intensive Nornir Chest to find in all of God of War . It requires that you complete all of the Dwarven side quests presented to you by Brok and Sindri. Then(!), you’ll still have to go through the entire area before getting to it.
However, after you’ve acquired the three mythic items you’re tasked with retrieving, you’ll come across a balcony on your path back. The Nornir Chest will be there. To activate the seals, you’ll need the Winds of Hel and quick reflexes.
- Activate the blank rune with the Winds of Hel
- Remove the winds when the rune is still blank to activate it
- Spin the other bell with the Winds of Hel
- Hit the stationary bell
- Throw the ax to hit the other two bells
Performing all of those steps should open the Nornir Chest for you. Finish the quest and get the Like Oil and Water trophy for completing all of Brok and Sindri’s side quests.
Related guides :
- All Hidden Valkyrie Locations
- How to Get Smoldering Embers
- Best Light & Heavy Runic Attacks
- How to Get the Frozen Flame
- What is Anchor of Fog? Answered
- Where to Find Every Chaos Flame
- Where to Find Every God of War Dragon
And that’s how you find all of the Nornir Chests and solve their rune puzzles in God of War . There are tons more collectibles to find along your journey. From artifacts to shrines and Odin’s Ravens , make sure to check out our other God of War guides while you’re here.
- Privacy Policy
- Corrections Policy
- Ethics Policy
- Fact-checking Policy
- Ownership Policy
- Looking for Eguides?
All 26 Ancient Glyph Locations in New World
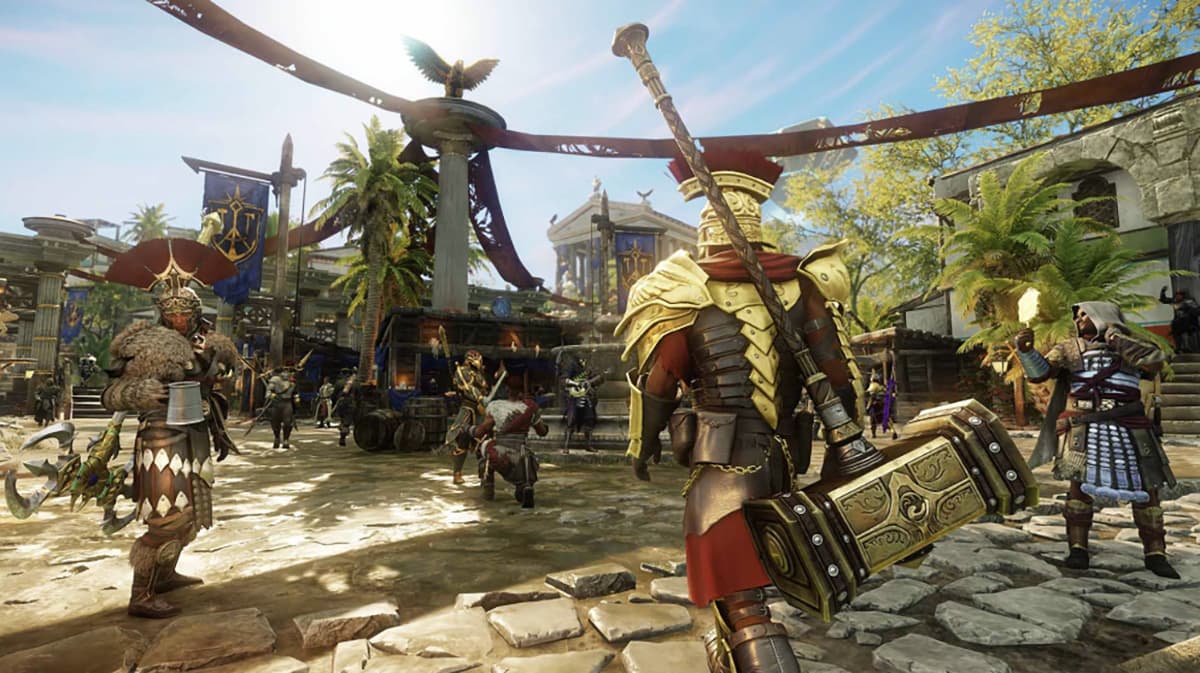
If you plan to explore the newly added Brimstone Sands region in New World, you’ll likely encounter Ancient Glyphs eventually. These are essential for opening Glyph chests in the new area for various rewards, making exploration a little more complicated than just finding a supply crate and opening it. If you’re interested in learning more, continue reading to find a comprehensive guide of all 26 Ancient Glyph locations within Brimstone Sands in New World.
Related: All New World Hemp Locations: Where to Find Hemp in New World
There are 26 Ancient Glyphs in total so far that you can find and interact with in New World. While some of these simply require some time and dedication, others have quests as unlock prerequisites. You’ll also have to make sure you can access Brimstones Sands first without instantly dying. In other words, you’ll have to meet the requirements for physically entering the region before you can even consider finding these Ancient Glyphs.
Related: How to Access Brimstone Sands in New World
If you’re already in the region and are eager to start searching for Ancient Glyphs, then don’t worry, you don’t have to wait any longer. Without further ado, let’s head straight into the list of all 26 Ancient Glyph locations:
- DINGTA, Wisdom – Above : Found at the Palace of Nekhbet. Climb through the palace and look along the building edges until you find several bird nests along the walls. Carefully jump down these ledges until you find one with an extra piece of stone jutting out the center. Jump here to find and unseal the first Glyph.
- JIIBA, Wisdom – Shadow: Found at the Beds of Ta-Bitjet. Venture east through the area, ascending the staircases along the way. Rather than heading to the top, go south and jump down the rocks. You’ll find a small cave entrance facing north, which you can enter to access the Glyph.
- KEYYA YIB’, Wisdom – Crossroads: Found in Atum’s Way. Head into the center of the area and fight through the monsters until you reach the pillar. The Glyph is inside pillar’s side.
- TEYII, Wisdom – Journey: Found at the Great Shrine of Thoth. When you first reach the area, head up the initial left or right staircase and go towards the center of this beginning area. You’ll find a small shrine in the wall alcove with the Glyph facing toward you. If you’re at the shrine already, go down the staircases toward this area.
- WETZUU, Wisdom – Gift: Found in Oasis Spontanea from Aqua Anuket. When you reach Aqua Anuket, venture through the area until you get to the massive wall. Travel along this bridge until you reach the very end and drop down to the ledge directly below. The Glyph is hidden under the stones here. Make sure not to drop all the way to the ground!
- CRUUJ, Wisdom – Sun: Found at Heliopolis. Head to the very top of the area, defeating the many monsters along the way until you find a shrine. The Glyph is in the center of this shrine. Bring a group here so that you can clear out the mobs here!
- AMBA, Wisdom – Mountain: Found at Diospolis. Upon entering the area, you’ll see a sealed door that you’ll unlock as you progress through the main story. Follow the path inside to find the Glyph.
- PIMBII, Wisdom – Dawn: Found at Kephri Arena near Heliopolis . With a group, defeat the boss that spawns here. The Glyph will appear afterward in the center of the arena for you to unseal.
- D’UN-YICH, Wisdom – Ordeal: Found at the Pools of Orcus. If you’re traveling here from the Brimstone Sands Settlement , go along the southern road and head southwest. You’ll find a fork in the road, with the western route leading to the oasis. Take this route and, after reaching the second fork, head directly south towards the small pool of water. The Glyph pillar is placed along a large boulder here.
- HIMDE, Wisdom – Ocean: Found at the Temple of Isis. Head south until you find the Glyph pillar on a large platform, surrounded by high-level enemies.
- AABER, Wisdom – Day: Found at the Lamp of Osiris. Once you enter the main area with the Radiant Automation, loop around it and descend the northeastern staircase. Go down this path, squeezing through the hole in the wall along the way. Continue moving this way until you find the Glyph pillar in a wall alcove guarded by two enemies.
- ITKA, Wisdom – Below: Found at the Place of Pillars. Parkour along the pillars, heading west, until you find the Glyph along the stone walls. The pillars you must jump across have “X” platforms to land on, differentiating them from the rest. They also have white, paint-like markings on them. Be careful when unsealing the Glyph since doing so will unleash a very powerful and aggressive goat king that will try to thwart your plans.
- DZUU, Wisdom – First: Found in Heru Plaza. Upon arriving at the landmark, head northwest until you find a small pond of freshwater surrounding the Glyph pillar. You’ll know you’re close when you face west and see a golden bird along the wall.
- J’IJ, Wisdom – Sealed: Found at the Necropolis of Sutekh. Teleport here and make your way to Sutekh’s Tomb. Behind the tomb is a stone balcony that houses the Glyph pillar.
- TSADZUI, Wisdom – Wall: Found at the Great Wall of Nebet-Het. Climb up the staircases to the very top of the structure. The Glyph pillar is in the center of this area, surrounded by a pool of water.
- HID, Wisdom – Home: Found at Hermopolis. Take the nearby teleporter after progressing through part of the main storyline to appear near the Glyph.
- B’EYEG, Wisdom – Chaos: Found at the end of the Ennead Expedition. You’ll find the Glyph after defeating the final boss of the expedition.
- RIIGA, Wisdom – Persona: Found at Arit-en-Geb. Head right to the center of the area and defeat the nearby guard before unsealing the Glyph located along the southern wall.
- EYBUE, Wisdom – Virtue: Found at Satet. Similar to the one above, go to the center of the area and look east. You’ll find a small, broken wall with the Glyph against it.
- CRUUJ’II, Wisdom – Strength: Found at the Forge of Ptah. Ascend the staircases, defeating the enemies along the way, until you reach the top section. The Glyph is along the back wall, guarded by multiple high-level monsters.
- D’UN-GA, Wisdom – Destruction: Found at Castrum Principium. You’ll find the Glyph along the stone walls in the southernmost part of this area. Like many spots on this list, you’ll encounter numerous enemies along the way, so be sure to bring a group!
- TAB’, Wisdom – Night: Found at the Ordeal of the Scorpion. After opening the initial Ancient Glyph doors, you’ll have to defeat the Scorpio Supernal boss with a group. Once you do, you’ll find the Glyph in this cave.
- B’ENGYING, Wisdom – Shield: Found at Serpent’s Pass. Rather than heading towards the main structure, continue running south until you find a small stone platform with a few guards and supply crates. The Glyph pillar is along the wall here.
- TSANGMIIJ, Wisdom – Food: Found near Castrum Victualis. Instead of entering the area, though, you can circle around it and head north past it. You’ll find a small, abandoned structure with the Glyph inside the stone pillar.
- JICH, Wisdom – Water: Found at Heka’s Cauldron. Go towards the center of the area to find a small pool of acid, with the Glyph pillar near the large central boulder.
- DUBUU, Wisdom – River: Found at Sopdu Hot Springs. Head to the northernmost pool connected to the river and run past the monsters. You’ll find the Ancient Glyph near a small, broken stone wall.
Be sure to check out the picture, created and posted by Reddit User Bsclassy, for a visual representation of where to find each Ancient Glyph in New World:
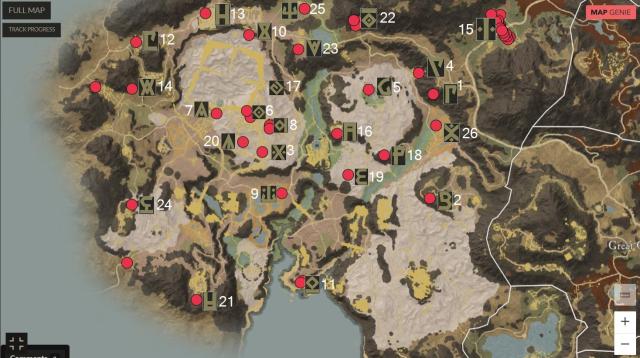
For more information about the exact locations of each Ancient Glyph, you can also check out the New World Resource Locator Map.
New World is available to play on PC through the official website . If you’re interested in learning more about the game, check out How to Change Servers , How to Declare War , and How to Play Music .
- Genshin Impact
- Call of Duty
- Final Fantasy
- Blox Fruits Codes
- Blade Ball Codes
- Fruit Battlegrounds Codes
- Haze Piece Codes
- King Legacy Codes
- Shinobi Life Codes
- Anime Champions Simulator Codes
- Peroxide Codes
- Fortnite Skins List
- Fortnite Item Shop Today
- Tomorrow's Fortnite Item Shop
- Fortnite Rarest Skins
- Fortnite Rarest Emotes
- Privacy Policy

Destiny 2 Xenophage Quest Steps Guide – Puzzle Solutions & How-to Start The Journey!
Our Destiny 2 Shadowkeep Xenophage Quest Steps Guide will walk you through everything we currently know about this Exotic Machine Gun and how-to start the quest. We've got a full look at all of the quest steps, and feature a list of the perks and weapon features.
Xenophage Perks & Stats
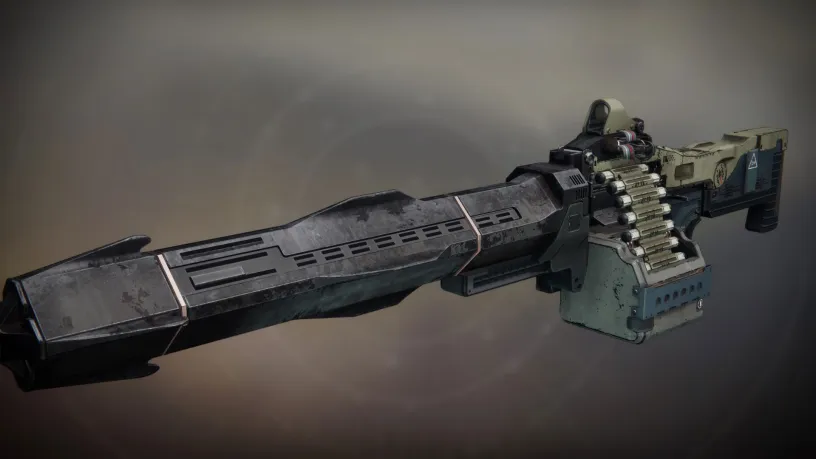
This might sting a little.
Weapon Perks
- Pyrotoxin Rounds: Fires high-powered explosive ammunition.
- Rangefinder: Aiming this weapon increases its effective range and zoom magnification. Increased projectile velocity while aiming Rocket Launchers and Grenade Launchers.
Weapon Stats
- Impact: 100
- Stability: 39
- Handling: 37
- Reload Speed: 38
- Rounds Per Minute: 120
- Magazine: 20
Xenophage Quest Steps
Starting the quest.
To start this quest, you'll need to go through the portal that is usually at the Sanctuary Landing Zone on the Moon. If it is not there, then you're going to need to do a bit of legwork. Go to Sorrow's Harbor and enter the Keep. Go down the hall and go through the door on the left. Keep following this hallway down until you get to a cave like area. You'll see a bright green light and right behind this will be a large opening to go down into the cave, and a smaller opening leading up and to the right. Jump up to the right entrance and follow this to the area you'd end up in if you took the portal. The two cave area should look like this:
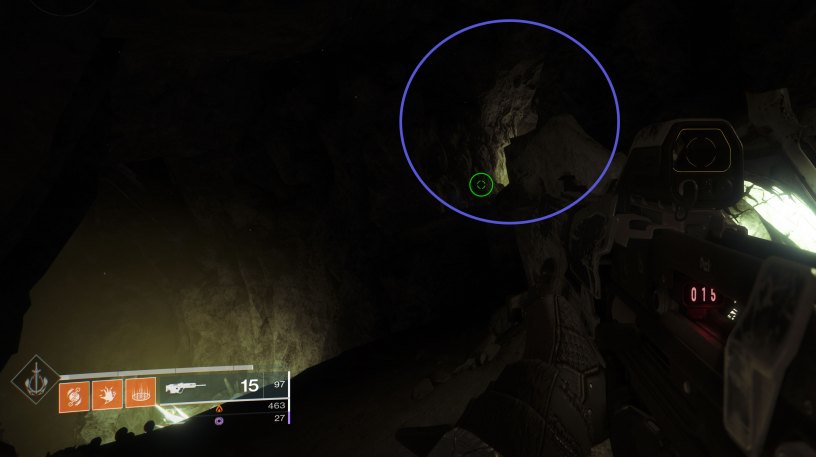
There are four statues in this room that you will need to light in a certain order (if you're facing the direction from the cave): Bottom Right, Top Right, Top Left, Bottom Left. That will unveil a chest you can open which will start you on the quest.
Around you… darkness. If you are to discover your path, you must anchor yourself to light.
The quest merely tells you to "Emerged from the Dark." To complete this step, you'll need to go to the Anchor of Light area on the moon and to this exact spot:
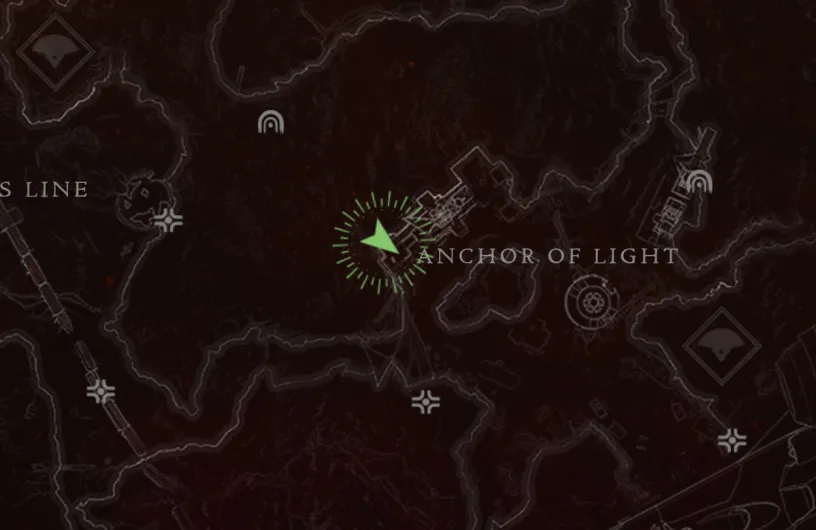
It's inside a little building, you will find an orb of light hidden behind some of the machinery:
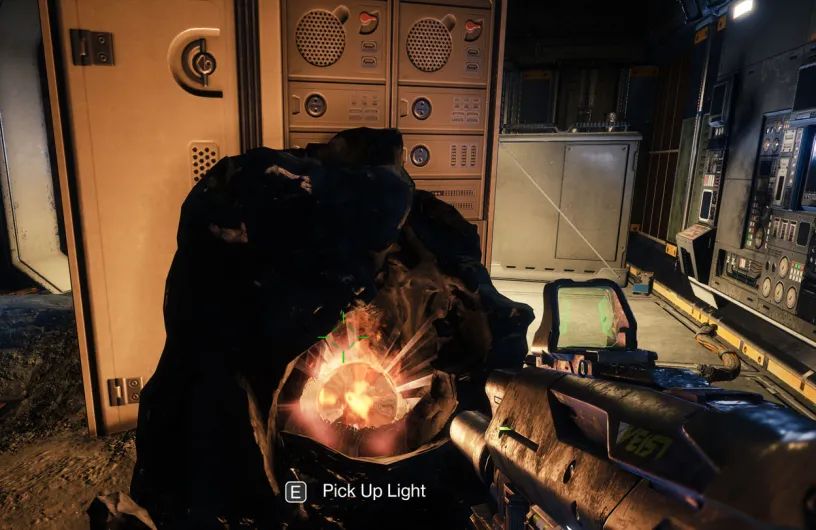
You will then need to light a bunch of torches in under a minute to complete the quest. It's best just to follow along with this video:
A light shines on your path. But you have yet to bring it into focus. Until then, your path remains among the lost.
You now need to collect four Path Fragments, one from each of the Lost Sectors on the moon. Once you complete the boss in one of those Lost Sectors, a puzzle will show up on a wall. You need to solve the puzzle by matching the six runes to the top rune.
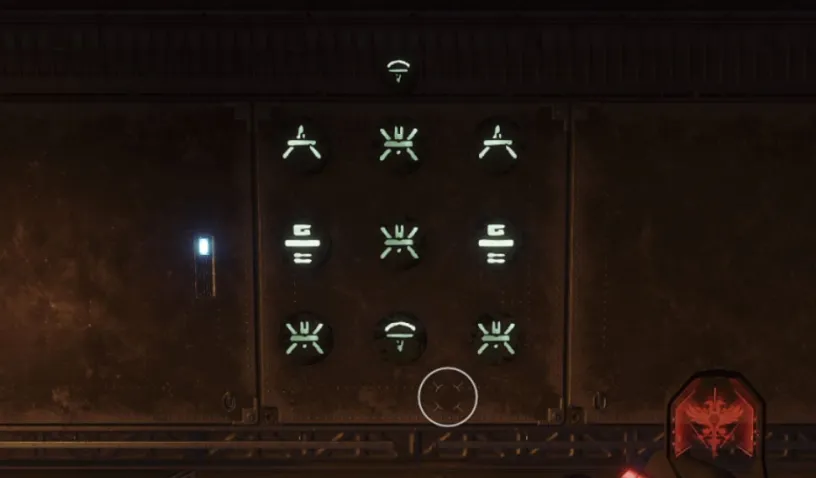
If you don't want to figure these out for yourself, here's the solutions we have right now. These solutions are from where the puzzle starts initially, if you shot it at all previously then the solution likely won't work. You can fully reset the puzzle by exiting the Lost Sector and redoing it.
- K1 Communion (Anchor of Light, Confirmed ): Bottom Left, Bottom Right, Top Middle, Top Middle
- K1 Crew Quarters (Hellmouth, Confirmed ): Top Right, Middle Left, Middle, Bottom Middle, Bottom Right, Bottom Right, Bottom Middle, Bottom Middle
- K1 Logistics (Archer's Line, Confirmed ): Top Left, Bottom Left, Middle, Middle Right
- K1 Revelation (Sorrow's Harbor, Confirmed ): Middle Right, Middle Left, Middle, Middle, Middle Left, Top Middle, Bottom Middle, Middle
If you mess up a single rune, you can shoot the rune four times to rotate it back to what it was previously.
Your path brightens, shining through the barrier of emerald, beneath a harbor built from sorrow.
Now you will head to the Sorrow's Harbor Pit of Heresy Dungeon. You don't need to complete the entire dungeon to finish this part of the quest. After the first mini-boss encounter, you'll come to a jumping section with a bunch of doors. You need to jump to the top left door, anyone on your fireteam can do it an you will receive credit for it.
Here's a video if you get confused:
The Pariahs stand guard over far more than just despair, for within these tunnels lie many secrets.
This part is really confusing, so I'm going to recommend you watch the following video on how-to complete it. You basically need to now light a path within the dungeon. There's some glowing platforms you'll need to engage, and then you'll need to bring the orb of light to braziers like you did in the Emergence step.
Slay Volmâr, the Tempted
The end of your path is in sight. Defeat those who would keep you from it.
It's time to face the boss, there are four elemental orbs in the boss room. Each of these corresponds to a particular elemental damage type: arc, solar, kinetic, void. Each player on the team will get a "dread" buff of a specific name. You will need to grab the orb in the middle of the room and place it into the correct slot.
- Solar (Fiery Dread) = X Symbol
- Kinetic (Neutral Dread) = Division Symbol (two dots and a line in the middle)
- Void (Abyssal Dread) = A Symbol
- Arc (Thunderous Dread) = Downward Triangle
Once you dunk the orb, you will then have 15 - 20 seconds to damage the boss with that particular elemental damage type. Keep doing this until the boss has been defeated!
Return to Eris Morn with the Hive bug.
That's everything! Head back to Eris Morn and collect your prize.
13 Comments
Cancel reply.
Comments are on moderation and will be approved in a timely manner. Please read the following rules before commenting:
- All comments must be on topic and add something of substance to the post
- No swearing or inappropriate words
- No asking or begging for anything free
- Do not attempt to start a poll in the comments
- Comments in all CAPS will be removed
- We reserve the right to remove a comment for any reason
- Do not impersonate a staff member or influencer
Save my nickname and email in this browser for the next time I comment.
This site is protected by reCAPTCHA and the Google Privacy Policy and Terms of Service apply.
Home > Game Guides
- Game Guides
Destiny 2: Shadowkeep The Journey Guide
by enricofairme · Published October 29, 2019 5:50 PM · Updated October 29, 2019 7:44 PM
In Destiny 2 there is an Exotic Quest called The Journey. This Exotic Quest takes you around the Moon as you attempt to find the Exotic weapon. To help you complete this quest, use our The Journey Guide.
Note : Guide is still updating.

Reaching Enduring Abyss
To start you want to make your way to the area you meet Eris Morn overlooking the Pyramid. This area is in Enduring Abyss which can be accessed through a Memory portal, or by travelling through Sorrow’s Harbor to the Scarlet Keep. The portal way is rather straightforward, but requires having a Memory quest to turn in.
If you don’t have a Memory quest to turn in, fast travel to Sorrow’s Harbor and make your way inside the Scarlet Keep (located in the north). Inside the keep head forward until you see some glowing green rocks. Take a left here and head forward through the hallway.
As you walk through the hallway you will reach a new area called Enduring Abyss. After the text for this area walk forward until you need to drop down. Don’t drop down. Instead look along the right wall for a hole. Jump to the hole then walk through the corridor to reach the area overlooking the Pyramid.
Interact With the Four Statues to Get Quest
In the area overlooking the Pyramid you will find four statues. Go up to each statue and interact with it (“emerge from the dark”). Once you’ve done this with all four statues a chest will appear. Interact with the chest to receive the quest step Emergence, which is part of The Journey Exotic Quest.
Emergence: Anchor of Light
Once you have the Quest make your way to the Anchor of Light area. I found the the video from YouTuber Spider above to be useful in guiding you where you need to go. To complete this portion of the Exotic Quest you need to pick up a light source then light torches in a specific sequence. Once you’ve lit all the torches you will earn the Pathfinder mission step.
Pathfinder: Find the Path Fragments
The Pathfinder mission step is split into four objectives. You need to find Path Fragments in Anchor of Light, Sorrow’s Harbor, Hellmouth, and Archer’s Line. All of the Path Fragments can be found in the exits of each areas Lost Sector so you will need to complete each one. To help you find the exact locations, consult the the more indepth locations below.
Anchor of Light Path Fragment
Go to the Lost Sector in Anchor of Light. Make your way through the Lost Sector and exit via the door next to the Chest (elevated above the chest ledge). Go up the stairs and you will see some symbols on the wall in front of you. To solve this puzzle complete match all nine symbols to the one show on top of the puzzle. You can change the symbol by shooting. Once you match the symbols a chest appears with the Path Fragment inside it.
Solution (Puzzle Spawn) : Bottom Left, Bottom Right, 2x Top Middle.
Sorrow’s Harbor Path Fragment
Go to the Lost Sector in Sorrow’s Harbor. Make your way through the Lost Sector and exit via the door next to the Chest (on the catwalk by the Chest). Go up the stairs and you will see some symbols on the wall to the right of you. To solve this puzzle complete match all nine symbols to the one show on top of the puzzle. You can change the symbol by shooting. Once you match the symbols a chest appears with the Path Fragment inside it.
Solution (Puzzle Spawn) : Right Middle, Left Middle, 2x Middle, Left Middle, Top Middle, Bottom Middle, Middle.
Hellmouth Path Fragment
Go to the Lost Sector in Hellmouth. Make your way through the Lost Sector and exit using the stone platform near the Chest. On this stone platform is the puzzle. To solve this puzzle complete match all nine symbols to the one show on top of the puzzle. You can change the symbol by shooting. Once you match the symbols a chest appears with the Path Fragment inside it.
Solution (Puzzle Spawn) : Top Right, Left Middle, Middle, Bottom Middle, 2x Right Bottom, 2x Bottom Middle.
Archer’s Landing Path Fragment
Go to the Lost Sector in Archer’s Landing. Make your way through the Lost Sector and exit using the building behind the chest that opens when you defeat the boss. On your way out of this building you will see the puzzle on the wall to your right. To solve this puzzle complete match all nine symbols to the one show on top of the puzzle. You can change the symbol by shooting. Once you match the symbols a chest appears with the Path Fragment inside it.
Solution (Puzzle Spawn) : Top Left, Bottom Left, Middle, Middle Right.
Once you’ve collected all the Path Fragments from the puzzles above you will unlock the Descent objective. This objective takes you to into the Dungeon on the Moon.
Path Uncovered: Pit of Heresy
For this next portion of the quest make your way into the Pit of Heresy Dungeon. In this Dungeon you want to complete the first encounter. You then need to find a hidden pathway. Use the video by WoW Quests above to find the exact location. You will probably need a second or even third to get this far in the Dungeon. Once you reveal Path’s End you unlock the Discovery quest step.
Thoughts on our The Journey Guide? Drop a comment in The Pit below.
Tags: Destiny 2 Destiny 2: Shadowkeep
enricofairme
A lifelong gamer who has devoted the last six years to the creation and development of "Hold To Reset," a website tailored by gamers for gamers. Yell your hot takes at him on X .
- Next story Luigi’s Mansion 3 Prologue Guide
- Previous story Destiny 2: Shadowkeep How to Start Xenophage Exotic Quest
You may also like...
Ascendant hunter – destiny 2 guide.
January 5, 2021 5:53 PM
by enricofairme · Published January 5, 2021 5:53 PM · Last modified October 5, 2023 7:19 PM
Destiny 2: Recovering the Past Guide – How to get the Perfect Paradox
December 17, 2019 5:41 PM
by enricofairme · Published December 17, 2019 5:41 PM
Destiny 2: Weekly Reset (November 19)
November 19, 2019 10:00 AM
by enricofairme · Published November 19, 2019 10:00 AM · Last modified November 26, 2019 1:02 AM
3 responses
- Pingbacks 0
Had to leave the quest at step 4. Quest card shows i am on step 4. How do i get back in to start at 4 and not do all of pit of heresy again? This is the exotic quest the journey.
How do you reset the puzzle? I started the puzzle before I saw the walkthrough.
easy just reset the hidden sector and you’ll reset the puzzle
Leave a Reply Cancel reply
Your email address will not be published. Required fields are marked *
Save my name, email, and website in this browser for the next time I comment.
This site uses Akismet to reduce spam. Learn how your comment data is processed .
- Pet Simulator 99 Rebirth System Explained
- NBA 2K24 2KTV Episode 33 Answers Guide
- Stardew Valley Fish Frenzies
- Pet Simulator 99 Treasure Hideout
- How to Get Hype Eggs in Pet Simulator 99
Welcome back!
Sign in or create an account to enjoy GINX perks, enter competitions and access exclusive features.
Your status: free member
Your status: friend, your status: supporter, your status: super fan, your status: producer.

- Fallout Shelter
- Sea of Thieves
- Dead by Daylight
- Marvel Snap
- ARK Survival Ascended
- MLB The Show 24

Elden Ring Rune Arcs guide – How to use and locations
Throughout their journey in Elden Ring, players will have to level up their character, uncover map fragments and upgrade their gear to defeat every fearsome boss. Defeating all six will reward you with Runes and a Great Rune.
These special items require Rune Arcs to be bound to them, awarding its users buffs to HP, Focus Points and Stamina. This guide details everything about Rune Arcs, including where to find them and how to use them in Elden Ring.
What are Rune Arcs in Elden Ring?
A Rune Arc is a special consumable item that players can bind to their Great Rune to activate its effects. If you’re not using a Great Rune during gameplay, your rune slot remains inactive and unable to receive buffs from the rune effects.
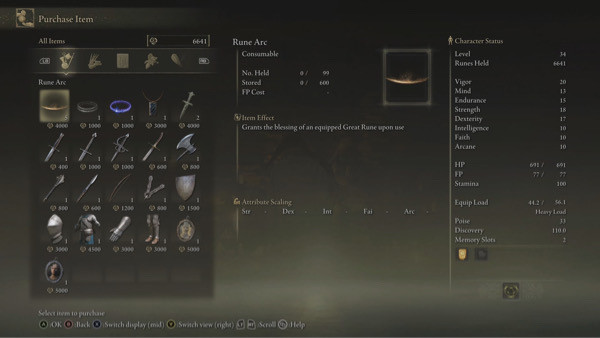
Rune Arcs can be used on their own to replenish your HP; however, to gain maximum benefits, it’s best used on a Great Rune. On the other hand, Great Runes are pretty hard to come by as you’ll need to defeat the six main bosses to acquire them.
Once you have acquired a Great Rune, you must activate them at its corresponding towers before binding them with Rune Arcs. You can activate the runes at any of the following towers:
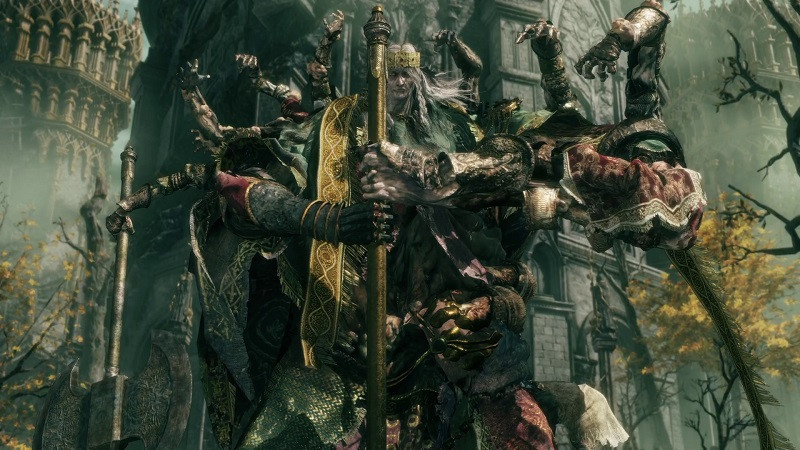
All rune upgrade locations in Elden Ring
- Godrick's Great Rune : after defeating Godrick, the Grafted can be activated at the Divine Tower of Limgrave
- Malenia's Great Run e: after defeating Malenia, Blade of Miquella can be activated at the isolated Divine Tower in Leyndell, the Royal Capital (use the Divine Tower Site of Grace as a fast travel point)
- Radahn's Great Rune : after defeating Starcourage Radahn, can be activated at the Divine Tower of Caelid
- Morgott's Great Rune : after defeating Morgott, the Omen King, can be activated at the Divine Tower of East Altus
- Rykard's Great Rune : after defeating Rykard, Lord of Blasphemy, can be activated at the Divine Tower of West Altus
- Mohg's Great Rune : after defeating Mohg, Lord of Blood, can be activated at the Divine Tower of East Altus
Where to find Rune Arcs in Elden Ring?
Acquiring a Rune Arc in Elden Ring is relatively straightforward since they aren't well-hidden and don't require the main quest for completion. Rune Arcs are dropped when summoned to defeat a boss or as a Bloody Finger when beating a Host of Fingers during multiplayer.
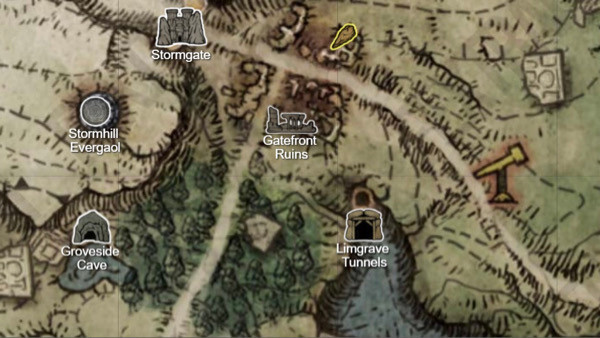
Secondly, rats and Giant Rats can frequently drop Rune Arcs, which you'll encounter inside underground and cavernous areas like Limgrave Tunnels, Tombsward Cave and Dragon-Burnt Ruins, to name a few. You can also find Rune Arcs at some of the following locations:
All Rune Arc locations in Elden Ring
- Locate a room guarded by a Great Sage to find a chest containing a Rune Arc at the Academy Crystal Cave
- Beneath a set of stairs at the Cliffbottom Catacombs
- Inside a chest found in the first room to the right at Altus Tunnel
- Find a corpse further up the path east of the gardens at Caria Manor
- Locate a corpse inside an enemy outpost west of The Four Belfries
- On a corpse at the bottom of a cavern at the Sealed Tunnel
- Found on a corpse towards the edge of a cliff, past the Nomadic Merchant at Bellum Church
- Near the sword table inside the Fortified Manor at Leyndell, the Royal Capital
- On a corpse near the Lion Guardian boss at Fort Gael
Lastly, if you haven't acquired enough Rune Arcs by farming and looting, you can purchase them from vendors at three various locations. These vendors will only sell one Rune Arc at a time, except for the last vendor, who has three Rune Arcs in his inventory.
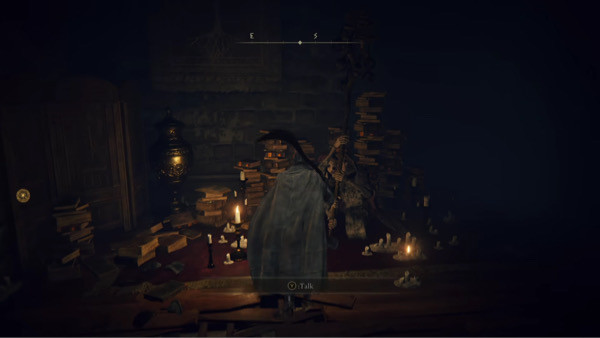
- Nomadic Merchant at Bellum Church, Liurnia of the Lakes for 4,000 Runes
- Twin Maiden Husks at the Roundtable Hold for 4,000 Runes
- Nomadic Merchant east of the Mountaintops of the Giants for 8,000 Runes
How to use Rune Arcs in Elden Ring?
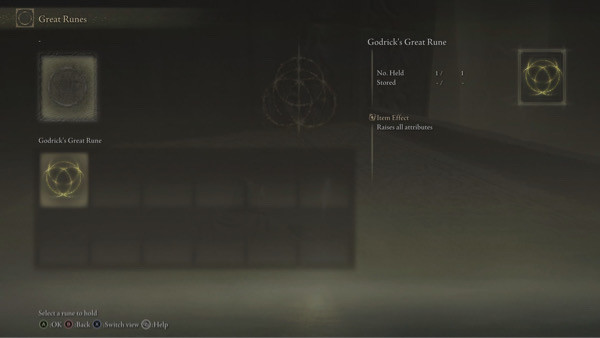
Once you have Rune Arcs and a Great Rune in your possession, travel to any Site of Grace you've uncovered. Then, equip the Great Rune by accessing the Great Runes menu. Next, navigate to your inventory and find the Rune Arcs and bind them to the Great Rune for the rune's effects to be activated.
Since each Great Rune can be effective for every playstyle, it's essential to know what effects you can gain from each rune. With a Great Rune equipped, you will be able to use the effects effectively when battling enemies, mini-bosses, bosses and clearing dungeons.
We want to thank the YouTube channel Maka91 Productions for the complete walkthrough on getting Rune Arcs and activating a Great Rune in Elden Ring.
- Read more: What to do after killing Godrick boss in Elden Ring?
Featured image courtesy of FromSoftware.

Written by Ashleigh Klein
Ashleigh was a former Features Intern at Glamour South Africa and previously worked as a Multimedia Journalist at IOL News and the Weekend Argus before reigniting her love for video games.
She now works full-time with GINX and can often be found exploring the worlds of Palia , Conan Exiles , Elder Scrolls Online , and Elden Ring while trying to reach Infinite rank in Marvel Snap . Whilst she has seen improvements at farming in Stardew Valley (much thanks to Palia), Ashleigh more than makes up for it by being a decent Blastoise trainer in Pokemon GO .
While her gaming adventures take her to unique locations, she actively enjoys following trending stories within the Entertainment industry, just don't ask why her Letterboxd hasn't seen an entry in a while. If you manage to catch Ash in between playing games and watching Marvel or Star Wars shows, you can forward any gaming and entertainment news, tips, and tricks to her via email or on social media.
Follow me on:
Follow Polygon online:
- Follow Polygon on Facebook
- Follow Polygon on Youtube
- Follow Polygon on Instagram
Site search
- Dragon’s Dogma 2
- FF7 Rebirth
- Zelda: Tears of the Kingdom
- Baldur’s Gate 3
- PlayStation
- Dungeons & Dragons
- Magic: The Gathering
- Board Games
- All Tabletop
- All Entertainment
- What to Watch
- What to Play
- Buyer’s Guides
- Really Bad Chess
- All Puzzles
Filed under:
God of War guide: Witch’s Cave walkthrough and collectibles
Explore this Lake of Nine location
Share this story
- Share this on Facebook
- Share this on Reddit
- Share All sharing options
Share All sharing options for: God of War guide: Witch’s Cave walkthrough and collectibles
/cdn.vox-cdn.com/uploads/chorus_image/image/68789082/vlcsnap_2018_04_19_12h41m13s124.0.png)
In God of War , once you’re free to explore all there is to offer on the Lake of Nine, you’ll likely head to the various towers and landmarks shrouded in the mist throughout the body of water. Each of these has various items, enemies and more to explore. We’ll breakdown what you can find at one of these such locations, the Witch’s Cave , located south of Tyr’s Temple. If you can’t find the entrance, it’s behind the massive statue at Muspelheim Tower .
You’ll return to areas many times throughout God of War , and at certain points during the campaign, you can explore deeper and find new items to collect. In this guide, we’ll show you everything — treasure chests, hacksilver, pure collectibles and more — in the Witch’s Cave. Think of it like a walkthrough focused on making Kratos rich and powerful.
A note on God of War spoilers
God of War is full of surprises, and that makes guides particularly tricky to write. We want to help you with the game. We don’t want to spoil it. So we want you to know that we’ve written every guide with spoilers in mind.
If our guide doesn’t appear to get you every item (a chest, for example), there’s a reason for that. Rather than spoil that reason, our tables of contents and a big image in the guide indicating spoilers ahead will tell you when and why you find yourself in that situation — in the least spoilery way possible.
Table of contents
Late-game spoilers below.
- During A New Destination
Nornir chest
Sand bowl puzzle.
- After The Sickness
When you make your way there in the early game, there isn’t much to see yet. You can open up a M ystic G ateway back to Brok’s shop at Tyr’s temple and stare at a door that you cannot open in the early part of the game.
:no_upscale()/cdn.vox-cdn.com/uploads/chorus_asset/file/10668673/God_of_War_spoiler_warning_image.jpg)
During “A New Destination”
We’re going to talk about this section as if you’re coming back to it from the Lake of Nine during God of War ’s main story journey goal, “A New Destination.” You can’t actually get back into the Witch’s Cave before then, so you’ll almost definitely be approaching the cave from this direction.
Items in this area : Legendary chest (Muspelheim cipher), Nornir chest (Horn of Blood Mead), coffin (soft Svartalfheim steel), treasure map (The Turtle’s Tribute), hidden chamber door, coffin (soft Svartalfheim steel), wooden chest, Legendary chest (Murder of Crows runic summon)
This will be your first time back to the Witch’s Cave since Atreus got his exciting new arrows, so there’s a few new things you can pick up now.
When you dock, have Atreus blow up the red sap wall blocking your path. On the other side of the wall, take the elevator up.
Turn to the right at the top of the elevator for another sap wall . Blow this one up as well. There are some reavers and a revenant to handle, and then you can start working on loot.
Run into the tunnel you just opened and turn right. There’s a mysterious green orb you can ignore, but right next to it is a Legendary chest with a piece of the Muspelheim cipher inside — if you’ve been following our guides and exploring a lot, this should be the last piece you need.

Much of the rest of your exploring will be in service of opening a nearby Nornir chest (that you haven’t even seen yet). Since you’re right here, head back to the left of the Legendary chest you just opened, then turn right. The first seal is just above your head in the wall of the well.
Head back to the elevator area, then turn right. Drop down off the ledge — you may have picked up an artifact and a coffin down here earlier. Turn a little to the left and look for a light crystal for Atreus. Shoot it to create a light bridge across to the Nornir chest.
Turn to the right to find another light crystal . Shoot this one to create a bridge to a shatter crystal dispensing root. We’ll be coming back to this a bunch, so remember where it is. For now, grab one, then run back across both bridges. Toss the crystal at the coffin you see there and have the boy shoot it to free the coffin (we’ll get to it in a second). To the right of that coffin is the second seal .
Take a couple steps to the right out onto the stone pallet you pushed off the first time you were here. Turn left and look below where you were just standing to find another light crystal . Create a bridge and cross to the coffin for some solid Svartalfheim steel .
Head back and grab another shatter crystal. Run back past the Nornir chest and stop at the top of the ramp down. Look ahead of you for another sap wall to blow up. Run down the ramp and turn to the left for some hacksilver . Climb up the wooden wall through the opening you just created.
There are five things right in this room:
- High on the left side of the wall in front of you is the third Nornir seal .
- Next, most obviously, is a hidden chamber door.
- Next to that is a wooden chest .
- Turn toward the right wall. In the middle is The Turtle’s Tribute treasure map . (Check out our guide for The Turtle’s Tribute Treasure map to find the loot.)
- In the right corner is a coffin with some more solid Svartalfheim steel .
Drop back down and open the Nornir chest for your Horn of Blood Mead , then come back here.

On the left side of the hidden room with the hidden chamber door, there’s a gate you can open. Go through it and fight the revenant that pops up to say hi. Look along the wall on your right for some smashable planks. Toss your axe, then hoist the boy up to the level above.
Turn left and look for more smashable planks across a large gap, then grab the big stone-filled pallet and slide it to the right. Wait for Atreus to climb on top, then you can shuttle him all the way to the left.
He’ll run over to your left to find a sand bowl. Keep turning left and look in front of Atreus to find a few more breakable planks along the ceiling. Smash these three squares to reveal some runes and give Atreus the solution. When he’s done playing in the sand, the podium he’s on will lower enough that you can jump to it. Hop across, then turn right to find a Legendary chest . Inside, you’ll get the Murder of Crows runic summon for the boy.
After ‘ The Sickness ’ Journey
Items in this area: Legendary chest (Rampage of the Furies light runic attack)
After God of War ’s “The Sickness” Journey , you can open doors locked with the Winds of Hel (and Hidden Chambers ), so there’s a couple more things to take care of when you return to the Witch’s Cave.

When you exit Freya’s house, walk down the ramp and turn left. Walk past the lift and head over toward the well you climbed up earlier, then take a right. There’s an active Wind trap where you found that Legendary chest earlier.
Run back and put the Wind in the trap in the middle of the cavern.
Move to the right a bit toward the path that leads to the Nornir chest and the hidden chamber — you need to move the Wind down here, but it’s kind of a long trip, so every little bit helps. Before you drop off the ledge, grab the Wind and turn around. As soon as you drop down, turn left and run out onto the stone pallet from your first trip here. Throw the wind into the Wind trap across the gap.
Back up and follow the path that runs past the Nornir chest and up into the room with the Hidden Chamber door. Turn left, go through the doorway, and turn left again — you’ll end up on the other side of the Wind trap.
Grab the Wind again, then turn around. Above the Hel bramble, there’s another trap. Stash the Wind there, then burn the bramble.
Before you climb up, continue to the left and move the stone pallet to the middle of the gap between the platforms — you need to be able to jump across it. Run back and climb up onto the ledge you exposed and grab the wind. Turn left and jump across the gaps.
On the other side, turn right to find one final Wind trap that will open a door and reveal a Legendary chest . Open it to pick up the Rampage of the Furies light runic attack for the Blades of Chaos.
:no_upscale()/cdn.vox-cdn.com/uploads/chorus_asset/file/10721157/God_of_War_Witch_s_Cave_Late_game_collectibles__0000_Layer_19.jpg)
On your way back out, you can open the Hidden Chamber you found earlier. Ride the elevator down to unlock the Mystic Gateway and, if you’re feeling up to the challenge, take on the Valkyrie Kara .
The next level of puzzles.
Take a break from your day by playing a puzzle or two! We’ve got SpellTower, Typeshift, crosswords, and more.
Sign up for the newsletter Patch Notes
A weekly roundup of the best things from Polygon
Just one more thing!
Please check your email to find a confirmation email, and follow the steps to confirm your humanity.
Oops. Something went wrong. Please enter a valid email and try again.

When does Manor Lords release?
Honkai: Star Rail codes for April 2024

How to complete the Yo-kai Watch event in FFXIV

X-Men ’97’s big villain reveal gives mutants their second-greatest enemy

Fallout is ‘probably the best-performing Commander set ever,’ says Hasbro CEO

‘TikTok ban’ gets signed into law — here’s what happens next
All Runes Found in Phase 3 - Season of Discovery
Druid runes: 6 out of 6 discovered, hunter runes: 6 out of 6 discovered, mage runes: 6 out of 6 discovered, paladin runes: 7 out of 7 discovered, priest runes: 6 out of 6 discovered, rogue runes: 6 out of 6 discovered, shaman runes: 7 out of 7 discovered, warlock runes: 6 out of 6 discovered, warrior runes: 7 out of 7 discovered, comment by deathisi.
Light's Grace is the most useless rune ever, even more so now that we know Paladin's have essentially been griefed by it being put on the head slot.....
Comment by leonscottken
I wished this rune was never found, in protest. Whoever designed this has never played a paladin healer and it tells - you'd never use this instead of Fanaticism in the same slot, and we just get no healing oriented rune for our bracers. Thanks Blizzard! Justice for Holy Paladins!
Comment by Basado
I would rather they really experimented and let us put runes wherever we want, and if it makes any amazingly broken builds then we know for the record and make it so some runes can't be used together. I thought the whole point was to experiment anyway?
Comment by DarkLinkUmbreon
People DIDDNT wanted to find it. So to make such a big thing out of it is a bit mad but ok
Comment by Guzzed
A frustrating solution to a $%^&ty rune no one wants to be sure people don't bother getting it even more now.
Comment by Boothage
Dead rune rip paladins blizzard are set o cun*s
Comment by Mollerten
Didn't warlocks' metamorphosis also take around a week, or am i tripping?
- Category: Games
Preparing for Adventure – Talking to the Creative Minds Behind Eiyuden Chronicle: Hundred Heroes
- Sebastian Yamaguchi, Xbox Wire Japan Editor
- Xbox Wire Japan recently had a chance to speak with Studio Head and Illustrator Junko Kawano, Producer and Art Director Junichi Murakami, and Director Osamu Komuta at Rabbit & Bear Studios.
- Eiyuden Chronicle: Hundred Heroes was funded via Kickstarter with a total of 46,307 backers that were eager for a new game from the creator of the Suikoden series, the late Yoshitaka Murayama.
Eiyuden Chronicle: Hundred Heroes is available now for Xbox Series X|S, Xbox One, Windows, and with Game Pass.
Starting today, players can immerse themselves in the world of Eiyuden Chronicle: Hundred Heroes , which continues a rich legacy of memorable JRPGs guided by the stewardship of the late Yoshitaka Murayama and his team at Rabbit & Bear Studios.
Funded via Kickstarter back in 2020, with a total of 46,307 backers that were hungry for more Murayama-esque game experiences like Suikoden , Eiyuden Chroncole: Hundred Heroes is now available for players on Xbox Series X|S, Xbox One, Windows, as well as with Game Pass.
Producer and Art Director Junichi Murakami

Studio Head and Illustrator Junko Kawano

Director Osamu Komuta
To commemorate its launch, Xbox Wire Japan recently had a chance to speak with Studio Head and Illustrator Junko Kawano, Producer and Art Director Junichi Murakami, and Director Osamu Komuta at Rabbit & Bear Studios, where the team’s sincere responses conveyed how much Hundred Heroes embodies the vision of Murayama, with a team that was built around the desire to make “the most interesting game of [their] lives”.
The Kickstarter launched back in July 2020, and now Hundred Heroes is nearly here. How are you feeling?
Producer and Art Director Junichi Murakami: Actually, I haven’t settled down emotionally at all yet. There is a sense of relief that we can finally deliver the product to everyone, but there are still some things that we won’t know until it goes on sale. Although I am anxious in some ways, there is a sense of accomplishment in knowing that we have finally come this far after working hard together for a long period of time.
Director Osamu Komuta : We have been working on this game for about three and a half years now, so we are all exhausted (laughs). We have been working hard as a team to patch the game, but now we are closing into the release of the game. On one hand, I am a bit relieved, but on the other hand, as Murakami mentioned, I am also excitedly waiting to hear the reactions of the players as the game goes on sale in two weeks’ time.
Studio Head and Illustrator Junko Kawano: I feel pretty much the same way as those two do, so they’ve done most of the talking. It’s been too long since I’ve worked on a consumer title, and I feel like, “Well, nowadays pretty much everyone is already working on patches”, so I really have to keep going until the very last minute… I wonder if I’ll feel done once it’s released and everyone has played it.
What are the highlights of Hundred Heroes , from your perspective, especially the parts you would like people to pay attention to?
Komuta: As the title suggests, there are a lot of characters. We want players to go on adventures with their favorite party and prepare for battles with them. We also want them to try using characters they meet along the way, and hopefully enjoy switching characters around. In most RPGs, you would train the skills of, or you explore the power of individual characters, but in HH , the fun is rooted in the variety of characters. The depth of the game becomes based on the number of characters that you have trained and brought up.
Murakami: In terms of design, we have put a lot of thought into each of the characters and made sure that each had a distinct personality. Even for a single mini game, the characters have different looks prepared just for that game. Basically, I don’t think we have cut any corners, so if you play through the game thoroughly, I think you will see many good things that you expected when starting to play the game.
What are some of the aspects of Hundred Heroes that you focused on from a JRPG standpoint?
Murakami: I’m sure each of us has our own thoughts on various things and what we were particular about, but I believe JRPGs are unique in the way they portray the nature of the story and the characters. There is always an added element where “anything goes in a JRPG.” RPGs from overseas pursue reality, but in the case of JRPGs, after an intense battle, the players are suddenly spending time in a hot spring (laughs). I think the beauty of JRPGs is that they contain a flexible mindset where fun is hybrid, allowing players to start playing with cards regardless of location. I feel that Hundred Heroes has been able to bring that essence out very well.
Komuta: Murayama always talked about the makunouchi bento when explaining RPGs. He would say that “RPGs had a variety of side dishes, and every one of them is delicious”. Surely, there is a storyline that runs through the richness of variation and variety like a makunouchi bento. But if you take a side trip for a break, you can soak in a hot spring, play a card game, get into the theater…… and have fun. There are many variations in the story.
We were particularly careful about making sure that when the player goes off on a tangent, the game will have a proper reaction to whatever he or she does. Even a single line of dialogue may change depending on the party you have formed, so I believe that players will enjoy the abundance of options and the development the game provides in response to their choices.
The pixel art of the characters in Hundred Heroes is extremely detailed, which seems to be a rare direction to take these days. How did you decide on this?
Murakami: When we first started planning the game, we had already decided to make it an evolution of pixel art, or dots. When we began to consider what kind of resolution we wanted to use, we started with a size that was familiar from old games, but we realized that if we continued in this manner, it would be difficult to distinguish the individuality of the more than 100 characters Kawano had created, and it would also be difficult to express the individuality of the characters themselves.
In addition, the expressions themselves seemed a bit old-fashioned, so we decided to increase the resolution. However, increasing the resolution would inevitably increase the number of dots, so the amount of work increased. Furthermore, if the resolution is increased too far, the pixel art may end up becoming more like an illustration.
After trying various methods, we decided that the current size would require more technique, but would allow us to properly express the detailed design and accessories that adorn the characters Kawano has created. The size and feel of the design matched the sense of expression that we were looking for.
There are several battles available: normal battles (with a party of 6), boss battles, duels (1 vs. 1), and wars. What are the highlights and key points of each? Also, was the decision to use random encounters based on the feel of old JRPGs?
Komuta: The adoption of random encounters was based on the premise that this game was a JRPG. In addition to this, Murayama’s idea of RPGs was to make it possible for anyone to complete the game, even if may the first time in their lives that they have played such game. So long as you know the basic rules, anyone can advance and complete the story in HH.
At first, we considered using symbolic encounters, but we decided to use random encounters for this game, as we thought it would be easier for players to understand (the game). We also wanted to respect the initial concept of clearly separating between the scenes, namely when the games switch between normality and battle.
In the very early stages of planning, we had two ideas, and one of them was to have the battle transition occur on the spot, which is very common these days. The idea also came up during the planning stage, but since we wanted to express the transition properly, we decided to use random encounters with clear transitions, that would set the tone and mood and prepare the player for battle. The battles themselves are rather simple command battles; even if you are new to the JPRG genre, once you get used to it and start leveling up, you will be able to move on within the story.
Of course, there is an element of challenge in the game. The higher you set the difficulty within the game, the more you will have to play around the attributes and the order of actions. There are plenty of challenging battles waiting for you, and we hope players will have a great time strategizing and overcoming.
The system of strongholds, one-on-one battles, wars, etc. were also seen in Gensou Suikoden . Did you intend to include these systems from the beginning of the project? Is there a reason why you decided to use it again in Hyaku Eiyouden ? Also, what did you change from the past games to better suit today’s game experience?
Murakami: All of these elements were included in the Kickstarter stretch goal, including war, single combat, and the Fortress Town.
Kawano: Including the cook-offs, too.
Murakami: The backers are fans of Murayama’s games, so it seems that those elements were required. All of them were realistic targets if we got the budget and time frame right, so we included them as items, but we’ve already accomplished all of them. We started from the point where we had to aim to include all the elements we promised in the Kickstarter program.
Komuta: From the very beginning of the project, we wanted to develop the Fortress Town aspect of the game. We were not talking about a castle where everyone could gather, but rather a town where people could build their own town, as if we were putting in a whole other game where people could build their own town.
Murakami: It was borderline crazy to think of such thing (laughs).
Komuta: It is true that when we started imagining the Fortress Town, it was not an easy task. It may have been better if it was just an automatic progression of elements, such as the city growing as it levels up, but this time, we wanted to includes elements such as building structures of your own choosing, and calling in the people needed to build and maintain them. Some people told me that I was making another game within the game (laughs).
Murakami: Once you get into that phase, HH gets more and more interesting. In the beginning, you don’t even have the Fortress Town.
What kind of response did you receive from overseas players (after Kickstarter)? Were there any regions where the response was particularly strong?
Murakami: Originally, HH started with the fact that Murayama had many fans overseas, since Kickstarter and crowdfunding in general has not been too familiar within Japan. That’s why we didn’t include Japan in our crowdfunding activities at first. When the crowdfunding started, we came to think, “No, there are definitely Murayama fans in Japan as well,” so we decided to approach them too, and thus the order was first overseas and then domestic. The game itself is developed by Japanese people with Japanese sensibilities, so it will have a JRPG-like finish. We have been trying to create something that is uniquely Japanese, rather than focusing on foreign countries.
Kawano: In terms of the response from people overseas, we received support for “making a game that Murayama likes,” and we expected that there would be many fans around the world. In fact, when we launched the crowdfunding, the largest number of support came from the U.S., and the second largest was from Japan. Besides that, we also have received support from France and the Asian region, but also from Brazil, and really from all over the world. We didn’t really prepare anything special for any one place, but unlike Japanese fans, we received requests from American fans that are a bit more hardcore, such as wanting a mode with a higher level of difficulty.
Eiyden Chronicle: Hundred Heroes will be available on day one with Game Pass. What is your impression of the subscription service?
Murakami: When the idea of distributing Hundred Heroes through Game Pass first came up, It got me thinking since I was yet to consider it as an option. I thought it over very well and decided that our priority should be to spread awareness of Hundred Heroes rather than to aim for the stars with the first game.
When we settled on this direction, we realized that our core fans had already turned their attention to us. The backers of Hundred Heroes are the most important, and we will produce the work they wish, but I felt that their support alone would not be enough to continue the series — if that was the only way to continue the series, it would not last.
What I had to do as a producer was to increase the number of people who could play Hundred Heroes and broaden the base of the fan community. I thought that Xbox Game Pass would be the best way to increase opportunities for people who have never played this genre to pick up the game and see it. After considering these ideas, we decided that we should go for it.
Can you tell us about some of the memorable events in the development of Hundred Heroes ?
Murakami: Memories abound (laughs). One of the things that was unprecedented was the (COVID) lockdown during development. I have very fond memories of that special environment, where we had to team up with people we didn’t know and had never met face-to-face from the beginning of development to create the game.
Komuta: About half of the people on my team have never met me face-to-face.
Kawano: Everything was done online, mostly from home.
Murakami: There are many such episodes. But the most memorable one was when Murayama and I launched the Kickstarter project.
Komuta: After we launched the Kickstarter, we reached our goal in an instant. We all went a little crazy at that moment.
Murakami: If it were a lottery ticket or something, I would simply be happy, but in the case of crowdfunding, the more it goes up, the more I got worried.
Kawano: Yes, you feel the sense of responsibility building up (laughs).
Komuta: I couldn’t believe our dream would gather so much support.
Murakami: I got the feeling that the expectations were being taken on board in a new way.
Komuta: I felt like I was taking on something great.
Kawano: While I felt grateful, it also came with a feeling of heavy commitments being placed on my shoulders.
Murakami: I had the feeling that there was no way I could escape from this (laughs).
Komuta: I had a lot of mixed feelings running through me, but above all, I was happy. Even now, I can’t forget what Murayama said at that moment. He said something along the lines of, “I can’t stop my hands from shaking”.
Kawano: It was like that from the beginning, and it was a special kind of game production right up to the end.
Lastly, what is your message to Xbox players who are new to the JRPG genre?
Kawano: We have created a place where people can play in a variety of ways. We hope you will enjoy the game, because we have created a game that can be played in any way you like and can be fun no matter where you pick up the pieces.
Komuta: If you play the game normally, you may get the feeling that “It’s just a regular JRPG”, but if you enjoy the deep variations, such as taking side trips, going off to the side, gathering your friends and changing to a different party, I think you will find HH very interesting. If you enjoy these side contents, I can guarantee you will feel the fun of HH.
Murakami: It is difficult to imagine what kind of person might experience a JRPG for the first time. But one thing I am sure of is that whoever experiences JRPGs through HH for the first time will find everything new and fresh. I think they will be able to enjoy a game they have never played before, a type of worldview they have never traveled in, and a feeling they have never had before. We have used different voice actors for all the characters. All characters have their movements and effects changed in detail, and there are also scenarios for each of them. Overall, I think you can enjoy the game without thinking too hard about it. There is not a single difficult thing to do, so in that sense, I hope that newcomers will feel free to give it a try.
Eiyuden Chronicle: Hundred Heroes – Digital Deluxe Edition
Eiyuden Chronicle: Hundred Heroes
- Remember me Not recommended on shared computers
Forgot your password?
Or sign in with one of these services
- Direct Consular Filing (DCF) General Discussion
DCF Moscow - Current Wait Times
By jim2013 September 16, 2013 in Direct Consular Filing (DCF) General Discussion
- Register to Reply or Ask a Question
- Go to first unread post
1 post in this topic
Recommended posts, jim2013 0.
Has anyone recently went through the DCF process in Moscow that can comment on how long the process takes? I saw some threads saying that it was hard to get an interview earlier this year. Is this still the case? It looks like things were moving really quickly last year, I hope that's still the case.
Thanks in advance!
Link to comment
Share on other sites.
Create an account or sign in to comment
You need to be a member in order to leave a comment
Create an account
Sign up for a new account in our community. It's easy!
Already have an account? Sign in here.
- Existing user? Sign In
- Immigration Guides
- Immigration Wiki
- Example Immigration Forms
- Form Downloads
- K1 Fiancé Visa
- CR1 & IR1 Spousal Visa
- US Visa FAQs
Office Reviews & Info
- Consulate & USCIS Office Reviews
- US Port of Entry Reviews
- US Consulate Information
- Processing Times
- Immigration Timelines
- VJ Partners
- Ask a Lawyer
- All Activity
- Popular Topics
- Create New...

IMAGES
VIDEO
COMMENTS
Symbol 1. From the start, head straight towards the mountain for quite a bit of time. Before you reach the sandstorm, keep your eye on the mountain until you spot a pair of lights shoot out into ...
Symbol #1: The first glowing symbol is right in front of your starting point. Symbol #2: After crossing the sands in the lower area, you'll reach a three-story platform that you circle to reach ...
The first Glyph in the Sunken City can be found in the first area where you finally stop sliding down. As soon as you land in this small valley, head straight forward until you spot a gathering of ...
Playthrough of Journey with the locations of all runes -- Watch live at https://www.twitch.tv/mcsmashyy
Symbols are a visual representation of the in-game civilization's language as well as its written form used by the in-game species. They are one of the key elements of the game's art style and design. Orbs Shinies, Shiny Things QR-Codes Some players refer to symbols as glyphs; such use is discouraged on this Wiki to avoid confusion with Ancient Glyphs (visual elements that reveal parts of the ...
The note will show the location of the Rune, and the key will unlock a chest at this location. As a Dwarf, pickpocketing Dark Iron Dwarves has a chance to give you a Dark Iron Lockbox, lockpick the box and the rune will be inside. As a Night Elf, kill Naga at the Cliffspring River Cave in North Western Darkshore. In the back of the cave, there ...
Screenshot by GameSkinny. Complete all four Lost Sectors on the Moon. Solve a brief rune puzzle after the final loot chest. Complete each Lost Sector and loot the last chest to unlock the ability to complete the puzzle safely. 7 or Bottom left. 9 or Bottom right. 2 or Top middle. 2 or Top middle. 1 or Top left.
Place the winds in the anchor point and watch the bell spin around. Remove the winds before the "N" symbol bell appears to lock it in place. Now take the winds to the right of the Nornir Chest and ...
Engraves your belt with the Slam-altering ability Precision Timing. Where To Start The Dark Riders Quests. In order to find the Dark Riders and obtain your precious runes, you first need to travel ...
Shaman Runes Season of Discovery - Phase 2 Level 40. Here is where you will find all our Rune Guides, with exact locations, maps, walkthroughs, and tips and tricks for all Shaman runes through Level 40. Runes marked "Partly Complete" have at least one known solution, but there may be more out there. Please report any that you find!
Seal 1: There's a giant block to the right of the Nornir Chest. Move it halfway out and then step into the gap to the left. The back of the block will be open and the seal will be inside. Seal 2: Move the block all the way out. This seal is behind the block. Seal 3: Climb the block after moving it completely out.
TEYII, Wisdom - Journey: Found at the Great Shrine of Thoth. When you first reach the area, head up the initial left or right staircase and go towards the center of this beginning area. You'll find a small shrine in the wall alcove with the Glyph facing toward you. If you're at the shrine already, go down the staircases toward this area.
Destiny 2 Xenophage Quest Steps Guide - Puzzle Solutions & How-to Start The Journey! Jean-Pierre van Wyk | Published: Oct 29, 2019 01:54 pm ... If you mess up a single rune, you can shoot the rune four times to rotate it back to what it was previously. Descent. Your path brightens, shining through the barrier of emerald, beneath a harbor ...
Season of Discovery Rune Guides. Rune Engraving is a character customization system that will be introduced in Season of Discovery for adding new skill abilities to equipment rather than adding them through skills or talents. Rather than adding to existing skills through the Talent system, Runes allow you to add new abilities that augment ...
In Destiny 2 there is an Exotic Quest called The Journey. This Exotic Quest takes you around the Moon as you attempt to find the Exotic weapon. To help you complete this quest, use our The Journey Guide. Note: Guide is still updating. Reaching Enduring Abyss. To start you want to make your way to the area you meet Eris Morn overlooking the Pyramid.
All Rune Arc locations in Elden Ring. Locate a room guarded by a Great Sage to find a chest containing a Rune Arc at the Academy Crystal Cave. Beneath a set of stairs at the Cliffbottom Catacombs. Inside a chest found in the first room to the right at Altus Tunnel. Find a corpse further up the path east of the gardens at Caria Manor.
On the left side of the hidden room with the hidden chamber door, there's a gate you can open. Go through it and fight the revenant that pops up to say hi. Look along the wall on your right for ...
Now that every rune from Phase 3 has been discovered, you can use Wowhead's guides to collect them all! Light's Grace proved to be the most elusive Rune yet across all phases, taking a full seven days to be discovered. This is a drastic change from Phase 1 and 2, where virtually everything was discovered in the first 24 - 48 hours - this one ...
Tyr's Temple is one of the main Regions in God of War. It is one of the main regions you can explore in the game, and part of your main Journey. In this guide, you will find the locations of all ...
Get the most out of your adventure with the Digital Deluxe Edition, which includes the following content: • Eiyuden Chronicle: Hundred Heroes full game • 1x Easy Journey Pack: (6x Healing Herb, 4x Healing Incense, 2x Revive Medicine. 3x Runeshard of Return, 1x Gold Coin) • 1x Headquarters Custom Object • Season Pass: [3x Original Wallpapers by Junko Kawano, Story Expansion: The Chapter ...
Hi! I would like to tell my story of Direct Consular Filing for CR-1 visa in Moscow. Slade&Natasha's experience helped us VERY much. Thank you guys!!! Slade&Natasha's med exams Slade&Natasha's interview First I must say that generally we spent 2 months for the whole procedure. It coul...
On this World Malaria Day 2024, we unite under the theme "Accelerating the fight against malaria for a more equitable world." This theme, which is in sync with this year's World Health Day theme "My Health, My Right', underscores the urgent need to address the stark inequities that persist in access to malaria prevention, detection, and ...
The Black Rune. Welcome to IGN's Walkthrough for God of War. This page contains information on the tenth step of your Journey - The Black Rune - which will include paths to take, enemies to ...
Hi everyone, Just got back from Moscow for the 'final' DCF interview. I'm very happy to say that my husband's visa has been approved! We're both so relieved. I posted a detailed review in the Consulate reviews section, so if you're interested you can read it here. I had no problem getting into th...
Filing Location: Timeline Photos; Filed: Timeline. Share; Posted September 16, 2013. Has anyone recently went through the DCF process in Moscow that can comment on how long the process takes? I saw some threads saying that it was hard to get an interview earlier this year. Is this still the case?
The Russian Jazz Quartet was a modern jazz band founded in 1964 by saxophonist/clarinetist Boris Midney and bass player Igor Berukshtis, who made a break fro...
Found in the Highblock Halls marketplace area, you will find the rune towards the top right hand side of the open area. This can be found near a building that allows you to stand on top of its ...