How to screenshot a full page on iPhone and iPad
Learn how to screenshot a full page on iPhone and iPad

There are so many hidden iOS features that it can be a challenge remembering them all, but knowing how to screenshot a full page on iPhone is one I've never forgotten.
As a writer, I often find myself needing to screenshot large chunks of text from websites and articles to send to someone or read later. And while my iPhone 13 Pro Max has an enviable screen size, my stomach turns slightly at the thought of having to screenshot 25 pages of long-form text individually, ensuring nothing is missed, before sending each screenshot one by one.
Fortunately for me, Apple has thought about this, giving any device running iOS an easy way to capture a full page with just a couple of clicks. So read on and I'll show you how to use the full page screenshot feature on iPhone and iPad to capture and share an entire Safari page in one go.

How to screenshot a full page on iPhone and iPad
1. Open Safari and head over to a webpage you want to screenshot. Simultaneously press the Side and Volume Up buttons to take a screenshot. A thumbnail preview box will appear in the bottom-left of the screen.

If you have an iPad, it's pretty much the same, but you'll need to press the Lock button and Volume Up simultaneously .

2. Tap the screenshot preview box , then tap Full Page at the top.

3. Scroll the page using the bar on the right of the screen.
Sign up to get the BEST of Tom’s Guide direct to your inbox.
Upgrade your life with a daily dose of the biggest tech news, lifestyle hacks and our curated analysis. Be the first to know about cutting-edge gadgets and the hottest deals.

4. Tap Crop to shorten the screenshot. Select a tool from the Mark Up bar and use your digit to mark up the screenshot as required, for example highlighting or encircling sections of text.

5. When you're ready, click Done , then tap Save PDF to Files to store your screenshot for later. Alternatively, hit Share to send the PDF to someone instantly via email or direct message.

So, you now know how to screenshot an entire page on both iPhone and iPad. It's little everyday features like this, designed to make your life easier, that turn your average smartphone or tablet into one of the best phones or best tablets out there.
It's worth nothing that this screenshot feature only works in Safari, and can't be used in other apps. As Safari is the browser I use most of the time, I rarely need this feature anywhere else, but it would be nice to see it rolled out to other apps in the future.
Now that you've learnt how to screenshot full pages, why not check out our list of other hidden iPhone features and our guides to how to turn on mirror front camera on iPhone , how to activate the interactive Weather map on iPhone and how to cast Harry Potter spells on iPhone .
The security conscious may also want to read our guide on how to turn off significant locations to stop their iPhone from tracking them, and how to protect your iPhone from thieves . Meanwhile if you're trying and failing to draw or write on your iPad, here's how to fix an Apple Pencil that's not working .

Peter is Reviews Editor at Tom's Guide. As a writer, he covers topics including tech, photography, gaming, hardware, motoring and food & drink. Outside of work, he's an avid photographer, specialising in architectural and portrait photography. When he's not snapping away on his beloved Fujifilm camera, he can usually be found telling everyone about his greyhounds, riding his motorcycle, squeezing as many FPS as possible out of PC games, and perfecting his espresso shots.
Thirsting for the new iPad Air with Mini-LED? We’ve got some bad news
Google Pixel Tablet tipped to ditch the dock and finally get a productivity boost — stepping up to iPad Air
Massive Best Buy weekend sale is live — here’s 17 deals I’d get on OLED TVs, headphones, laptops and more
- nlucchesi Apparently on some websites, e.g., LastPass.com, the full page option is not presented. Reply
- View All 1 Comment
Most Popular
- 2 New Google Pixel 8a leaked renders leave absolutely nothing to the imagination
- 3 One of the most iconic sci-fi movies ever is leaving Prime Video soon — and it's 100% on Rotten Tomatoes
- 4 7 new movies and shows to watch this weekend on Netflix, Apple and more (April 26-28)
- 5 A future Apple HomePod could look more like a soundbar — what we know
How-To Geek
How to take a full-page screenshot of a website on an iphone or ipad.
Single-page screenshots are so last year. Let's go the whole hog.
Using a feature tucked away in iPhones (running iOS 13 or later) or iPads (running iPadOS 13 or later), you can take a "full-page" screenshot of a website in Safari and save it as a PDF file. Here's how.
First, open Safari on your iPhone or iPad and navigate to the website you'd like to capture with a full-page screenshot. (This feature doesn't work in Chrome for iPhone or iPad yet.)
When you're ready, take a screenshot on your device by pressing a combination of physical buttons. Here's how to do it on each type of device:
- iPhones without a Home button: Briefly press and hold the Side and Volume Up buttons at the same time.
- iPhones with a Home and Side button: Briefly press and hold the Home and Side buttons at the same time.
- iPhones with a Home and Top button: Briefly press and hold the Home and Top buttons at the same time.
- iPads without a Home button: Briefly press and hold the Top button and the Volume Up button at the same time.
- iPads with a Home button: Briefly press and hold the Top button and the Home button at the same time.
Related: How to Take a Screenshot on Your iPhone or iPad
After you take a screenshot, you'll see a thumbnail image of the screenshot in the corner of the screen. Tap the thumbnail once.
After tapping the thumbnail, you'll enter a screenshot editing mode. Tap the "Full Page" tab located just below the toolbar at the top of the screen. You'll see a preview of the entire web page appear along the right side of the screen. You can scroll through it by sliding your finger.
If you don't like the capture, you can press the Trash Can icon to delete it. But if you're satisfied and want to save it as a PDF file, tap "Done."
In the small pop-up dialog that appears, tap "Save PDF to Files."
Next, browse to the location in Files where you want to save the full-page website capture. When you find the right spot, tap "Save."
If you want to read the full-page screenshot later, open the Files app , navigate to the location of the PDF you just saved, and tap the file once to open it.
Repeat this process as often as you'd like with any website that you'd like to capture as a PDF. Interestingly, the full-page screenshot technique also works in Apple's Pages and Notes apps (although not perfectly), so it might work in other apps as well if you experiment. Have fun!
Related: How to Find Downloaded Files on an iPhone or iPad
Tips & Tricks
Troubleshooting, how to take full page screenshots in safari on iphone & ipad.

Have you ever wanted to take a full webpage screenshot in Safari on iPhone or iPad? Now you can do exactly that with the latest iOS and iPadOS releases, where you’re able to snap full page screenshot and save it as a PDF file, which can then be shared, saved locally, edited, printed, or anything else you’d like to do with it.
Android smartphones have had the ability to capture scrolling screenshots for quite a while now. Also known as full page or long screenshots, this feature allows users to take a screenshot of an entire web page and share it with anyone, which is a lot more convenient than taking multiple screenshots. Until now, iOS had lacked this functionality, but you don’t have to feel like you’re left out anymore. With iOS 13, iPadOS 13, and later, Apple allows you to take full page screenshots on your iPhone and iPad, though the feature is limited to the Safari web browser .
Are you one of those iOS users who felt like you were missing out on such a nifty feature? Look no further, because in this article, we’ll be discussing exactly how you can take full page screenshots using Safari on iPhone and iPad. Let’s get right to it.
Since this feature was introduced alongside recent iOS versions, you need to make sure your iPhone and iPad is running iOS 13 / iPadOS 13 or later. Capturing full page screenshots on your iPhone and iPad is fairly similar to taking any regular screenshot , except you have to choose a specific option that saves the whole web page as a file. Here’s how this works:
- Open “Safari” web browser from the home screen of your iPhone and iPad, then visit a website or webpage you want to take a full page screenshot of.
- Next, tap on the thumbnail of the screenshot in the bottom corner of the screen to bring up the markup and sharing option menu for that screen shot

Now that you’ve taken a full webpage screenshot in Safari, you might be wondering how to locate that full page screenshot on the iPhone or iPad. That’s what we’ll discuss next.
How to Find and Share Full Page Screenshots on iPhone & iPad
Unlike regular screenshots that get saved to Photos app as a PNG file, “Full Page” screenshots get saved as a PDF file that can be accessed using the Files app on your iPhone and iPad. Simply follow the steps below to find and share your screenshots.

Those are the steps that you need to follow in order to snap, find, and share your Full Page screenshots.
The brief video below shows the process of taking full page screenshots on an iPhone; taking the screenshot, tapping the thumbnail, selecting ‘Full Page’ from the tab options, then tapping on ‘Done’ so you can save the full webpage screenshot as a PDF file to your device or elsewhere (you can also share it directly from that screen).
Prior to this feature being native to screenshots in the latest iOS and iPadOS releases, your only option was to grab multiple screenshots and stitch them together using a third-party application from the App Store, but having this feature built in is much more convenient.
Apple took some time to bring these full page scrolling screenshots to iOS devices, but now that it’s here it’s quite useful particularly for anyone who works with the web, or even if you just want to save a webpage locally.
The feature is not perfect however, as it only applies to Safari thus far and you can’t really use other third-party web browsers like Chrome, Firefox, Firefox Focus, etc for capturing Full Page screenshots with this technique. Thus if you don’t use Safari for browsing on iPhone or iPad, you’re out of luck for easy full page screenshots.
Additionally, while you can snap full webpage screenshots, you can’t take Full Page screenshots within other apps like Mail, Facebook, Instagram, etc (yet at least, but perhaps that will arrive in a future version of iOS and iPadOS?).
Finally, remember that all of these full page screenshots aren’t really images, but instead they’re saved as PDF files. That may be inconvenient to access and share compared to JPEG and PNG files like regular screenshots, but it also may be a necessity for capturing the full length of a webpage and being able to view it properly.
What do you think of Full Page Screenshots within Safari on iPhone and iPad? Do you see yourself using this feature to capture whole web pages? Let us know your thoughts, experiences, and opinions in the comments section down below.
Enjoy this tip? Subscribe to our newsletter!
Get more of our great Apple tips, tricks, and important news delivered to your inbox with the OSXDaily newsletter.
You have successfully joined our subscriber list.
Related articles:
- Using the Screenshots Album on iPhone and iPad
- How to Markup Screenshots on iPhone & iPad
- How to Turn Off Split Screen in Safari for iPad? Exiting Safari Split Screen in iPadOS
- Take Full Webpage Screenshots on Mac via Command Line with webkit2png
30 Comments
» Comments RSS Feed
This is a cool but useless feature unless the screenshot is saved as, well, a screenshot (JPG or PNG). Saving it as a PDF is useless. PDFs don’t show up in Photos and so can’t be shared via Messages.
Linda! Thank you for this. I have IPhone XS and and a 13 iOS. This works only if you search for website in Safari. If you are in Google (which I do almost exclusively even though my son tells me not to) you will NOT get the full page tab. Search for the website you want In the Safari browser not in Google.
I have the same problem with mr.Carlos. Only part of the full website is captured, maybe there’s a limitation of how long you can captured..
This would be great……..if it worked properly! Having gone through the steps as instructed, the saved webpage is incomplete. Realising that each part of the page generated as I scrolled down, I let that happen before taking the screenshot. It worked….in part. Half of the webpage is missing. I haven’t been able to solve this issue. So, useless!
Great tip. As well as in Safari, I have been able to use this in Apple’s iOS/iPadOS Mail and Numbers apps.
I use the Tailor app. Saves to your Photos. I like that better then as a PDF.
Here is how to snap a full webpage screenshot with iPhone or iPad:
– Open Safari
– Go to a web page that is long enough to scroll
– Take a screenshot as usual on your iPhone or iPad (press Volume Up and Power, or Home button + Power, depends on your device)
– NOW tap the screenshot thumbnail that appears in the corner – this is the part some people are skipping
– Choose “FULL PAGE” at the top of the screen to take the full webpage screenshot on iPhone or iPad or iPod
– You can then use the Share option to send it to someone directly, or to email it or save it
– If you tap on Done you will have the immediate option to “Save as PDF” to save the entire webpage screenshot as a PDF file
There you have it. This is a great feature.
This did not work for me with an iPhone XS MAX. Tried it a couple of times and all I get is the screen to power off the phone.
Nedda, after you take the screenshot of the webpage in Safari, immediately tap on the thumbnail icon of the screenshot that appears in the corner of the screen. Then you’ll be in the markup screen where you can select “Full Page” to snap the full webpage screenshot.
Hope that helps!
I tried it .. just upgrade to 13.3.1 . and when i hit those two buttons it takes a snapshot and doesn’t give me any options for Full or not
It’s hidden behind the editing toolbar. Slide the toolbar out of the way and you’ll see the missing menu
IPad Pro (first version) iPadOS 13.3.1. Safari Sorry Linda but this does not work here. I just get a screenshot saved in photos.
Hi, not working on iPad Air running iOS 13…don’t get the tabs, just takes screenshot
Tap on the thumbnail after you take the screenshot in Safari, that’s how you access the the tabs to choose the full page screenshot option!
I am running IOS 13.3 on an iPhone XR, this feature is not present!
On my iPhone 7 with iOS 13.3.1, using Power + Home button in Safari, I only get the standard prtscrn image.
I have an iPhone 7 with iOS 13.3.1, I use Power button + Home on Safari, and I only get the standard printscreen to image.
How can I stop getting mail from my old discontinued Blackberry account?
Be aware you must choose FULL PAGE very quick on an iPad or in a blink it defaults to screen.
Finally! Long overdue feature.
So will I not be able to take a photo? I want to be able to create a jpg in Safari.
I have an Xr iPhone with the very latest and tabs do not show either.
This is a great tip! Thanks a lot Paul 😊
The “two tabs” shown in step 3 do not appear on an iPhone 8 or an iPhone X. Are you sure this isn’t just a trick for iPhone 11?
Positively this is for every iPhone or iPad that runs the latest iOS / ipadOS releases. If you’re not using Safari or on iOS 13 or later you will not have this full page screen shot option however.
No, the “two tabs” do not appear on my iPhone X either. I am running the latest 13.3.1 software
You neglected to tell people to click on the thumbnail screenshot image (before it disappears) that was created by pressing the button combinations in step 2.
Only then will the options in step 3 be available.
I agree with Fulano. I am running ios13 on my iPhone X and this functionality does not exist.
I’m running iOS 13 on my iPhone X and iPadOS 13.4 on iPad and the functionality DOES EXIST, there is an extra step that some of you are missing however. Here is how you do this:
– Open Safari
– GO to a web page that is long enough to scroll
– Take a screenshot as usual on your iPhone or iPad
– NOW tap the screenshot thumbnail that appears in the corner – this is the part some people are skipping
– Choose “FULL PAGE” at the top of the screen to take the full webpage screenshot on iPhone or iPad or iPod
There you have it, doing it right now as we speak!
This is a feature that Apple openly talks about on their own website and it’s a good one. Remember to tap that thumbnail in Safari after the screenshot, that’s how you can select FULL PAGE!
I, too, had trouble finding the tabs at first. There’s a step missing: the tabs are in the temporary screenshot that appears at the bottom of your iPhone or iPad screen. Tap on that temporary image and you will see the tabs and be able to follow the rest of the instructions.
Leave a Reply
Name (required)
Mail (will not be published) (required)
Subscribe to OSXDaily
- - How to Customize the Finder Sidebar on Mac
- - How to Uninstall Apps on MacOS Sonoma & Ventura via System Settings
- - How to Mute a Call on Apple Watch
- - How to Use the Latest GPT 4 & DALL-E 3 Free on iPhone & iPad with Copilot
- - 15 Mail Keyboard Shortcuts for Mac
- - Apple Event Set for May 7, New iPads Expected
- - Beta 2 of iOS 17.5, iPadOS 17.5, macOS Sonoma 14.5, Available for Testing
- - Opinion: Shiny Keys on MacBook Air & Pro Are Ugly and Shouldn’t Happen
- - MacOS Ventura 13.6.6 & Safari 17.4.1 Update Available
- - Using M3 MacBook Air in Clamshell Mode May Reduce Performance
iPhone / iPad
- - How to Bulk Image Edit on iPhone & iPad wth Copy & Paste Edits to Photos
- - What Does the Bell with Line Through It Mean in Messages? Bell Icon on iPhone, iPad, & Mac Explained
- - iOS 16.7.7 & iPadOS 16.7.7 Released for Older iPhone & iPad Models
- - Fix a Repeating “Trust This Computer” Alert on iPhone & iPad
- - Make a Website Your Mac Wallpaper with Plash
- - How to Use Hover Text on Mac to Magnify On-Screen Text
- - Fix “warning: unable to access /Users/Name/.config/git/attributes Permission Denied” Errors
- - How to Fix the Apple Watch Squiggly Charging Cable Screen
- - NewsToday2: What it is & How to Disable NewsToday2 on Mac

About OSXDaily | Contact Us | Privacy Policy | Sitemap
This website is unrelated to Apple Inc
All trademarks and copyrights on this website are property of their respective owners.
© 2024 OS X Daily. All Rights Reserved. Reproduction without explicit permission is prohibited.
How to take a full-page screenshot in any iPhone app
In this tutorial, we will show you how to take a full-page screenshot in Apple apps like Safari, Mail, Notes, Maps, and Files, as well as any other non-Apple apps like Google Chrome, Firefox, WhatsApp, Telegram, and more.

If you’ve ever wanted to send a screenshot that shows more than what’s on your screen, then you may want to consider sending a full-page scrolling screenshot.
The process is similar to taking a regular screenshot , but with a full-page version, you get to share more.
Use the built-in full-page screenshot tool on iPhone
iOS has a native option to capture the entire web page, note, email, PDF, or map in one go and save it as an image to the Photos app, or as a PDF to the Files app.
This native screenshot tool works with Safari (when you’re on a web page) and a few other Apple apps like Notes (when you’re inside a note), Mail (when you’re inside an individual email), the Files app (when you’ve opened a PDF), and Apple Maps (when you’ve a map on the screen).
The steps to capture a full-page screenshot in all these apps are similar. We’ve used Safari for this tutorial.
- Open Safari , Notes , Mail , Files , or Maps on your iPhone or iPad.
- Take a screenshot as you would normally do by pressing the Volume Up + Side button .
- Now tap the screenshot preview that appears on the bottom corner of the screen.
- Select Full Page from the top. A new preview window will appear next to the screenshot, where you can scroll to see the entire screen. You can also Markup and crop the screenshot.
- Finally, tap Done and select Save to Photos or Save PDF to Files .

The scrolling screenshot of the Safari web page or the concerned app is now ready. Depending on where you saved it, you’ll find it inside the Photos or Files app.
Crop the screenshot
Before saving the screenshot, you can also make changes to it. For example, you can use the Markup tools or crop the screenshot to remove any unwanted parts of the web page or the screen grab. To do that, tap the Crop button on top of the screen and adjust the screenshot per your requirement. After that, tap Done > Done and save it.

Don’t see the ‘Save to Photos’ option?
While the ability to save a full-screen capture as a PDF via the above method has existed for several years, you can save them as an image to the Photos app only on iOS 17 and later . So, make sure you update your iPhone to get the “Save to Photos” option.
Secondly, you won’t see the “Save to Photos” option if the web page, PDF, note, or email is extremely lengthy . However, it should have you covered for most web articles. In case the on-page ads make the screenshot lengthy, use Safari Reader Mode to strip the ads and then take a screenshot.
Related: How to print pages without ads in Safari, Firefox, and Chrome on Mac
Take a scrolling screenshot in all other iPhone apps
Thanks to third-party apps like Picsew (paid version – $1.99), you can take scrolling screenshots anywhere you scroll vertically, like Chrome, Firefox, WhatsApp, Telegram, Gmail, App Library, Messages, Calendars, Reminders, and more, provided that particular app has not blocked the screenshot feature .
Here’s how to take a scrolling, long-form, full-page screenshot on any iPhone and iPad screen:
1) Download Picsew from the App Store. Now, open it and tap the gear icon > Advanced Features to upgrade to its Pro version.

2) Make sure the screen recording icon is added to your iPhone Control Center. If not, go to Settings > Control Center and tap the green plus icon for Screen Recording .

3) Be in the browser, app, or screen whose long screenshot you wish to take. From here, open the Control Center:
- On iPhone with Face ID, swipe down from the top right corner.
- On iPhone with a Home button, swipe up from the bottom edge of the screen.
4) Long-press the screen recording icon .
5) Select Picsew and tap Start Broadcasting . You have three seconds to tap any empty area in the Control Center to return to the screen whose long screenshot you want.

6) While Picsew is recording your screen (you will see a red pill shape or bar on top of your screen), scroll the page .
7) Once you have scrolled to the desired length (in the screenshots below, you can see I have scrolled from the top of the article to the bottom), tap the red pill shape or red bar from the top of your iPhone to stop the screen recording. At times, you might also see a notification from Picsew saying it has finished the screen recording.

8) Open Picsew from the popup or the Home Screen.
9) The app has already stitched several images one after another, creating a long screenshot. Optionally, you can use the tiny yellow pencil icon to adjust individual images. Once done, tap the share icon from the top right and export it as an image or PDF.

Here’s how the saved full-page, long screenshot looks in the iPhone Photos app:

On the same note:
- How to capture a screenshot of a whole text thread on iPhone
- How to capture full-page screenshots in Safari, Firefox, and Chrome on Mac
- GTA 5 Cheats
- What is Discord?
- Find a Lost Phone
- Upcoming Movies
- Nintendo Switch 2
- Best YouTube TV Alternatives
- How to Recall an Email in Outlook
How to take a screenshot on an iPad (any generation)

While most iPad apps have built-in sharing features, taking a screenshot is still one of the easiest ways to capture information from your iPad. Whether that's an interesting news article or recipe, directions to your favorite restaurant, or a cool scene from one of your favorite games from the App Store , iPadOS makes it easy to capture a quick image of whatever's on your iPad and either save it for future reference or share it with your friends and family.
How to take a screenshot on an iPad without a home button
How to take a screenshot on an ipad with the home button, ipad screenshot accessibility options, how to screenshot with apple pencil, how to edit and annotate a screenshot, how to share a screenshot.
- How to take a screenshot on a Chromebook
- How to take a screenshot on a Mac
- How to take a screenshot on an iPhone
What You Need
Note that while you can capture a screenshot from just about any app on your iPad — even games — screenshots taken in premium streaming apps like Netflix and Disney+ will result in a black image rather than a still frame of the movie or TV show you're watching. This is not a bug — these apps are specifically designed to prevent you from capturing screenshots for copyright reasons.
The process for taking screenshots differs slightly depending on which iPad model you have. Here's how to take a screenshot if your iPad has an edge-to-edge screen with only a side button and no front home button, such as the iPad Pro (2022) , iPad Air (2022) , iPad mini (2021) , or iPad (2022) .
Step 1: Make sure whatever you want to take a screenshot of is shown the way you want on your iPad.
Step 2: Simultaneously press the top button (located on the top-right edge when holding your iPad in portrait orientation), and either one of the volume buttons.
Your iPad screen will flash momentarily, and a thumbnail preview of your screenshot will appear in the bottom-left corner of your screen. You'll hear a shutter-click sound if your iPad isn't in silent mode.
- How to find your phone number on iPhone or Android
- The best iPads in 2024: the 5 best ones you should buy
- The most common iPad problems and how to fix them
Step 3: After a few seconds, the thumbnail preview of the screenshot will disappear, or you can swipe it off the edge of the screen to dismiss it manually. In either case, the image will be automatically saved to your Photos app.
If you have an older iPad model with a home button on the front, such as the iPad (2021) , then the process to take a screenshot will be slightly different — and it can also be a bit trickier since you'll need to use two hands.
Step 2: Simultaneously press the top button (located on the top-right edge when holding your iPad in portrait orientation), and the home button. Unlike the newer iPads, this is a two-handed operation, so make sure you press them at the same time; otherwise, your iPad may simply turn off instead of capturing a screenshot.
Once you've successfully captured a screenshot, your iPad screen will flash and a thumbnail preview of your screenshot will appear in the bottom-left corner of your screen. As with the newer iPads, you'll also get a camera-like shutter-click sound as confirmation, assuming your iPad isn't in silent mode.
Step 3: Wait for the thumbnail of the screenshot to disappear or swipe it off the edge of the screen to dismiss it manually. You'll be able to find the image saved in your photo library in the Photos app.
If you're unable to press the two physical buttons at the same time, then Apple's AssistiveTouch accessibility feature offers an entirely buttonless way to capture a screenshot.
AssistiveTouch is designed to help you perform a range of more complex touch-based commands on the iPad through a simple menu that is just a few taps away. This can be handy for many things, one of which is an alternative way to get screenshots. Here's how to turn it on.
Step 1: Open the Settings app.
Step 2: Select Accessibility .
Step 3: Select Touch .
Step 4: Select AssistiveTouch .
Step 5: Toggle AssistiveTouch on. You'll see the AssistiveTouch button appear on your screen, which resembles a series of faded, concentric circles.
Step 6: Select Double-Tap .
Step 7: Select Screenshot .
Step 8: Swipe up or press the home button to return to the Home Screen. The AssistiveTouch control should remain visible on the screen.
Step 9: When you find a screen that you want to save an image of, double-tap the AssistiveTouch button. Your iPad display will briefly flash white, and you'll also hear the same shutter noise that you do when taking a picture in the Camera app, as long as your device isn't in silent mode.
Step 10: A thumbnail of the screenshot will appear in the bottom-left corner of the screen. After a few seconds, this will disappear and the screenshot will be automatically saved to your photo library. You can also swipe it away at any time to save it to your photo library immediately, or tap on it to crop, annotate, or share it using the steps described earlier.
If you have an Apple Pencil , you can also use that to take a quick screenshot, which is even handier when you're already working with your stylus.
Step 1: Swipe your Apple Pencil from the bottom-left corner of your screen up toward the center.
The bottom-left corner is the default setting, with a swipe from the bottom-right used for the Quick Note feature. This can be changed in the iPad Settings app under Apple Pencil > Pencil Gestures .
Step 2: You'll see and hear the same flash and shutter-click sound that occurs when taking a screenshot with the buttons. However, when using the Apple Pencil, you'll be taken directly to the editing and annotation screen.
Step 3: Perform any edits or markup you want on your screenshot.
Step 4: When finished, select Done in the top-left corner to save your screenshot. You can also use the Share button in the top-right corner to share your screenshot in the normal way.
Once you've successfully captured a screenshot, you'll see a small preview in the bottom-left corner of your screen. This thumbnail will automatically disappear in a few seconds, or you can swipe it to the left to dismiss it manually. In this case, the screenshot gets tucked away safely in your photo library, and you can carry on with whatever you were doing before.
However, you can also pull up the screenshot to make some quick edits and annotations before that happens. Here's how.
Step 1: After taking a screenshot, select the thumbnail that appears in the bottom-left corner of your screen.
Step 2: Your screenshot will open in a simplified editing window, ready to be cropped or annotated.
Step 3: For screenshots taken from certain supported apps, such as Safari or Mail, you may also see two extra buttons at the top. In this case, you can choose Screen to save a normal screenshot that includes only what's shown on your screen or Full Page to capture an entire article, web page, or email. This can be annotated and cropped in the same way as any other screenshot, but the results will be saved to a PDF file in the Files app rather than your Photos library.
Step 4: To save only a portion of your screenshot, adjust the cropping handles to draw a box around the portion you want to keep. You can also use the standard pinch-to-zoom gesture to enlarge a portion of your screenshot.
Step 5: You can also add markup and other annotations to your screenshot by drawing with your finger or an Apple Pencil. Several annotation tools can be found in the annotations panel on the editing screen, along with Undo and Redo buttons so you can walk back any edits you don't like.
Step 6: You can also add advanced annotations, such as a text box, magnifier loupe, or your signature, by selecting the Plus button and choosing the appropriate options from the pop-up menu that appears.
Step 7: When you’re finished making edits, select Done in the upper-left corner.
Step 8: Choose Save to Photos or Save to Files to save the resulting image to your photo library or a destination in the Files app, respectively. You can also select Delete Screenshot if you've changed your mind and don't want to save it.
You can also share a screenshot with any of your contacts directly from the editing screen. This is both a fun way to show your friends and family members what you're up to, and also handy for quickly sharing information such as directions and maps, articles, and snippets of text.
Step 2: Crop and annotate the screenshot if desired.
Step 3: When you're ready to send it out, select the Share button in the top-right corner. The standard iPadOS sharing options appear.
Step 4: Choose an option from the row of icons at the top to quickly share with one of your frequent contacts or an option from the second row to share via a specific app such as Mail or Facebook or send to another device using AirDrop. You can also find the usual sharing options here for saving your screenshot to other apps like Notes.
Editors' Recommendations
- The best tablets in 2024: top 11 tablets you can buy now
- Apple is about to do the unthinkable to its iPads
- We finally know when Apple will announce its 2024 iPads
- Apple Music vs. Spotify: Which music streaming service is the best?
- How to find your lost phone (tips for iPhone and Android)
- How-To Guides

The standard Apple 10.9-inch iPad rarely sees a deep discount but that’s the case over at Best Buy at the moment. Normally priced at $449, you can buy one for just $349 for a limited time. A hefty saving of $100, this is one of the better iPad deals at the moment and worth checking out if you want a new tablet or you’re keen to buy someone a great gift. Here’s what the Apple 10.9-inch iPad has to offer.
Why you should buy the Apple 10.9-inch iPad The Apple 10.9-inch iPad is a pretty good tablet for anyone who wants something straightforward and useful. It has an attractive 10.9-inch Liquid Retina display with True Tone support so it looks great with whatever you’re doing, whether you’re browsing the internet, watching videos, or playing a game. It’s powered by the A14 Bionic chip with a 6-core CPU and 4-core GPU which is why the Apple 10.9-inch iPad easily joins the best iPads list for anyone seeking a great mid-range example. It’s easily capable of playing many games through Apple Arcade as well as being snappy when it comes to looking up YouTube videos and similar.
There's a tablet out there for almost everyone, with designs available to accommodate anything from kids to creative professionals. The Apple iPad is one of the most popular tablet lineups, with the best iPads offering a wide range of options and capabilities. If you’re in the market for a new iPad, there are some great iPad deals worth shopping right now. In fact, not only are iPads some of the best Apple deals currently taking place, but some of the best tablet deals as well. We’ve rounded up what we feel are the best tablet deals to shop at the moment. They include iPads, iPad cases and covers, and iPad accessories, so read onward for more details. Apple iPad 10.2 (9th Gen) 64GB Wi-Fi -- $249, was $329
Apple's A13 Bionic chip is no M1 or M2, but it still offers 64-bit architecture and neural engine support for excellent performance. In other words, this 10.2-inch iPad is incredible value. It has a 10.2-inch Retina display, 64GB of storage, supports Touch ID and Apple Pencil (1st Gen), and it's size, plus all-day battery life make it an excellent choice for anyone with an on-the-go lifestyle.
iPad Pro 2022 Joe Maring / Digital Trends
Apple is already past its usual upgrade cycle for the iPad Pro after the previous model was released in October 2022. Latest reports hint at an announcement now set for "early May" this year where Apple will unveil the new iPad Pro and iPad Air models, even though a proper event seems unlikely. Despite Apple's suggested lack of fervor, these purported new iPad models are expected to bring significant changes, especially to the display.
How To Take A Screenshot On Safari

- Software & Applications
- Browsers & Extensions

Introduction
Taking a screenshot is a handy skill that allows you to capture and save a snapshot of what's displayed on your screen. Whether you want to preserve a memorable moment, share information with others, or keep a record of important details, knowing how to take a screenshot on Safari can be incredibly useful. Safari, the default web browser for Apple devices, offers several methods for capturing screenshots, each with its own unique advantages. In this article, we'll explore three simple and effective ways to take a screenshot on Safari, empowering you to effortlessly capture and save images of web pages, online articles, or any other content you encounter while browsing the internet.
By mastering these screenshot techniques, you'll be equipped to capture and share visual information with ease. Whether you're a student needing to save excerpts from online research, a professional seeking to document web content for presentations, or simply someone who wants to preserve memorable online moments, the ability to take screenshots on Safari will prove to be a valuable skill. So, let's dive into the methods and learn how to capture and save screenshots using Safari on your Apple device.
Method 1: Using Keyboard Shortcuts
Capturing a screenshot on Safari using keyboard shortcuts is a quick and convenient method that allows you to capture the entire screen, a specific window, or a selected portion with ease. These keyboard shortcuts are intuitive and can be executed seamlessly, making them a popular choice for many users.
Full Screen Screenshot
To capture the entire screen, simply press the Command + Shift + 3 keys simultaneously. Upon doing so, Safari will instantly capture a screenshot of the entire screen, including the browser window and any open tabs or applications in the background. The captured image will be automatically saved to your desktop, ready for you to access and utilize as needed.
Screenshot of a Specific Window
If you wish to capture a screenshot of a specific Safari window, such as a single browser tab, you can do so by pressing Command + Shift + 4 followed by the Spacebar . This combination will transform your cursor into a camera icon, allowing you to click on the desired Safari window to capture a screenshot of it exclusively. Once captured, the image will be saved to your desktop, providing you with a focused snapshot of the selected Safari window.
Custom Selection Screenshot
For scenarios where you only need to capture a specific portion of the Safari window, the keyboard shortcut Command + Shift + 4 enables you to create a custom selection screenshot. Upon pressing this combination, your cursor will transform into a crosshair, empowering you to select the exact area of the Safari window that you want to capture. Once the selection is made, releasing the mouse or trackpad will trigger the screenshot to be saved to your desktop, offering you a tailored image of the chosen portion.
By leveraging these keyboard shortcuts, you can efficiently capture screenshots while browsing on Safari, empowering you to preserve and share valuable visual information effortlessly. Whether you need to capture the entire screen, a specific window, or a custom selection, the keyboard shortcuts in Safari provide a seamless and efficient way to capture and save screenshots, enhancing your browsing experience and productivity.
Method 2: Using the Screenshot Toolbar
Another convenient method for capturing screenshots on Safari is by utilizing the built-in Screenshot Toolbar. This feature, introduced in macOS Mojave and later versions, offers a user-friendly interface that simplifies the process of taking screenshots while browsing. The Screenshot Toolbar provides various options for capturing specific portions of the screen, adding annotations, and even recording video clips, making it a versatile tool for visual documentation.
To access the Screenshot Toolbar while using Safari, simply follow these steps:
Open Safari : Launch the Safari browser and navigate to the web page or content you wish to capture.
Activate the Screenshot Toolbar : Once on the desired page, press the Shift + Command + 5 keys simultaneously. This keyboard shortcut triggers the Screenshot Toolbar to appear at the bottom of the screen, presenting a range of screenshot and recording options.
Select Screenshot Type : Within the Screenshot Toolbar, you can choose from various screenshot options, including capturing the entire screen, a specific window, or a custom selection. By selecting the appropriate screenshot mode, you can tailor the capture to suit your specific needs.
Customize Screenshot Settings : The Screenshot Toolbar also allows you to customize additional settings, such as setting a timer for delayed captures, choosing the save location for screenshots, and enabling options for showing the mouse pointer in the screenshot.
Capture and Save : Once the desired settings are configured, simply click on the "Capture" button within the Screenshot Toolbar to initiate the screenshot. The captured image will be saved to the designated location, ready for you to access and utilize as needed.
The Screenshot Toolbar not only streamlines the process of capturing screenshots on Safari but also offers additional features for annotating and editing the captured images. After taking a screenshot, the Screenshot Toolbar provides options for adding text, shapes, and other annotations to the image, empowering you to highlight specific details or provide context to the captured content.
Furthermore, the Screenshot Toolbar enables users to record video clips of their screen, making it a comprehensive tool for visual documentation and communication. Whether you need to capture a static image of a web page or record a dynamic demonstration within Safari, the Screenshot Toolbar equips you with the necessary features to accomplish these tasks seamlessly.
By leveraging the Screenshot Toolbar in Safari, users can enhance their screenshot capabilities, benefiting from a user-friendly interface and versatile options for capturing, annotating, and recording visual content while browsing the web. This method provides a modern and intuitive approach to taking screenshots on Safari, catering to a diverse range of visual documentation needs.
Method 3: Using the Preview App
In addition to the keyboard shortcuts and the Screenshot Toolbar, Safari users can also utilize the Preview app, a versatile and feature-rich tool that offers advanced capabilities for capturing and editing screenshots. The Preview app, which comes pre-installed on macOS devices, serves as a powerful image viewing and editing application, and it includes seamless integration with Safari for capturing and annotating screenshots.
To utilize the Preview app for capturing screenshots while browsing on Safari, follow these simple steps:
Access the Preview App : Once on the desired page, navigate to the Applications folder or use Spotlight Search to locate and open the Preview app.
Capture the Screenshot : Within the Preview app, click on the "File" menu and select "Take Screenshot." This action will present options for capturing the entire screen, a specific window, or a custom selection.
Customize Screenshot Settings : After selecting the desired screenshot mode, the Preview app allows users to customize additional settings, such as setting a timer for delayed captures, choosing the save location for screenshots, and enabling options for showing the mouse pointer in the screenshot.
Annotate and Edit : Once the screenshot is captured, the Preview app provides a comprehensive set of tools for annotating and editing the image. Users can add text, shapes, arrows, and other annotations to highlight specific details or provide context to the captured content. Additionally, the app offers features for cropping, resizing, and adjusting the image, empowering users to refine the screenshot according to their preferences.
Save and Share : After annotating and editing the screenshot, users can save the image in their preferred format and share it with others as needed. The Preview app supports various image file formats, ensuring compatibility and flexibility in sharing the captured screenshots.
By leveraging the Preview app, Safari users can elevate their screenshot capabilities, benefiting from advanced annotation and editing features that enhance the visual documentation process. Whether you need to capture, annotate, or edit screenshots of web pages, online articles, or any other content within Safari, the Preview app provides a comprehensive solution for these tasks, empowering users to capture and customize visual content with precision and efficiency.
Incorporating the Preview app into your screenshot workflow expands your capabilities, allowing you to capture and refine screenshots seamlessly while browsing on Safari. This method offers a robust and versatile approach to capturing and editing screenshots, catering to a diverse range of visual documentation and communication needs.
In conclusion, mastering the art of taking screenshots on Safari opens up a world of possibilities for capturing and preserving visual content while browsing the web. By exploring the three methods outlined in this article, users can equip themselves with versatile and efficient techniques for capturing screenshots on Safari, each offering unique advantages and capabilities.
The keyboard shortcuts method provides a quick and intuitive way to capture screenshots, allowing users to effortlessly capture the entire screen, specific windows, or custom selections with ease. This method is ideal for those seeking a streamlined approach to capturing screenshots without the need for additional interfaces or tools.
The Screenshot Toolbar, introduced in macOS Mojave and later versions, offers a modern and user-friendly interface for capturing and annotating screenshots. With its versatile options for capturing specific portions of the screen, adding annotations, and even recording video clips, the Screenshot Toolbar caters to a diverse range of visual documentation needs, enhancing the screenshot experience on Safari.
Furthermore, the integration of the Preview app with Safari provides advanced capabilities for capturing, annotating, and editing screenshots. By leveraging the comprehensive set of annotation and editing tools offered by the Preview app, users can refine and customize their screenshots with precision, adding context and visual enhancements to the captured content.
By incorporating these methods into their workflow, Safari users can elevate their screenshot capabilities, benefiting from a range of options for capturing, annotating, and refining visual content with precision and efficiency. Whether it's capturing web pages, online articles, or dynamic content within Safari, the ability to take screenshots empowers users to preserve and share valuable visual information seamlessly.
In essence, the knowledge and proficiency in taking screenshots on Safari not only enhance individual productivity and documentation needs but also contribute to effective communication and collaboration. Whether you're a student, professional, or casual user, the ability to capture and share visual content with ease enriches the browsing experience and facilitates seamless information sharing.
By embracing these screenshot techniques, users can harness the power of visual documentation, preserving valuable moments, information, and insights encountered while browsing on Safari. With these methods at their disposal, users can confidently navigate the digital landscape, equipped with the tools to capture, annotate, and share visual content effortlessly.
Leave a Reply Cancel reply
Your email address will not be published. Required fields are marked *
Save my name, email, and website in this browser for the next time I comment.
- Crowdfunding
- Cryptocurrency
- Digital Banking
- Digital Payments
- Investments
- Console Gaming
- Mobile Gaming
- VR/AR Gaming
- Gadget Usage
- Gaming Tips
- Online Safety
- Software Tutorials
- Tech Setup & Troubleshooting
- Buyer’s Guides
- Comparative Analysis
- Gadget Reviews
- Service Reviews
- Software Reviews
- Mobile Devices
- PCs & Laptops
- Smart Home Gadgets
- Content Creation Tools
- Digital Photography
- Video & Music Streaming
- Online Security
- Online Services
- Web Hosting
- WiFi & Ethernet
- Browsers & Extensions
- Communication Platforms
- Operating Systems
- Productivity Tools
- AI & Machine Learning
- Cybersecurity
- Emerging Tech
- IoT & Smart Devices
- Virtual & Augmented Reality
- Latest News
- AI Developments
- Fintech Updates
- Gaming News
- New Product Launches
- Fintechs and Traditional Banks Navigating the Future of Financial Services
- AI Writing How Its Changing the Way We Create Content
Related Post
How to find the best midjourney alternative in 2024: a guide to ai anime generators, unleashing young geniuses: how lingokids makes learning a blast, 10 best ai math solvers for instant homework solutions, 10 best ai homework helper tools to get instant homework help, 10 best ai humanizers to humanize ai text with ease, sla network: benefits, advantages, satisfaction of both parties to the contract, related posts.

How To Download Apps From Safari

10 Best Browsers for Privacy That Aren’t Google Chrome

How To View Page Source On Tablet

What Is Cross-Browser Testing

How To Download The Latest Version Of Safari

How To Get Adblock For Safari

MovieBox Pro: How to Install It on Your Phone

How To Download Vshare On IPad
Recent stories.

Fintechs and Traditional Banks: Navigating the Future of Financial Services

AI Writing: How It’s Changing the Way We Create Content

How to Know When it’s the Right Time to Buy Bitcoin

How to Sell Counter-Strike 2 Skins Instantly? A Comprehensive Guide

10 Proven Ways For Online Gamers To Avoid Cyber Attacks And Scams

- Privacy Overview
- Strictly Necessary Cookies
This website uses cookies so that we can provide you with the best user experience possible. Cookie information is stored in your browser and performs functions such as recognising you when you return to our website and helping our team to understand which sections of the website you find most interesting and useful.
Strictly Necessary Cookie should be enabled at all times so that we can save your preferences for cookie settings.
If you disable this cookie, we will not be able to save your preferences. This means that every time you visit this website you will need to enable or disable cookies again.
13 essential tips and tricks to help you get the most out of your iPad
- Apple has made it much easier to multitask on the iPad in recent years by adding new features that let you run two apps at once and watch video while using other apps.
- Whether you've just purchased a new iPad Air or have been an iPad user for years, there are bound to be a few capabilities you haven't heard of.
- See below for tips and tricks that will help you save time, from covering the basics like how to take a screenshot to learning how to use split screen mode.
- But first, make sure your iPad is running the latest software by navigating to "Settings," tapping "General," and selecting "Software Update."
- Visit Business Insider's homepage for more stories
1. How to open another app in a smaller window on the iPad's screen.
Apple's Slide Over feature makes it possible to launch a second app in a smaller window while you continue to use another app.
To do this, follow the steps below:
- Swipe up from the bottom of the screen to reveal the dock.
- Then, choose the second app from the dock that you'd like to use, and drag and drop it onto the screen.
- Now, the secondary app should appear in a floating column on the screen over the app you're currently using.
2. How to use two apps in Split View mode.
If you want to evenly split the screen between two apps rather than using a secondary app in a floating window, try using Apple's Split View mode.
Here's how to do it:
- Follow the same steps described in the previous section to launch a second app in Slide Over.
- Then, drag down on the line symbol at the top of the Slide Over window.
- This will prompt the second app to fit neatly alongside the other app that's currently open on your screen.
- Adjust how much space each app occupies on screen by dragging the line that divides them.
3. How to add more apps to the iPad's dock.
The dock lives along the bottom of the iPad's screen, and is a handy shortcut to your most frequently used apps. Apple has increased the number of apps you can pin to the dock over the years, making it even easier to quickly launch apps.
Here's how to add a new app to the dock:
- Press and hold the app icon you'd like to add.
- Drag and drop it onto the dock.
4. How to use your iPad's keyboard as a trackpad.
Tasks that require precision — like moving a cursor — can sometimes be tricky on a touch screen device like the iPad. Luckily, your iPad's on-screen keyboard can double as a trackpad when you follow the below steps.
- Hold two fingers on the keyboard until the keys appear blank as shown above.
- Slide your finger across the keyboard just as you would when using a trackpad.
5. How to switch back to the last app you just used.
If you want to quickly jump back to an app you were previously using, just swipe to the right using four or five fingers.
Those using one of Apple's 2018 iPad Pro models can do this by swiping along the bottom edge of the screen.
6. How to drag and drop multiple photos into an email.
With the release of iOS 11 in 2017, Apple made it much easier to share a batch of photos at once via email. Take a look at the steps below to learn how:
- Open a blank email and your photo gallery in Split View.
- Press and hold one of the photos you'd like to share.
- Drag the photo over to the blank email while continuing to keep your finger down on the screen.
- Tap the other photos you'd like to send in the email, and release your finger from the screen when you're finished selecting.
7. How to quickly navigate to the home screen without pressing the home button.
Sure, you can press the iPad's home button to get back to your device's home screen. Or, you could just swipe up from the bottom of the screen, which might be easier and more comfortable if you've got your tablet propped in a stand or dock accessory.
8. How to view multiple web pages in Safari side-by-side.
In addition to viewing two apps at once, you can also open two web pages in Safari alongside one another if you have an iPad Pro, fifth-generation iPad or later, iPad Air 2, or iPad mini 4 or later.
Here's how:
- Make sure your tablet is in landscape mode.
- Open Safari.
- Tap and hold the symbol located in the upper right corner of the screen for opening a new page, which looks like one square stacked over another square.
- Choose the "Open in Split View" option.
9. How to type a number or symbol without switching to the iPad's numeric keyboard.
Press and drag down on any key to type the corresponding number or symbol, as shown in the photo above. This can save you a couple of taps since you don't have to press the key in the bottom corner to switch keyboard modes.
10. How to split the keyboard in half.
It can be uncomfortable to type while holding your iPad, but splitting the keyboard in half makes this feel more natural. To do so, follow the steps below:
- Press and hold the symbol near the bottom of the screen that looks like a keyboard with a down arrow underneath it.
- Then choose the "Split" option from the menu that appears.
11. How to take a screenshot.
It's a basic task, but one that's easily forgettable if you haven't done it in a while. See the instructions below to learn how to capture a screenshot on your iPad.
- On the new 11-inch and 12.9-inch iPad Pros, press the top button and volume up key simultaneously and quickly release.
- On all other iPad models, press the top button and home button simultaneously and quickly release.
12. How to watch a video while using another app.
There's no need to stop watching Netflix to check your email or browse Facebook, thanks to Apple's picture-in-picture mode.
Here's how to use it:
- First, launch the "Settings" menu and choose "Multitasking & Dock."
- Then, make sure the "Picture in Picture" setting is turned on.
- When watching content in an app like Netflix, tap the home button to shrink the video and send it to the corner of your iPad's display.
- To bring the video back to full screen mode, tap the video and press the symbol that looks like a box with an arrow in it.
- Tap the video and press the "X" button to close it.
13. How to sign into all of your TV channel apps at once.
You don't have to sign into each individual app to get access to content on your iPad.
Follow the steps below to login with your TV provider just once, and check out Apple's website for a full list of providers that support single sign-on.
- Open "Settings."
- Choose "TV Provider."
- Select your TV provider from the list of options.
- Login with your TV provider account information
- Main content
- The Best Tech Gifts Under $100
- Traveling? Get These Gadgets!
How to Capture an iPad Screenshot
Press Volume Up and Home or the Wake/Sleep buttons at the same time
:max_bytes(150000):strip_icc():format(webp)/DanNations-b3e3901c63b544bf8588ac2fc6231f60.jpg "safari ipad screenshot")
- University of Texas at Arlington
In This Article
Jump to a Section
How to Take a Screenshot on an iPad
How to share an ipad screenshot, where does the ipad screenshot go, good uses for screenshots.
- Frequently Asked Questions
What to Know
- With Home button: Press Home button and top / side button simultaneously.
- Without Home button: Press Power button and volume up button simultaneously.
- Share: Open Photos or Camera app > tap screenshot thumbnail > tap Share icon > choose how to share.
This article explains how to take a screenshot on an iPad, as well as how to share and print the screenshot. Information applies to iPad Pro, iPad Air, iPad mini, and iPad models with iPadOS 13 or higher installed.
Screenshots are handy for saving a cool drawing you made in a drawing app, showing your friends your high score in Candy Crush Saga, or creating a new meme . Screenshots are also useful for sharing information with people who are in a different location. The iPad doesn't have a Print Screen button, but capturing a screenshot on the iPad requires only a few steps.
To take a picture of content on the iPad screen:
Go to the content you want to capture. (Open an app, game, file, browser, or any content that you want to appear in a screenshot.)
If your iPad has a Home button , which is the round button below the screen, simultaneously press and hold the Home button and the top button (or side button, depending on orientation). When you hear the click of a camera shutter, release both buttons.
On iPads that don't have a Home button, press and hold the Power button and the volume up button simultaneously until you hear the camera shutter click.
A thumbnail image of the screen capture appears briefly at the bottom of the iPad screen.
There are plenty of ways to share a screenshot after you capture it.
Locate the screenshot in the Photos or Camera app and tap its thumbnail image to open it.
Tap the Share icon, which is the square with an arrow, at the top of the screen.
Choose how to share the screenshot. Send the screenshot as a text message, in an email message, or to a shared album . You can also share the photo on social media, AirDrop it to a nearby device, or add it to a Note. Scroll to the right or downward for additional sharing options.
To print, assign to a contact, or use as wallpaper , among other options, tap the desired action in the menu.
The image of the captured screen is sent to the Photos app. You can find it in several locations in the Photos app:
- Tap Photos at the bottom of the Photos app screen. The screenshot appears as the most recent photo.
- Tap Albums at the bottom of the Photos screen and select the All Photos album.
- Tap Albums at the bottom of the screen and scroll down to the Media Types section and tap Screenshots . The Screenshots album is created when you take your first screenshot, and all subsequent screenshots also appear here.
- Tap the Camera app to see a thumbnail of the most recent image you've taken.
Here are a few good reasons to take a picture of your iPad screen:
- Capture a photo from the web : Some photos can be downloaded from the web by tapping and holding the photo and then choosing a download option. If you can't download an image, take a screenshot of it. For the best quality, use a pinch-to-zoom gesture to zoom in on the image until it is large on the screen before snapping the screenshot.
- Capture a photo from an app : The screenshot function is a feature of the iPad, not a feature within an app, so it works on all apps. If you are on Instagram, Facebook, or any other app, you can take a screenshot of what you see.
- Save a tweet or Facebook update : When you find a status update and suspect the author may delete it in the future, take a screenshot. The screenshot function is a great way to save a record of status updates from social media platforms.
- Create a background image for the Lock Screen : Personalize your iPad lock screen by capturing a screenshot that is meaningful to you and assigning it as wallpaper.
- Capture an image for support help : When you have problems with your iPad, a screen capture may give the technical support tech the information needed to correct the problem.
When you capture a screenshot, you can enhance it with Markup by adding drawings, text, and making changes to the screenshot.
Position the Apple Pencil in one of the bottom corners of a compatible iPad screen and swipe up. Use the markup tools at the bottom of the screenshot if needed, and then select Save to Files or Save to Photos . Tap Done when you're finished.
If you can't take a screenshot on your iPad, which might occur after a system upgrade, a restart or force restart usually fixes the problem. Other less-likely causes include trying to take screenshots on an iPad that doesn't have room for them (solution: make room by deleting images and videos) or using an iPad that needs to be updated to the current iPadOS version .
Get the Latest Tech News Delivered Every Day
- How to Download and Save Photos and Images to the iPad's Camera Roll
- How to Screenshot on a Surface Laptop
- How to Take a Screenshot on iPad
- The 4 Best iPad Pro Wallpapers of 2024
- How to Screenshot on Samsung S21
- How to Screenshot on a Surface Pro 8
- How to Screenshot on Samsung Galaxy A51
- How to Take a Screenshot on Your iPhone
- How to Take a Screenshot on a Surface Pro
- How to Take a Screenshot on iPhone 12
- How to Turn Off Motion Photo on Android
- How to Use Markup on an iPhone, iPad, or iPod Touch
- How to Screenshot on Microsoft Surface
- How to Take a Screenshot on iPhone 11
- How to Screenshot on an HP Laptop
- How to Hard Reset or Restart an iPad (All Models)
- a. Send us an email
- b. Anonymous form
- Buyer's Guide
- Upcoming Products
- Tips / Contact Us
- Podcast Instagram Facebook Twitter Mastodon YouTube Notifications RSS Newsletter
How to Save a Full Page or 'Scrolling Screenshot' as a PDF on iPhone and iPad
In iOS, Apple has extended the system's built-in screenshot feature to include the ability to save a full web page or "scrolling screenshot" as a multi-page PDF.

- Launch the Safari app on your iPhone or iPad .
- Navigate to the web page that you wish to save as a multi-page PDF.

- A preview of the screenshot will pop up in the lower left of the display. Tap it to open up the Instant Markup interface. You'll have about five seconds before it disappears.
- Tap the Full Page tab in the upper right corner of the Markup interface.
- To save the PDF, tap Done and then tap Save PDF to Files . To share the PDF, tap the Share button (the square with an arrow pointing out) and select how or who to share it with from the Share screen.
Note that you can also use Markup to edit your PDF before saving or sending it.
Get weekly top MacRumors stories in your inbox.
Top Rated Comments
I tell you what...we needed iOS 13 a long time ago...nice features we should have had back in iOS 11 but Apple rested on its laurels for far too long.

Popular Stories

Apple Announces 'Let Loose' Event on May 7 Amid Rumors of New iPads

Apple Releases Open Source AI Models That Run On-Device

Apple Cuts Vision Pro Shipments as Demand Falls 'Sharply Beyond Expectations'

iOS 18 Rumored to Add These 10 New Features to Your iPhone

Apple Finally Plans to Release a Calculator App for iPad Later This Year
Next article.

Our comprehensive guide highlighting every major new addition in iOS 17, plus how-tos that walk you through using the new features.

App Store changes for the EU, new emoji, Podcasts transcripts, and more.

Get the most out your iPhone 15 with our complete guide to all the new features.
A deep dive into new features in macOS Sonoma, big and small.

Revamped models with OLED displays, M3 chip, and redesigned Magic Keyboard accessory.

Updated 10.9-inch model and new 12.9-inch model, M2 chip expected.

Apple's annual Worldwide Developers Conference will kick off with a keynote on June 10.

Expected to see new AI-focused features and more. Preview coming at WWDC in June with public release in September.
Other Stories

17 hours ago by Joe Rossignol

21 hours ago by MacRumors Staff

2 days ago by Joe Rossignol

3 days ago by Tim Hardwick

Full-Page Screenshots on Safari Not Working? Here's How to Fix It
Follow these three simple tips to fix full-page screenshots if they stopped working in Safari on your iPhone or iPad.
Safari is a wonderful browser that allows you to browse the internet with minimal distractions. It even allows you to take full-page screenshots of webpages, documents, or emails that exceed your iPhone screen, allowing you to save these long files as a PDF.
Unfortunately, full-page screenshots don't always work how they're supposed to. But we'll show you how to fix that below.
How to Take a Full-Page Screenshot
To take a full-page, scrolling screenshot of a webpage, take a screenshot as you normally would while on Safari, then tap the preview and select Full Page at the top. You can then choose Save PDF to Files or the Share icon to send it elsewhere.
Related: How to Take Full-Page Screenshots in Safari on iOS
What to Do When Full-Page Screenshots Aren't Working
Try these tips if you can't take full-page screenshots in Safari.
1. Check Your iOS Version
Full-page screenshots are available for iPhone users running on iOS 13 and later. First, make sure that your iPhone is running an iOS version that supports the feature by going to Settings > General > About .
If your OS is not the problem, make sure to check the app you’re using when attempting to take a full-page screenshot. It only works with Safari.
2. Make Sure You're in Safari
There are times that, depending on what you’re browsing, Safari will redirect you to another built-in app, like Apple Books, Files, or Messages. Full-page screenshots are not available in other apps or browsers.
3. Remove Safari From Any Home Screen Folders
A recent update may have a bug where full-page screenshots aren't accessible if you open Safari from a folder.
If your Safari is grouped with other apps in a folder on your Home Screen, first remove Safari from the folder and just place it somewhere on the Home Screen itself. Then launch the app and try to take a screenshot. You should see the Full-Page option again.
However, if you don’t like a cluttered Home Screen, you can also launch Safari from the App Library.
Related: What Is the iPhone App Library and How Do I Use It?
Take Screenshots Again
Full-page screenshots are a handy way to save whole web pages for later offline reading or other purposes. With these easy troubleshooting tips, you can make use of this simple hack again.
- Press Releases
- Industry News
- Product Spotlight
- Fresh from Apple
- Video Production
- Installation Videos
- Explainer Videos
- Testing Lab
- Networking & Security
- Special OWC Deals
- The Other World
- Powered by OWC
- Space & Beyond
- Random Thoughts & Topics
- OWC Unplugged
- Article Archives
- Make a Suggestion
Send us a Topic or Tip
Have a suggestion for the blog? Perhaps a topic you'd like us to write about? If so, we'd love to hear from you! Fancy yourself a writer and have a tech tip, handy computer trick, or "how to" to share? Let us know what you'd like to contribute!
How to Take a Screenshot of an Entire Webpage in Safari on a Mac

Taking screenshots of a webpage is a normal operation for many. Perhaps it’s to capture an image for a meme, graphs for a presentation, or to send that annoying error message to a disbelieving customer service rep. Whatever the reason, some of the standard Mac screenshot options may not do the trick.
Most of us are familiar with Shift-Command-3 to capture the entire screen, or Shift-Command-4 to capture a selected portion of a screen. You may even be familiar with Shift-Command-5 to capture a single window. But what if you want to take a scrolling screen capture of an entire webpage? The aforementioned tools can’t do that – they can only capture visible areas of your screen. So, is it even possible to take a screenshot that includes a portion of a webpage you would normally need to scroll to see?
Yes, there is! But it does take a few extra steps than just executing a single keystroke combination.
Screenshot a Webpage
- Open Safari and go to “ Safari > Preferences… “
- Click the Advanced tab and toggle on “ Show Develop menu in menu bar .”

- Navigate to the webpage you want to capture and from the Develop menu, choose “ Show Web Inspector .” Alternatively, you can hit alt-command-I (⌥⌘I).

- Select the Elements tab and right-click on the line that begins with “<html…”
- Choose Capture Screenshot
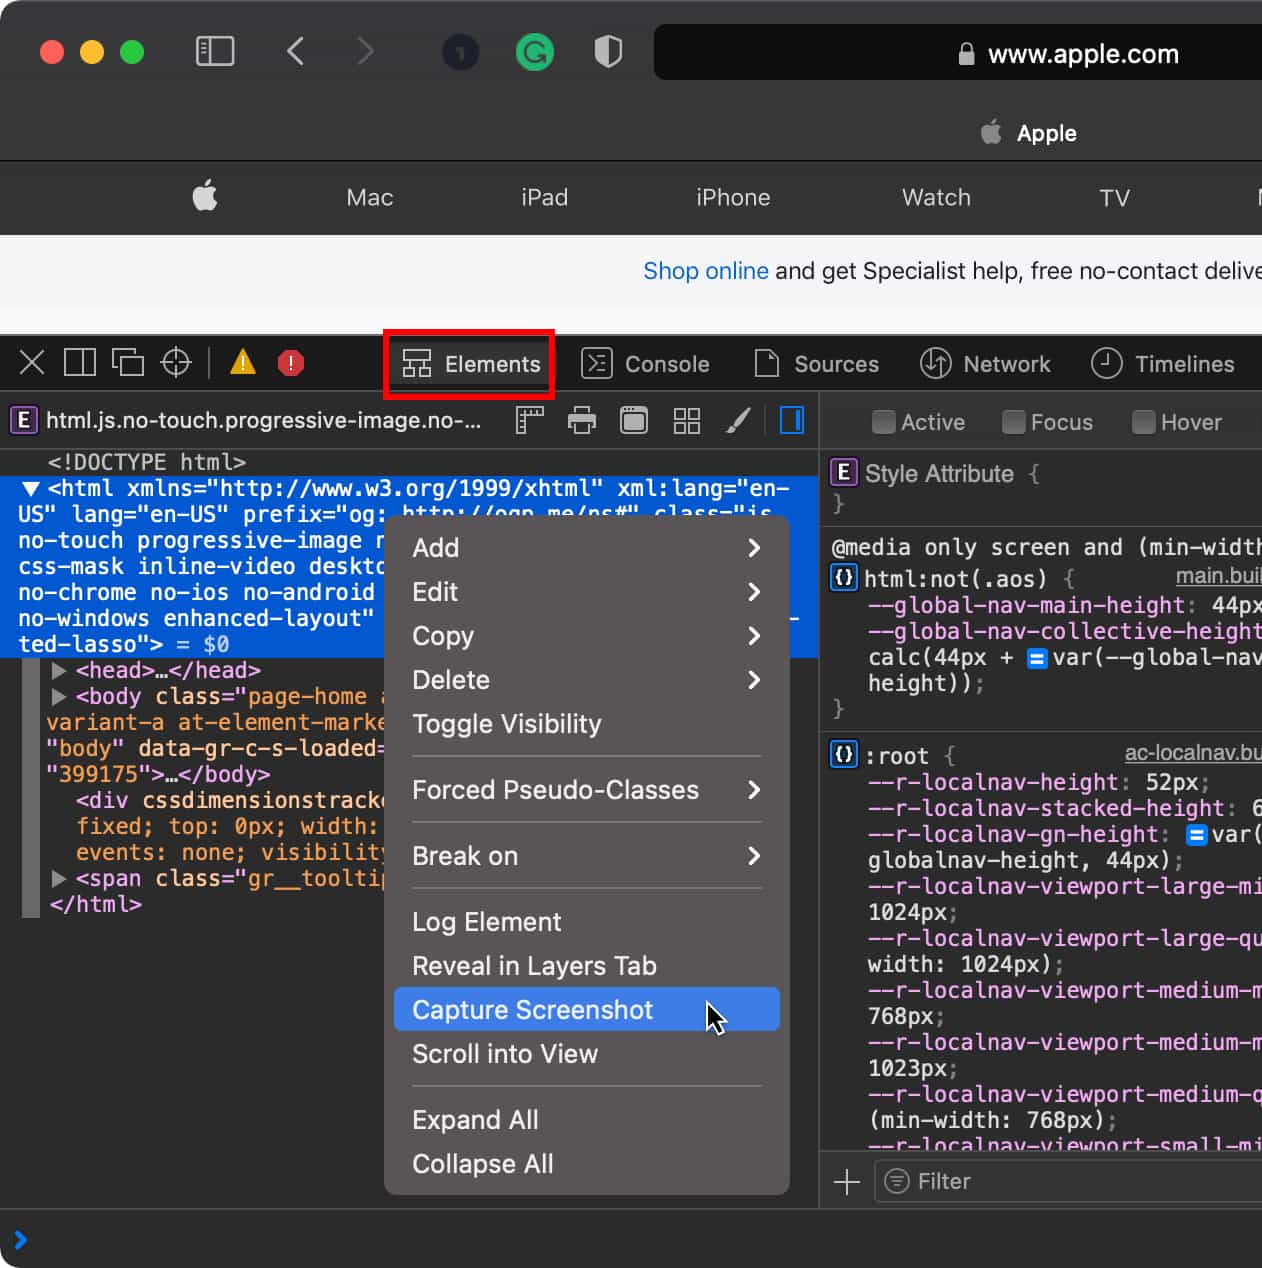
- Give it a moment to do it’s magic, and then select a name and location to save the file.

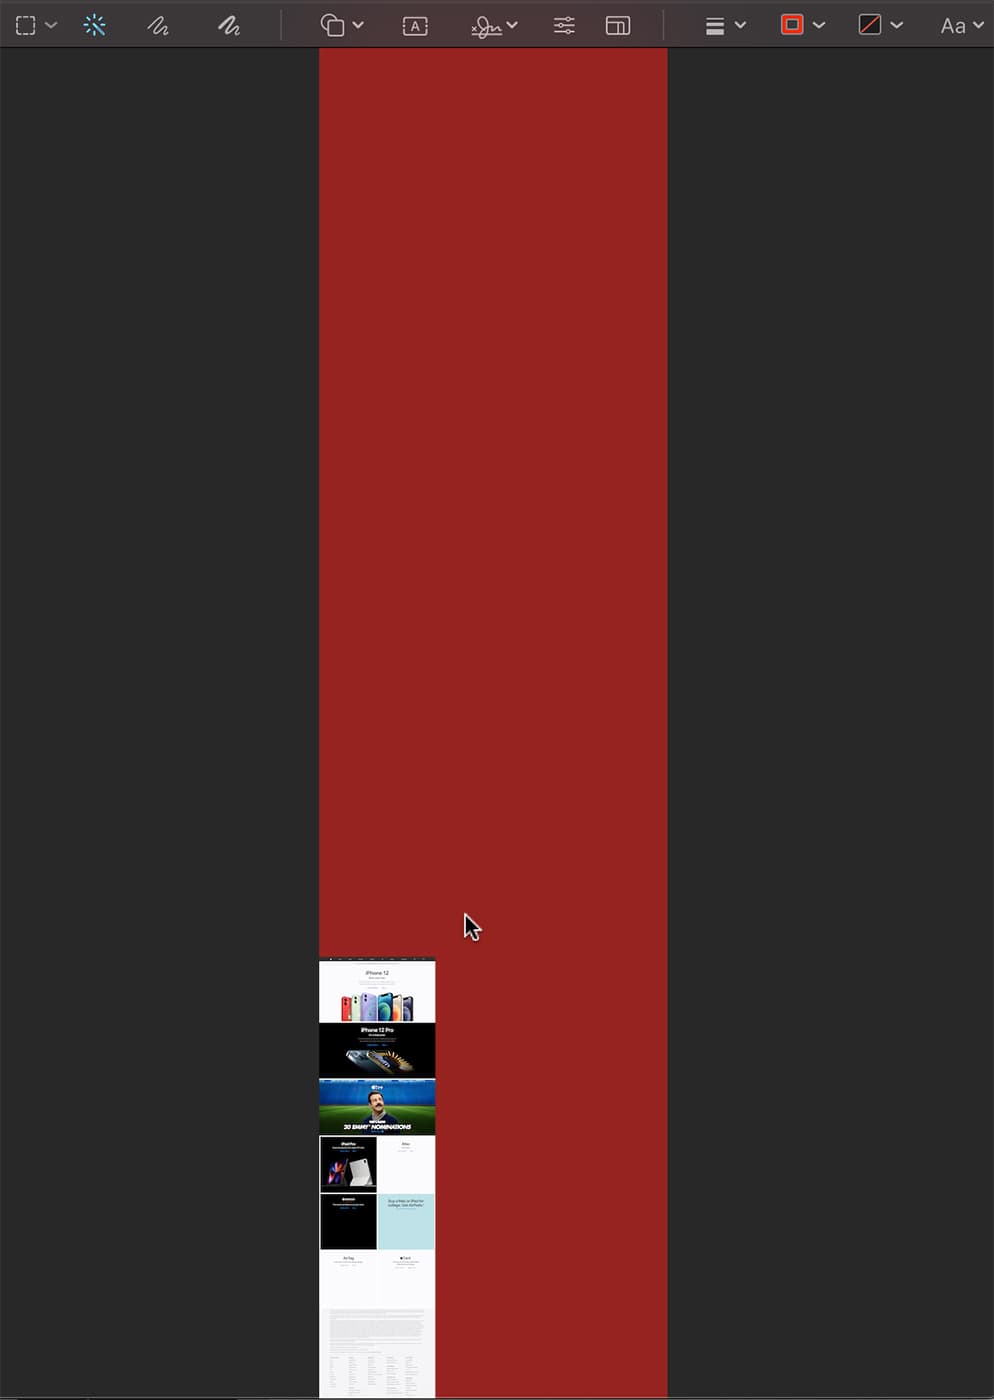
All done! Well, almost…
This could just be an issue I run into, but when capturing entire pages in this manner, there is a lot of empty container buffer around the image in the PNG file. You can see this in the Quick Preview of the file:

Let’s fix that.
- Open the file in Preview . If Preview is already your default application to open PNG files, you can simply double-click its icon.

- Drag the crosshairs in the empty area around the image. You’ll see the empty space selected and highlighted in red. Drag too far, and you’ll pick up the image itself. Don’t do that, we only want to select the empty area.
- When you let go of the mouse button, the highlighted color will disappear and be replaced with a dotted line indicating the selected area.

- Hit Shift-Command-I (⇧⌘I) to invert the selection.

- Hit Control-K (⌘K) to crop the image to the selection.
- Now you can hit Save (⌘S) and you truly are done. One cleaned up screenshot of an entire webpage.

Related Links
- macOS 101: What’s in the Utility Folder, Part 2
- Friday Five: Apple Webpages You Should Bookmark Right Now
- Using Activity Monitor Part 1: CPU and Memory
- Your Mac Doesn’t Want to Empty the Trash? Make It!
- How to Print a Webpage Without Ads and Backgrounds on a Mac
Other Topics You Might Like:

Leave a Reply Cancel reply
Save my name, email, and website in this browser for the next time I comment.
Notify me of follow-up comments by email.
Notify me of new posts by email.
13 Comments
OH man, Thank you so much for this post. it really helped me and saved a lot of my time.
Thanks for the helpful screen capture. I cannot get the clean up to work. The Shift+Command+I doesn’t work and I cannot get the Control+K to work. Can select the red area but that’s it.
Hoping you can help.
You show us how to capture OTHER web pages but NOT your own? That’s not cool dudes! If its not NOT for you, its not OK for anyone, right?
on Catalina, the part involving Preview to crop the image was a bit different, but I figured it out. Click on the show Markup Toolbar icon, then click on Rectangular Selection, then draw a box around the bit of interest, then click on “crop” in the toolbar. Repeat if needed. Zoom as needed.
Thanks for the insight!
Tried it on the article and when I try to pen saved .png I get message that either file is corrupted or can’t open the file format.
I ran into this also, then I quickly realized the file does not have the .png extension. Recaptured the screen and ensured when renaming the file, I added .png. Opened as a webpage though not as a preview. Still to figure out how to set preview as the default file opener for png files.
I’ve often wanted to do this. However, on this very page, while the initial steps seem to work, the resulting .png is un-openable by Preview or Pixelmator Pro or Quicklook. (“It may be damaged or use a file format that Preview doesn’t recognize.”)
File->Print->Save as PDF, and File->Export as PDF work as expected in Safari (full HTML-rendered page) with the added features of selectable text and extractable images in the PDFs (for those memes y’all). ~Tim~ macOS Big Sur, 11.4 Safari 14.1.1
Awesome tip! These are the articles that make it worthwhile to keep visiting Rocket Yard of OWC. Thanks. BTW an application to do it is Paparazzi! (but it does not work in all cases) https://derailer.org/paparazzi
I just tried that same Apple webpage with Safari 14.1.1 in OS 11.4. Went to File > Export as PDF… and bingo! Got a nice high-res 8.2MB PDF on my desktop instantly. Image is clean, no unexpected margins.
That works! Thank you!
Huh. I just tried that in Mojave with the latest Safari (14.1.2), using this webpage for the test.
I end up with a 20.6mb file ending in .PNG format, but which will not open. It’s either “damaged” or in a format that Preview can’t open.
In most other applications, this function would be easily performed using the Print button, and then Save as PDF. It is truly unfortunate that web developers have blocked the normal Print functionality on the web.
You Might Also Like
How to Share Security Certificates in macOS Sonoma

At OWC Earth Day is Every Day

Keep it Simple! Don’t Trust Your Photo Library’s Organization to Cloud and Editing Apps

How to Control your Mac, Windows and Linux Machines with One Keyboard and Mouse
Email Address
- Brand Assets
8 Galaxy Way Woodstock, IL 60098 1-800-275-4576 +1-815-338-8685 (Int)
All Rights Reserved, Copyright 2020, OWC – Since 1988 | Terms of Use | Privacy Policy
We use cookies to provide you with a full shopping experience, including personalized content, and to help us improve your experience. To learn more, click here .
By continuing to use our site, you accept our use of Cookies, Privacy Policy and Terms of Use .
- Home New Posts Forum List Trending New Threads New Media Spy
- WikiPost Latest summaries Watched WikiPosts
- Support FAQ and Rules Contact Us
How to take Partial Screenshot on iPad ?
- Thread starter vish26
- Start date Jun 20, 2017
- Sort by reaction score
- iPhone, iPad, and iPod Touch
- Jun 20, 2017
is there a way is there an APP by which I can take a partial (Selected area) or a full screen screenshot of the webpage ? For partial screenshot I know I can take a screenshot of the entire area and then crop it but I am looking to minimise steps a way to directly do it on the webpage using an APP or something !

Stefan johansson
Macrumors 65816.
Try zoom the webpage,then take screenshot. Of course it depend on why you want a partial screenshot.

MyopicPaideia
Macrumors 68020.
Full webpage: Print to PDF. Use the share sheet and select print. Then when the print dialog comes up, use two finger pinch to zoom in to full page view. Then a new share sheet icon will appear and you can save as PDF to Dropbox or iCloud or Documents, etc Partial Screen shot: This will be natively supported in iOS 11 but for now you can take a regular screen shot and then go in to Photos and edit the screen shot by cropping it. Or you can use whatever phot editing app you like best to crop, smudge out identifying info, etc. I know that's not what you wanted to hear, but like I said that one-step native functionality is coming in iOS 11.
Attachments
- How to take Partial Screenshot on iPad ? | MacRumors Forums.pdf 388.5 KB · Views: 617
MyopicPaideia said: Full webpage: Print to PDF. Use the share sheet and select print. Then when the print dialog comes up, use two finger pinch to zoom in to full page view. Then a new share sheet icon will appear and you can save as PDF to Dropbox or iCloud or Documents, etc Partial Screen shot: This will be natively supported in iOS 11 but for now you can take a regular screen shot and then go in to Photos and edit the screen shot by cropping it. Or you can use whatever phot editing app you like best to crop, smudge out identifying info, etc. I know that's not what you wanted to hear, but like I said that one-step native functionality is coming in iOS 11. Click to expand...
vish26 said: Oh cool ! iOS 11 will support specific area screenshot just like Mac OS ? How cool is that !! Super excited about iOS 11 ! I am not sure I have understood the full page screenshot trick that you have mentioned. Because to even to do a print to PDF I need to first take a screenshot the normal way by pressing the home and power button together and that way, only what is displayed on the screen is selected as screenshot ! Not the entire page is selected as screenshot. So how do I do it ? Click to expand...
MyopicPaideia said: No, do not take a screen shot, just click on the share sheet icon in Safari. Then select print. Then zoom with two fingers to full screen. Then tap the new share sheet icon and select add to icloud, save to dropbox, etc. Click to expand...

macrumors 6502
the app "awesome screenshot for safari" by diigo inc. should do it https://itunes.apple.com/us/app/awesome-screenshot-for-safari/id918780145?mt=8
beernut said: the app "awesome screenshot for safari" by diigo inc. should do it https://itunes.apple.com/us/app/awesome-screenshot-for-safari/id918780145?mt=8 Click to expand...

macrumors 603
vish26 said: When I click on the share sheet icon and then select print in the print option it gives me this (Please see the attached screenshot) it does not let me zoom out with two fingers. Can you please post a screenshot of what you mean. If you can post a video that would be great. Click to expand...
vish26 said: I checked out this APP, but could not figure out how to take full page sceeen shot in safari using this APP ? Click to expand...

macrumors G3
In iOS 11 when you take a screen shot it appears in the bottom left. You tap that and you can crop before it’s saved. Quite nifty
beernut said: You can use the extension when in safari (the app shows you how when you open it the first time after installing) or open the webpage in the app and tap 'full page' in the upper right. Click to expand...
vish26 said: I downloaded the APP on my iPad it did not give me the option to install the extension. And When I go in the APP paste the URL there and say full page in the upper right it does give me full page but it does not give any provision to take a screenshot of that full webpage ! Can you post a screenshot of where and how to do it in that APP ? Click to expand...
beernut said: After you hit 'full page', it's pretty much done, just tap the check mark and save. To install enable the safari extension, tap the hamburger menu (3 horizontal bars) in the app and then --> 'help'. It shows you the four simple steps Click to expand...
- Jun 21, 2017
MyopicPaideia said: That is the exact screen you should be in. Then zoom IN, not out, with two fingers. Click to expand...
vish26 said: Nope when on the print screen, the image does not move neither does it zoom in nor does it zoom out ! Click to expand...
MadeByApple
Macrumors regular.
MyopicPaideia said: Very suspicious!! So you pinch out with two fingers on the preview, and nothing at all happens?? Should work on all devices running the latest OS... Click to expand...

macrumors 68000
i always just take a full screen shot (home button+off button) and quickly crop in the regular photos app

macrumors 601
vish26 said: Nope ! Still can't zoom in or zoom out ! I am trying to do this on an iPad-3 which is on iOS 9.3 Click to expand...
Krevnik said: 1) It only works on the thumbnail in the print preview. Click to expand...
Yeah, I'm pretty sure it is iOS 10 where this was introduced. Sorry @vish26 !
Record the screen on your iPhone, iPad, or iPod touch
Learn how to create a screen recording and capture sound on your iPhone, iPad, or iPod touch.
How to record your screen
Open Control Center on your iPhone , or on your iPad .
Exit Control Center to record your screen.
Go to the Photos app and select your screen recording.
Some apps might not allow you to record audio or video. You can't record your screen and use screen mirroring at the same time.
Learn how to take a screenshot on your iPhone .
Explore Apple Support Community
Find what’s been asked and answered by Apple customers.
Contact Apple Support
Need more help? Save time by starting your support request online and we'll connect you to an expert.
IMAGES
VIDEO
COMMENTS
Take a screenshot with an iPad that has a Touch ID. Quickly press and release the top button and the Home button at the same time. A thumbnail of the screenshot temporarily appears in the lower-left corner of your screen. Tap the thumbnail to view the screenshot or swipe left to dismiss it. Screenshots are automatically saved to your photo ...
How to take a screenshot on an iPad with a Home button. Press the top button and the Home button at the same time.*. Quickly release both buttons. After you take a screenshot, a thumbnail temporarily appears in the lower-left corner of your screen. Tap the thumbnail to open it or swipe left to dismiss it.
If you have an iPad, it's pretty much the same, but you'll need to press the Lock button and Volume Up simultaneously . (Image credit: Apple) 2. Tap the screenshot preview box, then tap Full Page ...
Here's how. First, open Safari on your iPhone or iPad and navigate to the website you'd like to capture with a full-page screenshot. (This feature doesn't work in Chrome for iPhone or iPad yet.) When you're ready, take a screenshot on your device by pressing a combination of physical buttons. Here's how to do it on each type of device: iPhones ...
Learn how to take a full-page, scrolling screenshot in Safari on iPhone or iPad, and share or save it as a PDF. To learn more about this topic, visit the fol...
Open "Safari" web browser from the home screen of your iPhone and iPad, then visit a website or webpage you want to take a full page screenshot of. If you aren't aware, you can take a screenshot on your iPhone and iPhone by pressing your "Power" button and "Volume Up" button simultaneously. However, if you're using an device ...
Open Safari, Notes, Mail, Files, or Maps on your iPhone or iPad. Take a screenshot as you would normally do by pressing the Volume Up + Side button. Now tap the screenshot preview that appears on the bottom corner of the screen. Select Full Page from the top. A new preview window will appear next to the screenshot, where you can scroll to see ...
Press the volume up button and the power button simultaneously to take a screenshot. If your iPhone has a Home button, press the Home button and the power button instead. (Learn how to take screenshots without a power button .) Tap the Full Page option in the toggle near the top of the screen. The view will change slightly to show the top ...
Step 1: After taking a screenshot, select the thumbnail that appears in the bottom-left corner of your screen. Step 2: Crop and annotate the screenshot if desired. Step 3: When you're ready to ...
Hit the top/power button and the Home button on the iPad at the same time. Then, quickly release both these buttons. IMAGE: Apple. Instantly, your screenshot will be captured, and you'll see its ...
Once you have Safari open, take the screenshot using your preferred method. For example, you can try pressing the top and home buttons at the same time. You should see the screenshot at the bottom left-hand corner. Tap on it to make it bigger. At the top, you'll see two options: Screen and Full Page. If you realize that you've taken a ...
Open Safari: Launch the Safari browser and navigate to the web page or content you wish to capture. Activate the Screenshot Toolbar: Once on the desired page, press the Shift + Command + 5 keys simultaneously. This keyboard shortcut triggers the Screenshot Toolbar to appear at the bottom of the screen, presenting a range of screenshot and ...
To do this, follow the steps below: Swipe up from the bottom of the screen to reveal the dock. Then, choose the second app from the dock that you'd like to use, and drag and drop it onto the ...
To take a picture of content on the iPad screen: Go to the content you want to capture. (Open an app, game, file, browser, or any content that you want to appear in a screenshot.) If your iPad has a Home button, which is the round button below the screen, simultaneously press and hold the Home button and the top button (or side button ...
Launch the Safari app on your iPhone or iPad. Navigate to the web page that you wish to save as a multi-page PDF. Press the Home button and the Sleep/Wake button simultaneously to capture a ...
First, make sure that your iPhone is running an iOS version that supports the feature by going to Settings > General > About . If your OS is not the problem, make sure to check the app you're using when attempting to take a full-page screenshot. It only works with Safari. 2. Make Sure You're in Safari.
Screenshot a Webpage. Open Safari and go to " Safari > Preferences…. Click the Advanced tab and toggle on " Show Develop menu in menu bar .". Navigate to the webpage you want to capture and from the Develop menu, choose " Show Web Inspector .". Alternatively, you can hit alt-command-I (⌥⌘I).
How to take a screenshot on an iPad with a Home button. Press the Top button and the Home button at the same time.*. Quickly release both buttons. After you take a screenshot, a thumbnail appears temporarily in the bottom left-hand corner of your screen. Tap the thumbnail to open it or swipe left to dismiss it.
Take a screenshot. Press the Sleep/Wake button and Volume up or Volume down button simultaneously, then release. Note: For iPads with a Home button, press the Sleep/Wake button and the Home button simultaneously. To access screenshots, from the home screen, select the Photos app > Sidebar icon > All Albums > Recents.
To cancel taking the screenshot, press the Esc (Escape) key. Click the window or menu to capture it. To exclude the window's shadow from the screenshot, press and hold the Option key while you click. If you see a thumbnail in the corner of your screen, click it to edit the screenshot. Or wait for the screenshot to save to your desktop.
Jun 20, 2017. #4. MyopicPaideia said: Full webpage: Print to PDF. Use the share sheet and select print. Then when the print dialog comes up, use two finger pinch to zoom in to full page view. Then a new share sheet icon will appear and you can save as PDF to Dropbox or iCloud or Documents, etc. Partial Screen shot:
Open Control Center on your iPhone, or on your iPad. Tap the gray Record button, then wait for the three-second countdown. Exit Control Center to record your screen. To stop recording, tap the Screen Recording button at the top of your screen, then tap the Stop button. Or open Control Center and tap the red Record button.