
21 TRAVEL PHOTOGRAPHY TIPS (Easy Ways to Improve Today)

- Last Updated: February 8, 2024
Here are our best travel photography tips for beginners and intermediates, based on our experience of going from complete beginners to professional travel photographers, and now working in the industry for 8 years.
Picture this.
You finally book a trip to your ultimate bucket list destination.
Antarctica, Iceland, Namibia, Bali, seeing the Aurora Borealis – wherever it is, you’ve waited your whole life to finally visit.
Naturally you are going to want to capture the best travel photos possible of this once-in-a-lifetime adventure to share with your portrfriends and family members, on social media, and maybe even print on the wall at home.
Moments in time or a travel experience that you always want to cherish.
So you’ve splashed out on a new camera based on expert recommendations , and you’re keen to hit the road.
But here’s the problem – you don’t have the faintest idea how to get the same kinds of images you see in postcards or on the internet.
The kinds of travel photos that just pop, stand out from the rest, inspire you to book a flight immediately.
Luckily that’s where we come in.
We’ve been fortunate enough to work as professional travel photographers for almost a decade now, being paid to fly around the world, running photography workshops, take pictures for the tourism industry and tell stories.
And now we want to share our knowledge, secrets and insights from our travel photography journey with you so you can take better travel photos.
In this post you’ll find many of our favourite travel photography tips you need to know to come home with shots you will be proud to show off.
Today is the time to learn. Let’s begin.

Table of Contents
1) Know Your Camera
2) focus on the golden and blue hours, 3) plan your shots, 4) learn about composition, 5) framing, framing and more framing, 6) move your feet, make them feel comfortable, 8) use a tripod, 9) find the right travel photography gear, 10) be unique, 11) find your voice as a photographer, 13) aperture, 15) shutter speed, 17) bonus – general ideas for camera equipment settings, 18) use manual mode, 19) shoot in raw (if available), 20) learn about post processing, save this pin for later, general travel photography tips for beginners.
To start with let me talk about the general travel photography tips that I feel are not only the most important, but also the most difficult to master.
Developing an eye for photography takes time. Years in fact. It’s a never-ending learning process, but I promise you with practice you will get much better.
And once you start to get the skills for framing and composing a shot, the rest is easy.
Whether you shoot on a dSLR, mirrorless, smartphone or an old film unit, the first travel photography tip is to get to know your camera equipment.
Whatever you have in your camera bag , take the time to read the instructions, play around with all the buttons and camera settings, and spend hours with it in your hand so that it becomes a part of you.
Study the menu so that if you need to change camera settings in the field you’re not spending minutes scrolling through it when timing is critical.
Also don’t forget to learn your camera’s limitations.
Does it perform well in low-light or does the image fall apart? Is it sharp wide open, or do you need to stop down to get the best clarity? Does it have inbuilt image stabilisation?
Ultimately when you pick up your camera you want to feel comfortable and know exactly how it works. Then getting better pictures will come faster and easier.

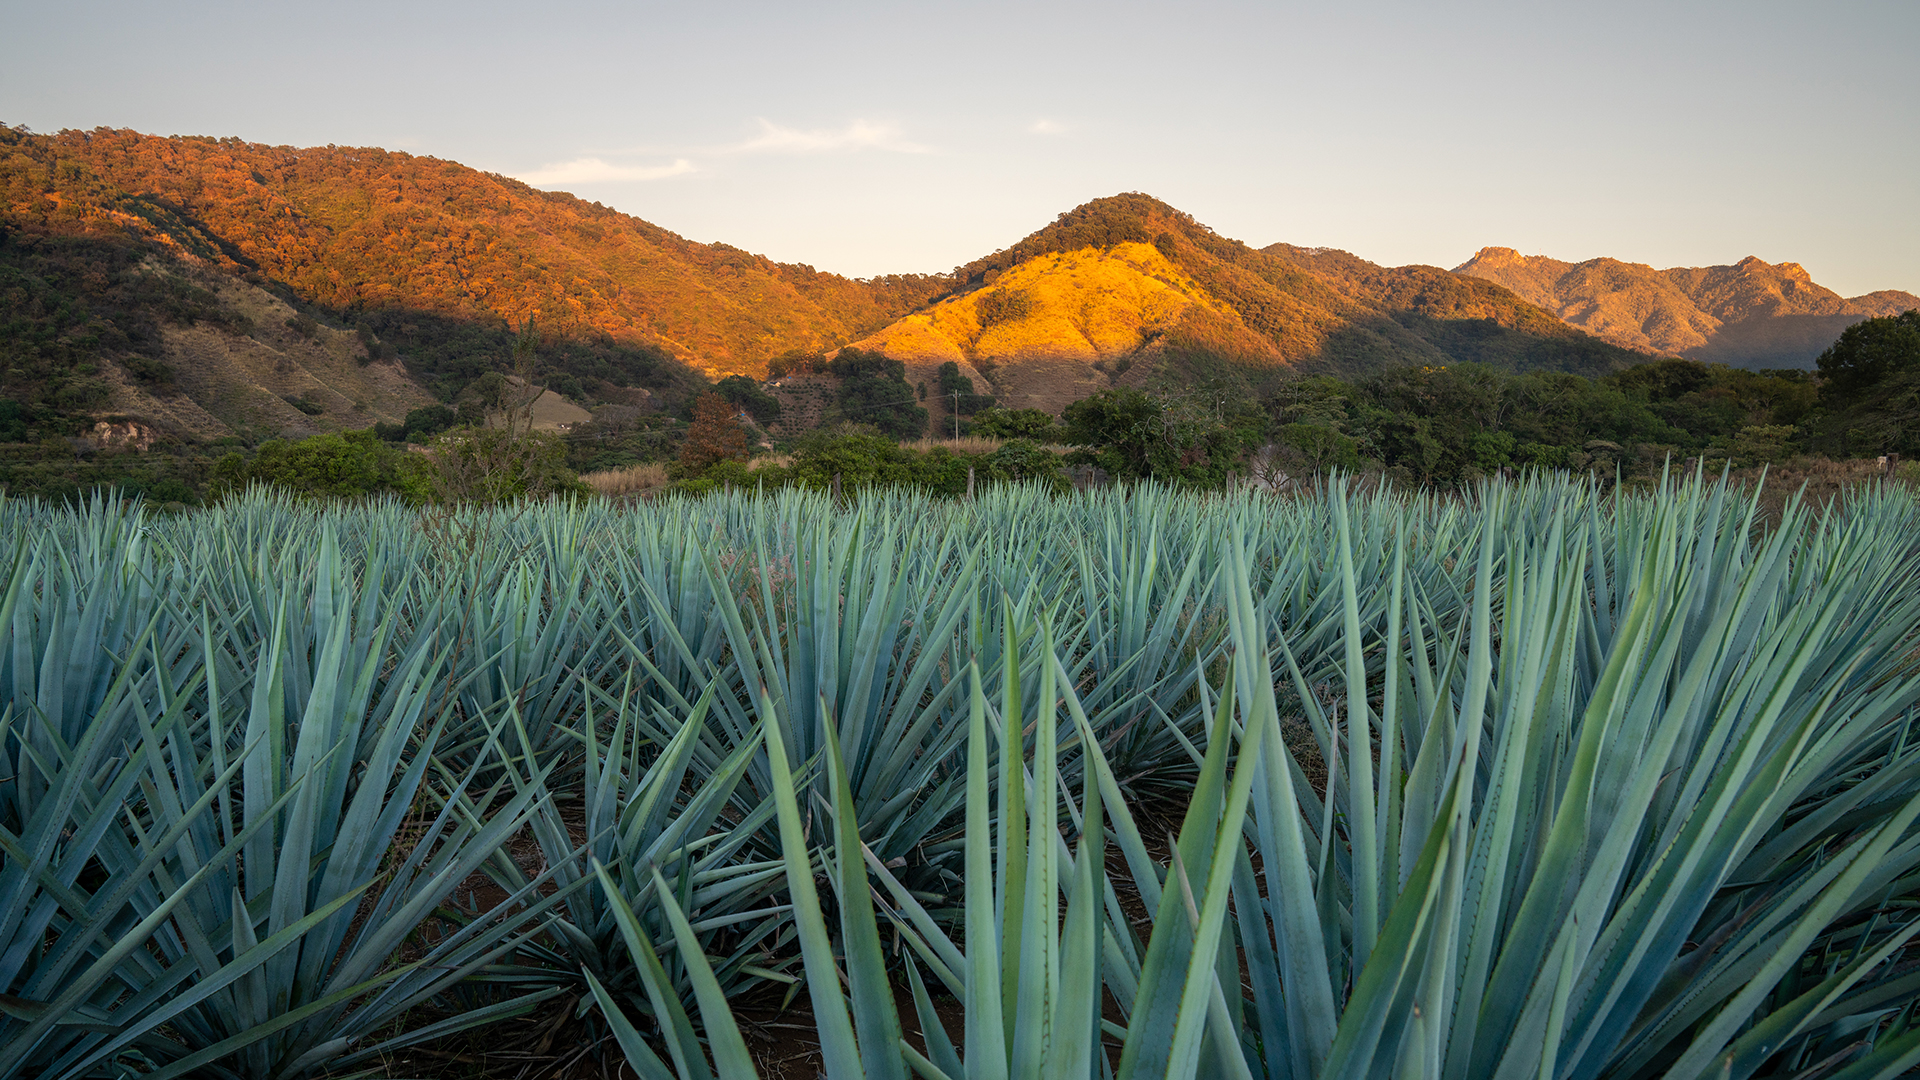
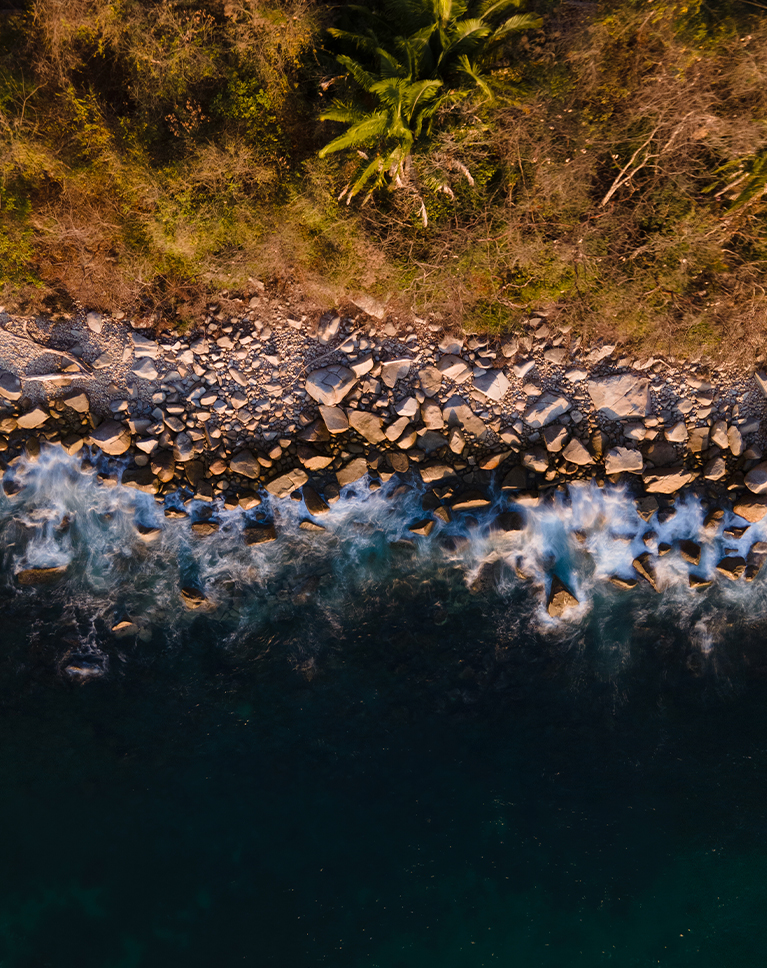
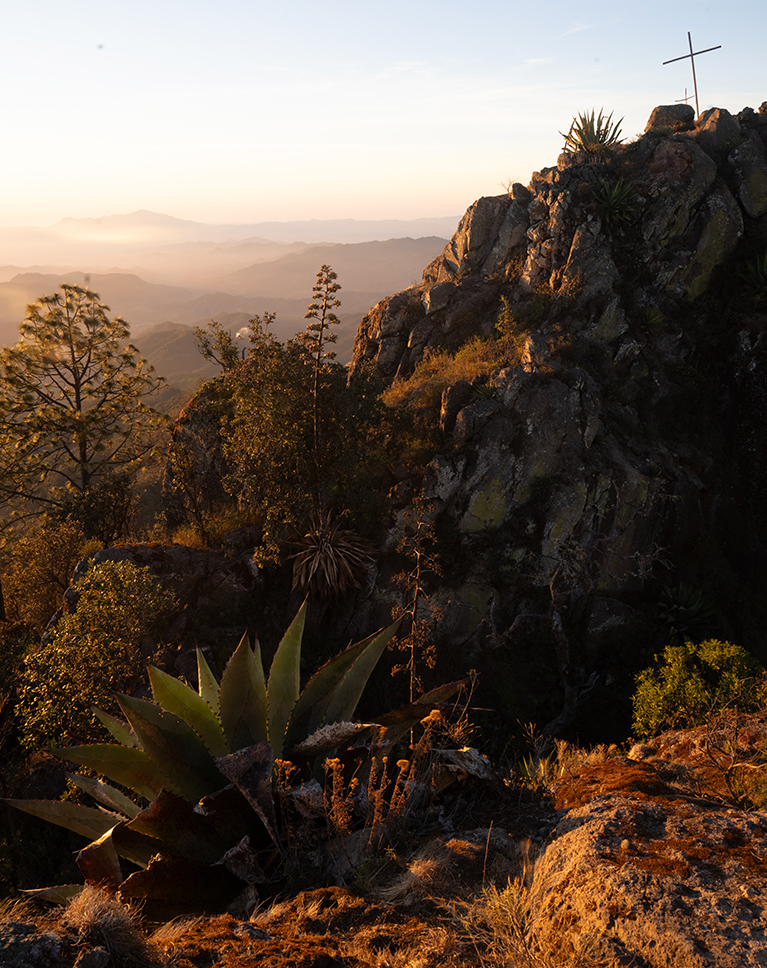
Light is everything when it comes to travel photography images, and there’s a good chance you’ve already heard about the golden and blue hours.
The Golden Hour is that time when the sun is low in the sky and it throws a magical, warm glow across the scene.
Think the first hour after the sun peaks in the morning, and the last hour or two before the sun drops over the horizon in the afternoon.
The Blue Hour is when the sun is below the horizon and the sky gives off a beautiful blue hue.
If you really want better travel photos, one of the best travel photography tips we can give is to get used to waking up early and stay out late to make the most of these two times of day.
If you’re not a morning person, get used to setting an alarm. Many of the great travel photos of the Taj Mahal and other tourist sites with no one in them for example were taken by people who got there early.
Taking photos in the middle of the day can still result in great shots, but in general you’ll find the blue sky too blown out unless there are some interesting clouds, and on a sunny day you’ll find the lighting conditions can be a bit harsh.
Instead use the middle of the day to get street photography, or scout out photo locations and a vantage point for your sunrise and sunset photos to come back later.
Bonus Tip – Even if it looks like the sunrise or sunset might not be so beautiful, wait around. You never know when the clouds might break or the sky randomly lights up in brilliant colours.

Before you arrive in your tourist destinations, spend a few hours planning out your shot list of images you want to photograph.
You can get inspiration from Instagram, Google Maps, travel guides, magazines and more.
Make a note of these pictures, and then plan your day around the optimum time to shoot (sunrise or sunset for example).
Doing this will help you nail the shots you want to go, and give you more purpose and direction.
You need to know that all of the best photographers use tools like Google Maps or social media to form a shot list, and you should get used to it too.

You’ve probably heard about how important it is to compose a shot properly, and I bet if you’ve ever read a photography manual you would have come across the ‘ rule of thirds ‘.
Good composition can be the difference between an average shot and award-winning travel photos.
There’s all kinds of ‘rules’ that theoretically make a photo look nicer, such as not putting your subject in the middle of the shot, don’t cut elements out of the frame, etc.
But right now let’s go a bit into the Rule of Thirds.
This concept is where you divide your image into 9 even squares (many cameras actually have this grid line feature built into their display options).
Then what you do is you place the subjects and points of interest such as a human element along those lines and squares.
Here’s an example of how this looks:

The idea of the rule of thirds is that this is a mathematical idea of what our eyes naturally find pleasing. So it’s good practice to incorporate this method into your shots.
Another thing to look for is leading lines that naturally draw your eye around the photo, as well as different angles and shapes.
Have a river flowing from the side of the shot up to a waterfall on the top left for example, or the foreground bending around, leading the eye towards a church at the top of the photo.
This is a skill that you’ll learn with more practice.
An important thing to remember is that rules are meant to be broken .
Get used to analysing your shots with the rule of thirds, but please don’t use it as gospel if you think a different composition would work.
Adding a human element also brings a lot of interest to a good shot, so place people in your frame.

When you look through the viewfinder or LCD screen, don’t just focus on the subject.
Make sure you run your eyes around the entire frame to make sure you’re not accidentally cutting off something important.
Double-check that the top of a mountain is fully inside the frame, or that your friend’s whole body is in the shot as an example.
This isn’t gospel, because sometimes having something cut off from the frame can be good for composition, but you’ll have to be the judge of that.
Also check to see if you can use something natural in the scene to create a frame inside your picture.
Think of looking out a window at a building, or a bent-over tree surrounding a pretty lake.
These can all help make better travel photos.

This is one of the most important travel photography tips I can give – Move your feet.
Don’t just arrive to a scene and take a shot from the place you’re standing.
Instead take a few minutes to walk around and see if there is a better frame or composition.
Go closer, move back, step to the side, consider your lens’ focal length, etc.
Imagine trying to take that iconic Taj Mahal photo, only to find out later that you were 2m to the left of centre, throwing off that perfect symmetry.
Or maybe if you walk to the river’s edge you’ll be able to incorporate some interesting rocks into the scene instead of just water.
Better yet, take multiple travel photos and fill up those memory cards from the same photo locations so you have lots of options when you get home to see which is your favourite.

7) Ask People for Permission
Travel photography isn’t all about capturing the most beautiful sunsets and gorgeous architecture around the world.
Travel photography is also about the people you meet. But if you’re a bit shy like me, how do you get those amazing portrait photos without feeling rude?
Simple – just ask for permission.
Asking someone for permission to take their photo is polite and respectful.
If you have had a great encounter with someone, or you just see a great opportunity and want to capture a wonderful portrait, give them a big smile and ask if it’s ok to take their photo.
You’ll find many people are more than happy to pose for a photo if you just ask (just make sure you respect them if they say no).

But what if you want to get a candid shot, with the subject looking natural?
There’s always another way to get these without annoying the person.
Don’t make it obvious that you are taking their photo. Act natural and take lots of photos of the environment around them.
You can also keep your camera down by your side and point the lens in their direction.
If you have a zoom lens, use it. This was you can be on the other side of the street or market and still photograph the person.
Interested in learning more? Join one of our exclusive photography workshops in Antarctica, Kyrgyzstan, Tajikistan or Mongolia !
Another one of my favourite travel photography tips for portraits is to bring in another element to the shot.
Some people will feel uncomfortable posing for a stranger, but if you can make it about something else they will feel much more at ease.
As an example, maybe ask if they can pose with something in their store like a rug, or ask them to show you their wedding ring.
This way they’ll realise there is more to your photo than just them. This will also add a lot more interesting elements to the shot!

A tripod is one of the best camera accessories you can have in your camera bag, and really essential for travel photography.
This will allow you to get excellent shots in low light, as well as get creative with your images (like taking long exposures).
These days you don’t always need a massive tripod to travel around with, especially if you want to travel light and are a hobbyist photographer. Look at some of the Joby Gorillapods .
Another good thing about using a tripod is that it will force you to slow down with your photography and put more thought into each shot.
Rather than just pointing and shooting, you will think carefully about where you want to set up your tripod and how you want to compose your shot.
Honestly if you want to become a better travel photographer, you’ll need to invest in at least a small tripod.

You don’t need to go out and spend tens of thousands of dollars on new travel photography gear to get the best shots.
In fact chances are you already have a perfectly adequate camera right next to you (your phone).
Instead just get what you an afford, and as you grow with your photography style, post production, etc, you’ll learn what camera gear you need as well.
Things like filters, tripods, flashes, prime lenses, zoom lenses, etc will come in time.
For now, all you really need is a camera, memory card and enthusiasm!
Check out our recommendations for the best travel tripods .
There’s nothing wrong with getting those iconic shots of the Eiffel Tower or Machu Picchu to share on social media.
They’re beautiful and are often amazing camera angles of famous places that everyone wants to visit.
But don’t forget to be unique as well! Find a different perspective that hasn’t been photographed a million times.
In fact make it your goal to get a few unique shots that you can be proud of.
Over-expose, under-expose, incorporate motion blue – the only limitation is your imagination!

Just like a writer or musician finds a particular style they like, as a photographer you need to discover your ‘voice’.
Travel photography is such a broad term that can cover just about anything.
Really just taking any travel photos will fit the description, whether it is landscape photography, wildlife photography, architecture, portraits, food or whatever.
Just find a style you love most, and focus on getting better at it.
If you really like black and white photography, then start shooting in black and white! Love taking images of crazy street markets? Then get out there and find them!
Experiment, learn, discover and nurture!

Technical Travel Photography Tips
While the technical side of using a camera is usually the most overwhelming thing for a new photographer to think about, it’s actually one of the easiest things to master. All it takes is a bit of study and practice.
If you’ve never looked into getting out of ‘Auto mode’ on your camera, then terms like ISO, aperture, white balance and shutter speed will seem completely foreign.
READ MORE: Check out our great article and blog posts featuring our best landscape photography tips !
12) Exposure Triangle of Photography
The Exposure Triangle is a metaphor to explain the 3 elements that allow light onto a sensor.
A camera captures light, and the right amount is needed so that your image isn’t too bright or too dark.
The 3 parts of the Exposure Triangle are aperture, ISO and shutter.
Each one affects how light reaches the sensor in different ways, and getting this combination right is essential to capturing a beautiful image.

If you want more information, I’ve put together this comprehensive guide to understanding the exposure triangle which you should really check out.
For now though I’ll explain these three things briefly, and how they relate to taking better travel photographs.
Aperture is how wide, or small, the blades in your lens are and how much light goes through the lens.
The aperture size is measured in ‘F Stops’, and displayed as numbers. f5.6, f8, f11, f16, etc
A wide aperture (small number – f1.8) lets in more light than a low aperture (big number – f22).
A wide aperture also has a shallowed depth of field than a low aperture. I know it can be a little confusing, but you’ll pick it up the more you play around with it.
If you want the background blurry in your photo, you’ll want a wide aperture. If you want everything in focus, you’ll want a low aperture.

ISO is how sensitive your camera sensor is to light. A small number, such as 100, means it’s not very sensitive and therefore needs more light to leave an impression.
A high number, like 6400, means it’s very sensitive and needs only a little bit of light to show up on the sensor.
The higher the ISO, the more noise shows up in a photo. Noise lowers the quality of your image, so in a perfect world you’ll want to keep this as low as possible (unless you’re going to stay out late doing astro and night photography ).
It’s also necessary to raise your ISO if you’re shooting moving subjects (or handheld) indoors.

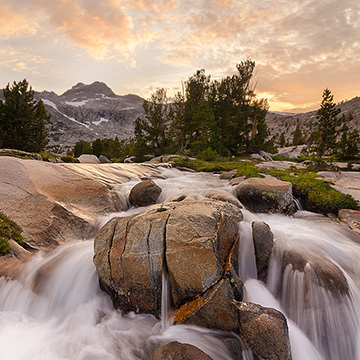
Shutter speed is pretty straight forward – how long it takes for your shutter to open and close. This allows you to freeze a frame, or introduce motion blur.
Want to capture a bird in flight? You’ll want to have a fast shutter (1/4000th of a second for example).
Want to make a waterfall look silky smooth, like you see in so much Iceland photography? Go for slow shutter speeds (3 seconds for example), and check out our guide to waterfall photography tips while you’re at it!
Keep in mind that if you are holding your camera equipment rather than using a tripod, you’ll need to have a fast enough shutter to eliminate your own hand movement.
As a general rule 1/60 of a second is the slowest you should go so your picture doesn’t pick up hand movement. Any slower than that and you’ll probably need a tripod.

16) Combining All Three for Perfect Exposure
There is no ‘perfect setting’ for aperture, ISO and shutter. It all depends on what you are trying to photograph and the style you’re going for.
Luckily most decent digital cameras have two little tools that will let you play around figure out how all three work together – manual mode and histograms.
Manual gives you complete control over your camera’s ISO, aperture and shutter.
If you change one, nothing else will change, unlike in ‘aperture priority’ mode or ‘shutter priority’ mode.
The histogram is a visual display of light. When the bars are all the way to the left, the image is darker. When they are all the way to the right, the image is lighter.
When most of the bars are in the centre, this is perfectly exposed.

The best way to figure out what combinations work best when you’re a complete amateur is to put your camera on “manual” mode, activate the histogram, and play around with the settings.
Pick an aperture (f/8 for example) and point it at the scene. Now look at the histogram.
If the image is too dark, then you’ll need to let more light in. Let’s make the speed slower. See a change?
Now put the shutter back to where it was and instead change the ISO. Make the ISO higher. Is the image getting lighter?
Spend an hour or two playing around with different apertures, ISO and shutter so you get an idea of how each one affects the light hitting the display.
Take note at how drastically things can change if a cloud goes in front of the sun, or you take the camera inside.
This just comes with practice of course, and knowing what settings you want for a particular scene will become second nature
Keep in mind that not all travel photos needs to be perfectly exposed. Sometimes having a darker image looks much better than having one that is nice and bright. You can use your judgement for this.

This is very, very basic and by no means should be read as gospel. There are a million different things that can affect why you would want a faster shutter, or wider aperture. But if you are confused about what to pick for what here’s a quick idea.
- Landscapes – You’ll want your aperture around f8-f11. You’ll also want your ISO as low as possible. Slow down the shutter accordingly.
- Portraits – You’ll probably want to photograph your subject to be sharp, but the background blurry to bring focus on the person. Have a wider aperture (say f2.8 for example), and a faster shutter (around 1/160 at the absolute slowest) to freeze the subject. Adjust ISO accordingly.
- Indoors – Because it is darker inside than outside, you’ll need to let a lot more light into the sensor. Unless you’re using a tripod, keep the speed at around 1/60 as the slowest, and the aperture around f5.6 to start with. Adjust ISO and aperture accordingly.
Of course there’s a bunch of other styles of travel photography that would use different settings, such as astrophotography, architecture, street scenes photography, wildlife photography, etc.
In time you’ll learn what settings work best for each scene.
The best way to get to know your camera and how light works is to have complete control over what settings you choose.
The only way to do this is to shoot in manual mode (shown by the letter M on most cameras).
It will take months of practice, but I promise you that in time you’ll be able to look at a scene and instantly know what aperture, ISO and shutter to use to get the exact style of image you’re looking for.
You can also use aperture priority mode (the letter A on your camera) if you don’t want to make the big leap to manual just yet.
This way you can lock in the aperture you want (f8 for landscape photography, f2.8 for portraits, etc) and the camera will automatically adjust the ISO (although you can control this part too) and shutter to get perfect exposure.
I highly recommend focusing on learning manual settings though until you have it perfected.

When you take a photo on your digital camera, the computer chip inside it takes what you captured on the sensor and converts it into a format that can be easily read. For most cameras, these two formats are RAW and JPEG.
JPEG is a compressed format that the camera creates to save on space. In doing so it ‘locks in’ all the data that it picked up such as the colour and white balance.
RAW files actually saves all the data of what you took and doesn’t compress it.
Most decent digital cameras will give you the menu option of shooting in RAW, and I recommend you use it if you ever plan on editing your photos.
Keep in mind that the file sizes will be a lot bigger (for example on one of our cameras a RAW is 42, while a JPEG is just 20), so you’ll need to have extra memory cards and external hard drive storage.
If you have no plans on editing your photos then shoot in JPEG.

Some people think that editing your photo is ‘cheating’. But the truth is photographers have been editing their photos ever since photography was invented.
Yes, even your favourite photos in National Geographic have been manipulated in some way.
99% of photos you see in your favourite travel magazines have been edited. Every professional photographer edits their photos to some degree.
The reason is that not all cameras are great at capturing exactly what the eye saw in terms of colour and light.
If you really want to get the most out of your professional travel photography business, you should start playing around with post processing.
Many people have heard of Adobe Photoshop , but it’s a pretty advanced tool that most people wouldn’t ever need to use (until you get more experience).
To start with look at the free apps that you can get on your phone, such as Snapseed, or free editing programs on your computer, like iPhoto or GIMP.
Once you get serious about travel photography and you want to start editing all of your photos that are filling up your memory cards and external hard drive, we recommend purchasing Adobe Lightroom.
If you’re ready to make the jump to using Lightroom and Photoshop, Adobe have a great ‘Creative Cloud’ package, which is what we use for only $10 a month. You can buy it here with a 7-day free trial

21) Practice, Practice, Practice
Just like anything, becoming a great travel photographer takes time, and a lot of practice. The only way you can get better is by getting out there taking travel photos!
You don’t even have to travel the world to tourist destinations or have the most travel camera available to be a great photographer.
Borrow some family members to take their portraits, get a friend who is also interested in photography and push each other, or grab your smartphone and go shoot sunset.
Buy whatever you can afford, go for a walk around your city and snap away.
We hope that this general guide on travel photography tips for beginners has been helpful.
Please feel free to reach out to us if you have any other questions. We have a lot of experience working with tourism boards, and would be happy to help you too.
Good luck on your photographic journey, and maybe we’ll see you in National Geographic one day!
DISCLAIMER: Some of the links in this article are affiliate links, which means if you book accommodation, tours or buy a product, we will receive a small commission at no extra cost to you. These commissions help us keep creating more free travel content to help people plan their holidays and adventures. We only recommend the best accommodations, tours and products that ourselves or our fantastic editorial team have personally experienced, and regularly review these. Thanks for your support, kind friend!

Alesha and Jarryd
Hi, We’re Alesha and Jarryd!

We’ve been traveling the world together since 2008, searching for the planet’s best destinations and adventures.
Love Travel?
Sign up for our free weekly newsletter for the best travel tips, ideas and deals!
We respect your privacy. Unsubscribe at any time.
READ MORE...
GoPro HERO 12 Review – Is it Worth Buying in 2024?
Peak Design Everyday Messenger Review – My Honest Experience
GoPro HERO 11 Review – Is it Worth Upgrading in 2024?
Related Posts
Luminar neo review – is ai photo editing any good (2024), the people of the world nomad games (photography essay), dear phong nha…we love you – a photo essay, 40 incredible photos of uzbekistan that will blow your mind, 73 thoughts on “21 travel photography tips (easy ways to improve today)”.
I indeed agree in Know your camera and Plan your shots. These tips would make a good start in achieving your socmed worthy travel shots. And ofcourse, the other tips will surely be useful too. Great post!
Good article but I need to say something about using Manual – it’s not that great. Manual is just a different mode of settings for exposure, little different from either shutter or aperture priority, except these two give you a leg up, to where you’re going anyway. At the end of the day whatever exposure setting you choose will be just a combination of the 3 on the ‘exposure triangle’. Instead of using manual try these other two in conjunction with exposure compensation, which overrides the exposure meter reading. You still need the meter for any exposure anyway, just not necessarily using the value it recommends. It amounts to the same thing, only easier, quicker, and still constraining one of the triangle sides that you want. I use manual for specific unusual objects, such as sun, moon, stars, but during general daytime subjects it’ll be very unusual to hamper yourself by not using the aid provided when there is no advantage.
Your blog has become my go-to source for insightful content.
Thank you so much. So glad to hear. 🙂
Before you go, research your destination and its culture. This will help you better understand the people, customs, and landscapes you’ll be photographing.
I benefited a lot from your post. Thank you
So glad you did. Thank you for stopping by. 🙂
Thanks for sharing all this amazing tips & information. Fabulous post !
You are welcome. We are happy to help. Happy photographing
nice summary of basic photo tips that will improve my shots, thanx!
You are rocking..keep it up your work
Thank you so much. We really appreciate it.
Great article with great tips and i also like the pictures
Thank you so much Alesha and Jarryd for these amazing photography tips! I look forward to putting into practice some of your wonderful ideas and tips! I do so appreciate any tips that I can get to improve my photography. :)) Cheers, Marilyn
I absolutely loved this article! Like you I received my first ‘proper’ camera at 14 and since then have been hooked. I recently purchased a Nikon D750 and am absolutely loving it. Although at the moment I only have two lenses for it I am hoping to be able to afford more soon. What are your favourite lenses?
In my photography I love capturing candid portraits of people I encounter during my travels. I always struggle with the dilemma of getting the perfect candid shot and feeling compelled to ask permission before taking the shot. As a very shy person directing people in images is daunting, but it is something I am striving to work on. It’s nice to read that you are also shy yet manage to capture such incredible images of people.
As I am mostly self-taught, I always love to read technical tips to improve my images. I found the technical side of your post incredibly helpful and wanted to say thank you for taking the time to write such a detailed post. I believe it really helps and inspires amateur photographers like myself.
Glad you liked the article. Thank you for your comment. Keep photographying Caitlyn 🙂
Great tips and awesome photos! I always tell people if they aren’t comfortable with their settings, the #1 way to make sure their images aren’t blurry is to shoot in TV/S (shutter) priority. That way you can prioritize having no hand shake.
Thank you so much. Great advice. Thanks for your comment. 🙂
Awesome tips for everyone and specially to me who loves capturing photos everytime i travel.This one also help me and give me more knowledge on how to make awesome photos and its good because you don’t need to buy expensive camera to have a good quality photos, just your iPhone or smartphone you can make a great photos.
Hi, you are so right. You can take great photos with your phone. Glad the article could help you.
Great article! Do you even bother carrying your camera with you during the day in broad sunlight? I find it’s not worth the hassle for such poor shooting conditions.
Hi Scott, It all depends what we are doing. If we are on a job, we always carry our cameras with us. The midday sun is harsh but you get used to working with it. Especially indoors with the sun coming through the cracks, it can work out really lovely sometimes. When we are travelling on our own time, we don’t usually carry the camera. Happy travels
I really enjoyed reading this post, as I am a beginner in photography as well and it’s always interesting to see what gear other people are using!
I have the Canon Rebel as well, and also love the 50mm lens. It’s just great and is so versatile!
Thanks for sharing.
Glad we could help. Thank you for your comment. Happy photographing,
Great tips guys! Photography is an art so it must be learned properly. A good guide can teach art in a great way. This article is similar to a guide because it is an eye-opener for blooming photographers and travel lovers.
Thank you so much!
Thank you for your comment Glorias. Glad the article could help.
Hello Alesha and Jarryd, not sure to whom I adresse the message to, but I’m guessing Jarryd took the pictures and Alesha wrote about it :p
Anyway, do you guys use any customized Firmware on your DSLR? like the CHDK or Magic Lantern. That’s one question, the other one will be: can’t find any Mobile Phone photography on your blog? can you please refer me to any article that provide valuable info around Mobile phone photography?
Hi Ayoub, The photos and words in the article are a combination of both of us. Usually Alesha is the photographer and Jarryd is the writer.
We use use no customise firmware at all. We haven’t ventured this way as it voids our warranty.
As for phone photography, maybe this is an article we should write. With our phone photos, we do use Snapseed to edit them. But do not take any photos through any apps. All the best
Thank you for the tip regarding phone photography, I mostly use the customized firmware to do timelaps and edit directly on the camera, keep me posted after publishing the new article. (Already subscribed to the weekly newsletter)
Definitely will do. Thank you so much. Happy photographing. 🙂
you are doing a great job
Thank you so much. 🙂
This was really an amazing list of tips, I am a hobbyist photographer and this would really helps me a lot
Glad we could help. Keep up the photographing. 🙂
Great tips Alesha and Jarred. I really liked your golden and blue hours tip. Will try it soon and hope get amazing pics 🙂
Glad we could help. Practise will get you on the right track and before you know it you will be taking amazing shots. We are still learning about photography everyday. We love that you can never stop learning. Thanks Linda.
Some of the best tips I have read so far. Amazing post and captures so much detail. Worth the read for every travel photographer. 🙂 Keep it up.
Thank you so much,. We really appreciate it. 🙂
Priceless tips for amateurs like me. Thanks for sharing. For a long while, I’ve tried to follow the rule of thirds, but the best shots came out when I finally dared to break it. You’re absolutely right about the rules are meant to be broken. Regarding the camera, I agree it doesn’t have to be the most expensive. But sometimes I have a feeling my shots would have been better had I owned a proper camera. What device is the best balance between price and quality?
HI Robin, you’re welcome. We are so happy we could help. Sometimes breaking the rules works out to be better. 🙂 We definitely know what you mean. You do not need to buy the most experience camera. A camera that you can use manual settings, is great as you can start using and playing with aperture, shutter speed and ISO. We started off with a Sony RX100ii and it was great. Compact and a great camera to learn. Here is some articles that may help. https://www.nomadasaurus.com/best-camera-for-travel-ultimate-photography-series/ https://www.nomadasaurus.com/best-camera-accessories-ultimate-photography-series/
Thanks a lot for the great advise! I especially like your explanations about the exposure triangle. I was a bit aware of it before, but never played around with it unless I wanted to change the depth of field (and even then, I did this very rarely). But thanks to focusing more on it, I am starting to get the hang of it. I have taken some very good hummingbird pictures, for example, which never would have been possible if I hadn’t raised the ISO so I can keep the shutter speed fast. Those birds zip around like crazy!
Also, I think one of the most important pieces of advise, and the one I’m struggling with most, is to always look at the whole frame. I am guilty of looking at the main subject and later finding out that I cut off important things on the side or that something weird is in the photo that shouldn’t have been there.
Hi Ilona, so happy the article could help you. That’s amazing you experiment with your hummingbird shots. They are fast birds. By practising photography, you will get better and better. No matter how experienced you are, there are always things to learn. When you come to a scene you want to photograph, stop for a minute look around, walk around and think about what shots you want to take. Obviously this is hard when the subject is moving but great for landscape and street photography. All the best and keep up the awesome work. 🙂
Hi, I took around 500 shots on a trip to Kyrgyzstan recently, some I think are pretty good, but now after reading your tips, I think I will make another trip to that part of the world again soon!
what a great tips especially the lighting part – i also agree that getting up earlier and shooting in the natural sunlight is so great for your photos. talking to the locals and knowing your camera, You guys covered it all
Thank you so much for reading Shama. Glad you liked our article. Natural lighting is the best. Even though sometimes that early morning is hard it is worth it. 🙂
u are absolutely right u don’t need an expensive camera or go to Bali ( although it’s a good idea) to get great photos. it’s just simple common sense and a good eye and you can master photography
Well said. Thank you for your comment and reading Shama. Have a great week.
Thanks a lot for the helpful tips on holiday photos. My partner and I are in Easter Island, irresistible place for photo opportunity. My Nikon D7000 will keep on taking photos on auto mode for the time being until I have had enough practice following your guidelines and the who knows what photos I might produce! Thanks.
Glad we could help Balu. Definitely when you have time, go out and take some photos on manual. Play with the different settings. Before you know it, you’ll only be on manual. At the beginning when I was still learning, I would take a shot on the manual settings I thought and then a shot of the same view on auto in case I messed up. Better safe than sorry. Have a great time in Easter Island. There is so much to do there and learning about the history is amazing. Take care. Alesha
Guys your advice are completely helped me. I was stressed before, i want to travelling at the moment but i hope i can take a good picture cause you know how annoying it will be when we take a picture and then when we are home they are completely bad. So then you have to comeback at the same place again just to take a picture. But this one is helpfull
Hi Fabio, Don’t stress. You are going to bring back amazing photos from your travels. It is all overwhelming at the beginning but it gets easy. When you are shooting, put some time aside and concentrate on what you have learned. It doesn’t matter if it takes you 20 minutes to an hour to get your shot. If their are other photographers around, most of the time that are happy to give you some advice. Let them know you are new. Maybe they will let you know their settings for ISO, aperture and shutter. When it comes to editing, take your time as well. There are many You Tube videos that can help you for free. Have a great time on your trip. Happy travels
Hey Guys, very useful tips especially the Bonus tips.
Keep Sharing!!!
Glad we could help. Thanks for reading.
P(Program) you set either the aperture or shutter and the camera adjusts the other one accordingly to maintain the right exposure. Thanks
Thanks Rezan
I love traveling around the world. I wish to capture some of the beautiful places that I enjoyed. The above tips helped me to improve my travel photography skills. It also helped me to click some of the memorable moments of my travel with my friends and relatives.
Hi Vivek, Glad we could help. It is all about practise. We love having a day to ourselves and just getting out and shooting anything – landscape, cityscape, people or animals. We try to give ourselves a challenge sometimes. It makes it interesting and we are enjoying ourselves. 🙂
Great tips to help out beginners like me. I need to work on to ask people for permission as I get shy sometimes. I love the quote “rules are meant to be broken”!
Thank you Mao. Don’t worry, “asking” will come. Alesha was so shy and I used to take all the people shots. Now she is more confident and really enjoys shooting people. All the best.
THANK YOU . Your very easy to read starter guide to photography was AMAZEBALLS I learnt so much .cheers LIZY
Thank you. Glad we could help. Happy shooting and get creative. 🙂
Hey guys, this is an amazing guide, thanks for writing this up in such detail. As an amateur, I always look for good travel photography tips from other travellers. I left my tripod behind in Thailand and I think this was a huge mistake, I need to get a new one, urgently 🙂
By the way, really enjoy your photos on your blog and Instagram, they are amazing! 🙂
Glad we could help guys. We never used to use a tripod in our early years until we discovered how amazing the shots can be with one in low light and now we have 3. You can rest your camera on something to get a shot but you are limited to positions. Thanks for reading guys. 🙂
thanks for the tips. i’d make one edit: instead of ‘move your feet’ i’d say “don’t be lazy”…move left or right. move forward or back. climb up on something or get down on your knees.
Love it Aaron. You are so right. A little to the left might be the perfect shot or a little to the right and crouching might be the perfect shot. thanks for the input. Have a good one.
I love this post. It is incredibly helpful to all beginner travel photographers like myself! I have only been shooting in manual mode for the past 5 months and have already seen a huge increase in the quality of my photos! But I am always looking to improve. Will definitely be sharing your post
It is crazy how you improve when you start shooting manual. I know Alesha did also. You learn so much about the camera and what it can do, it is incredible. Thank you for reading and all the best with your photography Hayley. 🙂
this guide is amazing, thank you so much for explaining everything in a way an amateur can understand 🙂
Bookmarking the post for future reference!
Cheers, Naddya
Thank you guys. We are glad it is useful for you. 🙂
Wow! Amazing Tips. These tips will help a lot to click great pictures with your camera. Love the point of Shutter Speed. and about RAW.
Thanks for Sharing Helpful Post.
Thank you so much Nitin. Glad we can help. Thank you for reading.
Yeah I agree with you buddy.
Thank you 🙂
Leave a comment Cancel reply
Save my name, email, and website in this browser for the next time I comment.
To view this video please enable JavaScript, and consider upgrading to a web browser that supports HTML5 video
The Beginner’s Guide to Travel Photo Editing

- Add to favorites
- Review 4.90 out of 5 10 Reviews
- Difficulty Medium
- Length 1.75 hours
- Software Lightroom Photoshop
Description
Take your travel photos to the next level! This tutorial merges the power of Lightroom and Photoshop with cutting-edge AI tools. Discover the best techniques for recovering detail in hazy photos, breathing new life into even the most challenging landscapes.
Plus, we’ll show you how to create HDR images using bracketed exposures to ensure you never miss a detail. Explore the world of AI editing to streamline your workflow and unlock creative possibilities. Best of all, to solidify your learning, you’ll get a whopping 87 RAW files to practice your newfound editing skills on!
THIS COURSE INCLUDES
- 87 RAW Files
- 3 Sample TIFFs
Table of Contents
- 01 - What You’ll Learn 1:27m
- 01 - Importing & Merging Images 18:43m
- 02 - Beyond HDR 20:14m
- 03 - Your Skills in Action 33:39m
- 04 - Level Up with AI 21:48m
Course Downloads
Epic views. easy edits..
Getting Started in Lightroom
Learn how to use Adobe Lightroom to process your RAW images, make color and exposure adjustments, and finalize your images all in one powerful application.
Importing & Selecting Your Images
In this tutorial we’ll guide you through importing your photos into Lightroom, then we’ll teach you the art of picking and choosing the best images to move forward with in the editing process.
Combining Multiple Images
Want to capture every detail in your photos, from sun-drenched highlights to hidden shadows? HDR (High Dynamic Range) is your secret weapon! By merging multiple exposures, HDR creates stunning images with perfect light and shadow balance. In this tutorial, we’ll show you how to use Lightroom’s HDR tool to achieve this effect and take your photography to the next level!
Edit RAW Images
RAW will help you get the absolute most out of your landscape images. This tutorial includes 87 RAW images, to help you practice your editing skills in a variety of lighting conditions and landscapes. With so many examples, you’ll be a landscape editing pro in no time!
Non-destructive Editing
Ditch the fear of editing! Non-destructive editing lets you experiment freely. Rewind to your original photo anytime and adjust edits on the fly. No more starting from scratch! In this tutorial, we’ll show you the best worry-free workflow to get the best results.
Sky Replacement with AI
Once we’re done showing you our top editing tricks, we’ll take your skills to the next level with AI sky replacement! Imagine swapping out dull skies for vibrant sunrises or dramatic sunsets, all with a few clicks. AI sky replacement lets you create the perfect mood and lighting, making your adventures truly shine.
Enhance Any Landscape
Rescue Lost Details
Sometimes, even a great shot can miss some of the magic. Photoshop offers a friendly helping hand to recover those hidden gems. We can unveil the intricate details in a rocky cliff face, or leafy textures dancing in sunlight.
Correct Exposure
Correcting exposure in Photoshop can transform your photos, revealing hidden details and creating a more harmonious image. Learn how to balance out exposure, dialing down the brightness of the sky, while lightening the shadows of the ground below.
Expand Your Images
Stuck with a landscape that just cuts off the amazing view? Photoshop’s Generative Expand is your magic portal to wider horizons! In this tutorial, we’ll show you how to unlock the hidden potential of your photos, letting you capture the entire breathtaking scene with just a few clicks!
Bring Colors Back to Life
Photos can sometimes lose their luster, leaving colors dull and details hidden. Learn how to use Photoshop and Lightroom’s tools to make your pictures pop with color and reveal details you never knew were there!
Creating Balanced Compositions
Crooked horizons and off-balance composition can take away from an otherwise wonderful landscape image. Learn how to use tools in Lightroom to adjust composition and straighten horizon lines, helping the subjects of your images stand out.
Interactive Learning
Being a PRO member means you get to practice your skills as you go! This PRO tutorial includes also 3 Sample TIFFs, so you can put your editing skills to the test on real image files and follow along with the tutorial step-by-step.
Next Level Skills
Now that you’ve learn the basics of landscape editing, it’s time to take things to the next level! Follow this link to access our in-depth PRO tutorial How to Edit Travel & Landscape Photos and master advanced editing techniques for stunning results.

PHLEARN Founder – Class Instructor
Aaron Nace is a photographer, Photoshop artist and founder of PHLEARN. He is the #1 Photoshop instructor in the world with millions of YouTube subscribers.
View More Classes by Aaron Nace
Lots of stuff to learn, and Aaron explains it very well. Having him try (and fail) on a couple of AI ‘searches’ was great too. Thank you so much!
Enjoyed not only the clearly presented information but appreciated the friendly way of delivering it. It feels like I’m in the same room. I’ve been following Phlearn since it was first set up and I can remember Aaron when he had long hair (and briefly, a man bun!)
Learning from you is always a wonderful experience..
Great tutorial! And Aaron, I love your humor! :)))))
Great course. HDR and AI are fantastic tools I am just learning to use. Thanks a lot!
Thanks Aaron. I shoot a lot of multiple exposure images for this reason and until now have had a hard time understanding how to edit well. It’s great the detail you go into and then make adjustments on your adjustments and basically keep it real. Thank you
Brilliant tips. Sincerely enjoy your tutorials. Very easy to follow and to apply in my own processing. Thank you Peter Savage Qld Australia
Aaron, I really like your edits. As you look at an image, you seem to be able to see what needs to be modified to give the image a more compelling representation. I wish I could see this, maybe with time, experience, ? ?
Great look at some new techniques for me.

Brilliant tutorials .. as always.
New & Popular Tutorials
Popular pro tutorials view more.
Frequency Separation: How to Master Retouching in Photoshop
Better than HDR – Master Luminosity Masks in Photoshop
The Ultimate Guide to Retouching

Photoshop 101-301

How to Master Dodging & Burning in Photoshop
New pro tutorials view all ».
AI Learning Path
The Beginner’s Guide to Portrait Retouching Using AI & Traditional Tools
Photoshop for advertising: master graphics, mockups & designs, the ultimate guide to compositing in photoshop using ai & more.
Master Photoshop, Lightroom, and Photography.
From $8.50/month.
Unlimited access to a vast library of Photoshop, Lightroom, and photography tutorials
Exclusive downloadable resources, including lightroom presets and sample files, instant streaming on all devices, anytime, anywhere, flexible monthly and annual plans to suit your needs and budget, 100% money back guarantee, cancel anytime..
Nomadic Matt's Travel Site
Travel Better, Cheaper, Longer
7 Editing Tips to Improve Your Travel Photographs

Today, professional photographer Laurence Norah of Finding the Universe finishes his five-part series on taking better travel photos. Here, Laurence gives some simple post-processing techniques that you can use to make your travel photos wow your friends and family! Editing your photos is just as important as how you compose them, so I hope you’re ready to take some notes!
One of the most misunderstood parts of digital photography is what happens after you take the shot: editing your photos, aka post-processing. This is where you edit the images you have taken, to create the final product.
Post-processing is the equivalent of the darkroom from the days we shot in film.
In today’s post, we’re going to be covering some ideas for editing your photos, from the basics (cropping and leveling) to more complicated actions, like recovering shadow and highlight information.
Editing Photos: 7 Editing Tips for Your Travel Photos
1. How to Crop Your Photos The crop tool allows you to change the size of your image, and also to change the aspect ratio. For example, you can crop an image from a rectangular shape to a square shape. There are many reasons you would want to crop, including for publishing in different formats and aspect ratios.
Let’s take a look at the first photo from this post, a lightning shot I took on a recent trip to the Florida Keys. Here’s the original version without cropping:
And the edited version, post-crop:

Compared to the original, I have cropped the image to remove the dark part of the pier on the right-hand side of the image and recomposed using the rule of thirds, so I have one-third land and two-thirds sky. This makes the lightning bolt more the focus of the shot.
You might wonder why I didn’t just compose properly when taking the shot. Well, in this case, I was doing a long-exposure shot without a tripod, so had the camera balanced on the edge of the pier for stability. That very much limited my ability to perfectly frame the moment, so I just shot wider, knowing I’d be able to crop the shot appropriately after the fact.
Let’s look at what cropping looks inside a couple of the tools available.
Here’s an example of cropping in Snapseed:

And the same thing in Lightroom:

In both cases, cropping is very simple: it just involves you selecting the crop tool and then selecting the area you want to keep with your mouse or finger. Then you apply the changes, and voilà, your new cropped image is ready to go.
As you see from this and later examples, the tools look similar across different platforms, so it’s easy to apply what you know from one tool to another.
2. How to Level Your Travel Photos One of my personal petty annoyances in photography is when the horizon line in a photo isn’t level. Sometimes when we’re caught up in the moment, this basic compositional rule is forgotten — but the good news is that editing your photos to make them level is also very easy.
I’ll use the lightning shot as my example again. Balancing the camera on the edge of the pier meant that the shot wasn’t level — this is particularly noticeable to the eye when the image has a clearly defined horizon line, such as the sea.
If we look at a zoomed-in version of the image in its original form, with a line overlaid near the horizon, we can see that it’s not level — the line is closer to the horizon on the right-hand side than the left.

In Lightroom, the level tool is part of the crop tool, and you can just rotate the image to suit. When you use the level tool, a grid will appear to help you get the alignment correct. Here’s a screenshot of that in action in Lightroom.

And here’s the same procedure in Snapseed, where the level tool is called “Rotate”:

Leveling an image is a really simple task that will take just a few seconds of your time, resulting in a much more visually pleasing image.
3. Vignetting Your Photos Vignetting is about making parts of the image darker or lighter than other parts, in order to make it clearer what the subject of the shot is.
Some tools restrict your vignette to the corners, but in applications like Snapseed and Lightroom, you can selectively darken and lighten areas of the image — you don’t need to restrict yourself to the corners.
Taking the lightning shot above, let’s load up the vignette tool in Snapseed:

Here we have options for how big to make the “center size,” i.e., the area to be edited. Inside this area, everything can be made brighter (inner brightness) and everything outside the area can be made darker (outer brightness). We can also do it in reverse, making the inner darker and the outer brighter.
Let’s apply the vignette tool to the lightning bolt, to give you an idea of the effect:

Above are the settings I chose for outer brightness and inner brightness, while below is the size of the vignette itself, which is based on the center size setting.

Vignetting is particularly good for portraits, and anywhere where you really want to make the subject of the image more clearly obvious to the viewer.
4. How to Change Shadows and Highlights in Your Photos Sometimes when we take a photograph, parts of the shot might end up being darker or brighter than we want. We refer to the dark areas of the shot as shadows, and the bright areas of the shot as highlights.
We can fix this by changing the brightness of the shadow and highlight areas specifically, using either the “Shadow” or “Highlight” tool. This is a tool that works particularly well on RAW files, as they retain more information on the shadow and highlight areas of an image compared to a compressed JPG, which discards most of this information in order to reduce the file size.
Let’s take a quick look at adjusting shadows and highlights using Lightroom. (In Snapseed, shadow and highlight adjustment can be found under the “Tune Image” setting.)
Here’s a shot of a couple enjoying a bonfire and fireworks display in Edinburgh during Hogmanay:

As you can see, the fireworks and bonfire are clearly visible, as are the torches the couple is holding, but the rest of the shot is dark. Let’s adjust the settings and see what we can get.

In this version of the image, the couple is much more visible, as are the hill the fireworks are on and the surrounding crowd.
To achieve this, I increased the overall exposure of the image, making the whole image brighter, including the shadows and the highlights.
Then, as the shadow areas were still a little dark, I increased those a little more.
Finally, as the global exposure adjustment made the fireworks and bonfire too bright, I reduced the highlights a little bit to give the final result.
Shadow and highlight adjustment is useful in a wide range of scenarios to help balance the image out — bringing overexposed areas down in brightness, and helping to boost the shadows. Just be aware that a light touch is recommended — increasing the brightness of the shadows too much can result in a lot of noise being revealed, which might look unnaturally green or purple.
5. How to Adjust the Contrast Contrast is about accentuating the difference between the light and dark parts of the image. Increasing the contrast of an image can dramatically improve the visual impact that has, by making the boundaries between those light and dark parts clearer.
Let’s take a look at a shot of people jumping against the sunset in the Sahara, for example, which I’ll be editing in Snapseed.

There is nothing too wrong with this shot, but it lacks the visual impact that I wanted. Ideally, I would want the shapes of the people to be in full silhouette against the sun, but as it was shot the camera picked up some skin tones and clothing color.
Using the contrast tool, we can make the dark areas stand out against the bright areas.

And here’s the result:

As you can see, this made the jumping figures and the dune more silhouetted against the sky. In most shots, you only want to tweak the contrast a little bit to get the desired effect, normally no more than +20 or so, but in this case, the higher number gave the best result.
6. How to Adjust Colors Color adjustment is another important piece of the editing toolkit. We can adjust image color in all sorts of ways, from changing the overall “warmth” of the image (how blue or yellow it appears), to individually changing the hue and saturation of specific colors inside of an image.
For this post, though, I just want to cover some very simple color changes you can use to make your images just a little more visually impactful.
The fastest way to adjust an image’s color is with the “Saturation” tool. This changes the appearance of every color in an image to make it more or less saturated. We can use the saturation tool to desaturate an image, eventually resulting in a black-and-white image with no color:

Or we can go all the way to the other end of the spectrum, and make the color incredibly saturated:

As with many edits, the key is to find a good balance — oversaturated images tend to look rather unnatural. Desaturated images can be very effective, and of course black-and-white is an excellent choice for all sorts of situations, in particular portraits, architecture, and certain landscape scenes. But generally, you would want to find a happy midpoint: not too oversaturated and not too undersaturated.

Saturation is adjusted on a sliding scale and is found on the basic adjustments panel in Lightroom or the “Tune Image” option in Snapseed.
7. Blemish Correction The last area I’m going to touch on today is blemish correction, or “image healing.” Sometimes there will be something in an image that you really don’t want to be there, like an inconvenient pimple on someone’s face. This is easy to remove in all the major editing tools.
You can, in theory, remove any object from a scene, but the healing tool works best on distinct, small objects that are surrounded by uniform colors. This is because the heal tool has to replace the area you wish to remove with something else, and this works best when it has an area nearby that looks similar. So for example, a pimple on a face is surrounded by a lot of similarly colored skin, so the heal tool can easily calculate what to replace the pimple based on the surrounding area.
For this example, I’m going to show how Snapseed can be used to replace an object in a scene. Here’s a group of people sitting on a sand dune in the Sahara:

Let’s say for some reason I only wanted to have people sitting in my shot, and I need to remove the standing person. She is a good candidate for removal as she is separate from the rest, and the surrounding scenery is not too complicated.
In Snapseed, we load up the healing tool, then we zoom in on the object to be removed with the standard “pinch to zoom” gesture.

Next, we use our finger to draw the area to be removed. It’s important to be as precise as possible because the tool is most accurate with small objects.

Once we have drawn the area, Snapseed will edit it out, replacing it with the best guess of what is behind the object.

As you can see, the result is impressive, with no real evidence that there was anyone standing there at all.
The healing tool is perfect for all manner of fixes, from editing out unwanted background strangers in your shot, to removing skin blemishes in portraits or power lines in landscape shots.
Best Photography Editing Software
Here is a list of the best editing tools out there:
- Adobe Lightroom (PC or Mac) – Lightroom is the industry standard tool for photography professionals. But this post doesn’t focus on Lightroom, or cover everything you can do in Lightroom, as it’s a massively complex tool, covering both photo management and photo editing.
- Photos (Mac) – I list iPhoto here mainly because it’s a commonly used tool among Apple users. However, I personally never recommend using it. While it will let you do everything that I cover in this post and is better than nothing, the way it manages your photos makes it hard to migrate to a more sophisticated system further down the line if you choose to do so.
- Snapseed (iOS or Android) – Another free Google tool, Snapseed is the best mobile image-editing app for both iOS and Android. It’s an incredibly powerful tool that, while simple to start using, has a great many features that take time to fully master. I use it for 95% of my mobile editing needs.
Editing your photos is a crucial step that far too many people skip. As you can see from this lesson, there is much more to editing your photos than just picking a filter and posting your picture on Instagram. By incorporating some of these tips and techniques into your post-processing routine, you’ll be able to improve your travel photography by leaps and bounds.
So get out there and start taking pictures!
Laurence started his journey in June 2009 after quitting the corporate life and looking for a change of scenery. His blog, Finding the Universe , catalogs his experiences and is a wonderful resource for photography advice! You can also find him on Facebook , Instagram , and Twitter .
Travel Photography: Learn More Tips
For more helpful travel photography tips, be sure to check out the rest of Laurence’s series:
- Part 1 – How to Take Professional Travel Photos
- Part 2 – How to Shoot the Perfect Travel Photograph
- Part 3 – The Best Cameras & Travel Photography Gear
- Part 4 – How to Take the Perfect Photo: Advanced Techniques
- Part 5 – 7 Editing Tips to Improve Your Travel Photographs
Book Your Trip: Logistical Tips and Tricks
Book Your Flight Find a cheap flight by using Skyscanner . It’s my favorite search engine because it searches websites and airlines around the globe so you always know no stone is being left unturned.
Book Your Accommodation You can book your hostel with Hostelworld . If you want to stay somewhere other than a hostel, use Booking.com as it consistently returns the cheapest rates for guesthouses and hotels.
Don’t Forget Travel Insurance Travel insurance will protect you against illness, injury, theft, and cancellations. It’s comprehensive protection in case anything goes wrong. I never go on a trip without it as I’ve had to use it many times in the past. My favorite companies that offer the best service and value are:
- SafetyWing (best for everyone)
- Insure My Trip (for those 70 and over)
- Medjet (for additional evacuation coverage)
Want to Travel for Free? Travel credit cards allow you to earn points that can be redeemed for free flights and accommodation — all without any extra spending. Check out my guide to picking the right card and my current favorites to get started and see the latest best deals.
Need Help Finding Activities for Your Trip? Get Your Guide is a huge online marketplace where you can find cool walking tours, fun excursions, skip-the-line tickets, private guides, and more.
Ready to Book Your Trip? Check out my resource page for the best companies to use when you travel. I list all the ones I use when I travel. They are the best in class and you can’t go wrong using them on your trip.
Got a comment on this article? Join the conversation on Facebook , Instagram , or Twitter and share your thoughts!
Disclosure: Please note that some of the links above may be affiliate links, and at no additional cost to you, I earn a commission if you make a purchase. I recommend only products and companies I use and the income goes to keeping the site community supported and ad free.
Related Posts

Get my best stuff sent straight to you!
Pin it on pinterest.
Subscribe to Updates
Get the latest creative news from FooBar about art, design and business.
By signing up, you agree to the our terms and our Privacy Policy agreement.

Travel Photography Editing: Perfecting Your Photos Anywhere
Travel photography editing brings out the best in the photos you captured from a memorable trip. While travel photography captures the essence of a location, it is just the beginning. To truly make your travel photos stand out, mastering the art of editing is essential. In this guide, explore the intricacies of travel photography editing. Gain insights, tips, and techniques to perfect your photos wherever your adventures take you.
Table of Contents
Choosing the Right Editing Software
When it comes to elevating your travel photography editing, the choice of software is akin to selecting the right brush for a painter. The market is brimming with options, each boasting unique features crafted to cater to the discerning needs of photographers. Among the myriad of choices, three stand out prominently: Adobe Lightroom, Capture One, and DxO PhotoLab.
Adobe Lightroom

Widely regarded as the industry standard, Adobe Lightroom is a comprehensive and user-friendly editing tool. Its intuitive interface seamlessly integrates with Adobe’s Creative Cloud, offering a smooth workflow for both beginners and seasoned photographers. Lightroom’s extensive range of features includes powerful color correction, versatile presets, and robust organization tools. As a cloud-based platform, it allows for seamless editing across multiple devices, making it a go-to choice for those who value flexibility and accessibility.
Capture One

Capture One, a favorite among professional photographers, is celebrated for its unparalleled control over image quality. Known for its exceptional color grading capabilities, Capture One provides a level of precision that caters to photographers with a keen eye for detail. The software’s tethering capabilities make it a preferred choice for studio and commercial photography. If meticulous adjustments and uncompromising image quality are non-negotiables in your editing process, Capture One might be the ideal fit for your needs.
DxO PhotoLab

DxO PhotoLab distinguishes itself by harnessing the power of artificial intelligence (AI) to streamline the editing process. This software employs advanced algorithms to automatically enhance images, making it an excellent choice for those looking to achieve impressive results with minimal manual intervention. DxO’s standout feature is its Smart Lighting technology, which intelligently optimizes exposure and contrast. If efficiency and a touch of automation appeal to your editing style, DxO PhotoLab offers a compelling solution.
Color Correction
The significance of color cannot be overstated. It is the language through which emotions, atmospheres, and narratives come to life. Proper color correction, therefore, ensures your photos authentically capture the beauty you witnessed during your journeys.

The Language of Color in Photography
Color isn’t merely a visual component; it’s a powerful communicator. The warm, golden hues of a sunset evoke feelings of warmth, nostalgia, and tranquility, while the cool tones of a mountain landscape convey a sense of serenity and majesty. Understanding this visual language is essential for a photographer aiming to connect viewers with the essence of a moment.
The Role of Color Correction
Color correction, at its core, is the process of fine-tuning and adjusting colors in a photograph to ensure they are faithful to the scene as perceived by the human eye. It involves correcting any deviations or inaccuracies introduced during the capture or post-processing stages. The goal is not just accuracy but also enhancing the emotional impact of the image.

At its essence, cropping involves trimming or cutting portions of a photograph to enhance its composition. The reasons behind employing this technique are as diverse as the landscapes encountered during travel. From eliminating distractions that detract from the focal point to emphasizing a specific element, the strategic use of cropping allows photographers to craft images that resonate with impact and intent.
Rule of Thirds
The classic rule of thirds remains a stalwart principle in composition. By aligning key elements along the imaginary gridlines, photographers create a balanced and visually appealing composition. Cropping becomes a tool to fine-tune this alignment, ensuring that the subject harmonizes with the surrounding space.
Aspect Ratios for Impact
Experimenting with different aspect ratios can yield dramatic results. Consider the cinematic allure of a widescreen format or the intimacy evoked by a square crop. Each ratio introduces a unique visual language, and the choice depends on the story a photographer seeks to convey.
Learning from Iterations
Cropping is an iterative process. It’s essential to explore various crops of the same image, comparing the before and after to gauge the impact of each adjustment. This exploration hones a photographer’s eye, refining the ability to discern the most effective composition for a given scene.
Exposure Adjustments

Exposure, in the context of photography, refers to the amount of light that reaches the camera sensor. It’s a delicate balance, especially when traversing diverse environments during travel. The challenge lies in harmonizing the interplay between shadows and highlights, allowing for a nuanced representation of the scene’s true character.
Contrast and Saturation
Contrast is the range between the darkest and lightest parts of an image. It defines the visual depth and impact of a photograph. Effective use of contrast adds drama, emphasizes details, and breathes life into the composition.
Saturation, on the other hand, refers to the intensity or purity of colors in an image. It’s the element that makes a lush green forest vibrant or a sunset sky breathtakingly vivid. Controlled saturation enhances the mood, draws attention to key elements, and contributes to the overall visual allure.
Optimizing for Social Media: Aspect Ratios and Resolutions
Sharing your travel adventures on social media requires consideration of aspect ratios and resolutions. Tailor your edits to suit each platform, maximizing the visual impact of your photos.

Instagram, a powerhouse for visual storytelling, favors a square aspect ratio. Photos with a 1:1 ratio work seamlessly on Instagram, allowing for a consistent and aesthetically pleasing grid layout. Square compositions evoke a sense of cohesion, making it an ideal choice for a curated feed.
Recommended Size for Instagram: 1080×1080 pixels
Facebook accommodates a range of aspect ratios, offering flexibility in your storytelling. However, for optimal display in the News Feed, a 16:9 aspect ratio is a safe bet. This ratio ensures your photos occupy a substantial portion of the viewer’s screen, commanding attention amidst the diverse content.
Recommended Size for Facebook: 1200×675 pixels (16:9 aspect ratio)
Twitter, with its fast-paced feed, thrives on landscape-oriented images. A 16:9 aspect ratio is well-suited for Twitter, ensuring your photos stand out and deliver their narrative swiftly in the timeline.
Recommended Size for Twitter: 1200×675 pixels (16:9 aspect ratio)
Pinterest, a platform designed for discovery, favors vertical compositions. Taller images with a 2:3 or 1:2.3 aspect ratio perform well, maximizing the impact of your visuals as users scroll through their inspiration boards.
Recommended Size for Pinterest : 600×900 pixels or 1000×1500 pixels (2:3 aspect ratio)
Mobile Editing Apps for On-the-Go Enhancements
Mobile editing apps have become indispensable companions for globetrotting photographers, offering a suite of tools to enhance and refine images directly from the convenience of a smartphone. Among the myriad options available, two stand out as titans of on-the-go editing: Snapseed and Lightroom Mobile.
Snapseed: Your Pocket-Sized Editing Studio

Snapseed, developed by Google, is a powerhouse in the realm of mobile editing. What sets Snapseed apart is its user-friendly interface paired with a robust set of editing tools. From basic adjustments like brightness and contrast to advanced features such as selective editing and healing brushes, Snapseed provides a comprehensive toolkit for enhancing travel photos on the fly.
Key Features of Snapseed:
- Selective Editing: Target specific areas for adjustments, allowing for precise enhancements.
- Brushes and Healing Tools: Remove unwanted elements or blemishes with ease.
- Filters and Presets: Apply artistic filters or create your own presets for a consistent style.
- Perspective Correction: Straighten skewed lines and correct perspective distortions.
Lightroom Mobile: The Mobile Extension of a Photography Giant

Lightroom Mobile seamlessly extends the power of Adobe’s renowned desktop editing software to your smartphone. This app is a favorite among photographers for its synchronization capabilities, allowing edits made on the mobile app to be seamlessly transferred to the desktop version. Lightroom Mobile combines user-friendly simplicity with professional-grade editing tools, making it an ideal choice for travel photographers seeking flexibility and consistency in their editing workflow.
Key Features of Lightroom Mobile:
- Sync Across Devices: Edit on your smartphone, and your changes automatically sync to your desktop.
- Advanced Color Grading: Fine-tune colors with precision, ensuring your photos retain their natural vibrancy.
- Professional Presets: Access a vast library of presets or create your own for efficient and consistent editing.
- RAW Editing: Edit high-quality RAW files directly from your mobile device.
In the realm of travel photography editing, the journey is as enriching as the destination. Armed with the knowledge to correct colors, enhance compositions, and wield creative tools, you’re ready to embark on a transformative editing adventure. Experiment, discover your unique style, and let your edited travel photos tell the captivating stories of your wanderlust.
We hope that you find this article about travel photography editing helpful. Thank you for reading and you’re always free to leave a comment. If you find this article interesting, consider checking out one of our recently published posts. A few of them showcase advancements in technology such as AI Art Generators. On the other hand, if you’re looking towards Photography, we also offer great articles for your inspiration. We also have multiple articles that talk about the various printing mediums for wall art. May these articles give you inspiration for your next print!
Find them here:
Discover the Secret to High-quality Canvas Prints The 9 Best Canvas Print Companies in 2023 Acrylic Prints: Add Vibrance to Any Space The Top Food Photography Trends to Try Now The Ultimate Guide to Continuous Lighting for Photography Stable Diffusion Tips and Tricks Best AI Art Generator for Android Phones 2023
We enjoy reading your comments and insights with our posts! Should you have any questions or concerns, feel free to leave them below! -Mark

Mark is a Toy Photographer and Blogger since 2019. He uses his passion for photography to research and write articles about photography, wall art, and AI art generators. He applies photography fundamentals as well as graphic editing in his work which you can follow on Instagram.
Leave A Reply Cancel Reply
Save my name, email, and website in this browser for the next time I comment.
This site uses Akismet to reduce spam. Learn how your comment data is processed .
Type above and press Enter to search. Press Esc to cancel.
Privacy Overview

8 photo editing techniques to take your travel photos to the next level

Sometimes, I use affiliate/sponsored links with my recommendations, which if bought through might earn me a few pennies at absolutely no extra cost to you . This helps with the cost of keeping this site alive so I can continue to guide you on your travels. Please remember that I would never ever ever recommend anything I don’t or wouldn’t use myself. Big thanks to each and every one of you who have trusted my recommendations so far! Lozzy x
Fairly new to photography and not sure how to use editing to take your travel photos to the next level? I’ve put together a list of the 8 travel photo editing techniques that I use the most often to enhance my images. While I have nothing against them, I personally don’t use anyone else’s Photoshop actions or Lightroom presets (these are blanket editing styles that can be automatically applied like a filter, and then tweaked).
However, if you’re a beginner to travel photo editing techniques, I really encourage you to make the effort to understand the ins and outs of the editing software, even if you do choose to buy presets. You’ll always be reliant on other people’s styles and expertise, otherwise!

For software, I use Lightroom and Photoshop as part of Adobe Creative Cloud . Though there are plenty of other alternatives available, I highly recommend this suite for its ease of use and the wealth of information and guidance out there, since it’s by far the most frequently used amongst professional photographers. The below travel photo editing techniques are based on my Adobe experience, but any decent alternative will be able to provide the same functions.
On a tangent from travel photo editing techniques, but still very important, you’ll want to work out how to keep your photos safe, both before and after you edit them. Check out this guide to backing up your photos whilst travelling .
Disclaimer: in a bid to stay in Google’s good books, I’ve had to greatly reduce the quality of my photo uploads across the whole blog. Just pretend these are all sharp AF. I promise you my exports are bangin’.
After you’ve finished this post on travel photo editing techniques, you have these travel photography posts to check out:
- How I created travel couple photos without a tripod
- What I pack for travel photography when backpacking
- The 4 best cameras for travel blogging in 2021
How do my travel photos differ from other photography styles?
The way I edit travel photos versus my portrait or events sessions does differ, as my main aim is to showcase a location or something of cultural interest, using people who are enjoying or interacting with just to allow viewers to place themselves in that situation.
In portraiture and events, my mission is to highlight the beauty or personality of the people themselves as my main subject, and capture natural micro-moments with a much lesser consideration for the background (though beautiful settings do of course help!).

When shooting travel photos, I’m very likely to be using a wide lens such as my Canon 24mm 2.8 on my DSLR to get more of the scene into the shot, and I’ve seen a lot of photographers travelling with the very popular 35mm or even the crazy-versatile 24-70mm if they feeling like ruining their holiday having to constantly worry about owning the most expensive lens in their hostel (these are all for Canon but there are alternatives for all brands out there).
You can get wider angles, such as a 10-20mm , but honestly I feel like at that point the distortion is a little too much for my liking, and you’ll start to see walls and trees at the edge of your images curving. Go too wide, and it starts to look like a GoPro.
In contrast, for events and portraiture I’m far more prone to picking up something like a 50mm and using a wide aperture (low-numbered F stop) to create the blurred background effect called ‘bokeh’. Bokeh can be beautiful, and it makes your photos look instantly more professional, but it’s not often appropriate for most travel photos, where you want to capture the essence of the place you’re in.

Do you shoot Raw?
You should! Raw files store a ton more information than regular JPEGs, which means you can push the editing to new limits without losing as much detail or ruining the quality of the final image. They come out looking a little duller straight off the camera, but once you’ve mastered editing you’ll realise how much better your final images can be.
All DSLR cameras should have the feature to shoot in JPEG or in raw (these file names are .CR2 for Canon cameras, .NEF for Nikon and ARW for Sony). If you’re nervous about switching, most DSLRs will give you the option to save both a raw and JPEG file of each shot you take.

Note that raw files cannot be opened in any old editing software – investing in Adobe Lightroom and Photoshop or other professional-level software such as Affinity will allow you to open raw files and take advantage of all the extra information they store.
Raw files are also a lot bigger in size so you’ll want to get yourself a shockproof hard-drive to store them in while travelling.
So, what you’ve all been scrolling for…
8 editing techniques to take your travel photos to the next level
1. radial filtering.
Definitely the easiest of these 8 travel photo editing techniques. Inverting the mask of and then turning up the exposure and highlights of a radial filter is a nice way to mimic a strong light source (whether from the sun or an artificial light). It’s subtle, but can add a bit of magic to your travel photos. I wouldn’t recommend doing it in every travel photo you edit, though! I like to use a high feathering to make the light look more natural.
If you want to go the extra mile, you can purchase light flare overlays to use in Photoshop, which can add a lot drama to the effect.

2. Graduated filtering
This is another basic tool that I recommend using to change the exposure in one or two opposite corners of the image. It adds that little bit more depth to a photo which draws the eye to the focal point and gets rid of any flatness or uneasy feeling that something is missing (I can’t be the only one this happens to?). Super simple, just place your grids and shift the exposure slider.
Below, I’ve used a darkened graduated filter on the bottom right and a lighter one on the top left. I feel it has more oomf to it now.

3. Colour grading
Colour grading is where your personal style can really start to shine. Have a real think about the kinds of travel photos you like to see; have a closer look at some of them and try to spot the colours that the photographer has enhanced, and which they have desaturated.
Colour grading is done using the HSL tool, which has three sliders in it:
Hue: allows you to change the shade of a certain colour. Turning blues slightly turquoise is a very popular slide.
Saturation: turns up or down the impact that a colour has in the image. Desaturating yellows and greens has been on-trend for a few years now.
Luminance: controls how light or dark the selected colour is. Lots of travel photographers darken (and desaturate) the oranges to give their bloggers a tan that no blonde Western European could naturally achieve, but I prefer to have my oranges lighter to give people a bit of a glow.

Remember, everything in moderation! You don’t want your images to look over-processed, nor do you want the scenes depicted to become inaccurate and misleading.
4. Tone curve
The tone curve is often neglected by newbies to travel photo editing just because it looks way more complicated than it is, but making a few tweaks can make a big difference to your photos. It’s a really easy way to start building your own travel photo edit style if all your photos have the same tone curve.
It takes some time to hone in on your styles so have a play with marking some points along the curve and then shifting them around ever so slightly.
If you’ve ever wondered how travel photographers get that classic matte, almost faded look, they’re usually using the tone curve to do what is called ‘crushing the blacks’. To achieve this travel photo editing technique, mark a point near the bottom left of the tone curve, without moving it anywhere for now. Then pick up the very end of the line, exactly where it meets the left-hand corner, and drag it upwards along the Y axis.

I Iike to keep my tone curve adjustments subtle, but you can see how adding it can just make the image pop a little more:

5. Brush Adjustments
This is a travel photo editing technique that is perfect for correcting any colour or exposure imperfections, or for highlighting/pulling focus away from certain parts of the image (such as a person who’s stood just a little too in the shadows and needs to ‘pop’ a bit more).
Simply use the brush to draw on the part of the photo you want to edit, then use the sliders as necessary. Here, I used it to dehaze and add clarity to the mountains behind my subject:

6. Spot removal
As the old saying goes, not all humans are blemishes, but most humans are blemishes. It’s no secret that travel photographers fight tooth and nail to capture locations without crowds in them. This usually means waking up at stupid o’clock to start snapping at dawn, but I’m not about that life so I’ve used my normal waking hours wisely to pick up mad skillz in spot removal instead.
The spot removal tool allows you to select an area of your image to remove, then either replace it with a cloned selection from another part of the same image, or heal it, in which the software takes the texture of the healing selection whilst assessing the edges of the removed selection to invent what it thinks the colours within the area should be.
Pay attention to how much you’re feathering the selection, and make sure to account for patterns like the lines of paving. This travel photo editing technique is also super handy for cleaning up the spots made by dust and dirt that may have found its way onto your lens – very common when you’re on the road!

This is an in-camera function that takes 2 or more shots immediately after each other, automatically changing the shutter speed to allow different exposures. In a dark room with a very bright scene coming in through a window, for example, it’s an easy way to capture detail in both lighting settings, without blowing out the skies or making the inside scene too dark and grainy to be used.
Set your camera to shoot HDR (not all DSLRs do this, mind you, but you can always take a couple of differently-exposed shots manually), then when you upload into Lightroom , select the images and click Photo Merge: HDR .
Now, you do have to be extremely still for this to work, and the camera needs to be in a stable position like on a tripod or the next best thing (usually a precariously-balanced tower of books, in my case).
I personally don’t use the HDR technique very often as most of my shots are taken outside, but travel bloggers who showcase hotels with amazing views are big fans.
While not the best quality (let’s be honest, it’s crap), I put this quick example together this morning to demonstrate the underexposed, overexposed, merged raw and edited image. I’ve really channelled my inner blogger here and smiled down upon my framed map of Colombia. Yes, of course you can buy it here in several different colours ; I’m a blogger, don’t you know.

8. Composites (PS)
My favourite. This is the travel photo editing technique that takes the most skill to master, but practice enough and you’ll be able to do it in your sleep. The art of being able to cut and paste parts of one photo into another is particularly helpful for travel couples who don’t want to lug too much gear around.
I’ve detailed how to do it and given a few examples of my previous composites in my ‘ How I take couple travel photos without a tripod ‘ post. When using the composite technique, don’t forget to copy in the shadows, too!

Bringing these travel photo editing techniques together
Now, it’s rare that I use every single one of the above travel photo editing techniques in one image, but I usually use at least 5. In the below travel photo edit, I’ve used a radial filter to create a sun, then used the spot removal to make sure the light coming through the roof slats are accurate for that new light source, and taken out the decking, too.
I’ve composited Andy into the shot, then applied my usual tone curve and colour grading (I have them saved as my own preset).
I grabbed the adjustment brush to even out the smoothness of my skin after raising the shadows so much (which often creates lots of messy grain). HDR would have been a handy thing to use here, but not possible with a moving swing. This image edit did take a long while to finalise, but goddamnit I do love to waste my own time.

Now you’ve finished this post on travel photo editing techniques, you have these travel photography posts to check out:

Liked this post on travel photo editing techniques to take your images to the next level?
Give it a save on Pinterest to be able to refer back to later!

Last Updated on 23 December 2022 by Cuppa to Copa Travels
Read these posts next!

Planning a route across South America

Learn from our travel mistakes

What to look for in a night bus in South America
Leave a comment :) cancel reply.

- Czech Republic
- Falkland Islands
- Latin America
- New Zealand
- North America
- South Georgia
- Kilimanjaro
- Adventure Travel
- Archaeology
- City Guides
- Itineraries
- Portrait Photography
- Tips and Advice
- Travel Photography
- Travel Stories
- Unhelpful Guides
- Wildlife Photography
- Work With Me
Travel Photography On The Road – My Photo Editing Workflow Tips
As a travel photographer, one of the things I have to consider is how I am going to backup, catalogue, and even edit my photos (and occasional videos) while travelling.
Contents (click to view)
All travel photographers have their own travel photo editing workflow, but since a few people have asked about mine, I thought I’d pop it all down in this blog post so you can see what works for me.
Of course, there is no right or wrong way to do any of this, but after 20 years as a photographer, this is the system I have ended up with, and so far it seems to work well. You may have your own routine that you’re happy with, or you may be interested in learning what other photographers do so you can get ideas and adapt your own workflow. Either way, I hope this helps!
NOTE: This is a review of my experiences using Adobe Creative Cloud. I was given a year’s subscription by the lovely people at Adobe – but I have been a Creative Cloud user since it came out (and before that I used Adobe Creative Suite), so it was already an application that I knew and loved. All opinions are honestly held and I don’t accept freebies or payment in exchange for positive reviews.

Travel photo editing with Adobe Creative Cloud
The core of my travel photography editing workflow is Adobe Creative Cloud. This is a suite of applications for all kinds of creative projects, from photo and video editing to graphic design, web development, animation and much more.
Adobe also offers cloud-based editing and storage, fonts, stock images and online tutorials, so it’s adaptable to whatever you do and however you choose to work. In fact, there are so many options it’s a bit overwhelming, and I’ve barely even scratched the surface of all the different ways you can use it.

There are various packages ranging from a smaller (and cheaper) bundle of apps aimed just at photographers, to one that includes every programme in the Creative Cloud suite. For the last few years, I’ve subscribed to the photography package, which includes Bridge, Lightroom, and Photoshop.
- Adobe Bridge: The central hub of the Creative Cloud suite. It’s really just a file management programme where you can view, sort, label, and organise your images.
- Adobe Lightroom: The application I use the most. Lightroom is where I back up my images, do all my photo editing and then export the images at different sizes depending on what’s needed.
- Adobe Photoshop: Photoshop is a more advanced image editing tool, with many more advanced functions, most of which I don’t use. As a travel photographer I only make basic adjustments to my images as I prefer to keep them as real and authentic as possible. So I only use Photoshop very rarely.

For creating videos, the other programme I use is Premiere Pro. This isn’t included in the photography package, so you need to get a separate subscription or simply buy the ‘All apps’ package.
- Adobe Premiere Pro: This is Adobe’s answer to Final Cut Pro or Avid Media Composer. While it has some very high-powered editing capabilities, it’s also simple and user-friendly enough for a novice like me who just wants something with a bit more oomph than Apple’s iMovie or any other basic, free, video editing software.

Backing up images as a travel photographer
If you’re only going away for a week or two, it’s entirely possible not to do any backing up at all. A single memory card (or perhaps two) is plenty for most people, and then you can download all your images when you get home.
However, if your camera gets lost, damaged or stolen and you haven’t backed up, you’d lose all your images! And if, like me, you travel for longer than a couple of weeks, or you take a lot of images, or you’re shooting high-resolution RAW files, you’ll soon run out of memory card space.
So that’s why, even if I do nothing else while I’m travelling, I back up. Every day.

Storing images while travelling
Adobe Creative Cloud, as the name implies, offers the ability to store your images in the cloud and edit remotely on the go.
Many people use this option, but it’s not something I do. I’m often travelling in remote places with rubbish wifi, and since my RAW files are huge and I sometimes take many hundreds of images in a single day, it would be impossible to upload them all.
For example, when I spent three months travelling in Guatemala , I ended up taking over 12,000 photos. Uploading them all to the cloud would have been impossible!
So I always travel with two portable 2TB hard drives and I back up my photos to both of them every day. Then I can wipe the memory card and use it again.
It’s important to have two, so that you’re fully protected. Portable drives can and do fail, so I always back up everything twice, in case one breaks or gets stolen. Best practice is to keep them separate from one another, so that if you lose one, you still have the second.

Backing up with Adobe Lightroom
Lightroom is not just an editing tool; it’s also where I back up my images. In the Library module, you can import, rename, label and organise all your files. So as soon as I get back from a day’s shooting, the first thing I do is grab the card out of the camera, plug it into my card reader, and use Lightroom to download all the files.
I organise them by year, then by date and location, and then within that folder I’ll have different folders for file types, such as RAW files, iPhone photos, videos, and later I’ll add folders for exported high-res images for printing or low-res ones for Instagram and this site.
As Lightroom imports them, it will also rename them to something more searchable than a string of numbers, add my name and contact information to the metadata, and apply a preset (about which more in a bit).

Organising with Adobe Lightroom
Once the images are all imported, the next stage for me is sorting, classifying and deleting. I take a LOT of photos, and I definitely don’t need to keep them all! I only rarely delete in camera, so the first step is to go through and get rid of duplicates, dull images, or ones that are just rubbish. I aim to delete 50% of the images I’ve taken during this first pass.
As I go through, I also give the images a star rating, from 1* to 5*. One star for anything I think I will want to edit, two to four for ones that are quite good, and five stars for the images that leap out at me as the very best.
Then, as soon as possible, I go back through the ones I’ve starred and edit them.
Read more: 30 Beautiful Pictures Of Guatemala And The Stories Behind Them

Using presets in Adobe Lightroom
The two main areas of Lightroom that I use are the Library and Develop modules. In the Library I can sort, tag and label my images. There is also a basic editing function, but I prefer to do all my editing in the Develop module.
As I mentioned, all my images get a preset applied as I import them. A preset, as the name suggests, is group of pre-set photo editing settings, that you can apply to give all your images a similar look, to save you having to manually apply the same settings to every image.
You can create your own, use the selection that comes free with Lightroom, or download them from other photographers on the internet.
I like bold, colourful images, so my preset corrects the exposure where necessary and adds a little boost of brightness, contrast and vibrancy. Not too much – I still want them to look authentic and not over-processed – just a bit to give the image a bit of punch and take away any flatness.
But you can choose the look that suits you – whether that’s with more or less contrast, brighter or more subdued highlights, black and white, or any other style.
Read more: Using The Canon R5 For Wildlife Photography: A Full Review

Travel photo editing with Adobe Lightroom
But the software doesn’t always get it right, and my preset won’t correct things like a wonky horizon, high-ISO noise, or unsatisfactory framing. So the most important part of my editing process is to go through the images I’ve starred, one by one, and give each a very quick polish. That includes checking I’m happy with what the preset has done and adjusting it if not, correcting the white balance, cropping, reducing noise or adding a mask to bring out details in the sky.
I probably spend no more than about 30-60 seconds tweaking each image, but I might edit 100 images at a time, so it soon adds up!

Most of those images will never get published or shared, and sometimes people ask me why I don’t only edit the ones I know I’m going to put on this blog or my Instagram .
The answer is that sometimes an image doesn’t come into its own until you edit it. There have been plenty of occasions where I thought a photo wasn’t that great, but with a bit of polish, suddenly it becomes a keeper.
I really like working in Adobe Lightroom because the whole process is so quick and simple. You can tweak as little or as much as you like using the various sliders, and you can also edit a group of images in bulk or copy and paste adjustments from one image to another.
Read more: Ethical Travel Photography: How To Capture With A Conscience

Exporting with Adobe Lightroom
Once I’m happy with my edits, I can then use Lightroom’s export function to export the corrected RAW files. You can save different presets, so I have one for Instagram, one for the blog, another for high-res jpegs, and so on.
As you export you can also get Lightroom to pop a watermark on, which is very handy if, like me, you’re posting a lot of images online and want to digitally sign your work.

Travel photo editing workflow – back home
I’m not much of a party girl and, especially if I’m travelling solo, I’m quite happy spending my evenings editing photos. So if I’m lucky, I can sometimes manage to get a lot of editing done while still on the road. When I went to photograph animals in Antarctica , I managed to get all my editing done before we returned to dry land!
Once I get home, there is one more job to do, and that’s store everything correctly. I have two big external hard drives (again, master and backup), so I copy all the images from my portable hard drive to the master drive.
At this point, the Lightroom catalogue will still try to connect with the portable drive, and if I unplug it, Lightroom will think the images are missing. So the final task is to use the ‘Find Missing Folder’ tool in the Lightroom library module to redirect it to the folder’s new location on my master hard drive. This way I won’t lose any of the hours of editing I’ve done – which would be a disaster!

Creating travel videos using Adobe Creative Cloud
While in Guatemala I volunteered as a photographer for Trama Textiles , a non-profit cooperative based in Xela that works with weaving communities.
During the Civil War many Maya women lost their husbands, fathers and brothers, so they had to fend for themselves. Weaving gorgeous textiles using the traditional back strap loom is the main way they can support their families.

Organisations like Trama Textiles help them to get fair prices for their work, and sell their products online. They also support them with grants and fundraising to help them survive and look after their children.
My role was mainly to photograph products for the online shop, and take photos of the weavers at work for newsletters and promotional materials.
But I was also asked to make a short film documenting their journey towards creating products made entirely with natural dyes instead of chemical dyes.
I shot the film using my iPhone 13 Pro, and edited it using Premiere Pro, Adobe’s editing programme that comes as part of the Creative Cloud package.

Travel video editing tutorials and tips
If you’re a regular reader of this blog you’ll know that my main job for the last 18 years has been directing documentaries . That means I have sat in more edits than I can remember – but I always work with a professional editor.
So although I have a very good understanding of the editing process and how to cut a film together, I’m not all that familiar with the various editing programmes themselves.
Three years ago I volunteered in Uganda , and filmed and cut a few short videos using a Canon camera and Adobe Premiere Pro, but it’s been a while since I used it.
So my memory of the programme and where the various tools and functions are was rather rusty!
Fortunately Adobe offers loads of practical guides and online tutorials to help you get started, and if ever you’re stuck on a particular action, a simple Google search will quickly bring up advice on how to do it.

Editing travel videos using Premiere Pro
Since this was the first time I’d used Premiere Pro in a while, I took full advantage of the online tutorials while cutting my short film.
I learned how to import my footage, how to sort and label it, and how to select part of a clip and put it on the timeline. I also learned how to add transitions, effects and music, and how to add captions.
This is all pretty basic editing, and I found it quite easy to learn how to do it in Premiere Pro.
The programme has many more advanced features that I didn’t use, but I can definitely see myself using it again if I want to make more short videos for Instagram or YouTube in the future. It’s much more responsive and you have a lot more choice and control than in free applications like iMovie.
If you’d like to see how the film turned out, here it is!
Where to next?
Interested in more travel photography tips? Why not try these?
- 25 Brilliant Tips For Travel Photography
- 13 Top Tips For Taking Great Travel Photos Of Markets
60+ Awesome Antarctica Photography Tips
- 19 Easy Wildlife Photography Tips For Beginners
Or if you’d like to find out more about my adventures in Guatemala, how about one of these?
Yaxha Guatemala: The Magical Mayan Ruins You Need To Visit
- Backpacking in Guatemala: All You Need To Know Before You Go
Visiting San Andres Xecul, Guatemala: Home Of The Famous Yellow Church
- The Thrilling Volcan De Acatenango Hike In Antigua Guatemala

Bella is a multi-award-winning travel writer, wildlife photographer and science and history documentary director from London. Among many awards and nominations she won Blogger of the Year at the British Guild of Travel Writers’ Awards 2023 and Best Photography at the Travel Media Awards 2020. Her work has been published by National Geographic, Wanderlust, and BBC Travel among others. Her films have been shown around the world including on the BBC, Discovery and PBS.
Further Reading...

Sweat And Leather At Chouara Tannery, Morocco

A Guide To Flores Guatemala: Why I Loved This Maya Town
Some of the links on this site are affiliate links. This means that if you click through and make a purchase, I will earn a small commission at no additional cost to you. Passport & Pixels is a participant in the Amazon Services LLC Associates Program. As an Amazon Associate I earn from qualifying purchases.

Photography
Travel photography tips for near or far.
Get travel photography tips from professional photographers so you can capture new landscapes, cityscapes, and portraits of people you meet on your journeys.
Not sure which apps are best for you?
Take a minute. We'll help you figure it out.
JUMP TO SECTION
Types of travel photography
Top tips for travel photography
Turn travel photography into a career
A 10,000-foot view of travel photography
- Travel photography can be pictures of landscapes, cities, architecture, or people on the street.
- You don’t have to go far to start practicing — photograph interesting places close to where you live.
- To make a career of it, build an online portfolio of your best work.
Types of travel photography.
Travel photography can stretch across genres because you can take any type of photo when you travel. Depending on where you go and what you do, you can touch on everything from astrophotography to wildlife photography . As you travel, consider which aspects of your journey you want to focus on.
Landscape photography.
The world is dotted with picturesque, compelling, and breathtaking sights. When you’re on a walk and you want to capture the feeling of the scenery you find, you can focus on landscape photography. Make sure to do your research before you go, be intentional about the time of day you want to shoot, and be sure to bring gear to protect yourself from the elements.

City photography.
Capture the cityscape . From vast skylines to everyday life on the street, cities present wonderful subjects for experiments with perspective, texture, light, and color. Play with framing and vantage points, from the tops of buildings down to street level and below.
Architecture photography.
With architecture photography , you can explore the universal features and specific quirks of human-made structures wherever you go. Study a still subject like a building or a bridge to highlight the effects of weather or time of day, or to play with different vantage points.

Street photography.
Once you’re on the street, you can focus less on the architecture and more on the people moving through the city. Capturing life on the ground is the goal of street photography — a style of visual storytelling that shows off and communicates the experience of everyday life. It’s vibrant and spontaneous, and you have to work with whatever light is available. Catch people as they move about their day to immerse yourself in the experience of a new city.
Top tips for travel photography.
Finding your way in the world of travel photography doesn’t have to be overwhelming or onerous. Discover how you can get started with these tips.

1. Follow your wanderlust.
No matter where your interest lies, if you travel for the shoot, it counts as travel photography. Like documentary photography , travel photography expresses some truth about the particular scene it captures. “For me, it’s just one way to share my perspective on the world,” says professional travel photographer Tiffany Nguyen. “I travel to different places, see the world through my lens, and tell stories through photography.”
2. Start where you are.
You don’t need to quit your day job and sell all your possessions to make travel photography. “I would just start in your own backyard,” Nguyen says. “I started small, doing short, weekend trips, and then when I got more comfortable traveling and better at photography, I wanted to take it to the next level and do more international locations.” Begin with a list of places nearby that might be interesting to shoot. Find locations you can get to in an afternoon.
3. Research the location.
You can save yourself time and effort, and get better pictures, if you plan ahead. “Having the right inspiration before you get there is really key,” says travel photographer Forrest Smith. “Before I go, I like to build a moodboard to try to find the exact shot that I want.”
Nguyen does a lot of internet research, looking at blogs, Google Earth, and Google images. She scouts Instagram for different angles and perspectives. “I also find that social media is a huge resource, especially using hashtags on Instagram,” she says. “They’re really helpful for finding live conditions at a certain location. For example, if I go to a waterfall, I don’t really want to waste my time trying to get water photos if the waterfall is dry. So I’ll search the hashtag of the waterfall name to get an idea of the water level.”
In addition to weather conditions, your internet research can tell you how popular the location is, how to get there, and what times might be the least crowded. “I’m looking for the length of the hike, the elevation gain, any obstacles or challenges that are going to come my way,” says Nguyen.

4. Bring the right equipment.
Make a checklist so you don’t forget anything as you pack your camera bag. Include things like extra batteries, an extra memory card, a headlamp, emergency snacks, rain gear, protective cover for your photographic equipment, and extra lenses . (If you know you’ll do a lot of walking, make sure you really want that telephoto lens before you bring it.)
“For me it’s important to have compact, lightweight equipment,” says Nguyen, who uses a mirrorless Sony camera. Unlike DSLR cameras , mirrorless cameras have no mirror to reflect the image to the optical viewfinder. “Their bodies and lenses are much smaller than the DSLR cameras, but they’re still super-high quality, super-high resolution,” Nguyen says. She uses several lenses, including a 24–70mm f/2.8 lens and a 16–35mm f/2.8 lens for wide-angle shots. She’ll bring a prime lens (a lens of fixed focal length ) for astrophotography or low-light photography, and a lightweight carbon-fiber tripod. If she’s going to be close to her car, she’ll bring a 70–200mm f/2.8 telephoto lens.
Both Nguyen and Smith will bring drones for aerial shots if they know they’re going somewhere drones are allowed to fly. (Drones are not allowed in US national parks.) The best camera for his work, Smith says, is a Canon 5D Mark IV DSLR. Like Nguyen, he uses a 24–70mm f/2.8 lens. “If I’m going out for the day, I like to have something wide and something more cropped, so I’ll bring my 24mm prime or my 100mm prime,” Smith says. He’ll also bring neutral density filters . “They’re really great to have if you’re photographing water.”

5. Get the timing right.
Part of your research should include finding the best times of day to shoot and factoring in travel time. “I like to take advantage of the light, so I like to shoot at golden hour or sunset,” Nguyen says. “I try to avoid shooting at midday because the harsh lighting doesn’t look good for photos and there are more people out.” If you want to shoot an empty landscape in a typically busy place like a national park, you may want to get to the location before sunrise.
Always be on the lookout for great shots that you haven’t planned. “You have to be in the right place at the right time with the right attitude,” says Smith. “Keep an eye out because there are always stories to be told. Whether you’re in the heart of New York City or the middle of nowhere in Utah, there are always things happening that, if you’re attentive to them, you can use to tell an incredible story.”
Smith recommends keeping a camera with you at all times, even if it’s just a Polaroid or the camera on your smartphone, and using it to develop your creative eye. “Whether you’re at an iconic location or you’re just walking around your neighborhood, look for compositions and good lighting. Those off-the-hip, spur-of-the-moment photographs often tell a more incredible narrative than the super-planned shots do,” he says.
6. Accept uncertainty.
Travel is all about unpredictability. You might stumble upon a once-in-a-lifetime shot, or you might get fogged in and rained on. Try to roll with the punches when you encounter frustrating weather, find a road closed, or miss a train.
It helps to have backup plans and even backup plans for your backup plans. That way, you’re never at a complete loss for what to do if things go wrong. “Be realistic with your expectations and with things that you can’t control; it’s just a lot easier to be flexible and try to find a different plan,” Nguyen says.

7. Focus on telling stories.
Every travel photograph has a story to tell about a time and place. “Being able to bring people along for your journey through your images is the most important part of travel photography for me,” says Smith. “You want to be able to not just show the location but breathe life into it and find those authentic moments.”
Don’t be afraid to tread the beaten path. Even if you travel to places that have been photographed by hundreds or thousands of people, your photos and your stories will be unique. “You can have ten different photographers go to the same location, but you’ll come back with ten completely different images, ten different edits, and ten different stories, because everyone sees the locations differently,” says Nguyen.

8. International travel photography tips.
International travel involves a lot of planning because you want to make the most of your time. But it’s also important to accept that you can’t plan every moment. “Part of the experience that’s so fun and rewarding is how spontaneous it can be,” says Nguyen. “You never know where you’ll run into things you just can’t plan out or predict, so you just have to just go with the flow and work with what you find around you.”
Approach local people and their customs with an open mind and heart, and try to participate in their culture instead of just observing it from outside. “The people make the big difference. They have their own stories to tell, and you can learn a lot from them,” says Nguyen.
Remember to always be respectful. If you want to take a photo of someone, talk to them. Get to know them a bit, and then ask for permission. “A majority of the time, they’re more than happy for you to take their photo and maybe talk, too,” Nguyen says. “People think it’s fun because it’s not something that happens every day.”
Edit, organize, store, and share photos from anywhere.
Adobe Photoshop Lightroom
View product details
9. Family travel photography tips.
You can apply all the tips above to the family photos you take on your travels. Just remember to be patient, do your best to cultivate patience in your family members, and be sure to pack a tripod and remote so you can capture the whole group at once.
If you have specific staged shots in mind, communicate your ideas ahead of time. It might help to share some inspirational photos from Pinterest or Instagram to get buy-in from every member of the family. If you have young children (or teenagers) be prepared to bribe them to cooperate.
Otherwise, focus on taking candid shots of your family members. Like people, candid photography can be unpredictable. You have to read the room, adapt, and give up control, but you might perfectly capture the experience of family travel with a mix of shots that cover everything from excitement to exhaustion, unfettered joy to unequivocal irritation.
10. Practice.
The best way to get better at travel photography is to keep going places and taking photos. “Put in the time and effort, show up and shoot as much as you can,” Nguyen says. Keep building your portfolio, and when you’re ready to look for work in the photography business, be selective about the photos you share. Be sure that you know why you’re including each photo and what skills you want to showcase with it.

11. Make the right moves in post-processing.
With Adobe Photoshop Lightroom photo editing software, you can take your photos from good to great. If a photo just needs a nudge toward the rule of thirds , or your horizon needs leveling, you can easily make those changes in Lightroom. You can also apply presets for fast fixes to urban photos and nature photos or follow step-by-step tutorials to learn how to do everything from image sharpening to removing unwanted objects.
Wherever you go with your camera, remember to embrace the adventure and the uncertainty that goes along with it. Be patient with yourself and your surroundings. With every photo you take, you’re practicing your photography skills and adding to your story.
Turn travel photography into a career.
To turn your passion for travel photos into a career, start by taking a lot of photos and collecting your best work. If you’re committed and willing to think outside the box, you can start your own photography business .
- Pay attention to costs. You may already have camera gear and a computer, but you’ll also have to spend money on photo editing software and travel.
- Create a portfolio. Clients have to see your work before booking, so create a portfolio specific to your audience and your niche.
- Market yourself. One key part of turning your photography into a business is paying attention to marketing and branding . Establish an aesthetic and a point of view, so potential clients can have a sense of what they’re getting when they work with you.
- Think unconventionally. Many tropical paradises are oversaturated with people who want to travel and take photos of picturesque landscapes. A great place to start is by contacting bed and breakfasts, smaller hotels, and other businesses trying to attract visitors. Link them to your portfolio and see if they’re interested in providing lodging or a small per diem to photograph their resort.
- Treat every trip as an opportunity. If you’re interested in travel photography, you've likely already been bitten by the travel bug. Whenever you take a trip, take some time to build your portfolio. Professional photography can be a nomadic lifestyle with inconsistent income, so embrace a mindset of working wherever you are and being open to new opportunities.
Finally, remember that careers are not made overnight, and every small step you take as a travel photographer is moving you closer to the goal of adopting it as your career. Good luck, and happy trails.
Contributors
Tiffany Nguyen , Forrest Smith
Share this article
Do more with Adobe Photoshop Lightroom.
You may also like
Language Navigation
- WORK WITH US
Photo Presets
The Mandagies

12 Incredible Photo Editing Apps For Busy Travel Photographers
Post Summary: photo editing apps for travelers + tips to edit quickly on the go!
Let’s face it, there’s a high chance you’ve taken pictures on your latest vacation.
And we totally get it – those sandy beaches, tall mountains, or bustling cities are too good not to share. Berty and I have even made a full-time job out of sharing beautiful travel photos!
Normally for us, editing photos require a computer, multiple hard drives, essential photography accessories , and fast wifi. However, we’ve done our fair share of testing mobile editing apps so that we can be more efficient on the road.
Berty and I have experimented with so many and we’ve FINALLY found our favorites!
If you’ve stumbled upon this post for easy travel photography solutions, you’re in the right place.
In this post, we’re sharing the 12 best photo editing apps for travel photography , and additional tips on how you can stay organized and share on the go.

This is our master list of the top photo editing apps, scheduling, and sharing tools for travel photographers.
This post covers everything from editing photos on your mobile phone to sharing them on social media, and finally, scheduling them out for those times that wifi is unreliable.
As new photography apps come, we will try to update this post with the latest and greatest!
To the best of our knowledge, all these apps listed below are available on both iOS and Android smartphones. We’ll make sure to note if that’s not the case!

1. Instasize
( download instasize here. ).
Price: Free Trial // $4.99 monthly for Premium (to unlock all the tools)
Instasize is an all-in-one photo and video editing app for creative photographers. Basic stories are out – take your creativity to the next level and make one-of-a-kind stories and static images to showcase your unique style!
With over 130 filters for photo and video, it’s one of the most comprehensive photo editing apps on the market. Resize your images, add borders (they are the OG for the Instagram white border trend!), make custom layouts, and even retouch your photos in one powerful tool.
We feel like they are constantly coming out with new features! Our next goal is to use their video editing tools to make engaging Reels for upcoming Instagram stories.
If you’re looking for one app to use for both image editing AND short form video , Instasize is definitely for you.
- Pros: Really intuitive design, easy to use. A huge platform of features, for both photo and video editing.
- Cons: Limited use in the free version. You need to get Premium to make the most of this tool!
2. Adobe Lightroom CC (Best app for professional photographers)

( Download Adobe Lightroom CC Mobile Here. )
Price: Free (To access Adobe Creative cloud storage , you pay a subscription)
Adobe Lightroom CC is one of the most powerful mobile editing tools out there for professional photographers .
With the ease of use from desktop to mobile versions, you can download your own presets on both devices and get the same editing results wherever you go.
Along with custom preset creation, Adobe Lightroom CC has several advanced photo editing tools like tweaking tone curves, gradient, and effects to make a photo exactly how you want.
Become an experienced photo editor right from your phone!
Note: We don’t generally use Adobe Photoshop in our current work, but there are mobile versions available. Click this link to see the whole Adobe Photoshop series.
- Pros: Professional photography editing capabilities, easily transfer work from desktop to mobile (with subscription).
- Cons: Can be difficult to make precise changes on mobile, a steep learning curve if you are new to Adobe, subscription use only.

( Download VSCO Here. )
Price: FREE (with in-app purchases)
VSCO is loved by everyone from amateurs to photographers to designers!
VSCO’s incredibly on-trend filters and presets will have your photos insta-worthy in a matter of seconds. This photo editing app also has the option to purchase limited edition filters, so you can use one for each of your travel destinations.
VSCO also has a highly involved community that supports artists and their work! You can submit your own creations to their journal and have your own curated feed as another social platform to share your photographs.
We find that this is a great app to discover new artists and photographers.
- Pros: User-friendly, simple interface, able to copy and paste presets for multiple images.
- Cons: Limited use until purchasing more filters.
4. Snapseed

( Download Snapseed Here. ) (Only available for iOS)
Price: FREE
One of the best free photo editing apps for its wide array of capabilities. It has sophisticated photo editing and social media sharing all in one app!
Snapseed (owned by Google) has an easy-to-use interface with quick and simple image adjustment tools like crop, saturation, and sharpness. You also have the ability to tweak more advanced details like colors, hiding blemishes, double exposure and more.
Snapseed provides everything from ready-made filters to tweaking every detail possible. So whether you’re a beginning photographer or a professional, try this free photo editing app!
- Pros: Huge array of photo editing features and filters. Ability to save your editing preferences (like presets) so your feed and aesthetic looks consistent. The app is completely free.
- Cons: So simple it’s confusing sometimes. It can a while to test all the features to see what exactly they do. You can only upload and edit one photo at a time.
5. TouchRetouch (Best Photo Correction App)

( Download TouchRetouch here. )
Price: $1.99 In Apple Store
Say you’ve taken a photo, loved it, but later realized there’s an irritating telephone wire across your serene mountainscape. Do you bag the whole picture? No!
TouchRetouch makes it easy to remove objects from a photo by using your finger to erase those blemishes out.
We use this tool for quick fixes and last minute observations in already-edited photos. We commonly use TouchRetouch to edit out logos, and things like garbage cans or signs.
The app makes it easy to erase and allows you to zoom in and use a “magnifying” tool for incredibly accurate precision.
You can also get creative with this app and come up with quirky and fun ideas like floating people or oceans in a jar!
- Pros: Tutorials provided in-app, intuitive user experiences, quick fixes for obvious photo eyesores.
- Cons: Takes some practice for precision, not free (but worth the price).
6. CannonConnect

( Download CannonConnect Here. )
If you own a Canon camera with wifi capabilities, which is basically everything newer than a Canon 5D Mark III (even the new entry-level Rebel T6 has it!), you have the ability to transfer raw photos directly from your camera’s memory card to the camera roll on your phone .
Berty and I use this app very heavily while traveling . We love to pull photos from the memory card to edit and share with our Instagram followers in as close to real-time as possible.
CannonConnect also acts as a live viewer if your camera is on a tripod. You can snap the shutter from your phone, or even use it to capture the perfect selfies!
- Pros: Immediate access to photos, the ability to transfer files without an intermediary device.
- Cons: Photos can quickly take up memory on phone because of huge raw file image sizes, only for Canon users.
The Best Photo Scheduling Apps

( Download Later here. )
Price: FREE for 30 day periods, monthly plan for extended use.
Later is not a photo editing tool, but rather a photo scheduling app. Once you’ve edited your photo to perfection, what’s the use if you don’t share it? 😉
This app allows you to manage your time for minimal planning and more time for other productive activities.
There are options to auto-post to Instagram, reminder notifications to post, and tools to draft up several pieces of Instagram content all in one app!
More Features: Later has a super helpful blog with productivity and marketing tips. They also have a desktop version that provides more features. On a computer, you can now easily reply to comments!
- Pros: convenient auto-posting feature, downloading unlimited quantities of photos, has a desktop version available.
- Cons: Difficult to see feed preview before it goes live,

( Download Planoly here. )
Price: FREE for 30 uploads per month, monthly plans after that for extended use.
Why another scheduling tool?
For starters, the free plans for Later and Planoly only allow one account – after that, you’ll have to pay for it.
Therefore, we use one tool for each account @themandagies and @emilymandagie to save a few bucks and keep it free. Marketing hack!
We really like to use Planoly because we are able to see our Instagram feed before it goes live.
We can upload photos we want to publish, then drag and rearrange them in different combinations until we like the way they all look together.
If you’re into feed aesthetics and making things look cohesive, you’ll definitely benefit from this photo editing app.
- Pros: Easily arrange your Instagram feed before it goes live, auto-posting, in-app stats for top performing photos.
- Cons: No ability to tag photos before they go live, limited use of the app without paying for the subscription.

( Download Buffer App Here )
Price: FREE for the first 3 channels. (Subscription to add more)
Not all content does well across all social channels. This is why we like to use a split-scheduling tool called Buffer.
Buffer is a one-stop shop for photographers who want to share their images across multiple social channels without having to open 5+ apps on their phone.
For each channel, you can customize what content goes out and when. Example: We like to share a mini-photo album on Facebook , maybe two on Twitter with some hashtags, and one on Instagram .
With Buffer, you can easily personalize your captions and content for each social profile.
- Pros: One app does all the scheduling, easily view what goes live and when, customizable for each account.
- Cons: Limited to three channels unless upgrading to the paid version.
Best Photo Design Apps Smartphones
10. canva (best user-friendly graphic designer app).

( Download Canva Here. )
Price: Free. (Option to subscribe monthly for more tools)
Canva is our #1 tool for creating images with a text overlay.
We especially use this for the pins we share on Pinterest. Canva just had a huge upgrade, so there are tons more free fonts, images, and graphics to use in your designs.
Note: There is a paid version, but I wouldn’t bother with it unless you will be constantly using it for graphic design. You essentially just pay for shortcuts, the ability to download fonts and resizing images quickly.
In our opinion, the subscription isn’t worth the simple tools it provides if you are just using the app occasionally.
- Pros: Ease of use between the mobile app and desktop, ability resize images for any social platform.
- Cons: Mobile version is a little more difficult to navigate, requires wifi.
11. Unfold (Best Instagram Story Sharing App)

( Download Unfold Here. )
Price: FREE with in app features for purchase.
Unfold is a story creation & design tool , mostly used for Instagram stories but the app can also be used for Snapchat too.
Unfold has tons of creative effects to make your stories ultra-cool, engaging and stylish.
Some new filters and updates include polaroid frames, ripped paper layers, and computer crop frames. They occasionally have limited editing frames for unique story designs.
With this app, you can create one-of-a-kind social stories and share everything from video, collages, and professional photography galleries.
There are endless creative ways to use this app!
- Pros: Easy to use, extremely customizable, makes Instagram stories look professionally created.
- Cons: Basic templates until payment for more, clips shorter than 15 seconds repeat over.
12: *Bonus: Instagram (Best Social Media Photography App)

It’s no surprise that Instagram is the largest photo sharing app out there.
With over 1 billion users on Instagram , you have the opportunity to share your work with the world.
Not only is this a great tool to connect with other like-minded photographers, with the help of Instagram and these photo editing apps, you can also share your best pictures online!
For more photo editing inspiration, follow us at @themandagies to see how we edit, share, and schedule our photographs!
FINAL THOUGHTS
Modern technology has made it easy for the average smartphone user to become a travel photographer.
Smartphones can sometimes be as good as their camera counterparts, and the average consumer now has access to creating beautiful photography in the palm of their hand .
We hope this post can inspire you to take what you have and simply start creating! One of the hardest parts of growing as a creative photographer is just beginning.
We encourage you to take these simple mobile tools and use these as stepping stones in your journey.
Do I need all of these photography apps to be a good photographer?
Absolutely not! Many of these apps have similar features and capabilities, so try experimenting and see which photo editing apps work best for you!
What are some of your favorite photo editing apps? Let us know in the comments below!
More travel & photo tips.
8 Easy Tips To Capture Amazing Travel Photos
10 Road Trip Tools and Planners For Your Next Trip
12 Crucial Tasks Photographers Should Do During Slow Season
Our Complete List Of Travel Photography Gear
How To Shoot A Doors Off Helicopter Flight In NYC
20+ Of The Best Instagram Spots In NYC
The Photography Guide To Cuyahoga Valley National Park, Ohio

9 Best Apps for Travel Photography (in 2023)
A Post By: Kevin Landwer-Johan

Your smartphone is one of the best travel photography accessories you own. When equipped with the right apps, your phone can save you time, put you in the right place for amazing images, and enhance the photos you’ve already taken.
But which apps are best for travel photography ? How do you pick the apps that are right for you?
Fortunately, whether you have an iOS or Android phone, there are plenty of apps perfect for travel shooting. Below, we share a roundup of our favorites – all of which are guaranteed to make your trip, and the photos you take, better than ever.
The best travel photography location apps
When you first arrive in a new location, it can be challenging to find your way around the area. That’s where location apps will come in handy, such as:
1. Maps.ME (for iOS and Android )
Maps.ME is a great mapping app that you can use without an internet connection. Once you have Maps.ME installed on your phone, you can download maps for pretty much any location.
These maps will provide you with turn-by-turn directions for each destination – and the app relies on open-source software, so it’s always up to date.
The app will direct you to your hotel or any other specific address, and it can also help you find points of interest, trekking trails, etc.
Maps.ME is free for both Android and iOS devices.

2. Citymapper (for iOS and Android )
Most of us don’t have endless time at each location; the faster and more efficiently we can arrive at each location, the more time we have to be out and about. Citymapper is a clever little app that helps you make the most of your travel time.
With the Citymapper app installed on your phone, you can find the nearest bus stops and train stations. You can even book tickets and compare travel time and prices across different transport modes. And if you prefer to walk, scooter, or ride a bike, the app can help you with that, too.
Bottom line: Citymapper is a terrific app for navigating around larger cities pretty much anywhere in the world – and it’s free for both Android and iOS devices.

3. Spot (for iOS )
Casual photographers are often satisfied with snapshots of the most touristy places – but more serious photographers want to discover interesting locations that are off the beaten path. They know that these less-popular locations will offer the opportunity to capture unique photos that don’t appear on every other Instagram feed.
So how do you find these hidden gems? You can use apps like Facebook and Instagram to search through location-tagged photos. But in my experience, there are better ways to locate top-notch areas. For instance, you can use the Spot app!
This free app is like a social media platform that shows you the locations photographers love; in fact, the developers boast that their app will help you find “the best places in the world.” Users are able to upload photos and share the cool places they visit. The app also pulls data on locations based on discussions elsewhere on the web.
You’ll even get recommendations for nearby places to eat or grab a coffee. And the app offers a strong social aspect; you can follow other users, see places they’ve visited, and build your own lists to share. In other words, Spot is more versatile and diverse than just a location tracker.
Spot is only available for iOS devices.

The best apps for travel photography editing
Sharing photos on social media is all part of today’s travel culture. Naturally, these photos must look stellar, so editing must be done on the fly.
Any rundown of the best apps for travel photography should include a selection of post-processing apps . Here are our picks:
1. VSCO (for iOS and Android )
Learning to use new editing apps, especially those that are very comprehensive, can be tricky. But not VSCO; you’ll notice how easy the app is to navigate as soon as you fire it up.
There are plenty of quick and easy presets for enhancing the colors and contrast in your pictures. And once you’ve applied a preset, you can tweak it to match each photo you work on. You can also save your adjusted presets for later use.
There’s a free version of VSCO, but if you want more control over your images, consider grabbing the paid version, which offers extra tools and filters.

2. Snapseed (for iOS and Android )
Snapseed is the go-to photo-editing app for many professional and amateur photographers. It’s quick and easy to use, it offers a great selection of filters and presets, and you can create pretty much any edit you imagine.
The app offers tons of options for manual adjustments. The tools let you manage curves, apply vignettes, do selective edits, and so much more. You have a great deal of control over how your images look, and Snapseed even includes a feature that allows you to batch edit photos for a faster workflow.
Snapseed is free for both Android and iOS devices.

3. Lightroom Mobile (for iOS and Android )
If you already have an Adobe subscription, then this editing app is a must-have. If you don’t own an Adobe subscription, you can still use the app, but the functionality is (slightly) limited.
Lightroom Mobile is easy to use for both beginners and experienced photographers. It provides tons of tools and features that give you plenty of control over your wonderful travel photos.
Within the app, you have dozens of adjustment options; you can clone unwanted elements, correct exposure issues, enhance contrast, and reduce noise. And the split toning, masking, and sharpening options make Lightroom Mobile one of the more advanced photo-editing apps available.
LR Mobile is free for both Android and iOS phones with limited functionality. But you can unlock the app’s full functionality with an Adobe Photography subscription .

A few more handy travel photo apps
These three additional apps are bound to make your travel photography experience more enjoyable:
1. PhotoPills (for iOS and Android )
PhotoPills is like a toolbox for photographers. Take a peek inside, and you’ll be amazed at the array of features to help you make better travel photos.
The app can help you calculate exposures , explore and manage the locations you want to visit, produce time-lapses, and much more. It’s basically an all-around photography assistant you can carry in your pocket.
Do you need to know what time sunset is? Do you need to determine the phase of the moon? PhotoPills maps all of this out for you based on the date and location. It will help you plan your photos and execute them, too.
PhotoPills is a paid app available for both Android and iOS devices.

2. WeatherBug (for iOS and Android )
WeatherBug isn’t strictly a photography app, but it’s one that photographers love – and it can certainly help you capture better photos while traveling.
WeatherBug helps you take the guesswork out of weather prediction. There’s nothing worse than heading to a sunrise location you’ve been wanting to capture for months only to find the sky obscured by clouds. Thanks to this app, you’ll know how the weather will pan out, so you can plan your shoots for the most suitable times.
WeatherBug will give you a forecast for up to ten days in advance. And it’s customizable, so you can tweak it to best suit your needs.
WeatherBug is free for both Android and iOS devices.

3. Phonto (for iOS and Android )
Phonto is a fun little app that lets you add text to your photos. It’s simple to use, and it’s a great way to enhance your travel shots with some fun text! There are tons of different fonts available, and you have the option to rotate, resize, and generally manage the text to get the effect you want.
In my opinion, adding text to your travel photos with Phonto will make them stand out on social media. Plus, it can let people know how much fun you’re having!
Phonto is free for both Android and iOS devices.

The best travel photography apps: final words

Hopefully, you found this list helpful – and you’re ready to download one (or more!) of our favorite travel photography apps.
The apps we’ve shared will ensure you find the right locations, plan your photoshoots, edit on the fly, and more.
So enjoy your travels! And capture some amazing photos.
Which apps do you plan to get? Share your thoughts in the comments below!

Read more from our Tips & Tutorials category

Kevin Landwer-Johan is a photographer, photography teacher, and author with over 30 years of experience that he loves to share with others.
Check out his website and his Buy Me a Coffee page .
- Guaranteed for 2 full months
- Pay by PayPal or Credit Card
- Instant Digital Download

- All our best articles for the week
- Fun photographic challenges
- Special offers and discounts
TRAVEL GUIDES
Popular cities, explore by region, featured guide.

Japan Travel Guide
Destinations.

A Creative’s Guide to Thailand
Creative resources, photography, videography, art & design.

7 Tips to Spice up Your Photography Using Geometry
GET INVOLVED
EXPERIENCES

#PPImagineAZ Enter to Win a trip to Arizona!
The journal, get inspired, sustainability.

How to Be a More Responsible Traveler in 2021
Resources - creative , travel stories, travel photo editing for beginners: a guide.

- Published August 27, 2020
There’s no one right way to edit your travel pictures. Some methods are quite easy, simple, and fast, and some can even be done right on your phone. But, if you shoot with a camera, editing on a computer can be more precise, and the possibilities are endless. All photographers have different opinions on the best ways to edit photos, but here are my personal recommendations on how to approach photo editing for beginners.
Editing on a phone
Whether you choose to photograph portraits, landscapes, or minimalist subjects, it’s incredible what you can do with a few apps. Nowadays, the quality of an iPhone or Android photo is fantastic, so it’s easy to edit a photo without losing details or quality. Even though I only post shots that have been edited on my MacBook, from time to time I do edit quickly on my phone for Instagram Stories.
When editing on my phone, there are two apps I use before any other. Snapseed is a must-have for iPhonography and precise editing. Whether you want to make your shot brighter or recover more details by playing with the highlights and shadows, Snapseed has many features that allow you to edit efficiently. It’s possible to crop, change the temperature and white balance, and even edit a specific spot on the picture.

I suggest not playing with the HDR feature, as this can make the picture look unrealistic. Make sure not to add too much saturation, and instead, add some “ambiance” to your shot. If you want your picture to have a certain “faded” look, tone down the contrast. On the other hand, if you prefer to give your photo a more detailed, sharp quality, add some contrast or clarity using another app called VSCO.
VSCO is, without a doubt, my favorite editing app. It’s a bit less precise than Snapseed when it comes to changing specific details, but this app has incredible filters that give a light, professional, and artistic look to your pictures. It’s a favorite among all of the Instagrammers I know. Certain filters (called “Presets” in the app) give a vintage look to your photos, while others accentuate the details. You can browse through the different packages of filters and choose those that are a better fit for your style.

There are no surefire tips or tricks, as we all have different preferences for retouching our photos. Some of us like the colors to stand out, while others prefer when the image has a cinematic or dramatic edge. What I can suggest is to choose a filter you really love and tweak it according to what you think will make the image look as good as possible. If your image is a bit too dark, don’t hesitate to add some exposure and play with the clarity so the details don’t disappear.

Editing on a Computer
First thing’s first, if you shoot with a camera and want to have the ability to change important details after the fact, it is vital to set the quality of your photos as RAW, not JPEG. That setting should be under an “image quality” category in your camera’s menu. Now that that’s taken care of, we can look at editing options.

In my opinion, the best photo editing software is Adobe Lightroom . I’ve been using Adobe Lightroom for years and I still discover new features all the time. Lightroom allows you to make any changes you want to a photo. Whether you want to intensify one color or change it completely, it’s extremely easy as you just have to “play” with the hue, saturation, or luminance.
Though this is a professional software for editing photographs, beginning photo editors won’t have any difficulty understanding it. I personally use VSCO film presets and tweak them to make them my own. What’s great about Lightroom is you can even change minor details in a photo thanks to the radial and gradual filters that allow you to, for example, change the sky. If you use a gradual filter and apply it to the sky, you can make it more colorful or change the colors.

The Lens Correction functions are also fantastic, as you can select the lens profile of your camera and transform the photo if you believe it’s not symmetrical. Lightroom allows you to keep the quality of your photo at its best, unlike some mobile apps that diminish it, which is why I always use computer software for the best, most-professional looking edit.

Now that you have all the tools to edit your travel photos, get out there and start shooting!
Trending Stories
The pursuit of self on south africa’s spectacular otter trail, two hours from: reykjavic, from the arabian sea to your plate: seafood in varkala , explore by region, explore by map.

SIGN UP TO OUR NEWSLETTER
Get your weekly dose of armchair travelling, straight to your inbox.
© Passion Passport 2024
with Laurence Norah
- $ 0.00 USD 0 items
MASTER THE ART OF TRAVEL PHOTOGRAPHY

Have you ever wanted to take better photos, but weren’t sure where to begin?
Maybe you want to learn how to use your camera properly and get out of Auto mode. Maybe you want to learn how to properly edit your photos. Maybe you have a vision of the kind of photos you want to take, but just aren’t sure how to go about doing it.
The good news is that taking amazing photos is not some special skill that you are born with, but it is a skill that you can learn and improve over time. I would love to teach you what you need to know in order to take great photos.
When you learn the key concepts of photography outlined in my travel photography course, you will be able take the photos you’ve always dreamed of taking.
This online course will teach you everything you need to know about photography – regardless of your experience level or device – so you can take the pictures you’ve always wanted! It takes a step-by-step approach to helping you improve your photography and is packed with examples, images and videos, making what can seem like a complex subject easy to understand.
The skills you will learn apply not only to travel photography, but to all kinds of photography. The fundamentals are all the same, and I give you tips on how to take photos in just about any setting or situation.
You won’t be doing it alone. You will be able to get direct access to me so you can ask questions and get feedback on homework assignments as often as you need. There are also webinars, interviews with other professional photographers, and access to an exclusive Facebook group. In the group, you can ask questions, get feedback, and participate in regular fun photography challenges.
All in all, I think this online travel photography course offers a fantastic package at a truly excellent price. I hope you agree!
Read on to find out more about what the course covers, and if you have any questions do get in touch.
Come join over 2,000 other students and take the first step today in improving your photography!
TRAVEL PHOTOGRAPHY COURSE INFORMATION
Over 10 weeks you’ll learn how to:
- Master your camera so you know how to get the most out of it. This includes the fundamentals of how your camera works and all the settings you can control.
- Master composition, use of light, exposure, and other photography principles so you can take beautiful photos.
- Get great photos in all types of situations and settings, from portraits and landscapes to wildlife and evening scenes.
- Choose the best camera gear for any budget so you avoid buying expensive stuff you don’t need.
- Take excellent photos with your smartphone – and find the best apps to use to edit those pictures!
- Edit photos with video tutorials of photo editing software and comprehensive editing guides using industry standard photo editing software on both computers and mobile phones.
- Master the secrets of HDR photography, time lapse photography, astrophotography, and other advanced techniques!
- Sell your photos and make money doing what you love!
- Learn skills you can apply to all kinds of photography, not just travel photography

How Your Camera Works

Photography Gear

Composition

Mobile Photography

Advanced Techniques

Making Money
Improve your photography today.
With professional travel photographer Laurence Norah

$ 129.00 USD
Lifetime access !

My name is Laurence Norah, and I’m a full-time professional travel photographer and travel blogger. I run the travel blogs Finding the Universe & Independent Travel Cats with my wife Jessica.
I’ve been a passionate photographer since I was 13 years old. I’ve been taking photos for over thirty years, and in my career my photos have appeared in many magazines and news sites, including in USA Today , The Times , BuzzFeed , The Evening Standard , National Geographic , and the BBC. My photography has also won a number of awards, including from the Society of American Travel Writers and The Times newspaper.
I’ve taught photography at workshops, led photography walks, and spoken at conferences around the world, from Dublin to Dubai. Events I have been invited to speak and give workshops at include TravelCon, The UK Photography Show, TBEX, and Arabian Travel Market.
I love to share my passion for photography with others, and teaching photography is the best way I have found to do that. Since I launched this course in 2016, I’ve helped over 2,000 people start taking better photos. You can read some of the testimonials here from my students, sharing their experiences of how the course helped them master their cameras. That page also has some of the students’ images so you can see what they’ve been taking photos of!
Want to know more about me? You can find out more on the About Me page .
TRAVEL PHOTOGRAPHY COURSE SYLLABUS
Week 1: an introduction to photography.
- How Your Camera Works: Nuts and Bolts
- Exposure Concepts and Understanding the Exposure Triangle
- How to Control the Exposure
- Glossary of Terms
Week 2: Camera Gear and Accessories
- Understanding When to Upgrade your Camera Equipment
- Learning What to Look for in a Camera
- Tips for Choosing a Camera
- Tips for Choosing Lenses
- Tips for Choosing Accessories
- Tips for Traveling with your Gear and Insuring it
Week 3: Composition and Light
- Rules of Composition
- Depth of Field and Compression
- Understanding the Light
- Metering: Measuring the Light
- Getting the Light Color Right: White Balance
- Focusing the Light
- Shooting in RAW
Week 4: Shooting Specific Scenes
- Portrait Photography, Action / Sports Photography, Street Photography, and Wildlife Photography
- Shooting Landscape Photos and Nature Scenes
- Taking Photos Indoor and in Low Light, such as in Museums and at Events
- Macro Photography, Food Photography and Product Photography
- BONUS: Downloadable 50 Page PDF Cheat Sheet with Camera Settings for Different Scenes
Week 5: Managing and Editing Your Work
- Organizing Your Photos
- Getting Your Photos into Lightroom
- Setting Up Your Workflow
- Editing Your Photos in Lightroom
- Using Presets in Lightroom
- Exporting Your Photos and Optimizing Them for the Web
- Backing Up Your Photos
Week 6: Mobile Photography, Compact Cameras & Drones
- Compact Camera (Point-and-Shoot) Tips and Advice
- Action Camera Photography
- Drone Photography
- Mobile Phone Photography Guide and Tips
- Basic Mobile Editing
- Advanced Mobile Editing and Backup
Week 7: Advanced Photography, Part I
- Flash Photography
- HDR Photography
Week 8: Advanced Photography, Part II
- Astrophotography
- Northern Lights Photography
- How to Photograph the Moon
- Night Photography
Week 9: Advanced Photography, Part III
- Long-exposure Photography
- Time-lapse Photography
Week 10: The Business of Photography
- Developing a Website
- Promoting Your Photos on Social Media
- More Ways to Promote Your Work
- Ways to Make Money with Your Photos
- How Much to Charge for Your Work
WHAT MY STUDENTS ARE SAYING

SUPPORT YOU’LL RECEIVE
Here’s what you’re going to get as part of this photography course:
- Access to over 60 lessons of photography learning material across 10 weeks
- Exclusive membership of a private Facebook community so that you can chat and get advice from other students and participate in fun challenges.
- Homework assignments at the end of each module.
- Direct access to me by email so you can ask me any questions you have and get feedback on assignments.
- Access to webinars and expert interviews.
- Option to take part in biweekly photo challenges.
- Lifetime updates so you always have the latest info.
- A 50 page photography cheat sheet so you can take key aspects of the course with you anywhere.

GET INTERVIEWS WITH 6 EXPERT PHOTOGRAPHERS
When you take this course, you’ll get access to exclusive interviews with some of the world’s top travel photographers.

Brendan Van Son
Travel Photographer
Brendan is a professional photographer. In this interview, he goes in-depth on making money as a photographer.

Lola Akinmade Akerstrom
Freelance Photographer
Lola’s work has appeared in over 85 publications. In this interview, she talks about how to get started as a photographer.

Daniel Nahabedian
Daniel runs workshops around the world. In this interview, he discusses how to find freelancing work.

Edin Chavez
Commercial Photographer
Edin is the editor-in-chief of Shut Your Aperture . In this interview, he discusses commercial photography.

Jaume Marin
Director of Tourism
Jaume is the director of tourism for the Costa Brava region and his interview explains what brands are looking for when hiring photographers.

Sarah Ann Loreth
Sarah Ann is a self-taught professional photographer who specializes in fine art and travel photography.

GET STARTED TODAY
With over 60 individual lessons, multiple homework assignments, and a series of videos, I believe this is the most robust travel photography course on the market. In addition, it’s available for one payment, you get lifetime access, and there are no upsells. Everything is already in the course!
I’ll answer all your questions, and be there when you need help. Get started today for just $ 129.00 USD !
One Payment of
Lifetime access.
30-Day Guarantee
SECURE CHECKOUT
Your data is safe

MONEY BACK GUARANTEE
I’m fully committed to helping you improve your photography. You can test-drive the course for 30 days, read the material, listen to the webinars and interviews, and do the homework. If you do the work and don’t feel the course is good or will improve your photography, I’ll happily refund 100% of your money.

CHARITABLE PROMISE
I love photographing beautiful places around the world, and I want to try to ensure that they stay beautiful. As such, I donate 10% of every course sale to the World Land Trust. The WLT is an international charity organization dedicated to protecting and conserving threatened habitats around the world. To date, over 100 acres of land has been protected through the WLT Buy an Acre program thanks to course sales!
FREQUENTLY ASKED QUESTIONS
How is this travel photography course structured.
This online photography course is unit based and divided into ten weeks of content, but you can take it at whatever pace you like. Each week of lessons introduces new concepts and builds upon the previous week — and you’ll always be able to access previous units and lessons, so there’s no rush. You can’t fall behind, and you can take the course at your own pace.
I don’t have a lot of time. Is this course for me?
This course is meant to be completed at your own pace. There’s no weekly time limit. Go as fast or slow as you want. Take your time on each lesson. There is no rush. You have lifetime access to all the material and any future updates.
What if I get really confused or stuck?
I’m here to be your mentor. You can email me as often you as you need to and I’ll help troubleshoot your problems. I want you to succeed, not be confused.
How often do I need to travel to make this work?
You don’t need to travel at all! You can do the whole course from the comfort of your home. Photography doesn’t require you to travel to far-off places – you can learn all the key skills in your own house, then take them with you when you do travel.
How long is each expert interview?
Each interview is between 45 minutes and one hour.
Can I buy this travel photography course as a gift?
Yes, you can! You just need to buy the course as a gift . This will allow you to purchase a copy of the course as a gift, redeemable via coupon code. The coupon can be sent directly to the person you wish to gift it to at purchase, or I can send it to you so you can pass it on when you wish.
Also, if you are looking for a gift certificate to print out or send digitally we have a range of templates for various situations (eg. Christmas, Birthday, Gap Year, Mother’s Day, etc.) that we can customize and send to you for free.
Is my payment secure?
Payments are collected via the 256-bit encryption payment providers Stripe and Paypal. This website and your payment are secure, so no one will steal your data. I know how important this is!
If I’m not interested in selling my photos or starting a business is this course still for me?
Absolutely! I give you the tools and information to start selling your photos and working as a photographer, but many students take the course simply to improve their own personal photography.
My approach to creating this course was to cover as much as possible in one place, so everything is there if you need it.
How often is this course updated?
This course is updated at least twice a year to ensure our tips and advice are up to date.
What kind of camera do I need for this course?
My course doesn’t require any specific type of camera. Whether you use a DSLR, iPhone or Android smartphone, compact camera, or mirrorless camera, you’ll get something from this course.
Most people do choose to use a mirrorless or DSLR camera, but some have done it fully with just a smartphone or compact camera. I also provide additional tips for taking photos with action cameras (e.g., GoPros) and drones for those who have either of those types of gear
Being a good photographer is not about the device you use but the skills you know!
I don’t have a camera yet, is this course for me?
Yes! I’ve had feedback from students who’ve bought the course that they’ve found it really useful even before they’ve bought their camera. It’s helped them plan their purchase, and start getting great photos straight away once they do get a camera.
If I don’t like the photography course, can I get a refund?
Yes. I’m fully committed to helping you improve your photography. You can test-drive the course for 30 days, read the material, listen to the webinars and interviews, and do the homework. If you do the work and don’t feel the course is good or will improve your photography, I’ll happily refund 100% of your money.
It says that 10% of my purchase goes to the World Land Trust. Can you tell me more about this charity?
World Land Trust is an international non-profit conservation organization. Its primary mission is to protect plants, animals, and local communities in areas at environmental risk by funding the purchase of land for local NGOs to undertake conservation. They also support projects that directly tackle climate change.
The funds raised from the course sales will specifically go to supporting the Buy an Acre program. To date (2023), over 100 acres of land has been purchased and protected in perpetuity thanks to course sales.
You can read more about the organization and its current projects here .
I have a question, who can I contact?
Feel free to just send me an e-mail and ask me any questions you have about the course. My email is [email protected] .
Lifetime access

- Student Successes
- My Learning
7 Best Travel Apps for Photographers in 2024 (Updated)

You can also select your interests for free access to our premium training:
Travel apps for photography can help you with anything from finding the best photo spots to editing while on the move. Here are a few of the best apps for travel photography options you need to download before exploring beautiful destinations on your bucket list.
7 Best Travel Apps for Photographers
We list travel apps for both iOS and Android. And there is a mix of free and paid apps.
7. Snapseed

- App Type : Photo editor
- Price : Free
- Platform : iOS and Android
This is one of the best photography apps out there because of its features. It lets you do anything from color grading to adding all sorts of effects to make your travel photos look professional. Snapseed may be from Google, but it also supports iPhones . That means you don’t have to worry about any compatibility issues. And the good news is that all the tools it offers on Android are also available on the iPhone. Like any other editing app , Snapseed has all the basic tools you need, from adjusting exposure to correcting the white balance . But what differentiates it from the rest is the plethora of effects that it features. For instance, it has dozens of presets that let you create anything from retro film effects to classic black and white images . It also has advanced editing tools such as HDR . This lets you create vivid pictures even in challenging lighting conditions. Apart from the editing tools, Snapseed also includes frames and text tools to personalize your images. Using it allows you to create scrapbook-style images by adding borders and captions .

- Price: Free but has in-app purchases
While traveling, you don’t want to spend too much time on your phone editing your images. That’s why VSCO is one of the best apps for photographers because it’s so easy to use. Unlike Snapseed, VSCO doesn’t offer a lot of tools for advanced editing. Instead, it offers a streamlined experience. It lets you add presets and tweak basic exposure settings quickly. To use VSCO, all you have to do is tap a preset you like and adjust the sliders to alter the amount of effect you like on your images. You can also use sliders to change the brightness, contrast, saturation, highlights, and other exposure parameters. VSCO’s main selling point is its ability to recreate a film look . Its presets are based on real film stocks, making the result authentic. Apart from basic adjustments, you can also add fade and grain, among other effects, to help you customize the vintage style of your photo.
5. Pro HDR X (Discontinued)

- App Type : HDR ( high dynamic range ) camera and editor
- Price : $1.99
When you’re doing travel photography, a big chunk of photos are landscapes. And Pro HDR X is what you’ll need to make your images look more vivid and alive. HDR, or High Dynamic Range, is a technical term that describes the ability of an image to faithfully display shadows and highlights. Your phone cannot accurately capture the darkest and brightest elements, especially in bad lighting conditions. That’s why you’ll need Pro HDR X to make calibrations and ensure that your final image has rich blacks and bright whites. To create vivid landscapes, Pro HDR X captures three images with different exposures. It then automatically combines those pictures into one that has all the correct shadows and highlights. Just remember to only use Pro HDR X for static shots, preferably on a tripod . If you include moving subjects in your frame, they’ll end up blurry since the app sandwiches the three photos it takes into one image.

- App Type : Photo sharing and social media
Looking for the best locations when traveling can be intimidating, even for veteran travelers. When you’re in a place you haven’t been, it’s easy to get lost and miss the beautiful gems you want to capture. Spot helps you locate picturesque destinations while traveling. Consider it a social media platform where photographers can share the local spots they discover in the areas they visit. Apart from featuring well-known destinations such as Paris , Spot showcases places that other people may not know about at all. This cool app even has maps to help you locate where the photos were shot. It’s for planning your shoots, especially if you want to include unique places in your portfolio . Spot also lets you share the places you discovered on your travels. When you upload your photos to the app, you get to add locations and even include tips to help your fellow photographers track the exact spot where you took the pictures.
3. Citymapper

- App Type : GPS
When you’re doing travel photography, your ability to navigate places is just as crucial as your ability to take pictures. Knowing how to get there in the quickest way possible allows you to cover more areas. You can always use Google Maps to help you figure out where to go. But it doesn’t have all the information you need to get there. Citymapper shows you everything from routes to various transportation options to reach your destination. One of the biggest features of Citymapper is that it shows you the nearest train and bus stations. And it guides you on how to get there. It even shows the arrival and departure times, so you don’t miss your bus or train. Citymapper is available in major cities from Asia to Europe . The only catch is that it won’t be much use if you happen to be in lesser-known destinations. But if you happen to find yourself shooting around New York or Paris , this app is definitely for you.
2. PhotoPills

- App Type : Sun and moon tracker, photography assistant, and calculator
- Price : $10.99
Think of PhotoPills as your photography instructor and assistant. It has all the tools you may need, from taking photos of the stars to calculating your depth of field . One of its main features is the sun/moon/ star tracker . It helps you figure out where the sun or the moon will be at your location at any time of the day. If you want to know where the moon will rise and set, you have to get your phone out. What’s great about PhotoPills is that it uses augmented reality to show you where the sun or moon will be in a real environment. Even if you use the app in the middle of the day, you can see a digital rendition of the moon on your screen like it’s there. PhotoPills is also perfect for tracking the Milky Way . You can use it to figure out its location so that when the night comes, you can go to the exact spot where you expect it to appear. Apart from the tracker, it also has calculators for DOF, FOV, Hyperfocal Table, Long Exposures , Time Lapse and Star Trails . So if you don’t like fumbling around to get your settings correct, you’ll find this app useful.
1. Weatherbug

Weatherbug isn’t exactly photography-related. But you’ll find yourself using it a lot, especially in places with unpredictable weather. One of the best reasons to use it is that it’s free. And it offers a forecast for up to ten days. That means it’s perfect for helping plan your itinerary for more than a week in advance. Another advantage of using Weatherbug is that it has 18 weather maps. They include wind, temperature, and lighting models, among others. And it even has a Doppler radar that shows real-time snapshots of what’s going on without resorting to news updates. But what truly makes Weatherbug indispensable to photographers is that it features weather widgets that you can customize according to your needs. For instance, you can activate traffic updates in your area if you’re in a busy tourist spot. You can even keep track of pollen count and air quality if you are allergic or have a health condition.
When doing travel photography, you must have all the tools to capture the places you visit. And having good photography apps on your phone would allow you to do just about anything, even when you move around a lot. You should also include non-photography travel apps that you’ll find useful when navigating new places. Remember that as a travel photographer , you need to be as skilled at looking for the perfect destinations as you are with your camera. Check out our Next Stop: Travel Photography e-book to learn how to take print-worthy photos!
How To Use The Magic Editor In Google Photos: 7 Tips That Will Level Up Your Photography Game
Do you know how to use Adobe Photoshop, the world’s greatest image-editing application? It’s highly complex for beginners and requires hours of skills to make advanced levels of editing to your favourite vacation photographs. Thankfully, in a world where generative AI has solutions to most of our complex issues.
You no longer need to spend hours learning and perfecting your image editing skills. With tools like Magic Editor on Google Photos, you can make pro levels of editing on your phone while sipping your morning tea.
The Magic Editor from Google is one of humanity’s greatest gifts since the Photoshop application’s advent in 1990. Presented as one of the hero features of Google Photos, Magic Editor lets you utilise the power of generative AI to make substantial changes to images without dealing with complex tools and a full-fledged computer with advanced graphics processing capabilities.
It was introduced on the Google Pixel 8 series and was later released to everyone with a Google One subscription. In the coming weeks, Magic Editor will be available for free to use for everyone, although it will allow limited edits per month.
In many ways, it truly is magical for those who love editing their photos before posting on social media.
However, we are still witnessing the early stages of generative AI and as a result, you can only rely on them as tools. Google may promise easy fixes for all kinds of photos but we humans still need our genius and skills to get around Gen-AI’s early limitations that result in imperfections.
So, if you have decided to use Magic Editor for tweaking your summer holiday photos, we have a few useful tips on how to use the Magic Editor in Google Photos to get the best out of it.

5 Best AI Editors That Can Make Retouching Your Photos A Breeze

A Step-By-Step Guide To Plan Your Next Travel Itinerary With Google Search AI
7 simple tips to make the most of google’s ai photo editor, 1. choose the right photo.

Most of Google’s promotional images used in their marketing campaigns feature clear and well-defined subjects with simpler backgrounds. The Magic Editor is comfortable only when your photo has fewer complexities for the algorithms to understand.
Hence, we recommend you use less complex images for editing via the Magic Editor. Try sticking to photos that have clear skies, simpler backgrounds with fewer complex textures and are shot in good lighting.
2. Blur the background to hide inaccuracies
Let’s say you had to use Magic Editor on a complex photograph of your kids playing on the beach and you are desperately trying to mask the ghost effect left by the Magic Eraser behind them but your efforts go in vain. Don’t panic as we have an easy hack. Simply blur the background.
Scroll through the edit option and choose to blur the background. This way, the blurring will mask the ghostly effect without ruining the photo and the moment it celebrates.
3. Have you tried editing the sky?
Another cool feature in Magic Editor is the ability to alter the sky in your landscape photo. Let’s say your family photo has a rather dull sky that dampens the mood. You would want to do something about it, right?
Head to the Magic Editor mode and check for the suggested edits on your landscape photo. It will show several options to change the pattern of clouds, create a sunset effect or go all artsy. Once you select a category, the Gen-AI will do its part to suggest changes that gel nicely with all the other elements. Choose your favourite and hit Save to apply the changes.
4. Feel free to zoom in
This tip applies to every editing tool, regardless of whether it has AI or not. While selecting your subjects with a lasso tool, you should always move the cursor precisely over its outline. Small elements like the edges of a sunglass, a hair clip, the space between hands, the tail of your furry dog, a missing palm of the person playing with the ball and lots of similar stuff can be missed if you don’t zoom in while making the selection.
You can spot the inaccuracies before you hit that ‘Save’ button, thereby saving yourself time and effort.
5. Make use of Portrait Light in dim-lit scenes
We all love well-lit selfies and portraits, regardless of whether there’s ample ambient lighting. It is this obsession with bright selfies that helped brands like Vivo and Oppo build a multi-million dollar business in the smartphone segment. With generative AI, you can now do that on any smartphone that can run Google Photos .
The AI algorithms can identify portrait photos and selfies in Google Photos and automatically recommend using portrait lighting. Tap on it and drag the circular source of the light to adjust the angle of artificial lighting. You can also adjust the intensity of the light using the bottom slider. Note that you need to apply the portrait effect from the edit menu before you can apply the Portrait Light.
6. Use Suggested edits
An often overlooked feature is the Suggested edits in Magic Editor. When you put a busy photograph in Magic Editor mode, Google Photos uses its AI to guess the subjects that you might want to delete.
For example, it will suggest removing a couple of people and pets from the background of your portrait photo. Tap on the accompanying ‘Erase All’ button and Magic Editor will remove most of them without leaving a trace. It saves you from the hard work of manually highlighting unwanted subjects.
7. Make minor tweaks while repositioning subjects
The Magic Editor lets you reposition your subjects in the photo but you should always make believable changes. For example, if you want to reposition your kid in your family photo, you can use Magic Editor to move the child according to your will and achieve the desired output. Avoid increasing its size or changing the angle unnaturally to maintain visual discipline.
Remember that the Magic Editor still can’t apply shadows and alter other minor details on your modified subject.

How The Latest Galaxy AI Features Make Samsung’s Galaxy S24 The Coolest Premium Phone On The Market

Deepfake vs Real Videos: 7 Easy Ways To Distinguish AI Generated Fake Content
(Hero and Featured Image Credits: Courtesy Le Buzz Studio via Unsplash / Representational Image)
Amritanshu Mukherjee

Subscribe to the magazine

Most popular

7 Highest-Paying Tech Companies Around The World One Can Work For In 2024

Android Find My Device vs Apple Find My: Which Is The Better Gadget Tracking Ecosystem?

A Simple Guide To Using Your Apple Health Apps For Maximum Benefits

How To Customise Your Instagram Suggestions On Android And iOS
Subscribe to our newsletter to get the latest updates.
You’re all set
Thank you for your subscription.
The Red Square and beyond: a guide to Moscow’s neighbourhoods
Apr 23, 2019 • 6 min read

The Red Square, Kremlin and St Basil's Cathedral in Moscow at night © Mordolff / Getty Images
One of the world’s largest cities, Moscow is a true metropolis whose ancient neighbourhoods are interspersed with newly built high-rises, inhabited by people from all over the former Soviet Union.
It’s also the city of rings: the innermost is the Kremlin itself; further away are the former defensive rings, Boulevard Ring and Garden Ring; still further are the Third Ring Road and the MKAD, which delineates the city’s borders. There’s an ongoing joke that Moscow Mayor is the Lord of the Rings. Most sights are contained within the Garden Ring, although for some more authentic neighbourhoods one has to venture further out. To help you explore Moscow’s diversity, we picked our favourite ’hoods – but this list is by no means exhaustive.

The Red Square and around
It can be argued that Moscow, or even the whole of Russia, starts at the Red Square – it’s an absolute must-see for any visitor. After standing in line to check out Lenin’s granite mausoleum , go to GUM , Moscow's oldest department store. Full of luxury shops, it’s famous for the glass roof designed by one of Russia’s most celebrated architects, Vladimir Shukhov. Apart from architectural wonders, GUM has several places to eat including the Soviet-style cafeteria Stolovaya No 57 where you can sample mysterious-sounding delicacies such as the ‘herring in a fur coat’.
On the opposite side of GUM, Kremlin ’s walls and towers rise above the Red Square. Walk through the Alexander Garden and past the grotto to the Kremlin’s entrance. It’s a treasure trove for any art and history lover: ancient gold-domed churches, icons galore and the resting place of Moscow tsars.
On the other side of the Red Square is Moscow's symbol, St Basil's Cathedral with its multi-colored domes. Right behind it is the newly built Zaryadye Park , which showcases flora from all over Russia; another attraction is the floating bridge jutting out above the embankment and the Moscow river. A glass pavilion nearby hosts Voskhod , a space-themed restaurant with dishes from all 15 former Soviet Union republics. It’s a perfect spot for a classy evening meal and there’s often live music.

Patriarch’s Ponds
The Patriarch’s Ponds (aka Patriki) is a historical neighbourhood, celebrated in Mikhail Bulgakov’s novel Master and Margarita . Located right off Tverskaya street, Moscow’s main thoroughfare, Patriki recently became the city’s most happening quarter. It has some of the most elegant architecture, including several buildings by art-nouveau genius Fyodor Shekhtel. Narrow streets here have a cozy feel, with recently widened sidewalks and bike lanes. In the summer it becomes party central.
Start by checking out free exhibitions or one of the cutting-edge performances at the experimental theatre Praktika . But make no mistake, the neighbourhood’s main attraction are its bars and restaurants. Patriki’s residents are well-off Russians and expats, so it’s no wonder that Moscow’s recent culinary revolution started here. Uilliam’s , one of the pioneers of this foodie movement, still rules over the scene with its floor-to-ceiling windows. Also try AQ Chicken for everything chicken-related, Patara for a taste of Georgian cuisine, and Cutfish for some great sushi. Finish your gastronomic tour with original cocktails at Pinch or the Moscow outpost of NYC restaurant Saxon+Parole .

Around Kursky train station
For a long time, Kursky train station was surrounded by semi-abandoned factories and the area was best avoided. It all changed in the late 2000s, when a dilapidated wine factory was turned into Winzavod , a mecca for fans of contemporary art. Today these red-brick buildings are occupied by some of Moscow’s leading galleries. After taking in all the art, pop in the small wine bar Barrell for a glass from burgeoning wineries of Russia’s south or grab a bite at Khitrye Lyudi cafe.
Right next to Winzavod is Artplay , another refurbished factory full of design and furniture shops and large exhibition spaces. It’s also home to Pluton , one of the latest additions to Moscow’s dance scene. Other Pluton residents are the multimedia art gallery Proun and another lunch option, Shanhaika , with authentic Chinese cuisine.
A short walk away is Arma, where a cluster of circular gas holders has been turned into offices, restaurants and clubs including Gazgolder (it belongs to one of Russia’s most famous rappers, Basta). Apart from hip-hop concerts, Gazgolder organises regular techno parties that sometimes go non-stop from Friday to Monday.

If you’re interested in religious architecture, Taganka is the place to go. First of all, see the old Moscow at Krutitskoye Podvorye – one of those places where nothing seems to have changed in centuries. The monastery was founded in the 13th century, but in the 16th century it became the home of Moscow metropolitans and most of the surviving buildings are from that epoch. Take a tour of the grounds, and don’t miss the interior and icons of the Assumption Cathedral.
Your next stop is the Rogozhskoe settlement of ‘old believers’, a branch that split from Russian Orthodoxy in the 17th century. The settlement is dominated by an 80m-tall bell tower. The yellow-coloured Intercession Church, built in neoclassical style with baroque elements, has an important collection of icons. Next to the church grounds is the popular Trapeznaya cafeteria, with Russian food cooked using traditional recipes – a perfect spot for lunch.
A short ride away is Andronikov Monastery, which today houses the Rublyov Museum in the old monks’ quarters. There’s a great collection of ancient Orthodox icons although none by Andrei Rublyov, who was a monk here in the 15th century. The main attraction at the monastery is the small Saviour’s Cathedral, considered the oldest surviving church in Moscow.
Finish the day at the craft-beer cluster around Taganskaya metro station. Varka offers both Russian and imported labels, with the Burger Heroes stand serving arguably the best burgers in town. Craft & Draft looks more like a respectable old-fashioned pub, with decent food, 20 beers on tap and a hundred types of bottled brews.

Khamovniki is Moscow’s ancient textile district, named after the word kham (a type of cloth). Two main thoroughfares, Ostozhenka and Prechistenka, cut through the neighbourhood parallel to each other. The former turned into the so-called ‘Golden Mile’ of Moscow in the 1990s, with the highest real-estate prices and some of the best examples of new Russian architecture, while the latter is still mostly lined up with impressive 19th-century mansions.
Khamovniki is somewhat of a literary quarter, as several museums devoted to Russia’s best-known writers – among them Leo Tolstoy , Alexander Pushkin and Ivan Turgenev – popped up here during the last century. There’s also plenty to see for an art lover. The Multimedia Art Museum regularly hosts exhibitions by some of the best photographers from all over the world, as well as contemporary art. Several galleries, including RuArts and Kournikova Gallery , have also found home in Khamovniki.
When you’ve had your fill of literature and art, stop by Gorod Sad on Ostozhenka, an outpost of a local health-food chain, and order dishes such as pumpkin soup or grilled vegetables salads. Afterwards, head to Dom 12 , which is located just off Ostozhenka street. This restaurant and wine bar is frequented by the city’s intellectuals and its schedule includes lectures, book presentations and film screenings, while in the summer guests migrate to a lovely courtyard.
https://shop.lonelyplanet.com/products/moscow-city-guide-7
Explore related stories

Mar 31, 2024 • 10 min read
With savvy planning and a bit of local know-how, you'll find a wealth of ways to enjoy Paris without blowing your budget. Here are our top tips.

Feb 15, 2024 • 16 min read

Jan 25, 2024 • 9 min read

Apr 20, 2023 • 8 min read

Apr 19, 2024 • 9 min read

Apr 19, 2024 • 4 min read

Apr 20, 2024 • 5 min read

Apr 20, 2024 • 9 min read

Apr 19, 2024 • 7 min read

Russia Travel Blog | All about Russia in English
- About our blog
- RussiaTrek.org
Sidebar →
- Architecture
- Entertainment
- RussiaTrek.org News

- Send us a tip with a message
- Support RussiaTrek.org
- Travel Guide to Ukraine
- Comments RSS
← Sidebar
The trains and stations of the Moscow Metro
2 Comments · Posted by Alex Smirnov in Cities , Travel , Video
The Moscow Metro is the third most intensive subway system in the world after Tokyo and Seoul subways. The first line was opened on May 15, 1935. Since 1955, the metro has the name of V.I. Lenin.
The system consists of 12 lines with a total length of 305.7 km. Forty four stations are recognized cultural heritage. The largest passenger traffic is in rush hours from 8:00 to 9:00 and from 18:00 to 19:00.
Cellular communication is available on most of the stations of the Moscow Metro. In March 2012, a free Wi-Fi appeared in the Circle Line train. The Moscow Metro is open to passengers from 5:20 to 01:00. The average interval between trains is 2.5 minutes.
The fare is paid by using contactless tickets and contactless smart cards, the passes to the stations are controlled by automatic turnstiles. Ticket offices and ticket vending machines can be found in station vestibules.

Tags: Moscow city
You might also like:

The bridge over Zolotoy Rog Bay in Vladivostok
The views of St. Petersburg from the TV tower >>
Tomás · August 27, 2012 at 11:34 pm
The Moscow metro stations are the best That I know, cars do not.
Alberto Calvo · September 25, 2016 at 8:57 pm
Great videos! Moscow Metro is just spectacular. I actually visited Moscow myself quite recently and wrote a post about my top 7 stations, please check it out and let me know what you think! :)
http://www.arwtravels.com/blog/moscow-metro-top-7-stations-you-cant-miss
Leave a Reply
XHTML: You can use these tags: <a href="" title=""> <abbr title=""> <acronym title=""> <b> <blockquote cite=""> <cite> <code> <del datetime=""> <em> <i> <q cite=""> <s> <strike> <strong>
- February 2024
- January 2024
- December 2023
- November 2023
- October 2023
- September 2023
- August 2023
- Smart Living
The Best Sales to Shop This Week From Leesa, Away, and Dermstore
Updated on 4/19/2024 at 8:30 PM
:upscale()/2024/04/18/754/n/1922441/9768a469662152f9c1f9e8.18133359_.png "travel photography editing")
Our team knows a thing or two about finding a great deal — we are shopping editors after all. Our experts spend all of our free time testing out new product launches, interviewing brand founders, and scouring the internet for the best deals. Which is why we can tell you with full confidence that this week's sales are some of the best in recent memory.
To help simplify your weekly shopping duties, we rounded up the best deals to have on your radar this week, with ongoing promotions from some of our favorite brands. Buffy is celebrating Earth Day with a sale that features deals of up to 15 percent off sitewide. Aerie is helping shoppers revamp their wardrobes for summer with deals of up to 30 percent off on bestselling swimwear, including bikinis and one-pieces that are perfect for all body types . Dozens of tech essentials and gadgets are now marked down at Amazon, including the editor-favorite iWalk Portable Charger . And if you're looking for a little incentive to book your next getaway, Away is offering $50 off on suitcase and travel bag bundles — but only for a limited time.
Regardless of what you're in the market for, you can score it on sale this weekend — and find your new favorite product ahead. Keep reading for our full guide of the week's best sales.
:upscale()/2024/04/18/744/n/1922441/09cb31305806fda3_netimgZo49NX.png "travel photography editing")
Best Skin-Care Deal to Shop This Week
Klairs Freshly Juiced Vitamin E Mask ($19, originally $27)
Refresh your skin-care arsenal at Soko Glam. For a limited time, the beauty retailer is offering 30 percent off on select Klairs products, including this hydrating vitamin E mask. The formula works to brighten skin and reduce the appearance of wrinkles with ingredients like vitamin E and niacinamide. Just use the code KLAIRS30 at checkout.
:quality(70):extract_cover():upscale():fill(ffffff)/2024/04/18/744/n/1922441/09cb31305806fda3_netimgZo49NX.png "travel photography editing")
Best Swimwear Deal to Shop This Week
Aerie Plunge Longline Triangle Bikini ($23, originally $33) and Aerie Full Coverage Bikini Bottom ($14, originally $20)
Now's the perfect time to stock up on swimwear for summer at Aerie. The apparel brand is hosting a sitewide sale that includes 30 percent off on cheeky swimsuits like bikinis and one-pieces. We love the simplicity of this contoured black bikini which is made from a stretchy nylon material.
:quality(70):extract_cover():upscale():fill(ffffff)/2024/04/18/800/n/1922441/136dea146621629ea9aae6.28579464_Screen_Shot_.png "travel photography editing")
Best Tech Deal to Shop This Week
iWalk Small USB C Portable Charger ($27, originally $35)
Struggling to keep your phone battery charged throughout the day? This portable power bank will be a savior when you're away from home or traveling. Unlike other portable chargers, this model can be plugged directly into your phone's USB port, no extra cord necessary. The handy tech is a favorite of our editors; just read our review of the iWalk Portable Charger to see why.
Editor Quote: "I love the easy functionality of the product and the fact it's compact (and stylish!), so it doesn't feel like a nuisance to have to travel with it. I recently relied on my iWalk charger while attending back-to-back shows at NYFW, and it proved to be a lifesaver for those longer days outside of my hotel when my battery life would be drained from taking photos, notes, or just responding to emails." — Kyley Warren, assistant editor, Commerce
:quality(70):extract_cover():upscale():fill(ffffff)/2024/04/18/744/n/1922441/4698b1e35f35aa45_netimgVx4gRX.jpg "travel photography editing")
Best Summer Deal to Shop This Week
Supergoop! Unseen Sunscreen SPF 40 ($38)
There are cult-favorite beauty products, and there's Supergoop!'s viral sunscreen, which is a favorite of editors and celebrities alike. The oil-free formula goes on smooth and leaves no whitecast after application. It also acts as a primer that can be used under makeup for a more natural glow. Best of all: new customers can now save 15 percent on products sitewide at Dermstore. Read our review of the Supergoop! Unseen Sunscreen for the full product details.
Editor Quote: "The formula has a light, barely-there tint and a pearlescent shine that looks like you bathed in highlighter (but like, in a really, really good way). I smeared it on with my fingertips and found it absorbed within seconds. It feels hydrating immediately upon application thanks to hyaluronic acid and vitamin B5, but not greasy or wet like the sunscreen you grew up slathering on before pool days." — Jessica Harrington, senior editor, Beauty
:quality(70):extract_cover():upscale():fill(ffffff)/2024/04/18/744/n/1922441/570869f53e109f83_netimgujloUV.png "travel photography editing")
Best Fashion Deal to Shop This Week
Athleta Salutation Stash High Rise Tight ($80, originally $109)
Whether you're going to a Pilates class, heading out for a run, or just lounging around at home, you'll be glad to have these workout leggings in your wardrobe. The top-rated style is made from Athleta's signature Powervita fabric, which boasts a buttery soft design with plenty of stretch in the waist. Dozens of the brand's most popular leggings are now on sale for up to 60 percent off, including this colorful pair. Plus, members can enjoy free shipping on orders over $50.
:quality(70):extract_cover():upscale():fill(ffffff)/2024/04/18/802/n/1922441/47a78c1666216353a83f45.03656178_Screen_Shot_.png "travel photography editing")
Best Home Deal to Shop This Week
Buffy Eucalyptus Sheet Set ($123, originally $145)
You haven't experienced true comfort until you've tried these airy sheets from Buffy. Unlike other sets, this style is crafted from a eucalyptus material that's softer than cotton and made to last. Shop these bestselling sheets — along with a number of other home essentials — on sale at Buffy's massive Earth Day event to save 15 percent off.
:quality(70):extract_cover():upscale():fill(ffffff)/2024/04/18/744/n/1922441/79e21554b957dfff_netimggXikBW.png "travel photography editing")
Best Fitness Deal to Shop This Week
Walking Pad 2-in-1 Under Desk Treadmill ($153, originally $180)
Skip the gym and experience a high-movement workout at home with the help of this under desk treadmill. The functional walking pad boasts over 600 five-star reviews on Walmart's site, with shoppers raving about everything from the tool's practical design to its quick delivery and easy setup. Plus, for a limited time, you can score it on sale (bonus).
:quality(70):extract_cover():upscale():fill(ffffff)/2024/04/18/744/n/1922441/059bc7696a915ba9_netimgWUYmYW.webp "travel photography editing")
Best Travel Deal to Shop This Week
Away Everywhere Bag ($195)
Away might have a reputation for its stylish luggage, but the brand also has a bevy of chic travel bags that are bound to elevate your next vacation for the better. For a limited time, the retailer is currently running a deal where shoppers can get $50 off any best-selling suitcase and bag combo.
:quality(70):extract_cover():upscale():fill(ffffff)/2024/04/18/744/n/1922441/9ef9e5a9fbeec5ac_netimgocK6YX.webp "travel photography editing")
Best Cookware Deal to Shop This Week
Our Place Mini Home Cook Duo ($200, originally $250)
In case you didn't already know, our editors really love Our Place — and for good reason. The brand is responsible for making some of the most functional, stylish cookware, from nonstick pans to mini pots and more. The brand is hosting a major sale on its bestselling bundles, including the Mini Home Cook Duo, which includes the Mini Always Pan 2.0 and Mini Perfect Pot 2.0. For the full product details, read our review of the Our Place Always Pan 2.0 .
Editor Quote: "The versatility of the Our Place Always Pan 2.0 is unmatched; you can cook breakfast, lunch, dinner, and dessert all in one place. I've been experimenting with this pan for a little while, and I've made everything, including fried eggs, chicken curry, pasta, and baked cinnamon rolls. I use this pan so much that it's perpetually sitting on my drying rack. I love that I can use it for most of my cooking needs, especially because I live in an apartment with limited kitchen storage space." — Anvita Reddy, assistant editor, Commerce
:quality(70):extract_cover():upscale():fill(ffffff)/2024/04/18/744/n/1922441/05ed7e90adddf87d_netimgGkP5aX.png "travel photography editing")
Best Mattress Deal to Shop This Week
Leesa Memory Foam Mattress ($1,059, originally $1,332)
In the market for a new mattress? We recommend starting your next spree at Leesa, where the brand is offering 20 percent off on mattresses sitewide. The original mattress is one of the retailer's bestsellers, hailed for its breathable knit cover and deep memory foam base. Check out our review of the Leesa Hybrid Mattress to learn more about the brand's top models.
Editor Quote: "First and foremost, I appreciate all of the thoughtful design elements that have been incorporated into it. From the supportive edges that ensure the mattress doesn't sink down on the sides to the highly breathable foam material that helps with pressure relief (and promotes cool airflow for hot sleepers) to the variety of add-ons that shoppers can buy directly from Leesa's site — like a platform or adjustable bed frame — everything feels like it's been designed with the consumer in mind, making the process of buying a new mattress feel like more of a treat and less of a chore." — Kyley Warren, assistant editor, Commerce
:quality(70):extract_cover():upscale():fill(ffffff)/2024/04/18/744/n/1922441/3fe16d265080c2a1_netimgfbvPQY.jpg "travel photography editing")
Kyley Warren is an award-winning writer, editor, and affiliate strategist with more than four years of experience in the publishing space. She currently works as an assistant editor on POPSUGAR Shopping and is an expert on all things related to shopping and fashion. She previously worked with Entertainment Tonight as a style commerce writer, and her byline has appeared in publications globally.
- Affordable Shopping
- Weekly Sales
IMAGES
VIDEO
COMMENTS
Editing Travel Photos. Editing your travel photos can take them to the next level. There are many techniques you can use to improve your images, from simple adjustments to more advanced processes. Cropping is a quick way to remove unwanted elements or zoom in on important parts of the photo. Sharpening will make details pop, while noise ...
Table of Contents. General Travel Photography Tips for Beginners. 1) Know Your Camera. 2) Focus on the Golden and Blue Hours. 3) Plan Your Shots. 4) Learn About Composition. 5) Framing, Framing and More Framing. 6) Move Your Feet. 7) Ask People for Permission.
Take your travel photos to the next level! This tutorial merges the power of Lightroom and Photoshop with cutting-edge AI tools. Discover the best techniques for recovering detail in hazy photos, breathing new life into even the most challenging landscapes. Plus, we'll show you how to create HDR images using bracketed exposures to ensure you ...
Editing Photos: 7 Editing Tips for Your Travel Photos. 1. How to Crop Your Photos. The crop tool allows you to change the size of your image, and also to change the aspect ratio. For example, you can crop an image from a rectangular shape to a square shape. There are many reasons you would want to crop, including for publishing in different ...
Uncover the secrets behind captivating and dynamic travel photography compositions. Learn about the editing process, top five editing tips, exposure guidelines, preferred labs and products for art prints, and where to view the photographer's remarkable travel portfolio.
Travel photography editing brings out the best in the photos you captured from a memorable trip. While travel photography captures the essence of a location, it is just the beginning. To truly make your travel photos stand out, mastering the art of editing is essential. In this guide, explore the intricacies of travel photography editing.
1. Cropping. Using the crop tool to adjust your travel images is a great way of drawing attention to the important part of the photo. The majority of the programs mentioned above have a cropping facility, which you can use for this adjustment. You'll use this for a number of reasons, let's look at those.
8 editing techniques to take your travel photos to the next level. 1. Radial filtering. Definitely the easiest of these 8 travel photo editing techniques. Inverting the mask of and then turning up the exposure and highlights of a radial filter is a nice way to mimic a strong light source (whether from the sun or an artificial light).
Travel photo editing with Adobe Creative Cloud. The core of my travel photography editing workflow is Adobe Creative Cloud. This is a suite of applications for all kinds of creative projects, from photo and video editing to graphic design, web development, animation and much more. Adobe also offers cloud-based editing and storage, fonts, stock ...
6. Make a travel collage. When you want to preserve all your memories with an artistic vibe, PhotoDirector's Collage feature gives you a template to put together your travel images. The app has several collage styles, so you can choose the one that works best for your trip and matches your aesthetic.
At that point, it's high time to sharpen your eye as a photo editor. According to award-winning travel photographer Krista Rossow, photo editing is a practice that really should begin before you leave on a trip. Rossow is well versed in the process behind editing photos to tell a dynamic story, given her seven years as a picture editor for ...
Get travel photography tips from professional photographers, so you can capture new landscapes, cityscapes, and portraits of people you meet on your journey. ... You may already have camera gear and a computer, but you'll also have to spend money on photo editing software and travel. Create a portfolio. Clients have to see your work before ...
Price: Free Trial // $4.99 monthly for Premium (to unlock all the tools) Instasize is an all-in-one photo and video editing app for creative photographers. Basic stories are out - take your creativity to the next level and make one-of-a-kind stories and static images to showcase your unique style! With over 130 filters for photo and video, it ...
The best apps for travel photography editing. Sharing photos on social media is all part of today's travel culture. Naturally, these photos must look stellar, so editing must be done on the fly. Any rundown of the best apps for travel photography should include a selection of post-processing apps. Here are our picks: 1. VSCO (for iOS and Android)
In my opinion, the best photo editing software is Adobe Lightroom.I've been using Adobe Lightroom for years and I still discover new features all the time. Lightroom allows you to make any changes you want to a photo. Whether you want to intensify one color or change it completely, it's extremely easy as you just have to "play" with the hue, saturation, or luminance.
Travel photography is not just about taking pictures of a place; ... Photo editing software can be costly or just confusing. Dan shows you how to achieve professional-looking photos with just a few taps using nothing more than a few apps from the App Store. Also compatible with Android, these easy-to-use apps allow you to change the white ...
YouCam Perfect, available for free on iOS and Android, is a photo editor app with various editing tools and filters to assist you in creating the perfect travel photos. The YouCam Perfect app comes with beautifying tools, including lipstick options, eyeliner, eyeshadow options, and smooth skin effects to help you get the perfect travel selfies. 3.
A detailed online travel photography course with everything you need to master your camera and take better photos! Join 2000+ students and start learning today! ... Edit photos with video tutorials of photo editing software and comprehensive editing guides using industry standard photo editing software on both computers and mobile phones ...
Travel apps for photography can help you with anything from finding the best photo spots to editing while on the move. Here are a few of the best apps for travel photography options you need to download before exploring beautiful destinations on your bucket list.. 7 Best Travel Apps for Photographers. We list travel apps for both iOS and Android. And there is a mix of free and paid apps.
Tap on it and drag the circular source of the light to adjust the angle of artificial lighting. You can also adjust the intensity of the light using the bottom slider. Note that you need to apply the portrait effect from the edit menu before you can apply the Portrait Light. 6. Use Suggested edits.
The Patriarch's Ponds (aka Patriki) is a historical neighbourhood, celebrated in Mikhail Bulgakov's novel Master and Margarita. Located right off Tverskaya street, Moscow's main thoroughfare, Patriki recently became the city's most happening quarter. It has some of the most elegant architecture, including several buildings by art ...
2 Comments · Posted by Alex Smirnov in Cities, Travel, Video The Moscow Metro is the third most intensive subway system in the world after Tokyo and Seoul subways. The first line was opened on May 15, 1935.
Best Swimwear Deal to Shop This Week. Aerie Plunge Longline Triangle Bikini ($23, originally $33) and Aerie Full Coverage Bikini Bottom ($14, originally $20) Now's the perfect time to stock up on ...
The Moscow International Business Center (MIBC), also known as Moscow-City, is a commercial development in Moscow, the capital of Russia.The project occupies an area of 60 hectares, and is located just east of the Third Ring Road at the western edge of the Presnensky District in the Central Administrative Okrug.Construction of the MIBC takes place on the Presnenskaya Embankment of the Moskva ...
map to travel: Kommunarka. Wikipedia. Photo: Wikimedia, CC BY 4.0. Type: Town with 4,600 residents; ... Text is available under the CC BY-SA 4.0 license, excluding photos, directions and the map. Description text is based on the Wikipdia page Kommunarka. Photo: ...
Stranded passengers search for information at Dubai International Airport on April 19, 2024, after more than 1,200 flights were cancelled following an unprecedented storm, leading to widespread ...