- Fishing Gear

Protect Ya Rod! How to Build Bulletproof Fishing Rod Tubes for Under $20

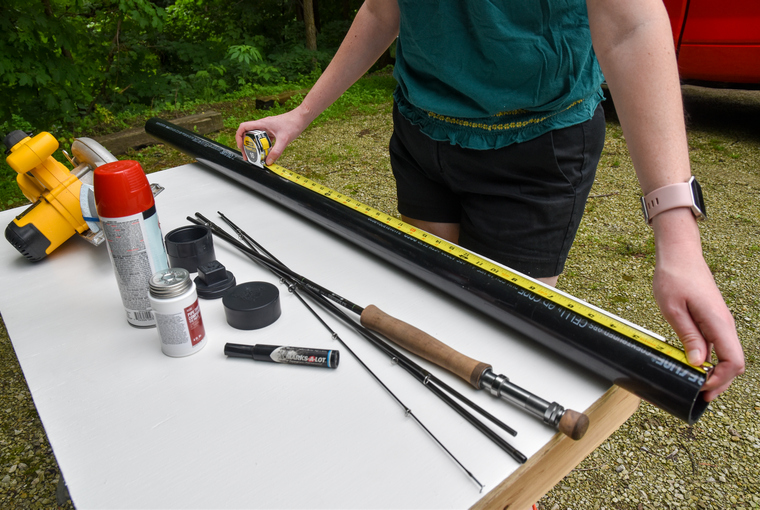
We’ve all been there. You try to sneak in a couple hours of fishing after work, but in the rush to get to the water your rod gets slammed in the car door, a guide breaks from bouncing in the truck bed, or your reel picks up a few new dings. For less than $20 you can build a durable rod tube that will prevent this from happening and keep your rods in mint condition for years to come.
The most important material for making your own rod tube is ABS pipe. ABS (acrylonitrile butadiene styrene) is a common material used in plumbing, but it’s also used to make protective headgear, whitewater canoes, and Kevlar vests. Because of its durability and light weight, it’s perfect for a rod tube.
First, measure the length of your rod. Many rods break down, and I like to store my rods in sections so they take up less space. Keep in mind that a rod tube can hold more than one rod. A 2-inch-diameter pipe is perfect for a single rod, but my favorite homemade rod tube has a 4-inch diameter. It holds three fly rods in their rod socks, which is nice because it saves me from having to travel with a bunch of individual tubes.

Once you’ve measured your rod, buy a piece of pipe that accommodates the length. Pretty much every hardware store sells ABS pipe. If the pipe is a bit long, cut the excess with a saw (a pipe cutting wrench is even better if you have one). The less wiggle room you have in there, the better. The best thing about making your own rod tubes is the low cost allows you to make multiple tubes for specific situations. Say you’re taking a trip to the saltwater flats for tarpon , bonefish , and permit. One fly rod isn’t going to handle all three species, so you can make a larger tube to take all the rods you need. If you wanted to bring a spinning rod for jacks or barracuda too, you could make the tube slightly longer to accommodate that two-piece as well.

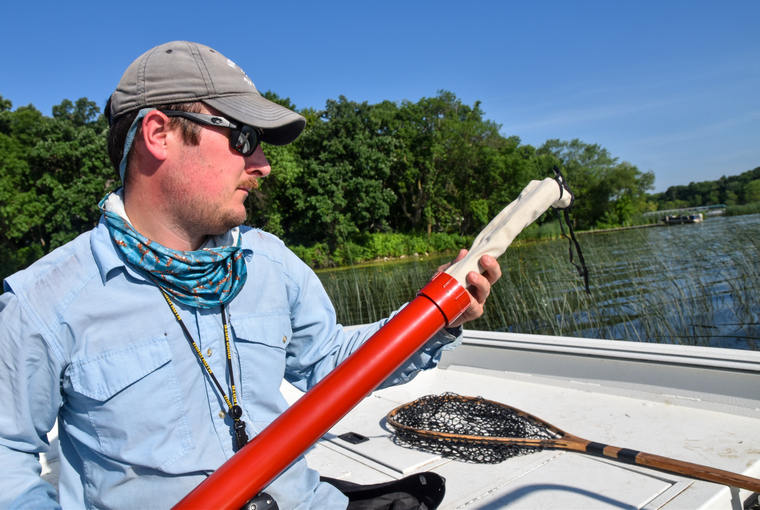
I like to bring my rods as carry-ons when I travel, but on smaller planes I’ve had to check them. Once, I watched a baggage handler at a small regional airport throw my rod tube into the cargo hold like a javelin. When I got it back it was no worse for the wear.
The same goes for long, one-piece rods. Some of my favorite conventional rods are a single piece, but because they’re awkward to transport, they seem to be the ones I always break. With an ABS rod tube, I can literally throw them from the back of my truck into the boat and not worry about it.

I spray paint all tubes for conventional rods black, fly rod tubes green, and spinning rod tubes red. So if I want my 6-weight fly rod, I look for the green tube with a big “6” on it. Since I started making my own rod tubes, I haven’t broken a rod during transport it in six years. Snags, trolling motor props, and drunken friends are another story.
- Hack saw or pipe-cutting wrench
- ABS specific solvent-cement (glue) ($2-4)
- ABS pipe with a diameter that suits your needs ($5-15)
- 1 closed endcap ($2)
- 1 open female-threaded endcap ($2)
- 1 male-threaded end plug ($1)
- Optional: Para-cord, silicone caulking, spray-paint

Sign In or Create a Free Account

Conventional Fishing Rod Action and Power Explained

The beauty of fishing is that you can make it whatever you want it to be. It’s called style. Do you want to be a largemouth aficionado or someone who only throws bait into the surf? Or, are you casting ultralight rods for wild, 6-inch brook trout in alpine creeks or tossing 9-inch swimbaits for muskies? It’s all fishing, but there are wildly different applications depending on your style, target, and goals. A huge part of mastering any type of...

How to Build a DIY Minnow Cart

It’s no secret that we live in a world of click now and have it on your doorstep tomorrow. While that can be super convenient, it also doesn’t work for everything when it comes to the outdoors. In the same way that a small old-school tackle, fly, or bait shop just always seems to have what you can’t find anywhere else, sometimes anglers have to take things into their own hands. One such item is a minnow cart. I guess the first question is, what...

Fly Fishing Rod Weight, Action, and Flex Explained
The beauty of fly fishing lies in personal style. No, I’m not talking about felt hats and plaid shirts. I’m talking about the style with which you tie and select flies, cast, target fish, and generally approach the sport. On one side of the aisle, you’ll have fly anglers who only run nymphs in swift water, while on the other side you’ll have anglers who will only throw dry flies for rising fish. And we haven’t even gotten to saltwater, bass...
Fishing Skillz
Fishing Skillz is reader-supported. When you buy through links on our site, we may earn an affiliate commission at no additional cost to you.
3 Tips For Traveling With Fishing Rods (FREE DIY Rod Tube Instructions)

Traveling With Fishing Rods (Plus DIY Rod Tube Instructions)
Traveling with a fishing rod is a reality for many anglers. Whether traveling for the sole purpose of fishing, dual-purpose vacation, or simply as a “just-in-case”; having a fishing rod along on your travels can be incredibly rewarding. However, the hassle some people think that comes with traveling with these oversized and fragile objects can often times be a deterrent.
It can be quite cheap and easy to travel, or even fly, with fishing rods and have the piece of mind that they are safe and sound inside.
Every day, thousands of fishing rods are shipped damage free all over the country. With shorter break-down rods, you can even avoid excess baggage fees by following our tricks below.
Whether it means transporting your one piece fly-rod on a road trip, flying with a stack of fishing rods to the remote Canadian tundra, backpacking into a remote mountain stream, or flying carry-on with a small rod tube; traveling with fishing rods is a reality.
Here are some great tips, tricks, and products that will make your life easier and keep your rod safe.
Types Of Fishing Rod Cases
1. rod tubes.
Rod tubes are typically the first association with heavy duty rod travel. After all, fishing rod tubes are the type of container fishing rods are shipped in from the manufacturer. From these cardboard shipping containers to more sophisticated rod tubes offering guaranteed protection, the natural geometric strength of a cylindrical design is hard to beat and has proven itself as a solid choice. Especially when on a budget.
2. Rod Cases
Rod Cases are a more feature packed option and can be associated with seriously rugged use. However, some rod cases on the lower end of the price spectrum may not be suitable for heavy duty travel.
Rod cases offer a more appealing way to store your rods than shoving them in a tube. Generally protected by heavy duty locking latches or zippers, these flip open cases are often capable of holding multiple rods and reels in an appealing display style fashion.

Buy on Amazon.com
For an attractive and protective cased to transport your rods in, check out this JEKOSEN 2019 Portable Travel Fishing Rod Reel Case review.
At a nice mid-range price, this zip open rod case will store sections of rod up to 5 feet in length and can hold up to 4 sections of rod.
On top of that, it features additional zipper storage on the lid and can likely fit a few more key items stuffed inside the case with a little padding.

Made from similar material to hard-shell suitcases, you can trust this case to protect its contents through rigorous travel. This is a simple no-frills rod case that will offer great protection in it’s slim and sleek design.
3. Roof Vaults
Roof Vaults are great for anglers fishing out of their vehicles. Particularly, fly-fishing anglers and surf casters with exceedingly long rods. Jumping around from spot to spot on the river or lake to lake gets much easier with these roof vault type cases.
For longer rods, roof vaults offer the quick and easy convenience/access of slide-in storage securely mounted to your roof. Most are generally equipped to store the fully rigged rod and reel which makes them so convenient.
They’re also a great tool for long road trips where you’re taking a fishing rod along as it frees up much needed room inside the cab or bed. These options, while a little pricier than others, can be the best and most convenient option for certain styles of fishing.
4. DIY Sewer Tube (And How To Make Your Own Fishing Rod Case)
For the frugal folks, the budget bums, people like me; here is the cheap way to safely store your rods. All it takes is a little work.
Starting off with a few simple components that should cost you around $20, you can have a durable and reliable rod tube for years to come. Fly it on a plane, strap in on a car, or make a small one for your break-down backcountry fishing rod setup.

-Purchase either traditional PVC pipe or lighter weight triple-wall sewer drain pipe from your local hardware store (I prefer the latter). This should cost you somewhere around $10.
-For sizing, I like 3 inch or 4 inch pipe.
-Next, find some properly sized fittings for the ends. You will need a glue-on cap on one end and a screw on cap for the other. Lastly, you will need a can of two in one PVC glue. You want the one with both the primer and the actual glue. (It always helps to buy the pipes and fittings in person to verify the size pipe you want and make sure the fittings are the proper size.)

Glued on end-cap
-Once you have all your components, cut your pipe to the length you desire with a hacksaw or other tool.
-Liberally apply PVC glue to your pipe and cap both and then glue your end cap securely on one end.
-Now glue your screw on cap on the other, let it set, and you have a rod case.

For extra protection, you can always ad a piece of foam to your glue-on cap or slide it in after the fact to protect from rod tip damage. You can also paint the case as you wish and when traveling with it, it’s always a good idea to have your name and contact info somewhere on the case written in permanent marker.
How To Travel With A Fishing Rod (Expert Tips and Tricks)
Flying with fishing rods.
Flying can be the most rigorous type of travel on fishing rods. Worse yet, your precious cargo is out of your sight for most of it. As such, most people ensure they have a heavy duty case for checking their fishing poles as baggage.
When flying, you’re certainly going to want to use a hard case for your rods. Whether you go with a rod case, rod tube, or make your own out of pvc, it’s much more a personal choice in what you feel comfortable with.
Just make sure you pack your rod with plenty of padding and write your name and address permanently somewhere on your case.
Looking for a case for a flight coming up quickly? Check out the JEKOSEN 2019 Portable Travel Fishing Rod Reel Case .
Expert Tip:
Carry-on baggage can save you fees if you can somehow manage to pack all your belongings in it. One of which, can be a 4 piece break-down fishing pole or fly-rod that you can slide into your carry on bag or personal item. Save on fees and trust your fishing gear is in good hands.
Driving With Fishing Rods
Driving with your rod puts you in control of the handling. You can go with absolutely no protection or a full blown rod case when driving. Regardless, it is always nice to have your rod in some form of hard protection to avoid any accidents. If you are simply doing long distance travel to a fishing destination, any type of rod case or rod tube will offer more than ample protection. You can likely even strap it to the roof of your car.Alternatively, if you are hoping from fishing hole to fishing hole in your car and want quick and easy access, consider something like a rod vault. These full protection tubes mount on the roof of your car and generally have room for a fully rigged rod/reel setup. These are often favored by fly fishing anglers who carry long cumbersome rods between shuttle points on rivers or fishing holes.
You can also use a clamping style ski rack or snowboard rack that mounts to your roof to hold your fishing rods.
Hiking With Fishing Rods
Hiking to access fishing spots can sometimes be the best way to get your lures or flies in front of wild and willing fish. When covering miles overland or backpacking in somewhere, you probably don’t want your rod in hand the whole time.
A small lightweight rod tube is generally the way to go for this type of transport to strap on to your pack. Also, for fly rods especially, a 4-piece take-down style is really the ticket for this type of travel.
Utilizing a small homemade pvc tube as seen above (maybe try 2 inch pipe) or a sleek and lightweight rod tube like this MaxCatch Carbon Fiber Rod Tube .
Slide your reel into an old sock or beanie to protect it in your backpack while hiking.
Final Thoughts
If you need to travel with your fishing rods, there’s no reason you can’t do so, especially with some of the tips and ideas we shared in this post.
If you’re on a tight budget, then consider making your own fishing rod tube. It’s inexpensive and very simple to make. You can read through the instructions again by following this link: DIY Fishing Tube Instructions.
But if you want something that looks a little nicer, then consider picking up the JEKOSEN 2019 Portable Travel Fishing Rod Reel Case or the MaxCatch Carbon Fiber Rod Tube .
You’ll enjoy travelling a whole lot more knowing your fishing rods are safe and will be ready to toss a line in the water at your next destination.

Written by Don
When I'm not bass fishing or looking for steelhead in my home state of Oregon I can be found working on house projects dreaming of my next fishing adventure.
I started this website to share just some of the things I've learned along my fishing journey, and the many things I'm still learning. Enjoy!

What Battery To Use For A Fish Finder (3 Best Fish Finder Batteries)

Lake Trout vs Rainbow Trout (Similarities and Differences)
© 2024 by Fishing Skillz

Great American Spring Sweepstakes
Enter to Win a 4-Day Pass for 2 to One of America's Premier Country Music Festivals in Nashville June 6-9

Regional Rut Update
Live updates from our whitetail experts in the field

Regional Strut Update
Live updates from our turkey experts in each region

Work and Play: Merriam's Turkeys in Wyoming
It's a family affair as ALPS OutdoorZ celebrates 30 years with an awesome gobbler hunt.
Get The Magazine
Subscribe & Save.
Digital Now Included!
Build Your Own Roof-Top Rod Locker in 8 Steps
Keep your fly rods safe on road trips this season with this easy-to-build car-top rod carrier..

You can make your own roof-top rod carrier in a weekend for about $100. (Photo by Joseph Albanese)
Outfitting your vehicle with a roof-top rod locker means being able to transport your fly rods rigged and ready to fish as soon as you hit the water. With rods secured on the roof, they’re out of the way of passengers, dogs and car doors, and less likely to get broken in transit.
There are many good commercially available rod lockers available (see our Gear section in the April issue), but you can also make your own in a weekend for about $100.
TOOLS NEEDED
- Assorted bits
- 1½-inch hole saw
- Circular sawv
- File or sandpaper
- Miter box and saw
- Tape measure and ruler
MATERIALS LIST
- 1 plastic toolbox sized to accommodate reels (mine was 14-by-7-by-7 inches; $7.97)
- 3 10-foot, 11/2-inch PVC pipes ($6.61 each; $19.83 total)
- 3 11/2-inch pipe trap adapters ($1.56 each; $4.68 total)
- 3 11/2-inch PVC caps ($1.14 each; $3.42 total)
- 3 tub-drain gaskets ($2.73 each; $8.19 total)
- 6 ¾-inch foam pipe insulation ($2.47 each; $14.82 total)
- 12 size 12, ½-inch screws ($1.18 per 10; $2.36 total)
- 6 1½-inch galvanized two-hole pipe hanger straps ($0.52 each; $3.12 total) ¾-inch plywood or dimensional lumber of similar thickness (project panel about $10)
- 4 M8 T-bolts ($4.49)
- 4 M8 hex flange lock nuts ($5.59)
- Exterior paint ($4.98)
- PVC primer and glue ($7.70)
- Silicone caulk ($2.58)
Total: $99.73
Video That May Interest You

Begin by laying out the locations of the holes for the rod tubes on the toolbox. Cover the bottom of the toolbox with masking tape to make marking easier and place the trap adapters, without caps, in their approximate locations. I put one directly in the middle and the others 2 inches in from the sides, but do what works best for you.

Drill holes through the box bottom in the marked locations. Start with pilot holes, followed by the hole saw. Go slowly, applying gentle pressure. I found I could make a cleaner hole by putting the drill in reverse but be aware that the nut holding the blade on the arbor will loosen. After the 1 1/2-inch holes are cut, clean up the edges using a round file or sandpaper wrapped around a dowel.

Connect the trap adapters to the holes. Apply a bead of silicone sealant around the threaded portion of each adapter and insert it into the hole. Once seated, place a tub-drain gasket on the back (interior) side and secure it with the nut.

Cut the PVC pipes an appropriate length to fit your rods, then stuff the pipes with foam insulation, which will cushion your rods over rough roads. Leave the first 8 inches of the end that will be inserted into the toolbox free of insulation to accommodate the rod handle and large stripper guide. Cut the insultation at the other end flush with the pipe. Skip this step altogether if you have a rod with large guides along its entire length.

Before everything gets glued together, you’ll want to have the bracket bases ready. I used a piece of 3/4-inch plywood as long as the toolbox, ripped down to a 2-inch width to fit my roof rack’s crossbars. Make your cuts with a circular saw and fine-tooth blade to ensure you don’t chip the wood. I drilled a hole in each end of the bases for the T-bolts I used to attach the carrier to the roof rack. Alternatively, you can secure the bases to a rack’s crossbars with U-bolt clamps, in which case drilling holes isn’t necessary. Give the plywood a coat of exterior paint to protect it from the elements.
Recommended

It’s time to put everything together. It doesn’t matter if you put the caps on your pipes or attach the pipes to the toolbox first, but it will be easier to focus on one end at a time. PVC cement isn’t glue, but rather a solvent that bonds two pieces together by melting the surfaces and fusing them; they re-harden quickly, so you have to work fast. Hit each side with primer so they’re clean and follow with the cement. Press the components together and rotate them to ensure the connection is evenly coated.

Decide whether you want your rods to rest reel-up or reel-down, and orient the toolbox to accommodate that desire. Lay the bracket bases under the PVC pipes, and place the pipe straps over the pipes. Once everything is lined up, drill pilot holes and secure the straps using the 1/2-inch screws. Repeat the process for the second base, but leave the screws loose so that you can slide it to align with your rack’s front crossbar.

Mount the rod locker to your roof rack. Position the plywood bases so they line up with the crossbars, and attach them. As mentioned, I used T-bolts that slide into the extruded channels in my rack. If you use U-bolt clamps, place them between the pipes to ensure they don’t walk out. Once the T-bolts or U-bolts are snug, tighten the screws holding the pipe straps to the front base. Throw your rods in the tubes and hit the road.
GET THE NEWSLETTER Join the List and Never Miss a Thing.
Recommended articles.

7 Things to Ponder Before Buying a Fishing Kayak
Drew Warden

5 Steps to Quality Walleye Fillets
Scott Mackenthun

Go Big or Go Home to Hook Lunker Summer Bass

Tiny-Stream Trout Strategies

Make Crawfish Part of Perfect Summertime Meal
David Johnson

Channel Catfish Chowdown
M.D. Johnson

Best Budget Compound Bows 2022
Alan Clemons

Spin to Win: Panfish Secrets for Catching Limits on Spinners
Keith Sutton

Best New Baitcasting Rods & Reels for 2022
Dr. Todd Kuhn

Go Whole Hog for Delectable Backyard Pork BBQ
Lynn Burkhead

It's Tick Season. Here's What You Need to Know
Game & Fish Staff
Recent Videos

Bass Crash Course: Bass Fishing in the Wind
How to make windy conditions work for you when you're on the water.

She Kills The Biggest Bird of the Year
Taylor is a known turkey killer in her family, and this year is no different. After an enjoyable gobbling morning, a wary longbeard pitches down and spends a couple of hours crossing a large ag field in Minnesota. A lot can and does go wrong, but will the long-spurred turkey finish? Check it out.

Bass Crash Course: Unlock the Patterns Squarebill Crankbaits
Host Shane Beilue covers three things to look for when considering square bills in shallow water.

Tips for Cooking Over an Open Fire
Cooking over an open fire demands preparation, but with patience, it transforms each meal into a rewarding and delicious experience every time.

How to Build the Perfect Campfire
With the right materials and know-how, you can construct a reliable blaze for any gathering. Follow these tips to build a great campfire this spring.

First Morning: Father/Son Iowa Turkey Double
Thomas and Tommy Allen head to Iowa to hunt a familiar and very productive farm that has been grounds for family memories for many years. The duo only had one full day to make it happen and things came together in spectacular fashion again this year.

Shot the Same Bird! UP of Michigan Double Down
Thomas and Taylor head to the UP of Michigan on their annual traveling turkey hunt, and the first morning was nothing short of spectacular. But, as they often do, things didn't go as planned, and they almost got away. But the footage on this fine morning was amazing and the hunt ended up being very exciting.

Work and Play: Merriam's Turkeys in Wyoming
It's a family affair as ALPS OutdoorZ celebrates 30 years with an awesome gobbler hunt.

Winchester Waterfowl Loads
Winchester has been at the forefront of developing high-tech, lead-alternative loads for waterfowl hunters since the non-lead mandate of the late 1980s. That innovation continues today with the company's Blind Side 2 shotshells featuring uniquely shaped Hex Steel Shot, along with its Bismuth loads that have a special buffer to protect the pellets and provide denser patterns. New this year in the Bismuth line is a 3-inch, 28-gauge load with 1 ounce of No. 5 shot at 1,300 fps.

Winchester .400 Legend
Building on the success of the .350 Legend, Winchester releases a new straight-wall rifle cartridge for deer hunters looking for more downrange energy at longer distances. Winchester reports the .400 Legend produces about 25 percent more energy than its little brother, putting it on par with the .450 Bushmaster but with less recoil. The initial .400 Legend loads feature a 190-grain Extreme Point, 215-grain Power Point and subsonic 300-grain Open Tip Range bullet.

Browning A5 in the Long Anticipated 20 gauge
Fans of Browning's popular A5 shotgun have long been waiting for a 20-gauge model and it's finally here! Built on a small-sized frame, the A5 20 gauge is lightweight making it easy to carry in the field. The recoil-operated Kinematic Drive System makes the A5 one of the softest shooting and most reliable guns on the market.

White Flyer Eco Flyer
Instead of containing pitch or a sulfur-based substance, the new Eco Flyer targets are made from a more environmentally friendly material that lab studies have confirmed is non-toxic to ryegrass, algae, earthworms, rodents and minnows. Although the material is different, Eco Flyer targets are designed to meet or exceed the performance of traditional White Flyer pitch targets and meet ATA, NSSA and NSCA specifications. Initially available in 108 mm AA and Pheasant versions, the new targets will soon be offered in all sporting clays sizes as well as a 110 mm international version.
GET THE MAGAZINE Subscribe & Save
SUBSCRIBE NOW
Give a Gift | Subscriber Services
PREVIEW THIS MONTH'S ISSUE
Buy Digital Single Issues

Don't miss an issue. Buy single digital issue for your phone or tablet.
Other magazines.

Guns & Ammo

North American Whitetail

See All Other Magazines
Special Interest Magazines

2023 Backcountry Hunter Fall

2023 Fly Fisherman Destinations

2023 Crossbow Revolution #2

2023 Tree Saddle Hunter

2023 Hunting Gear Guide
See All Special Interest Magazines
More You May Be Interested In
Get the top Game & Fish stories delivered right to your inbox every week.

Get Digital Access.
All Game & Fish subscribers now have digital access to their magazine content. This means you have the option to read your magazine on most popular phones and tablets.
To get started, click the link below to visit mymagnow.com and learn how to access your digital magazine.
Get Digital Access
Not a Subscriber?
Enjoying What You're Reading?
Get a Full Year of Guns & Ammo & Digital Access.
Offer only for new subscribers.
Subscribe Now

- Forum Listing
- Marketplace
- Advanced Search
- Spey Clave Casting Forums
DIY/ Homemade rod tube

- Add to quote
Hey folks. This may be really obvious to some of you, but I recently purchased a used spey rod that did not come with a rod tube. After calling sage and hearing that they wanted $80 for the tube, I started thinking about ways I could make my own. I landed on PVC! Yes, it's a bit heavy. Anyway, I wanted to share my rough plans and steps so others can do this. It cost me about $30 total, including the glue and primer that I can re-use next time. You will have a hard time finding the 2.5" PVC and fitting as it not a common diameter for normal/ intended applications. I think the only use is some drainage from a certain type of heating unit. Try plumbing specialty stores. parts/ supplies: -length of 2.5" PVC. (start by measuring an existing tube you have have that you know the rod you plan to use the case for will fit.) -2.5" PVC closed end cap -2.5" Female adapter with a female (fipt) socket on one side and a slip socket on the opposing side. ( https://www.amazon.com/gp/product/B01D4WULIQ/ref=oh_aui_detailpage_o00_s00?ie=UTF8&psc=1 ) -2.5" PVC clean out screw in plug meant for closing the end of a cleanout adapter. Male NPT threads for connecting to female threaded pipes ( https://www.amazon.com/gp/product/B009H423RS/ref=oh_aui_detailpage_o01_s00?ie=UTF8&psc=1 ) -pvc purple primer -pvc blue glue -contact cement (optional to glue padding on to PVC) -random pieces of closed cell foam 2" thick (optional but highly recommend top and bottom padding) -grill mat (goes under grills) (optional side padding) this is essentially waterproof heavy felt. -400 grit ebony/ sand paper -utility or para cord -fishing coating of your choice (optional) Instructions: -sand of grind cut edges of PVC pipe. There will be flanges from the cutting process, this will prevent the end pieces from seating well. I chamfered mine with a dremel tool and mini grinding wheel. -sand sides of pipe near ends and inside of end cap fittings. -if using the grill mat and foam padding, cut pieces of foam to fit in close end cap, glue in with contact cement. Then cut grill mat to correct length of rod tube and inside circumference. This will take some trial and error. Contact cement it in just at either end. -Prime then glue closed end cap and female adapter socket slip socket side. follow normal PVC primer and gluing instructions. If you've not done this, watch a youtube on it, there is a specific procedure. -drill hole through side of square wrench head on clean out plug (diameter of bit should match the diameter of your para cord. -slip cord through both holes/ sides. tie knot in one end to hold it place. tap other side of cord to side of female socket adapter. -let dry for a day -coat with your choice of coating. you could of course leave it as PVC, but where's the fun in that? I actually used alternative red and white duct tape and wrapped it around and down on an angle to make mine like a huge candy cane. Fly fishing bro patagonia and yeti stickers would also work.

PHP: I bought a tube from cabelas for 20 bucks, removed the end piece, shortened the plastic inside, stuffed the extra canvas in and sewed the butt back on. I coated the sewing with aqua seal as added protection
Attachments

dang, I should have searched for generic tubes. That's a good deal. Why did you have to cut it down? Did they only have them for longer TH rods and you wanted it for a single hand one?

I've made a few of these of various lengths and diameters specifically for different trips I take using larger diameter ABS pipe. For example, a 4" tube, cut to the right length obviously, will hold 3 stout spey rods for a bigger water trip (you may have to think about how the butt ends relate to get them all to slide in...) I can fit 3 or 4 lighter rods in a 3" tube. A piece of webbing looped around as a handle and secured by sawed off and glued screws is handy for carrying. I did learn by trial and error that the black ABS can be difficult to see in a cargo hold, e.g., when gate-checked on a smaller plane, so I wrap a stripe of yellow duct tape around either end. Yes, they're pretty heavy, but a couple of mine have been on several trips and have been bullet-proof so far. I think my material cost is a little less than $30 - the end fittings are in the $5-7 range each around here so its probably close - but there's a certain pride in having such an ugly but utilitarian piece of kit. Jed
I've made and used various forms. Even a cardboard shipping tube is adequate protection for most vehicle trips; a pvc pipe might survive even the plane crash that kills you. A little extra weight is a non-issue. Plastic pipe can easily be sawed to perfect length (leave room for foam padding in both ends). Most glues work for end caps. It's easy to apply, and remove, name-and-address mail labels and Dymo label strips. And a plebian-looking tube looks less appealing to thieves than fancy anodyzed maker's aluminum tubes.

I'm willing to bet that many of us have a pile of DIY and factory rod tubes in our garages or man-caves. Just keep in mind if you fly to Alaska... Alaska Air is pretty cool about fishing rods, they don't even count, but 5' is their max size for carry on rod tubes. I found that out the hard way.

I have made several rod tubes over the years with various plastics. Not pretty but beats a broken rod. For my recent trip to Costa Rica I purchased a tube from Sail. $20cad. It's 4' long and 2.5" diameter. they have several types and sizes all around the same price. Worked well as a carry on flying down but forced to check it in on the way back. FYI check with the air lines. Many of them will count several bags/tubes as one item if they only have fishing gear. They still need to meet length and weight limits.

I've made more rod tubes like that than you can shake a stick at. And none of them cost anywhere near $30. But then, I don't count the cost of a can of solvent because I only had to buy it once and it goes a long way. ABS (black) tubing & caps are lighter weight & cheaper than PVC. You can get some kind of drain tubing in 4" Ø (white) that is really thin wall, light weight, strong, & will make a rod tube capable of holding multiple rods. If you want an aluminum factory type tube, call the Meize, or Steve. He buys a lot of that tubing + the end caps. If you have to fly with your gear, nothing beats a Sportube ski or snowboard case. Those things will not only hold multiple rods, but your waders, raincoat, & boots, & more. Do a search on the forum. There have been multiple discussions on flying with rods.

Those make a statement!

I’ve made a few out of heavyweight shipping tubes - the cardboard kind. Once you take off the mailing label and clean them up they don’t look bad at all. Put a nice label on the cap and they are pretty nice. I put one of those newish Meiser stickers, the ones with the Haida type slylized fish art, on one for a Meiser rod (just for easy visual ID) and now I actually like it a lot. Except yesterday when I dropped it in the back of a friends pickup truck and just for a second was worried about scuffing the sticker. :chuckle: I have kind of wondered on occasion if an old bare one might be less likely to get stolen if someone breaks into your trunk. But for %95 of the the practical functions of a tube those are great. On a side note last week I intentionally put a few coats of wood hardener on one with the idea that maybe you could then put several several coats of spar varnish over that to make something truly beautiful and unique, but I think this is just another example of me taking a good idea and stretching it until it becomes absurd.
- ?
- 24K members
Top Contributors this Month


DIY Guide To Making Your Own Fishing Rod Roof Rack Tube
Have you ever wondered if there was a better way to transport your fishing rods when you’re on the road heading to your next fishing hole? Well, thanks to YakAngler , your question may just have been answered.
Often, some of the dedicated gear can be a bit pricey and that’s why doing it yourself can sometimes be a little more cost efficient. So to help you save those all important dollars, we’ve put together this guide to show you how you can make your own roof rack tube.
So hopefully you’ll be able to transport your fishing rods more safely when you head out on your next fishing trip.
Table of Contents
What You Need To Get Started
- Reese Carry Power TransRack Conduit Carrier
- 6 inch diameter PVC pipe (around 8 feet long)
- Plasti Dip (for painting)
- Acetone (for cleaning)
- A cloth or rag
- Drill with ⅜ inch drill bit
- Silicone Sealant
How To Build Your Own Fishing Pole Tube
step 1: ensure correct pipe length.
Before you start attaching various parts to your PVC pipe, make sure you have the correct length of pipe to suit your rods. Place the rods inside the pipe; this can give you an idea of how much pipe you’ll need and if you need to cut it down to size.
Remember to remove your rods beforehand if you do need to cut the pipe.
Step 2: Prep The Pipe
Now that you have your pipe the correct length for your rods, using a cloth or rag, clean the exterior of the PVC pipe with acetone in order to remove any residue from the pipe. Then allow it to dry.
Step 3: Paint it
In order to make your new rod holder look less like a pipe and a little more sophisticated, it can be a good idea to paint it another color, such as black.
Using Plasti Dip rubber coating spray, cover the exterior of the pipe and allow to dry. The Plasti Dip will also give that added layer of durability for outdoor use.
Step 4: Drill Holes
The next thing you want to do is drill holes in either end of your pipe to line up with the end cap or door from the Conduit Carrier kit.
Step 5: Add Silicone Sealant
Before you secure the end cap and door to your pipe, run a layer of silicone sealant along the inside rim of the end cap and door (making sure you don’t seal the door shut).
Video: Fishing Pole Rod Tube
Step 6: Attach End
With the silicone seal in place, carefully place your end cap to the end of your pipe. Do the same with the door on the opposite end of the pipe. Secure both ends with the provided screws and bolts.
Step 7: Secure To Roof Rack
Using the hardware included with the Conduit Carrier kit, secure your new rod holder to your roof rack. If you want to have access to your rods while they’re on the roof of your vehicle, make sure the door end of your new rod holder is easily accessible.
You might find that having the door lifting upwards, with the hinge at the top, is the most convenient.
Conclusion
Hopefully you’ll have found that it’s easy to make your own fishing rod roof rack tube and can be a great way to save some cash .
You should be able to transport your fishing rods in style the next time you head out and know that they’re safe on the roof of your vehicle.
If you enjoyed this and think your friends could benefit from it, just share it with them. But don’t forget to leave us a comment to let us know how you got on when you made your own rod tube.
Leave a Comment Cancel reply
Amazon and the Amazon logo are trademarks of Amazon.com, Inc. or its affiliates
© Copyright 2024 by Kayak Guru.
How to Build a Fly Rod Tube Roof Rack
- Written By: Jamie Melvin
- Last Updated: December 20, 2023
Fly Fisher Pro is reader-supported. When you buy through links on our site, we may earn an affiliate commission. Learn more .
Venturing into the grand outdoors for some fly fishing is an exhilarating experience. However, moving from one fishing spot to another can be quite the chore, especially if it involves dismantling and reassembling your fly rods. Unfortunately, casually tossing your fishing rod into the back of your car could result in a shattered rod, as I’ve learned from personal experience.
The solution? A rod vault or rod carrier mounted to your roof rack. While buying one online can strain your wallet, you can create an economical DIY fly rod holder. This will not only protect your rods while you’re on the move but also save you the hassle of constantly setting up and breaking down your gear. Here’s how to build a fly rod tube roof rack from the comfort of your home.
Your PVC Fly Rod Holder Shopping List
Before you start, ensure your vehicle has a roof rack. If you’re good to go, let’s start building. You’ll need one DIY fly rod holder per fly rod you wish to carry. Here’s what you’ll need:
- A 2-inch diameter, 10-ft long PVC pipe (up to 11 ft for long euro nymphing fly rods)
- Three 6-inch lengths of 2-inch PVC pipe insulation
- A lockable Tupperware box or ammo can
- A 2-inch PVC coupler threaded
- A 2-inch O ring
- A 2-inch PVC cap
- Cuttable foam insulation
- A 2-inch hole saw
If you wish to carry multiple rods, simply increase the number of PVC pipes. Consider finding a single box for your reels that all the pipes can fit into. This will enhance your design and make it more efficient.
Building Your DIY Fly Fishing Rod Holders
Let’s begin constructing your homemade fishing rod racks for your car. Here’s the step-by-step guide:
Take your 2″ PVC foam insulation and cut it to match the length of your pipe. Insert it into the pipe. This padding will ensure your rods are secure and protected in the carrier during transit. Next, use the PVC cement to seal one end of the pipe with the 2″ PVC cap. On the opposite end, secure the male or female end of the threaded coupler with the cement.
Drill a 2-inch hole into the center of your reel box. If you’re making a vault for multiple rods, drill an appropriate number of holes. Smooth the edges with sandpaper for a sleek finish. Confirm the coupler fits by slotting the coupled end of the PVC pipe through the reel box, attaching the other end of the coupler with the O-ring.
If everything aligns, you’re ready to secure it permanently. But first, line the reel box with foam to prevent any damage to the reels.
Apply cement to the threads, slot the coupler end of the pipe through the reel box, and screw in the other end of the coupler. You now have a single rod carrier system ready for your car.
Before mounting your fishing rod storage vault to your roof rack, make sure the reel box can open and close smoothly. If it’s lockable, even better. You might need to adjust the opening and closing mechanisms, but a suitable ammo or Tupperware box should work just fine.
Your fishing rod rack is now ready to be mounted on the roof. Make sure your roof rack can handle the weight. You can use basic cable ties, but large pipe clamps from a DIY retail store might serve you better.
The beauty of this design is that it’s bare bones. You can easily add on to it or improve it as you see fit. If you’re making a roof rod rack for multiple rods, consider creating supports between each of the PVC pipes to ensure they remain aligned and are easier to mount.
Aside from the time investment, this fishing vault design shouldn’t cost you more than $100 for two rods, even less for four rods. Plus, it’s a fun and quick project to undertake.
In contrast, a reliable rod vault that holds two rods can set you back around $400, and a 4-rod setup around $700. Hence, a DIY solution is far more economical.
Safety Concerns
The safety of your rods in this DIY version largely depends on the lockable box you’ve chosen for your reels. With a sturdy box and padding in the form of insulation, your rods will be secure on the highway and protected from falling debris when parked next to the river.
Wrapping Up
Thanks for reading my article. I hope this DIY project proves useful and helps you transport your gear to, from, and around the river without breaking the bank.
Ready for more fly fishing tips and tricks? Download our series of fly fishing books below.
Jamie Melvin
Save up to 50% at trident fly fishing.
We’ve partnered with Trident Fly Fishing to get you EXCLUSIVE DISCOUNTS on a huge selection of fly fishing gear. I highly recommend checking out their USED GEAR SECTION to save a ton on a premium rod and reel.
The 9 Best Fly Fishing Magazines in 2024
The importance of catch and release fly fishing, the 13 best fly rods of 2024 – rod buyer’s guide, tfo mangrove review in 2024 – fly rods, best 3 weight fly rods of 2024, redington path review in 2024 – fly rods, 1 thought on “how to build a fly rod tube roof rack”.
This really needs more photos. I’d like to try this but the photos here don’t seem to sync up to what you are writing. Where does the tupperware box fit in?
Leave a Comment Cancel Reply
Your email address will not be published. Required fields are marked *
Start typing and press enter to search
Interior Mounted Fishing Rod Carriers
There aren't too many vehicles that can accommodate a fully-assembled fly rod inside. However, many SUVs and even some cars do offer enough length along the roof for mounting a fishing rod carrier. Just like the exterior roof-mounted fly rod carriers, there are pre-built options to buy that are ready to just install and go fishing. However, you'll likely save a few bucks with some of these DIY options.
If you have enough room in your vehicle for fully assembled fishing rods, it's probably along the roof. So, most of these fishing rod carriers consist of two braces that secure fishing rods along the top of the vehicle. This way, the fishing gear is above your head, and you'll still have plenty of room for passengers.
The Global FlyFisher
Simply the best place to go for online fly fishing and fly tying.

Search form
Mobile menu.
- All content
- Your profile
- Pattern section
- Pattern list
- Today's Fly
- Your fly today?
- Streamers 365
- Tying cribs
- Review section
- Book reviews
- Video reviews
- Review policy
- Short takes
- Fishing section
- Rod building
- Destinations
- Fishing videos
- Tip of the day
- A better life
- Fly fishing
- Rod Building
- New comments
- Most commented
- More discussions
- Gallery section
- Photographers
- User's Pix
- Video section
- Fly tying videos
- Originators
- Suggest your own
- Video articles
- Stream fishing
- More keywords
- Staff section
- Submit pattern
- Copyright policy
- Author list
- Author bios
- About section
- Your account
- GFF on Facebook
- GFF on Pinterest
- GFF on Instagram
- GFF on Twitter
- No guest posts
- Not buying flies
- Support GFF
DIY Rod Tubes
You have one extra rod with no sock and rod tube. you've been putting off buying a tube...why don't you just make your own with $4.00 and about a 1/2 hour's time, you'll have a diy rod tube. these won't win beauty contests, but they work just as well as any retail version. read here how to diy..
They're not pretty, but they sure do work!
From time-to-time, somewhere down the line, you'll need a rod tube because of that one rogue rod without a sock and without a tube. But you've stalled on buying a rod tube becuase they are so darned expensive. The solution is to make your own! In under a half hour, you can fabricate a dozen or so tubes if you need that many. It's that easy! And the price is right too.
The materials
The materials required are minimal and the investment is small. You'll need:
- A china marker
- A fine-toothed, small kerfed pipe or hand saw
- PVC Primer and Cement
- PVC piping, schedule 40 works fine
- 1 closed endcap
- 1 open female-threaded endcap
- 1 male-threaded end plug
A simple cost breakdown reveals an appealing price to this Do-It-Yourself project. For a 3-foot rod tube, my costs were:
- PVC pipe: $0.238 per foot: $0.71
- 3'x1' flannel cloth for rod sock: $0.25
- Closed end cap: $1.49
- Threaded end cap: $0.98
- Threaded end plug: $0.57
- glue and tools: negligable cost
TOTAL COST FOR A 3-FOOT TUBE and sock cloth: $4.00

Getting started
Lay the PVC on a flat surface and measure your rod(s) against the PVC. Mark the cut point with a china marker. You can cut the PVC to the exact length of the rod as the end cap and threaded cap add about a 1/2" to the length, giving you an extra inch to play with. After the PVC sections are cut to length, line them up and arrange all the required end pieces behind the tube in the order in which you will assemble: closed end cap, then the threaded end cap. You'll be glad you organized the parts because PVC cement dries very quickly, leaving you little time to shuffle around looking for the parts.

Priming and cementing
Prior to assembling the parts, wipe them with a damp cloth to remove dust and shipping debris. This will aide in the priming and glueing steps. Also, be considerate of yourself and perform this step in a well ventilated area such as the back patio or your garage. All PVC needs some priming to 'scuff' up the surface. This is done with a chemical PVC primer. Be careful as PVC primer will most assuredly drip where you don't want it...it stains and it is sticky. Pre-fit the pieces to get a feel where the PVC contact points are. Then prime just those areas on each PVC tube. BE sure to prime the tube and the inside of each fitting. Apply the cement in the same fashion, coating both the PVC tube and the inside of the fitting with ample cement. Quickly assemble the fitting on the PVC tube and twist to ensure full coverage of the cement to all the glued surfaces. In just a few moments, the cement will set.

Once the tubes are assembled and glued, allow them an hour or so of curing time in a well ventilated area. It's not advisable to stick your rod in the newly glued tube...there just may be some cement that hasn't dried thoroughly.

The finishing touches
Although the picture to the right doesn't clearly show the markings, use a metallic permanent pen to label your rod tube with the contents. Rod socks can be purchased from most any rod making supplier for around $5 to $10, depending on the material you choose. Or, to carry the theme of this article, make your own rod sock to your exact specifications. Me personally, I like just a sheet of flannel the length of my rod and the width of a foot or so. I begin rolling in each rod segment in one at a time, like a wrapping a cigar. No stitching is required and the cost of the flannel is minimal at best. Then, insert the rod-in-sock, tighten the cap and go to the stream in confidence that your rod is safely protected! I actually needed a few rod tubes to mail some rods I had sold. After trying to find appropriate cardboard tubes of varying lengths, I decided to cost out making my own. In the end analysis, the cardboard tubes cost the same and in some cases more expensive for longer sections I needed. I then decided to make my own. These DIY rod tubes aren't going to win any beauty or crafstmanship awards, but with just a sheet of flannel and some PVC they are just as functional as any on the market...at 1/10th the price.

A gun sock that ties
A gun sock that ties works well to hold a couple of tubes for travel
Thanks. I've been t
Thanks. I've been thinking about this for a long time, but didn't think I'd be able to do it, and really didn't know how to go about it. :)
Hi Rudi These are a
Hi Rudi These are available here at Home Depot stores. The three I made three years ago I'm still using. If you're still in the market let me know how many you want and I'll make arrangements.
Hi I live in Isra
I live in Israel, I doubt I can find the:
- closed endcap - open female-threaded endcap - male-threaded end plug
Is someone willing to ship to me a few peaces? I will pay all expenses + a nice fee for your time.
Just reply here or pm if that is possible.

Sandy, I don't kn
I don't know whether they would be the best, but they would be fairly inexpensive, certainly better than no tube and you could make them exactly the length and diameter you wanted. Depending on the thickness material you choose for your tubes they could become a very good protection for your rods. Check out the options in your local plumbing supplies store. Plastic pipes for sink drains seem to be available in the proper diameters. They usually come in many lengths and can be fitted with plugs and end caps.
Hi, have a question
Hi, have a question about the rod tubes. I have some expensive rods and was wanting to make some rod tubes for them. They are 1 piece rods, 5'4 up to 7'10 and they are spinning rods. I'll probably have to have 2 1/2 in. pipe. I was wondering if these rod tubes would be the best for my rods and any ideas or suggestions. Thanks alot.
I was thinking of bu
I was thinking of building some rod case's and you gave me the boost I needed
I have made these fo
I have made these for a while as well. One touch that I add is after I get the pieces assembled, I will lightly sand the parts, and clean them well. Then I will spray the tube with a can of spray-on bedliner bought from AdvanceAuto. I will do a few coats, and increase my distance from the tube on the 2nd or 3rd coat to add more texture. It creates a very tough finish and has lasted me quite a while.
If you'd like a more
If you'd like a more attractive or unique case, there are two things I've done that others may find fun to try. Both options increase the cost slightly. First, you can purchase cordura fabric, factory seconds or closeouts, for ~$6.50 a yard (check ebay for example). Your case will look professional if you do this. This is exactly how the good cases are made. Simply glue the cordura to your pipe, or stitch a tube and slide the pipe in. You can even add webbing for a handle or sling.
Second, and the most fun IMO, is to purchase white pvc, not abs. Using a medium grain sandpaper, sand the length of tube. Get the entire surface sanded. Then, using a rough grain sandpaper (medium will also work) run the sand paper from top to bottom (once or twice only - do not sand back and forth for this step). Force the grit to slice vertical lines down the pipe. Different techniques will give you different effects, you'll have to experiment. Now for the trick - take your favorite color of wood stain, and stain the pipe. Run your clothsponge with the stain from the top of the tube to the bottom. You will notice immediately that your case is taking on an uncanny wood appearance. Some folks can't tell it's pvc even when holding the case. Using a small camp stove and leather gloves, you can kinkbendwarptwist the pipe to increase the wood effect before you sand and stain. Beware of fumes.
I've been making didgeridoo instruments this way for over a decade. Each one is unique, and I've never had anyone guess it was pvc.
Tracy, They can b
They can be checked in, and will do nicely and be sturdy enough for air travel. But don't expect to bring them as hand luggage - or anything like them. Those days are over. Security is much too tight to let anything like a rod tube go through these days.
Can these types of r
Can these types of rod cases be taken on airlines?
I just used ordinary
I just used ordinary contact cement to attach the PVC fittings. Buying the actual primer and cement would have added another $5-6.00 dollars to the two tubes I built. I was able to get the contact cement at a local dollar store. It's been two years and no problems.
Hi Steven Great ide
Hi Steven Great idea. Thank you! Did you use 1 1/2" or 2" PVC?
Pvc is wonderful stu
Pvc is wonderful stuff, man. The (dubmon1)
You guys are always
You guys are always thinkin, man. Your fly patterns are some of the very best I have ever tied/used. when I need some help with anything to do with or about fly fishing, I come here. Thank you very much people. the (dubmon)
I had two rods that
I had two rods that had their gloss finish bubble completely off from storing a rod in a PVC rod tube that was homemade. I was able to scotchbrite the failed finish off, and refinish the rods. Since then, I know there have been changes made in PVC formulations, so I don't know if this may happen with some rods or not. Also, I can't speak for black ABS, but I thought it was worth mentioning.
I've made several of
I've made several of these over the years, the last for a 2 piece 9 1/2 foot 8 wt that was going in baggage when I flew back east. I went with an end cap I found in the hardware store that screws in flush with the end of the tube. It has an indented cross, like a huge phillips head screw, that requires a tool to open. I felt this would dicourage the merely curious from getting into it in transit. I also like to add a handle and shoulder strap that I pop rivet in place-but ALWAYS use a rod sock as the end of the rivet on the inside of the tube can scratch the rod.
What store do you bu
What store do you buy your PVC tubing from? I went to a local LOWE'S and HOME DEPOT but they only carried the thick walled super heavy big tubes? I like in Detroit, MI. Any suggestion would be nice ASAP. Thanks!
Another great produc
Another great product for making rod tubes is central vac tubing available at any large building supply outlet like Home Depot etc. There are even snug fitting end caps available to seal up the ends. What I do is cut the pipe to length, wet sand it with about 600 or 800 grit to make it shiny and slick. Glue the end cap in place for the bottom (put some closed cell foam in the bottom of the cap for rod protection) I then drill a small hole in the top cap (perfectly centered) and another in the side of the tube. These are done to connect the top cap to the tube with a piece of small diameter rope. Central vac tubing is made up of the same material as the PVC mentioned above (at least I think it is) but it has thinner side walls. It's still very durable however. I have found it in white and grey colors. It's pretty cheap as well. A 12ft length cost me about $10.00 and the matching end caps were $0.50 a piece.
If I'm not mistaken,
If I'm not mistaken, that's ABS pipe, which is chemically different from PVC, and has its own specific primer.
Using PVC cement will help make a mechanical joint between two pieces of ABS, but if you want a permanent joint (one that won't come apart when subject to baggage handling abuse), you may want to use the primer and cement that's specifically made for ABS.
The pictures indicat
The pictures indicate tubes of ABS not PVC. Is this correct?
I made one of these rod Tubes For my Three Piece Fly Rod.
I made one of these rod Tubes For my Three Piece Fly Rod.I'm not paying a big price for a ROD TUBE? when there so easy to make
Add new comment
Related content, more content from the front page.

Bouncing Caddis!
Leader formulas.
In order to calculate the proper formula of a fly fishing leader, you need to understand the basics of leader design.

Since you got this far …

… I have a small favor to ask.
Long story short
Support the Global FlyFisher through several different channels, including PayPal.
Long story longer
The Global FlyFisher has been online since the mid-90's and has been free to access for everybody since day one – and will stay free for as long as I run it. But that doesn't mean that it's free to run. It costs money to drive a large site like this.
See more details about what you can do to help in this blog post.
You are using an outdated browser. Please upgrade your browser to improve your experience.
- Subscribe / Renew Renew --> Add digital Give a Gift US Subscribers Address Change Int'l Subscribers Newsletter Back Issues

- Photo Friday
- Digital edition
- Classifieds
- Wild Turkey
- Solunar Calendar
- Fly Fishing
- Ice Fishing
- Guns & Gear
- Where To Go
- Ask an Expert
- She's Out There
- Guest Blogs
DIY: build a rod tube

Tired of snapping off rod tips and guides? Here’s a $20 solution to keep your rods in mint condition for years to come.
What you need
• A saw (or pipe-cutting wrench) • ABS-specific solvent cement (glue) ($2-4) • ABS pipe with a diameter that suits your needs ($5-15) • 1 closed endcap ($2) • 1 open female-threaded endcap ($2) • 1 male-threaded end plug ($1) • Open- or closed-cell foam • Optional: Para-cord, silicone caulking, spray-paint
The primary material for the rod tube is ABS pipe. Its durability and low weight make it perfectly suited for the job. First, measure the length of your rod. Many rods break down into sections, and I like to store mine broken down so they take up less space.
Once you have a measurement, buy a piece of pipe that accommodates the length. If the pipe is long, cut the excess with a saw (a pipe-cutting wrench also works well). The rest is easy. Make sure the pipe is clean and glue the endcaps to both ends. Once they are dry, cut a round piece of foam and insert it into either end of the tube for cushioning. Mine came from the foam padding in a mail-order package.
I used a 2-inch diameter pipe for a single fly rod, and a 4-inch pipe to hold several 2-piece spinning and baitcasting rods. I like to spray-paint the tubes.
At this point, you are either done or can continue with a few customizations. I added a handle by braiding para-cord, drilling two small holes, and attaching it with a knot on the inside of the pipe (there are many online instructional videos that demonstrate how to braid para-cord). If you add a handle, seal the holes with silicone caulking, for a waterproof setup. With a marker, label the top of the tube so you know what rods are inside. Since making my rod tube four years ago, I’ve had no issues keeping my rods safe.
Originally published in the 2020 Fishing Annual issue of Ontario OUT of DOORS
Click here for more DIY projects
For more fishing content click here, related posts:.
Sign up for our mailing list
You can use these tags: <a href="" title=""> <abbr title=""> <acronym title=""> <b> <blockquote cite=""> <cite> <code> <del datetime=""> <em> <i> <q cite=""> <s> <strike> <strong>

- Memory Bank

Do you have hunting, fishing, and outdoors photos to share? Submit yours today!

MAGNETIC WEIGHT TRANSFER SYSTEM OUT-CASTS & OUT-FISHES ALL OTHER LURES! SEE THEM NOW!
- Totally Useful Stuff
- Terms of use
- Privacy Statement
- Accessibility
Stay in the know on all things hunting and fishing in Ontario. Sign up for our FREE newsletter!

P.O. Box 8500, Peterborough, Ontario, K9J 0B4
©2024 OODMag.com - All Rights Reserved

- Search forums
- Fishing Magic
- The UK Fly Fishing Forum
- Salmon Fishing Forum
- Sea Trout Forum
- Thomas Turner
- Tackle Talk
DIY Rod Tube
- Thread starter Daz
- Start date Jul 20, 2020

National Treasure
Anybody have any experiences (good or bad) with a DIY rod tube? I've got a two-piece 7'6" 3wt that doesn't have a tube and I really don't want to risk it getting dinged up. I've looked around online and did find a nice looking pre-made 48" carbon fiber tube on the auction site, but I got to thinking that I should be able to make something myself for less if I can source materials (aluminum or glass tubing and end caps). I know I could go with PVC, but would really prefer something nicer. Any ideas / suggestions?
Well-known member
I've used PVC drain pipe for 30+ years. Probably have a dozen currently. Never have had any trouble with them. Most 2 piece rods will fit in 1 1/4" thin wall (sch20 has larger than nominal ID) I put a cap on one end and screw cap on the other. <$10/rod iirc It could be covered with cloth or painted, perhaps camo colors Key is PVC is available next door, most aluminum or FRP tubing is going to be harder to source. Fiberglass tubing will probably be called FRP The ID needs to minimal ~1 3/8" There is a 48" Sage aluminum tube on eBay at the moment

Like Trev, I make my own rod tubes out of PVC pipe. Cheap, easy to make, absolutely bombproof. Cut out some 1/4" foam to put in the end caps, and use epoxy to glue them together instead of the two-part PVC cement. I put all sorts of fishy stickers on mine; you could paint them or cover them with cloth as Trev suggests to make them look classier. Maybe get a sticker from your rod maker/brand? Scott
Also PVC pipe. And my wife sewed some rod socks for me.

If building your own tube, don’t forget to add and allow for in the length, a piece of closed cell foam in each end To protect the rod ends.
If you do decide on aluminium tubing be sure to check that the seam inside is clean, there is usually a very sharp burr on welded tubing ( the cheapest ) so the tube will need to be lined with foam, 3mm (1/8") will be fine. Seamless tubing ( cold drawn ) is available but is more expensive because of the production process. Check the metal gauge ( wall thickness) before you buy it because there is a bewildering array of choices. Ali tubing polishes up beautifully if it's looks your after and any local machine shop or a friend with a lathe will be able to turn up some end caps for you. PVC tubing is not stable at elevated temperatures, such as those you get in a vehicle in summer, and will develop a bend. Thicker plastic tubing, for in ground drains for example, is stable but may not be available in the sizes you require, most is far to big in diameter. PS; I recently made some Aluminium uplighter's from welded tubing and made a 2 7/8" reamer to remove the burr but I'm guessing you won't want to go that far.
I have a carpet store nearby. The cores from the carpet rolls are just about crush proof. Thought about making one, I am sure they would give me all I would want. Now, how to make end caps, and waterproof the cardboard tubes....
snubnose57 said: how to make end caps, and waterproof the cardboard tubes.... Click to expand...
When I was building rods, just for kicks I ran over some thin wall pvc and an aluminum tube with my Landcruiser. No comparison. PVC was fine, aluminum was crushed. From a functional point of view, it was an easy decision for me to choose the correct material.

Montrose, Co.
I have made several using ABS. PVC is stronger and a bit less prone to bending. Thought ABS is strong enough. lighter and a bit easier to work with.
As an update, after looking at multiple options (including buying a pre-made tube), I decided to just sell the tubeless two-piece and buy a new rod that came with a tube. New rod, easier transport, and net outlay (after applying proceeds from the sale) actually less than if I had purchased one of the new tubes that I was considering.
Buying a new rod is almost always the right solution.

It is unique, but you left off a few more adjectives like, beautiful, exceptional, dazzling. There, that's better.
Best Fishing Rod Tubes: Protect Your Best Fishing Rod

There’s something special about spring time for those of us who enjoy fishing (especially if, unlike Dad, you don’t live in Florida and can’t fish 24/7 365 days a year). The ice breaks, the temperature starts warming up, and it is time to clean out whatever part of the garage the old fishing gear is being stored in. First find your protective fishing rod tubes. You know, the ones that are holding your favorite fishing rods.
Dust them off, re-spool the reels, check the overall health of the rods to make sure everything is in working order, and then it’s time to start planning those fishing trips.
Whether it’s a visit to a recently stocked trout creek, hitting the lake for some bass or walleye, or whatever your preferred fish are in your area after the ice break, you know when it’s fishing season. That means breaking out those rods and reels, your favorite lures, and heading to your favorite fishing holes.
While the fishing rod is the obvious piece of equipment you’ll need, the last thing you want to find out during the opening of the season is that you favorite rod (or rods) are damaged because you didn’t take care to get a fishing rod tube to protect them. Read on to find our list of best fishing rod tubes currently available on the market!
Table of Contents
Protect Your Purchase!
Hey, I don’t have to tell you how much gets invested into even a small collection of good gear. The right rod and reel combination is pretty expensive in and of itself in some cases. And that’s even before adding premium fishing line, lures, boxes, and everything else. Then, oh yeah, depending where you live, a boat.
So unless you’re in one of the few areas where a good spearfishing gun is your fishing tool of choice, you will want to have one, if not several, good fishing roads that are perfectly set up for your preferred type of freshwater or saltwater fishing. The best way to transport them and keep them protected (and to avoid those oh-too-easy-to-get damaged tips) is to have the right protective tube.
Plano Fabric Rod Tube
The Plano fabric rod tube is one of the most popular choices for anglers looking for a solid but inexpensive option for protecting their fishing rods. Especially when transporting them from point A to point B or even packing them up for the long haul.
This rod tube’s main base is designed in a solid tube made from durable polypropylene that is specifically made and manufactured to be resistant from pressure and crushing. Each end is covered with a dense foam pad that helps make sure all your rod tips are protected.
The outside is lined in a solid fabric that is both tough as well as water resistant in nature. In addition to this the fabric is colored a nice green that adds an excellent aesthetic to an already extremely functional rod tube. The handle to carry this fabric rod tube easily is made from solid nylon, and with a three inch diameter there should be plenty of room for one or more rods, depending on the thickness of the base of the fishing rods you prefer to use.
We’ve dealt with broken tips before and while it’s not a big deal when you have a Dad who makes custom rods (seriously, he does, check out some of his work on the Facebook page for LMD Custom Rods ), at least when we’re by his work area. If you’re traveling to a lodge on a lake in Canada where the only way in is a one hour boat ride then a few broken rod tips become a very big deal. Protect them!
These particular protective rod tubes are 48 inches in length, with a 3 inch width and height. While there are a lot of great options out there, we are huge on this one from personal experience, and that is backed up by online ratings and reviews that are frankly superb.

Adamsbuilt Fly Tailwater Rod Case
While the Adamsbuilt rod case might be second on our list, there is a very good case for arguing that Plano is 1A and Adamsbuilt is 1B when it comes to the best and most effective overall cases for protecting your fishing rods. In fact, we’d be willing to listen to any angler who made the argument that there isn’t even that much separation between these two outstanding options.
The Fly Tailwater Rod Case is a touch over 30 inches long but has space for up to 30 inches of length (very important if you have particularly long rods). This is a single rod case that comes with a shoulder strap for convenient carrying and transport.
There are pockets integrated into the design for rod pieces in the interior, although no reel pouch. This is an impressive hard case that certainly holds up to initial tests and has the type of solid strength I want when protecting my fishing rods.
Each end has about 1.5 inches of foam to help make sure your rod doesn’t receive any damage from bumping the ends during transport. The inside diameter is 2.25 inches, and while this one isn’t as widely used as some of the others on this list, there is a reason that it has earned the #2/1B spot on this list. If you want solid protection for your fishing poles, you aren’t going to be disappointed with what this one brings to the table.
High quality, reasonably priced, and it gets the job done. What more could you ask for? A well deserved #2 spot!

Plano Airliner Telescoping Rod Case
This is a design that definitely catches the eye, that’s for sure. This telescoping rod case is adjustable, using a three tier design that combines with a remarkable 5 inch diameter to allow you to store not just one or two rods, but in most cases up to eight 7 foot rods. That is an impressive set up.
Depending on what you’re carrying at the time you can fully extend this particular Plano Airliner protective tube case to be a full 88 inches in length or if you are only transporting the protective tube itself at the moment then it breaks down to 47 inches to make it much easier to transport to and fro.
In other words, it is a remarkably well built and very versatile design that is going to find a large number of fans among anglers, especially among those of us who understand the importance of being prepared and carry multiple fishing rods with us wherever we go. The hard sided case should be more than enough to protect all of your favorite rods during bus or airline travel, and you are going to be very hard pressed to find any other design that comes even close to offering the same amount of space and thus the ability to transport the same number of rods.
Speaking of travel, there are some basic holes drilled into the design. You’ll need two basic locks to secure the tube, but that’s it: you won’t need anything special. Among the telescoping rod cases we’ve seen, this is the one we’ve got to give the highest grade. With hundreds of positive reviews from happy buyers, it’s not hard at all to see why this choice is an outstanding addition to the list.
Redington Single Tube Case
Featuring a classic but effective hard shell design, this basic protective tube for fishing rods might not be flashy, it might not have an eye catching design, but it is effective and gets the job done. These cases are designed to hold rods up to a length of about 27 inches on the inside once you mark off for the necessary foam padding on each side.
It’s important to note that while this case can be used for several different fishing rod designs, this Redington case in particular is designed to carry a 9 foot long 4-piece fly rod. The section of these rods are 2 feet and 3 inches, or 27 inches total.
While the overall length of the Redington protective fly rod case is 31 inches, that’s the total amount. Make sure to only use this with rods whose sections are 27 inches or less otherwise you will find yourself in a situation where they don’t fit or there’s bending, which risks damage and really defeats the purpose of having a protective carrying and transport case for your fishing rods.
An adjustable shoulder strap for easy carrying is a nice benefit while reinforced plastic caps at each end means you can rely on this tube doing the job. As long as your fly rod fits perfectly, you’ll be extremely happy with the quality of this case and the job it does.
Allen Riprap Fishing Rod Case
Another great addition to this list, it’s obvious right from first glance that this is a very different type of carrying case from many of the others on the list. While most of the protective rod tubes on this list are designed only to protect the broken down fishing rods, they don’t have any space for the reel.
This case is designed specifically to fit spinning rods of up to seven feet or can also work with the right type of 4-piece spey/switch fishing rods all the way up to 13 feet. The key is making sure that the individual parts of the broken down rod aren’t too long for the case.
While the “side bag” that gives this case room for the reels is made of a tough nylon cloth, the tube section actually holding the rods themselves are made from a harder material that is built so it won’t be crushed or damaged.
This allows the full level of protection you need for the more thin and delicate sections of your fishing rod while also eliminating the inconvenience of having to find another way to transport the reels.
Featuring a classic olive color this fits right in with the other gear many other outdoor enthusiasts are likely to have or use and a padded handle means easy carrying. There is also a clear plastic ID window which is definitely convenient if you’re flying and need to quickly ID what is yours, or simply prove that it is.
This model is a bit more expensive than some of the others on the list but there’s no denying a certain convenience here that the other models will not be able to match. Because of that for some of us this is worth the extra little bit of payment.
Plano Adjustable Rod Case
Plano appears once again on the list and while this version of an adjustable protective rod case couldn’t quite make it as the highest rated we have, there’s no shame in coming in second to another model from your own company.
Bronze is pretty dang good if your brothers are gold and silver. This 3″ adjustable rod case comes in a stark white color that definitely sticks out and frankly kind of reminds me of the PVC pipe experiment my dad had to create his own protective case for his collection of fishing rods.
This case has received high marks for being able to hold rods up to 8.5 feet in length, and this is a reliable, simple, but effective design that gets the job done without too much fuss or confusion. The adjustable fishing rod case comes with a Plano brochure as well as a nameplate order form. Each end of this design has foam padding to protect rod tips and can also be locked for that extra bit of security.
While in general the materials used would be waterproof because there are small holes for adding locks or for adjusting the length, if submerged this will take on water but if your fishing rod tubes are all submerged in a lake chances are you’ve got much bigger problems going on at that point. A limited lifetime warranty backs what is sure to be more top notch craftsmanship.
Flambeau Outdoors Bazuka Rod Case
Flambeau certainly wins the award for most attention grabbing name out of all the options on this list. Winning praise from many anglers for being an especially sturdy design, the Bazuka is a telescoping protective rod case that boasts of a 5 inch diameter (plenty of room for multiple fishing rods as a result), and can go from 63 inches all the way up to 87, offering plenty of space for even some of the largest fishing rods.
In ideal conditions the Flambeau case can hold up to a half dozen 6.5 inch rods and the case boasts of being virtually indestructible, a boast that is hard not to take seriously as they have foregone any attempt to make it look like it has a basic cloth or leather cover.
This is a strong solid tube meant to protect the contents and it truly shows. The versatility of this case makes it extremely popular and it has a hinged door to make it easy to load or unload.
While this is convenient, the one knock this product has had is that every great once in a while those very same hinges will be damaged, which kind of nullifies the benefit of having a nearly indestructibly constructed tube.
However, for most anglers this is never an issue and the purchase is well worth every penny, with many reviewers commenting that while a touch on the expensive side, they see the value as being very much worth it.
Entsport Foldable Fishing Rod Bag
The last one on the list definitely is more about transportation as opposed to focusing on protection. There are plenty of good options for the latter on this list already, and even a brief review of Amazon will reveal more. Although I feel pretty confident that even a long search there will give you a list of a lot of familiar names after you’ve read this article.
However, when it comes to simply wanting and easy and reliable way to transport, the Entsport foldable fishing rod bag is a favorite among those who have tried it.
This bag is 45 inches in length and can be used to easily group together and transport your group of protective rod tubes, cases, and other similar materials. If you have four or five rod tubes to carry around, that can quickly become a giant pain in the backside.
On the other hand, with a good fishing rod (or fishing rod case) bag that was designed just for that type of transportation, you are going to be in much better shape and not have nearly as many potential issues.
While this is a very durable bag, it’s also important to recognize it as what it is and NOT a substitute for an actual hard tube that will actually protect rod tips and the body of the fishing poles themselves.
Many Names for Fishing Rod Tubes
These outstanding pieces of protective fishing equipment come under many names. Whether you refer to them as a rod case, a rod tube, travel case, or something else completely, it’s important to remember that you are protecting what is likely one of your most expensive (and important) pieces of fishing gear so you don’t want to skimp!
This just scratches the surface, as well. There are many different fishing rod cases out there, and memories of my childhood include actual bought rod tubes from the sporting goods store but it also includes some DIY work with PVC pipe. The key is that at the end of the day you want to make sure what you have is going to work to protect your investment.
In Conclusion
You don’t want to drop some serious money on your new fishing rods only to end up breaking a tip or seeing them damaged in transport. While getting a top rated fishing rod tube or protective holder doesn’t have that sexy appeal as a brand new rod and reel combination, it’s an investment you want to make. Protecting your best gear is crucial to getting the most out of your time out in nature, and getting a couple of these for your best rods will help you travel in confidence and make sure you always have your best fishing days ahead of you.
Personally I’m not as big on the DIY projects as others and I’d probably go with a proven one but if you guys are looking for one way of creating your own protecting case for your favorite fishing rods, this video is one of the best I’ve seen:
Video DIY Creating Fishing Rod Case
Pine Knoll Lodge & Cabins
Diy Fishing Rod Travel Case
A fishing rod travel case is a must-have for any angler who loves to fish on the go. While there are many commercially available cases on the market, you can also easily make your own case at home. This article will show you how to make a DIY fishing rod travel case that is perfect for your needs.
The first step is to choose the materials you will need for your case. You will need a sturdy box or container, some foam insulation, and a cutting tool. The size of your box will depend on the size of your fishing rod. You will also need to decide on the shape of your case. A simple rectangular or square box will work, but you can also get creative with a more custom shape.
Once you have chosen the materials, it is time to start cutting. The foam insulation should be cut to fit snugly around the fishing rod. Make sure to leave enough room for the rod to fit comfortably in the case. If you are using a custom shape for your case, you will also need to cut the foam to fit.
Once the foam is cut to size, it is time to assemble the case. Start by placing the fishing rod in the box or container. If you are using a rectangular or square box, you can then place the foam insulation in the box around the rod. If you are using a custom shape, you will need to place the foam in the correct position before closing the case.
Once the foam is in place, close the case and secure it with tape or a closure. You now have a custom fishing rod travel case that is perfect for your needs.
- 1 How do you make a travel rod tube?
- 2 How do you make a simple fishing rod holder?
- 3 How do you travel with a fishing rod on a car?
- 4 How do you make a PVC fishing rod holder?
- 5 How do I make a homemade rod tube?
- 6 How do you make a PVC rod tube?
- 7 How do you make a homemade rod holder?
How do you make a travel rod tube?
Making a travel rod tube is a great way to protect your fishing rods while on the go. There are many different ways to make a travel rod tube, but the following is one of the simplest and most effective methods.
To make a travel rod tube, you will need:
-A PVC pipe
-A measuring tape
1. Measure the length of your PVC pipe and mark it with a marker.
2. Cut the PVC pipe with a hacksaw.
3. Drill a hole in each end of the PVC pipe.
4. Cut a piece of fabric that is slightly larger than the PVC pipe.
5. Sew the fabric around the PVC pipe.
6. Sand the edges of the fabric to prevent them from fraying.
7. Insert your fishing rods into the PVC pipe.
8. Close the fabric around the fishing rods with a zip tie.
Your travel rod tube is now ready to use!
How do you make a simple fishing rod holder?
There are a few different ways that you can make a fishing rod holder. In this article, we will show you how to make a simple fishing rod holder using a PVC pipe and some clamps.
To make this fishing rod holder, you will need the following supplies:
-Tape measure
– hacksaw
-Pipe cutter
-Paint or a sealant
The first thing you need to do is measure the PVC pipe to fit your fishing rods. You will want to make sure that the PVC pipe is at least as long as the fishing rods.
Once you have measured the PVC pipe, use a hacksaw to cut the pipe to the desired length. If you are not comfortable using a hacksaw, you can also use a pipe cutter to cut the pipe.
Once the PVC pipe is cut to the desired length, use a pipe cutter or a hacksaw to cut the pipe into two pieces. The two pieces should be the same length.
Next, use a clamp to attach the two pieces of PVC pipe together. Make sure that the clamps are tight, so that the PVC pipe does not move.
Once the PVC pipe is clamped together, use a tape measure to measure the width of the fishing rods.
Next, use a hacksaw to cut a piece of PVC pipe to the desired width. This piece of PVC pipe will be used to hold the fishing rods.
Once the PVC pipe is cut to the desired width, use a pipe cutter or a hacksaw to cut the pipe into two pieces. The two pieces should be the same width.
Next, use a clamp to attach the piece of PVC pipe to the top of the PVC pipe. Make sure that the clamps are tight, so that the PVC pipe does not move.
Now, your fishing rod holder is finished! You can use this holder to store your fishing rods while you are not using them. You can also use this holder to take your fishing rods with you on your next fishing trip.
How do you travel with a fishing rod on a car?
When you’re traveling with a fishing rod, you want to make sure that it’s well-protected. There are a few ways to do this. One way is to put the fishing rod in a protective case. This will protect it from getting damaged. Another way to protect the fishing rod is to put it in the car’s trunk. This will protect it from the wind and the sun.
How do you make a PVC fishing rod holder?
Making your own PVC fishing rod holder is a great way to save money and have a custom holder that is exactly the size you need. There are a few different ways to make a PVC fishing rod holder, but all of them involve cutting and drilling PVC pipe.
The simplest way to make a PVC fishing rod holder is to cut two pieces of pipe to the desired length and then drill a hole in each one for the fishing rod to fit through. If you want to make a more secure holder, you can also add a PVC fitting to the top and bottom of the holder. This will allow you to attach the holder to a post or a wall.
If you want to make a fishing rod holder that can be used in the water, you can add a PVC fitting to the top and bottom of the holder and then attach a piece of PVC pipe to each fitting. This will create a holder that is stable in the water and that will keep your fishing rods from getting wet.
No matter how you choose to make your PVC fishing rod holder, it is important to make sure that the holder is stable and that the fishing rods fit securely in the holder.
How do I make a homemade rod tube?
A rod tube is a common piece of fishing gear that is used to protect fishing rods while they are not in use. It can also be used to protect the rod while it is in transit. There are a few different ways to make a homemade rod tube.
One way to make a homemade rod tube is to use a PVC pipe. You will need a PVC pipe that is at least as long as your fishing rod is. The PVC pipe should also be at least as thick as your fishing rod. You will also need a PVC pipe cutter to cut the PVC pipe to the correct length.
Once you have the PVC pipe, you will need to cut one end of the pipe off. This will be the end that you will put your fishing rod in. The other end of the PVC pipe will need to be sealed. You can do this by using a PVC glue or a PVC sealant.
Once the PVC pipe is sealed, you can put your fishing rod in the tube. You can then use the PVC pipe to protect your fishing rod while it is not in use or while it is in transit.
Another way to make a homemade rod tube is to use a cardboard tube. You will need a cardboard tube that is at least as long as your fishing rod is. The cardboard tube should also be at least as thick as your fishing rod.
Once you have the cardboard tube, you will need to cut one end of the tube off. This will be the end that you will put your fishing rod in. The other end of the cardboard tube will need to be sealed. You can do this by using tape or a hot glue gun.
Once the cardboard tube is sealed, you can put your fishing rod in the tube. You can then use the cardboard tube to protect your fishing rod while it is not in use or while it is in transit.
How do you make a PVC rod tube?
Making your own PVC rod tube is a great way to protect your fishing rods while they are not in use. This project is simple and can be completed in just a few steps.
To make a PVC rod tube, you will need the following supplies:
-a piece of PVC pipe, at least 2 inches in diameter
-a PVC pipe cutter or a hacksaw
-a measuring tape
1. Measure the length of your fishing rods and cut the PVC pipe to that length.
2. Use a marker to draw a line around the PVC pipe at the desired height of your tube.
3. Use a hacksaw or PVC pipe cutter to cut the pipe along the line.
4. Measure and mark the desired width of your tube.
5. Use a hacksaw or PVC pipe cutter to cut the pipe to the desired width.
6. Use a level to make sure the tube is straight.
7. Use a measuring tape to measure the inside diameter of the tube.
8. Cut a piece of PVC pipe to the desired length and inside diameter.
9. Slide the cut piece of PVC pipe into the tube.
10. Use a level to make sure the piece of PVC pipe is straight.
11. Use a hacksaw or PVC pipe cutter to cut the piece of PVC pipe to the desired length.
12. Slide the cut piece of PVC pipe into the tube.
13. Your PVC rod tube is now complete!
How do you make a homemade rod holder?
Making a homemade rod holder is a great way to save money and customize your fishing gear. There are a few different ways to make a rod holder, so choose the method that best suits your needs.
One way to make a rod holder is to use a PVC pipe. Cut the PVC pipe to the desired length, and then use a saw to cut a V-shape into one end. The V-shape will hold the rod in place. You can then use a hot glue gun to attach a PVC T-joint to the other end of the pipe. The T-joint will allow you to attach the pipe to a post or a railing.
Another way to make a rod holder is to use a piece of lumber. Cut the lumber to the desired length, and then use a saw to cut a U-shape into one end. The U-shape will hold the rod in place. You can then use a screwdriver to attach a wooden T-joint to the other end of the lumber. The T-joint will allow you to attach the lumber to a post or a railing.
Finally, you can also make a rod holder using a metal pipe. Cut the metal pipe to the desired length, and then use a saw to cut a V-shape into one end. The V-shape will hold the rod in place. You can then use a drill to attach a metal T-joint to the other end of the pipe. The T-joint will allow you to attach the pipe to a post or a railing.
No matter what method you choose, make sure that the rod holder is secure and will not fall over. You can also add a cushion or a pad to the holder to protect the rod. Enjoy your new homemade rod holder!
Related Posts
Good travel snacks for diabetics, good time to travel to cancun.
Wooden Fly Rod Tube

Introduction: Wooden Fly Rod Tube

My brother and I are avid fly fishermen. I love all kinds of fishing but fly fishing is my favorite. The other day he texted me a picture of a wooden fly rod tube that Orvis sells. Really fancy with some nice inlay work. The text read: I bet you could make one of these. Hmmmm….. challenge accepted, except for the fancy inlay work. The main challenge was to figure out how to make a round cylinder out of wood. I looked at the picture he sent me and I could see that the inside of the tube was octagonal. So I need to make an octagonal blank and turn it down to where it is cylindrical. My first thought was to use my jack plane…. plane down the edges to go from 8 sided to 16 sided and then from 16 to 32….etc. Afterwards sand it all smooth. But that would take a lot of work and it would require careful attention to maintain a constant diameter across the length of the tube. I wanted to make a bunch of these rod tubes so I needed a better method.
I thought about a jig that I had made a few years ago that allowed me to use my router table to make large wooden dowels in the range of an inch and a quarter to an inch and a half in diameter. The difference here was that the fly rod tube is hollow, has an outside diameter of 3 inches, and is over two and a half feet long. I had an idea but first I needed to design the octagonal blank to determine various critical dimensions for the jig.
Jigs are great in that they can make the job so much easier as they provide a reliable and repeatable process for building/shaping things. Variability is reduced such that much less skill is required to fabricate pieces. And if you are making several copies of the item then it is especially well worth the time and effort of designing and fabricating a jig. I’m calling the device I came up with for this project the Cylinder Jig .
Supplies: I have access to a large supply of old oak barnwood from our family farm in West Virginia. This wood is probably in the range of 150 years old and started growing over 200 years ago. It has been in my family's posession for many generations and is quite special to me. The fifth picture shows the piece of wood that I used for this project. It looks pretty rough and most people would probably relegate it to the burn pile but run it through a surface planer and it is actually amazing material. I used the oak to make the tube as well as walnut (picture 6) for the end caps.
A leather strap holds the top cap in place and I used snaps to secure it to the tube. I've had these leather scraps for decades… leftover from a simple project I made when I was in high school. It's pretty thick... in the 3 to 4 mm range. Sometimes it pays to be a pack rat. I ordered the snaps off of Amazon. Though as it turns out that the rivet on these was too short for the thickness of leather that I was using. So I bought some other snaps from Tandy Leather and used the top piece from that package with the rest of the snap pieces that I already had. You can get these snaps from Amazon as well.
I used Titebond 3 wood glue and I had a can of wipe-on polyureathane finish left over from another project. I like the satin finish version. The other glue that comes in handy is a can of spray adhesive. I used Elmer's CraftBOND to glue paper templates in place.
Half inch MDF is used to build the cylinder jig along with #8 screws, wing nuts, and a small section of a 3 inch diameter pool noodle. Also a 1 inch diameter hardwood dowel is required. All of these materials are available at most of your average hardware stores. Though I got the pool noodle at Target and it was left over from my Catfish Noodle/Jugline project (another one of my Instructables).
Tools: I have a good assortment of power tools that help make the job so much easier. Table saw, miter saw, router table, drill press, surface planer, disc sander, random orbital sander, and hand drill. Obligatory word of warning: Power tools can be dangerous if used improperly. Read and follow the manufacturer’s instructions and wear the appropriate safety gear. I always have on my safety glasses and hearing protection when using power tools. Along with an assortment of basic hand tools like screw drivers, hammers, Xacto knife, rulers, clamps, etc. I also purchased a leather stitching kit from Amazon but found I needed a couple of additional leather tools and I bought those from my local Tandy Leather. The surface planer and table saw are essential if you are repurposing old lumber like I am. And a router table is required to use the jig that we are featuring in this tutorial.
Step 1: Designing and Building the Octagonal Blank

I checked the details for the rod tube that Orvis sells and it was 3 inches in diameter and 34 inches long. This length includes the end caps and it was also specified that the tube would accomodate a 10 foot 4 piece fly rod. My rods are 9 feet long so I will end up with a little shorter tube. I also measured the inside diameter of one of my existing metal tubes and found that it was 2 inches. Finally I measured the length of the individual rod pieces of my nine foot rod and they were about 29 inches. So I need to make sure that I have at least that much room in the wooden tube plus additional space to accomodate the top cap and end cap.
I pulled up AutoCAD and constructed an octagon that would fit around a 3 inch diameter circle as well as another octagon that would fit over a 2 inch diameter circle. Then I connected the vertices of the octagons and ended up with a cross section of the rod tube. The attached PDF file is the full sized drawing of the cross section and is included simply as a reference. Once I had completed the diagram it was a simple matter of measuring the dimensions for what would be the individual staves of the rod tube. As it turns out each stave would start as a 1.25 inch wide by 0.5 inch thick by 36 inch long piece of wood. These were ripped using the table saw. The additional length would allow me to work around some of the imperfections (cracks, knots, checks) in the wood. I ended up with pieces that were about 31.5 inches long once I evaluated each stave and trimmed off the imperfections as best as I could (first picture). What little knots and cracks that were left over I made sure that these would be on the inside of the tube and I ran the staves across the router table using a 22.5 degree chamfer bit (picture 2).
At this point I'm starting to get excited. The staves looked really good and were nice and straight. I lined up the staves and put a few strips of masking tape across them. Then I rolled them together (picture 3). Ha! Really cool! So far I'm on the right track. I set a metal rod tube next to the blank for comparison.
Glue ups always seem to be a dang fire drill and I was especially anxious on this one. There was a lot of surface area to cover and a number of clamps to install. I got the hose clamps from the local hardware store. They were adjustable across a pretty wide range… something like 2 inches to 4 inches in diameter so perfect for this application. I set my drill on the slowest speed and lightest torque setting and installed a socket that fit the screw head on the clamps. Definitely the way to go. I applied masking tape on the inside face of the staves to help keep the mess down. I wasn’t concerned about getting glue all over the outside since all of that surface would get machined away.
I set all of the staves back side down on a single piece of masking tape running across the center and left a little tag at the top (4th picture). Glue is slathered over all the mating surfaces, the whole mess is rolled up while trying to keep the ends as even as possible and then I wrapped tape up and down the length of the assembly. Next the clamps were installed and lightly tightened with the cordless drill. The last step was to snug the clamps down to where they were just hand tight (picture 5). There was a lot of squeeze out (which was good) but it was a pretty big mess. I grabbed a huge wad of dampened paper towels to clean up the inside and used a long dowel as a ram rod to push it through. Worked pretty well. I gave it about an hour then I peeled off the tape on the inside. That was a bit tricky and I end up using the dowel again to help peel off the tape as I slowly worked it down the length of the tube. The glue was allowed to set for 24 hours before removing the clamps and rest of the tape (last two pictures).
Looking back this was the hardest part of the project. So once you’re past this point you can relax a bit.
Attachments

Step 2: Designing and Building the Cylinder Jig

Now that I completed building the octagonal blank I had something tangible to help me design and build the jig. I just wanted to make sure everything was in the ballpark before I got too far along. As it turned out I was pretty close when I measured the dimensions of the blank. On to the jig…
The jig is constructed with half inch MDF from the local big box hardware store. They had 2 foot by 4 foot pieces already cut so I didn’t have to buy a big 4 by 8 sheet. You’ll also need four #8 screws and wing nuts. I had some 3 inch screws left over from another project and I cut the heads off them so I had two inches worth of all thread. Titebond 3 glue holds everything together.
Start by ripping the MDF lengthwise to a width of three and three quarters (3-3/4) inches. Repeat 2 more times. Now you have three 4 foot pieces that are 3-3/4 inches wide. Everything is made from these 3 pieces. Cut two of those down to a length of 34 inches. These are the side pieces. Take the last 4 foot section and cut 6 pieces that are 3-3/4 inches wide and 2 that are 4-3/4 inches wide. And finally 2 pieces that are 1 inch wide. Save the scrap for later. We’ll be using it to build a holding fixture.
One thing to keep in mind is the more accurate you are in building the jig the better results you’ll get when you use it.
Take one 3-3/4 wide piece and glue that in the dead center of one of the 4-3/4 inch pieces. Repeat. When the glue is set (24 hours later) drill a 1 inch diameter hole in the middle. I just drew 2 diagonal lines across the back from corner to corner to mark the center. These are the two end pieces of the jig.
Next print out the template. Make sure you print it actual size. The diameter of the smaller circle should be 3 inches. Cut out the 4 templates and glue them to the remaining four 3-3/4 inch wide pieces using the spray adhesive. This stuff sets pretty fast so you don’t have to wait long. Now drill a 1 inch diameter hole in center of the template for each piece. You should end up with something like picture 1.
I used a scroll saw with a fairly fine blade to cut out the pieces shown in picture 2. When cutting out the circular pieces make sure you are using the inner (3 inch diameter) circle on the template as your guide.
In picture 3 I have marked points 1 inch away on either side of the vertical centerline. Draw a line from each of these points to where they connect tangentially to the circle. Cut along those lines and save the pieces that are removed but make sure you keep the pieces togther since they are a matched set. Take a look at picture 4 to get an idea of what you end up with (but we haven't drilled the holes yet).
In retrospect I did the next step the hard way but ended up getting lucky and everything fit. Let's jump a little ahead and take a look at the end result we're shooting for. Take a look at pictures 5 and 6. That’s what we want. I measured all of the hole positions separately, drilled them on the drill press, and then glued. It would probably be easier to mark and drill the one inch wide pieces and then glue on the little wedge. Once that dried set the glued piece in place on the matching end piece and then match drill with the cordless drill. That would give you a more fool proof method to having everything fit well. For reference… I drilled the holes 1/2 inch in from the outside edges of the 1 inch wide piece along the centerline. I used a drill bit that was just barely larger than the #8 screw thread diameter. Mark your drill bit with a piece of tape so that you drill to the correct depth. You want to end up with about 3/4 of in inch of threads sticking out of the jig. Once end piece has been match drilled apply glue to the lower half of the all thread and place it in the hole. Keep the part vertical and let the glue set for a while before handling.
Picture 7 shows the little clamping wedges (top) and the cylinder end caps (bottom) once they have been glued. I used one end of the 1 inch dowel as an alignment guide when I glued the end cap pieces together. Just make sure to remove them from the dowel before the glue sets!
In picture 8 we have the side and end pieces being glued together. Use light clamping pressure… just enough to pull everything together. I used masking tape to make squeeze out clean up easier. One key element is to make sure that you glue up the assembly on a dead flat surface. I used my granite counter top in the kitchen. You want the jig to be as level and even as possible.
24 hours later in picture 9 the glue is set and the clamps are off. I’ve also installed the octagonal blank for the first test fit. I noticed a couple of minor issues that were easily corrected. One of the cylinder end caps wasn’t as snug as I wanted it and it bothered me that there was nothing to keep the end caps against the octagonal blank. So in picture 10 I added a small piece of 3 inch diameter pool noodle over the end of the dowel and I added a layer of tape on the cap that was a little loose. A second test fit was good.
Step 3: Loading the Octagonal Blank Into the Jig

If you are paying especially close attention you will notice a couple differences in the next two sections. I was really excited when I loaded up the jig with the oak blank that I couldn't wait to take it to the router table and start cutting chips. In doing so I totally forgot about taking pictures of the process. Duh!!!! (Smacks self in forehead). I devoted 100 percent of my attention to evaluating the performance of the jig and didn't take any pictures while I was cutting the blank. I also didn't show how to load the blank into the jig. I first attempted to write this section of the instructable without those pictures and it just wasn't working for me. The whole point behind this instructable was to feature the jig! Therefore... I built another blank out of some cedar that I had on hand and repeated everything with more picture taking and a video. So if you are looking at the pictures and thinking something looks different... well, that's why.
On with the show...
In picture 1 we have our newly constructed cedar blank sitting next to the cylinder jig. I cut the blank longer this time which removed the need for the small slice of pool noodle as a gap filler. The length of the blank is just a smidge under 32 inches to keep it from binding in the jig. You want it snug but still able to freely rotate.
To install the octagonal blank in the jig remove the clamping blocks from both ends of the jig and take out the dowel/cap assembly (picture 2). Slide one of the end caps off of the dowel (picture 3). This will allow you to run the dowel through your blank (picture 4). Replace the end cap back on the dowel (picture 5). Now slide both end caps towards the ends of the blank and insert the octagonal parts of the end caps into the blank... they should be snug (picture 6). It will sort of look like a giant (albiet octagonal) rolling pin (picture 7). Now place this assembly back into the base of the cylinder jig (pictures 8 and 9). Replace the clamping blocks and secure with the wing nuts (pictures 10 thru 13).
Pictures 14 and 15 show the snug fit of the blank in the jig.
The completed setup is depicted in picture 16 and is ready to go to the router table.
Step 4: Using the Cylinder Jig

I will say that the first time I used the jig to turn down the oak octagonal blank it was a time consuming process as it took probably 2 or 3 hours to complete. But I was going extremely slow and assessing my progress very carefully along the way. Turning down the cedar blank went much faster... about half the time. Note: All of the still photos in this section were taken with the router table off to make it easier. So if you don't see any chips flying in the pictures that's why. I have included a video demo of the first rotation where I knock off the high points on the octagonal blank. That way you can see the cylinder jig in use. Oh... The router is loud so turn your sound down.
The first step is to set up the router table fence. This doesn't have to be precise... you can just eyeball it. Or since the width of the jig is 4 and 3/4 inches you can measure over 2 and 3/8 inches from the fence to the center of the bit. However you want to do it... set the fence such that the bit is under the center of the jig (picture 1). I used an empty jig for this picture so you get a better view of how everything lines up.
I used a 1/4 inch up-cut spiral router bit and it will need to be raised just a tiny amount such that it barely contacts one of the edges of the octagonal blank. On my setup that turned out to be about a quarter inch. The first several passes that you make will only be taking off the high points on the wooden blank. Theoretically you could just set the router bit to the final height and make one rotation of the blank but I think it’s better to slowly creep up on it by making very shallow cuts over multiple passes. I just believe it’s a safer approach and gives you the opportunity to make any corrections along the way if there are any issues with the setup. It will also give you a smoother surface requiring less sanding.
A couple of notes before we proceed further… The circular part of the end caps are 3 inches in diameter. This is the diameter that you will be shooting for as you are turning down the octagonal blank. The idea here is to be able to use these as a reference during the process and let you know that everything is being cut symmetrically. Also, if you look at the end cap in picture 2 you can see a pencil mark on top of the circular part of the end cap. This is a witness mark that will let you know when you have made a full rotation of the octagonal blank. And finally, you will be starting the cut with the router bit underneath one of the end caps and then ending your cut when you complete the pass and the bit is under the other end cap. You need to have a sense of where the router bit is so you might want to make some pencil marks on your router fence and the jig for reference. I pushed the fence together and where the ends meet there in the middle was my indicator for where the bit was positioned (picture 3).
With the router switched off set the jig on the table and against the router fence. I made sure that the octagonal blank was rotated such that one of the flat faces of the blank was parallel to the table top so that the router bit would not touch (pictures 4 and 5). Slide the jig to the right until the router bit is under the left end cap (picture 6). At this point a pretty good part of the jig is now cantilevered off the right side of the table so keep one hand on the jig at all times to keep it from tipping off the table. Turn on the router and with both hands on the jig ensure that it is firmly against the table top and against the fence. Rotate the octagonal blank so one of the edges is pointed up (picture 7). This will ensure that the opposite edge is pointed straight down and will be contacted by the router bit when you start your cut. Now slowly and smoothly slide the jig to the left and continue the cut until the bit clears the blank and is under the end cap (picture 8). You should be able to tell when you’ve completed the cut by listening to the sound level change. Remember to keep your hands on the jig and pushed against the table. Now that you have completed the first pass use your fingertips to barely rotate the blank away from you. Maybe an eighth of an inch or so. Then start your next cut by slowly and smoothly moving the jig to the right and continue until you have once again cleared the blank. So you are cutting in both directions and the process is cut… rotate slightly … cut… rotate slightly… cut... etc. until you have made one full rotation of the blank. Keeping an eye on the witness mark will let you know when you have made a full rotation. Switch off the router after you have made a full rotation and let it come to a complete stop before proceeding. Remove the jig from the table and raise the router bit just a little… no more than a sixteenth of an inch… maybe even less. When you’ve got everything set then you repeat the cutting process and do this over and over until you have a 3 inch diameter cylinder. Now you have pretty darn close to a next to perfect cylinder (pictures 9, 10, and 11).
I hope all of this made sense. Seems like it took a lot to describe but it really is very simple. The video should make everything clear if there is any confusion.
One more note: During the first few rotations the router bit will only be contacting the high points on the blank so you can cheat a little bit and rotate the blank more between cutting passes (like in the video). Otherwise if you just rotate it a tiny bit then you'll be sliding the jig back and forth several times before you rotate it enough to actually start cutting again.
And now we will be switching back to our regular programming using the oak cylinder starting with the last three pictures. LOL… well the upside is I do have the hard part of another rod tube done. I’ll update the instructable with a few pictures when I finish it. I’m really curious how the cedar will work out. It's about half the weight but nowhere near as strong and hard.
Step 5: Building the End Caps

Print out a couple more sheets of the template from step two. We'll be using them to fabricate our end caps.
I'll start with the top cap. I cut out three of the templates and trimmed one of them down to just an octagon. These are spray adhesive glued to a piece of walnut (picture 1).
Important Construction Note: When gluing down the templates make sure that one of them is oriented such that one of the octagon sides is parallel to the edge of the board (see picture 2 for reference). We will cut a channel in the bottom of this piece to accomodate the leather strap. This will ensure that when we install snaps on the wooden tube later on they will be in the middle of the staves... which is the thickest part of the stave.
I used the miter saw to cut the first piece from the rest of the board (picture 2). I need to cut a channel in the bottom of this part to accomodate the leather strap we'll make later. The channel is 3/16 inch deep and 7/8 inch wide. I made several passes on the router table (picture 3) using a quarter inch up-cut spiral bit. The 2-3/16 inch measurement is where I wanted the edge of the router bit for the first cut to ensure the channel would be centered on the finished part. Finished router cut in picture 4. Next the piece is cut out on the jig saw with a fine blade and going very slowly. This time we will be using the larger circle on the template as our guide. This will give us some extra material to work with so it can be sanded smooth and not be too small. Finished piece in picture 5. Picture 6 shows all of the pieces that are required for the rod tube end caps. You need two circular pieces and an octagonal piece for the top cap and 1 circular piece plus 1 octagonal piece for the bottom cap. All of the parts are 3/4 inch thick and are made from walnut except for the octagonal part for the bottom cap... it's a quarter inch thick and it can be either oak or walnut. I used oak since I had a scrap piece that was the correct thickness.
Two of the circular pieces will have an octagonal piece glued to the bottom of it. I used a pin to mark the points of the octagon to use as a guide when it's time to glue (pictures 7 and 8). Once everything is cut out and marked you can remove the templates from the parts. I used paint thinner and applied it with a rag. Let it set for several minutes and it will soak through such that the paper will peel right off. You'll still need to do some additional cleaning and some light sanding to get rid of the remaining spray adhesive.
Picture 9 shows all of the wooden parts required to make the rod tube. At this point I trimmed the ends of the rod tube with the miter saw to make them even. I'm using a finish blade on the saw and cutting very slowly to avoid any chipping.
In picture 10 I'm looking at the wood grain to determine which side I want showing.
Picture 11 shows the top and bottom caps after they have been glued.
Admiring the results in pictures 12, 13, and 14!
Step 6: Making the Leather Strap

I am a rank beginner when it comes to leatherwork. In fact, I spent a couple hours watching YouTube videos to figure out what I needed and how to make a simple strap. As it turns out it's not that hard and you only need a few inexpensive tools.
Start off with a piece of leather that is in the 3 to 4 mm thick range (picture 1).
Cut a 7/8 inch wide strip that is about 12 and 3/4 inches long. I used an Xacto knife... which I also used to tastefully round the ends. The edges are beveled with the beveling tool shown on the right of picture 2. And then I burnished the edges with that peg looking thing (burnishing tool). All that means is that you rub the heck out of the edges using the grooves in the tool.
The tool in picture 3 is a stitch groover. It cuts a shallow groove in the leather at a set distance from the edge.
The medieval looking device in picture 4 marks the spacing for the stitching.
The awl in picture 5 pokes holes in the leather at the previously marked spots.
And then finally you can stitch everything up using waxed nylon thread (picture 6). I used a saddle stitch. Again, if you want to learn more about leatherwork then go watch a bunch of YouTube videos like I did. Finished strap in picture 7.
I started and ended the stitching in the middle of the strap so that the finishing overlap would be hidden once it was installed in the end cap (picture 8). This was just a fit check. It won't be installed for good until later.
Step 7: Rounding Off the End Caps and Attaching the Bottom Cap

As you recall we left the bottom and top caps a little on the wide side when we cut them on the jig saw. I ended up sanding the bottom cap flush with the tube but I left the top cap a little oversized. Just thought it looked nice that way. Afterwards both parts were run across the router table using a 3/8 inch roundover bit. Results are in picture 1. Pictures 2, 3, and 4 are fit checks. Looks nice!
In picture 5 I glued the end cap in place. Masking tape makes clean up of the squeeze out much easier.
Glue is dry and the part is given a light sanding (picture 6).
Holy cow! We're starting to get close!
Step 8: Finishing and Adding Snaps to the Tube

I started off by figuring out the spacing for the snaps in picture 1. The measurements are from the end of the cylinder. Some design parameters are driven by functionality others by esthetics. Here I’m mostly considering what looks nice but I was also thinking about spacing the first snap far enough away from the edge of the tube to keep the wood from cracking when the snap is installed.
In picture 2 I have numerous coats of the polyurethane finish on the tube. I wanted to do most of the finish work before I installed the snaps so they wouldn't be in the way when I was sanding the tube between coats.
The measurements are marked on the tube in picture 3. I used the scratch awl to poke small holes and then peeled off the tape. This was done on the opposite side as well.
So not only do we have a jig as our main feature of the instructable there is a holding fixture as well (picture 4). I made it out of the MDF we had left over from when we made the cylinder jig. It was custom made to fit my own drill press and is designed to hold the tube in place and keep it centered under the drill bit (picture 5). The MDF isn't stiff enough so I have a leg clamped to the fixture that you can see to the left to support the weight of the tube.
The point here is to make 1/2 inch diameter circular flat areas for the snaps to set on. Two flats are cut with a Forstner bit (picture 6). This is done on both sides of the tube. Keep your hand on the left end of the tube to keep it from tipping up when making the cut.
You can see one of the snaps in picture 7. The next step is to drill a hole to accomodate the wood screw on the snap. Here I put a piece of tape on the bit to mark the depth. The holes are drilled (again using the fixture) in picture 8. And the snaps are installed in the last shot.
We are almost home!
Step 9: Adding Snaps to the Strap and Installing It in the Top Cap

OK... back to leatherwork again. This time it's even more simple. Mostly we're beating the heck out of stuff with a hammer. Everyone can do that!
To mark the hole positions I installed the strap in the top cap and set it in place on the end of the tube. I folded down the straps to see where they met the snaps that we already mounted on the tube and marked it lightly with a pencil. The strap was removed from the top cap when all the marks were made and holes were cut using this slick little tool that I bought at Tandy Leather (picture 1). Place the tool with the cutting edge against the leather and whack the other end a few times with the hammer.
Now it's time to install the snaps on the strap (picture 2). There are two parts to the snap... a top and a bottom. The top is the decorative button and the bottom is the other. Not sure why I placed 2 bottom pieces on the board for the picture... you only need 1. The silver disc is the anvil and the long slender piece next to that is the swaging tool. And of course there's a hammer too.
Note: Picture 3 shows a couple of different top (button) pieces. You can see the difference in length between the two parts. Make sure you have the correct length for the leather that you are using. I’m using the one on the right. It is a size 24.
Picture 4. To install the snap place the top piece through the hole on the finished side of the leather. Flip the strap over install the bottom piece over the rivet that is poking through the strap. Place the top piece on the anvil and set the swaging tool in place on the rivet. It takes a pretty good strike with the hammer to swage the rivet so give it several good whacks.
Extremely important note: Install two rivets on one side of the strap first. Then insert the strap into the top cap BEFORE installing the final two snaps. Also make sure you have the strap oriented correctly when you are installing it in the end cap. Once you pound those last two snaps home there ain't no removing the strap from the top cap no more! If you do get it wrong you'll have to drill out the rivets and take off the snaps. This will destroy the top part of the snap and you'll need to replace it. LOL… no, I did not learn this the hard way!
Finished top cap complete with strap and snaps in picture 5.
One last step in the process... take your favorite fly rod and place it into its new home and button up the top!
WOOOO HOOOOOOOOOO!!!!!! That's it! We're done!!!
Step 10: Go Fishing and Show Off Your New Rod Tube!

Here I am with a nice Hawaiian bonefish that I caught with one of my own hand tied flies. Hey... that could be another instructable... How to Tie a Peterson's Spawning Shrimp. LOL.
I hope that this instructable was helpful. I welcome any comments and questions. If you end up building your own rod tube I'd love to see a picture and let me know how it went. I've cut two tubes using the Cylinder Jig so far and I am very confident that it produces a repeatable process. Honestly, these rod tubes are not that difficult to make.
I’ve looked at a lot of wooden fly rod tubes on the internet… seems like most people leave the tube octagonal or even hexagonal. I think the cylindrical tube has a more refined look and I prefer it over the others. Just my opinion... to each his own. And I am very happy with my cylinder jig. Take your time, use good materials, do a good job, finish it carefully, and you’ll have a rod tube that is worth $250 to $300. Even more if you do some fancy inlay work!
Good luck and keep a tight line!
Step 11: GALLERY - Coming Soon
I have several more rod tubes in work right now that I'll add to this section when they are complete. One particular tube that I'm interested in seeing how it turns out is made from a dead limb from an old pecan tree from my buddy's farm. The wood has a lot of worm holes in it that I'm inlaying with powdered turquoise. So far it looks really cool. So stay tuned!
Step 12: Monogram Oak and Walnut Rod Tube

34 inches long and 3 inches in diameter. The oak for the tube came from my family farm in West Virginia. The wood for the walnut end cap and the walnut/oak top came from my cousin's farm in West Virginia. This was a 2022 Christmas gift I made for my brother.
Step 13: Another Oak and Walnut Case

35 inches long and 3 inches in diameter. Similar to the previous one... the wood was sourced from our family farms in Tyler County West Virginia. This one will be a 2023 Christmas present for another family member... Ha! I'm way ahead of the game on making presents this year... it's only March! LOL.

Second Prize in the Jigs & Rigs Speed Challenge
Recommendations

For the Home Contest

Green Future Student Design Challenge

Fix It Contest

IMAGES
VIDEO
COMMENTS
Here is a how to video detailing my deluxe rod tube case I made for a few of my favorite casting and fly rods. The construction is quite simple... Instagram ...
In this video we build our own fishing rod travel case out of PVC. If you are looking for a DIY travel tube for your fishing rods, check out the video!We lov...
Keep in mind that a rod tube can hold more than one rod. A 2-inch-diameter pipe is perfect for a single rod, but my favorite homemade rod tube has a 4-inch diameter. It holds three fly rods in their rod socks, which is nice because it saves me from having to travel with a bunch of individual tubes.
Step 1: Cut and Sand. Cut the pipe at least 2 inches longer than the rod sections, making sure the ends are square, and remove any burrs with sandpaper. Next, using medium-grit sandpaper, rough up the surfaces that will be glued, both on the outside of the pipe and inside the fittings. Photo by Bryce M. Towsley.
3. Roof Vaults. Roof Vaults are great for anglers fishing out of their vehicles. Particularly, fly-fishing anglers and surf casters with exceedingly long rods. Jumping around from spot to spot on the river or lake to lake gets much easier with these roof vault type cases. For longer rods, roof vaults offer the quick and easy convenience/access ...
Step 7. Decide whether you want your rods to rest reel-up or reel-down, and orient the toolbox to accommodate that desire. Lay the bracket bases under the PVC pipes, and place the pipe straps over the pipes. Once everything is lined up, drill pilot holes and secure the straps using the 1/2-inch screws.
I chamfered mine with a dremel tool and mini grinding wheel. -sand sides of pipe near ends and inside of end cap fittings. -if using the grill mat and foam padding, cut pieces of foam to fit in close end cap, glue in with contact cement. Then cut grill mat to correct length of rod tube and inside circumference.
Step 4: And the final product. I attached the strap (from duffel bag) on to the top and towards the bottom of the tube. After tightening the bolts at the bottom, I replaced the cap onto the tube. I felt like taking it the extra step and wrapped the tube in camo Duct tape, just for fun! (just don't lay it down in tall grass when fishing and walk ...
Looking for a Fishing Rod Storage solution that will keep your fishing rods safe when you're travelling? www.scutefishing.comThe SCUTE fishing rod case is a ...
Plasti Dip (for painting) Acetone (for cleaning) A cloth or rag. Drill with ⅜ inch drill bit. Silicone Sealant. How To Build Your Own Fishing Pole Tube. Step 1: Ensure Correct Pipe Length. Before you start attaching various parts to your PVC pipe, make sure you have the correct length of pipe to suit your rods.
Building Your DIY Fly Fishing Rod Holders. Let's begin constructing your homemade fishing rod racks for your car. Here's the step-by-step guide: Step 1. Take your 2″ PVC foam insulation and cut it to match the length of your pipe. Insert it into the pipe. This padding will ensure your rods are secure and protected in the carrier during ...
Step 1: Pick Your Rod to Modify. Ok, so I had this older two piece rod in my garage that was still a good rod, but one I didn't mind chopping to try and make it better. The overall rod length was around 53" and separated the two sections were about 27".
Exterior Mount Vehicle Fly Rod Carrier Made From Pipe. For your own, homemade fly rod carrier, PVC or ABS pipe is one of the most popular materials to start with. The size of pipe you're looking for will depend on what type of rod carrier you're looking to make. If you're looking to carry just one or two rods, you might consider a four-inch ...
Hi, have a question about the rod tubes. I have some expensive rods and was wanting to make some rod tubes for them. They are 1 piece rods, 5'4 up to 7'10 and they are spinning rods. I'll probably have to have 2 1/2 in. pipe. I was wondering if these rod tubes would be the best for my rods and any ideas or suggestions. Thanks alot.
Make sure the pipe is clean and glue the endcaps to both ends. Once they are dry, cut a round piece of foam and insert it into either end of the tube for cushioning. Mine came from the foam padding in a mail-order package. I used a 2-inch diameter pipe for a single fly rod, and a 4-inch pipe to hold several 2-piece spinning and baitcasting rods.
I never travel with the actual rod tubes. Depending on how much you want to spend, I would consider: 1. A travel case like the Fishpond Dakota or Orvis Safe Passage Carry-all. Simms makes one too. 2. A ballistic tube like the one suggested above 3. Make your own tube out of PVC (for 5 rods would need two). 4.
Most 2 piece rods will fit in 1 1/4" thin wall (sch20 has larger than nominal ID) I put a cap on one end and screw cap on the other. <$10/rod iirc. It could be covered with cloth or painted, perhaps camo colors. Key is PVC is available next door, most aluminum or FRP tubing is going to be harder to source.
🕹 ️ Check out my RC Channel ⬅️🕹: https://www.youtube.com/channel/UCkXj9_80x1PquHxWZtT-6HgA movie by Philipp HubertMusic by Soundcloud
Adamsbuilt Fly Tailwater Rod Case. Plano Airliner Telescoping Rod Case. Redington Single Tube Case. Allen Riprap Fishing Rod Case. Plano Adjustable Rod Case. Flambeau Outdoors Bazuka Rod Case. Entsport Foldable Fishing Rod Bag. Many Names for Fishing Rod Tubes. In Conclusion.
How do you make a travel rod tube? Making a travel rod tube is a great way to protect your fishing rods while on the go. There are many different ways to make a travel rod tube, but the following is one of the simplest and most effective methods. To make a travel rod tube, you will need:-A PVC pipe-A hacksaw-A drill-A marker-A measuring tape-A ...
Step 1: Designing and Building the Octagonal Blank. I checked the details for the rod tube that Orvis sells and it was 3 inches in diameter and 34 inches long. This length includes the end caps and it was also specified that the tube would accomodate a 10 foot 4 piece fly rod.
This is a how to video that shows a good use for those fishing pole tubes from Tackle Warehouse. Don't throw them away anymore. You can make a custom pole tr...
Travel Rod Tube. Explore our wide range of travel rod tubes designed to protect and transport your fishing gear with ease. Our collection features durable and sturdy options that ensure the safety of your rods during travel. With various sizes and designs available, you can find the perfect rod tube to accommodate your specific needs.