What Is the Reader View in Safari and How Do You Use It?
We'll explain how Safari's reading mode can eliminate distractions online and show you how to use it on an iPhone, iPad, or Mac.
Our Apple devices are a pot of gold when it comes to convenient features we may be unaware of. One cool feature on Safari that you may have skipped over is Reader Mode.
Reader View, often referred to as Reading Mode, appears as an icon in the top-left corner of your Safari search bar, and it reworks your webpage into a perfectly organized, ad-free layout to help you focus better on reading the content. You can even make some quick edits to a webpage through this feature.
Want to read a novel or an article without interruption? Reader View is for you. Let's take a look at what it can do and how you can enable it on your iPhone, iPad, and Mac.

How to Turn on Reader View
Turning on Reader View is extremely easy and only takes a couple of taps. Before you begin, make sure Safari is updated on your device.
Read More: How to Update Safari on a Mac
Then follow these steps to enable the Reader View on an iPhone or iPad:
- After you open the webpage you'd like to read on Safari, tap on the Reader View icon in the top-left corner of the Search Bar.
- From the dropdown menu, select Show Reader View . Your webpage will appear ad-free and organized automatically.
If you want to enable Reader View on a Mac, here's how you do it:
- Load a website in the Safari.
- Use Command+Shift+R to turn on Reader Mode.
- Another option would be to click the same icon at the left end of the Smart Search field.
If you don't see the button, it means that webpage doesn't have any articles that can be viewed in Reader View. To stop using Reader View across all devices, just hit the button again. You can also use the Esc key on your Mac to disable Reader View.
How to Make Edits in Reader View
You can also customize a page to your liking. Reader View allows you to choose from nine font styles, four background colors, and various font sizes. Here's how you can make these edits on an iPhone, iPad, and Mac:
- Tap the Reader View icon again.
- You should see options for font style in the dropdown menu with the font sizes above it and the background colors below it. Choose whatever you like.
The options to edit a webpage are pretty minimal, but Apple will hopefully expand to a broader range in the future.
A distinct advantage of Reader View is the fact that you can save your webpages as PDFs on iPhone and iPad straight into your Books app using this feature.
How to Make Reader View the Default
Happen to love Reader Mode? There's an option that automatically switches a URL to Reader View every time you open it. It saves up a lot of time and is efficient. Follow these steps to enable this feature on an iPhone or iPad:
- Tap the Reader View icon in the top left of Safari.
- Select Website Settings from the dropdown menu.
- Turn on the toggle for Use Reader Automatically and press Done . The webpage will now automatically switch to Reader View every time you open it.
To do this on a Mac, all you have to do is Control-click on the Reader View icon and select Use Reader View Automatically on [Site Name] .
You can even enable this feature for all websites that you open in Safari. Here are the steps to do so on an iPhone or iPad:
- Go to Settings and open Safari .
- Scroll down and select Reader under Settings for Websites .
- Turn on the toggle for Other Websites .
Follow these steps to allow all websites to open with Reader View on your Mac:
- Control-click the Reader View button and select Reader Website Preferences from the popup.
- At the bottom of the popup panel, click the dropdown box for When visiting other websites and choose On.
Enjoy Clutter-Free Reading in Safari
Reader View in Safari is the perfect way to do some reading without any distractions. Only relevant text and images will remain on your screen, and all other ads will be removed.
You can adjust the font size, style, and background color with this feature, too. Even better, you can automatically open specific websites, or all of them, in Reader View when you want to.
How to use Reader View in Safari on iPhone and iPad

If you like to get most of your news on the web, then you've likely struggled with reading things on your iPhone or iPad, since ads and menus can clutter up the page. Reader View in Safari allows you to view web pages without all that clutter and you can even change the font, font size, and page color to better suit your reading habits and vision.
Here's how to use Reader View in Safari on iPhone and iPad.
How to enable Reader View
How to change the font and font size in reader view, how to change the page color in reader view.
When you're on a website that supports Reader View on your iPhone or iPad, the address bar at the top of the screen will say "Reader View Available" when you arrive at the site. If it's not there, then it can't be used.
- Launch Safari from your Home screen.
- Navigate to the website you'd like to read.
- Tap the Reader button on the left of the address bar. It looks like a series of stacked lines.

Reader View is now enabled. You'll notice that much of the color and animations will be removed and you'll see a simple screen of text.
To disable Reader View, just tap the Reader button again.
- Tap the A's on the right of the address bar.

- Tap either of the A's that appear in the menu to change the font to one of two sizes.
- Tap one of the eight font choices .

If you read better when text is light and the page is dark, you can change things to your liking.
- Tap one of the four page color choices : white, beige, gray, or black.

Let us know in the comments below.
Master your iPhone in minutes
iMore offers spot-on advice and guidance from our team of experts, with decades of Apple device experience to lean on. Learn more with iMore!
Updated August 2018: Everything's up to date for the latest version of iOS.

○ iOS 14 Review ○ What's new in iOS 14 ○ Updating your iPhone ultimate guide ○ iOS Help Guide ○ iOS Discussion

Mick is a staff writer who's as frugal as they come, so he always does extensive research (much to the exhaustion of his wife) before making a purchase. If it's not worth the price, Mick ain't buying.
TikTok ban signed into law by President Biden — ByteDance now on the clock to sell, or 170 million Americans will lose the app
Apple Fitness Plus cycling workouts vs outdoors: Which is better?
M4 MacBook Pro: Everything you need to know
Most Popular
- 2 Apple accused of using blood minerals from a region 'devastated by grave violations of human rights' in its products
- 3 Did Apple just email you to say your trade-in is canceled? Don't panic, it's a glitch
- 4 On-device iOS 18 AI features tipped as Apple makes new open source LLM tools available online
- 5 This Australian iPhone can use the EU's third-party app stores and more, but it's a messy workaround you probably shouldn't try
How-To Geek
How to automatically open articles in safari's reader view.
Like reading articles in Safari's minimalist Reader View?
Quick Links
Turn on reader view on iphone, ipad, and mac, automatically open articles in reader mode on iphone and ipad, automatically open articles in reader mode on mac.
Not all web pages are created equal. Some web articles contain unnecessary formatting and media. Safari's Reader Mode on iPhone, iPad, and Mac cleans up the article text. You can even set the feature up to automatically open all articles directly in the Reader View.
If you're new to Reader Mode , here's the rundown. When you open a supported page (most articles on the web are supported) on Safari for iPhone, iPad, or Mac, you will see an "aA" button in the URL bar.
Related: How to Use and Tweak Reader Mode in Safari
On your iPhone or iPad, simply tap and hold this button to enter Reader View. You can also tap on the "aA" button and choose the "Show Reader View" option.
On your Mac, the Reader View icon looks like a web page. You'll find it on the left edge of the URL bar.
Once you enter Reader View, you will only see the article text and images---and nothing else. Mac, Chrome , and Firefox have their own reader modes.
You can improve your reading experience by increasing the font size or changing the font or theme.
Once you start using the Reader View feature, you are bound to wonder, "Why can't all articles look like this?" While you can't change how websites are designed, you can have Safari load up every article automatically in Reader View.
What's cool is that this even works in an app that uses Safari's built-in browser. So, for instance, if you tap a link in the Twitter app , it will open directly in Safari's Reader View.
You can enable this feature from Settings. On your iPhone or iPad, open the "Settings" app to get started.
Choose the "Safari" app.
Now, go to the "Reader" section.
Toggle on the "All Websites" option.
Now, when you open any web article in Safari, it will open directly in Reader View.
Safari also lets you exclude particular websites from the automatic Reader View feature. To do this, open the website that you want to exclude, and then tap the "aA" button. Here, choose the "Website Settings" option.
Now, tap the toggle next to the "Use Reader Automatically" option to disable the feature for the website.
You can view a list of all the websites that are excluded from Reader View by going to Settings > Safari > Reader. Here, you can reenable websites if you want.
The process for enabling Reader View for all articles is different on Mac. On your Mac, open the Safari app. Then, click the "Safari" button from the top menu bar and choose the "Preferences" option.
Go to the "Websites" tab and select the "Reader" option from the sidebar.
From the bottom of the window, click the dropdown next to the "When Visiting Other Websites" button and choose the "On" option.
Now, all supported articles will automatically open in Reader View.
If you want to disable this feature for a particular website, open the website in Safari, right-click the Reader View button from the URL bar, and then uncheck the "Use Reader View Automatically on (Website Name)" option.
If you want to see a list of all websites where you have disabled this feature, you can go to Safari Preferences > Websites > Reader. From here, you can reenable the feature for particular websites.
Like the dark mode in macOS? Wish that all websites would automatically open in dark mode as well? Here's how you can get dark mode for all websites in Safari !
Related: How to Get Dark Mode for All Websites on Mac
How to Enable Reader View (Mode) in Safari on iPhone, iPad, and Mac
Do you find yourself struggling to read an article on Safari? If yes, then you’ve come to the right place. Reader View (commonly called as Reading Mode) is a Safari browser’s feature that allows users to read an article on the web without any distractions or ads when enabled. Let’s learn how to enable reader view in the Safari browser on your iPhone, iPad, and Mac.
Table of Contents
Enable Reader View in Safari on iPhone
If you are continuously scrolling and reading on your iPhone, Reader View in Safari will definitely help you in reducing distractions while reading. Here are the steps to do so.
1. Navigate to Safari on your iPhone and tap on the app icon to open it.
2. Tap on the URL bar on the bottom side of the screen to enter editing mode.
3. Enter the URL of the website where you want to read an article and tap on go button on the keyboard.

4. Open an article on the full page by tapping on it.
5. Once the article is fully loaded, tap on the AA icon in the bottom left corner of the URL bar.

6. Now tap on Show Reader to view the article in Reader View in Safari browser on your iPhone.
Bonus Tip: Once you have entered the Reader View, again tap on AA to customize the Reader View according to your taste. You can change the background color and font from here.

Must Read: 12+ Exciting Things You Can Do With the Dynamic Island on the iPhone 14 Pro .
Enable Reader View in Safari on iPad
If the iPad is your go-to device for reading and researching like many students, then here are the steps to enable Reader View in Safari on iPad.
1. Navigate to the Safari app icon on your iPad and tap to open it.

2. Once Safari is open, tap on the URL bar and enter the website address.

3. Once the website loads up, tap on an article to open it. You can do so by tapping on the image or the title.

4. Once the article is open, tap on the Reader View icon (4 horizontal lines) in the URL bar to view the article in Reader View.

Bonus Tip: You can also customize the Reader View on iPad just like on an iPhone by tapping on the AA icon near the right side of the URL bar. It allows you to change the page color and fonts for easy and seamless reading.

Also Read: How to Stop App Store From Asking for Password on iPad .
Enable Reader View in Safari on MacBook
If you own a Mac and want to read an article without ads and other unnecessary elements in Safari, then enabling the Reader View will definitely help. Here are the steps to enable Reader View in Safari on Mac.
1. Navigate to the Safari icon on your Mac and launch it.

2. Click on the URL bar to enter the URL of the website from where you want to read an article.

3. Type the address of the website and hit Return on your keyboard.

4. Click on an article’s title or image to open it on the full page.

5. Once the article opens, click on the Reader View icon (4 horizontal lines) on the right side of the URL bar.

Pro Tip: Sometimes, the Reader View icon disappears quickly. In that case, click on the kebab menu (three dots icon) in the URL bar and then select Reader View .

Bonus Tip: Once the Reader View is open, click on the Kebab menu (three dots icon) in the URL bar and click on Reader Appearance . From here you can customize the Reader View’s background and font according to your taste.

Must Read: How to Take and Highlight a Screenshot on Mac .
Safari’s Reading Mode
Safari is an elegant browser that comes pre-installed on Apple devices. And Reader View in Safari allows a seamless reading experience without any interruptions. Whether you’re on iPhone, iPad, or Mac, by following the above-mentioned steps you can easily enable Reader View for any website or article.
Do you want to disable autocorrect on your Safari browser ? It can be a blessing but also a curse under certain circumstances. Learn how to tame it now.

Subham is a tech enthusiast and a has knack for writing, he also has a deep love for filmmaking. He is currently working as a full-time Technical writer at TechWiser and his roots are from Samastipur, Bihar.
You may also like
How to set a song as an alarm..., what is stolen device protection on iphone, 11 fixes for imessage not working with one..., 7 fixes for microsoft teams notifications not working..., 11 fixes for pictures not loading or showing..., 3 ways to use google gemini ai on..., 8 fixes for slow app store downloads and..., how to use two different search engines in..., 3 ways to mark all messages as read..., 6 fixes for outlook not showing email preview....
How to use the iOS Safari Reader Mode
The iOS Safari Reader tool is designed to cut out ads and distractions

You should learn how to use the iOS Safari Reader if, like the rest of the entire population of Earth, you don't like ads and other distractions getting in the way of your online browsing experience.
See, while ads are necessary to the functioning of many websites, including Tom's Guide, we know they can be annoying sometimes. It's also not uncommon to stumble across a page that is totally dominated by ads, which can hamper your ability to read through the text on a page.
Thankfully, as you'd expect from one of the best phones out there, the iPhone has a built-in way to clear the clutter and let you see webpages more clearly. It's called Reader, and it's built into iOS Safari.
Want to learn how to use the iOS Safari Reader? Of course you do, so read on!
How to use the iOS Safari Reader
Note: not every website or webpage support Reader, but many do. We'll show you how to identify this and how to enable Reader to turn on automatically whenever possible.
This process is the same on iOS and iPadOS.
1.Tap AA on a webpage

Open a webpage in Safari and tap the AA icon , top left, next to the URL bar.
2. Tap Show Reader

Tap Show Reader from the dropdown menu. You can also adjust text size from this menu using the small or large A buttons at the top.
You'll now have a page in Reader format, with no distractions and just the text and images displayed.
Sign up to get the BEST of Tom’s Guide direct to your inbox.
Upgrade your life with a daily dose of the biggest tech news, lifestyle hacks and our curated analysis. Be the first to know about cutting-edge gadgets and the hottest deals.

To exit the Reader, simply tap the AA icon again and select Hide Reader .
How to use iOS Safari Reader automatically
Alternatively, if you'd like to set the Reader to come on whenever it can, you can follow these steps. This might not result in the best experience on certain websites, though.
1. Go to Settings > Safari

Open the Settings app , scroll down and tap Safari .
2. Tap Reader

Scroll down and tap Reader .
3. Toggle on All Websites

Toggle on All Websites and, voila, Safari will now display any applicable pages in Reader mode where possible. This is basically like an automatic ad blocker, at the expense of some page functionality and styling.
If you enjoyed this tutorial, we have many more iPhone-themed guides to help you better use your tech, including how to clear RAM on iPhone , how to delete multiple contacts on iPhone and how to transfer data from iPhone to iPhone . And if you're finding iOS 16's wallpapers system confusing, don't worry: we can show you how to delete wallpapers on iPhone . Want to learn a couple of neat iPhone camera hacks? We can show you how to enable lens correction on iPhone , for more-natural-looking images and how to enable View Outside the Frame on iPhone , to mimic a DSLR's optical viewfinder. If you're a gamer, learn how to connect classic-style controllers to your iPhone .
Next: learn how to play games in iOS Messages .

Peter is Reviews Editor at Tom's Guide. As a writer, he covers topics including tech, photography, gaming, hardware, motoring and food & drink. Outside of work, he's an avid photographer, specialising in architectural and portrait photography. When he's not snapping away on his beloved Fujifilm camera, he can usually be found telling everyone about his greyhounds, riding his motorcycle, squeezing as many FPS as possible out of PC games, and perfecting his espresso shots.
Forget the iPad — it's the iPhone 16 Pro that needs Apple Pencil 3 support
Google Maps on iPhone may finally get this useful navigation feature
What is the Casper One mattress and should you buy it in Memorial Day sales?
Most Popular
- 2 Do mattress toppers help with back pain or make it worse? Experts respond
- 3 After TikTok, DJI drone ban could be next for US lawmakers
- 4 Google Pixel 8a could get seven years of security updates — here's why
- 5 Should you buy a mattress from Amazon, Walmart or Costco? Pros and cons
- a. Send us an email
- b. Anonymous form
- Buyer's Guide
- Upcoming Products
- Tips / Contact Us
- Podcast Instagram Facebook Twitter Mastodon YouTube Notifications RSS Newsletter
How to Enable Automatic Reader View in Safari for iOS
Safari for iOS has a nifty built-in "Reader" feature that's designed to allow Safari users to read online articles with a distraction-free design that tucks away ads and other visual clutter on supported sites.
- Open up Safari.
- Navigate to a favorite website like MacRumors.com.
- Click on an article.
- In the navigation bar at the top, where it says "Reader View Available," tap and hold on the icon that looks like three lines.
From here, you'll see a pop that says "Automatic Reader View," with options to either enable Automatic Reader View on the website you're currently visiting or on all websites.
With this feature enabled, all articles that you click on for a specific website (or all websites if you chose that option) will be displayed in Reader View by default.
You can also use Reader View on the Mac too, and your Automatic Reader preferences for Mac can be accessed by going to Preferences in the Safari Mac app and choosing "Reader" under general. You can also turn Reader on for all articles on a particular webpage by right clicking or clicking and holding on the Reader icon while visiting a website.
Get weekly top MacRumors stories in your inbox.
Top Rated Comments

Popular Stories

Apple Releases Open Source AI Models That Run On-Device

iOS 18 Rumored to Add These 10 New Features to Your iPhone

Apple Announces 'Let Loose' Event on May 7 Amid Rumors of New iPads

Apple Cuts Vision Pro Shipments as Demand Falls 'Sharply Beyond Expectations'

Apple Finally Plans to Release a Calculator App for iPad Later This Year

Best Buy Introduces Record Low Prices on Apple's M3 MacBook Pro for Members
Next article.

Our comprehensive guide highlighting every major new addition in iOS 17, plus how-tos that walk you through using the new features.

App Store changes for the EU, new emoji, Podcasts transcripts, and more.

Get the most out your iPhone 15 with our complete guide to all the new features.
A deep dive into new features in macOS Sonoma, big and small.

Revamped models with OLED displays, M3 chip, and redesigned Magic Keyboard accessory.

Updated 10.9-inch model and new 12.9-inch model, M2 chip expected.

Apple's annual Worldwide Developers Conference will kick off with a keynote on June 10.

Expected to see new AI-focused features and more. Preview coming at WWDC in June with public release in September.
Other Stories

18 hours ago by Tim Hardwick

1 day ago by Joe Rossignol

2 days ago by MacRumors Staff

2 days ago by Joe Rossignol

4 days ago by Tim Hardwick
How to make Safari read a webpage aloud to you
Here's how to make Safari read a webpage aloud

Here's a neat but hidden trick Safari can do: read a webpage aloud to you. This comes in handy for getting multiple things done at once, such as typing while catching up on a news article or having recipes read to you while you cook. Follow the steps below to get Safari to read to you on your MacBook or iPad .

Get Safari to read a webpage to you in OS X
1. Tap the Reader View icon in the browser bar.

This will make Safari show you only the main website content. Otherwise, Safari will attempt to read every word on the page, including navigation menus and other details you don't need to hear.

2. Go to Edit > Speech > Start Speaking.

Safari will immediately start reading the content on the webpage. Unfortunately, there's no pause or speed controls available directly in Safari. However, you can customize the voice and speaking rate in the System Preferences app. Go to System Preferences > Dictation & Speech > Text to Speech to customize the voice you hear:

To stop the reading in Safari, go to Edit > Speech > Stop Speaking.
Get Safari to read a webpage to you in iOS
On the iPad or iPhone , you'll set up the text-to-speech option first in the Settings app.
Stay in the know with Laptop Mag
Get our in-depth reviews, helpful tips, great deals, and the biggest news stories delivered to your inbox.
1. Open the Settings app.
2. Tap Accessibility under General.

3. Tap Speech.

4. Toggle Speak Screen on.
Alternatively (or additionally), you can show a speech button when you highlight text in Safari or other iOS apps, but for having entire webpages read to you, the two-finger swipe down is easier to use. Here you can also adjust the speaking rate and choose a different voice.
5. Tap the Reader view icon in Safari to switch the page to a simplified reading -- and listening -- format.

6. Swipe down from the top of the screen with two fingers to have Safari start reading aloud.
You'll be able to fast forward and rewind, pause, or change the reading speed from the mobile browser's onscreen controls.
Looking for more Safari tips? Here's how to force Safari to sync with iCloud . Or maybe you'd like to learn how to hide top sites in Safari . Keep everything at your fingertips by syncing Safari Bookmarks with Chrome, Firefox and Internet Explorer .
How to convert PDF to JPG, PNG, or TIFF
How to add Outlook Calendar to Google Calendar
What Nvidia's $700 million acquisition of Run:ai means for the future of AI
Most Popular
- 2 What Nvidia's $700 million acquisition of Run:ai means for the future of AI
- 3 Samsung Mother's Day sale 2024: Top deals and gift ideas
- 4 A new Windows 11 update injects ads in your Start menu — here's how to turn them off
- 5 Dynabook's new featherlight business laptop may challenge the best from Lenovo, Dell
Reader View Not Working on Safari? 8 Ways To Fix It

Reader View is a Safari feature that hides ads, navigation menus, and other distracting elements on a website. After you switch to Reader View, the website will only display necessary information (text and images) which enhances the interface and makes text easily readable. Unfortunately, several people are encountering issues with Reader View/Mode not working on their iPhones, iPads, or Macs. If you’re facing similar issues, here’s how to fix Reader View not working in Safari.
How To Fix Reader View Not Working in Safari
1. restart iphone or mac to fix reader view not working in safari.
A temporary bug or glitch might be responsible for Reader View not working in Safari on your iPhone, iPad, or Mac. The quickest way to get rid of the temporary bug is to restart the device.
Time needed: 2 minutes
Steps to restart iPhone 8 and above

Restart iPhone 7, SE (3rd Gen) and below
- Press and hold the Side button until the power-off slider appears.
- Drag the power-off slider to turn off your iPhone.
- After waiting a few minutes, press and hold the Side button until the Apple logo appears on your screen.
Steps to Restart a Mac.
- Click the Apple logo at the top right corner of the menu bar.

- Unselect the checkbox to the left of the “Reopen windows when logging back in” option.

2. Force Quit and Relaunch Safari To Fix Reader View Not Working
Force Quitting any application stops all its activities right away. Relaunching the application will freshly start all the services from the ground up. Again, this process helps eliminate glitches, and force quitting Safari can help fix Reader View not working.
On iPhone and iPad
- Open the Safari Browser and swipe up from the bottom or press the Home button .
- Once on the Home Screen, swipe up and hold from the bottom or double-click the Home button until you see the recently used apps.
- Swipe up on the Safari Browser to remove it from the recent list and force quit.
- Restart your iPhone or iPad or ask Siri to restart your iPhone/iPad .
- After your iPhone restarts, open the Safari Browser and check if the Reader View is working.

On Mac
- Click on the Apple Logo in the Menu Bar at the top left corner.
- Select the Force Quit option.
- Select the Safari Browser from the list and click the Force Quit button at the bottom right.
- Click Force Quit again in the popup window to confirm your selection.
- Relaunch the Safari Browser and check if the Reader View is working properly.
3. Ensure the Website Supports Reader View
If you aren’t already aware, Reader View is not available on every website you visit. A website needs to have a certain amount of text to qualify for the Reader View option. Safari automatically detects this text and then displays the “Reader Available” message in the address bar.
Just glance through the website, and check if there’s enough text on it for it to qualify for the Reader View. We do not have any information about the minimum requirements for Reader View. However, Safari offers Reader View for most news websites, blogs, etc., and if the website has more text compared to images, tables, or any other elements, it should support Reader View.
4. Request Desktop Website on iPhone or iPad
If the Show Reader/Reader View option is grayed out in Safari, you can try switching to the Desktop website on your iPhone or iPad. It might be able to help resolve the Reader View not working issue on your iPhone or iPad.
- Open Safari Browser on your iPhone or iPad.
- Tap the AA icon at the bottom right corner of the Address Bar.
- Select the Request Desktop Website option from the list.

After the page reloads and switches to the Desktop Site, you can tap on the AA icon and select the Show Reader option to switch to Reader View. Again, the Show Reader feature will only work if the issue is resolved.
5. Disable Low Power Mode To Fix Reader View Not Working in Safari
Low Power Mode reduces background activity. While the Reader View feature is not a background activity, Safari might not get access to much needed resources to process the website and offer the Reader View in Low Power Mode. We suggest disabling Low Power Mode to fix the Reader View not working on your iPhone, iPad, or Mac.
- Open the Settings app on your iPhone.
- Head to the Battery option.
- Disable the Low Power Mode toggle.

- Select the System Settings… option.
- Click the Battery option in the sidebar.
- Now, click the drop-down list beside the Low Power Mode.
- Select the Never option.
6. Update Software To Fix Reader View Not Working in Safari
Another reason for Reader View not working can be a software bug within the Safari browser or the operating system. Moreover, there’s no way to individually update Safari as the browser is a part of the operating system. Therefore, you must update the system software which in turn will update Safari and might help resolve the Reader View not working issue on your iPhone, iPad, or Mac.
Update iOS or iPadOS on iPhone or iPad
- Open the Settings app on your iPhone/iPad and head to the General option.
- Select the Software Update option.
- Now, tap the Update Now or Install Now button. Please note that either of these options will only be available when a new version of iOS/iPadOS is available.
- Enter your device’s passcode to continue.

Update macOS on any Mac
- Click the General option in the sidebar and then select the Software Update option located on the right side. Alternatively, if an update is available, you’ll see a Software Update Available notification under your Name/Apple ID at the top of the right sidebar.

- Then click the Agree button after you’ve read the terms to update macOS to the latest version.
- Enter your Mac’s password and then click the OK button.
7. Reset All Settings on iPhone or iPad
Sometimes, we misconfigure settings by mistake. We aren’t aware of what we’ve changed, and it might be the reason Reader View isn’t working in the Safari browser. Luckily, you can Reset All Settings to their default configurations and this might help fix Reader View not working in Safari on iPhone or iPad.
- Here, scroll down and select the Transfer or Reset iPhone/iPad option.
- On the next page, tap the Reset option.
- Then select the Reset All Settings option.
- Enter the device passcode to confirm your selection.
- Tap the Reset All Settings option in the pop-up to confirm your selection.

8. Contact Apple Support
One or the other step mentioned in this guide should be able to help fix Reader View/Mode not working on your iPhone, iPad, or Mac. However, if the issue hasn’t been resolved yet, you should consider contacting Apple Support . They might know more about the issue and might be able to help fix Reader View not working.
In case you’re aware of any other effective methods to fix Reader View not working in Safari, please let us know in the comments below. It will help others who are facing a similar problem. Lastly, if you have any doubts, leave a comment below, and we’ll get back to you as soon as possible.
Leave a Reply Cancel reply
You must be logged in to post a comment.
This site uses Akismet to reduce spam. Learn how your comment data is processed .
- Darryl Dsouza
- Apple Watch
- Accessories
- Digital Magazine – Subscribe
- Digital Magazine – Info
- Smart Answers
- New iPad Air
- iPad mini 7
- Next Mac Pro
- Best Mac antivirus
- Best Mac VPN
When you purchase through links in our articles, we may earn a small commission. This doesn't affect our editorial independence .
How to use Safari on a Mac

Safari is the web browser app bundled with all Macs as part of macOS. You don’t have to use it – if you prefer to use Chrome or Firefox, for example, you can install those apps for your web surfing needs. But in our experience, Safari is a good option – and as you can see from our round-up of best web browser apps for the Mac , it’s pretty much the best you can get.
If you are new to Safari this article will help you find your way around the app. And if you are a seasoned Safari user we will reveal a few Safari tips and tricks that you might not know, including some of the fab new features in Safari 11, the latest version of Safari for Mac.
If you’d like to read about using Safari on the iPad or iPhone, read this .
How to get the latest version of Safari for Mac
First things first. You will want to make sure you have the latest version of Safari. At the time of writing the most up-to-date version is Safari 11.1.
Here’s how to find out which version of Safari you are running:
- Open Safari.
- Click on Safari > About Safari in the menu.
- The resulting window will reveal the version number.
As long as your copy of MacOS – the Mac operating system – is up to date your copy of Safari should be because Safari is bundled as part of an operating system update.
However, you don’t have to be using the latest version of macOS to have the latest version of Safari. Apple is bundling Safari 11 with High Sierra, Sierra and El Capitan versions of the Mac OS. If you need to update your version of MacOS read this: how to update your Mac operating system software .
Now that you have the latest version of Safari you can start enjoying some of the new features that we will discuss below.
Safari basics
If you are a surfing novice you might want to familiarise yourself with these tips.
We’ll start off with the basics, such as how to get into Safari, how to search, and other useful pointers. You can skip this bit if you aren’t a Safari beginner, there are plenty of tips below that you might find useful.
You can find Safari in the Dock at the bottom of your Mac’s screen. Its icon looks like a compass.
How to use Safari
The big bar at the top of the Safari window is where you can enter a website URL or a search term to either take you directly to a website, or to a list of pages that match your query.
It will automatically search in Google (but you can change it so it defaults to another search engine).
You rarely have to enter a complete URL for a website. Once you have visited a site once you only need to type a few letters of its name and it will autofill the rest of the URL.
For example, type: ‘Face’ and it will autofill the rest of the URL and when you press enter it will take you straight to Facebook.
How to make it easy to find your favourite sites in Safari
There are lots of ways of making it easy to get to websites you frequently visit.
When you open a new tab (see below for details of how to do that) you will see your Favourites view including Frequently Visited Sites. You could also choose to see a Top Sites view, set a Homepage, just see an empty page, or have the Same Page show up. These are all options you can access in Safari > Preferences > General. Just click on the menu beside New tabs open with.
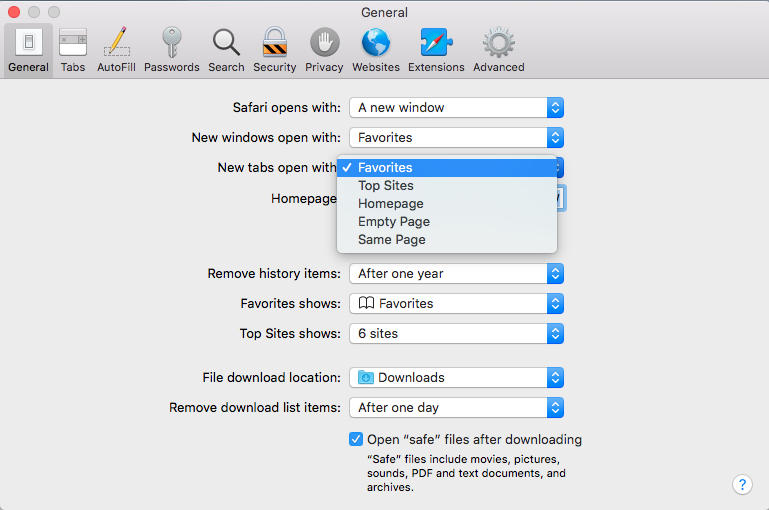
If you choose the Top Sites view you can adjust it to show 6, 12 or 24 sites. To add and remove Top Sites hover over the preview until you see an x and a pin icon. Pin those sites you wish to keep and click x on those you don’t image you will want to find again. The sites that appear in Top Sites tend to be those you visit most frequently.
You can choose one of these views for every time you open a new Safari window.
How to Pin a site in Safari
In Safari you can also ‘Pin’ favourite sites to the menu bar – a simple way of adding a shortcut to Facebook, YouTube or any site you visit frequently.
When you Pin a site you will see a small icon representing that site on the left of your tabs.
To Pin a particular web page right- or control-click on the tab and choose Pin Tab. Then it’s very easy to go straight to that site.

Using tabs in Safari
Back to tabs. You can open multiple tabs in a Safari window, this means that rather than having a different Safari window open for every website you are on, you can just have one Safari window open and multiple pages accessible through that.
To open a new tab press Command + T.
There are two ways that you can see a preview of the different tabs you have open:
- You can see a short summary of the name of the web page on the tabs themselves. This might be sufficient if you only have one or two tabs open, but once you have more than eight you’ll probably find the summary is too short to be useful.
- Or, you can click on the icon that looks like two boxes on the right of the search/URL box. This will show a thumbnail view of all the web pages you have open.
While we’re on the subject of Tabs, you can close a single tab just by hovering over the tab and clicking on the x that shows up in the corner of that tab.
It’s also possible to close all but one tab. Just hold down the Option/Alt key when you click on the x to get rid of all the other tabs that are open, except for the page on that tab.
How to tell which Safari tabs are playing audio
Not everyone wants to surf the web in silence though. There is lots of very worthy audio and video content available on the web and no doubt many surfers wouldn’t want to miss out on that.
The problem is when you have multiple web pages open and more than one of them is blaring out audio.
Luckily there is another Safari tip to fix that.
You can identify which of your open tabs is playing audio by the speaker symbol that appears in the far right of the Safari tab associated with that web page.
It’s possible to mute the audio with a single click on the speaker symbol without even opening the tab.

And if more than one Safari webpage is playing audio you can choose to mute them all at once. Just click on the speaker symbol in the URL bar and choose Mute all Tabs.
Alternatively, you can Option/Alt-click on the speaker icon of the tab you do wish to listen to and mute the audio on all the other tabs.
How to reopen all windows from the last session
Here’s another useful tip. You can easily reopen all the tabs you had open last time you were using Safari.
Click History > Reopen All Windows from Last Session to quickly recover all the windows you were recently looking at. You might also find this helpful: How to export bookmarks from Chrome to Safari
How to show the full URL in Safari
Another handy Safari tip. In Yosemite Safari stopped showing the whole URL – a feature designed to help avoid users being taken in by phishing scams, wherein the URL is obfuscated. In other words, if you’re visiting https://macworld.co.uk/this/page/that/page then all you’ll see in the address bar is macworld.co.uk.
If this isn’t what you want, perhaps you want to see the full URL of the article you are reading, you can change things so that the whole URL is shown.
Open Safari’s preferences dialog box (Cmd+,) then click the Advanced icon and put a check alongside Show Full Website Address.
How to change how you view websites in Safari
One of our favourite features in Safari 11 is the extra control we have over the web. You can tweak the settings of specific websites so that they suit you for example.
How to change the font size on a website
You can tweak your settings so that when you visit a specific site the images and text are bigger – perfect if you are frustrated to find that the text on a favourite website is a bit too small for your eyes.
Here’s how to enlarge (or reduce) the font size on a particular website so that it stays that size whether you visit:
- Go to Safari > Preferences.
- Click on the Websites tab.
- Click on Page Zoom.
- Find the site you want to customise (any site you have open or have recently visited will be listed here).
- Choose a number bigger or smaller than 100% depending on how large you want the text and images to be.
You can do this on a per website basis, or if you frequently find that the text on websites is too small for you, you can choose to default to the percentage that suits you wherever you go on the web. Note that not all websites are created the same so some will naturally have larger type than others.

To choose the zoom percentage for all websites, click in the drop down box beside “When visiting other websites”.
Another benefit of having access to these controls that allow you to change the way you view the web is that it enables you to stop seeing ads and auto-playing videos. We’ll look at that below.
How to stop ads and auto-playing videos in Safari
Another enticing feature of Safari is the way you can choose to adjust the settings so that you never see another ad or auto-playing video again. We’ll look at how to do that next.
How to stop autoplay audio and video in Safari
Perhaps you are frustrated by auto-playing video blaring out every time you visit a website.
With Safari 11 you can disable autoplay video, so you will never again have to hear voices while you are browsing the web. Here’s what to do:
- Open the offending website.
- Click on Safari > Settings for This Website (or right-click the URL box and select Settings for This Website).
- Allow All Auto-Play
- Stop Media with Sound
- Never Auto-Play
Stop Media with Sounds is the default option, and it will essentially stop any video from starting if the sound is set to be on. If the video is set to play silently it will still run but you won’t hear it, unless you choose to.
If you would rather not let auto-playing video play, you can choose Never Auto-Play.
Remember that if you adjust the settings this way it will only apply to autoplay videos on that website. If you’d like to never see an autoplaying video again follow these steps:
- Go to Safari > Preferences and click on Websites.
And there is an option below to choose the same settings “When visiting other websites”.
We have a complete tutorial that explains how to use this feature here: How to stop autoplay video in Safari & Chrome on Mac .
We also cover how to stop Safari asking to use your location data here .
How to stop seeing ads on websites in Safari
While ads pay a part of our wage, we realise that some ads can really reduce the enjoyment of web browsing. Usually these are ads that have something wrong with the way they have been coded and aren’t behaving as intended, or even worse they are spam ads that have crept onto the ad networks. We are honestly as frustrated as you are!
One of the big changes Apple bought to Safari 11 was the ability to really manage the ads that you see – this was part of Apple’s effort to make the web work better. Effectively, if Apple can remove ads that aren’t behaving as intended and are jamming up page loading times and the like, then Safari will perform quicker, which means that the surfer has a better time surfing.
There are a few ways you can take advantage of these anti-ad related features in Safari 11.
One way is to choose to surf the web – or certain pages – in Reader mode.
Reader mode is a way of viewing webpages that Apple introduced back in 2010 in Safari 5. Reader displays just the text and images from a webpage, without any of the other page furniture. We think it is a bit like reading a Word document or a PDF. The feature hasn’t changed much over the years, but in Safari 11 it’s became possible to choose for a site to always be viewed in Reader Mode.
First, here’s how to view a site in Reader mode:
- Click on the stack of lines to the left of the URL bar.
- This will automatically change the webpage to Reader view.
- Click on the stack of lines to turn Reader view off.
It’s worth checking how a site appears in this mode before switching over to it because not all sites implement it particularly well (sometimes you will find that an article stops abruptly because only one page has been carried into Reader view). Some sites don’t have a Reader view at all (such as Apple, for example).
And here is how to customise your settings so that whenever you visit that site the pages are viewed in Reader mode:
- Click on Reader.
- Find the site you want to customise (any site you have open, or have recently visited will be listed here).
- Toggle the drop-down menu beside that site to On.
A quicker way to do this is to right-click or control-click on the stack of lines beside the URL and choose Use Reader Automatically.
Or, as long as you are on the website you wish to change the setting for, you can click on Safari > Settings for this Website, and choose Use Reader When Available.
How to surf in private using Safari
Another useful feature in Safari is the option to use a private browsing window. This doesn’t just keep your browsing habits private from someone else who has access to your Mac, it also means that you are incognito – in other words even the websites you are visiting don’t have any information about you.
Go to Safari > File > New Private Window (or shift-cmd-n). You can tell if a window is private because the search bar will be grey. Any new tabs you open in this window will be private.
Alternatively, to open a Private Browsing window you can click shift, command and N.
You can tell it’s a private window because the URL field will be greyed out.
Hold down Option/Alt while picking Private Browsing to quickly switch it on and bypass the ‘Do you want to switch on Private Browsing?’ alert window if you happen to see it frequently. We have a complete guide to private browsing on Safari here .
For even more privacy, you can choose to always search with privacy-obsessed DuckDuckGo as your default search engine. Go to Safari > Preferences > Search, and click on the Search Engine. Then select Duck Duck Go from the Search Engine dropdown list. You can choose from Google, Bing, Yahoo or DuckDuckGo.
How to delete your histroy in Safari
If you didn’t search using a private browsing window you can still delete your history and evidence of what you were up to.
- Click on History.
- Scroll down and click on Clear History.
- You can choose to clear history for Today, the last hour, today and yesterday, or all history.
- You’ll see a warning that Clearing history will remove related cookies and other website data. Basically this is warning you that if you go ahead and Clear History you may find that you have to log onto websites, or shopping cart information may disappear.
- If you are happy with that then click on Clear history.
We have a complete tutorial all about how to delete your browser history on a Mac here .
How to delete cookies in Safari
Another new feature that came in Safari 11 was the introduction of privacy protection, a feature that’ll stop those annoying Amazon adverts showing you products after you’ve bought them.
Safari actively tries to block the cross-site tracking data that powers targeted adverts. While it won’t completely stop it, it should have a noticeable effect when using the browser.
According to Apple this isn’t an attempt to block ads, but rather to protect your privacy.
This means that you should no longer need to delete cookies if you want to stop seeing targeted ads (cookies have also been known to affect the price for goods if you have previously shown an interest in a product so deleting cookies could avoid such practices).
If you want to go a step further regarding cookies in Safari 11 there are some preferences changes you can make.
- Beside Website tracking click on Ask websites not to track me.
- Beside Cookies and website data click on Block all cookies.
If you aren’t using Safari 11 you can still delete cookies.
- Click on the Privacy tab.
- Click on Remove All Website Data…
Here’s how to add your own background image to Safari.
Author: Karen Haslam , Managing Editor

Karen has worked on both sides of the Apple divide, clocking up a number of years at Apple's PR agency prior to joining Macworld more than two decades ago. Karen's career highlights include interviewing Apple's Steve Wozniak and discussing Steve Jobs’ legacy on the BBC. Having edited the U.K. print and online editions of Macworld for many years, more recently her focus has been on SEO and evergreen content as well product recommendations and buying advice on Macworld.com.
Recent stories by Karen Haslam:
- How to copy and paste on a MacBook or Mac
- How to scan documents on iPhone
- How to back up a MacBook or Mac
How to Use Safari Reader Mode on iPhone & iPad (iOS 17)

Safari Reader view on iPhone and iPad allows you to read a web page without distractions so that only the text and photos are left. I personally find that this makes the article easier to focus on, and gentler on my eyes. We'll walk you through how to use Safari Reader mode and turn it off when you're done.
Why You’ll Love This Tip:
- Enjoy simpler reading without the clutter and distraction of ads and extra page features.
- Print web articles or recipes without ads to save for later.
How to Enable Reader View in Safari on iPhone & iPad
System requirements.
This tip works on iPhones running iOS 16 or later. Find out how to update to the latest version of iOS.
Safari's Reader (also commonly referred to as Reader view or Reader mode) has been a user favorite for quite some time since it allows you to view and print web pages without ads . Let's learn how to use it, what the page will look like with and without Reader enabled, and how to turn off Reader mode once you're done! Want to learn more about how to navigate Safari on iPhone & iPad? Sign up for our free Tip of the Day newsletter. Here's how to use Reader mode in Safari.

I often forget about Safari Reader mode, but it’s a feature I really love when I remember to use it, similar to the new method for opening new tabs in Safari ! Reader view puts text and images center stage, leaving ads and other interruptions out of it. Plus, once you've enabled Reader, you can print without ads !
Author Details

Jim Karpen holds a Ph.D. in literature and writing, and has a love of gizmos. His doctoral dissertation focused on the revolutionary consequences of digital technologies and anticipated some of the developments taking place in the industry today. Jim has been writing about the Internet and technology since 1994 and has been using Apple's visionary products for decades.

Featured Products

Most Popular

How to Tell If Someone Blocked Your Number on iPhone

10 Simple Tips To Fix iPhone Battery Drain

How to Schedule a Text Message on iPhone

iPhone Alarm Volume Low? How to Make an iPhone Alarm Louder

How to Tell If a Dead iPhone Is Charging

How To Put Two Pictures Together on iPhone

How to Fix Apple Watch ECG Not Working

How to Hide an App on Your iPhone

How To Turn Off Flashlight on iPhone (Without Swiping Up!)

Can iPhones Get Viruses? How to Detect & Remove Malware (iOS 17)

How to Get Automatic Birthday Reminders on iPhone

Organize Your iPhone Home Screen & Apps
Featured articles, why is my iphone battery draining so fast 13 easy fixes.

Identify Mystery Numbers: How to Find No Caller ID on iPhone

Apple ID Not Active? Here’s the Fix!

How to Cast Apple TV to Chromecast for Easy Viewing

Fix Photos Not Uploading to iCloud Once & for All (iOS 17)

There Was an Error Connecting to the Apple ID Server: Fixed

CarPlay Not Working? 4 Ways to Fix Apple CarPlay Today
Check out our sponsors.

- Each email reveals new things you can do with your phone (and other devices) with easy-to-follow screenshots.
- Enter your email to get your first tip immediately!
How to customize the Reader view and per-site settings in Safari for iPhone and iPad
Maximize your reading experience on Safari for iPhone and iPad by learning how to customize the Reader view and per-site settings.

Using the Safari View menu on iPad and iPhone
Visit a site you like and then tap the AA icon on the left of the Safari address bar to open the View menu. You’ll see some new options you can adjust:
- Text size controls : Use the small A and the large A to decrease or increase the text size on the page. To return the webpage to its original text sizes, just tap the percentage in the center.
- Show Reader : If Reader View is available, tap to enter it and see below for the options you have there.
- Hide Toolbar : You can hide the entire bar at the top of Safari for a larger view of the website. Tap at the very top to unhide the toolbar.
- Request Mobile/Desktop Site : Depending on whether you are viewing the desktop or mobile version of the site, you can request the other with just a tap.
- Website Settings : These are the Per-Site settings that we’ll explain next.
- Privacy Report: It gives you a rundown of trackers Safari prevented from profiling you.
Tap the AA icon once more to close the View menu.

Reader View settings
If you use the Show Reader view option in the menu and tap the AA icon you can make changes to the Reader View too.
Choose from backgrounds like white, sepia, gray, and black. You can select a different font style and increase or decrease the font size .
Tap Hide Reader to return to the mobile or desktop site, or just tap the AA icon to close the menu.

Using the Safari Per-Site settings
Tap the Website Settings option in the View menu , and you can change these options:
- Request Desktop Website : Enable the toggle to display this option to Request the Desktop Site.
- Use Reader Automatically : Enable the toggle to jump into Reader View automatically .
- Camera, Microphone, and Location : Choose from Ask, Deny, or Allow for each of these three options.
Remember, these settings are on a per-site basis. So for those that you visit regularly, you can adjust these settings to enhance your experience.
Tap Done when you finish making your adjustments.

Do more with Safari:
- How to download videos from Safari on iPhone and iPad
- How to increase privacy in Safari for iPhone and iPad
- How to customize and personalize Safari on iPhone and iPad
- Accessories
- Meet the team
- Advertise with us
- Privacy Policy
Reader mode in Safari on iPhone or iPad lets you read a webpage distraction-free without ads, navigation, and other annoying items. It gives you a clean, mobile-friendly, customizable reading experience .
With the Reader view, you can change the font type, background color, and increase or decrease the text size for comfortable reading according to your preference. Let us see how to turn on Safari’s reader view on iPhone running iOS 15 or 14.
Enable Safari Reader View automatically for specific sites
Enable safari reader view automatically for all sites, how to turn on reader mode in safari in ios 12.
Note : Reader Mode works best on the actual article and not the homepage or category page of a website.
How to enable Reader View in Safari on iPhone and iPad
- Open Safari and visit a webpage.
- Tap on A A from the upper left.

- You will see that the webpage looks clean and different. This is the Reader view.

You should know that not all websites and webpages will support this. To exit Reader mode, tap on A A and then tap Hide Reader View to turn it off.

- Visit the site in Safari on iPhone
- Tap on A A from the upper left and tap on Website Settings .
- Now, turn ON Use Reader Automatically .
- Tap on Done .
From now on, this particular website will always open in the Reader view. To disable automatic Safari reader mode, follow the same steps, and turn off the switch in step 4. You may also do it from the Settings app.
- Open Settings app on your iPhone.
- Scroll down and tap Safari .

- Turn on the option for All Websites .

To disable automatic Safari reader mode for all websites, follow the above methods, and turn off the toggle in step 4. If changes do not take effect, restart your device.
Reader Mode in iOS 12 is just as easy to enable as its successor. Here is how to enable the Safari reader view.
- Visit a webpage in Safari on iPhone running iOS 12
- Tap on four horizontal lines icon from upper-left
To exit out of Reader mode, tap on the Same icon again.
To automatically enable Reader view on the current site or all websites, touch and hold the Reader button and then choose the preferred option.
That’s all, folks!
This was how to enable and disable Safari Reader view on iPhone or iPad. You can also use it in Safari on Mac . Have a question, drop it in the comments down below.
You may also like to take a peek at:
- Best eBook Reader Apps for iOS
- How to Enable Private Browsing in Safari on iPhone or iPad
- How to Request Desktop Site in Safari on iPhone or iPad
- 8 Techniques to Open (t.co) Short Links from Twitter

Jignesh Padhiyar is the co-founder of iGeeksBlog.com, who has a keen eye for news, rumors, and all the unusual stuff around Apple products. During his tight schedule, Jignesh finds some moments of respite to share side-splitting content on social media.
View all posts
🗣️ Our site is supported by our readers like you. When you purchase through our links, we earn a small commission. Read Disclaimer .
LEAVE A REPLY Cancel reply
Save my name, email, and website in this browser for the next time I comment.
Related Articles
How to stop “verification required” when installing free apps, how to make a voice memo a ringtone on iphone (2024 guide), how to install homebrew on mac m1, m2, m3 (2024 updated), how to know if someone has blocked you on imessage (2024).
Tips & Tricks
Troubleshooting, how to enable reader view in safari automatically on iphone or ipad.

Do you like using Safari Reader View on the iPhone or iPad when reading a particular webpages articles or stories? Reader View in Safari can make webpages easier to read in some situations, and if you use the feature for some websites, or all of the web, you might appreciate enabling Automatic Reader View in Safari for iOS.
With this Automatic Reader View enabled in Safari for iOS, Safari will automatically enter into Reader Mode, either for specific website URLs as chosen, or for all web sites.
How to Enable Automatic Reader View in Safari for iPhone or iPad
Want to enable Reader View automatically, either on a particular website or for all websites? Here’s how to do that in iPad and iOS:
- Open Safari on iPhone or iPad, then visit the website URL you want to use Automatic Reader View for
- For iOS 13 and later: tap the “aA” button, then tap on “Website Settings”
- For iOS 12 and earlier: Tap and hold on the Reader button in the URL bar at the top of the Safari screen

- When the ‘Automatic Reader View’ option shows up, choose to toggle it on with one of the following: “Use on (current domain)” or “Use on All Websites”

- Browse the web as usual with the settings in place
If you choose “Use on (current domain)” then anytime you load that particular website in Safari for iOS, Reader View in Safari will enable itself automatically, but only for that website domain.
If you choose “Use on All Websites” then every web site will load into Reader View automatically in Safari for iOS and iPadOS.
Most users will probably want to limit this feature to specific websites and domains that are either not optimized for their device or screen, or otherwise difficult to read for some other reason. That way every time such a website is visited, the Reader mode feature will trigger and legibility and readability should improve (remember you can customize the appearance of Safari Reader ).
Automatic Reader View will use the last settings that were defined for the appearance of Safari Reader Mode, so if you want to change the text size, color theme, font face, or other aspects of the Safari Reader experience you can do so as described here and have those customizations carry over to the Automatic Reader mode too.
This is a particularly helpful feature for viewing webpages on the iPhone that are not mobile optimized or that don’t have a mobile website, since Safari Reader View tends to improve legibility in those situations by boosting font size and focusing on the webpages content.
How to Disable Automatic Reader View in Safari for iOS
If you had previously turned on Automatic Reader View and would now like to change that setting in iOS, here’s how to do so:
- Open Safari in iOS, then visit the specific website URL that you want to disable Automatic Reader View for
- Tap and hold the Reader button at the top of the Safari screen

- When the ‘Automatic Reader View’ options appear, choose one of the following: “Stop Using on (current domain)” or “All Websites”

- Use Safari with the previously set Reader settings disabled
These settings obviously pertain to iOS Safari for the iPhone and iPad, but the feature exists on the Mac version of Safari as well, where it can also be set to activate on individual websites or all websites, and the Reader appearance customized as needed on the Mac too.
Safari Reader Mode has been around for a while and is really quite useful, even if you don’t use it for reading certain webpages it can be useful for other purposes like printing out webpage articles without ads and other extraneous page content . This automatic feature changed slightly from iOS 12 to iOS 13 and iPadOS 13 and later, but it still persists behind the “aA” button and when looking at individual settings for websites.
Share your thoughts, experiences, and comments on Automatic Reader View in the comments below!
Enjoy this tip? Subscribe to our newsletter!
Get more of our great Apple tips, tricks, and important news delivered to your inbox with the OSXDaily newsletter.
You have successfully joined our subscriber list.
Related articles:
- How to Change Safari Reader View Font & Background on iPhone & iPad
- Customize the Background Color, Font, & Text Size in Safari Reader for iPhone or iPad
- How to Turn Off Split Screen in Safari for iPad? Exiting Safari Split Screen in iPadOS
- How to Change Safari Reader Font, Text Size, & Color Theme on Mac OS X
» Comments RSS Feed
Thank you for this information as I had the opposite situation in that it was turned on for all websites and I did not want that. Was googling to find out how to turn it off and discovered this site. Your instructions were excellent. Thank you.
This is why technology sucks. Reader view was awesome! It was almost perfect. You could even “print” this to PDF in IOS. I do not see it at all in iOS 13 and Apple suxs and blows at the same time.
WTF Apple???
I guess they did buy into the Authoritarian Communist Manifesto? Mothers!
In iOS 13 and later, automatic Reader View is still available in Safari by tapping on ‘aA’ then “Website Settings” and toggling it on from there.
in iOS 12, you can just tap and hold the lines button to access automatic reader view setting
I am having the same experience. I get the choice of using the reader on all websites in Safari or in the current. The All Websites doesn’t work on IOS12.2 We await developments. Thank for all you do for us
Deson’t work on iPhone SE running the latest iOS update 12.2. No such reader button exists.
Hey Paul, Unfortunately it’s not working after Update from yesterday and on your Website staying still „Nicht sicher“ I have tried many times but always get back to white website! And I have got your logo on my iPad 3 times 😲 What can I do? The same on 📱, can’t get a Reader in Safari! Anyway thanks for sharing your great tips and have a great day! Friendly greetings from 🇧🇧
Leave a Reply
Name (required)
Mail (will not be published) (required)
Subscribe to OSXDaily
- - How to Connect AirPods to a Smart TV
- - How to Customize the Finder Sidebar on Mac
- - How to Uninstall Apps on MacOS Sonoma & Ventura via System Settings
- - How to Mute a Call on Apple Watch
- - How to Use the Latest GPT 4 & DALL-E 3 Free on iPhone & iPad with Copilot
- - Beta 3 of iOS 17.5, macOS Sonoma 14.5, iPadOS 17.5, Available for Testing
- - Apple Event Set for May 7, New iPads Expected
- - Beta 2 of iOS 17.5, iPadOS 17.5, macOS Sonoma 14.5, Available for Testing
- - Opinion: Shiny Keys on MacBook Air & Pro Are Ugly and Shouldn’t Happen
- - MacOS Ventura 13.6.6 & Safari 17.4.1 Update Available
iPhone / iPad
- - How to Bulk Image Edit on iPhone & iPad wth Copy & Paste Edits to Photos
- - What Does the Bell with Line Through It Mean in Messages? Bell Icon on iPhone, iPad, & Mac Explained
- - iOS 16.7.7 & iPadOS 16.7.7 Released for Older iPhone & iPad Models
- - Fix a Repeating “Trust This Computer” Alert on iPhone & iPad
- - Make a Website Your Mac Wallpaper with Plash
- - 15 Mail Keyboard Shortcuts for Mac
- - How to Use Hover Text on Mac to Magnify On-Screen Text
- - Fix “warning: unable to access /Users/Name/.config/git/attributes Permission Denied” Errors
- - How to Fix the Apple Watch Squiggly Charging Cable Screen
- - NewsToday2: What it is & How to Disable NewsToday2 on Mac

About OSXDaily | Contact Us | Privacy Policy | Sitemap
This website is unrelated to Apple Inc
All trademarks and copyrights on this website are property of their respective owners.
© 2024 OS X Daily. All Rights Reserved. Reproduction without explicit permission is prohibited.

How To : Force Safari to Automatically Show Reader View for Specific Websites on Your iPhone
The Reader mode in Safari is a great way to view a webpage on your iPhone in a stripped-down manner, removing unnecessary images, videos, and advertisements for a streamlined experience free of distractions. Apple's iOS 13 improves upon Safari Reader when it comes to choosing which sites you want it to run automatically on, so everything is more accessible with more controls to work with.
While you could enable Automatic Reader View for specific websites, i.e., domains and subdomains, in iOS 11 and 12, it was relatively hidden and not very intuitive, to say the least. With iOS 13, the options for Reader have been bundled together with other features like Desktop view , and there's an easy-to-access settings panel to set Reader View automatically, to name just a few improvements.
- Don't Miss: 200+ Exciting New iOS 13 Features for iPhone
1. Turn On Reader View for Specific Websites
Quickly enabling Reader view for a supported webpage while browsing in Safari is simple. Tap either the Reader icon to the left of the Smart Search bar (only appears for a moment in iOS 13), long-press the "AA" icon that takes its place, or tap the "AA" icon and select "Show Reader View" from the menu that appears (iOS 13 only). The webpage should load the Reader view, free of unnecessary distractions.
This method is temporary, however, and the site will revert to its original layout once you close or refresh its page or visit another site and come back. If you want a more permanent fix, where specific websites always show up in an easier-to-read format, follow the instructions below.
Method 1: In iOS 13
Head to a supported webpage for a domain you want to always use with Safari Reader. Next, tap on the "AA" icon to the left in Smart Search (if you see the Reader icon instead, wait for it to disappear first), then select "Website Settings" from the prompt that appears. Now, toggle on "Use Reader Automatically" to force Reader view for the domain or subdomain. Hit "Done" to finish up.

Once enabled, Automatic Reader View works throughout the entire domain or subdomain where applicable, not just the page you're viewing. Reader will also kick in for the target domain or subdomain when you're using Private Browsing Mode. It is domain-specific, though, so using Automatic Reader View on gadgethacks.com won't also apply to ios.gadgethacks.com, and vice versa, for example.
Not all webpages support Reader, so don't be discouraged if some pages on some websites aren't automatically loading with the distraction-free view.

Method 2: In iOS 11 & iOS 12
Compared to iOS 13, in iOS 11 and 12, enabling Automatic Reader View for specific sites is mostly hidden and a little more convoluted. To do so, perform a long-press on the Reader icon on the left side of the address bar, then either tap "Use on [Website URL]" or "Use on All Websites" on the menu prompt.

Tapping on "Use on [Website URL]" will apply the format automatically for supported pages within that specific domain or subdomain. If it was a subdomain, it applies only for that subdomain, so it won't work on other subdomains on the same site, nor on the site's primary domain itself.
Selecting "Use on All Websites," on the other hand, will apply the layout for all webpages across the board for all websites. You can turn it on from any Reader-supported webpage. To turn it off, do the same thing, but this time hit "Stop Using on All Websites."

2. Quickly Hide Reader View When Needed
Naturally, there will be some pages within the domain or subdomain that you may want to view in their original layout to better understand the content. So if you want to quickly get out of Reader mode to go back to the regular format, either long-press on the "AA" (iOS 13) or tap on the Reader mode icon (iOS 11–12).
It's worth noting that on iOS 13, you have the added option of tapping on the "AA" icon and selecting "Hide Reader View" to go back to the original format.

3. Disable Automatic Reader View for Specific Websites
If you want to get out of Reader mode entirely for the domain or subdomain on iOS 13, you'll first need to get out of Reader View, as described in section 2 above. Next, tap the "AA" button, then "Website Settings" from the menu, toggle off "Use Reader Automatically," and hit "Done." Safari will no longer default to Reader for that domain or subdomain.
On iOS 11 and 12, disabling Reader mode is the same as enabling it. So long-press on the Reader icon to reveal the action sheet, and tap on "Stop Using on [Website URL]" to default the domain or subdomain back to mobile view always. "Stop Using on All Websites" will disable Automatic Reader View for all domains and subdomains.

4. Manage Reader View Settings (iOS 13 Only)
Besides having the ability to set Reader View for sites directly in Safari, iOS 13 also lets you manage the feature for multiple sites within the Settings app. In the app, head to the "Safari" page, then hit "Reader" under the Settings for Websites section.
Here, you'll see a list of all the domains and subdomains you've set Automatic Reader View for at least once. That means if you set it for a site, then changed your mind, it will still show up here but toggled off. For any domains or subdomains you don't or do want to use Automatic Reader View on, toggle them accordingly.
You can also flip the switch for "Automatically Use Reader" under Other Websites to turn it on everywhere on the web, unless you toggle a specific domain or subdomain off in the Automatically Use On section above. This is helpful if you want to whitelist all sites and only blacklist a few.

If you want to delete saved websites within the menu, first tap "Edit" in the top right. From there, tap on just the sites you want to remove and hit "Delete." Alternatively, you can select "Clear All Settings" and confirm it on the action sheet to erase all your stored websites in one go.

Note that any sites you set Automatic Reader View for will automatically be added to the "Reader" menu in Safari's settings — even if you've set them while in Private mode. Unfortunately, clearing your history and website data won't make a difference as well.
Just updated your iPhone? You'll find new emoji, enhanced security, podcast transcripts, Apple Cash virtual numbers, and other useful features. There are even new additions hidden within Safari. Find out what's new and changed on your iPhone with the iOS 17.4 update.
Be the First to Comment
Share your thoughts, how to : make your iphone do all your talking for you on calls and in person, how to : keep your night vision sharp with the iphone's hidden red screen, how to : add unsupported cards and passes to apple wallet for quick, easy access on your iphone, how to : install facebook lite on your iphone, how to : force your iphone to switch cell towers for a stronger signal, how to : how thieves unlock passcodes on stolen iphones (and how to protect yourself against it), how to : shoot in 4k with the selfie camera on your iphone 11, 11 pro & 11 pro max, warning : sensitive info you black out in images can be revealed with a few quick edits on your iphone, how to : dial these secret codes to see if someone is hijacking calls & texts on your iphone, how to : make siri say whatever you want every time you connect your iphone to a charger, how to : there's an easy way to see all the unsent messages in your imessage conversations, how to : your iphone's status bar can actually be customized — here's how, how to : 100+ secret dialer codes for your iphone, how to : 20 surprisingly practical uses for apple airtags, how to : the trick to disabling link previews for urls in your iphone's messages app, how to : the simple trick to stop your iphone from automatically going to sleep, how to : use your iphone to hear the world around you better, spy on conversations, listen to your heartbeat, and more, how to : can't access any icloud data from a web browser this is how you fix it, how to : take scrolling screenshots of entire webpages, text documents, and more on your iphone or ipad, how to : figure out your total calorie burn in apple's health app.
- All Features
- All Hot Posts
- Share full article
Advertisement
Supported by
Reader Mode in Safari
Apple’s Reader tool doesn’t outright block advertisements, but it can temporarily isolate the page text so you can read without distractions.

By J. D. Biersdorfer
Q. Is the Reader button in the Safari browser the same thing as an ad blocker?
A. The Reader mode, built into Apple’s Safari browser since 2010 and available on macOS and iOS , strips away web advertisements and the page’s navigational design to present an article’s text and basic images in a clean and uncluttered format. However, Safari’s Reader mode is not in the same category as a dedicated extension that stops ads from downloading and displaying on the page.
Instead, when you click the Reader button in the Safari address bar, the program analyzes the page for article text and relevant images and puts a reformatted version onto a separate layer on top of the original web page. When Reader displays a page, you can print or email the streamlined version. (Not every webpage is compatible with Safari Reader, and the mode doesn’t work on home pages with links to multiple articles.)

In the latest iOS 11 and macOS High Sierra systems, you can also set the browser (or certain sites) to always open in Reader mode, by pressing the Reader button in iOS or right-clicking the Safari address bar in macOS to get to the controls. In recent versions of Safari, you can customize the look of the Reader mode by clicking the double-A icon on the right side of the address bar and choosing your preferred font and background color.
Safari is not the only browser with a reader-friendly mode. For example, Microsoft Edge and Mozilla Firefox include similar tools, and browser extensions like the Mercury Reader for Google Chrome can also give you a distraction-free reading experience.
Personal Tech invites questions about computer-based technology to [email protected] . This column will answer questions of general interest, but letters cannot be answered individually.
J.D. Biersdorfer has been answering technology questions — in print, on the web, in audio and in video — since 1998. She also writes the Sunday Book Review’s “Applied Reading” column on ebooks and literary apps, among other things. More about J. D. Biersdorfer
How to Make Your Smartphone Better
These days, smartphones include tools to help you more easily connect with the people you want to contact — and avoid those you don’t. Here are some tips .
Trying to spend less time on your phone? The “Do Not Disturb” mode can help you set boundaries and signal that it may take you a while to respond .
To comply with recent European regulations, Apple will make a switch to USB-C charging for its iPhones. Here is how to navigate the change .
Photo apps have been using A.I. for years to give you control over the look of your images. Here’s how to take advantage of that .
The loss of your smartphone can be disruptive and stressful. Taking a few simple steps ahead of time can make things easier if disaster strikes .
Many default settings make us share superfluous amounts of data with tech companies. Here’s how to shut those off .

6 Tips to Improve Your Safari Experience on iPhone
A ccessing the internet on an iPhone is made simple by Safari, Apple's native web browser; it does a great job of getting you started, but there are several other features that you can leverage to enhance your user experience.
Below, we'll list some valuable tips you can use to get the most out of Safari on your iPhone. So, let's get started.
1. Modify the Start Page
The start page is the first element you usually run into when launching Safari—it's the default screen if you've not used the browser before or didn't leave any tabs open after your last session. And the first step you can take in improving your Safari experience is to customize it.
Customizing the start page involves changing the background image and choosing the sections (listed below) you want the app to show. We've added descriptions to help you understand a little more about each section.
- Favorites : This section will show all your favorite websites and bookmarks which have been added to the Favorites section on your iPhone.
- Frequently Visited : This is a collection of searches and websites you've frequented in recent months. The information is said to be a mix from all your Apple devices if you've enabled iCloud.
- Shared with You : It works by finding links, images, music, and more, sent within the Messages app, and brings them up in relevant applications. For example, if someone texted you a link via iMessage, you'll find it in this section of the start page.
- Privacy Report : This section surfaces information on the trackers used by websites you've visited in the last 30 days and showcases when your iPhone—and other Apple devices—prevented them from profiling you.
- Siri Suggestions : You can find website suggestions based on your recent browsing history, bookmarks, and open tabs within this section if you choose to use them.
- Reading List : You can find the three latest additions to your Reading List in this section, with a Show All button available in case you want to view the other articles you've added to your read later list.
- iCloud Tabs : This feature showcases up to four most recent tabs open on each Apple device you own with iCloud enabled for Safari.
To begin customizing your Safari's start page, follow the steps listed below:
- Scroll down to the bottom of the Safari start page and tap Edit.
- Now, enable the desired sections using the toggles or reorder them by pressing (and dragging) the three horizontal lines.
If you want to experience Apple's Continuity feature , toggle on Use Start Page on All Devices at the top of the edit menu. This will ensure your start page is in sync across all devices connected to your iCloud account.
2. Create Tab Groups in Safari
The next step in improving Safari on iPhone is to create and use Tab Groups . The feature lets you bring order and control to tabs by allowing you to group similar ones—or those you often use together—into folders. Ideally, you can use the feature to separate search results and websites related to work from those you open during casual browsing.
To create a Tab Group, follow the steps listed below:
- View all your tabs by tapping the Tab button in the bottom-right corner.
- Now, tap the text box at the bottom of the screen—it mentions the number of tabs open.
- In the menu that appears, tap New Empty Tab Group or the second option, New Tab Group with X Tabs .
- Name the Tab Group according to your liking and hit Save .
The X in the second option will vary based on the number of tabs open when creating a Tab Group.
3. Use Safari Extensions
Like Chrome, you can install Safari extensions to improve your browsing experience. For those unaware, these are applications built for web browsers that bring additional functionality and make your life easier.
For example, you can install applications that scour the web for coupon codes and bring them up when you're making a purchase or add ones that help edit written content to ensure you aren't making silly errors.
Adding extensions to Safari on an iPhone is a bit different compared to installing and removing extensions in Safari on a Mac . To do this, follow the steps listed below:
- Go to Settings > Safari on your iOS device.
- On the next screen, find Extensions under the General subsection and tap on it.
- You'll now see a list of extensions available. In case you see no options, tap More Extensions to visit the Safari Extensions store.
You may sometimes see options without having installed an extension before; these are present due to an application—that offers Safari extensions—installed on your iPhone from before.
Once you've installed an extension, activate it in Settings using the same steps above and then do the following:
- Open Safari and tap the AA button in the address bar.
- Now, tap Manage Extensions and select the extension you want to activate.
4. Choose Websites to Automatically Use Reader
Reader in Safari is a nifty add-on that lets you read content from a website with minimal distractions and no ads. It makes the experience quite simple and offers options like changing the page color, font, and font size.
Activating Reader is quite simple; tap the AA button in the address bar when you're on a supported webpage and choose Show Reader . However, if you frequently visit a specific website, you can configure Safari to load all its webpages in Reader. Here's what you need to do:
- Open the desired website and tap the AA button.
- In the context menu that appears, tap Website Settings .
- Now, toggle on Use Reader Automatically . Each supported webpage will now open in Reader, making it easier to read the content.
5. Set Tabs to Open in Background
Despite it being easy to access AI tools like ChatGPT on mobile for learning about things, if you prefer getting deep into the weeds when doing research, you may want to view many of the following webpages in new tabs.
By default, opening a new tab via a hyperlink will leave the old tab behind and move you to the new tab. While this behavior is fine, it can feel like a chore if you'd like to open multiple results from a search page.
Fortunately, you can change this behavior. Here's what you need to do:
- Open the Settings app, and scroll down to the Safari option.
- On this page, under the Tabs subsection, tap on Open Links .
- Now, choose In Background .
6. Configure Safari to Automatically Close Tabs
Lastly, while the ability to open many tabs in Safari is a boon, knowing ways to organize your browser and keeping it clutter-free can help you focus better and increase productivity. And keeping only a few tabs open can be a part of this regime.
Safari on iPhone also helps with this, with the ability to automatically close tabs after a set period of time; we've detailed the steps to activate the feature below:
- On this page, under the Tabs subsection, tap on Close Tabs .
- Now, choose from the available options: After One Day , After One Week , or After One Month .
Become a Safari Power User With These Changes
Each customization method listed above will help improve your Safari experience, be it with a new background image that makes the app feel more personal or a setting that keeps it clutter-free.
Overall, Safari is an excellent browser that can be made even better for power users with a few changes. And some of Apple's exclusive features make a strong case for the app, especially if you're a Mac user.

iPhone User Guide
- iPhone models compatible with iOS 17
- R ' class='toc-item' data-ss-analytics-link-url='https://support.apple.com/guide/iphone/iphone-xr-iph017302841/ios' data-ajax-endpoint='https://support.apple.com/guide/iphone/iphone-xr-iph017302841/ios' data-ss-analytics-event="acs.link_click" href='https://support.apple.com/guide/iphone/iphone-xr-iph017302841/ios' id='toc-item-IPH017302841' data-tocid='IPH017302841' > iPhone X R
- S ' class='toc-item' data-ss-analytics-link-url='https://support.apple.com/guide/iphone/iphone-xs-iphc00446242/ios' data-ajax-endpoint='https://support.apple.com/guide/iphone/iphone-xs-iphc00446242/ios' data-ss-analytics-event="acs.link_click" href='https://support.apple.com/guide/iphone/iphone-xs-iphc00446242/ios' id='toc-item-IPHC00446242' data-tocid='IPHC00446242' > iPhone X S
- S Max' class='toc-item' data-ss-analytics-link-url='https://support.apple.com/guide/iphone/iphone-xs-max-iphcd2066870/ios' data-ajax-endpoint='https://support.apple.com/guide/iphone/iphone-xs-max-iphcd2066870/ios' data-ss-analytics-event="acs.link_click" href='https://support.apple.com/guide/iphone/iphone-xs-max-iphcd2066870/ios' id='toc-item-IPHCD2066870' data-tocid='IPHCD2066870' > iPhone X S Max
- iPhone 11 Pro
- iPhone 11 Pro Max
- iPhone SE (2nd generation)
- iPhone 12 mini
- iPhone 12 Pro
- iPhone 12 Pro Max
- iPhone 13 mini
- iPhone 13 Pro
- iPhone 13 Pro Max
- iPhone SE (3rd generation)
- iPhone 14 Plus
- iPhone 14 Pro
- iPhone 14 Pro Max
- iPhone 15 Plus
- iPhone 15 Pro
- iPhone 15 Pro Max
- Setup basics
- Make your iPhone your own
- Take great photos and videos
- Keep in touch with friends and family
- Share features with your family
- Use iPhone for your daily routines
- Expert advice from Apple Support
- What’s new in iOS 17
- Turn on and set up iPhone
- Wake and unlock
- Set up cellular service
- Use Dual SIM
- Connect to the internet
- Sign in with Apple ID
- Subscribe to iCloud+
- Find settings
- Set up mail, contacts, and calendar accounts
- Learn the meaning of the status icons
- Charge the battery
- Charge with cleaner energy sources
- Show the battery percentage
- Check battery health and usage
- Use Low Power Mode
- Read and bookmark the user guide
- Learn basic gestures
- Learn gestures for iPhone models with Face ID
- Adjust the volume
- Find your apps in App Library
- Switch between open apps
- Quit and reopen an app
- Multitask with Picture in Picture
- Access features from the Lock Screen
- View Live Activities in the Dynamic Island
- Perform quick actions
- Search on iPhone
- Get information about your iPhone
- View or change cellular data settings
- Travel with iPhone
- Change sounds and vibrations
- Use the Action button on iPhone 15 Pro and iPhone 15 Pro Max
- Create a custom Lock Screen
- Change the wallpaper
- Adjust the screen brightness and color balance
- Keep the iPhone display on longer
- Use StandBy
- Customize the text size and zoom setting
- Change the name of your iPhone
- Change the date and time
- Change the language and region
- Organize your apps in folders
- Add, edit, and remove widgets
- Move apps and widgets on the Home Screen
- Remove apps
- Use and customize Control Center
- Change or lock the screen orientation
- View and respond to notifications
- Change notification settings
- Set up a Focus
- Allow or silence notifications for a Focus
- Turn a Focus on or off
- Stay focused while driving
- Customize sharing options
- Type with the onscreen keyboard
- Dictate text
- Select and edit text
- Use predictive text
- Use text replacements
- Add or change keyboards
- Add emoji and stickers
- Take a screenshot
- Take a screen recording
- Draw in documents
- Add text, shapes, signatures, and more
- Fill out forms and sign documents
- Use Live Text to interact with content in a photo or video
- Use Visual Look Up to identify objects in your photos and videos
- Lift a subject from the photo background
- Subscribe to Apple Arcade
- Play with friends in Game Center
- Connect a game controller
- Use App Clips
- Update apps
- View or cancel subscriptions
- Manage purchases, settings, and restrictions
- Install and manage fonts
- Buy books and audiobooks
- Annotate books
- Access books on other Apple devices
- Listen to audiobooks
- Set reading goals
- Organize books
- Create and edit events in Calendar
- Send invitations
- Reply to invitations
- Change how you view events
- Search for events
- Change calendar and event settings
- Schedule or display events in a different time zone
- Keep track of events
- Use multiple calendars
- Use the Holidays calendar
- Share iCloud calendars
- Camera basics
- Set up your shot
- Apply Photographic Styles
- Take Live Photos
- Take Burst mode shots
- Take a selfie
- Take panoramic photos
- Take macro photos and videos
- Take portraits
- Take Night mode photos
- Take Apple ProRAW photos
- Adjust the shutter volume
- Adjust HDR camera settings
- Record videos
- Record spatial videos for Apple Vision Pro
- Record ProRes videos
- Record videos in Cinematic mode
- Change video recording settings
- Save camera settings
- Customize the Main camera lens
- Change advanced camera settings
- View, share, and print photos
- Use Live Text
- Scan a QR code
- See the world clock
- Set an alarm
- Change the next wake up alarm
- Use the stopwatch
- Use multiple timers
- Add and use contact information
- Edit contacts
- Add your contact info
- Use NameDrop on iPhone to share your contact info
- Use other contact accounts
- Use Contacts from the Phone app
- Merge or hide duplicate contacts
- Export contacts
- Get started with FaceTime
- Make FaceTime calls
- Receive FaceTime calls
- Create a FaceTime link
- Take a Live Photo
- Turn on Live Captions in a FaceTime call
- Use other apps during a call
- Make a Group FaceTime call
- View participants in a grid
- Use SharePlay to watch, listen, and play together
- Share your screen in a FaceTime call
- Collaborate on a document in FaceTime
- Use video conferencing features
- Hand off a FaceTime call to another Apple device
- Change the FaceTime video settings
- Change the FaceTime audio settings
- Change your appearance
- Leave a call or switch to Messages
- Block unwanted callers
- Report a call as spam
- Connect external devices or servers
- Modify files, folders, and downloads
- Search for files and folders
- Organize files and folders
- Set up iCloud Drive
- Share files and folders in iCloud Drive
- Share your location
- Meet up with a friend
- Send your location via satellite
- Add or remove a friend
- Locate a friend
- Get notified when friends change their location
- Notify a friend when your location changes
- Add your iPhone
- Add your iPhone Wallet with MagSafe
- Get notified if you leave a device behind
- Locate a device
- Mark a device as lost
- Erase a device
- Remove a device
- Add an AirTag
- Share an AirTag or other item in Find My on iPhone
- Add a third-party item
- Get notified if you leave an item behind
- Locate an item
- Mark an item as lost
- Remove an item
- Adjust map settings
- Get started with Fitness
- Track daily activity and change your move goal
- See your activity summary
- Sync a third-party workout app
- Change fitness notifications
- Share your activity
- Subscribe to Apple Fitness+
- Find Apple Fitness+ workouts and meditations
- Start an Apple Fitness+ workout or meditation
- Create a Custom Plan in Apple Fitness+
- Work out together using SharePlay
- Change what’s on the screen during an Apple Fitness+ workout or meditation
- Download an Apple Fitness+ workout or meditation
- Get started with Freeform
- Create a Freeform board
- Draw or handwrite
- Apply consistent styles
- Position items on a board
- Search Freeform boards
- Share and collaborate
- Delete and recover boards
- Get started with Health
- Fill out your Health Details
- Intro to Health data
- View your health data
- Share your health data
- View health data shared by others
- Download health records
- View health records
- Monitor your walking steadiness
- Log menstrual cycle information
- View menstrual cycle predictions and history
- Track your medications
- Learn more about your medications
- Log your state of mind
- Take a mental health assessment
- Set up a schedule for a Sleep Focus
- Turn off alarms and delete sleep schedules
- Add or change sleep schedules
- Turn Sleep Focus on or off
- Change your wind down period, sleep goal, and more
- View your sleep history
- Check your headphone levels
- Use audiogram data
- Register as an organ donor
- Back up your Health data
- Intro to Home
- Upgrade to the new Home architecture
- Set up accessories
- Control accessories
- Control your home using Siri
- Use Grid Forecast to plan your energy usage
- Set up HomePod
- Control your home remotely
- Create and use scenes
- Use automations
- Set up security cameras
- Use Face Recognition
- Unlock your door with a home key
- Configure a router
- Invite others to control accessories
- Add more homes
- Get music, movies, and TV shows
- Get ringtones
- Manage purchases and settings
- Get started with Journal
- Write in your journal
- Review your past journal entries
- Change Journal settings
- Magnify nearby objects
- Change settings
- Detect people around you
- Detect doors around you
- Receive image descriptions of your surroundings
- Read aloud text and labels around you
- Set up shortcuts for Detection Mode
- Add and remove email accounts
- Set up a custom email domain
- Check your email
- Unsend email with Undo Send
- Reply to and forward emails
- Save an email draft
- Add email attachments
- Download email attachments
- Annotate email attachments
- Set email notifications
- Search for email
- Organize email in mailboxes
- Flag or block emails
- Filter emails
- Use Hide My Email
- Use Mail Privacy Protection
- Change email settings
- Delete and recover emails
- Add a Mail widget to your Home Screen
- Print emails
- Get travel directions
- Select other route options
- Find stops along your route
- View a route overview or a list of turns
- Change settings for spoken directions
- Get driving directions
- Get directions to your parked car
- Set up electric vehicle routing
- Report traffic incidents
- Get cycling directions
- Get walking directions
- Get transit directions
- Delete recent directions
- Get traffic and weather info
- Estimate travel time and ETA
- Download offline maps
- Search for places
- Find nearby attractions, restaurants, and services
- Get information about places
- Mark places
- Share places
- Rate places
- Save favorite places
- Explore new places with Guides
- Organize places in My Guides
- Delete significant locations
- Look around places
- Take Flyover tours
- Find your Maps settings
- Measure dimensions
- View and save measurements
- Measure a person’s height
- Use the level
- Set up Messages
- About iMessage
- Send and reply to messages
- Unsend and edit messages
- Keep track of messages
- Forward and share messages
- Group conversations
- Watch, listen, or play together using SharePlay
- Collaborate on projects
- Use iMessage apps
- Take and edit photos or videos
- Share photos, links, and more
- Send stickers
- Request, send, and receive payments
- Send and receive audio messages
- Animate messages
- Change notifications
- Block, filter, and report messages
- Delete messages and attachments
- Recover deleted messages
- View albums, playlists, and more
- Show song credits and lyrics
- Queue up your music
- Listen to broadcast radio
- Subscribe to Apple Music
- Play music together in the car with iPhone
- Listen to lossless music
- Listen to Dolby Atmos music
- Apple Music Sing
- Find new music
- Add music and listen offline
- Get personalized recommendations
- Listen to radio
- Search for music
- Create playlists
- See what your friends are listening to
- Use Siri to play music
- Change the way music sounds
- Get started with News
- Use News widgets
- See news stories chosen just for you
- Read stories
- Follow your favorite teams with My Sports
- Listen to Apple News Today
- Subscribe to Apple News+
- Browse and read Apple News+ stories and issues
- Download Apple News+ issues
- Listen to audio stories
- Solve crossword puzzles
- Search for news stories
- Save stories in News for later
- Subscribe to individual news channels
- Get started with Notes
- Add or remove accounts
- Create and format notes
- Draw or write
- Add photos, videos, and more
- Scan text and documents
- Work with PDFs
- Create Quick Notes
- Search notes
- Organize in folders
- Organize with tags
- Use Smart Folders
- Export or print notes
- Change Notes settings
- Make a call
- Answer or decline incoming calls
- While on a call
- Set up voicemail
- Check voicemail
- Change voicemail greeting and settings
- Select ringtones and vibrations
- Make calls using Wi-Fi
- Set up call forwarding and call waiting
- Avoid unwanted calls
- View photos and videos
- Play videos and slideshows
- Delete or hide photos and videos
- Edit photos and videos
- Trim video length and adjust slow motion
- Edit Cinematic mode videos
- Edit Live Photos
- Edit portraits
- Use photo albums
- Edit, share, and organize albums
- Filter and sort photos and videos in albums
- Make stickers from your photos
- Duplicate and copy photos and videos
- Merge duplicate photos and videos
- Search for photos
- Identify people and pets
- Browse photos by location
- Share photos and videos
- Share long videos
- View photos and videos shared with you
- Watch memories
- Personalize your memories
- Manage memories and featured photos
- Use iCloud Photos
- Create shared albums
- Add and remove people in a shared album
- Add and delete photos and videos in a shared album
- Set up or join an iCloud Shared Photo Library
- Add content to an iCloud Shared Photo Library
- Use iCloud Shared Photo Library
- Import and export photos and videos
- Print photos
- Find podcasts
- Listen to podcasts
- Follow your favorite podcasts
- Use the Podcasts widget
- Organize your podcast library
- Download, save, or share podcasts
- Subscribe to podcasts
- Listen to subscriber-only content
- Change download settings
- Make a grocery list
- Add items to a list
- Edit and manage a list
- Search and organize lists
- Work with templates
- Use Smart Lists
- Print reminders
- Use the Reminders widget
- Change Reminders settings
- Browse the web
- Search for websites
- Customize your Safari settings
- Change the layout
- Use Safari profiles
- Open and close tabs
- Organize your tabs
- View your Safari tabs from another Apple device
- Share Tab Groups
- Use Siri to listen to a webpage
- Bookmark favorite webpages
- Save pages to a Reading List
- Find links shared with you
- Annotate and save a webpage as a PDF
- Automatically fill in forms
- Get extensions
- Hide ads and distractions
- Clear your cache
- Browse the web privately
- Use passkeys in Safari
- Check stocks
- Manage multiple watchlists
- Read business news
- Add earnings reports to your calendar
- Use a Stocks widget
- Translate text, voice, and conversations
- Translate text in apps
- Translate with the camera view
- Subscribe to Apple TV+, MLS Season Pass, or an Apple TV channel
- Add your TV provider
- Get shows, movies, and more
- Watch sports
- Watch Major League Soccer with MLS Season Pass
- Control playback
- Manage your library
- Change the settings
- Make a recording
- Play it back
- Edit or delete a recording
- Keep recordings up to date
- Organize recordings
- Search for or rename a recording
- Share a recording
- Duplicate a recording
- Keep cards and passes in Wallet
- Set up Apple Pay
- Use Apple Pay for contactless payments
- Use Apple Pay in apps and on the web
- Track your orders
- Use Apple Cash
- Use Apple Card
- Use Savings
- Pay for transit
- Access your home, hotel room, and vehicle
- Add identity cards
- Use COVID-19 vaccination cards
- Check your Apple Account balance
- Use Express Mode
- Organize your Wallet
- Remove cards or passes
- Check the weather
- Check the weather in other locations
- View weather maps
- Manage weather notifications
- Use Weather widgets
- Learn the weather icons
- Find out what Siri can do
- Tell Siri about yourself
- Have Siri announce calls and notifications
- Add Siri Shortcuts
- About Siri Suggestions
- Use Siri in your car
- Change Siri settings
- Contact emergency services
- Use Emergency SOS via satellite
- Request Roadside Assistance via satellite
- Set up and view your Medical ID
- Use Check In
- Manage Crash Detection
- Reset privacy and security settings in an emergency
- Set up Family Sharing
- Add Family Sharing members
- Remove Family Sharing members
- Share subscriptions
- Share purchases
- Share locations with family and locate lost devices
- Set up Apple Cash Family and Apple Card Family
- Set up parental controls
- Set up a child’s device
- Get started with Screen Time
- Protect your vision health with Screen Distance
- Set up Screen Time
- Set communication and safety limits and block inappropriate content
- Charging cable
- Power adapters
- MagSafe chargers and battery packs
- MagSafe cases and sleeves
- Qi-certified wireless chargers
- Use AirPods
- Use EarPods
- Apple Watch
- Wirelessly stream videos and photos to Apple TV or a smart TV
- Connect to a display with a cable
- HomePod and other wireless speakers
- Pair Magic Keyboard
- Enter characters with diacritical marks
- Switch between keyboards
- Use shortcuts
- Choose an alternative keyboard layout
- Change typing assistance options
- External storage devices
- Bluetooth accessories
- Share your internet connection
- Allow phone calls on your iPad and Mac
- Use iPhone as a webcam
- Hand off tasks between devices
- Cut, copy, and paste between iPhone and other devices
- Stream video or mirror the screen of your iPhone
- Start SharePlay instantly
- Use AirDrop to send items
- Connect iPhone and your computer with a cable
- Transfer files between devices
- Transfer files with email, messages, or AirDrop
- Transfer files or sync content with the Finder or iTunes
- Automatically keep files up to date with iCloud
- Use an external storage device, a file server, or a cloud storage service
- Intro to CarPlay
- Connect to CarPlay
- Use your vehicle’s built-in controls
- Get turn-by-turn directions
- Change the map view
- Make phone calls
- View your calendar
- Send and receive text messages
- Announce incoming text messages
- Play podcasts
- Play audiobooks
- Listen to news stories
- Control your home
- Use other apps with CarPlay
- Rearrange icons on CarPlay Home
- Change settings in CarPlay
- Get started with accessibility features
- Turn on accessibility features for setup
- Change Siri accessibility settings
- Open features with Accessibility Shortcut
- Change color and brightness
- Make text easier to read
- Reduce onscreen motion
- Customize per-app visual settings
- Hear what’s on the screen or typed
- Hear audio descriptions
- Turn on and practice VoiceOver
- Change your VoiceOver settings
- Use VoiceOver gestures
- Operate iPhone when VoiceOver is on
- Control VoiceOver using the rotor
- Use the onscreen keyboard
- Write with your finger
- Use VoiceOver with an Apple external keyboard
- Use a braille display
- Type braille on the screen
- Customize gestures and keyboard shortcuts
- Use VoiceOver with a pointer device
- Use VoiceOver for images and videos
- Use VoiceOver in apps
- Use AssistiveTouch
- Adjust how iPhone responds to your touch
- Use Reachability
- Auto-answer calls
- Turn off vibration
- Change Face ID and attention settings
- Use Voice Control
- Adjust the side or Home button
- Use Apple TV Remote buttons
- Adjust pointer settings
- Adjust keyboard settings
- Adjust AirPods settings
- Turn on Apple Watch Mirroring
- Control a nearby Apple device
- Intro to Switch Control
- Set up and turn on Switch Control
- Select items, perform actions, and more
- Control several devices with one switch
- Use hearing devices
- Use Live Listen
- Use sound recognition
- Set up and use RTT and TTY
- Flash the LED for alerts
- Adjust audio settings
- Play background sounds
- Display subtitles and captions
- Show transcriptions for Intercom messages
- Get Live Captions (beta)
- Type to speak
- Record a Personal Voice
- Use Guided Access
- Use built-in privacy and security protections
- Set a passcode
- Set up Face ID
- Set up Touch ID
- Control access to information on the Lock Screen
- Keep your Apple ID secure
- Use passkeys to sign in to apps and websites
- Sign in with Apple
- Share passwords
- Automatically fill in strong passwords
- Change weak or compromised passwords
- View your passwords and related information
- Share passkeys and passwords securely with AirDrop
- Make your passkeys and passwords available on all your devices
- Automatically fill in verification codes
- Automatically fill in SMS passcodes
- Sign in with fewer CAPTCHA challenges
- Use two-factor authentication
- Use security keys
- Manage information sharing with Safety Check
- Control app tracking permissions
- Control the location information you share
- Control access to information in apps
- Control how Apple delivers advertising to you
- Control access to hardware features
- Create and manage Hide My Email addresses
- Protect your web browsing with iCloud Private Relay
- Use a private network address
- Use Advanced Data Protection
- Use Lockdown Mode
- Use Stolen Device Protection
- Receive warnings about sensitive content
- Use Contact Key Verification
- Turn iPhone on or off
- Force restart iPhone
- Back up iPhone
- Return iPhone settings to their defaults
- Restore all content from a backup
- Restore purchased and deleted items
- Sell, give away, or trade in your iPhone
- Erase iPhone
- Install or remove configuration profiles
- Important safety information
- Important handling information
- Find more resources for software and service
- FCC compliance statement
- ISED Canada compliance statement
- Ultra Wideband information
- Class 1 Laser information
- Apple and the environment
- Disposal and recycling information
- Unauthorized modification of iOS
Hide ads and distractions in Safari on iPhone
Show Reader
Reader formats a webpage to show just the relevant text and images.
Note: If Show Reader is dimmed, Reader isn’t available for that page.
Automatically use Reader for a website
Turn on Use Reader Automatically.
Block pop-ups
IMAGES
VIDEO
COMMENTS
Follow these steps to enable this feature on an iPhone or iPad: Tap the Reader View icon in the top left of Safari. Select Website Settings from the dropdown menu. Turn on the toggle for Use Reader Automatically and press Done. The webpage will now automatically switch to Reader View every time you open it.
See a streamlined view of the webpage: Tap Show Reader (if available). To return to the normal view, tap Hide Reader. See what the webpage looks like on a desktop computer: Tap Request Desktop Website (if available). You can also adjust Safari settings in Accessibility settings. Go to Settings > Accessibility > Per-App Settings.
Launch Safari from your Home screen. Navigate to the website you'd like to read. Tap the Reader button on the left of the address bar. It looks like a series of stacked lines. Tap the A's on the right of the address bar. Tap one of the four page color choices: white, beige, gray, or black.
In the Safari app on your Mac, use Websites preferences to customize how you browse individual websites. To change these preferences, choose Safari > Preferences, then click Websites. The settings you can customize (such as Reader and Content Blockers) are listed on the left. To apply a setting to a website on the right, first select the ...
On your iPhone or iPad, open the "Settings" app to get started. Choose the "Safari" app. Now, go to the "Reader" section. Toggle on the "All Websites" option. Now, when you open any web article in Safari, it will open directly in Reader View. Safari also lets you exclude particular websites from the automatic Reader View feature.
Here are the steps to do so. 1. Navigate to Safari on your iPhone and tap on the app icon to open it. 2. Tap on the URL bar on the bottom side of the screen to enter editing mode. 3. Enter the URL of the website where you want to read an article and tap on go button on the keyboard. 4.
2. Tap Reader. Scroll down and tap Reader. 3. Toggle on All Websites. Toggle on All Websites and, voila, Safari will now display any applicable pages in Reader mode where possible. This is ...
Open up Safari. Click on an article. In the navigation bar at the top, where it says "Reader View Available," tap and hold on the icon that looks like three lines. From here, you'll see a pop that ...
On your Mac, open Safari. Navigate to an article you'd like to read. Click the Reader button that appears in the address bar at the top of the Safari app. To customize font style, size, and color, click the AA button on the opposite side of the address bar. To increase or decrease font size, click the larger or smaller "A" respectively.
Open the Settings app. 2. Tap Accessibility under General. 3. Tap Speech. 4. Toggle Speak Screen on. Alternatively (or additionally), you can show a speech button when you highlight text in Safari ...
To use Automatic Reader View in Safari on your Mac, navigate to the website you want to read articles on in Reader View. Then, click the Reader View button on the left side of the address bar ...
Unselect the checkbox to the left of the "Reopen windows when logging back in" option. Then, click the Restart button to restart your Mac. 2. Force Quit and Relaunch Safari To Fix Reader View ...
Go to Safari > Preferences. 2. In the Preferences window, click on the Websites icon at the top. 3. Click on Reader in the left column. 4. In the box to the right, you will see a list of websites ...
Open the offending website. Click on Safari > Settings for This Website (or right-click the URL box and select Settings for This Website). You will see a pop-up window with the option Auto-Play ...
Change the display controls for a website on Safari. You can hide the search field, switch to Reader, and more. Open the Safari app on your iPad. Tap , then do any of the following: Hide the search field: Tap Hide Toolbar (tap the top of the screen to get it back). See a streamlined view of the webpage: Tap Show Reader (if available).
Open the Safari app and navigate to the page you want to read. Tap the AA icon. Tap Show Reader. The page will change to Safari's reading mode, eliminating any ads or extraneous navigation menus. If Reader is grayed out, it means the page does not work with Safari Reader. The A A icon will now be black to show that Reader view is active.
Using the Safari Per-Site settings. Tap the Website Settings option in the View menu, and you can change these options:. Request Desktop Website: Enable the toggle to display this option to Request the Desktop Site.; Use Reader Automatically: Enable the toggle to jump into Reader View automatically.; Camera, Microphone, and Location: Choose from Ask, Deny, or Allow for each of these three options.
Open Settings app on your iPhone. Scroll down and tap Safari. Under SETTINGS FOR WEBSITES tap Reader. Turn on the option for All Websites. From now on, all websites in Safari (if compatible) will open in the Reader view. In step 4, if you do not see All Website but Other Websites, then turn it ON.
Open Safari on iPhone or iPad, then visit the website URL you want to use Automatic Reader View for. For iOS 13 and later: tap the "aA" button, then tap on "Website Settings". For iOS 12 and earlier: Tap and hold on the Reader button in the URL bar at the top of the Safari screen. r.
Now, here are 30 tricks to help you have a better experience when using Safari. 1. Navigate Tab Bar. (Credit: Lance Whitney / Apple) The jump to iOS 15 moved Safari's address bar to the bottom of ...
4. Manage Reader View Settings (iOS 13 Only) Besides having the ability to set Reader View for sites directly in Safari, iOS 13 also lets you manage the feature for multiple sites within the Settings app. In the app, head to the "Safari" page, then hit "Reader" under the Settings for Websites section.
The Reader mode, built into Apple's Safari browser since 2010 and available on macOS and iOS, strips away web advertisements and the page's navigational design to present an article's text ...
Open the Settings app, and scroll down to the Safari option. On this page, under the Tabs subsection, tap on Close Tabs. Now, choose from the available options: After One Day, After One Week, or ...
Block pop-ups. Go to Settings > Safari, then turn on Block Pop-ups. Get extensions Customize your Safari settings. On iPhone, use Safari Reader to hide ads, menus, and other distractions when viewing webpages.