
Is The Arai Tour X4 ADV Helmet A Cut Above The Rest?
This Arai Tour X4 is the most recent version of the Arai adventure helmet. It’s been in their range for nine years already, but it’s still going strong, making many riders very happy.
Some of those riders are on their second or even their third Arai Tour X4, which shows it has a very loyal following.

Arai Tour X4 Review
Table of Contents
Shell Construction
The shell on this helmet is Arai’s super fiber laminate. It’s a composite of fibers designed to deliver the strength needed for the Arai protection philosophy.

Our eye shells tend to be stronger than many other fiber shells, allowing them to use a softer eps impact liner.
Arai strongly believes this makes the helmets more protective than the alternative method, which has a lighter shell and a harder eps impact liner behind it.
Having a stronger shell does mean Arai’s tend to be a little heavier than many other lids. For example, the Tour X4 in a medium-size weighs 1683 grams/3.7 lbs on our scales. But, of course, that’s with the peak and the visor fitted.
It’s not light, but neither is it the heaviest adventure lid, and at least Arai has a solid reason to explain why their helmets weigh a little bit more than your usual helmet.

Ventilation
Venting on an adventure helmet like this is important because if they’re going to be used off-road, airflow is crucial for riders who aren’t just plonked in the saddle all day.
There are two vents behind the peak with simple rocking switches, and then there are two exhaust vents at the rear, which can be opened and closed on these rocker switches.
Arai’s trademark brow vents come on the visor, delivering more cooling air. They come through the vents on the top of the visor, and then they are channeled into ducts at the top of the interior.
The air then flows down the side of your temples, giving you a good amount of inflowing air as you ride along.

The last venting area on this helmet is the one that takes the most description as there are three stages to the chin venting. First, the central vent opens in two stages.
There’s one external shutter on the chin part of the helmet, and then there’s one on the inside of the helmet right in front of your chin. Having both of these open allows air to flow directly to the rider’s mouth.
If you have the outside shutter open and the inside shutter closed, the air forces air up through the chin bar towards the inner surface of the visor.
In addition, air can flow through the grills on the front of the helmet. You operate those with sliding vents just on the inside by your chin.
Anti-Fogging
The Arai Tour X4 adventure is pin lock protected. There’s a pin lock 120 insert in the box. That’s the middle of the three levels that they provide.
Some owners found the pin lock tricky to fit on this helmet, which is understandable on an adventure lid because the curve of the visor is much more exaggerated than normal.
Straightening the visor to fit that insert takes a lot more effort. However, once it is inserted, many people are happy about the anti-miss properties.
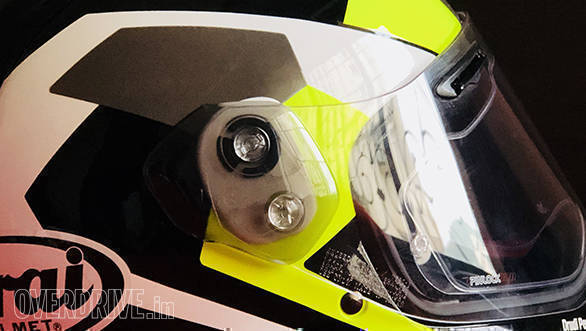
First, remove that visor; you need to take off the peak. Unfortunately, there’s no quick-release attachment for the peak on this helmet; you need a screwdriver or a coin to undo the screws holding it in place.
Somewhere along the line, this Tour X4 design has been changed to make removing and refitting the peak easier. When you undo the screws on the side of the helmet, they don’t fall away.
A little retainer plate keeps the retainer in one piece with the peak, making it easier to replace.

You can put the peak back on without refitting the visor, which means you can use this helmet with goggles.
The frames fit snugly in the eye-port, and then there’s room for the straps just underneath the mounting for the peak. You can also put the visor back on without the peak, which gives you a street-styled helmet.
To do that, first, you need to remove the screws. You’ll also need to free them from that retaining plate, and then you have additional pressure plates to refit the visor without the peak being in place.
Peaks like this sometimes cause problems when you’re riding along, and you’ve got drag and some aerodynamic problems, although there’s a fairly clear consensus among the customer reviews for this helmet that it’s not a big issue with the Tour X4 .
I have seen some customer reviews who preferred removing the peak for long journeys, so it is a handy option.
There’s no internal sun visor with this helmet. Aria doesn’t believe in them and doesn’t fit them, so you can’t have one with this. Some Arai’s have the option of an external sun visor, but even that’s not an option with this helmet.
A light reactive pin lock insert is available, but the customer reviews I have seen aren’t great, so you’re likely to want a tinted visor if you need protection from glare. That will mean switching from dark to clear visors depending on the light conditions.
It’s typically an Arai. It’s soft, comfy, and moisture-wicking, so it suits active riding rather than just laid-back touring. It’s fully removable, and you can do a certain amount of tailoring.
There’s a five-millimeter layer of foam on the outer surface of each cheek pad which you can remove, which creates a bit more room on either side of your face.
It’s best to be sure that you need that extra room before removing the layers, as I’m pretty sure you’re not going to be able to put those bits of foam back in there if it turns out you preferred it when it was thicker.
The removable skull pad around the top also has some removable sections. Arai calls them temple pads, which can be taken out to create more space at the side of the head.
The owner’s manual for the helmet says you can stick those back in if you use some double-sided tape, so if you prefer it before, there is at least the option to go back to the original setup.
There’s no official intercom for this helmet, but there’s nothing that I can see to stop a universal intercom from being used. There are plenty of customers amongst the reviews who’ve done that.
Cena also makes an Arai-specific kit that will fit neatly to this helmet. However, it is worth noting that Cena themselves doesn’t recommend the kit for smaller sizes of this helmet.
There’s one neat addition to this lid, and that is a chin curtain. The chin curtain can be pulled down, acting as a wind-deflecting spoiler. This helps keep that cold and noisy air away from the base of the lid.
Safety Straps
The final piece of the interior puzzle is the strap fastener. Again, this is an Arai, so you’ll get a sporty D-ring strap.
One neat touch with that, though, is the covers that protect your skin from wear against that strap can be taken off and washed.
Safety Ratings
As you’d expect, this helmet is fully road approved to ECU 2205 as a full-face helmet. It also has ACU gold approval for use in competitions or on track.
It’s not rated by the UK government’s sharp impact testing program. That’s not unusual as sharp doesn’t appear to have ever tested a helmet that comes supplied with a peak.
For the American market, it is Snell M2020 approved.
In Conclusion
The Arai XD-4 Helmet is a fully adjustable helmet for all types of riding. It has a comfortable headliner fully removable interior with replaceable cheek pads, chin cover, and chinstrap.
In addition, it features Dry Cool technology, which keeps you dry and cool for greater comfort.
The Arai XD-4 Helmet also has FCS (Facial Contour Support) cheek pads with a 5mm peel-away layer that allows easier cleaning and replacement. In addition, the helmet is Snell M2020 approved.
Where To Buy
MotorcycleGear
Keith Mallinson has been a motorcycle enthusiast for the past 20 years. He has owned a variety of bikes during this time, ranging from sport bikes to cruisers. Keith has a passion for all things motorcycle related, including riding, maintaining, and customizing his bikes.In addition to his personal experience with motorcycles, Keith has also kept up to date with industry news and trends. He enjoys sharing his knowledge and insights with others through his motorcycle blog.When he's not out on the open road, Keith can be found tinkering in his garage, planning his next road trip, or spending time with his family.

- Advice & Inspiration
- Track an Order
- Return an item
- Create an account
- Accessories

Video: Arai Tour X4 helmet review
This is perhaps the classic adventure motorcycle helmet. Blame Ewan and Charley if you like. The Arai Tour X4 has been around for yonks, but if it ain’t broke then why fix it? Click above to watch our video covering the essential details of this hugely popular lid...

Arai Tour X4
- Bike Reviews
Arai Tour-X4 helmet review
The Arai Tour-X4 is an excellent, top-spec ADV helmet with a couple of quirks.
Published on May 12, 2020 09:00:00 AM
29,870 Views

The visor removal process is tedious.

An ADV helmet is one that combines the best attributes of an MX helmet and a traditional full-face helmet. In other words, amazing ventilation and sun/roost protection, along with high-speed aerodynamics, and general comfort and practicality. The Arai Tour-X4 does this amazingly well, at least for the most part.
Aside from the extended jaw, its rounded shell keeps with the company’s philosophy that a round shape glances off surfaces, thereby reducing the force of impact. As you’d expect, quality is top level, particularly the paint thickness and lustre. The removable/washable interior material feels luxurious against the skin. Arai’s Facial Contouring System for the cheekpads ensures a snug, super-comfy fit and the 5mm ‘peel-away’ pads allow you to further refine the fit if needed. Built using Arai’s proprietary Special Fibre Laminate material, this is a hefty thing at 1.64kg, but it is so well balanced that all-day comfort is guaranteed.

With a total of 14 intake and exhaust vents (of which 11 are controllable), the Tour X-4 is a breezy dream. The three big jaw vents provide exceptional airflow, and they can be fully closed off, insulating the helmet quite well in the cold. There’s even a retractable chin spoiler for improved air deflection. Another impressive factor is that despite its extreme curvature, the visor displays no visual distortion, and with the included Pinlock anti-fog lens inserted, there’s no issue with fogging either
The Tour is extremely versatile in terms of what kind of helmet you’d like it to be. For aggressive off road riding you can remove the visor and use a pair of goggles. When out on the highway, you could use the plastic blanks fitted to remove the peak and turn it into a more traditional road helmet. While the plastic peak’s aerodynamics are a lot better than an MX helmet’s at highway speeds, the Tour does start to lift a little once you cross 100kph. I find that large windscreens on ADV bikes can mitigate this to a large extent, but the peak is certainly not intended for sustained high speeds on bikes without wind protection.

Here’s where the problem arises: Arai visor removal has always been a fiddly affair, but the Tour’s system is downright tedious. You have to remove the two screws on the sides while being careful not to remove the thin plastic screw retainer. This can’t be done by hand, but a coin will work. Reinstallation demands careful alignment of the visor and peak, along with an even tightening of the four screws. Arai doesn’t sell one of those fancy transition-style visors either and a quicker, simpler solution is much needed for the next generation model.
Safety-wise, the Tour is ECE 22-05 rated, but it also complies with Arai’s own internal test regimen which is said to be stricter. Fully handmade, it goes through five different inspections before being deemed fit for sale and it comes as no surprise that this is a very expensive helmet. Rs 60,000 gets you solid colours, while most graphic schemes, like the Catch Red seen here, cost Rs 66,000. This is what you have to pay for a top-tier helmet and the price is between the top-spec RX7v and the midlevel Chaser X.
The Tour-X4 undoubtedly pairs up well with an ADV bike, but pure road riders may find Arais like the Chaser X or QV Pro to be the more appropriate choice
Where: www. performanceracing.in
Price: Rs 66,000
Copyright (c) Autocar India. All rights reserved.
Member Login
Personal details.
No comments yet. Be the first to comment.
Change City
Pick from popular cities, need an expert opinion on your car and bike related queries, search by bike price.
Bikes under ₹ 50,000 Thousand
Bikes under ₹ 60,000 Thousand
Bikes under ₹ 70,000 Thousand
Bikes under ₹ 80,000 Thousand
Bikes under ₹ 1 Lakh
Bikes under ₹ 1.5 Lakh
Bikes under ₹ 2 Lakh
Bikes above ₹ 2 Lakh
Poll of the month
The Mahindra XUV 300 facelift will be called the XUV 3XO. Should more brands rename models for facelifts?
Yes, it could give new life to a slow-selling car
Yes, but only if there are significant changes
No, it's confusing and dilutes the brand name
No difference, the product speaks for itself
Sign up for our newsletter
Get all the latest updates from the automobile universe

- Reviews Home
- Motorcycle Reviews
- Product Reviews
- Racing News Home
- Road Racing
- Features Home
- Advanced Riding
- Motorcycle Track Guides
Arai Tour-X4 review | Versatile adventure touring motorcycle helmet

We spent the last few months riding with the Arai Tour-X4 motorcycle helmet, putting the versatile adventure lid through its paces.
If after a versatile do-it-all motorcycle helmet for adventure riding, the Arai Tour-X4 ticks all of the boxes. With a removable peak, interchangeable visors, and the option to remove the visor altogether and run goggles instead, this lid is well worth a look.
Packed with features and designed to the current ECE 22-05 safety standards required in 50 countries, the TX4 certainly meets the high standards set by Arai as a premium supplier.
I ‘debuted’ this helmet on the launch of the Zero DSR/X in Italy, and have since been riding with it on numerous adventure touring rides - including the KTM 1290 Super Adventure R .

Arai Tour-X4 Price & Availability
The Arai Tour-X4 is priced at an RRP of £599, though you tend to regularly find deals online that place it from £400 - £500. It’s certainly a pricey option, but for those looking at the premium brands for protecting your noggin, it’s money spent in the best place.
Available in a huge array of colours, including Diamond White (as pictured), Frost Black, matt colours and colourful variations, even a special Honda Africa Twin design, the TX4 can be grabbed in sizing XS through to XXL - with an outer shell for every two helmet sizes.

Arai Tour-X4 Features
Jumping to the features, the Arai has plenty to note. We’ll start with the peak, which as an adventure lid is one of the more prominent features. I found that the peak itself is fairly lightweight, well-shaped to block glare from the sun, and works in unison with under-peak forehead vents to direct plenty of the captured wind from the peak to your head.
On the point of ventilation, it’s a very well-vented helmet. Dual intakes on the forehead, a three-position chin vent with an inner shutter to block any debris, and side exhausts keep everything nice and cool. There is no chin-curtain, mind, which does mean in adverse weather you can become a bit exposed to debris and water from below.
With an outer shell of Complex Fibre Laminate (CFL) to deliver structural strength and integrity, plus providing impact flexibility to spread any impact force to the entire shell, and though not required for European standard accreditation, Arai performs a 3kg test cone penetration test to ensure safety. Fitted also is an Emergency Release System if things do go south on a ride.

The total weight (with peak and visor installed) is around 1710g. Though not a lightweight, I’ve had no complaints wearing this lid on full-day tours - no neck-ache in sight.
Visibility is top, here, and the visor (which comes with a pinlock) can be removed if you prefer to ride with goggles. I will note that removing the visor for attaching the pinlock is a right faff, where you need to remove the plastic screws for the peak, the peak itself, and pop out the visor before doing it all again to re-install the visor and peak.
Also, when screwing the plastic screws back in, take real care not to over-tighten them with your coin.

Arai Tour-X4 Comfort & Fit
If riding with glasses or sunglasses, there is plenty of room inside, and whilst researching I noted other owners & wearers commenting that specs will fit fine and comfortably.
Riding at normal speeds has a little bit of wind-noise seep in, so riding with earplugs (as always) is recommended, but buffeting is only really noticeable if riding at higher speeds and turning your head to the left or right.

Wind can catch the peak, naturally, but not to the extent you think your head is about to pop off - you can just as easily point your head down to keep everything stable.
Of course, it goes without saying that you’re well advised to test for size in person before purchasing, as sizes vary between manufacturers.

Arai Tour-X4 Verdict
I’d absolutely recommend adventure and touring riders to consider this helmet. Though a high ticket price, it’s up there as one of the best on the market for adventure and touring riders - in true Arai fashion - and many riders will swear by them.
In terms of specs and features, the versatility of the lid is top - you could ride with this on any bike, removing the peak if you’re after a more street-wise lid. If riding off-road or touring, the peak does a lot of work to ensure ventilation and protection, and in any situation the visibility is superb.

Simply put, the Arai Tour-X4 gets the Visordown stamp of approval for adventure and touring riders. There’s a reason they are Japan’s most famous motorcycle helmet manufacturer.
More info found on the Arai website .
Watch the Arai Tour-X4 in action in our Zero DSR/X review.
2023 zero dsr/x review | electric adv in sicily.

- Privacy Policy

[wpseo_breadcrumb]
Arai Tour-X4 vs. Arai XD-4 (Which Is Better?)
Today we take a look at the difference and a comparison between the Arai Tour X4 vs Arai XD 4 motorcycle helmets.
If you don’t have enough time to read through the whole thing, we’ve featured the winner here and a quick summary of what makes it a better helmet over the other one from Arai.
Arai Tour-X4 vs. Arai XD-4

We believe that the Arai XD-4 is clearly the superior choice between the two. It’s cheaper as well as lighter, making it more comfortable for your shoulders as well as your pockets!
Wait…

If you don’t feel these two helmets match your needs, check out these best-selling motorcycle helmets on Amazon! They’re selling like hotcakes! 🍰 Have a look at least, maybe you’ll like what you see. 😉
 5")
- Boasting a compact, aerodynamic DOT shell design with sharp and aggressive styling for impeccable impact protection to excel whether short-distance street performance or long-distance touring comfort.
- Multiple conscientiously designed ventilation panels effective in streamlining the cooling process to assist with freshening the rider's experience. Large lower vent shutters for ease of use with riding gloves.
- Trendsetting springs for precise functionality ensuring a superior wind and water sealant layer. Unique 3D molded shield designed to ensure a distortion-free view throughout the entire field of vision.
- Removable Breath Guard rerouting the rider’s breath to reduce shield fogging. Inserted Chin Curtain designed to reduce wind turbulence and noise. Quick-Release Chin Strap for effortless usage.
- Fully removable, washable, and replaceable microfiber inner material that absorbs sweat without compromising comfort or security. Plus the GLX One-Year Limited Manufacturer.
 6")
- Communications port no longer built in to helmet. Picture incorrect
- Lightweight polycarbonate/ABS shell construction with removable interior, padded wind collar drastically reduces wind and road noise
- Velocity Flow Ventilation system with FlowAdjust
- This colorway comes with 2 shields, the clear (on the helmet) and dark smoke is included in the box.
- DOT approved. Meets the FMVSS 218 Standard
 7")
- Helmet shown with optional tinted shield. (Ships with clear shield only)
- Lightweight construction with a strong, durable outer shell to provide maximum protection
- NutraFog II shield which is a ClickRelease shield for fast, easy and tool-free shield replacement
- Velocity Flow Ventilation system designed to provide optimal airflow for comfortable wear
 8")
- 2 Visors Included: Clear + Smoked and 1 Neck Scarf for Winter Use
- Streamlined Aerodynamic Design Reduces Wind Noise and Drag
- Advanced and Lightweight Durable ABS Shell
- Quick Release Clasp and Strap and Removable Inner Lining Pads
- Meets or Exceeds FMVSS-218 and DOT Safety Standards
 9")
- Bluetooth technology 3.0 version, 8 hours of talk time and 110 hours of standby. Fully washable microfiber lining and adjustable vents. This Helmet Runs 1 Size Smaller Due to Built-in Bluetooth Module. The size of this helmet: S:55-56,M:57-58CM,L:59-60CM,XL:61-62CM,XXL:63-64CM.
- One Touch Control for Calling, Answering, Rejecting Incoming Calls and Redialing. Incoming Phone Call Overrides Intercom, Music, FM Radio and GPS Navigation Audio.
- Supports a Maximum distance of 1680 Feet Between Two Riders While Using the Intercom Function. Two High Quality Built-in Speakers with Full Stereo Sound to Enjoy Communication or Music.
- Meets or Exceeds FMVSS-218 and DOT Safety Standards. DSP Echo Cancellation and Noise Suppression Technology Delivers High-quality Voice at High Speeds.
- Note: When the Bluetooth System has not been used for a long time, the battery will enter into deep sleep mode and Bluetooth device may not available. Charge the battery for about half an hour to wake it up. The Bluetooth function will be restored after charging. If there is any missing small parts of the item received, welcome to contact ILM customer service for help.
Arai Tour X4 – A Brief Overview

Comes with an easy-to-remove visor.
It is true that the Arai Tour-X4 can be worn without the peak (and without the visor), but most purchasers will choose it because of its extremely high level of sun protection.
Therefore, it is paramount that you comprehend that noise increases and your neck become stronger; peaks aren’t a universal solution for everyone.
It makes biking more safe at night, and it is especially useful for evening rides.
Its venting is less powerful than the Shoei Hornet ADV, and it cannot be used without a peak and visor. But is it better than the Shoei Hornet ADV? It depends on what you want out of a lid.
On the other hand, the visor is a lot easier to remove and replace even with the peak on, so it is a much lighter lid.
It will be a matter of choosing between the more road-focused Shoei or the more off-road-trained Arai to hear the same drumming sound.
A great helmet with excellent venting, the Tour-X 4 is perfect for riders who know the ramifications of riding with a peak.
Arai XD-4 – A Brief Overview
“Just look at that bad boy. Its like I stole it from Master Chief when he wasn’t looking.”
On the XD4, the driver is extremely satisfied with the wide unobstructed field of view provided by the clear and wide face shield, especially outside near the peripherals.
There are not many helmets on the market that offer this level of ventilation.
Arai uses venting in its face shields rather than anti-fogging chemicals to help keep the mask from fogging up.
The mouth guard comes with a standard air intake port on the front of the mouthguard, but in addition, there are two toggles for increased ventilation on the inside of the chin.
A rocker switch is used to control the two top vents.
It can be shut or left half-open, and you can close or open the two exhaust ports located at the lower front of the lid and above the ears.
A retractable chin deflector is included on the helmet, and I realized that it works quite well when it is deployed.
Shell sizes range from XS-XXL internally on the shell while the chin strap is a generic D-ring with no padding.
New comfort headliner styles are available, and they also feature peel away temple pads and proprietary Facial Contour System cheek pads.
A Dry Cool system is present throughout the entire interior to wick away moisture and heat and, in conjunction with the extreme ventilation system, produces a cool, dry interior.
The combination of these features combined make for one of the most comfortable surfaces I’ve ever slept in.
Arai uses a special composite fiber laminate which reduces weight while retaining the rigidity and strength needed in case things go wrong.
There’s a noticeable difference between the noise level of the XD4 and other adventure-style helmets since the XD4 is not as light as a carbon fiber lid.
One feature with this lid is that you can pick any combination of iterations: you can remove the clear face shield and clear visor, or just the clear visor.
A Honda Africa Twin model is the most expensive out of the nineteen paint options available. Five are solid and the rest in graphics.
A nice attention to detail is that the peak visor has matte black inside to reduce glare—not something you would notice right away.
As you might expect given its classic ADVenture-style, the updated version of the Arai helmet received positive reviews.
As a manufacturer, they are known for comfort and safety for serious safety helmets.
It’s pretty expensive, but you pay that for a hand-built product that uses proprietary technologies along with some complex features.
You may also like

- Comparisons
Last updated:
Is Antifreeze And Coolant The Same Thing?

lt vs ls: What’s The Difference?
- Best Motorcycle Glasses
- Best Motorcycle Boots
- Best Motorcycle Helmets
- Best Wireless Earbuds
- Best Sounding Harley Touring Exhaust
© 2022 Let’sGoForARide, All Rights Reserved.
Address: 25293 Telegraph Rd, Southfield, MI 48033, United States Phone: +1 (248) 356-9200 Email: [email protected]
- Jeep Compass 4x2 AT
- Tata Nexon EV
- Citroen C3 Aircross
- TVS Apache RTR 310
- RE Bullet 350
- Honda CB200X
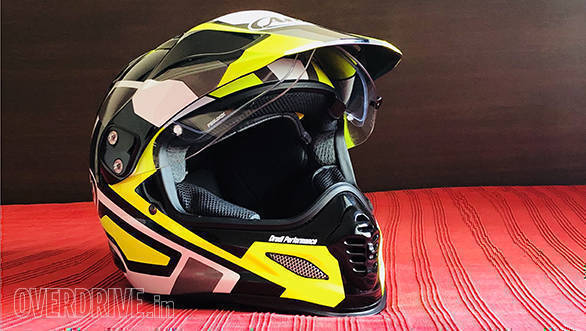
Now on test: 2018 Arai Tour-X4 adv helmet
The Arai Tour-X4 is not a new helmet. The original X4 series dates back to 2011 which in motorcycles years might be a long time ago. But motorcycle helmets do not evolve quite that fast. As we learnt from our experience of the Arai RX-7V, the Japanese company's flagship helmet, the difference between the visually identical ones from 2016 and 2017 was actually significant. The 2016 Arai RX-7V Vinales felt heavier and the 2017 Arai RX-7V Ghost felt lighter as well as better balanced. So what's the Tour-X4 about, then?
Who is Arai? If you haven't heard of Arai... Arai was started in Japan by founder Hirotake Arai who got his break designing helmets that the Japanese army rather liked. Arai was an inventor and it was him that first put the combination of a fibreglass shell and (expanded) styrofoam together. It's a combination that still powers almost every helmet money can buy. The level of detail and technology in both the shell and the shock-absorbing liner has moved on, but the principles and basic materials remains the same. The company, Arai Helmet, dates back to 1926, when it started out as a maker of hats. Today, Michio Arai, son of Hirotake runs the company. Michio reiterates the essential values that make Arai Helmets such a hallowed brand in motorcycling have not changed and safety and protection, above all else, is Arai's goal for all of their helmets. Even today, all Arai helmets are made by hand and carry the name of the shell's maker proudly inside the helmet. Arai also proudly reminds everyone that each helmet is inspected at each stage of the manufacturing process to ensure that each Arai Helmet meets their own stringent standards.
Who is Performance Racing? Performance Racing was started by Vivek Jaising and his team in the early 2000s. Vivek - or Vicky as everyone calls him - is on the CNBC-TV18 OVERDRIVE Awards jury for two-wheelers today and has been a serious motorcyclists for decades. Owning a series of superbikes along the way, Vicky started Performance Racing because he realised how hard it was for riders to find good riding gear. Today, the market has changed and there are many players, but it was Vicky and Performance Racing that set the ball rolling. Today, Performance Racing distributes and sell Arai Helmets as well as a series of other brands in India, including French gear maker Ixon, Sidi boots, Forma boots and many more.
The Arai Tour-X4 The Tour-X line dates back to around 2004. Arai created a helmet with a visor and a peak for the growing adventure tourer market. In fact, Ewan and Charlie, the duo widely held responsible for putting BMW's R 1200 GS on the map, as it were, were wearing Arai Tour X-series helmets in their Long Way Round series. The latest generation of that line is the Tour-X4 you see on these pages.
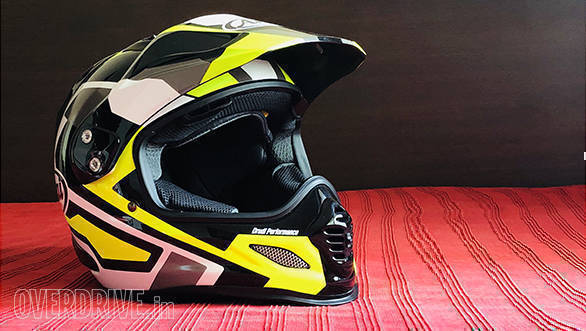
It still follows the same essential pattern. The shell is as round as possible - an Arai stable. But the jaw bar is slightly elongated to resemble a dirt helmet. A curved visor closes off the eyeport and atop that is the dirt bike helmet-style peak. The helmet looks cohesive as a design and a shape although it mixes elements of full-face and dirt-bike helmets.
The idea of the mixture of styles makes for a versatile helmet. You can ride it with the peak and visor on an adv. If you have a big screen, this works rather well. You can also take the dirt more seriously by replacing the visor with a pair of MX goggles if you like. Or, you could turn the Tour-X4 into a more serious road helmet by removing the peak.
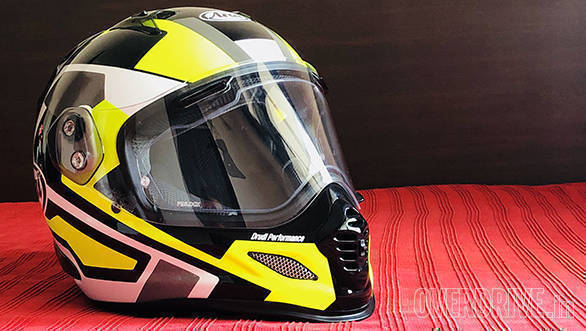
The reason why motocross helmets tend not to use visors, partly, is because of your ability to breathe freely. Riding dirt is hard work and the ability to oxygenate is critical. The Arai Tour-X4's chin bar is heavily vented. There are two side vents with a metal mesh cover as well as a vertical central vent with two separately controlled inlets. All four can be closed individually, though Arai says the bottom-centre vent closes primarily to stop dirt from entering the helmet in dusty conditions.
The top of the helmet has two intake vents, again with individual on-off buttons. The peak is designed not only to minimise buffeting but to also drive air into these two vents. At the back of the helmet are two upper exhaust vents, low lower vents as well as the usual central vent just above the neck.
Moving to the inside, the Arai Tour-X4 has a completely removable interior. The cheek pads and the temple pads on the crown have 5mm of thin layers of sponge that can be peeled off to tailor the fit exactly to the rider's head. As usual, Arai uses double-D rings for retention. These are slightly fiddly to learn to use but the best retention mechanism of all because you cannot wear the helmet with a loose chin strap.
First impressions Compared to the RX-7V, the Tour-X4 uses a slightly lower spec material for the shell since it isn't a race helmet. This allows the helmet to be lighter and I have more space around my ears. This is good for long rides and for those who use helmet intercoms, it might provide a little more space for speakers as well. As with all Arais, the helmet feels fantastic next to skin. So the first impression is of a plush, well-fitting, light-weight helmet. As it is, Arai's are particularly well-balanced once worn and the Tour-X4 is excellent as well.
On the move, I was surprised at how much air flows into the helmet. The four vents on the chin are excellent! However, I did have an issue with fogging initially. Then I installed the included Pinlock. The Pinlock is an insert that creates a small transparent air pocket in the visor that totally ends fogging. Arai, I've been told, prefers this to chemical anti-fog coatings because the latter wear out over time.
I was worried about the peak causing the helmet to lift at speed. And it does too. But first, I noticed that even at high speed, the helmet never buffets or shakes. Score! On the flip side, the peak catches air and lift the helmet a bit but you learn to tilt your head forward just enough to prevent this rapidly. Will this work on an extended highway run? I think it should but we shall see.
The other thing that's making me really happy is the colours. You see, the white, black and green scheme looks fantastic. But what none of the photos tell you is that the grey parts are actually a reflective grey. So once you're riding in the night, the helmet lights up from all sides and that's a huge score for your visibility and safety at night.
Overall I really like the Arai Tour-X4. I've been using race helmets as my daily helmet for just over 10 years. I'm rather enjoying the lightness of this Arai as well as the larger eye-port which dramatically improves vision. I've removed the peak as I write this and I want to ride the Arai as a pointy-jawed street helmet for a few days next. Stay tuned to OVERDRIVE as we put the new Arai Tour-X4 through its paces.
2018 Arai Tour-X4 Catch Yellow Rs 57,000 (Mesh Yellow Pattern) performanceracing.in
Related Stories

Latest Videos

Skoda 100K Dash

24 Hour Volkswagen Endurance Drive | Setting the bar high

Zoom Into 'Exter'Ordinary | OVERDRIVE
Top stories.

- 2022 Volkswagen Virtus 1.0 MT Topline review - the most VFM variant to buy?
- 2022 Honda CB300F walk-around review, all colours and exhaust note!
- 2022 RE Hunter 350 review - does the smallest, most accessible RE pack enough firepower?
Most Popular
- Budget Sportbike Showdown: Kawasaki Ninja 500 vs Aprilia RS 457 vs Yamaha YZF-R3 Rohit Paradkar | 19 Apr 2024
- 2014 Triumph Daytona 675 vs 2024 Kawasaki ZX6R - A Decade of Evolution in Supersport Motorcycles Rohit Paradkar | 21 Apr 2024
- Mumbai-Pune Expressway speed restrictions updated Kenneth John | 22 Apr 2024
- Nissan Magnite EZ-Shift review - is the AMT any good? Kenneth John | 09 Oct 2023
- 2024 Bajaj Pulsar N160 launched at Rs 1.39 lakh; gets USD forks & new features Gajanan Kashikar | 25 Apr 2024
Network18 Updates

Arai Tour-X 5 review: Does this latest adventure lid still have the X-factor?

The Arai Tour-X 5 is the latest version of the iconic Japanese manufacturer’s versatile adventure touring motorcycle helmet . It features a raft of improvements over the previous model, the Tour-X 4 , which was already a very highly regarded lid and one that has long been my personal favourite from the Arai stable.
I’ve covered 3,100 miles over the past three months in the new Tour-X 5 to see how it stacks up against its predecessor and the competition.
Arai Tour-X 5
The materials used ooze premium plushness and quickly wick sweat away, plus the entire liner can be removed for a full wash and refresh when needed. There is a downside to this luxurious lining though, and that is how vulnerable it is to Velcro or other hook and loop style closures. It’s only really an issue along the bottom edge where it can come into contact with jacket fastenings, but I’ve snagged mine numerous times on a storm collar and it’s starting to look a little tatty.
What sets the new version apart significantly are the redesigned cheek pads, which are noticeably firmer and provide a snug, cushioned fit around the jawline. This makes the T-X 5 feel more like a race helmet – a ‘wide aperture’ RX-7, if you will – which adds to the appeal of running it in the peak-less configuration.
Donning and removing the T-X 5 has been made easier too, thanks to a flare in the base of the shell that gives an extra 5mm either side, bringing it in line with the Quantic, Provile V and RX-7. This also means that Arai’s optional ES (‘egg shaped’) chin curtain (£29.99) can be fitted to reduce wind noise and prevent turbulent air from entering from the face area.
I’ve tried it by switching the one over from my RX-7 and it makes a big difference on colder rides. The built in retractable chin spoiler isn’t as effective, but does help with cooling, so I’ll most likely revert to that when the weather is warmer.
The Arai Tour-X 5 is fully prepped for specs, allowing the arms to slip down sculpted channels by the temples. I’ve worn glasses for every mile I’ve ridden in it and have never had a moment of discomfort. Unlike some helmets that can press the arms against your head and hold frames at a fixed angle, the T-X 5 has been designed to let them sit naturally on your nose and ears.
I have worn some peaked helmets that suffer from buffeting, particularly in conjunction with a screen, however this has certainly not been the case with the Tour-X 5. I’ve covered hundreds of miles on a KTM 790 Adventure wearing it and felt no adverse effects whatsoever. The aerodynamic design slips cleanly through the air, and I’ve been barely aware it’s there, even on a naked bike.
How good is the Tour-X 5’s visor?
The most stand out feature of the T-X5 is the new Variable Axis System (VAS-A) visor system, developed from the the RX-7V, which includes quick release side pods for rapid visor changes. Unlike the old model, where the peak and visor were attached to the shell with screws at either side, the T-X5’s peak and side pods come away as one unit at the push of a button, after which you just rotate the visor upwards to lift it off. Installation, as they say at Haynes, is simply the reverse of removal – and it really is that easy. The mounting position has been lowered too, providing a smoother surface across the temple area for improved ‘glance off’ ability in an impact.
The visor is larger and more curved than that of the outgoing model, providing a clearer view at night (the more pointy T-X 4 visor had a tendency to reflect light in odd patterns at times) and allowing rain to roll off better. A clear one is fitted as standard and comes with the all-important Pinlock anti-fog insert, although different tints are available, including a snazzy rainbow iridium coated item.
It’s also the first Arai visor that I’ve seen not to have integrated flaps for brow air intakes, a consequence of the redesigned ventilation system, which is great because I’ve broken a fair few of those in the past. As is traditionally Arai, there are no stepped positions to the opening mechanism – it operates smoothly from open to closed and, at slow speeds anyway, can be set to any position desired.
There’s no lockable mechanism to keep the visor closed, however a small plastic catch does the job perfectly well. When shut, the visor sits tight against its seal and I’ve yet to suffer any leaks despite subjecting it to some pretty serious rain. Even with it cracked open to allow a little airflow for my spectacles, there’s been no sign of water ingress.
The aperture itself offers a fantastic field of vision in all directions and is one of the aspects I’ve always loved about the Tour-X range. The T-X 5 boasts the biggest yet, providing a pleasant sensation of space around your face and no restriction to peripheral view.
What is the Tour-X 5’s ventilation like?
Ventilation was never wanting with the T-X 4, but Arai has managed to find some improvements in developing the 5. The chin vent is double the size of the previous version, and it certainly does let a large volume of air through, enough for Arai to omit the additional mesh vents of previous versions. It has adjustability both inside and out to regulate the flow and direct it either onto your face or up the inside of the visor.
Front and centre is the innovative Arai 3D logo duct, as already seen and proven on the Quantic. This sits over twin 10mm ports in the shell and draws air in when operated via a single slider at the top. It has two positions, closed when the slider sits proud of the logo and open when it’s clicked in. The airflow is noticeable as soon as it’s open, even at slow speeds, plus there’s a further three position vent at the top for even more.
With all this air coming in there needs to be an exit, and the T-X 5 has two permanently open exhausts at either side towards the back. Above those are three 10mm holes hidden by the spoiler and covered by a three position lever. With everything open you don’t need to go too quickly to feel the effect of fresh air passing through, and above 40 mph it’s like having air conditioning.
When worn back-to-back with the T-X 4, there does seem to be an increase in airflow, however both helmets are so incredibly efficient in this department that it isn’t easy to separate them.
Is the Tour-X 5 noisy?
I always ride in earplugs, so unless a helmet is unduly noisy, I tend not to notice. What I can say is that the Arai Tour-X 5 doesn’t have any localised areas of wind roar, and there’s little difference in general noise between riding with or without the peak.
Although I haven’t tried it with an intercom as yet, it is worth mentioning that due to the redesigned interior it’s now possible to fit speakers without having to remove the cheek pads. There are also flat surfaces either side to mount an intercom unit and a pocket in the neckroll for tucking away wires.
Does the Tour-X 5 look good?
Arai’s philosophy of the smooth, round shell shape being the safest profile for a helmet due to its ability to ‘glance off’, means that the Tour-X 5 keeps the clean, organic look associated with all their products. With the aerodynamically sculptured peak fitted it has a purposeful, dual sport appearance, and with it removed takes on an aggressive streetfighter style.
The more rounded shape of the T-X 5 is closer to the RX-7 than to its predecessor, and that makes it particularly attractive in peak-less mode – especially when paired up with a dark smoke or rainbow iridium visor.
Four graphic schemes and seven solid colours are available, making 19 variations to the range. The helmet on test here is in ‘Discovery Red’, which features a sparkly lacquered finish that makes it look custom painted. It’s easily one of my favourite factory designs from any manufacturer.
How well-made is the Tour-X 5?
Every Arai helmet is hand made, but it wasn’t until a recent trip to the factory that I realised what that actually meant. There is no automated production line – it’s a completely manual process, from the person who pulls the first strands of fibre together to make the laminate weave, to the guy who ties a knot in the helmet bag and seals up the box. The only robot in the factory is the one which laser cuts the front aperture – and that’s only for the sake of ultimate precision.
All in all, there are 27 stages to production which means that every helmet passes through at least 50 pairs of hands, whether it’s to form the shell, fit the EPS, drill vents or attach the visor seal. Every Arai employee cares deeply about what they do, and there’s no difference between the helmets raced at the top level of motor sport and the ones you can buy off the shelf.
Each helmet is subjected to five quality control departments during its 18 hour construction, and checked twice at each inspection, so it should be of little surprise that the finished article is built to such a high standard. Even so, one should step back to appreciate the care and skill that goes into making every single unit, and it’s that unquantifiable input that makes Arai products so special.
The Tour-X 5 is of course no exception and a shining example of that process. In addition to the basic construction, all external fixtures and fittings are suitably robust and easy to use, despite the fact that they are designed to break away easily in an impact. The hand applied paint and decals are absolutely on point and as mentioned previously, the interior is suitably plush and cosseting.
Is the Tour-X 5 good value for money?
Arai helmets are not cheap, in fact they’re up at the premium end, but when you look at what goes into production – and what the ultimate goal is, the best protection possible – they offer excellent value for money.
The Tour-X 5 uses Arai’s Peripherally Belted Complex Laminate Construction for the shell to give it both strength and flexibility. In essence this involves different layers of fibre matting (Arai’s Super Fibre Laminates) that are bonded together in a sandwich by a special resin, with a reinforced band that runs across the top of the front aperture for additional strength. (As a side note, it’s that resin which gives Arai helmets their distinctive perfume.)
This technique means that the shell can be thinner and lighter, whilst still offering the impact protection needed to exceed ECE 22.06 regulations. Having seen Arai’s in-house testing first hand, I have no reason to believe that it wouldn’t do the job it’s designed to if called upon. Arai is also the only manufacturer to use a multi density EPS (the softer, inner layer that cushions your head in an impact) formed in a single piece, so as not to have any weak spots.
Much of the value is in the years of development behind the Tour-X 5, making it the company’s most advanced product to date. Arai’s philosophy is all about making the safest helmet they can, whilst keeping it practical and effective, for the track, trail or everyday use. Advancements come slowly through careful study and evaluation, not just in the lab but of real world situations – Arai has always had a close relationship with the top levels of motorsport.
There are a couple of features that some might expect to find on a premium helmet which aren’t present on the T-X 5, namely a drop down visor or integrated comms. The reason is simple, and it goes back to Arai’s unwavering commitment to safety, where any additional construction would be considered a concession to that.
The Arai Tour-X 5 is a well constructed, comfortable and versatile helmet. It brings together some of the best features of the current range, such as the RX-7’s visor system, Quantic’s logo vent and Profile V’s wider base, along with improvements of its own, to stand as a testament to the company’s commitment to safety through measured evolution.
With the peak fitted the T-X 5 is ideal for adventure touring, boasting ample room to flip the visor up and wear goggles if needs be, and with it removed makes a smart and practical alternative to a traditional full-face lid. In a previous review I said that the T-X 4 could be the only lid you’ll ever need, but with its quick-change visor, improved shape and enhanced ventilation, the Tour-X 5 takes that versatility to the next level.
Arai Tour-X 4
Shoei hornet adv, schuberth e2.
- Just so you know, whilst we may receive a commission or other compensation from the links on this page, we never allow this to influence product selections - read why you should trust us .

By Justin Hayzelden
Product Specialist for MCN and global adventurer.

- Search bike reviews
- Search all bikes
- Search new bikes
- Sell your bike
- Latest news
- Motorcycle Live
- Accessories
- Base Layers
- Communication
- Riding tips
- Learn to ride a motorbike with MCN
- Electric motorbikes
- Maintenance
- Travelling touring
- Insurance guides
- Buying and selling
- Inspiration
- Members' Content
- The Newspaper
- Latest Issue
- #Ride5000miles
- Buy Official MCN Merchandise
- MCN Festival
- London Motorcycle Show
JavaScript seems to be disabled in your browser. For the best experience on our site, be sure to turn on Javascript in your browser.
- HKD - Hong Kong Dollar
- JPY - Japanese Yen
- TWD - New Taiwan Dollar
- RUB - Russian Ruble
- SGD - Singapore Dollar
- ZAR - South African Rand
- KRW - South Korean Won
- AED - United Arab Emirates Dirham
- Create an Account
Arai Tour-X5 - Review and Road-Test
So, now that we’ve gotten the results of all of our testing, time to put them into perspective. It started relatively slow on material and weight, where it earned 3.5 stars for material and 3 stars for weight. Then the TourX5 did manage a series of respectable scores, earning four stars for its visor thanks to its stellar visor mechanism, and with an average measurement of 100 decibels it earns a nice 4 stars for noise isolation. It also performed well on ventilation, managing a difference with the outside temperature of about plus one degree Celsius. Then, as the only adventure helmet ever, it earned the full 5 stars for comfort, which was very impressive. And finally, for features, it earned 4 stars which is great, especially in the adventure helmet category. But, here comes the kicker. With an average of almost 4 stars, it has the highest price per star value. Obviously that comes from its high price tag of 880 euros. But then again, if you leave out the Value for money it has the highest score of all Adventure helmets. Aside from the price we honestly couldn’t find any weakness and everything is so well engineered. Arai is almost obsessed with safety and you can tell from pretty much all of the safety tests where they very often come out on top. And yes, that quality comes with a serious price tag. So with the Tour X4 seen by many as the best Adventure helmet available today, Arai has managed to even improve it and earn better scores on different aspect. SO if you have the money and you’re looking for the absolute best Adventure helmet available today when it comes to quality, then this is the helmet for you .
That’s it for the TourX5 road test. I’m curious to what you guys think of this helmet, let us know in the comments down below. Also don’t forget to check out champion helmets.com where we have the lowest price guaranteed and very sharp discount bundles. Like & subscribe for more content just like this, ride safe!
- Studio Review
- Buying Guides
- Dainese Full Metal 7 Review
- Scorpion Exo-1400 Evo Carbon Air 2 Road-Test and Review
- Top 10 Best Entry Level Helmets of 2024
- Nolan N100-6 Review and Road-Test
- HJC RPHA-71 Carbon - Review And Road-Test
- February 2024
- January 2024
- December 2023
- November 2023
- October 2023
- September 2023
- August 2023
- February 2023
- January 2023
- December 2022
- November 2022
- October 2022
- September 2022
- August 2022
- February 2022
- January 2022
- December 2021
- November 2021
- October 2021
- September 2021
- August 2021
- February 2021
- January 2021
- December 2020
- November 2020
- October 2020
- September 2020
- August 2020
- February 2020
- January 2020
- December 2019
- November 2019
- October 2019
- September 2019
- August 2019
- February 2019
- January 2019
- December 2018
- November 2018
- October 2010
- schuberth c5
- shark evo gt
- agv tourmodular
- bell qualifier dlx
- shark spartan gt carbon
- shoei gt air 2
- arai rx-7v racing vs arai rx-7v evo
- klim outlander gtx
- dainese freeland gtx
- Motorcycle Clothing
- win a valentino rossi signed helmet
- shark skwal 2.2
- dainese x-tourer
- dainese tempest 3 d-dry
- scorpion exo r1- fabio monster replica
- alpinestars rt-8 gore-tex
- dainese metropolis d-wp shoes
- roof boxxer carbon
- dainese super speed 3
- alpinestars fusion leather jacket
- shark spartan rs carbon skin
- klim badlands pro a3 review
- revit spark air
- how to install insyde in the tourmodular
- shoei neotec 2
- revit expedition gtx
- top 10 best sport-touring helmets of 2022
- revit parabolica jacket
- the best helmets of 2022
- agv pista gp rr
- shoei nxr 2
- icon airflite
- When to replace a helmet
- how to measure motorcycle gear
- dainese atipica air shoes - review
- BMW R1300GS
- x-lite x-1005 ultra carbon
- nolan n100-5 plus
- copper pro denim pants
- klim k fifty
- How to determine helmet size
- torque 2 h2o
SEEN IT CHEAPER? TELL US, IF WE CAN BEAT IT WE WILL

- Accessories
- Base Layers & Socks
- Battery Charging
- Belt Connection
- Gift Vouchers
- Neck Tubes & Balaclavas
- Safety / Protection
- Toe Sliders
- Waterproofs

Popular right now Lots of people have looked at this recently
Selling fast! Grab yours while you can

Arai Tour-X4 - Diamond White
Arai Tour-X4 - Diamond White - M is backordered and will ship as soon as it is back in stock.
Couldn't load pickup availability
Delivery and Shipping
Add some general information about your delivery and shipping policies.

Description
The Tour-X4 has a complete new outer shell. Redesigned to be tougher, stronger and stiffer than ever. As the Tour-X4 may be used under extreme conditions, the ventilation system has been redeveloped for maximum efficiency. The new Facial Contour System (FCS) offers more support and comfort to the lower jaw and creates a tighter fit. For an even better personal fit, there is a removable 5 mm surface foam layer on the cheek pads and temple pad from the headliner. Wear the Tour-X4 with or without peak, with or without visor and combinations of these two. The large visor opening offers plenty of room for motocross-style goggles when riding without visor. This is a motorcycle helmet that is ready for anything whatever the conditions! A crash helmet for Adventure, grand touring and off road motorcycling!
- Super Fibre Construction (SFC)
- Triple density inner shell
- Two TDF3 front ducts
- TX4 diffuser
- Side exhaust vents
- New controlled chin ventilation
- Aeroflap – reduces wind noise and turbulence
- Flatter neck roll to minimise turbulence
- Visor/peak holder pressure plate enlarged for extra stability
- Patented visor brow vents
- Wear with or without peak/with or without visor or combination of the two
- Enhanced visor with aerodynamically designed visor levers and brow vents
- Facial Contour System (FCS) with removable 5mm foam layer on cheek pads
- Removable 5mm temple pads on the head liner
- Fully washable and removable Dry Cool® interior
- Emergency release tab cheekpads
- Optional holder set to use peak or visor only
- Double ‘D’ ring fastening system ensures correct strap tension at all times
- Visor Pinlock® ready and Pinlock® insert included
Payment & Security
Payment methods
- Diners Club
Your payment information is processed securely. We do not store credit card details nor have access to your credit card information.
Your cart is empty
Subtotal:£0.00 GBP

Free delivery
On all orders over £100 (exc tyres)
Special offers
Regular sales and discounts
Easy returns
Hassle-free returns policy
Vip newsletter
Sign up and stay up to date
NEED HELP OR ADVICE
Arai Tour-X4 Instruction Manual

INSTRUCTIONS FOR USE READ THIS BOOKLET BEFORE USE!
INSTRUCTIONS D’UTILISATION LISEZ CE MANUEL AVANT DE PORTER LE CASQUE !
GEBRAUCHSANLEITUNG BITTE LESEN SIE DIESE BROSCHÜRE VOR DEM GEBRAUCH SORGFÄLTIG DURCH!
ISTRUZIONI PER L’USO LEGGERE PRIMA QUESTO LIBRETTO INFORMATIVO!
INSTRUCCIONES DE USO LEA ESTE MANUAL ANTES DEL USO
ΟΔΗΓΙΕΣ ΧΡΗΣΕΩΣ ΔΙΑΒΑΣΤΕ ΤΟ ΠΑΡΟΝ ΦΥΛΛΑΔΙΟ ΠΡΙΝ ΤΗΝ ΧΡΗΣΗ.
HANDLEIDING LEZEN VOOR GEBRUIK VAN DE HELM! ANVÄNDARINSTRUKTIONER LÄS DENNA INFORMATIONSBROSCHYR FÖRE ANVÄNDNING! KÄYTTÖOHJEET LUE TÄMÄ VIHKONEN ENNEN KÄYTTÖÄ!
Nederlands Svenska Suomi TX-4 / XD4 / VX-3 / VX-PRO3
TX-4/XD4/VX-3/VX-PRO3 â‘
English CONTENTS To open/close shield.................................................................................4 (TX-4/XD4) To operate browvents...............................................................................4 (TX-4/XD4) To adjust peak angle.................................................................................6 To operate mouthvent...............................................................................6 (TX-4/XD4) To operate top vents.................................................................................8 To operate airflow spoiler .......................................................................8 (TX-4/XD4) To remove/replace face shield/peak............................................................8 (TX-4/XD4) To remove/replace diffusers....................................................................12 To remove/replace cheekpads................................................................14 To remove/replace comfort lining............................................................16 To remove/replace chinstrap covers........................................................18 CAUTION: The peak supplied with your helmet is not suitable for high-speed use. At such speeds air catching a side or main surface of the peak may cause difficulty in returning the head to a forward and/or level position, or may obstruct your vision. You should practice experiencing this effect starting at low speeds and gradually increasing speeds so that you will know what to expect and determine when the peak should be removed for higher speed riding. 2
Français CONTENU
Deutsch INHALT
Pour ouvrir/fermer l’écran.........................................................................5 Zum öffnen/schliessen des visieres..........................................................5 (TX-4/XD4) (TX-4/XD4) Fonctionnement du système de désembuage...........................................5 Bedienung der antibeschlagvorrichtung....................................................5 (TX-4/XD4) (TX-4/XD4) Pour ajuster l’angle de la visière...............................................................7 Anpassen des schildwinkels.....................................................................7 Fonctionnement de la ventilation inférieure...............................................7 Bedienung der kinnbelüüftung..................................................................7 (TX-4/XD4) (TX-4/XD4) Fonctionnement de la ventilation supérieure.............................................9 Bedienung der oberkopfbelüftung.............................................................9 Fonctionnement du déflecteur d’air...........................................................9 Bedienung des luftfluss-spoilers...............................................................9 (TX-4/XD4) (TX-4/XD4) Pour enlever/remplacer l’écran facial/la visière.........................................9 Entfernen/austauschen des visiers/schilds................................................9 (TX-4/XD4) (TX-4/XD4) Pour enlever/remplacer les diffuseurs d’air.............................................13 Entfernen/austauschen der diffusoren.....................................................13 Pour enlever/remplacer les mousses des joues.......................................15 Abnehmen/einsetzen der wangenpolster................................................15 Pour enlever/remplacer la doublure de confort........................................17 Anbringen/einsetzen des komfortfutters..................................................17 Pour enlever/remplacer les habillages de jugulaire.................................19 Abnehmen/einsetzen der kinnriemenabdeckungen.....................................19 ATTENTION ! La visière fournie avec votre casque n’est pas appropriée pour l’usage à grande vitesse. À grande vitesse l’air frappant latéralement la visière ou la surface principale de la visière peut vous gêner lorsque vous déplacez la tête en avant et/ou lorsque vous la mettez droite, ou peut gêner votre vision. Vous devriez essayer le casque avec la visière d’abord à basse vitesse et augmenter graduellement la vitesse de façon vous familiariser avec l’effet provoqué par l’air et déterminer quand la visière devrait être enlevée pour conduire à vitesse élevée.
VORSICHT: Der im Lieferumfang des Helms enthaltene Schirm eignet sich nicht für hohe Geschwindigkeiten. Wenn die seitliche oder vordere Schirmfläche bei hoher Geschwindigkeit vom Luftstrom erfasst wird, kann es schwierig werden, den Kopf wieder in eine nach vorne gerichtete und/oder ebene Position zu bringen. Dadurch kann auch das Sichtfeld eingeschränkt werden. Probieren Sie diese Wirkung zunächst bei niedriger Geschwindigkeit aus, und erhöhen Sie die Geschwindigkeit dann allmählich, damit Sie wissen, was Sie erwartet, und selbst entscheiden können, wann Sie den Schirm bei Fahrten mit hoher Geschwindigkeit abnehmen müssen. 3
English TO OPEN/CLOSE SHIELD TX-4 / XD4 Pull the shield latch tab on lower left side of the shield outward to release latch system and then raise the shield. To close the shield, push down the shield until the shield latch tab fully latches into place. Apply one or two drops of supplied silicone lubricant around the edge trim and on other moving parts and wipe off with soft tissue paper to maintain proper operation. WARNING: If your shield becomes too scratched or uncleanable, replace it with a new one. Impaired visibility causes accidents. Use a solution of mild soap or detergent and lukewarm water to clean your shield. Rinse well with clean water, and wipe off with a soft cloth. Never use petrol, thinner, benzene or any other solvents. There are many “aggressive� cleaners on the market, including some supposed to be specifically for use on shield. Arai strongly recommends that you do not use any such products to clean your shield as some of their ingredients may have damaging effects on the shield and other plastic parts installed on your helmet. Do not apply stickers or adhesive tape to the shield, as this will weaken the hard coating. If tinted, the shield is for daylight use only.
TO OPERATE BROWVENTS TX-4 / XD4
The Browvents are operated from fully closed through intermediate, to fully open positions by simply pulling the vent control down to open, pushing up to close.
Français POUR OUVRIR/FERMER L’ÉCRAN
Deutsch ZUM ÖFFNEN/SCHLIESSEN DES VISIERES
Pour relâcher le système de verrouillage et relever l’écran, tirer sa languette située en bas à gauche de l’écran vers l’extérieur. Pour fermer l’écran, pousser l’écran le bas jusqu’à ce que la languette de verrouillage de l’écran se verrouille complètement en place.
Ziehen Sie den Visier-Verriegelungsknopf unten an der linken Seite des Visiers leicht nach außen, um die Verriegelung zu lösen, und heben Sie das Visier an. Zum Schließen des Visiers drücken Sie es nach unten, bis es voll eingeschnappt ist.
Autour du pivot latéral et sur les autres pièces mobiles, appliquer une ou deux gouttes d’huile de silicone fournie et essuyer l’excédent avec un chiffon de papier pour maintenir le bon fonctionnement.
Tragen Sie ein oder zwei Tropfen des mitgelieferten Flüssigsilikons im Bereich der Kantenabschlusses und auf anderen beweglichen Teilen auf, und wischen Sie überschüssiges Silikon mit einem weichen Papiertaschentuch ab, um die richtige Funktion zu gewährleisten.
ATTENTION : Si l’écran est trop rayé ou qu’il ne peut être nettoyé, il faut le remplacer. Une mauvaise visibilité provoque des accidents. Utiliser une solution à base de savon doux ou de détergent et d’eau tiède pour nettoyer l’écran. Rincer abondamment à l’eau propre et essuyer avec un chiffon doux. Ne jamais utiliser d’essence, de diluant, de benzène ou tout autre solvant. De nombreux nettoyants « agressifs » sont commercialisés, certains sont même prétendument conçus pour être utilisés sur un écran. Arai conseille fortement de ne pas utiliser ces produits de nettoyage car cela risquerait d’endommager l’écran et autres pièces en plastique. Ne collez pas d’autocollants ni de ruban adhésif sur l’écran car cela endommagerait le revêtement rigide. Un écran teinté ne doit être utilisé qu’en plein jour.
WARNUNG: Wenn Ihr Visier zu zerkratzt oder unmöglich zu reinigen wird, müssen Sie es durch ein neues ersetzen. Beeinträchtigte Sicht kann zuführt zu Unfällen führen. Mit einem weichen Tuch und einer Lösung aus milder SeifeGeschirrspülmittel und lauwarmem Wasser das Visier reinigen. Gut mit sauberem Wasser abspülen und mit einem weichen Lappen trockenwischen. Nie Benzin, Verdünner, Benzol oder andere Lösungsmittel benutzen. Es gibt viele „aggressive“ Reinigungsmittel auf dem Markt, einschließlich solcher, die angeblich besonders für die Reinigung von Visieren geeignet sind. Arai rät dringend davon ab, solche Produkte zur Reinigung Ihres Visiers zu verwenden, da manche Bestandteile das Visier oder andere KunststoffPlastikteile des Helms beschädigen können. Bringen Sie keine Aufkleber oder Klebeband auf dem Visier an, da dadurch die Hartbeschichtung geschwächt wird. Getönte Visiere sind nur zur Verwendung bei Tageslicht geeignet.
FONCTIONNEMENT DU SYSTÈME DE DÉSEMBUAGE
BEDIENUNG DER ANTIBESCHLAGVORRICHTUNG
Le système de désembuage est incorporé au dispositif de verrouillage de l’écran pour permettre un nettoyage de la buée intérieure plus rapide sans détacher l’écran. Il suffit d’avancer le dispositif de verrouillage de l’écran pour avoir suffisamment de place afin de faciliter l’évacuation de l’humidité.
Die Antibeschlagvorrichtung ist in der Visier-Verriegelungsvorrichtung integriert, um eine schnellere Beseitigung von Beschlag auf dem verriegelten Visier zu erlauben. Drücken Sie einfach den Visier-Verriegelungsknopf nach vorne, um einen kleinen Spalt zur Feuchtigkeitsbeseitigung zu schaffen. 5
English TO ADJUST PEAK ANGLE Slightly loosen all screws of the peak with a coin or flat blade screwdriver so that the peak can be moved up and down without scratching helmet surface. Put the helmet on and adjust the peak to the desired position. Tighten the screws and take helmet off. Tighten all screws firmly but do not over-tighten.
TO OPERATE MOUTHVENT CLOSE
Simply push the switches/levers on each vent to open/close the vents.
When the shutter inside is open, air is directed to the mouth area to provide fresh air inside the helmet.
When the shutter is closed, air is then directed up along the interior surface of the face shield to help prevent fogging.
Français POUR AJUSTER L’ANGLE DE LA VISIÈRE Desserrer légèrement les vis de la visière à l’aide d’une pièce ou d’un tournevis plat afin de pouvoir faire bouger la visière vers le haut ou le bas sans rayer la surface du casque. Mettre le casque et ajuster la visière à la position souhaitée. Serrer les vis et retirer le casque. Serrer fermement les quatre vis mais pas de manière excessive.
FONCTIONNEMENT DE LA VENTILATION INFÉRIEURE TX-4 / XD4 Il suffit d’appuyer sur les boutons/manettes de chaque côte du casque pour ouvrir ou fermer les conduits d’aération.
Deutsch ANPASSEN DES SCHILDWINKELS Lösen Sie leicht alle Schrauben des Schilds mit einer Münze oder Schlitzschraubendreher, damit das Schild nach oben oder unten bewegt werden kann, ohne die Oberfläche des Helms zu zerkratzen. Setzen Sie den Helm auf und stellen Sie das Schild auf die gewünschte Position ein. Ziehen Sie die Schrauben wieder an und setzen Sie den Helm ab. Ziehen Sie alle Schrauben fest an, aber nicht übermäßig da es sich um Kunststoffschrauben handelt.
BEDIENUNG DER KINNBELÜÜFTUNG TX-4 / XD4
Drücken Sie einfach die Schalter/Hebel an jeder Belüftungsöffnung zum Öffnen/Schließen der Belüftungsöffnungen.
Lorsque le volet interne est ouvert, l’air est dirigé vers la zone autour de la Wenn der innere Verschluss geöffnet ist, wird die Luft zum Mundbereich geführt und liefert Frischluft in das Helminnere. bouche afin d’amener de l’air frais à l’intérieur du casque. Lorsque le volet est fermé, l’air est alors dirigé vers le haut le long de la surface interne de l’écran facial afin d’éviter la formation de buée.
Wenn der Verschluss geschlossen ist, wird die Luft entlang der Innenseite des Visiers geleitet, um ein Beschlagen zu verhindern.
Il suffit d’appuyer sur les boutons/manettes de chaque côte du casque pour ouvrir ou fermer les conduits d’aération.
English LEFT (CLUTCH SIDE) CLOSE
RIGHT (THROTTLE SIDE)
TO OPERATE TOP VENTS Simply push/slide the switch/lever on each duct to open/close the ducts as illustrated. WARNING: Never attempt to adjust ventilation ducts when in motion riding your motorcycle.
CLOSE CLOSE OPEN INTERMEDIATE INTERMEDIATE
TO OPERATE AIRFLOW SPOILER TX-4 / XD4 To deploy the spoiler in the down position, simply pull it down by grasping the center of its chin curtain. To retract, the spoiler, simply push it up with the heel of your hand.
TO REMOVE/REPLACE FACE SHIELD/PEAK
To remove shield/peak, remove the two screws from each side of the peak with flat blade screwdriver or coin. Remove the pressure plate from each side of the peak. The shield/peak can now be removed. The black spring clip on each side may be removed for cleaning but please note that they can only be reinstalled properly in one direction. Do not remove the base plates from the helmet. 8
Français FONCTIONNEMENT DE LA VENTILATION SUPÉRIEURE Il suffit d’appuyer sur les boutons/manettes de chaque côte du casque pour ouvrir ou fermer les conduits d’aération. ATTENTION : Ne jamais essayer de régler les conduits de ventilation lorsque vous êtes en mouvement en circulant à moto.
FONCTIONNEMENT DU DÉFLECTEUR D’AIR TX-4 / XD4
Deutsch BEDIENUNG DER OBERKOPFBELÜFTUNG Drücken Sie einfach die Schalter/Hebel an jeder Belüftungsöffnung zum Öffnen/Schließen der Belüftungsöffnungen. WARNUNG: Versuchen Sie niemals die Belüftungsöffnungen anzupassen, während Sie auf Ihrem Motorrad fahren.
BEDIENUNG DES LUFTFLUSS-SPOILERS TX-4 / XD4
Pour déployer le déflecteur, il suffit de le tirer vers le bas en attrapant le centre de sa mentonnière.
Um den Spoiler in niedrige Stellung zu bringenstellen, ziehen Sie ihn einfach nach unten, indem Sie die Mitte des Windabweisers greifen.
Pour le rentrer, il suffit de le pousser vers le haut avec la main.
Zum Zurückziehen des Spoilers drücken Sie ihn einfach mit dem Handrücken nach oben.
POUR ENLEVER/REMPLACER L’ÉCRAN FACIAL/LA VISIÈRE ENTFERNEN/AUSTAUSCHEN DES VISIERS/SCHILDS TX-4 / XD4
Les agrafes à ressort noires située de chaque côté peuvent être retirées pour le nettoyage mais il faut noter qu’elles ne peuvent être réinstallées correctement que dans un seul sens. Ne pas retirer les plaques d’appui du casque.
Die schwarzen Federclips auf jeder Seite können für Reinigungszwecke entfernt werden, beachten Sie jedoch, dass sie sich nur in eine Richtung korrekt einsetzen lassen. Entfernen Sie nicht die Grundplatten vom Helm.
Pour retirer l’écran/la visière, retirer les deux vis situées de chaque côté de la visière à l’aide d’un tournevis plat ou d’une pièce. Retirer la plaque de pression de chaque côté de la visière. Il est maintenant possible de retirer l’écran/la visière.
Um das Visier bzw. das Schild abzunehmen, entfernen Sie die zwei Schrauben auf jeder Seite des Schilds mit einem Schlitzschraubendreher oder einer Münze. Entfernen Sie die Druckplatte von jeder Seite des Schildes. Das Visier bzw. das Schild kann jetzt abgenommen werden.
English To replace shield/peak, place the black spring clip on the base plate on each side as illustrated (pay attention to the proper direction).
Place the shield on the helmet in the fully closed position, as illustrated, and place the peak so that the two screw holes line up ensuring the two pins of the base plate are in the lower screw hole of the peak, as illustrated.
Place the pressure plate on the peak (note that the L & R embossed on the plate indicate Left and Right on the helmet when the helmet is worn) and install the two screws through each pressure plate into the helmet and tighten with flat blade screwdriver or coin. Do not over-tighten. Work the shield up and down to check the operation. To use the helmet with just the peak, place the black spring clip on each side as per previous instructions. Place the peak, pressure plates and screws, then tighten screws as per previous instructions.
To use the helmet with just the shield, place the black spring clips and shield as per previous instructions. Then, place the shield pressure plates, included in package, on the shield (note that the L & R embossed on the plate indicate Left and Right on the helmet when the helmet is worn), install the screws through each shield pressure plate into the helmet and tighten with flat blade screwdriver or coin. Do not over-tighten. Work the shield up and down to check the operation.
Pour remettre l’écran/la visière en place, disposer les agrafes à ressort noires sur la plaque d’appui de chaque côté, comme illustré (faire attention au sens correct).
Um das Visier bzw. das Schild auszutauschen, stellen Sie den schwarzen Federclip der Grundplatte auf jeder Seite wie abgebildet ein. (Achten Sie dabei auf die richtige Richtung.)
Placer l’écran sur le casque en position complètement fermée, comme illustré, et disposer la visière de telle sorte que les deux trous de vis soient alignés, en vérifiant que les deux broches situées sur la plaque d’appui se trouvent dans le trou de vis inférieur de la visière, comme illustré.
Setzen Sie das Visier auf den Helm, wenn es sich, wie abgebildet, in der vollständig geöffneten Position befindet. Positionieren Sie dann das Schild so, dass die zwei Schraublöcher aneinander ausgerichtet sind und sich dabei die zwei Stifte der Grundplatte in den unteren Schraublöchern des Schildes, wie abgebildet, befinden.
Disposer la plaque de pression sur la visière (noter que le L et le R gravés sur la plaque indiquent le côté gauche( L ) et le côté droit( R ) sur le casque lorsque celui-ci est porté) et insérer les deux vis à travers chaque plaque de pression dans le casque puis serrer avec un tournevis à pointe plate ou une pièce. Ne pas serrer de manière excessive. Déplacer l’écran vers le haut et le bas afin de vérifier le fonctionnement. Pour utiliser le casque avec simplement la visière, placer les agrafes à ressort noires situées de chaque côté conformément aux instructions précédentes. Mettre en place la visière, les plaques de pression et les vis, puis serrer les vis conformément aux instructions précédentes.
Setzen Sie die Druckplatte auf das Schild und schrauben Sie die zwei Schrauben durch jede Druckplatte in den Helm und ziehen Sie sie mit einem Schlitzschraubendreher oder einer Münze fest. (Beachten Sie, dass sich die Prägungen L & R an der Platte auf die linke und rechte Seite des Helms beziehen, wenn dieser getragen wird.) Ziehen Sie die Schrauben nicht zu fest an. Bewegen Sie das Visier nach oben und unten, um seine Funktion zu überprüfen.
Pour utiliser le casque avec simplement l’écran, placer les agrafes à ressort noires et l’écran conformément aux instructions précédentes. Disposer ensuite les plaques de pression, fournies dans l’emballage (noter que le L( gauche) et le R ( droit) gravés sur la plaque indiquent le côté gauche et le côté droit sur le casque lorsque celui-ci est porté), insérer les vis à travers chaque plaque de pression dans le casque et serrer avec un tournevis à pointe plate ou une pièce. Ne pas serrer de manière excessive. Déplacer l’écran vers le haut et le bas afin de vérifier le fonctionnement.
Um den Helm nur mit dem Visier zu verwenden, stellen Sie den schwarzen Federclip und den Schild entsprechend der vorherigen Anweisung ein. Setzen Sie die im Lieferumfang enthaltenen Visier-Druckplatten auf das Schild und schrauben Sie die Schrauben durch jede Visier-Druckplatte in den Helm und ziehen Sie sie mit einem Schlitzschraubendreher oder einer Münze fest. (Beachten Sie, dass sich die Prägungen L & R an der Platte auf die linke und rechte Seite des Helms beziehen, wenn dieser getragen wird.) Ziehen Sie sie nicht zu fest an. Bewegen 11 Sie das Visier nach oben und unten, um seine Bedienung zu überprüfen.
Um den Helm nur mit dem Schild zu verwenden, stellen Sie den schwarzen Federclip auf jeder Seite entsprechend der vorherigen Anweisung ein. Positionieren Sie das Schild, die Druckplatten und Schrauben, und ziehen Sie die Schrauben entsprechend der vorherigen Anweisung fest.
English LEFT (CLUTCH SIDE)
TO REMOVE/REPLACE DIFFUSERS To remove diffusers for cleaning or maintenance, first slide the black open/ close lever at each side of the diffuser outward to fully open position.
INTERMEDIATE CLOSE CLOSE INTERMEDIATE OPEN RIGHT (THROTTLE SIDE)
LEFT (CLUTCH SIDE)
LOCKED POSITION
RELEASED POSITION LOCKED POSITION
Then slide the red lock lever at each side of the diffuser inward to release lock system.
RELEASED POSITION
Finally slide back the black open/close lever inward to intermediate position, and pull the black lever down/backwards to remove the diffuser on each side. To replace diffusers, place diffuser on helmet (contour of each diffuser will match the recess of the helmet shell) and push on the center of the diffuser until it snaps home. Repeat for the other side. Be sure the diffusers are fully secured to the helmet shell and the red lock levers are in the locked position. NOTE: Do not use oils or waxes to lubricate vents or other moving parts. If you must lubricate such components, sparingly use the silicone lubricant supplied with your helmet for eyeport trim dressing. 12
Français POUR ENLEVER/REMPLACER LES DIFFUSEURS D’AIR
Deutsch ENTFERNEN/AUSTAUSCHEN DER DIFFUSOREN
Pour enlever les diffuseurs pour les nettoyer ou pour entretien, faire tout d’abord glisser le levier noir d’ouverture/fermeture situé de chaque côté du diffuseur pour l’ouvrir complètement.
Um Diffusoren für Reinigungs- oder Wartungsarbeiten zu entfernen, schieben Sie zuerst den schwarzen Verschluß/Öffnung-Hebel auf jeder Seite des Diffusors nach außen, um ihn vollständig zu entriegeln.
Faire ensuite glisser le levier de verrouillage rouge situé de chaque côté du diffuseur vers l’intérieur afin de libérer le système de verrouillage.
Schieben Sie dann den roten Sperrhebel auf jeder Seite des Diffusors nach innen, um das Verriegelungssystem zu lösen.
Pour terminer, faire glisser le levier noir d’ouverture/fermeture vers Schieben Sie zuletzt den schwarzen Entsperr/Sperr-Hebel nach innen in die l’intérieur en position intermédiaire, et tirer sur le levier noir vers le bas/en mittlere Position und ziehen Sie den schwarzen Hebel nach unten/hinten, um arrière pour retirer le diffuseur de chaque côté. den Diffusor auf jeder Seite zu entfernen. Pour remettre les diffuseurs en place, disposer le diffuseur sur le casque (le contour de chaque diffuseur correspond à la cavité de la coque du casque) et pousser au centre du diffuseur jusqu’à ce qu’il s’enclenche. Faire de même de l’autre côté. S’assurer que les diffuseurs sont bien fixés sur la coque du casque et que les leviers de verrouillage rouges se trouvent en position verrouillée. REMARQUE : Ne pas utiliser d’huiles ni de cires pour lubrifier les ventilations et les autres pièces mobiles. S’il est nécessaire de lubrifier ces parties, utiliser un peu d’huile de silicone fournie avec le casque pour lubrifier le pivot.
Um die Diffusoren zu montieren, setzen Sie sie auf den Helm (die Form jedes Diffusors passt zur Aussparung in der Helmschale) und drücken Sie auf die Mitte des Diffusors, bis er in seiner Grundposition einrastet. Wiederholen Sie denselben Schritt auf der anderen Seite. Stellen Sie sicher, dass die Diffusoren fest an der Helmschale befestigt sind und sich die roten Sperrhebel in der Sperrposition befinden. ACHTUNG: Verwenden Sie keine ÖÖle oder Wachse zum Schmieren von Belüftungsöffnungen oder anderen beweglichen Teilen. Wenn Sie solche Komponenten schmieren müssen, verwenden Sie sparsam das mit dem Helm mitgelieferte 13 Flüssigsilikon für die GesichtsfeldAugenöffnungsumrandung.
English TO REMOVE/REPLACE CHEEKPADS When first servicing the cheekpads, it is suggested that you do only one at a time so that the other can be used as reinstallation guide. To remove cheekpads, first undo chinstrap. Pull pad toward the rear of the helmet, then inward to release and slide it off the strap.
To take off fabric covering for washing, peel the covering off until all the fabric is on the face side surface. Then draw the covering through the opening by grasping the rectangular collar and pulling. TX-4 / XD4 cheekpad is equipped with a 5mm surface foam layer. The layer is removable to offer a bit more room if desired. To wash fabric coverings, put them into lukewarm water with small amount of laundry soap or your own shampoo and wash gently by hand. Rinse well with fresh water and wipe off with a soft cloth. Dry them in the shade at ambient temperature. To replace fabric covering, ensure it is turned right side out, and stretch the covering over pad so that the label that says EMERGENCY TAB INSIDE sewn on the covering comes at the front bottom of the cheekpad assembly, and adjust the covering to lie smoothly. Be sure EMERGENCY TAB is covered by the fabric covering. Then push the rectangular collar through the pad assembly and adjust into final position.
WARNING: Do not leave the EMERGENCY TAB outside the fabric covering. The looped tab may be caught by projecting objects when riding.
Français POUR ENLEVER/REMPLACER LES MOUSSES DES JOUES
Deutsch ABNEHMEN/EINSETZEN DER WANGENPOLSTER
Lors du premier entretien des mousses des joues, il est recommandé de traiter une mousse après l’autre afin que la mousse restée en place serve de guide pour réinstaller l’autre mousse.Pour enlever les mousses
Wenn Sie die Wangenpolster das erste Mal austauschen, ist es sinnvoll, erst nur ein Polster zu entfernen, damit Sie das andere als Installationshilfe weiterhin zur Verfügung haben.
des joues, il faut préalablement défaire la jugulaire. Tirer la mousse vers l’arrière du casque, puis vers l’intérieur pour qu’elle se libère et la faire glisser hors de la bride.
Vor dem Entfernen der Wangenpolster erst den Kinnriemen öffnen. Ziehen Sie das Wangenpolster zum hinteren Teil des Helms und dann nach innen zum Freigeben und schieben Sie es vom Kinnriemen.
Pour enlever l’habillage en tissu pour le laver, le détacher jusqu’à ce qu’il soit entièrement ramené vers l’avant. Ensuite, faire passer l’habillage à travers le trou en agrippant le col rectangulaire et en tirant.
Zum Abnehmen der Textilabdeckung zum Waschen ziehen Sie die Abdeckung ab, bis der gesamte Stoff auf der Gesichtsseite ist. Dann ziehen Sie die Abdeckung durch die Öffnung, indem Sie den rechteckigen Kragen greifen und ziehen.
TX-4 / XD4 comporte une 2éme couche de mousse de 5 mm d’épaisseur en surface.
TX-4 / XD4 wangenpolster sind mit einer 5 mm dicken Schaumstoffschicht an der Oberfläche ausgestattet.
Pour laver les habillages en tissu, les placer dans de l’eau tiède additionnée d’un peu de lessive ou de shampooing et laver délicatement à la main. Rincer abondamment à l’eau propre et essuyer avec un chiffon doux. Les laisser sécher à l’ombre à température ambiante. Pour remettre en place les habillages en tissu, veiller à ce qu’ils soient dans le bon sens, les tirer sur le bord arrière au-dessus de la mousse de telle sorte que l’étiquette indiquant « LANGUETTE D’URGENCE À L’INTÉRIEUR » et cousue sur l’habillage se trouve au bas de la partie avant de l’ensemble de mousse des joues, et arranger les habillages pour qu’ils soient posés régulièrement. Veiller à ce que l’inscription « LANGUETTE D’URGENCE » soit recouverte par l’habillage en tissu. Ensuite, faire passer le col rectangulaire par l’ensemble des mousses et l’ajuster en position définitive.
Falls Sie die Textilabdeckungen waschen, legen Sie diese in lauwarmes Wasser mit etwas Waschseife oder Ihrem eigenen Shampoo und waschen Sie sie vorsichtig mit der Hand. Gut mit frischem Wasser abspülen und mit einem weichen Lappen trockenwischen. Im Schatten bei Umgebungstemperatur trocknen.
ATTENTION : Ne pas laisser l’inscription « LANGUETTE D’URGENCE » dépasser de l’habillage en tissu. La languette faisant une boucle, elle risque d’être attrapée par des objets qui dépassent lorsque vous circulez.
Zum Einsetzen der Textilabdeckung stellen Sie sicher, dass diese mit der richtigen Seite nach außen zeigt, ziehen Sie die Abdeckung über das Polster, sodass das Etikett mit der Beschriftung „EMERGENCY TAB INSIDE“, das an der Abdeckung angenäht ist, vorne unten an der Wangenpolsterbaugruppe erscheint, und ziehen Sie die Abdeckung glatt. Stellen Sie sicher, dass der NOTFALLHILFEZAPFEN von der Textilabdeckung bedeckt ist. Dann drücken Sie den rechteckigen Kragen durch die Polsterbaugruppe und justieren Sie ihn in der endgültigen Position. WARNUNG: Lassen Sie den NOTFALLHILFEZAPFEN nicht außerhalb der Textilabdeckung. Der schleifenförmige Zapfen kann sich anderenfalls beim Fahren in vorstehenden Gegenständen verfangen.
English ABOUT EMERGENCY TAB SYSTEM: The EMERGENCY TAB SYSTEM is to smoothly remove cheekpads that may be a hindrance when rescuers attempt to remove helmet from an inured helmet wearer. With the label that says EMERGENCY TAB INSIDE which is sewn on the fabric covering of the cheekpad at each side, rescuers can recognize that the helmet is equipped with the EMERGENCY TAB and can get access to the tab at each side by pulling up the label at the cheekpad covering and peeling the cover off to expose the EMERGENCY TAB which is then pulled downward to remove the cheekpad. WARNING: Rescuers need to have sufficient knowledge and training about this system. The Emergency Tab may not always be an effective measure to securely remove cheekpads depending on circumstances of accident or condition of injured wearers. To replace cheekpad in helmet, slip pad onto chinstrap. Then place the rear tab toward the rear of the helmet and push the forward part of pad until the front tab is locked in place. Pull chinstrap to check possible chinstrap play in the cheekpad. q
Pull the chinstrap to check possible chinstrap play in the cheekpad. Replace the neckroll tab into place.
TO REMOVE/REPLACE COMFORT LINING The comfort lining is secured to the helmet by plastic bosses. To remove the lining, undo bosses by grasping the lining as close to each boss as possible and pulling straight up. Note the fore & back, top & bottom sides of the lining for replacement. 16
Français À PROPOS DU SYSTÈME DE LANGUETTE D’URGENCE : Le SYSTÈME DE LANGUETTE D’URGENCE sert à retirer les mousses des joues délicatement. Ces dernières peuvent en effet gêner les secouristes quand ils essaient de retirer le casque d’un blessé. Grâce à l’étiquette indiquant « LANGUETTE D’URGENCE À L’INTÉRIEUR » cousue sur l’habillage en tissu de chaque côté des mousses de joues, les secouristes peuvent savoir que le casque est équipé d’une LANGUETTE D’URGENCE et accéder à la languette d’un côté ou de l’autre en tirant vers le haut sur l’étiquette sur l’habillage des mousses de joue et en détachant l’habillage pour découvrir la LANGUETTE D’URGENCE qui est ensuite tirée vers le bas pour retirer les mousses des joues. ATTENTION : Les secouristes doivent suffisamment connaître ce système et y être assez entraînés. La Languette de Sécurité peut ne pas toujours constituer une mesure efficace pour retirer les mousses des joues en toute sécurité, en fonction des circonstances de l’accident ou des blessures des victimes.
TX-4/XD4/VX-3/VX-PRO3 ②
ÜBER DAS NOTFALLHILFEZAPFEN-SYSTEM: Der Zweck des NOTFALLHILFEZAPFEN-SYSTEMS ist es, die Wangenpolster leicht zu entfernen, da diese ein Hindernis darstellen können, wenn nach einem Unfall der Helm des verletzten Fahrers abgenommen werden soll. Mit dem Etikett mit der Beschriftung „EMERGENCY TAB INSIDE“, das an der Textilabdeckung des Wangenpolsters auf beiden Seiten angenäht ist, können Helfer schnell erkennen, dass der Helm mit einem NOTFALLHILFEZAPFEN ausgestattet ist und können die Zapfen an jeder Seite erreichen, indem sie das Etikett an der Wangenpolsterabdeckung hochziehen und die Abdeckung abziehen, um den NOTFALLHILFEZAPFEN freizugeben, der dann nur nach unten gezogen werden muss, um das Wangenpolster zu entfernen. WARNUNG: Notfallhelfer müssen mit diesem System ausreichend vertraut sein. Daser Notfallhilfesystemzapfen ist möglicherweise nicht in jeder Sitation eine wirksame Lösung zum sicheren Entfernen der Wangenpolster, je nach Umständen des Unfalls und Zustand des verletzten Fahrers.
Pour réinstaller la mousse des joues dans le casque, faire glisser la mousse sur la jugulaire. Ensuite, placer la languette arrière vers l’arrière du casque et appuyer sur la partie avant de la mousse jusqu’à ce que la languette avant soit en place. Tirer sur la jugulaire pour vérifier si elle peut coulisser dans la mousse des joues.
Zum Einsetzen des Wangenpolsters in einem Helm schieben Sie das Polster auf den Kinnriemen. Dann schieben Sie den hinteren Zapfen zur Rückseite des Helms und drücken Sie den vorderen Teil des Polsters, bis der vordere Zapfen eingerastet ist. Ziehen Sie am Kinnriemen, um auf mögliches Spiel des Kinnriemens im Wangenpolster zu prüfen.
Tirer la jugulaire pour vérifier s’il y a du jeu entre les mousses des joues. Remettre la languette du coussinet du cou en place.
Ziehen Sie am Kinnriemen, um auf mögliches Spiel des Kinnriemens im Wangenpolster zu prüfen. Bringen Sie den Nackenrollenkranzaufhänger wieder in der richtigen Stellung
POUR ENLEVER/REMPLACER LA DOUBLURE DE CONFORT La doublure de confort est fixée au casque par renflements. Pour retirer la doublure, défaire les renflements en attrapant la doublure le plus près possible de chacun d’entre eux et en tirant droit vers le haut. Repérer les côtés avant et arrière, inférieur et supérieur pour pouvoir remettre la doublure en place.
an.ANBRINGEN/EINSETZEN DES KOMFORTFUTTERS Das Komfortfutter ist mit Plastikdruckknöpfen am Helm befestigt. Zum Entfernen des Futters lösen Sie die Druckknöpfe, indem Sie das Futter so nahe an den Druckknöpfen wie möglich greifen und gerade nach oben ziehen. Achten Sie beim Wiedereinsetzen auf die richtige Ausrichtung des Futters nach vorne, hinten, oben und unten. 17
English TX-4 / XD4 lining is equipped with removable temple pads to offer a bit more room if desired. To remove pads, open the pocket on each side of the lining and gently remove pad from the pocket. If you wish to replace them in the pockets, use double sided tape to fix them in place.
To wash the comfort lining, put it into lukewarm water with small amount of laundry soap or your own shampoo and wash gently by hand. Rinse well with fresh water and wipe off with a soft cloth. Dry it in the shade at ambient temperature. WARNING: Never use petrol, thinner, benzene or any other solvents. To replace the lining, place the bosses over their plastic receptacles and push them home. WARNING: When reinstalling the comfort lining, be sure the lining is properly positioned along the inside shape of the EPS (a.k.a. Styrofoam) liner. If the comfort lining is not properly installed, the frame of the comfort lining may fold when you put on and take off the helmet, which may injure your skin, etc. Whenever you feel something is wrong with the comfort lining, check that the lining is properly installed.
TO REMOVE/REPLACE CHINSTRAP COVERS To remove the chinstrap covers, first remove the cheekpads as per previous instructions.
La doublure du TX-4 / XD4 est munie de mousses amovibles au niveau des tempes pour offrir un peu plus d’espace si nécessaire. Pour retirer les mousses amovibles, ouvrir la poche située de chaque côté de la doublure et retirer délicatement la mousse de la poche. Si vous souhaitez les remettre en place dans les poches, utilisez de la bande adhésive double face pour les maintenir en place.
Das Futter des TX-4 / XD4 ist mit entnehmbaren Schläfenpolstern ausgestattet, um bei Bedarf mehr Platz zu schaffen. Um die Polster zu entnehmen, öffnen Sie die Taschen auf jeder Seite des Futters und entnehmen Sie das Polster vorsichtig aus der Tasche. Möchten Sie sie austauschen, befestigen Sie die Polster mit doppelseitigem Klebeband an der gewünschten Position in den Taschen.
Pour laver la doublure de confort, la placer dans de l’eau tiède additionnée d’un peu de lessive ou de shampooing et laver délicatement à la main. Rincer abondamment à l’eau propre et essuyer avec un chiffon doux. La laisser sécher à l’ombre à température ambiante.
Falls Sie das Komfortfutter waschen möchten, legen Sie es in lauwarmes Wasser mit etwas Waschseife oder Ihrem eigenen Shampoo und waschen Sie es vorsichtig mit der Hand. Gut mit frischem Wasser abspülen und mit einem weichen Lappen trockenwischen. Im Schatten bei Umgebungstemperatur trocknen.
ATTENTION : Ne jamais utiliser d’essence, de diluant, de benzène ou tout autre solvant. Pour remettre la doublure en place, placer les renflements sur leurs réceptacles en plastique et les coincer. ATTENTION : Lors du remontage de la doublure de confort, s’assurer qu’elle suit bien la forme intérieure de la garniture en polystyrène expansé (ou mousse de polystyrène). Si la doublure de confort n’est pas correctement installée, elle est susceptible de se plier lors du port et de l’enlèvement du casque, ce qui peut provoquer des blessures cutanées. Dès l’apparition de sensations de gène dues à la doublure de confort, s’assurer qu’elle est correctement placée.
WARNUNG: Nie Benzin, Verdünner, Benzol oder andere Lösungsmittel benutzen. Zum Einsetzen des Futters die Druckknöpfe über ihre Plastikgegenstücke setzen und dann zusammendrücken. WARNUNG: Beim erneuten Anbringen des Komfortfutters stellen Sie sicher, dass das Futter richtig in der Innenform des EPS (d.h. der Styropor-InnenkalotteFutters) positioniert ist. Wenn das Komfortfutter nicht richtig eingesetzt ist, kann der Rand des Komfortfutters beim Aufsetzen und Abnehmen des Helms Falten bilden und Hautverletzungen etc.usw. verursachen. Wenn Sie das Gefühl haben, dass mit dem Komfortfutter etwas nicht stimmt, prüfen Sie, ob das Futter richtig eingesetzt ist.
POUR ENLEVER/REMPLACER LES HABILLAGES DE JUGULAIRE ABNEHMEN/EINSETZEN DER KINNRIEMENABDECKUNGEN Pour retirer les habillages de jugulaire, commencer par retirer les mousses Vor dem Entfernen der Kinnriemenabdeckungen zuerst die Wangenpolster des joues en suivant les consignes ci-dessus. abnehmen, wie vorher beschrieben. 19
English Left chinstrap cover (D-ring side) Right chinstrap cover (long side) Couvercle gauche de la jugulaire (côté anneau en forme de D) Couvercle droit de la jugulaire (côté long) Linke Kinnriemenabdeckung (D-Ring-Seite) Rechte Kinnriemenabdeckung (lange Seite)
Remove the plastic chinstrap anchor cover from the steel chinstrap anchor and slide the cover off the chinstrap. Note the right and left, inside and outside of the chinstrap covers for replacement. To wash the chinstrap covers, put them into lukewarm water with small amount of laundry soap or your own shampoo and wash gently by hand. Rinse well with fresh water and wipe off with a soft cloth. Dry them in the shade at ambient temperature. WARNING: Never use petrol, thinner, benzene or any other solvents. To replace the left chinstrap cover (D-ring side), ensure the female chinstrap end snap side of the chinstrap and the leatherette side of the chinstrap cover both face outward, slip the chinstrap cover onto the chinstrap. Position the plastic chinstrap anchor cover over the steel anchor and push the cover in the anchor until the tab on the back of the cover snaps fully home. To replace the right chinstrap cover (long side), ensure the cap side of the chinstrap end snap (Arai logo impressed) on the chinstrap and the leatherette side of the chinstrap cover both face outward, slip the chinstrap cover onto the chinstrap. Position the plastic chinstrap anchor cover over the steel anchor and push the cover in the anchor until the tab on the back of the cover snaps fully home
Retirer le couvercle d’ancrage plastique de la jugulaire de son ancrage en Nehmen Sie die KunststoffPlastik-Kinnriemenankerabdeckung von dem acier et le faire glisser pour le retirer de la jugulaire. Stahl-Kinnriemenanker ab und schieben die Abdeckung vom Kinnriemen. Repérer la droite et la gauche, ainsi que l’intérieur et l’extérieur de la jugulaire, pour pouvoir la remettre en place.
Achten Sie auf die richtige Ausrichtung von links, rechts, innen und außen beim Einsetzen der Kinnriemenabdeckungen.
Pour laver les couvercles de jugulaire, les placer dans de l’eau tiède Falls Sie die Kinnriemenabdeckungen waschen, legen Sie diese in lauwarmes additionnée d’un peu de lessive ou de shampooing et laver délicatement Wasser mit etwas Waschseife oder Ihrem eigenen Shampoo und waschen Sie sie à la main. Rincer abondamment à l’eau propre et essuyer avec un chiffon vorsichtig mit der Hand. Gut mit frischem Wasser abspülen und mit einem weichen doux. Les laisser sécher à l’ombre à température ambiante. Lappen trockenwischen. Im Schatten bei Umgebungstemperatur trocknen. ATTENTION : Ne jamais utiliser d’essence, de diluant, de benzène ou tout autre solvant.
WARNUNG: Nie Benzin, Verdünner, Benzol oder andere Lösungsmittel benutzen.
Pour remettre le couvercle gauche de la jugulaire (côté anneau en forme de D), s’assurer que le côté femelle du mousqueton de la jugulaire et le côté en simili cuir du couvercle de jugulaire sont tous deux orientés vers l’extérieur, puis faire glisser le couvercle de jugulaire sur cette dernière.
Zum Einsetzen der linken Kinnriemenabdeckung (D-Ring-Seite) stellen Sie sicher, dass die Buchsenseite des Kinnriemenendes und die Kunstlederseite der Kinnriemenabdeckung beide nach außen weisen, und schieben Sie die Kinnriemenabdeckung auf den Kinnriemen.
Placer le couvercle d’ancrage plastique de la jugulaire sur l’ancrage en acier et le pousser dans l’ancrage jusqu’à ce que la languette à l’arrière du couvercle soit bien en place.
Positionieren Sie die KunststoffPlastik-Kinnriemenankerabdeckung über den Stahlanker und drücken Sie die Abdeckung in den Anker, bis der Zapfen an der Rückseite der Abdeckung ganz einrastet.
Pour remettre en place le couvercle droit de la jugulaire (côté long), s’assurer que le côté supérieur du mousqueton de la jugulaire et le côté en simili cuir du couvercle de jugulaire sont tous deux orientés vers l’extérieur, puis faire glisser le couvercle de jugulaire sur cette dernière.
Zum Einsetzen der rechten Kinnriemenabdeckung (lange Seite) stellen Sie sicher, dass die Kappenseite des Kinnriemenendes (mit eingeprägtem Arai-Logo) auf dem Kinnriemen und die Kunstlederseite der Kinnriemenabdeckung beide nach außen weisen, und schieben Sie die Kinnriemenabdeckung auf den Kinnriemen.
Positionieren Sie die Plastik-Kinnriemenankerabdeckung über den Stahlanker und drücken Sie die Abdeckung in den Anker, bis der Zapfen an der Rückseite der Abdeckung ganz einrastet. 21
Italiano CONTENUTI Aprire/chiudere la visiera.......................................................................24 (TX-4/XD4) Azionare le prese d’aria “brow vent”.....................................................24 (TX-4/XD4) Regolare l’angolazione del frontino ......................................................26 Azionare la presa d’aria mentoniera......................................................26 (TX-4/XD4) Azionare le prese d’aria superiori..........................................................28 Azionare lo spoiler.................................................................................28 (TX-4/XD4) Rimuovere/sostituire la visiera/il frontino...............................................28 (TX-4/XD4) Rimuovere/sostituire i diffusori..............................................................32 Rimuovere/sostituire i guanciali.............................................................34 Rimuovere/sostituire l’imbottitura interna..............................................36 Rimuovere/sostituire i copri-cinturino....................................................38 ATTENZIONE: Il frontino in dotazione con il casco non si presta all’uso ad alta velocità. A velocità elevate, l’aria che colpisce una parte laterale o principale del frontino può impedire che la testa torni agevolmente diritta o protesa in avanti, o può ostruire la visione del conducente. Fare pratica sperimentando questo effetto prima a velocità ridotte, poi gradualmente aumentate, permette al conducente di verificare il tipo di reazione che si ottiene stabilendo, dunque, quando dover rimuovere il frontino a velocità più elevate. 22
Español ÍNDICE Cómo abrir o cerrar la pantalla............................................................. 25 (TX-4/XD4) Cómo manejar las entradas de aire de la pantalla................................. 25 (TX-4/XD4) Cómo ajustar el ángulo de la visera..................................................... 27 Cómo accionar la entrada de aire de la mentonera............................... 27 (TX-4/XD4) Cómo accionar las entradas de aire superiores..................................... 29 Cómo manejar el spoiler de flujo de aire............................................... 29 (TX-4/XD4) Cómo quitar/sustituir la pantalla........................................................... 29 (TX-4/XD4) Cómo quitar/sustituir los difusores....................................................... 33 Cómo quitar/sustituir los acolchados laterales...................................... 35 Cómo quitar/sustituir el forro interior.................................................... 37 Cómo quitar/sustituir las protecciones de la correa.............................. 39 PRECAUCIÓN: La visera suministrada con el casco no es apta para uso a alta velocidad. A una velocidad elevada, la fuerza ejercida por el aire en la superficie principal o en el lateral de la visera puede hacer que resulte difícil mover la cabeza hacia delante o ponerla en una posición nivelada, o bien puede impedir la visión. Para familiarizarse con este efecto, empiece circulando a velocidades bajas y vaya aumentando la velocidad gradualmente para saber a qué atenerse y determinar cuándo debe retirarse la visera para circular a velocidades más altas.
Ελληνικά ΠΕΡΙΕΧΌΜΕΝΑ Για να ανοιξετε / κλεισετε τη ζελατινα............................................................. 25
Η λειτουργια των οπων εξαερισμου μετωπου.................................................. 25
Ρυθμιση κλισησ γεισου................................................................................... 27 Η λειτουργια των οπων εξαερισμου στοματοσ................................................ 27
Η λειτουργια των ανω εξαερισμων.................................................................. 29 Η λειτουργια του spoiler αναχαιτισησ ροησ αερα. .......................................... 29
Για να αφαιρεσετε/τοποθετησετε τη ζελατινα/το γεισο.................................. 29
Για να αφαιρεσετε/τοποθετησετε τα diffuser.................................................. 33 Για την αφαιρεση / αντικατασταση επενδυσησ παρειων.................................. 35 Για να αφαιρεσετε / αντικαταστησετε την επενδυση ανεσησ........................... 37 Για την αφαιρεση / αντικατασταση των καλυμματων του ιμαντα σαγονιου...... 39 ΠΡΟΣΟΧΗ: Το σκίαστρο που παρέχεται με το κράνος σας δεν είναι κατάλληλο για χρήση σε υψηλές ταχύτητες. Σε τέτοιες ταχύτητες ο αέρας που έρχεται σε επαφή με κάποια πλευρά ή την κύρια επιφάνεια του σκιάστρου ενδέχεται να σας δυσκολεύει όταν θέλετε να επαναφέρετε το κεφάλι σας στην εμπρόσθια ή όρθια θέση, ή ενδέχεται να παρεμποδίζει την όρασή σας. Θα πρέπει να αποκτήσετε εμπειρία με αυτό το φαινόμενο ξεκινώντας από χαμηλή ταχύτητα και αυξάνοντας σταδιακά την ταχύτητα, έτσι ώστε να γνωρίζετε τι θα πρέπει να περιμένετε και να καθορίσετε εάν θα πρέπει να αφαιρεθεί το σκίαστρο για οδήγηση σε μεγαλύτερες ταχύτητες. 23
Italiano APRIRE/CHIUDERE LA VISIERA TX-4 / XD4
Estrarre la linguetta della serratura con scatto a molla della visiera, sul lato inferiore sinistro di quest’ultima per sbloccare la serratura, quindi sollevare la visiera. Per chiudere la visiera, spingerla verso il basso, finché la linguetta di chiusura non risulterà completamente inserita. Applicare una o due gocce di lubrificante al silicone intorno alla guarnizione del bordo e su altre parti mobili, quindi asciugare con un panno morbido per mantenerne un corretto funzionamento ATTENZIONE: Nel caso in cui la visiera sia eccessivamente graffiata o non sia lavabile, sostituirla con una nuova. Una visibilità difficoltosa è causa di incidenti. Utilizzare una soluzione di sapone neutro e acqua tiepida per pulire la visiera. Risciacquare bene con acqua pulita e asciugare con un panno morbido. Non utilizzare mai benzina, solventi, benzene o altri prodotti chimici. In commercio si trovano molti detergenti “aggressivi”, alcuni dei quali specifici per visiere. Arai raccomanda fortemente di non utilizzare nessuno di questi prodotti per pulire la visiera poiché alcune sostanze in essi contenuti potrebbero danneggiare la visiera e altre parti in plastica del casco. Non applicate adesivi o nastro adesivo sulla visiera o ne indebolirete il rivestimento protettivo. Se fumè, la visiera è idonea solo alla guida diurna.
AZIONARE LE PRESE D’ARIA “BROW VENT” TX-4 / XD4
Le prese d’aria “Brow Vent” possono assumere la posizione completamente chiusa, intermedia, o completamente aperta. A tal fine è sufficiente abbassare il dispositivo di regolazione del flusso d’aria per aprirlo o alzarlo per chiuderlo. 24
Español CÓMO ABRIR O CERRAR LA PANTALLA TX-4 / XD4
Ελληνικά ΓΙΑ ΝΑ ΑΝΟΙΞΕΤΕ / ΚΛΕΙΣΕΤΕ ΤΗ ΖΕΛΑΤΙΝΑ. TX-4 / XD4
Tire hacia afuera de la lengüeta de cierre de la pantalla, en el lado inferior Τραβήξτε προς τα έξω το γλωσσίδι κουμπώματος στην κάτω αριστερή μεριά της ζελατίνας izquierdo de ésta, para soltar el sistema de cierre, y levante la pantalla. για να απελευθερωθεί το σύστημα κουμπώματος και κατόπιν σηκώστε τη ζελατίνα. Για να Para cerrar la pantalla, empújela hacia abajo hasta que el seguro de la κλείσετε τη ζελατίνα, σπρώξτε τη προς τα κάτω έως ότου κουμπώσει στη θέση της. pantalla quede totalmente cerrado en su lugar. Aplique una o dos gotas del lubricante de silicona suministrado alrededor Επαλείψτε με μία ή δύο σταγόνες από το λιπαντικό σιλικόνης που σας παρέχεται γύρο από το σιρίτι της παρυφής και επί άλλων κινουμένων μερών και σκουπίστε με ένα μαλακό del embellecedor del borde y en otras partes móviles, y limpie los restos con un pañuelo de papel suave para mantener un correcto funcionamiento. χαρτομάντηλο για να διατηρήσετε την κατάλληλη λειτουργία. ADVERTENCIA: Si la pantalla está demasiado rayada o ya no se puede limpiar, cámbiela por otra nueva. La falta de visibilidad puede causar accidentes. Limpie la pantalla con una solución de jabón o detergente suave y agua templada. Enjuáguela bien con agua limpia y séquela con un paño suave. No utilice nunca gasolina, diluyente, benceno ni disolventes de otro tipo. Existen multitud de productos de limpieza “agresivos” en el mercado, incluidos algunos que supuestamente son específicos para la limpieza de pantallas. Arai recomienda encarecidamente no utilizar ninguno de dichos productos para la limpieza de la pantalla, ya que algunos de sus ingredientes pueden deteriorar tanto la pantalla como otras piezas de plástico del casco. No fije pegatinas ni cinta adhesiva a la pantalla, ya que debilitarán su revestimiento. Si la pantalla es ahumada, debe utilizarse exclusivamente durante el día.
CÓMO MANEJAR LAS ENTRADAS DE AIRE DE LA PANTALLA TX-4 / XD4
ΠΡΟΕΙΔΟΠΟΙΗΣΗ: Εάν η ζελατίνα σας έχει πάρα πολλές γρατσουνιές ή δεν καθαρίζεται, αντικαταστήστε το με ένα καινούργιο. Η περιορισμένη ορατότητα δημιουργεί ατυχήματα. Χρησιμοποιήστε ένα διάλυμα από ήπιο σαπούνι ή απορρυπαντικό και χλιαρό νερό για να καθαρίσετε το προστατευτικό προσώπου σας. Ξεβγάλατε καλώς με καθαρό νερό και σκουπίστε με ένα μαλακό πανί. Ποτέ μην χρησιμοποιείτε βενζίνη, διαλυτικό, βενζόλη ή άλλα διαλύματα. Υπάρχουν πολλά «επιθετικά» καθαριστικά στην αγορά, συμπεριλαμβανομένων κάποιων που υποτίθεται ότι έχουν κατασκευαστεί ειδικά για να χρησιμοποιούνται σε προστατευτικά προσώπου. Η Arai συνιστά ιδιαιτέρως να μην χρησιμοποιείτε τα οιαδήποτε εν λόγω προϊόντα για να καθαρίσετε το προστατευτικό προσώπου σας διότι κάποια από τα συστατικά τους ενδέχεται να έχουν επιζήμιες επιρροές επί του προστατευτικού προσώπου και άλλων πλαστικών μερών που είναι προσαρμοσμένα στο κράνος σας. Μην επικολλάτε αυτοκόλλητα ή αυτοκόλλητη ταινία στη ζελατίνα σας. Μην επικολλάτε αυτοκόλλητα ή αυτοκόλλητη ταινία στη ζελατίνα , διότι αυτή σας η ενέργεια θα εξασθενίσει την σκληρή επικάλυψη. Εάν έχει χρωματισμό τότε το κράνος είναι κατάλληλο μόνον για φως ημέρας.
Η ΛΕΙΤΟΥΡΓΙΑ ΤΩΝ ΟΠΩΝ ΕΞΑΕΡΙΣΜΟΥ ΜΕΤΩΠΟΥ. TX-4 / XD4
Οι οπές εξαερισμού μετώπου λειτουργούν από τη θέση πλήρους φραγής μέσω ενδιάμεσης Las entradas de aire de la pantalla cambian de una posición totalmente cerrada a la de abierta a medias; para abrirlas completamente, sólo tiene θέσης, στη θέση πλήρους ανοίγματος, απλά τραβώντας το κουμπί ελέγχου του εξαερισμού que tirar del regulador hacia abajo, y empujar hacia arriba para cerrarlas. προς τα κάτω ώστε να ανοίξει, και προς τα επάνω ώστε να κλείσει. 25
Italiano REGOLARE L’ANGOLAZIONE DEL FRONTINO Allentare leggermente tutte e le viti del frontino con una moneta o con un cacciavite a lama piatta per poter spostare il frontino su e giù senza scalfire la superficie del casco. Indossare il casco e regolare il frontino nella posizione desiderata. Serrare le viti e sfilare il casco. Serrare saldamente tutte le viti senza eccedere.
AZIONARE LA PRESA D’ARIA MENTONIERA CLOSE OPEN
È sufficiente premere gli interruttori/levette su ogni presa d’aria per aprire/ chiudere le prese.
Quando la bocchetta interna è aperta, l’aria si dirige verso la zona bocca per ventilare l’interno del casco.
Quando la bocchetta è chiusa, l’aria si dirige lungo la superficie interna della visiera, svolgendo una funzione antinebbia.
Español CÓMO AJUSTAR EL ÁNGULO DE LA VISERA Afloje ligeramente los tornillos de la visera con una moneda o con un destornillador de cabeza plana de forma que se pueda mover la visera hacia arriba y hacia abajo sin rayar la superficie del casco. Póngase el casco y ajuste la visera en la posición deseada. Apriete los tornillos y quítese el casco. Apriete todos los tornillos firmemente pero no más de lo necesario.
Ελληνικά ΡΥΘΜΙΣΗ ΚΛΙΣΗΣ ΓΕΙΣΟΥ Χαλαρώστε ελαφρά και τις βίδες του γείσου με ένα νόμισμα ή με ίσιο κατσαβίδι έτσι ώστε να μετακινείται το γείσο προς τα επάνω και προς τα κάτω χωρίς να γρατζουνιέται η επιφάνεια του κράνους. Φορέστε το κράνος και τοποθετήστε το γείσο στην επιθυμητή θέση. Σφίξτε τις βίδες και βγάλτε το κράνος. Σφίξτε όλες τις βίδες καλά, χωρίς όμως να τις σφίξετε υπερβολικά.
CÓMO ACCIONAR LA ENTRADA DE AIRE DE LA MENTONERA Η ΛΕΙΤΟΥΡΓΙΑ ΤΩΝ ΟΠΩΝ ΕΞΑΕΡΙΣΜΟΥ ΣΤΟΜΑΤΟΣ.
Sólo tiene que empujar los interruptores/palancas de cada entrada para abrirlos/cerrarlos.
Απλώς πιέστε τους διακόπτες στον εκάστοτε εξαερισμό για να ανοίξετε / κλείσετε τους εξαερισμούς όπως δείχνουν τα διαγράμματα.
Cuando el obturador interior está abierto, el aire se dirige al área de la boca para suministrar aire fresco al interior del casco.
Όταν ο αεραγωγός στο εσωτερικό είναι ανοιχτός, ο αέρας κατευθύνεται προς το στόμα για την παροχή αέρα στο εσωτερικό του κράνους.
Cuando el obturador está cerrado, el aire se dirige entonces hacia arriba siguiendo la superficie interior de la pantalla de la cara para evitar la condensación.
Όταν ο αεραγωγός είναι κλειστός, ο αέρας κατευθύνεται προς τα επάνω, παράλληλα με την εσωτερική επιφάνεια της ζελατίνας, για να αποφευχθεί η θόλωση.
Italiano LEFT (CLUTCH SIDE) CLOSE
AZIONARE LE PRESE D’ARIA SUPERIORI È sufficiente premere gli interruttori/levette su ogni presa d’aria per aprire/ chiudere le prese.
ATTENZIONE: Non tentare mai di regolare i condotti di ventilazione durante la guida.
AZIONARE LO SPOILER TX-4 / XD4 Per posizionare lo spoiler in basso, è sufficiente spingerlo verso il basso afferrando il centro del relativo sottogola. Per ritrarre lo spoiler, è sufficiente spingerlo verso l’alto con il palmo della mano.
RIMUOVERE/SOSTITUIRE LA VISIERA/IL FRONTINO TX-4 / XD4 Per togliere la visiera/il frontino, rimuovere le due viti da ogni lato del frontino con un cacciavite a lama piatta o una moneta. Rimuovere la placca a pressione da ogni lato del frontino. Ora la visiera/il frontino possono essere rimossi. Il fermaglio a molla nero posto su ogni lato può essere rimosso per le operazioni di pulizia ma la corretta reinstallazione dello stesso è possibile unicamente in una direzione. Non rimuovere i supporti interni dal casco. 28
Español CÓMO ACCIONAR LAS ENTRADAS DE AIRE SUPERIORES Sólo tiene que empujar los interruptores/palancas de cada entrada para abrirlos/cerrarlos. ADVERTENCIA: No trate de ajustar los conductos de ventilación cuando se encuentre en movimiento montado en su motocicleta.
CÓMO MANEJAR EL SPOILER DE FLUJO DE AIRE
Ελληνικά Η ΛΕΙΤΟΥΡΓΙΑ ΤΩΝ ΑΝΩ ΕΞΑΕΡΙΣΜΩΝ. Απλώς πιέστε τους διακόπτες στον εκάστοτε εξαερισμό για να ανοίξετε / κλείσετε τους εξαερισμούς όπως δείχνουν τα διαγράμματα.ΠΡΟΕΙΔΟΠΟΙΗΣΗ ΠΡΟΕΙΔΟΠΟΙΗΣΗ: Ποτέ μην επιχειρείτε να ρυθμίσετε τους αεραγωγούς όταν οδηγείτε τη μοτοσικλέτα σας.
Η ΛΕΙΤΟΥΡΓΙΑ ΤΟΥ SPOILER ΑΝΑΧΑΙΤΙΣΗΣ ΡΟΗΣ ΑΕΡΑ.
Para colocar el spoiler en la posición bajada, sencillamente tire de él hacia abajo, sujetándolo por el centro de su barbillera.
Για να τοποθετήσετε την αναχαίτιση στην κάτω θέση, απλώς τραβήξτε την κάτω κρατώντας το κέντρο του παραπετάσματος σαγονιού.
Para retraer el spoiler, sencillamente empújelo hacia arriba con la base de la mano.
Για να συμπτύξετε την αναχαίτιση, απλώς πιέστε την προς τα επάνω με το μετακάρπιο του χεριού σας.
CÓMO QUITAR/SUSTITUIR LA PANTALLA TX-4 / XD4 Para quitar la pantalla/visera, extraiga los dos tornillos de cada lado de la visera con un tornillo de cabeza plana o una moneda. Quite la placa de presión de cada lado de la visera. Ya se puede sacar la pantalla/visera.
ΓΙΑ ΝΑ ΑΦΑΙΡΕΣΕΤΕ/ΤΟΠΟΘΕΤΗΣΕΤΕ ΤΗ ΖΕΛΑΤΙΝΑ/ΤΟ ΓΕΙΣΟ TX-4 / XD4 Για να αφαιρέσετε τη ζελατίνα/το γείσο, αφαιρέστε τις δύο βίδες στην κάθε πλευρά της ζελατίνας με ένα ίσιο κατσαβίδι ή με ένα νόμισμα. Αφαιρέστε την πλάκα πίεσης από κάθε πλευρά του γείσου. Τώρα μπορείτε να αφαιρέσετε τη ζελατίνα/το γείσο.
El cierre de resorte negro de cada lado puede quitarse durante la limpieza, Μπορείτε να αφαιρέσετε το μαύρο κλιπ σε κάθε πλευρά για να το καθαρίσετε, αλλά λάβετε pero tenga en cuenta que solo se puede volver a instalar correctamente en υπόψη σας ότι μπορείτε να το τοποθετήσετε ξανά σωστά μόνο προς μία κατεύθυνση. Μην una única dirección. No extraiga las placas base del casco. αφαιρείτε τους μηχανισμούς στήριξης από το κράνος. 29
Italiano Per montare visiera/frontino, posizionare il fermaglio a molla nero sul supporto interno di ogni lato come illustrato (attenzione alla corretta direzione).
Collocare la visiera sul casco in posizione completamente chiusa, come illustrato, e posizionare il frontino in modo da allineare i due fori delle viti, assicurandosi che i due perni del supporto interno si trovino nel foro della vite inferiore del frontino, come illustrato.
Posizionare la placca a pressione sul frontino (da notare che le lettere L e R impresse sulla placca indicano rispettivamente la parte sinistra e la parte destra del casco quando indossato) e inserire le due viti lungo ogni placca a pressione nel casco, per poi serrare con un cacciavite a lama piatta o con una moneta. Non serrare eccessivamente. Sollevare ed abbassare la visiera per verificarne il corretto funzionamento. Per utilizzare il casco con il solo frontino, posizionare il fermaglio a molla nero su ogni lato seguendo le istruzioni precedenti. Posizionare frontino, placche a pressione e viti, quindi serrare le viti seguendo le istruzioni precedenti.
Per utilizzare il casco con la sola visiera, posizionare i fermagli a molla neri e la visiera seguendo le istruzioni precedenti. Quindi, posizionare le placche a pressione della visiera, incluse nella confezione, sulla visiera (da notare che le lettere L e R impresse sulla placca indicano rispettivamente la parte sinistra e la parte destra del casco quando indossato), inserire le viti lungo ogni placca a pressione della visiera nel casco e serrare con un cacciavite a lama piatta o con una moneta. Non serrare eccessivamente. Sollevare ed abbassare la visiera per verificarne il corretto funzionamento.
Για να αντικαταστήσετε τη ζελατίνα/το γείσο, τοποθετήστε το μαύρο κλιπ στο μηχανισμό Para sustituir la pantalla/visera, coloque el cierre de resorte negro en la placa base en cada lado como se ilustra (tenga cuidado de colocarlo en la στήριξης ζελατίνας σε κάθε πλευρά όπως φαίνεται στην εικόνα (λάβετε υπόψη τη σωστή dirección correcta). κατεύθυνση).
Coloque la pantalla en el casco en la posición totalmente cerrada, como se ilustra, y coloque la visera de forma que los dos orificios para los tornillos queden alineados, asegurándose de que los dos pernos de la placa base se encuentran en el orificio inferior para el tornillo de la visera, como se ilustra.
Τοποθετήστε τη ζελατίνα στο κράνος σε πλήρως κλειστή θέση, όπως φαίνεται στο σχήμα και τοποθετήστε το γείσο έτσι ώστε οι δύο οπές για βίδες να ευθυγραμμίζονται, προσέχοντας να βρίσκονται στην κάτω οπή βίδας οι δύο ακίδες του μηχανισμού στήριξης ζελατίνας, όπως φαίνεται στο σχήμα.
Coloque la placa de presión en la visera (tenga en cuenta que las marcas en relieve L y R de la placa indican la izquierda y derecha del casco cuando se lleva puesto) e instale los dos tornillos en el casco a través de cada plato de presión y apriételos con un destornillador de cabeza plana o una moneda. No los apriete más de lo necesario. Suba y baje la pantalla para comprobar el funcionamiento.
Τοποθετήστε την πλάκα πίεσης στο γείσο (λάβετε υπόψη σας ότι τα L & R που εμφανίζονται στην πλάκα υποδηλώνουν την αριστερή και τη δεξιά πλευρά του κράνους, όταν φοράτε το κράνος) και τοποθετήστε τις δύο βίδες μέσα από κάθε πλάκα πίεσης στο κράνος και σφίξτε με ίσιο κατσαβίδι ή νόμισμα. Μην σφίγγετε υπερβολικά. Μετακινήστε τη ζελατίνα προς τα πάνω και προς τα κάτω για να ελέγξετε εάν λειτουργεί σωστά.
Para utilizar el casco con la visera únicamente, coloque el cierre de Για να χρησιμοποιήσετε το κράνος μόνο με το γείσο, τοποθετήστε τα μαύρα κλιπ σε κάθε resorte negro en cada lado como se indica en las instrucciones anteriores. πλευρά σύμφωνα με τις προηγούμενες οδηγίες. Τοποθετήστε το γείσο, τις πλάκες πίεσης Coloque la visera, las placas de presión y los tornillos y seguidamente και τις βίδες και στη συνέχεια σφίξτε τις βίδες σύμφωνα με τις προηγούμενες οδηγίες. apriete los tornillos como se indica en las instrucciones anteriores.
Para utilizar el casco con la pantalla únicamente, coloque los cierres de resorte negros y la pantalla como se indica en las instrucciones anteriores. A continuación, coloque en la pantalla las placas de presión de la pantalla incluidas en el paquete (tenga en cuenta que las marcas en relieve L y R de la placa indican la izquierda y derecha del casco cuando se lleva puesto), instale los tornillos en el casco a través de cada placa de presión de la pantalla y apriételos con un destornillador de cabeza plana o una moneda. No los apriete más de lo necesario. Suba y baje la pantalla para comprobar el funcionamiento.
Για να χρησιμοποιήσετε το κράνος μόνο με τη ζελατίνα, τοποθετήστε τα μαύρα κλιπ και τη ζελατίνα σύμφωνα με τις προηγούμενες οδηγίες. Στη συνέχεια τοποθετήστε τις πλάκες πίεσης, που συμπεριλαμβάνονται στη συσκευασία, στη ζελατίνα (λάβετε υπόψη σας ότι τα L & R που εμφανίζονται στην πλάκα υποδηλώνουν την αριστερή και τη δεξιά πλευρά του κράνους, όταν φοράτε το κράνος) και τοποθετήστε τις βίδες μέσα από κάθε πλάκα πίεσης στο κράνος και σφίξτε με ίσιο κατσαβίδι ή νόμισμα. Μην σφίγγετε υπερβολικά. Μετακινήστε τη ζελατίνα προς τα πάνω και προς τα κάτω για να ελέγξετε εάν λειτουργεί σωστά. 31
Italiano LEFT (CLUTCH SIDE)
RIMUOVERE/SOSTITUIRE I DIFFUSORI Per rimuovere i diffusori per le operazioni di pulizia o manutenzione, prima far scorrere la leva nera di apertura/chiusura posta su ogni lato del diffusore verso l’esterno, fino al massimo grado di apertura.
Far scorrere quindi la leva di bloccaggio rossa posta su ogni lato del diffusore verso l’interno per disattivare il sistema di bloccaggio.
Infine, far scorrere all’indietro e verso l’interno la leva nera di apertura/ chiusura per portarla in posizione intermedia, quindi tirare giù/all’indietro la leva nera per rimuovere il diffusore su ogni lato. Per montare i diffusori, posizionare il diffusore sul casco (il bordo di ogni diffusore combacerà con l’incavo della calotta del casco) e spingere il centro del diffusore fino a sentire uno scatto. Ripetere l’operazione per l’altro lato. Assicurarsi che i diffusori siano del tutto fissati alla calotta del casco e che le leve di bloccaggio rosse si trovino in posizione di blocco.
NOTA: Non utilizzare olio o cere per lubrificare le prese d’aria o altre parti mobili. Nel caso in cui fosse necessario lubrificare tali componenti, usare con moderazione il lubrificante al silicone in dotazione con il casco per la guarnizione della visiera.
Español CÓMO QUITAR/SUSTITUIR LOS DIFUSORES
TX-4/XD4/VX-3/VX-PRO3 ③
ΓΙΑ ΝΑ ΑΦΑΙΡΕΣΕΤΕ/ΤΟΠΟΘΕΤΗΣΕΤΕ ΤΑ DIFFUSER
Para quitar los difusores durante la limpieza o el mantenimiento, primero deslice hacia Για να αφαιρέσετε τα diffuser για καθαρισμό και συντήρηση, πρώτα σύρετε το μαύρο μοχλό afuera la palanca negra para abrir y cerrar situada a cada lado del difusor hasta su ανοίγματος/κλεισίματος σε κάθε πλευρά του diffuser προς τα έξω, στην πλήρως ανοιχτή posición completamente abierta. θέση.
A continuación, deslice hacia dentro la palanca de bloqueo roja situada a cada lado del Στη συνέχεια σύρετε τον κόκκινο μοχλό κλειδώματος σε κάθε πλευρά του diffuser προς τα μέσα για να ελευθερώσετε το σύστημα κλειδώματος. difusor para abrir el sistema de bloqueo.
Y por último, deslice hacia dentro la palanca negra para abrir y cerrar hasta su posición Τέλος, σύρετε προς τα πίσω το μαύρο μοχλό ανοίγματος/κλεισίματος στη μέση θέση και intermedia y tire de la palanca negra hacia abajo y hacia atrás para sacar el difusor de τραβήξτε το μαύρο μοχλό προς τα κάτω και πίσω για να αφαιρέσετε το diffuser σε κάθε πλευρά. cada lado. Para sustituir los difusores, coloque el difusor en el casco (el contorno de cada difusor coincidirá con el hueco del armazón del casco) y empuje en el centro del difusor hasta que quede colocado en su sitio con un clic. Repita el procedimiento para el otro lado. Asegúrese de que los difusores se encuentran completamente sujetos al armazón del casco y de que las palancas de bloqueo rojas se encuentran en la posición de bloqueo. NOTA: No utilice aceite ni cera como lubricante de las entradas de aire u otras piezas móviles. Si necesita lubricar estos componentes, use una pequeña cantidad del lubricante de silicona suministrado con el casco para el embellecedor de anilla.
Για να αντικαταστήσετε τα diffuser, τοποθετήστε το diffuser στο κράνος (To σχήμα κάθε diffuser θα αντιστοιχεί με την υποδοχή στο κέλυφος του κράνους) και πιέστε το κέντρο του diffuser μέχρι να κουμπώσει στη θέση του. Επαναλάβετε για την άλλη πλευρά. Βεβαιωθείτε ότι τα diffuser έχουν κουμπώσει καλά στο κέλυφος του κράνους και οι κόκκινοι μοχλοί κλειδώματος βρίσκονται στη θέση κλειδώματος. ΣΗΜΕΙΩΣΗ: Μην χρησιμοποιείτε λάδια ή κεριά για την λίπανση των εξαερισμών ή άλλων κινουμένων εξαρτημάτων. Εάν είναι απαραίτητη η λίπανση κάποιων εξαρτημάτων, χρησιμοποιήστε με διάκριση το λιπαντικό σιλικόνης που σας παρέχεται μαζί με το κράνος σας στην διακόσμηση των άκρων της θύρας ματιών. 33
Italiano RIMUOVERE/SOSTITUIRE I GUANCIALI In occasione della prima sostituzione dei guanciali si consiglia di procedere smontandone uno alla volta, così l’altro può servire da guida per la re-installazione. Slacciare il cinturino sottogola per rimuovere i guanciali. Tirare il guanciale verso la parte posteriore del casco, quindi verso l’interno per sganciarlo e sfilarlo.
Per rimuovere il rivestimento in tessuto e sottoporlo a lavaggio, staccare il rivestimento fino a farne raggruppare il tessuto sulla superficie laterale frontale. Quindi, tirare il rivestimento attraverso l’apertura afferrando l’anello rettangolare e tirare. La superficie del guanciale dell’ TX-4 / XD4 è rivestita da uno strato di 5 mm di schiuma. Per lavare i rivestimenti in tessuto, immergerli in acqua tiepida con una piccola dose di sapone neutro o di shampoo per capelli e lavare delicatamente a mano. Risciacquare bene con acqua pulita e detergere con un panno morbido. Asciugarli all’ombra, a temperatura ambiente. Per sostituire il rivestimento in tessuto, assicurarsi che sia girato dal lato giusto e distenderlo sul guanciale in modo tale che l’etichetta con la scritta EMERGENCY TAB INSIDE cucita sul rivestimento raggiunga il lato inferiore anteriore del guanciale, quindi farlo aderire in maniera perfettamente uniforme. Assicurarsi che il rivestimento in tessuto copra la linguetta EMERGENCY TAB. Spingere poi l’anello rettangolare nel guanciale e sistemarlo fino al raggiungimento della posizione definitiva. ATTENZIONE: Non lasciare la linguetta EMERGENCY TAB fuori dal rivestimento in tessuto. Durante la guida, la linguetta arrotolata può restare impigliata in oggetti sporgenti. 34
CÓMO QUITAR/SUSTITUIR LOS ACOLCHADOS LATERALES ΓΙΑ ΤΗΝ ΑΦΑΙΡΕΣΗ / ΑΝΤΙΚΑΤΑΣΤΑΣΗ ΕΠΕΝΔΥΣΗΣ ΠΑΡΕΙΩΝ. Para arreglar los acolchados laterales la primera vez, se aconseja hacerlo Όταν εκτελείτε συντήρηση στις επενδύσεις παρειών, σας συνιστούμε να εκτελέσετε την συντήρηση σε μία μόνον κάθε φορά έτσι ώστε η άλλη να χρησιμεύσει ως οδηγός της εκ νέου de uno en uno, de modo que el otro sirva como guía para el nuevo εγκαταστάσεως. montaje. Para quitar los acolchados laterales, deshaga primero la correa. Tire del acolchado hacia la parte posterior del casco, luego hacia el interior y finalmente retírelo de la correa.
Για να αφαιρέσετε τις επενδύσεις παρειών, πρώτα λύστε τον ιμάντα σαγονιού. Τραβήξτε την επένδυση προς το πίσω μέρος του κράνους και στη συνέχεια προς τα έσω για να την απελευθερώσετε και να την αφαιρέσετε από τον ιμάντα.
Para quitar la tela para lavarla, despegue la tapa hasta que toda la tela se encuentre sobre la superficie del lado de la cara. A continuación, extraiga la tela por la abertura, sujetando por el manguito rectangular y tirando.
Για να αφαιρέσετε το υφασμάτινο κάλυμμα για να το πλύνετε, βγάλτε το κάλυμμα με τέτοιο τρόπο ώστε να το φέρετε στην επιφάνεια που έρχεται σε επαφή με το πρόσωπο. Στη συνέχεια τραβήξτε το κάλυμμα από το άνοιγμα κρατώντας το ορθογώνιο κολάρο και τραβώντας.
La almohadilla del TX-4 / XD4 está equipada con una capa de espuma con una superficie de 5 mm.
Τα μαξιλάρια στα μάγουλα του TX-4 / XD4 αποτελούνται από ένα επιπλέον στρώμα αφρώδους υλικού πάχους 5mm.
Para lavar la tela, sumérjala en agua templada con un poco de jabón en polvo o de champú normal y lávela a mano con cuidado. Enjuáguela bien con agua limpia y séquela con un paño suave. Déjela secar bien a la sombra a temperatura ambiente.
Για να πλύνετε τα υφασμάτινα καλύμματα, βάλτε τα μέσα σε χλιαρό νερό με μία μικρή ποσότητα απορρυπαντικού πλυντηρίου ή του σαμπουάν σας και πλύνετέ τα ήπια με το χέρι. Ξεβγάλτε τα καλώς με φρέσκο νερό και σκουπίστε τα με ένα μαλακό πανί. Στεγνώστε τα στην σκιά σε θερμοκρασία περιβάλλοντος. Για να τοποθετήσετε ξανά το υφασμάτινο κάλυμμα, βεβαιωθείτε ότι δεν είναι ανάποδα και Para volver a colocar la tela, tras darle la vuelta, estire la tapa sobre el acolchado lateral de forma que la etiqueta en la que se indica EMERGENCY TAB INSIDE (lengüeta τεντώστε το κάλυμμα επάνω στην επένδυση έτσι ώστε η ετικέτα που αναγράφει EMERGENCY para emergencias en el interior), que está cosida en la tapa, quede en la parte TAB INSIDE και είναι ραμμένη στο κάλυμμα να βρεθεί στο μπροστά και κάτω μέρος της delantera inferior del conjunto de los acolchados y ajuste la tapa con suavidad. επένδυσης παρειών, ενώ φροντίστε το κάλυμμα να τοποθετηθεί ομαλά. Βεβαιωθείτε ότι Asegúrese de que la LENGÜETA PARA EMERGENCIAS quede cubierta por la tela. A continuación, empuje el manguito rectangular a través del conjunto de los acolchados το ΓΛΩΣΣΙΔΙ ΕΚΤΑΚΤΟΥ ΑΝΑΓΚΗΣ καλύπτεται από το υφασμάτινο κάλυμμα. Στη συνέχεια σπρώξτε το ορθογώνιο κολάρο μέσα στην επένδυση και φέρτε το στην τελική του θέση. y ajústelo en la posición final. ADVERTENCIA: No deje la LENGÜETA PARA EMERGENCIAS fuera de la tela. La lengüeta con forma de bucle puede quedarse atrapada en objetos salientes al conducir la moto.
ΠΡΟΕΙΔΟΠΟΙΗΣΗ: Μην αφήσετε το ΓΛΩΣΣΙΔΙ ΕΚΤΑΚΤΟΥ ΑΝΑΓΚΗΣ έξω από το υφασμάτινο κάλυμμα. Το γλωσσίδι - θηλιά ενδέχεται να πιαστεί από αντικείμενα που προεξέχουν κατά την οδήγηση. 35
Italiano EMERGENCY TAB SYSTEM: L’EMERGENCY TAB SYSTEM consente di rimuovere agevolmente i guanciali se d’intralcio ai soccorritori che tentano di togliere il casco dalla testa di un motociclista ferito. L’etichetta con la scritta EMERGENCY TAB INSIDE, cucita su ogni lato del rivestimento in tessuto, segnala ai soccorritori che il casco è provvisto di EMERGENCY TAB, consentendo loro di accedervi da ogni lato sollevando l’etichetta sul rivestimento del guanciale e staccando il rivestimento per esporre la linguetta EMERGENCY TAB per poi spingerla verso il basso e rimuovere così il guanciale. ATTENZIONE: Occorre che i soccorritori abbiano sufficiente familiarità con questo sistema e che siano stati addestrati al suo utilizzo. Il sistema Emergency Tab non sempre è una misura efficace per rimuovere in sicurezza i guanciali; dipende dalle circostanze in cui è avvenuto l’incidente o dalle condizioni dei feriti.
Per sostituire un guanciale del casco, inserirlo nel cinturino sottogola. Quindi spostare la linguetta posteriore verso la parte posteriore del casco e spingere la parte anteriore del guanciale fino al blocco della linguetta frontale. Tirare il cinturino sottogola per verificare la possibile presenza di gioco del cinturino nel guanciale. Tirate il cinturino sottogola per verificare la possibile presenza di gioco del cinturino nel guanciale. Rimettere a posto la linguetta del cuscinetto paranuca.
RIMUOVERE/SOSTITUIRE L’IMBOTTITURA INTERNA L’imbottitura viene fissata al casco da borchie in plastica.
Per rimuovere l’imbottitura interna, sganciare le borchie afferrando l’imbottitura interna quanto più possibile vicino ad ogni singola borchia e tirare verso l’alto. Notare fronte e retro, oltre ai lati superiori e inferiori dell’imbottitura per la sostituzione.
Español ACERCA DEL SISTEMA DE LENGÜETA PARA EMERGENCIAS: El SISTEMA DE LENGÜETA PARA EMERGENCIAS permite quitar sin dificultades los acolchados laterales que pueden ser un estorbo cuando el personal de urgencias intente quitar el casco a una persona herida. La etiqueta en la que se indica EMERGENCY TAB INSIDE (lengüeta para emergencias en el interior), que está cosida en la tela de ambos acolchados laterales, permite que el personal de urgencias sepa que el casco está equipado con la LENGÜETA PARA EMERGENCIAS y que puede alcanzar la lengüeta de cada lado tirando de la etiqueta situada en las tapas de ambos acolchados y despegando las tapas para dejar al descubierto la LENGÜETA PARA EMERGENCIAS de la cual se tira hacia abajo para quitar el acolchado lateral. ADVERTENCIA: El personal de urgencias debe conocer este sistema y saber cómo utilizarlo. Puede que la lengüeta para emergencias no sea siempre una medida eficaz para retirar con seguridad los acolchados laterales, según las circunstancias del accidente o el estado de la persona herida. Para volver a colocar el acolchado lateral en el casco, deslice el acolchado sobre la correa. A continuación, coloque la lengüeta trasera hacia la parte posterior del casco y empuje la parte delantera del acolchado hasta que la lengüeta delantera quede fija en posición. Tire de la correa para comprobar su posible juego en el acolchado lateral. Tire de la correa para comprobar su posible juego en la almohadilla de la mejilla. Vuelva a colocar la lengüeta del acolchado de nuca en su posición.
CÓMO QUITAR/SUSTITUIR EL FORRO INTERIOR
Ελληνικά ΣΧΕΤΙΚΑ ΜΕ ΤΟ ΓΛΩΣΣΙΔΙ ΕΚΤΑΚΤΟΥ ΑΝΑΓΚΗΣ: Το ΓΛΩΣΣΙΔΙ ΕΚΤΑΚΤΟΥ ΑΝΑΓΚΗΣ χρησιμεύει για την ομαλή αφαίρεση των επενδύσεων παρειών που ενδέχεται να εμποδίζουν όταν το νοσηλευτικό προσωπικό επιχειρήσει να αφαιρέσει το κράνος από τραυματισμένο άτομο. Χάρη στην ετικέτα που αναγράφει EMERGENCY TAB INSIDE και είναι ραμμένη στο υφασμάτινο κάλυμμα της επένδυσης παρειών και στις δύο πλευρές, το νοσηλευτικό προσωπικό μπορεί να αναγνωρίσει ότι το κράνος είναι εξοπλισμένο με ΓΛΩΣΣΙΔΙ ΕΚΤΑΚΤΟΥ ΑΝΑΓΚΗΣ και μπορεί να έχει πρόσβαση στο γλωσσίδι σε κάθε πλευρά τραβώντας την ετικέτα στο υφασμάτινο κάλυμμα της επένδυσης προκειμένου να εκθέσει το ΓΛΩΣΣΙΔΙ ΕΚΤΑΚΤΟΥ ΑΝΑΓΚΗΣ, το οποίο στη συνέχεια εάν τραβηχθεί προς τα κάτω θα αφαιρεθεί η επένδυση. ΠΡΟΕΙΔΟΠΟΙΗΣΗ: Σχετικά με το εν λόγω σύστημα, είναι απαραίτητο οι διασώστες να έχουν επαρκή γνώση και εξάσκηση. Το Γλωσσίδι Εκτάκτου Ανάγκης ενδέχεται να μην είναι πάντοτε ένα αποτελεσματικό μέτρο για να εξασφαλιστεί η αφαίρεση της επένδυσης των παρειών, αναλόγως με τις συνθήκες του ατυχήματος ή την κατάσταση των τραυματισμένων που φορούν το κράνος. Για να τοποθετήσετε ξανά την επένδυση παρειών στο κράνος, σύρετε την επένδυση στον ιμάντα σαγονιού. Στη συνέχεια τοποθετήστε την πίσω γλωττίδα προς το πίσω μέρος του κράνους και σπρώξτε το μπροστινό μέρος της επένδυσης μέχρι να κουμπώσει στη θέση της η μπροστινή γλωττίδα. Τραβήξτε τον ιμάντα σαγονιού για να ελέγξετε πιθανό τζόγο του ιμάντα στο εσωτερικό της επένδυσης παρειών. Τραβήξτε τον ιμάντα σαγονιού για να ελέγξετε το ενδεχόμενο να εμπλέκεται ο ιμάντας σαγονιού εντός της επένδυσης παρειάς. Αντικαταστήσατε την ετικέτα του κυλίνδρου αυχένα στην θέση του.
ΓΙΑ ΝΑ ΑΦΑΙΡΕΣΕΤΕ / ΑΝΤΙΚΑΤΑΣΤΗΣΕΤΕ ΤΗΝ ΕΠΕΝΔΥΣΗ ΑΝΕΣΗΣ.
El forro interior está fijado al casco por medio de salientes de plástico.
Η επένδυση άνεσης είναι ασφαλισμένη στο κράνος με πλαστικές σούστες.
Para quitar el forro, quite los salientes, sujetando el forro por la posición más próxima posible a cada saliente y tirando directamente hacia arriba. Para volver a colocarlo, tome nota de los salientes de los lados delantero y trasero del forro, así como superior e inferior.
Για να αφαιρέσετε την επένδυση, ξεκουμπώστε τις σούστες κρατώντας την επένδυση όσο το δυνατόν πιο κοντά στην κάθε μία σούστα και τραβώντας προς τα επάνω. Ελέγξατε την εμπρόσθια και οπίσθια όπως την πίσω και κάτω πλευρά της επένδυσης για ενδεχόμενη 37 αντικατάσταση.
Italiano La fodera dell’TX-4 / XD4 è dotata di imbottiture sulle tempie, rimovibili all’occorrenza per offrire un po’ di spazio in più. Per rimuovere le imbottiture, aprire la tasca posta su ogni lato della fodera e rimuovere delicatamente l’imbottitura dalla tasca. Se si desidera riposizionarle nelle tasche, utilizzare un nastro biadesivo per il fissaggio. Per il lavaggio dell’imbottitura interna, immergerla in acqua tiepida con una piccola dose di sapone neutro o di shampoo per capelli e lavare delicatamente a mano. Risciacquare bene con acqua pulita e asciugare con un panno morbido. Asciugarla all’ombra, a temperatura ambiente. ATTENZIONE: Non utilizzare mai benzina, solventi, benzene o altri prodotti chimici. Per sostituire l’imbottitura, posizionare le borchie sulle rispettive sedi in plastica e spingerle a fondo. ATTENZIONE: In caso di (ripetuta) applicazione dell’imbottitura interna, assicurarsi che questa sia opportunamente disposta lungo la forma interna del rivestimento in polistirene espanso (Styrofoam). Se l’imbottitura interna non viene correttamente applicata, la struttura della stessa potrebbe piegarsi ogni qualvolta si calza/scalza il casco, col rischio di ferirsi, ecc. Ogni qualvolta avvertite un problema con l’imbottitura interna, verificate che sia stata applicata correttamente.
RIMUOVERE/SOSTITUIRE I COPRI-CINTURINO Per rimuovere i copri-cinturino, rimuovere prima i guanciali secondo le istruzioni precedenti. 38
El forro del TX-4 / XD4 está equipado con acolchados extraíbles para las sienes que ofrecen un poco más de espacio si fuera necesario. Para extraer los acolchados, abra las fundas de cada lado del forro y saque con cuidado el achochado de la funda. Si desea volverlos a poner en las fundas, utilice cinta adhesiva de doble cara para sujetarlos en su sitio.
Σε περίπτωση που χρειάζεστε περισσότερο χώρο, μπορείτε να αφαιρέσετε τα μαξιλαράκια στους κροτάφους από την εσωτερική επένδυση του TX-4 / XD4. Για να αφαιρέσετε τα μαξιλαράκια, ανοίξτε τη θήκη σε κάθε πλευρά της επένδυσης και βγάλτε προσεκτικά το μαξιλαράκι από τη θήκη. Εάν επιθυμείτε να τα τοποθετήσετε ξανά στις θήκες, χρησιμοποιήστε ταινία διπλής όψης, για να τα σταθεροποιήσει στη θέση τους.
Para lavar el forro interior, sumérjalo en agua templada con un poco de jabón en polvo o de champú normal y lávelo a mano suavemente. Enjuáguelo bien con agua limpia y séquelo con un paño suave. Déjelo secar bien a la sombra a temperatura ambiente.
Για να πλύνετε την επένδυση άνεσης, βάλτε την εντός χλιαρού νερού με μικρή ποσότητα απορρυπαντικού πλυντηρίου ή του δικού σας σαμπουάν και πλύνετε ήπια με το χέρι. Ξεβγάλτε καλώς με καθαρό νερό και σκουπίστε με ένα μαλακό πανί. Στεγνώστε την στην σκιά σε θερμοκρασία περιβάλλοντος.
ADVERTENCIA: No utilice nunca gasolina, diluyente, benceno ni disolventes de otro tipo.
ΠΡΟΕΙΔΟΠΟΙΗΣΗ: Ποτέ μην χρησιμοποιείτε βενζίνη, διαλυτικό, βενζόλη ή άλλα διαλύματα.
Para volver a colocar el forro, introduzca los salientes en sus agujeros de plástico y empújelos hasta el fondo.
Για την αντικατάσταση της επένδυσης, τοποθετήστε τις σούστες πάνω από τον πλαστικό τους σύνδεσμο και πιέστε τις για την τοποθέτηση τους.
ADVERTENCIA: Cuando vuelva a instalar el forro interior, asegúrese de adaptarlo correctamente a la forma interior del revestimiento de EPS (llamado también poliestireno). Si el forro no se coloca correctamente, su montura puede doblarse al ponerse y quitarse el casco, lo cual puede causar heridas en la piel, etc. Siempre que sienta algún tipo de incomodidad con el forro, compruebe si está bien colocado.
ΠΡΟΕΙΔΟΠΟΙΗΣΗ: Όταν εγκαταστήσετε εκ νέου την επένδυση άνεσης, βεβαιωθείτε ότι η επένδυση είναι τοποθετημένη καταλλήλως εντός του σχήματος της επένδυσης EPS (a.k.a. Αφρώδες Στυρόλιο). Εάν δεν εγκατασταθεί καταλλήλως η επένδυση άνεσης, η κορνίζα της επένδυσης άνεσης ενδέχεται να μην διπλώνει όταν φοράτε και όταν βγάζετε το κράνος, πράγμα το οποίο ενδέχεται να τραυματίσει το δέρμα σας κλπ. Οποτεδήποτε αισθανθείτε ότι κάτι δεν πάει καλά με την επένδυση άνεσης, ελέγξατε εάν η επένδυση έχει εγκατασταθεί καταλλήλως.
CÓMO QUITAR/SUSTITUIR LAS PROTECCIONES DE LA CORREA
ΓΙΑ ΤΗΝ ΑΦΑΙΡΕΣΗ / ΑΝΤΙΚΑΤΑΣΤΑΣΗ ΤΩΝ ΚΑΛΥΜΜΑΤΩΝ ΤΟΥ ΙΜΑΝΤΑ ΣΑΓΟΝΙΟΥ.
Para quitar las protecciones de la correa, en primer lugar quite los acolchados laterales, conforme a las instrucciones anteriores.
Για να αντικαταστήσετε τα καλύμματα του ιμάντα σαγονιού, κατ’ αρχήν αφαιρέστε τις επενδύσεις παρειών συμφώνως προς τις ανωτέρω οδηγίες. 39
Italiano Left chinstrap cover (D-ring side) Right chinstrap cover (long side) Couvercle gauche de la jugulaire (côté anneau en forme de D) Couvercle droit de la jugulaire (côté long) Linke Kinnriemenabdeckung (D-Ring-Seite) Rechte Kinnriemenabdeckung (lange Seite)
Rimuovere il copriattacco in plastica del cinturino dall’attacco in acciaio del cinturino facendone poi scivolare via la copertura. Notare il lato destro e sinistro, interno ed esterno dei copri- cinturino per la sostituzione. Per lavare i copri-cinturino, immergerli in acqua tiepida con una piccola dose di sapone neutro o di shampoo per capelli e lavare delicatamente a mano. Risciacquare bene con acqua pulita e asciugare con un panno morbido. Asciugarli all’ombra, a temperatura ambiente. ATTENZIONE: Non utilizzare mai benzina, solventi, benzene o altri prodotti chimici. Per sostituire il copri-cinturino sinistro (lato anello a D), assicurarsi che il lato del cinturino col bottone femmina a pressione posto sull’estremità e il lato in similpelle del copri-cinturino siano entrambi rivolti verso l’esterno per poi inserire il copri-cinturino nel cinturino. Applicare il copriattacco in plastica del cinturino sull’attacco in acciaio, e spingerlo nell’attacco finché la linguetta posta sul lato posteriore del copriattacco non arriva fino in fondo e scatta. Per sostituire il copri-cinturino destro (lato lungo), assicurarsi che il lato della copertura del bottone a pressione (con il logo Arai) posto sull’estremità del cinturino e il lato in similpelle del copri-cinturino siano entrambi rivolti verso l’esterno per poi inserire il copri-cinturino nel cinturino.
Applicare il copriattacco in plastica del cinturino sull’attacco in acciaio e spingerlo nell’attacco finché la linguetta posta sul lato posteriore del copriattacco non arriva fino in fondo e scatta.
Quite el anclaje de la correa de plástico del anclaje de acero de la correa y Αφαιρέστε το πλαστικό κάλυμμα της κόπιτσας του ιμάντα σαγονιού από την μεταλλική κόπιτσα deslice la protección para quitarla de la correa. του ιμάντα σαγονιού και ολισθήσατε το κάλυμμα για να αφαιρεθεί από τον ιμάντα σαγονιού. Para volver a colocar la correa, tome nota de las posiciones derecha e izquierda, así como interior y exterior de las protecciones. Para lavar las protecciones de la correa, sumérjalas en agua templada con un poco de jabón en polvo o de champú normal y lávelas a mano suavemente. Enjuáguelas bien con agua limpia y séquelas con un paño suave. Déjelas secar bien a la sombra a temperatura ambiente. ADVERTENCIA: No utilice nunca gasolina, diluyente, benceno ni disolventes de otro tipo. Para volver a colocar la protección de la correa izquierda (lado de anillos en forma de D), asegúrese de que el lado del cierre hembra de la correa y el lado de cuero artificial de la protección de la correa estén mirando hacia afuera, y deslice la protección de la correa sobre ésta.
Σημειώσατε το δεξί, αριστερό εσωτερικό και εξωτερικό των καλυμμάτων του ιμάντα σαγονιού για ενδεχόμενη αντικατάσταση. Για να πλύνετε τα καλύμματα του ιμάντα σαγονιού, βάλτε τα μέσα σε χλιαρό νερό με μικρή ποσότητα απορρυπαντικού πλυντηρίου ή από το δικό σας σαμπουάν και πλύνετέ τα ήπια με το χέρι. Ξεβγάλτε καλώς με καθαρό νερό και σκουπίστε με ένα μαλακό πανί. Στεγνώστέ τα στην σκιά σε θερμοκρασία περιβάλλοντος. ΠΡΟΕΙΔΟΠΟΙΗΣΗ: Ποτέ μην χρησιμοποιήσετε βενζίνη, διαλυτικό, βενζόλη ή άλλα διαλύματα. Για να αντικαταστήσετε το αριστερό κάλυμμα του ιμάντα σαγονιού (πλευρά D-κρίκου), βεβαιωθείτε ότι η πλευρά του θηλυκού άκρου της σούστας του ιμάντα σαγονιού και η πλευρά απομίμησης δέρματος του καλύμματος του ιμάντα σαγονιού βλέπουν αμφότερα προς τα επάνω, ολισθήσατε το κάλυμμα του ιμάντα σαγονιού επί του ιμάντα σαγονιού.
Coloque el anclaje de protección de la correa de plástico sobre el anclaje Τοποθετήστε το πλαστικό κάλυμμα της κόπιτσας του ιμάντα σαγονιού πάνω από την de acero e introduzca la protección en el anclaje hasta que la lengüeta de μεταλλική κόπιτσα και πιέστε το κάλυμμα εντός της κόπιτσας έως ότου η ετικέτα στο πίσω su parte posterior encaje completamente. μέρος του καλύμματος να κουμπωθεί στην θέση της. Para volver a colocar la protección de la correa derecha (lado largo), asegúrese de que el lado del capuchón del cierre de la correa (con el logotipo de Arai) y el lado de cuero artificial de la protección de la correa estén mirando hacia afuera, y deslice la protección de la correa sobre ésta.
Για να αντικαταστήσετε το δεξί κάλυμμα του ιμάντα σαγονιού (πλευρά μεγάλου μήκους), βεβαιωθείτε ότι η άκρη της μεριάς του πώματος της σούστας του ιμάντα σαγονιού (με τον λογότυπο της Arai εντυπωμένο) επί του ιμάντα σαγονιού και η πλευρά απομίμησης δέρματος του καλύμματος του ιμάντα σαγονιού βλέπουν αμφότερα προς τα επάνω, ολισθήσατε το κάλυμμα του ιμάντα σαγονιού επί του ιμάντα σαγονιού.
Coloque el anclaje de la protección de la correa de plástico sobre el anclaje de acero e introduzca la protección en el anclaje hasta que la lengüeta de su parte posterior encaje completamente.
Τοποθετήστε το πλαστικό κάλυμμα της κόπιτσας του ιμάντα σαγονιού πάνω από την μεταλλική κόπιτσα και πιέστε το κάλυμμα στην κόπιτσα έως ότου η ετικέτα στο πίσω μέρους του καλύμματος να κουμπωθεί πλήρως στην θέση της. 41
Nederlands INHOUD Het vizier openen/sluiten....................................................................... 44 (TX-4/XD4) De vizier ventilatie toevoer bedienen..................................................... 44 (TX-4/XD4) Hoek van de klep regelen...................................................................... 46 De kinventilatie bedienen...................................................................... 46 (TX-4/XD4) De top ventilatie bedienen..................................................................... 48 Bediening van de kinspoiler................................................................... 48 (TX-4/XD4) Vizier/klep verwijderen/terugplaatsen.................................................... 48 (TX-4/XD4) Diffusors verwijderen/terugplaatsen...................................................... 52 De wangstukken verwijderen/vervangen............................................... 54 Het interieur verwijderen/vervangen...................................................... 56 De kinriemhoesjes verwijderen/vervangen............................................ 58 WAARSCHUWING: De bij uw helm geleverde piek is niet geschikt voor gebruik met hoge snelheid. Met een hoge snelheid kan de luchtstroom aan de zijkant of het oppervlak van de piek het naar voren en/of naar de horizontale stand bewegen van uw hoofd belemmeren of uw zicht worden beperkt. Oefen het gebruik eerst met een lage snelheid en verhoog uw snelheid vervolgens langzaam zodat u het gevolg van het gebruik goed doorhebt en tevens kunt bepalen wanneer de piek voor het rijden met een hogere snelheid moet worden verwijderd. 42
Svenska INNEHÅLL
Suomi SISÄLTÖ
Hur du öppnar/stänger visiret................................................................ 45 (TX-4/XD4) Hur du använder pannventiler................................................................ 45 (TX-4/XD4) Hur du justerar skärmvinkeln................................................................ 47 Hur du använder hakventilen................................................................. 47 (TX-4/XD4) Hur du använder toppventilerna............................................................. 49 Hur du använder luftflödesavledare....................................................... 49 (TX-4/XD4) Hur du tar bort/byter ut ansiktsskyddet/skärmen................................... 49 (TX-4/XD4) Hur du tar bort/byter ut diffusorer.......................................................... 53 Hur du avlägsnar/sätter tillbaka kindkuddarna....................................... 55 Hur du avlägsnar/sätter tillbaka passfodret............................................ 57 Hur du avlägsnar/sätter tillbaka hakbandets överdrag........................... 59
Visiirin avaaminen/sulkeminen............................................................. 45 (TX-4/XD4) Tuuletusaukkojen käyttäminen............................................................. 45 (TX-4/XD4) Lipan kulman säätäminen.................................................................... 47 Suun tuuletusaukon käyttäminen......................................................... 47 (TX-4/XD4) Yläventtiilien käyttäminen..................................................................... 49 Ilmavirtaohjaimen käyttö...................................................................... 49 (TX-4/XD4) Visiirin/lipan irrottaminen ja kiinnittäminen........................................... 49 (TX-4/XD4) Diffuusorien irrottaminen ja kiinnittäminen........................................... 53 Poskipehmusteiden irrottaminen ja kiinnittäminen................................ 55 Pehmusteen irrottaminen ja kiinnittäminen........................................... 57 Leukahihnan suojusten irrottaminen ja kiinnittäminen.......................... 59
SE UPP! Skärmen som medföljer din hjälm är inte lämplig för användning vid hög hastighet. Vid hög hastighet kan luft som fångar skärmens sida eller huvudyta göra det svårt att vända tillbaka huvudet till frampositionen eller en jämn position, eller skymma din sikt. Du bör öva med denna effekt vid låg hastighet och sedan långsamt öka hastighet tills du vet vad du kan förvänta dig och bestämma när skärmen ska avlägsnas för körning med högre hastighet.
HUOMIO: Kypärän mukana toimitettu lippa ei sovellu käytettäväksi suurilla nopeuksilla. Tällaisilla nopeuksilla lipan sivu tai pääpinnalle osuva ilma voi vaikeuttaa pään palauttamista eteenpäin ja/tai suoraan tai haitata näkemistä. Harjoittele tämän vaikutuksen kokemista aloittamalla alhaisella nopeudella ja nostamalla sitä vähitellen niin, että tiedät, mitä on odotettavissa, ja voit määrittää, milloin lippa täytyy irrottaa ajettaessa suuremmilla nopeuksilla. 43
Nederlands HET VIZIER OPENEN/SLUITEN TX-4 / XD4 Trek de sluiting linksonder van het vizier naar buiten om het los te maken en til het vizier op. Om het vizier te sluiten, drukt u het omlaag totdat het vergrendellipje van het vizier op zijn plaats vastklikt. De soepele werking blijft behouden door ĂŠĂŠn of twee druppels van het meegeleverde siliconen smeermiddel op de afsluitrubbers en andere bewegende delen aan te brengen en deze dan af te nemen met een tissue. WAARSCHUWING: Vervang het vizier als er te veel krassen op zitten of niet meer goed schoon te krijgen is. Slecht zicht veroorzaakt ongelukken. Reinig het vizier met een oplossing van milde zeep of wasmiddel en lauw water. Goed naspoelen met schoon water en droogwrijven met een zachte doek. Gebruik nooit benzine, thinner, benzeen, afwasmiddel of andere oplosmiddelen. Er zijn veel 'agressieve' schoonmaakmiddelen op de markt. Een aantal daarvan zou zelfs zogenaamd speciaal voor vizieren bedoeld zijn. Arai raadt u ten sterkte af deze producten te gebruiken voor het reinigen van het vizier. Een aantal bestanddelen ervan kunnen het vizier en andere kunststof onderdelen van uw helm beschadigen. Plak geen stickers of zelfklevend plakband op het vizier, deze kunnen de viziercoating aantasten. Een getint vizier mag uitsluitend overdag gebruikt worden.
DE VIZIER VENTILATIE TOEVOER BEDIENEN TX-4 / XD4
De beide luchtinlaten in het vizier kennen een gesloten, een tussen- en een volledig geopende stand. Trek de klepjes omlaag om de ventilatie te openen en druk ze omhoog om te sluiten. 44
Svenska HUR DU ÖPPNAR/STÄNGER VISIRET TX-4 / XD4
Dra visirets spärrhaksflik på nedre vänster sida av visiret utåt för att släppa spärrhakssystemet och sedan höja visiret. För att stänga visiret, tryck ner visiret tills dess låsflik låses på plats helt.
Suomi VISIIRIN AVAAMINEN/SULKEMINEN TX-4 / XD4 Vedä visiirin vasemmassa alareunassa olevaa lukituskielekettä ulospäin. Lukitusmekanismi aukeaa ja visiiri nousee ylös. Sulje visiiri painamalla sitä alaspäin, kunnes sen salvan kieleke lukittuu paikalleen.
Applicera en eller två droppar av det medföljande silikonsmörjmedlet runt Levitä pehmeällä paperiliinalla yksi tai kaksi tippaa mukana tulevaa kanten och på andra rörliga delar och torka av med en mjuk trasa för att silikonivoiteluainetta reunakumiin ja muihin liikkuviin osiin toimivuuden bibehålla ett gott skick. takaamiseksi. VARNING: Om ditt visir blir för repat eller omöjligt att göra rent, byt ut det mot ett nytt. Försämrad sikt resulterar i olyckor. Använd en lösning med mild tvål eller rengöringsmedel och ljummet vatten för att rengöra visiret. Skölj ordentligt med rent vatten och torka av med en mjuk trasa. Använd aldrig bensin, thinner, bensen eller andra petrokemiska lösningar. Det finns många ”aggressiva” rengöringsmedel på marknaden, inklusive en del som är tänkta att användas specifikt på visir. Arai rekommenderar dig starkt att inte använda några sådana produkter för att rengöra visiret eftersom några av deras beståndsdelar kan ha skadegörande effekter på visiret och andra plastdelar som sitter fast på hjälmen. Sätt inte på klistermärken eller tejp på visiret eftersom detta kan skada den hårda ytbeläggningen. Om visiret är tonat är det endast ämnat för användning i dagsljus.
VAROITUS: Jos visiiri naarmuuntuu liikaa tai sitä ei saa enää puhtaaksi, vaihda se uuteen visiiriin. Rajoittunut näkökyky aiheuttaa onnettomuuksia. Puhdista visiiri haalealla ja miedolla saippua- tai pesuaineliuoksella. Huuhtele kypärä hyvin puhtaalla vedellä ja kuivaa se pehmeällä kankaalla. Älä koskaan käytä bensiiniä, tinneriä, bentseeniä tai muita liuottimia. Markkinoilla on useita voimakkaita puhdistusaineita, myös sellaisia, joiden sanotaan olevan tarkoitettuja visiirin puhdistamiseen. Arai suosittelee, ettet käytä edellä mainitun kaltaisia tuotteita visiirin puhdistamiseen, koska jotkut tuotteissa käytettävät ainesosat voivat vahingoittaa visiiriä sekä muita kypärässä olevia muoviosia. Visiiriin ei saa liimata tarroja tai teippiä, ettei sen pinta heikkene. Jos visiirissä on sävytys, sitä voi käyttää vain päivänvalossa.
HUR DU ANVÄNDER PANNVENTILER
TUULETUSAUKKOJEN KÄYTTÄMINEN
TX-4 / XD4 Pannventilerna kan du ha i helt stängt läge, via mellanläge, till helt öppet läge genom att du helt enkelt drar ner ventilkontrollen för att öppna, och trycker upp den för att stänga.
TX-4 / XD4 Silmäkulman tuuletusaukot voidaan säätää täysin suljetuiksi, puoliavoimiksi tai täysin avoimiksi työntämällä tuuletusaukon säädintä alaspäin (auki) tai ylöspäin (kiinni). 45
Nederlands HOEK VAN DE KLEP REGELEN Draai de schroeven van de klep (peak) iets los met een muntstuk of een platte schroevendraaier, zodat de klep op en neer kan bewegen zonder de helm te krassen. Zet de helm op en breng de klep in de gewenste stand. Draai de schroeven vast en zet de helm af. Draai alle schroeven goed, maar niet te hard vast.
DE KINVENTILATIE BEDIENEN CLOSE OPEN
Druk of schuif op de knoppen/hendels om ieder ventilatiekanaal te openen of te sluiten.
Wanneer de kinventilatie geopend is, wordt frisse lucht naar de mond geleid in de helm.
Wanneer de ventilatieopening gesloten is, wordt lucht langs de binnenkant van het vizier gevoerd om te voorkomen dat het beslaat.
Svenska HUR DU JUSTERAR SKÄRMVINKELN Lossa försiktigt alla skruvarna på skärmen med ett mynt eller en plan skruvmejsel så att skärmen kan flyttas upp och ner utan att repa hjälpens yta. Sätt på dig hjälmen och justera skärmen till önskad position. Dra åt skruvarna och ta av dig hjälmen. Dra åt alla skruvarna ordentligt men inte för hårt.
HUR DU ANVÄNDER HAKVENTILEN TX-4 / XD4 Du trycker helt enkelt på växlarna/spakarna på varje ventil för att öppna/ stänga ventilerna.
Suomi LIPAN KULMAN SÄÄTÄMINEN Avaa lipan ruuvia hieman kolikolla tai litteäkärkisellä ruuvitaltalla, jotta lippaa voidaan siirtää ylös ja alas naarmuttamatta kypärän pintaa. Laita kypärä päälle ja säädä lippa haluamaasi asentoon. Kiristä ruuvit ja riisu kypärä. Kiristä kaikki ruuvit mutta älä kiristä liikaa.
SUUN TUULETUSAUKON KÄYTTÄMINEN TX-4 / XD4 Avaa tai sulje työntämällä yläventtiilejä/vipuja.
När luckan inuti är öppen riktas luft mot munområdet för att ge frisk luft inuti hjälmen.
Kun sisällä oleva venttiili on auki, ilmaa ohjataan suun alueelle raittiin ilman tuomiseksi kypärän sisälle.
När luckan är stängd riktas luften upp längs den inre ytan av ansiktsskyddet för att hjälpa till att förhindra imma.
Kun venttiili on kiinni, ilma ohjataan ylös kasvosuojuksen sisäpintaa pitkin huurtumisen ehkäisemiseksi.
Du trycker helt enkelt på växlarna/spakarna på varje ventil för att öppna/ stänga ventilerna.
Avaa tai sulje työntämällä yläventtiilejä/vipuja.
Nederlands LEFT (CLUTCH SIDE) CLOSE
DE TOP VENTILATIE BEDIENEN Druk of schuif op de knoppen/hendels om ieder ventilatiekanaal te openen of te sluiten.
WAARSCHUWING: regel de ventilatie nooit onder het rijden!
BEDIENING VAN DE KINSPOILER TX-4 / XD4 Om de spoiler naar beneden te plaatsen, pakt u de kinbeschermer in het midden vast en trekt u deze omlaag. Duw de spoiler met uw handpalm omhoog om deze weer in te schuiven.
VIZIER/KLEP VERWIJDEREN/TERUGPLAATSEN TX-4 / XD4 Om een vizier/klep te verwijderen, draait u de twee schroeven aan weerszijden van de klep volledig los met een platte schroevendraaier of muntstuk. Verwijder de drukplaat aan weerszijden van de klep. Het vizier/ de klep kan nu worden verwijderd. De zwarte veerklem aan elke kant kan worden verwijderd voor reiniging maar houd er wel rekening mee dat ze maar in één richting kan worden geplaatst. Verwijder de twee basisplaatjes niet van de helm. 48
Svenska HUR DU ANVÄNDER TOPPVENTILERNA Du trycker helt enkelt på växlarna/spakarna på varje ventil för att öppna/ stänga ventilerna.
VARNING: Försök aldrig justera ventilationshålen när du kör din motorcykel.
HUR DU ANVÄNDER LUFTFLÖDESAVLEDARE
TX-4/XD4/VX-3/VX-PRO3 ④
YLÄVENTTIILIEN KÄYTTÄMINEN Avaa tai sulje työntämällä yläventtiilejä/vipuja.
VAROITUS: Älä koskaan yritä säätää ilmanvaihtokanavia, kun ajat moottoripyörällä.
ILMAVIRTAOHJAIMEN KÄYTTÖ
För att använda avledaren i ner-läget drar du helt enkelt ner den genom att ta tag i mitten på dess hakskydd.
Siirrä ohjain ala-asentoon vetämällä sitä alaspäin leukasuojuksesta.
För att dra tillbaka avledaren trycker du helt enkelt upp den med handflatan. Työnnä ohjain takaisin sisään kämmenellä.
HUR DU TAR BORT/BYTER UT ANSIKTSSKYDDET/SKÄRMEN
VISIIRIN/LIPAN IRROTTAMINEN JA KIINNITTÄMINEN
Den svarta klämfjädern på vardera sidan kan tas bort för rengöring, men observera att den endast kan sättas tillbaka korrekt i en riktning. Ta inte bort basplattorna från hjälmen.
Kummallakin puolella oleva musta jousipidike voidaan irrottaa puhdistusta varten, mutta huomaa, että ne voidaan asentaa takaisin vain yhdessä asennossa. Älä irrota pohjalevyjä kypärästä.
För att ta bort skyddet/skärmen, tar du bort de två skruvarna från vardera Kun haluat irrottaa visiirin/lipan, irrota kaksi ruuvia lipan kummaltakin sidan av skärmen med en plan skruvmejsel eller ett mynt. Ta bort puolelta litteäkärkisellä ruuvitaltalla tai kolikolla. Irrota painelevy lipan tryckplattan från vardera sidan av skärmen. Skyddet/skärmen kan nu tas kummaltakin puolelta. Visiiri/lippa voidaan nyt irrottaa. bort.
Nederlands Om een vizier/klep terug te plaatsen, legt u de zwarte veerklem op het basisplaatje aan weerszijden, zoals de afbeelding laat zien (in de juiste richting).
Plaats het vizier in de volledig gesloten stand op de helm, zoals de afbeelding laat zien, en plaats de klep zo dat de twee schroefgaten samenvallen en de twee pinnen op het basisplaatje in de onderste schroefgaten van de klep zitten, zoals de afbeelding laat zien.
Plaats de drukplaat op de klep (de aanduidingen L & R op de plaat staan voor “links” en “rechts” in de positie wanneer de helm wordt gedragen), steek de twee schroeven door elke drukplaat in de helm en draai ze goed vast met een platte schroevendraaier of muntstuk. Niet te hard vastzetten. Controleer of het vizier goed op en neer kan worden bewogen.
Om alleen de klep te monteren, bevestigt u de zwarte veerklem aan weerszijden zoals hiervoor beschreven. Plaats de klep, drukplaten en schroeven, en draai de schroeven vast zoals hiervoor beschreven.
Om alleen het vizier te monteren, bevestigt u de zwarte veerklemmen en het vizier zoals hiervoor beschreven. Bevestig vervolgens de meegeleverde drukplaten op het vizier (de aanduidingen L & R op de plaat staan voor “links” en “rechts” in de positie wanneer de helm wordt gedragen), steek de schroeven door elke drukplaat in de helm en draai ze goed vast met een platte schroevendraaier of muntstuk. Niet te hard vastzetten. Controleer of het vizier goed op en neer kan worden bewogen.
För att byta ut skyddet/skärmen, placera den svarta klämfjädern på basplattan på vardera sidan såsom visas på bilden (beakta korrekt riktning).
Kun haluat asentaa visiirin/lipan takaisin, aseta musta jousipidike pohjalevyyn kummallekin puolelle kuvan mukaisesti (kiinnitä huomiota oikeaan suuntaan).
Placera skyddet på hjälmen i helt stängd position, såsom visas, och placeras skärmen så att det två skruvhålen placeras så att de två knopparna på basplattan är i de lägre skruvhålen på skärmen, såsom visas på bilden.
Aseta visiiri kypärään täysin suljetussa asennossa kuvan mukaisesti. Aseta lippa niin, että kaksi ruuvinreikää ovat kohdakkain niin, että pohjalevyn kaksi tappia ovat lipan alemmassa ruuvinreiässä kuvan mukaisesti.
Placera tryckplattan på skärmen (observera att L & R som finns tryckt på plattan anger vänster och höger på hjälmen när du har den på dig) och installera de två skruvarna genom varje tryckplatta i hjälmen och dra åt med en plan skruvmejsel eller ett mynt. Dra inte åt för hårt. Dra skyddet upp och ner för att kontrollera att det fungerar.
Aseta painelevy lippaan (huomaa, että levyyn merkityt L ja R tarkoittavat vasenta ja oikeaa, kun kypärä on päässä) ja asenna kaksi ruuvia kummankin painelevyn läpi kypärään ja kiristä litteäkärkisellä ruuvitaltalla tai kolikolla. Älä kiristä liikaa. Tarkista toiminta liikuttamalla visiiriä ylös ja alas.
För att använda hjälmen med bara skärmen, placera de svarta klämfjädrarna på vardera sidan såsom i instruktionerna innan. Placera skärmen, tryckplattorna och skruvarna, och dra sedan åt skruvarna såsom i instruktionerna innan.
Jos haluat käyttää kypärää vain lipan kanssa, aseta musta jousipidike kummallekin puolelle yllä olevien ohjeiden mukaisesti. Aseta lippa, painelevyt ja ruuvit paikalleen. Kiristä sitten ruuvit yllä olevien ohjeiden mukaisesti.
För att använda hjälmen med bara skyddet, placera de svarta klämfjädrarna och skyddet såsom i instruktionerna innan. Placera sedan skyddets tryckplattor, medföljer i paketet, på skyddet (observera att L & R som finns tryckt på plattan anger vänster och höger på hjälmen när du har den på dig), sätt i skruvarna genom varje skydds tryckplatta i hjälmen och dra åt med en plan skruvmejsel eller ett mynt. Dra inte åt för hårt. Dra upp och ner skyddet för att kontrollera att det fungerar.
Jos haluat käyttää kypärää vain visiirin kanssa, aseta mustat jousipidikkeet ja visiiri yllä olevien ohjeiden mukaisesti. Aseta sitten pakkauksessa olevat visiirin painelevyt visiiriin (huomaa, että levyyn merkityt L ja R tarkoittavat vasenta ja oikeaa, kun kypärä on päässä) ja kiinnitä kaksi ruuvia visiirin kummankin painelevyn läpi kypärään ja kiristä litteäkärkisellä ruuvitaltalla tai kolikolla. Älä kiristä liikaa. Tarkista toiminta liikuttamalla visiiriä ylös ja alas. 51
Nederlands LEFT (CLUTCH SIDE)
DIFFUSORS VERWIJDEREN/TERUGPLAATSEN Om de diffusors te verwijderen voor reiniging of onderhoud, schuift u eerst de zwarte hendel aan weerszijden van de diffusor naar buiten in de volledig geopende stand.
INTERMEDIATE CLOSE CLOSE INTERMEDIATE OPEN
Schuif vervolgens de rode hendel aan weerszijden van de diffusor naar binnen om de vergrendeling te ontgrendelen.
Schuif tenslotte de zwarte hendel voor de helft naar binnen en trek hem omlaag/achteruit om de diffusor aan elke kant te verwijderen. Om de diffusors terug te plaatsen, zet u de diffusor op de helm (let op: links en rechts zijn verschillend van model) en duw in het midden van de diffusor tot deze vastklikt. Herhaal dit voor de andere zijde. Zorg ervoor dat de diffusors goed vastzitten op de helmschaal en de rode hendels zijn vergrendeld in de middelste positie.
OPMERKING: Om het vizier terug te zetten in de volledig gesloten stand, moet het lipje van de viziersluiting worden teruggeduwd. Het is niet voldoende om het vizier zelf omlaag te duwen. Het vizier moet opnieuw worden gesloten met het knopje van de viziersluiting.
Svenska HUR DU TAR BORT/BYTER UT DIFFUSORER
Suomi DIFFUUSORIEN IRROTTAMINEN JA KIINNITTÄMINEN
För att ta bort diffusorer för rengöring och underhåll, för du först den svarta öppnings-/stängningsspaken på var sida om diffusorn utåt till helt öppen position.
Kun haluat irrottaa diffuusorit puhdistusta tai huoltoa varten, vedä ensin diffuusorin kummallakin puolella oleva musta avaus/sulkemisvipu täysin auki.
För sedan den röda låsspaken på var sida om diffusorn inåt för att låsa upp låssystemet.
Vapauta sitten lukitusjärjestelmä vetämällä diffuusorin kummallakin puolella olevaa punaista lukitusvipua sisäänpäin.
För slutligen tillbaka den svarta öppnings-/stängningsspaken inåt till mittposition och dra den svarta spaken ner/bakåt för att ta bort diffusorn på varje sida. För att byta ut diffusorer, placera diffusorn på hjälmen (konturen på varje diffusor kommer att matcha infällningen i hjälmens skal) och tryck på mitten av diffusorn tills den snäpper på plats. Upprepa på den andra sidan. Se till att diffusorerna är helt säkrade på hjälmens skal och att de röda låsspakarna är i låst position.
Vedä lopuksi musta avaus/sulkemisvipu takaisin keskiasentoon ja irrota diffuuseri kummaltakin puolelta vetämällä mustaa vipua alas/taakse.
OBS: Visirets spärrhaksflik måste skjutas tillbaka för att stänga visiret helt. Det räcker inte att trycka ner själva visiret. Återstängning måste göras med visirets spärrhaksflik.
Kun haluat vaihtaa diffuusorin, aseta se kypärän päälle (diffuusorin muoto vastaa kypärän kuoren syvennystä) ja paina diffuuserin keskiosaa, kunnes se napsahtaa paikalleen. Tee sama toisella puolella. Varmista, että diffuusorit ovat kunnolla kiinni kypärän kuoressa ja että punaiset lukitusvivut ovat lukitussa asennossa. HUOMAA: Visiirin lukituskieleke on työnnettävä paikalleen, jotta visiiri sulkeutuisi täysin. Pelkästään itse visiirin työntäminen ei riitä. Visiiri on suljettava uudelleen lukituskielekkeen avulla. 53
Nederlands DE WANGSTUKKEN VERWIJDEREN/VERVANGEN Wanneer u voor het eerst aan de wangstukken werkt, raden we u aan er eerst ĂŠĂŠn te verwijderen, zodat u het andere wangstuk als voorbeeld kunt gebruiken voor het terugplaatsen. Om de wangstukken te kunnen verwijderen moet u eerst het kinbandje losmaken. Trek het wangstuk naar de achterkant van de helm en vervolgens naar binnen zodat het vrij komt en u het van de kinband kunt schuiven. Om de voering te kunnen wassen, trekt u die naar voren tot ze volledig aan de voorkant van de helm zit. Trek vervolgens de voering met de rechthoekige kraag door de kinband opening. De wangstukken van de TX-4 / XD4 zijn voorzien van een 5mm dikke schuimrubber laag. Was de stoffen voering op de hand in een lauwwarme oplossing met een klein beetje wasmiddel of shampoo. Spoel de voering goed uit en wrijf hem droog met een zachte doek. Op kamertemperatuur laten drogen en uit het zonlicht houden. Zorg ervoor dat bij het terugplaatsen van de voering de juiste kant naar buiten ligt, strek de voering over het wangstuk zodat het ingenaaide etiket met het opschrift EMERGENCY TAB INSIDE aan de onderkant vooraan op het wangstuk zit en maak de voering glad. Zorg ervoor dat de voering over de EMERGENCY TAB zit. Trek vervolgens de rechthoekige kraag door de opening en leg de voering op haar plaats.
WAARSCHUWING: zorg ervoor dat de EMERGENCY TAB niet uit de voering steekt. Deze lus kan onderweg immers worden geraakt door rondvliegende voorwerpen.
HUR DU AVLÄGSNAR/SÄTTER TILLBAKA KINDKUDDARNA POSKIPEHMUSTEIDEN IRROTTAMINEN JA KIINNITTÄMINEN När du servar kindkuddarna för första gången rekommenderas att du tar en åt gången så att den andra kan användas som återinstallationsguide.
Kun huollat poskipehmusteita ensimmäisen kerran, ne kannattaa huoltaa yksi kerrallaan. Tällöin toista pehmustetta voidaan käyttää mallina.
För att ta bort kindkuddarna, knäpp först upp hakbandet. Dra kudden mot Aloita poskipehmusteiden irrottaminen avaamalla leukahihna. Vapauta baksidan av hjälmen och sedan inåt för att frigöra och dra av den från pehmuste vetämällä sitä kypärän takaosaa kohti ja sitten sisäänpäin ja liu’uta se irti hihnasta. bandet. För att ta bort tygklädseln för tvätt, skalar du bort den tills allt tyg är på Jos haluat irrottaa kangassuojuksen pesua varten, kuori suojusta irti, framsidan av ytan. Dra sedan klädseln genom öppningen genom att ta tag kunnes koko kangas on kasvojen puolella olevalla pinnalla. Vedä sitten neliönmuotoisesta liepeestä suojus aukon läpi. i den rektangulära kragen och dra. TX-4 / XD4 kindkuddar är utrustade med en 5 mm skumyta.
TX-4 / XD4 -poskipaloissa on 5 mm:n pintavaahtokerros.
För att tvätta tygfodringar lägger du dem i ljummet vatten med en liten mängd badrumstvål eller schampo i och tvättar försiktigt för hand. Skölj ordentligt med rent vatten, och torka av med en mjuk trasa. Torka dem i skugga i omgivningstemperatur.
Pese kangassuojukset käsin haalealla ja miedolla pesuaine- tai sampooliuoksella. Huuhtele hyvin puhtaalla vedellä ja pyyhi pehmeällä kankaalla. Kuivaa suojukset varjossa huoneenlämmössä.
För att sätta tillbaka tygklädseln, se till att den är vänd åt rätt håll och sträck klädseln över kudden så att etiketten som säger EMERGENCY TAB INSIDE ses på klädselns hörn på främre botten av kindkuddens fäste. Justera sedan klädseln så att den ligger rätt. Se till att EMERGENCY TAB täcks av tygklädseln. Tryck sedan den rektangulära kragen genom kuddens fäste och justera till den slutgiltiga positionen.
Kiinnitä kangassuojus seuraavasti: Varmista, että suojus on oikein päin. Venytä suojus pehmusteen päälle niin, että suojukseen ommeltu EMERGENCY TAB INSIDE merkki (HÄTÄKIELEKE SISÄPUOLELLA) tulee alas poskipehmustekokoonpanon etupuolelle, ja suorista se. Varmista, että kangassuojus peittää HÄTÄKIELEKKEEN. Työnnä sitten neliönmuotoinen lieve pehmusteen läpi ja säädä paikalleen.
VARNING: Lämna inte EMERGENCY TAB utanför tygklädseln. Öglan kan fastna i utskjutande föremål då du är ute och åker.
VAROITUS: Älä jätä HÄTÄKIELEKETTÄ kangassuojuksen ulkopuolelle. Ulkonevat esineet voivat tarttua silmukkakielekkeeseen ajon aikana.seln. Öglan kan fastna i utskjutande föremål då du är ute och åker.
Nederlands OVER DE EMERGENCY TAB: Deze noodlus zorgt ervoor dat de wangstukken makkelijk verwijderd kunnen worden als die hulpverleners hinderen bij het afnemen van de helm bij een gewonde helmdrager. Aan het etiket met het opschrift EMERGENCY TAB INSIDE dat in de voering van het wangstuk aan weerszijden is genaaid, kunnen hulpverleners zien dat de helm is uitgerust met een EMERGENCY TAB aan weerszijden die bereikbaar is door het etiket op de voering van het wangstuk omhoog te trekken om zo de EMERGENCY TAB vrij te maken en omlaag te trekken om het wangstuk te verwijderen. WAARSCHUWING: Hulpverleners moeten dit systeem kennen en training in het gebruik ervan hebben gehad. De Emergency Tab is niet altijd de meest effectieve wijze waarop de wangstukken verwijderd kunnen worden. Dit is afhankelijk van de omstandigheden van het ongeluk of de toestand waarin de dragers zich bevinden. Voor het terugplaatsen van het wangstuk in de helm, schuift u het wangstuk op de kinband. Plaats dan de achterste lip vervolgens naar de achterkant van de helm en duw tegen het voorste deel van het wangstuk tot de lip vooraan op zijn plaats zit. Trek aan de kinband om te controleren of er speling is ontstaan in het wangstuk. Trek aan de kinband om te controleren of er speling is ontstaan in het wangstuk. q
Zet het lipje van de nekrol weer op zijn plaats.
HET INTERIEUR VERWIJDEREN/VERVANGEN Het interieur is aan de binnenschaal bevestigd met kunststof drukknoppen.
U kunt de voering verwijderen door de drukknoppen los te trekken. Pak de voering daarvoor zo dicht mogelijk bij de knoppens vast en verwijder de voering recht naar buiten. Zorg dat u voor het terugplaatsen weet wat de voor- en achterkant en boven- en onderkant van de voering is.
OM EMERGENCY TAB-SYSTEMET:
TIETOJA HÄTÄKIELEKEJÄRJESTELMÄSTÄ:
EMERGENCY TAB-SYSTEMET är till för att smidigt ta bort kindkuddarna som kan vara ett hinder vid räddningsförsök för att ta bort hjälmen från en skadad hjälmbärare. Med etiketten som det står EMERGENCY TAB INSIDE på, som ses från tygklädseln på kindkudden på varje sida, kan räddningsarbetare se att hjälmen är utrustad med EMERGENCY TAB och kan komma åt fliken på varje sida genom att dra upp etiketten på kindkuddens klädsel och dra av klädseln för att visa EMERGENCY TAB som sedan dras neråt för att ta bort kindkudden.
HÄTÄKIELEKEJÄRJESTELMÄN avulla pelastajat voivat irrottaa poskipehmusteen varovasti, jotta kypärä saadaan irrotettua loukkaantuneen päästä. Kummankin puolen poskipehmusteen kangassuojaan on ommeltu merkki, jossa lukee EMERGENCY TAB INSIDE (HÄTÄKIELEKE SISÄPUOLELLA). Merkistä pelastajat tunnistavat, että kypärässä on HÄTÄKIELEKE, ja he pääsevät kielekkeeseen käsiksi kummallakin puolella vetämällä poskipehmusteen suojuksen merkin ylös ja irrottamalla suojuksen. Tällöin HÄTÄKIELEKE tulee esiin, ja poskipehmuste irrotetaan vetämällä kielekettä alaspäin.
VARNING! Räddningstjänstemän behöver ha tillräckligt med kunskap och träning om detta system. Nödflikssystemet är inte alltid ett effektivt sätt att säkert ta bort kindkuddarna, utan det kan bero på omständigheterna kring olyckan och tillståndet för den skadade hjälmbäraren. För att sätta tillbaka kindkudden i hjälmen, för du på kudden på hakbandet. Placera sedan den bakre fliken mot hjälmens baksida och tryck på den främre delen av kudden tills den främre etiketten är låst på plats. Dra i hakbandet för att kontrollera eventuellt glapp i kindkudden.
VAROITUS: Pelastajilla tulee olla tarvittavat tiedot ja koulutus hätäkielekkeen käyttöä varten. Hätäkieleke ei aina ole tehokas keino poskipehmusteiden irrottamiseen riippuen onnettomuustilanteesta sekä loukkaantuneen tilasta. Kiinnitä poskipehmuste kypärään seuraavasti: Liu’uta pehmuste leukahihnaan. Aseta sitten takakieleke kypärän takaosaa kohti ja paina pehmusteen etuosaa, kunnes etukieleke lukittuu paikalleen. Tarkista leukahihnaa vetämällä, liikkuuko se poskipehmusteessa.
Dra i hakbandet för att kolla ifall det sitter löst vid kindkudden.
Vedä leukahihnaa ja varmista, ettei se ole kiinni poskipehmusteessa.
Sätt tillbaka nackfliken på plats.
Pane niskarullakieleke paikalleen.
HUR DU AVLÄGSNAR/SÄTTER TILLBAKA PASSFODRET
PEHMUSTEEN IRROTTAMINEN JA KIINNITTÄMINEN
Passfodret sitter fast i hjälmen med plastknoppar.
Pehmuste on kiinnitetty kypärään neljällä muovinapilla.
För att avlägsna fodret tar du loss knoppar genom att ta tag i fodret så nära varje knopp som möjligt och dra rakt upp. Notera hur du har fram & bak, samt ovan- och undersida på fodret innan du byter.
Irrota pehmuste tarttumalla pehmusteeseen mahdollisimman läheltä nappeja ja vetämällä suoraan ylöspäin. Paina mieleen pehmusteen asento kypärässä, jolloin se on helppo panna takaisin paikalleen. 57
Nederlands De TX-4 / XD4 is voorzien van een uitneembare voering ter hoogte van de slapen om desgewenst meer ruimte vrij te maken. Om deze voering te verwijderen, het voeringvak aan weerszijden openen en voorzichtig het voeringmateriaal verwijderen. Gebruik dubbelzijdig plakband wanneer het voeringmateriaal teruggeplaatst wordt, om het materiaal op zijn plaats te houden. Was het interieur op de hand in een lauwwarme oplossing met een klein beetje wasmiddel of zeep. Spoel de voering goed uit en wrijf hem droog met een zachte doek. Op kamertemperatuur laten drogen en uit het zonlicht houden. WAARSCHUWING: Gebruik nooit benzine, thinner, benzeen, afwasmiddel of andere oplosmiddelen. Plaats het interieur weer terug door de vier knoppen te plaatsen en ze vast te duwen. WAARSCHUWING: Zorg er bij terugplaatsen voor, dat het interieur goed aansluit op de binnenvorm van de EPS (ook wel Styrofoam genaamd) binnenschaal. Als het interieur niet goed zit, kunnen de randen ervan omvouwen wanneer u de helm op- of afzet, wat schaafwondjes kan opleveren, enz. Controleer of het interieur goed op zijn plaats zit als u ooit vindt dat de helm niet optimaal zit.
DE KINRIEMHOESJES VERWIJDEREN/VERVANGEN Voordat de kinriemhoesjes verwijderd kunnen worden, moeten eerst de wangstukken volgens de eerder beschreven instructies worden verwijderd.
TX-4 / XD4 -fodring har borttagbara tinningskuddar för att ge lite extra utrymme om så önskas. För att ta bort kuddarna öppnar du fickan på varje sida om fodringen och tar försiktigt bort kudden från fickan. Om du vill sätta tillbaka dem i fickorna, använd dubbelsidig tape för att fästa dem på plats.
TX-4 / XD4 -pehmusteessa on irrotettavat ohimotyynyt, jotka antavat tarvittaessa hieman lisätilaa. Jos haluat irrottaa tyynyt, avaa taskut pehmusteen kummaltakin puolelta ja poista tyyny varovasti taskusta. Jos haluat laittaa ne takaisin taskuihin, kiinnitä ne paikoilleen kaksipuolisella teipillä.
För att tvätta passfodret lägger du det i ljummet vatten med en liten mängd badrumstvål eller schampo i och tvättar försiktigt för hand. Skölj ordentligt med rent vatten, och torka av med en mjuk trasa. Torka den i skugga i omgivningstemperatur.
Pese pehmuste käsin haalealla ja miedolla pesuaine- tai sampooliuoksella. Huuhtele hyvin puhtaalla vedellä ja pyyhi pehmeällä kankaalla. Kuivaa pehmuste varjossa huoneenlämmössä.
VARNING! Använd aldrig bensin, thinner, bensen eller andra lösningar.
VAROITUS: Älä koskaan käytä bensiiniä, tinneriä, bentseeniä tai muita liuottimia.
För att sätta tillbaka fodret placerar du de knopparna över sina plastuttag Kiinnitä pehmuste paikalleen panemalla neljä nappia vastakappaleidensa och trycker dem på plats. kohdalle ja työntämällä ne kiinni. VARNING! Då du återinstallerar passfodret, se till att fodret är riktigt satt längs insidesformen på fodret i EPS (dvs. Styrenplast). Om passfodret inte är riktigt isatt kan dess kanter börja vika sig då du sätter på och tar av hjälmen, vilket gör att du bl.a. kan skada huden. Om du känner att något är fel med passfodret, kontrollera att fodret är riktigt isatt.
VAROITUS: Kun kiinnität pehmustetta paikalleen, varmista että se on oikeassa asennossa EPS-sisäkuoren (vaahtomuovi) suhteen. Jos pehmuste ei ole asianmukaisesti paikallaan, sen kehys voi taittua kypärää puettaessa tai riisuttaessa, jolloin voit loukata itsesi. Jos tunnet, että pehmusteessa on jokin vialla, tarkista aina ensin, että se on kunnolla paikallaan.
HUR DU AVLÄGSNAR/SÄTTER TILLBAKA HAKBANDETS ÖVERDRAG LEUKAHIHNAN SUOJUSTEN IRROTTAMINEN JA KIINNITTÄMINEN För att avlägsna hakbandets överdrag avlägsnar du först kindkuddarna enligt tidigare instruktioner.
Irrota ennen leukahihnojen suojusten irrottamista poskipehmusteet edellä olevien ohjeiden mukaisesti.
Nederlands Left chinstrap cover (D-ring side) Right chinstrap cover (long side) Couvercle gauche de la jugulaire (côté anneau en forme de D) Couvercle droit de la jugulaire (côté long) Linke Kinnriemenabdeckung (D-Ring-Seite) Rechte Kinnriemenabdeckung (lange Seite)
Verwijder de gele plastic afdekking van de stalen kinriembevestiging en schuif het hoesje van de kinriem af. Teken aan wat de linker- en rechterkant en binnen- en buitenkant is van het kinriemhoesje om deze weer goed te kunnen terugplaatsen. Was de hoesjes op de hand in een lauwwarme oplossing met een klein beetje wasmiddel of shampoo. Spoel de hoesjes goed en wrijf ze droog met een zachte doek. Op kamertemperatuur drogen en uit het zonlicht houden. WAARSCHUWING: Gebruik nooit benzine, thinner, benzeen, afwasmiddel of andere oplosmiddelen. Controleer bij het terugplaatsen van het linker kinriemhoesje (D-ringzijde) dat het stoffen gedeelte naar de binnenzijde van de helm gericht is en schuif de hoes dan over de kinriem. Plaats de plastic kinriembevestiging over de stalen bevestiging en duw deze in de bevestiging totdat het lipje aan de achterkant van de hoes stevig op zijn plaats klikt. Controleer bij het terugplaatsen van het kinriemhoesje aan de rechterkant (lange zijde) dat het stoffen gedeelte vanhet kinriemhoesje naar de binnenzijde van de helm gericht is. Schuif de hoes vervolgens over de kinriem. Plaats de plastic kinriembevestiging over de stalen bevestiging en duw deze in de bevestiging totdat het lipje aan de achterkant van de hoes stevig op zijn plaats klikt.
Avlägsna plastöverdraget från hakbandets stålfäste och ta av överdraget från hakbandet.
Irrota muovinen leukahihnan ankkurisuojus metallisesta leukahihnan ankkurisuojuksesta ja liu’uta suojus pois leukahihnasta.
Notera hur du har höger och vänster, samt insida och utsida på hakbandsöverdragen innan du byter. För att tvätta hakbandsöverdragen lägger du dem i ljummet vatten med en liten mängd badrumstvål eller schampo i och tvättar försiktigt för hand. Skölj ordentligt med rent vatten, och torka av med en mjuk trasa. Torka dem i skugga i omgivningstemperatur.
Paina mieleen leukahihnan suojusten asento kypärässä, jolloin ne on helppo panna takaisin paikalleen.
Pese leukahihnan suojukset käsin haalealla ja miedolla pesuaine- tai sampooliuoksella. Huuhtele hyvin puhtaalla vedellä ja pyyhi pehmeällä kankaalla. Kuivaa suojukset varjossa huoneenlämmössä. VAROITUS: Älä koskaan käytä bensiiniä, tinneriä, bentseeniä tai muita liuottimia.
För att sätta tillbaka vänster hakbandsöverdrag (D-öglesidan), se till att Vaihda vasen leukahihnan suojus D-renkaan puolelta seuraavasti: Varmista, että hakbandets snäpplåssida med honände och konstlädersidan på hakbandets naaraspuolinen leukahihnan kiinnike sekä leukahihnan suojuksen tekonahkapuoli ovat molemmat ulospäin. Liu’uta leukahihnan suojus leukahihnaan. överdrag båda är riktade utåt, och för på överdraget på hakbandet. Placera plastöverdraget över hakbandets stålfäste och tryck på överdraget Pane muovinen leukahihnan ankkurisuojus metallisen ankkurin päälle ja työnnä suojusta ankkuriin kunnes suojuksen takana oleva kiinnike i fästet tills fliken på baksidan av överdraget knäpper på plats. naksahtaa paikalleen. För att sätta tillbaka höger hakbandsöverdrag (långa sidan), se till att hakbandets snäpplåssida med kåpa (med Arais logo tryckt på) och konstlädersidan på hakbandets överdrag båda är riktade utåt, och för på överdraget på hakbandet.
Vaihda oikea leukahihnan suojus pitkältä puolelta seuraavasti: Varmista, että leukahihnan se puoli, jossa on Arain logo, naksahtaa paikalleen leukahihnaan ja että se sekä leukahihnan suojuksen tekonahkapuoli ovat molemmat ulospäin. Liu’uta leukahihnan suojus leukahihnaan.
Placera plastöverdraget över hakbandets stålfäste och tryck på överdraget Sijoita muovinen leukahihnan ankkurisuojus metallisen ankkurin päälle ja työnnä suojusta ankkuriin kunnes suojuksen takana oleva kiinnike naksahtaa paikalleen. i fästet tills fliken på baksidan av överdraget knäpper på plats. Vaihda vasen leukahihnan suojus D-renkaan puolelta seuraavasti: Varmista, että naaraspuolinen leukahihnan kiinnike sekä leukahihnan suojuksen tekonahkapuoli 61 ovat molemmat ulospäin. Liu’uta leukahihnan suojus leukahihnaan.
TX-4/XD4/VX-3/VX-PRO3 â‘£
Helmet Specifications subject to Change Without Notice. Les caractéristiques techniques du casque sont susceptibles de subir des modifications sans avis préalable. Änderungen der technischen Daten des Helms ohne vorherige Ankündigung bleiben vorbehalten. Specifiche sui caschi soggette a modifiche senza preavviso. Las especificaciones del casco están sujetas a cambios sin previo aviso. Οι Προδιαγραφές για το Κράνος Υπόκεινται σε Ενδεχόμενες Αλλαγές Άνευ Προγενέστερης Προειδοποιήσεως. Helmspecificaties kunnen zonder kennisgeving worden gewijzigd. Specifikationerna för hjälmen kan ändras utan vidare meddelande. Kypärän teknisiä tietoja voidaan muuttaa ilman ennakkoilmoitusta. http://www.arai.co.jp Contact to
ARAI HELMET, LIMITED 12 Azuma-cho, 2-chome Omiya, Saitama 330-0841 JAPAN
ARAI HELMET (AMERICAS), INC. P.O. Box 787 Fogelsville, PA 18051-0787 U.S.A.
ARAI HELMET (EUROPE), B.V. P.O. Box 112 3870 CC Hoevelaken The Netherlands
Printed in Japan
2018_12 TX-4/XD4/VX-3/VX-PRO3 FUKUYAMA PRINTING CO.,LTD.

- Search forums
Follow along with the video below to see how to install our site as a web app on your home screen.
Note: This feature may not be available in some browsers.
- Technical & Rider
- Equipment & Toys
- Clothing & Protective Gear
Tour X4 question
- Thread starter Akulaking
- Start date Oct 31, 2023

Well-known member
- Oct 31, 2023
Any one know roughly when the Arai Tour X4 was released? The D ring on mine says 2013 but I’m gobsmacked if it’s that old. I know they can sit on shelves a year or two before selling, but if that’s right it’s had a damn good run, around 10 years with the 5 just coming out. There are some good deals on 4’s now, I’ve seen plain white ones for £339. The 5’s are £599 and unlikely to be discounted for a good while. Makes the 4 seem cheap.
- Nov 1, 2023
Any thoughts?

stickywicket
Active member, arai tour x3 or x4.

Eastmidsbiker
Are the 5's for sale now ? 2013 sounds about right, but I don't believe its an issue if they are stored correctly. Need to check the date on mine as its only about 3 years old to me but an older colour scheme.
Eastmidsbiker said: Are the 5's for sale now ? 2013 sounds about right, but I don't believe its an issue if they are stored correctly. Need to check the date on mine as its only about 3 years old to me but an older colour scheme. Click to expand...
- Nov 10, 2023
Apparently the new X5 in plain colours is £510, multi colours £599. Hopefully have some At the NEC show.

Robbo1200ADV
I have a brand new one from about 2013 never worn .............is it scrap ?

Akulaking said: Any thoughts? Click to expand...
Worth watching the Bennett’s Social review of the X5 on YouTube, if you need a new helmet I would say it’s a no brainer, but if your existing X4 is in good shape and not too old then it come down to wanting rather than needing. A plain colour X5 is only just over £100 more than a multi coloured X4. You pays your money and you makes your choice………………..
Robbo1200ADV said: I have a brand new one from about 2013 never worn .............is it scrap ? Click to expand...
Registered user
- Feb 6, 2024
just bought a x4 in grey for £299 delivered. 3rd Arai tour x. Superb quality, unlike the hornet ds I got when Hein gerike went bust. Bloody awful.

I like my X4 but I found the Pinlock never worked satisfactorily because of the sharpness of the front of the visor. For that reason I'm, probably going to upgrade to the X5 but I haven't seen them on pre-order cheaper than £599 for black or white and £699 for coloured.

Similar threads
- Nov 22, 2021
- Jul 17, 2023
- Pedal Power, including E-Bikes
- Aug 18, 2023
- Motorcycle trips
- Feb 2, 2022
- Super Ténéré
- Oct 6, 2022
- ALL MOSCOW TOURS
- Getting Russian Visa
- Top 10 Reasons To Go
- Things To Do In Moscow
- Sheremetyevo Airport
- Domodedovo Airport
- Vnukovo Airport
- Airports Transfer
- Layover in Moscow
- Best Moscow Hotels
- Best Moscow Hostels
- Art in Moscow
- Moscow Theatres
- Moscow Parks
- Free Attractions
- Walking Routes
- Sports in Moscow
- Shopping in Moscow
- The Moscow Metro
- Moscow Public Transport
- Taxi in Moscow
- Driving in Moscow
- Moscow Maps & Traffic
- Facts about Moscow – City Factsheet
- Expat Communities
- Groceries in Moscow
- Healthcare in Moscow
- Blogs about Moscow
- Flat Rentals
People & blogs about Moscow
Impressions of an expat.
This blog written in the form of fascinating novel-in-progress. Marco North immerses the readers into particular situations expats can face daily but in literary processed version. The blog is widely popular and even is called as «the work of a modern Chekhov».
Site: http://impressionsofanexpat.blogspot.com
Kidding Herself
Kidding Herself is written from the point of view of a five year old girl and is a child’s guide to going out in Moscow. Herself moved to Moscow from London in 2015 with her British Mama, her Russian Papa and her AngloRusski Big Brother. Find out what she thinks about the Kremlin, Red Square, the zoo, more art galleries than she thinks are strictly necessary and the giant Central Children’s Store.
Site: http://kiddingherself.com
FunnyNotesBlog
Mostly the funny notes of Iva coping with Russian life and culture!
Site: https://funnynotesblog.blogspot.ru
Potty diares
This is a blog of an expat mother of two sons, living in Moscow. The author shares her experience on bringing up kids in Moscow, some useful tips and impressions of the city.
Site: http://potty-diaries.blogspot.co.uk
Arty Generation
This is a site about artists and creative people in Moscow.
Site: https://www.artygeneration.com
If you have a great blog about Moscow to add, send us a link at [email protected]
Our Private Tours in Moscow
All-in-one moscow essential private tour, moscow metro & stalin skyscrapers private tour, moscow art & design private tour, soviet moscow historical & heritage private tour, gastronomic moscow private tour, «day two» moscow private tour, layover in moscow tailor-made private tour, whole day in moscow private tour, tour guide jobs →.
Every year we host more and more private tours in English, Russian and other languages for travelers from all over the world. They need best service, amazing stories and deep history knowledge. If you want to become our guide, please write us.
Contact Info
+7 495 166-72-69
119019 Moscow, Russia, Filippovskiy per. 7, 1
Mon - Sun 10.00 - 18.00
IMAGES
VIDEO
COMMENTS
Tested by Michael Guy for five years, 8400 miles. Quality 5/5, Value 4/5. The Tour-X 4 has certainly been my go-to helmet for a significant chunk of riding I've completed over the last five ...
Arai have really nailed the subtle styling of an adventure helmet with the Tour-X 4. It steers clear of the sharper lines and aggressive chinbars of competitors that scream 'moto-cross hero', instead capturing the versatility of our adventure bikes by looking ready to take riders on and off the tarmac. The 'Cover-White' colourway that I ...
The Arai Tour X-4 's shell is made of Arai's Complex Fibre Laminate construction, which is Arai's own in house shell material that gives the helmet strength and impact flexibility. This also gives you a fairly light weight helmet since when we weighed the Arai Tour Ex-4, we got a weight of 1620 grams in a size M with all the extras.
Its been around for a while and is held in very high esteem amongst riders, particularly in the Adventure Bike World. I've been wanting to try the Arai Tour ...
Weight. Having a stronger shell does mean Arai's tend to be a little heavier than many other lids. For example, the Tour X4 in a medium-size weighs 1683 grams/3.7 lbs on our scales. But, of course, that's with the peak and the visor fitted. It's not light, but neither is it the heaviest adventure lid, and at least Arai has a solid reason ...
4.9 (257) Review Conditions. Motorcycle: Kawasaki KLX250. Seasons Ridden: All year. Arai's Tour X4 is the latest version of the incredibly popular adventure helmet, with a redesigned shell shape and added ventilation over the previous Tour X3. The most immediately obvious changes on the Arai Tour X4 are a whole array of front and rear vents ...
Made from Super Laminated Fiber, the same material used in other Arai models, like the Chaser V, the Tour-X4 outer shell have been designed around the Arai's exclusive 'R75' concept: the shell's round angle never surpass the 75º degree, making it more effective in a crash, as the kinetic energy scatters more regularly all around the helmet and avoiding a single point in the shell ...
You can find the Arai Tour X4 in our webshop at:https://www.championhelmets.com/en/helmets/arai/tour-x4/You can read more about the Review in our blogpost on...
Arai's famous Tour X4 helmet isn't perfect, but there's no arguing with the sheer quality 23 December 2023 23 Dec 2023. Video: Arai Tour-X5 helmet review By Tony Hoare. It's been a long wait, but the fifth incarnation of Arai's Tour-X range lives up to the hype ...
Arai Tour-X4 helmet review. The Arai Tour-X4 is an excellent, top-spec ADV helmet with a couple of quirks. Published on May 12, 2020 09:00:00 AM. 29,835 Views. Follow us on .
Shop Arai Tour X4 at Sportsbikeshop… http://bit.ly/AraiTX4This is perhaps the classic adventure motorcycle helmet. Blame Ewan and Charley if you like. The Ar...
Arai Tour-X4 Price & Availability. The Arai Tour-X4 is priced at an RRP of £599, though you tend to regularly find deals online that place it from £400 - £500. It's certainly a pricey option, but for those looking at the premium brands for protecting your noggin, it's money spent in the best place. Available in a huge array of colours ...
This Helmet Runs 1 Size Smaller Due to Built-in Bluetooth Module. The size of this helmet: S:55-56,M:57-58CM,L:59-60CM,XL:61-62CM,XXL:63-64CM. One Touch Control for Calling, Answering, Rejecting Incoming Calls and Redialing. Incoming Phone Call Overrides Intercom, Music, FM Radio and GPS Navigation Audio.
Shell. The Arai Tour X-4's shell is made of Arai's Complex Fibre Laminate construction, which is Arai's own in house shell material that gives the helmet strength and impact flexibility. This also means a lightweight helmet since when we weighed the Tour X-4, we got a weight of 1620 grams in a size M. The helmet also comes in 5 shell ...
The Arai Tour-X4's chin bar is heavily vented. There are two side vents with a metal mesh cover as well as a vertical central vent with two separately controlled inlets. All four can be closed ...
You can find the Klim Krios Pro in our webshop at:https://www.championhelmets.com/en/klim/krios-pro/helmets.htmlYou can find the Arai Tour X4 in our webshop ...
Read our full Arai Tour-X 4 review here. 4 . Shoei Hornet ADV . Price: £383.94 (was £479.99) www.sportsbikeshop.co.uk ... Pretty much on a par with Arai T-X 4 in terms of quality and value ...
Arai is almost obsessed with safety and you can tell from pretty much all of the safety tests where they very often come out on top. And yes, that quality comes with a serious price tag. So with the Tour X4 seen by many as the best Adventure helmet available today, Arai has managed to even improve it and earn better scores on different aspect.
The Tour-X4 has a complete new outer shell. Redesigned to be tougher, stronger and stiffer than ever. As the Tour-X4 may be used under extreme conditions, the ventilation system has been redeveloped for maximum efficiency. The new Facial Contour System (FCS) offers more support and comfort to the lower jaw and creates
Arai Tour-X4 Instruction Manual. Published on Sep 3, 2019. Arai Helmet (Europe) B.V. Follow this publisher. About. INSTRUCTIONS FOR USE READ THIS BOOKLET BEFORE USE! More from. Arai Helmet (Europe ...
just bought a x4 in grey for £299 delivered. 3rd Arai tour x. Superb quality, unlike the hornet ds I got when Hein gerike went bust. Bloody awful. ShakeyBMW S K P. UKGSer Subscriber. Joined Apr 3, 2012 Messages 3,624 Reaction score 68 Location The Garioch, Scotland. Feb 6, 2024 #12
Je kan de Tour-X4 vinden in onze webshop op: https://www.championhelmets.com/nl/helmen/arai/tour-x4/ ChampionHelmets.com is de #1 online shop voor motorhelme...
Soviet Moscow Historical & Heritage Private Tour. €119 €109 Gastronomic Moscow Private Tour. €59 €49 «Day Two» Moscow Private Tour. €49 €39 Layover in Moscow Tailor-Made Private Tour. €129 €119 Whole Day in Moscow Private Tour. Follow us. Tour Guide Jobs →. Every year we host more and more private tours in English, Russian ...