How to Quickly Disable or Delete Safari Extensions on an iPhone or iPad
Did you install one too many extensions on your iPhone and now Safari is really slow? Follow this quick guide to disable or delete them.
Safari extensions are a popular way to customize your browser. With the release of iOS 15 came the introduction of numerous new extensions Safari was compatible with on an iPhone, as well as on a Mac.
You can download extensions from the App Store, just like you do with any other app. However, if you ever get too many of them, it might slow down your browsing experience. Luckily, you can get rid of extensions easily.
Take a look below to learn how to disable or delete Safari extensions.

What Are Safari Extensions?
As the term itself indicates, Safari extensions are small apps that add specific functions to Safari so you can personalize your browser. It improves functionality and helps you get the most out of Safari.
Related: Finally, You Can Install Safari Extensions on iPhone With iOS 15: Here's How
Some examples of tasks that extensions do for you include automatically filling cookie forms, blocking ads, and improving privacy.
You can either toggle off Safari extensions or completely delete them.
How to Turn Off Safari Extensions on an iPhone or iPad
If you don't want an extension temporarily, but find it useful in the long run, you can just disable and enable it when you want it back. Here's how to do so:
- Open Settings and select Safari .
- Scroll down and tap on Extensions .
- Choose the extension you would like to disable.
- Tap the toggle next to it to disable the extension. Repeat for every extension you'd like to turn off.
How to Delete Safari Extensions on an iPhone or iPad
Have an extension that is just taking up space because you don't really use it? You can quickly delete it from your iPhone or iPad the same way you delete an app. Some extensions also tend collect personal data, so be careful which extensions you choose to download and keep.
Related: Browser Extensions You Should Remove Now Due to DataSpii
Follow these steps to delete an extension:
- Search for the app on your Home Screen or in the App Library . Once you find it, press and hold until the apps begin shaking.
- Press the minus (–) sign that appears and select Delete App from the popup that appears. Repeat for all extensions you want to delete.
- Tap Done in the top-right corner to return the screen to normal.
Declutter Your Browser by Disabling or Deleting Extensions
Safari extensions are quite helpful for plenty of different functions you may not even know you needed. You can browse through the App Store to download one whenever you want.
If you ever want to get rid of them, just open your Safari settings to toggle off an extension or just delete the relevant app like you would with any others on your device. Removing Safari extensions from an iPhone or iPad is really that simple.
Boom 3D Is The Ultimate Audio Enhancer App For Mac (Review)
Is one airpod louder than the other here’s how to fix it, delta game emulator is now available on the app store, bimmy – nes emulator for iphone and ipad hits the app store.
- Zip-rar tool
- Zip browser
How To Add Or Remove Safari Extensions On iPhone Or iPad
Looking to learn how to add or remove Safari web extensions on iPhone or iPad? then this article is for you.
With iOS 15 and iPadOS 15 Apple has finally brought Safari web extensions to iPhone and iPad. Now users can use web extensions on iOS Safari to add new functionality and features to the web browser and enhance their browsing experience.
Adding or removing Safari extensions on iPhone or iPad is very simple. Web extensions can be added from the App Store and managed through Safari preferences found under the Settings app.
Safari web extensions are developed by third-party developers. Currently, the majority of extensions that are available for iOS involve ad-blockers, popup blockers, and VPNs . However, we expect more iOS web extensions to make their way into the App Store in the coming months.
How to add Safari web extension on iPhone or iPad
You can add Safari extension on iPhone or iPad by following the steps below.
Step 1. Open Settings and go to Safari .
Step 2. Now tap on Extensions option found under the General heading.
Step 3. Tap on More Extensions button, after which you will be redirected to the App Store.
Step 4. On the App Store look for the extension you want to install and tap on the ‘Get’ button next to it. Both paid and free extensions are available in the store.
Step 5. Next, you need to enable the extension. Go back to Extensions page as shown in step 2.
Step 6. Now turn on the toggle located next to the extension you have just downloaded.
This is how you can add new extensions to Safari on iPhone and iPad.
How to remove Safari web extension on iPhone or iPad
You can disable an iOS Safari web extension by going to Settings -> Safari -> Extension and turning off the toggle next to it.
However, if you want to completely remove Safari web extension on iPhone or iPad, then you can follow these steps.
Step 1. Check which Safari web extensions are installed on your device by going to Settings -> Safari -> Extensions .
Step 2. Return to the home screen and look for the app icon for the extension you want to delete.
Step 3. Long press on it and tap on the Remove App button from the menu. After confirming the deletion also tap Yes for deleting app’s data.
This should remove the Safari web extension from your iOS device and remove it from Safari’s extensions list.
There you go folks, this is how you can easily add or remove Safari extensions on iPhones and iPad running iOS 15 or later.
- iOS 15 features
- iPhone Safari
- Safari web extensions
- Web extension

Leave a Reply Cancel reply
Your email address will not be published. Required fields are marked *
Notify me of follow-up comments by email.
Notify me of new posts by email.
This site uses Akismet to reduce spam. Learn how your comment data is processed .
Sign Up for Our Newsletters
Related posts, how to connect xbox controller to iphone or ipad, how to refresh airtag location for improved tracking, iphone unavailable error here’s how to fix it.
Last Updated on August 11, 2023 by Zaib Ali
Manage Your Safari Extensions on iPhone and iPad

For those looking to manage their Safari extensions, doing so from an iPhone or an iPad is actually relatively easy. With Safari being Apple’s own web-browser, there’s a reason users may choose this as their go-to browser. With extensions, users are able to further customize their web experience through adding certain modifications.
Concerning extensions, there’s an entire world of possibilities. Users can have extensions that block pop-ups, help them find coupons, block content and more. Using this guide, I’ll show you how to manage your extensions in Safari on your iPhone and iPad, as well as where users can find even more extensions for their browser.
Where is Manage Extensions in Safari?
If you are looking for where to find your Safari extensions, navigating to this is actually rather easy.
On either your iPad or iPhone, perform the following actions:
- Go to Settings > Safari

This will show you your extensions that you have for Safari. Additionally, you can also select More Extensions to browse through what is available on the App Store. If you find one that you like, you are able to download it be selecting either its price (should it have one) or by selecting Get. You will then just need to follow the onscreen instructions.
It’s worth mentioning that any extensions you install on your iPhone or iPad will also appear as Safari settings on additional devices that are signed into the same Apple ID. This can make them easier to access and download.
Suggestions for Safari Extensions
When it comes to using extensions on Safari, some can be particularly more helpful than others. Personally, there’s a couple of free extensions that I would recommend.
- Turn Off the Lights for Safari : This free extension enables Dark Mode across the web. Additionally, this extension also allows users to customize what it and what isn’t in Dark Mode. This app allows pages with video to darken to focus more on the streaming content: giving users a theatre experience directly on their device. There’s plenty of more options as well, and with the extension being free, there really isn’t a reason not to try it.
- Ka-Block : This is a free content blocker that is also open-source. Using this app, users can prevent both ads and tracking scripts from slowing down any webpages that a user visits. They also have an extension for Mac as well.
- Checkmate : This free app helps users find deals while they shop online by automatically applying deals when the user goes to checkout. How the app works is that it tracks deals online stores send out, and then collects unused discounts and gives them directly to you.
You can find all of these extensions through the More Extensions option as outlined above.
How do I Remove Unwanted Extensions from Safari?
If you don’t like a particular Safari extensions, you don’t have to keep it around. Unfortunately, uninstalling these extensions can be a bit weird, but luckily there is a way to do it.
If you are looking to remove a Safari extension, from your device, simply follow these steps:
Time needed: 1 minute
How to remove unwanted extensions from Safari.

How do I Edit Safari Extensions on iPhone and iPad?
When it comes to managing and editing your extensions, users also have options. Being able to set your own permissions and settings through an extension is possible, users just need to ensure that they are navigating to the right place.
On an iPhone, the easiest way to manage extensions is by going through Settings > Safari > Extensions . Click on the extensions you want to modify, then select Extension Settings . The extension may need to be turned on to find this option.
For those on an iPad, not only can you follow the same steps for the iPhone from above, but you can also tap the puzzle-icon next to the right-side of the search field and select Manage Extensions . This also allows you to set permissions within the extension.
Working with Safari Extensions on iPhone and iPad
Being able to modify Safari through extensions can be extraordinarily helpful for a majority of users. By using extensions, users can create an experience that is custom-tailored specifically to their needs. Using this guide, users can easily install new extensions, and then manage them directly from their settings.
How you choose to surf the web is ultimately up to you. However, there are way to customize this experience in a manner that ensures you’re getting the most out of Safari. Whether you’re using your iPad or your iPhone to browse the web, users still have the option of adding extensions to Safari to create the best experience possible for them. Using this guide, be sure to give extensions a try.
Leave a Reply Cancel reply
You must be logged in to post a comment.
This site uses Akismet to reduce spam. Learn how your comment data is processed .
- Nick deCourville
How to Remove Safari Extensions Quickly

How do you uninstall Safari extensions? If you downloaded a Safari extension and found it to be cumbersome or annoying, you'll want to know how to delete extensions from Safari. Luckily, it's easy to do and doesn't involve mucking about in the App Store at all. Here's how to delete an extension on Safari.
How to Remove Safari Extensions on iPhone or iPad
How to delete extensions on a mac, how to remove safari extensions.
Did you add a Safari extension that you don't want anymore? Remove it! There are two ways to do this, depending on if you're using a Mac or an iPhone or iPad.
There are two options to remove Safari extensions on your iPhone or iPad. You can either turn it off, or delete it entirely.

Related: The Evolution of the iPhone: Every Model from 2007–2021

Next, learn about how to customize Safari tab groups .
Author Details

Amy Spitzfaden Both
Amy Spitzfaden-Both is the Managing Editor for iPhone Life magazine and an award-winning novelist, with over 10 years of experience in the publishing industry. She specializes in Apple news and rumors, health and fitness tech, and parenting in the digital age. She graduated from MIU with a BA in Literature and Writing. Amy lives in New Hampshire with her husband and daughter. When she’s not writing or glued to her iPhone, she enjoys hiking, traveling, and creating her own tea blends.

Featured Products

Now you can try Informant 5 for free and experience a productivity boost by managing projects with tasks and notes, syncing your calendar among all your devices, enjoying a user-friendly 30-day calendar view, and so much more. Informant 5 features SmartBar navigation which makes it so much easier to use and master this calendar app. Plus, you can use it almost anywhere thanks to Dark Mode. With a dark background, you can check in on your tasks and schedule anywhere, even the movie theater. Upgrade to the best calendar app and task manager for iOS! Download Informant 5 today and get organized!
Most Popular

How to Tell If Someone Blocked Your Number on iPhone

10 Simple Tips To Fix iPhone Battery Drain

iPhone Alarm Volume Low? How to Make an iPhone Alarm Louder

How to Tell If a Dead iPhone Is Charging

How to Schedule a Text Message on iPhone

How To Put Two Pictures Together on iPhone

How to Hide an App on Your iPhone

How To Turn Off Flashlight on iPhone (Without Swiping Up!)

Why Is Find My iPhone Not Working? Here’s the Real Fix

Find Out Which App Is Using Your Camera or Microphone

How to Get Automatic Birthday Reminders on iPhone

Can iPhones Get Viruses? How to Detect & Remove Malware (iOS 17)
Featured articles, why is my iphone battery draining so fast 13 easy fixes.

Identify Mystery Numbers: How to Find No Caller ID on iPhone

Apple ID Not Active? Here’s the Fix!

How to Cast Apple TV to Chromecast for Easy Viewing

Fix Photos Not Uploading to iCloud Once & for All (iOS 17)

There Was an Error Connecting to the Apple ID Server: Fixed

CarPlay Not Working? 4 Ways to Fix Apple CarPlay Today
Check out our sponsors.

- Each email reveals new things you can do with your phone (and other devices) with easy-to-follow screenshots.
- Enter your email to get your first tip immediately!
- Great Tech Gifts for Any Occasion
- The Best Gadgets for The Beach or Pool
How to Install, Manage, and Delete Safari Extensions
Add functionality and efficiency to Apple's web browser
Tom Nelson is an engineer, programmer, network manager, and computer network and systems designer who has written for Other World Computing,and others. Tom is also president of Coyote Moon, Inc., a Macintosh and Windows consulting firm.
What to Know
- To download and install an extension, go to the Safari menu > Safari Extensions , find an extension, and click Get > Install .
- To activate an extension, go to Safari > Preferences > Extensions , click the check box next to the extension, then click Turn on .
- Access an extension via its Safari Toolbar icon. To disable: Preferences > Extensions , remove the check mark. Click Uninstall to delete it.
This article explains how to install, use, and manage Safari extensions. Instructions in this article apply to Safari 9 and later.
How to Download and Install Safari Extensions
Installing Safari extensions is an easy process. You can find a selection within Safari itself.
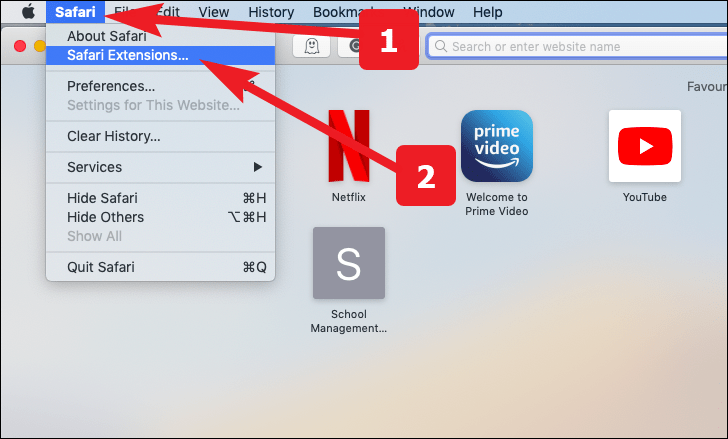
Open Safari and select Safari Extensions from the Safari menu.
The App Store opens to the Safari Extensions section. Scroll to find an extension you want to add. Downloading extensions is like buying anything else in the Mac App Store .
Click Get on a free extension or the price on a paid extension.
The Get button or price button becomes a green Install button. Click it to download the extension.
Your Mac may ask you to authorize the purchase even if the extension is free. Do so to continue the download.
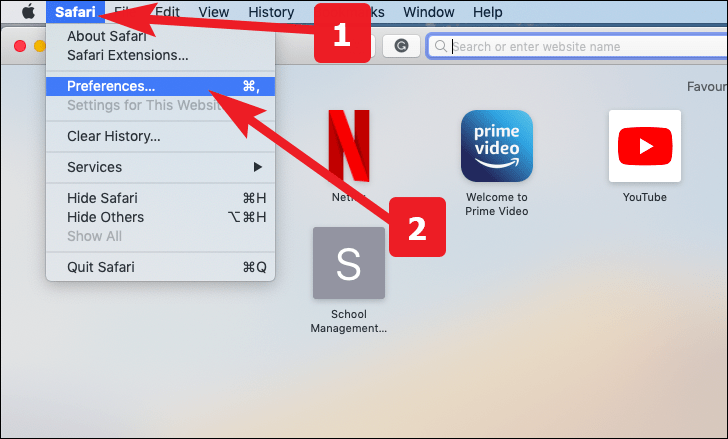
To activate the new extension, return to Safari and select Preferences under the Safari menu.
The keyboard shortcut is Command + , (comma).
Select the Extensions tab in the Safari General preferences screen.
Click the check box next to the extension you downloaded.
Confirm the activation by selecting Turn On in the pop-up window.
To browse for additional add-ons, click the More Extensions button to return to the Mac App Store. Repeat these steps for all the extensions you download.
How to Use a Safari Extension
How you use a Safari extension depends on its functionality, but some elements are common to all of them. Generally speaking, you access and use an extension by clicking its icon on your Safari Toolbar. Once you do that, it runs an automated process or opens a menu to let you set preferences or select actions.
For example, the Grammarly extension runs automatically while you write, but you can open the menu to turn it off or on for a website.
How to Manage or Delete Safari Extensions
Once you start loading extensions for your Safari browser, you're probably going to want to manage their use or uninstall the extensions you don't like or just never use.
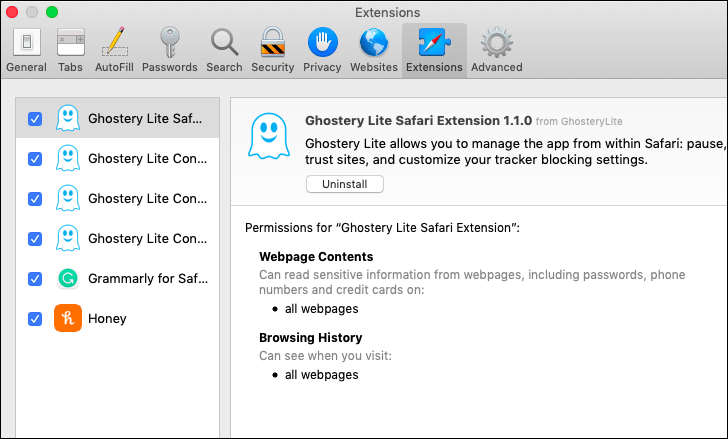
Return to the Extensions pane of Safari's Preferences pane.
Click the name of the extension you want to remove in the left pane.
To temporarily disable the extension, remove the check mark from the box next to it.
To remove an extension completely, click Uninstall in the right pane.
You can redownload extensions you've uninstalled as long as they're still available in the App Store.
What Are Safari Extensions?
Extensions are third-party developers add-on code that uses Safari's web features for specific tasks, such as making it easier to search Amazon, allowing an app, such as 1Password, to integrate with the browser and create an easy-to-use password management system, or adding an effective way to block pop-up ads.
You'll also find that most social media sites have Safari extensions that make posting to your favorite social site as simple as clicking a button in the Safari toolbar .
Where to Find More Safari Extensions
The App Store isn't the only place to download Safari extensions; it's just the easiest. You can also find them on other sites with a quick internet search.
Safari extensions are generally safe to install. Apple requires all extensions to run within the basic tools it provides in the Safari extension environment. You don't necessarily have to worry that one you download outside of the App Store will wreck your computer but make sure you trust the developer before you install anything they made.
Get the Latest Tech News Delivered Every Day
- 9 Best Safari Extensions of 2024
- How to Install Mac OS on PC
- How to Install Safari Extensions in Windows
- How to View, Manage, or Remove Safari Plug-Ins
- How to Manage Extensions in Popular Web Browsers
- Speed Up Safari With These Tuneup Tips
- How to Reset Safari to Default Settings
- How to Remove Adware From Your Mac
- How to Remove MacKeeper
- How to Install and Use OpenOffice Extensions
- How to Check Computer History
- Manage Smart Search in Safari for Mac
- How to Activate and Use Responsive Design Mode in Safari
- Add More Features by Turning on Safari's Develop Menu
- How to Enable Safari Dark Mode
- How to Manage Cookies in the Safari Browser
iPad User Guide
- iPad models compatible with iPadOS 17
- iPad mini (5th generation)
- iPad mini (6th generation)
- iPad (6th generation)
- iPad (7th generation)
- iPad (8th generation)
- iPad (9th generation)
- iPad (10th generation)
- iPad Air (3rd generation)
- iPad Air (4th generation)
- iPad Air (5th generation)
- iPad Pro 10.5-inch
- iPad Pro 11-inch (1st generation)
- iPad Pro 11-inch (2nd generation)
- iPad Pro 11-inch (3rd generation)
- iPad Pro 11-inch (4th generation)
- iPad Pro 12.9-inch (2nd generation)
- iPad Pro 12.9-inch (3rd generation)
- iPad Pro 12.9-inch (4th generation)
- iPad Pro 12.9-inch (5th generation)
- iPad Pro 12.9-inch (6th generation)
- Setup basics
- Make your iPad your own
- Keep in touch with friends and family
- Customize your workspace
- Do more with Apple Pencil
- Customize iPad for your child
- What’s new in iPadOS 17
- Turn on and set up iPad
- Wake and unlock
- Set up cellular service
- Connect to the internet
- Sign in with Apple ID
- Subscribe to iCloud+
- Find settings
- Set up mail, contacts, and calendar accounts
- Learn the meaning of the status icons
- Charge the battery
- Show the battery percentage
- Check battery usage
- Use Low Power Mode to save battery life
- Read and bookmark the user guide
- Learn basic gestures
- Learn advanced gestures
- Adjust the volume
- Find your apps in App Library
- Switch between apps
- Zoom an app to fill the screen
- Quit and reopen an app
- Drag and drop
- Open two items in Split View
- Switch an app window to Slide Over
- View an app’s windows and workspaces
- Multitask with Picture in Picture
- Move, resize, and organize windows
- Access features from the Lock Screen
- Perform quick actions
- Search on iPad
- Get information about your iPad
- View or change cellular data settings
- Travel with iPad
- Change or turn off sounds
- Create a custom Lock Screen
- Change the wallpaper
- Adjust the screen brightness and color balance
- Customize the text size and zoom setting
- Change the name of your iPad
- Change the date and time
- Change the language and region
- Organize your apps in folders
- Add, edit, and remove widgets
- Move apps and widgets on the Home Screen
- Remove apps
- Use and customize Control Center
- Change or lock the screen orientation
- View and respond to notifications
- Change notification settings
- Set up a focus
- Allow or silence notifications for a Focus
- Turn a Focus on or off
- Customize sharing options
- Type with the onscreen keyboard
- Dictate text
- Move the onscreen keyboard
- Select and edit text
- Use predictive text
- Use text replacements
- Add or change keyboards
- Add emoji and stickers
- Take a screenshot
- Take a screen recording
- Write and draw in documents
- Add text, shapes, signatures, and more
- Fill out forms and sign documents
- Use Live Text to interact with content in a photo or video
- Use Visual Look Up to identify objects in your photos and videos
- Lift a subject from the photo background
- Subscribe to Apple Arcade
- Play with friends in Game Center
- Connect a game controller
- Use App Clips
- Update apps
- View or cancel subscriptions
- Manage purchases, settings, and restrictions
- Install and manage fonts
- Buy books and audiobooks
- Annotate books
- Access books on other Apple devices
- Listen to audiobooks
- Set reading goals
- Organize books
- Create and edit events in Calendar
- Send invitations
- Reply to invitations
- Change how you view events
- Search for events
- Change calendar and event settings
- Schedule or display events in a different time zone
- Keep track of events
- Use multiple calendars
- Use the Holidays calendar
- Share iCloud calendars
- Take photos
- Take a selfie
- Take a Portrait mode selfie
- Take videos
- Change advanced camera settings
- Adjust HDR camera settings
- View, share, and print photos
- Use Live Text
- Scan a QR code
- See the world clock
- Set an alarm
- Use the stopwatch
- Use multiple timers
- Add and use contact information
- Edit contacts
- Add your contact info
- Send Contacts on iPad
- Use other contact accounts
- Hide duplicate contacts
- Export contacts
- Get started with FaceTime
- Make FaceTime calls
- Receive FaceTime calls
- Create a FaceTime link
- Take a Live Photo
- Turn on Live Captions
- Use other apps during a call
- Make a Group FaceTime call
- View participants in a grid
- Use SharePlay to watch, listen, and play together
- Share your screen in a FaceTime call
- Collaborate on a document in a FaceTime call
- Use video conferencing features
- Hand off a FaceTime call to another Apple device
- Change the FaceTime video settings
- Change the FaceTime audio settings
- Change your appearance
- Leave a call or switch to Messages
- Block unwanted callers
- Report a call as spam
- Connect external devices or servers
- Modify files, folders, and downloads
- Search for files and folders
- Organize files and folders
- Set up iCloud Drive
- Share files and folders in iCloud Drive
- Share your location
- Add or remove a friend
- Locate a friend
- Get notified when friends change their location
- Notify a friend when your location changes
- Add your iPad
- Get notified if you leave a device behind
- Locate a device
- Mark a device as lost
- Erase a device
- Remove a device
- Add an AirTag
- Share an AirTag or other item in Find My on iPad
- Add a third-party item
- Get notified if you leave an item behind
- Locate an item
- Mark an item as lost
- Remove an item
- Adjust map settings
- Get started with Freeform
- Create a Freeform board
- Draw or handwrite
- Apply consistent styles
- Position items on a board
- Search Freeform boards
- Share and collaborate
- Delete and recover boards
- Get started with Health
- Fill out your Health Details
- Intro to Health data
- View your health data
- Share your health data
- View health data shared by others
- Download health records
- View health records
- Log menstrual cycle information
- View menstrual cycle predictions and history
- Track your medications
- Learn more about your medications
- Log your state of mind
- Take a mental health assessment
- Customize your Sleep Focus
- Turn Sleep Focus on or off
- View your sleep history
- Check your headphone audio levels
- Use audiogram data
- Back up your Health data
- Intro to Home
- Upgrade to the new Home architecture
- Set up accessories
- Control accessories
- Control your home using Siri
- Use Grid Forecast to plan your energy usage
- Set up HomePod
- Control your home remotely
- Create and use scenes
- Use automations
- Set up security cameras
- Use Face Recognition
- Configure a router
- Invite others to control accessories
- Add more homes
- Get music, movies, and TV shows
- Get ringtones
- Manage purchases and settings
- Magnify nearby objects
- Change settings
- Detect people around you
- Detect doors around you
- Receive image descriptions of your surroundings
- Read aloud text and labels around you
- Set up shortcuts for Detection Mode
- Add and remove email accounts
- Set up a custom email domain
- Check your email
- Unsend email with Undo send
- Reply to and forward emails
- Save an email draft
- Add email attachments
- Download email attachments
- Annotate email attachments
- Set email notifications
- Search for email
- Organize your email in mailboxes
- Flag or block emails
- Filter emails
- Use Hide My Email
- Use Mail Privacy Protection
- Change email settings
- Delete and recover emails
- Add a Mail widget to your Home Screen
- Print emails
Use keyboard shortcuts
- Get travel directions
- Select other route options
- Find stops along your route
- View a route overview or a list of turns
- Change settings for spoken directions
- Get driving directions
- Report traffic incidents
- Get cycling directions
- Get walking directions
- Get transit directions
- Delete recent directions
- Get traffic and weather info
- Predict travel time and ETA
- Download offline maps
- Search for places
- Find nearby attractions, restaurants, and services
- Get information about places
- Mark places
- Share places
- Rate places
- Save favorite places
- Explore new places with Guides
- Organize places in My Guides
- Delete significant locations
- Look around places
- Take Flyover tours
- Find your Maps settings
- Measure dimensions
- View and save measurements
- Measure a person’s height
- Set up Messages
- About iMessage
- Send and reply to messages
- Unsend and edit messages
- Keep track of messages
- Forward and share messages
- Group conversations
- Watch, listen, or play together using SharePlay
- Collaborate on projects
- Use iMessage apps
- Take and edit photos or videos
- Share photos, links, and more
- Send stickers
- Request, send, and receive payments
- Send and receive audio messages
- Animate messages
- Change notifications
- Block, filter, and report messages
- Delete messages and attachments
- Recover deleted messages
- View albums, playlists, and more
- Show song credits and lyrics
- Queue up your music
- Listen to broadcast radio
- Subscribe to Apple Music
- Listen to lossless music
- Listen to Dolby Atmos music
- Apple Music Sing
- Find new music
- Add music and listen offline
- Get personalized recommendations
- Listen to radio
- Search for music
- Create playlists
- See what your friends are listening to
- Use Siri to play music
- Change the way music sounds
- Get started with News
- Use News widgets
- See news stories chosen just for you
- Read stories
- Follow your favorite teams with My Sports
- Subscribe to Apple News+
- Browse and read Apple News+ stories and issues
- Download Apple News+ issues
- Solve crossword puzzles
- Search for news stories
- Save stories in News for later
- Subscribe to individual news channels
- Get started with Notes
- Add or remove accounts
- Create and format notes
- Draw or write
- Add photos, videos, and more
- Scan text and documents
- Work with PDFs
- Create Quick Notes
- Search notes
- Organize in folders
- Organize with tags
- Use Smart Folders
- Export or print notes
- Change Notes settings
- Delete, share, or copy a photo
- View and edit Photo Booth photos in the Photos app
- View photos and videos
- Play videos and slideshows
- Delete or hide photos and videos
- Edit photos and videos
- Trim video length and adjust slow motion
- Edit Live Photos
- Edit Cinematic videos
- Edit portraits
- Use photo albums
- Edit, share, and organize albums
- Filter and sort photos and videos in albums
- Make stickers from your photos
- Duplicate and copy photos and videos
- Merge duplicate photos
- Search for photos
- Identify people and pets
- Browse photos by location
- Share photos and videos
- Share long videos
- View photos and videos shared with you
- Watch memories
- Personalize your memories
- Manage memories and featured photos
- Use iCloud Photos
- Create shared albums
- Add and remove people in a shared album
- Add and delete photos and videos in a shared album
- Set up or join an iCloud Shared Photo Library
- Add content to an iCloud Shared Photo Library
- Use iCloud Shared Photo Library
- Import and export photos and videos
- Print photos
- Find podcasts
- Listen to podcasts
- Follow your favorite podcasts
- Use the Podcasts widget
- Organize your podcast library
- Download, save, and share podcasts
- Subscribe to podcasts
- Listen to subscriber-only content
- Change download settings
- Make a grocery list
- Add items to a list
- Edit and manage a list
- Search and organize lists
- Work with templates
- Use Smart Lists
- Print reminders
- Use the Reminders widget
- Change Reminders settings
- Browse the web
- Search for websites
- Customize your Safari settings
- Change the layout
- Use Safari profiles
- Open and close tabs
- Organize your tabs with Tab Groups
- View your tabs from another device
- Share Tab Groups
- Use Siri to listen to a webpage
- Bookmark a website
- Bookmark a website as a favorite
- Save pages to a Reading List
- Find links shared with you
- Annotate and save a webpage as a PDF
- Automatically fill in forms
- Get extensions
- Hide ads and distractions
- Clear your cache
- Browse the web privately
- Use passkeys in Safari
- Check stocks
- Manage multiple watchlists
- Read business news
- Add earnings reports to your calendar
- Use a Stocks widget
- Translate text, voice, and conversations
- Translate text in apps
- Translate with the camera view
- Subscribe to Apple TV+, MLS Season Pass, or an Apple TV channel
- Add your TV provider
- Get shows, movies, and more
- Watch sports
- Watch Major League Soccer with MLS Season Pass
- Watch multiple live sports streams
- Control playback
- Manage your library
- Change the settings
- Make a recording
- Play it back
- Edit or delete a recording
- Keep recordings up to date
- Organize recordings
- Search for or rename a recording
- Share a recording
- Duplicate a recording
- Check the weather
- Check the weather in other locations
- View weather maps
- Manage weather notifications
- Use Weather widgets
- Learn the weather icons
- Find out what Siri can do
- Tell Siri about yourself
- Have Siri announce calls and notifications
- Add Siri Shortcuts
- About Siri Suggestions
- Change Siri settings
- Set up Family Sharing
- Add Family Sharing members
- Remove Family Sharing members
- Share subscriptions
- Share purchases
- Share locations with family and locate lost devices
- Set up Apple Cash Family and Apple Card Family
- Set up parental controls
- Set up a child’s device
- Get started with Screen Time
- Protect your vision health with Screen Distance
- Set up Screen Time for yourself
- Set communication and safety limits and block inappropriate content
- Set up Screen Time for a family member
- Set up Apple Pay
- Use Apple Pay in apps and on the web
- Track your orders
- Use Apple Cash
- Use Apple Card
- Use Savings
- Manage payment cards and activity
- Power adapter and charge cable
- Use AirPods
- Use EarPods
- Use headphone audio-level features
- Apple Pencil compatibility
- Pair and charge Apple Pencil (1st generation)
- Pair and charge Apple Pencil (2nd generation)
- Pair and charge Apple Pencil (USB-C)
- Enter text with Scribble
- Draw with Apple Pencil
- Take and mark up a screenshot with Apple Pencil
- Quickly write notes
- Preview tools and controls with Apple Pencil hover
- Wirelessly stream videos and photos to Apple TV or a smart TV
- Connect to a display with a cable
- HomePod and other wireless speakers
- iPad keyboards
- Switch between keyboards
- Enter characters with diacritical marks
- Use shortcuts
- Choose an alternative keyboard layout
- Change typing assistance options
- Connect Magic Trackpad
- Trackpad gestures
- Change trackpad settings
- Connect a mouse
- Mouse actions and gestures
- Change mouse settings
- External storage devices
- Bluetooth accessories
- Apple Watch with Fitness+
- Share your internet connection
- Make and receive phone calls
- Use iPad as a second display for Mac
- Use iPad as a webcam
- Use a keyboard and mouse or trackpad across your Mac and iPad
- Hand off tasks between devices
- Cut, copy, and paste between iPad and other devices
- Stream video or mirror the screen of your iPad
- Use AirDrop to send items
- Connect iPad and your computer with a cable
- Transfer files between devices
- Transfer files with email, messages, or AirDrop
- Transfer files or sync content with the Finder or iTunes
- Automatically keep files up to date with iCloud
- Use an external storage device, a file server, or a cloud storage service
- Get started with accessibility features
- Turn on accessibility features for setup
- Change Siri accessibility settings
- Open features with Accessibility Shortcut
- Enlarge text by hovering
- Change color and brightness
- Make text easier to read
- Reduce onscreen motion
- Customize per-app visual settings
- Hear what’s on the screen or typed
- Hear audio descriptions
- Turn on and practice VoiceOver
- Change your VoiceOver settings
- Use VoiceOver gestures
- Operate iPad when VoiceOver is on
- Control VoiceOver using the rotor
- Use the onscreen keyboard
- Write with your finger
- Use VoiceOver with an Apple external keyboard
- Use a braille display
- Type braille on the screen
- Customize gestures and keyboard shortcuts
- Use VoiceOver with a pointer device
- Use VoiceOver for images and videos
- Use VoiceOver in apps
- Use AssistiveTouch
- Use an eye-tracking device
- Adjust how iPad responds to your touch
- Auto-answer calls
- Change Face ID and attention settings
- Use Voice Control
- Adjust the top or Home button
- Use Apple TV Remote buttons
- Adjust pointer settings
- Adjust keyboard settings
- Adjust AirPods settings
- Adjust Apple Pencil settings
- Control a nearby Apple device
- Intro to Switch Control
- Set up and turn on Switch Control
- Select items, perform actions, and more
- Control several devices with one switch
- Use hearing devices
- Use Live Listen
- Use sound recognition
- Set up and use RTT
- Flash the LED for alerts
- Adjust audio settings
- Play background sounds
- Display subtitles and captions
- Show transcriptions for Intercom messages
- Get Live Captions (beta)
- Type to speak
- Record a Personal Voice
- Use Guided Access
- Use built-in privacy and security protections
- Set a passcode
- Set up Face ID
- Set up Touch ID
- Control access to information on the Lock Screen
- Keep your Apple ID secure
- Use passkeys to sign in to apps and websites
- Sign in with Apple
- Share passwords
- Automatically fill in strong passwords
- Change weak or compromised passwords
- View your passwords and related information
- Share passkeys and passwords securely with AirDrop
- Make your passkeys and passwords available on all your devices
- Automatically fill in verification codes
- Sign in with fewer CAPTCHA challenges
- Two-factor authentication
- Use security keys
- Control app tracking permissions
- Control the location information you share
- Control access to information in apps
- Control how Apple delivers advertising to you
- Control access to hardware features
- Create and manage Hide My Email addresses
- Protect your web browsing with iCloud Private Relay
- Use a private network address
- Use Advanced Data Protection
- Use Lockdown Mode
- Receive warnings about sensitive content
- Use Contact Key Verification
- Turn iPad on or off
- Force restart iPad
- Update iPadOS
- Back up iPad
- Return iPad settings to their defaults
- Restore all content from a backup
- Restore purchased and deleted items
- Sell, give away, or trade in your iPad
- Install or remove configuration profiles
- Important safety information
- Important handling information
- Find more resources for software and service
- FCC compliance statement
- ISED Canada compliance statement
- Apple and the environment
- Class 1 Laser information
- Disposal and recycling information
- Unauthorized modification of iPadOS
- ENERGY STAR compliance statement
Customize your Safari settings on iPad
Customize your start page
Every time you open a new tab, you begin on your start page. You can customize your start page with new background images and options.

Scroll to the bottom of the page, then tap Edit.
Choose options for your start page.
Favorites: Display shortcuts to your favorite bookmarked websites. See Add a website to Favorites .
Frequently Visited: Go straight to the websites you visit most.
Shared with You: See links shared with you in Messages. See Find links shared with you .
Privacy Report: Stay updated on how many trackers and websites Safari blocked from tracking you. See View the Privacy Report .
Siri Suggestions: As you search, allow websites shared in Calendar and other apps to appear.
Reading List: Show webpages currently in your Reading List. See Add the current webpage to your Reading List .
Recently Closed Tabs: Go back to tabs you previously closed.
iCloud Tabs: Show open tabs from other Apple devices where you’re signed in with the same Apple ID and Safari is turned on in iCloud settings or preferences. See Organize your tabs with Tab Groups .
Note: Your custom start page settings are updated on all your Apple devices where you have Use Start Page on All Devices turned on, and you’re signed in with the same Apple ID using two-factor authentication .
Change the text size for a website on Safari
Tap the large A to increase the font size or the small A to decrease it.

Change the display controls for a website on Safari
You can hide the search field, switch to Reader, and more.
Hide the search field: Tap Hide Toolbar (tap the top of the screen to get it back).
See a streamlined view of the webpage: Tap Show Reader (if available).
To return to the normal view, tap Hide Reader.
See what the webpage looks like on a desktop computer: Tap Request Desktop Website (if available).
You can also adjust Safari settings in Accessibility settings. Go to Settings > Accessibility > Per-App Settings. Tap Add App, choose Safari, then tap Safari to adjust the settings.
Choose where to save downloads
When you download a file in Safari, you can choose whether to save it to iCloud or on your iPad.
iCloud Drive: Select this option to save downloads to the Downloads folder in iCloud Drive. This allows you to access the downloaded file on any iPhone, iPad, or Mac where you’re signed in with the same Apple ID .
On My iPad: Select this option to save downloads to the Downloads folder on your iPad.
Share website passwords with a group
You can create a group of trusted contacts and share a set of passwords. Passwords stay up to date for everyone in the group, and you can remove someone at any time.
See Create shared password groups .
Adjust privacy settings for Safari
You can choose what privacy settings you want across Safari, and create individual exceptions for websites. See Browse privately .
You can navigate in Safari using keyboard shortcuts if you have an Apple external keyboard connected to your iPad.
To view available keyboard shortcuts, connect your keyboard, then press and hold the Command key.
How to View, Manage, or Remove a Safari Extension
Safari extension showing up in Launchpad? Cannot get the old extension file working? Well, we have all the answers for you!

With the introduction of macOS Mojave, there came a new set of rules for the Safari extension. Apple decided, the extensions will now have to be installed through the macOS app store. Not only that, but the extensions will also show up as apps in Launchpad.
It’s been 3 years now this system is in practice, and the process to manage Safari extensions remains as serpentine as ever. If you are also the one bearing the torturous wrath of safari extensions and in need of a systemic way to handle them, you have landed on just the right page.
View Safari Extensions
To view the available extension list. Launch the Safari app from the dock or from Launchpad.
Next, from the upper right corner of the menu bar. Click on the ‘Safari’ tab. Then click on the ‘Preferences’ option.
Now, go to the ‘Extensions’ tab. You will be able to see all installed extensions on Safari.
Manage Safari Extensions
Well, managing Safari extensions can surely get a bit tricky. However, it’s easy as a pie once you know what you are doing.
Get a New Extension
To get new extensions, launch the Safari application from your dock or Launchpad.

Now, from the top left corner of the toolbar, click on ‘Safari’ and click on the ‘Safari Extensions’ option. It will take you right to the Safari extensions section on the Mac app store.
After that, click on ‘Get’ or price to purchase the extension. It will transform to ‘Install’, after that click on ‘Install’ on the extension from the now launched App store window.

Disable an Extension
If you don’t want to remove an extension, and just disable it for the time being. Go to the ‘Extensions’ tab from Safari preferences. Next, uncheck the desired extension from the list. The aforementioned extension will now be disabled.

Remove a Safari Extension
Here comes the most cringe worthy process. However, let’s get it over with.
Go to the ‘Extensions’ tab in Safari, as we did earlier in this guide above. Now, from the extensions tab, first, disable the extension by unchecking it from the list. Then, click on the ‘Uninstall’ option from the right section of the window.

Now, you will receive a prompt asking you to remove the application containing the extension. Click on the ‘Show in Finder’ option.

Next, secondary click on the said application and select the ‘Move to trash’ option from the list.

After that, enter your password to move the application to trash. Once, entered the application will be removed along with the Safari extension.

We hope after reading this, Safari gets a bit more tolerable. If not, well, there are many good options available out there and you dear reader are not in an exclusive relationship with Safari!

How to Use Gemini Code Assist in VS Code

How to Code Using AI

Microsoft Copilot Pro Review: There is a lot of Unrealized Potential
Get all the latest posts delivered straight to your inbox., member discussion.

How to Enable Cookies on iPhone

How to Block Websites on iPhone

How to Disable Pop up Blocker on iPhone

How to Import Data from Safari to Microsoft Edge on Mac

How to Disable or Hide 'Shared with You' section on Safari Start Page on iPhone
How to use Safari extensions on your iPhone and iPad
Along with some extensions to try.
By Barbara Krasnoff , a reviews editor who manages how-tos. She’s worked as an editor and writer for almost 40 years. Previously, she was a senior reviews editor for Computerworld.
Share this story
If you buy something from a Verge link, Vox Media may earn a commission. See our ethics statement.
:format(webp)/cdn.vox-cdn.com/uploads/chorus_asset/file/22863260/akrales_210917_4760_0330.jpg)
One of the handiest types of software in anyone’s quiver is the browser extension: those cool little applets that let your browser do what you want it to do. And one of the nicest things about iOS 15 and iPadOS 15 is that you can now add extensions to the Safari browser. Even though this is a new feature that launched with the latest iOS version, there are already a number of useful extensions available for you to add.
What follows is a rundown on how to add extensions to your Safari app — while we’ve illustrated the process using an iPhone, you can follow the same basic directions with an iPad. We’ve also included a sampling of some extensions you can try.
How to add extensions
- Tap on the Settings app.
- Scroll down to and select Safari > Extensions.
- Any extensions that you’ve already installed will be listed here. Tap on “More Extensions” if you’d like to see what’s available in the App Store. (You can also simply go to the App Store and search on “Safari Extensions.”)
:format(webp)/cdn.vox-cdn.com/uploads/chorus_asset/file/22924238/makephotogallery.net_1634147611611.png "delete extension safari ipad")
- Once you’ve installed your first extension, you’ll see a little “puzzle piece” icon on the left side of Safari’s address bar. Tap that, and the menu that pops up will include your current extensions plus a “Manage Extensions” selection, which lets you toggle your extensions on and off.
:format(webp)/cdn.vox-cdn.com/uploads/chorus_asset/file/22924199/IMG_62BD37855789_1.jpeg "delete extension safari ipad")
Some extensions to try
This is a small sampling of some of the extensions that you can now access via the App Store. While there are not many extensions yet available (compared to the number of extensions for, say, Chrome), it’s a pretty safe bet that there will be lots more to come over the next few months.
Amplosion ($2.99)
AMP, which is short for “Accelerated Mobile Pages,” is a web format created by Google to optimize search results for mobile browsers. However, if you’d rather not have Google tweaking the webpages you upload, you can use Amplosion to redirect the AMP links that show up in search results into normal mobile links.
Noir ($2.99)
When you’re browsing at night and you’ve set your iPhone or iPad to dark mode, you will often hit a website that is bright enough to make your eyes water. Noir allows you to set a dark mode for all the websites you visit.
1Password (subscription needed)
1Password is a well-known and respected password manager . If you’re a 1Password user, there’s no question that you’re going to want to add this one to your mobile Safari app.
Super Agent for Safari (free)
This handy extension automatically fills out a website’s cookie consent forms based on your preferences, which can save you a lot of time and irritation.
Web Inspector (free)
Something for developers: an app that lets you inspect the HTML coding of a website, modify it, debug it, and perform other essential tasks.
The invisible seafaring industry that keeps the internet afloat
The free delta game emulator for iphones is live on apple’s app store, sony might have perfected mini led tvs with its new 2024 lineup, google fires 28 employees after sit-in protest over israel cloud contract, nine google employees arrested after eight-hour sit-in protest.
More from Tech
:format(webp)/cdn.vox-cdn.com/uploads/chorus_asset/file/25184511/111323_PlayStation_Portal_ADiBenedetto_0013.jpg "delete extension safari ipad")
Sony’s portable PlayStation Portal is back in stock
:format(webp)/cdn.vox-cdn.com/uploads/chorus_asset/file/23925998/acastro_STK054_03.jpg "delete extension safari ipad")
The Nintendo Switch 2 will now reportedly arrive in 2025 instead of 2024
:format(webp)/cdn.vox-cdn.com/uploads/chorus_asset/file/19336098/cwelch_191031_3763_0002.jpg "delete extension safari ipad")
The best Presidents Day deals you can already get
:format(webp)/cdn.vox-cdn.com/uploads/chorus_asset/file/25289959/Command_Line_Site_Post_Dylan_Field_Figma.jpg "delete extension safari ipad")
Interview: Figma’s CEO on life after the company’s failed sale to Adobe
How to add and enable extensions in Safari for iPhone and iPad

- How to add an extension to Safari
- How to enable an extension in Safari
If you use Safari on your Mac, then you may be familiar with extensions. These are basically add-ons for Safari that you can customize the browser with, and they enhance your overall user experience. Since Safari itself is pretty barebones to start with, having extensions can greatly improve the usability of Apple's native browser.
With iOS 15 and iPadOS 15, Apple added extensions for mobile Safari, bringing it more in line with the desktop version. But how do you go about adding and enabling them? Don't worry, we'll show you the ropes.
How to add an extension to Safari on iPhone and iPad
Before you can start using Safari extensions, you'll need apps that support the feature first. You also want to make sure that you are running iOS 15 or iPadOS 15 on your best iPhone and favorite iPad , respectively. Since this is a brand new feature, you need to be running the latest software for it to work. It won't be available with iOS/iPadOS 14 and earlier.
You can add an extension to Safari by downloading apps with Safari extensions just like any other app or game on the App Store. You can simply search for "Safari extensions" on the App Store search page, or check a simple list that Apple has with some extension apps .
For a full collection of all supported apps on the App Store, you can get to it from the Settings app.
- Launch Settings on your iPhone or iPad.
- Scroll down and tap Safari .
- Tap Extensions .

- Scroll down and tap More Extensions . This takes you to the App Store with all apps that support extensions.
- Tap Get (Free) or $X.XX on the apps with Safari extensions that you want to use.

- Download or purchase the app like you would with any other app or game.
How to enable an extension in Safari on iPhone and iPad
Once you have your apps with Safari extensions, you need to make sure that they are enabled before they can start working. There are two ways to go about this: from Settings, or directly in Safari.
To do this from Settings :
Master your iPhone in minutes
iMore offers spot-on advice and guidance from our team of experts, with decades of Apple device experience to lean on. Learn more with iMore!
- Under the Allow These Extensions area, tap on the extension you want to enable.
- Turn the toggle to ON (green) if you want to enable the extension.

- Repeat steps 1-5 for all extensions you want to enable.
To do this from Safari :
- Launch Safari on your iPhone or iPad.
- Tap the Reader/Extensions button in the toolbar . It looks like "AA" with a puzzle piece next to it.

- In the menu that pops up, tap Manage Extensions .
- Turn the toggle to ON (green) for any extension you want to use.
- Optionally, to disable an extension, just make sure the toggle is OFF (gray).

Make your life better with Safari extensions
As you can see, Safari extensions can really improve your mobile web experience. Extensions are used to block annoying ads and trackers, enable dark mode on any webpage, give you Picture-in-Picture for videos, help you save money, and more. And there are so many on the App Store! If you want some personal recommendations, check out what we think are the best Safari extensions for iPhone and iPad .

Christine Romero-Chan was formerly a Senior Editor for iMore. She has been writing about technology, specifically Apple, for over a decade at a variety of websites. She is currently part of the Digital Trends team, and has been using Apple’s smartphone since the original iPhone back in 2007. While her main speciality is the iPhone, she also covers Apple Watch, iPad, and Mac when needed. When she isn’t writing about Apple, Christine can often be found at Disneyland in Anaheim, California, as she is a passholder and obsessed with all things Disney, especially Star Wars. Christine also enjoys coffee, food, photography, mechanical keyboards, and spending as much time with her new daughter as possible.
Upcoming iOS 18 iPhone update tipped to include new Notes app voice recording and math features as WWDC 2024 nears
This dark mode iPhone app is a dream come true for night-time reading — here's how to use it
Delta iPhone emulator also works on Mac and Apple Vision Pro — but you'll need a controller for the best experience
Most Popular
- 2 iPhone 17: Everything you need to know
- 3 The creator of a PSP emulator has said it will come to iPhone but ‘it all depends on how Apple interprets their own rules’
- 4 Do Snapdragon X Elite benchmarks spell danger for Apple's M3 chip?
- 5 Your iPhone has a hidden sound library that will help you sleep better
How To Delete Safari From IPad

- Software & Applications
- Browsers & Extensions

Introduction
So, you've decided to bid farewell to Safari on your iPad. Whether you're looking to free up some space, streamline your browsing experience, or simply prefer an alternative browser, removing Safari is a straightforward process. In this guide, we'll walk you through the steps to delete the Safari app from your iPad. By the end of this tutorial, you'll have a clear understanding of how to remove Safari and potentially explore other browsing options that better suit your needs.
Deleting the Safari app from your iPad can be a liberating experience. It's akin to decluttering your digital space, allowing you to customize your device to align with your preferences. While Safari is a robust and user-friendly browser , there are numerous alternatives available, each with its own set of features and benefits. By removing Safari, you open the door to exploring these alternatives and finding the perfect fit for your browsing habits.
Whether you're a casual iPad user or a tech-savvy individual seeking to optimize your device, understanding how to delete the Safari app is a valuable skill. This knowledge empowers you to take control of your digital environment, tailoring it to your specific requirements. Additionally, by learning the steps to remove an app from your iPad, you gain a deeper understanding of the device's functionality, enhancing your overall user experience.
Now, let's delve into the step-by-step process of removing Safari from your iPad. By following these instructions, you'll be able to confidently navigate the settings and manage your apps, ensuring that your iPad reflects your individual preferences and usage patterns. Let's embark on this journey to declutter your device and explore the myriad of browsing options available to you.
Step 1: Locate the Safari App
Locating the Safari app on your iPad is the first step towards removing it from your device. Safari is the default web browser on iPads, making it easily accessible from the home screen. To begin the process of deleting Safari, you'll need to pinpoint its location amidst the array of app icons on your iPad.
Navigate to the Home Screen : Upon unlocking your iPad, you'll find yourself on the home screen, adorned with a multitude of app icons. Take a moment to familiarize yourself with the layout, as the Safari app icon may be positioned among the various other apps.
Swipe Through App Pages : If you don't immediately spot the Safari app on the initial screen, swipe left or right to navigate through additional app pages. iPads can accommodate multiple pages of apps, so it's essential to thoroughly scan each page to locate the Safari icon.
Use the Search Feature : Alternatively, you can utilize the search feature by swiping down from the middle of the home screen. This action will reveal the search bar at the top of the screen. Type "Safari" into the search bar, and the iPad will display the app icon, allowing you to access it directly.
Spot the Compass Icon : The Safari app is represented by a compass icon, making it easily recognizable amidst the sea of app icons. Look for a blue compass with a red needle, which serves as the distinctive emblem of the Safari browser.
By following these steps, you'll successfully locate the Safari app on your iPad, setting the stage for the subsequent steps to remove it from your device. Once you've identified the Safari app, you can proceed to the next phase of the deletion process, ultimately customizing your iPad to align with your browsing preferences.
Step 2: Press and Hold the Safari App Icon
Once you've located the Safari app on your iPad, the next step is to initiate the deletion process by pressing and holding the Safari app icon. This action triggers the familiar app management interface, allowing you to proceed with removing the Safari browser from your device.
To press and hold the Safari app icon, simply follow these straightforward instructions:
Long-Press the Safari App Icon : Position your finger on the Safari app icon and press and hold it for a few seconds. As you do this, the app icons on the screen may start to wiggle slightly, indicating that you've activated the app management mode.
Wait for the Icons to Wiggle : When you press and hold the Safari app icon, the surrounding app icons will begin to wiggle, signifying that you've entered the app management mode. This visual cue confirms that you're now able to modify the arrangement of apps on your iPad.
Avoid Releasing Too Soon : It's important to maintain the press-and-hold action until the app icons start to wiggle. Releasing too soon may result in the app management interface not being activated, requiring you to repeat the process to access the necessary options.
Prepare for Customization : The wiggling app icons indicate that you're now in a position to customize your app layout, including the ability to delete apps from your iPad. This visual feedback serves as a prompt for you to proceed with the next steps in managing your apps.
By pressing and holding the Safari app icon, you've successfully activated the app management mode, setting the stage for the subsequent steps in the deletion process. This simple yet pivotal action paves the way for you to seamlessly navigate the app management interface and proceed with removing the Safari browser from your iPad.
Step 3: Tap "Delete App"
After successfully activating the app management mode by pressing and holding the Safari app icon, the next crucial step in removing Safari from your iPad is to tap the "Delete App" option. This action initiates the deletion process, allowing you to proceed with removing the Safari browser from your device.
To tap "Delete App," follow these straightforward instructions:
Locate the 'X' Icon : Upon entering the app management mode, you'll notice that each app icon displays a small 'X' symbol in the top-left corner. This 'X' serves as the visual indicator for deleting an app from your iPad. Locate the 'X' icon overlaid on the Safari app icon, signaling that you can proceed with the deletion process.
Tap the 'X' Icon : Position your finger over the 'X' icon on the Safari app and tap it. This action prompts the iPad to display a confirmation dialogue, ensuring that you intend to delete the Safari browser from your device. By tapping the 'X' icon, you're signaling your intent to remove the app, initiating the next phase of the deletion process.
Confirm the Deletion : Upon tapping the 'X' icon, the iPad will present a confirmation dialogue, typically asking if you want to delete the app and all its data. This step serves as a safeguard, preventing accidental deletions and ensuring that you consciously choose to remove the Safari browser from your iPad. To proceed with the deletion, tap the "Delete" option within the confirmation dialogue.
Wait for the Deletion Process : Once you've confirmed the deletion, the iPad will commence the removal process, erasing the Safari app and its associated data from your device. Depending on the app's size and the amount of data it contains, this process may take a few moments to complete. During this time, it's essential to allow the iPad to finalize the deletion, ensuring that the Safari browser is fully removed from your device.
By tapping "Delete App" and confirming the deletion, you've taken a decisive step towards removing the Safari browser from your iPad. This straightforward yet pivotal action sets the stage for the final phase of the deletion process, ultimately allowing you to customize your device and explore alternative browsing options that better align with your preferences.
Step 4: Confirm Deletion
After tapping the 'X' icon and signaling your intent to delete the Safari app from your iPad, the confirmation dialogue appears, ensuring that you consciously choose to proceed with the deletion. This crucial step serves as a safeguard, preventing accidental deletions and providing you with the opportunity to confirm your decision before finalizing the removal of the Safari browser from your device.
Upon the appearance of the confirmation dialogue, you'll typically encounter a message prompting you to confirm the deletion of the app and its associated data. This message serves as a final checkpoint, ensuring that you're fully aware of the consequences of removing the Safari browser from your iPad. It's essential to take a moment to review this message, reaffirming your decision to proceed with the deletion.
Once you've carefully considered the implications of removing the Safari app, the confirmation dialogue will typically present two options: "Delete" and "Cancel." The "Delete" option serves as the affirmative action, signaling your commitment to removing the app and its data from your device. On the other hand, the "Cancel" option allows you to retract your decision, preserving the Safari browser and its associated data on your iPad.
To confirm the deletion, tap the "Delete" option within the confirmation dialogue. This decisive action signifies your intent to proceed with removing the Safari app, initiating the final phase of the deletion process. By affirming the deletion, you're actively participating in customizing your device, tailoring it to align with your browsing preferences and digital environment.
Upon tapping "Delete," the iPad will commence the deletion process, erasing the Safari app and its associated data from your device. Depending on the app's size and the amount of data it contains, this process may take a few moments to complete. It's essential to allow the iPad to finalize the deletion, ensuring that the Safari browser is fully removed from your device.
By confirming the deletion, you've successfully navigated through the crucial step of finalizing the removal of the Safari browser from your iPad. This affirmative action empowers you to take control of your digital environment, allowing you to explore alternative browsing options and customize your device to better suit your preferences.
Congratulations! By following the step-by-step instructions outlined in this guide, you've successfully navigated the process of removing the Safari app from your iPad. This decisive action not only frees up valuable space on your device but also empowers you to explore a diverse range of alternative browsers, each offering unique features and capabilities. As you bid adieu to Safari, you open the door to a world of browsing possibilities, allowing you to tailor your digital experience to align with your individual preferences and usage patterns.
The removal of the Safari app marks a pivotal moment in customizing your iPad, reflecting your evolving needs and technological preferences. Whether you're seeking enhanced privacy features, advanced customization options, or seamless integration with other devices and platforms, the act of deleting Safari signifies your proactive approach to optimizing your digital environment.
As you embark on this new chapter of browsing freedom, consider exploring alternative browsers such as Google Chrome, Mozilla Firefox, Microsoft Edge, or Opera. Each of these browsers offers a distinct set of features, ranging from robust security measures and intuitive user interfaces to seamless synchronization across devices. By experimenting with different browsers, you have the opportunity to discover the perfect fit for your browsing habits, ultimately enhancing your digital experience.
Furthermore, the knowledge and skills gained from removing the Safari app from your iPad serve as a testament to your ability to navigate the intricacies of app management and device customization. This newfound proficiency empowers you to confidently manage your apps, streamline your digital space, and adapt your device to suit your evolving needs.
In essence, the removal of the Safari app from your iPad represents a transformative step towards personalizing your digital ecosystem. By embracing change and exploring alternative browsing options, you're actively shaping your digital experience, ensuring that it aligns with your unique preferences and requirements.
As you continue to navigate the ever-evolving landscape of technology, remember that the ability to customize and tailor your digital environment is a powerful tool. By staying informed and proactive, you're poised to make informed decisions that enhance your digital experience, ultimately empowering you to make the most of your technological resources.
So, as you bid farewell to Safari and embrace the myriad of browsing options available, may your digital journey be filled with seamless browsing experiences, enhanced productivity, and a personalized approach to technology. Here's to a future of limitless possibilities and tailored digital experiences!
Leave a Reply Cancel reply
Your email address will not be published. Required fields are marked *
Save my name, email, and website in this browser for the next time I comment.
- Crowdfunding
- Cryptocurrency
- Digital Banking
- Digital Payments
- Investments
- Console Gaming
- Mobile Gaming
- VR/AR Gaming
- Gadget Usage
- Gaming Tips
- Online Safety
- Software Tutorials
- Tech Setup & Troubleshooting
- Buyer’s Guides
- Comparative Analysis
- Gadget Reviews
- Service Reviews
- Software Reviews
- Mobile Devices
- PCs & Laptops
- Smart Home Gadgets
- Content Creation Tools
- Digital Photography
- Video & Music Streaming
- Online Security
- Online Services
- Web Hosting
- WiFi & Ethernet
- Browsers & Extensions
- Communication Platforms
- Operating Systems
- Productivity Tools
- AI & Machine Learning
- Cybersecurity
- Emerging Tech
- IoT & Smart Devices
- Virtual & Augmented Reality
- Latest News
- AI Developments
- Fintech Updates
- Gaming News
- New Product Launches
- AI Writing How Its Changing the Way We Create Content
- How to Find the Best Midjourney Alternative in 2024 A Guide to AI Anime Generators
Related Post
Ai writing: how it’s changing the way we create content, unleashing young geniuses: how lingokids makes learning a blast, 10 best ai math solvers for instant homework solutions, 10 best ai homework helper tools to get instant homework help, 10 best ai humanizers to humanize ai text with ease, sla network: benefits, advantages, satisfaction of both parties to the contract, related posts.

How To Delete Favorites On IPad Safari

How To Delete History On IPad Safari

How Do You Delete Safari

How To Delete Private Browsing History On Safari

How To Delete Downloads On Safari

How To Organize Safari Bookmarks

How To See Safari History On IPad

How To Delete Passwords On Safari
Recent stories.

How to Find the Best Midjourney Alternative in 2024: A Guide to AI Anime Generators

How to Know When it’s the Right Time to Buy Bitcoin

How to Sell Counter-Strike 2 Skins Instantly? A Comprehensive Guide

10 Proven Ways For Online Gamers To Avoid Cyber Attacks And Scams

- Privacy Overview
- Strictly Necessary Cookies
This website uses cookies so that we can provide you with the best user experience possible. Cookie information is stored in your browser and performs functions such as recognising you when you return to our website and helping our team to understand which sections of the website you find most interesting and useful.
Strictly Necessary Cookie should be enabled at all times so that we can save your preferences for cookie settings.
If you disable this cookie, we will not be able to save your preferences. This means that every time you visit this website you will need to enable or disable cookies again.
How-To Geek
How to uninstall or disable safari extensions on mac.
Don't want to use a Safari extension anymore? Here's how you can uninstall and remove the extension from your Mac!
Safari extensions add additional functionality to the browser. They function like mini-apps, and on the Mac, they are installed and behave as apps themselves. If you don't want to use a Safari extension anymore, here's how to uninstall it.
Mac users who are using Safari 12.0 or higher (running macOS Mojave or newer) will see extensions show up as apps. In fact, the older Safari extension file isn't supported anymore .
Just like the process of installing Safari extensions, deleting them is also convoluted. Safari extensions are downloaded as individual apps. This means that to remove an extension, you have to delete the app that comes with it (after first disabling it).
You can manage Safari extensions from the browser's Preferences menu. Click the "Safari" button from the menu bar and select the "Preferences" button.
From here, go to the "Extensions" tab. You'll now see a list of extensions in the left sidebar. To disable an extension, click the checkmark button next to it.
Some extensions have multiple sub-extensions, so you'll have to uncheck them all.
The extension will now disappear from the extension bar.
You can now delete the extension. From the extension information section, click the "Uninstall" button.
You'll now see a pop-up message that reads that the extension is part of the app and that to uninstall the extension, you'll have to remove the app itself. Here, click the "Show in Finder" button.
This will open the Finder with the app selected. Right-click the app and choose the "Move to Bin" (or "Move to Trash") button.
Enter your Mac's username and password and then click the "OK" button.
The extension will now be deleted. If you see the pop-up message that reads that the app wasn't deleted because it was in use, you'll have to go back to Safari's Preferences menu and make sure that the extension is disabled. Again, ensure that all sub-extensions are also disabled.
Once the extension is deleted (moved to the trash), you'll see that it disappears from the Safari extension bar and from Safari Preferences.
Find yourself frequently switching between Safari on your Mac and iPhone? Here's how to seamlessly move Safari tabs between iPhone, iPad, and Mac .
Related: How to Move Safari Tabs Between iPhone, iPad, and Mac
Want to highlight a helpful answer? Upvote!
Did someone help you, or did an answer or User Tip resolve your issue? Upvote by selecting the upvote arrow. Your feedback helps others! Learn more about when to upvote >
Looks like no one’s replied in a while. To start the conversation again, simply ask a new question.
How to remove a safari extension
Iphone 4, iOS 4
Posted on Jul 28, 2010 7:30 AM
Loading page content
Page content loaded
Nov 22, 2017 8:03 PM in response to Richard Walker
Everybody is happy and thankful, but the single Safari extension that shows up for me, Wotja, has neither an uninstall button, nor a button to turn it off. It's blank, not even grayed out, where these buttons should be. Perhaps it's an app that has been stationed there?
Jun 7, 2017 9:20 PM in response to hallor61809
Jul 28, 2010 7:36 AM in response to hallor61809
Jul 28, 2010 7:41 AM in response to Richard Walker
Jul 28, 2010 8:11 AM in response to Richard Walker
Dec 26, 2010 8:43 AM in response to hallor61809
Feb 2, 2011 6:05 AM in response to Richard Walker
Sep 17, 2011 2:33 PM in response to hallor61809
Thanks man! I had this really annoying utube thing
Oct 6, 2011 8:07 PM in response to hallor61809
Thank you to all of you for the tip! I thought Safari would have their own "Extensions" menu item or something along those lines. It NEVER occurred to me to look in the Preferences. 😮
Dec 14, 2012 5:21 PM in response to Richard Walker
THANKS SO MUCH! I have been trying to find out how to do this for what seems like FOREVER. I hope this removes the annoying bell sound I've been getting on my Mac. Sounds like a boxing match start bell when it goes off
Feb 4, 2013 8:36 AM in response to Richard Walker
BIGGEST THANK YOU. Been trying to solve this for the last 2hrs. Cheers.
May 12, 2013 11:42 AM in response to Richard Walker
spot on... cheers mate, its a bit diff to firefox. Thanks man
Oct 31, 2013 4:40 PM in response to Richard Walker
Thank you! it worked for me.
Mar 18, 2014 12:01 PM in response to Richard Walker
You rock, Richard Walker.
Jul 2, 2014 10:05 AM in response to hallor61809
Boom, thank you !
IMAGES
VIDEO
COMMENTS
Follow these steps to delete an extension: Search for the app on your Home Screen or in the App Library. Once you find it, press and hold until the apps begin shaking. Press the minus (-) sign that appears and select Delete App from the popup that appears. Repeat for all extensions you want to delete. Tap Done in the top-right corner to ...
How to add Safari web extension on iPhone or iPad. You can add Safari extension on iPhone or iPad by following the steps below. Step 1. Open Settings and go to Safari. Step 2. Now tap on Extensions option found under the General heading. Step 3. Tap on More Extensions button, after which you will be redirected to the App Store.
Add Safari extensions. Open the Safari app on your iPad. Tap on the right side of the search field, then tap Manage Extensions. Tap More Extensions to browse through extensions in the App Store. When you find one you want, tap the price, or if the app is free, tap Get, then follow the onscreen instructions.
Time needed: 1 minute How to remove unwanted extensions from Safari. From your iPad or iPhone, swipe down on the Home Screen. Using the search bar, search for the extension you want to remove.
On your Mac, open Safari and choose Safari > Settings, then click Extensions. Select "Share across devices" at the bottom of the window. On your iPhone or iPad, go to Settings > Safari > Extensions, then turn on Share Across Devices. If an extension on one device is also compatible with your other devices, it automatically appears in ...
Related: The Evolution of the iPhone: Every Model from 2007-2021. Open Safari and click Safari in the menu bar. Click Preferences. Click the Extensions tab at the top. Click on the extension you'd like to remove. Click Uninstall. Next, learn about how to customize Safari tab groups. Master your iPhone in one minute a day: Sign up here to get ...
To download and install an extension, go to the Safari menu > Safari Extensions, find an extension, and click Get > Install. To activate an extension, go to Safari > Preferences > Extensions, click the check box next to the extension, then click Turn on. Access an extension via its Safari Toolbar icon. To disable: Preferences > Extensions ...
Change the display controls for a website on Safari. You can hide the search field, switch to Reader, and more. Open the Safari app on your iPad. Tap , then do any of the following: Hide the search field: Tap Hide Toolbar (tap the top of the screen to get it back). See a streamlined view of the webpage: Tap Show Reader (if available).
Remove a Safari Extension. Here comes the most cringe worthy process. However, let's get it over with. Go to the 'Extensions' tab in Safari, as we did earlier in this guide above. Now, from the extensions tab, first, disable the extension by unchecking it from the list. Then, click on the 'Uninstall' option from the right section of ...
How to add extensions. Tap on the Settings app. Scroll down to and select Safari > Extensions. Any extensions that you've already installed will be listed here. Tap on "More Extensions" if ...
Once Safari is open, accessing the Extensions menu is the next crucial step in the process of managing and removing unwanted extensions. Safari simplifies the task of managing extensions by providing a dedicated menu where users can view, enable, disable, and remove extensions with ease. Here's how you can access the Extensions menu on Safari ...
Enable an extension in Safari on iPhone from Settings by showing: Tap the extension you want, tap the toggle to ON (green) (Image credit: iMore) Repeat steps 1-5 for all extensions you want to enable. To do this from Safari: Launch Safari on your iPhone or iPad. Tap the Reader/Extensions button in the toolbar.
Before you can actually use an extension, you'll need to enable it. The process is the same on both iPhone and iPad. Open Settings, select the Safari settings menu, then tap Extensions. Under Allow These Extensions, you'll see a list of all the extensions you've installed and whether they're enabled or not. To enable an extension, tap on it ...
There are extensions for web-browsers (such as Safari) and Network Extensions that expose additional protocol support (such as DoH, DoT etc.), content filtering and/or VPN services. Safari extensions (such as Content and Ad-filtering) are generally added or deleted by installing or removing a related App - but can be enabled/disabled here:
Open Safari on your iPhone or iPad. On the iPad, tap the Share icon in the top toolbar. If using the iPhone, tap the three dot icon in the toolbar and then select Share. Scroll through the list of actions and tap the extension. In the event that you can't find your extension in your list of Actions, you'll need to add it.
Step 3: Tap "Delete App". After successfully activating the app management mode by pressing and holding the Safari app icon, the next crucial step in removing Safari from your iPad is to tap the "Delete App" option. This action initiates the deletion process, allowing you to proceed with removing the Safari browser from your device.
Click the "Safari" button from the menu bar and select the "Preferences" button. From here, go to the "Extensions" tab. You'll now see a list of extensions in the left sidebar. To disable an extension, click the checkmark button next to it. Some extensions have multiple sub-extensions, so you'll have to uncheck them all.
Launch Safari > Safari menu > Preferences. 2. Select the Extensions pane. 3. To disable an extension but leave it installed, uncheck the box next to its name. To delete an extension completely, click on it, then in the main window, choose Uninstall. 4. Repeat steps 4 and 5 for every extension you want to remove. 5.
Then, delete the Honey app according to Delete apps on your iPhone, iPad, and iPod touch - Apple Support. Show more Less. View in context. Similar questions. ... Delete the PayPal app and they Honey extension will be deleted from Safari. Show more Less. Reply. Link. of 1; Removing PayPal honey extension from iPad.
Safari Menu/Preferences... Click on the extensions tab. Choose the extension you want to uninstall. Click the Uninstall button. Hope that helps. Richard Walker. Level 1. 50 points. Jul 28, 2010 7:41 AM in response to Richard Walker.