- Find a Location

How To Level and Stabilize Your RV

Many RVs will not be equipped with an auto-leveling system. So, before you arrive at your campsite, you must know how to manually level your rig.
What You Need To Level a Towable RV
- A bubble level
- RV Leveling blocks (or 2 x 6 pieces of wood, if you prefer)
- Wheel chocks ( Very important because towables don’t have transmissions or parking brakes of their own!)
- Jack crank handle or scissor jack drill attachment
What You Need To Level a Motorized RV
- Leveling blocks (or a few 2-inch by 6-inch pieces of wood if you prefer)
With those items packed, you’ll be ready to level your RV when you set up camp.
How To Level Your Towable RV Manually

You will need to level your RV both left to right and front to back. Here are the steps to leveling a travel trailer or fifth wheel manually.
How to Level Your RV Left to Right
Step 1: position your rv.

When backing a trailer into a campsite , try to get as close as possible to being level left to right. Rolling forward or backward as you’re pulling can help you get close to level left to right. Use a handheld bubble level (or a built-in level inside your RV) to check your level side to side.
TIP: Place that handheld bubble level on the RV floor, the RV’s rear bumper, or a countertop to check the level.
Step 2: Set your Leveling Blocks

Decide if you need to raise the right tires or the left tires to become level left to right. If you’re close to level, try going up on just one block. If you’re off by a bit, try going up onto two blocks. It’s not recommended to go up more than three blocks.
TIP: Make it easier to drive up (or roll back) on the blocks by building a platform––for example, use five blocks to make a kind of ramp or slope to go up the height of two blocks.
Step 3: Pull Onto Leveling Blocks

Look at the angle of your campsite and trailer. Decide if it will be easier to roll back onto blocks or to pull the RV forward up onto blocks. If you’re going to roll back, place your blocks behind the wheel. For pulling forward, lay the blocks in front of the wheel.
Pull your towable onto leveling blocks slowly. It’s best to have someone who knows how to guide an RV to help you with this process. If you’re alone, go slow and check your placement several times.
TIP: Set your parking brake each time you need to leave your tow vehicle.
Check to see if you are now level. If you’re not yet level, you may need to pull off the blocks, add another level, and repeat the process.
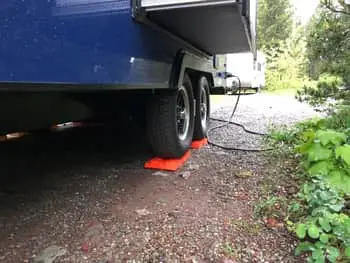
Step 4: Chock Your Wheels

Now that you are level from left to right, do NOT unhitch yet. Instead, grab your wheel chocks and chock the wheel that you did not raise up blocks. Place a wheel chock on both sides of the tire so that your camper can’t roll.
Step 5: Unhitch

With both wheel chocks firmly in place, you can now go ahead and disconnect your tow hitch. If you’re towing a 5th wheel, make sure you don’t make the most common mistake that new fifth wheel owners make .
How to Level Your RV Front to Back
Step 1: use your bubble level.
Grab your bubble level one more time, but this time check the level of your RV front to back. Place the level on the floor inside your towable RV to check the front-to-back level.
Step 2: Adjust the Jack

Level your trailer by raising or lowering your fifth wheel’s landing jack or your travel trailer’s tongue jack. Some jacks are power jacks and some are manual hand-crank jacks.
Step 3: Stabilize
Now that your RV is level, lower (or place) your stabilizing jacks onto jack pads. Extend just until they make solid contact with the pad and be sure there is equal pressure on all of them. These jacks are for stabilizing only and should NOT be used to lift your towable RV to adjust the level.
TIP: Don’t extend your RV slideouts until your RV is level and stable.
How To Manually Level Your Motorhome

Many Class B and Class C RVs , and even some used travel trailers , won’t have an auto-leveling system, so you’ll need to manually level your motorized RV when you arrive at your campsite.
The process is mainly the same. Check your level, set leveling blocks, pull onto the blocks, and re-check your level. But here are a few additional considerations for motorized RVs :
- Check your level left to right and front to back. You want to start out as levelly as possible. It’s easier to reposition your RV before you start driving up onto blocks.
- To adjust the level front to back , place blocks under the front or back wheels.
- To adjust the level left to right , place blocks under both driver or passenger wheels.
TIP: If you need to drive onto a stack of more than three leveling blocks, you need to reposition your RV or, in the worst case, choose another campsite .
Slowly back your RV onto blocks until you are centered on the highest block. Having a spotter is really helpful here. Otherwise, you’ll have to stop, set your parking brake, and check your position several times before you get it right.
How to Use an Automatic RV Leveling System
Most Class A’s and some towable RVs are equipped with an auto-leveling or hydraulic leveling system that makes leveling as easy as pushing a button. They make leveling and stabilizing your RV easy by utilizing hydraulic jacks to raise the low corners of your RV.
Step 1: Parking your RV

Auto-leveling systems are great, but you still need to start fairly level. So get your bubble level out and make sure you’re as level as possible before you begin.
Park the front end of the RV on the downhill side of an uneven campsite or parking space. You want your low corners in the front so you’ll be leveling by raising the front end of the RV rather than the rear.
This is a must because when you’re in Park only your rear wheels are locked. Your RV could roll off the jacks if one or both of the rear wheels is raised off the ground. If you have any doubts, place chocks in front and back of your front wheels and use the parking brake if applicable.
Step 2: Placing Jack Pads

Place blocks or jack pads under your jacks. Make sure you’re not about to place your jacks down on an icy or slick surface that could allow the foot pads to slip.
TIP: Jack pads prevent your jacks from sinking in and protect the campsite’s parking pad. Remember that jacks can sink on asphalt if it’s hot.
Step 3: Using your RV Leveling System

Use your control panel to level your RV using your auto-leveling system. Your control panel will have lights telling you which corners are low. Use the corresponding buttons to automatically level your camper.
Leveling systems vary amongst fifth wheel campers and motorhomes for sale . Be sure to consult your owner’s manual for specific details on your RV’s auto-leveling procedures and best practices.
TIP: No matter which auto-leveling system you have, never lift your RV wheels beyond the ground when extending your rear stabilizers.
Leveling your RV isn’t complicated, but it’s much easier if you do it right the first time. That way, you can get on with enjoying all the benefits of living in an RV !
Now that you know how to level your RV, where will you take your RV first? Leave a comment below!

- Comment (8)

Check out this van leveling application I created for helping me figure out How Much to raise each wheel to bring the van to level: https://levelmycamper.com
I know there’s tons of apps out there for checking IF your van is level, but Camper Level tells you HOW to level it. Just enter your wheelbase and track width and place your smart device on a horizontal surface (counter top, floor, etc…) in your van. Check it out and feel free to leave comments on any issues you find or improvements you’d like to see!
Cool app John!
Thanks for sharing!

The picture of chocking the wheels isn’t a chock, it’s a curved leveler, which are great to level. You drive on and it rises as yo go, then just put the other side under to chock.

When I level side to side the heavy side with the slides takes out of level again. Is this normal or am I not using my stabilizers correctly. Afraid to put too much tension

It was interesting to know that hydraulic jacks are great because this system allows you to easily raise the law corners of your RV. My sister mentioned that she is planning to shop for a refrigerated trailer. This would be used for her mini-restaurant at home. This is not her business. She had it installed so their family would feel that they are in a fine dining restaurant when having dinner together. I will be sure to share this with her for easy trailer maintenance. https://adamsiscooler.com/

My first big trip is going to be to California to see my daughter. Then where ever the road takes me and I have the money for. I have always wanted an RV ever since I went on disability so I have entertainment besides TV. Just 2 words come too mind “ Road Trip”.

I actually had a more comfortable sleep when my RV was leveling. Thank you for great information you provided for me and everyone!
Great catch Charlotte! Thanks for pointing that out.
Leave Your Comment Cancel Reply
Save my name, email, and website in this browser for the next time I comment.
Shop By RV Type

Your Adventure Awaits
Copyright © 2023 cwi, llc all rights reserved.
- RV Glossary |
- Privacy Policy |
- California Privacy Rights |
- Do Not Sell or Share My Personal Information |
- Targeted Advertising Opt Out |
- Terms of Use
Home » Guides » How To Level a Travel Trailer (2 Easy Ways)
How To Level a Travel Trailer (2 Easy Ways)

- Last Updated: Apr 5, 2024
Are you looking for an easy-to-follow guide on leveling your travel trailer?
You’re in the right place!
In this LearningRV.com guide, you’ll learn:
- Picking the right spot
- What you’ll need to get it level
- Step by step to leveling your travel trailer
- And much more!

Picture this: you have bought a new trailer, and you’re excited to try it out. So, you play about six or seven different scenarios in your head of how you will park it and unhitch your truck .
Then, a thought crosses your mind:
“What if I unhitch my vehicle, and one side of the trailer ends up higher than the other?”
Fortunately, while leveling your camper can seem like a daunting task, it is not impossible. With the right tools, some elbow grease, and patience, you will have a level travel trailer in no time.
Keep reading to learn more about how to level a travel trailer!
Table of Contents
First things first: picking your parking spot.
Leveling your trailer is all about establishing equilibrium. The first step to preventing a lopsided trailer is choosing the right parking spot.
Now, granted, no patch of grass or dirt will be perfectly flat.
There will be obstacles like roots and rocks — everything you will likely come across in the great outdoors. To make life easier, you need to clear whatever debris you can.
Besides a debris-free parking spot, you also need to think about the ground’s stability. Your camper or trailer will be heavy, weighing at least a ton.
For this reason, you need to do your best to avoid soft patches of land.
Even if you use many leveling blocks, your camper will sink into soft ground, so pick a campsite where the ground is stable and hard.
Lastly, no campsite will be completely flat. This is a reality you will need to accept and learn to work with.
However, you should still try to pick a campsite that is as level as possible.
Related >> Make Sure You Know The Height and Width of Your Travel Trailer

What You Will Need for a Level Camper or Trailer
Besides your towing vehicle and your trailer, you will need a few things to keep your trailer balanced. The tools and equipment will determine how you will level your camper or trailer.
Here are some of the things you might need for your trailer leveling efforts. To be clear, you do not need to have all of these on hand:
- A set of leveling blocks or wedge levelers
- A tongue jack-based leveling system (which most likely comes with your trailer)
- A bubble level
For added stability, a set of wheel stabilizers can come in handy. Some campers have also used x-chocks, but these require a bit of expertise — not good for first-time campers.
Related >> How Do Sway Bars Really Work?
How To Level a Trailer Using Leveling Blocks (5 Easy Steps)
Leveling blocks enable you to equally balance loads of your trailer from side to side.
To use leveling blocks, you need to drive your trailer on top of them. You may have to keep doing this as you add or subtract more blocks.
Once you reach the level you desire, you can stabilize the wheels and unhitch your vehicle.
The steps to leveling your camper with leveling blocks are:
- Estimating how many blocks to use
- Driving your trailer over the blocks
- Adjusting as needed
- Stabilizing the wheels of your camper
- Using your tongue jack to lower your trailer’s landing gear
Step 1: Estimate the Number of Blocks You Will Need
Leveling blocks usually come in sets. Each block has certain dimensions. To minimize the number of times you need to drive, estimate how many blocks you will use.
Once you have, set your leveling blocks in front of your trailer’s tires .
Step 2: Drive Your Trailer Over the Blocks
You might need to drive your wheels over leveling blocks a few times to get to the right level. Of course, drive your towing vehicle slowly.
Step 3: Adjust as Needed
Depending on your desired level, you might have to add or subtract blocks.
Continue adjusting and driving over your blocks until you are happy with your camper’s level of balance.
To check whether or not your trailer is level, use bubble level indicators . For the best results, have three: two for the sides and one for either the front or rear.
Step 4: Stabilize the Wheels of Your Camper or Trailer
Using wheel stabilizers will ensure that your camper or trailer does not roll off the blocks.
Step 5: Lower (or Raise) Your Trailer’s Landing Gear
Use the tongue jack mechanism to adjust the height of your trailer in the front. Many trailers have landing gear with a solid base plate.
If yours does not have one, use one of your leveling blocks to prevent the landing gear from sinking.
Once you have adjusted your trailer’s height in the front, you can now unhitch your towing vehicle.
Read More >> Top 10 Best Travel Trailer Tires (2021 Review)
How To Level a Trailer Using Wedge Levelers (6 Quick Steps)
Wedge levelers like Anderson levelers act in a similar way to leveling blocks.
More efficient, wedge leveling systems do not need you to estimate how many you need to use. Instead, all you need to do is adjust using a second wedge.
Just like when using leveling blocks, you still need to drive. To safely use wedge levelers, follow these steps:
- Place the wedges either in front of your tires or behind them
- Drive in the direction you have placed your wedges
- Secure the wedges with chocks
- Stabilize the wheels
- Unhitch your towing vehicle
Step 1: Place the Wedges Either in Front of Your Tires or Behind Them
You can only drive in one direction. So, depending on where you want to go, place all your wedges in the same direction so you can drive over them.
Step 2: Drive in the Direction You Have Placed Your Wedges
Back up or advance in the direction you have placed your wedges. Drive slowly to keep the wedge levelers from flying off.
Step 3: Secure The Wedges
Wedge levelers usually come with chocks.
These chocks keep the levelers from falling, thereby allowing the trailer to roll off or become unleveled.
As you push the chocks under the wedges, push them in as tight as you can. Using a rubber mallet can be a great idea.
Step 4: Stabilize the Wheels
Use the wheel stabilizers to keep the wheels from accidentally rolling off the levelers.
Step 5: Lower (or Raise) Your Trailer’s Landing Gear
Use the tongue jack mechanism to adjust the height of your trailer in the front. If the landing gear lacks a base, use a rock or leveling block.
You can even use an extra wedge leveler.
Step 6: Unhitch Your Vehicle
Once you have performed all five steps, you are now ready to unhitch your towing vehicle.
Read More >> How To Use Stabilizer Jacks (5 Easy Steps)
Leveling A Travel Trailer FAQs
One of the most commonly asked questions is about determining the level of the camper.
We also receive questions involving problems encountered when using wedge levelers.
Let’s have a look into these questions in more detail. Hopefully, our answers help you out too.
Bubble levelers can help you determine if your trailer is slanted somewhere. A good idea is to attach two on either side and one close to where the tongue jack is.
The bubble in the vial will stay in the middle when the trailer is level.
It is actually quite easy to remove the chocks. All you need to do is move your trailer in the direction of the wedge leveler. This will ease some of the pressure off the chocks, allowing you to dislodge them.
This is a nightmare situation for anyone trying to dislodge the wedge levelers. If this happens to you, don’t panic.
All you need to do is nudge your vehicle in one direction slightly. After that, you will find that you will be able to remove some of the chocks and levelers.
Then, move your vehicle in the opposite direction. Do this enough times until you can remove all the levelers and chocks.
Final Thoughts
Whether you are using leveling blocks or wedge levelers, learning how to level a travel trailer takes just a bit of patience and effort.
Establishing a level camper or trailer might seem like a lot of work. In reality, doing it is a pretty straightforward process.
Make sure to keep your leveling systems clean and maintained for maximum safety.
If you happen to smash your finger during this process, remember RICE:
- Compression
Most of the time, though, things will go according to plan without hiccups!
Go out into the outdoors and start camping in your RV!
Learn More About RVing
Here are more resources to learn more about the RV lifestyle!

Buying a Generator for RV Life

RV Refrigerators: How Do They Work?

How to Repair Norcold Fridge Flap

How To Troubleshoot The Thermistor On Your RV Refrigerator

Propane RV Fridge and RV Driving: How Dangerous Is It? (Explained)

How To Install A Residential Refrigerator In An RV (Securely)

Leave a Comment Cancel reply
Recently published guides.
The ultimate hub for all things RVs

How to Level a Travel Trailer in an Easy Step-By-Step Guide
You’ll probably want to jump out of your travel trailer and relax on arrival at your campsite. However, if you don’t take time to level your travel trailer, you’ll likely encounter problems and ruin your camping experience. The slightest mishap, such as a water pool in the shower or your bed placed at the wrong angle, can result in deep regret.
To level a travel trailer, you start by choosing a flat spot and removing all the debris, if any. Level the RV from side to side and chock the RV tires. Then, unhitch the travel trailer from the tow vehicle and level the RV from front to back. Ensure you use the stabilizer jacks to maintain the trailer’s balance.
Fortunately, leveling your travel trailer isn’t so difficult. We’ve compiled an extensive guide on how to level a travel trailer. Read on to learn the steps and tools you need to level your camper trailer . Have an insightful read!
Table of Contents
- 1 What is a camper leveler?
- 2.1 RV Leveling Blocks, Jack Pads, or Levelers
- 2.2 Bubble Level
- 2.3 Tire Chocks
- 2.4 Level Mate PRO or Level Mate PRO+ (suggested upgrade)
- 2.5 Tongue Jack Stand
- 3.1 Step 1: Drive the Travel Trailer to the Best Location, Preferably a Flat Spot
- 3.2 Step 2: Level the Travel Trailer from Side to Side
- 3.3 Step 3: Chock the Travel Trailer Tires
- 3.4 Step 4: Unhitch the Travel Trailer from the Tow Vehicle
- 3.5 Step 5: Level the Travel Trailer Front to Back
- 3.6 Step 6: Maintain the Travel Trailer’s Balance
- 4 Leveling a Travel Trailer Without Leveling Blocks
- 5 How to Level a Travel Trailer with Electric Jacks
- 6 The Importance of Leveling Your Travel Trailer
- 7 Summary of How to Level a Travel Trailer
- 8.1 Is it hard to level a travel trailer?
- 8.2 What happens if your camper is not level?
- 8.3 Where is the best place to put the level on a travel trailer?
- 8.4 What is the best way to stabilize a travel trailer?
- 8.5 Can I use wood to level my RV?
What is a camper leveler?

A camper leveler is a tool that helps you level your camper trailer on the first try every single time. You don’t need to stress or second-guess.
With a camper leveler, you only need to drive until your trailer is leveled and then chock. Applying the right tricks and tips will help prevent ailments like overindulgence in mind-altering activities or campground cursing.
What is needed to level a travel trailer?
Knowing how to level a travel trailer ensures stability and safety. Here’s an overview of the things you need to level an RV.
- RV Leveling Blocks , Jack Pads, or Levelers
Bubble Level
Tire chocks, level mate pro or level mate pro+ (suggested upgrade), tongue jack stand, rv leveling blocks, jack pads, or levelers.
In most cases, in-built levelers aren’t always enough to level an RV. Some sites are so sloppy that the jack pads won’t be enough to level the trailer.
Sometimes, you may encounter soft ground; if it’s too soft, your in-built jacks will sink in, making it impossible to get your rig level. So, always carry RV leveling blocks.
Leveling blocks serve as increased surface area to prevent the travel trailer from sinking into the ground and provide additional height for off-level campsites. Utility Blocks are the best leveling blocks. They’re available in single blocks and come in four packs.
A bubble level is an effective, simple tool that helps level trailers. They’re permanently attached to strategic places outside and inside the trailer, even on the trailer hitch.
Many travel trailers use bubble levels in tandem with other leveling systems. One of the inexpensive but best bubble levels is the inclinometer.
Bubble levels are weightless and don’t require any software updates. Also, they require little space and are easy to read. Glancing at the bubble level gives you a quick update on when and how you’re off the level, giving you room to make adjustments as necessary.
Tire chocks help to keep your trailer rig from rolling off, even slightly. They’re useful when parking and even at the campsite.
Also, they keep your travel trailer in place when you’re unhitching or hitching. We’ve tried many tire chocks, and Camco Super Wheel Chocks happen to be the best so far. They’re easy to carry, durable, and inexpensive.
The LevelMatePRO is one of the best leveling tools on the market. The LevelMatePRO and LevelMatePRO+ use a 3-axis digital accelerometer that aids RV leveling.
Besides wirelessly indicating the direction your trailer is off-level through Bluetooth broadcast, it also informs you exactly how much you’re off-level (by showing the actual centimeters).
You can perfectly level your RV on the first try by seeing the amount of height to add and where to add it. Although the LevelMatePRO (base model) is slightly less costly, we recommend the LevelMatePRO+ as it has extended app support for the Apple Watch.
It also has an increased battery capacity and a micro-USB port for using external power. LevelMatePRO is one of our favorite gear pieces. It makes leveling a cinch for all types of RVs, including travel trailers.
You just have to level until the indicators turn green, and you’re done. Also, it has the ability to store and recall your hitch height. Making it super easy to return your trailer tongue to the exact height it needs to be for hitching back up, saving you time when you’re breaking camp.
Tongue jack stands help to distribute the weight of your trailer tongue, providing a stable platform that prevents slipping. They also prevent the tongue from sinking into soft ground or from the sun’s heat softening the asphalt.
If you don’t have a tongue jack , you can improvise with a perfectly optimized wooden stand or cinder block.
How to Level a Camper Trailer in an Easy Step-by-Step Guide
Travel trailer leveling blocks and RV wheel stabilizers are amazing tools for leveling a travel trailer. However, there are tips and tricks you must follow if you’re looking for how to level a camper trailer.
Step 1: Drive the Travel Trailer to the Best Location, Preferably a Flat Spot

Although it may not be easy to choose where to park at a campsite, you must first park it in a good location before leveling a trailer, preferably in a dry, firm, and flat spot. It’ll be difficult to level the trailer if it’s on muddy ground or gravel.
The more level the area, the easier it is to level your RV. If you’re at a campsite with many hookups, ensure your sewer hose, power cord, and water hose can reach the campground connections after parking.
Note that unless the trailer is perfectly leveled side-to-side, you’ll have to drive the RV forward or backward a bit to get your tires onto the levelers on one side. Once you’re sure that you’ll be able to reach the hook-ups, you can start the leveling process.
Step 2: Level the Travel Trailer from Side to Side
Once you find the perfect parking location, you’ll have to park your trailer about 2 feet ahead of when you plan to do the leveling. Then, place a leveler across the trailer hitch. It’ll indicate the side you need to elevate to ensure the trailer balances from side to side.
Placing leveling blocks or boards that aren’t evenly balanced around the wheels will help you determine how much to lower or raise each side. After placing the leveling blocks behind the wheels, back the trailer onto the blocks and check the level again.
You’ll need to repeat this process of removing and adding leveling blocks until you reach the desired level. Most importantly, level your trailer from side to side before you unhitch.
We used LevelMatePRO+ for this process, and it was seamless. The carpenter’s level, bubble level, and Tyler Anderson levelers are great options, too.
Step 3: Chock the Travel Trailer Tires
You’ll need to chock the wheels after leveling the RV from side to side. To prevent all your hard work from going to waste, ensure the wheels don’t move. Place chocks or bricks behind and in front of each wheel to prevent them from rolling and causing an imbalance.
Then, choke your RV’s tires before unhitching them from your tow vehicle. This will help ensure safety and preserve your travel trailer, everyone inside, and anyone who may be in the trailer’s path if it moves and starts rolling down the grade.
While it doesn’t require much for the trailer to start moving, it takes a lot to stop it from rolling. So, make sure to chock the tires so the travel trailer doesn’t move backward or forward.
Step 4: Unhitch the Travel Trailer from the Tow Vehicle
To unhitch the travel trailer, you’ll need to remove the lights, wiring harness, tow (safety) chains, stabilizers, and any other connection. Then, proceed to park your RV out of the way.
Place a leveling pad or jack pad under your tongue jack and lower the jack. Continue raising the front of the RV until the tongue clears the hitch ball by about a half-inch.
Step 5: Level the Travel Trailer Front to Back

After unhitching your travel trailer, you’ll need to level it from front to back. All you need to make this process easy is a hitchjack. You use the level vertically by turning it 90 degrees.
Then, lower or raise the jack to guide the bubble to the center. You can also use a square for this process. Once you’re done with this step, you may need to recheck the side-to-side levels and adjust if need be.
With LevelMatePRO or bubble levels, you can monitor your progress and raise or lower the RV’s tongue until the trailer levels from front to back. You can even use the travel trailer’s stabilizers if it’s equipped and you’re ready to enjoy your RV.
Step 6: Maintain the Travel Trailer’s Balance
You must ensure your travel trailer remains stationary throughout your trip. Travel trailers are equipped with stabilizing jacks on all four corners. These jacks extend to the ground to prevent the trailer from shifting.
Some RV owners prefer to mount the jack in front of a power drill to make extending it easier and faster. When using the stabilizer jacks, ensure you don’t apply too much pressure while cranking them.
Also, ensure they’re putting light pressure on the ground. Note that if you attempt to level your travel trailer with stabilizer jacks, you’ll damage it because they aren’t meant for that purpose.
Leveling a Travel Trailer Without Leveling Blocks
When leveling your travel trailer, considering the sun, wind, solar panels, view, and satellite TV reception aren’t the best options. Usually, if you don’t have hydraulic levelers and want to level your RV, you’ll need to raise the lower side with blocks.
But if you’re looking to level a travel trailer without leveling blocks, you’ll need to start by lowering the high side of the RV first. Then, continue digging small depressions behind the tires on the high side of the trailer.
Leveling a travel trailer without leveling blocks has a lot of advantages. It makes the RV more stable, with the tires cradled in a hole rather than perched on top of blocks. Plus, you won’t need to chock the wheels.
Also, it is easier to back your trailer into a couple of holes than it is to back onto a stack of blocks. The entry step of your trailer will be closer to the ground.
How to Level a Travel Trailer with Electric Jacks

The first thing to do is level side-to-side with leveling blocks. Then, level from front to rear with your electric (tongue) jacks. After that, place the jacks down to stabilize the trailer, tighten until snug, and give an extra turn.
For clarity, it’s best to use blocks and the front lifting jack to level your mobile home trailer. Electric tongue jacks help lift (raise) and stabilize (lower) travel trailers with a single button push, making it easy to level and hitch an RV instead of manual labor.
An electric jack offers a stable base for your RV and reduces your physical stress when breaking or setting up camp.
Most travel trailers come with pre-installed stabilizing electric jacks, like the Lippert Power Stabilizer Jack, making stabilizing your trailer much easier once level. A stabilizing jack is designed to keep your trailer steady when you walk around inside it after leveling it.
The Importance of Leveling Your Travel Trailer
There are several reasons why it’s important to level your travel trailer. The first is comfort. Nobody enjoys walking or standing off-level, and sleeping off-level is a hassle for many people, especially if the foot of your bed is higher than the head.
Additionally, water pooling at one side of the shower can be very annoying, especially when there’s no drainage, and you have to use your foot as a squeegee to get all the water out.
Also, the trailer must be reasonably level for a traditional electric or propane RV refrigerator to function properly. Otherwise, the ammonia (coolant) won’t be able to circulate properly.
Not only will your fridge stop cooling at safe levels during your camping trip if it’s off-level, but it might also cause a fire outbreak or sustain permanent damage.
Lastly, deploying your slides when the trailer is at a steep angle stresses the slide mechanism and can break the shear pins on the slide-out gears. This self-inflicted damage is quite expensive to repair.
Summary of How to Level a Travel Trailer
Knowing how to level a travel trailer requires in-depth knowledge and frequent practice. Once you discover the system or tool that works for you, you’ll be the best leveler in no time.
RVing is an entirely different world of adventure. It provides a stable base of operation for camping, hiking, fishing, hunting, and numerous other outdoor activities. It offers a level of comfort a tent can’t provide.
The first trip with a travel trailer can be so exciting, but knowing how to level your travel trailer makes the adventure more fun. We hope you’ve learned the steps on how to level a mobile home trailer to make your trip easier.
Did you learn any new leveling methods? Let us know in the comments!
FAQs on How to Level a Travel Trailer
Is it hard to level a travel trailer.
Leveling a travel trailer is not hard. It is a slow process, especially if you’re doing it alone. You just have to find a coach to guide you in making adjustments and confirming whether or not you’re properly leveled.
What happens if your camper is not level?
When your camper isn’t level, it goes off equilibrium, giving an overall feeling of uneasiness. Also, walking inside an unlevel RV is unsafe as you’ll struggle to balance, which could cause you to trip or fall. Not to mention how frustrating it can be when items slip or roll off the tables and countertops.
Where is the best place to put the level on a travel trailer?
The best place to put the level on a travel trailer is on the trailer tongue. This will allow you to see if one side of the trailer is higher than the other. You’ll get to know which side is too low, and you can put leveling blocks or boards behind the wheels you’re trying to raise.
What is the best way to stabilize a travel trailer?
The best way to stabilize a travel trailer is to use jacks. Most RVs are equipped with leveling systems used for leveling and stabilizing, while fifth wheels use landing gears.
The best way to stop your RV from rocking or rolling off is by combining leveling jacks with stabilizers, which reduce up-and-down motions.
Can I use wood to level my RV?
You can use planks of wood to level your travel trailer. If you’re in a hole and need to quickly level your rig, head into a local hardware store or workshop and get some wood to stick under the trailer’s tires.
Leave a Comment Cancel reply
Save my name, email, and website in this browser for the next time I comment.
- More Networks
The Savvy Campers
How do I Level a Travel Trailer? 10 Simple Steps Explained
The first thing you need to do when you get to a campsite is level your RV. Leveling can be easy for some, but can also be difficult depending on the situation. I have broke down the process into some easy steps.
How do I level a travel trailer?
To level a travel trailer, you must first park about a foot from where you want your final spot to be. Estimate the amount of lift and add leveling devices under tires by using a level on your floor. Drive your RV on the leveling device and recheck. Adjust leveling blocks as necessary.
Successfully leveling a RV can take a few tries, but once you learn your unit, the process should get easier to estimate leveling blocks needed over time. You need two simple tools to level your RV such as a 4′ level and leveling blocks. Never use your stabilizing jacks to level your RV.
Having a partner help level your RV can save several trips in and out of your tow vehicle checking on your trailer. If you do not have a spotter, a LevelMatePro along with Andersen Levelers can save time and energy by taking the guesswork out of leveling time.
Items Needed to Level your RV
- Leveling Blocks
- 4’ Level or LevelMatePro
- Wheel Chocks
Level your Travel Trailer in 10 easy steps:
- Find the right parking spot
- Park about 1 ½’ away from where you want your RV to sit
- Check for level utilizing a 4’ level on your RV floor
- Estimate and install leveling blocks under RV tires
- Drive on leveling blocks
- Recheck for level
- If level, chock RV and unhook from vehicle.
- If not, go back to step 4
- Use tongue jack to level front to back and check level on floor
- Deploy stabilizing jacks
The Complete Guide to Leveling your RV
If you are either new to travel trailers, or are looking to brush up on your travel trailer skills, you always will have to know how and will have to level your RV. On your first trip, or your 300th, you still will have to level your RV.
Here is an in depth look at the process and items needed to level your RV.
Pick the Right Parking Spot
There are four considerations we look at when finding our camping spot.
- View- The first consideration we take when parking our RV is our view. We are camping in the outdoors, so we want to be able to look out the windows or sit under the awning and look at the best view possible.
- Sunlight/shade- A second consideration we take when parking our trailer is where the sun will be in the afternoon, or how we will get shade. Sunlight will be more important if you have solar panels installed on your RV, or if you like to basque in the sun. Personally, we like the sun as we are in the northwest when we are camping, but you may want to position your awning towards the afternoon sun to help cool your RV.
- Privacy- We take our privacy into account when positioning our RV as it compares with other sites. We like to sit down at dinner not looking directly at our neighbors. This is simple in some campgrounds, but not in others.
- How Level is the spot- Pick a spot to park that is most suited to be level to help aid you in leveling your trailer. If you pick a spot very unlevel, you may not have enough leveling blocks to level your RV.
Level your RV Side to Side
Types of leveling systems.
There are two main types of leveling systems, the block type and ramp type.
The block type are essentially like legos that stack together to build a platform to get height. The two top brands are Lynx and Camco. Read more about our favorite leveling systems here . Using the block type may take some guesswork and are only adjustable in 1” increments. Getting perfectly level may require pushing some gravel under the blocks to get a half inch here or there. The block type leveler can require several attempts on and off to get the proper amount of level.
Andersen makes the ramp type , which is simpler than the block type and also acts as wheel chocks. Place the ramps under your tires and drive forward until you are level and place the chocks under the ramp. The ramp type leveling system will take one attempt if you have a spotter or if you have a Level Mate Pro
After leveling side to side, you will chock your RV wheels with wheel chocks and preferably X-Chocks as well.
Level your Trailer Front to Back
Once your travel trailer is level side to side, you will need to level your RV front to back. This will require being unhitched from your tow vehicle. Once unhitched, simply use your tongue jack to go up and down to find level on the floor of your travel trailer. An electric tongue jack can save your arms from having to wind the jack up and down several times. Leveling front to back may be the easiest part of the process
Stabilizing your RV
After you are level in all directions, lower your stabilizing jacks to the ground or preferably a leveling block or 2×6. This will ensure your travel trailer stays still when you are parked and it does not move when you are walking around. Learn more about stabilizing your RV by reading our article on How to Stabilize your Travel Trailer. Read more about stabilizing your RV from our article here.
How to save time with Level Mate Pro
A LevelMatePro is a device that is installed and calibrated to your travel trailer when it is perfectly level. After it is calibrated, wherever you go, it will tell you how much lift to add to which side to become level.
To use a Level Mate Pro, load the app and connect via Bluetooth to your phone when you are about 1 ½’ away from your final camping spot. The app should tell you how much lift to install under which side of the travel trailer. If using leveling blocks, install the amount of lift the app says your trailer requires. If using the Andersen levelers, simply drive up the ramps and the app will alert you if you are level. Install the blocks under the ramps and you are done. The combination of the LevelMatePro and Andersen Levelers can save you 20 minutes of guesswork at leveling time.
Items that have to be level in your RV
- The fridge in your RV has to be level to function properly if it is an absorption fridge.
- Your travel trailer will need to be level before you use your slide out as to keep it on its tracks. We have had our slide come off its tracks and it is not fun.
- It is hard to fry an egg when the oil is sitting on one side of the pan, or if you are so tilted the pan slides off the stove.
Related Questions
How to level a travel trailer with a slide out?
Leveling a travel trailer with a slide out is the same process as one without. Make sure not to deploy your slide out until your RV is level as your slide can come off its tracks. Stow your slide out prior to unleveling your RV for the same reason of keeping it on its tracks.
Can stabilizer jacks be used to level a trailer?
No, stabilizer jacks are only to stabilize your RV and are not meant to hold much weight. Using stabilizer jacks to level your RV can damage your jacks or the frame of your travel trailer. Only use jacks after your leveling process is complete.
Be the first to be notified about FREE tips, hints, coupon codes, and email-exclusive information. All for FREE!
Related Posts:

Similar Posts

How Long will a Fresh Water Tank last on a Travel Trailer
Every time we go camping, we have to fill our fresh water tank so we have adequate water available for our needs. Sometimes this is easy if we are only going for a few nights, vs needing to conserve water to make it last for a longer duration. This guide will help you conserve and…

How to Use an RV Oven? Plus Tips for Cooking in an RV Oven
One of the many reasons that so many people are drawn to travel trailers and RV’s as a form of camping is the household amenities that you can have while still enjoying nature right outside your front door. One of the items that many trailers come with is a working oven and RV stove so…

Can You Put a Lift Kit on a Travel Trailer?
Most people who own a travel trailer spend their time in campgrounds, some of the best campgrounds are difficult to get to. Whether the road is bumpy, hilly, or simply not maintained, you may run into an issue of hitting your sewer line or rear bumper on obstacles. Lifting your travel trailer is one way…

Why Does My RV Have Two Batteries? Everything you need to know
In general, most RVs will have either one or two batteries. This applies to travel trailers, motorhomes, and fifth-wheel campers. Whether or not your camper has multiple batteries depends on several things. If your RV only has one battery, you also have the option of adding a second one. Most RVs have two batteries to…

Can you Camp with a Baby? Tips for a Successful Trip
Camping with my parents as a kid is one of my favorite memories. I remember my mom toting around my younger siblings as babies and I never thought twice about how camping with a baby could be tricky until I had my own. It is relatively easy to go camping with a baby. The main…

How to Put a Roof Rack on a Travel Trailer
Adding a roof rack to a travel trailer or 5th wheel can be a great way to add extra storage for travel, but the process must be undertaken carefully. Whether you get a mechanic to install the roof rack for you or tackle the installation yourself, knowing how to install it correctly can mean the…
Join our Newsletter to stay up to date on the latest RV topics and receive our FREE RV Inspection Cheat Sheet Today. Use this tool to inspect new or used campers you are looking at purchasing.
No thanks, I’m not interested!
- Motorhome Classes
- Travel Trailer
- Fifth Wheel
- Pop Up Camper
- Teardrop Camper
- Hybrid Camper
- Truck Camper
- RV Manufacturers
- Best RV Brands
- Buying An RV
- Backup Camera
- Electric Trailer Jack
- Portable Generator
- Portable Refrigerator
- Portable Solar Panel
- RV Power Cord
- RV Surge Protector
- RV Vent Fan
- RV Camping Chair
- Camping Table
- Portable Dog Playpen
- Propane Fire Pit
- RV Leveling Block
- RV Patio Mat
- RV Wheel Chock
- Wood Burning Fire Pit
- Portable Camping Toilet
- RV Black Tank Treatment
- RV Macerator Pump
- RV Portable Waste Tank
- RV Sewer Hose
- RV Shower Head
- RV Toilet Paper
- RV Water Pump
- Towed Vehicle Braking System
- Weight Distribution Hitch
- 12-Volt Air Compressor
- Collapsible RV Ladder
- Discount Camping Club
- Good Sam Club Membership
- Portable Propane Heater
- RV Mattress
- RV Step Cover
- Quick Reviews
- Full-Time RV Living
- RV Upgrades
- RV Boondocking
- Public Lands
- Overnight RV Parking
- Amazon Storefront
- Must-Have RV Accessories
- Travel Trailer Accessories
- Pop-Up Camper Accessories
- RV Kitchen Accessories
- Luxe RV Accessories
- Gifts For RV Owners
- RVers Online University
- Talk To RV Mechanic
- About Camp Addict
- Events & Press
We may earn money when you make a purchase via links on this page. Learn more
- Camp Addict
- 🏕️ How To Level A Travel Trailer
How To Level Your Travel Trailer Like A Professional
By Kelly Beasley
You just got your travel trailer - congratulations!
But now what do you do with it???
Indeed, the first thing you have to do is bring it home.
And if you're bringing it home or to a campground, you must park it and know how to level a trailer.
So after parking your travel trailer , you must LEVEL YOUR TRAILER as long as you are running your absorption fridge.
(If it's a residential fridge, you don't have to level your rig. But propane (absorption) fridges have ammonia in them, and if your trailer is not level, the ammonia cannot move around, which is a fire hazard.)
Leveling a travel trailer isn't so hard once you know how to level a camper, but it can be a little intimidating at first (of course, if you have an auto-leveling system, you only have to push a button).
You will make mistakes. It's only natural, so don't fret when you mess up.
Mistakes will be made, including the time that Marshall's trailer slid forwarding, causing the tongue jack to fall off the leveling blocks.
You will need a few things before leveling an RV:
Leveling blocks
- Stand for your tongue jack and stabilizers
- Bubble levels on your camper
What is the procedure for leveling a camper? Let's dig in.
How To Level A Camping Trailer: Picking Your Spot
Well, if you're in a campground, you may not have much choice.
But most campground spots are usually reasonably level.
Trailer leveling is usually pretty easy to unnecessary in many campgrounds. (But if you don't have to level, make sure you still chock your trailer tires!)
This was a really interesting spot to get level. Not recommended!
If you aren't comfortable with backing your new trailer, you can choose to get a 'pull-through' spot.
It might be a little more expensive, but worth it in times of high-stress/tight quarters!
If you are boondocking, you can find a spot using our guide to boondocking .
Parking Considerations
Level: You're going to want to find a spot that's as level as you can find to start with.
Solar: If you are using rooftop solar , consider positioning your travel trailer to get maximum sun on your panels.
Refrigerator Needs: In hotter climates, some people will also park to deliberately keep the side of their rig that has the refrigerator shaded.
The most common type of RV refrigerator, an absorption one, has to work hard to stay cool if it's scorching and facing the sun.
Compression Or Absorption Refrigerator?
- How do you know which one you have? Just look for the tell-tale 'fins' inside your refrigerator. If you have fins, you have an absorption refrigerator! ('Fins' pictured below)
View: You can consider positioning your rig so that your windows have the best views if you're boondocking.
Neighborly Considerations: If you are boondocking with others you don't know, there's an unwritten rule to try not to park nearby with your door facing their door.
This sometimes cannot be helped, but try to do your best not to be 'staring' right at your neighbor if they were there first.
Slides: Your spot must be wide enough to accommodate your slide-outs . Also, be sure to park the side of the camper with the slide so that it has room to open if you're in a tight spot.
Comfort: It's nice to have a level camper, as you don't want your cupboards and doors annoyingly swinging open or not staying in the position you want them in.
Levelers VS. Stabilizing Jacks
RVing stuff can be confusing. Don't confuse your stabilizers for something that levels your camper.
Stabilizing jacks are only to do just what they say they do: stabilize and keep your camper from shaking a lot when you're inside.
Leveling block used under stabilizer to prevent it from sinking into the ground
If you have hydraulic leveling jacks, you should keep leveling blocks even if you have Andersen levelers. Why? Because some spots will have soft ground.
If you don't use blocks of some sort underneath your leveling jacks, they might sink right into the ground, and you'll remain unlevel.
Additionally, if your camper is unlevel and you try to use your crank or auto stabilizers to level your camper, you might end up breaking your stabilizing jacks.
Then you'll need to replace them, which isn't fun and costs money.
After You Have Parked (DON'T Unhitch Yet!)
Ok, you picked your spot and parked your camper.
Now comes the work of leveling your RV, which starts BEFORE you unhitch.
You will first need to level your rig from side to side.
THEN you can level front to back by leveling the front of the trailer (after unhitching).
Bubble level on outside of RV
Your rig might come with bubble levels pre-installed somewhere on the outside of your rig or the inside.
If not, you can purchase levels to stick onto the front and side of your rig so you can see where level is.
(Use the level on the tongue to find level before you stick the level on your camper.)
Also, you can use a level on the tongue of your trailer paralleling your bumper or use a level app on your smartphone and use it for your travel trailer leveling ( See the Level Mate Pro below ).
OR, since your refrigerator is the most crucial component of being level, you can use a bubble level inside your fridge.
However, it's more than a pain to run into and out of your rig to keep checking for level.
After you have figured out which side needs to be raised (the low side is where the leveling blocks go to raise that side), it's time to get out your camper leveling system.
Types of Camper Leveling Systems
There are two primary types of levels for leveling a travel trailer. Block style and wedge style.
Using Leveling Blocks
If you have stacking blocks or ' Lynx Levelers ,' place them in front of your trailer tires on the side that needs to be lifted.
You can put the leveling blocks in front of or behind your trailer tires.
You have to guesstimate how many blocks to use to get to level.
Get in your tow vehicle.
Pull forward or backward until your tires are on top of the leveling blocks.
Then you have to check to see if you are level or need more or fewer leveling blocks to get level.
If you aren't level, back off the blocks, adjust them, and try again.
Leveling blocks in use
Once you are level, chock your wheels on the other side, and you will disconnect your rig.
Now you can level your travel trailer from front to back using your tongue (front) jack.
Make sure your tongue jack has a 'foot' on it, or you use some blocks or stand for your jack so it doesn't sink into the soft or wet ground.
Boom, you're ready to start camping!
Leveling A Travel Trailer With Andersen Levelers
Andersen Levelers are such an ingenious leveling system we can hardly stand it!
It might just be the best way to level an RV.
Andersen Levelers
This system eliminates the hassle of driving onto blocks, figuring out you need more blocks, having to drive off, add some and start over again. Instead, Andersen levelers are shaped like wedges or ramps.
With them, simply place the wedges in front of the tires or behind the tires that need to be lifted.
Drive forward until your rig looks level or until your partner tells you you are level.
If alone, step out, check the level, and correct (pulling forward or backward) if necessary.
No hassle with figuring out more blocks or fewer blocks and having to re-stack the blocks.
Back up more or pull forward more according to what your level is telling you.
Andersen Levelers in use (not chocked yet)
Once you are level, you must chock the levelers themselves.
We DO recommend having a spare pair of good trailer wheel chocks to chock the other side of the trailer.
Sometimes it is hard to tell which way your trailer will roll at your campsite.
If you chock the Andersen Levelers incorrectly, your rig might roll a little and become un-level again.
After you are level side-to-side, you can unhitch your trailer from your tow vehicle and then level from front to back using your tongue (front) jack.
Make sure your tongue has a jack pad or 'foot' on it, or you use some blocks or stand for your jack, so it doesn't sink into the soft or wet ground.
Here's a simple video showing how to level a travel trailer side-to-side:
Solo Leveling: Leveling Help Using A Level Mate Pro
Talk about convenience!
This little puppy makes trailer leveling solo a breeze.
The Level Mate Pro also helps if you have a very lazy partner who doesn't want to help with set-up.
Or it's good if you're super controlling and want to get your RV level all by yourself.
Instead of jumping in and out of your tow vehicle to check your level bubbles, this gadget lets you see what is happening in real-time.
It's a little pricey, but if you have to, or choose to level on your own and have to do it a lot, then it may justify the price.
There are other digital RV leveling systems out there, but they are not as simple to use and don't cost much less.
Frequently Asked Questions
How level should a travel trailer be.
It's said that you can be 2-3 inches off of level. Anymore than that and you will feel it as you walk around inside, the cabinet and bathroom doors might swing open on their own, and if you have an absorption fridge, it needs to be no more out of level than this.
Should I Replace A Manual Tongue Jack With An Automatic Jack?
If you're asking me directly, I say it's worth it. I did this in 2017 and immediately wished I'd done so sooner. Not only is it easier to level, but if you have weight distribution bars, it's much easier to lift and lower the tongue with an automatic jack.
Electric Tongue Jacks
- If your trailer came with a 'crank' style tongue jack, you can replace it with an electric tongue jack . This may be a good idea if you have a bad back as turning the handle on a manual jack can be a dangerous movement to make with the rotation it requires. (Unless you use only your arms. But for most women, and this is Kelly writing this, its easier to use your torso as well.)
- I (Kelly) have a bad back, and sometimes when I crank, my back 'zings', warning me I'd better be more careful. Once I upgraded to an electric jack, my back has been so much happier!
Does A Travel Trailer Need To Be Level When Stored?
Your travel trailer does not need to be level when stored unless you have an absorption refrigerator and plan to keep it running. Otherwise, it does not need to be level.
Is It Difficult To Level An RV Camper?
Leveling a camper trailer is relatively easy once you know how to do it. It's a matter of leveling from side to side first, then front to back. You need a relatively level spot to start with, or leveling a trailer will be next to impossible.
Conclusion To Leveling A Travel Trailer
Now that you know how to level an RV trailer get out there and DO it!
It's easy once you get the hang of it and even easier now that you know how to properly level a travel trailer if you use the best tools out there.
Andersen Levelers and either a (willing) partner or the Level Mate Pro !
If you have a motorhome, you might have auto-levelers. If not, you'll have to manually level it too, but that's another article.
Camp On, Y'all!
- Showing you the best way to level a travel trailer is just one of the many ways Camp Addict helps the aspiring RVer and veteran campers alike. Learn more today!
Author: Kelly Beasley
I dedicated myself to living the full-time RV life for over 6.5 years, immersing myself in the unique quirks and joys of the boondocking lifestyle and gaining a wealth of knowledge and experience along the way. In December 2020, my business partner and I made the transition to part-time RVing, but in January 2023, we hit the road once again, this time in our trusty vans. My mission is to help others embrace the RVing lifestyle with confidence and excitement, armed with the knowledge and resources needed to make the most of their adventures. I believe that the more you know, the more you can truly appreciate and enjoy the freedom and flexibility of the open road.
What are the level tolerances for an absorption refrigerator? Or When is level level enough?
The popular method or idea, if your absorption fridge is mounted facing sideways, is 6 degrees front-to-back, and 3 degrees side-to-side. This would be flipped if your fridge faces front to back. I like having a bubble mount inside my fridge. That way I know it’s the FRIDGE getting as level as possible as opposed to the RV, as the fridge may not be mounted exactly even with the RV itself.
Hope that helps!
To be clear, So as one faces their reefer it is 3 degrees left to right, correct? 3 degrees equals about 1/2” per foot, cuz most non electronic levels don’t show degrees. So if one has a 1 foot long level there should be less than 1/2” space at the end of the level when the level is held so one end is on the floor and the bubble is centered.
Another pro tip in leveling is determine how out of level a space is before pulling into it. That way you eliminate pulling on and off blocks multiple times. Set blocks down, check blocs for level to each other, pull on, Done. This may take carrying a straight edge (2×4)to placelevel on to level across blocks. Excavating the high side rather than blocking or a combination works well particularly if boondocking.
It still depends on which way your refrigerator is placed inside the RV. The degrees, the way you mention it is correct IF and only if your fridge faces the narrow (sides) side of your RV. If it faces the front or back of the RV, the degrees would be reversed.
very helpful tips for all campers who have not yet levelled. Thanks for that. In the beginning it takes a lot of time, but the more you do it, the faster you get. It’s just like putting up a tent, in the beginning it takes hours. Our awning is now quickly erected and the caravan levelled. Then we have a well-deserved beer.
Yep, I remember back when it was a struggle on my brain to unhitch and level my trailer! After a while, it’s easy-peasy for the most part.
And yep, it’s very nice to crack open a beverage after a long travel day.
About the X-Chocks they are not to be used to chock your trailer, you still need to choke your tires. They are for stabilizing the trailer. Also that was way too many lynx levelers on that tongue. Happy camping. 🙂
Hi Samantha,
You are absolutely correct! We mention this on our RV chocks review page .
Thanks for the comment and happy camping to you as well!
Another very simple trick I just learned is to keep a small camp shovel with you. If you are on dirt or sand and not level. Back up (or pull forward) a few feet, dig a small hole for your tires on the side that needs to come down, and then park those tires in the hole. Sometimes it’s easier (and much more stable) than having to mess leveling blocks and making sure you are centered on the blocks.
Yes! This is something I have done in the past. Sometimes the ground won’t allow it, but when it does, it can make the difference between not being to get level and getting level. I’d just recommend filling the dug out hole before one leaves.
Great tip, thanks for adding!
Is there a weight restriction? Can these be used in a ‘permanent’ situation? My tiny house on wheels probably weighs 18,000 lbs with contents. Can’t seem to get it level.
There are weight restrictions, but they tend to be in the 30-40,000 pound range so you are fine.
I can’t think of a reason they wouldn’t work in a permanent situation.
You can check out individual weight limitations on the leveling blocks we recommend and see which might work best for your situation.
Session expired
Please log in again. The login page will open in a new tab. After logging in you can close it and return to this page.
Success usually comes to those who are too busy to be looking for it. Henry David Thoreau
How to Level Your RV?

In this article, we’ll answer some common questions about leveling your RV and provide some useful tips to make the process easier. Let’s get started!
Table of Contents
Why Should You Level Your RV?
There are a few reasons why you might want to level your RV.
- First, it can make your RV feel more comfortable and homey. When you’re driving down the road, small bumps can cause things to shake around inside your RV. If everything is level, it’ll minimize the amount of movement and make your ride more pleasant overall.
- Second, leveling your RV can help prolong its lifespan. All that shaking can loosen screws and cause wear and tear on different parts of the RV. By keeping everything level, you’ll give your RV a break and hopefully avoid any serious damage down the line.
- Finally, some campgrounds require RVs to be leveled before they’ll allow you to hook up to their utilities. This is usually for the same reasons listed above – it’s more comfortable and it helps protect their equipment. [1]

Tools Needed To Manually Level Your RV
The first thing you’ll need to do is gather some supplies. You’ll need a level, chocks, and either blocks or leveling jacks. If you have an RV with slide-outs, you’ll also need to make sure that they’re all fully retracted before you start leveling.
Once you have your tools, it’s time to get started. Begin by parking your RV on a level surface. If you don’t have access to a paved area, you can use leveling jacks to create a level spot for your RV. Once your RV is parked, put the chocks in place behind the tires so that it can’t roll while you’re working.
If your RV has slides, the next step is to extend them. This will give you more stability and prevent the RV from tipping while you’re working.
Now it’s time to start leveling. If your RV is level front-to-back, you can move on to leveling side-to-side. If it’s not level front-to-back, use the leveling jacks to adjust the RV until it is level.
Once your RV is level, check the chocks and make sure they’re still in place. Then put the blocks in place under the leveling jacks so that they’ll support the weight of the RV if one of the jacks should fail.
You’re now ready to enjoy your leveled RV!

How to Level an RV
If you’ve ever been RVing, you know that one of the most important things is to make sure your RV is level. If it’s not, you’ll be uncomfortable and your appliances may not work properly. So how do you level an RV?
There are a few different ways. The easiest way is with leveling blocks. You can find these at most camping stores or online. All you have to do is place them under the tires on one side of the RV until it’s level.
Another way to level an RV is by using jacks. This method takes a little more time, but it’s still pretty easy. Just put the jacks on each corner of the RV and raise or lower them until the RV is level.
If you’re at a campground that has hookups, you can also use the water and sewer connections to level your RV. Just hook up the hose to the water connection and turn on the faucet until the RV is level. Then, connect the sewer hose and let it drain until the vehicle is level.
Once you’ve leveled your RV, make sure to check the tires so it doesn’t roll away. And that’s it! You’re now ready to enjoy your comfortable and level RV. Happy camping!
Leveling a Motorhome (Class B or C RV)
If you have a motorhome (Class B or C RV), there are a few things you need to know before you start leveling it. First, always park on level ground if possible. If not, use blocks or jacks to level the RV.
Next, put out the stabilizing jacks. These will help keep the RV from rocking when you’re inside it. Once the jacks are down, lower the leveling jacks until they’re touching the ground.

To do this, find the location of your water fill and sewer drain valves. They’re usually near the back of the RV on either side. Connect a hose to the water fill valve and turn it on until the RV is level. Then, connect the hose to the sewage drain valve and allow it to empty until the RV is level.
Leveling a Travel Trailer (Towable RVs)
First, find a level spot to park your RV. If you can’t find one, use blocks or jacks to level the RV. Next, put out the stabilizing jacks.
Once the jacks are down, it’s time to level the RV. To do this, determine the location of your water fill and sewage drain valves while in the crawl space. They’re usually near the back of the RV on either side. Connect a hose to the water fill valve and turn it on until the RV is level. Then, connect the hose to the sewer drain valve and let it drain until the RV is level.
Once your RV is level, check that all of your appliances are working properly. If they’re not, make sure that they’re turned off and then turn them back on again. With a little bit of care and attention, you can easily level your RV like a pro!
Leveling an RV is something that every RVer should know how to do. It’s not difficult, but it does take a little bit of time and effort. With these tips, you’ll be leveling your RV like a pro in no time!
Using the Auto Leveling System
If your RV is equipped with an auto leveling system, all you have to do is push a button and the RV will level itself. However, there are a few things you need to do before you use the auto leveling system.
- First, try to park your RV on level ground. If that’s not possible, use blocks or jacks to make it level.
- Next, place the stabilizing jacks out. The goal of these tips is to help prevent your RV from rocking while you are inside it. Once the jacks are lowered, place the leveling jacks against the ground. Now it’s time to use the auto leveling system.
To do this, find the location of your auto leveling controls. They’re usually near the front of the RV on the dash. Push the button to start the leveling process. The RV will automatically level itself.
Once the RV is leveled, make sure to check the tires so it doesn’t roll away. And that’s it! You’re now ready to enjoy your comfortable and level RV. [2]

Best Practices for Leveling an RV
There are a few different ways that you can level your RV, but some methods are definitely better than others. Here are a few tips to help you get started:
- Start by finding a level spot. This may seem like common sense, but it’s actually one of the most important steps in the process. If you start on an uneven surface, you’ll likely just end up with an uneven RV.
- Use leveling blocks or ramps. These devices will help to even out your RV and make it easier to level. Just be sure to follow the manufacturer’s instructions carefully so that you don’t damage your RV in the process.
- Manually adjust your RV’s leveling jacks. If you have this type of leveling system, it’s important to know how to use it properly. Be sure to consult your RV’s owner’s manual for specific instructions.
- Use a level. This is probably the most important tool you’ll need in order to level your RV. A simple carpenter’s level will do the trick. Just be sure to place it on a flat surface before you start adjusting your RV’s jacks or blocks.
Levelers VS. Stabilizing Jacks
There are two ways that you can level your RV: with levelers or with stabilizing jacks. Levelers are attached to the RV and provide a way to easily and quickly level the RV from outside. Stabilizing jacks, on the other hand, are not attached to the RV and must be placed under each corner of the RV in order to stabilize and level it.
Both methods have their pros and cons, so it’s important to decide which one is right for you before you start leveling your RV.

Stabilizing jacks, on the other hand, are less expensive and can be left in place even when you’re not using them. This is because they don’t need to be attached to the RV in order to work. However, they can be more difficult to use, especially if you’re not used to them.
Once you’ve decided which method you want to use, it’s time to start leveling your RV. If you’re using levelers, simply extend them until they reach the ground and then turn the knob until the RV is level. If you’re using stabilizing jacks, place them under each corner of the RV and then use the crank to raise or lower the RV until it’s level.
Once your RV is level, you can then move on to hooking up your utilities and enjoying your vacation. Just remember to take your time and be safe while you’re leveling your RV. With a little bit of practice, you’ll be a pro in no time!
After You Have Parked (DON’T Unhitch Yet!)
Now that you have finally found the perfect spot and parked, it is time to level your RV. The process is actually pretty simple, but there are a few things you need to know before you get started.
The first thing you need to do is find a level spot. This may seem like a no-brainer, but it is actually harder than it sounds. If possible, try to park on grass or dirt instead of concrete or asphalt. This will give you a little more wiggle room when it comes to leveling.
Once you have found a level spot, the next step is to unhitch your RV from your tow vehicle. Once again, this may seem like a no-brainer, but there are a few things you need to keep in mind. First, make sure that your RV is in park and the parking brake is engaged. Next, disconnect your electrical and water connections. Finally, lower your leveling jacks until they are touching the ground.
Now that your RV is unhitched and level, it is time to start leveling it. The easiest way to do this is with a set of leveling blocks. You can find these at most RV dealerships or online.
Simply place the leveling blocks under each corner of your RV until it is level from front to back and side to side. Once you have the RV level, you can reattach your tow vehicle and enjoy your vacation!

Types of Camper Leveling Systems
The first thing you need to do when leveling your RV is to determine what type of leveling system your RV has. There are three basic types of systems: hydraulic, electric, and manual.
Hydraulic leveling systems are the most popular type because they are the easiest to use. Electric leveling systems are also easy to use, but they require an electrical hookup. Manual leveling systems are the most difficult to use, but they are the least expensive.
Once you know what type of system you have, you can move on to the next step: choosing a level spot.
Using Leveling Blocks
If you don’t have built-in leveling jacks, you’ll need to use leveling blocks. Leveling blocks are large, rectangular pieces of material that you place under the tires or jacks on one side of your RV to level it out. You can find them at most hardware stores or online.
To use leveling blocks, simply drive your RV onto them and position them so that they’re evenly distributed under the tires or jacks. Then, lower your RV down until it’s resting on the blocks. Once it’s in position, you can begin to level out your RV using the same process as above.
Keep in mind that you’ll need to use more than one block on each side of your RV to level it out completely. You may also need to reposition the blocks a few times to get the perfect level. But with a little patience, you’ll be able to get your RV leveled out in no time!
One final tip for using leveling blocks: be sure to put them on top of something sturdy, like a piece of plywood or a level concrete pad. This will help prevent the blocks from sinking into soft ground and becoming uneven.
Leveling A Travel Trailer With Andersen Levelers
If you have an Andersen Leveler, the process is pretty simple. Just extend your leveling jacks until they make contact with the ground, then crank them down until they’re snug. You’ll want to do this one jack at a time so that your trailer stays level as you go. Once all four jacks are in place, just lower your trailer onto them and you’re good to go!
If you don’t have an Andersen Leveler, don’t worry – the process is still pretty straightforward. You’ll just need to use some blocks or ramps to get your trailer level before you start cranking down on those jacks.
Once you’ve got your trailer leveled off, it’s time to start hooking up your utilities. If you’re not sure how to do that, don’t worry – we’ve got a whole separate article on just that topic. Stay tuned for that one, and in the meantime, Happy RVing!

Solo Leveling: Leveling Help Using A Level Mate Pro
If you are like most RVers, you love the idea of being able to take your home on the road with you. However, one of the challenges that comes along with owning an RV is learning how to level it properly. If you have ever tried to level your RV by yourself, you know that it can be a daunting task. But don’t worry, we are here to help! In this blog post, we will answer some of the most common questions about how to level your RV and provide some useful tips to make the process easier.
So, what do you need to know about leveling your RV? First and foremost, it is important to understand that there are different types of leveling systems. The two most common types are hydraulic and electric. Hydraulic leveling systems use a series of pumps and hoses to level the RV, while electric leveling systems use a series of motors and switches.
Once you know which type of system you have, the next step is to familiarize yourself with the different parts of the system. This will make it easier for you to troubleshoot any problems that may arise during the leveling process.
The most important part of the leveling process is ensuring that your RV is level from front to back and side to side. This can be done using a variety of methods, but the most common is to use leveling blocks. Leveling blocks are placed under the tires of your RV and can be adjusted to raise or lower the RV until it is level.
Another method that can be used to level your RV is by using leveling jacks. Jacks are placed under the frame of your RV and are used to raise or lower one side at a time. This method is often used when there is an uneven surface, such as a driveway, that prevents the use of leveling blocks.
Once you have determined which method you will use to level your RV, the next step is to identify where you will place the leveling blocks or jacks. It is important to make sure that they are placed in a safe location so that they will not slip or fall over. Once they are in place, you can begin the process of leveling your RV.
The final step in the process is to check your work. Once you have leveled your RV, it is important to take a few minutes to walk around and make sure that everything looks level from all sides. If anything looks out of place, simply adjust the blocks or jacks until it is level again.

Can You Level an RV with the Slides Out?
The simple answer is yes, you can level your RV with the slides out. However, there are a few things to keep in mind. First, make sure that all of your leveling blocks or jacks are in place and secure before you extend the slides. Second, once the slides are out, you’ll want to be extra careful not to put any strain on them – this means no sitting or standing on them, and no leaning against them when moving around inside the RV. Finally, keep an eye on the weather; if it’s windy, it’s best to leave the slides in until you’re ready to call it a day and head inside. [3]
With those caveats in mind, extending your slides while leveling shouldn’t be a problem. In fact, it can even be helpful in some cases – for example, if you need to make a minor adjustment to one side of the RV, extending the slide on that side can give you a little extra room to work with. Just use your best judgment, take things slowly, and you’ll be fine.
How do I level my RV?
There are a few different ways that you can level your RV. The most common method is using leveling jacks, which are typically operated manually or with a hydraulic system. You can also use blocks or chocks to level your RV, but this method is less common.
If you’re using leveling jacks, it’s important to make sure that they are properly positioned before you begin raising or lowering them. Once they’re in place, you can start slowly raising or lowering the jacks until your RV is level.
If you’re using blocks or chocks to level your RV, you’ll need to place them under the wheels on one side of the vehicle and then raise or lower the other side until it’s level.
How do I manually level my RV?
There are a few different ways that you can manually level your RV. The most common way is by using leveling blocks or jacks. You can also use leveling chocks, which are placed under the tires to help keep your RV level. Another option is to use a tongue jack, which is placed at the front of the RV and helps to level it from the front end. Finally, you can also use a rear stabilizer to help level your RV from the back end.
If you are using leveling blocks or jacks, you will want to place them under the wheels on either side of the RV until it is level.
If you are using a rear stabilizer, you will want to place it under the back end of the RV and slowly raise it until the RV is level. Once the RV is level, you can then move on to chocking the tires. [4]
Once your RV is level, you will want to make sure that all of your appliances are turned off. This includes your furnace, water heater, refrigerator, and any other appliances that use gas or electricity. You will also want to disconnect any hoses or cords that are attached to the RV. Once all of these things are taken care of, you can then enjoy your level RV!
Does a camper need to be perfectly level?
The quick answer is no, your camper does not need to be perfectly level in order to camp comfortably. In fact, most campgrounds are not perfectly level, so don’t worry if your RV isn’t either.
However, there are a few things to bear in mind when it comes to leveling your RV. First, you want to make sure that your RV is stable and will not rock back and forth when you move around inside. Second, you’ll want to ensure that all of your doors and windows can open and close properly. Third, if you have any slides on your RV, you’ll want to make sure they’re level so they can deploy properly.
So how do you go about leveling your RV? There are a few different methods, and which one you use will depend on your particular RV and the campground you’re staying at.
- One popular method is to use leveling blocks. These are basically small pieces of wood or plastic that you place under the wheels of your RV to level it out. You can find leveling blocks at most RV supply stores.
- Another common method is to use leveling jacks. These are metal jacks that you place under each corner of your RV and then crank until the RV is level. You can usually find leveling jacks at hardware stores or online.
- Finally, some RVs come with built-in leveling systems. These are usually electronic and can be operated with the push of a button. If your RV has a built-in leveling system, be sure to read the manual before using it so you know how it works. [5]
Are RV leveling blocks necessary?
RV leveling blocks are not necessary, but they can make the process easier and provide a more stable foundation for your RV. If you choose to use leveling blocks, be sure to select a level spot on which to place them. You’ll also want to avoid placing them too close to the tires, as this could damage your RV. [6]
If you’re just starting out with RVing, we recommend reading our comprehensive guide on how to set up your campsite. This guide covers everything from choosing the perfect spot to setting up your camp chairs and table. Trust us – it’s worth the read!
How Level Should A Travel Trailer Be?
There are a few different schools of thought on which level your travel trailer should be. Some people believe that it’s best to keep your RV as level as possible, while others say that it’s okay to have a slight incline. Ultimately, it’s up to you to decide what feels most comfortable for you and your family.
If you’re planning on doing any cooking or baking while you’re on the road, then you’ll want to make sure that your RV is fairly level. This will help ensure that your food turns out correctly.
Another thing to consider is which level your RV will be when you’re hooking it up to utilities like water and electricity. If your RV is too low, then you may have difficulty connecting to these services.
Ultimately, the best way to figure out how level your RV should be is to experiment and see what works best for you. There’s no right or wrong answer, so don’t be afraid to try different things until you find what works best for you and your family.
Is It Difficult To Level An RV Camper?
No, it’s not difficult to level an RV camper. However, there are a few things you need to know before you get started.
The most important thing is to make sure that your RV is parked on level ground. If it’s not, then leveling it will be more difficult. Once you’ve found a level spot, park your RV and set the parking brake. Then, you can begin leveling it using either blocks or leveling jacks. [7]
Useful Video: How To Level Your RV Fast And Accurate!
Now that you know how to level your RV, you can enjoy your next camping trip with peace of mind. Just remember to take it slow and be patient, and you’ll be able to get your RV perfectly level in no time. Happy travels!
- https://rvsnappad.com/blogs/news/why-you-need-to-level-an-rv
- https://blog.campingworld.com/rv-basics/level-your-rv-right-the-first-time/
- https://drivinvibin.com/2021/06/25/level-your-rv-slides/
- https://gudgear.com/how-to-level-a-camper/
- https://camperreport.com/why-rvs-have-to-be-level-and-how-to-do-it-faster/
- https://www.thervgeeks.com/do-you-need-rv-leveling-blocks/
- https://campaddict.com/how-to-level-a-travel-trailer/
How to Repair RV Body Damage?
How to Remove Carpet From Under RV Slide Out?
How to Keep RV Cool in Arizona?
How to Manually Retract RV Steps?
Written by Johnathan R. Smith • October 7, 2020 • 3:14 am • Common Questions
How to level a travel trailer in 5 Simple Steps?

If you’re a first-time RVer, you might still be anxious about getting your trailer on the highway. Our advice? Just do it. As long as you’ve done the necessary precautions, you’ll be alright.
Another cause of concern among those using travel trailers for the first time is how to level their trailer when they get to their campsite destination. This is understandable but don’t worry. It’s actually quite easy. Read on and we’ll teach you how.
Why does your travel trailer need to be level?
But first, you have to understand why you have to level your travel trailer in the first place. Leveling your trailer means you put it in a level position at all sides – front to back and side to side. Leveling is required for your safety.
- Minimize stress on your RV’s structure and frame. This will reduce the stress on various areas of your RV. Take note that an RV is designed to be level. If you don’t put it on level position, you would be causing damage and other long term issues on your trailer and that would mean additional expense for repairs and replacement. Some parts may not function properly when your trailer is uneven. The doors may pop open even when locked or wouldn’t open when you want to open them.
- Reduce stress on your slide outs. Slide outs depend on a level frame to function properly. If your trailer is uneven, it would accelerate wear and tear as you force the components to accommodate the slide outs. It would be a very expensive problem if your bracket gives in because of this.
- Keep the interior secure. The areas that you should be looking out for are the door frames, cupboards, plumbing, and chassis. Use blocks and stabilizers to keep the interior of your trailer securely in place and intact.
- Safety of your refrigerator. You’ll need your trailer to be level for your fridge to function properly. RV fridges are prone to catching fire when the ammonia or water solution inside the fridge cannot flow properly. You don’t want the heat from your fridge going inside your camper so make sure it is leveled properly.
- Accuracy of your tank readings. When your RV is not level, you won’t be able to know exactly how much you have in your tank. The sensors might show that you have more or fewer liquid depending on the slope. You might also not be dumping your trailer the way you should if your trailer is uneven.
- Your comfort. Imagine staying in an unlevelled RV. You’d be out of balance and uneasy all the time. It would be hard to sleep. And you don’t want your things rolling around or slipping off.
So, better keep your camper leveled for your comfort, safety, and ensue the durability of your RV.
Things you need for leveling your travel trailer
These are the tools you’ll need for your trailer leveling .
Pieces of wood as your leveling system . Always have 2x6s or 2x8s in your trailer kit. The wider the better. These will serve as your leveling blocks. They will go under the wheels of your trailer and will help level the sides of your RV.
You can also use another piece of wood as a wheel chock . This is cut at an angle so that you can chock them on your tires perfectly.
There are also upgraded versions of these on the market if you like. Just look for RV leveling systems, leveling RV blocks, and wheel chocks.
Carpenter’s level. Although your RV comes with a bubble level, it always helps to have a carpenter’s level that you can put on different areas of your RV to check your leveling. Use a carpenter’s level with a magnet attached to the side to help you know if your travel trailer is already level or not. You can put this on different parts of your RV that you particularly want to check if they’re levelled.
These are basically all you need in leveling your travel trailer . Nothing fancy. But then again, there are upgraded versions available in the market so you can just check them out. They come in different sizes and packs to suit your leveling needs.
You can also include a stabilizing jack and jack pads in your kit. Some RVers also swear by using a commercial jack stand. This will reduce the pressure on the tongue jack and also saves time for campers because they don’t have to wait until the tongue jack hits the ground. But this is not really essential for leveling your travel trailer and it’s a matter of personal choice if you will include this in your equipment kit.
Always have these on hand to make leveling a travel trailer easier.
Here are 5 simple steps on how to level a travel trailer.
Step 1. find out the need for leveling..
There will always be a natural slope of the ground unless you’re in an RV park where the ground has already been leveled for users.
Find a nice level area to park or at least one with minimal slope. Avoid parking in a significantly uneven site as this could be dangerous especially for first-time RVers. Just find another site to level your trailer.
Here’s how you can level your trailer on a slope.
Visualize the site where you want to level your trailer. This is helpful in determining the need for RV leveling and saves you the effort and headache of backing your trailer only to find out later on that it’s a very challenging slope.
Consider also where everything is located such as your power and slide when you choose a spot for parking your RV. How far do you need to go to hook up to an electric outlet? Do you have enough space to lay out the slide outs of your travel trailer properly?
Step 2. Level your travel trailer from side to side.
When you’ve already found a spot in your campsite and successfully backed your trailer, it’s time to check if you’re level on the ground. Your RV’s bubble level can help you with this.
It’s also advisable to use your carpenter’s level to determine which side you’re leaning to. This is important because sometimes it may seem that you’re already level to the ground but when you check with your tool, you’ll find out that you’re slightly leaning on one side. We’re trying to eliminate this to avoid causing stress on any side of your travel trailer.
There are some who insist on leveling by sight but experienced RVers know better. That’s why it’s best to always have a leveling tool on hand and not just rely on your RV bubble level.
Where do you put the levels on a travel trailer?
Your blocks or levels are used for leveling your trailer from side to side.
For example, when you find out that you’re leaning on the driver’s side, you can use your wood pieces or leveling system to help level up that side. Mark the area you want to level then adjust your wheels and drive over those pieces of wood or blocks when backing to level your driver’s side with your passenger’s side. This will keep your trailer balanced from side to side. Check your carpenter’s level again to confirm your position.
Another tip is for you to put the wood pieces or leveling blocks right against the wheels so that you can just pull over them until you reposition your trailer.
This is how you maintain your RV level from side to side.
3. Chock the wheels of your trailer.
Put another piece of wood that’s cut at an angle to chock the wheels. Putting wheel chocks is a very important safety move. It will also ensure that your effort for repositioning your travel trailer is not wasted.
Make sure you chock the wheels both in the front and in the back so that they will stay in place and not move forward or backwards.
4. Unhitch your travel trailer from the tow vehicle.
When you’re already levelled from side to side, you can unhitch your trailer from your tow vehicle. Move your vehicle forward so that you can begin adjusting the level from front to back this time.
5. Check that the trailer is still level
Find a nice, flat surface which is the center point spot of your RV to check your leveling. Again, your carpenter’s level can help you determine if your front or back side is higher than the other.
If your front area is higher, you can lower the nose of your jack a couple of inches and then check your level again if it’s aligned with the back of your RV. If your front area is lower, you can adjust your jack higher until your trailer is level from front to back.
A tip for those whose travel trailers that have wastewater tanks located at the middle or back part of the coach: It is better to have your front side slightly higher than the back. This will help in draining of the plumbing more efficiently while you’re using the trailer.
Some people would stop at this point and then begin stabilizing their trailer. But it is always a good idea to check the level for RV in other areas as well.
For example, find a nice center spot on your kitchen floor to check if it’s level to the ground. Check it from front to back and side to side to make sure you’re truly level. Reposition as needed if not. Use leveling blocks as required. Your leveling system and stabilizing jacks will help you with this.
It’s pretty much simple and easy but it takes time especially when you’re on uneven ground, you have to dig on one side or put some blocks on the other to be able to get the best position.
Final step: Stabilize your travel trailer.
When you’re sure everything’s level on your travel trailer, you can begin to stabilize it to maintain a secure and rigid position on the ground so that you can move inside your trailer comfortably.
Lower your stabilizer jacks in place so that you can secure your travel trailer in your preferred campsite. Take note that stabilizer jacks are not meant to fully take on all of the weight of the trailer. They just act as support to your wheels so that they can fully support your travel trailer.
A good rule of thumb is to let your stabilizing jacks go halfway so that they can provide a solid support for your trailer. Don’t use them beyond this to maintain adequate balance while inside the trailer.
Just a reminder, if you’re traveling with kids or pets, keep them away from the trailer while you’re leveling a travel trailer and you’re not yet done stabilizing to avoid any accidents.
Please always be cautious when RVing! Follow these steps for your safety.
Once the stabilizing jacks are properly in place, you’re done! You can do a final check by going around your trailer. Double check the chocks on your wheels.
Proper leveling and stabilizing could take around 10 to 15 minutes. There’s no need to rush. Safety should always be your priority.
What is the best way to level a travel trailer ?
The best way to level your RV trailer is by using a level tool to help you determine if your RV is level to the ground. Don’t just rely on your sight because our eyes can deceive us.
When you’re satisfied with the level and stability of your travel trailer, then you can sit down, relax and enjoy your camping adventure.

About the Author / Johnathan R. Smith

Comments are closed.
- Affiliate Disclosure
- Privacy Policy
- More Networks
How to Level a Travel Trailer on a Permanent Site in 9 Easy Steps
If you are parking your trailer permanently or for a few months, you need to level it properly. Leveling is important to keep your appliances safe, avoid accidents in the RV kitchen, and free your body from diseases like sleep apnea and sinus.
Leveling your trailer is a complex process, but we will make it simple by giving you a 9-step guide on how to level a travel trailer on a permanent site . We will also discuss why leveling is important, whether it is possible to find an already level campsite, and how to level a camper without moving it.
When you click on links to various merchants on this site and make a purchase, this can result in this site earning a commission. As Amazon Associates, we earn from qualifying purchases. For more info, please check our disclosure page .
Why Do I Need To Level My Travel Trailer On A Permanent Site?
How it impacts your refrigerator’s ability to cool.
You might have already heard that a poorly leveled RV impacts how well your refrigerators work. But did you know why?
Absorption refrigerators are very common in RVs. These can work on both AC electricity and propane gas. So if you park near a power source, you can plug into the grid, but when you are on the road, you can run the fridge on propane.
This refrigerator uses a simple trick to move its cooling ammonia liquid: gravity. Gravity moves ammonia from the condenser at the top of the fridge to the evaporator at the bottom. Normal refrigerators use a compressor for this job.
If your RV is not level, the ammonia will not travel down properly. The refrigerator will not cool things as you want it to. This means you lose your perishables quicker, and the fridge gets damaged over time.
Problems With Running Water Supplies in The RV
The same gravity principle applies to your RV running water systems. If it is not perfectly level, water will not drain properly, and toilets will not flush properly.
The more the incline, the worse these problems will become. With time, standing water will cause your drainage pipes to start clogging, and if they are metallic, it can also cause corrosion and rust.
Problems With Your Water And Waste Storage Tanks
Your RV water tank indicator works by checking the water level at a particular point in the tank. If the tank is inclined, your indicator will overestimate or underestimate the water supply (depending on which side is higher).
Secondly, as the water level falls to the bottom of the tank, your pump may not be able to push it up if the tank is inclined away from the pump.
Your waste storage tanks will also face the same problems. You will have to make more runs to the dumpsite because the waste indicator will tell you it’s full before it actually is.
How It Can Impact Your Health
When you lie down on a tilted bed, blood flow from your heart goes haywire because gravity pulls it more in one direction than the other.
You can suffer from heartburn, blood-pressure-related issues, sinus, backaches, muscle pain, and other problems just by sleeping on a slightly tilted bed. You might also have trouble getting out of bed. You can even roll down off it if you sleep in a tilted bed.
Kitchen Disasters
If you keep heavy items in overhead cupboards, there is a risk that they will fall and injure you. Things like knives and other sharp objects on your kitchen countertop can fall on your legs and hurt you.
Another impacted area is the doors of the cupboards or the RV itself. They will either shut too tightly or open on their own if they are on a tilted surface.
What You’ll Need
1. rv levels.

There are two types of levels that you can use: the bubble type and the Bluetooth type.
Bubble levels are simple, easy to use, and inexpensive. You can put them on the bumper or anywhere on the floor inside the RV to get an accurate reading.
Bluetooth levels are expensive, but they can be helpful when you are backing up into your camping spot. If you don’t have a partner to help you, you can install a Bluetooth level to guide you when backing up.
These will connect with your smartphone through an app and guide you into the perfect spot as you are backing up.
2. RV Chocks

Chocks stabilize your RV’s wheels when parked, especially on an incline. You need to consider six things when you buy chocks:
- Durability : You should prefer heavy-duty crack-proof plastic or thick rubber-based chocks.
- Size : Your RV chocks should be at least 25% bigger than the width of your wheel
- Color : Try to get a brightly colored chock which you won’t forget to remove before you move out of your campsite
- Grip : While rubber wheel chocks are great at gripping all kinds of surfaces, plastic ones are not. So look for textured plastic chocks that have a better grip on the surface.
- Price : Do your research well because some very good wheel chocks come for great prices. Don’t fall for marketing gimmicks; instead, visit expert forums and take the opinion of regular RVers.
- Additional Features : Some chocks come with a handle which makes it easier to lift them. If you plan to camp at a sunny place, chocks with UV stabilizers will crack lesser under the sun’s rays. Rubber wheel chocks smell a bit, so PU and plastic chocks are better if you don’t like the smell.
3. RV Blocks

RV leveling blocks are the swiss army knives of leveling. They are easy to clean, store, and help you level your rig on any surface.
You should look for these things in RV blocks:
- Strength : Make sure they can carry the weight of your RV with all its paraphernalia.
- Size : As in the case of chocks, they should be at least 25% wider than your wheels.
- Weight : You will have to store these in the RV, so ideally, they are better if they are lighter. But being light should not mean that they should not be durable.
4. Stabilizer Jacks

Stabilizer jacks help reduce your rig’s swaying and rocking motion after you have leveled it perfectly. There are ten types of stabilizer jacks that you can use in an RV, so you need to know which ones are best suited for your case.
If you are looking for an inexpensive option, you can use scissor jacks or screw jacks. For automatic solutions, check out electric jacks or full-width double stabilizers.
5. Several 2-inch Wood Plank Pieces (At least 10)
We will use these planks to support the tongue jack.
Steps To Level Your Travel Trailer When You Are On A Permanent Site
1. choose your site.
Ensure that your level indicator is not on the far left or right when parking your RV. If so, look for another place to camp. Otherwise, you will find it difficult to level the trailer later on.
Tips For Picking A Level Spot To Permanently Park Your Trailer
- A long concrete level is a great tool to give you at least a ballpark about how much adjustment you will have to do when you finally park.
- Check if the soil at the spot you have chosen is firm. If it is soft or soggy, you are better off picking a different area.
- Try to choose rocky ground during the rainy season because even firm soil will quickly turn into soft mud if it rains a lot.
2. Clear the Area of Debris and Clutter
Clear the area of rocks, debris, logs, branches, and any other clutter because these will cause problems when leveling. There are tree branches and sticks that you might also want to clear before you start the leveling process in many places.
You can ask for help from nearby RVers to move your vehicle in and out of the spot to check how level it is. You can even use the Bluetooth level we talked about earlier.
3. Check Your Travel Trailer With A Level

Now, bring out the RV level to see if it would be better to park your trailer head first or back first. The level will help you see which way the site is higher and which side is lower.
4. Place Leveling Blocks Near Your Travel Trailer’s Tires

RV leveling blocks build a temporary foundation to help you raise that side of the trailer, which is lower as per your RV level. Bring out your RV leveling blocks, assemble them and place them in front of the tires on the side you need to lift.
If you do not have leveling blocks, a makeshift arrangement you can use is pressure-treated blocks of lumber wood. But if the RV will stay in one spot for several months, we would suggest you spend the extra money and get blocks instead.
After all, wood can rot and easily break. If it rains, the wood may absorb water and become bloated, raising the RV from one side. This will defeat the entire purpose of leveling.
5. Bring the RV onto the Blocks
Get some help from nearby RVers to drive your trailer on the RV blocks. Try to make sure that they can communicate well with hand signals because you will need them while backing up.
Driving onto the blocks is a slow process that needs finesse. If you are not a patient driver, give up the wheel to someone who can do a better job.
Make sure that blocks are completely under the tire, not partially. Otherwise, the part of the tire hanging out will get damaged in a few months and might blow out whenever you are ready to move out of the campsite.
If you miss the blocks the first time, or your wheel is not completely on the block, keep trying till you get it right.
6. Install the Wheel Chocks
Again, for a single season or a few weeks, you can get away with just using wood blocks to stop the wheels on both sides. However, if you are going to be spending a long time in this spot, there is no excuse for not getting quality wheel chocks.
Bring out your wheel chocks and install them under the tires. For extra safety, you can also get locking chocks. Make sure they are firmly in place, and you cannot move them with your hand on either side of the tires.
It might also be a good idea to get wheel-locking chocks for longer stints. These will give additional support to keep your wheels in place.
7. Slowly Start Lowering The Tongue Jack

Now, put a big paving stone, and then create a small pile of your 2-inch wood planks underneath the tongue jack. This will ensure that the tongue jack does not sink into the ground over time.
Now use your level somewhere in the middle of the RV. You can request a nearby RVer to watch over it and tell you when the bubble is centered while you slowly bring down the tongue.
8. Install Any Stabilizing Jacks

You may already have stabilizing jacks installed on your RV, but you can always purchase them online or at an automotive store if you don’t.
There are ten types of stabilizing jacks, and each has its pros and cons. In short, if you want a simple and inexpensive solution, use scissor jacks or screw jacks. If you are looking for something that can work at a button press, choose electric ones.
Whatever you choose, make sure that you use them to stabilize the RV because, without them, your rig will constantly sway and rock, which can eventually damage the nuts and bolts.
9. Make Final Adjustments
Once you complete the process, check your RV level both front to back and side to side. The ideal place to test this would be to put it in the center of the RV.
If you find that your level’s bubble is not centered, you can drive your RV out and make minor adjustments to the blocks, levels, or jacks as the case may be. Then bring your RV back and repeat the process of mounting your wheels on the blocks and locking them in with chocks.
Are Permanent Travel Trailer Spots Level?
In most cases, no. Unless it is a professionally managed site that has taken the effort to make concrete spots for camping, you won’t find level spots anywhere. This is why the leveling process we explained above is very important.
How Do You Level a Camper Without Moving it?
If you plan to place your camper in a spot where you cannot tow it in or out, you might need to level the camper with some ingenious solutions.
One method you can try is to use a bottle jack to lift the RV’s lower side. Then reach under the wheels and add more blocks in the right spot.
After this, slowly bring down the jack, let the RV rest on the blocks, and check if it is level. You might have to try doing this three or four times before you get the right level for your camper.
Conclusion
The history of RVing has been one of innovation and finding new solutions, and regular improvements to every little detail. Leveling is one area where many small innovations have helped solve a problem that everyone knew but couldn’t do anything about.
Leveling your trailer is perfectly important, but once you get the hang of it and buy quality wheel blocks, chocks, and a good RV level, our guide should make the process very easy.
Angela Devaney

Angela Devaney, a former IT project management professional, embarked on an adventurous journey of full-time travel, which included touring West Africa in a converted overland truck and converting an ex-military 4×4 Sprinter van into a camper for a five-year South American expedition. She now utilizes her hands-on experience to create practical RV living and van life advice as a full-time digital media producer, reaching over a million users annually through her YouTube channel , blog, and newsletter. Angela also lends her expertise as the editor-in-chief of the Campervan Electrics Handbook .
Leave a Comment Cancel reply
Save my name, email, and website in this browser for the next time I comment.
Related Posts
© 2024 mowgli adventures
Privacy Policy | Terms Of Service | Sitemap
Part of Mowgli Adventures Media Ltd. Registered in England and Wales. Company Number 13558893
How To Level a Travel Trailer on a Slope

Sharing is caring!
Thanks for your support! If you make a purchase using our links in this article, we may make a commission. And, as an Amazon Associate, I earn from qualifying purchases. See the full disclosure here .
Updated March 29, 2024
I was looking through some RV forums recently and noticed many questions about how to level a travel trailer on a slope. So I did some research and learned a few things myself that I thought would be interesting to share.
Leveling your travel trailer is important for two reasons. First, it makes your camper much more comfortable for sleeping and walking around inside.
Second, and most people don’t know this, it helps to ensure that your gas refrigerator functions properly. The reason a gas powered refrigerator needs to be level is that it relies on gravity to cool properly. The more out of level the camper and refrigerator are the less efficient the fridge is at keeping food cold.
How To Level Your Travel Trailer
So how do you level a travel trailer on a slope? Begin by leveling the travel trailer from side to side, chocking the wheels, and then leveling it from front to back by adjusting the tongue jack. When done properly, your travel trailer will be stable and ready for you to safely enjoy.
Things You Will Need
- A Two Foot Level
- Plastic or Wood Leveling Blocks
- Wheel Chocks
Level The Camper From Side to Side First
First things first. Before you level the travel trailer find the flattest place to park. Clear the area of any debris like big rocks or branches to avoid having them interfere with leveling the travel trailer.
Finding the flattest place to park will minimize the amount of slope and make leveling the camper a little easier. If possible, try to position the travel trailer so the slope runs from front to back rather than side to side. Once you have the travel trailer or camper in the best position, it’s time to begin leveling it.
Use the level to estimate how much you will need to raise the low side of the travel trailer to level it. An inexpensive bubble level is all you need to level the travel trailer.
Sometimes people get confused when using a level. Lay the level from left to right on the camper’s rear bumper. The bubble in the level will float to the high side of the camper.
You will need to raise the lower side of the camper which is the side opposite the bubble. It is important to remember to keep the travel trailer hitched until you are finished leveling it from side to side.
Once you have guesstimated the number of blocks you will need to level the camper it’s time to place the leveling blocks in front of the tires. Plastic leveling blocks are like super strong Lego blocks for campers.
Snap them together to form a ramp for the camper and place them in front of the wheel you need to raise. If your travel trailer or camper has dual wheels you will need to place the leveling blocks in front of both wheels.
You can also use DIY wood leveling blocks instead of plastic leveling blocks. Just remember that the wood should be slightly wider than the tires.
The downside to using wood is that it is heavier than plastic leveling blocks and it can crack. Wood blocks can also slide out of place when driving the travel trailer on them. Obviously, if the wood is rotten or broken, it shouldn’t be used.
Once you have the leveling blocks in place, drive the camper onto the blocks. Slowly drive the camper forward onto the leveling blocks and have someone to guide you so you know exactly when to stop.
The tires should be directly on top of the blocks. If part of the tire is not on the leveling blocks you will need to drive off and reposition the blocks to make sure the entire tire is supported by the leveling blocks.
Check to see if the camper is level once you have it situated on the leveling blocks. If the camper is not level you will need to slowly back off the blocks and add or remove a block to level the camper. Once your camper is leveled, place the wheel chocks on the wheels on both sides of the camper.
Place the chocks under each wheel, wedging them in place by hand. Place them beneath the downhill side of the wheels. Wheel chocks are important to hold the camper still but many folks don’t think they need to use them – you DO need wheel chocks .
Normally a camper will move after people start walking around inside the camper, which makes the camper rock a little bit and then it can move. The wheel chocks keep the camper still, so use them even when you think you don’t need them.
Another Option to Level Your Travel Trailer
Another way to level your travel trailer is with Andersen Levelers . Andersen Levelers take the guesswork out of leveling your travel trailer. Therefore, you won’t drive onto the leveling blocks, find out the camper is still not level, then drive off and add or remove a block and then drive back on.
Anderson Levelers have a wedge system that allows you to drive onto the wedge and pull forward until the camper is level and then you chock the wedge. It is also very important to chock the wheels on both sides of the travel trailer when using the Anderson Levelers. Just check out the video below to see how they work.
Level The Camper From Front To Back
To level the travel trailer from front to back start by either setting the jack in a wheel dock or placing a few pieces of thick strong wood under the tongue jack. The tongue jack is the front part of the travel trailer that connects to your vehicle.
Once you have a solid resting spot for the jack, raise it and unhitch the camper from your vehicle’s bumper. Move your vehicle out of the way so you can finish leveling and stabilizing the camper.
Place the level inside your camper door on the floor and check to see how level it is from front to back. Then raise or lower the jack to level the camper. Usually, the jack will have a hand crank or an electric crank that you can turn to raise or lower it on its metal shaft. Continue to raise or lower the jack until the camper is level from front to back.
Place a plastic or wood leveling block wood under each of the camper’s stabilizing jacks, which are located at the four corners of the camper. The stabilizing jacks aren’t meant for leveling your camper so never use them for that purpose or they could break.
Stabilizer jacks are simply meant to prevent your camper from rocking and falling out of level. If your camper doesn’t have stabilizer jacks, you can have them professionally installed or you can place jack stands under the camper’s four corners.
How To Level a Travel Trailer on a Steep Slope

The best advice is to park your travel trailer somewhere else! But, if that isn’t an option you can follow the steps above but you need to add additional blocking under the leveling blocks on the low side of the travel trailer.
However, this can be very difficult because the base you create needs to be level, and you will be building on uneven ground. So, what do you do?
The best option is to dig down a couple of inches and level the ground itself like in the picture to the right. You will need a shovel and a small level to do this and it doesn’t take long.
Most importantly, it is the safest way to create a safe level base for your camper to sit on. I’ve seen folks try to shove rocks or small boards under the bottom board to try to make it level and it is very unsafe.
If you start with a good base you can ramp your travel trailer up higher and level it even on a steep slope.
Slides In or Out Before Leveling a Travel Trailer
We have tons of people asking us if the slides should be in or out before leveling an RV or trailer. The quick answer is that your slides should be in before you level your travel trailer.
Once you are level you can put your slides out. We are asked this question so often we wrote a blog article about it called Should You Level RVs With Slides In Or Out?
Learn More:
– 5 Best RV Leveling Apps For Your RV – Can You Add Auto Leveling Jacks to an RV or Trailer? – Best RV Jack Pads To Level And Stabilize Your RV
I hope you have found this article helpful for leveling your travel trailer or camper. If done correctly your camper will be sturdy and safe and the fridge will operate efficiently too! Check out some of our other articles related to this topic such as Can I Park an RV in My Driveway? Most of the time I see RV’s out of level they are parked in people’s driveways.
Do you have an idea or suggestion to share about how to level a camper, travel trailer or RV? Please leave your comments below!
If you would like to contact us directly, please feel free to visit our Contact Page to send us an email.
To see a list of all of our articles, check out the Blog Archive !
Mike Scarpignato – Bio
Mike Scarpignato created RVBlogger.com over five years ago in 2018 to share all we have learned about RV camping.
Mike is an avid outdoorsman with decades of experience tent camping and traveling in his 2008 Gulf Stream Conquest Class C RV and 2021 Thor Challenger Class A motorhome.
We attend RV Shows and visit RV dealerships all across the country to tour and review drivable motorhomes and towable trailers to provide the best evaluations of these RVs in our blog articles and YouTube videos.
We are 3/4-time RVers who created RVBlogger.com to provide helpful information about all kinds of RVs and related products, gear, camping memberships, tips, hacks and advice.

5 thoughts on “How To Level a Travel Trailer on a Slope”
I’m bringing my 34′ camper to my dad’s house in a month and the slope on his driveway is insane. It’s a concrete driveway and we really have no other place to keep it. If I run boards or blocks under the tires, it should lift the back end of the trailer, correct? If not, is there another way to make this work? Trying to not stay at a campsite since his driveway is massive, just slopes down towards the house.
I think this is great information for rvers new like me. It help me more understand about level rv . Thanks so much!
Glad you liked the article Natalie!
I always level the bottom of the refrigerator with a torpedo level. Side to side first, than front to back. It is better to have the fridge level than the bumper or floor. A out of level refrigerator may not work properly or completely die of a vapor lock in the system. This is on a propane / electric refrigerator. I do believe that residencial refrigerators also need to be level.
Hi Wayne, What a great suggestion! I never thought of putting the level right in the fridge! Thanks for sharing!
Leave a Comment Cancel reply
Save my name, email, and website in this browser for the next time I comment.
VIDEO
COMMENTS
Learn the tips and tricks to level your travel trailer using the right gear and tools. Find out what you need, how to level your trailer side to side and front to back, and why it's important to level your trailer. Follow the step-by-step guide with photos and videos for a successful leveling experience.
How to level your RV easily every time can be quick and efficient. There are many ways to level your RV or Camper, we thought we would share what we have fo...
Step 3: Pull Onto Leveling Blocks. Photo by Camping World. Look at the angle of your campsite and trailer. Decide if it will be easier to roll back onto blocks or to pull the RV forward up onto blocks. If you're going to roll back, place your blocks behind the wheel. For pulling forward, lay the blocks in front of the wheel.
2b. Unhitch Your Rig. After your tongue jack is stable, unhitch the trailer from your tow vehicle. Then, simply move your vehicle out of the way. 2c. Lower Tongue Jack Until Camper is Level Now, it's time to crank the handle of your tongue jack to raise or lower your camper until the travel trailer is level.
Learn how to level your RV correctly for comfort, safety and convenience. Find out the differences between leveling a motorhome and a travel trailer, and the best practices for each type. Use a bubble level and blocks or jacks to adjust the balance of your RV.
Hey, guys! Let's break down the 3-step process of leveling your travel trailer or camper, so you can feel confident and prepared when rolling up to your camp...
Once you have, set your leveling blocks in front of your trailer's tires. Step 2: Drive Your Trailer Over the Blocks. You might need to drive your wheels over leveling blocks a few times to get to the right level. Of course, drive your towing vehicle slowly. Step 3: Adjust as Needed.
Step 4: Unhitch the Travel Trailer from the Tow Vehicle. To unhitch the travel trailer, you'll need to remove the lights, wiring harness, tow (safety) chains, stabilizers, and any other connection. Then, proceed to park your RV out of the way. Place a leveling pad or jack pad under your tongue jack and lower the jack.
Step 5. Chock the Wheels and Proceed to Unhitch. When you are happy with the side-to-side level of the trailer, you need to chock the wheels on both sides of the camper so they don't budge when you unhitch from the tow vehicle. After chocking the RV tires, unhitch and move your tow vehicle out of the way.
In this RV how to video host Mark Polk demonstrates how to properly level your travel trailer at the campground.Happy Camping,Mark Polk RV Education 101 http...
To manual level your travel trailer can be done using RV leveling blocks or by pulling forward onto the blocks. When using leveling blocks, be sure to determine how many blocks are needed to achieve the desired level. RV leveling blocks can be stacked in a pyramid fashion to provide a stable base for your tires. If you're manually leveling ...
To level a travel trailer, you must first park about a foot from where you want your final spot to be. Estimate the amount of lift and add leveling devices under tires by using a level on your floor. Drive your RV on the leveling device and recheck. Adjust leveling blocks as necessary. Successfully leveling a RV can take a few tries, but once ...
Once you are level, chock your wheels on the other side, and you will disconnect your rig. Now you can level your travel trailer from front to back using your tongue (front) jack. Make sure your tongue jack has a 'foot' on it, or you use some blocks or stand for your jack so it doesn't sink into the soft or wet ground.
First, find a level spot to park your RV. If you can't find one, use blocks or jacks to level the RV. Next, put out the stabilizing jacks. Once the jacks are down, it's time to level the RV. To do this, determine the location of your water fill and sewage drain valves while in the crawl space.
Unhitch your travel trailer from the tow vehicle. When you're already levelled from side to side, you can unhitch your trailer from your tow vehicle. Move your vehicle forward so that you can begin adjusting the level from front to back this time. 5. Check that the trailer is still level.
Now slowly pull forward and watch the bubble again. Keep advancing slowly until the bubble shows level, but pull ahead another inch or two to allow for settling. With your previously low wheels now just a hair higher than level, get out and chock your wheels for safety before you unhitch.
RV Lifestyle Consultant Randy Murray provides step-by-step instruction for leveling a camper. For his demonstration, Randy uses a Keystone Cougar Xlite 28RBS...
4. Place Leveling Blocks Near Your Travel Trailer's Tires. RV leveling blocks build a temporary foundation to help you raise that side of the trailer, which is lower as per your RV level. Bring out your RV leveling blocks, assemble them and place them in front of the tires on the side you need to lift.
An inexpensive bubble level is all you need to level the travel trailer. Sometimes people get confused when using a level. Lay the level from left to right on the camper's rear bumper. The bubble in the level will float to the high side of the camper. You will need to raise the lower side of the camper which is the side opposite the bubble.
LEVEL YOUR RV/ TRAVEL TRAILER FAST & EASY! UNDER 5 MINUTES! Hey Guys! In this video we show you how to easily level you RV Travel Trailer on even ground. Thi...
In this RV DIY® Project video Mark Polk of RV Education 101 demonstrates how to level and stabilize a travel trailer using leveling blocks, wheel chocks and stabilizer jacks. To learn more about the many educational products available at RV Education 101 visit https://shop.rveducation101.com . Editor: Here's an article about an easy-to-use ...
How to level a travel trailer on uneven ground? How to level a travel trailer on a slope? There are many ways to level an RV, but we have found the following...
In this video, we show you how to level your RV / Travel Trailer. We always boondock so we are never on even ground. The biggest time saver is some cheap lit...