ProGameTalk

Acid Trip Side Quest in BL3

- Mission Type: Side Mission
- Planet: The Handsome Jackpot
- Location: Jack’s Secret
A robot that calls itself Hitch requires your help as a new line of robots are being created and if this happens, its legacy will be destroyed.
You are tasked to head to the creation area where the robots are being made and put an end to their creation as well as destroy any of them that have been built.
Mission Walkthrough
May your way to the R&D lab which is located beyond the impound lot and should be accessible when you have progressed through the Moxxi’s Heist main quest .
Check Out Moxxi’s Heist Main Quests Walkthrough Below
- The Handsome Jackpot
- Playing With Fire
- Winners & Losers
- One Man’s Treasure
- Jack’s Wild
- All Bets Off
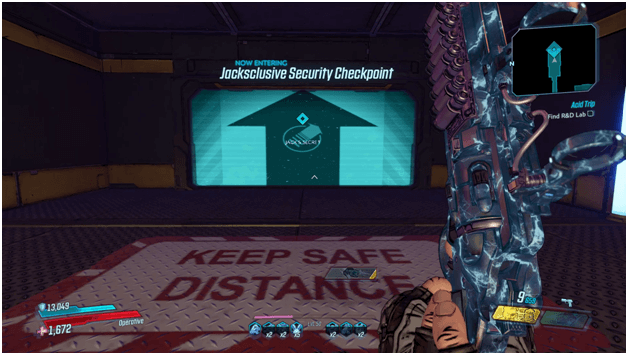
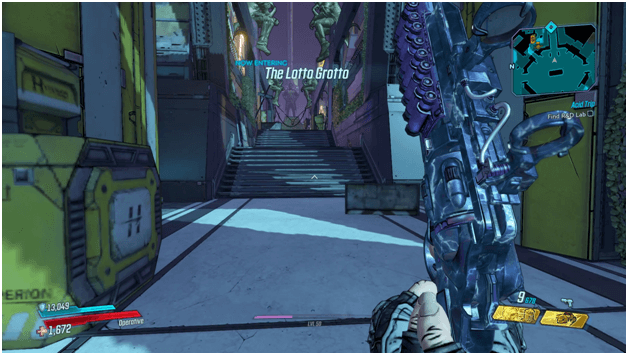
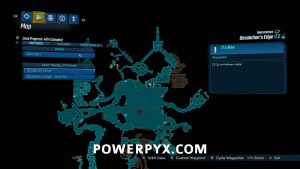
Follow the waypoint and it will eventually lead you to Jack’s Secret where you will soon make your way to the impound area.
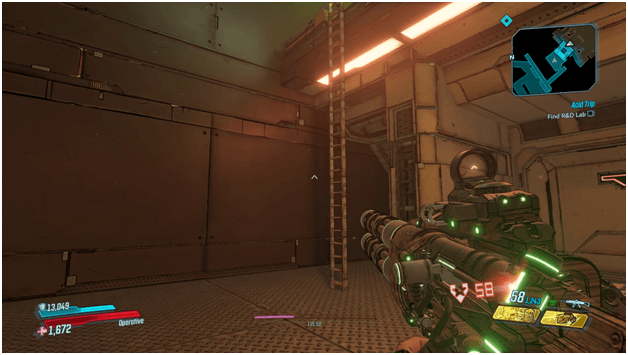
The R&D Lab will be a long way out but eventually you will reach it and it will be at the top of a ladder which you will then climb up to proceed with the mission.
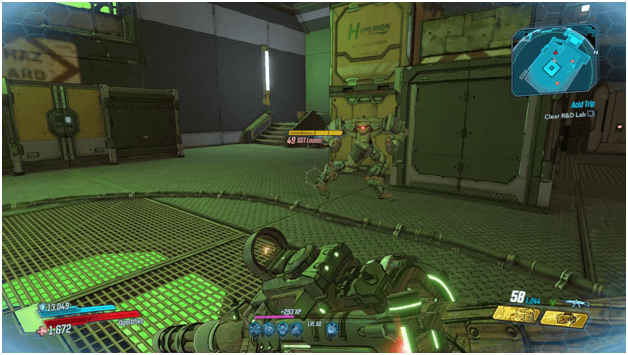
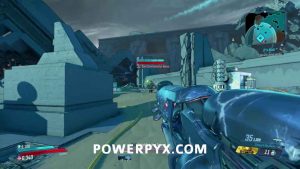
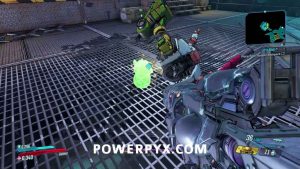
Once you reach the lab, Hitch will tell you to clear the lab of robots and once they appear you must destroy all of them before proceeding with the mission.
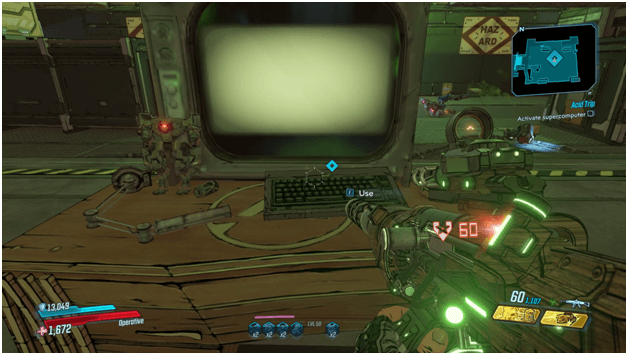
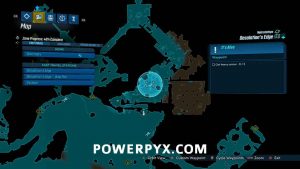
Once the lab has been cleared, access the nearby supercomputer to gain access to the prototype loaders that are stored there.
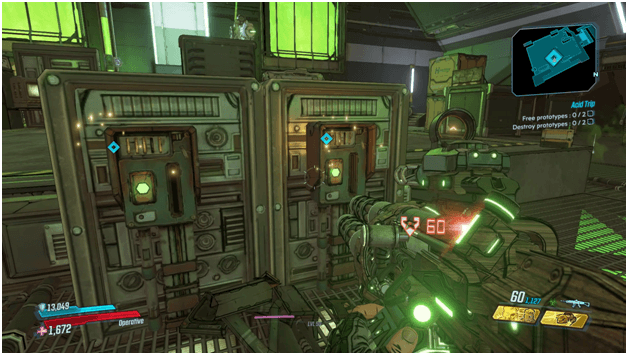
There will be two buttons that become pressable which will each release a prototype and you need to open both and destroy each robot.
The two prototype loaders will be released after pressing the nearby buttons and they will begin to attack you when you come into sight.
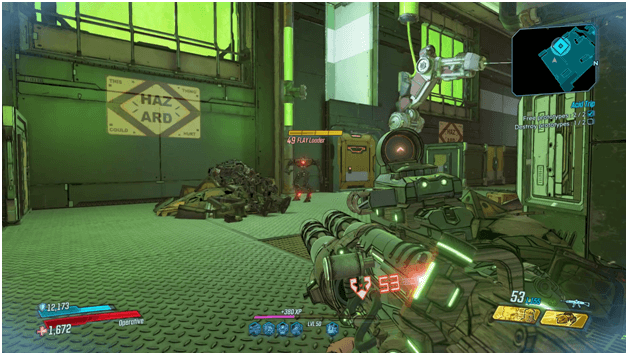
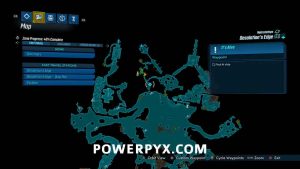
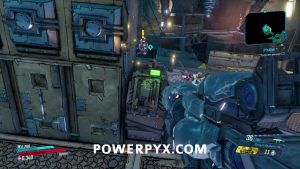
Destroy both of the prototype robots which will cause the lab’s system to activate the final prototype called “Facemelt”.
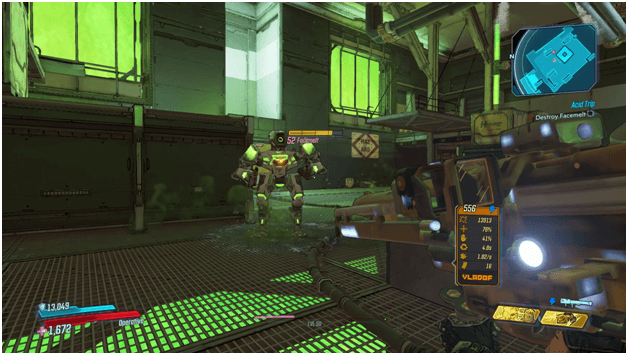
Once Facemelt has been released, head over to it and destroy it to end the last of the prototypes in the lab.
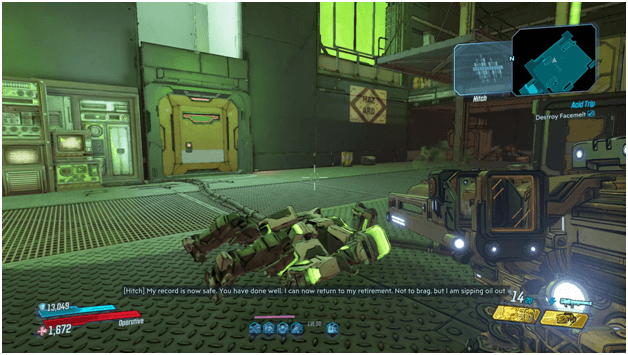
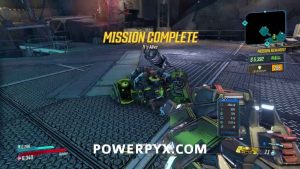
After you destroy Facemelt, Hitch will contact you and thank you for helping it which follows with the mission being completed.
Acid Trip Mission Rewards
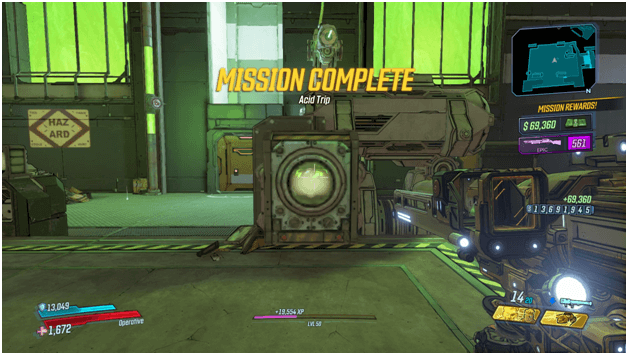
After completion of the Acid Trip mission, you will be rewarded with around 69,360 cash and the “Melt Facer” epic shotgun.
- Most of the enemies you face in the mission will be robots which makes bringing a corrosive weapon a good idea.
- Facemelt may be a robot but for some reason it was designed to be immune to corrosive so be sure to bring another type of weapon for it.
- Follow waypoints and ignore the enemies unless it is required to clear them if you want to rush the mission.

Michael James
Related Posts
Gaige’s Gifts Crew Challenge Guide (Guns, Love & Tentacles)
Mancubus Eldritch Statues Guide (Guns, Love & Tentacles)
Hammerlock’s Occult Hunt Guide (Guns, Love & Tentacles)
BL3 Wendigo (Boss): Defeating, Location, Attacks, Drops, Weak Spots
BL3 Empowered Scholar (Boss): Defeating, Location, Abilities, Drops, Weak Spots
BL3 Empowered Grawn (Boss): Defeating, Location, Attacks, Drops, Weak Spots
BL3 Eleanor and the Heart (Boss): Defeating, Location, Attacks, Drops, Weak Spots
BL3 Eista (Boss): Defeating, Location, Attacks, Drops, Weak Spots
Cold Case: Forgotten Answers (Side Mission) in BL3
Cold Case: Restless Memories (Side Mission) in BL3
Leave a Comment Cancel reply
Please enter an answer in digits: 8 + five =
This site uses Akismet to reduce spam. Learn how your comment data is processed .
- View history
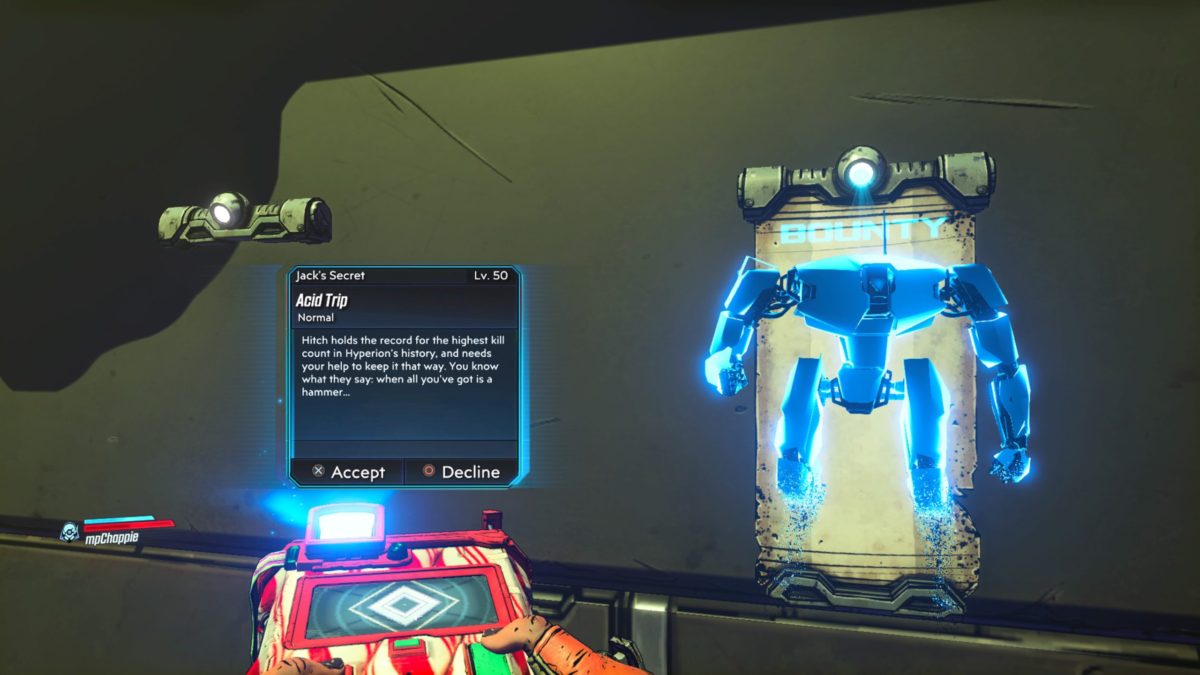
Acid Trip is an optional mission in the Moxxi's Heist of the Handsome Jackpot a downloadable content ( DLC ) add-on for Borderlands 3 .
- 1 Background
- 2.1 Objectives
- 2.2 Strategy
- 4 Video Walkthrough
Background [ ]
Walkthrough [ ], objectives [ ].
- Find R&D lab
- Clear R&D lab
- Activate supercomputer
- Free prototypes (2)
- Destroy prototypes (2)
- Free Facemelt
- Destroy Facemelt
Strategy [ ]
- The prototype loaders fought during this mission include Facemelt , SLAY Loader and FLAY Loader .
Video Walkthrough [ ]
")
- Borderlands
- 2 Add-on content
- 3 Borderlands 3
- Privacy Policy
- Corrections Policy
- Ethics Policy
- Fact-checking Policy
- Ownership Policy
- Looking for Eguides?

Borderlands 3 Acid Trip Guide – Moxxi’s Heist DLC
So, you’re one of those Vault Hunters who’s spent their time in Borderlands 3 trying to help Mad Moxxi one-up Handsome Jack for all that he’s done. Once the Moxxi’s Heist DLC was revealed , we knew that we’d come rushing right back to the game to take down a whole new range of bosses and to lay hands on a ton of new weapons. Now, check out our Borderlands 3 Acid Trip guide for some advice on how to complete this particular DLC mission.

The Borderlands 3 Acid Trip mission is a sidequest that only appears as part of the Moxxi’s Heist of the Handsome Jackpot DLC, so if you haven’t got this to plow through then you’re not going to have to worry about it at all.
If you have been enlisted by the lovely Moxxi to help her take back what’s hers, though, then you might want to perk up. Essentially, you’ll have also had to have completed the Jack’s Wild story mission that’s part of the DLC story content first before this quest becomes available at level 50.
You’ll pick up the Acid Trip quest from Hitch in the Spendopticon, and your objectives are reasonably straightforward here. You’ll be told that you’re going to have to take out other Loaders in the R&D lab before they dethrone Hitch from being, well, the best murderous robot that anyone’s ever seen in recent memory. The steps you’ll have to take are below:
- Find the R&d lab and clear it out
- Activate the supercomputer powering everything
- Free and destroy two prototype loader bots
- Free Facemelt and kill it – immune to corrosive damage, so keep that in mind
Facemelt is the last prototype in this secret R&D lab that HItch has had you infiltrate, but it isn’t much harder to defeat than the prototypes that came before it. The important thing about killing Facemelt and finishing this optional mission, however, is the fact that you’ll also pick up the Melt Facer Epic shotgun . This weapon is highly effective against Armor, so it’s a worthy get if you don’t have something that fills that spot in your deadly arsenal. Now that you’ve got our Borderlands 3 Acid Trip guide to rely on, finishing this side mission should be a piece of cake. Need a hand with anything else? Check out these tips and tricks that we’ve prepared for you Vault Hunters below:
- Borderlands 3 Hotfix Patch Notes for January 9
- Borderlands 3 Guardian Rank Cap – What We Know
- How to Emote in Borderlands 3 on the PS4

Borderlands 3 – Acid Trip
Location: The Handsome Jackpot – The Spendopticon
Obtained: Interact with the poster on the wall in Casa de Timothy (accessible during Jack’s Wild main story mission)
Objective(s):
Find R&D Lab
Clear R&D Lab
Activate Supercomputer
Free Prototypes
Destroy Prototypes
Free Facemelt
Destroy Facemelt
Head to Tricksy Nick Slick Ditch then fast travel to Jack’s Secret (have to first unlock Jack’s Secret during the Jack’s Wild main story mission). The lab is in the Awesome Expensive Reactor area.
Defeat all the loaders in the lab.
Interact with the keyboard in the middle of the room.
Activate the two switches near the supercomputer.
Kill the two loaders.
Use the supercomputer to unleash the “Melter of Faces”.
Kill the loader. As Hitch says, the loader is immune to corrosive so use something else.
Related Posts
Dragon's Dogma 2 - A Place to Call Home Quest
Snack World - Chapter 6 Side Quests
- Borderlands 3 Achievements
- Borderlands 3 News
- Walkthrough *
5. Borderlands 3 Moxxi's Heist of the Handsome Jackpot
Welcome to the first DLC for Borderlands 3. It takes us to a casino and is a pretty short completion. Whenever you're ready...
Head over to Moxxi's and find the quest marker (this one is inside a box, rather than just being a standalone !) and pick up The Handsome Jackpot . Moxxi will speak to you over the echo and, once she's done, head to the bridge and set the ship to head to The Handsome Jackpot. Then head for the drop pod to head down to The Grand Opening.
The Grand Opening

As usual, we start at 1 and there will be a robot offering the V.I.Pay experience. Buy it and the bot will open the door; head through and go to 2 where you can pull a lever and try to spin to win. Of course, you lose and some Loaders come after you. Take them out and when the door opens up, head on through here. Once you reach the stairs at 3 head up the first section and go left and find your first sidequest of the DLC, Regaining One's Feet . The sidequests in the DLC don't actually count towards any achievements so if you want to skip out on them you can, but I'm going to include them in the guide. Make this one active and head to the quest marker and pick up the horseshoe. Head back up the stairs but this time going right to find another good luck charm and then to the bottom left corner below the stairs for the last charm. Return the charms to Allan and take the money and place the charms and then talk to Allan again. Head over to 4 and into the side room and kill all of the enemies and then grab the foot before heading back to Allan. Place the foot and watch Allan win before the quest completes.
Now head back to 3 and through the door straight on at the stairs. Head forwards until you reach a blackjack chest right in front of a statue at 5 . This is where we're going to get our first achievement. Interact with the chest and every time you don't get 21 save and quit. Load back in and you'll be right by the chest so play again, and keep doing this until you get 21 and unlock:
Got a 21 in the blackjack minigame.
You don't need to get 21 in one hit, as long as when you finish, you're on the magic number. It took me 11 tries to get it so it can take a while, but if you're lucky you won't need to try too many times.
Carry on to 6 to get through to the next section and kill enemies as you find them until Third Rail spawns somewhere around 7 . Finally, go to 8 to find the transition to The Spendopticon.
The Spendopticon

From 1 head straight to 2 where you will need to clear the area of Loaders. Once the area is cleared you'll meet Timothy, who you'll find kind of familiar. Talk to him and he'll open a door to a room that contains the area's red chest. Continue following Tim until he hands you a gun and opens yet another door for you at 3 . As you head in Torgue will talk at you so look up and notice a bottle of hot sauce sat on one of the light fixtures. Shoot this for the first of Torgues Hot Sauce Bottles, one of the collectibles for an achievement. Head further into the room and smash some glass to grab an object and then go back to Tim and place the teleporter and melee it.
Head back to 4 and enter a door behind a waterfall. You'll find Sisterly Love on a wall, grab this but don't make it active yet. As Tim does some more talking interact with the holostructor button and watch the scene unfold. This will complete The Handsome Jackpot and start Playing with Fire but now is the time to make Sisterly Love active. There's a waterfall you need to throw a grenade at 5 so do this and grab the dead fish. Go to 6 and place the 3 fish. Go to 7 to grab the Shady Cartridge and head to 8 to install the algorithm. Next, you'll find the Debt Collector somewhere around 9 . Once the Debt Collector is dead the mission will complete.
Now fast travel into the Grand Opening, and then save and quit. Load back in and fast travel back into the Spendopticon and run back to 9 . If the Debt Collector has spawned again kill him, if not repeat the fast travel stuff, save and quit, and then go back to 9 again. It can take a while but once he does spawn in and you kill him you'll unlock:
Defeated the wandering Debt Collector.
Once this pops, head up to 10 and press the button to open the door and head inside. Clear the loaders and head wait for Timothy to catch up, and then press the button at 11 to travel to 11 on the right-hand section of the map. Work your way over to 12 and kill the two bandits and talk to the dancer. Just to the left is Trent, so talk to him and then left again to talk to Shiny Hunk and then head to 13 to grab the package. Go to 14 and place the explosive. This is technically the first of six statues needed for an achievement, the rest of which will act as crew challenges. We ran by where one is earlier in the middle section but we'll be going back for it at some point. For now, follow the quest markers to 15 and clear out the enemies. Ember will introduce herself, talk to her and Playing with Fire will complete and Winners and Losers will start.
Go to 16 and get activate the information board and then go grab Do it for Digby (Part1) and make it active. Melee him and then travel to each of the objective markers in turn before returning to Digby and using the blender. Give the blender to Digby and wait for him to do his thing for Part 1 to complete and then grab Part 2 from him. He'll send you to the Vice District so fast travel to Casa de Timothy at 4 . Before heading to the quest marker go left and head to 16 and climb along the hedge and archway to jump to the Piece of Resistance. I found it pretty awkward going, but be careful and remember to spring jump and mantle and you should be okay.
Follow Digby over to Foxxi's, kill the enemies and head into the corner with Digby at 18 to start recording, and then head out front to destroy the speakers and kill the enemies. Then head back into 18 and interact with the console here. Part 3 will complete now.
We'll be left with Winners and Losers so follow the quest markers until you get to 19 which is a button that will open the way through to the transition to Impound Deluxe.
Impound Deluxe

The Impound Deluxe is another area that was awful to get a map for, but it's pretty straight forwards for getting around.
Starting at 1 head around to 2 and grab The Great Escape and but don't make it active yet. Head to the door at 3 and interact with the button and then up to 4 to do the next couple points on the quest. After a bit of back and forth, you'll be able to head through the door to 5 where you will need to try to take someone else's ticket, have a fight, and then head through another door. Follow the quest markers, dropping through the holes in the floor as needed to move on until you reach 6 . Look to the right to see a load of yellow containers. Climb as high as you can on these go to find the first red chest. Jump down and head to 7 . Once here make The Great Escape active and head to 8 .
The next section is on the lower section of the map so be careful with any custom markers you lay down, but it's easy enough and can be done just following the quest markers. Speak with Max Sky and interact with the countdown button. He'll send you off to another area that you have to jump along a series of platforms to get to but none of the jumps are particularly challenging. Destroy his rival's ship which will be around 9 , and then the rival himself. Head back to Max Sky and do the next couple of objectives to launch him. The quest will complete and a storage container nearby will also open, giving access to the last red chest.
Head back up to 7 and follow the quest marker until you reach 10 where you'll find this area's sole Resistance piece. Now go to 11 and kill all the enemies. Once the last one is dead, you'll meet Freddie. Talk to him and go all the way to 12 and clear the enemies from this area. Move on to 13 and again, clear out the enemies. Once they're disposed of, press the button on the wall and head back to Freddie via the levitating pathway he will set up for you. Once they appear, grab Ember's tools. You'll then be ordered to head back to Timothy's place so fast travel there now.
The Spendopticonhttps

Spawn in at 1 and head straight to 2 and press the button to open the way towards the Market District. Fight your way over to 3 and interact with the travel station to get to 3 over on the left section. Follow the quest markers until you reach 4 on the lowest level. You'll be tasked with grabbing 15 different pieces of trash, so head around to the different quest markers and grab these by from any lootable such as trash piles and bins. As you're working your way around this courtyard make sure to go to 5 and get the piece of resistance here. I found the best way to get to it was to stand on the railing and jump and mantle on to the sloped roof. Once you have this and the trash go to 4 again and place the trash. Ember will join you and give you a bomb. Place this and shoot it to summon Stanley the trash bot. Once he's dead grab the keys and head to the transition at 6 .
The Compactor

This is a pretty straight forwards area with just 2 Crew Challenges and no red chests. We will be getting an achievement in this visit though, towards the end.
Start at 1 and head through the quest markers until you reach 2, where you'll find one of Torgue's Hot Sauces. Look towards the challenge marker and up and you'll see the bottle inside a container. Carry on again to meet the Mayor of Trashlantis and, once he's done talking and sent you to get the AI chip and power cells, go to 3 to pick up Heart of Gold .
Make this active and head to 4 and 5 in turn to grab the first two items, then backtrack a little and head around to 6 where you'll find the third item. While you're here, make sure you pick up any power cells that the loaders you kill drop. You should be able to get the 5 needed for the main quest easily. Go around to 7 next and grab the basket. Make your way to 8 and, as you pass by, take note of a VIP door. We aren't coming here yet but this is the location of the last crew challenge when we unlock those. Once you're at 8 grab the last item and make One Man's Treasure active again.
Head to 9 and drop down into an arena to fight a boss, or rather a swarm of minibosses that, as each one dies, will chip away at an overall health bar. Once these are taken care of a larger form will appear, but shouldn't give you any trouble. Grab the AI chip and then follow the quest markers again and once you have an area waypoint to find a way in, go to 10 and shoot the explosive barrels. You'll find the constructor eye at 11 . Now head back to Trashlantis and at 12 find the Constructor and give the power cores to Freddie before placing the other items. Open the door and then make Heart of Gold active.
As the Clapstructor moves off, go back to Joy. Talk to him, and follow him to the picnic area. Place the items and wait for him to finish talking. Once done Heart of Gold will complete, leaving you with just the main quest.
Head back to catch up with the Clapstructor at 13 and once all the enemies are dead talk to the Clapstrictor again and once the door has been opened head through to kill more enemies. Eventually, you'll reach 14 and while the beam is reinforced you'll have to fight even more enemies. Once everyone is dead you'll see the Clapstructor weld himself to the beam. When your objective updates to Talk to the Mayor go talk to the Clapstructor and you'll unlock:
Returned for a chat with the Clapstructor.
Now head back to 12 to talk to the Mayor to complete One Man's Treasure and start The Plan . Before we head back to the Spendopticon head to 15 and take out the first of the Mayor's Killer Look targets. They work the same as Zero's Targets and shouldn't give you any problems.

Once you spawn in at 1 head to the quest marker around the corner and talk to Timothy to get a little cutscene. You'll then be transported to 2 . Head through the door to 3 and do your thing to get the plan. You'll then be transported to 4 but before following the objective marker turn left and go pick up Too Much of a Good Thing at 5 .
Make this active and head downstairs to grab the three items you need, all very close by. Go back to 5 and put the items in the slot and then go to 6 to grab the ice cream before going back to 5 again. Go to 6 to fight the fat guy and grab his spleen once he's dead and finally back to 5 again to complete the quest.
We're back on with The Plan so head back past 6 and in front of you, you'll see a tiger statue. Climb the rocks behind this statue to get to the Torgue's Hot Sauce at 7 . You then need to activate a series of switches in the correct order. Facing the forcefield you need to get through the correct order is left, centre, right. Shoot the forcefield and then grab the compound at 8 before being transported to 9 . Head forwards and once the enemies are dead, don't pick up the items. Hop over the fence to get to 5 , on the level above the door we were at before. Fight the Killer Look target, and then jump back over the fence to grab the clothes. Once you have these you'll be transported back to 1 . This will complete The Plan and start Jack's Wild but before we do any of this we're going to do a little bit of mop-up.
Travel to 10 in the top right of the map to get the last of the Crew Challenges for this area, a Killer Look target. From here we want to fast travel to the Impound Deluxe to get the Crew Challenge we had to miss there.

Spawn in at 1 which is Beggar's Berth and head straight for 2 . You will need to press the button on the door to spawn the Killer Look target. Once we have this head back to the Spendopticon to continue on with the story.

Spawn in at Casa de Timothy and grab Acid Trip at 1 and then head to the Market District and get Raging Bot at 2 . Make Raging Bot active and knock on the door just by you. Interact with the button in the toilet to activate the lift and then bet on two fights. You then need to travel back to Casa De Timothy to take out three enemies, each one is marked on the map as 3 . Take them out in any order and then head back to 2 and down into 4 . You're told to go down in the third round, but I won the third round because of my digiclone and Yvan attacked me. Killing him completed the quest.
Make Jack's Wild active and follow the quest marker to 5 . I fast travelled to the Spendopticon at the bottom of the map for this. Fight the bots that come at you and then head through to Jack's Secret.
Jack's Secret

Starting at 1 head around to 2 where you'll find a hole you can drop through. Before you do look up and you'll see a bottle of Torgue's Hot Sauce to destroy, very hard to miss. Head the 3 and clear the area of Ratch. Grab the chemicals when prompted to, place them and shoot them to move on. Once you've seen the next bit of story wait for the force field to lower and head through to 4 and clear out the enemies. When they're all dead head to 5 to go down on an elevator.
As you get to 6 make Acid Trip active and look for a yellow container on the left wall. Jump up on to here and on to the walkway and follow this around to 7 . Clear out the enemies and interact with the computer at the centre of the room and then press the two buttons just behind this computer, and then clear out more enemies. Once the last enemy, Facemelt, has been killed Acid Trip will complete and leave you with just the main quest.
Head back the way you came and follow the path onwards until you get to 8 . On the right-hand side, there will be a Piece of Resistance to destroy, you can get to it by jumping from the platform you're stood on as you enter to get to a metal walkway on the right, and then over to the sloped platform the statue is on. Follow the linear way through until you get to 9 where you're met with a force field, head up to 10 to shut it off. You can now work your way over to 11 to drop down into an arena for the area's boss fight.
The boss here is against the Fabricator and the name of the game here is distance. At the level cap, it took my health down to almost nothing instantly when i was up close. I strafed around the edge of the arena after this and had absolutely no trouble from it though. Once the Fabricator has been destroyed there will be a large tube on the opposite side of where you entered. Shoot this to destroy it. Jack's Wild will complete and then the final mission All Bets Off will commence. With this area taken care of head to the Spendopticon
I haven't done a map for the area as you're purely following the quest markers. Go to Ember, kill enemies, take the thermite and place it, and kill more enemies. Once the termite has made a way through the blast door head through the transition to the VIP Tower.

We're in the final area of the game and for how small it is there is a lot of stuff to grab! We'll be getting the last of each type of Crew challenge, each of which gets us an achievement. There are also two red chests in the area. There's also the main mission to do here, of course.
Starting at 1 head to the right towards 2 and take out the last Killer Look target, unlocking:
Completed the Mayor's outfit.
From here go to 3 and clear the area of enemies. Once this is done, Freddie will come to attack you, spawning in at 4 , flanked by 2 named robots and a horde of normal loaders. It's a pretty tough fight, but definitely doable. Once he's dead, go to 5 and open the VIP door to find the last Torgue Hot Sauce bottle, which will unlock:
Destroyed all of Mr. Torgue's hot sauces.
Now head to the corner at 6 and run along the hedge and jump over to the hedge towards the Crew Challenge marker. You need to mantle up here and can then get to the last statue. This will unlock:
Sabotaged all statues for Ember.
Now head back to 4 and head up the elevator. Dropdown into the arena at 7 to fight the boss, which is the Jackpot. He doesn't have much health, and even his long-distance attacks are pretty accurate and do decent damage. When you get his health down to 0 he'll repair himself, and repeat this three times.
Once he's finally dead instead of going to the objective marker turn around and go into the vault to find two red chests. Now head to 8 and go through the next few moments of the story to eventually get the credits, and you'll unlock:
Completed mission All Bets Off.
There's one last side quest to complete now that the final mission has been completed. It's picked up in the Spendopticon and it's called Double Down . I won't map it out as it's just following the quest markers.
I'll see you in the next DLC!

Borderlands 3 It’s Alive Side Mission Walkthrough
September 22, 2019 by PowerPyx Leave a Comment
It’s Alive is a side mission in Borderlands 3 (BL3). This walkthrough will guide you through all objectives of the It’s Alive Side Quest.
It’s Alive is unlocked when you complete Side Mission “Homeopathological” (which also starts in Desolation’s Edge).
Planet: Nekrotafeyo Area: Desolation’s Edge Quest Giver: Sparrow Requirement: Finished Side Mission “ Homeopathological ” (also in Desolation’s Edge) Recommended Level: 30 Reward: Money ($5392) + 7890 XP + Legendary Shield “ The Transformer ” Mission Info: Sparrow wants to build a new friend! Be a dear and help out this nice boy.
Objectives:
Go to Maliwan camp
Get heavy armor 0/2, get oversphere thrusters 0/2, get jetpacks 0/2, get flash trooper backpacks 0/2, get swords 0/2, get death lasers 0/2, get flamethrowers 0/2, obtain acid tank, find ai chip, return to research center, place flash trooper backpack, melee it in, place acid tank, melee it like you mean it, turn on power, install ai chip, kill the abomination, starting location: it’s alive.
You can accept this side mission from Sparrow (red robot) in Desolation’s Edge. Only available after doing his previous side mission “Homeopathological”.

Sparrow sends us to “borrow” some parts from the Maliwan. Meaning we’ll have to kill some soldiers and pick up parts from their equipment to bring back to Sparrow so he can build a new robot out of it.
Go to the Maliwan Camp is Desolation’s Edge, marked on the map.
This and the next few objectives until “Get Jetpacks” are basically non-existent. Sparrow and Grouse will discuss over the radio what parts they want for their new defense robot. So they’ll argue and keep changing the desired robot part (thus changing the mission objective) until they land on “Get flash trooper backpacks”. So ignore this and the next 2 objectives as they will change within a few seconds.
[Grouse] “Well, Typhon put ME in charge of security, and I say we need a combat bot to protect us! One with heavy armor to deflect our enemies’ assault” *this objective gets skipped
[Sparrow] “We don’t need a combat bot, we need a cool friend who can fly around and do sweet tricks!” [Grouse] “Maneuverability IS key for battle, as well as “weet tricks”. How about oversphere thrusters?” *this objective gets skipped
[Sparrow] “No jetpacks!” [Grouse] “Quiet. Vault Hunter, acquire some flash trooper backpacks.” *this objective gets skipped
Finally Sparrow and Grouse arrive at a common understanding that they want flash trooper backpacks for their new bot.
So we’re going to have to kill all the flash troopers that spawn in the area, as well as the other enemies. Just kill everything. Two of the troopers will leave behind their backpacks, which are blue glowing mission items on the floor. Pick up both of these.
After finding the flash trooper backpacks, Grouse and Sparrow will again argue which part they want next. The swords and the next two objectives (death lasers / flamethrowers) will be skipped again as they settle on the acid tank.
[Grouse] “Give him crazy wrod hands, too! I need swords” [Sparrow] “Sword hands?! How are we gonna high-five?” *this objective gets skipped
[Grouse] “Agreed. Let’s use oversphere death lasers instead! Pew pew, baby.” [Sparrow] “No combat bot! My new friend will roast tasty marshmallows for us! Get some flamethrowers!” *this objective gets skipped
[Grouse] “Where would we even GET marshmallows? With an acid tank, our new centurion could melt our foes!” [Sparrow] “I guess that’ll work for cleaning up the lab. Less work for me! Fine, acid tank it is.” *this objective gets skipped
Finally, Sparrow and Grouse decide on getting an acid tank for their new bot. We have to kill the “Dark Contaminator Heavy” in the next area with enemies. It will drop the acid tank mission item. Pick it up.
Fast travel back to the Desolation’s Edge fast travel station. The AI chip is right outside the cave entrance. Pick that up.
Go back to Sparrow where he gave you the quest.
There’s a broken robot on the floor. A green outline will show up next to it, interact with the green outline to place the trooper backpack.
Now we must repeat the same for the acid tank, which you can place by the robot’s head where the green outline shows up.

And again, melee it 3 times in a row to hammer it into the robot.
Flip the power switch behind the robot. This will power it on, enjoy the lightning show.
One final touch – insert the AI chip in the robot’s chest – and done is the abomination. All it does is drop acid while making fart noices, not the entertaining defense bot that Sparrow and Grouse were hoping for.

It’s a good thing Sparrow and Grouse didn’t decide on Swords, Flamethrowers and Jetpacks. Our new robot friend isn’t exactly functioning as intended and will attack us! Kill this abomination to get your quest reward – a legendary shield called “The Transformer” that voids all shock damage completely. Perfect against bosses such as Killavolt !
This finishes It’s Alive side mission in Borderlands 3.
For all other Side Mission Walkthroughs, check out our complete Borderlands 3 Side Missions Walkthrough .
Leave a Reply Cancel reply
Your email address will not be published. Required fields are marked *
- Terms of Service
- Privacy Policy
- Cookie Policy
Borderlands 3 Junpai Goat Eater
- Source Type Mayor's Killer Look
- Location The Spendopticon
- Quest Giver
Junpai Goat Eater Location & Map
.webp "acid trip bl3")
The Spendopticon

Junpai Goat Eater Dedicated Loot Pool
Junpai goat eater - quest rewards.
.webp "acid trip bl3")
- Junpai Goat Eater 10 %
Junpai Goat Eater Pool
Sources in the spendopticon.

Do it for Digby (Part 3)
Double Down
.webp "acid trip bl3")
Evil Saint Lawrence
.webp "acid trip bl3")
Junpai Goat Eater
Playing with Fire
.webp "acid trip bl3")
The Debt Collector Mk II
The Handsome Jackpot
Winners and Losers
Junpai goat eater related sources.
IMAGES
VIDEO
COMMENTS
Acid Trip Walkthrough. To begin the Acid Trip mission, visit the poster on the wall and listen to Hitch. Per the robot's instructions, head to the R&D lab in Jack's Secret. It's a bit of a run ...
Acid Trip Side Quest in BL3. A robot that calls itself Hitch requires your help as a new line of robots are being created and if this happens, its legacy will be destroyed. You are tasked to head to the creation area where the robots are being made and put an end to their creation as well as destroy any of them that have been built.
Acid Trip is an optional mission in the Moxxi's Heist of the Handsome Jackpot a downloadable content (DLC) add-on for Borderlands 3. "Hitch is the best killer bot Hyperion's ever had, but a new prototype Loader may threaten his record. Obviously, he needs you to destroy the R&D lab and destroy these advanced new Loaders before they tarnish his legacy." Find R&D lab Clear R&D lab Activate ...
This video shows how to do Find R&D Lab Acid Trip Borderlands 3 Quest. Where is Borderlands 3 Acid Trip Find R&D Lab objective location? You can complete Fin...
Acid Trip Borderlands 3 Side Mission video. This video shows how to complete Acid Trip Borderlands 3 side quest. Find R&D LabClear R&D LabActivate supercompu...
Published: Jan 12, 2020 8:23 PM PST. Borderlands 3 Moxxi's Heist DLC was revealed Borderlands 3 Acid Trip. Recommended Videos. completed the Jack's Wild story mission. Find the R&d lab and clear it out. Activate the supercomputer powering everything. Free and destroy two prototype loader bots. Free Facemelt and kill it - immune to ...
This video shows how to do Acid Trip Borderlands 3 Jack's Secret Mission. Where is Borderlands 3 Acid Trip objective location? You can complete Acid Trip Jac...
Borderlands 3Acid Trip. Acid Trip. Hitch is the best killer bot Hyperion's ever had, but a new prototype Loader may threaten his record. Obviously, he needs you to destroy the R&D lab and destroy these advanced new Loaders before they tarnish his legacy.
Activate the two switches near the supercomputer. Destroy Prototypes. Kill the two loaders. Free Facemelt. Use the supercomputer to unleash the "Melter of Faces". Destroy Facemelt. Kill the loader. As Hitch says, the loader is immune to corrosive so use something else. A guide on the Acid Trip side mission in Borderlands 3 - Moxxi's Heist ...
Where's the R&D lab for this quest? Not quite sure what I'm missing my quest marker just keeps pointing to every single fast travel station on the map. It's in the power core area. You have advance far enough in the main quest to get to there.
Spawn in at Casa de Timothy and grab Acid Trip at 1 and then head to the Market District and get Raging Bot at 2. Make Raging Bot active and knock on the door just by you. Interact with the button ...
You'd see it on your map if you switched to the story line quest. It worked. By switching from the the side quest to the main story line the propane tank re-apeared. Big Thanks. I lool at wall you've got to blow up, turn 180⁰ go forward and then turn right. Go onto the platform and it should be there.
This video shows how to do Acid Trip Borderlands 3 Mission Walkthrough.Thanks for watching, like and subscribe for more videos.
The answer to my question was YES YOU NEED TO DO JACKS WILD IN ORDER TO DO ACID TRIP thanks anyway bl3 sub Reply reply Top 1% Rank by size . More posts you may like Related Borderlands 3 First-person shooter Shooter game Gaming forward back. r/lifemakeover. r/lifemakeover ...
There are a total of eight side mission in the Spendopticon, each of which can be completed in 15 minutes or less. Players will earn a total of $304,578 for completing the missions. See the full ...
Acid Trip. Quest. Do it for Digby (Part 3) Quest. Double Down. Quest. Evil Saint Lawrence. Mayor's Killer Look. Junpai Goat Eater. Mayor's Killer Look. Playing with Fire. Quest. The Debt Collector Mk II. Rare Spawn. The Handsome Jackpot. Quest. The Plan. Quest. Winners and Losers. Quest.
It's Alive is a side mission in Borderlands 3 (BL3). This walkthrough will guide you through all objectives of the It's Alive Side Quest. It's Alive is unlocked when you complete Side Mission "Homeopathological" (which also starts in Desolation's Edge). Planet: Nekrotafeyo. Area: Desolation's Edge. Quest Giver: Sparrow.
-----Played on PC: Intel i5-7600 CPU @ 3.5GhzGeForce GTX 1070-----Borderlands 3 Game ...
To begin the Regaining One's Feet side mission, speak with Allan at the slot machine. He will ask you to try and find his lucky charm from a man named Bruce the Deuce. Follow the marker on your ...
Find R&D Lab Acid Trip Borderlands 3 Quest video. This video shows how to complete Find R&D Lab Acid Trip Borderlands 3 mission. Borderlands 3 is an open wor...
The IGN Borderlands 3 Wiki Guide and Walkthrough contains step-by-step instructions for completing the Main Story Campaign and all Optional Side
Acid Trip. Quest. Do it for Digby (Part 3) Quest. Double Down. Quest. Evil Saint Lawrence. Mayor's Killer Look. Junpai Goat Eater. Mayor's Killer Look. Playing with Fire. Quest. The Debt Collector Mk II. Rare Spawn. The Handsome Jackpot. Quest. The Plan. Quest. Winners and Losers. Quest. Junpai Goat Eater related Sources.
This video shows how to Find R&D Lab Acid Trip Borderlands 3 Mission Walkthrough.Thanks for watching, like and subscribe for more videos.