How to turn off SafeSearch on Mac

Here is a detailed description of Google’s SafeSearch feature and a walkthrough to disable it on Mac if it’s causing inconveniences.

What is SafeSearch?
SafeSearch is a feature geared toward filtering explicit results from Google search. In particular, it hides materials that contain violence or pornography. This is incredibly useful functionality for managed environments, such as enterprise or school networks in which users are not supposed to access NSFW content. It is also an important element of Google’s parental controls service called Family Link. If the corresponding app is running on a supervised device, SafeSearch is enabled by default if the user is under 13 years old. The web browsing restrictions can be set by a network admin or a Mac owner who wants to purge search results of links they deem inappropriate.

Why turn off SafeSearch?
As useful as it is, SafeSearch is not flawless. Its algorithms aren’t ultimately accurate in identifying content that doesn’t belong on search engine results pages (SERPs) viewed by a kid or an employee during the workday. Also, some users think its filtering can be blown out of proportion, in which case some materials are wrongfully flagged as explicit and relevant links aren’t displayed when you are looking for specific information. One more important aspect is that the service affects the freedom of finding and accessing websites. Nowadays, users dislike it when there are strings attached and other encroachments that hamper full-fledged web surfing routine.
In addition, this term has some shades of ambiguity when viewed from the cybersecurity angle. One of the long-running browser hijack campaigns involves Mac malware that redirects Safari, Google Chrome, Mozilla Firefox, and other browsers to SafeSearch.net without permission. This is a junk page mimicking a typical search engine and trying to piggyback on the name of Google’s well-known content filtering feature in question. Its authors pursue illegal monetization of the intercepted Internet traffic.
On a side note, a similar massive browser redirect scheme involves a potentially unwanted application (PUA) that forces hits to Yahoo Search via affiliated garbage services like Safe Finder, Chill-Tab, Searchmine, Search Pulse, or TapuFind. This quandary is associated with APIs of ad networks, which allows the crooks in charge to convert their misdemeanor into profit. Yet another concern that fits the mold of a plot parasitizing legitimate search providers is the Bing redirect wave . It harnesses several notorious sites, such as SearchMarquis.com and SearchBaron.com, to forward the victim’s traffic in the wrong direction.
With that said, before deciding to turn off SafeSearch on Mac, it makes sense to distinguish between benign and malware-related implications of the issue. If malicious code has taken over your search preferences, it must be removed from the system. In the event you aren’t okay with Google’s filtering your search results to get explicit stuff out of the way, use the following method to deactivate it.
If you feel like SafeSearch is imposing limitations on your web surfing experience, it’s very easy to turn off. Just follow the steps below.
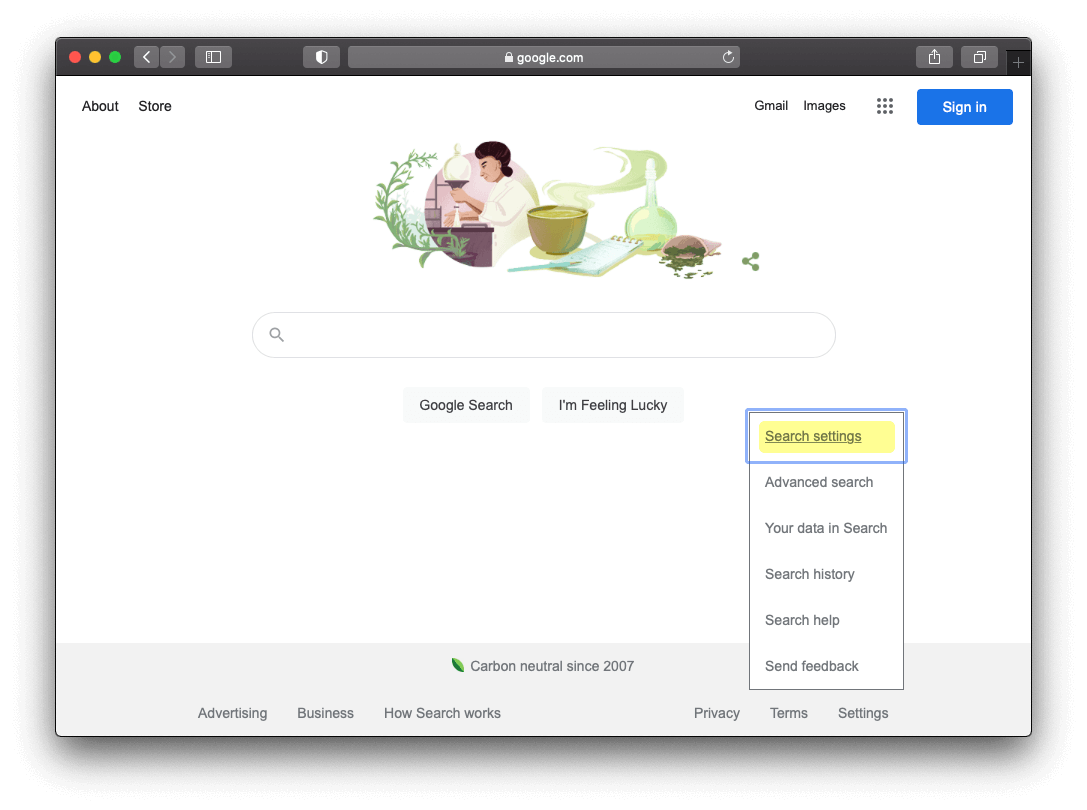
- If the toggle next to the Explicit results filter option is in the off position, it means that adult materials and images of violence will be henceforth making it to your search results when you look for them. It’s easy to re-enable this setting at a later point if you so desire.
Was this article helpful? Please, rate this.
“Pulse Secure will damage your computer” popup removal on Mac
How to fix “your connection is not private” error in chrome / safari on mac, authentication required.
You must log in to post a comment.

How to Enable SafeSearch Settings in Safari?
Are you looking for a way to make sure your children are only exposed to age-appropriate content when browsing the web? If so, then you need to know about SafeSearch settings in Safari. SafeSearch is a feature offered by Apple’s web browser that allows users to filter out explicit and adult content from their search results.
At its core, SafeSearch blocks websites containing explicit or offensive material from appearing in your search results. This helps protect kids from being exposed to inappropriate content when they use Safari on their devices. It also helps keep adults from accidentally stumbling upon objectionable material while surfing the web.
When enabled, SafeSearch will filter out explicit images, videos, and text in both organic search results and sponsored ads. Additionally, it will block certain phrases that may be used in searches that could lead to offensive or inappropriate materials.
To enable SafeSearch settings in Safari, open the browser and click on “Settings” at the bottom of the window. Then scroll down until you see “SafeSearch” and toggle it on. Once enabled, any searches you conduct will automatically filter out potentially offensive materials from appearing on the results page.
If you’re a parent or guardian looking for an extra layer of security for your children when using Safari, then enabling SafeSearch settings is a must-do step. It can help keep kids safe online and give parents peace of mind when their children are using the internet unsupervised.

Turning Off SafeSearch in Safari
To turn off SafeSearch in Safari, go to the Safari menu and select Preferences. Under the General tab, scroll down to the bottom and uncheck the box labeled “SafeSearch”. This will turn off SafeSearch for all searches in Safari. You may need to enter your device’s passcode or use Touch ID to change this setting. Once you have successfully turned off SafeSearch, any search results that may contain explicit content will be visible when you search on Safari.
Restricting Access to Over 18 Sites on iPhone
If you have chosen the ‘Limit Adult Websites’ or ‘Allowed Websites Only’ option in your iPhone’s Content Restrictions settings, it means that you cannot access websites that contain adult content. This is a safety precaution to help protect children and other users from inappropriate material. To be able to access such sites, you would need to change the setting to Unrestricted Access.
Enabling Safe Browsing on an iPhone
To turn on safe browsing on your iPhone, open the Chrome app and tap ‘More’ in the bottom right corner. Then select ‘Settings’. Tap ‘Privacy and Security’, then scroll down to the ‘Safe Browsing’ option and select the desired level of protection. By default, Safe Browsing is set to Standard, which blocks dangerous sites and downloads but does not send usage statistics and crash reports to Google. You can also select Strict, which provides additional protection by blocking deceptive content like phishing sites, as well as sending usage statistics and crash reports to Google.
Changing Safari Privacy Settings on iPhone
To change your Safari privacy settings on your iPhone, go to the Settings app and select Safari. Under Privacy & Security, you can turn off or on various options that affect how websites interact with and track you. For example, you can choose to prevent cross-site tracking, block all cookies, or stop websites from asking to use your location information. You can also choose whether or not to allow fraud warnings and website notifications. Depending on the version of iOS you have installed, other privacy settings may be available. Once you’ve made changes, tap Done in the upper right corner of the screen to save them.
Locked SafeSearch Settings: Understanding the Reasons
Your SafeSearch settings may be locked if Google believes you to be under 18. This is because we have a range of systems, tools, and policies that are designed to help people discover content from across the web while not surprising them with mature content they haven’t searched for. We do this by automatically locking SafeSearch for those who appear to be under 18 so that they are not exposed to explicit or mature content. If you believe your SafeSearch settings have been locked in error, please contact us directly here and we’ll be happy to assist.
In conclusion, it is important to understand how the SafeSearch settings in Safari work. Turning the Explicit results filter on will block explicit content from appearing in search results while turning it off will allow explicit content to appear. It is also important to be aware that SafeSearch may be locked by networks or organizations, or set by parents or guardians. It is possible to turn security warnings and JavaScript on or off in the Security Settings of Safari. By being aware of these settings and taking steps to ensure that they are set appropriately, users can ensure that their online experience is safe and secure.
Related posts:

Sanjeev Singh
- Help Center
- Google Search
- Privacy Policy
- Terms of Service
- Submit feedback
- Announcements
Fix issues with SafeSearch
If you have issues with SafeSearch, try the steps below to help fix the issue.
Check if your SafeSearch setting is locked
Your SafeSearch setting can be set to "Filter" and locked by your account, device, or network administrator.
Tip: If your SafeSearch setting isn’t locked, sign in to your Google Account. This is to save and apply your SafeSearch preferences.
Here are a few possible reasons why you're not able to change your SafeSearch settings:
- Public Wi-Fi networks.
- Operating system family protection settings .
- Antivirus software. In these cases, those settings might override your individual SafeSearch setting. Contact your Internet service provider (ISP) or network administrator for more info.
- If your account or device is managed with Family Link, they can set preferences for your account in Google Family Link.
- Ask your parent or guardian about your account settings.
- If you have a Google Workspace for Education account, your school administrator sets SafeSearch settings.
- Contact your school or organization administrator for more info.
- These can use URL parameters, like safe=active , to force a setting to filter, blur, or off
- Check your address bar, browser settings, and extensions.
Learn why you get inappropriate content when SafeSearch is on
The SafeSearch setting filters explicit results, like adult content or graphic violence, to prevent them from appearing in your search results. While no filter is 100% accurate, turning this setting on helps you avoid explicit content when you search.
The SafeSearch setting isn’t designed to filter explicit content that has significant artistic, educational, historical, documentary, or scientific value.
If SafeSearch is on but you still get explicit sites or images, let us know.
Report inappropriate content .
If you find an image that you want to report when you search at images.google.com :
- On the image results page, click the image you want to report.
Phone or tablet
- On the image results page, tap the image you want to report.
Learn why your SafeSearch setting keeps turning off
If you allow cookies , SafeSearch should stay the way you set it.
If you delete your cookies and you're not signed in to your Google Account , your SafeSearch setting could get reset.
Tip: To save and apply your SafeSearch preferences across devices and browsing sessions, sign in to your Google Account.
Learn why SafeSearch incorrectly filters the site you own
If you’re a content creator or website owner and you have any issues with the way SafeSearch filters your site, find out how to optimize your site for SafeSearch .
Related resources
- Filter explicit results on Google using SafeSearch
- Lock explicit results filters on Google for devices and networks you manage
Was this helpful?
Need more help, try these next steps:.
- Great Tech Gifts for Any Occasion
- The Best Gadgets for The Beach or Pool
How to Control iPhone Safari Settings and Security
Control your settings and security in the iPhone browser
:max_bytes(150000):strip_icc():format(webp)/SamCostello-d7fcf106ec2048ccb06d1e2190b3396d.jpg)
- Ithaca College
In This Article
Jump to a Section
How to Change the Default iPhone Browser Search Engine
How to use safari autofill to fill out forms faster, how to view saved passwords in safari, control how links open in iphone safari, how to cover your online tracks using private browsing, how to clear your iphone browser history and cookies, prevent advertisers from tracking you on your iphone, how to get warnings about potentially malicious websites, how to block websites, ads, cookies, and pop-ups using safari, how to use apple pay for online purchases.
- Take Control of Your iPhone Security and Privacy Settings
What to Know
- To change search engine, go to Settings > Safari > Search Engine . To control links, go to Safari > Open Links .
- To use AutoFill, go to Settings > Safari > AutoFill > turn on Use Contact Info .
- To view saved passwords, go to Settings > Passwords & Accounts > Website & App Passwords .
This article explains how to adjust Safari settings and security on your iPhone or iPad.
Searching for content in Safari is simple; tap the menu bar at the top of the browser and enter your search terms. By default, all iOS devices use Google for web searches, but you can select a different search engine by following these steps:
Open the Settings app.
Select Safari > Search Engine .
Select the search engine you would like to use as the default. Options include Google , Yahoo , Bing , and DuckDuckGo . The setting is automatically saved, so you can search using the new default search engine right away.
Similar to a desktop browser , Safari automatically fills in forms by grabbing information from your address book. This saves time because you don't need to fill out the same forms over and over again. To use this feature, follow these steps:
Select Safari > AutoFill .
Toggle the Use Contact Info switch to on/green.
Your information appears in the My Info field. If it does not, select the field and browse your address book to find your contact information.
Older versions of iOS allowed you to change your username and password info here. If you want to save, edit, or delete usernames and passwords in iOS 13 or later, go to the Passwords & Accounts settings page (select Settings > Passwords & Accounts ).
To save frequently used credit cards to make online purchases quicker, move the Credit Cards switch to on/green. If you don't have a credit card saved on your iPhone, select Saved Credit Cards , and add a card.
Saving usernames and passwords in Safari means you're not forced to memorize login credentials to access a website. As this data is sensitive, iOS takes measures to protect it. If you need to look up a username or password, you can do so by following these steps:
Select Passwords & Accounts > Website & App Passwords .
You are asked to authorize access to this information using Touch ID , Face ID , or your passcode.
A list details all the websites for which iOS has saved login data. Select a site to view the corresponding username and password.
You can choose where new links open by default—in a new window that appears either in front of or behind the page you are currently viewing. Follow these steps to adjust this setting:
Select Safari > Open Links .
Select In New Tab to open links in a new window in Safari and to have that window appear in front of the current tab. Select In Background to open links in a new window that appears behind the page you are currently viewing.
Browsing the web leaves digital footprints. Between browsing history, cookies, and other usage data, you may prefer to cover some of those tracks. The Safari Private Browsing feature prevents Safari from saving information about your behavior—including browsing history, cookies, and other files—while it is turned on.
When you want to delete your browsing history or cookies manually, follow these steps:
Select Safari > Clear History and Website Data .
A menu appears asking if you would like to clear the browsing data. Select Clear History and Data .
Cookies allow advertisers to track you across the web. This lets them build a profile of your behavior and interests to target you with ads better. Here's how to opt-out of some of that tracking data:
Select Safari .
Move the Prevent Cross-Site Tracking switch to on/green.
Older versions of iOS included a Do Not Track feature that asked websites not to track your browsing data. Apple removed this feature, as the request was never mandatory and did not do much to limit the tracking of user data.
Setting up fake websites that look like ones you normally use is a common method of stealing data from users. Safari has a feature to help avoid these sites. Here's how to enable it:
Move the Fraudulent Website Warning switch to on/green.
You can speed up your browsing, maintain privacy, and avoid certain ads and websites by blocking cookies. Here's how:
Move the Block All Cookies switch to on/green, then select Block All to confirm the action.
If you set up Apple Pay , you can use it at any participating retailer to complete purchases. To make sure you can use it at those stores, enable Apple Pay for the web. Here's how:
Move the Check for Apple Pay switch to on/green.
Take Control of Your iPhone Security and Privacy Settings
While this article focuses on privacy and security settings for the Safari web browser, the iPhone has other security and privacy settings. These settings can be used with other apps and features to protect private info stored on your iPhone .
Get the Latest Tech News Delivered Every Day
- How to Clear Search History on iPhone
- 3 Ways to Clear Cache on an iPad
- How to Manage Browsing History on Safari for iPad
- 4 Ways to Play Fortnite on iPhone
- How to Find a Wi-Fi Password on an iPhone
- The Top 10 Internet Browsers for 2024
- How to Manage History and Browsing Data on iPhone
- How to Change the Default Search Engine in Safari for iOS
- How to Enable or Change AutoFill Information on an iPhone
- How to Disable JavaScript in Safari for iPhone
- How to Solve Safari Crashes on the iPhone
- How to Clear Cookies on iPad
- Firefox Focus: What It Is and How to Use It
- How to Add, Edit, and Delete Bookmarks in iPhone's Safari
- How to Manage Your Browsing History in Safari
- Managing History and Other Private Data in Safari for macOS
How To Turn Off Safe Search On Safari

- Software & Applications
- Browsers & Extensions

Introduction
Safari, the sleek and user-friendly web browser developed by Apple, is renowned for its seamless integration with the Mac and iOS ecosystems. It offers a secure and efficient browsing experience, making it a popular choice among Apple device users. One of the features that Safari provides is Safe Search, a built-in setting designed to filter out explicit or inappropriate content from search results. While this feature is valuable for ensuring a family-friendly browsing experience, there are instances where users may wish to turn it off to access a broader range of search results.
In this article, we will delve into the process of turning off Safe Search on Safari. Whether you're a parent seeking to adjust the browsing settings for your child or an individual looking to customize your search preferences, understanding how to disable Safe Search can empower you to tailor your browsing experience to your specific needs. Let's explore the steps to access Safari settings and disable Safe Search, allowing you to unlock a wider spectrum of search results while using this popular web browser .
Accessing Safari Settings
Accessing the settings in Safari is a straightforward process that allows users to customize their browsing experience according to their preferences. Whether you're using Safari on a Mac computer or an iOS device, the steps to access the settings remain consistent, offering a seamless experience across different platforms.
If you're using Safari on a Mac, you can access the browser's settings by following these simple steps:
Open Safari : Launch the Safari browser on your Mac by clicking on its icon in the dock or by searching for it using Spotlight.
Navigate to Preferences : Once Safari is open, click on "Safari" in the top-left corner of the screen. A drop-down menu will appear, and you should select "Preferences" from the options listed. Alternatively, you can use the keyboard shortcut "Command + ," to access the Preferences window directly.
Explore Settings : In the Preferences window, you will find a range of tabs at the top, such as General, AutoFill, and Security. These tabs allow you to customize various aspects of your browsing experience. To modify the Safe Search settings, you will need to navigate to the "Search" tab.
Adjust Safe Search : Within the "Search" tab, you will find the option to enable or disable Safe Search. Simply uncheck the box next to "Enable Safe Search" to turn off this feature. Once you've made the desired changes, you can close the Preferences window, and your new settings will be applied.
For those using Safari on an iOS device, such as an iPhone or iPad, the process of accessing the browser's settings is equally user-friendly:
Open Settings : Begin by tapping on the "Settings" app on your iOS device's home screen. This will open the main settings menu, where you can configure various options for your device and installed apps.
Scroll to Safari : Within the Settings menu, scroll down until you find the list of installed apps. Tap on "Safari" to access the browser's specific settings.
Customize Search Settings : In the Safari settings, you can customize a range of options, including search engine preferences and privacy settings. To disable Safe Search, look for the "Search Engine" section and toggle off the "Safe Search" option.
By following these straightforward steps, users can easily access Safari's settings and make adjustments to their browsing preferences, including the ability to disable Safe Search. This flexibility empowers users to tailor their browsing experience to align with their individual needs and preferences, ensuring a personalized and enjoyable web surfing experience.
Turning Off Safe Search
Disabling Safe Search on Safari can be a simple yet impactful way to customize your browsing experience. By turning off this feature, you can access a broader range of search results, allowing for more comprehensive and unrestricted exploration of online content. Whether you're seeking to fine-tune your search preferences or enable access to specific types of content, the process of turning off Safe Search in Safari is designed to be user-friendly and easily accessible.
Once you have accessed the Safari settings, whether on a Mac or iOS device, the next step is to locate the Safe Search option and make the necessary adjustments. In the Preferences window on a Mac, you can find the Safe Search setting within the "Search" tab. By unchecking the box next to "Enable Safe Search," you can effectively turn off this feature. On iOS devices, the Safe Search option is typically found within the Safari settings menu, where you can toggle off the "Safe Search" setting to disable it.
It's important to note that by turning off Safe Search, you may encounter a wider variety of search results, including content that may not be suitable for all audiences. Therefore, it's advisable to exercise caution and consider the browsing environment and audience when making this adjustment. For parents or guardians managing the browsing settings for children, it's essential to have open conversations about online safety and responsible browsing practices.
By providing users with the flexibility to customize their Safe Search preferences, Safari empowers individuals to tailor their browsing experience according to their specific needs and preferences. Whether you're conducting research, exploring diverse perspectives, or simply seeking a more unrestricted search experience, the ability to turn off Safe Search in Safari offers a valuable level of control and customization.
Ultimately, the process of turning off Safe Search in Safari is designed to be intuitive and user-centric, aligning with Apple's commitment to delivering a seamless and personalized browsing experience. By understanding how to navigate the Safari settings and make adjustments to the Safe Search feature, users can unlock a more tailored and versatile browsing experience, allowing them to explore the web in a way that aligns with their individual preferences and requirements.
In conclusion, the ability to turn off Safe Search on Safari offers users a valuable level of customization and control over their browsing experience. By providing a user-friendly interface for adjusting search preferences, Safari empowers individuals to tailor their online exploration according to their specific needs and preferences. Whether it's enabling access to a broader spectrum of search results for research purposes or customizing the browsing environment for a more unrestricted experience, the option to disable Safe Search reflects Apple's commitment to delivering a personalized and versatile web browsing platform.
It's important to recognize that while turning off Safe Search can expand the range of search results, it also comes with the responsibility to exercise caution and consider the browsing environment and audience. For parents and guardians managing the browsing settings for children, open conversations about online safety and responsible browsing practices are essential. By fostering a proactive approach to online safety, users can leverage the flexibility of Safe Search settings to create a balanced and secure browsing environment for themselves and their families.
Furthermore, the seamless integration of Safe Search settings across different platforms, including Mac computers and iOS devices, underscores Apple's dedication to providing a consistent and intuitive user experience. Whether accessing Safari settings on a Mac or an iOS device, the process remains straightforward and accessible, ensuring that users can easily customize their browsing preferences regardless of the device they are using.
By understanding how to navigate the Safari settings and make adjustments to the Safe Search feature, users can unlock a more tailored and versatile browsing experience, allowing them to explore the web in a way that aligns with their individual preferences and requirements. This level of customization reflects the evolving nature of online exploration, where users seek a balance between access to diverse content and the implementation of appropriate safety measures.
In essence, the ability to turn off Safe Search on Safari represents a pivotal aspect of the browser's commitment to user empowerment and personalized browsing experiences. By offering a seamless and intuitive process for adjusting Safe Search settings, Safari ensures that users can navigate the digital landscape with confidence, knowing that they have the flexibility to tailor their browsing experience according to their unique needs and preferences.
Leave a Reply Cancel reply
Your email address will not be published. Required fields are marked *
Save my name, email, and website in this browser for the next time I comment.
- Crowdfunding
- Cryptocurrency
- Digital Banking
- Digital Payments
- Investments
- Console Gaming
- Mobile Gaming
- VR/AR Gaming
- Gadget Usage
- Gaming Tips
- Online Safety
- Software Tutorials
- Tech Setup & Troubleshooting
- Buyer’s Guides
- Comparative Analysis
- Gadget Reviews
- Service Reviews
- Software Reviews
- Mobile Devices
- PCs & Laptops
- Smart Home Gadgets
- Content Creation Tools
- Digital Photography
- Video & Music Streaming
- Online Security
- Online Services
- Web Hosting
- WiFi & Ethernet
- Browsers & Extensions
- Communication Platforms
- Operating Systems
- Productivity Tools
- AI & Machine Learning
- Cybersecurity
- Emerging Tech
- IoT & Smart Devices
- Virtual & Augmented Reality
- Latest News
- AI Developments
- Fintech Updates
- Gaming News
- New Product Launches
- AI Writing How Its Changing the Way We Create Content
- How to Find the Best Midjourney Alternative in 2024 A Guide to AI Anime Generators
Related Post
Ai writing: how it’s changing the way we create content, unleashing young geniuses: how lingokids makes learning a blast, 10 best ai math solvers for instant homework solutions, 10 best ai homework helper tools to get instant homework help, 10 best ai humanizers to humanize ai text with ease, sla network: benefits, advantages, satisfaction of both parties to the contract, related posts.

How To Turn Safe Search On In Safari

How To Parental Control Safari

The Truth About Incognito Mode That You Don’t Know

How To Turn On Incognito Mode Safari
How To Open Private Browser On Safari iPhone
How To Restrict Safari Searches

How Do I Turn Off Safari Private Browsing

How Do You Update Safari On IPad
Recent stories.

How to Find the Best Midjourney Alternative in 2024: A Guide to AI Anime Generators

How to Know When it’s the Right Time to Buy Bitcoin

How to Sell Counter-Strike 2 Skins Instantly? A Comprehensive Guide

10 Proven Ways For Online Gamers To Avoid Cyber Attacks And Scams

- Privacy Overview
- Strictly Necessary Cookies
This website uses cookies so that we can provide you with the best user experience possible. Cookie information is stored in your browser and performs functions such as recognising you when you return to our website and helping our team to understand which sections of the website you find most interesting and useful.
Strictly Necessary Cookie should be enabled at all times so that we can save your preferences for cookie settings.
If you disable this cookie, we will not be able to save your preferences. This means that every time you visit this website you will need to enable or disable cookies again.
How to manage privacy and security settings in Safari on Mac
Apple continues to add new features to Safari on a regular basis to try to make our web browsing experience faster, easier, and—above all—more secure.
You can open up a private browser window anytime you want in Safari's file menu and Safari won't save your browsing history and will ask websites you visit not to track you. But there are a few more steps you might want to consider taking.
The place to go for most of these things is in Safari's preferences window, accessed from the Safari menu.
How to guard against unsafe files
How to identify fraudulent websites, how to disable javascript, how to prevent cross-site tracking, how to block all cookies in safari, how to remove website data, how to clear your browsing history, how to check for apple pay on websites, how to allow or deny camera, microphone, and location access, how to block pop-up windows.
As with all things related to security, there's a balancing act between convenience and safety. Safari will automatically open certain types of "safe" files you download from the web as a matter of convenience. But because a malicious file could be disguised as a "safe" file, it's a good idea to guard against unsafe files—and it's as easy as checking a box.
- Launch Safari . If it's not in the Dock, you can find it in the Applications folder.
- From the Safari menu, choose Preferences... .
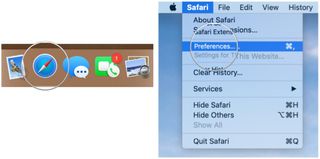
- Click the General button.
- Uncheck the box to Open "safe" files after downloading .

Downloads will occur as they usually do, and to the location you have chosen, but the files won't automatically open.
Safari already identifies websites that use encryption (indicated by a padlock icon in the address bar) and an EV certificate which indicates a more extensive identity verification of the website operator (indicated in green). Safari also uses Google Safe Browsing technology--which is simply a list of websites that may contain malware, unwanted software, or phishing scams.
If it's not already on, here's how to do so:
Master your iPhone in minutes
iMore offers spot-on advice and guidance from our team of experts, with decades of Apple device experience to lean on. Learn more with iMore!
- Click the Security button.
- Check the box to Warn when visiting a fraudulent website .

If you happen to run across one of these sites, Safari will put up a full-screen warning about the site before you can proceed.
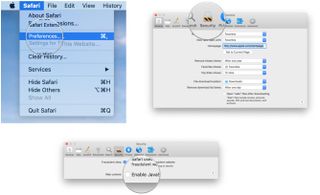
Many—if not all—webpages contain JavaScript, which enables certain functionality for web pages, such as displaying the time and date or displaying an image from a set of options.
You can disable JavaScript if you like, but it may impact the functioning of the web page.
- Uncheck the box to disable JavaScript .
If you've been using Safari and suddenly seen a plethora of lawnmower ads not long after doing some web research about lawnmowers, then congratulations: you've discovered crop-site tracking. It's a way of keeping track of your behavior on one part of the internet to show you ads while using a different part of the internet. If you prefer, you can turn it off.
- Click the Privacy button.
- Check the box to Prevent cross-site tracking and check the box to Ask websites not to track me .
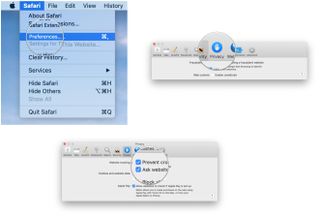
Keep in mind that while you can ask websites not to track you, it's up to the website creator to honor your request.
Cookies are small text files a website may store on your Mac to help identify you or your Mac when you visit the website in the future. Examples of content stored in a cookie are your name, site browsing history, and preferences. If you don't want Safari to use cookies, you can shut it off.
- Uncheck the box to Block all cookies .

If you ever decide to remove website data from your Mac, you can do it selectively for certain websites or remove all the data.

- Click the Manage Website Data... button.
- Select a website and click the Remove button to remove the site's cache, cookies, or local storage or click the Remove All button to delete data for all websites.

Rather than root around through a set of checkboxes and pop-up menus, you can clear your browsing history, cookies, and website data with a menu command.
- From the Safari menu, choose Clear History... .
- From the Clear pop-up menu, choose how far back you want to go.
- Click Clear History .

In addition to the history of the website pages you've visited, you'll also give the heave-ho to recent searches, a list of items you have downloaded, the frequently visited site list, and other information.
If your Mac and other devices have Safari turned on in iCloud preferences, the clear history command will remove the browsing history from Safari on those other devices.
You can enable Safari on your Mac to show you websites that can accept payments via Apple Pay. You can then make the payments from your Apple Watch or iPhone, or using Touch ID if it's built into your Mac.
- Check the box to Allow websites to check if Apple Pay is set up .
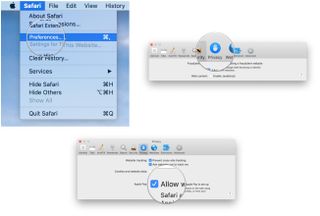
Safari includes the ability to determine whether or not websites ask can use your Mac's camera and microphone. Here's how to set it up.
- Click the Websites button.

- From the General section of the sidebar, click Camera .
- Click the pop-up menu for "When visiting other websites" and choose Ask, Deny, or Allow , depending on your preference.

The settings work in exactly the same way for your Mac's microphone and your location. Simply click Microphone or Location in the sidebar. Similarly, you can change the setting for currently open websites to suit your preference.
Some web pages that you visit will automatically display a pop-up window that will block content—often with an ad—that you're trying to view. While this can be annoying, there are some sites that require pop-up windows to work properly. Fortunately, Safari provides fine-grained control of these pop-up windows.
- From the General section of the sidebar, click Pop-up Windows .
- Click the pop-up menu for "When visiting other websites" and choose Block and Notify, Block, or Allow , depending on your preference.

Similarly, you can change the setting for currently open websites to suit your preference.
If you choose Block and Notify, a small icon will appear on the right side of the Smart Search field. Click it to display the pop-up windows for the web page.
Great Mac accessories

Apple AirPods 2 (From $159 at Apple)
The best Apple accessory has gotten betting with AirPods 2. Now offering a wireless charger case, the popular earbuds feature the new Apple H1 headphone chip that delivers a faster wireless connection to your devices, as well as support for "Hey Siri."

Samsung T5 SSD (From $88 at Amazon)
This solid-state drive from Samsung is speedy, tiny, and portable. It also connects using USB-C, making it a perfect companion for your new Mac.
Let us know in the comments below.
Updated August 2019: Updated through macOS Mojave and the macOS Catalina beta.

Mike Matthews is a writer at iMore.com. He has used Apple products all the way back to the Apple II+. He appreciates no longer having to launch apps by loading them from a cassette tape recorder.
iPad Air 6 to get the iPad Pro's mini-LED display in shock late leak — OLED iPad Pro won't be the only display boost in May
How to play games on Delta Game Emulator for iPhone — get to grips with the app everyone's talking about
iPhone and iPad owners can now AirPlay content, music, and even games to TVs in these hotels
Most Popular
- 2 iPhone and iPad owners can now AirPlay content, music, and even games to TVs in these hotels
- 3 Apple M4 chip: Everything you need to know
- 4 How to connect your Apple Watch to a treadmill or exercise bike
- 5 The Lofree Dot Foundation mechanical keyboard is the nicest-sounding keyboard I’ve ever used — but bigger hands may tap typos
How-To Geek
How to turn off safesearch on google, bing, yahoo, and duckduckgo.
View all kinds of search results on your favorite search engine!
Quick Links
How to turn off safesearch on google, how to turn off safesearch on bing, how to turn off safesearch on yahoo, how to turn off safesearch on duckduckgo.
When SafeSearch is enabled, your search engines block what they consider to be mature content in your search results. In case you'd like to include those results in your searches, you will have to turn off SafeSearch first. Here's how.
Related: 5 Alternative Search Engines That Respect Your Privacy
To disable SafeSearch on Google on your desktop, simply open Google Search and go to Settings > Search Settings > SafeSearch Filters. There you can uncheck "Turn on SafeSearch."
For more detailed instructions on this process, as well as how to do it on mobile devices, check out our dedicated guide. It lists and illustrates each step you need to follow to enable mature content results in your searches.
Related: How to Turn Off SafeSearch on Google Search
If you use Bing as your search engine, it's easy to disable SafeSearch on this engine on both desktop and mobile.
Disable Bing SafeSearch on Desktop
On your Windows, Mac, Linux, or Chromebook desktop computer, open a web browser and launch the Bing site. In Bing's top-right corner, click the hamburger menu (three horizontal lines).
In the menu that opens, click "SafeSearch."
You will see a "Search" page. Here, in the "SafeSearch" section, enable the "Off" option. This disables SafeSearch on Bing for you.
In case you do not want to disable SafeSearch completely, but you'd rather change its effect, use either "Moderate" or "Strict" options for SafeSearch.
To save your changes, in the menu that pops up from the bottom of your screen, click "Save."
Disable Bing SafeSearch on Mobile
On your Android, iPhone, or iPad, launch a web browser and open the Bing site. In the site's top-right corner, tap the hamburger menu (three horizontal lines).
From the menu that opens, select "SafeSearch."
On the "Search" page, in the "SafeSearch" section, activate the "Off" option. This removes SafeSearch's filtering.
Save your changes by tapping "Save" in the menu that opens.
Confirm that you are at least 18 years old by tapping "Agree" in the prompt that opens.
That's all.
Related: How to Get Bing's Daily Photos as Your Wallpaper on Windows 10
Unlike other search engines, on Yahoo, you have to first perform a search to then disable SafeSearch.
Disable Yahoo SafeSearch on Desktop
On your Windows, Mac, Linux, or Chromebook computer, open a web browser and access the Yahoo site. On the site, click the search box, type any query, and press Enter.
On the search results page, in the top-right corner, click "Yahoo Sites" (a square made of nine dots).
At the bottom of the "Yahoo Sites" menu, click "Settings."
You will see a "Search Preferences" page. Here, next to "SafeSearch," click the drop-down menu.
Choose "Off" in the drop-down menu to disable SafeSearch.
Save your changes by scrolling down the page, and at the bottom, clicking "Save."
Enjoy more results in your Yahoo searches going forward.
Disable Yahoo SafeSearch on Mobile
On an iPhone, iPad, or Android smartphone, open a web browser and launch the Yahoo site. At the top of the site, tap the search box and type a query. Then press Enter.
Scroll the search results page to the bottom. There, tap "Settings."
Yahoo will open a "Search Preferences" page. On this page, in the "SafeSearch" section, tap the drop-down menu.
Select "Off" from the menu.
Scroll the "Search Preferences" page to the bottom, and there, tap "Save."
You will see a prompt that says you must agree to Yahoo's terms to disable SafeSearch. If you agree, tap "I Accept."
Yahoo will take you back to your search results with SafeSearch disabled. You're all set.
Like other search engines, DuckDuckGo also comes with the SafeSearch filter. You can disable this filter fairly easily from the settings page.
Related: What Is DuckDuckGo? Meet the Google Alternative for Privacy
Disable DuckDuckGo SafeSearch o Desktop
On your Windows, Mac, Linux, or Chromebook computer, open your preferred web browser and access the DuckDuckGo site. In the site's top-right corner, click the three horizontal lines.
In the "Settings" menu that opens, at the top, click "All Settings."
On the "All Settings" page, at the top, click the "General" tab.
Scroll down the "General" tab to the "Safe Search" section. Here, click the drop-down menu and choose "Off."
Scroll your page all the way down, and at the bottom, select "Save and Exit."
SafeSearch is now turned off on DuckDuckGo.
Disable DuckDuckGo SafeSearch on Mobile
On your handheld device, open a web browser and launch the DuckDuckGo site. In the site's top-left corner, tap the three horizontal lines.
In the menu that opens, tap "All Settings."
At the top of the "All Settings" page, tap the "General" tab.
In the "General" tab, scroll down to the "Safe Search" option. Here, tap the drop-down menu and select "Off."
Save your changes by scrolling the page to the bottom and tapping "Save and Exit" there.
And that's how you ensure you get all kinds of search results on your favorite search engine!
If you are a Twitter user, you might want to unblock potentially sensitive content on the popular microblogging site, too. It's easy to do that.
Related: How to Unblock "Potentially Sensitive Content" on Twitter
How to turn off all safe search filters on iPhone and iPad
In this tutorial, we will outline the steps to disable all search filters on your iPhone or iPad so you have an unrestricted experience while looking for web queries and media.
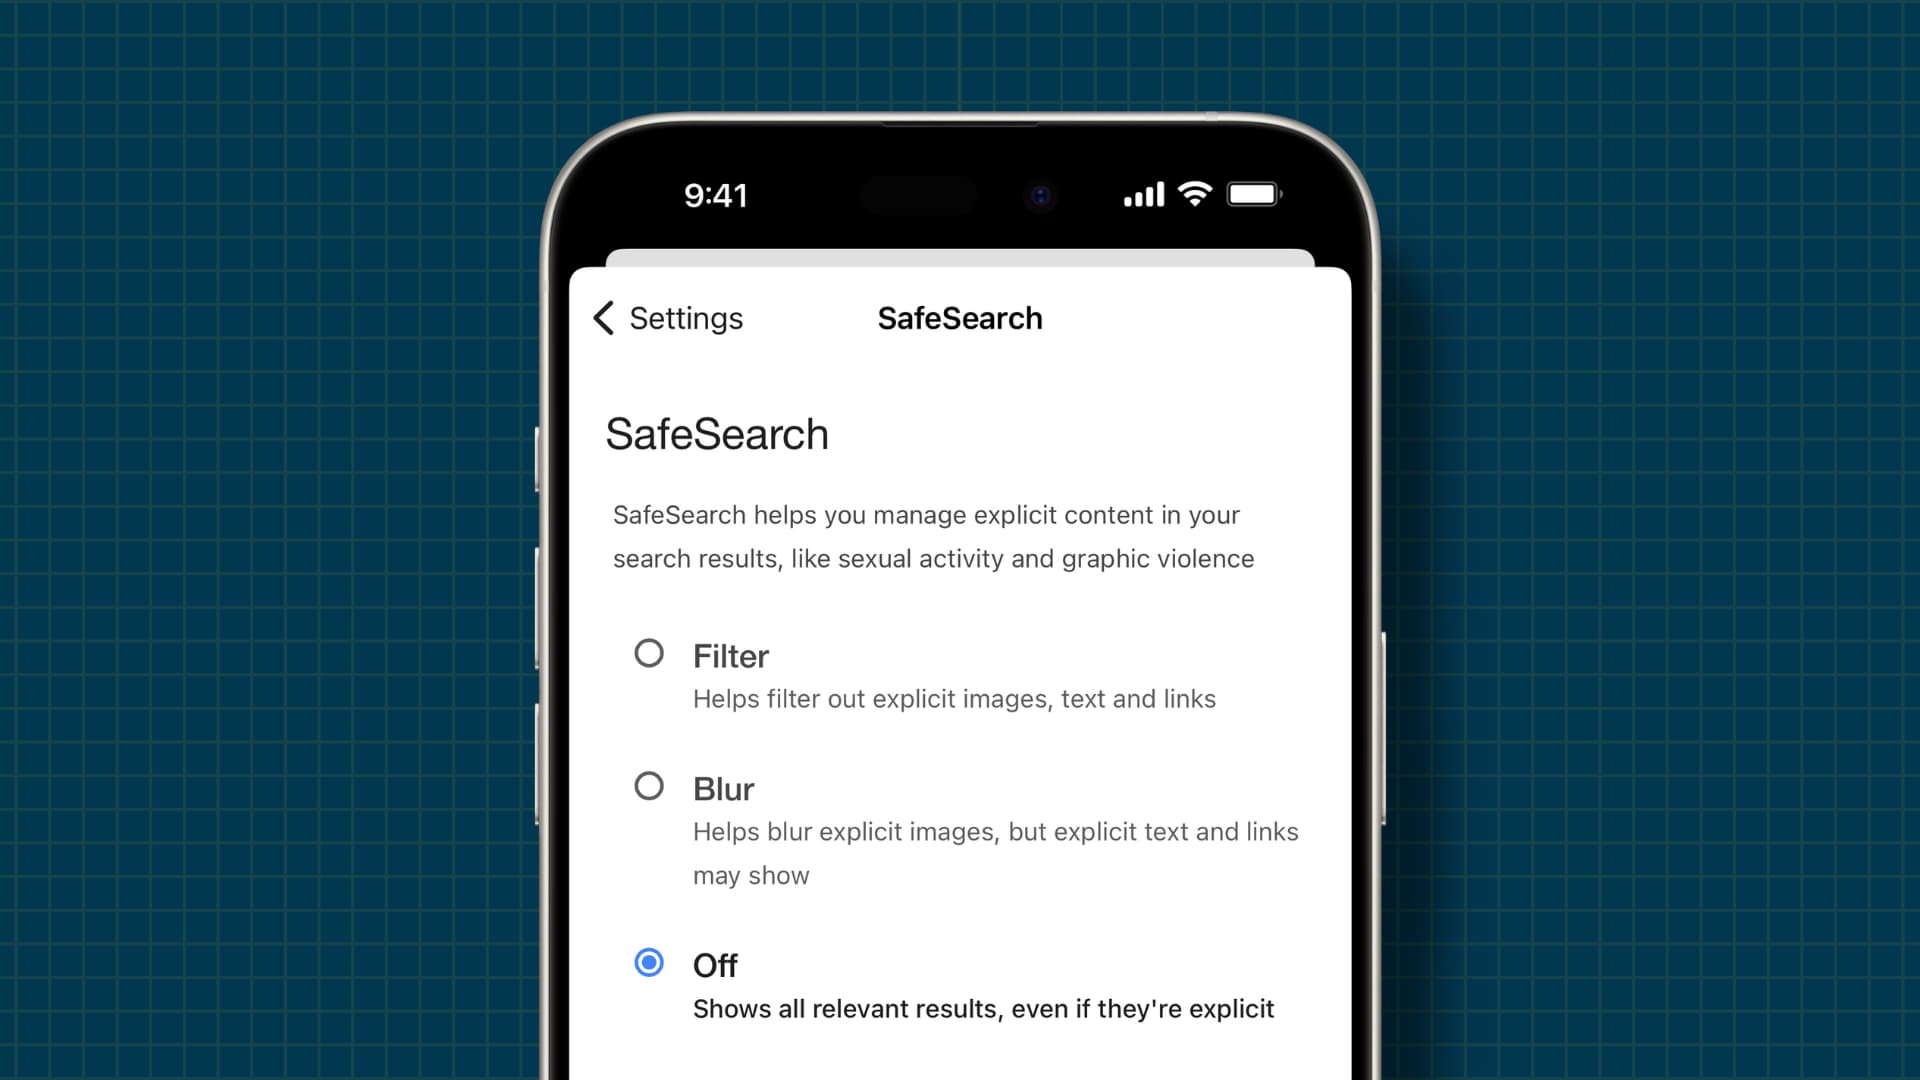
Have you ever found yourself doing a Google search only to discover that the results, especially explicit ones, have been excluded?
These measures are in place to ensure you do not come across adult, mature, and sensitive content. But if you’re over 18 and want to bypass such restrictions, you can easily do that in various apps and services.
Search engines
We’ve outlined the steps for Google and DuckDuckGo, but they are almost similar even if you use something else.
Google is the default search engine powering all popular web browsers like Safari, Chrome, and Firefox, and it blocks or blurs explicit search results. But if you’d like to see them, here’s how to do that.
1) Open Safari and go to google.com .
2) Tap Settings from the bottom of the screen and select Search settings .
3) Tap SafeSearch and choose Off to see all relevant results, including explicit ones.
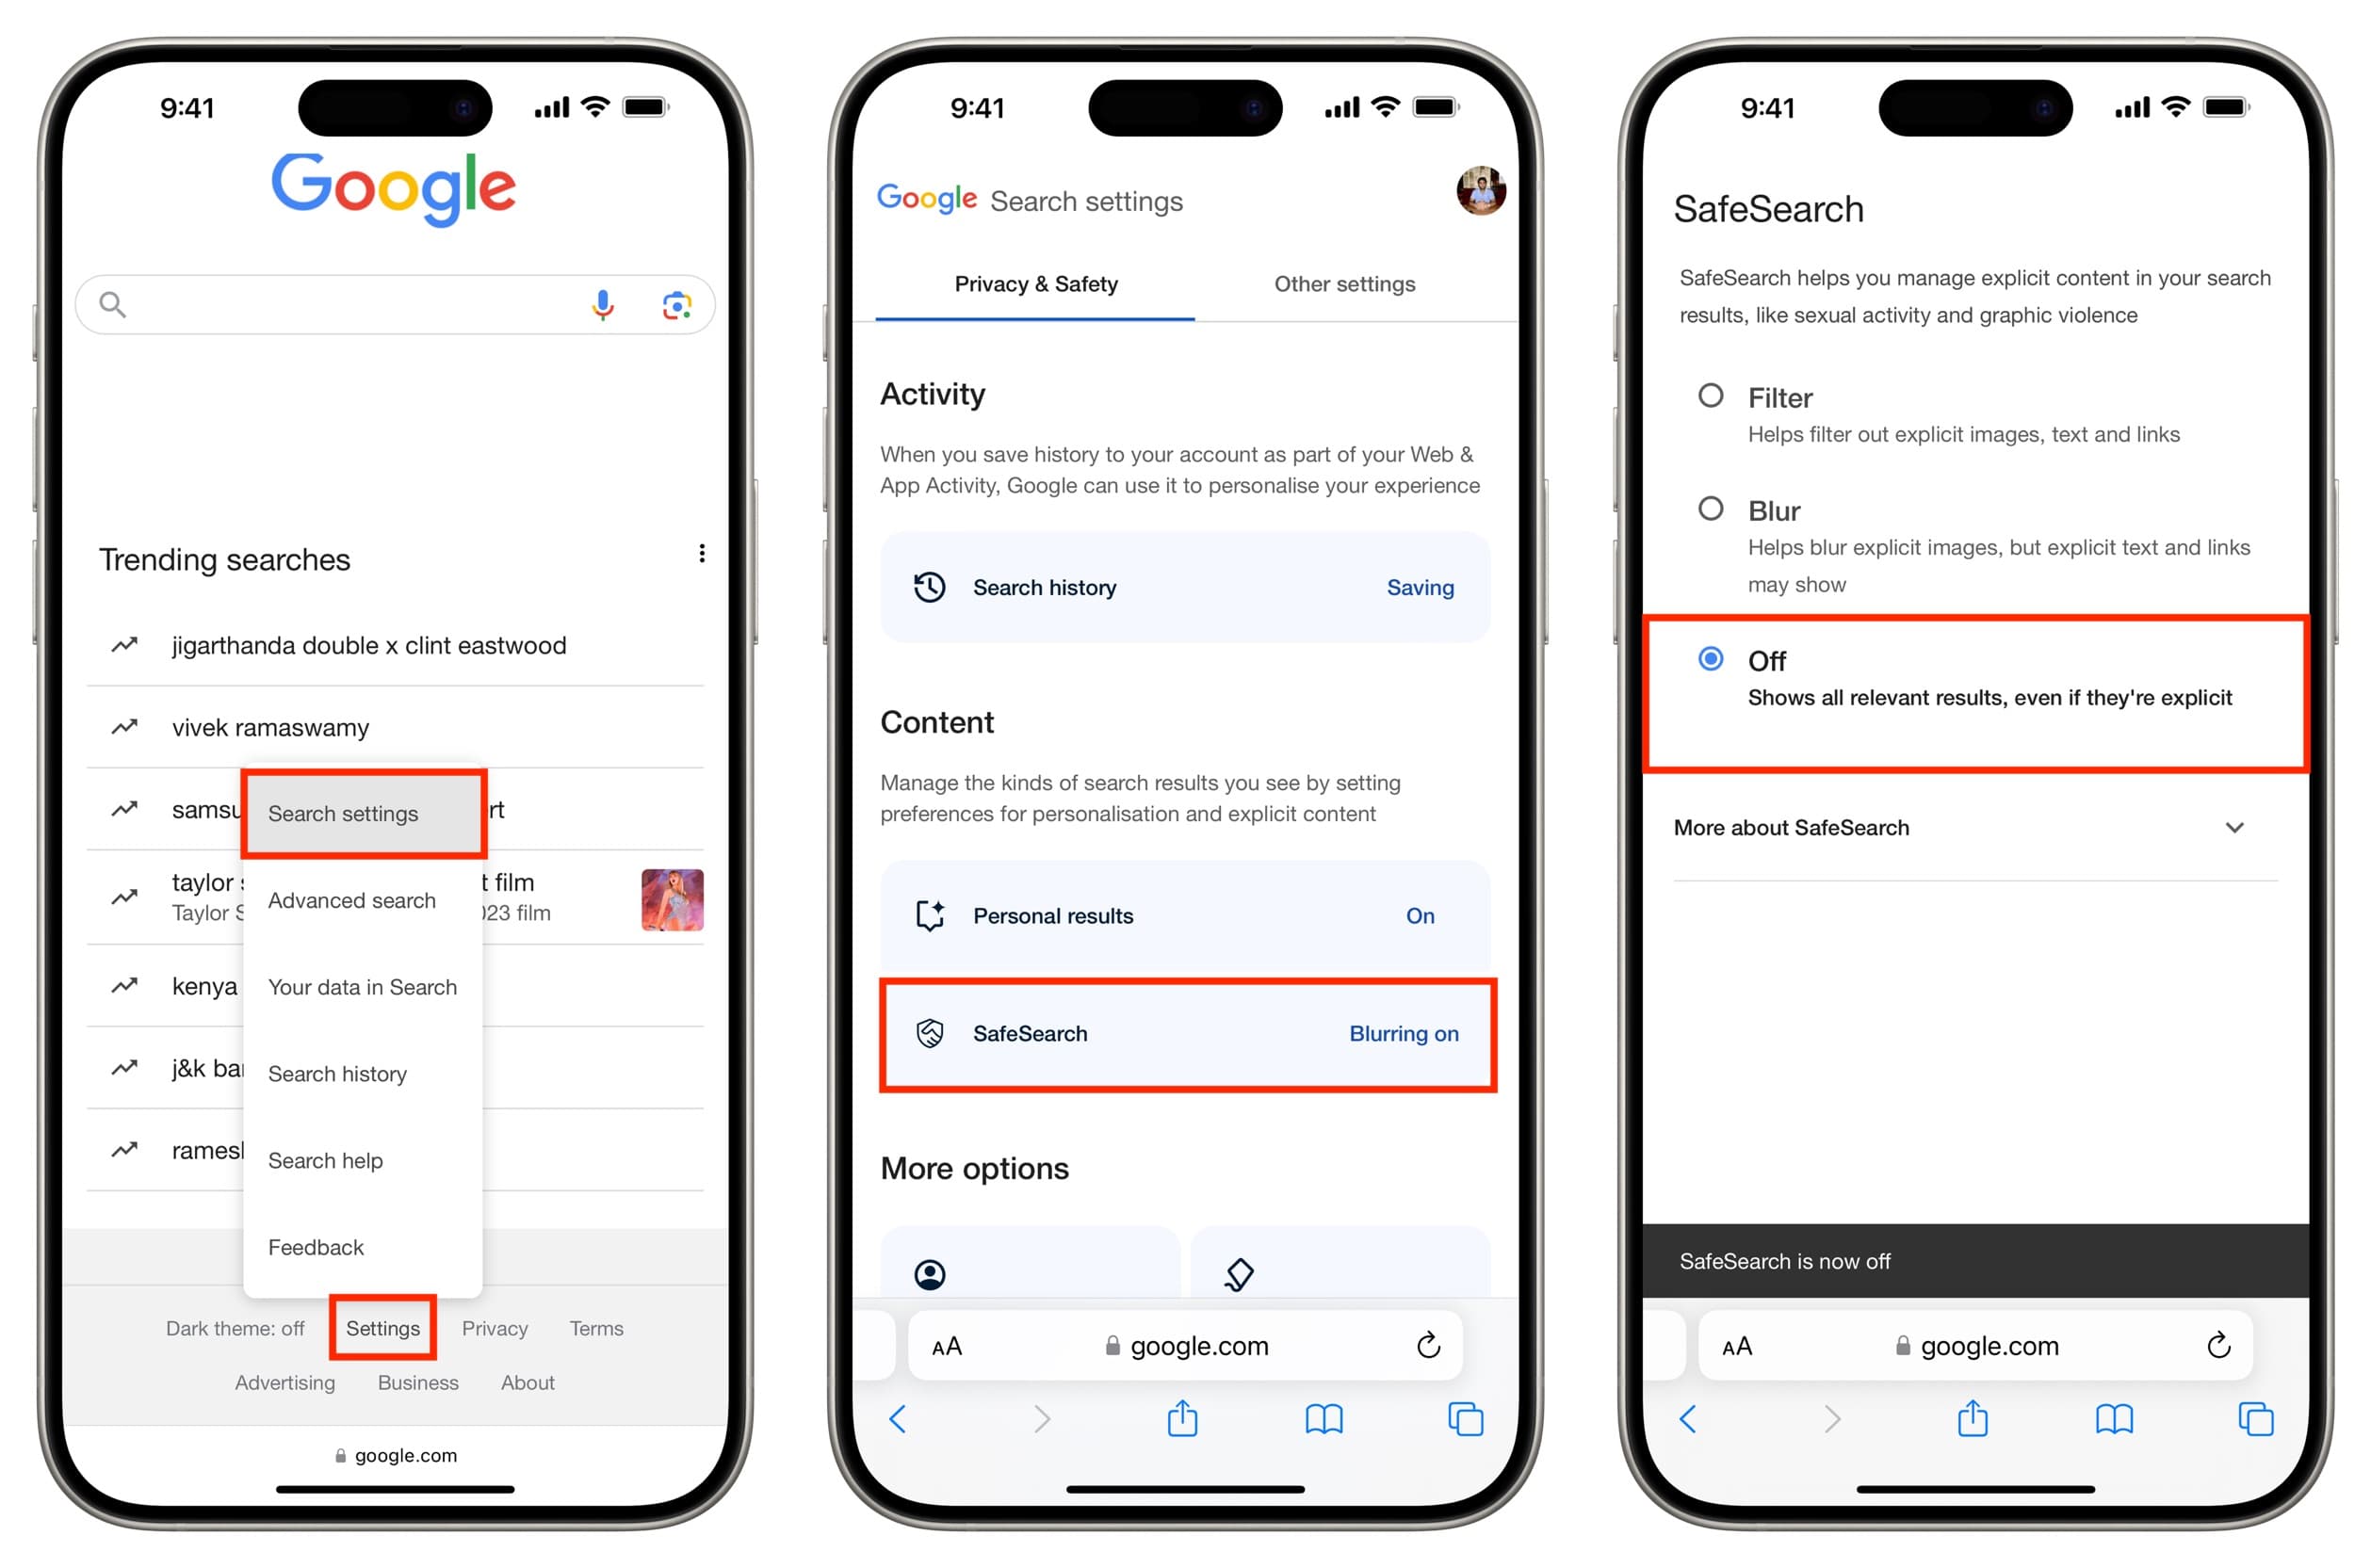
You can easily go to Safari settings or the respective browser settings and change the search engine from Google to something else like DuckDuckGo. You can also set your phone to use a different search engine while in private browsing mode .
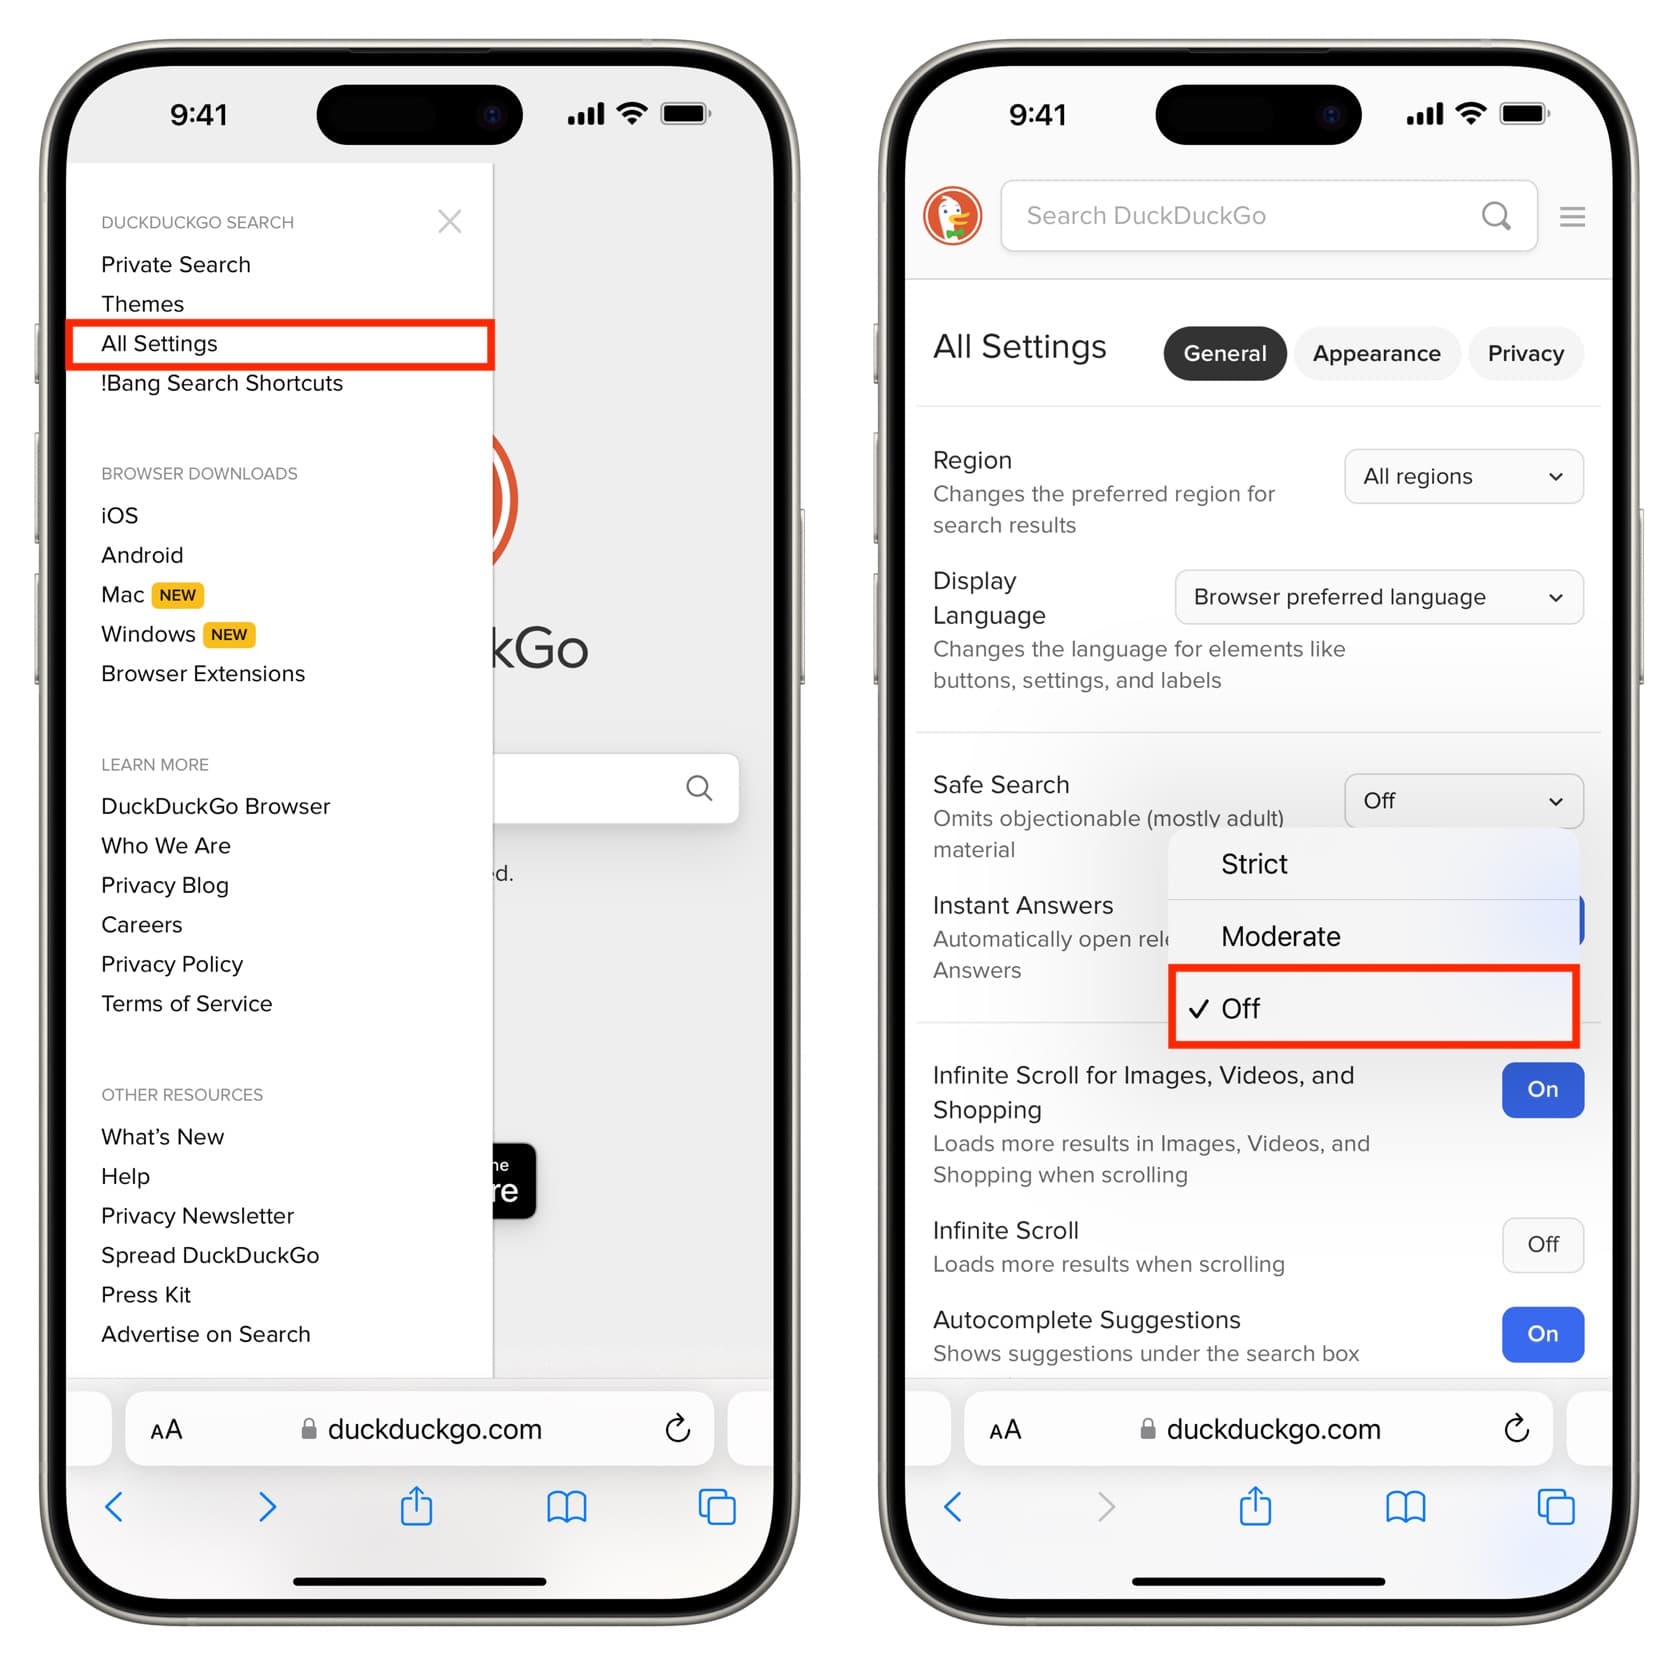
Like Google, DuckDuckGo offers an easy way to turn off search filters.
1) Visit DuckDuckGo.com and tap the hamburger menu icon from the top left.
2) Select All Settings .
3) Tap Safe Search and change it from Moderate to Off .
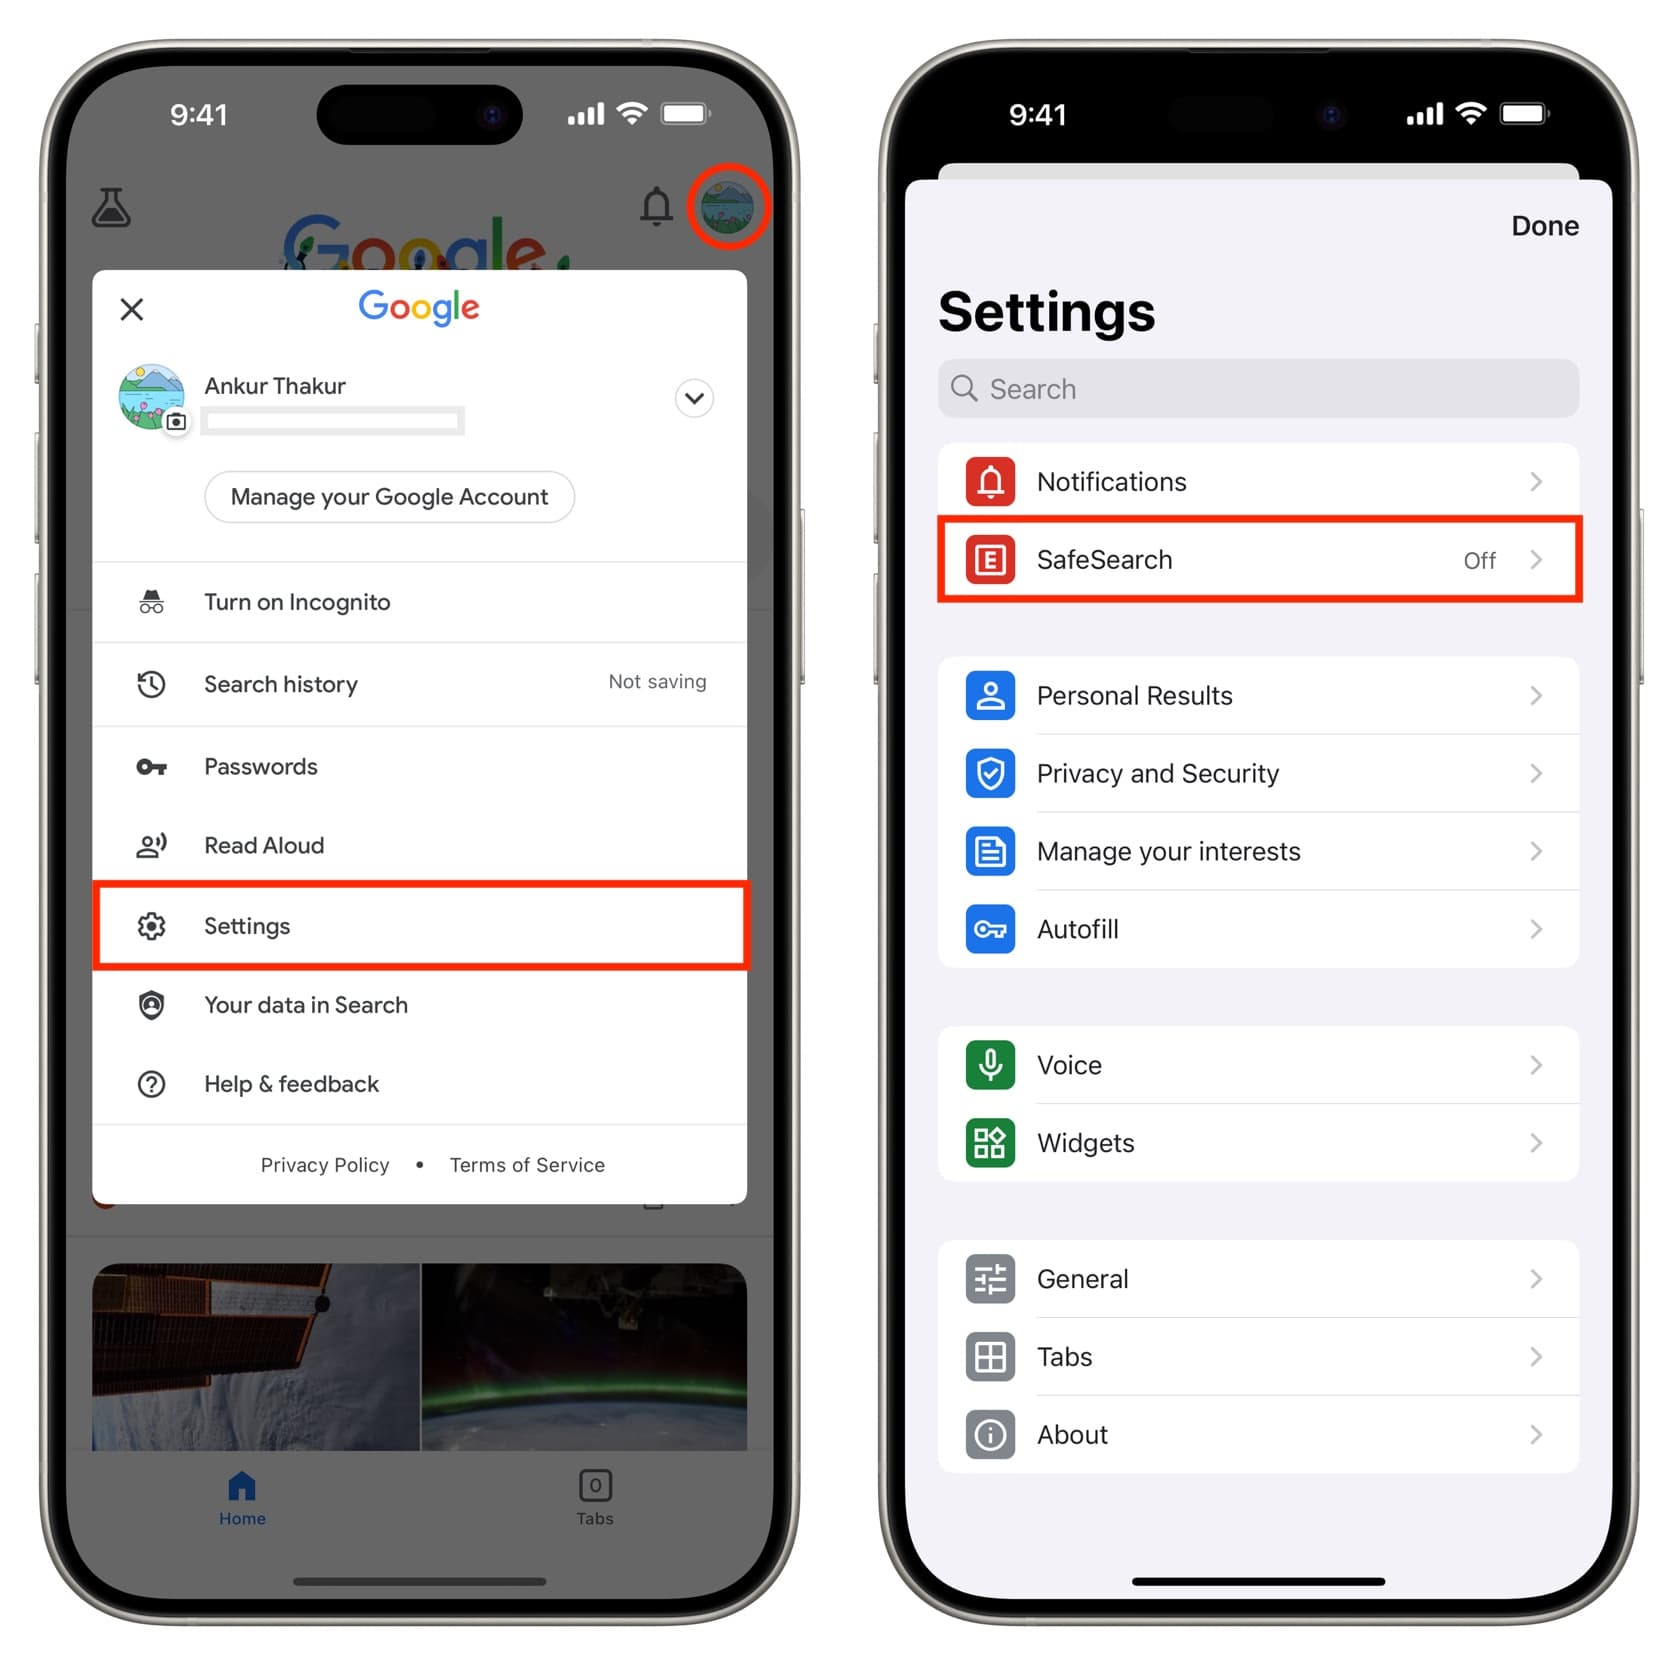
If you primarily rely on the Google app for your search needs, you can turn off its SafeSearch as well.
1) Open the app and tap your profile picture from the top right.
2) Tap Settings .
3) Pick SafeSearch .
4) Select Off in place of Blur or Filter.
Music, Movies, TV shows, Podcasts, News, Fitness, Books, and Siri
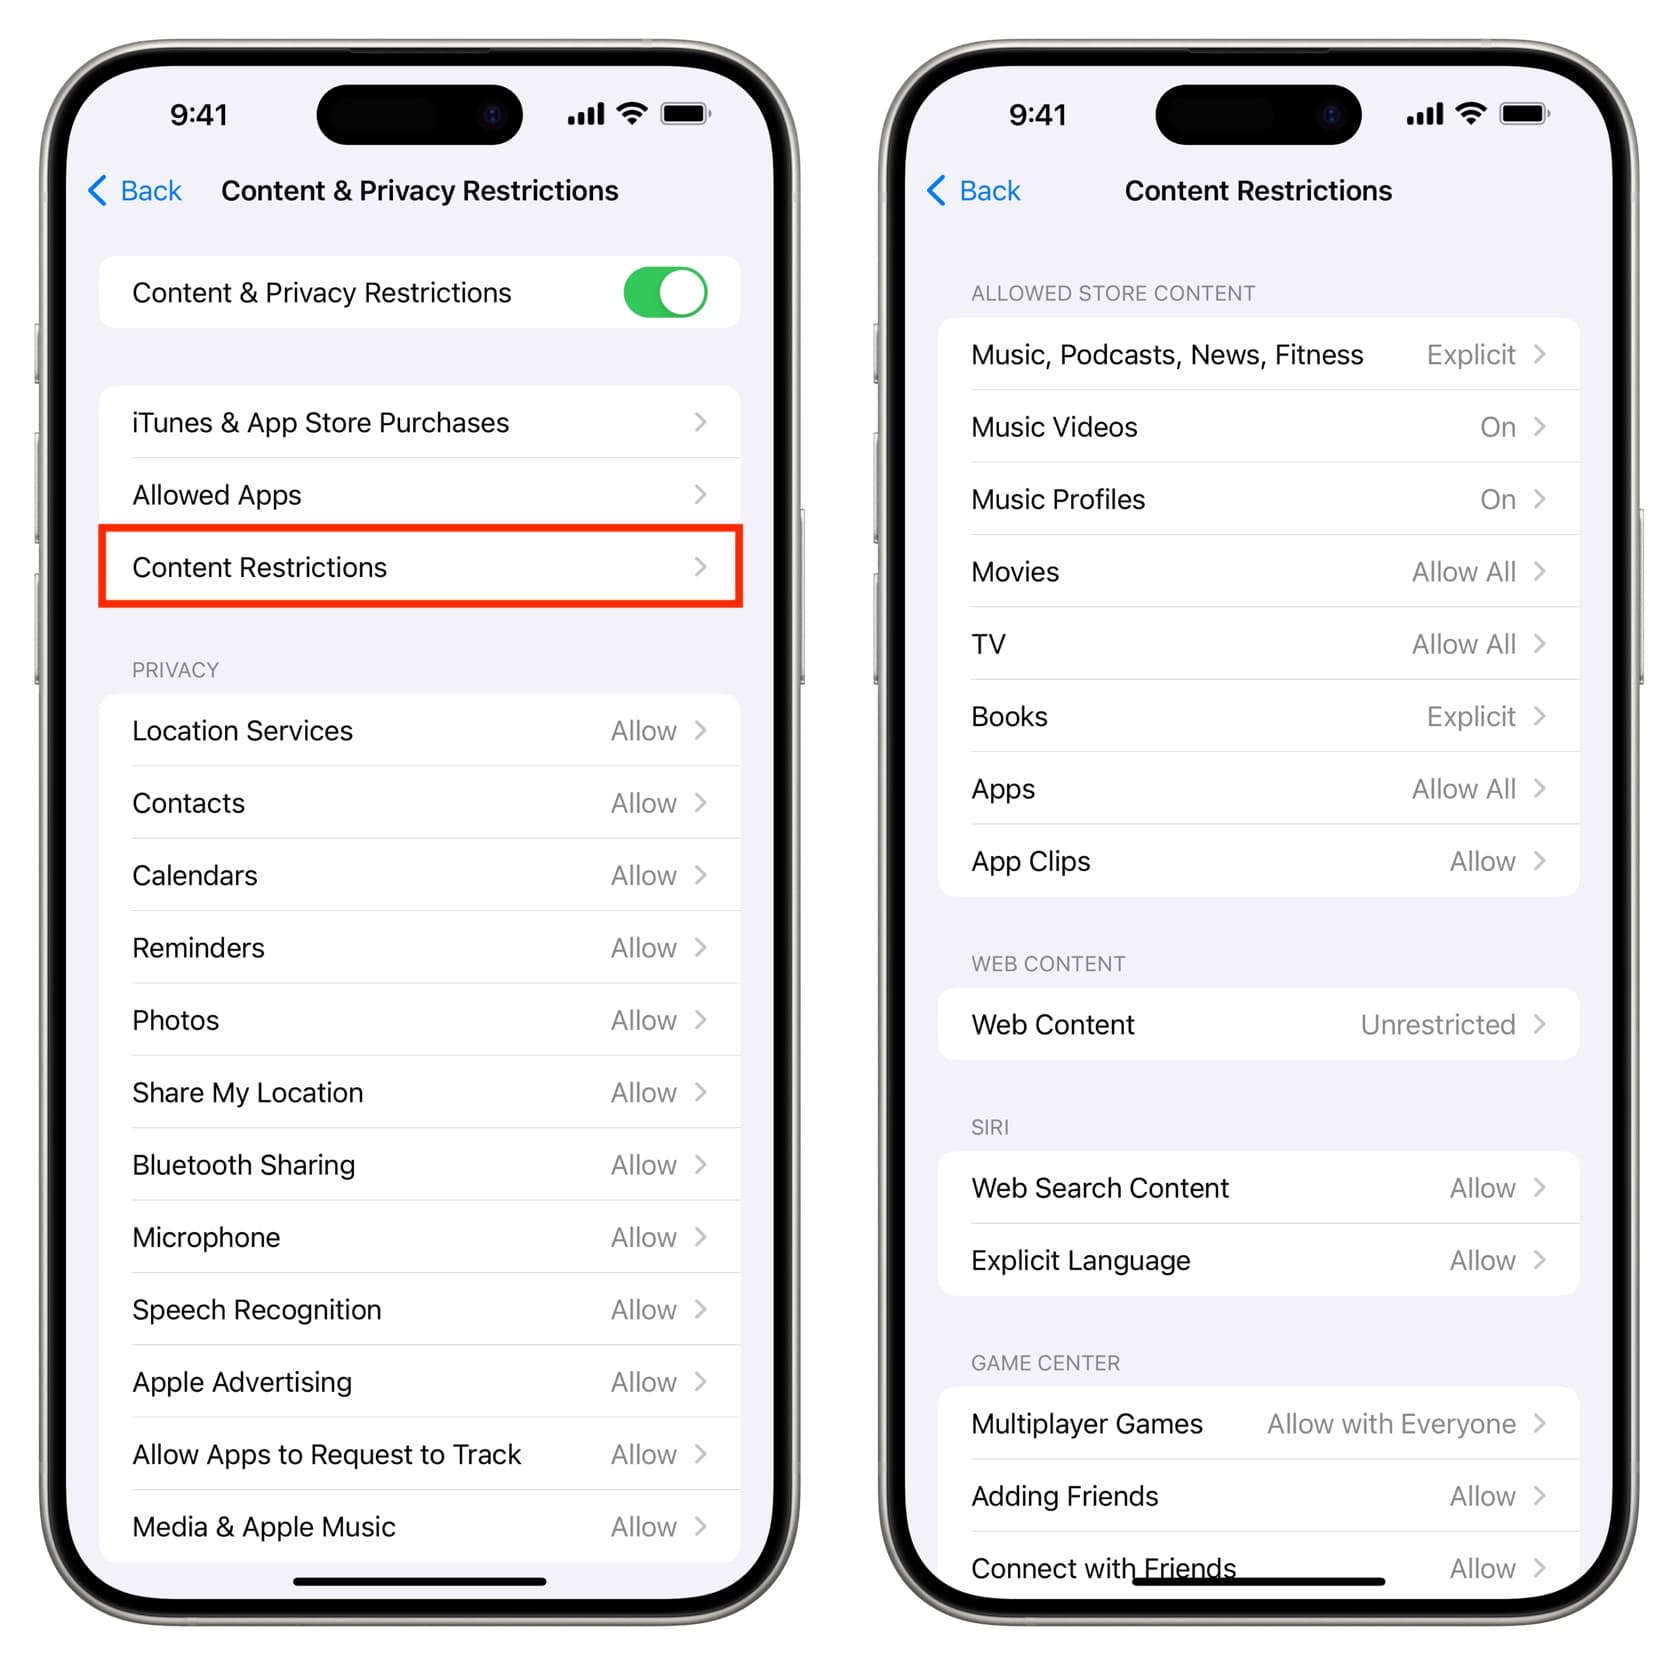
The ability to see or block explicit content in Apple apps or services is managed under the iOS Screen Time settings. Here’s how to adjust them:
1) Open the Settings app on your iPhone or iPad and tap Screen Time > Content & Privacy Restrictions .
2) Make sure the Content & Privacy Restrictions option is switched on and tap Content Restrictions . Enter your Screen Time password if prompted.
3) From here, you have different options to see explicit content. Just tap the app or service name and pick the option that offers unrestricted access.
- Music, Podcasts, News, Fitness: Set it to Explicit
- Movies: Select Allow All
- TV: Allow All
- Books: Explicit
- Apps: Allow All
- Web Content: Unrestricted
- Siri > Explicit Language: Allow
YouTube and YouTube Music
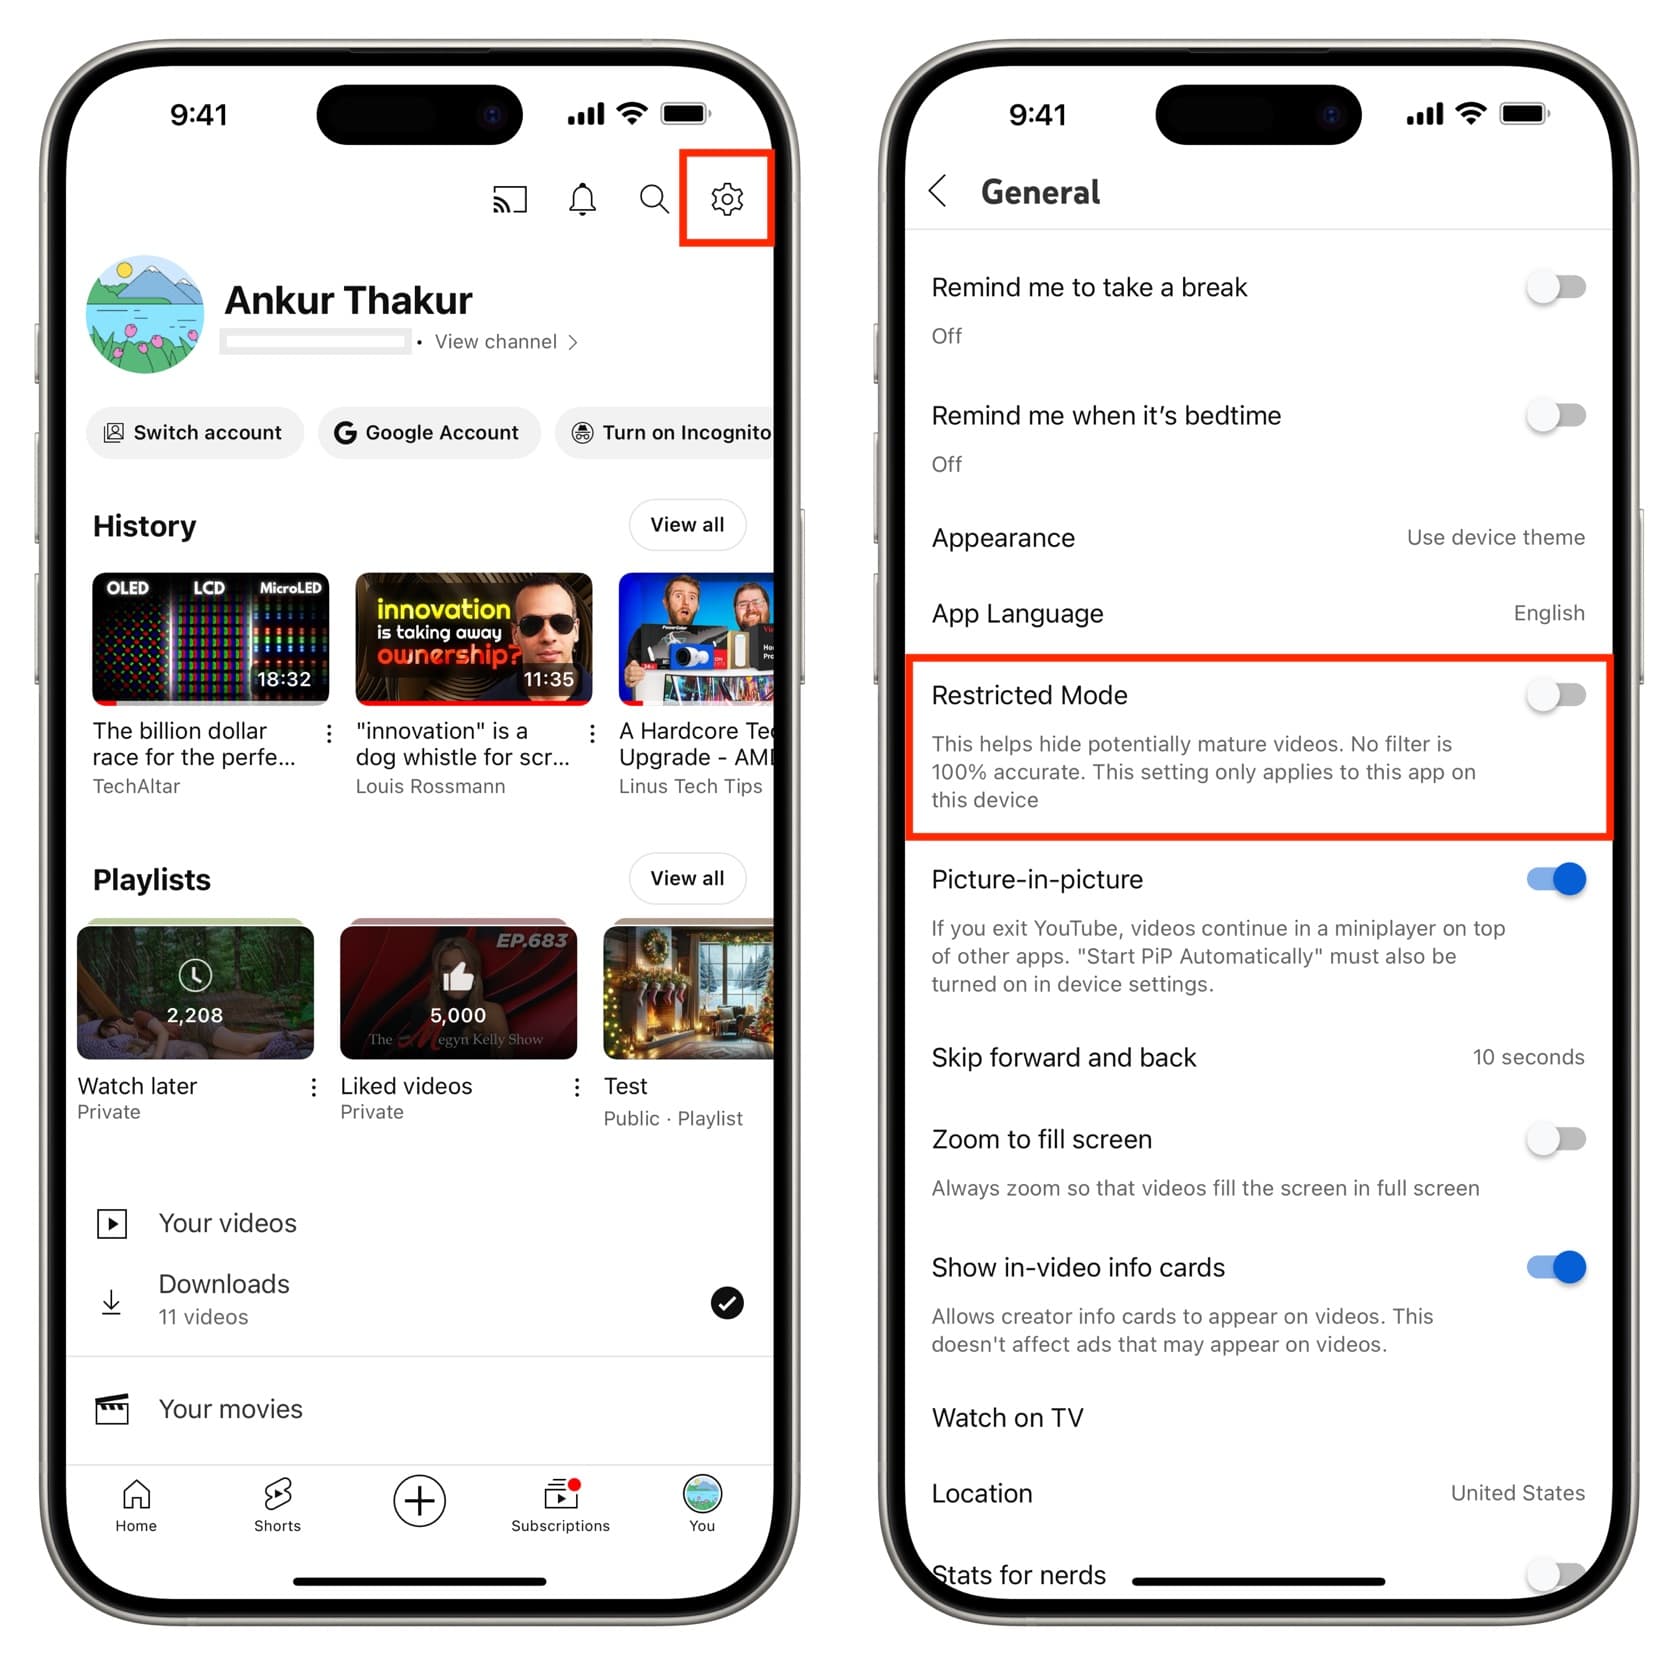
Follow these steps to see all kinds of videos, songs, and music videos, including those with mature content or themes.
1) Open the YouTube app and tap You from the bottom right, followed by the settings icon at the top.
2) Go to General .
3) Turn off Restricted Mode to stop the app from hiding mature videos.
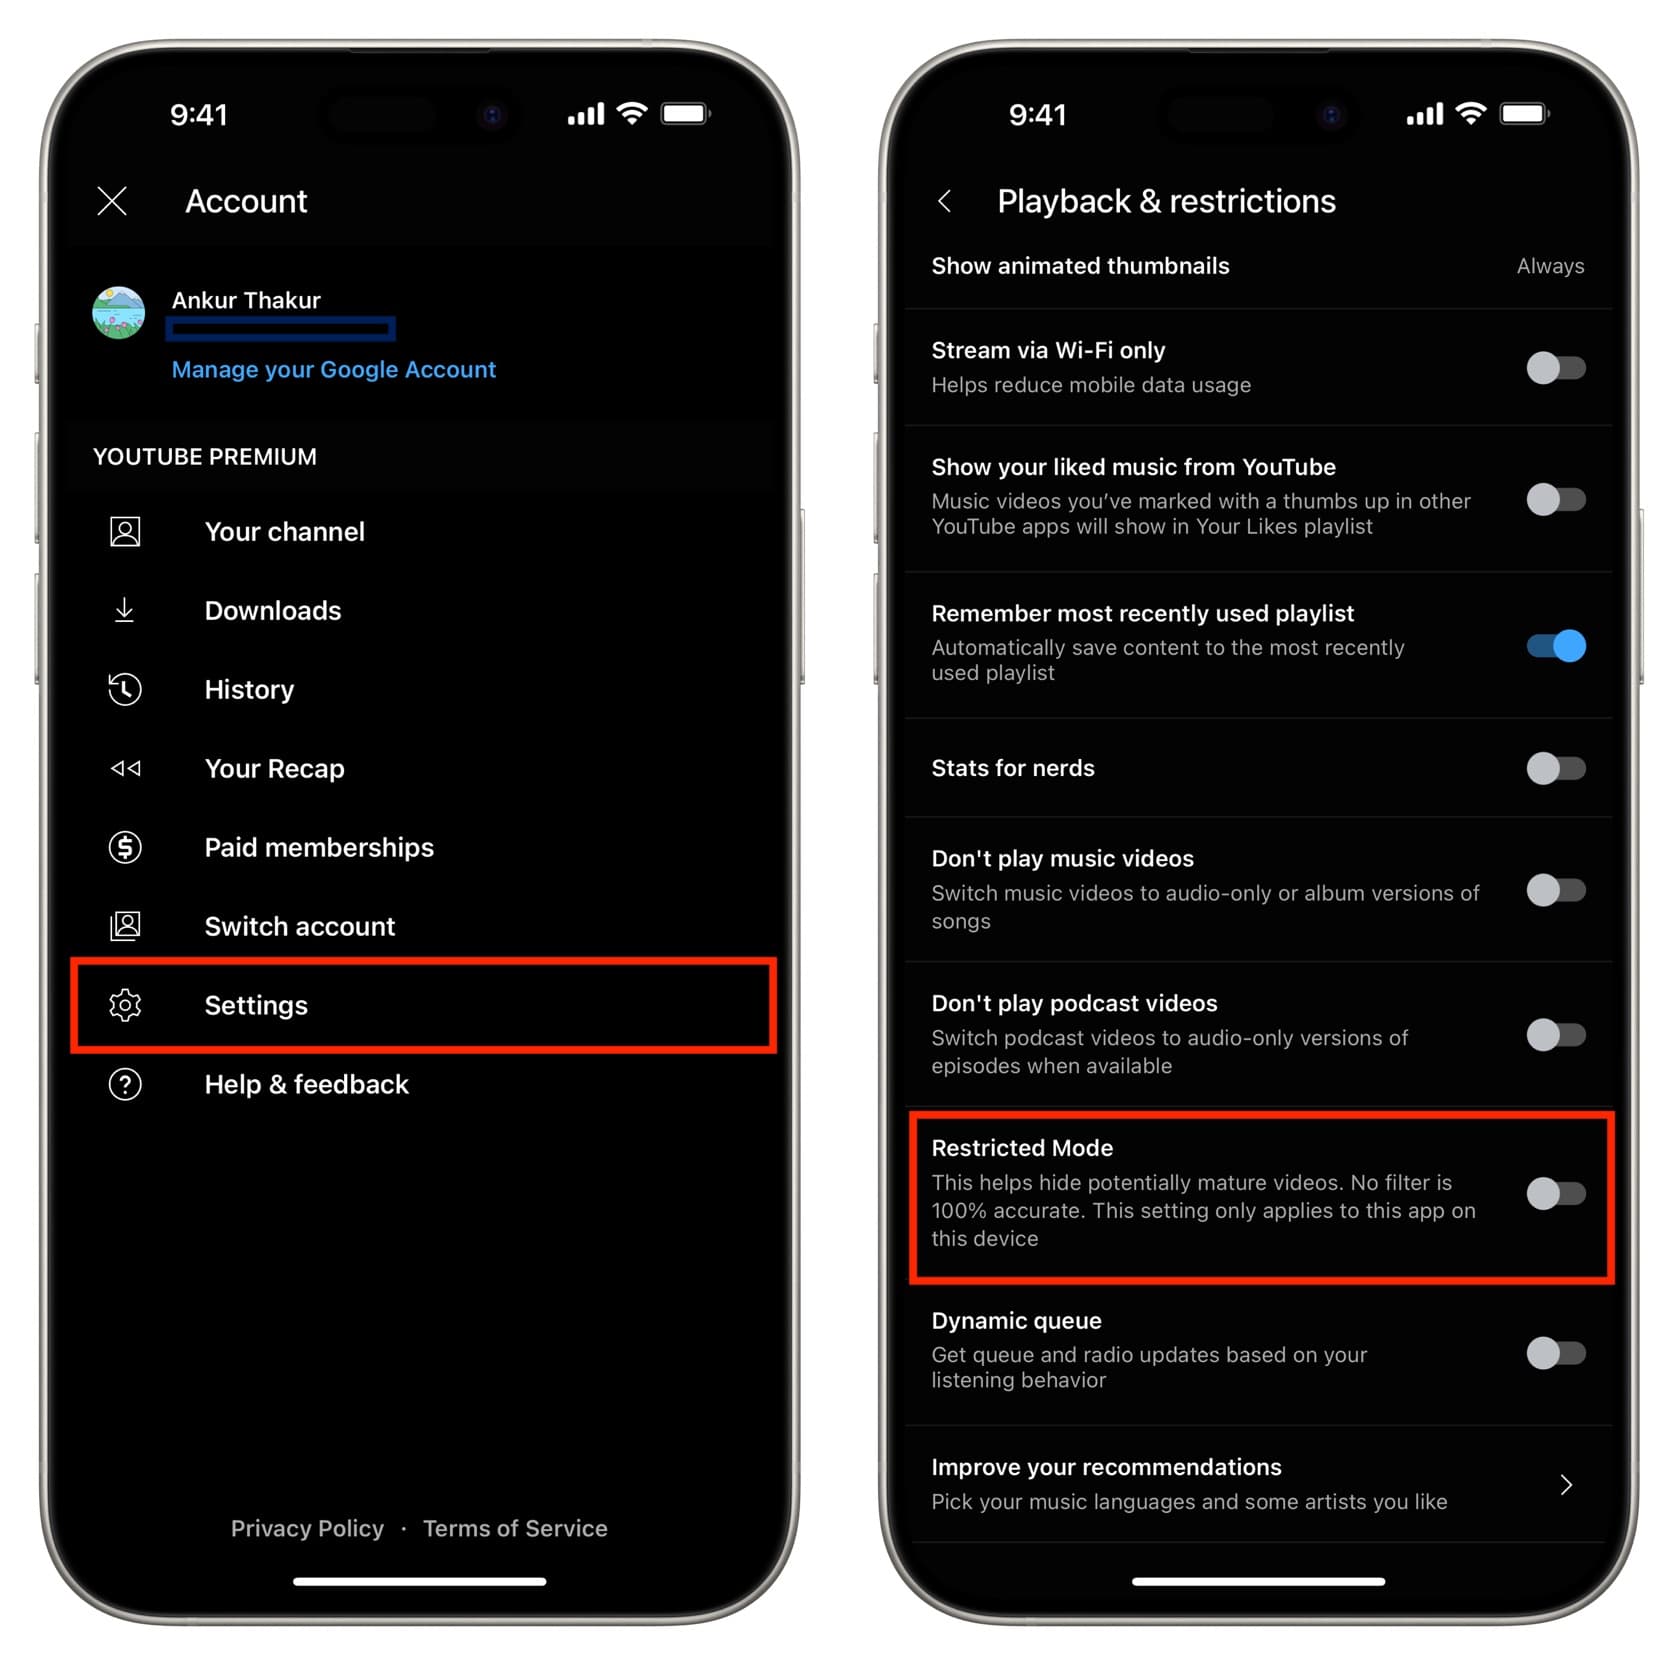
Similar to YouTube, you can turn off this setting in the YT Music app .
1) Tap your profile picture and pick Settings .
2) Select Playback & restrictions .
3) Turn off Restricted Mode .
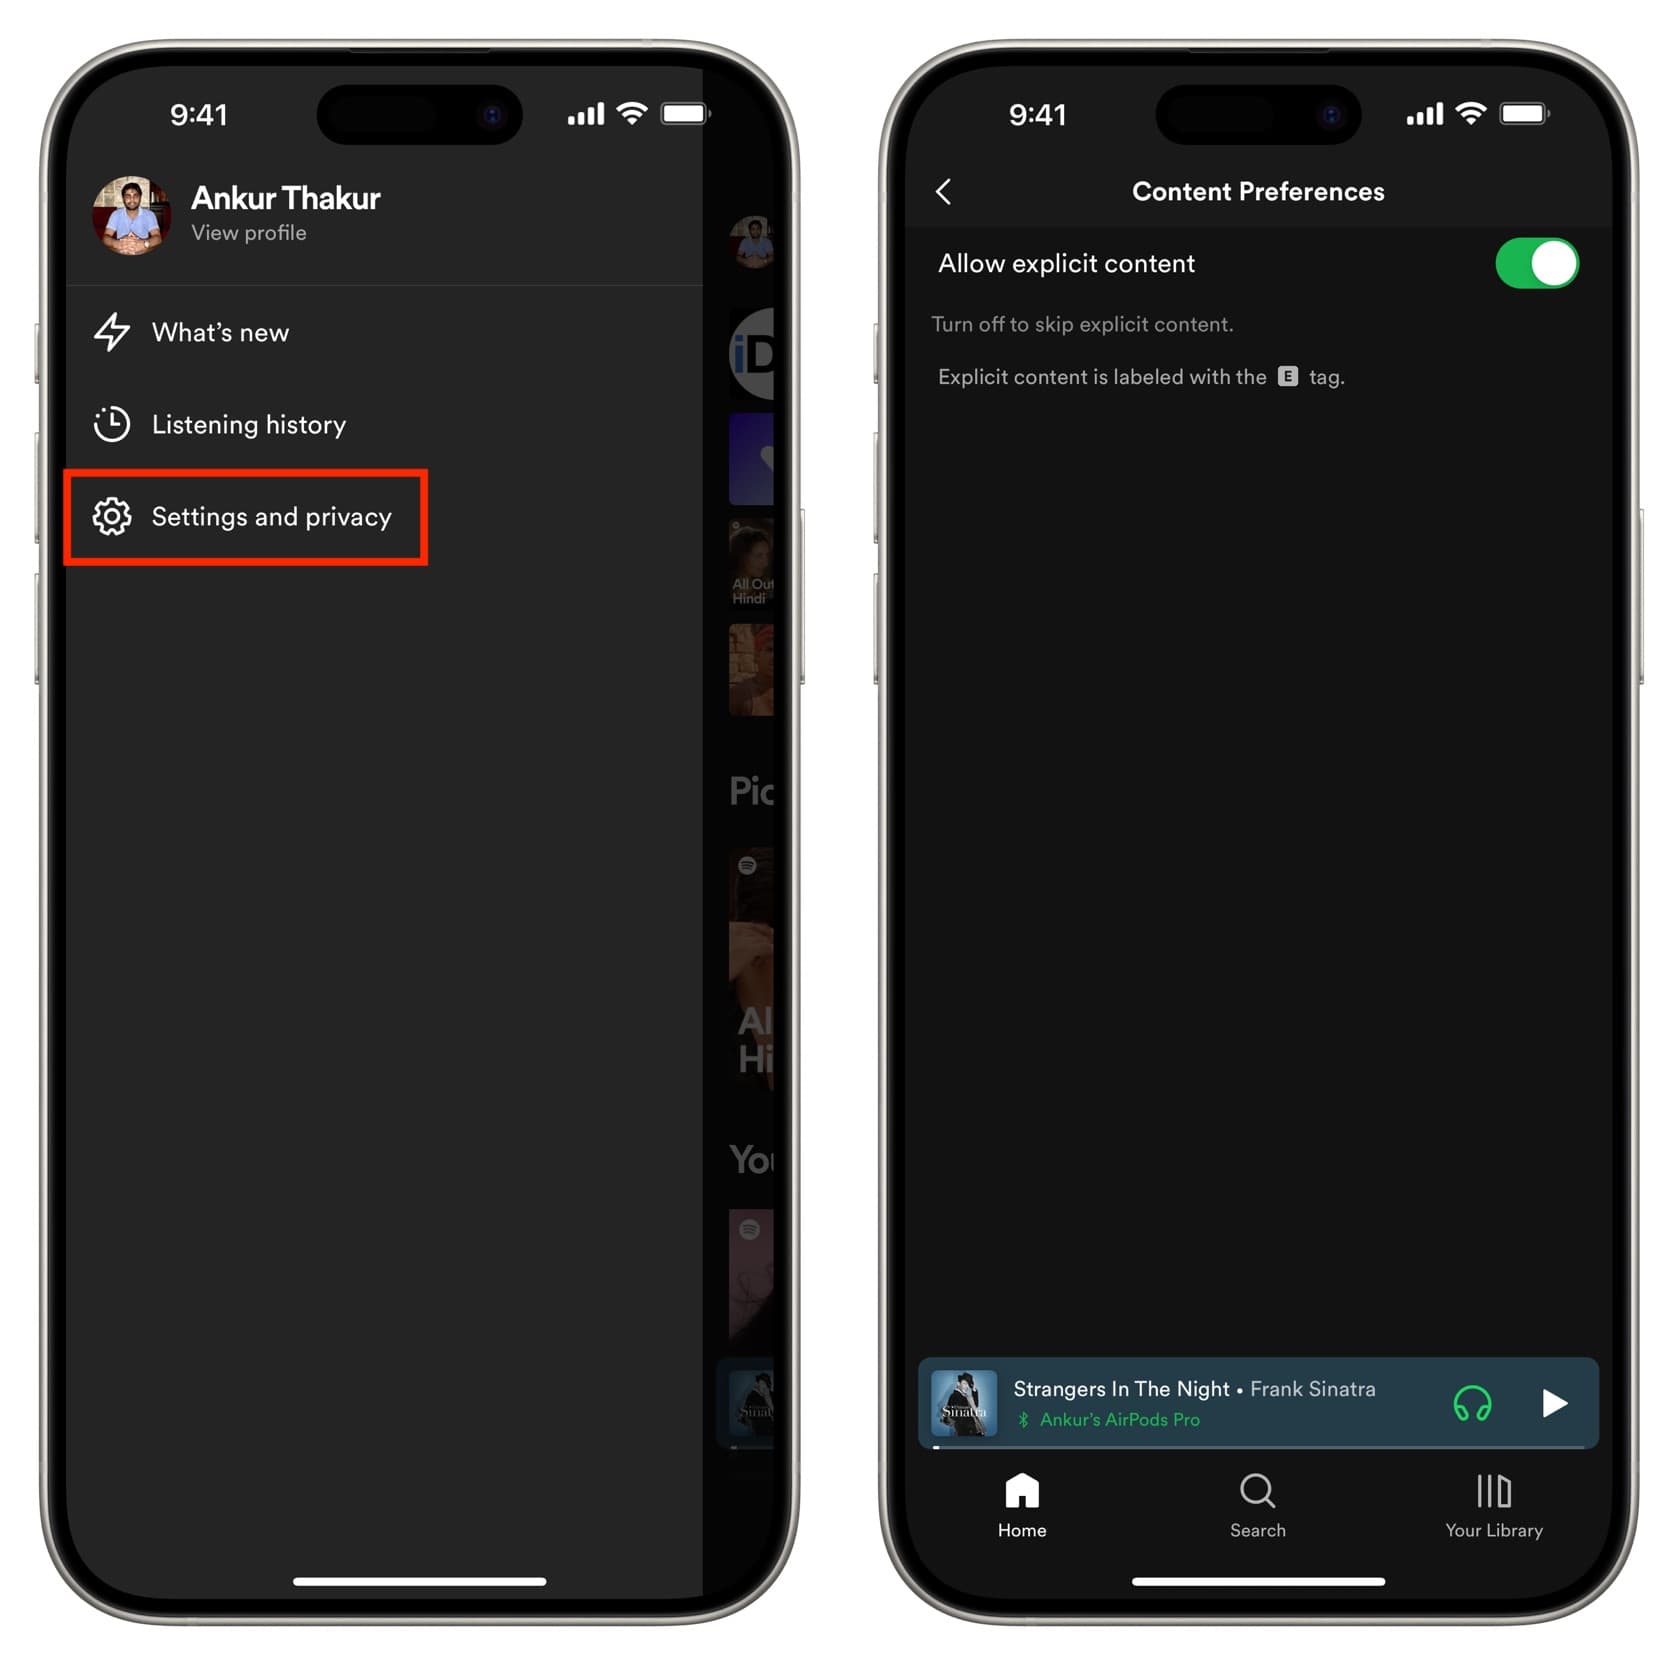
Like most music streaming platforms, Spotify has an option to allow or block explicit songs. If it’s set to block, you will not see certain songs in the app, or you will see the clean version of that track (if one exists).
So, to enjoy an unrestricted music listening experience with “E” (explicit) songs, here’s what you need to do.
1) Open Spotify and tap your display picture from the top left.
2) Select Settings and privacy > Content Preferences .
3) Turn on the switch next to Allow explicit content .
The “For You” tab is highly curated with content even from people you do not follow. The posts here may not show mature content if you have safe content settings in place.
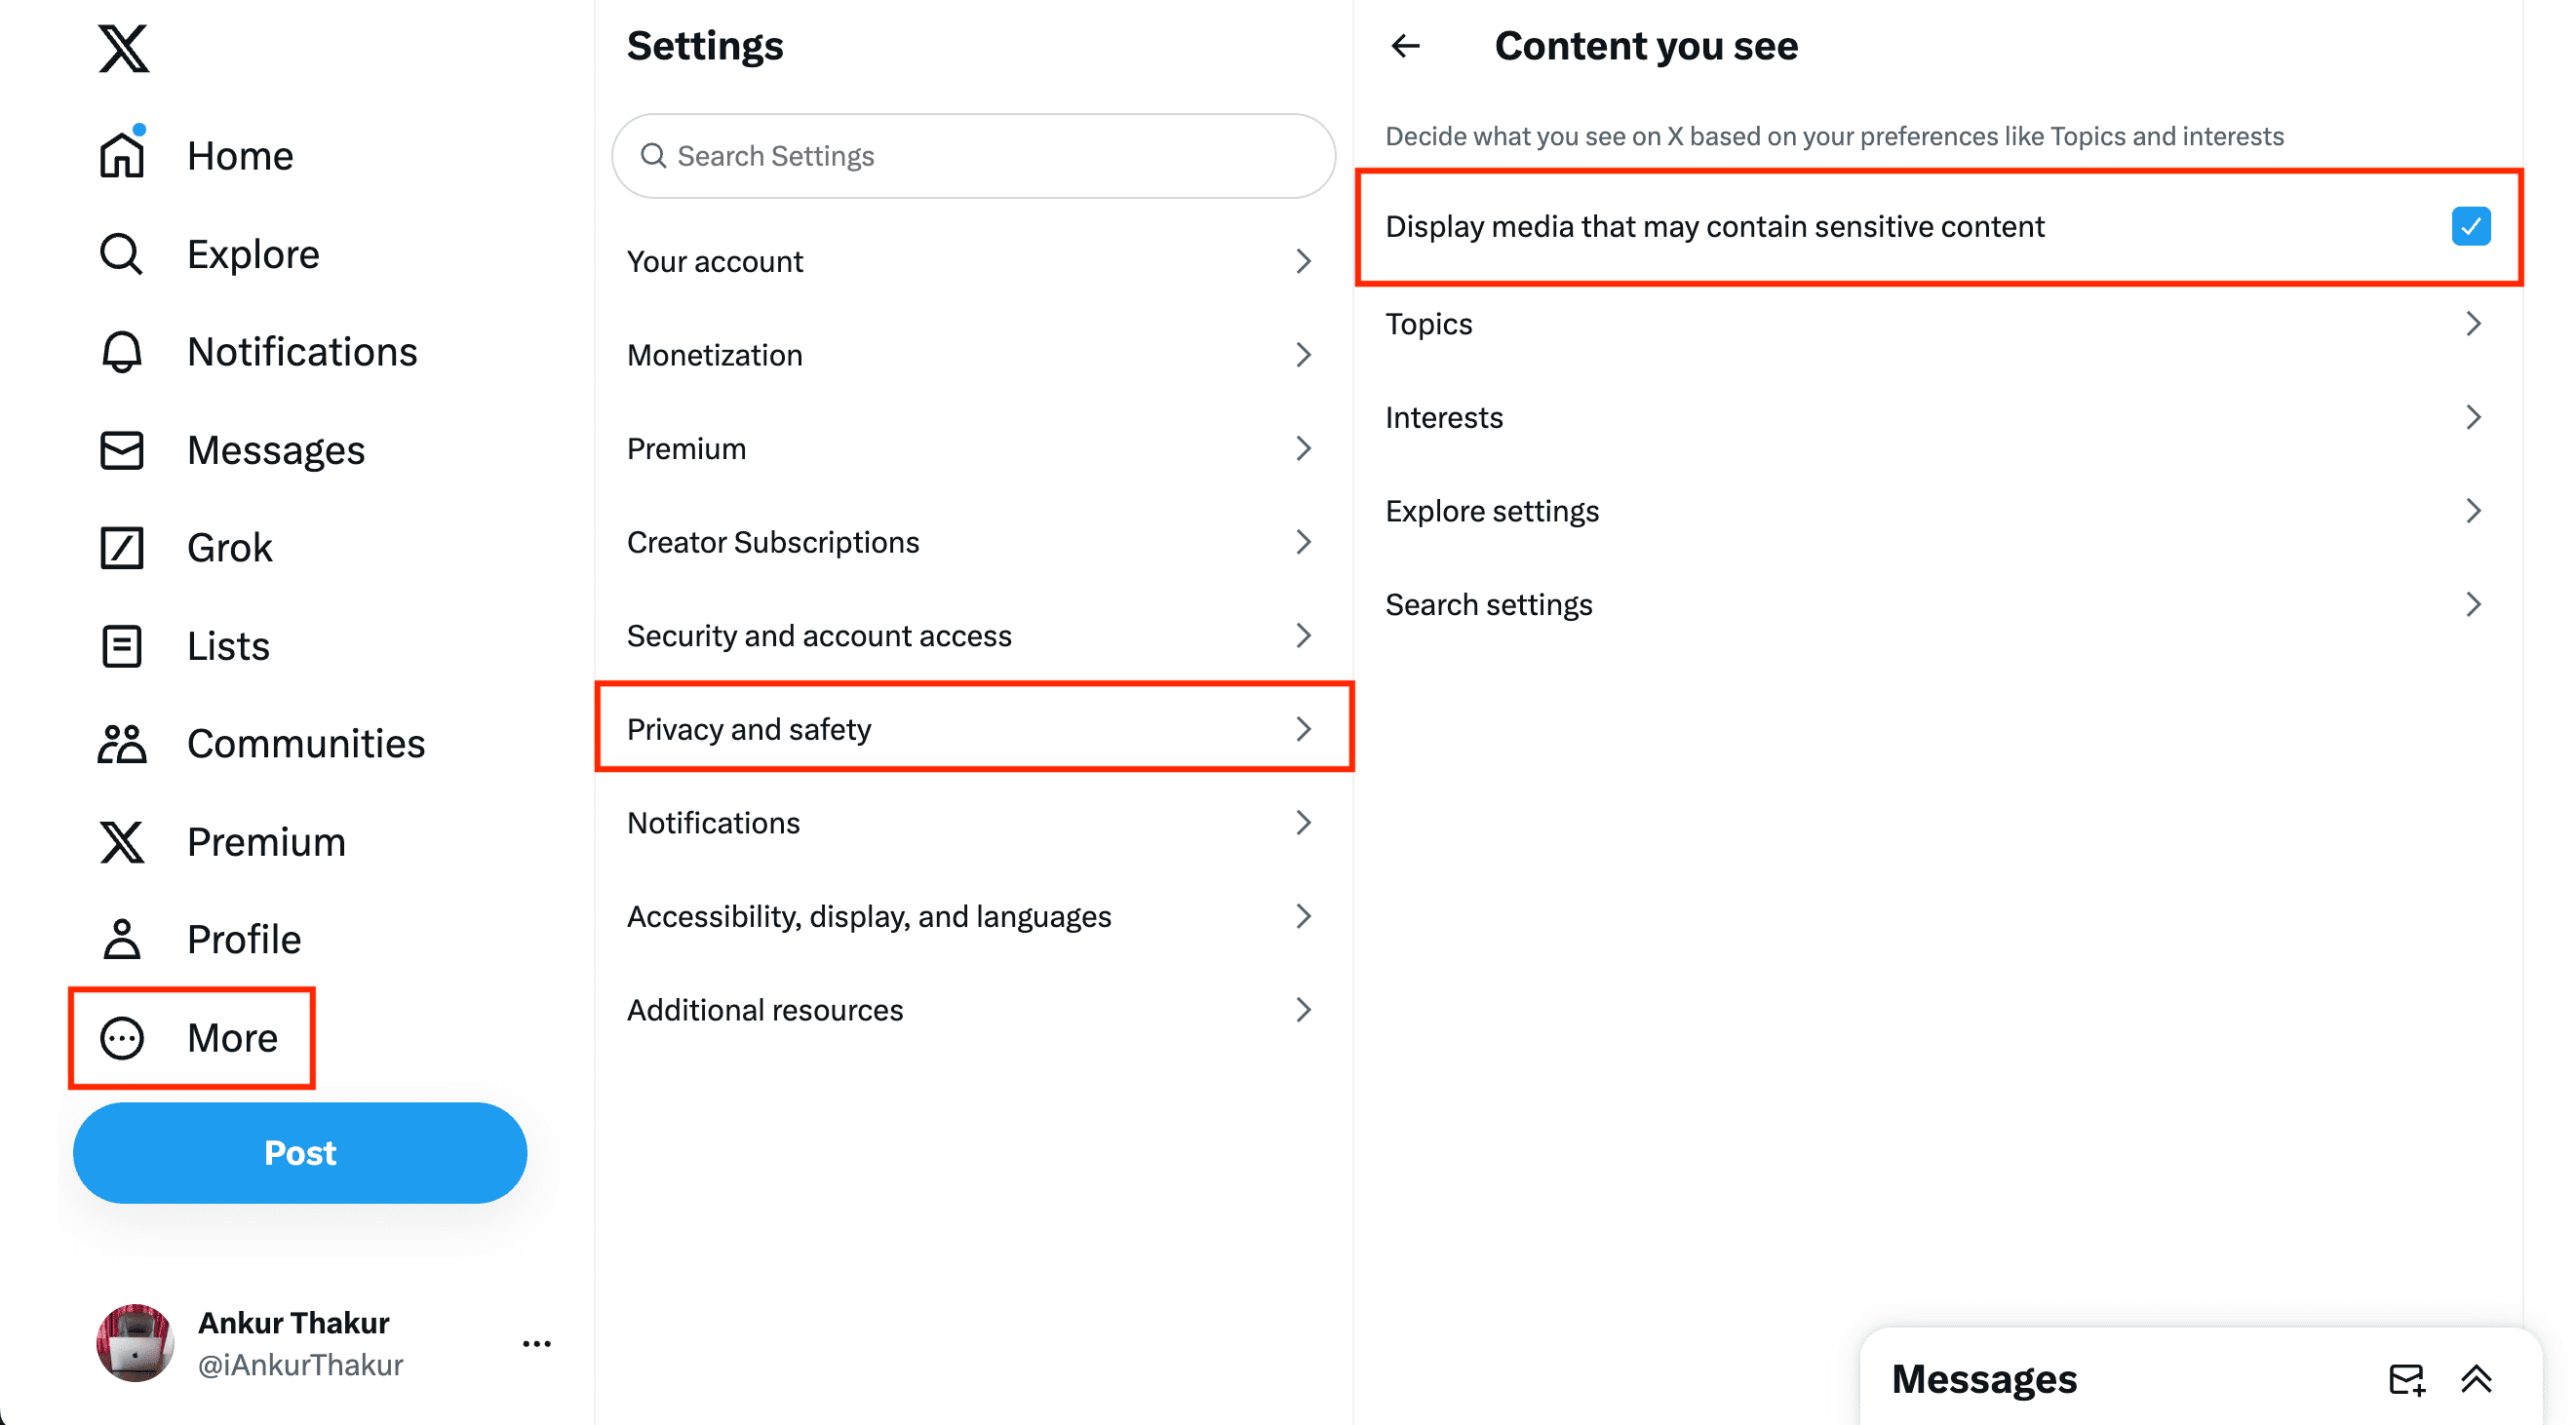
Therefore, you will have to follow these steps to see all kinds of posts in For You and elsewhere on Twitter:
1) Visit Twitter.com in a web browser, as this option seems to be missing in the latest version of the X app .
2) Click More > Settings and Support > Settings and privacy > Privacy and safety > Content you see .
3) From here, check the box for “ Display media that may contain sensitive content .”
Like the above-mentioned services, other audio, video, web, and book apps may also have an option that hides mature content. To unblock them, explore their in-app settings and look for such an option.
Check out next: How to block access to specific websites on iPhone or iPad
- Defragmentation
- PC & Devices
- Go to category
- Privacy Tips
- Security Tips
- Social Media
- Windows Registry
- Data Recovery
- Windows Update Errors
- Performance
- FPS Improvement
- Tips & Tricks
SafeSearch Control: How to Turn SafeSearch On/Off on Desktop and Mobile
SafeSearch helps to remove explicit content from your search results. However, you must know how to turn off safe search to include that in your search results. We’ll show you how to do that on your PC and mobile device…
- 6 min to read

What Is SafeSearch?
How does safesearch work, how to turn off google safesearch: pros and cons, how to turn off safe search on desktop, how to turn on safesearch, how to turn off/on safe search: explained.
If you want to know how to turn off safe search , you’ve come to the right place! Search engines like Google take precautions to protect users from explicit content in search results.
SafeSearch helps control explicit content for different contexts, such as personal, family, or work-related browsing. It’s enabled by default by browsers.
If you want to know how to turn safe search off , keep reading!
Before we dive into how to turn off safe search on Chrome, let’s find out what SafeSearch is.
Search engines like Google have a SafeSearch tool that helps remove offensive or explicit content from search results.
SafeSearch is designed to offer a safer online experience, especially for children or people who don’t want to see such content.
When SafeSearch is turned on, the search engine will filter out results that can be offensive, pornographic, or violent.
You can usually set SafeSearch on or off, depending on your preference and the type of content you want to see in your search results.
SafeSearch filters explicit or improper content using predefined standards to prevent it from appearing in search results.
The search engine’s SafeSearch algorithm analyzes web pages and websites when you type a query to see if any of them include anything considered sensitive, such as violent content, adult content, or explicit images.
The search results are filtered to exclude web pages that satisfy the criteria for explicit content.
You can decide whether to turn SafeSearch on or off depending on your needs and browsing habits. These are the pros and cons of turning off the feature:
- You can access a wider selection of search results, including everything SafeSearch would have excluded.
- More flexible to look for specific subjects or content without restrictions.
- Increased risk of exposure to explicit or inappropriate content, particularly for sensitive users or children.
- You may come across offensive or harmful content that could be upsetting or uncomfortable.
- Less control over the types of content that appear in search results could expose users to undesirable content by accident.
In the following sections, we’ll show you how to get rid of safe search.
Also read: Digital Privacy: Tips on How to Protect Yourself on the Internet
If you want to know how to disable SafeSearch , follow the steps below. Remember: you can use this method on Windows, Chromebook , or Mac.
- Open your browser and visit Google Search.
- Click on “ Settings ” at the bottom of the screen and select “ Search settings.”

- Scroll down and search for “ Content ,” then click “ SafeSearch.”
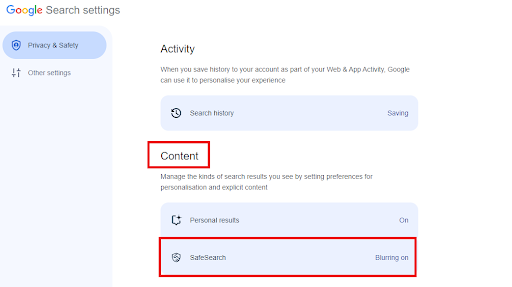
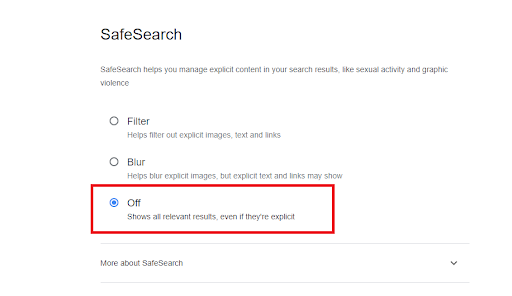
- Lastly, click “ Off ” to disable the SafeSearch feature.
Related: What Is the Best Internet Browser?
How to Disable SafeSearch on Android or iPhone
If you want to know how to turn off safe search on Safari and Google, check the following steps.
Here’s how to turn off safe search on Google:
- Open Google on your mobile device.
- Tap “Settings ” at the bottom of the screen.

- Tap “ Search settings.”
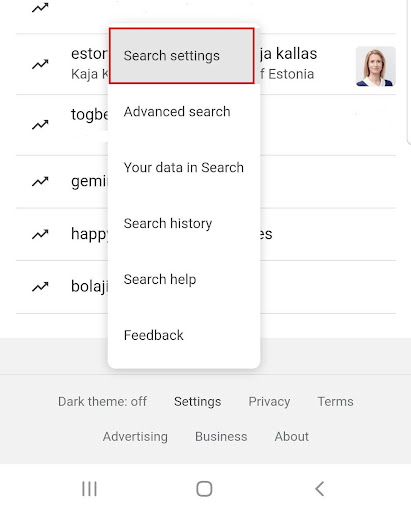
- Tap “ SafeSearch.”
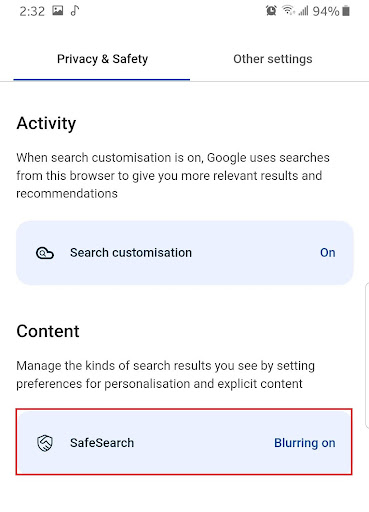
- Tap “ Off ” to disable SafeSearch.
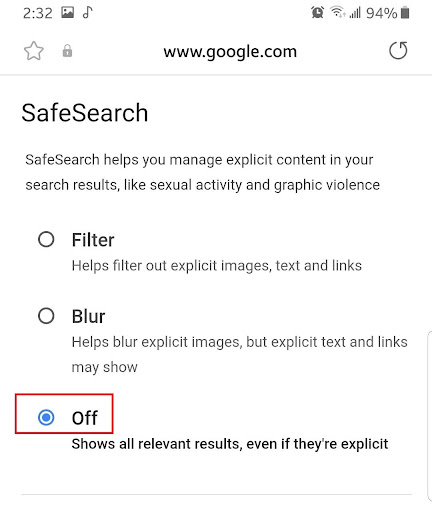
Here’s how to turn safe search off on Safari:
- Open Safari.
- Make a search.
- Tap on the three horizontal lines at the top left corner of your screen.
- Tap “ Settings.”
- Search for “ SafeSearch filters.”
- Tap “ Hide explicit results.”
Also read: Hard Refresh Your Browser: Chrome, Firefox, Edge, and Safari
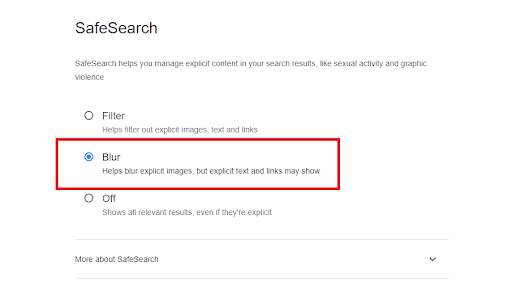
If you want to know how to turn on SafeSearch, follow the steps below:
- Click “ Blur ” or “ Filter ” to enable the SafeSearch feature.
Also read: How to Reset the Google Chrome Browser to Its Default Settings?
If you want to know how to turn off safe search, this guide offers easy steps. SafeSearch can improve your online browsing experience by filtering explicit content from search results.
Whether you enable or disable the SafeSearch feature depends on your preference and the type of browsing you do.
When making this option, consider the needs of all users, especially children. We hope this guide has helped you understand how to turn off Google SafeSearch.
If you found this article helpful, share your thoughts and tips in the comments below!
Also, some search engines like Google may require you to sign in to your account before you can make any changes to SafeSearch.
Another reason is that your browser or device settings may have restrictions that prevent you from disabling the feature.
To troubleshoot this issue, use a different browser or device to access the SafeSearch settings. If you still need help, contact your network administrator. How to turn off SafeSearch permanently? Usually, you’ll need to change the settings in your browser preferences or search engine account to disable SafeSearch permanently.
Go into your account, select “Search settings,” then look for the “SafeSearch” item for search engines such as Google.
From there, you can select to save your preferences and completely turn off SafeSearch.
Remember that some network limits or parental controls might still override these options, so ensure your device settings reflect your preferences. How to turn off SafeSearch blurring? Disabling SafeSearch blurring can improve your search experience, showing all search results without explicit content filtering or blurring.
To do this, find the SafeSearch options in your search engine’s settings or preferences menu. Disable any SafeSearch blurring-related settings that you can find. Is it safe to turn off SafeSearch? It’s generally not safe to turn off SafeSearch. While disabling SafeSearch gives you access to more search results, you should weigh the consequences, especially if you have young children or don’t want to see explicit content.
Disabling SafeSearch can expose you to offensive or explicit content depending on the type of searches you conduct and the websites you visit.
Also, disabling SafeSearch can reduce the relevancy or quality of search results because some search engines prioritize SafeSearch-enabled results. How to turn off SafeSearch when it’s locked? If SafeSearch is locked and you can’t unlock it, your device or network’s parental settings or network limits are probably the cause.
You’ll need permission from the administrator who set up the network limits and parental controls or disable them to get around this.
Leave a Reply Cancel reply
Your email address will not be published. Required fields are marked *
You may also like
- 21 Apr 2023
- Optimization
- 19 Jun 2018
iPhone User Guide
- iPhone models compatible with iOS 17
- R ' class='toc-item' data-ss-analytics-link-url='https://support.apple.com/guide/iphone/iphone-xr-iph017302841/ios' data-ajax-endpoint='https://support.apple.com/guide/iphone/iphone-xr-iph017302841/ios' data-ss-analytics-event="acs.link_click" href='https://support.apple.com/guide/iphone/iphone-xr-iph017302841/ios' id='toc-item-IPH017302841' data-tocid='IPH017302841' > iPhone X R
- S ' class='toc-item' data-ss-analytics-link-url='https://support.apple.com/guide/iphone/iphone-xs-iphc00446242/ios' data-ajax-endpoint='https://support.apple.com/guide/iphone/iphone-xs-iphc00446242/ios' data-ss-analytics-event="acs.link_click" href='https://support.apple.com/guide/iphone/iphone-xs-iphc00446242/ios' id='toc-item-IPHC00446242' data-tocid='IPHC00446242' > iPhone X S
- S Max' class='toc-item' data-ss-analytics-link-url='https://support.apple.com/guide/iphone/iphone-xs-max-iphcd2066870/ios' data-ajax-endpoint='https://support.apple.com/guide/iphone/iphone-xs-max-iphcd2066870/ios' data-ss-analytics-event="acs.link_click" href='https://support.apple.com/guide/iphone/iphone-xs-max-iphcd2066870/ios' id='toc-item-IPHCD2066870' data-tocid='IPHCD2066870' > iPhone X S Max
- iPhone 11 Pro
- iPhone 11 Pro Max
- iPhone SE (2nd generation)
- iPhone 12 mini
- iPhone 12 Pro
- iPhone 12 Pro Max
- iPhone 13 mini
- iPhone 13 Pro
- iPhone 13 Pro Max
- iPhone SE (3rd generation)
- iPhone 14 Plus
- iPhone 14 Pro
- iPhone 14 Pro Max
- iPhone 15 Plus
- iPhone 15 Pro
- iPhone 15 Pro Max
- Setup basics
- Make your iPhone your own
- Take great photos and videos
- Keep in touch with friends and family
- Share features with your family
- Use iPhone for your daily routines
- Expert advice from Apple Support
- What’s new in iOS 17
- Turn on and set up iPhone
- Wake and unlock
- Set up cellular service
- Use Dual SIM
- Connect to the internet
- Sign in with Apple ID
- Subscribe to iCloud+
- Find settings
- Set up mail, contacts, and calendar accounts
- Learn the meaning of the status icons
- Charge the battery
- Charge with cleaner energy sources
- Show the battery percentage
- Check battery health and usage
- Use Low Power Mode
- Read and bookmark the user guide
- Learn basic gestures
- Learn gestures for iPhone models with Face ID
- Adjust the volume
- Find your apps in App Library
- Switch between open apps
- Quit and reopen an app
- Multitask with Picture in Picture
- Access features from the Lock Screen
- View Live Activities in the Dynamic Island
- Perform quick actions
- Search on iPhone
- Get information about your iPhone
- View or change cellular data settings
- Travel with iPhone
- Change sounds and vibrations
- Use the Action button on iPhone 15 Pro and iPhone 15 Pro Max
- Create a custom Lock Screen
- Change the wallpaper
- Adjust the screen brightness and color balance
- Keep the iPhone display on longer
- Use StandBy
- Customize the text size and zoom setting
- Change the name of your iPhone
- Change the date and time
- Change the language and region
- Organize your apps in folders
- Add, edit, and remove widgets
- Move apps and widgets on the Home Screen
- Remove apps
- Use and customize Control Center
- Change or lock the screen orientation
- View and respond to notifications
- Change notification settings
- Set up a Focus
- Allow or silence notifications for a Focus
- Turn a Focus on or off
- Stay focused while driving
- Customize sharing options
- Type with the onscreen keyboard
- Dictate text
- Select and edit text
- Use predictive text
- Use text replacements
- Add or change keyboards
- Add emoji and stickers
- Take a screenshot
- Take a screen recording
- Draw in documents
- Add text, shapes, signatures, and more
- Fill out forms and sign documents
- Use Live Text to interact with content in a photo or video
- Use Visual Look Up to identify objects in your photos and videos
- Lift a subject from the photo background
- Subscribe to Apple Arcade
- Play with friends in Game Center
- Connect a game controller
- Use App Clips
- Update apps
- View or cancel subscriptions
- Manage purchases, settings, and restrictions
- Install and manage fonts
- Buy books and audiobooks
- Annotate books
- Access books on other Apple devices
- Listen to audiobooks
- Set reading goals
- Organize books
- Create and edit events in Calendar
- Send invitations
- Reply to invitations
- Change how you view events
- Search for events
- Change calendar and event settings
- Schedule or display events in a different time zone
- Keep track of events
- Use multiple calendars
- Use the Holidays calendar
- Share iCloud calendars
- Camera basics
- Set up your shot
- Apply Photographic Styles
- Take Live Photos
- Take Burst mode shots
- Take a selfie
- Take panoramic photos
- Take macro photos and videos
- Take portraits
- Take Night mode photos
- Take Apple ProRAW photos
- Adjust the shutter volume
- Adjust HDR camera settings
- Record videos
- Record spatial videos for Apple Vision Pro
- Record ProRes videos
- Record videos in Cinematic mode
- Change video recording settings
- Save camera settings
- Customize the Main camera lens
- Change advanced camera settings
- View, share, and print photos
- Use Live Text
- Scan a QR code
- See the world clock
- Set an alarm
- Change the next wake up alarm
- Use the stopwatch
- Use multiple timers
- Add and use contact information
- Edit contacts
- Add your contact info
- Use NameDrop on iPhone to share your contact info
- Use other contact accounts
- Use Contacts from the Phone app
- Merge or hide duplicate contacts
- Export contacts
- Get started with FaceTime
- Make FaceTime calls
- Receive FaceTime calls
- Create a FaceTime link
- Take a Live Photo
- Turn on Live Captions in a FaceTime call
- Use other apps during a call
- Make a Group FaceTime call
- View participants in a grid
- Use SharePlay to watch, listen, and play together
- Share your screen in a FaceTime call
- Collaborate on a document in FaceTime
- Use video conferencing features
- Hand off a FaceTime call to another Apple device
- Change the FaceTime video settings
- Change the FaceTime audio settings
- Change your appearance
- Leave a call or switch to Messages
- Block unwanted callers
- Report a call as spam
- Connect external devices or servers
- Modify files, folders, and downloads
- Search for files and folders
- Organize files and folders
- Set up iCloud Drive
- Share files and folders in iCloud Drive
- Share your location
- Meet up with a friend
- Send your location via satellite
- Add or remove a friend
- Locate a friend
- Get notified when friends change their location
- Notify a friend when your location changes
- Add your iPhone
- Add your iPhone Wallet with MagSafe
- Get notified if you leave a device behind
- Locate a device
- Mark a device as lost
- Erase a device
- Remove a device
- Add an AirTag
- Share an AirTag or other item in Find My on iPhone
- Add a third-party item
- Get notified if you leave an item behind
- Locate an item
- Mark an item as lost
- Remove an item
- Adjust map settings
- Get started with Fitness
- Track daily activity and change your move goal
- See your activity summary
- Sync a third-party workout app
- Change fitness notifications
- Share your activity
- Subscribe to Apple Fitness+
- Find Apple Fitness+ workouts and meditations
- Start an Apple Fitness+ workout or meditation
- Create a Custom Plan in Apple Fitness+
- Work out together using SharePlay
- Change what’s on the screen during an Apple Fitness+ workout or meditation
- Download an Apple Fitness+ workout or meditation
- Get started with Freeform
- Create a Freeform board
- Draw or handwrite
- Apply consistent styles
- Position items on a board
- Search Freeform boards
- Share and collaborate
- Delete and recover boards
- Get started with Health
- Fill out your Health Details
- Intro to Health data
- View your health data
- Share your health data
- View health data shared by others
- Download health records
- View health records
- Monitor your walking steadiness
- Log menstrual cycle information
- View menstrual cycle predictions and history
- Track your medications
- Learn more about your medications
- Log your state of mind
- Take a mental health assessment
- Set up a schedule for a Sleep Focus
- Turn off alarms and delete sleep schedules
- Add or change sleep schedules
- Turn Sleep Focus on or off
- Change your wind down period, sleep goal, and more
- View your sleep history
- Check your headphone levels
- Use audiogram data
- Register as an organ donor
- Back up your Health data
- Intro to Home
- Upgrade to the new Home architecture
- Set up accessories
- Control accessories
- Control your home using Siri
- Use Grid Forecast to plan your energy usage
- Set up HomePod
- Control your home remotely
- Create and use scenes
- Use automations
- Set up security cameras
- Use Face Recognition
- Unlock your door with a home key
- Configure a router
- Invite others to control accessories
- Add more homes
- Get music, movies, and TV shows
- Get ringtones
- Manage purchases and settings
- Get started with Journal
- Write in your journal
- Review your past journal entries
- Change Journal settings
- Magnify nearby objects
- Change settings
- Detect people around you
- Detect doors around you
- Receive image descriptions of your surroundings
- Read aloud text and labels around you
- Set up shortcuts for Detection Mode
- Add and remove email accounts
- Set up a custom email domain
- Check your email
- Unsend email with Undo Send
- Reply to and forward emails
- Save an email draft
- Add email attachments
- Download email attachments
- Annotate email attachments
- Set email notifications
- Search for email
- Organize email in mailboxes
- Flag or block emails
- Filter emails
- Use Hide My Email
- Use Mail Privacy Protection
- Change email settings
- Delete and recover emails
- Add a Mail widget to your Home Screen
- Print emails
- Get travel directions
- Select other route options
- Find stops along your route
- View a route overview or a list of turns
- Change settings for spoken directions
- Get driving directions
- Get directions to your parked car
- Set up electric vehicle routing
- Report traffic incidents
- Get cycling directions
- Get walking directions
- Get transit directions
- Delete recent directions
- Get traffic and weather info
- Estimate travel time and ETA
- Download offline maps
- Search for places
- Find nearby attractions, restaurants, and services
- Get information about places
- Mark places
- Share places
- Rate places
- Save favorite places
- Explore new places with Guides
- Organize places in My Guides
- Delete significant locations
- Look around places
- Take Flyover tours
- Find your Maps settings
- Measure dimensions
- View and save measurements
- Measure a person’s height
- Use the level
- Set up Messages
- About iMessage
- Send and reply to messages
- Unsend and edit messages
- Keep track of messages
- Forward and share messages
- Group conversations
- Watch, listen, or play together using SharePlay
- Collaborate on projects
- Use iMessage apps
- Take and edit photos or videos
- Share photos, links, and more
- Send stickers
- Request, send, and receive payments
- Send and receive audio messages
- Animate messages
- Change notifications
- Block, filter, and report messages
- Delete messages and attachments
- Recover deleted messages
- View albums, playlists, and more
- Show song credits and lyrics
- Queue up your music
- Listen to broadcast radio
- Subscribe to Apple Music
- Play music together in the car with iPhone
- Listen to lossless music
- Listen to Dolby Atmos music
- Apple Music Sing
- Find new music
- Add music and listen offline
- Get personalized recommendations
- Listen to radio
- Search for music
- Create playlists
- See what your friends are listening to
- Use Siri to play music
- Change the way music sounds
- Get started with News
- Use News widgets
- See news stories chosen just for you
- Read stories
- Follow your favorite teams with My Sports
- Listen to Apple News Today
- Subscribe to Apple News+
- Browse and read Apple News+ stories and issues
- Download Apple News+ issues
- Listen to audio stories
- Solve crossword puzzles
- Search for news stories
- Save stories in News for later
- Subscribe to individual news channels
- Get started with Notes
- Add or remove accounts
- Create and format notes
- Draw or write
- Add photos, videos, and more
- Scan text and documents
- Work with PDFs
- Create Quick Notes
- Search notes
- Organize in folders
- Organize with tags
- Use Smart Folders
- Export or print notes
- Change Notes settings
- Make a call
- Answer or decline incoming calls
- While on a call
- Set up voicemail
- Check voicemail
- Change voicemail greeting and settings
- Select ringtones and vibrations
- Make calls using Wi-Fi
- Set up call forwarding and call waiting
- Avoid unwanted calls
- View photos and videos
- Play videos and slideshows
- Delete or hide photos and videos
- Edit photos and videos
- Trim video length and adjust slow motion
- Edit Cinematic mode videos
- Edit Live Photos
- Edit portraits
- Use photo albums
- Edit, share, and organize albums
- Filter and sort photos and videos in albums
- Make stickers from your photos
- Duplicate and copy photos and videos
- Merge duplicate photos and videos
- Search for photos
- Identify people and pets
- Browse photos by location
- Share photos and videos
- Share long videos
- View photos and videos shared with you
- Watch memories
- Personalize your memories
- Manage memories and featured photos
- Use iCloud Photos
- Create shared albums
- Add and remove people in a shared album
- Add and delete photos and videos in a shared album
- Set up or join an iCloud Shared Photo Library
- Add content to an iCloud Shared Photo Library
- Use iCloud Shared Photo Library
- Import and export photos and videos
- Print photos
- Find podcasts
- Listen to podcasts
- Follow your favorite podcasts
- Use the Podcasts widget
- Organize your podcast library
- Download, save, or share podcasts
- Subscribe to podcasts
- Listen to subscriber-only content
- Change download settings
- Make a grocery list
- Add items to a list
- Edit and manage a list
- Search and organize lists
- Work with templates
- Use Smart Lists
- Print reminders
- Use the Reminders widget
- Change Reminders settings
- Browse the web
- Search for websites
- Customize your Safari settings
- Change the layout
- Use Safari profiles
- Open and close tabs
- Organize your tabs
- View your Safari tabs from another Apple device
- Share Tab Groups
- Use Siri to listen to a webpage
- Bookmark favorite webpages
- Save pages to a Reading List
- Find links shared with you
- Annotate and save a webpage as a PDF
- Automatically fill in forms
- Get extensions
- Hide ads and distractions
- Clear your cache
- Browse the web privately
- Use passkeys in Safari
- Check stocks
- Manage multiple watchlists
- Read business news
- Add earnings reports to your calendar
- Use a Stocks widget
- Translate text, voice, and conversations
- Translate text in apps
- Translate with the camera view
- Subscribe to Apple TV+, MLS Season Pass, or an Apple TV channel
- Add your TV provider
- Get shows, movies, and more
- Watch sports
- Watch Major League Soccer with MLS Season Pass
- Control playback
- Manage your library
- Change the settings
- Make a recording
- Play it back
- Edit or delete a recording
- Keep recordings up to date
- Organize recordings
- Search for or rename a recording
- Share a recording
- Duplicate a recording
- Keep cards and passes in Wallet
- Set up Apple Pay
- Use Apple Pay for contactless payments
- Use Apple Pay in apps and on the web
- Track your orders
- Use Apple Cash
- Use Apple Card
- Use Savings
- Pay for transit
- Access your home, hotel room, and vehicle
- Add identity cards
- Use COVID-19 vaccination cards
- Check your Apple Account balance
- Use Express Mode
- Organize your Wallet
- Remove cards or passes
- Check the weather
- Check the weather in other locations
- View weather maps
- Manage weather notifications
- Use Weather widgets
- Learn the weather icons
- Find out what Siri can do
- Tell Siri about yourself
- Have Siri announce calls and notifications
- Add Siri Shortcuts
- About Siri Suggestions
- Use Siri in your car
- Change Siri settings
- Contact emergency services
- Use Emergency SOS via satellite
- Request Roadside Assistance via satellite
- Set up and view your Medical ID
- Use Check In
- Manage Crash Detection
- Reset privacy and security settings in an emergency
- Set up Family Sharing
- Add Family Sharing members
- Remove Family Sharing members
- Share subscriptions
- Share purchases
- Share locations with family and locate lost devices
- Set up Apple Cash Family and Apple Card Family
- Set up parental controls
- Set up a child’s device
- Get started with Screen Time
- Protect your vision health with Screen Distance
- Set up Screen Time
- Set communication and safety limits and block inappropriate content
- Charging cable
- Power adapters
- MagSafe chargers and battery packs
- MagSafe cases and sleeves
- Qi-certified wireless chargers
- Use AirPods
- Use EarPods
- Apple Watch
- Wirelessly stream videos and photos to Apple TV or a smart TV
- Connect to a display with a cable
- HomePod and other wireless speakers
- Pair Magic Keyboard
- Enter characters with diacritical marks
- Switch between keyboards
- Use shortcuts
- Choose an alternative keyboard layout
- Change typing assistance options
- External storage devices
- Bluetooth accessories
- Share your internet connection
- Allow phone calls on your iPad and Mac
- Use iPhone as a webcam
- Hand off tasks between devices
- Cut, copy, and paste between iPhone and other devices
- Stream video or mirror the screen of your iPhone
- Start SharePlay instantly
- Use AirDrop to send items
- Connect iPhone and your computer with a cable
- Transfer files between devices
- Transfer files with email, messages, or AirDrop
- Transfer files or sync content with the Finder or iTunes
- Automatically keep files up to date with iCloud
- Use an external storage device, a file server, or a cloud storage service
- Intro to CarPlay
- Connect to CarPlay
- Use your vehicle’s built-in controls
- Get turn-by-turn directions
- Change the map view
- Make phone calls
- View your calendar
- Send and receive text messages
- Announce incoming text messages
- Play podcasts
- Play audiobooks
- Listen to news stories
- Control your home
- Use other apps with CarPlay
- Rearrange icons on CarPlay Home
- Change settings in CarPlay
- Get started with accessibility features
- Turn on accessibility features for setup
- Change Siri accessibility settings
- Open features with Accessibility Shortcut
- Change color and brightness
- Make text easier to read
- Reduce onscreen motion
- Customize per-app visual settings
- Hear what’s on the screen or typed
- Hear audio descriptions
- Turn on and practice VoiceOver
- Change your VoiceOver settings
- Use VoiceOver gestures
- Operate iPhone when VoiceOver is on
- Control VoiceOver using the rotor
- Use the onscreen keyboard
- Write with your finger
- Use VoiceOver with an Apple external keyboard
- Use a braille display
- Type braille on the screen
- Customize gestures and keyboard shortcuts
- Use VoiceOver with a pointer device
- Use VoiceOver for images and videos
- Use VoiceOver in apps
- Use AssistiveTouch
- Adjust how iPhone responds to your touch
- Use Reachability
- Auto-answer calls
- Turn off vibration
- Change Face ID and attention settings
- Use Voice Control
- Adjust the side or Home button
- Use Apple TV Remote buttons
- Adjust pointer settings
- Adjust keyboard settings
- Adjust AirPods settings
- Turn on Apple Watch Mirroring
- Control a nearby Apple device
- Intro to Switch Control
- Set up and turn on Switch Control
- Select items, perform actions, and more
- Control several devices with one switch
- Use hearing devices
- Use Live Listen
- Use sound recognition
- Set up and use RTT and TTY
- Flash the LED for alerts
- Adjust audio settings
- Play background sounds
- Display subtitles and captions
- Show transcriptions for Intercom messages
- Get Live Captions (beta)
- Type to speak
- Record a Personal Voice
- Use Guided Access
- Use built-in privacy and security protections
- Set a passcode
- Set up Face ID
- Set up Touch ID
- Control access to information on the Lock Screen
- Keep your Apple ID secure
- Use passkeys to sign in to apps and websites
- Sign in with Apple
- Share passwords
- Automatically fill in strong passwords
- Change weak or compromised passwords
- View your passwords and related information
- Share passkeys and passwords securely with AirDrop
- Make your passkeys and passwords available on all your devices
- Automatically fill in verification codes
- Automatically fill in SMS passcodes
- Sign in with fewer CAPTCHA challenges
- Use two-factor authentication
- Use security keys
- Manage information sharing with Safety Check
- Control app tracking permissions
- Control the location information you share
- Control access to information in apps
- Control how Apple delivers advertising to you
- Control access to hardware features
- Create and manage Hide My Email addresses
- Protect your web browsing with iCloud Private Relay
- Use a private network address
- Use Advanced Data Protection
- Use Lockdown Mode
- Use Stolen Device Protection
- Receive warnings about sensitive content
- Use Contact Key Verification
- Turn iPhone on or off
- Force restart iPhone
- Back up iPhone
- Return iPhone settings to their defaults
- Restore all content from a backup
- Restore purchased and deleted items
- Sell, give away, or trade in your iPhone
- Erase iPhone
- Install or remove configuration profiles
- Important safety information
- Important handling information
- Find more resources for software and service
- FCC compliance statement
- ISED Canada compliance statement
- Ultra Wideband information
- Class 1 Laser information
- Apple and the environment
- Disposal and recycling information
- Unauthorized modification of iOS
Browse privately in Safari on iPhone
Visit sites privately
You can use Private Browsing to open private tabs that don’t appear in History on iPhone or in the list of tabs on your other devices. Tabs in Private Browsing aren’t shared with your other Apple devices, even if you’re signed in with the same Apple ID .
If you have a passcode set on your iPhone, Private Browsing locks when it’s not in use. Private Browsing may not lock immediately.
Swipe right on the tab bar at the bottom of the screen until Private Browsing opens, then tap Unlock.
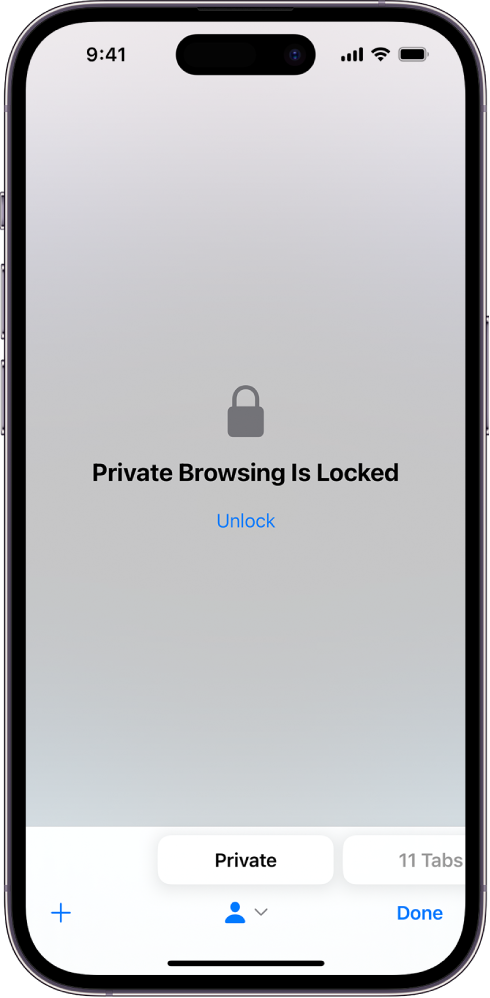
Note: Any Safari extensions you have installed that have access to browsing data are automatically turned off in Private Browsing. To turn on an extension in Private Browsing, see Use extensions .
Choose a search engine for Private Browsing
Tap Private Search Engine, then choose a search engine.
View the Privacy Report
Safari helps prevent trackers from following you across websites and viewing your IP address. You can review the Privacy Report to see a summary of trackers that have been encountered and prevented by Intelligent Tracking Prevention on the current webpage you’re visiting. You can also review and adjust Safari settings to keep your browsing activities private from others who use the same device, and help protect yourself from malicious websites.
Use iCloud Private Relay to browse the web with more privacy
When you subscribe to iCloud+ , you can use iCloud Private Relay to help prevent websites and network providers from creating a detailed profile about you. When iCloud Private Relay is turned on, the traffic leaving your iPhone is encrypted and sent through two separate internet relays. This prevents websites from seeing your IP address and exact location while it prevents network providers from collecting your browsing activity in Safari.
See Protect your web browsing with iCloud Private Relay on iPhone to learn how to:
Turn iCloud Private Relay completely on or off for your iPhone.
Turn iCloud Private Relay on or off for a specific Wi-Fi or cellular network.
Turn iCloud Private Relay off temporarily.
Set the specificity of your IP address location.
Temporarily allow a website to see your IP address
If a website relies on IP filtering, monitoring, or rate-limiting, it might require your IP address to be visible. You can turn off iCloud Private Relay temporarily for that website only.
Note: iCloud Private Relay isn’t available in all countries or regions. See the iOS and iPadOS Feature Availability website .
Tap Show IP Address.
Your IP address remains visible to that website until you leave the website or close its Safari tab. iCloud Private Relay remains on for other websites.
To turn off or pause iCloud Private Relay for all websites, see Protect your web browsing with iCloud Private Relay on iPhone .
Control privacy and security settings for Safari
Prevent Cross-Site Tracking: Safari limits third-party cookies and data by default. Turn this option off to allow cross-site tracking.
Hide IP address: Safari automatically protects your IP address from known trackers. For eligible iCloud+ subscribers, your IP address is protected from trackers and websites as you browse in Safari. If this option is off, your IP address isn’t hidden.
Fraudulent Website Warning: Safari displays a warning if you’re visiting a suspected phishing website. Turn this option off if you don’t want to be warned about fraudulent websites.
Camera: Choose whether Safari websites can use your camera without asking you first. Tap Camera, then choose Ask, Deny, or Allow.
Microphone: Choose whether Safari websites can use your microphone without asking you first. Tap Microphone, then choose Ask, Deny, or Allow.
Location: Choose whether Safari websites can use your location without asking you first. Tap Location, then choose Ask, Deny, or Allow.
Looks like no one’s replied in a while. To start the conversation again, simply ask a new question.
Safari safe search
How can you change Safari to exclude adult material and questionable material if a child has an iTouch?
Posted on Jan 13, 2012 9:24 PM
Loading page content
Page content loaded
Jan 13, 2012 9:29 PM in response to gruff007
I believe you can only disable the use of Safari, I don't think you can just block explicit websites. As for explicit search results, that all depends on what search engine you use, and most search engines will automatically have safesearch settings enabled.

IMAGES
VIDEO
COMMENTS
In the Google app. On your iPhone or iPad, open the Google app . At the top right, tap your profile picture or initial Settings SafeSearch. Select Filter, Blur, or Off . At the top right, if you find a Lock , your SafeSearch setting is locked. Tip: The settings page provides info about who manages your SafeSearch setting.
When on the Search Settings screen, find the section named SafeSearch filters. It includes a brief description of what this feature does. If you are sure you want to disable it, remove the checkmark from the box next to Turn on SafeSearch. Scroll down to the bottom of the page and click the Save button. This will put the new configuration into ...
Step 1: Open Safari. To initiate the process of enabling Safe Search on Safari, the first step is to launch the Safari web browser on your Apple device. Safari, known for its sleek interface and seamless user experience, is the default browser for iOS and macOS devices, making it easily accessible for a wide range of users.
To enable SafeSearch on Safari iPhone, simply go to Settings > Safari > Search Engine and select the "Filter Explicit Content" option. Once enabled, all your search queries will be filtered ...
To enable SafeSearch settings in Safari, open the browser and click on "Settings" at the bottom of the window. Then scroll down until you see "SafeSearch" and toggle it on.
Easy to follow tutorial on using the safe search features for Safari on iPhone. I'll show you how to set up safe search filters on you or your child's iphone...
To disable Safari Suggestions, go to Settings > Safari and tap to turn off Safari Suggestions. You can see and control the full list of features that Siri personalises and apps that Siri suggests shortcuts for in Settings > Siri & Search. To stop apps from contributing information to personalise Siri, go to Settings > Siri & Search and tap the ...
Change the display controls for a website on Safari. You can hide the search field, switch to Reader, and more. Open the Safari app on your iPad. Tap , then do any of the following: Hide the search field: Tap Hide Toolbar (tap the top of the screen to get it back). See a streamlined view of the webpage: Tap Show Reader (if available).
Tip: If your SafeSearch setting isn't locked, sign in to your Google Account. This is to save and apply your SafeSearch preferences. Here are a few possible reasons why you're not able to change your SafeSearch settings: The device or network you're connected to may have locked SafeSearch. Public Wi-Fi networks.
To control links, go to Safari > Open Links. To use AutoFill, go to Settings > Safari > AutoFill > turn on Use Contact Info. To view saved passwords, go to Settings > Passwords & Accounts > Website & App Passwords. This article explains how to adjust Safari settings and security on your iPhone or iPad.
Do you want to Turn On Safe Search Mode on iPhone? Here is How to Turn On Safe Search on iPhone Safari Web Browser. You'll also learn How to Turn Off Safe Se...
To modify the Safe Search settings, you will need to navigate to the "Search" tab. Adjust Safe Search: Within the "Search" tab, you will find the option to enable or disable Safe Search. Simply uncheck the box next to "Enable Safe Search" to turn off this feature. Once you've made the desired changes, you can close the Preferences window, and ...
From the Safari menu, choose Preferences.... Click the Websites button. From the General section of the sidebar, click Pop-up Windows. Click the pop-up menu for "When visiting other websites" and choose Block and Notify, Block, or Allow, depending on your preference.
Customize your start page. When you open a new tab, you begin on your start page. You can customize your start page with new background images and options. Open the Safari app on your iPhone. Tap , then tap . Scroll to the bottom of the page, then tap Edit. Favorites: Display shortcuts to your favorite bookmarked websites.
On the "All Settings" page, at the top, click the "General" tab. Scroll down the "General" tab to the "Safe Search" section. Here, click the drop-down menu and choose "Off." Scroll your page all the way down, and at the bottom, select "Save and Exit." SafeSearch is now turned off on DuckDuckGo.
In the Safari app on your Mac, use Security preferences to turn security warnings on or off. Also enable or disable JavaScript. To change these preferences, choose Safari > Preferences, then click Security. Get a warning if the site you're visiting is a suspected phishing website.
Google app. If you primarily rely on the Google app for your search needs, you can turn off its SafeSearch as well. 1) Open the app and tap your profile picture from the top right. 2) Tap Settings. 3) Pick SafeSearch. 4) Select Off in place of Blur or Filter.
If you want to know how to turn on SafeSearch, follow the steps below: Open your browser and visit Google Search. Click on "Settings" at the bottom of the screen and select "Search settings.". Scroll down and search for "Content," then click "SafeSearch.". Click "Blur" or "Filter" to enable the SafeSearch feature.
From the Google support website, here is information on disabling their browser SafeSearch feature: Filter explicit results using SafeSearch - iPhone & iPad. If you aren't using the Google web app, but using Safari, you may need to check your Screen Time settings. There are content restrictions you could have enabled that may be causing what ...
Go to Settings > Safari, then turn any of the following on or off:. Prevent Cross-Site Tracking: Safari limits third-party cookies and data by default. Turn this option off to allow cross-site tracking. Hide IP address: Safari automatically protects your IP address from known trackers. For eligible iCloud+ subscribers, your IP address is protected from trackers and websites as you browse in ...
Searching in Safari app on iOS 12.3.1 redirecting me to spam site Shortly after updating to iOS 12.3.1, I did a rather innocuous search (something or other about product development success metrics) using the address/search bar at the top of the Safari app. One of the initial results, maybe the fifth or sixth one down, once tapped wound up being a spam site that loaded a pop-up and hijacked my ...
Level 4. 2,781 points. Jan 13, 2012 9:29 PM in response to gruff007. I believe you can only disable the use of Safari, I don't think you can just block explicit websites. As for explicit search results, that all depends on what search engine you use, and most search engines will automatically have safesearch settings enabled.