- Best 3D Pens
- Top 5 Large 3D Printer – Best Machines To Build Large-Scale Objects
- Top 10 Cheap 3D Printers for Budget Under $500/$1000
- Best 5 Cheap Small 3D Printers – Price Comparison 2017
- 15 Best 3D Printer Reviews – Beginners, Hobbyist, Professionals | Buyers Guide
- PETG Filament Complete Guide | Durability, Flexibility and Reliability
- Wood Filament Review – Easy 3D Printing with Wood Filament
- ABS Filament – 1.75, 3mm Transparent Fiber For Your 3D Printer
- HIPS Filament – An Excellent Support Plastic Material for 3D Printing
- PETT Filament – Strength, Properties, and Tips for Better 3D Printing
- Glow in the Dark Filaments – Producing Perfect 3D Prints with GITD Materials
- TPU Filament 3D Printing Material – The Complete Guide
- Nylon Filament – Features, Properties, and Techniques on Printing Nylon
- TPE Filament – Durable, Elastic, and Versatile 3D Printing Filament
- PVA Filament Review – Best Soluble, Dissolvable Strand For 3D Printing
- 10 Insane Benefits of 3D Printing
- 10 Weird 3D Printed Objects You Do Not Know About
- 13 Mind-Blowing 3D Printed Things You Will Find At The Rio Olympics 2016
- 55 Useful, Cool Things To 3D Print: Best 3D Printing Ideas & Projects
- How to 3D Print with 3D Printing Pen?
- 3D Print – How To Price Your 3D Printing Project
- The History of 3D Printing
- What are 3D Pens or 3D Printing Pens?
- 10 Best 3D Printing Services Online – Cheap and Fast 3D Printing Services US

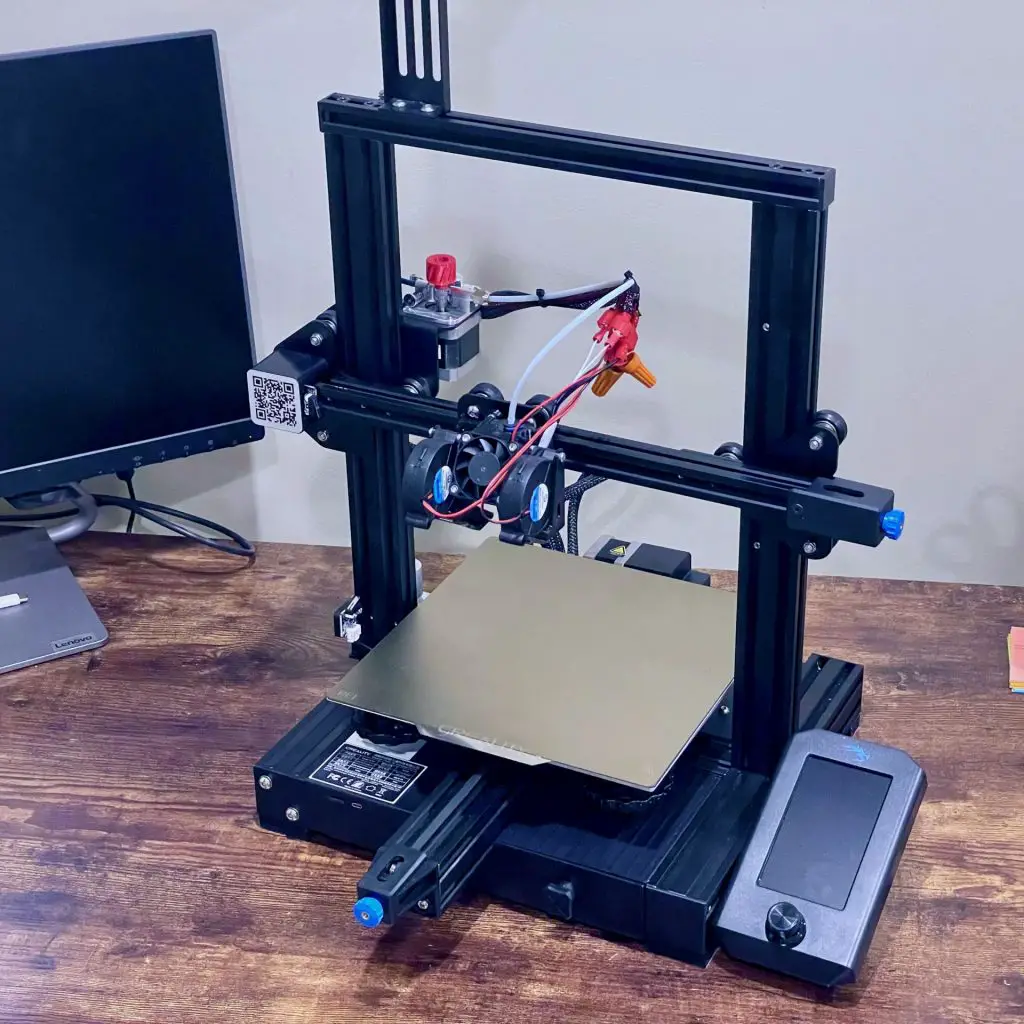
Creality Ender 3 Pro Review

3D Printing In Constructions: How It Works
3d printing for car parts: a complete guide.

3D Printed Gun: Legality, Models, & STL File Kits

3D Printing Food: 7 Best Food 3D Printers For Customization &…

3D Printing Speeds: 10 Speed Settings Tips To Print Faster

Beginners usually find themselves experimenting with printing speed because they aren’t sure how to choose the correct setting for their project.
However, aside from delaying production, poor printing speeds could also lead to imperfections and flawed outputs.
Thus, it’s something you should be sure of whenever you do your 3D object, especially if it’s for rapid prototyping .
If you need to learn more about setting your printing speeds, you are just on the right page. By the end of this article, you will know how to determine the perfect speed to produce a quality 3D printed object. Also, I will give you several tips if you want to print faster.
So, let’s get started!
What Is 3D Printing Speed?

3D printing speed is the main speed setting when you are 3D printing.
It refers to how fast your 3D printer’s motor moves, including the X- and Y-axis control and the extruder motor. It is usually measured in seconds (unit of time) and kg, mm or cm3 (unit of manufactured material).
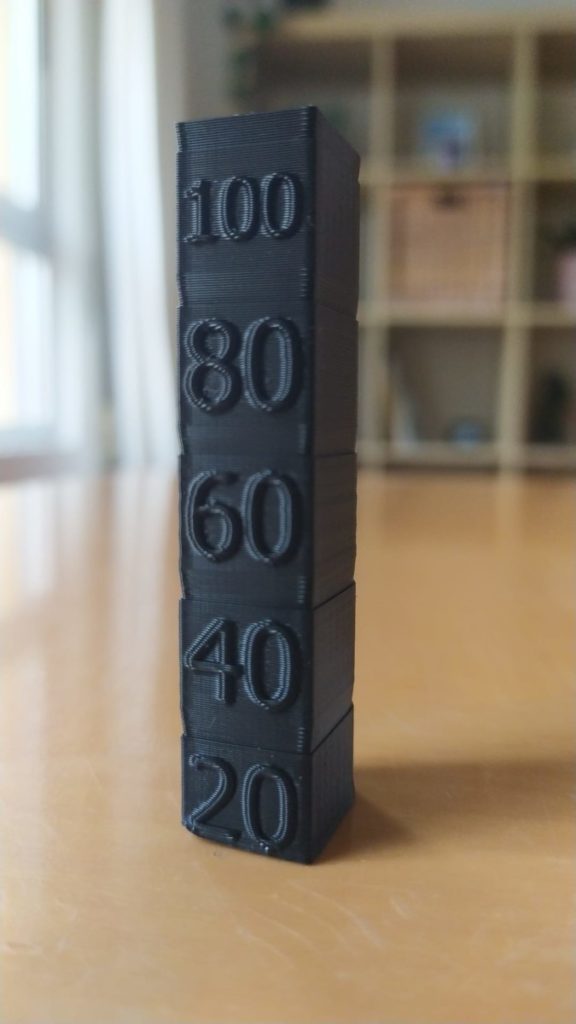
You can download a print speed test model to test your printer’s speed. The test model comes with instructions on adjusting the correct settings because the model linked will essentially print the same shape at gradually increasing speeds, allowing you to see for yourself the optimal setting to achieve a flawless output.
There are many factors when we talk about printing speeds like retraction speed, travel speed and more.
Retraction speed is the speed at which the extruder motor drives back the filament. A good retraction speed is between 1200-6000 mm/min (20-100 mm/s) where retraction performs best. When the retraction speed is too fast, the drive gear may grind away pieces of the filament.
Travel speed is the moving speed of the print head during non-printing status. It refers to the movement of the print head without squeezing the printing material out from the nozzle.
When travel speed is too slow, it could lead to stringing issues on the 3D printed object. A good travel speed for a 3D printer is 100 millimeters per second. But the optimum travel speed might differ for each 3D printer.
Here’s why you should aim for the accurate speed:
When the print speed is too slow, it could cause deformation due to the nozzle sitting on the plastic for too long. And when the speed is too fast, it results in ringing, which is caused by overly excessive vibrations.
Also, when you go too fast, the extruder might not be able to keep up and end extruding less filament than it should.
Hitting the sweet spot will enable the 3D printer to work fast, accurately, and flawlessly without sacrificing the quality of the output.
Print speeds and quality go hand-in-hand; that’s why it’s very important to use the right speed to achieve the desired results.
Overall, you will get a better quality output if you use a lower speed than a higher speed. However, that is only true when your 3D printer is not operating at its optimal conditions.
Also, some would argue that printing speed doesn’t impact print quality. That’s because other factors directly impact the print quality, which is as follows:
Type of 3D printer
The type of 3D printer will also affect the quality of the 3D prints without being influenced by the print speed.
A high-quality 3D printer can be set in a high-speed setting and achieve first-class quality 3D prints.
However, if you use a 3D printer of lower quality with the same speed, you won’t get the same high-quality results.
Type Of 3D Printing Material
The speed will be faster when using a high-quality support material because you do not need to keep unclogging the nozzle.
Also, you do not need to deal with support material getting stuck.
When you are done printing, you will remove the material without reducing the print quality.
How Fast Is A 3D Printer?

Regardless of whether you are using a slow 3D printer or the fastest 3D printers , several factors directly affect how fast your printer could finish a certain project.
Let’s get into more details below.
Resolution of the 3D printed part
Part of the process before 3D printing is slicing the model into layers on a 3D slicer such as Cura or Repetier-Host.
The more layers, the thinner each layer and the longer it will take to print. For instance, a part printed with 50-micron layers will have twice as many layers as the same part printed with 100-micron layers and take twice as long at the same speed.
Quality of print
Theoretically, you could run a budget 3D printer at its maximum speed — make it work at extremely high speed.
However, do not expect it to yield a result the same as on your slicer. Instead, it will probably result in a mess because the speed was too fast.
Some 3D printers, especially fast 3D printers, can handle high-speed 3D printing, but others don’t, especially budget 3D printers with limited capacity.
3D printing technology
The technology used is another factor that affects the speed. Resin 3D printers are faster than FDM 3D printers.
Yes, that’s true; even expensive FDM printers are slower than low-cost LCD 3D printers.
Aside from resin technologies used in SLA, DLP and LCD 3D printers, the fastest 3D printing technologies include Multi Jet Fusion.
Here’s an overview of the different printing speeds of the different 3D printing technology.
Materials or type of filaments use

However, the filaments mentioned above have different complexity.
Some are easier to print than others because they put less demand on the printer and make it print faster.
Model’s complexity
The 3D object you are about to print could also affect the speed of your machine. Printing a simple box will be easier for a 3D printer to finish than an intricate 3D printed jewelry piece.
Printing a larger object that’s not complex could make the printer work at a faster print speed without significant loss of quality because there are no intricate details needed.
However, the more complex or intricate the model, the more slow the speed is to ensure that it could follow the design as it is.
Infill settings
This factor affects the amount of materials extruded — depending on the level of the infill percentage; it could be between 10% to 100%. Infill settings affect the 3D printing space depending on the complexity.
The more complex the pattern, the longer it will take to finish printing. The effect of infills on printing speeds is through density.
A heavy density infill could promote the strength of the model. However, it also means that 3D printing will take more time or the printing speed is slower.
Size of print
Obviously, the larger the object to 3D print, the longer it will take for the 3D printer to finish. A full-size vase printed using an FDM printer could take 12 hours or more. But a small statue could only take under an hour.
It is true, provided that the two models are not very complex and have a significant difference in their sizes.
Nozzle size
For FDM 3D printers, the nozzle size matters in speed and performance. Smaller nozzles are great for working on models with intricate details.
Larger nozzles are not the best when printing objects with intricate details, but they can print faster.
How Fast Can The Fastest 3D Printer Print
There are a lot of fast 3D printers on the market today and the fastest FDM 3D printer — WASP 2040 PRO Turbo — could work as fast as 500mm/s.
Some said it could even print faster than that. Another great thing about it is that it is extremely accurate. However, DLP/SLA printers will always work faster than the fastest FDM 3D printer.
What Is A Good 3D Printing Speed

Here’s the recommended setting:
For slow 3D printers, it’s best to use 40 mm per second to 80mm per second. Mid-speed printers work best with 100mm per second. If you want to print faster, you can go 150mm per second. Fast-speed 3D printers can work beyond 150mm per second.
But you should note that there is no general print speed that works for all. There are many things that you need to consider to get the best print speed for your 3D desktop printer.
Here are some factors to consider:
Model’s outer wall. You should ask yourself, “how fast do you want the exterior of your model to be printed?” If your priority is surface quality, you better reduce the speed or opt for lower print speed settings.
Interior walls. For the interior, it is recommended that you use the same print speed in printing the overall model. The 3D printer speed needs to reduce the print time without lowering the 3D print strength.
Infill printing speed. For this, you also need to reduce printing time without compromising stability.
Bottom and top layers. For the last speed setting, you have to consider the top and bottom layers, and the best option is to go for a slightly lower print speed for better surface quality.
Print Speed Settings for PLA, ABS & More

But after a bit of trial and error, you will surely be able to find what works best for your 3D printer’s software and hardware.
The different 3D printing materials have different recommended print settings.
Here’s the good print speed for PLA, ABS, and more, so you will know how to get started when using them. You can refer to the following section for that.
What is a good 3D printing speed for PLA? When using PLA, you can start in the 40-60 mm/s range. It will give a good balance of print quality and speed.
However, depending on your 3D printer type, stability and set-up, you can increase the speed up to 100 mm/s. Some achieved great results at a higher speed, but the quality of your printer matters too.
A good print speed for ABS is typically similar to PLA between 40-60 mm/s. However, you can increase if you have an enclosure around your printer.
You can print ABS filament at a speed of 60 mm/s and keep the first layer speed to 70% of that and see if it will work for you. It works well for adhesion in some cases, ensuring that enough plastic is extruded out of the nozzle for proper and safe adhesion.
For PETG filament , a good print speed starts in the range of 50-6- mm/s. The filament could rise to string issues, so some will usually opt for 40 mm/s, and according to them, they find good results. PETG is a blend of ABS and PLA; that’s why the recommended print speed is not too far from the two’s recommended settings.
If you are using TPU, you can start with a speed between 15 mm/s to 30 mm/s. The filament is soft and should be printed much slower than the average filament. But if you are using a Direct Drive extrusion system, you can increase the speed to about 40 mm/s.
You can go a bit higher from the recommended speed of 15 – 30 mm/s and experiment. But then again, always remember that this is best printed at a low speed.
A good 3D print speed for nylon is between 30 mm/s to 60 mm/s, but most print with 40 mm/s for great quality and great details. You can also go higher, like 70 mm/s, because it is still sustainable if you increase the nozzle temperature side by side.
10 Tips to Get the Best Print Speed Calculation

In addition, it reduces problems such as warping or curling.
Yes, speed is very important because it has to do with your 3D printed model’s quality, accuracy and strength. With the right print setting, you can strike a perfect balance to achieve the three.
Here are some tips to increase print speed from 3D printerly. However, you should note that some of them might affect the quality of your print.
1. Increase print speed in slicer settings
Find the balance of your print speed in the slicer settings. It will be very helpful, especially if you depend on how big the print is because the size of the object is relatively related to printing time. Again, experiment to find the perfect balance of speed and quality, and in time, you will find it.
2. Adjust acceleration and jerk settings
Jerk settings refer to how fast the print head moves from a still position. When setting this, you want its movement to be smooth and fast at the same time.
You can test jerk settings by printing the vibration test cube and seeing whether the vibrations are visible on each axis by inspecting the corners, edges and letters on the cube.
Acceleration settings are how the print head gets to its top speed. A low acceleration means that the printer won’t get its top speed with smaller prints. Acceleration depends on several factors and is not the same in all of your 3D printing projects.
According to AK Eric, who did the test, comparing low jerk values (10) to high ones (40) on a 60 mm/sec speed made no difference in print speed. However, the lower value had better quality.
Increasing the speed at 120 mm/sec decreased printing time by 25% but at the expense of the quality. So, you can use the print speed settings to get what you want, but you might have to choose between speed and quality.
3. Infill pattern
For this, you can choose an infill pattern that prints faster than the others to save much time on increasing the print speed. The best has to be the “lines” pattern due to its simplicity and lower number of movements compared to other patterns. Depending on your model, the infill pattern can save you up to 25% of printing time.
The infill pattern is the strength of your model. It’s the honeycomb pattern. The more detailed it is, the more time it will take, because it will include more turns and movements to follow the pattern. If you want to print fast, you can adjust the infill pattern not to be that high.
4. Infill density
Density is what’s inside your print. An infill density of 0% means that the inside of the model is hallow. On the other hand, a 100% density infill means the inside will be solid. The density could depend on the purpose of the model.
For example, if you want a functional print, you should not sacrifice infill density to achieve the strength of the model. However, if it’s for aesthetics, it’s up to you to go all out for the density or skip it and focus on speed to reduce the print time.
5. Wall Thickness/shells
There is a relationship between the wall thickness or shells and density, so you should consider the other when adjusting either one. The good thing is getting a good ratio will help you achieve a great structure.
The thicker the wall, the longer the print till will be. To speed up the printing time, you can decrease the number of shells or perimeters of your prints in the settings.
You can play around with the print speed settings to find the perfect number, so you can maintain the strength while keeping it low to speed up the printing time.
6. Dynamic layer height/adaptive layer settings

It can improve the print speed and save you a decent amount of time compared to using the traditional layer method.
For example, 3D printing a chess piece without the adaptive layers setting takes 2 hours and 13 minutes.
However, using this featured in the speed settings could reduce the printing time by up to 30% down to 1 hour and 33 minutes.
7. Print multiple objects
To speed up the process, you can utilize all the space in the printer bed rather than doing one print at a time. To make it possible, use the center and arrange function in the slicer.
It will make a significant difference in the printing speed. However, this method might not apply to big prints.
Printing small objects will allow you to copy and paste the design multiple times on the print bed and print them all together simultaneously to speed up the entire process. Those who have tried this approach agreed that printing multiple objects could increase the speed.
8. Remove support
If your 3D object doesn’t need support, the printing time will be shorter. You can eliminate the need for support in many cases when you split the model in the right place and orient them properly.
So use the best orientation for your model, and you’ll definitely reduce the printing time. It is perfect if you want to increase printing speed.
9. Use a large nozzle when practical
Another great way to speed up the printing time is to use a large nozzle. However, doing so might not apply to all models and could reduce your print quality.
Using a large nozzle might not work when you are printing intricate models. But if your 3D objects are not as complex or intricate, go for a large nozzle to increase the printing speed.
There are many sizes of nozzles to choose from. Choose one that is most appropriate for your model.
• 4x 0.2mm nozzles • 4x 0.3mm nozzles • 36x 0.4mm nozzles • 4x 0.5mm nozzles • 4x 0.6mm nozzles • 4x 0.8mm nozzles • 4x 1mm nozzles • 10 cleaning needles
10. Increase layer height
The lower the layer height, the better the quality of your prints, but the longer the 3D printing time takes. If quality is not the top priority, you can increase the layer height and improve the printing speed.
You have to familiarize your printer and explore its print speed settings to get the optimal speed and enjoy quality outputs without the unnecessary long wait.
There are many ways to increase print speeds like using a large nozzle and reducing layer thickness, but always consider the results because when the printer works too fast, it might not achieve the quality you desire.
Also, always remember that the different 3D printing technologies offer different 3D printing speeds. SLA printers will always work faster, even when compared to the fastest FDM 3D printer.
The printing speed will affect the quality of your 3D printed object, so always make sure to strike the right balance, so you will achieve the strength, quality, and look you desire for your 3D project.
If you wish to learn more about 3D printing, better check our 3d printing home page .
- 3dprinterly.com/best-print-speed-settings-for-3d-printing/
- 3dprinterly.com/8-ways-how-to-speed-up-your-3d-printer-without-losing-quality/
- 3dsourced.com/3d-printers/fastest-3d-printer/
- rigid.ink/blogs/news/3d-printing-basics-how-to-get-the-best-results-with-pla-filament
- the3dprinterbee.com/3d-printer-speed/
- 3dsolved.com/3d-printing-speed-vs-quality/
- m3dzone.com/3d-printing-speed/
- all3dp.com/2/3d-printing-speed-optimal-settings/
- all3dp.com/3d-printing-speed/
- dyzedesign.com/2018/07/3d-print-speed-calculation-find-optimal-speed/
- thingiverse.com/thing:277394
RELATED ARTICLES MORE FROM AUTHOR

A Complete Selective Laser Sintering 3D Printing Guide

Advantages & Disadvantages Of 3D Printing Technology

10 Best Site To Find Anime 3D Print STL Files
How to Use a 3D Printer Step by Step (10 Tips...

7 Best Dual Extruder 3D Printers in 2024
Popular category.
- 3D Printing 56
- 3D Print 36
- 3D Printer 24
- 3D Printing Filaments 15
- 3D Printer Kit 9
- 3D Printing Service 8
- 3D Scanner 2
- Amazon Affiliate Disclosure
- UltiMaker Cura

- Existing user? Sign In Sign in with Ultimaker Account
UltiMaker uses functional, analytical and tracking cookies. Tracking cookies enhance your experience on our website and may also collect your personal data outside of Ultimaker websites. If you agree with the use of tracking cookies, click “I agree, continue browsing”. You can withdraw your consent at any time. If you do not consent with the use of tracking cookies, click “Refuse”. You can find more information about cookies on our Privacy and Cookie Policy page.
difference between print speed and travel speed ?

By ian October 4, 2012 in UltiMaker Cura
Recommended Posts
I also just put in the same number into both.
But what is the real difference between print speed and travel speed. are they not the same thing ?
many thanks.

Link to post
Share on other sites.

Print speed is the speed the head moves during extruding plastic, travel speed is the speed when moving from one place to another without printing. The default travelspeed of 150mm/s is quite low for an UM, and you can use 250mm/s for travel speed.
I've set a default of 150mm/s because it gives good results, while higher can cause missed steps when you have some mechanical issues or a bit underpowered steppers.
ok and in the ulticontoller, in tuning there is only one speed option ? is that controlling the print speed or travel speed or both ?
You adjust both.
Create an account or sign in to comment
You need to be a member in order to leave a comment
Create an account
Sign up for a new account in our community. It's easy!
Already have an account? Sign in here.

UltiMaker Cura 5.7 stable released
ArunC posted a topic in UltiMaker Cura , April 3

Release Notes: S-Line Firmware 8.3.0 (Latest)
Dustin posted a topic in Firmware , November 28, 2023
- Existing user? Sign In
- Official support
- Thingiverse
- UltiMaker Academy
- Code Of Conduct
- All Activity
- UltiMaker.com
- Create New...
Ender 3 Print Speed: Recommended settings and max possible
We participate in the Amazon affiliate program and may earn a commission if you make a purchase through links on our site. We also participate in other affiliate programs.
Learn about the Ender 3 Print Speed, how to maximize it (for free and for cheap), and what the best print speeds are for PLA, PETG, TPU, and other filaments.
Can you get a good print speed and good print quality from an Ender 3 series?
Yes… if you know how to calibrate it.
Ender 3 series 3d printers (Ender 3, Ender 3 Pro , Ender 3 Max, Ender 3 V2, and Ender 3 S1… then “neo” versions of all of those—listed from cheapest/oldest to most expensive & newest) are quite affordable… which means they also need some love out of the box.
My first 3D printer was an Ender 3 V2 and, after printing for a day or two, the first thing I thought was “how can I make my Ender 3 v2 print faster? “
Fun fact: as of this writing the fastest Ender 3 can print at over 1000 mm/s and print a Benchy in under four minutes instead of the typical 1.5 hours it usually takes.
But for those of us with a stock or slightly modified Ender 3, our print times are much, much slower than 1000mm/s.
So what’s the Ender 3’s print speed and what print speed settings should you use for the best print-to-quality?
The maximum listed mechanical speed of an Ender 3 series 3D printer (Pro & V2 included) is 200 mm/s. But the max actual print speed is often closer to 40 or 60mm/s depending on your material, line height, and nozzle size.
Let’s dig into why there’s such a difference between mechanical and actual print speeds.
Get the Ender 3 on Amazon for only $169.00
There is no ‘one size fits all’ print speed. This is because there are quite a few settings related to printing pace.
In most slicer engine software programs, “printing speed” is a setting that is used to calculate various settings that will decide how fast the nozzle will move.
Here we will refer to speed as the least amount of time needed to create a part when the machine is set to its fastest speed setting. Let’s assume we’ll use the default calculations to derive the other speed settings just like various other printers using a similar-sized printer bed .
What is the fastest the Ender 3 Pro, max, or V2 can print?
Creality lists the mechanical max print speed for a stock Creality Ender 3 3D printer as 200 mm/s .
BUT, the maximum print speed of any 3D printer is usually limited by the flow rate from your hotend.
Typical volumetric flow rates are 8mm³/s to 12mm³/s, depending on your hotend setup. These flow rates translate to 90-100mm/s and 140-150mm/s, respectively, at 0.2mm layer height with a 0.4mm nozzle depending on how your slicer handles the math.
The max speed also depends on the type of filament you use, your acceleration/jerk settings , what STL/model you’re building, and how nice you’d like the part to look.
But if you really want to have an incredible print speed, learn how to build a 1000mm/s Ender 3 for under $600 .
What is the fastest an Ender 3 can realistically print?
The fastest you can print depends on:
- The filament you have
- The nozzle diameter you have
- The later height you’re printing with
For example, PLA would give you 60 mm/s while other filaments would have their own ranges. Keep scrolling for stock (0.4mm nozzle, 0.2mm layer height) speeds for your Ender 3 based on material or
Check out the Ender 3’s recommended print settings here
Recommended Print Speeds for a stock Ender 3 (Pro/V2) with 0.4mm nozzle by material
Here’s a good starting point for your print speeds depending on the material.
† Max flow rates can vary even if both are the same model . Keep scrolling for how to calculate the max flow rate (which is the most critical number to find your max travel speed).
* For printing TPU keep all speeds constant. Also, Ender 3’s use a Bowden tube – meaning there is a lot of distance between extruder gears and the print head for TPU to “lock-up”… so print slow and test thoroughly. See the printing with TPU section for details as it’s difficult to work with.
** Stock Ender 3’s, Ender 3 V2s, and Ender 3 Pros really can’t print PC, PEEK, or other high-temp filaments for two reasons. First PC and PEEK warp horribly unless you have an enclosure that can hold the part at least 80°C . Second, the melting point of PEEK is roughly 343°C and PC’s melting point is typically at least 270°C but the max (safe) Ender 3 nozzle is ~240°C.
Want to go fast er? Learn how to build a 1000mm/s Ender 3 for under $600 .
WHAT IS the best ender 3 print speed for PLA?
When using a 0.4mm nozzle, most of my normal PLA prints are printed at 60mm/s on the perimeters, 25mm/s for small perimeters, 35mm/s for external perimeters, and “200mm/s” (which ends up programmatically limited by Prusa Slicer to ~100mm/s) for infill.
PLA prints well at speeds between 30mm to 90mm per second. For high-quality results stick to lower printer speeds – around 30-50mm/s. As you increase the speed you begin to risk reduced quality prints when printing for high detail. This is because high-speed printing tends to create resonance (known as ghosting or ringing) that shows up in your prints.
PLA is typically the first (and often the best) filament you’ll print with. It’s derived from plant starches and smells like cooked pancakes.
PLA is also dead-easy to print with. It doesn’t really warp, it doesn’t take much to keep it from stringing, and you can fix mistakes rather easily.
What’s the best Ender 3 print speed for TPU/flexible filament?
Printing TPU on an Ender 3 V1, Max, Pro, or V2 is possible but challenging. Keep all speed settings constant at 15-35mm/s and calibrate with a temperature tower before starting.
This is because TPU and other flexible materials are soft and flexible so they’re more difficult to “push”.
Also, stock Enders (until the “Sprite” hotends found on the S1 series onward) use a Bowen extruder instead of a direct drive.
Imagine trying to push al dente spaghetti through a long straw… that’s what a Bowden extruder is trying to do with TPU on your Ender.
To avoid bunching and added friction you want a smooth, steady “push” so plan on printing flexible materials slowly, sometimes as low as 15 mm/s up to 25 mm/s.
Here’s a great recommendation for pristine TPU prints on an Ender 3, posted on Reddit:
So, should you print TPU on an Ender 3 (V1, Max, Pro, V2)?
Absolutely! TPU and flexible filaments are great for functional parts such as grommets, gaskets, rubber stoppers, and more. It can be challenging but the additional functionality it offers is unbeatable.
Just take a look at a simple TPU bumper that I quickly printed which is keeping my refrigerator door from being damaged by my oven handle. Simple, functional, fast. TPU.

Check out our favorite flexible filaments here
Ender 3 print speeds for PETG
PETG (aka PET-G) is a 3D printing filament that prints at a higher temperature than PLA. It has fantastic mechanical properties (similar to ABS) but the print difficulty is only slightly more difficult than PLA.
As a general rule, print PETG at roughly the same pace—or slightly slower—than PLA. If you create basic objects at low res you should be able to print as fast as 60 mm/second.
However, the best pace for PETG is typically around 40 mm/s since PETG can be a bit stringy.
You can usually eliminate stringy-ness by slowing your print speed.
best Ender 3 print speeds for abs
I have struggled to print ABS on my Ender 3 due to the lack of an enclosure. With that said, ABS prints at higher temperatures; increasing flow and reducing friction.
For a stock Ender 3 I’d recommend 40-60 mm/s for your print speed starting point.
However, this study showed that the best mechanical properties for FDM printed ABS is found at 70 mm/s (Rezaeiana et al., 2021). From the paper:
According to the experimental results, the fabricated specimens with a printing speed of 70 mm/s shows the best performance with the maximum elongation and fracture resistance compared to the other printed specimens with different nozzle speeds. Rezaeiana et al., 2021
ABS can be a bear to stick to the print bed. If you’re having difficulty with warping be sure to print your first layer slow, turn on “draft shield” (if you’re using Prusa Slicer), and move your 3D printer away from drafts/airflow and into the warmest room of your house.
Oh… and be sure to have good ventilation.
ABS fumes emit both ultrafine particulates (UFPs) and volatile organic compounds (VOCs)—although this study states that they were both relatively negligible (Farcas et al., 2020).
What Factors affect print speed?
Apart from the filaments used, many other factors are responsible for printing speeds.
How acceleration and jerk affect your Ender 3’s Print Speed
Acceleration and jerk are often ignored outside of the Voron community. Yet acceleration and jerk are absolutely critical in reducing the total print time … which is really what we’re after.
Let’s say you set your print speed to be 200mm/s but most straight-line prints are a centimeter or two. In this case, the hotend assembly can never actually accelerate to 200mm/s before having to decelerate for the next turn.
Acceleration in 3D printing is exactly what it sounds like, but Jerk in 3D printing is different than in physics.
In 3D printing, Jerk is the maximum speed that the print head can be traveling before changing directions. It effectively ‘clips’ the remaining deceleration and just starts accelerating in a different direction.
Both of these have massive impacts on reducing your total print times, so they’re worth tuning.
how the Size and Complexity of the Model affects your ender 3’s print speed
Imagine trying to paint the Sistine Chapel in a day. To print detailed models you’ll need to slow your print speed to reduce artifacts such as ringing and ghosting.
For an Ender 3 (pro/V2) plan on 40 to 50 mm/s for detailed builds or as high as 70 to 80 mm/s for rough models and builds.
how Your ender 3 Hotend affects your print speed
Print speeds are limited by physics, namely, how much filament can you melt and solidify in a given amount of time. This is known as volumetric flow rate and is your real physical limitation on print speeds.
More on that in the next section.
how your Slicer settings affect your ender 3’s print speed
A few settings make a huge difference on print speeds and print times. Layer height, number of perimeters, and amount and type of infill are major culprits.
Perimeters generally print slower than infill. Having too much infill adds weight, time, cost without much gain. And types of infill can make a massive difference in print speed. And, if you’re increasing infill for strength, consider increasing perimeters instead. Like an I beam, it’s the “outsides” that matter more when it comes to strength.
How to make the ender 3 print faster (without upgrades)
There are two major ways to decrease your print times and increase print speed:
- Increase volumetric flow rate
- Adjust your model settings
200mm/s is not really your print speed, it’s a movement speed… even when printing.
When trying to print faster, it’s critical to focus on how much filament your printer can put down per second. This is known as the volumetric flow rate.
For example, a 1.6mm nozzle printing at 20mm/s will put down exactly as much filament as a 0.4mm nozzle printing at 80mm/s.
So, to print as fast as possible without upgrading you must:
- Calculate your maximum flow rate (which will be different for each printer) then
- Calculate your maximum print speed – or linear speed – based on the max flow rate.
How to calculate the max flow rate for a stock Ender 3 (v2/pro)
To find the max speeds for your printer, you need first to find the maximum volumetric flow rate for any given combination of nozzle size, material, and speed. You first pick a filament and temperature, then manually feed Gcode to your printer pushing more and more filament until it eventually starts clicking .
Why do this?
Every hotend is limited by how much energy (heat) it can send to the filament to melt it.
Hotend temperature will temporarily drop if you try to shove filament through faster than the hotend can heat it. When the hotend temp drops you’ll get under-extrusion, extruder clicking, and uneven print widths.
It’s gonna be a bad time.
For a very detailed walkthrough and discussion of testing methodologies, see Bob’s project notebook on calibrating volumetric flow rate .
Calculating your max print speed from the volumetric flow rate
Now that you know your maximum VFR, here’s how to calculate your maximum linear print speed from your volumetric flow rate
Total Time: 1 minute
Find your layer height and extrusion width ( not nozzle width )
In Prusa Slicer you can command/control + f (to search) and type “extrusion width” to find your settings.
I use the largest width (Prusa allows for different widths depending on line type – aka external perimeter vs infill) to be sure that I don’t under extrude a feature.
Divide Volumetric flow rate by line height
Be sure to keep units consistent – so this should be mm (usually 0.2mm for drafts/quick prints, 0.1mm to 0.15mm for finer detail)
then divide that number by the extrusion width
It’s important that you use the extrusion width, not the nozzle width, as this is the actual flow of material leaving your hotend. Again, be sure to use consistent units (mm, typically)
You’re done
Your result should be roughly 100mm/s, up to 200 and not likely below 80.
If your result falls outside of that and you started with 8-12mm^3/s then check your math.
For reference, the math is: Linear speed (mm/s) = VolumetricFlowRate(mm^3/s) / (lineHeight(mm) * extrusionWidth(mm))
Adjust model settings to print faster with your ender 3 (pro/v2)
What upgrades will make the ender 3 (v1/pro/v2) print faster?
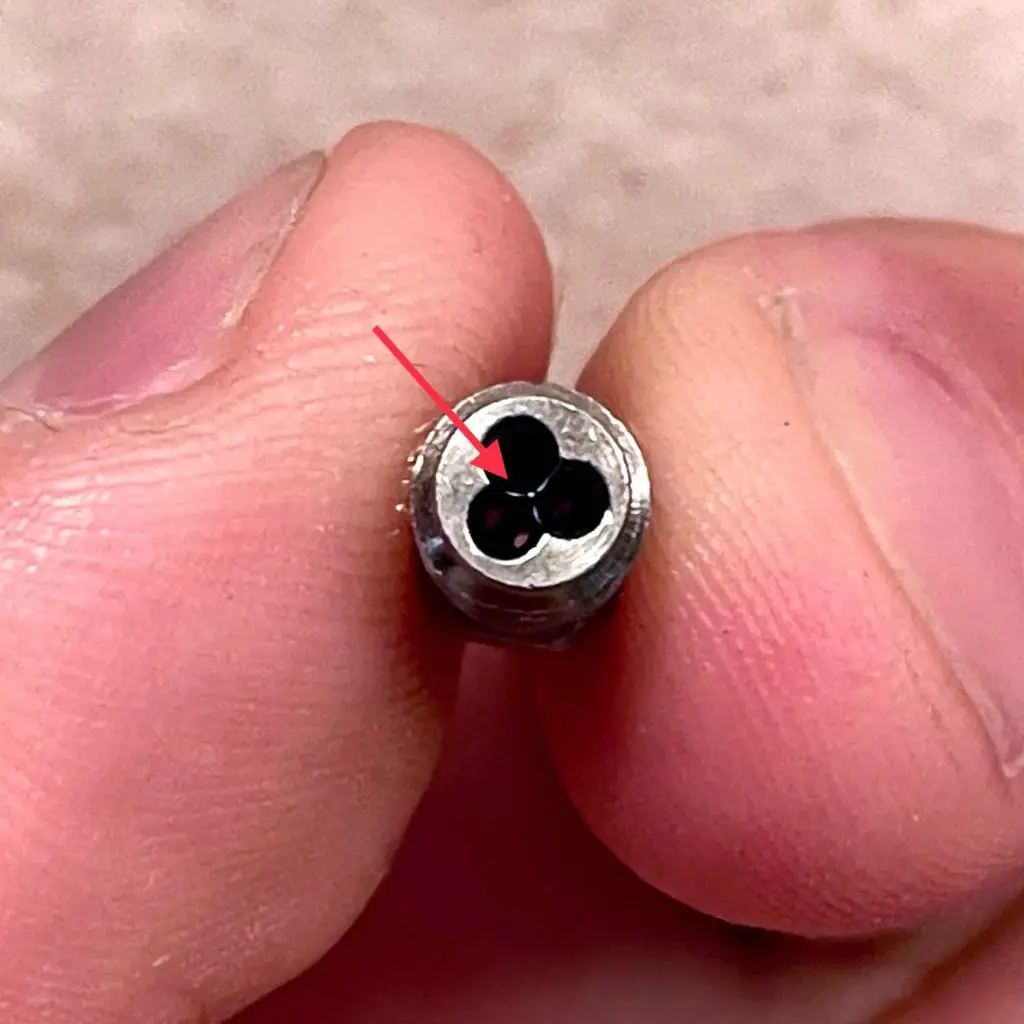
Bondtech cht nozzle – $20 and 2 minutes for 30% faster ender 3 print speed.
The cheapest and fastest way to improve print speed is to get yourself a CHT nozzle . They split filament into three parts – allowing faster heating of the filament and increasing flow rate by 30%.
For $20 – it’s the fastest and cheapest way to boost print speed. They’re also offered in MK8 (Stock Creality) and RepRap (aka M6)… though the MK8s are harder to find and the stock Creality hotend is a great thing to swap out.
All metal extruder to juice your ender 3 print speed
Next up, ditch your plastic extruder with the stock Creality gears. You have a lot of options, but I went with the Micro Swiss Bowden Dual Gear Extruder .
How fast can the Ender 5 print?
A well-calibrated Ender 5 can print at linear speeds of 80-120mm/s. This is because the Ender 5 is nearly a CoreXY setup, where the bed only moves up & down (the Z axis) and the print head moves in the XY plane.
This allows for faster print speeds as the actual printed item stays still.
It also means that you’re not slinging the bed around, which for an Ender 3 weighs nearly 1 kilogram (the glass alone is ~500g). Not an issue at low speed but a major issue when printing fast.
Due to the CoreXY-ish setup, the printing pace of the Ender 5 is faster than the Ender 3 series counterparts.
Depending on the material you can usually print good quality prints at around 80mm/s and craft high-quality models without compromising the overall quality of your prints.
There are no universal speeds for 3D printers and the general rule is “slow” (~40mm/s).
They are dependent on the filaments and personal quarks of the specific printer when it comes to build times.
To optimize the pace of your printer, keep the machine well-tuned and experiment with it to find the optimal settings for your 3D printer.
Also, if you want to increase your print speed be sure to:
- Measure and set the actual average diameter of your filament,
- calibrate your e-steps ,
- calculate your max volumetric flow rate (see above),
And it wouldn’t hurt to print a better part-cooling system .
Good luck and be sure to check out our build where we’re aiming to print at over 1000 mm/s for less than $600 including the cost of the printer (or, at least print a benchy in under 10 minutes for that price).
What is the best speed for 3D printing?
The best speed for 3D printing will depend on your printer type (bedslinger, fixed bed, core-xy, delta), hotend, flowrate, printer stiffness, filament type, etc. But, in general, the best speed for 3d printing—balancing quality and speed—on a stock printer is between 40mm/s–60mm/s
Should I 3D print at 100% speed?
Yes. In general you should be setting your print speed in your slicer, not on your printer. Plan to use the printer-based speeds when you hear clicking/skipping mid-print and don’t want to re-slice the model.
What’s the Ideal print speed for the Ender 3 (pro/v2)?
I’ve found that with PLA and PETG, the ideal print speed for the Ender 3 Pro and V2 is roughly 50mm/s. This balances both speed and quality, generally avoiding ghosting.
Assuming you haven’t upgraded your hotend, of course.
What is the fastest Ender 3 Pro can print?
The fastest Ender 3 Pro can print is 250mm/s on a stock Ender 3 Pro. At that speed your print speed will be limited by volumetric flow rate, quality, and the boards’ ability to take commands that fast.
What is the fastest the Ender 3 Printer can realistically print?
The fastest a stock Ender 3 Pro can realistically print is 100mm/s if printing at 0.45mm widths and a 0.2mm height—limited by its ~9mm/s^3 volumetric flow rate.
What’s the best ender 3 travel speed?
150mm/s. Even my most modified Ender 3 printer’s travel speed is only 200mm/s. Travel speed rarely slows down prints by much and isn’t worth over-stressing your printer to shave a few seconds off your print time.

Garrett Dunham
3 thoughts on “Ender 3 Print Speed: Recommended settings and max possible”
You’re estimates seem very low. I routinely print PLA with my Ender 3 Pro (properly calibrated esteps, linear advance, etc) at 150 mm/s and achieve exceptional results.
Thanks for the heads up, Greg. I’m the new owner of Makershop and am working on cleaning and updating content. Got a reference for us to link to on calibrating so we can hit 150 mm/s?
Thanks mate!
Went back and re-wrote the article. My Ender 3 V2 is pushing ~12.8 mm^3/s. At a 0.45mm extrusion width and 0.2mm height, that gives me a max linear speed of 142mm/s. To get past 150, I’d have to reduce the layer height (0.16mm H = 177mm max speed) or nozzle width.
Comments are closed.

Turning ideas into empires.
Makershop participates in the Amazon Associates Affiliate Program. We may earn a small commission on anything you purchase through a link on this site at no extra cost to you.
Thank you for your continued support!
© MakerShop
The 3D Printing Search Engine!
3D Print Speed vs Quality; Best Settings!
We all want to get the best out of our 3D printed models, both in terms of quality and speed. The problem is most of the time quality and speed don’t go hand in hand and finding the sweet spot between quality and speed will take some trial and error for every printer and filament type.
In this article, I will talk about how much impact print speed has on print quality, the most common problems, and how to find the best settings.
Does Printing Speed affect the Print’s Quality?
Why does it affect printing quality, printing speed, retraction speed, travel speed, print speed and print duration, weak layer adhesion, layer shifting, weak infill, under-extrusion, use a larger nozzle, print with a thicker layer height, lower the infill percentage and the number of shells, does filament type affect the print speed, how fast can a 3d printer print, ender 3 (pro and v2) speed settings, check out our recommended products section.

More often than not the print speed has a significant impact on print quality. As a rule of thumb, slow print speeds produce better quality prints. Achieving fast printing times without losing printing quality is possible, but that will depend on your 3D printer’s type and the quality of the materials used.
The degree to which printing speed affects your print’s quality will be tied to the machine’s ability to handle that given speed. Most consumer-grade 3D printers are not made with fast printing times in mind. These machines are usually made with cheap materials to make them affordable to everyone. As you increase printing speed these design and material deficiencies are more noticeable.
Fast movements from the extruder generate a significant amount of vibrations and the results are poor quality prints. Bowden setups have less weight on the extruder thus are more stable and mitigate this issue. A good quality 3D printer with a Bowden setup can achieve fast printing speeds without losing quality.
Besides the 3D printer’s quality, we need to consider the filaments used to print. Even if the 3D printer can handle a given printing speed, the filament can only melt so fast thus limiting the extrusion flow rates. Different types of filament printed at the same speed yield disparate results as they possess different physical and chemical properties.
Best Speed Settings for 3D Printing
In 3D printing, the best settings vary for every maker as optimal settings depend on many factors such as the 3D printer model, filament, and environmental conditions.
Printing speed controls how fast the nozzle moves across the build plate while printing. Usually, slow printing speeds produce better quality results as high speeds can lead to ringing and under-extrusion issues. To find out the best print speed settings for your machine download this Speed Test Tower .
In the link, you will find all the instructions on how to set up the Speed Test Tower print. Basically, this test increases print speed as the tower moves up so you can see the difference in print quality at a certain speed and figure out the best setting for your 3D printer.
Retraction speed determines how fast the printer retracts the filament through the nozzle while changing the printing position. This is done to avoid filament leaks. If the retraction speed is set too low, you will see stringing and blobs on your models. On the other hand, if the retraction speed is set too high the drive gears that feed the filament might damage the filament and mess with the feed flow.
To find out the proper retraction speed settings for your printer download this Retraction Test . Print a few tests, starting with a retraction speed of 25mm/s, and increase it by 5mm/s as long as you see good results. The speed that yields the cleanest result should be your optimal retraction speed.
Travel speed is the speed at which the nozzle moves while it is not extruding the filament. If the travel speed is set too high the printhead movements can generate some serious vibrations which lead to ringing or even layer shifting issues.
To get the optimal travel speed settings for your printer download this Test (the same model used to test retraction speed). For the first print, use 100mm/s travel speed and if the surface looks good you can repeat the print increasing travel speed by 5mm/s. You can repeat the process until you see defects on the surface.
High printing speeds can drastically decrease the print duration. Using Cura’s Draft profile, I sliced a Benchy using different printing speeds to see how much the printing duration decreases. These are the results:
As you can see, the first speed increments are the ones that have a higher impact on reducing print duration. This happens because depending on the overall shape and size of the printed object the extruder might not be able to reach these higher speeds.
Problems that arise when printing too fast
Even if the 3D printer can handle a high print speed the filament still needs time to properly bond. As the filament is laid down, it needs to stick to the print bed and fuse with the other layers to maintain the desired shape. If the printer is going too fast, the filament does not have the time to create a strong bond resulting in weak layer adhesion.
When printing at a high speed there is a chance the X, Y, Z axis motors fail due to the excess stress and misplace a layer. This happens because the motors are being forced to move at a higher speed than they can handle. Layer shifting can happen gradually or as one big displacement.
If we are printing too fast the extruder might not be able to keep up and end up extruding less filament than the software thinks it is extruding. This under-extrusion usually produces a weak infill and thus weakens the overall 3D-printed object structure as it can easily break. We can identify this issue if we see the layers are too thin and the infill is stringy.
When the printer is moving too fast and needs to make a sudden change in direction, like in a sharp corner, the inertia of the extruder can cause a considerable amount of vibrations which cause the ringing. Ringing is a visible defect of an unwanted pattern of lines on the surface of the 3D-printed object.
High printing speed can decrease bridging quality. Whenever a print needs to connect two columns with a suspended filament extrusion (bridging), the filament needs time to stick to the previous layer. If the extruder is moving too fast the filament will not be able to adhere in time to bridge a gap.
Other ways of achieving faster Print Times
With a large diameter nozzle, you sacrifice detail quality in exchange for decreasing print duration as a larger nozzle allows more filament to be extruded at once.
The thicker the layer height of your 3D printed object is the fewer layers need to be printed to finish your print. The downside to thicker layer heights is the loss of resolution in your model.
Lowering infill percentage and the number of shells reduces the overall strength of a 3D printed object. As we decrease these settings the amount of extruded material is reduced thus we get faster print times.
The type of filament used for printing plays an important role in print speed. The physical and chemical properties vary for every kind of filament and thus the recommended print speeds for each one of them.
These are good printing speeds for some of the most commonly used filaments:
Keep in mind that you should always check your filament spool for the best speed settings as these settings may change depending on the manufacturer.
As I said previously, the maximum speed that a 3D printer can achieve depends on the quality of its components. For most common consumer-grade FDM printers the average print speed is around 40mm/s to 80mm/s while some better ones are able to achieve 100mm/s to 150mm/s.
I would like to make a special mention of the VORON project. This is a non-commercial project which handles users the opportunity to build their own printer. The plans are free open-source and these wonderfully engineered machines can achieve impressive print speeds. The build documentation is great and you can download the assembly manual from their website .
Since the Ender 3 is such a popular printer I decided to run a couple speed tests as well as some benchys and calibration cubes at different speeds on it to find out how fast I could print reliably without compromising on quality too much.
Here’s how to the prints turned out (my phone’s camera isn’t the best at detecting ringing and ghosting, so you may have to take my word as far as which one turned out better):
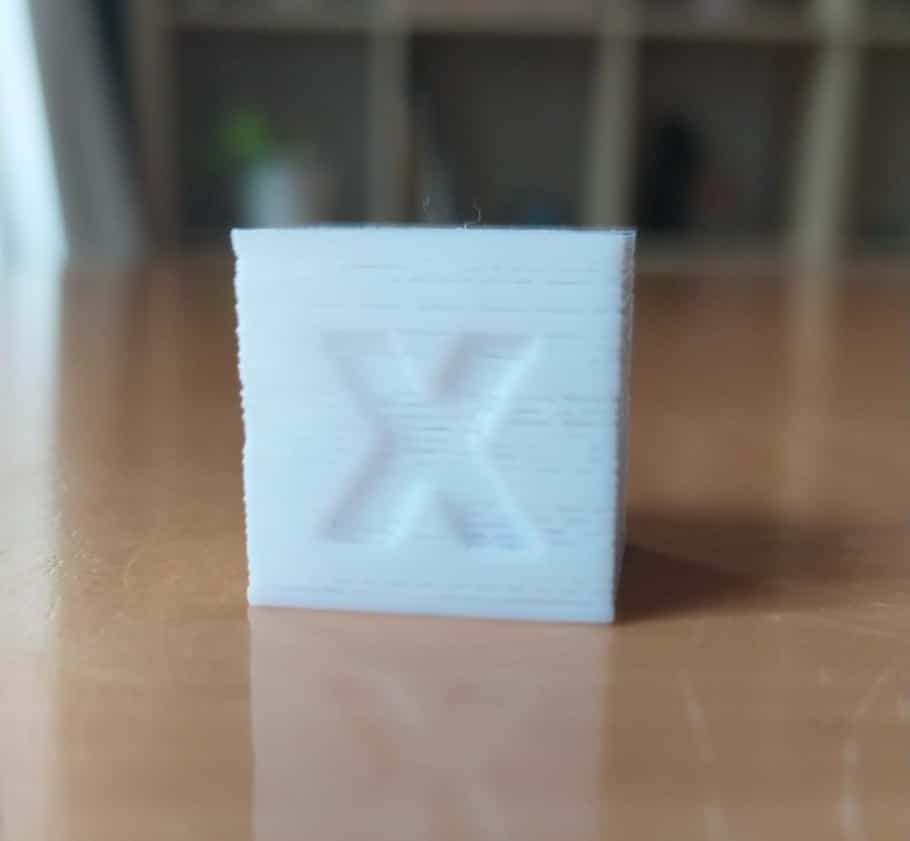
Speed test:
While it may not be as obvious in the image, at 200mm/s there was absolutely no ghosting going on and 40mm/s was very similar. However, from 60mm/s onwards you can clearly see more ghosting.
When looking at the same print from the sides, the height where it was printed at 20mm/s and 40mm/s is a bit smoother than all the other parts as well.
Benchy test:
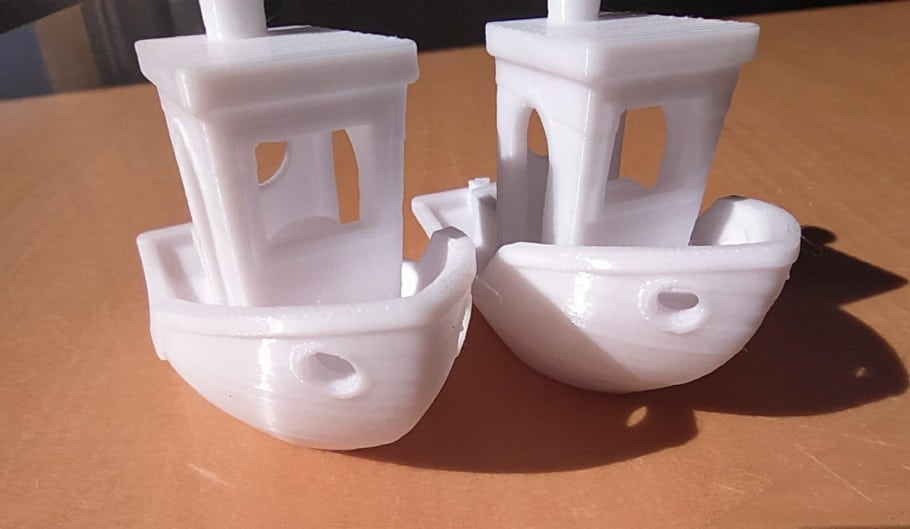
While it may not be very apparent on this image, the Benchy printed at 90mm/s had a bit more ghosting present and some small bulging layer lines, but the difference wasn’t as noticeable as I expected.

We created a recommended products section that will allow you to remove the guesswork and reduce the time spent researching what printer, filament, or upgrades to get, since we know that this can be a very daunting task and which generally leads to a lot of confusion.
We have selected just a handful of 3D printers that we consider to be good for beginners as well as intermediates, and even experts, making the decision easier, and the filaments, as well as the upgrades listed, were all tested by us and carefully selected, so you know that whichever one you choose will work as intended.
About The Author

Facundo Arceo
Leave a comment cancel reply.
Your email address will not be published. Required fields are marked *
Save my name, email, and website in this browser for the next time I comment.

The 3D Printer Bee
PLA Printing Speed: How to Find the Optimal Settings
- Recent Posts

- Z Seam | How to Hide & Avoid | Cura & PrusaSlicer - April 20, 2024
- Qidi Tech Q1 Pro – Best Orca Slicer Settings & Profile - April 9, 2024
- Creality Ender-3 V3 Review – Will CoreXZ be the New Trend? - March 27, 2024
Disclosure: Links marked with * are Affiliate Links. I earn from qualifying purchases if you decide to make a purchase through these links – at no additional cost for you!
Choosing the right speed for your 3D printing can be quite a challenge, especially if you’re not that familiar with 3D printing. However, if you spend more time on it, you’ll find a setting that works best for PLA in most cases.
Unfortunately, the print results can vary greatly depending on the selected printing speed. If you print too slowly, it can take a long time to complete a print. If the printing speed is set too high, faulty prints will result. Besides, you don’t want to leave your printing results to chance.
To find the best printing speed for PLA, use a printing speed calculator and then optimize it with test prints . Typical speeds for PLA are between 30 and 90 mm/s.
Below is an introduction to the general speed settings for 3D printers and how to find the perfect balance between printing speed and the resulting print quality.
Table of Contents:
- 1.1 Printing Speed
- 1.2 Travel Speed
- 1.3 Retraction Speed
- 2 Outer Wall, Infill and Individual Layers
- 3 Printing Speed Calculator
- 4.1 Why PLA?
- 4.2 What are the best uses for PLA?
- 4.3 Why print 3D models with PLA?
- 4.4 What is the difference between ABS and PLA?
- 4.5 Is PLA filament food safe?
- 4.6 What is the melting point of PLA?
- 4.7 What temperature is used to print PLA?
- 4.8 How should PLA be stored?
- 5 Conclusion
Determine Optimum PLA Printing Speed
3D printing is often referred to as “rapid prototyping”. However, this is incorrect, as typical 3D printing can take several hours, unlike the process of rapid prototyping.
It is an advantage that the printing speed can be adjusted to shorten the production time of 3D printing accordingly. However, incorrectly selected settings can also lead to faulty or unusable print results.
Printing speed is the most important aspect that determines the quality of your 3D print. It determines how fast the extruder motors and the X and Y axis motors move in your 3D printer.
If you choose a too low printing speed, this can lead to a deformation of the print, because the nozzle stays too long on the plastic. If the printing speed is set too high, overheating can occur due to insufficient cooling.
Other possible consequences are liquefaction of the material or insufficient adhesion of the individual layers.
The optimal printing speed should therefore be selected as fast as possible, but without compromising the print quality.

Printing Speed
The printing speed is basically divided into four individual settings:
- Outer wall speed: This setting determines how fast the outer wall of the 3D model should be printed. To improve the surface quality, it is usually reduced slightly.
- Inner wall speed: The speed of the inner wall determines how fast the inner wall of the 3D model is printed. The speed of the inner wall determines how fast the inner volumes of the 3D model are printed. You should orientate yourself on the total printing speed in order to reduce the printing time and at the same time maintain the desired printing strength.
- Infill Speed: This setting determines how fast the infill of the 3D model is printed. Usually, this is also the same as the total printing speed, in order to achieve the shortest possible printing time at optimal print strength.
- Top and Bottom Speed: This setting determines how fast the top and bottom sides of the 3D model should be printed. Usually, the top and bottom speeds are reduced slightly to improve the quality of the surface.
Travel Speed
The travel speed defines how fast the print head of the 3D printer moves when no plastic is extruded.
By increasing the travel speed, considerable time savings can be achieved during printing. However, too much increase can result in warped 3D printing or even completely misaligned planes of the model.

In order to determine the optimum speed for your printer, you should make use of several test prints.
You start with 100 millimeters per second and work your way forward in small steps of five millimeters per second. Once the surface quality is acceptable, you gradually increase the speed and decrease it again as soon as you notice a deterioration in quality. Pay particular attention to defects such as misaligned layers.
Retraction Speed
The retraction speed determines how fast the printer retracts the filament before the print head moves.
This setting influences a reduction of the character string, which can optimize the overall print quality. If the retraction speed is set too low, unsightly threads or drops may remain in the filament of your 3D print. If the retraction speed is set too high, this can cause drag marks on the filament.
Related Post: PLA Stringing Guide: 12 Solutions to Avoid PLA Strings
To determine the optimal retraction speed for your printer, you again perform test prints at different speed settings.
To do this, you start with 25 millimeters per second and gradually increase the speed by five millimeters per second. Watch out for any hairs that may appear, which can extend across the 3D print. With an optimally adjusted retraction speed, such errors will not occur, but without negatively affecting the filament flow.
On Thingiverse you will find numerous test objects to test the retraction setting.
Outer Wall, Infill and Individual Layers
Not only the printing speed is crucial for the quality of your 3D print with PLA. It is also significantly influenced by how much plastic is extruded for the design of the outer wall, the filling and the individual layers.
- The outer wall: The outer wall setting specifies how much plastic is extruded to form the outlines of the 3D model. Increasing the number of layers in the outer wall not only increases the thickness of the model but also the time it will take to complete the 3D print.
- The height of the individual layers: The selected layer height greatly influences how quickly the 3D print is completed. The greater the layer height, the thicker each layer of the 3D model and the shorter the printing time. The layer height should always be adjusted to the required print resolution.
- The infill: The infill describes the inner structure of the 3D model. The infill pattern has only a small effect on the printing speed, while the infill density has a decisive influence on the printing times. If a higher infill density is selected, this will increase the strength of the 3D model, but will also result in longer printing time.
Related Post: 3D Printing Infill Guide 👉 Basics, Patterns and Stability
Printing Speed Calculator
On the internet, you can find special calculators with which you can calculate the printing speed ( link ).
To do this, enter the nozzle size, the layer height, the minimum and maximum line width and the material you are using (probably PLA). Afterward, you will receive an indication of the maximum printing speed. The goal of this calculator is to find the most accurate slicer configuration for your 3D printer.
The result of this calculation is a more or less rough start on the way to the optimal speed. To optimize the settings we still recommend test prints!
The data on which the printing speed calculator is based was obtained from several experimental tests in various configurations from:
- Nozzle size
- Temperature
The results have again been divided into diagrams, which are used in this calculator. Once you have entered the desired layer parameters, the maximum printing speed is calculated.
If necessary you can also choose a lower value. The suggested flow rate is then adjusted based on the slower speed.
This setting of the flow rate is decisive for dimensional accuracy. The pressure is reduced when the speed is further away from the maximum so that only a slightly lower flow rate is required. However, maintaining the same flow rate for different speeds can result in small dimensions.
Especially when printing with large nozzles, the result can be irritating as the speed may appear too slow. If you use a 1.0-millimeter nozzle with a layer height of 0.5 millimeters and a line width of 1.5 millimeters, the recommended speed is less than 35 millimeters per second. Users usually expect a much higher value at this point.
The speed calculator is still in the development phase and many additional choices and more accurate values are expected.
Related Questions
PLA consists of polylactic acid and is therefore a thermoplastic polymer. Since PLA comes from natural sources such as corn or sugar cane, it is also called a bioplastic.
Many other thermoplastic polymers are distilled from non-renewable resources such as crude oil. PLA is biodegradable in the long term because it is a natural product . This also means that PLA usually decomposes into its components within a few years if it is disposed of on a compost heap, for example. Other thermoplastic materials, on the other hand, would take many thousands of years to decompose completely.
What are the best uses for PLA?
PLA is very versatile and therefore ideal for 3D printing. For a successful application in the creation of a high-quality 3D model, an equally high-quality PLA is necessary. If it has the required quality, PLA is a good alternative to stronger filaments such as ABS* or PTEG* until more complex 3D printing is required.
Once the PLA no longer provides the flexibility needed to create advanced 3D printing, more flexible materials like TPU* can be used.
Why print 3D models with PLA?
The advantages of PLA 3D printer filaments include ease of use since they flow well and rarely warp and robustness. It is not susceptible to threads in the filament or to droplets/blobs appearing on the surface.

Related Post: 3D-Printer-Guide 👉 How You Can Avoid Blobs & Zits!
Post-processing of the finished print is also uncomplicated. It can be sanded, drilled or cut without problems. PLA can be easily pigmented so that usually a better and more vivid color selection is available.
Another important argument for using PLA is its sustainability. It is non-toxic and consists entirely of natural ingredients. Last but not least, 3D printing benefits from the fact that the PLA printing temperature is lower than most other filaments.
What is the difference between ABS and PLA?
PLA is an all-rounder and is perfectly suited for most prints due to its good quality. However, ABS filaments also have their advantages. ABS is stronger and more durable than PLA, but also less dense. However, this makes ABS a great upgrade material for some end-use parts that should PLA not be sufficient for certain reasons.
In principle, liquefied plastics emit vapors during the printing process, which is also the reason why a 3D printer should always be placed in well-ventilated rooms. However, ABS emits a stronger odor during printing, while PLA has a much softer and slightly sweetish smell.
ABS can be smoothed with acetone, which can be used to smooth the layer lines left by the 3D print. This can additionally increase the strength of the print. Unlike PLA, ABS is not biodegradable but can be recycled.
Is PLA filament food safe?
PLA filament, which is intended for 3D printing, is not food safe. However, PLA is also used to produce many common items, such as food containers, disposable tableware or garbage bags.
However, since 3D printing can create many tiny gaps and cavities, PLA is not used in this context for the production of food-safe containers, as moisture and food residues can accumulate, which could lead to mold within a short time.
Although PLA is biodegradable, it is still a strong and durable material and harder than other thermoplastic materials. However, its low tensile strength tends to make PLA brittle quickly.
What is the melting point of PLA?
PLA has a relatively low melting temperature of about 170 degrees Celsius, which makes it a worse choice for objects that come into contact with high temperatures during their use.
However, for objects that should only be used at room temperature in a normal environment, PLA for 3D prints is a good choice.
What temperature is used to print PLA?
In general, the printing temperature for PLA filaments ranges from around 185 degrees Celsius to 205 degrees Celsius. This also depends on the thickness of the filament.
If a 1.75-millimeter filament is used, the temperature tends to be in the lower range, while a 2.85-millimeter filament should be closer to the upper-temperature range to compensate for the increased material thickness.

Related article: 🌡 Best Temperatures for Extruder and Printing Bed for PLA
How should PLA be stored?
PLA is hygroscopic like many other thermoplastics. This means that it naturally absorbs water from the ambient air over time. If a 3D print is produced with PLA, which has previously absorbed water, it is more difficult to bind the layers together.
If this has happened nevertheless, the layers tend to be distorted. If the PLA filament is brittle or tears, this also indicates that it has absorbed moisture.
To avoid this, proper storage of the PLA filament is important. Ideally, it should be stored in metallic, sealable bags, which are additionally provided with a desiccant.
Related article: Filament Drying: PLA, ABS, Nylon and Co.
Selecting the right parameters for speed and extrusion is not entirely straightforward. There are many estimations that can help you with this task. Unfortunately, these can also not always be an ideal solution and thus guarantee a perfect 3D print.
Printing Speed Calculators are designed to help users determine the optimal printing speed as well as the optimal flow. But this calculation is just the beginning – fine-tuning is done with test prints!
Disclosure: This website is the property of Martin Lütkemeyer and is operated by Martin Lütkemeyer. Martin Lütkemeyer is a member of the Amazon Services LLC and other Affiliate Programs. These are affiliate advertising programs designed to enable websites to earn advertising revenue through advertising and linking to Amazon.com and others. Links marked with * are affiliate links.

UltiMaker Cura - Speed settings
Nov 22, 2023 • knowledge, information, article details.
This article describes the various speed settings in UltiMaker Cura. These settings are available when opening the Custom mode.
The settings in the Speed category control the movements of the motion system, including speed, acceleration, and jerk.
Print speed
The print speed defines the speed (in mm/s) at which the print head moves while printing. Based on this setting, Ultimaker Cura calculates the extrusion flow. The print speed can be visualized per feature in the Layer view → Speed .
A higher print speed will lead to a shorter print time. Keep in mind that increasing the print speed means that you may have to increase the temperature as well to ensure the filament is properly melted.
Although you can choose one overall print speed for the complete print, it is also possible to use different print speeds for specific parts of the print:
- Infill Speed: The speed at which the infill material is printed. If the visual quality of the infill is not important, you could use a higher speed for the infill. However, keep in mind that this may affect the strength of your print.
- Outer Wall Speed: The speed at which the outer walls are printed. Printing the outer wall slower usually results in a better surface finish.
- Inner Wall Speed: The speed at which the inner walls are printed.
- Top Surface Outer Wall Speed: If the object has one or more top surface layers (this can be set in the Top/Bottom section), the outer wall speed for this layer can be adjusted separately.
- Top Surface Inner Wall Speed: If the object has one or more top surface layers (this can be set in the Top/Bottom section), the inner wall speed for this layer can be adjusted separately.
- Top Surface Skin Speed: The speed of the top surface skin layers. You can set the number of top surface layers in the Top/Bottom category.
- Top/Bottom Speed: The speed at which the top and bottom layers are printed. A lower speed increases the reliability of closure on the top layers, especially for large-area prints. Additionally, slower bottom layers will increase the surface quality for overhangs.
- Support Infill Speed: The speed at which support structures are printed. The quality of the support is not usually important, so a higher value can often be used here.
- Support Interface Speed: The speed at which support roofs and floors are printed. Since these need to adhere to the model properly, they should be printed at a slower speed. The settings for roofs and floors can be adjusted separately.
Example: This image shows the visualization of the different print speeds per model feature. You can see that the outer walls are printed slower than the top layers, and the infill is even faster.
Travel Speed
This is the speed at which the print head moves when it is not extruding. A higher travel speed decreases the chance of filament oozing from the nozzle, resulting in a cleaner object. However, higher speed could also cause the nozzle to hit a previously printed part, which may damage the print due to the heated nozzle. This can be prevented by using Z-hop when retracting. Additionally, very high travel speeds may cause accuracy issues.
The travel speed for the initial layer differs from the rest of the print to ensure proper adhesion with the build plate.
Initial Layer Speed
This setting controls the speed for the initial layer, the very first layer that is put onto the build plate. By default, the speed for the initial layer is lower than for the rest of the print. This ensures that the object adheres well to the build plate. There are two sub-settings controlled by the initial layer speed, but these can be adjusted separately:
- Initial Layer Print Speed: This is the speed at which the bottom layer is printed. By default, this is slower than the regular Print Speed settings.
- Initial Layer Travel Speed: This is the speed at which the print head moves when not extruding on the very first layer. Using a lower travel speed can reduce vibrations on the build plate. If your project contains many small parts on the first layer, using a lower travel speed will reduce the risk of these parts getting pulled away from the build plate by the print head.
Skirt/Brim Speed
It is possible to adjust the speed at which the skirt or brim is printed. This setting is the same as the Initial Layer Print Speed by default, but it can also be adjusted separately. Printing the skirt or brim slower ensures that they stick better to the build plate.
Z Hop speed
This setting changes the speed for all build plate moves during the print. This includes all layer changes and Z Hops. Faster Z-hops can reduce the chance of blobs or stringing on the model (when Z Hops are enabled). However, the horizontal movements are usually limited by the maximum acceleration rates of the Z axis.
Number of Slower Layers
This setting defines the number of layers it takes to reach the print speed from the bottom layer of the print. The speed will incline linearly over the number of layers specified, based on the Initial Layer Speed and Print Speed . A higher value decreases the chance of warping, but can also increase the print time significantly.
If the number of slower layers is 1, then only the very first layer will be printed slowly (according to the Initial Print Speed setting). The rest of the print will use the regular Print Speed settings. This can mean a sharp transition, especially if the difference between the two speed settings is big. Gradually increasing the speed over several layers can have a positive effect on print accuracy and ensures a smoother flow rate transition. However, using more slower slayers will increase the total printing time.
Example: In the picture below, the number of slower layers is set to four. During the first four layers, the speed will increase. From layer 5 onwards, the regular print speed settings will be used.
Flow equalization ratio
Printed lines with variable line widths are printed at different speeds to ensure the flow within the nozzle changes as little as possible. The Flow Equalization Ratio determines the correction to this flow and can be adjusted to compensate the flow further when needed.
This setting is a ratio. When set to 0%, the flow rate will be adjusted, while at 100%, the print speed is adjusted. Values between 0% and 100% combine the two. If this ratio exceeds 100%, the flow rate is reduced to produce thicker lines but the speed is reduced more to compensate. Higher values have the following effects:
- Higher likelihood of more accurate line widths.
- More equal flow rates, increasing reliability.
- Some chance of ringing due to faster movements in some places.
Example: This 3D model has been sliced with the default value of 110% Flow Equalization Ratio . As seen here, the line widths vary while the flow remains the same throughout the printed part.
Enable Acceleration Control
Acceleration is a very important part of printing. Just like a car, the print head needs to accelerate to get to the speeds as explained above. The acceleration reduces the speeds set in the firmware, making the print a little slower, but more accurate. Disable the setting to get the maximum acceleration.
When enabled, the acceleration settings for each part of the print can be adjusted separately. The biggest impact is on the outer parts of the printed model. Reduce the acceleration for the walls to reduce ringing (especially the outer walls) and for the top and bottom layers to increase watertightness.
Enable Jerk Control
Jerk defines the speed at which the print head can go through corners. When the print head changes direction, it would theoretically have to come to a full stop, which is not desirable for the print quality. Instead, Marlin allows for an instantaneous change in the velocity vector in each corner. Jerk is the magnitude of this change. Disable the setting to use the default jerk settings in the firmware.
Note: As this is a Marlin-based feature, the jerk settings will be ignored by every printer using a different firmware type.
Adjusting the jerk settings to higher values can have the following effects:
- Reduced print time because the print head slows down less.
- Less chance of blobs forming on the corners due to slow speeds.
- Increased vibrations can cause ringing on the print's outer surface.
- Extremely high values can cause the print head to miss steps and lead to layer shifts.
This is a theoretical image that shows the difference between speed, acceleration, and jerk.
Tip: Continue learning about all UltiMaker Cura custom settings. The next section is Travel .
Getting in touch with us has never been easier.
Cura Speed – Everything You Need to Know!
Printing speed in Cura plays a massive part in getting excellent print results. At first, you’ll only see “Cura Speed” and “Skirt/Brim Speed” in the main drop-down menu, but if you open up the settings, you can access many Cura speed settings.
Cura print speed is the speed at which the print head moves while printing. Cura speeds are represented in mm/s. You can adjust the print speed of specific parts of your model for increased accuracy or to decrease the print time.
Fine details are printed well at low speeds while basic models can be printed faster. By using the right print speed for the specific model you’re printing, you can improve your print quality and increase its strength.
Here’s everything you need to know about Cura speed and how each setting affects your print.

Cura Speed Settings
To make all of the speed settings visible, go to the settings tab and click on “configure setting visibility”. Type the word “speed” in the search bar and check all the boxes for the speed settings below. Print speed and Skirt/Brim speed are enabled by default and won’t need to be checked off.
- Print Speed
Adjusting the print speed changes the first six advanced speed settings on the list below. For example, the “Wall Speed” is automatically changed to half the value of the “Print Speed”. So if your print speed is 50mm/s, your Wall Speed will automatically be set to 25mm/s. However, you can change any value after you’ve set the main Print Speed.
The default speed values are unique to your printer.
Print Speed Affects:
Infill Speed
Top/bottom speed, travel speed.
- Raft Print Speed

The speed at which the infill is printed . By default, the infill speed is set to the same as the print speed but you can make it faster in most cases. You can make it faster because the infill isn’t visible in the end and doesn’t require flawless precision.
I like to keep the infill speed the same as the default print speed but if you want it to print faster, you can usually increase the infill speed by at least 20% to save a few hours depending on the model.
The fastest infill pattern is the lines pattern, but it’s also the weakest. The honeycomb pattern is the best in terms of material required and strength.
Infill Speed is affected by:
The speed at which the walls are printed. By default, the wall speed is set to half the print speed. If your print speed is 50mm/s, the wall speed will be set at 25mm/s. Changing the wall speed will change the outer and inner wall print speeds but you can adjust the different wall speeds independently.
Wall Speed Affects:
Outer Wall Speed
Inner wall speed.
Wall Speed is affected by:
The speed at which the outer wall is printed. The outer walls should be printed at a lower speed to minimize errors because the outer walls are what you see in the completed part.
- Support Speed
- Bridge Wall Speed
Print Speed is affected by:
The speed at which inner walls are printed. Inner walls can be printed slightly faster than outer walls because you won’t see them in the final print.
Inner Wall Speed is affected by:
The speed at which the top and bottom layers will print. Similar to the outer walls, the top and bottom speeds are half the print speed by default.
Top/Bottom Speed Affects:
- Ironing Speed
- Top Surface Skin Speed
- Support Interface Speed
- Prime Tower Speed
- Bridge Skin Speed
Travel speed refers to the speed at which the extruder head moves when it’s not printing. This will usually be much faster than the print speed, around three times faster. It can be this fast because it doesn’t lay any plastic down while traveling. Don’t set it too high though or your printer may become unstable. Two to three times your print speed should be perfect.
Travel Speed is affected by:
- Initial Layer Speed
The speed at which the printer head prints and travels during the initial layer.
Initial Layer Print Speed
Initial layer travel speed, skirt/brim speed.
The speed at which the initial layer is printed. This is usually around 40% of the print speed by default to assist with bed adhesion and to decrease other structural issues like warping.
Initial Layer Print Speed is affected by:
- Initial layer speed

The speed at which the printer head moves while it isn’t printing . This is usually at least 100mm/s but can be faster if your printer is stable enough.

The speed at which the Skirt/Brim is printed. Normally this would be the same as the initial layer speed if you don’t change it. Both of which are printed at lower speeds for better bed adhesion.
Skirt/Brim Speed is affected by:

How Do I Change The Speed In Cura?
To change the speed in Cura:
- Click on the main drop-down menu on the top right to open the print settings.
- Expand the “Speed” section of the menu.
- Input the Print Speed you’d like to print at.
By adjusting the “Print Speed”, most of the other speed settings will be adjusted automatically. If you want to adjust the other speed settings independently, open the settings visibility in the settings tab at the top and check off all the speed settings you’d like to adjust. Speed settings you check off will be available in your main drop-down menu.
How Can I Speed Up My Cura Print?
To speed up your Cura print in the settings, expand the “Speed” section of the main drop-down menu. Increase the “Print Speed” in small increments, like 50mm/s to 55mm/s and evaluate the results each time to make sure there are no major defects.
You can also decrease the “Infill Density” to speed up the print. Of course, the lower the infill density, the weaker the print will be.
What Is A Good Print Speed For PLA?
50mm/s is a good print speed for PLA in most instances. It’s fast enough to print without oozing while being slow enough to print with detail. Most 3D printers can print PLA at speeds of 20 to 100mm/s while producing excellent results.

Which Infill Pattern Is The Fastest?
The “lines” infill pattern is the fastest to print. Lines take little material and the printer head doesn’t need to change direction as much as other patterns require. Using lines for the infill will cause the model to have a weak structure so it’s best only to use for prints that don’t require much strength.
Can You 3D Print Too Slow?
You can print too slow, which causes deformations in your print. Printing too slowly causes the nozzle to come into contact with the plastic it laid and causes defects. Slow printing can also cause stringing.
Related Articles
- Create a Temperature Tower Using Cura – The Easy Way
- Cura Profiles
- Cura VS Simplify3D – Which is Right for You?
- Cura Brim Build Plate Adhesion – Everything You Need to Know!
- Cura Hacks – My Picks!
In most cases, you can leave your Cura print speed on the default value. Cura has default speed values for the printer you chose during the setup. You can increase the speed with certain prints but the physical stability of your printer will limit you. If the print speed is too high, the printer will shake and ruin the print.
If you increase the speed by a large percent, you may need to increase the nozzle temperature to help the plastic flow fast enough.
Decreasing the infill value and increasing the infill speed are ways to print faster without sacrificing visible detail on the end product. You can also use the lines infill pattern to make it faster if the part doesn’t need to be very strong.
Make sure you check out our YouTube channel, and if you would like any additional details or have any questions, please leave a comment below or join us on Discord . If you liked this article and want to read others click here .
I'm Rob, the founder of 3dprintscape.com. I’m a Marine Corps vet with a master’s degree in Information Systems and have been working in the technology field for over a decade. I started working with 3D printers because I was fascinated by the technology and wanted a hobby that my kids and I can enjoy together.
Leave a Reply Cancel reply
You must be logged in to post a comment.
Recent Posts
CR-Scan Otter: A Highly Versatile 3D Scanning Solution
The CR-Scan Otter is a multipurpose 3D scanning system that can be used for both personal and business purposes, according to Creality's CR-Scan series. The affordability and ease of use of this...
Fast Printing PCB – Factors How to Make it Perfect!
Are you looking for a company that can provide you with the best Fast Print PCB products? Do you need someone to increase the value of the product significantly during the assembly process? Do...
Fastest 3D printers benchmarked: Top printers ranked by output time
Some 3D printers can complete a complex piece in under 15 minutes.

Why use a Speed Benchy?
Creality k1c, creality k1 max, creality k1, bambu lab x1-carbon, elegoo neptune 4 plus, two trees sk1, bambu lab p1p, bambu lab p1s, bambu lab a1 mini, creality ender 3 v3 ke, elegoo neptune 4, ankermake m5c, elegoo neptune 4 pro, ankermake m5, biqu hurakan, prusa mini+ (with alpha input shaping update), anycubic kobra 2, creality ender 3 v3 se, the basics of motion, hotend flow, cooling and firmware.
There’s no doubt about it. 3D printers have been getting a lot faster and that’s a good thing. Models that used to take hours to complete can now be done in minutes. And the technical improvements are not limited to expensive printers either. Even basic machines can be found with stock installations of speedy Klipper firmware, Volcano nozzles and samples of high-flow PLA filament.
To find out which FDM-style (filament) 3D printer offers the best combination of quickness and quality output, we performed a timed print test using standard settings, max acceleration and no restrictions on flow. We used the standard nozzle with no hardware modifications as we tested more than a dozen models from leading manufacturers such as Creality, Bambu Lab and Prusa.
All of these are among the best 3D printers for speed and ease of use and surprisingly, even a handful of best budget 3D printers also made this speedster list, but they’re not all created equal. We saw print times ranging from 13 minutes to 41 minutes and huge quality differences in the output of our test model.
Below is a table summarizing our findings. Note that the Sovol SV06 is included to show how slow an old-school, unaccelerated printer performs.
The fastest printer in our fleet is the K1 Max, which beat other brands by nearly 5 minutes with a 13 minute and 50 second Speed Benchy. The K1 Max has a top speed of 600 mm/s and max acceleration of 20000 mm/s.
Test prints were performed with the same standard filament: Inland’s gray PLA . We choose this filament because it is widely available, affordable and brutally honest in photographs. It actually exaggerates layer lines and other imperfections rather than hide them.
Why you can trust Tom's Hardware Our expert reviewers spend hours testing and comparing products and services so you can choose the best for you. Find out more about how we test .

There are many variables that go into fast 3D printing besides acceleration and flow rates. The type of filament, choice of slicer, size of the model and how well tuned your printer is can all affect speed. We had a difficult time finding one testing model that would work with every slicer and every printer, so in the end we turned to the humble 3D Benchy .
3D Benchy was created to test and tune the quality settings of all types of 3D printers, even the Best Budget 3D Printers . It has difficult overhangs, precise curves and doesn’t waste a lot of filament. A “Speed” Benchy also uses the same quality setting to keep the playing field fair.
Every printer on this list can create a beautiful Benchy given about 45 minutes and sensible settings. However, none of our high-speed 3D printers could pull off a Benchy when all settings were 500mm/s, the top speed listed for several of these machines. Yes, we tried.

Parameters Used for Tom’s Hardware Speed Benchy
None of the printers were able to produce a perfect specimen at full speed, which was expected. But the photos show how close each was able to get.

Beating other brands by nearly 5 minutes (and the K1Max by 11 seconds), the K1C produced a boat that was a bit stringy and rough on the hull line, but exceptionally good by speed boat standards. There is no evidence of ringing and the top of the smokestack and overhangs are well-defined.

Our former champ, the K1 Max bested other brands by nearly 5 minutes with a boat that was a bit stringy and rough on the lower layers, but very solid by speed boat standards. Some edges are a bit rounded off due to excessive input shaping, but there is no ringing and the top of the smokestack and overhangs are well-defined.

Only 4 seconds slower than its larger sibling, the K1 prints a Benchy that is well-defined for Speed Boat rules despite being a bit stringy and rough on the lower layers. Like the K1 Max, which uses the same slicer and firmware, the edges are a bit rounded off from excessive input shaping. All in all, it’s a great printer for fast prototyping.

The fastest of the Bambu Lab printers, the X1-Carbon shines with a 15 minute and 29 second boat, only 2 minutes and 10 seconds slower than our current champion. The boat is remarkably clean, with just a hint of under extrusion in the layers.

Completing the Speed Benchy test in a blistering 16 minutes and 25 seconds, the Elegoo Neptune 4 Plus is an impressively fast machine for a large volume bed slinger. The 12000mm/s² acceleration of the Neptune 4 Plus results in a print with some minor banding and artifacts related to fast travel moves. Overall, the detail in the model is impressive considering the sub-17 minute speed.

The SK1 is a Voron inspired printer that should fare well in speed boat tests, but missed a spot in the Top 5. This boat had some odd bumps, but the hull was beautifully sharp with no cooling issues, no ringing and nice overhangs.

The P1P produced a beautiful speed Benchy with a tiny smudge from cooling issues on the bow, a little stringing but absolutely no ringing.

The fastest bed slinger by a few seconds, the A1 Mini produced a Benchy that was not only amazingly fast but super clean. There’s no ringing, the edges are well-defined and the layers are very smooth.

A very nice – for speed – print with a few rough spots on the corners. The Sovol SV97’s ridiculously large auxiliary curtain fan earns its keep with very decent overhangs.

The Ender 3 V3 KE is one of our favorite budget speedsters. It’s a mash-up of the old school Ender 3 and the K1 line, with a high flow K1 hotend, Klipper firmware and a budget Ender 3 body. The printer is Open Source, which allows for tinkering and updating Klipper however you please. It gave us a respectable speed boat at 19 minutes and 48 seconds that showed off good cooling and no ringing. The layers were a tad bit rough but the overhangs were quite good.

This is a very good print by the Neptune 4. It has some rough layers and gaps in the cabin’s corners, but is incredibly good considering the speed.

The AnkerMake M5c struggled with the columns that form the Benchy’s cabin, but otherwise this print is remarkably good without stringing or ringing about the porthole. Layers on the hull of the boat are very nice.
Elegoo Neptune 4 Pro

The Neptune 4 Pro produced a Benchy with only minor defects in an impressive 18 minutes. The hull has some minor banding, but the high flow part cooling fan on the Neptune 4 Pro prevented any curling even at high print speeds. The smokestack is impressively sharp, and the even layers show the Neptune 4 Pro is precise even at high speeds.

The AnkerMake M5 wasn’t originally built for this level of speed – it originally had a ceiling of 250 mm/s before a firmware update gave it this fast mode. It’s good enough for drafts, but little else.

The Hurakan was the first bed slinger we received with Klipper preinstalled, but now its speed is less remarkable. Lack of cooling holds it back, but on the bright side, there’s no ringing to be found.

Josef Prusa insists his machines are about precision and not speed, which shows with the Prusa XL tool changer. Sure, it’s twice as fast as the old Prusa MK3S, but its nowhere near the speed of a Bambu Lab. Its lack of acceleration could only hustle up a 25 minute and 14 second speed boat, and the results were acceptable, with soft lines, poor cooling on the bow and a weird gap in the lower third where the filament couldn’t keep up.

The MK4 recently received new firmware that released its inner speed demon. The walls are nice and neat, overhangs are pretty good and there’s no ringing. The Input Shaping firmware allows the MK4 to cut its run time in half.

The Prusa Mini+ is getting Input Shaping stuffed into its tiny board, and the Alpha version of this incredible update is out for the adventurous to sample. The results are still a bit shaky – the corners are pretty messy – but this really breathes new life into a fan favorite.

The Kobra 2 gets all its speed upgrades from a sturdy frame and new metal parts. It’s not as fast as a Klipper printer, but that keeps it well within the cooling power of its new fan for well formed overhangs.
Creality Ender 3 V3 SE

The Ender 3 V3 SE claims to be faster than previous Enders, but that’s not saying a lot. This print is very clean and looks fantastic in person.
3D printers create three-dimensional objects using layers of melted plastic extruded by a hot nozzle. The three dimensions are plotted with X, Y and Z coordinates, with X and Y covering lateral movements and Z taking the vertical.
There are three main types of motion systems for 3D printers: Cartesian, Core XY and Delta.
Cartesian: Named after the mathematical coordinate system, this style uses three linear axes – X, Y, and Z – to move the print head. Each axis has its own motor and works independently. The system can be quite heavy, especially when the Y axis is used to move the build plate. Cartesian printers have been popularized by Joseph Prusa’s i3 style machines – like the MK4 – and its many clones. Our favorite budget printers are usually Cartesian, such as the Neptune 3 Pro .
CoreXY: This style of printer uses two motor-driven belts that work together to control the way the print head moves in both the X and Y directions. The system is complex, but more efficient and lighter weight, which allows for fast, precise movement. The Bambu Lab P1S is a good example of a Core XY printer.
Delta: Tall and slender, deltas have three spindly arms connected to the tool head which work together in a complex dance. The nozzle moves by changing the height of these arms, allowing it to reach different points on the circular build area. Delta printers are faster due to their light weight and comparatively fewer moving parts – the build plate is stationary and there’s no heavy gantry to move up and down.
Hotend Flow
All 3D printers need to melt filament before squeezing it out of the nozzle in a desired shape. High speed printers need to melt more filament faster in order to avoid disastrous gaps – called under extrusion – in the layers.
Higher flow rates can be achieved by increasing the melt zone in the hotend. Printers like the Creality K1 use a longer Volcano style nozzle to maximize flow.

In order to print fast, a 3D printer needs adequate cooling systems to make sure each layer of plastic is solid before adding more on top of it. Poor cooling can result in saggy overhangs, sloppy bridging, blurred details and poor layer adhesion.
Cooling is provided by fans attached to the printer and pointed at the fresh layer of plastic as it's laid down. A few years ago, a printer might have one cooling fan on the tool head and call it a day. As we’ve strived for faster speeds, we’ve moved to bigger, more efficient fans. Additional fans have also been added to the sides or back of printers, like the large gantry mounted fan of the Elegoo Neptune 4 .
Your printer’s firmware is a big player in print speed. Traditional Marlin has been slow to add speed improvements, which has led to more manufacturers embracing Klipper. Klipper uses more advanced motion algorithms – and requires a bit more processing power – to make your printer faster. Before the introduction of the FLSun V400 , the only way to get Klipper was to install it yourself. Now many manufacturers are using Klipper as a stock firmware.
MORE: Best 3D Printers
MORE: Best Budget 3D Printers
MORE: Best Resin 3D Printers
Stay on the Cutting Edge
Join the experts who read Tom's Hardware for the inside track on enthusiast PC tech news — and have for over 25 years. We'll send breaking news and in-depth reviews of CPUs, GPUs, AI, maker hardware and more straight to your inbox.

Denise Bertacchi is a Contributing Writer for Tom’s Hardware US, covering 3D printing. Denise has been crafting with PCs since she discovered Print Shop had clip art on her Apple IIe. She’s been a freelance newspaper reporter, online columnist and craft blogger with an eye for kid’s STEM activities. She got hooked on 3D printing after her son made a tiny Tinkercad Jeep for a school science project. Excited to learn more, she got a Creality CR10s and hasn’t looked back. She loves reviewing 3D printers because she can mix all her passions: printing, photography and writing. When she’s not modding her Ender 3 Pro or stirring glitter into a batch of resin, you’ll find her at the latest superhero movie with her husband and two sons.
Bambu Lab Printer Firmware Updates Have Limited Timeline
QIDI Tech Q1 Pro Review: Turn Up the Heat
Russian media claims server and storage supply has returned to pre-sanctions levels despite ongoing restrictions
- Jimbosmith What about the Qidi x max 3? Why was that not in the list? Reply
- George³ Hmm, only for Sovol SV06 quality was written as "perfect" in table, but has no image and description in article? Reply
- peachpuff Bambu Lab A1 Mini labelled as P1S? Great article (y) Reply
- Conor Stewart There are a lot of factors here that could be influencing the results, like how the file is sliced and the settings used. Essentially this article isn't great for any kind of comparison, it is good for very rough comparisons but a lot of the times could be due to user skill. For your 500 mm/s benchys did you increase temperature? Also the judging of the quality isn't that consistent, a lot of the fastest printers produce much better results than the slower ones. Reply
- pmbroth Therre are several QIDi printers that should have been on the list, as there specs are similar, and they have addional key features such as heated chambers. Reply
- ThatsCold Only got my bambulab printer to print in 500 mm/s with a filament form https://dwdev.se/What differences does a filament do with the print speed? Reply
- View All 6 Comments
Most Popular
BigRep Industrial 3D Printers
3D Printer Speed: What You Need to Know
In additive manufacturing, if you want to succeed, then you need high speeds. The crucial question remains: how can you maintain quality while significantly ramping up production speeds?
It helps to have a better understanding of how 3D printing speeds are defined, what they mean for your prints, and tried and tested ways of producing parts faster. To learn more, read our thorough guide below.
Defining 3D Printer Speed
Oftentimes 3D printer speed is equated with the speed of the print head: the faster the printhead moves and deposits filament, the faster a part is built. But that’s only part of the picture.
While the speed of the print head influences the deposition rate of filament on the print bed, it does not reflect the overall length of the 3D printing process. It is far from the only print setting to influence overall printing time. It’s worth taking a broader look at 3D printing speeds for the FFF process, considering the 3D printing process from beginning (pre-processing) to end (post-processing).
Each step in the FFF 3D printing process adds time, contributing to how long it takes to get from 3D model to finished product. Fortunately, this means that the end-to-end 3D print speed can be accelerated by optimizing certain elements of the print process and tweaking certain settings. We propose a slightly more encompassing metric of speed that takes into account the time and labor spent before and after printing, as well as the printing time itself.
What Influences 3D Print Speed?
To accelerate and optimize the speed of the 3D printing process, it is important to understand what factors come into play across the pre-processing, build, and post-processing stages.

Pre-Processing
Pre-processing encompasses the time it takes to prepare the 3D model and the 3D printer for the printing process. Three pre-processing stages determine how long a 3D print will take.
3D Model Preparation
3D model preparation is itself a category that includes parameter selection and printing preferences. Decisions made in 3D model preparation have a massive influence on overall printing times. For example, choosing the right orientation for the 3D print on the build platform can reduce or even eliminate the need for support, cutting back on printing time. Some slicing programs, such as BigRep BLADE, offer automatic settings—like auto-orientation—that optimize these features so you don’t have to spend time figuring out the right parameters.
Slicing software translates 3D models into a language that 3D printers understand. This process takes time, especially if your 3D model is particularly complex or the STL file is too large. Adjusting the resolution of your 3D model as well as layer heights and infill densities can alter slicing times. Keeping your slicer software updated can also eliminate bugs that slow processing times.
3D Printer Calibration
Calibration is a necessary step that ensures your 3D printer is properly positioned and all components, such as the extruder, motors, and axes, are aligned. Manual calibration can be time-consuming and take hours, but many FFF 3D printers offer automatic calibration that can be done in mere minutes.
3D Print Time
The print time refers to how long the 3D printer spends creating an object. As you might expect, it is typically the most time-intensive element of the 3D printing process. Different print settings and hardware features can increase or decrease printing times.
3D Print Speed
Print speed refers to the rate at which the 3D printer extrusion system moves when extruding filament. Print speed is measured in millimeters per second (mm/s), and most FFF 3D printers have the capacity to print at speeds in the range of 40 mm/s to 150 mm/s. This setting can also influence print quality: the faster the extruder, the less precise the print becomes.
Travel Speed
Travel speed indicates how fast the print head moves when not extruding filament. The travel speed can often be faster than the print speed without affecting quality. However, if it is too fast, it can lead to 3D printing defects like less precise prints or even layer shifts.
The sustainable travel speed you can achieve, depends a lot on the mechanical structure of your 3D printer. A sturdier frame and portal allow for higher travel speeds without the risk of vibrations showing in your part.

Layer Height
This measurement determines how thick each printed layer will be and thus has a direct influence on printer speed. The thicker the layer height, the fewer layers will be needed to complete a print and the faster your part will be built. As the layer height increases, however, the resolution of the print decreases.
Nozzle Diameter
The nozzle diameter is a hardware selection that can unlock faster printing rates. The bigger the nozzle diameter, the wider each printed line will be. This can eliminate the need for multiple perimeter layers to achieve a certain wall thickness. A wider nozzle diameter also allows for increased layer height.

Infill Density
The percentage of infill density—the internal structure that supports the outer shell of a 3D print—can have a big impact on print speeds. The lower the infill density, the less material is required, which can reduce print times.
You should note that lower infill densities also provide less strength than a higher infill, so it’s about finding the right balance between speed and quality.
Support Structures
Generated to reinforce overhangs and bridges, support structures can also increase the time it takes to 3D print a model. Support patterns, densities, and other settings will influence support printing time. Orienting your model on the print bed to minimize supports can also speed up print times.

Post-Processing
Once the 3D print is removed from the print bed, a certain level of post-processing is required. For prototypes and hobbyist-grade components, post-processing times can be minimal. For end-use parts or visual prototypes, however, post-processing can be demanding.
Support Removal
If your 3D model was printed with supports, removal is an obligatory step. The ease of removal is highly dependent on the type and number of supports.
Some supports can be removed manually in just seconds, while others require special cutting tools to avoid damaging the 3D print. The easiest and often fastest support removal can be achieved by using a dual extrusion 3D printer and a soluble support material that simply dissolves away.
Sanding and Polishing
Sanding and polishing are necessary steps for 3D prints that need a fine surface finish. Since both these steps are manual—requiring the use of sandpaper, polishing paste, or cloth—they can be very time-consuming, especially for larger prints.
Mechanical methods like tumbling and sandblasting are more complex yet speedier options for larger batches.
Priming and Coating
Other optional post-processing steps are priming, painting, and coating. The time each of these steps takes depends entirely on the technique used (for example spray coating, dip coating, or hand painting) as well as the scale of the 3D print and batch size.
For example, dip coating can accelerate post-processing for batches of parts, while spray coating can be more efficient for large prints.

3D printing speed is not as simple as knowing the mm/s rate of the print head: many other factors influence how long it will take to complete a 3D print job. In the pre-processing stage, model prep, slicing, and parameter selection can be optimized for faster processing.
In the build stage, various settings and hardware choices directly influence the speed and quality of a 3D print. Finally, the degree of post-processing required for an FFF 3D print can greatly influence how long it takes to get from a 3D model to the finished part.
By optimizing these various steps and understanding the correlation between print speed and part quality, you can achieve faster print rates and a more efficient printing process overall.
Want to learn more? Watch this webinar to see how to save time with the BigRep PRO 3D printer !

Dominik Stürzer
SEO Manager
Dominik is a mechanical engineer whose passion to share knowledge turned him to content creation. His first 3D prints started in university. Back then the 3D printers were big on the outside and small on the inside. With BigRep the machines are finally big in their possibilities.

- BigRep STUDIO
- Dry Cabinet
- BigRep CONNECT
- BLADE – BigRep’s easy to use slicing software
- FLOW – Workflow automation for tools that work
- Customer Service
- Video Use Cases (Youtube)
- Applications
- Press & Media
- Change privacy settings
- Privacy settings history
- Revoke consents
3D Printer Retraction Settings 101: Speed & Distance
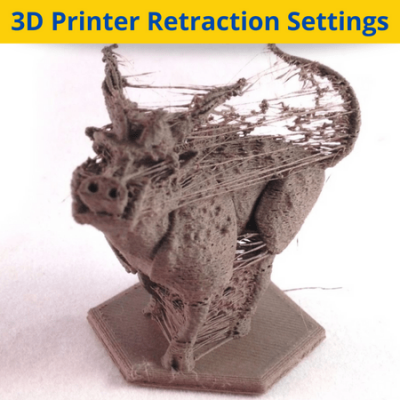
Retraction is one of the most useful slicer settings for a 3D printer. It controls how much filament is pulled back after a travel move, and it’s the #1 setting for eliminating retraction and over-extrusion on 3D prints .
There are a few different retraction settings worth taking a look at in your 3D slicer. The two most important ones are the retraction distance and retraction speed , which I suggest setting to 5 mm and 45 mm/s , respectively. I also strongly suggest activating the Z Hop When Retracted feature in your slicer program .
That said, you should also check out the minimum extrusion distance window, maximum retraction count, Combing Mode, and nozzle temperature settings as both also heavily affect the frequency of stringing on 3D printed models.
Want to learn about other best retraction settings?
Keep reading!
Table of Contents
What is Retraction?
Why use retraction, retraction distance, retraction speed, maximum retraction count, minimum extrusion distance window, z hop when retracted, combing mode, nozzle temperature, travel speed, how to test retraction settings.

If you’ve never heard the term “retraction”, it’s a process on 3D printers that involves the extruder pulling back filament from the hot end .
This is done to relieve the hot end of built-up pressure that happens due to the continuous flow of filament. This pressure can cause the melted filament to flow out the nozzle even when the extruder isn’t active, leaving marks of over-extrusion on your prints (e.g. stringing).

Retraction prevents this from happening by equalizing the hot end pressure through retracting (sucking back) filament from the hot end.
Retraction moves are the specific instances where the extruder pulls back the filament. These usually happen at each layer change and when the printhead is moving from one side of a print to another, like if you were 3D printing two models on the same print bed.

You should use retraction to prevent over-extrusion, especially in the form of stringing, from popping up on your prints.
For reference, over-extrusion, as the name suggests, is a printing problem where too much filament is extruded. Stringing is one way over extrusion can take its shape on a 3D printer, and this specific problem occurs when small whisps (“strings”) of melted filament attach to the exterior of your printed model. It makes your 3D print not only look bad but also a lot less dimensionally accurate.
Check out our article on how to fix stringing issues in your 3D printer here .
Additionally, using retraction in your 3D slicer settings helps prevent other forms of over-extrusion, such as zits and blobs, which can appear on the exterior of your prints.
Slicer Settings
Now that you know what retraction is and why you should use it, you’re probably wondering how you can control this feature for your 3D printer. In the mini sections below, I’ve gone over the most important slicer settings related to retraction, and I provided recommendations for each setting too!
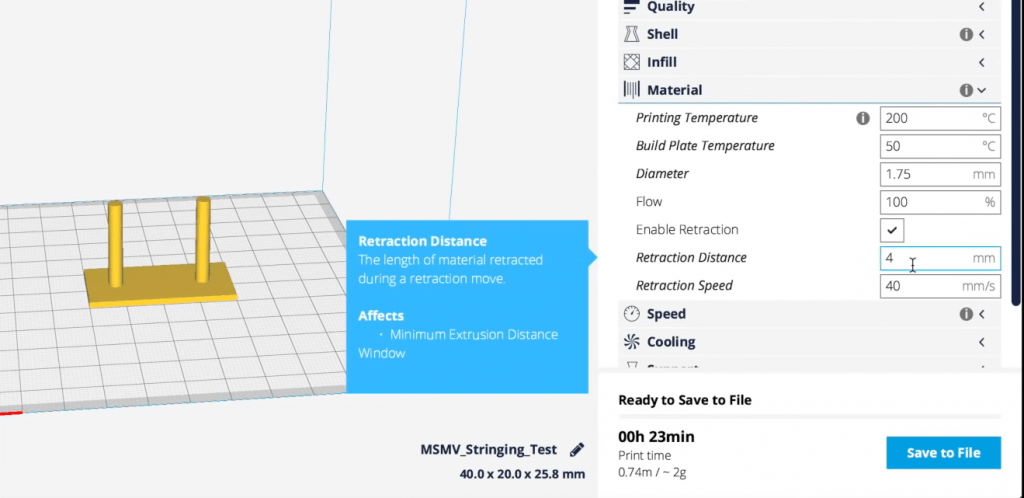
The most important setting for retraction is the retraction distance. This setting controls how much filament is pulled back for each retraction move.
The higher this value, the more effective each retraction move will be. However, too long of a retraction distance can also cause a hot end jam, so be careful.
For Bowden extruder printers, such as the Ender 3 (Pro/V2), I suggest going with a retraction distance of 5 mm, adjusting in increments of 0.2 mm until you hit 3 or 6 mm. If you’ve reached these values and still are having issues, then it might be time to try using another setting.
And, for direct drive printers , a retraction distance between 1.5 and 2.5 mm should work perfectly. You can also adjust it in increments of 0.2 mm.
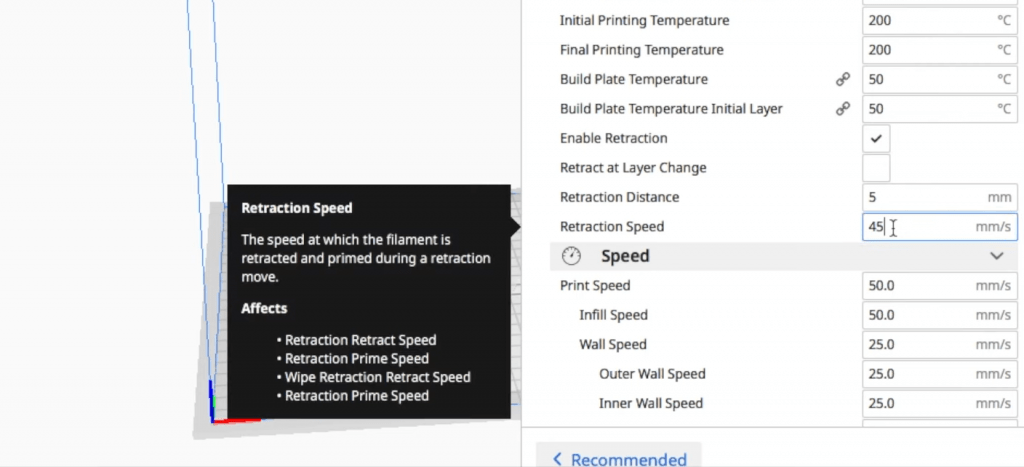
The second most important retraction setting is the retraction speed, which controls how fast the extruder moves for each retraction move.
Similar to the distance, the higher the value of the retraction speed settings, the more effective each retraction move. However, going too high might cause issues like jamming.
I suggest using a retraction speed of 40-50 mm/s . I like to use a retraction speed set to the same value as my print speed, as this is considered best practice for the extruder motor (it won’t overheat).
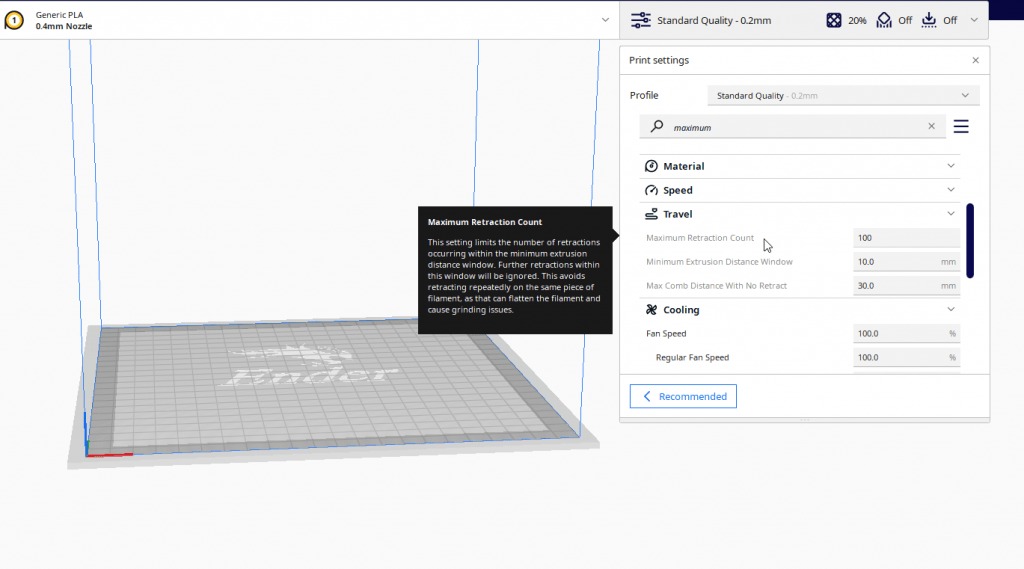
The Maximum Retraction Count is the maximum number of retractions that your 3D printer will allow to occur in the Minimum Extrusion Distance Window, which we’ll get to next. A value of 100 should work great, but you can increase it for 3D printing miniatures.
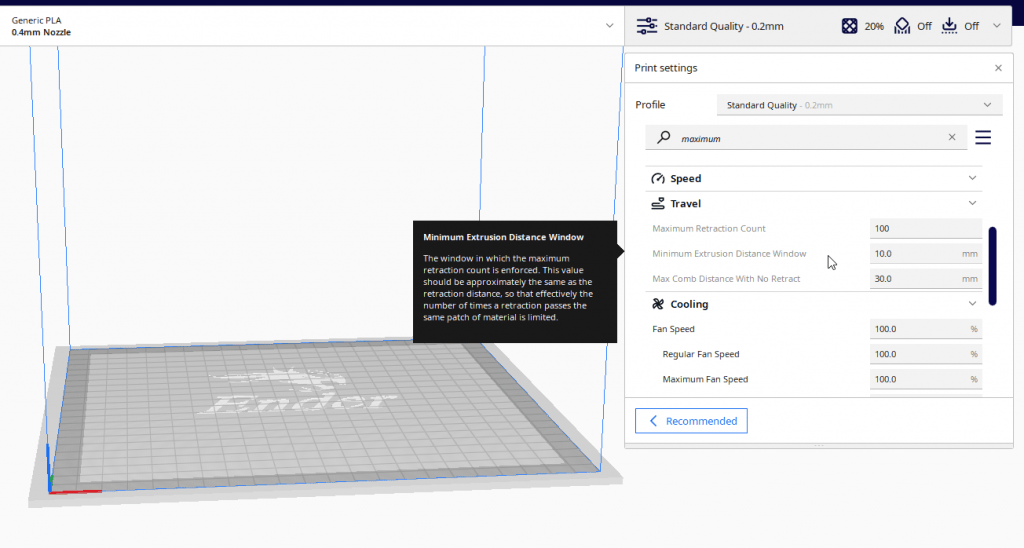
The Minimum Extrusion Distance Window is a setting that controls the space in which the Maximum Retraction Count is enforced. In other words, if this value is set to 10 mm and the Max Retraction Count is set to 5, then a total of 5 retraction moves will be allowed to occur for every 10 mm of filament extruded.
I suggest setting this value to the same as your Retraction Distance. So, in my case, that would be 5.2 mm .
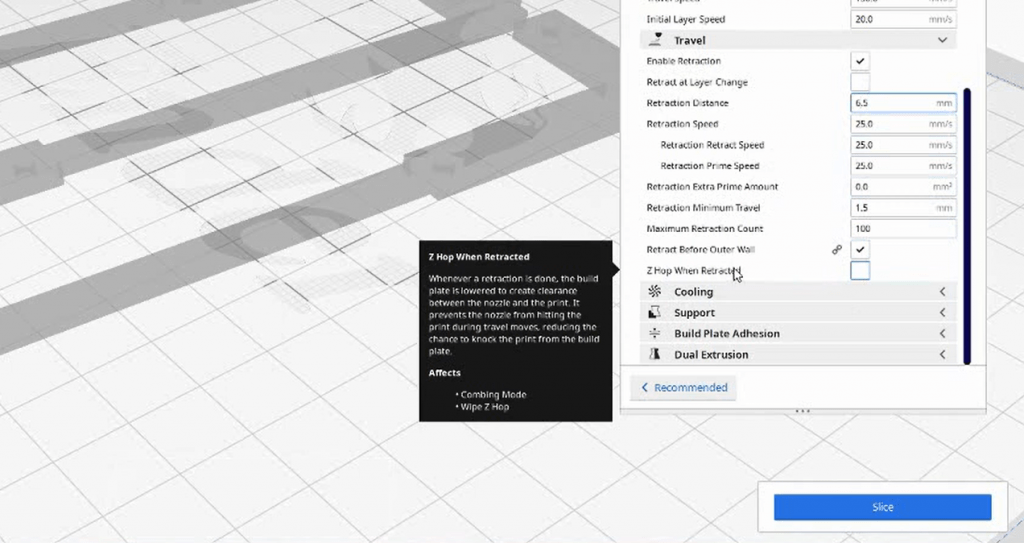
Finally, we have the Z Hop When Retracted setting, which is a boolean feature, meaning it can either be turned on or turned off (no numeric value).
When Z Hop When Retracted is activated, the printer will move the nozzle (printhead) up along the Z-axis every time a retraction occurs. This can make the retractions more effective because the nozzle will physically separate from the layer it’s printing before moving. I suggest turning this setting on!
Other Important Settings
There are also a few other settings that are indirectly related to stringing and are worth taking a look at. I’ve briefly gone over three in the sections below.
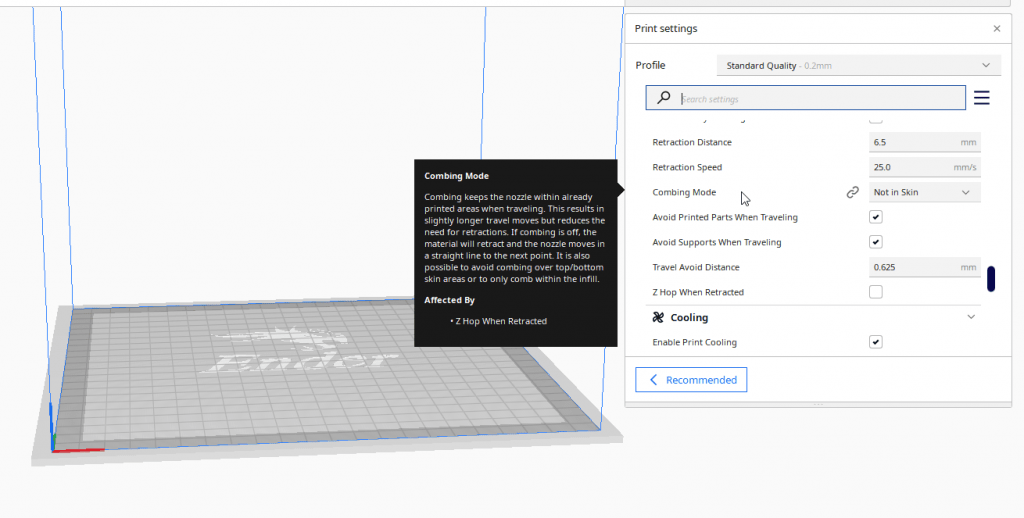
The combing mode is a slicer setting (in Cura) that defines the rules for how the printhead should move. There are a few options, each with different movement rules.
I suggest setting the combing mode to either “Within Infill” or “Not In Skin” . These modes make the printhead move inside the printing perimeter to prevent stringing and other forms of over-extrusion from occurring on the exterior of your 3D print.

The nozzle temperature is also heavily correlated with over-extrusion and stringing on prints. The higher the temperature of the nozzle, the faster filament will melt and the more easily it will flow out of the nozzle. As such, high nozzle temps can lead to over-extrusion, so consider lowering yours on top of adjusting some retraction settings if you’re dealing with stringing.
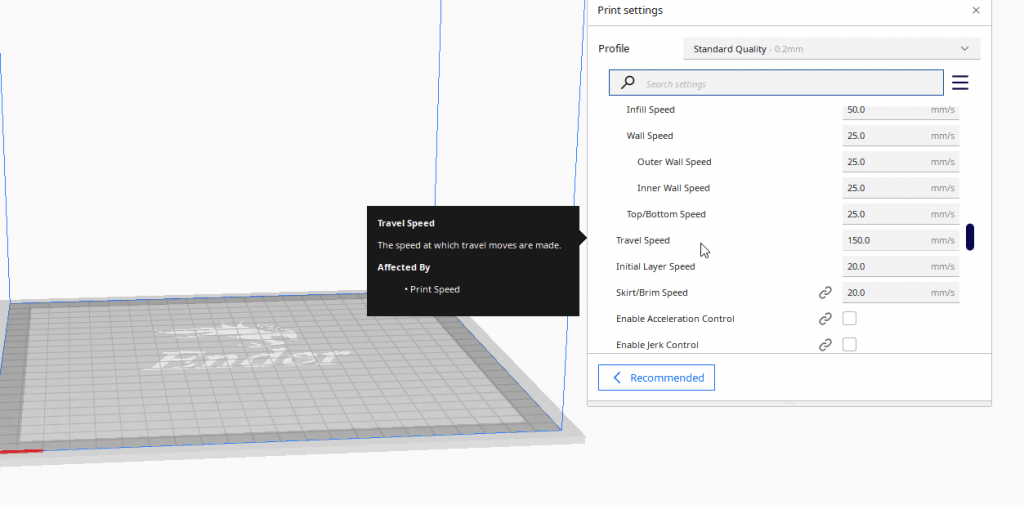
The travel speed in your slicer is a setting that controls how fast the printhead moves when it’s not extruding filament (traveling). A higher travel speed will give the filament less time to melt and flow out of the nozzle, thus reducing stringing. As such, I suggest increasing your travel speed if you’re having issues.

You can test your refraction settings by printing a test model specific for stringing, such as the following:
Printing these models will give you a good visual idea of how effective your retraction settings are. And from there, you can evaluate the model and adjust the retraction settings accordingly.
Overall, retraction is a supercritical element of the 3D printing process. If turned off, your prints will likely look hideous as they’ll be full of stringing and other forms of over-extrusion.
It’s a good idea to go into your slicer settings and, first, make sure that you enable retraction. Once it’s turned on, you should adjust some of your retraction settings if you’re having problems with stringing.
The two most important ones are the retraction distance setting and the retraction speed, which I suggest setting to 5 mm and 45 mm/s, respectively. I also strongly suggest activating the Z Hop When Retracted feature in your slicer program.
Finally, you might also want to check the Combing Mode and nozzle temperature settings as both also heavily affect the frequency of stringing on 3D printed models.
Related read:
- Best Ender 3 (Pro/V2/S1) Retraction Settings
- How To Fix Under-Extrusion
About The Author

Jackson O'Connell
IMAGES
VIDEO
COMMENTS
The Best 3D Print Speed Settings for PLA & More. by Hironori Kondo, Mônica Laiolti dos Santos. Updated Mar 2, 2024. Tuning your PLA print speed can be tricky. Learn how to find the perfect print speed settings for PLA and more materials! Advertisement. Tuning your PLA print speed can be tricky. Learn how to find the perfect print speed ...
Travel speed is the moving speed of the print head during non-printing status. It refers to the movement of the print head without squeezing the printing material out from the nozzle. When travel speed is too slow, it could lead to stringing issues on the 3D printed object. A good travel speed for a 3D printer is 100 millimeters per second.
However, there is a point beyond which a higher print speed improves the print duration only slightly. Increasing the printing speed from 50 to 100 mm/s almost halves the printing time. An increase from 100 to 200 mm/s only brings an improvement of about 20%. Print Speed vs. Print Quality on a 3D Printer.
Print speed is the speed the head moves during extruding plastic, travel speed is the speed when moving from one place to another without printing. The default travelspeed of 150mm/s is quite low for an UM, and you can use 250mm/s for travel speed.
20-40 mm/s. Nylon. 25-50 mm/s. FDM filaments and their best print speeds. To further complicate matters, different 3D printers have their own hardware and quirks, and this even extends to different brands of the same type of filament, given that formulations and additives can drastically alter the speed requirements.
The maximum listed mechanical speed of an Ender 3 series 3D printer (Pro & V2 included) is 200 mm/s. But the max actual print speed is often closer to 40 or 60mm/s depending on your material, line height, and nozzle size. Let's dig into why there's such a difference between mechanical and actual print speeds.
A good print speed for PLA usually falls in the 40-60 mm/s range, giving a good balance of print quality and speed. Depending on your 3D printer type, stability, and set up, you can reach speeds above 100 mm/s easily. Delta 3D printers are going to allow for higher speeds compared to Cartesian.
Your travel speed tells you printhead how fast to move over open spaces and between parts of your print. You should set a high travel speed to reduce print time and the risk of stringing between distant points. I recommend a 150-200 mm/s travel speed for most bed slingers like the Ender 3 and 500 mm/s for CoreXY 3D printers like the Bambu Lab ...
For most common consumer-grade FDM printers the average print speed is around 40mm/s to 80mm/s while some better ones are able to achieve 100mm/s to 150mm/s. I would like to make a special mention of the VORON project. This is a non-commercial project which handles users the opportunity to build their own printer.
The Best Ender 3 (V2/Pro/S1) Print Speed Settings. by Karen Ditsch, Jackson O'Connell. Updated Jun 10, 2023. To get the most out of your Ender 3 (V2/Pro/S1), print speed is a key factor. Read on to discover the perfect Ender 3 print speed settings!
Taking this into account, it's very important to choose the right speed and flow to get the same output. For example, doubling the flow from 5 mm 3 /s to 10mm 3 /s can reduce flow by around 3%. Same case with a 0.60mm nozzle will reduce flow by 2%, and less than 1% with a 1.20mm nozzle.
Travel Speed. The travel speed defines how fast the print head of the 3D printer moves when no plastic is extruded. By increasing the travel speed, considerable time savings can be achieved during printing. However, too much increase can result in warped 3D printing or even completely misaligned planes of the model.
Initial Layer Print Speed: This is the speed at which the bottom layer is printed. By default, this is slower than the regular Print Speed settings. Initial Layer Travel Speed: This is the speed at which the print head moves when not extruding on the very first layer. Using a lower travel speed can reduce vibrations on the build plate.
Travel Speed. Travel speed refers to the speed at which the extruder head moves when it's not printing. This will usually be much faster than the print speed, around three times faster. It can be this fast because it doesn't lay any plastic down while traveling. Don't set it too high though or your printer may become unstable.
The fastest printer in our fleet is the K1 Max, which beat other brands by nearly 5 minutes with a 13 minute and 50 second Speed Benchy. The K1 Max has a top speed of 600 mm/s and max acceleration ...
Lower speeds generally make 3D printers better quality when you have not properly optimized your 3D printer. When you have good stability, have taken out slack out of your 3D printer's parts, a high speed has less effect on print quality. Once optimized, the main thing that holds speed back is flow rates. By the end of this article, you would ...
3D Print Speed. Print speed refers to the rate at which the 3D printer extrusion system moves when extruding filament. Print speed is measured in millimeters per second (mm/s), and most FFF 3D printers have the capacity to print at speeds in the range of 40 mm/s to 150 mm/s. This setting can also influence print quality: the faster the extruder ...
3D printing speed refers to only the build stage, a subcomponent of the entire 3D printing process. However, the entire process spans from pre-processing to post-processing stages. The time required for printing a completed part from a data file (.stl or .obj) is calculated as the sum of time for the following stages: The pre-processing stage, which spans the preparation process of both part ...
3D Printer Retraction Settings 101: Speed & Distance. Retraction is one of the most useful slicer settings for a 3D printer. It controls how much filament is pulled back after a travel move, and it's the #1 setting for eliminating retraction and over-extrusion on 3D prints. There are a few different retraction settings worth taking a look at ...
150mm/sec is really, really fast on some printers, but may be acceptable on something like a Delta. The Makerbot can manage these sorts of speeds I believe, but it's been designed to do so. 20-30mm/sec is more like it for high detail travel speeds on moving bed printers, maybe 60-80 on coreXY-style printers. Travel speed is not a big deal, but ...
3D Printer Tool Wrap Kit Pro. Upgrade Kit for Wireless Scanning. 3D Printer Tool Wrap Kit Pro. Creality Space Pi Filament Dryer. 3D Printer Tool Box Kit. Ender-5 S1 Acrylic Enclosure. Discover the perfect print speed settings for your Ender 3 model. Enhance print quality, efficiency and performance by optimizing your 3D printer.
3D Printer Retraction Speed - Simply Explained. by Jackson O'Connell. Updated May 28, 2023. Pulling filament back into the hot end is a useful function but tricky to master. Read on to learn all about 3D printer retraction! Advertisement. Pulling filament back into the hot end is a useful function but tricky to master.
The speed of the printer is whatever is set in the slicer. Slow is 50% and iirc sport is 125% and ludicrous is 150% The pre loaded speed benchy is basically at ludicrous speed. Picking ludicrous sue while printing it will make bad sounds and cause the print to fail from layer shifts due to losing steps and thus where it is zeroed in the x/y plane.