

How to Sew a Travel Jewelry Pouch – Easy Pattern!

Thank you so much for sharing!
Today, I want to share with you how to sew a travel jewelry pouch! It’s beginner friendly, adorable and makes a great gift! I think this would be awesome as a Mother’s Day gift idea and even add some jewelry to it! Of course as a gift or for a weekend travel getaway works as well.

This year I’ve been focused a lot on teaching ya’ll how to sew. The Learn to Sew series has been a big hit and I love being able to teach all of you this skill! While this isn’t officially part of the Learn to Sew series, it goes nice and slow and will be perfect for beginners to make this adorable travel jewelry pouch.
Travel Jewelry Pouch

What fabric is best?
Wondering what type of fabric is best for this project? I think 100% quilting cotton is best, it’s high quality and soft enough to protect your jewelry. You also want to make sure this is easy to work with and durable enough for your travels. Plus you can find really cute fabric in cotton materials for your travel jewelry pouch. Here’s a great post if you are looking for good places to shop for fabric online !
Other Great Simple Sewing Tutorials
Love these types of sewing projects? Check out these other simple sewing tutorials!
Box Pouch with No Raw Edges
Half Apron Tutorial
Ruffle Zip Pouch

The jewelry I’m wearing in the photo is from Ana Luisa , I love it! This would be a great option to put in the pouch for a gift!
How to Sew a Travel Jewelry Pouch

1 Fat Quarter or (1) 18 x 22 inch piece of fabric will make 1 jewelry pouch. If you would like the coordinating print, you can make 2 jewelry pouches with 2 fat quarters.
- (1) Fat Quarter of Color A
- (1) Fat Quarter of Color B
- Coordinating thread
- (2) Ribbon, cord, or string 18 inches long for ties
- Sewing Machine
- Iron and Ironing surface
- medium size safety pin
- Rotary cutter or fabric scissors
- water soluble marking tool or chalk
Instructions

Would you prefer to watch this on YouTube? Here is the link for the full youtube version.
Recommended products.
As an Amazon Associate and member of other affiliate programs, I earn from qualifying purchases.

Did you make this project?
Please leave a comment on the blog or share a photo on Instagram
Sunday 26th of April 2020
Love your easy to follow and easy to learn, sewing, crocheting and other crafts. Gloria
Thursday 23rd of April 2020
What brand of fabric did you use for this project?
This is sooo adorable, can't wait to try! Thanks for all you do--very helpful & easy to understand your instructions!
Phyllis Antosz
Tuesday 21st of April 2020
Thank you, just found your videos on mask making and they are so easy in how you explained them. Thank you so much. Yes, I have subscribed and will be following you and when I need something I will order thru you.
- Pop Culture
- DIY Classes
- Brit+Co Picks
- Relationships
This Week’s Stories
Every question about gilmore girls, answered, 9 annoying airplane habits you’re probably guilty of (& how to avoid them), your may horoscope is here–see what's in store for your sign, 6 nostalgic movies that feel like summer vacation, 29 cinco de mayo recipes that aren’t tacos, striped home decor is so in — here are 20 pieces to shop right now, treat mom to a delicious egg in a hole breakfast sandwich this mother's day, kristen bell and dax shepard have the sweetest proposal story.
Style On-the-Go: How to Make a DIY Travel Jewelry Organizer

Time to vote! Which one is worse: Tangled necklaces or losing one earring? They’re both pretty terrible. Our solution: this all-in-one travel jewelry case! This is a MUST for your next trip, whether it’s a two-week-long journey or a quick overnight to Southern Cali. If you’re not sure what else to pack, may we suggest cute sandals to match your summer dresses and a punny beach cover-up for lounging at the pool? ;)
– patterned and solid fabric
– clear pouches
– sewing machine
– sewing pins
Instructions:
1. Cut 2 rectangles out of canvas that measure 10 x 13 inches. Then cut one rectangle that measure 11 x 15 inches out of canvas and another out of your patterned fabric.
2. Find the center of your 11 x 15-inch canvas rectangle and then pin on your desired pouch. Sew onto the canvas.
3. Use your solid colored fabric to create a pocket and loops for necklaces to hag from. Sew onto the canvas.
4. Once you have prepared the desired jewelry holders on your canvas, pin to the patterned fabric with the pockets (good side) facing in.
5. Sew around 3/4 of the rectangle, then turn right-side out and sew up the hole.
6. Do this same process for the 10 x 13-inch rectangles. Attach your desired pockets and sew.
7. Cut a piece of paracord and sew to the front side (patterned) of your rectangle.
8. Pin the center line of the smaller rectangle to the center line of the larger rectangle. Then sew down this line.
9. Fill with your favorite jewelry and head off to your tropical vacay!
Fire up that sewing machine, and let’s get started.
You will need canvas and a fun patterned fabric to complete this DIY. Cut two canvas rectangles that measure 10 x 13 inches, one canvas rectangle that measures 11 x 15 inches and one pattern rectangle that measures 11 x 15 inches.
Since we’re making a travel jewelry book, find the center of each sized rectangle. This will make it easier for you to center your pieces on your “page.”
Pin your pouch to the canvas page and sew. We used fun neon thread to amp up the neutral canvas.
Use your solid colored fabric to add loops and pockets to your canvas page. You’ll want to create pieces that are about 8 inches wide. When pinning, add extra space so your jewelry can slide in.
Pin your canvas to the patterned fabric. Make sure to pin good sides facing in. Sew 3/4 of the way around and then turn right side-out and sew closed.
Follow the same process for the 10 x 13-inch piece of canvas. Sew your desired add-ons to the inside page.
Pin the center of the pages together and then sew. You’re almost ready for vacation.
Cut a long piece of paracord, pin and sew onto the patterned side of the rectangle.
Check it out! A four-page jewelry-holding slice of heaven.
When choosing your color palette, try to use brights that will pop and complement each other.
Pop in your jewelry. Canvas is a great material to hold your earrings. Stick the posts through the canvas and attach the back on the other side. The neutral color makes the earrings pop and easy to spot.
Attach your bracelets to the sewn loops. Wait — is that a Katy Perry fast food charm bracelet? Yes. Yes it is.
The clear pouches are perfect for extra long necklaces that could get tangled.
The loops paired with the bottom pouch will keep delicate chains separated and not tangled when traveling. Total win!
All packed and ready to go!
Summer plans? Tell us where you’re going and your favorite packing tips and tricks.
- 25 Inventive Ways to Organize Your Shoes - Brit + Co ›
- 23 Inventive Ways to Organize Your Shoes - Brit + Co ›
Trending Stories
Trending topics.
- Blake Lively + Taylor Swift
- Starbucks Spring Menu
- Easy Potluck Ideas
- Interior Design Style Quiz
- Join our Newsletter
- Indian Food Recipes
- B+C Classes
- Selfmade Business Accelerator
- Crockpot Recipes
- Easy Lunch Ideas
- Healthy Dinner Ideas
Home > Bags > Clutches + Pouches > Drawstring 8-Pocket Jewelry Pouch
Drawstring 8-pocket jewelry pouch.
Your favorite shiny beads and baubles deserve to come along on vacation too. But figuring out how to pack them, without opening your suitcase upon arrival to find a tangled mess, is always a challenge. Our traveling jewelry pouch is up to the task. It has eight, wedge-shaped pockets to hold necklaces, earrings, rings, and watches. The pouch gathers up with a drawstring, safely enclosing the pockets in an upright position.

- ½ yard EACH of TWO 44″+ wide quilting weight cotton fabrics in coordinating prints NOTE: As mentioned above, if you cut carefully, ½ yard of each print will yield TWO matching pouches.
- Scrap of lightweight batting for center circle
- 2 yards of ⅛” satin rattail cording ; this is available in a rainbow of colors
- All purpose thread to match fabric
- See-through ruler
- Seam ripper
- Fabric marker, pen, or tailor’s chalk
- Iron and ironing board
- Scissors or rotary cutter and mat
- Straight pins
- Hand sewing needle
- Small safety pin
Getting Started and Pattern Download
- Download and print FOUR copies of the 8½” x 11″ pattern sheet: Pouch Template . IMPORTANT: This pattern is ONE 8½” x 11″ sheet. You must print the PDF file at 100%. DO NOT SCALE to fit the page. There is a guide rule on the page so you can confirm your final printout is to scale. Print horizontally (landscape).
- Cut out all four wedge pieces along the solid lines. Following the diagram on the sheet, tape the four wedges together to form a circle. Butt together your cut pieces and tape; do NOT overlap.
- The solid outside line is your cut line for the large circles. The solid inner line is the cut line for the smaller circles. And, the assembly diagram circle itself should be cut out and used as a pattern to cut the batting circle. NOTE: If you want, you could print EIGHT copies of the template, tape them together into two circle patterns, use one at full size and cut the other one down to the smaller size. Then you could retain both patterns (along with one small circle pattern) in your files for later use.
- Use the full circle pattern to cut ONE large circle from EACH of the two print fabrics.
- Use the trimmed, smaller circle pattern to cut ONE smaller circle from EACH of the two print fabrics.

At Your Sewing Machine & Ironing Board

- Carefully open up the buttonhole with your seam ripper.
- Find the small circle that will form the interior of your pockets. Place it wrong side up on your work surface and center the batting circle on it.

- Using a ¼” seam allowance , stitch both circle-pairs together, leaving a 1-2″ opening for turning. NOTE: When stitching in a circle, it can be a bit of a challenge to keep your seam allowance even and your curve smooth. Our best tips are to go slowly and to stop now and then, with your needle in the down position, lift up the presser foot, and slightly adjust your fabric to keep your seam allowance true. The smaller the circle, the more often you may need to stop and adjust. We also used a Janome Quarter Inch foot to help keep the seam allowance on track. Shortening the stitch length slightly can also help keep curves smooth.

- Press well, folding in and pressing the raw edges of the opening so they are flush with the sewn seam .
- Pin this opening closed. Thread a hand sewing needle with thread to match the fabric and slip stitch to close.
Mark and make the interior pockets

- Place your large circle exterior side down on your work surface. Place the smaller pocket circle interior side up (so you can see your markings) centered and on top of the first circle. Pin in place through both layers.

- Remove the sewn circles from the machine, press to insure both layers remain nice and flat, and adjust the pins as necessary to hold the layers together. Remove any visible basting stitches.

Create the drawstring channel
- You need to create two circular seams for your drawstring channel. These two seams should align top and bottom with the original buttonhole you made way back at the beginning.

- Attach a small safety pin to one end of the rattail satin cord.

- Make sure your cord tails are long enough to wrap around the pouch several times and make a generous bow. Trim away any excess, then make a small knot at the end of each tail.
Contributors
Project Design: Alicia Thommas Sample Creation: Liz Johnson
Related Posts
Puffer sling bag, ragged edge tote in two sizes, kid’s nap time set.

*Sew4Home reserves the right to restrict comments that don’t relate to the article, contain profanity, personal attacks or promote personal or other business. When commenting, your name will display but your email will not.

No. 9. Warp the cords….

Are you familiar with the Lay
Are you familiar with the Lay n Go makeup bag that is sold widely on Tv? It is similar to your jewelry pouch without the inside pockets. It is 22 inches across. I have made two of them. Love it as the cosmetic stuff is all there and contained. It has simplified my life.

@Jane – We haven’t heard of
@Jane – We haven’t heard of that one, but it sounds pretty cool. Clever storage projects are always some of our most popular. We all love to be organized!
- Satchels + Briefs
- Crossbody + Shoulder
- Backpacks + Duffles
- Clutches + Pouches
- Small Goods
- Baskets & Catchalls
- Sewing Room
- Tech + Travel Accessories
- Gift Bags + Card Holders
- Hot pads + mitts
- Cozies + Covers
- Placemats + Runners
- Napkins + Coasters
- Tablecloths
- Bath Towels
- Pillowcases + Sheets
- Caddies + Toiletry Bags
- Floor Cushions + Ottomans
- Bench + Chair Cushions
- Full Panels
- Cafe curtains
- Outdoor Shades
- Bedding + Bath
- Diaper Bags + Changing Pads
- Play Mats + Rugs
- Outdoor + Party Fun
- Accessories
- Belts & Scarves
- Hand Sewing
- Basic Sewing
- Intermediate Sewing
- Advanced Sewing
- Specialty Sewing
- Tools + Notions
- Presser Feet + Accessories
- Machine Tips
- Products We Love
- Reviews + Interviews
- Advertising + Sponsorship
- Copyright + Usage
- Privacy Notice
You cannot copy content of this page
JOIN OUR NEWSLETTER
Enter your email address below to subscribe to the Sew4Home newsletter. Be the first to see new projects and patterns, helpful techniques, and new resources to enhance your sewing experience.
We will never sell, rent or trade your personal information to third parties.

Sew a jewelry travel case pattern

Ideal to keep your favorite pieces easily to hand, or just right for traveling and looking glamorous on the go. This jewelry purse has a spot for earrings, chains or bracelets, rings, and other small items, and a full-width zipper pocket too.

Make it sumptuous in silk or satin, or practical and more hard-wearing in a quilting weight cotton.
- Finished size closed – 8.5 inches by 6 inches
- Ring holder, earring holder, 2 hangers for chains, zipper pocket, 2 slip pockets
- Soft and padded.
- Step by step photo tutorial and video
Pattern rating – the pattern testing team gave this one an Intermediate rating.

You can download the pattern pieces and instructions for the Jewelry Purse from my design account with Payhip. Save to your computer or pattern library and sew at your leisure.
For help downloading and printing PDF patterns, please CLICK HERE .
Video tutorial for the Jewelry Purse with variations and suggestions

Pattern Testing Results
I gave the testing team a tight deadline on this one because I knew it would make such a great Christmas present and wanted to make sure you all had time to sew it. As always, they rise to the challenge and created some pretty bags and made sure this pattern is spot on!
Louise – I liked it. Lots of compartments to keep things separate. Like the chain holder. Hopefully, will keep necklaces from knotting. I used a Pellon fusible lightweight interfacing and a Pellon fusible fleece. They worked well.

Sarah – the only thing that held me up with this pattern was how great it was. Every time I completed a section I had to get out some jewelry and start adding it in!

Donna at Stitched by Donna – I love the pattern. I added topstitching to the flap on my purse. For the interfacing, I used Pellon Shape-Flex SF101 – woven interfacing, and Pellon Fusible Interfacing . I used Pellon sew-in heavyweight stiff interfacing instead of cardboard for the earring holder, so the purse can be washable. I then punched holes with a regular hole puncher on the interfacing only before placing it in the stud holder.

Linda – Great pattern. Easy to put together. Unfortunately, I did not have a very fancy fabric to test with but next time I will try it with one. I loved the idea of making a jewelry organizer. This one has a lot of pockets and has a place for everything, rings, earring, chain. I liked the zipper pocket to make things more secure. However once closed it's not too big to get into your luggage and things stay in place. I loved the way it looks like a purse once closed making it pretty and feminine.
For the interfacing, I used Pellon 911FF. I loved this interfacing for cotton. I have used it in almost all my bags. For the fleece, it was not fusible so I used HeatnBond Lite to fuse it to the fabric. It worked great.

Sara at Made by Sara – It is a lovely bag! I love it! Although I didn't make the chain holders and added a larger ring holder for mine. I think you have thought about all the necessary pockets and closures to keep everything neat and safe. For the earring holder, I used a clear vinyl as a liner instead of a card to make it washable.

Crystal – this is a great idea, I like that there is a place for nearly every type of jewelry… the satin look is pretty. I was curious about the tie option and how or if it was functional – it looks pretty but its really optional I think. Mine stays closed just fine with the magnetic closure. I used baby snaps, and Kam snaps (prefer to avoid hand sewing of snaps). When I make this again, I'll use one layer of fleece lining, and one layer of heavy craft fusible for added stiffness. And it can easily be adapted to suit your own jewelry – for my next one I'll make those chain loops longer and use them for bangles and big hoop earrings.

A BIG Thank you to everyone who helped with the pattern testing on this one at such short notice and at such a busy time of year.

I have fell in love with this jewelry bag! I have searched and searched Pinterest for the right one and ran across yours!! I love everything about it! Is there any way to get the free pattern for this?? It would be the perfect bag!! Thank You for sharing!!!

I’m confused about the instruction of Pattern Piece A. It says to cut 2x fusible interfacing and 2x fusible fleece. However, in both the sewing instructions and video tuturial, there is no mention to use BOTH the interfacing and fleece on Piece A. Should it be one or the other depending on fabric weight?

Hi Lara, the answer to your question is on page 3 and 4. Please have another look.

Thank you for the reply. Next problem: The fusible fleece is not adhering to the fusible interfacing which is already applied to the fabric (Piece A). Any advice welcomed. I’m trying to make 5 of these by Tuesday morning (Christmas presents).
HI Lara, try not use steam when ironing the interfacing and see if that does the trick. Sprayable fabric glue would be my next move if the dry iron does not work.

I cannot find where to download this for free. Thank you for your time.
HI, Sally, it is probably because the link has expired, they are only good for 24 hours.

thank you for such a cute little purse…

Lovely idea! Thanks!

What a great pattern! Thank you for sharing it. The video is excellent–very clear & shows the construction very nicely.

This is beautiful and functional Thanks for the pattern

Thank you . A very lovely surprise. So delighted to receive this. Very excited n eager to make this 4 my girls. Will b the envy of their frens i m sure…yeay!!

Thank you for sharing this tutorial, it is really appreciated

Am so glad for this surprise gift. I live in Mexico City and the last week have been very hard, so a nice good thing means a lot during the disaster we have endured. Thanks a lot.

Thank you! That was very kind of you – love it!

Thank you for your generosity. Looks like a great pattern! Hoping to try it out very soon.

Thank you so very much, I have been looking for a “Special Something” to make for a dear friend. This is the absolute perfect gift. I love your site. Keep up the good ideas and sales.

Thank you for this pattern. will make some lovely gifts!

Thank you for the lovely pattern, will make some for Christmas gifts after I finish the pile of jean repairs. Happy stitching :~)
Search this site
Welcome to our site.
We are delighted that you found your way to So Sew Easy! We are here to inspire you, guide you, and also learn with you. If you can donate a few dollars to help us keep running the site, we would be very grateful!
Subscribe to Our Sunday Email and Never Miss a FREE Pattern!
Featured video.

Pin It on Pinterest
Thanks so much for your comment.
It would be great if you could share this post with your friends!

Subscribe to our weekly Sunday newsletter below and never miss the latest free sewing patterns and tutorials.
Thanks, I’m not interested
- Skip to main content
- Skip to primary sidebar
Free Diy Jewelry Organizer Sewing Pattern
By Damjana Jakos • Updated on Aug 7, 2023
Super practical and cute! Sew an easy diy jewelry organizer using my latest pattern that's free for all newsletter subscribers. No more searching for your earrings and a matching necklace - and no more tangled mess!

OR do you want a printable copy of the WHOLE tutorial? Scroll to the bottom of this tutorial for more details!
This post may contain affiliate links. thanks for your support. If you like diy organizing, you'll love these free patterns, too:
- Small Hanging Basket pattern
- 17 Amazing Diy Storage IDEAS
- This Free Pattern is PERFECT for your desk or kitchen counter
- Or try our new, popular SewPretty HOME series:

Join the FREE 7-part email course and make 6 beautiful items for your home! You'll love it!
- Diy Travel Jewelry Organizer
What Fabric to Use for a Jewelry Organizer
Finished size, diy jewelry organizer - sewing steps.
- How Do I Get the Diy Jewelry Organizer pattern for FREE?
WANT A PRINTABLE COPY OF THE WHOLE TUTORIAL?
I have a confession to make: I hardly ever take my jewelry with me on vacation. Why? Because I always get a tangled mess trying to keep them in my old cosmetic pouch . While I have a pretty much well-working solution for necklace storage in my home ( THIS super simple necklace hanger - works perfectly!), I honestly needed a sound travel-proof jewelry storage solution.
Now I'm showing off what I made, and showing you how to make a jewelry organizer for necklaces and earrings. You know, just in case you need one. Or know someone who'd love this cute circular pouch as a gift.

Now back to sewing your new, homemade diy jewelry holder. So, how do you make a travel jewelry pouch?
You know I love quilting cotton. Not just because it's available in all the prints and colors I can imagine, but also because it's not stretchy, it's lightweight and durable enough for travel.

But canvas, linen, or microfiber work great too, as they are all sturdy and breathable. Worried about humidity? Go for a water-resistant fabric!
And how much fabric do you need? You only need two fat quarters of fabric and 2 yards of cord.
- a padded center storage area to stash larger pieces of jewelry, such as watches and bracelets,
- eight inner pockets provide convenient storage for rings and smaller items
- the satin cord cinches the top closed and prevents tangling
- cuteness factor plus easier closure: hexie pulls!
Oh, and this is what the inside looks like when you pull on those drawstrings! Beautiful tiny pockets just pop out from a previously flat piece of fabric:

What I also love about this diy jewelry holder is the size. So handy - it's something like a 5" ball, you can safely throw it into your purse and carry it anywhere with you!
Finished size: closed 5" x 5" x 6" (13 x 13 x 15 cm), open flat: 12" (30cm)

But first, I'd like to mention that this pattern has been tested by my trusted pattern testers, so make sure to check out their beautiful jewelry organizers too - some of their photos are in the shop .

Now, let me give you a full supplies list so you've got everything ready to start:
- two fat quarters of quilting fabric
- a 3" scrap piece of fusible fleece
- 2.2 yards or 2 meters of ⅛"-width (3mm) satin cording
- sewing machine or needle, pins or sewing clips,
- iron, scissors, or rotary cutter plus cutting mat (I use this one by Olfa )
- the free template
Shop my personal favorite sewing supplies on Amazon HERE.
Step 1 - Get the pattern
Join our mailing list and get the jewelry organizer pattern emailed to you:
Step 2 - Print the pattern and Cut The Fabric
Print it out at no scaling (=100% size) and tape the paper pieces where necessary. Then cut out the fabric pieces:
- 2 large circles (Pattern Piece #1)
- 2 smaller circles (Pattern Piece #2)
- 1 piece of fusible fleece (Pattern Piece #3)
- 4 squares the size of 3" (7.5 cm) for hexies (optional, no pattern piece)

Step 3 - Make 2 buttonholes
Once you've cut out the 2 large circle pieces (from pattern piece #1), grab the one that's planned to become the outer and make 2 buttonholes on opposite sides of the circle, each the size of half an inch, and placed between 1 ¾" and 2 ¼" (4.5 and 5.7cm) away from the outer edge. See image below:

Use a buttonhole foot if you have one, it makes it so easy to sew buttonholes! Also, a useful tip: when you've finished sewing the buttonhole and you're ready to cut the slit using your seam ripper, place a pin to the spot where the slit should end - this way, you won't cut too far! See photo below:

BONUS TIP: Alternative To Buttonholes
If you aren't a fan of sewing buttonholes you'll love what Ulrike (find her on Etsy here ) suggested when pattern testing: use 2 grommets instead - here's how to add grommets the easy way. Eyelets are an option too.

Please note:
- before starting, fuse a 1" square piece of strong interfacing on the back side of the fabric where a grommet or an eyelet will be installed
- grommet's or eyelet's outer diameter must be a bit smaller than ½" , or it won't fit into the channel.
- Caution when sewing: make sure the needle never runs into the grommet/eyelet , or it will break!
Step 4 - sew the large piece
We're still with pattern piece #1 - Now it's time to stitch the two large circles together: Place the two large circle pieces RST and stitch around using a ¼" (7mm) seam allowance and make sure to leave a 2" (5cm) gap for turning. The arrows in the photo below show where the two buttonholes are placed. (SAME POSITION FOR EYELETS, NOT PICTURED)

Step 5 - Turn Right side out
Use pinking shears to trim the edges or make small notches all around the circle for easier turning. (I really, really love using pinking shears here, it goes so much faster!) Do not trim on the gap for turning.

Step 6 - Edgestitch around
Once turned right-side-out, press and then edgestitch all the way around. The seam will also close the gap for turning.

Step 7 - Make Pockets
Start working on pattern piece #2, the Pocket. First, apply the small 3-inch circle of fusible fleece (#3) to the backside of what you want to become the pocket lining (not visible!).

Step 8 - Stitch The Pocket Circles
Place the two pocket pieces RST and stitch around using a ¼" (7mm) seam allowance and make sure to leave a 2" (5cm) gap for turning.

Step 9 - Turn right Side out
Press to set the seam and trim the edge using pinking shears (do not trim on the gap for turning), turn right-side-out, press and edgestitch, just like you did with the larger circles.
TIP: Pressing makes the edge stitching so much easier!

Step 10 - Trace And Sew Slip Pockets
- Use pattern pieces #3 and #2 to trace the central 3" circle and the dividers onto the sewn pocket piece (#2).
- Center the pocket circle on the large (shell) circle, like this: large circle (#1) with LINING facing UP and the pocket circle (#2) with the LINING facing DOWN. (In other words, the inside of the larger circle and the inside of the smaller circle should be touching.)
- Topstitch through ALL the layers - both the small center circle and all straight pocket dividers, as marked by the blue lines in the photo below:

Step 11 - Make A Casing For the Cording
Remember the two buttonholes you made when starting the project? These are on the outer side of the large circle. Now, we'll make the casing - two circular seams that will align with the buttonholes - see the two red circles in the below photo.
- The buttonholes will end up between the two seams, and these seams will just barely touch the edges of the buttonholes.
- The INNER LINE of stitching will be super close to the edge of the smaller circle - just make sure not to stitch over it. If you love measuring, it should be exactly 2" (5.1cm) away from the finished edge of the large circle. This is the place where the buttonhole edge is.
- The OUTER LINE of stitching should be ½" (1.3cm) away from the inner line . Measuring from the outer edge, it's 1 ½" (3.8cm) from the large circle's outer edge.

IMPORTANT: the two seams should be ½" (1.3cm) apart , as the drawstring casing needs to be exactly this width. Here's a detailed view of the two casing lines on the inner side of the jewelry pouch pattern:

...and on the outside. The two stitching lines 'encase' the buttonholes, and voila! the drawstring casing is finalized.

Step 12 - Insert the cording
Now we'll need to insert the two 40" (1m) satin cords into the casing. Here's how:
- Attach your first cord to a safety pin and guide it through one buttonhole opening all the way around. Yep, you've read that right, both cord tails will peek out from the SAME buttonhole.
- Guide the other cord through the other buttonhole, all the way around. See below:

Step 13 - Add Drawstring Pulls
Tie off a knot on each end of the drawstring. You've finished your very own travel jewelry case - unless you want your drawstring pulls to be extra cute. I added two cute hexie pulls to make this drawstring jewelry bag even easier to use. Perfect!

Here is how to baste the hexies , my latest tutorial.
If you want a detailed step-by-step on how to insert these pretty hexie pulls , I've got you covered, too:

Check out the detailed how-to for adding hexie drawstring pulls - TUTORIAL HERE .
And, finished! You've just made a beautiful diy jewelry organizer. Congrats!
Make sure to check out the photos in the shop too , there are more beautiful jewelry organizers sewn by pattern testers!
Safely store all your jewelry in separate pockets while traveling to prevent tangling in this adorable pouch! Perfect for carrying cosmetics too, and adding a stylish touch to your overnight travel routine. One of the best diy jewelry organizer ideas if you ask me!
If you love keeping your home organized and tidy, these diy cord holders will keep your life free of tangled wire cords. Works every single time!
How Do I Get the Diy Jewelry Organizer pattern for FREE?
Get it for free when you join our free mailing list :
Do you want an ad-free, printable copy of this online tutorial? Find it here for just $3 . You won’t need to access the internet every time you want to make it. ------ Or get the BUNDLE with ALL the Printable Tutorials - current and future ones!

More Free Sewing Patterns

Reader Interactions
June 22, 2023 at 4:44 am
Made this as a bday gift for my friend, it was easy and really pretty!
Nancy DeVelde
March 07, 2023 at 9:43 pm
I love your patterns!
November 09, 2021 at 7:49 pm
So much cuter than I thought it would be. So much so that when I shared pictures with family they all wanted one. I would recommend the interfacing on one of each sized circles. It really does make a difference. Makes it look very professional..This is a very easy to follow tutorial, a beginner sewer will have not problem following the very well written tutorial. Thank you for offering this sewing pattern.
October 03, 2021 at 6:51 am
Thank you so much for this very nice purse which will be a nice gift for christmas
July 28, 2020 at 7:16 pm
This is so beautiful, Damjana! I am always blown away by your attention to detail! Love it!
July 28, 2020 at 7:35 pm
thank you so much, dear friend! <3 Sending hugs (e-hugs are a thing, right? 🙂 Damjana
September 14, 2022 at 2:24 pm
Hello Damjana, I was preparing myself in making this beautiful and useful pouch for some time...and finaly made it. It is indeed very good looking and to a none-sewer an extremely precious item. Thank you sooo much for sharing. Greetings from Croatia
April 07, 2020 at 8:10 pm
Made some as a gift for sons' girlfriends for when they travel. Easy, beautiful, useful. I showed it around my sewing class and gave everyone the link. Everyone was impressed. Used colored twine I had at home that matched the fabrics. Not the really scratchy type, but a silkier one. I think it came from a dollar store. Thanks!
April 07, 2020 at 8:13 pm
Dani that's so kind of you, thank you!
February 27, 2020 at 4:59 am
Outstanding use of fabric ! Loving this so much , can hardly wait to make it 👍🏼Love your creativity 💕
February 25, 2020 at 3:37 pm
Thank you so much! What an awesome bag for jewelry! Can't wait to try it. Thanks again! ~Cherease
February 25, 2020 at 2:48 pm
You are so right, and yours is beautiful! I made these as gifts years ago with silver cloth as the lining. It prevents tarnish of silver jewelry and other metals. I store my silver necklaces in an extra silver cloth pouch with pockets for silverware that I have had for over 50 years. No tarnish ever happens! 😀 It can be bought by the yard. It is a nice, very soft flannel that is treated to protect fine silver, and perfect for jewelry. Look for Pacific Silver Cloth or Hagerty. It is expensive, but it is 58 inches wide and goes a long way in small projects. You can line a drawer with it, too. It is always seen inside silver chests because it works so well. I guarantee: a jewelry pouch made with it will become a cherished heirloom! (Great bridal shower gift she won’t receive duplicates of!). You’re welcome. Love, Grandma, LOL! 😆
February 25, 2020 at 3:06 pm
Barbara hi, this is an awesome idea! Thank you for dropping by, happy to hear from you. xoxo,
February 25, 2020 at 2:00 pm
Great idea! One way to make it even better would be to use cross stitch fabric (aida cloth) so that you can secure your ear rings directly on the fabric so they don't fall out if the bag gets turned upside down.
February 25, 2020 at 3:09 pm
what a great idea! I think I have some of the aida cloth somewhere at the bottom of my stash...I'm terrible with cross-stitch so this might be a way better use of it!
Leave a Reply Cancel reply
Your email address will not be published. Required fields are marked *
Save my name, email, and website in this browser for the next time I comment.
- Capes & Cloaks
- Coat&Jacket
- Romper & Jumpsuit
- Baby & Kids
- Saint Patrick’s Day
- Mother’s Day
- Father’s Day
- Baby & Kids
DIY Fabric Travel Jewelry Case Free Sewing Patterns
Spring and Summer are perfect seasons to go out especially when you have school kids at home, and a organizer to keep all your jewelry in safe without tangling is essential, so these DIY Fabric Travel Jewelry Case Free Sewing Patterns are a must-try for sewer if you have scrap fabrics at hands. I have shared some purse DIY tutorials before, and if you love big handbags, I also shared some projects of sew bags tutorials . Crystal from Stitched by Crystal shares a tutorial at Make It and Love It for sewing this travel jewelry clutch. There’s a leather strip with holes for earrings, a padded strap for rings, a fabric strap with small pockets underneath to keep your necklaces, and one large clear pocket with a zipper. It folds up and ties shut for easy transport. The travel jewelry wallet by Amy from Positively Splendid also shares a tutorial showing how to make one with three small pockets to hold larger earrings or small brooches, a larger pocket to hold a necklace or large brooch, a snap-down roll to hold rings, and a card punched with holes to hold post earrings. Which one you will prefer to make as next Project?
You may love: DIY Rollie Pollie Travel Organizer Sewing Pattern

Click the link below for the FREE sewing pattern:
Travel Jewelry Case by Amy of Positively Splendid

Travel Jewelry Case by Sew Can She

Travel Jewelry Clutch Tutorial by Stitched by Crystal

Click the link below for the FREE sewing pattern and tutorial:
Mini Jewelry Roll by Haberdashery Fun
Related articles more from author, smocked chambray dress free sewing tutorial, women fabric flounce wrap skirt free sewing pattern, fabric dopp kit bag free sewing pattern, fabric banana plushies free sewing pattern, fabric paper bag pants free sewing pattern, reversible hanging basket storage pods free sewing pattern.
DIY Traveling Jewelry roll – FREE sewing pattern

UPDATE – we regret this pattern is no longer available on the burda website. Sadly, this sort of thing happens from time to time and is outside of our control. We hope you can find an alternative jewelry roll sewing pattern here.
Getting everything organized in your life is not easy. That’s why being able to download this FREE pdf pattern that keeps all your jewelry organized is awesome.
This DIY Traveling Jewelry Roll means you’ll have a place for all your jewelry whether at home or while traveling. This bright jewelry case is quick and easy to make and really fun and best of all the pattern is FREE.
What you will need to make the DIY Travelling Jewelry Roll
- Fabric pieces
- A piece of Leather or other non-fraying material such as cork or felt recommeneded
- Fusible web
- Snap fasteners and attachment pliers
- Quilting ruler
- Wonder clips
- Assorted ribbons
- Basic sewing supplies and a sewing machine .
Pattern no longer available
Related Posts

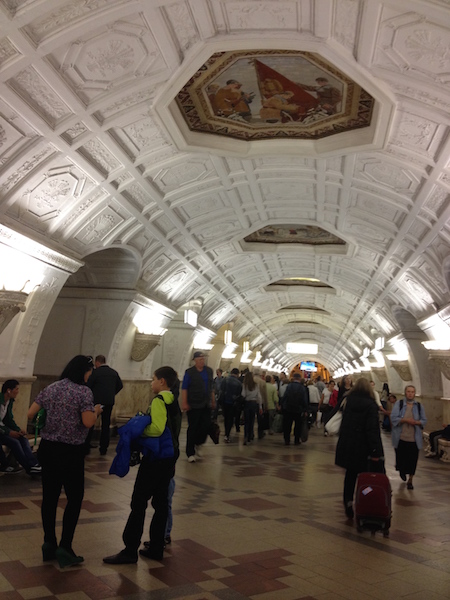
Komsomolskaya metro station looks like a museum. It has vaulted ceilings and baroque decor.
Hidden underground, in the heart of Moscow, are historical and architectural treasures of Russia. These are Soviet-era creations – the metro stations of Moscow.
Our guide Maria introduced these elaborate metro stations as “the palaces for the people.” Built between 1937 and 1955, each station holds its own history and stories. Stalin had the idea of building beautiful underground spaces that the masses could enjoy. They would look like museums, art centers, concert halls, palaces and churches. Each would have a different theme. None would be alike.
The two-hour private tour was with a former Intourist tour guide named Maria. Maria lived in Moscow all her life and through the communist era of 60s to 90s. She has been a tour guide for more than 30 years. Being in her 60s, she moved rather quickly for her age. We traveled and crammed with Maria and other Muscovites on the metro to visit 10 different metro stations.

Arrow showing the direction of metro line 1 and 2

Moscow subways are very clean
To Maria, every street, metro and building told a story. I couldn’t keep up with her stories. I don’t remember most of what she said because I was just thrilled being in Moscow. Added to that, she spilled out so many Russian words and names, which to one who can’t read Cyrillic, sounded so foreign and could be easily forgotten.
The metro tour was the first part of our all day tour of Moscow with Maria. Here are the stations we visited:
1. Komsomolskaya Metro Station is the most beautiful of them all. Painted yellow and decorated with chandeliers, gold leaves and semi precious stones, the station looks like a stately museum. And possibly decorated like a palace. I saw Komsomolskaya first, before the rest of the stations upon arrival in Moscow by train from St. Petersburg.
2. Revolution Square Metro Station (Ploshchad Revolyutsii) has marble arches and 72 bronze sculptures designed by Alexey Dushkin. The marble arches are flanked by the bronze sculptures. If you look closely you will see passersby touching the bronze dog's nose. Legend has it that good luck comes to those who touch the dog's nose.

Touch the dog's nose for good luck. At the Revolution Square station

Revolution Square Metro Station
3. Arbatskaya Metro Station served as a shelter during the Soviet-era. It is one of the largest and the deepest metro stations in Moscow.

Arbatskaya Metro Station
4. Biblioteka Imeni Lenina Metro Station was built in 1935 and named after the Russian State Library. It is located near the library and has a big mosaic portrait of Lenin and yellow ceramic tiles on the track walls.

Lenin's portrait at the Biblioteka Imeni Lenina Metro Station

5. Kievskaya Metro Station was one of the first to be completed in Moscow. Named after the capital city of Ukraine by Kiev-born, Nikita Khruschev, Stalin's successor.

Kievskaya Metro Station
6. Novoslobodskaya Metro Station was built in 1952. It has 32 stained glass murals with brass borders.

Novoslobodskaya metro station
7. Kurskaya Metro Station was one of the first few to be built in Moscow in 1938. It has ceiling panels and artwork showing Soviet leadership, Soviet lifestyle and political power. It has a dome with patriotic slogans decorated with red stars representing the Soviet's World War II Hall of Fame. Kurskaya Metro Station is a must-visit station in Moscow.
Ceiling panel and artworks at Kurskaya Metro Station

8. Mayakovskaya Metro Station built in 1938. It was named after Russian poet Vladmir Mayakovsky. This is one of the most beautiful metro stations in the world with 34 mosaics painted by Alexander Deyneka.

Mayakovskaya station

One of the over 30 ceiling mosaics in Mayakovskaya metro station
9. Belorusskaya Metro Station is named after the people of Belarus. In the picture below, there are statues of 3 members of the Partisan Resistance in Belarus during World War II. The statues were sculpted by Sergei Orlov, S. Rabinovich and I. Slonim.

10. Teatralnaya Metro Station (Theatre Metro Station) is located near the Bolshoi Theatre.

Teatralnaya Metro Station decorated with porcelain figures .

Taking the metro's escalator at the end of the tour with Maria the tour guide.
Have you visited the Moscow Metro? Leave your comment below.

January 15, 2017 at 8:17 am
An excellent read! Thanks for much for sharing the Russian metro system with us. We're heading to Moscow in April and exploring the metro stations were on our list and after reading your post, I'm even more excited to go visit them. Thanks again 🙂

December 6, 2017 at 10:45 pm
Hi, do you remember which tour company you contacted for this tour?
Leave a Reply Cancel reply
You must be logged in to post a comment.
Please go to the Instagram Feed settings page to create a feed.
- Client log in
Metallurgicheskii Zavod Electrostal AO (Russia)
In 1993 "Elektrostal" was transformed into an open joint stock company. The factory occupies a leading position among the manufacturers of high quality steel. The plant is a producer of high-temperature nickel alloys in a wide variety. It has a unique set of metallurgical equipment: open induction and arc furnaces, furnace steel processing unit, vacuum induction, vacuum- arc furnaces and others. The factory has implemented and certified quality management system ISO 9000, received international certificates for all products. Elektrostal today is a major supplier in Russia starting blanks for the production of blades, discs and rolls for gas turbine engines. Among them are companies in the aerospace industry, defense plants, and energy complex, automotive, mechanical engineering and instrument-making plants.
Headquarters Ulitsa Zheleznodorozhnaya, 1 Elektrostal; Moscow Oblast; Postal Code: 144002
Contact Details: Purchase the Metallurgicheskii Zavod Electrostal AO report to view the information.
Website: http://elsteel.ru
EMIS company profiles are part of a larger information service which combines company, industry and country data and analysis for over 145 emerging markets.
To view more information, Request a demonstration of the EMIS service
Elektrostal, Russia
Region: Moscow Oblast
Geographic coordinates: 55.783300, 38.466700, temperature range: -40.0°c to 30.0°c (-40°f to 86°f), climate: cold and snowy winters, mild summers with occasional heat waves., population: 158508, language: russian.
Elektrostal, Located in the Moscow Oblast region of Russia, Is a city known for its industrial heritage and diverse economy. With a population of around 150, 000 people, It lies approximately 50 kilometers east of Moscow. Founded in 1916 as an industrial center for steel and metal production, Elektrostal’s most notable landmark is the Elektrostal Metallurgical Plant (EMZ). The plant produces various steel products including railway wheels, Pipes, Wire rod, And sheet metal. Apart from its industrial significance, Elektrostal offers several cultural attractions that are worth visiting.
The Museum-Estate Kuskovo features an impressive collection of art and artifacts from the 18th century. Lake Senezh – a large freshwater lake outside Elektrostal’s city limits – provides opportunities for swimming, Boating or fishing during summer months. Elektrostal also has several parks where visitors can enjoy outdoor activities such as hiking or cycling. Gorky Park features walking paths along with sports facilities like tennis courts and basketball courts. Public transport within Elektrostal itself is convenient with numerous bus routes connecting different parts within the city limits as well as nearby towns like Noginsk or Dmitrovskiy Districts in Moscow Region.
Overall Elektrostal offers visitors an interesting mix of industrial heritage, Cultural attractions and natural beauty making it definitely worth a visit whether you’re interested in learning about Russia’s steel industry or simply want to enjoy the outdoors.

Important Landmarks
- The Museum of Local Lore – it showcases the history and culture of the town.
- The Church of St. Nicholas – a beautiful Orthodox church built in the 19th century.
- Victory Park – a large park with several monuments dedicated to World War II heroes.
- Ice Palace Vityaz – a modern ice arena that hosts various sports events and concerts.
- Elektrostal Central Park – a popular spot for picnics, walking, and outdoor activities.
- The Monument to Soviet Soldiers – located in Victory Square, it honors soldiers who died during World War II.
- Elektrostal History Museum – displays artifacts from ancient times to present day including photographs, documents, paintings etc.,
- Kuzminsky Park- A beautiful park with greenery all around perfect for spending some quality time with family or friends

Primary Industries
- Metallurgical Industry: Elektrostal is renowned for its steel production industry that involves the manufacturing of steel pipes, wires, sheets and other metal products.
- Chemical Industry: The city boasts several chemical plants that produce chemicals such as ammonia, fertilizers and plastics.
- Machinery Industry: Elektrostal has a significant machinery industry that produces machine tools, mining equipment and other industrial machinery.
- Construction Materials Industry: There are several cement factories in the city producing cement and concrete products.
- Food Processing Industry: Several food processing plants operate within the city producing dairy products, meat products and other food items.
- Energy Sector: The city houses a thermal power plant which supplies electricity to the region.
- Retail and Service Sector: Additionally, there is a well-developed retail sector with shopping centers, supermarkets and small shops catering to the local population’s needs.

Noteable History
- The city was founded in 1916 as a center for steel production during World War I.
- During World War II, Elektrostal played a crucial role in supplying the Soviet army with weapons and ammunition.
- In 1957, the first nuclear power plant in Russia was built near Elektrostal.
- The city is known for producing high-quality steel that is used in various industries such as automotive, aerospace, and construction.
- Notable people from Elektrostal include Olympic gold medalist figure skater Irina Slutskaya and former Russian Prime Minister Sergei Kiriyenko.
- In recent years, the city has undergone significant modernization efforts to improve its infrastructure and attract new businesses to the area.

Museums and Things To See
- Museum of Local Lore: This museum showcases the history and culture of Elektrostal and the surrounding region.
- Victory Park: A large park dedicated to the victory in World War II, with monuments, memorials, and a military museum.
- Church of St. Nicholas: A beautiful Orthodox church with stunning frescoes and icons.
- The House-Museum of V.V.Vorovsky: This museum is dedicated to the revolutionary leader Vorovsky who lived in Elektrostal for a time.
- The Central Culture and Leisure Park: A popular park with various attractions like amusement rides, sports facilities, cafes etc.
- The Monument to the First Builders of Elektrostal: This monument commemorates those who built the city’s first industrial complex.
- Art Gallery Art-El: An art center featuring works by local artists as well as exhibitions from around Russia and beyond.
- Museum Elektrosvet: A unique museum showcasing lighting equipment from various periods starting from 19th century till present day.


Cultural Events
- City Day Celebration: This festival is held annually on the first weekend of September to celebrate the founding of Elektrostal.
- International Festival The World of Dance: A dance festival featuring performances from various countries around the world.
- Folklore Kaleidoscope Festival: A cultural event showcasing traditional folk music, dance, and costumes from different regions of Russia.
- Art-Electro Festival: An art exhibition featuring works by local artists as well as artists from other parts of Russia.
- Jazz Festivals: There are several jazz festivals held throughout the year in Elektrostal which feature performances by local and international jazz musicians.

- Shashlychnaya No. 1 – A restaurant specializing in shashlik (Russian kebabs) and other grilled meats.
- Cafe U Dvukh Medvedey – A cozy cafe serving traditional Russian dishes like borscht, pelmeni (dumplings), and blini (pancakes).
- Pivnaya Apteka – A beer bar with a wide selection of craft beers from Russia and around the world.
- Kebab House – A fast-food chain offering various types of kebabs, falafel wraps, and salads.
- Cafe Podkova – Another cozy cafe serving Russian dishes like beef stroganoff, chicken Kiev, and dumplings with different fillings.
- Restaurant Kolbasny Dom – A meat lover’s paradise with various types of sausages, smoked meats, and steaks on the menu.
- Sushi Master – For those who crave Japanese cuisine; this sushi restaurant offers fresh sushi rolls and sashimi plates.
- Pizzeria Mama Mia!- If you’re in the mood for Italian food; this pizzeria offers delicious pizzas made from scratch using fresh ingredients.
- Cafe Kamelot- A cozy café serving traditional Russian dishes such as borscht soup,pelmeni (dumplings),and vareniki(boiled dumplings).
- Restaurant “Gagarin”- Named after Yuri Gagarin; this restaurant serves European cuisine including steaks,pasta,and salads along with exotic cocktails to choose from!

Parks and Recreation
- Central Park of Culture and Rest
- Park of the 50th Anniversary of Victory
- Park of the 300th Anniversary of Elektrostal
- Sports and Recreation Complex Olympic
- Ice Palace Elektrostal
- Ski resort Krugloye Ozero
- Beach complex Sunny Beach
- Tennis club Elektrostal
- Bowling club Strike
- Paintball club Delta Force

Create Memories, Travel Often.
Explore more:.

Youssoufia, Morocco
Reading Time: 8 minutes Youssoufia, Morocco Region: Youssoufia Geographic Coordinates: 32.250000, -8.533300 Climate: Data not available. Population: 67628 Language: Arabic Youssoufia is a vibrant city located in the western region of Morocco, Approximately 200 kilometers south of Casablanca. Situated on the fertile plains of

Talcahuano, Chile
Reading Time: 6 minutes Talcahuano, Chile Region: Talcahuano is located in the Biobío Region Geographic Coordinates: -36.716700, -73.121900 Temperature Range: 10.0°C to 25.0°C (50°F to 77°F) Climate: Variable. Population: 147831 Language: Spanish Talcahuano is a port city located in the Biobío Region of Chile,

Jīma, Ethiopia
Reading Time: 6 minutes Jīma, Ethiopia Region: Oromia Geographic Coordinates: 7.666700, 36.833300 Temperature Range: 15.0°C to 25.0°C (59°F to 77°F) Climate: Seasonal tropical climate with a rainy season from June to September and a dry season from October to May. Population: 177900 Language: Oromo

Stevenage, United Kingdom
Reading Time: 8 minutes Stevenage, United Kingdom Region: Hertfordshire Geographic Coordinates: 51.901700, -0.201900 Climate: Varies. Population: 89663 Language: English Stevenage is a vibrant town located in Hertfordshire, England. With a rich history dating back to Roman times, Stevenage has evolved into a modern and

Brookhaven, New York
Reading Time: 6 minutes Brookhaven, New York USA Geographic Coordinates: 40.832000, -72.951700 Temperature Range: -40.0°C to 40.0°C (-40°F to 104°F) Climate: Brookhaven has a humid subtropical climate with hot summers and mild winters. The area experiences precipitation throughout the year, with the heaviest rainfall

Wuzhou, China
Reading Time: 6 minutes Wuzhou, China Region: Guangxi Geographic Coordinates: 23.483300, 111.317000 Temperature Range: 10.0°C to 35.0°C (50°F to 95°F) Climate: Seasonal. Population: 3061100 Language: Chinese Wuzhou is a city located in the Guangxi Zhuang Autonomous Region of southern China. It sits on the
IMAGES
COMMENTS
Free Pattern: Travel Jewelry Case. Travel handmade with this beautiful jewelry organizer that you can sew with just 3 fat quarters! A few years ago when I was putting a proposal together for my first book Just For You, I wrote this Travel Jewelry Case Pattern. We figured out a few months later that it wasn't going to fit in the book, so I ...
About the Jewelry Organizer Pattern. This jewelry organizer is made in a fun circular shape with a ribbon or drawstring around the top to easily open and close the bag. The organizer features 6 pockets on the interior - 2 larger-sized pockets and 4 smaller pockets.
Repeat step 1 with Color B fabric. Place the right sides together of the Color A large circle and Color B large circle and pin in place. Do the same thing for the smaller circle for Color A and Color B. Sew around the pinned circles using a 1/2 seam allowance leaving a 1 ½ inch opening for turning right side out.
Travel jewelry cases would make a terrific gift for any of the ladies on your list, and with my complete step-by-step tutorial and free PDF pattern, they can be stitched in no time! These would be a perfect idea for moms and grandmas, but they would be a very nice gift for teachers, friends, neighbors and more.
Tri-Fold Jewelry Roll For Travel | | Production Ready| Customizable Mass Production Tech Pack | Up to Scale | Not Paper Patterns. (11) $12.99. Digital Download. Plan for Jewelry Cabinet Plan with rotating pull-out panels and 8 drawers. (PDF Plan only, no physical product) (249) $15.00.
Once you have prepared the desired jewelry holders on your canvas, pin to the patterned fabric with the pockets (good side) facing in. 5. Sew around 3/4 of the rectangle, then turn right-side out and sew up the hole. 6. Do this same process for the 10 x 13-inch rectangles. Attach your desired pockets and sew. 7.
We offer a free pattern download below to help you create a perfect circle and provide you with handy stitching guidelines. ... Circular Pouch Jewelry Caddy Jewelry Minder Jewelry Pouch Jewelry Roll-up Soft Jewelry Pouch travel accessories. Related Posts. Puffer Sling Bag. February 26, 2024. Ragged Edge Tote in Two Sizes. January 29, 2024. Kid ...
This jewelry purse has a spot for earrings, chains or bracelets, rings, and other small items, and a full-width zipper pocket too. Make it sumptuous in silk or satin, or practical and more hard-wearing in a quilting weight cotton. Features: Finished size closed - 8.5 inches by 6 inches. Ring holder, earring holder, 2 hangers for chains ...
Step 3 - Make 2 buttonholes. Once you've cut out the 2 large circle pieces (from pattern piece #1), grab the one that's planned to become the outer and make 2 buttonholes on opposite sides of the circle, each the size of half an inch, and placed between 1 ¾" and 2 ¼" (4.5 and 5.7cm) away from the outer edge.
Learn how to make a stylish and secure jewelry wallet travel organizer with this easy tutorial. Watch the video and follow the steps to create your own chic accessory.
http://www.analuisa.com/MelanieBlog post with written instructions: https://melaniekham.com/how-to-sew-a-travel-jewelry-pouch-easy-pattern/Learn how to sew y...
Crystal from Stitched by Crystal shares a tutorial at Make It and Love It for sewing this travel jewelry clutch. There's a leather strip with holes for earrings, a padded strap for rings, a fabric strap with small pockets underneath to keep your necklaces, and one large clear pocket with a zipper. It folds up and ties shut for easy transport.
5 Rod Girl & Women Bangles Box Teardrop Pattern Laminated Box, Organizer For Bangle, Watches, Bracelets, Jewellery With Travel Cases Storage. (748) $34.70. $38.99 (11% off)
Wrendale Jewellery Roll / Jewelry Roll - Knitting Pattern - Jewelry Organizer - Travel Bag - Gift - Instant Download (182) $ 5.00. Add to Favorites Patchwork Cross Stitch Project Bag Roll for Travel Retreat Quilted Needlework Case with Pockets and Secure Qsnap Housing Band (850) $ 49.99. FREE shipping ...
Keep untangling a knot of necklaces off your travel itinerary with this handy DIY jewelry roll organizer. 💍 Full Tutorial: https://www.ehow.com/13764490/diy...
From closet organizers to DIY jewelry organizers to travel organizer pattern ideas and more, this guide is the perfect way to get your clutter back in order. Find all sorts of inspiration in this collection of 50+ Sewing Organizer Pattern Ideas. Be ready for any occasion and tidy up with this amazing list of handmade organizer patterns, including closet organizers, purse pouches, jewelry cases ...
What you will need to make the DIY Travelling Jewelry Roll. Fabric pieces. A piece of Leather or other non-fraying material such as cork or felt recommeneded. A Zipper. Stuffing. Fusible web. Snap fasteners and attachment pliers. Quilting ruler. Thread.
6. Novoslobodskaya Metro Station was built in 1952. It has 32 stained glass murals with brass borders. Novoslobodskaya metro station. 7. Kurskaya Metro Station was one of the first few to be built in Moscow in 1938. It has ceiling panels and artwork showing Soviet leadership, Soviet lifestyle and political power.
Check out our travel organizer pattern selection for the very best in unique or custom, handmade pieces from our patterns shops. ... Jewelry roll pattern,Jewelry organizer pattern,Jewelry roll pdf,Jewelry organizer pdf,Jewelry roll template,Jewelry travel case pdf (941)
Metallurgicheskii Zavod Electrostal AO (Russia) In 1993 "Elektrostal" was transformed into an open joint stock company. The factory occupies a leading position among the manufacturers of high quality steel. The plant is a producer of high-temperature nickel alloys in a wide variety. It has a unique set of metallurgical equipment: open induction ...
Elektrostal is a city in Moscow Oblast, Russia, located 58 kilometers east of Moscow. Elektrostal has about 158,000 residents. Mapcarta, the open map.
Elektrostal, Located in the Moscow Oblast region of Russia, Is a city known for its industrial heritage and diverse economy. With a population of around 150, 000 people, It lies approximately 50 kilometers east of Moscow. Founded in 1916 as an industrial center for steel and metal production, Elektrostal's most notable landmark is the Elektrostal Metallurgical Plant (EMZ).