Creativity in Therapy
Inspiring therapists and counselors to be more creative
June 27, 2016 by Carolyn Mehlomakulu

Make An On-The-Go Art Kit for Travel
By the time this post goes up, I’ll be on vacation in Canada. As I was preparing to pack (and thinking about what to write in advance for this blog), I decided that I would share about my travel art kit.
If you’re a creative therapist, you hopefully make some time for your own art-making in your life. So, you may have occasion to be packing some traveling art supplies, either to bring on a trip or to carry around in your bag to use when you have free time. (If you’re not making art, you should make time for it! Art-making is excellent self-care. Did you see the latest research from Drexel that showed that art-making reduces levels of the stress hormone cortisol, regardless of your skill level?)
Unfortunately, I never do as much art as I hope to on vacations, but I always like to bring some art supplies with me. And my son is getting more and more interested in drawing and painting, especially when he sees me doing it, so I thought that some art supplies might help with toddler boredom on the airplane.
Thinking about a traveling art kit was also making me think about my past time spent as a “traveling” art therapist. Most of the time, art therapy is done in the therapist’s office, where we ideally have lots of awesome supplies for our clients to use. But I have also had jobs where I had to travel where the client is, doing both home-based therapy and school visit therapy. I didn’t want to stop doing art therapy, so I put together an on-the-go art therapy box. Although lots of different media and supplies are great, art therapy really only requires the therapist, the client, a single art medium, and a surface to create on.

So, here’s what has ended up in my traveling art kits…
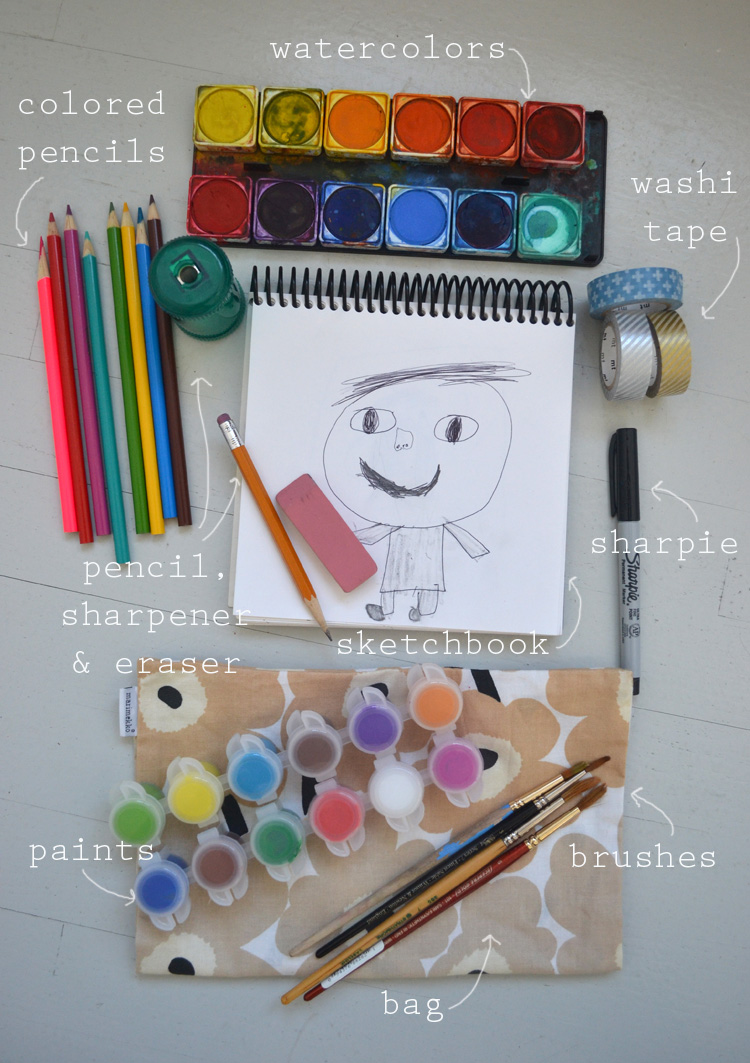
My current travel kit for vacation is minimal and small because it needs to fit easily in my carry-on bag, along with all the other things that a traveling toddler will need. This is the type of art kit that would be easy to throw into a large purse. Everything would fit into a pencil bag, but I put mine into a clear zipper pouch that I had.

- Small Journal or Sketchpad*
- High-Polymer Eraser
- Black Micron Pen
- Travel Watercolor Set (mine is Winsor & Newton)
- Full sized Watercolor Brush
- Mini Colored Pencils (I have Xonex Micro Colored Pencils )
- Markers (For the adult version, I would bring my Tombow Dual Brush ones, but for my kid-friendly version, I got Crayola Washable PipSqueaks )
- Baby wipes for clean-up
* I have a small journal for myself and made my son a small journal from a recycled file folder and scrap paper. Cut the folder in half and fold for the cover. Fold paper in half and staple down the center crease. Use tape along the front page and the back page to secure to the cover.

My Travel Art Therapy Kit

- Plastic storage box to hold everything (mine is from Target). You can also use a file storage box, messenger bag/satchel, etc. I like the box because it doubles as a surface to draw on, so if you’re using some kind of bag, make sure to include a clipboard.
- Layer of collage images
- Drawing paper
- Colored Pencils
- Pencil and sharpener (or mechanical pencils)
Your on-the-go art therapy kit can be as elaborate or simple as you want. You could also add…
- Oil or chalk pastels
- Construction paper or other colored paper
- Watercolors and brushes
- Watercolor pencils or crayons
- Water brush
- Modeling clay
- Wipes for clean-up
* Be mindful of your therapy setting when choosing supplies for community-based services; you don’t want to bring messy materials if the client won’t really be able to use them.
If you liked this post, be sure to sign up for the email newsletter to get updates on future posts: http://eepurl.com/bOu5yj
Carolyn Mehlomakulu is a Licensed Marriage and Family Therapist and Registered Art Therapist in Austin, Texas who works with children, teens, and families. For more information about individual therapy, adolescent and child counseling, family therapy, teen group therapy, and art therapy services, please visit: www.therapywithcarolyn.com .
This blog is not intended to diagnose or treat any mental health conditions. All directives, interventions, and ideas should be used by qualified individuals within the appropriate bounds of their education, training, and scope of practice. Information presented in this blog does not replace professional training in mental health, psychotherapy, counseling, art therapy, or play therapy . Although anyone can have a healing experience with art, art therapy requires the direction of a trained art therapist.
This blog includes affiliate links (see full disclosure here ). If you’d like to help support the blog without any extra cost to you, please click through on Amazon links and shop as you normally would. Your support is greatly appreciated!
Related Posts

About Carolyn Mehlomakulu
Carolyn Mehlomakulu, LMFT-S, ATR-BC is an art therapist in Austin, Texas who works with children, teens, and families. Carolyn also provides art therapy supervision and clinical supervision for LMFT-Associates. For more information about individual therapy, teen and child counseling, family therapy, teen group therapy, and art therapy services, please visit: www.therapywithcarolyn.com. In addition to blogging and working with clients, Carolyn enjoys making her own art, reading, running, enjoying nature, and spending time with her son and husband.
June 27, 2016 at 11:43 pm
Yes..I have been using one for over 25. Years…could not travel without it. I thought your was we'll written. I also have more space in mine now that I brought a rolling cart type. So I add things like balloons for making stress balls..and cut out paper shapes; some r for making genograms..etc..
July 6, 2016 at 1:52 pm
Thanks for sharing about your travel art kit. I love the idea of bringing a few balloons and play dough for making stress balls with clients.
July 6, 2016 at 9:55 pm
I am thrilled to have experienced your blog!. I too am a traveling art therapist. I have a travel bag of art supplies for adults and children. I do not pack clay but plasticine. I feel like it is my magic carpet bag filled with art supplies that thrills me every time I unpack the bag. I always have to have a traveling art supply bag. For my upcoming trip I must pack lightly which means a journal and pens and markers. Thanks so much for sharing.
August 10, 2017 at 11:33 pm
*i recently took a small box of oil pastels and cut paper on a cruise. I did a two pieces on time out before dinner several nights. I even processed a Holocaust Memorial that I visited. I kept getting better results by practicing regularly. Lol. Then I decided to use them on the flight home (5.5 hrs), so I packed them in my ‘purse’. I got stuck in security because they were thought to be fire crackers via xray. They had to go through my bag, kept dusting for gun powder… and finally let me go with art materials in hand. A fun art story for me.
August 19, 2017 at 2:04 pm
Thanks for sharing that story! I would have never thought that oil pastels would look suspicious.
Leave a Reply Cancel reply
Your email address will not be published. Required fields are marked *
Save my name, email, and website in this browser for the next time I comment.
Currently you have JavaScript disabled. In order to post comments, please make sure JavaScript and Cookies are enabled, and reload the page. Click here for instructions on how to enable JavaScript in your browser.

7 DIY Travel Bag Patterns So You Can Travel In Style
Have you ever noticed that when you are shopping for various travel bags, there are two options? You can get cheaply made nylon bags or extremely overpriced “bland” looking bags.
But how do we get around these two options? The answer is simple: DIY travel bags.
Today, I want to go over the different types of travel bags and supplies and how to create them, and then show you some beautiful travel bag patterns that you can use to create your traveling accessories.
Page Contents
Types of Travel Bags
Before we jump into the how-to or the patterns list, I want to go over the different kinds of bags categorized as “travel bags.” Remember that this post focuses on travel bags you can create, not factory-made luggage.
- Jewelry bag
- Toiletry bag
- Garment bag
- Travel tote
- Backpack
Supplies You Will Need to Make Your Own Travel Bag
The supplies you will need will vary depending on the specific item you are making. The following list will include various notions and supplies you will need to make different travel bags.
- Travel bag sewing pattern
- Interfacing for structure
- Trimming (optional for decoration)
- Scissors or rotary cutter and mat
- Sewing machine
How Do You Make a Travel Bag?
Now that we know the different types of travel bags and the supplies we may need to create them let’s go over the steps of making a travel bag.
I recommend using a pattern when doing a project like this since it will have detailed instructions for the different steps. These are essential steps to give you an idea of what’s involved when making a large bag.
- Step 1: Choose a pattern
When looking for the perfect pattern, you want to make sure you are looking for one that is within your skill level and will meet your traveling needs. There are thousands of travel bag patterns available on the market, so you shouldn’t have a problem finding something that will work for you.
- Step 2: Cut all fabric and interfacing pieces
The pattern you choose either has specific cutting instructions or may even come with templates you can use to cut the fabric pieces you will need. Remember the age-old tip: “measure twice, cut once.”
- Step 3: Attach notions to the fabric pieces
Where you add the notions will vary depending on which ones you are using and when the pattern tells you to add them. I wanted to include this so you can think about when you need to add them. There’s nothing more frustrating than realizing you forgot to add a D-ring or other notions and have to take apart part of your project and add it. *Speaking from personal experience*
- Step 4: Sew the exterior pieces together
The pattern writer will do a great job of explaining how to do this step. Ensure you keep your raw edges lined up at all times to ensure an even seam allowance.
- Step 5: Create and attach the straps
This is a fun step; you can make straps from various materials like canvas, leather, quilting cotton, denim, nylon strapping, etc. Some patterns will have you attach the straps before you sew the lining and exterior parts together. Others will have you connect them to the exterior first.
- Step 6: Sew the lining pieces together
This step will be where you add pockets for the bag’s interior and create the lining. I like to use a fun, funky fabric inside my bags. It gives it a little more personality and pizazz.
Tip: If you use a weekender bag pattern and want a sizeable wide-open bag, you can skip creating a lining. To conceal the raw edges of the exterior parts, take bias tape and sew it along all the raw edges. This will give the bag a more finished look; plus, when you wash it, the edges won’t unravel.
- Step 7: Sew the lining and exterior parts together
This final step is always exciting since you see the entire bag come together. Follow the instructions in the pattern you’ve used to complete the bag. Once you’ve finished the bag, take a moment to admire your work and show it off to your friends and family!
7 Travel Bag Patterns For You To Peruse
For this compilation, I tried to find a good selection of travel bag patterns to give you a glimpse into what is possible with a bit of fabric, thread, and imagination. Without further ado, let’s dive into this fun collection!
- Rollie Pollie Organizer

You can use this fun little organizer to store all kinds of things for your trip, from toiletries to makeup to jewelry. This toiletry bag sewing pattern includes instructions and templates to create this unique roll-up organizer. It features four removable pouches, and the pattern has instructions for three different sizes. The skill level for this project is intermediate.
- Convertible Travel Bag

How cute is this convertible bag? This bag would be great if you are planning a day trip to the city or if you want to take your laptop to the local coffee shop to do some work. The maker of this bag used an existing messenger bag pattern and made some changes to the straps to make it convertible. The straps can be used either as a messenger bag or backpack.
- DIY Easy Makeup Bag

Here is a free tutorial to make this cute pleated makeup bag. The maker gives a supplies list, written instructions with photos, and a YouTube video to accompany the tutorial. The finished bag will measure approximately 9”x5”x5”, the perfect size for travel.
- Retro Travel Bag

I found this pattern on Etsy in the shop PolkaDotChair. The pattern will show you how to create your duffel bag that measures 20”x11”x6”. The pattern includes templates and gives you three different strap options depending on what look you are going for with your bag.
- Got Your Back 2.1

This backpack pattern might be the right choice if you like to travel light. The backpack has multiple pockets to store items and keep your things organized while traveling and has a convenient handle on top if you don’t want to put it on your back while walking around. The finished size of the backpack is 14”x12”6”.
- Divide and Conquer

This pattern is perfect for those who like to organize their belongings while traveling. There are two size options for you and optional straps for carrying. You could use this bag for toiletries, makeup, craft supplies, electronics, kid’s toys, etc.
- Townsend Travel Bag

This beautiful bag can be made using the Townsend Travel Bag sewing pattern. You can tell the designer pays attention to detail by the professional finishes of this bag. Adding the train case bottom is a massive bonus if you need to bring shoes or other bulky items with you. You can use it for an overnight bag, carry-on, diaper bag, or gym bag, to name a few options. The final measurements of this bag are 16”x13”x6”.
I hope you enjoyed this group of travel bag patterns. I want to make a complete set of luggage for my next trip! How about you? Which bag was your favorite? Let me know in the comments below.
Happy Stitching!

Share this:
Similar posts.

15 Breath-Taking Spring Sewing Projects to Get You Through the Winter Blues

15 Incredible Fat Quarter Friendly Christmas Sewing Projects For Beginners

11 of the Most Adorable Frog Plush Beginner Sewing Patterns

15 Bright and Cheery Summer Sewing Projects to Make Your Summer Even Better!

The Absolute Best Sewing Chair for Quilters and Sewists

13 Gorgeous and Modern Baby Quilts to Make for Your New Bundle of Joy
One comment.
- Pingback: 11 Crossbody Bag Patterns
Leave a Reply Cancel reply
Your email address will not be published. Required fields are marked *
Save my name, email, and website in this browser for the next time I comment.
- Skip to primary navigation
- Skip to main content
- Skip to primary sidebar
- Skip to footer
raising creative thinkers
Travel Art Bag
February 27, 2013 by Barbara Rucci 1 Comment
- Pinterest 3

We’re back from our February vacation! It was beautiful in the Dominican Republic and we feel so fortunate that we were invited to share a very memorable family vacation with grandparents. Despite several trips to the infirmary for various problems (which I will not elaborate on because I am pretending none of that happened), we were able to relax, read, eat, play and best of all…create some pretty art! I threw together this little travel bag for the trip and it was perfect. I’ll include sources, but you can really just grab anything that you have on hand (or make a run to CVS) and even just put it in a ziplock! My goal was to get the kids to draw and paint from the beautiful nature that surrounded us. (I will share their art later this week.)
This post contains affiliate links. Thank you for your support!
Here’s what I put in our travel art bag:
Click here to see what we made with our art bag on this trip.
I hope you had a nice little break as well (or will have one soon!). Don’t forget to pack a few art supplies when you travel!
{Travel tip: Remember, when traveling to a foreign country with small kids, curtail the habit of picking off of your kids’ plates or having your kids share any food. Also, don’t share utensils or have the whole family drink from the same water bottle at the airport. And wash hands frequently! Sickness could be spreading and you won’t even know it until it’s too late. And that’s all I have to say about that.}
Reader Interactions
October 16, 2019 at 1:26 pm
I like the second picture where it shows all that you carry in your art bag. I want to buy a bag for my daughter so all her art supplies can fit. Thank you for sharing your pictures. I’ll search for a bag perfect for her to carry her art.
Leave a Reply Cancel reply
Your email address will not be published. Required fields are marked *
Save my name, email, and website in this browser for the next time I comment.

Recent Posts

Raise Thoughtful & Creative Children
Subscribe to my weekly (ish) newsletter and receive a list of the best art ideas every Saturday . Art matters!
Please review my Privacy Policy .
You have Successfully Subscribed!
- Gathering Login
- Login to Access Classes

What’s In My Travel Art Kit

Dear Wonderful, Creative You:
I am really passionate about making art on the go. Whether I’m camping for a week in the woods, in NYC for the weekend, or waiting in the doctor’s office, a travel art kit helps me put so much more art play time in my life. People ask me all the time about what’s in my travel art kit, so I want to share what I put it in and how and when I use it.

See this teeny little art kit? This is the small version. Now of course, the even more minimal version is the small journal and pen I carry in my purse daily, but any other time I might have a few minutes to create, I take a small travel art kit.
The most important thing to remember is that if your travel art kit is not portable, you won’t carry it. And if you don’t carry it, you won’t use it. So keep it small and carry it!
Mini Travel Art Kit
For weekends, day hikes, afternoons at the museum, or long waits at the doctor’s office, I’ll bring a mini travel art kit like this one:

Here’s some of the supplies I carry in my small art kit:
Small journal with hard cover like this Moleskine .
Watercolor brush with well of water.
Travel watercolor set . I made mine with a small tin, bottle caps, and squeezed in my own watercolors.
Drawing pens
Posca White paint marker
Fun and sassy recycled plastic zip pouches from Blue Q
Large Travel Art Kit
For a week’s vacation, art retreat, or an art date with friends, I’ll bring a slightly larger version of the mini kit. Again, I try to limit the supplies I bring because I want to be sure I’m willing to carry it around. As an added bonus, when you bring less art supplies, it creates boundaries that force you to push your own creative boundaries.

Another version of my travel art kit is to carry a mini version of my paper cutting supplies. If I am not flying, have good stretches of time and no tiny hands wandering, I’ll bring a tiny cutting board, Excel knife, and small scale paper cutting project.
Make Art a Priority
I’m a big believer in the idea that you have time for what is important to you. Everyone IS busy, but paying attention to how you spend your time can often reveal how you waste time on things you don’t really value. I’m guilty of this too.
If the idea of being more purposeful with your time speaks to you, you might decide to try this experiment:
Carry a travel art kit all week this week. Use it for 5 minutes here and there over the next week. At the end of the week, spend 5 minutes writing about your experience, both what it was like to make art at different times during the day, but also what you learned about how you are spending your time.
Looking for Ideas to Make a Little Art Each Day?
For ideas on what to do in your journal, I’ve got just the thing. Starting August 19th, 2019, I’ll be running a 5-day Inchie Challenge.
The idea is to make a small piece of art every day for 5 days. If you sign up below, I’ll send you my Inchie Challenge PDF workbook with tons of fun ideas on how to organize your small art by themes or projects, as well as some emails that will help you prep for daily creativity, in just a few minutes. We will get you creating now, during the challenge, and beyond!

Here’s How I Make Use of My Travel Art Kit
On our drive up to Acadia last week, we stopped for lunch in Camden, ME. We ate under some beautiful birch trees, and I got to admire the color and texture of the bark, as well as the hydrangea blooms nearby. Before we hit the road, I had a chance to draw for just a few minutes.
I didn’t try to complete the drawing, just capture a sense for reference. These small stolen moments are a delicious way to insert more art in my life, and build inspiration in my journals. You can do this too!

Daily creating is about keeping your art alive, making starting easier, and strengthening your practice of creative action.
Drawing What I See
Once we arrived at our campsite, I could see I had a wonderful space in which to create. I often had a bit of time to draw and paint in the morning while my son played.

Working on Art in Progress
Frequently I create new art pieces when I’m on vacation, even if they are small, but I also enjoy tinkering with some pieces that are in process and need just a few minutes more of my time .

Making Illustrated Lists
Another way I love to use my journal while traveling is to plan out the activities we will do on vacation. Illustrated lists are fun! For this one, we all came up with the ideas, I wrote and drew the pictures, and my son helped me color them in.

Completing a Small Art Challenge
This U project was an amazing way to create in short bursts of time. During the day I looked for U’s in nature and design elements, and then plugged them into the squares here. There are 100 in total so far.

As you can see, I keep my travel art kit supplies limited, and work small. I find working small is playful, precious, and invites me to begin. That’s why this month I’m hosting an Inchie Challenge, and I’d love for you to join.
What’s an inchie, you ask?
An inchie is any piece of art, a few inches in size or smaller. For the purposes of this challenge, it’s 3 inches or less.
Join us! You can participate by creating a piece of small art each day from August 19 – 23rd, 2019 and posting it with #mindfulartstudio and tagging me @amymaricle
I can’t wait to see what tiny creations you make!
Creatively Yours,
23 Comments

I’m heading up to Bar Harbor in another week. This is very timely as I am trying to figure out what I want to bring from a creativity stand point. I will be putting together a travel kit to bring as well as one for my kids to each have. It will be good for the trip up and back as well as while we are there.

Hi Amy: Oh! You will have such fun! I’m so happy I could help and tag me if you share anything you create, I’d love to see! XO Amy

thank you !!! Love your mini travel art kits and your U drawings. Peace, love, and Mindfulness, Vikki
Oh that’s amazing to hear. Thank you so much for taking the time to say so. Happy creating!

Thanks for the great reminder about the patterns we can see in nature and so ften overlook. I’ve sometimes made pencil rubbings of bark on a tree – it’s almost like being there again.
HI Marion: Oh I LOVE the idea of the bark rubbings. How very fun! Can’t wait to hear more about what happens with your travel art kit!

I LOVE your small travel kit that fits in the little zipper pouch. That’s exactly what I’m looking for!! Thank you!!
YAY I’m so glad to hear it Diane! XO

Loved the two page spread of branches and leaves. I am looking to start some ‘therapeutic’ art but can’t picture how to start.
Keep posting..
Hey Saalik:
Oh I’m so happy you liked it! There’s lots of ways to use art for well being. I have a class that is a great starting place and will lead you step by step. Art Journaling 101 Happy creating!

I googled your travel kit and found such a treasure here! It’s inspiring to see what you’ve done and I’m bringing your words and art with me as I prepare my own travel art kit for an upcoming trip! Thanks, Amy!
YAY so fun! I hope it serves you well Amelia! XO

Funny I’m heading up to Harpswell Maine on August 14th!
I hope you have a wonderful trip in that beautiful land, Gretta! xo

I love the inch studies with U’s I will be teaching a class with patterns from Nature and you are an inspiration. Thank you for always finding beauty … inch by inch!
I’m so happy I could offer some inspiration Anne! XO

I like the way you simplified your art travel bag. I bring way too much. Thanks for sharing the tips!
Yes, for me bringing limited supplies is the key, especially if I’m busy with family and have limited time. Xo

Thank you for your simplicity! I tend to overpack and never take anything out I think this will be doable for our upcoming trip to Croatia. I like the idea of making a list of your day and coloring it in.
Hi Marcia – What an amazing trip – I hope you record it all! xo

I’m really looking forward to the Inchie Challenge. I want to push my slow drawings to a new level. Can’t wait already!
Oh I’m so excited for you! It’s going to be so much fun. xo

This is the year 2023…I am late to the game but wanted to know if you could send me the Inchie Challenge PDF workbook. I am starting an Inchie challenge for myself. You may email it at your convenience if you still have it available to send. 2 days a week every week of the rest of my life I have day-long infusions which keep me tied to an IV pole for almost 6 hours each day. Working small and simply will be the perfect way to spend my time artistically and creatively. I am new to your facebook followers and I am excited about learning from you and others.
Submit a Comment Cancel reply
Your email address will not be published. Required fields are marked *
Submit Comment
This site uses Akismet to reduce spam. Learn how your comment data is processed .

Join my newsletter for weekly inspiration, workshops, and ways to connect to nature through art.
Quick Links

Join the Inchie Challenge! Dismiss
- Packing Tips
How to Pack Art Supplies for Travel
Published September 4, 2021
Written by:

Shawn Forno
If you want to learn about budget travel, minimalist carry on packing, or how to travel (and even live and...
Jenn Sutherland-Miller
Jenn raised 4 children while traveling full-time for more than a decade– it’s called worldschooling and it’s awesome. Jenn has...

The Tortuga Promise
At Tortuga, our mission is to make travel easier. Our advice and recommendations are based on years of travel experience. We only recommend products that we use on our own travels.
The art you make while you travel is the best art in the world. Yeah, I said it. Of course figuring out how to pack art supplies is the challenge. In a technical sense, of course, it’s nice to work in a studio with all your paint, equipment, and tools instead of on a park bench with a pencil you stole from a miniature golf course—but in terms of impact, passion, and capturing the spirit of a place or a moment, art in transit is unparalleled.
The Art of Travel
Old Moleskine journals are stacked on a shelf in my room, each packed with sketches, doodles, thoughts, and impromptu English/French hybrid poetry. While I hope those poems never see the light of day, and my many sketches of Notre Dame probably belong at the bottom of a lake, that stack of journals would be right at the top of the list of things I’d rescue in a fire. Every page is a creative time capsule that immediately transports me back to the exact time and place I created them. Travel is a special time of flux, transition, and inspiration; if you can capture that feeling with something you physically create, you’ll never forget it. Seriously. You are a different version of yourself on the road, and that time and place is worth capturing in more than an Instagram selfie. But traveling with art supplies is hard. So here’s a list of carry on packing tips , tricks, and hacks from some great traveling artists to get you back on the road to creativity. See what I did there? That’s art, baby.
How to Pack Art Supplies: Carry On Only
It goes without saying that this is a carry on only artist packing list , but I’ll say it anyway— Don’t check a bag full of art supplies . Trust me, you don’t want your fragile brushes, sketch pads, and watercolors chucked around as they’re shoved under a plane.
3-1-1 Rule: Art Without Liquid
TSA’s 3-1-1 Rule is about more than just tiny shampoo bottles. It applies to all liquids—which includes your oil and acrylic paints. Since 3.4 oz isn’t enough to paint with—especially for color mixing—and since you probably already filled your one clear plastic bag with actual shampoo already, let’s assume that you can’t pack any liquid paints. It’s a bummer, I know, but great art is about exceeding your limitations with what’s at hand. Man, I feel inspired already. So, if paints are out, what are your travel art supply options?

Pencils, Watercolor, & Moleskine
Moleskine: the travel artist’s work horse.
Moleskine journals are practically synonymous with travel. You can’t walk into a cafe in Spain without hearing the snap of that iconic elastic band and the skrtich of a pencil furiously sketching a stranger that isn’t aware they’re a subject. For a lot of artists, a moleskine and a pencil, or pen, is all you need to create amazing art work on these little canvas pages .

The name in the travel journal game for the last 20 years, Moleskine’s extensive line of sketchbook options includes:
- Moleskine Sketchbook Pocket (3.5” x 5.5”) — $13.95
- Moleskine Sketchbook Large (5” x 8.25”) — $19.95
- A4 Sketchbook (8.25” x 11.69” – this one is metric) — $29.95
- A3 Sketchbook (11.69” x 16.5”) — $39.95
Each journal is made with the same high-quality paper, thread binding, bookmark, inner pocket, and iconic cover and elastic clasp that have become the icon of artists, travelers, and doodlers for decades. However, the age of the traditional sketchbook as a travel journal might be over . Even Moleskine is embracing the move to digital media with their Evernote Sketchbook partnership. This journal features all the analog you can handle, but comes with a 3-month Evernote trial account. What’s more, the page layout is designed with Evernote in mind, so you can just snap a picture of what you’ve sketched with the Evernote app and it’s instantly digitally available to save, search, or share with your fans. If 3-Months of Evernote isn’t enough, click this link for one more free month.
Travel Watercolor Kits: Make a Splash on Instagram
If you’re not familiar, watercolor is super hard…but, damn, it’s pretty. And for the traveling artist, watercolor might be your best option for creating vibrant art on the move.

Watercolor paint isn’t a liquid (you’ve got to wet it first) so it’s carry on compatible. Bonus: you can wet the paint multiple times without ruining it (unlike leaving the cap off your acrylic paint for five minutes) and the amount of paint you need is tiny in comparison to oil paintings. Plus, watercolor brushes are adorably itsy bitsy . The best part about watercolor though, has to be the ease of cleaning and use. Unlike other paints, you don’t have to clean a watercolor brush right after using it—like at the cafe. Just run the brush under water when you get a chance, and boom, all better. If you do have a brush fetish, and the smaller watercolor brushes that come with most kits aren’t enough for you, upgrade to a small flat brush. However, a flat brush is really only necessary if you want to paint with gouache paint , like James Gurney. Sidenote: James Gurney is awesome and you should totally experiment with gouache paint. Artist Hali Karla recommends this setup for traveling with watercolor:
- Moleskine Watercolor Notebook ($18) — The heavy duty 200gsm paper is designed to withstand watercolor
- Koi 24-Color Watercolor Field Kit with Brush ($20)
- 4ml Koi Watercolor Brush ($8)
- Pilot Point Ultra Fine Black Pen ($11) (for those sweet outlines)
- (1) small bottle of white acrylic paint (for corrections)
- (1) Winsor & Newton’s Payne’s Grey watercolor paint ($11)
- (1) quart sized bag with Gouache paint (basically “opaque” watercolor)
National Geographic artist and contributor, Candace Rose Rardon recommends:
- (2) Winsor & Newton watercolor brushes (size 2 and 4)
- Winsor & Newton watercolor compact
- (1) Mimik synthetic squirrel hair brush (round, size 6) — only $3!
- Canson Montval watercolor pads (various sizes)
- Faber-Castell’s PITT Artist pens ($3 each)
Like Candace, I’m a big fan of the Winsor & Newton Watercolor Compact set ($68) . It’s got room for 14 colors, a brush, and it seals shut in a tidy container you can take anywhere with confidence. If you’re looking to go smaller than the Winsor & Newton case, I’d recommend a pair of binder clips work can help organize and contain your travel-sized palette, especially outside or on the go. Just clip the watercolor palette to your moleskine, and you’re all set to make some great art.

Pencils, Charcoal, & Graphite: Sketch of a Travel Artist
For the rest of us who can’t grapple with the subtle complexities of watercolor (it’s seriously super hard) colored pencils, graphite, and pens are solid travel art supply options. There are even watercolor pencils as a hybrid option. Megan Van Groll, from Travel, Paint, Repeat says that her secret for making art on the go is a mix of pencils and preparation:
“About 10% of my portfolio consists of hyperrealistic colored pencil drawings. So when I do choose to make art on the road, it’s usually small works on paper with graphite or color pencil. I’ll sketch the outline of my piece before leaving, secure the paper with archival artist tape to a piece of masonite or very hard cardboard, cover it with another protective piece of board or cardboard, and lay it flat in my hard-sided carry on luggage . Pencils are very easy to transport so there are no flammable materials or liquids to worry about there!”
Colored Pencils & Graphite
Three of the biggest names in colored pencils are Prismacolor, Faber-Castell, and Derwent. They each make great color pencils, but what you want depends on how you draw.
- Prismacolor’s Soft Core Pencils ($74) are perfect for blending, but they’re expensive, and break easily
- Faber-Castell’s Polychromous Set ($40) is smooth as butter, but doesn’t keep a sharp point
- Derwent Studio Color Pencils ($45) feature a hexagonal grip, if that matters to you
It’s really up to how you sketch. Regardless of which pencils you choose, remember that you don’t always need the full set to make great work. Pick and choose a few of your favorite hues from the 72-pack and see what happens. Also, a pencil nub is kind of perfect for traveling, so don’t be afraid to take along some old stubby pencils from around your workspace. Here are some other non-traditional pencil options (and an erasure eraser, because we’re not all perfect).
- Derwent Charcoal pencils ($11) come in a handy 6-pack that includes a case and a pencil sharpener
- White Stabilo marking pencils (1 x $4) are perfect for sketching on damn near any surface. Water soluble, and very erasable, this pencil is perfect for sketching and removing.
- White Pearl Erasures (3 x $3) are great…even though you never make mistakes.
Digital Art Alternatives
Before I finish, I’d be remiss if I didn’t include some of the fascinating new digital tools available to today’s traveling artists. Styluses and digital canvases have finally upgraded to the standards that working artists demand, while being intuitive enough (and affordable) for your average backpacker with a vision in their heart and some time to kill before their next flight.
53 Paper App (FREE)
Art is messy and in today’s digital sharing economy the incentive for artists and travelers to share their work immediately from the road is pushing a lot of creators to move away from the traditional sketchpad and pencil. Fifty-Three is leading this digital art charge with their Paper drawing app . Combined with their surprisingly intuitive “Pencil” digital stylus , 53 is literally taking creativity to the cloud. The app features a host of color options, palette blending, sketch tools, digital watercolor, markers, and pens, not too mention handy list and note features. The recent software upgrade now lets you upload your own photos or pictures to the app where you can edit, sketch, and doodle on top of them. It’s a brave new world.
“Pencil” Digital Stylus ($59)
The actual stylus is kind of fantastic. I own one, and I’ve taken it on several trips with great results. The battery life is great—I get weeks of sketching out of a single charge—and it’s USB rechargable, so I just plug it in when I have down time to make sure it’s topped up. But, the real treat is the functionality. The stylus tip is pressure sensitive and responsive—it actually draws what I want—which is saying something. I’m also a massive fan of the digital eraser on the top of the stylus. It works just like a real pencil, simply flip it over, erase, and flip back to continue. I forget it’s not graphite sometimes.
Organization is Key
Forget brush sizes, fancy paint, and 300 gsm quality paper. TSA regulations, packing cubes , and ziploc bags are the real tools of the traveling artist’s trade. Before you sketch a single line, you have to know how you’re going to carry your tools safely, cleanly, and effectively. Now that you know what to pack, how do keep your supplies organized and your t-shirts unsoiled?
Alvin Double Pocket Mesh Bags ($17 each)
Alvin is a trusted name in the art supply game with a lot of different options for storing your art supplies on the move. I like the double-pocket mesh bags because I don’t store a lot of particularly messy items, and the extra pocket helps keep everything together. If you’re really fancy, the Alvin Prestige Deluxe Mesh Bags ($17-$42) feature clear reinforced vinyl with a zipper for keeping all your messier supplies—like brushes and watercolors—far from your clothes.
Art is messy, but so is travel. I can’t imagine leaving home for my next adventure without a camera and a sketchpad to capture my experience. Photos are great at capturing the harsh reality of your travels—the people, places, and things—but sketches, drawings, collages, and paintings capture something so much more vivid and memorable than even the best DSLR in the world. Art makes the best souvenir.
- Moleskines come in dozens of customizable sizes—find yours
- Watercolor is hard but worth it
- Gouache; look it up
- The 53 Pencil Stylus is the real deal
- Colored Pencils are TSA approved, and all the tool you need
Related Articles

How to Layer Your Clothes for Traveling

What to Wear in Spain to Avoid Looking Like a Tourist
Tortuga travel backpack pro $350.
Max Carry On Size
If you want to learn about budget travel, minimalist carry on packing, or how to travel (and even live and work) in dozens of countries all over the world, Shawn is your guy. Shawn is not a New York Times bestselling travel author, but he is a full-time freelance blogger, copywriter, and content manager and is also a published photographer. He likes to rock climb, trek, surf, ride his bike, and read a bunch of sci-fi books.
Read more from Shawn
Find the perfect pack for your next trip
Take Our Bag Finder Quiz To Find The Perfect Bag For Your Next Trip
Bring everything you need without checking a bag.
25 DIY Travel Projects to Make for Your Next Trip
:max_bytes(150000):strip_icc():format(webp)/lauren_photo-5bbf772d4cedfd0051c9e0c3.jpg "diy art travel bag")
Travel allows us to see and experience places foreign to us, giving us new insights and enhanced cultural awareness. Wanderlust is a widespread epidemic.
Whether you’re jet-setting, hitting the road, or anything in between, planning for the trials and tribulations of travel is crucial for an easygoing experience.
Are you headed on a trip soon? Here are some uber useful DIYs to set you off on the right foot.
Soothing Lavender Lotion
Dehydration is a major side effect of travel, especially in airplanes. Lotion makes battling dry skin an easy win, and this DIY version has the added relaxation benefits and soothing scent of lavender essential oils . DIY Whipped Lavender Lotion from Abra’s Kitchen
DIY Waterproof Camera Float
You can eliminate the risk of a lost waterproof camera with an easy-to-make camera float made from a few simple supplies. You can cut the foam pool noodle down smaller for a more compact version. Waterproof Camera Float from Instructables
Floating Key Chain
Losing keys on a getaway is a quick way to ruin your trip. A big keychain will help you keep track of them. Plus, this DIY keychain uses cork to help it float for easy recovery in aquatic accidents. Wine Cork Keychain from Handimania
Personalized Passport Cover
Passports are a must for international travel. They can often be difficult to find when rummaging through your pack in the customs line, but this handy leather cover will make it easy to spot. Use leather punches to personalize it with your favorite travel quote. DIY Embossed Leather Passport Cover from Hungry Heart
Homemade Aloe Vera Gel
Do you tan, burn, or a combination of both? If sunburn is an issue, aloe vera is a must-have. It’s soothing feel and medicinal properties make it the perfect remedy for a suntan gone wrong. Soothing Sunburn Cure from Gardenista
DIY Sleep Mask
With this DIY, you’ll never have to fret about jet lag again. Keep sunlight out and sweet dreams in with this easy sewing project . Tired Mama Sleep Mask from Wine and Glue
Trendy Sunglasses Case
Sunglasses can easily get scratched or broken in a crowded beach bag. Your favorite pair deserves protection and this tutorial is here to help. Trendy DIY Sunglasses Case from DIY Candy
Travel Journal
Keep track of all the little details of your journey with a travel journal . You can read them later to reminisce on a trip well spent. Pick out a fun notebook and use these ideas to fill it with memories. Ideas for Your Travel Journal from A Pair and a Spare DIY
DIY Neck Pillow
Long flights, train rides, and road trips are not your body’s friend. They often lead to an unwelcome amount of aches and pains. Consider taking a travel pillow for neck support on your next adventure. Instead of shelling out dough for one at the airport, try this DIY one ahead of time. Buckwheat Travel Pillow from Sew DIY
Sunscreen Lip Balm
SPF is imperative to healthy skin and should be a staple in everyone’s skincare routine. Travel often means long days outdoors, making SPF even more important. And yes, your lips can burn just like your skin. They need SPF care, too! Natural Healing Lip Balm With SPF from Sunkissed Kate
Labeled Laundry Bag
If you’ve ever lived out of a suitcase, you know how quickly your clothes become disarrayed. This DIY laundry bag will help you on a mission to organize. DIY Travel Laundry Bag from Revamperate
Travel First Aid Kit
Anything can happen on a trip, including accidents. This handy kit fits easily in your travel bag and will arm you with the tools you need to face mishaps. Creating a Travel First Aid Kit from Life of Libby
Lettered Water Bottle
Hydration, hydration, hydration–we can’t say it enough. Drinking water is important in daily life, and crucial during travel. Trips typically involve lots of walking and time outdoors, two activities your body needs water for. These cute hand-lettered bottles will make hydration on-the-go a breeze. (Almost) Hand Lettered Swell Water Bottles from The Sweeter Side of Mommyhood
Reusable Snack Pouch
Keeping snacks handy will save you money, time, and frustration–trust us. Sew these beauties and fill them with your favorite munchies to get you through the day. Fruit Snack Pouches from A Kailo Chic Life
Compact Toiletry Kit
This space-saving DIY will up your packing game. No more loose toiletries in your bag! DIY Washcloth Travel Kit from Tip Hero
Bow Scrunchie
Traveling can be harsh on your hair. You won’t have to waste any of your precious time fixing it up after you make this bow scrunchie. Make Your Own Scrunchies from Hey Wanderer
DIY Cord Organizer
Organization is a travel lifesaver. Instead of rummaging through your bag to find the specific cord or device you need, make this stylish leather cord wallet to keep things in the right place. DIY Travel Cord Organizer from Mr. Kate
Comfy Camera Strap
Pics or it didn’t happen. But seriously, an exciting trip is nothing without proper documentation. What better way to photograph your adventure comfortably (and fashionably) than with this DIY scarf camera strap? Scarf Camera Strap Tutorial from Paper Thoughts
Travel Watercolor Palette
The therapeutic nature of painting is almost necessary on painstakingly long trips. If you have an old Altoids tin, you can make this watercolor kit and practice art anywhere. DIY Altoids Watercolor Travel Palette from Nerelle
Kids' Busy Board
Kids and travel don’t always mix well. These “busy board” ideas are sure to keep little ones occupied for hours. DIY Travel Busy Board for Kids from Mommy Testers
DIY Blanket Scarf
We love a multi-tasking item for travel. They save valuable luggage space and function just how you need it. This scarf can be worn for warmth on chilly flights or as a fashion-forward accessory and even used as a picnic blanket . DIY Flannel Blanket Scarf from Homedit
Travel Wallet
Traveling light makes trips so much easier. The concept applies to everything, even your wallet. You don’t need to buy a new slim travel wallet, you can customize your own for a few bucks with this tutorial! Two Dollar Travel Wallet from Instructables
Washi Tape Luggage Handle Wraps
Identifying your luggage as it rolls by on the baggage claim carousel just got a whole lot easier. Use your favorite colorful washi tape to personalize your suitcase handles and easily spot your bag. DIY Luggage Handle Wraps from Blitsy
Travel Tissue Holder
Experiencing new places often comes with extra allergies, or (knock on wood) a cold. Come prepared with a handmade tissue holder. Rick Rack Travel Tissue Holder from The Cottage Mama
Stylish Bookmark
Travel is practically synonymous with reading. It’s the perfect relaxing activity on beach bum days or long plane rides. Make this fun tassel bookmark to keep your spot.
DIY Chunky Tassel Bookmarks from Homeyohmy
More from The Spruce Crafts
- 10 Free Tote Bag Sewing Patterns
- 11 Free Yoga Mat Bag Sewing Patterns
- 12 Travel Bag Patterns
- 29 Pineapple DIYs to Make This Summer
- 17 DIY Sharpie Projects Everyone Will Love
- 73 Inexpensive Homemade Gift Ideas
- 21 Completely Free Macrame Patterns
- 25 DIY Couples Halloween Costumes
- 10 Best Origami Projects for Beginners
- The Best Sewing Kits to Use At-Home and On-the-Go
- 25 Amazing Homemade Graduation Gifts
- 15 DIY Travel and Organizing Kits for Your Embroidery
- Free, Printable Labels for Everything
- DIY Lip Balm in Three Scents
- 20 DIY Valentine's Day Gift Ideas
- 9 Star Wars Cross Stitch Patterns
Grab a copy of our FREE Handbag eBook!

F REE HANDBAG EBOOK! Get your copy! >
How to Make a Travel Bag with Pockets

For those of you who follow Sew Very Crafty you know that I love to make bags. This is a terrific travel bag with pockets that is perfect for overnight or any trip. It is an intermediate sewing project that is both fun and functional. Choose a fun fabric to make this sewing project truly your own. I really enjoyed making this travel bag with pockets and fully intend to use it. I hope you will give it a try too. If you would like to see some other travel bags my simple travel bag or my large travel tote.
What you will Need: How to Make a Travel Bag with Pockets
- Pattern you can get by clicking on this link
- 2 yds outer Fabric and Lining Fabric
- 1 yd fusible fleece like Pellon 987F
- 1/2 yd accent fabric
- 23″ zipper
- 9″ zipper
- 2 x 1″ D ring
- 1 x 1″ triglide
- 1 magnetic snap
Step 1: Create the Travel Bag Pattern
Print out the pattern pieces and tape them together. You should have three pattern pieces for this project. Take the “B” piece and cut it in half lengthwise keeping in mind that both pieces will be cut on the fold.
Step 2: Cut out your Fabrics
Outer fabrics
- 2 pieces — 17 3/8″ x 13 3 /8″
- 1 piece — 3 5/8″ x 7″
- 2 pieces — 3 1/2″ x 22″
- 2 pieces — 7″ x 8 5/8″
- 1 piece — 18 1/8 x 8 5/8″
- 2 Pieces — 3 1/2″ x 8 5/8″
- 1 Piece — 34 7/8″ x 7 1/8″
- 2 Pieces — 7 7/8″ x 8 5/8″
Lining fabrics
- 1 piece — 18 1/8″ x 11 3/4″
Accent Fabrics
- 2 pieces — 7″ x 3 1/8″
- 2 pieces — 4 3/8″ x 4″
- 1 piece — 59″ x 4″
- 2 pieces — WOF x 4″
Fusible Fleece
- 1 Pieces — 3 1/2″ x 8 5/8″
Step 3: Cut the Travel Bag Pattern Pieces
From the appropriate fleece piece cut out the pattern pieces you printed and taped. Make sure to cut them on the fold.

Step 4: Fuse the Fleece
Fuse the fleece to the corresponding outer fabric pieces. Trim the outer pieces to match the fleece pieces leaving a 3/8″ seam allowance.
Step 5: Create the Straps
Take the 59″ x 4 3/8″ accent fabric and fold it in half lengthwise and press used two pieces of fabric to race the 59″ length. Open up and fold the raw edges to the center fold and press. Fold in half again to enclose the raw edges. Repeat for the other accent fabrics. Topstitch the shorter straps on both sides starting and finishing 11″ from each end. Topstitch along the long sides of the rest of the accent fabrics. For the shortest pieces, fold the fabric over the D-Rings and stitch to secure.

Step 6: Create the Outer Zipper Pocket
Take the outer piece that measures 8 5/8″ x 18 1/8″ and place it right sides up on your work station. Place the 9″ zipper right sides down on the outer piece then lay the corresponding lining piece right sides down on top of the zipper creating a zipper sandwich. Stitch the zipper through all layers. Turn right sides out and topstitch. Fold up the outer fabric to meet the other side of the zipper and fold up the lining piece to create your zipper sandwich. Stitch the zipper through all layers and topstitch. Fold the pocket so that the zipper is 1 1/8″ from the top of the pocket and press. Zigzag stitch along both sides of the pocket

Step 7: Create the Flap Pocket
Take the two outer pieces that measure 7 7/8″ x 8 5/8″ and the outer pieces “D”. Place the 7 7/8″ x 8 5/8″ pieces right sides together and stitch along the two long sides using a 3/8″ seam allowance Turn right sides out and press. Topstitch along one of the seams. Take the outer piece “D” and stitch around the sides and bottom using a 3/8″ seam allowance. Turn right sides out and press. Topstitch.

Step 8: Add the Flap Pockets
Take the main outer piece “A” and find the center of the bottom. Measure up 1 1/2″ from the bottom and place zipper pocket you created in the center. Stitch along the sides leaving the bottom open. Take the other main side and repeat the process by placing the other pocket piece. Stitch on both sides and the bottom.

Step 9: Add Handles
Take the handle pieces and place them along the sides of the pockets. Stitch along both sides and across the top at the 11″ mark.

Step 10: Add the Flap
Place the flap piece Right sides together just above the pocket piece and stitch. Fold the flap down and topdstitch to enclose the raw edge underneath.

Step 11: Add the Kam Snaps
Find the center of the flap toward the bottom and place half of the Kam Snap. place the other half of the Kam Snap in the center of the pocket measuring so that the flap snaps into the pocket. If you would like to know how to install Kam Snaps check out the below video.

Step 12: Create the Lining
Take the main outer piece and use as a pattern for the lining. Cut the lining.

Step 13: Stitch the Lining Pocket
Take the 18 1/8″ x 11 3/4″ and fold it in half right sides together. Stitch along the sides and bottom leaving an opening in the bottom for turning. Turn right sides out and press. Topstitch along the fold.

Step 13: Add the Lining Pocket
Find the center the lining piece. Measure up 1 1/8″ from the bottom and place the pocket piece in the center. Stitch along the sides and bottom.

Step 14: Create the Side Pockets
Take the 7″ x 8 5/8″ outer and lining pieces along with the accent pieces that measure 7″ x 3 1/8″ . Place the outer and lining pieces right sides together and stitch on one short end each. Turn right sides out and press. Place the seam on the bottom. Lay the accent pieces on the top of each pair of fabric pieces on the lining side. Stitch to through all layers. Fold the accent piece twice to the right side of the pocket pieces and stitch.

Step 15: Add the Side Pockets
Take the Pattern piece “C” and find the center. Measure up 8 1/4″ from the center mark on both sides and place the pocket pieces so that the accent fabric faces toward the top on both sides. Trim the pocket pieces to match the pattern piece. Stitch the pockets along the sides and bottom.

Step 16: Create the Zipper Placket
Take the pattern pieces “B” outer and place them on your work surface. Take the lining pieces that measure 31/2″ x 22″ and use the corresponding outer pattern pieces as a pattern and cut the lining pieces to match. Place one of the outer pieces face up on your work surface. Place the zipper right sides down on the outer piece and the lining piece on top of the zipper. Stitch the zipper through all layers. Repeat for the other side. Topstitch on both sides of the zipper.

Step 17: Add the D-Rings
Place the D-Ring tabs at each end of the zipper placket at the ends of the zipper. Stitch.

Step 18: Add Pattern Piece C
Place outer pattern piece “C” right sides together with the corresponding lining piece and trim off the excess lining fabric so that the lining fabric and outer piece match. Place the zipper placket right sides together with the outer piece “C” and clip. Lay the lining piece right sides together with the other side of the placket so that the zipper placket is sandwiched between the outer and lining gusset and clip using the same clips. Stitch both short ends using a 3/8″ seam allowance. Topstitch along the seams. Stitch layers together on the top and bottom to secure using a zigzag stitch. This creates the gusset.

Step 19: Add the Outer Bag Piece
Fold the gusset in half and find the center. Mark the centers on both sides on top and bottom. Fold in half the other way matching the previous marks and mark again. Take one of the outer pieces and mark the centers in the same way you did the gusset. Place the outer main piece right sides together with the gusset matching the center marks. Make sure the top is on the zipper side of the gusset. Clip so that the main outer piece is wrapped by the gusset.

Fold in the gusset and place a lining piece on top right sides together. Start stitching 5″ from the side of the bottom of the bag but exclude the top lining piece. Stitch until you get to 5″ from the other side then start to stitch all layers of the bag using a 3/8″ seam allowance, Clip the curves and turn right sides out.

Step 20: Add the Other Outer Bag Piece
Place the other bag piece right sides together with the gusset matching the marks you previously made. Turn the whole piece so that the lining is facing up. Fold the sides of the bag to the center and place the final lining piece on top. Clip all the way around. Stitch all the way around the bag leaving an opening in the bottom. Clip the curves and turn right sides out. Stitch the opening closed using ladder stitch.

Step 21: Add the Shoulder Strap
Place one end of the long accent piece that you stitched around a D-Ring tab. Stitch to secure. Place the other end of the bag strap through the Tri-glide then through the opposite D-ring and back through the Tri-glide Stitch to secure. Your travel bag with handles is now complete. Fill it up and travel to far off places or just stay overnight. It is perfect.

I hope that you enjoyed this travel bag with pockets. If you would like more sewing and crafting projects subscribe to our newsletter and receive your free eBook of 15 handbag patterns and tutorials taken from the blog.
If you would like video tutorials of some of Sew Very Crafty’s most popular posts subscribe to our free YouTube channel here.

SIGN UP TO RECEIVE THE LATEST FROM SEW VERY CRAFTY !
We don’t spam! Read our privacy policy for more info.
Check your inbox or spam folder to confirm your subscription.
Share this:
- Click to share on Facebook (Opens in new window)
- Click to share on Pinterest (Opens in new window)
- Click to share on Twitter (Opens in new window)
- Click to email a link to a friend (Opens in new window)
- Click to print (Opens in new window)

Hi, Welcome to Sew Very Crafty a place for beginner and intermediate sewists and crafters to learn and create. Here at SVC we create simple and fun projects that anyone with basic to intermediate skills can create and grow with. My name is Diana and I am a lifelong learner, sewing enthusiast, parent, spouse, lawyer, and die hard St. Louis Cardinals fan. I live in California with my husband. I love God and my country but am proud of my Irish heritage. I enjoy sharing my creativity and the things that I love with others.
Similar Posts

How to Add a Purse Clasp Turn Lock

How to Make a DIY Cell Phone Bag

How to Make a KitchenAid Cover

How to Make a Custom Gym Bag

5 Minute Autumn Wreath

How to Make a Dollar Tree Foam Dice Wall Hanging
Hello! When cutting out the pieces I noticed that the size 7″ by 8 5/8″ was repeated. Do you need 2 or 4 of those sizes? Also for the pattern printed pieces are those just for the fusible fleece or do we cut those in the outer and lining fabrics as well? Thanks! Such a cute bag.
I believe that here are just two but it has been a while since I have made this project.
Looking Forward to Reading your Thoughts on this Project Cancel reply
This site uses Akismet to reduce spam. Learn how your comment data is processed .
Privacy Overview
My shopping cart
Your cart is currently empty.
SUBSCRIBE TO OUR NEWSLETTER
FOR DEBIS FREE VIDEO TUTORIALS AND CREATIVE TIPS!
Art Travel Bags
Lovely velvet art travel bags. Come in three beautiful colors- Navy, Purple and lavender
Measures Approx 8x6x3 inches
Why shouldnt your art supplies travel in style?!?
Related products
Create a beautiful life.
Stay in the loop by subscribing to our weekly newsletter!
© 2024 DIY À GOGO | Powered by Shopify
- American Express
- Diners Club
14 DIY Indispensable Travel Bags To Make

The season of holidays is on, everybody’s choosing a vacation, a destination and many other things. You’ll need to pack your things into some nice suitcases, put your documents into proper covers and you’ll also need some travel bags to pack our toothbrushes, makeup, cosmetics and stuff like that that you may need and should always have at hand on a holiday. I’ve prepared a round of indispensable bags to have with you on holiday. Let’s DIY some!
DIY Toilet/Cosmetic Bags

DIY map printed toiletry bag (via planb.annaevers.com )

DIY unisex navy and rope toiletry bag for travelling (via fallfordiy.com )

DIY waterproof toiletry bag with an acrylic part (via www.applegreencottage.com )

DIY personalized toiletry bag (via alittlecraftinyourday.com )

DIY toiletry bag with a leather tag (via www.instructables.com )

DIY roll up toiletries bag with pockets (via www.thecraftygentleman.net )

DIY navy polka dot toiletries bag (via www.shesgotthenotion.com )

DIY hanging toiletry bag in bold colors (via www.infarrantlycreative.net )

DIY washcloth travel kit for toothbrushes (via www.practicallyfunctional.com )

DIY personalized and decorated emergency travel kit (via www.thebeautydojo.com )
Other DIY Holders

DIY travel toothbrush holder of a towel (via swoodsonsays.com )

DIY pink windowpane nail kit (via thelovelydrawer.com )

DIY coral pompom travel pouch (via thecraftedlife.com )

DIY map printed makeup pouch (via planb.annaevers.com )
FOLLOW ON US
L a t e s t c r a f t v i d e o s.
- DIY Paper Olaf And Elsa From Frozen For Kids
- Summer Vacation Memory Craft For Kids
- DIY Salt Dough Fish Sun Catchers
- DIY Underwater Puppet Theater
- Ocean-Inspired Origami Interactive Paper Crafts
- Skip to primary navigation
- Skip to main content
- Skip to primary sidebar
- Father's Day
- Baby Shower
- Furniture Makeovers
- Kids Crafts
- Knitting & Crocheting
- Mother's Day
- Organization
- Valentine's Day
- Woodworking
60 Gorgeous DIY Tote Bags With Free Patterns For Every Occasion
Modified: Nov 20, 2023 by Vanessa Beaty · This post may contain affiliate links · 2 Comments

I love tote bags.

I have to say, I probably have way more than I will ever use, but that doesn’t stop me from getting more – especially when I find wonderfully easy patterns to make them myself.
Because of my love for tote bags, I have found a wonderful collection of 60 amazing tote bags that you can make yourself.
You’re going to really love all of these patterns and you’ll love making all of the bags, too.
Whether you want something quick to carry your groceries home, need a weekend luggage bag that’s not too bulky, or you just want something to keep your knitting needles and yarn safe and convenient to carry, there is definitely a bag in this collection for you.
1. One Yard – One Hour Tote
2. easy twenty minute tote bag, 3. basic booty bag, 4. diy mini book tote, 5. braided handle tote bag, 6. easy leather bucket bag, 7. diy rustic patchwork tote, 8. compact tote bag with surprise, 9. easy denim tote, 10. impressive diy dish towel tote bag, 11. dish towel library tote, 12. easy reversible diy tote bag, 13. beautiful diy doily canvas, 14. dress stitchery tote, 15. easy french seam bag, 16. easy denim and gingham tote, 17. diy versatile tote bag, 18. beautiful diy flowered tote, 19. fold over bag, 20. freezer paper tote designs, 21. the frou frou bag, 22. simple gathered tote, 23. gorgeous diy lined handbag, 24. kids busy bag, 25. leather and canvas satchel, 26. the library tote, 27. repurposed pillowcase tote bag, 28. easy diy tank top tote, 29. bright and cheery market purse, 30. minnie mouse inspired tote, 31. outer pocket tote, 32. peek-a-boo tote, 33. piano inspired tote, 34. easy pleated tote, 35. roomy post office bag, 36. reversible bucket style tote, 37. gorgeous diy ruffled bag, 38. market tote with ruffles, ribbons, and ties, 39. school bag styled tote, 40. diy scrunch tote – made with fabric scraps, 41. easy naughty secretary bag, 42. shirt and tie tote bag, 43. simple diy six pocket bag, 44. sling style tote bag, 45. easy diy spring tote bag, 46. summer perfect tote bag, 47. repurposed sweater tote bag, 48. diy weekender bag, 49. easy two toned tote, 50. perfect diy utility tote, 51. wallet style tote, 52. another great weekender bag, 53. big pocket tote bag, 54. cute zippered tote bag, 55. no sew t-shirt tote bag, 56. minimalist bag with leather straps, 57. easy half hour tote bag, 58. no sew leather and canvas bag, 59. big diaper bag styled tote, 60. easy diy pocket tote, fashion tote diy – make this adorable tote bag yourself, keep your crafts organized with this easy diy tote bag, make your own beach tote.

This is a gorgeous tote bag and the material that they’ve used gives it such a wonderful beach vacation look.
You can have this completely finished in about an hour and it only takes one yard of fabric – hence the name.
Lighter fabric is probably better and really makes it perfect for summer. The bag is 16 inches deep and 19 inches wide when it’s finished – a pretty good sized tote bag for just an hour of work.
Instructions and Pattern: lazygirldesigns

How about a lovely tote bag that you can make in less than half an hour, and one that only takes half a yard of fabric?
This lovely bag is so easy to make that even beginning sewers can do it, and it takes so little fabric that you could make several and give them as gifts.
You’ll need a couple of yards of webbing and of course, thread to match your material – or contrast it, whatever you prefer.
Instructions and Pattern: purlsoho

This booty bag is made from old jeans!
Or whatever pants you have in mind; the point is, it’s a repurposing project that gives you an amazing tote bag when you’re finished.
The bag is just a basic bag, so there’s no lining.
I love the idea of having one of these in denim and maybe even sweat pant material. Keep in mind that recommended pant sizes for the bag are junior or misses sizes up to six. Larger sizes will give you a larger bag.
Instructions and Pattern: thelongestyear

I love books so this little mini book tote really caught my eye. This one really doesn’t take much in the way of supplies.
You will need two fat quarters – one of the inside and one for the outside – and some fusible fleece interfacing.
Keep in mind that if you choose a directional fabric, you will need to use more than one fat quarter per side.
You’ll see why in the instructions – Overall, this is an adorable little book bag that won’t take you long at all to complete.
Instructions and Pattern: crazylittleprojects

This braided handle bag is such a wonderful bag for spring. It is lightweight and you really get a sea captain vibe from the handle.
I think it would be gorgeous in navy blue and white, but you use whatever colors you want. It even has a little pocket inside for storing smaller items.
It’s also a relatively easy bag to make and doesn’t take many supplies, so you can do several in different colors so that you’ll have a spring bag for every occasion.

Yes, you can make your own leather bucket bag and it will look like you bought it at one of those high end department stores.
Honestly, this is a much easier bag to make than it looks, and you are going to love showing it off and letting people know that you made it yourself.
You should ensure that you sew really slowly when working with leather, so that your stitches stay straight.
It can be a bit difficult to work with for the first time, but you’ll quickly get the hang of it.
Instructions and Pattern: brit

You are going to love this patchwork tote bag. It has that wonderful rustic look and it’s really easy to piece together. There’s a cute little ruffle toward the bottom and a big button holds it closed.
This is so reminiscent of bags that my grandmother used to carry.
I love the colors and the quilted look to it. It’s a great bag for those of you who love he Vera Wang bag collection. Plus, it’s really easy and won’t take you long at all to finish.
Instructions and Pattern: mypatchwork

This tiny little tote bag is cute in itself – but the real surprise is that it holds a full sized tote bag inside.
This is perfect for taking shopping! You can carry the small bag and then flip it out and use the larger bag to hold your purchases.
I love the design of the tiny bag and would use it for smaller items.
The fact that it houses a larger tote bag is just icing on the cake!
Instructions and Pattern: sudarushka

Here’s another great denim upcycled tote bag, but this one is a bit different. It looks like a huge traditional tote bag and will hold all sorts of items.
The handle is long enough to carry on your shoulder and the lightweight bag won’t drag you down.
Plus, you only need the legs of your old jeans to make it – you can totally make this one and the booty bag using the same old pair of jeans!
Instructions and Pattern: craftingagreenworld

This is probably the most impressive tote bag I’ve seen in a while. You make it with dish towels. You only need two standard sized dish towels per bag, so there’s not a lot of material needed.
You can easily find dish towels on sale at the Dollar Store for a dollar each.
Just imagine the number of bags you could make! I love the simplicity of this pattern and it’s a great project to share with little ones.
Instructions and Pattern: annamariahorner

This is another great bag that you can make from a dish towel, and it’s perfect for letting little ones carry their library books.
This one only requires one dish towel and of course, matching thread.
I love this idea for letting the kids help with their tote and then using that tote to carry books that they check out from the library. You get to share a craft with them and encourage them to read at the same time!
Instructions and Pattern: ihavetosay

You know what’s better than an easy DIY tote bag? This is such an easy DIY reversible bag to make, and you can have this one finished in just a couple of hours. I love reversible bags.
You can choose what you carry based on how you feel or what you’re wearing!
I really love how easy this is to make and the possibilities are endless as to what you can create with it.
Instructions and Pattern: instructables

So for this one, you can buy a canvas bag that’s already made – Hobby Lobby has them for just a couple dollars each. Or, you can make your own canvas bag and then use this gorgeous doily effect to decorate it.
You use a paper doily and canvas paint to create the design – in whatever color you prefer.
This is a wonderful way to dress up a boring old bag and make it fabulous.
Instructions and Pattern: ashleyannphotography

This dress stitchery method of making a tote bag leaves you with a gorgeous bag that is very reminiscent of old time dresses. I love the whole look of this bag and it’s really easy – plus you get major bragging rights when it’s finished.
It has a great embroidered dress design in the center that is also really easy to make.
Little girls – and big girls, too – are going to absolutely love this elegant and old-timey tote.
Instructions and Pattern: amelieandatticus

This bag is really easy to make and gives you a sturdy yet lightweight tote that is perfect for holding your knitting or crocheting, or even taking along to the farmer’s market to pick up some fresh produce.
The construction is really simplistic. It’s unlined and has french seams that give it a great neat look with no seams showing.
For a smaller bag, you will only need about half a yard of material.
Instructions and Pattern: needleandspatula

This is a really great bag if you are into gingham and denim. It’s also such an easy bag to create. You need two pieces of fabric, denim and gingham, about 18 by 40 inches long.
To make the bag, you literally just put your fabric together with the right side facing in and sew.
Then add the handles and you’re done. There are a few additional steps, but you get how easy it is, right?
Instructions and Pattern: catcancook

This bag is very unique, very easy to make, and full of possibilities.
You can alter the pattern so many ways and it will look great. I love how many variations there are possible for this one.
The design of the bag is a bit creative which I really love and it can be used for so many different things – from a market tote to a small diaper bag and even a purse. Make one in different colors and you’ll always have a stylish bag for every outfit and every occasion.
Instructions and Pattern: vivatveritas

This tote bag is gorgeous with its flowers and overall design.
You’ll make the flowers from scraps of wool and fabric as well as buttons and other embellishments. The bag itself is made from wool or tweed which gives it a wonderful contrast against the flowers.
It’s also lined with a gorgeous light floral fabric and the entire project can be completed in a day’s time.
This is definitely one of those bags that’s perfect for giving or keeping for yourself.
Instructions and Pattern: tearosehome

This little fold over bag is really cute and it’s really simple. It’s a smaller bag, so you’ll only need about half a yard of material plus another half a yard for the lining.
It’s a great spring bag if you need something a bit smaller than other totes with a bit of character.
Make the handle long enough to wear as a cross body – this is a really lightweight bag that holds your essentials but won’t be too heavy to carry.
Instructions and Pattern: placetobloom

Here’s another great method for dressing up those otherwise boring tote bags.
This freezer paper design method is as easy as it is beautiful. You can do whatever design you want and the freezer paper helps to make it fabulous.
Use bags that you buy at Hobby Lobby or Michael’s – or whatever craft store you use – or make a plain bag using one of the easy tote patterns and then decorate it with this great freezer paper design.
Instructions and Pattern: zitzmanfam

I love the name of this bag almost as much as I love the design.
The Frou Frou Bag is filled with adorable ruffles and is large enough to use as a diaper bag. This one is a bit more difficult than most of the others on the list, but it’s perfect for intermediate sewers.
It has an adjustable strap and snap closure, and it has four inside pockets that can hold anything you need.
If you want a gorgeous bag that is a bit more challenging than simple totes, this is definitely the pattern for you.
Instructions and Pattern: sewsweetness

This funky, unique bag is a great tote to make and to carry. Even if you’re completely new to sewing, you can make this gathered tote that has a drawstring. The bag itself has colorful grommets and the drawstring is a contrasting color, which is really gorgeous.
It’s the perfect sized bag that’s not too bulky and large enough to carry those necessities.
It’s so easy to make that you’ll want to have one for every girl in the house.
Instructions and Pattern: allfreesewing

This beautiful bag looks like a designer handbag, but you can easily make it yourself. It’s really inexpensive – unlike those actual designer bags – and it’s a sturdy bag that has loads of room for everything you need to carry with you on a daily basis.
You could use this as a tote or as a handbag.
t’s made of wool – although you could use any material you wanted. Wool does give it that nice expensive designer look, though.
Instructions and Pattern: twinkleandtwine

This bag is perfect for long road trips or anytime you need to keep the little ones busy with some creativity. I would totally take this along to doctor’s offices and anywhere you may have to sit and wait.
It’s a bag that is large enough to carry all of their crafting supplies or a few toys and it’s lightweight so it’s easy even for little ones to carry. With zippered pockets and even a crayon pouch, it’s the perfect busy bag for keeping little ones happy.

While you’re busy making all these wonderful tote bags for yourself, add in a project for the man in your life. This great leather and canvas satchel is pretty easy to make and it looks like such a professionally made bag.
He’ll never know you made it yourself – until you tell him, that is.
You’ll need about a yard of faux leather and a yard and a half of canvas to complete it. It’s got great pockets on the front and truly does look like something you would buy him in the men’s section of Macy’s.
Instructions and Pattern: fleecefun

You don’t have to use this tote for the library, although it is the perfect size for carrying library books. It’s also a great beach tote or just take it along to the market. It’s large enough to carry whatever you need and lightweight enough to be comfortable.
The little pocket on the front is really handy and you can adjust the size to make it large enough to hold you keys or your cell phone.
Instructions and Pattern: noodle-head

This little tote bag is a pillow case that has been repurposed. I love repurposing and this is one of the easiest repurpose projects I’ve seen. You can even get pillow cases for a dollar or less each if you visit a thrift store, so you can make many of these.
They’re great for reusable grocery bags or just taking things along with you to the beach or anywhere else you plan to go.
Instructions and Pattern: creativekismet

Tank top totes are among the easiest tote bags to make and since tank tops are relatively inexpensive, they’re also among the cheapest to make. If you have an old tank top that you can use, this one won’t cost you anything.
You’ll want to use tank tops that have front and back necklines that are even so that your bag won’t be crooked.
You can easily make a reversible tote bag out of your tank tops, and they all look so very adorable!
Instructions and Pattern: craftynest

I love the bright colors in this market purse – although you can do whatever colors you like. The inside of the bag has a pocket and magnetic snaps to keep everything neatly in place.
Believe it or not, those snaps aren’t even difficult to put in. In fact, the entire bag is really easy and it’s a great summer bag. It’s lightweight and will hold all of those outdoor essentials.
Instructions and Pattern: fabricworm

You can thrill any Disney fan with this cute little Minnie inspired tote bag. Once you get your tote finished – whichever basic tote you choose to make – add some red and white polka dot ruffles to the bottom and create a cute little Minnie shape.
If you’re planning a vacation to Disney World, this would be the perfect tote for keeping sunscreen and other necessities on hand. Or, just make it to carry to the market. It’s adorable either way.

This tote bag has four outer pockets – two on each side. It’s sure to have plenty of space for everything you could possibly want to carry. You don’t need a lot of materials, just the basic fabric, interfacing, and a sewing machine.
The pockets aren’t at all difficult to incorporate which is great and I really love how much room this one has. It would be the perfect carry all for the beach or to keep snacks in the car on long road trips.
Instructions and Pattern: twoflychicks

This adorable peek-a-boo tote has a chevron pattern sewn right into the center of the front. It’s a cute little bag with plenty of room for all sorts of things, and it’s a relatively easy project to sew together.
The buttons at the top of the peek-a-boo section match the chevron print, and overall the bag is very stylish and unique. Of course, you could skip the contrasting pattern section but that’s what gives the bag so much character.
Instructions and Pattern: allpeoplequilt

Music lovers are going to adore this piano tote bag. It looks like the keys from a baby grand piano and it’s just so elegant and lovely. The hardest part is putting the keys together, which is not too hard.
Overall, this is a really easy project considering it looks really difficult and it’s a great tote for carrying music books or just for showing off your love of the piano.
Instructions and Pattern: boredandcrafty

This DIY pleated tote bag is really stylish and much easier to sew than it looks. Pleats scare me – I mean terrify me.
They seem so difficult to do, but this pattern makes it really easy.
I also really love the handles and how the tote could double as a handbag – it looks really stylish! The pattern is really easy to follow. So easy in fact that you may find yourself wanting to make more than one.
Instructions and Pattern: u-handbag

This post office type bag is perfect for those of you who normally have to carry several packages to the post office or FedEx to have them shipped. Whether for work or even for your home business, if you tend to mail out several packages, or pick them up, this tote will help you to carry them much easier, and it’s a cinch to make.
You only need about one and a half yards of fabric, too, and the tote is big enough to handle a couple of packages, depending on their size.
Instructions and Pattern: elsiemarley

Bucket style totes may not be the most traditional, but they are really cute and they can hold so much stuff.
I love this reversible bucket style tote. Not only can you change it up depending on what you want to carry, it’s a really easy bag to make and it’s lightweight enough so that it doesn’t weigh you down when carrying it.
Instructions and Pattern: sewmamasew

This little bag looks like a ruffled dress! I love ruffles – not so much making them but looking at them. This pattern looks so very easy and it creates this gorgeous ruffled tote that you are sure to want to carry everywhere.
It’s a drawstring bag and would look great in any color or design. I really love the white, though.
Even though it may be hard to keep clean, it has such an elegant look.
Instructions and Pattern: wkdesigner

This bag just has it all – ruffles, ribbons, and ties work together to create this stunning tote that is sure to be your favorite. I love the idea of making these for Mother’s Day, which by the way will be here before you know it.
As beautiful as the bag is, it’s really not that difficult to make and you can embellish with any number of flowers, buttons, or whatever you want. The ruffled handles are my favorite part, but the entire bag is just gorgeous.
Instructions and Pattern: sew4home

In traditional school bag style, this tote is fabulous. You only need a yard of fabric, and just under a yard for the lining. The strap is great, but the pattern lets you leave that off if you don’t want to make it.
The tote is deep enough that your stuff will stay securely inside without it.
You can add it though if you want for dramatic effect. I love how big this one is and it’s perfect for carrying books – if you need it for school. Otherwise, you can use it as a market tote or a large handbag.
Instructions and Pattern: projectsbyjess

You don’t have to use scraps to make this, but you can. Plus, the strap is a belt – how easy is that? You can pick up a woman’s belt from Goodwill for a couple of dollars or less and it’s a great alternative to having to make the strap yourself.
This scrunchy looking tote is perfect if you like those larger type handbags or use it for carrying your beach necessities or whatever you want. I love it for books and maybe even knitting supplies to take along on road trips.
Instructions and Pattern: naechic

Okay, the name of this one is enough to make me want it, and that’s aside from the fact that it’s a lovely bag and so very easy to make. This one requires several steps, but all of them are easily done by the intermediate sewer, or even a beginner who is confident in her abilities.
It looks really professionally done when finished and would be the perfect Mother’s Day gift for any lady who loves stylish bags.

This is one of the most adorable bags ever. Ladies, if you just can’t bring yourself to be away from your man for too long, you can take along his shirt and tie to remind you of him while you’re out. You literally use an old dress shirt and tie to make this one.
It’s perfect for any occasion and would be a great book bag for little boys – assuming you’re not using a pink shirt or anything.
Instructions and Pattern: makeit-loveit

If you need a tote bag that’s easy to make and has pockets for everything, this six pocket bag is the perfect project. It has three outer pockets on each side, so you have room to take everything you need and keep it neatly organized.
You would think it would be a bit more complicated given the number of pockets but it’s a really easy tote bag project and you can finish this one up in just a few hours.
Instructions and Pattern: bhg

This sling style tote is really pretty and the wide band and handle make it really comfortable to carry. It’s not as large as some traditional tote bags but it will definitely hold all your essentials. Plus, it’s really easy to make and the contrasting band and handle look great.
Of course, you could do it all in one pattern, but it will draw much more attention if you contrast just a bit. This one would make a wonderful mini diaper bag, too.

This easy spring fashioned tote bag is made from a couple of tea towels. That’s what makes it so easy to make. You can of course, use fabric if you prefer but tea towels make it easy because they’re already cut.
If you want a tote bag project that you can finish in about an hour or less, and one that gives you a bag perfect for spring, this is it.
Instructions and Pattern: homemadebyjill

I just love the idea of using dish towels to make a tote bag. This one is made from dish cloths! You use two dish cloths that are the same size and you’ll need a yard of webbing.
It’s so much easier to create tote bags when your material is already cut for you and this one is super easy. You can make the handles longer if you prefer and choose dish cloths in any design, although these great summer designs would be perfect for vacation.
Instructions and Pattern: whatsthatgonnabe

Repurposing is so much fun. If you love it as much as I do, you’re really going to like this little tote bag that you create from an old sweater. Don’t throw out those old clothes – find a new use for them!
This little bag is perfect for when you want something stylish but lightweight. It’s also so very easy to make and you could coordinate so many different decorations to go on it.

How about a bag that’s big enough to pack away clothes or toiletries for a weekend getaway?
And, you can make it yourself. This versatile tote bag is large enough to carry a couple of outfits and even your bathroom necessities like a blow dryer or straightener.
If you’re only going away for a night or two, you don’t really want to carry bulky luggage. Instead, make this DIY weekender bag. With a leather looking base and trim, it’s an attractive bag and the pattern is easy enough for even the newest sewing fanatic.

This two toned tote is easy to make and it’s a great look with its contrasting colors. It’s pretty big too, measuring 17 inches by 15 inches, and you’ll find that it’s much easier to incorporate the two designs than you think.
You could make so many of these and give them out as gifts. Even if you have a ton of tote bags, you know you want one of these stylish two toned bags, just for the fun of it.

If you need a basic tote pattern, this is an easy one. You can decorate this with any of the methods above and it’s a pretty large bag, so it’s perfect for books, market purchases, or anything you need to carry.
It’s 18 inches high and 12 inches wide. Plus, you get six inches of depth, so you’ll have room for just about anything you need. You can even fit a laptop in this one, and the shoulder strap is adjustable. It also has an inside pocket.
Instructions and Pattern: bagntell

This little wallet style tote is really adorable and it’s pretty easy to make. You’ll have three basic steps which include assembling the wallet, assembling the outside bag, and making the lining.
The tote bag zips up into a really neat wallet size so you can stick this in your purse and go. When you need it, just unzip and you have a full sized tote bag to carry all your stuff.

As someone who loves spur of the moment trips, I can tell you that you will never have too many weekender bags. This one is an extra-large sized bag that will easily fit your laptop, clothes, toiletries, and so much more with room to spare.
You could also use it as a really nice diaper bag, and it really resembles those expensive bags that you see in department stores for several hundred dollars. You can make it in less than a weekend and it won’t cost you anywhere near what you would pay for a new one.
Instructions and Pattern: megantada

This would be a great library bag. It’s got a huge pocket in front and one that easily holds a pencil or pen. The lightweight design makes it perfect for carrying books – since books are heavy on their own, you don’t want any additional weight.
You could also use this one for crocheting or knitting supplies.
The little pocket is perfect for keeping your needles safe and within reach. Plus, it’s a really easy little bag to make.
Instructions and Pattern: mycottoncreations

Don’t let the zipper on this cute bag scare you – you can easily make this! It looks like the smaller version of a laptop bag and you can use it for so many things. The pattern itself looks pretty simple, even with the zipper.
This lightweight bag would be perfect for smaller tablets or market purchases, and the straps are designed to snap off if you want to carry it like a small handbag.

Tote bag projects are great and they’re even better when there is no sewing required, right? This t-shirt tote bag doesn’t need to be sewn at all. In fact, you can make this in under half an hour and you’ll have a great bag from that favorite t-shirt.
These are great as gifts – just buy cheap t-shirts with sayings, bands, or whatever, and customize them for your gift recipient. Instead of sewing the bottom, you cut fringe and then just tie the fringe together. It’s a simple bag that’s got so much character.
Instructions and Pattern: mommypotamus

I really love the look of tote bags that have leather straps, especially canvas bags.
You can easily make one yourself with this pattern. The entire thing should take you less than two hours to complete, and the bag is pretty room so you can take it along to the market and fill it up with loads of stuff.
This one requires sewing but you also need to work with grommets and the leather, so it’s a project that lets you use all of your crafting skills.
Instructions and Pattern: designsponge

In just under half an hour, you could create this lovely and really durable tote bag.
You can really never have too many totes, right? And of course, you want a tote bag that is durable and can handle whatever you throw into it.
This one is as durable as it is easy to sew and since you can turn one out in less than half an hour, it’s the perfect bag to give as a gift. Imagine making up a few of these before the holidays and giving out handmade bags as gifts!
Instructions and Pattern: babble

Did you know that you could get a great canvas and leather bag without sewing? You can! This huge bag is perfect for anything you need to carry and again, it’s a no sew project, which puts it at the top of my list.
Instead of dragging out the sewing machine, you use fabric glue or liquid stitch on this one. The leather handles are great and really make it look fancy, and even those don’t have to be sewn on. If you want an easy leather and canvas bag, this is about as easy as it gets.
Instructions and Pattern: homeyohmy

If you need a big diaper bag or you just want a tote bag that’s big enough to double as a diaper bag, this is a great project to try. This bag has loads of pockets and plenty of room for everything, plus it’s got an adjustable strap.
Whether you want a DIY diaper bag or you just really like tote bags that give you room for organization, this one is great and it’s durable and really easy to put together.

This adorable and easy to make DIY pocket tote is perfect for so many occasions. It has enough room to hold everything you need like wallet, phone, and keys or you could use it as a small diaper bag or even store your tablet in it.
It is so stylish with its leather trim and there are pockets all the way around. If you want a tote bag but not one that’s really huge, but you do want the convenience of pockets, this is the perfect DIY tote for you.
Instructions and Pattern: flamingotoes

Here is another adorable DIY tote bag project from Crazy Little Projects. This would be a great gift for pre-teens or teenage girls. It has adorable ruffles and is relatively easy to make.
You begin with a tote bag that you can find at any craft store and then just embellish on it just a bit. The tutorial tells you exactly what you need to make it and how to cut, pin and sew it all into place.
This is a great bag and the polka dots are just adorable, although you can do it in whatever pattern you like.

This is a really cute and handy project. Every DIY’er needs to have a tote bag to keep those projects organized. Well, here is your chance to make your very own foldable tote bag.
You can make this your next DIY project and use it for future projects.
You just need a bit of material and the instructions are really very easy.
They even tell you how to properly design the bag so that it folds up really easy for storage or for putting inside your purse. This is a quick and really adorable project and you can make tote bags for all of your DIY friends. Thanks to Zaaberry for the idea.
Instructions and Pattern: zaaberry

This is a great little tote bag for summer from Crazy Little Projects. The entire pattern is available on the site. You just have to print it out and get started. This is a really easy project that does require a bit of sewing but if you are an avid sewer then you should be able to turn this out in just a couple of hours. You just need a couple of yards of fabric and a yard of interfacing.
It’s a great little bag and fairly roomy so you will have space for all of those beach necessities. This would be a great project for gift giving if you know someone who just loves totes.
Many of these are also repurposing projects and you know how much I love to repurpose. Just check out these 15 brilliant ways to repurpose old bed springs into wonderful treasures.
Note that some of these are ways that you can design your tote bags – there are a couple that require you to already have a bag to use. In those cases you can use the basic tote bag patterns listed to make a bag and then easily transform it into something that you might find on a high end department store shelf. Seriously, there are even leather bags in here that you can easily make yourself.
There’s even a great no sew bag that you make from an old t-shirt. If you want to check out other fantastic crochet ideas check out our beginner friendly 100 crochet patterns post.
You can make some of these bags in less than an hour and many of them can be made from old clothing. You can buy clothing at your local Goodwill or thrift store – even the towels that are used to make a few of these can be bought really cheap.
So, you’ll get an amazing new tote bag and many of them won’t cost you anything. Whether you’re looking for a wonderful gift for Mother’s Day, which is just around the corner, or you just really want to add a new tote bag to your collection, you’re sure to find the perfect bag in this collection – perfectly fashionable and perfectly easy to DIY. Let’s grab those supplies and make some tote bags!
More Homemade

Reader Interactions
Leave a reply cancel reply.
Your email address will not be published. Required fields are marked *
Notify me of follow-up comments by email.
Notify me of new posts by email.
Parvathamma
September 17, 2019 at 11:51 am
Rishabh limestays
February 21, 2020 at 6:03 am
Hi,Thanks for sharing the article,It is very informative for everyone.Keep it up the good work.
Travel accessories you can make at home

Apr 8, 2020 • 3 min read

A man leans back in an airplane seat wearing an eye cover and headphones. Next to him is another man with headphones and neck pillow.
You're home, we're home and sometimes reading another book or baking another loaf of bread just doesn't cut it anymore. Looking for something else to occupy your time and really make staying indoors more creative and perhaps a little challenging? DIY projects, particularly travel-related, are the perfect way to maintain your love of travel while staying indoors.
These are our favorite travel-themed DIY projects.

1. Travel pillow
Travel pillows have become a quintessential carry-on item when criss-crossing the globe. Turns out these comfy companions are pretty easy to make in your home (where we all find ourselves at the moment). Here's how to sew your own travel pillow courtesy of the Instructables website . For the visual learners out there, check out Crafty Gemini Creates video . Mattea from the blog, Ducttapeguitar, offers up an ingenious idea of using a travel pillow as a form of luggage.
2. Passport cover
From chic, all-black options to zany, loud prints that TSA agents can spot from a mile away, passport covers are a fun way to display your personality. Instead of combing through countless websites looking for the passport cover that "speaks to you," try making your own. Here's a step-by-step tutorial courtesy of the Barefoot Blonde . And for those folks who can't sew, Deb Days and Adventures in Fashion will help you out.
3. Eye mask
Whether used to block out the sun, cabin lights or an annoying seatmate, eye covers are the perfect travel accessory. Though the basic pattern is the same, add a little flair with unique (yet comfy) fabrics. My Bluprint and Sleep Advisor offer comprehensive written steps for custom-made eye covers or follow along on Treasurie's video.
4. Jewelry organizers
Traveling with jewelry is always a roll of the dice. Will my favorite earring (it's always just one) get lost in the black hole that is my suitcase? Will that bracelet that goes with everything get crushed under the weight of all my clothes? Jewelry organizers are perfect solution to this problem. Check out Momtastic and Brit+Co for easy to follow tutorials.

5. Tote bag
Sourced from an old pair of jeans or an assortment of unused pieces of fabric, the tote bag is a versatile travel accessory that appeals to everyone. Add pockets or a drawstring or braided straps to make this essential travel item a true reflection of your style. Crazy Little Projects is perfect for beginners.
6. Toiletries storage
Washcloths take on a whole new meaning thanks to this practical DIY toiletries storage project courtesy of the blog Sparkles of Sunshine . Add a touch of homeliness with brightly-colored ribbons and ornately designed washcloth patterns. For a storage case with a bit more character, try The Crafty Gentleman's tutorial .
7. Luggage tags
Often overlooked, homemade luggage tags are not only practical but also creative. Make a custom tag for everyone in your family or make multiple tags for every piece luggage you own. For a simple design try the Polished Habit's version or for something with a bit more sparkle, test out Bre's glitter luggage tags from Average but Inspired.
You might also like:
5 home workouts from around the world Enjoy these free coloring pages from museums and libraries 5 creative ways to display your travel photos at home
Explore related stories

Mar 29, 2024 • 6 min read
The roads of Jaipur are jam-packed with hundreds of shops. Here's our guide to 5 of the best.

Sep 7, 2023 • 4 min read

Aug 16, 2023 • 5 min read

Mar 10, 2023 • 4 min read

Apr 27, 2024 • 6 min read

Apr 27, 2024 • 5 min read

Apr 27, 2024 • 4 min read

Apr 27, 2024 • 8 min read
- Skip to primary navigation
- Skip to main content
- Skip to primary sidebar

Diy Handbag & Wallet Projects » 24 DIY Duffle Bag Ideas: How To Sew A Travel Bag
24 DIY Duffle Bag Ideas: How To Sew A Travel Bag
Published: Apr 22, 2021 · Modified: Jul 30, 2021 by Luke Allison · This post may contain affiliate links · This blog generates income via ads
Duffle bags are essential when trying to pack for a mini-vacation or travel. It is very easy to carry about and simple to make. Growing up as a kid, I used to have a denim duffle bag, it was made by my mom, and, trust me when I say it has lasted for years.
If you are looking at making a DIY Duffle bag, you are in the right place, we have put together a list of 24 projects that will show you how to make a duffle bag from home using a few supplies.

Table of Contents
1. DIY Simple Duffle Bag

The materials needed for this simple duffle bag include heavy cotton, contrasting fabric, purse zipper, maxi piping, thread, stick pins, rotary cutter, and iron. Once the materials are ready, cut the fabric and start making the duffle bag. You can get a free PDF tutorial of the project by clicking the link below.
Click for more details
2. Gym Bag DIY

This is made from denim or any outdoor fabric, cotton webbing, straight pins, chalk, yardstick, sewing machine, Zipper, iron, and ironing board. Measure and cut a 75×40" piece from the denim, then cut four circles from the remaining denim fabric. Sew the 75×40" to the circles and attach the zipper.
3. DIY Fancy Duffle Bag Idea

The materials needed for this DIY duffle bag include yards of cotton canvas, zipper foot, rotary cutter, heavy-duty scissors, swivel hooks, leather punch, and leather strapping. Cut all the necessary fabrics and line the main bag panel with interfacing. Sew the inner pocket to the lining. Make the exterior pockets and attach the shoulder strap and zipper.
4. How To Sew A Weekender Bag

Start by gathering the materials needed for this DIY duffle bag, then cut the fabrics into pieces. Take out the pieces for the bag panel and sew them into a long tube-shaped cylinder. Then, attach the zipper and sew the handle/shoulder straps to it.
See also: 25 DIY Dice Bag Projects
5. How To Make A Duffle Bag
Start by cutting all the fabrics required for the bag. Take one of the main bag pieces and mark the center of it. Attach a zipper to the exterior pocket and topstitch it. Sew the pocket to the bag piece from the marked area downward. Then, attach a handle strap to surround the pocket. Repeat this process for the opposite side of the bag and attach other parts.
6. How To Sew A Weekend Bag
This is made from fabric, batting, sewing machine, needle, thread, and scissors. Cut the fabric into pieces and attach the batting to the wrong sides of it all. Then sew the fabric and batting together to secure it firmly. Assemble the pieces and start sewing.
7. How To Make A Duffle Bag
The materials needed for this DIY duffle bag include fabric, basting tape, continuous zipper chain, webbing polypropylene, foam luff tape, polyester thread, chalk pencil, hot knife, clear acrylic ruler, and sewing machine.
Cut the fabric into pieces and prepare the two side pockets. Attach the side pockets to the main body of the bag. Sew both sides of the bag together and attach the main zipper. Then, attach the handle and shoulder strap and you're good to go.
8. Duffle Bag Backpack DIY
This is made from denim, swill, D-rings, swivel clips, zippers, webbing, and a sewing machine. Cut the denim fabric for the main bag panel and cut the swill fabric as the lining. Since the pattern of the bag is a long tube cylinder, make the rectangular center of the bag and close both edges with circular pieces.
9. DIY Duffle Bag

This is made from 2 old bags, a seam ripper, needle, thread, pins, sewing machine, pencil, measuring tape, scissors, and paper. Using the seam, the ripper, disassembled the bags and kept each piece. Determine the design or pattern of the new bag you want to make and start sewing the pieces back together.
See also: 20 DIY Chalk Bag Projects
10. DIY Drawstring Travel Bag

The materials needed for this drawstring bag include 2 pieces of fabric, 2 pieces of ribbon/ bias tape, thread, safety pins, and a disappearing ink fabric pen. Download and print wordings on a piece of the hard surface then place the template under the fabric and trace the wordings out with a gold pen. Then, place the fabric right side together and stitch the three sides leaving the bag opening. Thread the ribbon to the opening and you're good to go.
11. DIY Laminated Toiletry Bag

This amazing toiletry is made from laminate fabric, seam gauge, fabric marker, plastic zipper, straight pins, and wax. Start by cutting the fabrics into pieces then sew the main bag panel with a zipper to form a tube. Once the bag is done, make the handle and you're good to go.
12. DIY Quilted Travel Duffle

This amazing duffle bag is very simple and straightforward to make. It is made from wide quilting cotton, piping cord, polyester webbing, coordinating zipper, swivel hooks, triangle rungs, and fusible interfacing. Download the free pattern for the duffle back by clicking the link below. Once you get the pattern, cut the fabric and start making your bag.
13. DIY Jeans Duffle Bag
This is made from old jeans, scissors, fusible interfacing, iron, clips, straight pins, and lining fabric. Cut all the pieces needed for the bag from the old jeans and line them all with fusible interfacing. Remove the two back pockets from the jeans and attach them to the main bag panel. Prepare the handle strap and attach it to the bag panel.
See also: 21 DIY Bean Bag Chair Ideas
14. How To Make A Duffle Bag
This is made from fabric, zipper, lining fabric, straight line, sewing machine, scissors, and webbing. Cut the fabric into pieces and attach the zipper to the main bag panels. Sew an open pocket to both sides of the bad panel and attach webbing to it as the handle. Sew the side panels to it and you're good to go.
15. DIY 10 Liter Duffel Bag
The materials used for this DIY duffle bag include fabric, zipper, thread unpicker, measuring tape, thread, pins, and scissors. Cut a rectangular piece for the bag panel. Sew two zippers to both edges of the rectangle, fold them into two and use a folded paper to trace the line for the handle strap on it. Attach webbing to the traced line, then attach the two circular side panels to the bag.
16. DIY Mini Duffle Bag
To make this mini duffle bag, you will need a pattern, fabrics, webbing, zipper, scissors, pins, iron, rotary cutter, sewing machine, and cutting mat. You can get a free pattern for this bag by clicking the link below. Once you get the pattern, cut the materials and start making your bag.
17. DIY Kids Duffle Bag

Start by cutting all the pieces needed for the bag. Cut a wide and long rectangular piece and two circular pieces for the sides. Attach the zipper to the rectangle and sew the handle strap to both sides. Then, sew the side pieces and you're good to go.
18. DIY Travel Bag Tutorial

This amazing drawstring bag is made from fabric, ribbon, sewing machine, interfacing, scissors, and pins. Cut the fabric into pieces and line the base/bottom circle with interfacing. Take out the rectangular piece for the bag panel and fold the edge like an inch where the drawstring will be. Sew the rectangle to the base and thread the ribbon inside the fold and you're good to go.
19. DIY Travel Bag For Kids

The materials needed for this duffle bag include fabric, pins, scissors, webbing, sewing machine, and rotary cutter. Start by cutting two pieces of the rectangle for the bag panel. Sew both together on all models leaving the opening. Fold the tips of each piece and sew, then attach the handle strap and you're good to go.
20. DIY Duffle Bag

The materials needed for this include denim fabric, D-rings, swivel snap hooks, nylon strap, zipper, and flexible fabric. Cut two pieces of rectangular pieces from the denim for the bag panel and cut two pieces of the circle for the side pieces. sew them together and attach the zipper.
21. Duffle Bag DIY
Start by preparing the template for the side panels, then cut out the jeans fabric for the panel using the template. After this, cut a rectangular piece from the jeans for the main bag panel and attach a zipper to it. Sew the side panels to the bag and attach the shoulder strap.
22. How To Sew A Duffle Bag
Start by cutting a long and wide rectangular piece of leather, attach a zipper to both sides of the rectangle. Sew the handle strap to it. Then, cut and attach two circles to both sides of the bag.
23. DIY Duffle Bag
This is made from leather, leather cutter, cutting mat, A4 paper, A3 paper, tape, and ruler. Download and print the pattern for the bag on the A4 and A3 sheet. Use this as the template and place it on the leather to cut each part of the bag. Download a free pattern from the link below.
24. DIY Leather Duffle Bag
The materials needed for this duffle bag include leather, leather sewing machine, zipper, strap cutter, rivets, roller knife, exact knife, and D-rings. Measure and cut the pieces for the bag panel from the leather. Attach the zipper to the main bag panels and sew the handle strap to it. Attach the side panels and you're good to go.
That’s a wrap! If you enjoy reading this article, we would love for you to share it with your friends and family across social media platforms. Someone you know might be in dire need of a duffle bag for his or her next trip. Thanks for stopping by!
Reader Interactions

Ask Me Anything Cancel reply
Your email address will not be published.
Save my name, email, and website in this browser for the next time I comment.
- Art & Design Resources
- Disclosure Policy
- Work With Me
Passport by Design
A Travel Blog for Design Lovers
DIY: Travel Makeup or Toiletry Bag

Make your own DIY travel makeup/toiletry bag. Line it with a cute fabric. It even has a strap to make carrying it around easier. There’s nothing like a new project to spark creativity. Keep reading for the tutorial. Check out my other DIY projects here .
- fabric – two 10.5 x 14.5″ (26.67 x 36.83 cm) rectangles for bag and lining
- fabric – one 7.25 x 4.25″ (18.415 x 10.795 cm) rectangle for the strap
- zipper- 10.5″ (26.67 cm) [I prefer the exposed metal ones, but any will do]
- sewing machine
- sewing pins
- chalk or white marking pencil
Sewing Machine Used
Singer Heavy Duty 4423

Step 1: Make the Strap
The first step in making your DIY travel makeup bag is constructing the strap. Start with the 7.25 x 4.25″ (18.415 x 10.795 cm) rectangle. Fold down 1/2″ (1.27 cm) of the top and bottom (bottom, left image). Then fold both of those sides together (bottom, right image).

Now you want to stitch about 1/4″ (0.635 cm) on both the top and bottom (below). Set it aside.

Step 2: Attaching the zipper
Place the two larger rectangles together evenly. Face the dull sides together (This is the opposite of what we normally do.) Then line up the zipper with the fabric at the short end of the rectangle. The zipper should be facing upside down.

Sew the zipper onto the the short end of the fabric (below). It gets a little tricky with the zipper if you have a metal zipper like this. You may have to move the zipper around a little to keep it out the way.

Now it’s time to do it on the opposite side. Make sure the top side of the zipper faces the outside fabric of the bag. In this case it’s the grey side.

When it’s done it should look like this (below).

Open the zipper all the way up and add a top stitch over the fabric that is touching the zipper (below). It will add a nice professional touch to the finished bag.

Step 3: Sew the Ends Together
The bag should be inside out at this point. Lay it flat. Use the ruler to make sure that each side of the zipper is even.
Then sew across where the closed end of the zipper is. Sew right behind the metal block at the end of the zipper. Otherwise you’ll have a big gap at the end of the zipper once the bag is finished.

I had to sew this one twice because I was going to have a gap (bottom, left image).
Leave the zipper open when you sew the other end. Or you’ll have a bag that is sewed and zippered shut. It will be funny, but not really funny.

Step 4: Creating the Box Shape
Start where the bag has the closed end of the zipper. Make a triangle at each corner of the bag. It’s easier to see the actual triangle shape in the bottom middle and left images because the ruler is not in the way. Use chalk or a white pencil to mark about 1″ (2.54 cm) from that peak of the triangle. After that, go to where you marked and sew straight across from that point.

Do that to the the other side. Remember to only do the two corners near the closed end of the zipper.

Step 5: Attaching the Strap
Now you’ll work on the end that has the open zipper. Poke out the corner with your finger (bottom, left image). You’re not going to make a little triangle just yet. Take the fabric that you sewed in the very beginning for the strap.
Place that about 1″ (2.54 cm) down from the triangle peak. Once you position it correctly, slide it so that the seam is directly in the middle of that strip (bottom, right image).

Use your thumb to keep the strip in that position as you fold the bag inside out to form the triangle (bottom left and middle images). Again, measure 1″ (2.54 cm) down from the triangle. This time use a pin to position the strap in place (bottom, right image).

Do the same thing with the other side, making sure that the strap is not twisted. Also make sure it’s facing the way you want it. Make the triangle again and add your pin (bottom, right image).

Don’t head right back to the sewing machine just yet. While everything is pinned turn your bag the right side out. Are the straps even? Do you like the way they look? Is one strap a lot higher than the other one? Keep readjusting it. This may be the hardest part in making the whole bag. But you’re almost finished!

Once you are happy with the strap, sew across just like you did for the other end. You may still have to rip out the stitches and do the strap over. But that’s fine.

Once you are completely satisfied, cut the corners off of each triangle so that the bag is not bulky inside.

And now you are done with your diy travel makeup bag!

Leave a Reply Cancel
You might also like, how to take art workshops on vacation, explore one of the top 2024 aviation news stories.
At Passport by Design, a travel blog with creatives in mind. Based in Connecticut, U.S.A. Authored by Kelcy Jenkins.
P.O. Box 2474, Milford, CT 06460 [email protected]
Popular Posts

How to Be More Creative At Home
DIY: Crochet Sunglasses Case for Beginners
DIY: Multi Purpose Pouch with Magnetic Closure
Recent posts.

Are the Citadines Serviced Apartments in Kyoto, Japan Better Than an Airbnb?

5 Ways to Pass Time During Your Airport Layover
Cheryl Boglioli Designs
Living the Art Life™
Sew a DIY Soap Saver Travel Pouch
by Cheryl Leave a Comment
While traveling is exciting, making it through the TSA security line can be painful. Fitting all my toiletries into one 1-quart zip-top bag is my greatest travel challenge because I like makeup, and my wavy hair needs a little extra product care, so I’ve been looking for ways to minimize my liquids. Carrying bar soap and shampoos help, but let’s face it, they get slimy in a zip-top bag. My solution is to create a small, waterproof fabric pouch that is still breathable.
Click here to jump straight to instructions

Heads up! My posts may contain affiliate links! If you buy something through one of my links, you won’t pay a penny more, but I may get a small commission that helps this blog stay afloat. Thank you for your support.
I had looked at purchasing oil cloth, but then Therm-O-Web shared with me their new HeatNBond Liquid Vinyl. One application will make your fabric water and stain-resistant. Two coats will make your fabric waterproof and stain-resistant. Three coats will make your fabric waterproof and stain resistant with a semi-gloss oilcloth finish. I love that I have options and can customize the application to suit my purpose.

You can create your own DIY Soap Saver Travel Pouch with basic sewing skills and fabric that you waterproof with Heat n Bond Liquid Vinyl.
You might notice that I felted my bar soap. Voila! Now I have a built-in washcloth. (stay tuned for a felted soap tutorial, but you can Google felted soap for many ideas)
keep an eye out
I’ll post a YouTube video in the next week sharing what & how I pack my toiletry bag for airplane travel in a carry-on.
Here is what you need to get started on your DIY Soap Saver Travel Pouch:
- bar soap of choice
- 1/4 yard cotton fabric
- Heat-n-Bond Liquid Vinyl
- small paintbrush
- craft mat or wax paper to protect your surface
- Heat-N-Bond pressing paper
- parchment paper
- iron *I use Oliso’s craft iron for these projects.
- sewing machine
- Schmetz nonstick sewing machine needle
- coordinating thread
- Omnigrid Ruler
- Omnigrid rotary cutter
- self-healing mat
- Wonder clips or Mini clips
- optional Kamsnaps and snap setting tool or ribbon
Instructions:
- Measure the height, width, and thickness of your soap. If your soap thickness exceeds 1″, you will need to add additional width and height to your fabric.
- Determine measurements for your fabric based on your soap size. My soap bar in the sample is 1.5″ wide by 3″ tall and 1″ thick. Note: I cut my soap bar with a butcher knife to make it smaller and more compact for travel.

- Cut fabric with a rotary cutter and ruler for straight edges and easier sewing. I used a different pattern fabric for the inside and outside of my pouch. Cut two pieces for the inside and two for the outside pouch. I cut my fabric pieces at 4.5 x 8.5 inches.

- Follow the instructions for Liquid Vinyl to make your fabric water-resistant. Place fabric on a nonstick craft mat or wax paper, and using a paintbrush, paint the fabric with a light, even coat of Liquid Vinyl.

- Allow the coat to dry and press with heated iron as instructed on the Liquid Vinyl jar, placing your fabric on parchment paper and using your nonstick craft mat or Heat-n-Bond pressing paper over the fabric. Press with medium heat iron.
- Repeat steps 4 & 5. Two coats of Liquid Vinyl will leave your cotton fabric waterproof.
- Place your fabric for the outside of your pouch right-sides together. Clip pieces together with mini clips or pins.

- Sew sides and bottom with 1/4″ seam allowance.

- Press seams and clip corners being careful not to cut into your seam.
- Turn the fabric right sides out. Make sure to push those corners out. Press fabric with a nonstick pressing cloth.
- Place the fabric for the interior of the pouch with the right sides facing, clipping the fabric together with mini clips or pins. Mark one section on one long side about 4″ long with different color clips or pins. We will not sew this section yet.
- Sew the sides and bottom of the fabric, leaving that 4″ section open so you can turn the pouch later.
- Press seams and clip your bottom corners; be careful not to cut into your seam.
- Place the outside sleeve down into the ‘inside-out’ inner fabric. Line up side seams.
- Take your time and sew around the top edges of the fabric pouch with a 1/4″ seam allowance.
- Turn the pouch out using the 4″ space you left open on the side of the interior fabric. Both interior and exterior right side-outs will be facing out and connected in the center.

- Topstitch to close that 4″ space on interior fabric or slipstitch opening closed by hand. This seam will not be seen on the finished project.
- Tuck the interior fabric down into the exterior pocket to create your pocket pouch, making sure to roll the interior fabric to the inside
- Topstitch around the top opening to finish.
- At this point, you can fold down the bag top or tie the top with a ribbon or string and call your bag finished.
- I decided to add snaps. Follow Kamsnaps directions to add snaps if you desire.

- Drop your soap into your pouch and make some travel plans with one less thing to pack in your clear 1-quart TSA-approved toiletry bag.

ps… if you want some amazing handmade soap, check out my sister-in-law’s business – JB Bath Shop . I only use her handmade soaps now, and she will build you a beautiful basket if you are looking for gifts. I send baskets to friends.
Let me know what you think by leaving your comment here! Cancel reply
This site uses Akismet to reduce spam. Learn how your comment data is processed .
- Media/Press
- Disclosure:
- Privacy Policy
- Terms and Conditions

- Search Please fill out this field.
- Manage Your Subscription
- Give a Gift Subscription
- Sweepstakes
- Travel Products
- Trends + Deals We Love
10 Ridiculously Spacious Weekender Bags You’ll Want on Hand for Travel This Year — Up to 50% Off at Amazon
Prices start as low as $21 on these functional and stylish duffels.
:max_bytes(150000):strip_icc():format(webp)/IMG_9861-28adc25e5c9643fa9f55e077a316c3f4.jpg "diy art travel bag")
If you click on links we provide, we may receive compensation.
Travel + Leisure / Daisy Rodriguez
On certain short vacations, it doesn’t necessarily make sense to pack up your bulky rolling suitcase. Namely, weekend trips. When you’re planning on only being away from home for just a few days, a spacious weekender bag is really all you need to get the job done, and Amazon has proven once again to be the go-to destination for all of your travel needs.
Whether you’re gearing up for a bachelorette trip , a beachside getaway, or even a staycation in your own city, we’ve uncovered the 10 weekender bags currently on sale at Amazon that are about to make your packing experience so much easier. Best of all, prices start as low as just $21.
Vera Bradley Women’s Cotton Weekender Travel Bag
Vera Bradley has been making spacious and reliable duffel bags for years, and this cotton tote is perfect for anything from a short weekend getaway to even longer adventures thanks to the luggage sleeve at the back of the bag that makes it stackable atop your rolling suitcase. Top-carry handles alongside an adjustable shoulder strap make traveling with this bag easy and comfortable, while a multitude of exterior and interior mesh pockets make way for impressive organization. Plus, the entire bag is machine washable so you can rinse away the dirt and grime of the airport once you’ve arrived home.
Etronik Travel Weekender Bag
If you’ve been eyeing the viral Béis weekender bag but can’t swing the price tag, this best-seller from Etronik is an excellent, wallet-friendly alternative that boasts impressive packing capacity alongside a number of compartments for maximum organization. The roomy primary pocket offers ample space for all of your favorite clothing that you might want to pack for your trip, while the base of the bag is fitted with a special shoe compartment to keep the remnants of filthy city streets away from your clean laundry. Air vents in the shoe compartment ensure that your bag will never get stuffy (even during longer trips), and right now the top-rated tote is on sale for just $36 at Amazon.
Hyc00 Travel Weekender Overnight Bag
Simple, spacious, and reliable, this best-selling tote bag from Hyc00 is a worthy bag selection for overnight and weekend travel, and can even be repurposed as a gym bag in the interim. The 35-liter capacity has room for several days’ worth of clothing, shoes, and toiletries, while a water-resistant exterior is great for traveling during the rainy spring months. The modest size of this bag is airplane compliant, securing its spot as a convenient carry-on, and a simple trolley sleeve also makes this bag a great stackable option alongside a larger rolling suitcase. It even contains a built-in laptop compartment and wet pocket to meet all of your travel needs.
Soaeon Canvas Travel Overnight Weekender Bag
This luxurious and astoundingly spacious weekender bag is a standout choice for travelers (and also currently available for just $38 at Amazon) because not only does it have the packing capacity for up to four days, but it also unzips like a traditional suitcase to allow for even more organized packing. The details of this bag set it apart from competitors as it features durable leather handles, a sturdy, waterproof exterior, and reinforced stitching that will keep it in prime shape for years to come. Just don’t forget to clip the additional 10 percent off coupon at checkout for even more impressive savings.
Foundry Fit & Fresh Art Deco Weekender Bag
Overpackers will be thrilled to get their hands on this exceptionally large weekender bag that’s best suited for long car rides, trips to the beach, or any other occasion when you plan on packing a large volume of items. This tote measures 22 inches by 18 inches by 12 inches, allowing ample space for more than everything you’ll need — just note that it’s not likely a great choice for taking on an airplane. A wide zipper at the top of the bag alongside several interior zippered pockets make it easy to keep your belongings organized and secure, and when this bag is not in use, the canvas material allows it to be easily folded up and kept out of the way. At just $21, you can upgrade your travel experience even on a budget.
Bagsmart Travel Quilted Weekender Bag
Bagsmart excels at crafting high-quality travel gear at affordable prices, and this quilted weekender bag is on sale for just $27 in time for your spring travels ahead. This tote is perfectly suited for air travel and will easily fit in the overhead compartment of most commercial airlines; plus, it comes with a comfy and adjustable shoulder-carry strap, a convenient trolley sleeve, and a portable shoe bag to keep your clothes clean and separated. With enough space to pack for up to a four-day trip, this versatile carry-on is a reliable choice for any trips you have on the agenda for the coming months.
Wogarl 4-piece Weekender Bag Set
Get the most bang for your buck with this four-piece luggage set from Wogarl that not only comes with a weekender bag, but also a shoe bag, a toiletry tote, an additional dopp kit, and even a matching purse. A luggage sleeve at the back of the bag makes it easily stackable for week-long adventures, while a water-resistant exterior promises to keep your belongings safe during any inclement weather you may encounter during your travel days. Plus, the base of the bag features another hidden compartment that’s an excellent place to store your dirty laundry, making for a streamlined unpacking experience once you arrive home.
Ibfun Weekender Bag
Looking to add some personality to your luggage selection this season? Well, this Ibfun weekender duffel is poised to be a great travel companion thanks to its spacious primary compartment, reinforced and reliable design, and roomy shoe pocket that’s lined with waterproof material to take on rainy weather in style. Right now, this convenient carry-on is double discounted to just $35 at Amazon, and it even boasts enough space to pack for up to four days of traveling (or a weekend trip if you’re an overpacker). And with a bonus toiletry kit and purse included, you can’t go wrong in scoring this unbeatable deal.
Beulptn Small Weekender Bag with Shoe Compartment
Minimalist packers will find this compact weekender to be a worthy addition to their travels — especially considering it’s on sale for just $24 at Amazon. Small enough to fit underneath most airplane seats (and inside of overhead bins), this weekender is truly ideal for two-day trips. It’s lightweight, durable, and conveniently designed to keep your belongings well-organized and in place, and it even features a hidden shoe pocket on the side for a single pair of your favorite kicks.
S-Zone Canvas Overnight Weekender Bag
If you’re shopping for a no-fuss bag that offers incredible packing capacity, a sturdy design, and even an expandable primary compartment, this duffel from S-Zone is sure to become your go-to choice — and it’s a whopping 50 percent off at Amazon. A canvas exterior accentuated with leather top-carry handles and other detailing creates a luxurious finish to this refined bag, while it’s the perfect size to function as a carry-on during your next flight. Rivets at the bottom of the bag add valuable reinforcements that help it stand on its own, and an adjustable and removable shoulder-carry strap is the cherry on top of this perfect weekender.
Love a great deal? Sign up for our T+L Recommends newsletter and we’ll send you our favorite travel products each week.
See More T+L Shopping Deals
:max_bytes(150000):strip_icc():format(webp)/tl-best-hiking-deals-tout-de042697b45a4c28be404f67772c4e7e.jpg "diy art travel bag")
IMAGES
VIDEO
COMMENTS
Cut the folder in half and fold for the cover. Fold paper in half and staple down the center crease. Use tape along the front page and the back page to secure to the cover. My Travel Art Therapy Kit. Plastic storage box to hold everything (mine is from Target). You can also use a file storage box, messenger bag/satchel, etc.
17 Items For Your Art Travel Kit. Winsor & Newton Promarker. Winsor & Newton markers start at $5.99, making them an excellent and affordable choice for any artist. "I always carry with me some pieces of the paper I work with, pencil, rubber and a small selection of my most-used color palette markers," freelance illustrator Ana Jarén says.
Step 2: Cut all fabric and interfacing pieces. The pattern you choose either has specific cutting instructions or may even come with templates you can use to cut the fabric pieces you will need. Remember the age-old tip: "measure twice, cut once.". Step 3: Attach notions to the fabric pieces.
12 Travel Bag Patterns. These travel bag patterns are the perfect solution to keeping organized on your next vacation, weekend trip, or a day out in the sun. You'll find free patterns so you can DIY your own duffel bag, tote, overnight bag, jewelry roll, tote bag, and more. All of these travel bag patterns have everything you need to sew up a ...
With this selection of gifts for traveling artists, you can finally hit the road without a headache. On top of mobile materials—including a booklet of watercolor sheets and a compact sculpting set—you'll also find supplies that conveniently fold, collapse, and roll into easy-to-carry shapes and sizes. Plus, with an artsy travel mug and a ...
Thank you for your support! Here's what I put in our travel art bag: watercolors // colored pencils // washi tape // 1 pencil, 1 eraser, 1 sharpener, 1 sharpie // sketchbook // paint brushes // tempera paints // small tote bag. Click here to see what we made with our art bag on this trip. I hope you had a nice little break as well (or will ...
A stamp pad of washable ink + a travel pack of wet wipes (for fingerprint art) Scissors. Tape or glue stick. Paint sticks. *Some of our favorite travel activity books include: Invitation to Draw, Jean's book of drawing prompts. An Ed Emberley drawing book or fingerprint art book. Printable art activities.
Great Paper artwork idea! Make a Paper #travelbag on your own. Watch this video by 92 Crafts team to learn about how to make Paper Travel Bag #DIY. Subscribe...
Kids Toiletry bag; Kids adventure bag; Kids travel toothbrush roll; Supplies for art bag - Okay, let's make an art bag to carry all those fun coloring supplies. One yard of fabric will be enough to make this bag, or a 1/2″ yard each of 2 fabrics. You will need to cut the main bag {in inches} 10 x 13 {cut 4}, pockets 10 x 6 {cut 2} and
Travel watercolor set. I made mine with a small tin, bottle caps, and squeezed in my own watercolors. Drawing pens. Posca White paint marker. Fun and sassy recycled plastic zip pouches from Blue Q. Large Travel Art Kit. For a week's vacation, art retreat, or an art date with friends, I'll bring a slightly larger version of the mini kit.
For a lot of artists, a moleskine and a pencil, or pen, is all you need to create amazing art work on these little canvas pages. The name in the travel journal game for the last 20 years, Moleskine's extensive line of sketchbook options includes: Moleskine Sketchbook Pocket (3.5" x 5.5") — $13.95. Moleskine Sketchbook Large (5" x 8.25 ...
Soothing Lavender Lotion. Abra's Kitchen. Dehydration is a major side effect of travel, especially in airplanes. Lotion makes battling dry skin an easy win, and this DIY version has the added relaxation benefits and soothing scent of lavender essential oils. DIY Whipped Lavender Lotion from Abra's Kitchen. 02 of 25.
How to make a travel bag with fabric, easy sewing step by step tutorial.Buy me a Coffee https://www.buymeacoffee.com/aepooimMaterial:Outer / Cotton Canvas ...
Buy: Etchr Slate Satchel 2 in 1 Bag $175.90. Buy it. 5. Royal & Langnickel Art Cargo Carry Bag. Designed by artists for artists, this bag boasts a sturdy, utilitarian construction. It measures 15 ...
Place the 7 7/8″ x 8 5/8″ pieces right sides together and stitch along the two long sides using a 3/8″ seam allowance Turn right sides out and press. Topstitch along one of the seams. Take the outer piece "D" and stitch around the sides and bottom using a 3/8″ seam allowance. Turn right sides out and press. Topstitch.
Lovely velvet art travel bags. Come in three beautiful colors- Navy, Purple and lavender Measures Approx 8x6x3 inches Why shouldnt your art supplies travel in style?!? ... Hit space bar to expand submenu DIY PAINT . DIY SAMPLE PAINT PACK; DIY WAX; DIY MAKING POWDERS; DIY TOP COATS; DIY BRUSHES. STENCILS. DECOUPAGE PAPER. IOD INLAYS. IOD TRANSFERS.
Here's a unisex travel toiletry bag made of navy fabric and some rope: DIYing it is very easy and doesn't suppose much sewing. You may add some embroidery like in the source or leave it as it is. The color combo of navy and white and rope will make the toilet bag nautical-like, ideal for a seaside vacation! DIY unisex navy and rope toiletry ...
30. Minnie Mouse Inspired Tote. You can thrill any Disney fan with this cute little Minnie inspired tote bag. Once you get your tote finished - whichever basic tote you choose to make - add some red and white polka dot ruffles to the bottom and create a cute little Minnie shape.
5. Tote bag. Sourced from an old pair of jeans or an assortment of unused pieces of fabric, the tote bag is a versatile travel accessory that appeals to everyone. Add pockets or a drawstring or braided straps to make this essential travel item a true reflection of your style. Crazy Little Projects is perfect for beginners.
Take one of the main bag pieces and mark the center of it. Attach a zipper to the exterior pocket and topstitch it. Sew the pocket to the bag piece from the marked area downward. Then, attach a handle strap to surround the pocket. Repeat this process for the opposite side of the bag and attach other parts.
Create a gift for yourself or a friend, reduce your fabric stash and save the planet all in one with our foldable DIY travel bag. WRITTEN TUTORIAL: https://h...
The first step in making your DIY travel makeup bag is constructing the strap. Start with the 7.25 x 4.25″ (18.415 x 10.795 cm) rectangle. Fold down 1/2″ (1.27 cm) of the top and bottom (bottom, left image). Then fold both of those sides together (bottom, right image).
Place your fabric for the outside of your pouch right-sides together. Clip pieces together with mini clips or pins. Sew sides and bottom with 1/4″ seam allowance. Press seams and clip corners being careful not to cut into your seam. Turn the fabric right sides out. Make sure to push those corners out.
10 Ridiculously Spacious Weekender Bags You'll Want on Hand for Travel This Year — Up to 50% Off at Amazon. Prices start as low as $21 on these functional and stylish duffels.