Choose country
- United Kingdom
- United States

Search results
Find a manual, troubleshooting: common clutch issues and causes, you are here.

Clutch troubleshooting is actually pretty easy. Just be patient and logical.
There are several ways that the clutch in your car can go wrong, but once you understand the parts, and how they interact, finding and fixing the problem should be easy. There are two basic ways a clutch fails - it either fails to disengage, or fails to engage fully.

Clutch fails to disengage when pressed
In normal, modern stop-and-go driving, you probably press the clutch pedal in every few seconds. And on that one time when you press it and the car still creeps forward, you know you have a problem. Sometimes a part fails and the clutch goes from working normally, to not working in an instant. Other times it is a slow gradual change, with each use of the clutch working less and less well. Each of these failure modes has different causes, and how it failed can be a big help in figuring out how to fix it.
Sudden Failure
- Broken/loose clutch cable
- Broken/loose linkage
- Failed hydraulic master/slave cylinder
- Leaking hydraulic line
- Improper fit of throwout bearing with pressure plate
- Disc contaminated with foreign material
Gradual failure
- Stretched cable
- Bent linkage
- Failing master/slave cylinder
- Low hydraulic fluid
- Broken motor/transmission mount

Clutch fails to engage properly
A clutch that doesn't engage fully, or slips under heavy load, is the normal failure mode of a worn out friction disc of pressure plate that has lost its tension. When you press the clutch, your foot counters the diaphragm spring which presses the friction disc to the flywheel. If the spring pressure is not great enough, or the clearance between all the parts is too great, there won't be enough friction to transmit the power from the motor to the transmission. Friction discs wear and get thinner, and springs get weaker with time and use, which is why all clutches eventually start to slip. The sudden onset of a slipping clutch usually indicates that an oil leak, or something else has contaminated the friction surfaces.
Clutch does not engage at all
- Binding in linkage or cable due to corrosion
- Seized slave cylinder
- Seized throw out bearing
- Failed pressure plate diaphragm
- Failed friction plate
Clutch slips under load
- Poorly adjusted cable/linkage
- Normal friction plate wear from use
- Glazed friction surfaces from slipping
- Worn flywheel friction surface
- Weak pressure plate diaphragm springs
- Leaking engine rear main seal
- Leaking transmission input shaft seal
- Warped/overheated pressure plate or flywheel.

Other clutch issues
Beside not engaging, or not disengaging, there can be other issues as well, such as noisy operation, or chattering on engagement. On older mechanical linkages, lack of periodic lubrication can lead to high effort or binding in pivots or cables, or a pedal that does not return smoothly. A bad throwout bearing can be a major headache in stop and go traffic, making horrible noises every time the clutch pedal is depressed. These are often annoyances more than anything else, especially since fixing them often involves removing the transmission/transaxle to get to the parts.
- Burned or glazed friction surfaces
- Oil on friction disc
- Loose engine or transmission mounts
- Worn splines on clutch disc hub
- Warped pressure plate or flywheel
- Worn pilot bearing
Squeal or rumble when pedal pressed
- Bad throwout bearing
- Failing pressure plate
- Bad pilot bushing
Rattle or clicking from clutch
- Loose clutch release fork
- Faulty throwout bearing
- Low engine idle speed or rough idle
- Worn friction disc splines
High pedal effort
- Linkages in need of lubrication
- Binding cable
- Binding pedal pivot
- Faulty slave cylinder
- Faulty pressure plate
Clutch pedal fails to return
- Faulty clutch cable
- Failed return spring
- Bad pressure plate
- Binding throwout bearing
Recommended for you
?")
Latest Tips & Tutorials

- Single Disc Kits
- Multi Disc Kits
- Accessories
- Action Clutch Merch
Free shipping on all orders $100+ Lower 48 states only

- Find your product Product Info Single Disc Kits Product Info Multi Disc Kits Product Info Flywheels Shop Accessories Shop Action Clutch Merch

Clutch Pedal Adjustment Importance
Why should you adjust your clutch p edal.
If you own a vehicle with a manual transmission, chances are that you have replaced or at least thought about replacing your clutch. Usually, OEM clutches last a long time and don’t require replacement before 50 to 60 thousand miles. That means many of those who replace their OEM clutches are looking for some action with aftermarket clutches.
So, after a careful selection process to find your aftermarket clutch, which is suitable for your vehicle, what comes next? Break in the clutch and you are good to go? Not really!
You have forgotten about a very important part of your manual transmission ecology, the clutch pedal. After installing a new clutch, if it’s an OEM clutch, sometimes it’s not necessary to adjust the pedal, especially if the free play is fine. But in the case of an aftermarket clutch, you certainly need a pedal adjustment. Believe it or not, an ill-adjusted clutch pedal can go as far as destroying the thrust bearing of your crankshaft, causing engine failure.
How Does The Clutch Pedal Work?
Before explaining why you need to adjust the clutch pedal after installing a new clutch, we should first understand how the clutch pedal work.
Most newer vehicles with manual transmission use hydraulic clutch release. In a hydraulic release, when you put the pressure on the pedal, the pedal transfers the pressure to something called the master cylinder. There is a plunger in the master cylinder that is connected to the pedal. As you push the pedal, the plunger pushes the oil inside the master cylinder. The oil then travels through tubing and reaches another cylinder down the line, known as the slave cylinder. There is another plunger there which moves forward due to the incoming oil pressure. This, in turn, pushes the clutch fork and the release bearing associated with it. The release bearing pushes the center of the diaphragm spring and voila! your clutch is disengaged.
In a mechanical clutch release, the pressure is conveyed by a clutch cable sliding inside a flexible sheathing. The clutch cable is connected to the clutch pedal on one end and the release fork on the other.
Pedal Height and Pedal Free Play: Two Metrics For Pedal Adjustment
Before talking about pedal adjustment, let’s talk about its two important parameters, the pedal height, and free play.
When you press the pedal, it goes down towards the floor, right? The pedal height is the travel distance between the pedal sit and the floor. This height determines how much travel you can put on the pedal to disengage the clutch. This height is adjustable and may need adjustment if you change anything down the line, such as the master cylinder, throw bearing, or the clutch itself.
Then we have pedal free play. It is the distance you can push down the pedal before feeling any resistance. In simple terms, it is the clearance before your clutch feels the pressure from your foot and starts to disengage. This is crucial for both your driving experience and clutch health.
Why Does Your Clutch Pedal Require Adjustment?
So now that we know the pedal mechanism and the important metrics, it is time to discuss why you need to adjust your clutch pedal after purchasing a new clutch. It all boils down to the thickness of the friction plate and the clamping pressure of the pressure plate.
When you had your OEM clutch, the pedal height, free play, and clutch response, all were calibrated by the manufacturer to work properly.
When you install a new clutch in your vehicle, things change, things like clutch assembly dimension, friction plate thickness, and clamping pressure. For example, if it’s an aftermarket clutch, it is bound to be thicker than your OEM clutch, and it will exert higher clamping pressure with a more robust pressure plate.
If you do not adjust the pedal, that means your pedal height is the same as before. When you will push the pedal down to the floor, the master cylinder will get the same actuation as before and in the end, the release fork will have the same travel. Since your new clutch has a new pressure plate with higher clamping pressure, the fork travel won’t be enough to fully disengage it. And here comes the infamous clutch slip. Whenever you will try to disengage and change gear, the clutch will be slipping, burning up the friction material. Slipping also puts rotational twists on the release bearing, causing it to seize and collapse eventually.
There is inconvenience regarding the friction disc too. Since it will be thicker than your worn-out OEM clutch, it will tend to bite sooner as you release the pedal. So, the moment you want to take your foot off the pedal, the clutch would want to bite, which can be pretty annoying for many people.
Then there is the issue of free play. Free play determines when your clutch starts disengaging after pushing the pedal. Some of us like the clutch to disengage immediately after depressing the pedal. But it is important to know that some amount, and more importantly, the correct amount of free play is essential for your clutch longevity.
When you install a new clutch, the changed dimension can change the free play available at the pedal. When there is less than ideal free play, the clutch will be right on point where disengagement begins, which means it will not have full clamping pressure on it and it will start slipping.
Also, without proper free play, the hydraulic oil cannot fully return to the master cylinder, meaning the rod of the master cylinder is not released all the way when your foot is off the pedal. This specifically happens when the parts are hot and expanded fully, or when you rest your foot on the pedal. Apart from wearing out the release bearing, the clutch fork, or the pivot, it can also cause leaks from the master and slave cylinders.
On the other hand, too much free play can cause clutch drag, making your car creep forward while changing gears, which can be troublesome in heavy traffic. Therefore adjusting your clutch pedal and achieving the correct amount of free play is very crucial.
My Clutch Release is Hydraulic, Does it Mean It’s Self-Adjusting?
Most new cars with manual transmission have hydraulic release instead of mechanical linkage. And some new models with hydraulic release also have self-adjusting mechanisms. That is why many assume that all hydraulic systems are self-adjusting. This is is a very common misconception.
Even if your vehicle has a self-adjusting pedal mechanism, it rarely works 100% and most often needs a bit of help in self-adjusting.
In conclusion, if you put a new clutch in your car, the clutch pedal needs an adjustment. Even a stock clutch will likely have to be adjusted. With an OEM clutch replacement, the new disc will have more thickness. With aftermarket clutches, the dimensions, and the pressure plate, both will be different, making it absolutely necessary to adjust the clutch pedal.
Add element
How to reduce clutch pedal travel
I have a 2001 Civic LX; I would like the clutch pedal travel distance to be far less than it is.
As in most manual cars, I find that the clutch pedal travel is mostly useless. That is, once the clutch is fully engaged, the pedal still has a goodly way to go before it hits the stop. On pedal depression the inverse is true. As modern hydraulic clutches are self-adjusting, this once-necessary extra distance is pointless.
(I would rather clutch with my ankle than my whole leg. If I could cut the pedal travel in half (or more), I would like that very much.)
Is this possible? How would I do such a thing?
Thanks in advance.
http://www.civicforums.com/forums/120-transmission/225779-diy-clutch-pedal-adjustment.html
Hondas usually have easy to push clutches and that long travel is needed for that. If you cut the travel in half, you’ll double the force needed. It would take re-engineering the pedal and pivot point.
Or installing a clutch master cylinder with a larger bore diameter so it pumped more fluid…Not a simple task…
Neutrino I have driven Honda manuals and found the clutch to be light and the transmissions slick without much “feel” but they seem to work well. When depressing the clutch pedal you should have about 3/4 inch free play before starting disengagement.
The master cylinder on that car is adjustable
http://www.autozone.com/autozone/parts/Duralast-Clutch-Master-Cylinder/2001-Honda-Civic-LX/ /N-jfdutZ6o23x?itemIdentifier=728236_0_0
and if anyone is so inclined they can experiment with adjusting the “tip in point” to suit them. The pedal stroke is considerably greater than the distance needed to control the clutch but the excess travel gives a great deal of allowance for wear to avoid constant adjustment.
A J-Turn Up For The Books: ‘Blind’ Juke…
May 17, 2022
Is the Caterham Seven 160 Exciting Enough?
March 1, 2022
Clutch Adjustment – Getting That Pedal Placement Just Right

Cars with manual gearboxes are a rarity these days. So much so, that you could pretty much count on one hand the number of three pedaled cars that zoom past you. But despite all this, there are still the enthusiasts out there, who we can count on to preserve the dignity, tactile pleasure, and engagement of a manual box. What isn’t always so clear, unfortunately, is the need for a clutch adjustment.
There’s a good reason why folks still prefer manuals over the convenience and ease of an automatic. It especially wins out against autos as far as driver feel goes. You’re able to more precisely switch to any gear of your choosing, providing you with granular control. That fun factor isn’t so easily replaceable, no matter how fast and sharp modern automatics have been. But what about the clutch pedal?
Barring the gear lever, everything you need to properly control a manual transmission is down to your left foot, and how it dances on the clutch pedal . While it’s better than nothing, there are times when the clutch pedal can feel a bit off. Sometimes, it’s too loose, or there’s too much free play. Even sports cars can have this issue, too. If you’re experiencing this, an urgent clutch adjustment is on the cards.
- How Much Play?
- Consequences
- Slip Vs Drag
- Mechanical Vs Hydraulic
- How To Adjust?
- Self-Adjusting?
- Final Thoughts
How Much Play To The Clutch Pedal For An Adjustment?
When defining the need for a clutch adjustment, we specifically denote adjusting its accuracy and feel . In other words, how much free play it has, on top of its looseness and sponginess when it’s pressed. A ‘free play’ in this instance means the amount of travel between initially pressing on the clutch pedal, until the moment it actually does something. On the contrary, free play is, in fact, a good thing.
There are certainly benefits to it, no doubt. For example, it’s able to provide a margin of error before the clutch begins to actuate. This is great if you’re in the habit of resting your foot on the clutch pedal , or are indecisive about wanting to change gears . On top of that, we also have to consider the fact that components within the transmission get pretty hot. With heat, components begin to expand.

This is the case with your gearbox’s master cylinder , which connects to the clutch pedal. Having a tiny bit of free play ensures that your clutch pedal can compensate for thermal expansion . While at the same time, make sure that the clutch’s master cylinder will release the whole way through once you’ve depressed the pedal. All in all, slight looseness is a core part of the clutch pedal’s design.
In regards to the precise figure for free play, there’s never a fixed amount. It varies wildly depending on the vehicle you drive, and personal preference . A general consensus seems to be that your clutch pedal should be able to be pressed down by 3/4 to 1 inch without much effort. However, others claim that the perfect amount of free play before the clutch engages is around 1cm (less than 1/2 inch).
What Are The Consequences For Not Adjusting The Clutch?
But what if you skimp on a clutch adjustment? Would anything bad happen to your car? While it may not necessarily cause long-term wear and tear or reliability issues with your car , a loose or spongy clutch pedal is culpable for being a nuisance. Having either too much or too little play in the clutch pedal is never a welcomed feeling. Besides the odd feeling you get, it might also have an impact on your driving.
- Too Much Play – When there’s far too much free play in the pedals, there’s a sensation that your car is creeping forwards. You’d notice this when you’re in gear, with the clutch pedal depressed. Rather than staying in place, your car begins to creep and roll ever so slightly forwards or back.
- Too Little Play – When there’s too little free play in the pedals, you’ll find yourself slipping on the clutch way too often. This is an instance where the clutch plate isn’t catching onto the flywheel accurately. It can leave you confused over why you’re in gear, but the car’s not moving at all .
Besides these, there are also other annoyances that you have to deal with when a clutch adjustment is dismissed:
- Makes it harder to ride or moderate the clutch, especially on hill starts or inclines .
- For rookies (those who are new to driving manuals), the risk of stalling is much greater.
- Removes any sense of tactility or precision that comes with a manual gearbox .
- Chances of you missing or skipping a gear increase due to the pedal’s odd feel.
- The clutch might not engage or disengage properly, which accelerates transmission wear.
- May cause the transmission to suddenly pop out of gear while you’re driving.
- You’re likely to grind on the gearbox more, which would cause long-term damage .
What Is Clutch Slip, And How Does It Differ From Drag?
With a clutch pedal that you can’t be sure if you’ve pressed it down right (or not), there’s a heightened likelihood you’ll suffer from either clutch slip or clutch drag. Both relate to the connection between the clutch plate itself, and your car’s flywheel . The latter is a component responsible for smoothening out your engine’s power, before joining up with the clutch, thus passing power onto the transmission.
In detail, slipping and dragging are two separate issues correlating the clutch plate and the flywheel:
- Clutch Slip – This is where the clutch disc isn’t able to catch and latch onto the flywheel properly. Or as we put it in another way, the clutch can’t sufficiently engage with the flywheel. This can result in your failure to swiftly change gears , or the transmission might fail to receive power at all.
- Clutch Drag – Alternatively, this is where the clutch disc isn’t able to release from the flywheel in a very smooth fashion. In other words, the clutch’s inability to disengage from the flywheel. When it happens to you, you immediately notice hard and noisy gear changes, not to mention stalling.
Frequent instances of either clutch slip or drag aren’t ideal for the wellbeing of the transmission. On the surface, it might appear merely like an inconvenience or an unpleasant experience. But inside of your gearbox, slipping and dragging can permanently scar and accelerate damage to the transmission. It inevitably leads to a greater risk of you needing significant gearbox repairs or rebuilds down the line.
How Do Mechanical And Hydraulic Clutches Compare?
It’s worthwhile learning of the differences between a mechanical and a hydraulic clutch, as they have different methods for a clutch adjustment. Modern cars tend to feature a hydraulic clutch, which is theoretically “self-adjusting”. Meanwhile, older cars (pre-1990s) tend to feature a mechanical clutch, where cables are used the link the clutch pedal and the clutch itself.
Elsewhere, here’s how they work:
- Mechanical Clutch – A steel cable connects the (clutch) pedal straight through to the clutch assembly. When you press the clutch pedal, it actuates a clutch fork, which subsequently activates the throwout bearing . In doing so, it disengages the clutch plate, enabling you to freely change gears. Folks tend to prefer mechanical clutches for the connected and engaging feeling, owing to its direct linkage.
- Hydraulic Clutch – In this instance, pressing the (clutch) pedal pressurizes the clutch’s master cylinder. Hydraulic pressure is created thanks to a clutch fluid, which is the same as brake fluids . With pressure being created, the master cylinder transmits it to the slave cylinder. From there, it actuates the clutch fork (like a mechanical clutch), moving the clutch release bearing , thus disengaging the clutch.
For the most part, hydraulic clutches are easier to operate, with minimal force required to press down on the clutch pedal. Although maintaining them can be more complicated and pricier , they don’t need frequent clutch adjustments. On the other hand, mechanical clutches get unadjusted pretty easily, as well as require more muscle to operate them. Still, it’s a much simpler system to take care of.
How Can You Undertake A (Mechanical) Clutch Adjustment?
If you’re tired of that spongy feeling in your clutch pedal, then worry not! Clutch adjustments aren’t a new concept, which has allowed many to refine the entire process. Plus, some automakers are also open to the thought that eventually, you’ll need a clutch adjustment. So, they’ve made it easier. In all, clutch adjustments are quite easy, and it’s recommended that you do this every 6,000 miles or so.
This is usually done as a part of your car’s regular servicing and maintenance . If you’re wondering why a clutch adjustment is even necessary, you can point fingers at your transmission itself. Gradually, any wear on your gearbox’s pressure and friction plates, as well as the clutch linkages, can slowly alter the pedal feel. Over time, the level of play and travel that the pedal has will begin to become misaligned.
This can all be resolved simply with a clutch adjustment. For this, we’ll cover both mechanical, as well as hydraulic clutches. We’ll first begin with a mechanical clutch (hydraulics in just a moment)…
Step 1: Inspect How Much Free Play There Is In The Clutch To Adjust
First, it’s highly suggested that you prepare a detailed service manual , specific to the make and model of your car, to refer to. The techniques on how to perform a clutch adjustment may differ greatly from one car to the next. Even if they all have a similar, mechanical clutch unit.
For example, some automakers recommend calculating the clearance of the clutch linkage. It could be done either from underneath the car or somewhere under the hood. Whereas on most cars, a process like this doesn’t apply. So, be sure to do your homework on clutch adjustments for your car.
Otherwise, it generally rhymes with a familiar process:

- Grab a tape measure or a ruler . Either works, so long as you have precise increments and readings.
- Place the tape measure or ruler next to the clutch pedal.
- Ensure that one end of it is placed towards the floor and is resting on it.
- Remember to angle and align the ruler or tape measure based on which direction the clutch pedal will travel and sink into.
- Note down the default distance between the top of the clutch pedal, and your car’s floor.
- Now, use your hand to gently press down on the clutch pedal. Keep pushing down until you no longer feel any free play.
- You can then write down the distance between the top of the pedal and the floors, with the pedal pressed down.
- Finally, subtract this distance from the default measurement. This then gives you how much free play there is in the pedal.
Step 2: Adjust Your Clutch’s Linkages
The next step revolves around adjusting your clutch linkages. First, you’ll have to locate them, hence why a repair manual will be quite handy. Typically, you’re able to find them at:
- Under your car, close to where the pedal box is.
- Under the hood, nearer to the back, close to the bottom edge of the firewall.
- At the bottom of the clutch cable, which is accessible from the pedal box.
- Underneath the dashboard, on the driver’s side, and close to the steering column .

As you’re adjusting the free play and pedal travel, it may require you to twist a nut or fastener. This is usually placed under the clutch pedal, or by the linkages. For the latter, you’ll have to look at the push rod that’s attached to the clutch fork. Try to find a similarly threaded nut or fastener.
Once you’ve found that, you can proceed with the clutch adjustment:
- First, you’ll have to loosen the aforementioned nuts or fasteners.
- If you want to increase the amount of free play (to solve pedals with minimal travel), you could try to lessen the push rod’s effective length.
- If you want to decrease the amount of free play (to solve pedals with excessive travel), you can try to extend the push rod’s effective length.
- Refer to your manual as to how you can proceed with adjusting these.
- Meanwhile, remember the pedal travel measurements that you jotted down earlier. That’ll give you an idea of how much to shorten or lengthen the push rods by.
- Once you’re done adjusting the linkages, remember to add lubrication to the system.
Step 3: Adjust Your Clutch’s Cables
With the entire linkage assembly and mechanism out of the way, you can now focus on the cables. Go back to your service manual, and find out where the adjuster nut, housing adjusting nut, as well as locknut (aka the wingnuts) are located. Commonly, it’s found attached to the clutch pedal.

When you’ve discovered that, you can begin to proceed with final adjustments to the clutch:
- Loosen the abovementioned nuts, near the end of the clutch cables.
- If you want to increase the amount of free play (for pedals with minimal travel), you can twist the nut to shorten the cable housing.
- If you want to decrease the amount of free play (for pedals with excessive travel), you can twist the nut to extend the cable housing.
And that should do it for a mechanical clutch adjustment! While you’re doing all this, repeatedly test the pedal travel, like in Step 1, and calibrate the linkages and cables where necessary. Always have a service manual on hand, as it can massively expedite and ease this process.
How About A (Hydraulic) Clutch Adjustment?
As we hinted at earlier, most hydraulic clutches classify themselves as “self-adjusting”. Thus, they can adjust the degree of free play in the pedals in real-time, based on a set threshold. It should supposedly mark the end of manual clutch adjustments. However, even they too aren’t always perfect.
Or, perhaps you want to re-adjust its boundaries to something more comfortable for you? If that’s the case, you can begin by measuring the pedal travel, as we did earlier. Get a detailed service manual, as we now begin with the next steps of adjusting the clutch:
https://www.youtube.com/watch?v=2zW2TQ3asVE
- Find the adjuster nut. This should be located either on the clutch fork’s push rod or the master cylinder push rod.
- Then, you can loosen this locknut (aka wingnut).
- If you want to increase the amount of travel (for pedals with minimal free play), you can twist the nut to shorten the length of the push rod.
- If you want to decrease the amount of travel (for pedals with excessive free play), you can twist the nut to extend the length of the push rod.
- Last but not least, remember to retighten the locknut.
And there you have it, how to adjust a hydraulic clutch. As you can see, it’s far easier than adjusting a mechanical clutch, albeit the entire process differs from one car to the next. Even for rookies or those that don’t have a significant mechanical skill, it’s a relatively straightforward process .
Option 2: Using The Clutch Self Adjustment System, Instead
Aha, but there’s an even easier way to proceed with a hydraulic clutch adjustment. This would simply be to leverage the “self-adjusting” properties that it’s already been engineered with. With the engine turned off, and your parking brake activated, you can start by:
- Position your toes or the tip of your shoes underneath the clutch pedal.
- Now, lift the pedal all the way up, and towards you.
- With the pedal in the fully-up position, this will activate its self-adjustment mechanism. You’ll notice how the clutch pedal now sits much higher than it usually does.
- Next, push the pedal down, as you normally would, and change into gears. Keep repeating this with as many gear changes as you see fit, but only a few should be enough.
- While you’re continually changing gears, pay close attention to how far the clutch pedal sinks into the floorboard before it lets you change gears.
It should adjust automatically, mitigating any free play that may have developed over time. If it didn’t work, and there’s still too much or too little free play, then you’ll have to get a manual adjustment. Go back to our earlier option, and perform that one instead.
How About A Conversion From A Mechanical To Hydraulic Clutch?
Whether it’s just for feel, convenience, or ease of maintenance, there is an abundance of brands out there who make conversion kits. In particular, kits which enable you to transition from an old-school mechanical clutch to a fancier and modern hydraulic clutch. You can find quite a lot of these selling at around $500, so they’re not terribly expensive or bad value. Installing them, however, is another story .
Clutch conversions are tough, even for experienced mechanics and DIYers. It’ll vary significantly based on the make and model of your vehicle, what transmission you have, and that kit you’ve just bought. The entire process will require some ingenuity, especially since you have additional parts to mount, as is the case with hydraulic clutches. Remember about the master and slave cylinders we spoke of?
Plus, you’ll have to jerry-rig the clutch fluid reservoir in there, too. But if you’re ever curious, here’s a very brief and condensed step-by-step of how to perform a mechanical-to-hydraulic clutch conversion:
- Disassemble the entire (mechanical) clutch assembly, including the linkages and cables.
- Drill a hole through your car’s firewall or bulkhead, which is necessary to mount and run the master cylinder.
- On the other end, you’ll have to mount the slave cylinder.
- Then, you can proceed to run and join together the hydraulic lines between the master and slave cylinders.
- Install the ‘clutch fluid’ reservoir, usually by screwing it on top of the master cylinder.
- Add in and bleed the clutch fluid, making sure that there’s hydraulic pressure with no air bubbles present.
- Test the clutch pedal feel, movement, and inspect if there’s any play.
Car Clutch Adjustment Facts:
- The clutch needs the correct amount of play in the linkage to work efficiently
- Too little clearance in the clutch linkage results in clutch slip, burned-out friction plate, and ruined pressure plate
- Too much clearance in the clutch linkage leads to clutch drag and difficulties in heavy traffic
- The clutch linkage needs to be checked and adjusted every 6,000 miles or 10,000 km, or as specified in the maker’s service schedule
- Adjustment for clearance in the linkage is made by increasing or decreasing the lengths of the inner and outer cables in relation to each other
- Mechanical clutch-linkage clearance is measured and adjusted underneath the car or at the pedal depending on the car’s make
- Most modern cars have a diaphragm-spring clutch operated either mechanically or hydraulically
- In an emergency, as long as there is play in the linkage, the clutch should perform well enough
- On some cars, many Hondas and Toyotas for example, checking and adjustment can be done at the bulkhead under the bonnet
- Clutch adjustment on a transverse engine can be done under the bonnet, and transverse engines have hydraulic clutches
Final Thoughts On Clutch Adjustments
That just about wraps up our look at clutch adjustments. In all, they’re an essential part of owning any manual vehicle . With use and abuse , combined with age, the clutch pedal can go out of whack. It’ll be misaligned, leading to a build-up of free play. Or in some cases, too little free play. Neither is an ideal scenario, although most do agree that too much free play is more tolerable than not enough.
The good news is that a clutch adjustment is always there to get it back in line. It doesn’t matter that you’re dealing with either a mechanical clutch or a hydraulic one. On the spectrum of DIY repairs, these are among the easier ones. They can, at times, require a moderate amount of skill. But if you get your car serviced at least once every 6,000 miles, then that should’ve been taken care of already.
Jake is the go-to guy for car content on Luxury Dimension, where he shares his extensive knowledge in vehicle repair and troubleshooting. With a knack for demystifying complex automotive issues, Jake guides readers through fixes and maintenance with ease, ensuring they're equipped to handle their luxury cars with the utmost confidence.
GTA IV Car Pack – 22 Best Free Car Mods For Grand Theft Auto
P0113 – is the intake air temperature (iat) sensor getting too hot, you may also like, does parking on a hill or incline damage..., ford focus transmission problems – are they worth..., car won’t move in drive – how can..., aamco transmission rebuild cost: how much is it, clutch replacement cost – how expensive are they..., cvt transmission repair cost: here’s how much you..., transmission flush cost – flushing your money down..., honda pilot transmission problems – is it worth..., honda accord transmission problems: diagnosis and repairs, car makes noise when put in reverse –..., leave a comment cancel reply.
Save my name, email, and website in this browser for the next time I comment.

- Summit Racing Equipment
Search Form
Recent searches.
- Hot Rods and Muscle Cars
- Old Motorcycles
Trending Searches
- Ford Bronco
- Record Setting
- Fuel Injection
Clutch Tech: Matching the Right Components for Optimal Pedal Feel
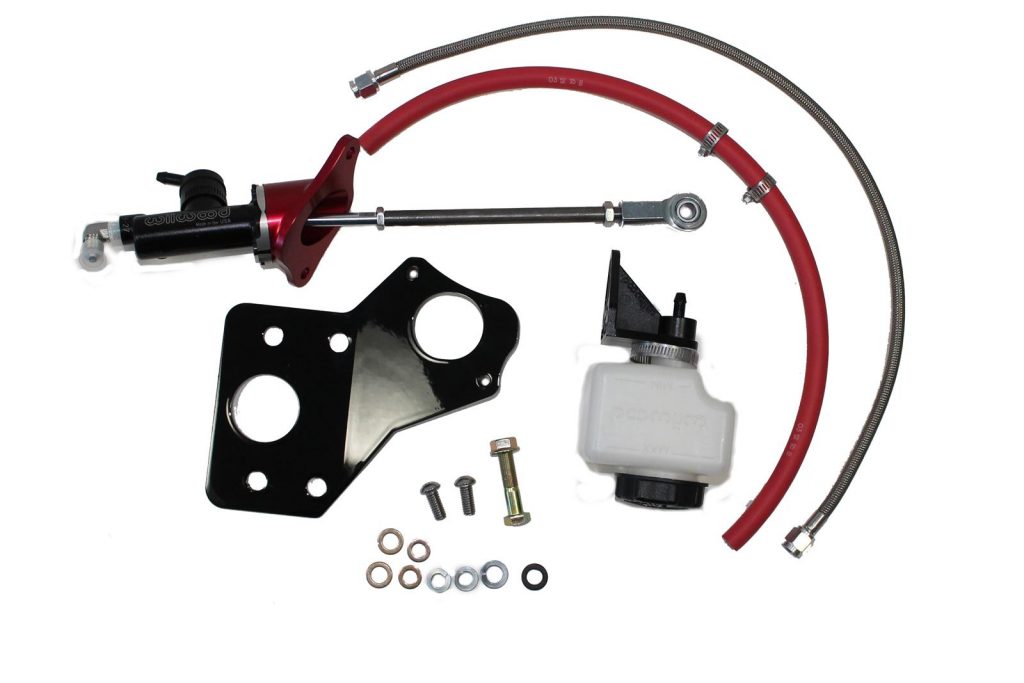
Hydraulic clutch throwout bearing conversion kits deliver smooth action, improved header clearance, and reduced free travel. Available for many popular applications, from Ford Model A to late-model muscle, they require a few modifications and work with stock and aftermarket transmissions. Where there’s no bolt-on option, there are still plenty of clutch master cylinders, hydraulic release bearings, and slave cylinders to accommodate most vehicles with a little ingenuity. Matching the right components will not only give you the best pedal feel, but also prevent clutch mechanism damage.
Let’s look at several key points for understanding proper pedal ratio, bore sizing, travel, and mounting angle.
Pedal ratio is the amount of leverage your clutch pedal exerts over the master cylinder. On average, clutch pedal ratios range from 5.0-7.0:1. To determine the pedal ratio, measure the pedal pad to the pivot, then measure from the master cylinder rod mount to the pivot and divide the second measurement into the first. The higher the ratio, the more leverage you will have over the clutch. This will decrease pedal effort and increase travel; the opposite will apply to lower pedal ratios.
Master cylinder bore size determines the amount of fluid that will be displaced as the clutch is depressed. With equal travel, a 7/8-inch master moves more fluid than a 3/4-inch master. While a larger-bore master cylinder displaces more fluid, it takes more pedal force to create the same pressure as a smaller-diameter bore.
Master cylinder travel is the distance the master cylinder piston can travel before it bottoms out. A pedal stop must be used to limit stroke to prevent clutch, release bearing, and transmission damage.
Mounting angle is critical to smooth operation and master cylinder longevity. Mount the master cylinder so the pushrod maintains a straight approach into the master cylinder throughout the pedal’s range of movement. Excessive angles can cause binding and premature wear; the exception to this would be a master cylinder that pivots on its mount like a Tilton 78-series.
Always follow master cylinder sizing recommendations for the hydraulic throwout bearing or slave cylinder. The goal is to have a balanced system that uses the majority of the master cylinder stroke with a pedal that comfortably disengages the clutch.
3 responses to “Clutch Tech: Matching the Right Components for Optimal Pedal Feel”
[…] Hydraulic clutch throwout bearing conversion kits deliver smooth action, improved header clearance, and reduced free travel. Available for many popular applications, from Ford Model A to late-model muscle, they require […] Read full article at http://www.onallcylinders.com […]
Have it instaled on my civic! One of the best parts of my baby
Putting a nv5600 in a 1999 ford f250 Super duty
Leave a Reply Cancel reply
Your email address will not be published. Required fields are marked *
This site uses Akismet to reduce spam. Learn how your comment data is processed .
Similar Stories
Video: what is torque converter pullout & how to check it, ask away with jeff smith: is a gm 200-4r automatic a good choice for a mostly stock 1968 camaro what transmission would you recommend, ask away with jeff smith: should i check my automatic transmission fluid level with the engine running.
Questions? Cell/Whatsapp/Wechat/Skype: +86 15057130301
International Shipping Services
See our New arrivals and services
We price match to give you the best deals
The influence of clutch pedal free travel on a manual car
The influence of clutch pedal free travel on a manual car.

The free travel of the clutch pedal is too large, which will cause incomplete disengaged and make the transmission shift difficult, so accelerate the wear of the driven plate, pressure plate and flywheel.In this case,it will strictly reduce the service life of the clutch.
If the clutch pedal free travel is too small, will cause clutch can not be fully engaged, resulting in the clutch skid and accelerate the clutch wear.
The right “free travel” can not only prevent abnormal wear of the clutch release bearing, but also ensure reliable engagement and complete disengagement of the clutch.

The clutch is mounted in the flywheel housing between the engine and the gearbox, and the clutch assembly(clutch cover,clutch disc and clutch release bearing)is fixed on the flywheel with bolts. The output shaft of the clutch is the input shaft of the gearbox. In the process of car driving, the driver can step down or release the clutch pedal according to the speed, so that the engine and gearbox temporarily disengaged and gradually engaged, in order to cut off or transfer the input power which engine export to the transmission.

Clutch pedal is one of the car driving “five control parts” of manual automobile clutch assembly. Whether its operation is correct or not directly affects the starting, shifting and reversing of the car.
TZ clutch supplies have hot sale products for ATM Sachs 6482000155 central slave cylinders VOLVO FH FM series

Share This Story, Choose Your Platform!
Related posts.

Amazing 5 Advantages of Pneumatic Clutch Actuators

How to repleace a central slave cylinder?

Why your clutch gear shifting so hard?

2022 Where should traditional fuel cars go under the wave of new energy vehicles?

3rd Floor, No.138 Zhongyu Modern City North District,Beigan Street, Xiaoshan District, Hangzhou City,China

Shop by brand
Useful links, subscribe to our newsletter.
© Copyright 2015 - 2024 | TZ Transmission Technology .,Ltd | All Rights Reserved | Powered by Steven

- Search forums
- Help Forums - Engine & Transmission Forums
- Transmissions
2000 Ranger Excessive Clutch Pedal Free Travel
- Thread starter mrm
- Start date Mar 13, 2015
I recently purchased a 2000 Ranger 2.5L 5 speed. When I purchased the truck I noticed excessive clutch pedal free travel (1-1/2"). I have noticed during this winter that when the ambient temperatures are cool (~45F and below) that the clutch pedal free travel disappears and when the temperatures warm up that the free travel comes back. I have done nothing other than check the fluid level in the clutch master cylinder which is OK. What could be the cause of the excessive free travel and why does it disappear when the ambient temperatures are cool? Thanks for your help.
Official TRS AI
I assume you mean when you push on the clutch pedal you don't feel resistance immediately when warm but do when cold? Things(metals and fluids) tend to expand when warmed and contract when cooled, so can't say why you would have this almost opposite effect. I assume that there is no issue with disengaging the clutch or engaging it? The clutch system also generates a bit of heat because of the friction when engaging disc with flywheel, so even in the cold weather the bell housing would get warmed up inside, so if the "free travel" doesn't return I wouldn't think the issue would be in that part of the system. BUT........assuming you have the heater on inside the cab, master would warm up as well so................. Just a thought: There is a check valve for the reservoir, it allows fluid to flow into the system but when you push on the pedal it blocks fluid from flowing into the reservoir, this could be the problem if it is allowing a little fluid to flow into reservoir before closing, but I would think it would work better warm than cold. It is at the bottom end of the master, so where it is coldest.
You are correct. When it's cold outside I feel resistance immediately when depressing the clutch pedal and when its warm I have free travel. Also, when it's warm outside my clutch begins to engage right after the pedal comes off the floor. When it's cold the clutch engages when the clutch pedal is much higher off the floor. I did try one test where I removed the clutch master cylinder reservoir cap and rubber diaphragm and had someone depress and release the clutch pedal. I saw no bubbles or change in the master cylinder reservoir fluid level. Thanks.
Was your test when it was warm or cold? I forgot to ask earlier, is the clutch pedal returning to the full open position, but I assume you would see or feel it if it wasn't?
My test was with the engine cold and the clutch pedal is returning to all the way up every time.
Then I would wait until symptom returns and test it again that way
Update It's been fairly warm around here the past couple of weeks and I've had lots of clutch pedal free travel. It cooled off some last night and was 42F this morning. I noticed when I got in the truck to go to work that I had the normal large amount of free travel. As I drove the truck I noticed that the free travel decreased considerably but did not totally disappear. I wonder if the problem is simply air in the system. As ambient temperatures increase air becomes less dense so a given amount of air takes up more volume and vise versa when air temperatures drop. I would think that if I had a problem with the clutch master or slave cylinders that the symptoms would stay consistent. Any thoughts? Thanks.

alwaysFlOoReD
Forum staff member.
Bleed it and be sure. It won't hurt anything and could help.

Senior Master Grease Monkey
Ron, the reason his symptom seems to act backwards to you is because it's a hydraulic issue, not a mechanical one. Just and metals contract when cold, so do fluids. This means when it is very cold out the fluid in the system is denser, making it react to the pressure faster. Extreme changes in pedal travel or feel on a clutch or brake system that relate to ambient temps can be a sign of a leak in the system, but more often just mean that the fluid has become water-logged and needs to be changed out. I would start by getting fresh brake fluid in your clutch system. You can open the bleeder a full turn and just gravity bleed (or in this case flush) it adding new fluid to the reservoir before it empties. You should probably do two to three reservoirs worth.
Sponsored Ad
Members online, today's birthdays, member & vendor upgrades.
For a small yearly donation, you can support this forum and receive a 'Supporting Member' banner, or become a 'Supporting Vendor' and promote your products here. Click the banner to find out how.
Latest posts

- Latest: RobbieD
- 4 minutes ago

- Latest: sgtsandman
- 45 minutes ago

- Latest: jharms02
- 48 minutes ago
- Latest: Micahfriesen
- 50 minutes ago

- Latest: racsan
- Today at 10:59 AM

- Latest: rusty ol ranger
- Today at 10:56 AM
- Latest: franklin2
- Today at 10:49 AM
- Today at 10:24 AM

- Latest: 94_PurpsRange
- Today at 9:49 AM
Truck of The Month

Recently Featured
Follow trs on instagram, latest album photos.

25th Anniversary Sponsors
Check out the trs store, amazon deals.

- This site uses cookies to help personalise content, tailor your experience and to keep you logged in if you register. By continuing to use this site, you are consenting to our use of cookies. Accept Learn more…

Mastering the Art of Semi Truck Clutch Adjustment: A Step-by-Step Guide for Smooth Shifting!
Adjusting a Semi Truck Clutch: A Step-by-Step Guide If you’re new to the world of semi-trucks or just looking to sharpen your skills, adjusting the clutch can be a daunting task. But fear not, this step-by-step guide will walk you through the process and have you shifting gears like a pro in no time. First and foremost, it’s important to understand the function of the clutch.
Essentially, it’s a mechanism that disengages the engine from the transmission, allowing you to shift gears or come to a stop without stalling the engine. An improperly adjusted clutch can lead to excessive wear on the clutch and transmission, decreased fuel efficiency, and difficulty shifting gears. To properly adjust the clutch, start by locating the adjustment rod.
This will typically be found near the clutch pedal, but may vary depending on the make and model of the truck. Use a wrench to loosen the lock nut on the adjustment rod and adjust the rod until there is approximately 1/2 inch of play in the clutch pedal. Next, start the engine and engage the clutch.
The truck should immediately start moving forward. If not, adjust the clutch until it does. With the vehicle in gear, release the clutch pedal slowly.
The truck should start moving forward without stalling the engine. If the engine does stall, adjust the clutch until it doesn’t. Repeat this process until you’re able to shift gears smoothly and without any difficulty.
Keep in mind that an over-adjusted clutch can cause excessive wear, so aim for the sweet spot where the clutch engages smoothly without too much play. By following these simple steps, you’ll be able to adjust the clutch on your semi-truck with ease. With a properly adjusted clutch, you’ll enjoy a smoother ride, better fuel efficiency, and extended life of your transmission and clutch components.
- 1 Signs Your Clutch Needs Adjustment:
- 2.1 Gather the Necessary Tools
- 2.2 Park the Truck on a Flat Surface
- 3.1 Identify the Clutch Linkage
- 3.2 Find the Adjustment Nut
- 4.1 Loosen the Lock Nut
- 4.2 Turn the Adjustment Screw
- 4.3 Tighten the Lock Nut
- 5.1 Start the Engine
- 5.2 Engage and Disengage the Clutch
- 5.3 Check the Result
- 6 Conclusion
Signs Your Clutch Needs Adjustment:
- Gear Grinding: Difficulty shifting gears or grinding noises during gear changes are classic signs of clutch issues. This indicates the clutch isn’t fully disengaging, causing the gears to clash.
- High Engagement Point: The clutch “grabs” too high in the pedal travel, making it difficult to find the friction zone (the sweet spot where the clutch engages smoothly). This can lead to jerky starts and stalling.
- Low Engagement Point: Conversely, the clutch engages too low in the pedal travel, requiring excessive pressure to shift gears. This can cause premature clutch wear and leg fatigue.
- Burning Clutch Smell: A burning rubber smell after driving can indicate excessive clutch slippage, which is often a symptom of improper adjustment.
Before You Adjust: Essential Considerations
- Consult Your Manual: Every truck model might have slight variations in clutch adjustment procedures. Always refer to your truck’s owner’s manual for specific instructions and safety precautions.
- Hydraulic vs. Cable Clutch: Trucks can have hydraulic or cable-operated clutches. The adjustment process differs between the two. Identify your truck’s system type before proceeding.
- DIY vs. Professional Help: While clutch adjustment is possible for some DIY enthusiasts with mechanical knowledge, it requires precision and can be time-consuming. If you’re unsure about your abilities, consider seeking help from a qualified mechanic.
Understanding Clutch Adjustment:
The goal of clutch adjustment is to ensure the clutch pedal has the correct amount of free play (travel before resistance is felt) to allow for smooth engagement and disengagement. Here’s a simplified overview of the adjustment process ( refer to your manual for specific steps ):
- Locating the Adjuster: The clutch adjuster is typically a threaded rod or cable connected to the clutch linkage. It’s often located near the clutch pedal or underneath the truck near the transmission.
- Making Adjustments: Using wrenches or pliers, carefully loosen or tighten the adjuster according to the manual’s instructions. Small adjustments are key to avoid over-adjusting, which can lead to clutch problems.
- Testing and Refining: After each adjustment, test the clutch pedal travel and engagement point. Repeat the process in small increments until the desired free play and engagement point are achieved.
Safety First!
- Park on Level Ground and Engage Parking Brake: Always ensure your truck is parked on a level surface with the parking brake securely engaged before attempting any clutch adjustments.
- Block the Wheels: Use wheel chocks to prevent the truck from accidentally rolling.
- Disconnect the Battery (Optional): While not always necessary, some mechanics recommend disconnecting the battery as a safety precaution to disable the starter motor.
Preparation
Adjusting the clutch in a semi-truck can be a daunting task, but with the right preparation, it can be a relatively simple process. Before beginning, it is essential to gather the necessary tools and equipment, including a torque wrench, a pressure gauge, and a manual for your specific make and model of semi-truck. It is also important to ensure that the engine is turned off and that the truck is in neutral before starting the adjustment process.
Once you are ready to proceed, it is helpful to have an assistant available to assist you with the adjustments while you monitor the pressure gauge. Remember to take your time and make small, gradual adjustments to avoid causing damage to the clutch or other components of the semi-truck. With patience and attention to detail, you can successfully adjust the clutch in your semi-truck and enjoy a smoother, more responsive driving experience.
Gather the Necessary Tools
When it comes to any task, preparing well will make all the difference. This is true for gathering the necessary tools needed for any project. Depending on what project you’re undertaking, you’ll need different tools.
Before embarking on your project, consider what tools you’ll need and double check to ensure you have everything necessary. The key is to have the right tools for the job. Make a list of the tools that you need, and purchase or gather them ahead of time.
Don’t forget to include additional materials such as safety equipment, measuring tools, and any required hardware. Having everything at hand ensures that you won’t have to stop to go out and get something during your project, which saves you time and hassle. By taking the time to prepare beforehand, you’ll be setting yourself up for success and ensuring that your project is completed efficiently and effectively.

Park the Truck on a Flat Surface
When it comes to preparing your truck for maintenance or repairs, the first step is to park it on a flat surface. This may seem like a no-brainer, but it’s an important step that shouldn’t be overlooked. Parking your truck on an uneven surface can throw off the balance of the vehicle and make it difficult to work on.
Plus, it can be downright dangerous if your truck starts rolling or sliding while you’re underneath it. Before you begin any work, take a few minutes to find a level spot to park your truck. If you’re not sure if the surface is level, use a level tool to check.
It’s always better to be safe than sorry, and parking on a flat surface is an easy way to start your maintenance or repair project off on the right foot. So, make sure to park your truck on a level surface and enjoy a safe and successful project.
Locate the Clutch
Adjusting a semi-truck clutch is no easy feat, but the first step is always to locate the clutch itself. You will typically find the clutch pedal on the left-hand side of the driver’s seat, near the floor. However, finding the clutch requires more than simply identifying the pedal’s location.
A semi-truck’s clutch is incredibly intricate, so it’s important to carefully assess its operation and note any unusual behaviors or malfunctions. Some common signs that your clutch needs adjustment include slippage, rough shifting, or the inability to engage gears at all. If you notice any of these issues, it’s time to start adjusting the clutch so that your truck runs smoothly and efficiently.
By understanding the operation of your clutch and taking note of any problem signs, you’ll be well on your way to adjusting it successfully and getting back on the road with a reliable and responsive semi-truck.
Identify the Clutch Linkage
To properly locate the clutch in your vehicle, it’s essential to understand what the clutch is and what it does. The clutch is a vital component of the manual transmission system, responsible for engaging and disengaging the engine from the wheels. It’s comprised of several parts, including the clutch pedal, pressure plate, friction disk, and release bearing.
The clutch linkage connects the pedal to the clutch release mechanism, enabling you to disengage the engine from the wheels when shifting gears. When identifying the clutch linkage, look for the part that connects the clutch pedal to the clutch release mechanism. It can usually be found near the clutch pedal under the hood of your vehicle.
If you’re having difficulty locating the clutch linkage, it’s best to consult your vehicle’s owner’s manual for further guidance.
Find the Adjustment Nut
If you’re working on a vehicle, it’s essential to be able to locate the clutch and find the adjustment nut. The clutch is responsible for shifting gears and transferring power from the engine to the transmission. To find it, you’ll need to locate the pedal on the left side of the driver’s footwell.
The clutch should be near the top of this unit and looks like a circular plate. The adjustment nut is usually found on the clutch release lever, which is located near the bottom of the clutch. This nut allows you to adjust the clearance between the clutch and the release bearing, which can affect the transmission’s smoothness.
To locate the adjustment nut, you may need to refer to your vehicle’s owner manual or do some research online. Once you find it, it’s essential to handle it with care and make small adjustments to avoid damaging the transmission. With a bit of practice, you can become confident in adjusting the clutch and improving the overall performance of your vehicle.
Adjustment Process
Adjusting a semi truck clutch is an essential maintenance task that can save you a lot of time and money in the long run. The adjustment process involves adjusting the clutch pedal and linkage to ensure proper engagement and disengagement of the clutch. To begin the process, locate the clutch linkage and verify that there is enough slack in the linkage to allow for adjustment.
Next, loosen the jam nut on the linkage and turn the adjustment nut until the clutch pedal has the desired amount of free play. Tighten the jam nut and test the pedal for smooth engagement and disengagement. Keep in mind that over-tightening the clutch can cause premature wear on the clutch plates and can cause difficulty in shifting gears.
By regularly adjusting your semi truck clutch, you can ensure that your vehicle operates smoothly and efficiently, saving you time and money on repairs down the line.
Loosen the Lock Nut
Adjusting a lock nut may seem like a daunting task, but it’s not as complicated as you might think. To start, you need to loosen the lock nut, which is the nut that’s tight against the adjustment nut. The lock nut keeps the adjustment nut in place, so loosening it is essential for making any adjustments.
To do this, use a wrench to hold the adjustment nut in place while using another wrench to turn the lock nut counterclockwise. This loosens the lock nut, and you can then make the necessary adjustments to the adjustment nut. Remember to re-tighten the lock nut after making the adjustments, so the adjustment stays in place.
With a few simple steps, you can adjust your lock nut and keep your machinery working smoothly.
Turn the Adjustment Screw
If you’re having trouble with the performance of your machine, you may need to adjust the adjustment screw. This small but vital piece of equipment can make all the difference in how your machine operates. The adjustment process is typically quite easy, and you can do it yourself with just a few tools.
Simply locate the adjustment screw and use a screwdriver to turn it until you find the right level of performance for your needs. It’s important to be patient and to make small, incremental changes until you get the results you’re looking for. By doing this, you’ll avoid over-adjusting and causing even more problems.
Remember, the adjustment screw is there for a reason, and with a little bit of patience and some trial and error, you can get your machine back up to speed in no time.
Tighten the Lock Nut
When it comes to adjusting a lock nut, it’s important to tighten it properly to ensure that your appliance or machine stays securely in place. But before you even start tightening, it’s important to identify where the lock nut is located. It’s typically located at the end of a threaded rod or bolt and is used to prevent the nut from loosening due to vibrations or other factors.
Once located, you can use a wrench or pliers to tighten the lock nut until it’s snug against the other nuts. It’s important not to over-tighten, as this can cause damage or strip the threads. However, if the nut is too loose, you risk having it come undone, causing potential safety hazards or damage to your equipment.
So, take your time and ensure that the lock nut is tightened securely to keep everything in working order. Remember, safety first!
Testing the Clutch Like a Pro
Adjusting a semi truck clutch is an essential maintenance task that helps keep your vehicle running smoothly. To effectively test your clutch, begin by shifting your truck into gear and engaging the clutch. Then, press down on the accelerator and gradually release the clutch.
If your truck stalls, it’s likely that you need to adjust the clutch. A loose clutch will cause your truck to slip while a tight clutch will make it difficult to shift gears smoothly. To adjust your clutch, locate the clutch linkage on your truck’s transmission.
Depending on the make and model of your vehicle, you may need to loosen or tighten the bolts on the linkage until your clutch engages and disengages at the correct point. It’s important to note that the process can become complex, so if you’re unsure about how to do this yourself, it’s best to seek the help of a professional mechanic. By regularly testing and adjusting your semi truck’s clutch, you’ll ensure that it continues to operate efficiently and effectively for years to come.
Start the Engine
When you’re learning how to drive a manual car, one of the first things you’ll need to master is testing the clutch. This is a critical step in starting the engine and getting the car moving. Testing the clutch involves pressing the clutch pedal down with your foot and then slowly releasing it while keeping your other foot on the brake pedal.
As you release the clutch, you’ll feel it engage with the transmission, which means the engine is connected to the wheels and ready to move. It’s important to do this slowly and smoothly, so you don’t stall the engine or jerk the car forward. Practice makes perfect, so be patient and take your time until you feel comfortable with this important skill.
Once you’ve tested the clutch and the engine is running smoothly, you’re ready to shift into first gear and start driving!
Engage and Disengage the Clutch
Testing the clutch is an essential step in maintaining your vehicle’s performance. Engaging and disengaging the clutch must feel smooth and effortless. It’s essential to ensure the clutch feels tight and responsive, and there should be no slipping or resistance during acceleration or deceleration.
A clutch that doesn’t engage or disengage correctly can cause damage to your engine and transmission, reducing the lifespan of your vehicle. When testing the clutch, make sure that the pedal feels light and doesn’t require too much pressure to engage. Test the clutch by engaging it, pressing the gas pedal, and releasing the clutch slowly.
A well-maintained clutch should allow the car to move smoothly and without any shuddering or jerking. In summary, the clutch is a vital component of your vehicle, and regular testing can help identify small issues before they become more significant problems. So, it’s essential to pay attention to how your clutch feels and make sure that it’s operating at its optimal level.
Check the Result
If you’re wondering whether your car’s clutch is in good shape or not, it’s important to know how to test it. Testing the clutch is necessary to ensure that it’s working properly and smoothly. One way to do this is by using the “roll test” method.
While the vehicle is in a quiet area with a flat surface, put it in high gear and start it. Then, release the handbrake and gradually engage the throttle. If the engine stalls or sounds weird, it may indicate that the clutch needs replacing.
Another useful method is the “road test” method, which requires you to drive the car typically and notice how the clutch engages when you shift gears. If there’s any slip or grinding sound, you may need to have it checked. Testing the clutch is essential as it will prolong the life of your vehicle and prevent potential accidents.
Remember to have a trained technician inspect your car if either of these tests reveal any issues.
Adjusting a semi truck clutch is not rocket science, but it does require some patience, attention to detail, and a little bit of elbow grease. Whether you’re an experienced driver or a complete newbie, it’s important to ensure your clutch is in good working order for a smooth ride and efficient operation. With the right tools, knowledge, and a little bit of practice, you’ll be shifting gears like a pro in no time.
So, shift into gear, adjust that clutch, and hit the road with confidence, because there’s nothing quite like the feeling of a perfectly timed shift.”
What are the signs that the semi truck clutch needs adjustment? Signs indicating the need for clutch adjustment include difficulty shifting gears, clutch slippage, and a burning smell coming from the clutch.
How often should a semi truck clutch be adjusted? Semi truck clutches typically need adjustment every 100,000 miles or every two years, depending on the manufacturer’s recommendations.
What tools are needed to adjust a semi truck clutch? Adjusting a semi truck clutch typically requires basic hand tools such as a socket set, screwdrivers, and a wrench.
Can a semi truck clutch be adjusted without professional help? Yes, it is possible to adjust a semi truck clutch without professional help. However, it is important to have a good understanding of the clutch system and follow the manufacturer’s recommended procedures closely to avoid causing damage to the clutch or transmission.
Is adjusting my truck’s clutch a DIY job?
It depends. Clutch adjustment on some trucks can be tackled by DIY enthusiasts with mechanical knowledge and a good understanding of their specific vehicle. However, it requires precision and can be time-consuming. If you’re unsure about your abilities or uncomfortable working on your truck’s undercarriage, seeking help from a qualified mechanic is recommended.
What tools do I need to adjust my truck’s clutch?
The specific tools you’ll need depend on your truck’s model and clutch system (hydraulic or cable-operated). Typically, you might need wrenches, pliers, and possibly a jack and jack stands if accessing the adjuster requires getting under the truck. Always refer to your truck’s manual for the exact tools required.
What happens if I don’t adjust my clutch properly?
Improper clutch adjustment can lead to a number of problems. Over-adjusting can cause the clutch to not disengage fully, leading to gear grinding and potential transmission damage. Under-adjusting can result in excessive pressure required to operate the clutch, causing premature wear and leg fatigue. In severe cases, both scenarios can lead to needing a complete clutch replacement, which can be a costly repair.
Is there anything else I can do to prolong the life of my truck’s clutch?
Absolutely! Here are some tips:
- Avoid riding the clutch: Don’t rest your foot on the clutch pedal while driving, as this creates unnecessary wear and tear.
- Smooth gear changes: Shift gears smoothly and avoid slamming them into place.
- Minimize towing heavy loads: Excessive towing puts a strain on the clutch. If you frequently tow heavy loads, consult your truck’s manual for towing capacity recommendations and avoid exceeding them.
- Listen to your truck: Pay attention to any warning signs like grinding or burning smells, and address clutch issues promptly to prevent further damage.
By following these tips and performing proper clutch adjustment when necessary, you can extend the life of your truck’s clutch and ensure a smoother driving experience.
Similar Posts
Mastering camber adjustment on trucks: the ultimate guide to perfect alignments.
Welcome to our latest post on truck maintenance tips! If you’re an avid truck enthusiast or rely on your truck for work, you know how important it is to keep it in peak condition. One of the critical aspects of maintaining your truck’s performance is understanding how to adjust your truck’s camber. Camber, the measurement…

How to Fix High Exhaust Temperature International Truck
Dealing with a high exhaust temperature in your International truck can be a concerning issue. However, with the right knowledge and steps, you can effectively diagnose and resolve this problem. High exhaust temperatures can lead to engine damage and reduced performance if not addressed promptly. In this guide, we’ll discuss the common causes of high…

Get Your Tank Back on Track: The Ultimate Guide to Draining Diesel Fuel Tanks!
If you’re a diesel vehicle owner, there may come a time when you need to drain your fuel tank. Whether it’s due to a contaminated fuel system or just a simple mistake, it’s important to know how to properly drain your diesel fuel tank to avoid any damages to your vehicle. The process of draining…

Get Your Sunroof Back on Track: Simple Steps to Fix a Misaligned Sunroof
Are you stuck with a sunroof that won’t budge, making that once-enjoyable car ride now a less than perfect experience? Don’t worry; you’re not alone. Sunroofs are an excellent addition to any vehicle, but, just like any other automobile component, they can malfunction too. Fortunately, sunroof off-track issues can be fixed. In this comprehensive guide,…

Effortlessly Purge Air from Your 6.7 Cummins Fuel System: A Step-by-Step Guide
If you own a 7 Cummins engine, chances are you’re familiar with the occasional problem of air entering the fuel system. If not addressed quickly, this can lead to reduced power, rough idling, misfires, and even damage to the engine. So, what can you do to get rid of that pesky air in your fuel…
How to Bypass Solenoid on Dump Trailer: Expert Tips
How to Bypass Solenoid on Dump Trailer Operating a dump trailer is an essential part of many industries, including construction, landscaping, and agriculture. However, if the solenoid on your dump trailer fails, you might find yourself unable to operate the dump function, which can be incredibly frustrating and costly. Bypassing the solenoid can provide a…
Leave a Reply Cancel reply
Your email address will not be published. Required fields are marked *
Save my name, email, and website in this browser for the next time I comment.

- Latest Topics Table
- MGB & GT
- Buy, Sell & Trade
- Vendor Market
- MG Performance
- MG Engine Swaps
- Factory Correct
- MG Magnette
- 1100 & 1300
- T-Series & Prewar
- EV Conversion
- MG Motorsports
- Events & Meetup
- MG 2024 Katy Texas
- Other Vehicles
- Random Topic
- Who's Online?
- Add Your Car
- Top Rated Cars
- Browse Registry
- Recently Added
- Search Registry
- Motorsport Info
- Random Vehicle
- Cars For Sale
- Sell Your Car
- Parts For Sale
- Buyer Safety
- Buy & Sell Forum
- MGExp Regalia Shop
- Books & Magazines
- Parts & Accessories
- Tires & Wheels
- My Order Status
- Events Calendar
- Add an Event
- Featured Build Journals
- Latest Journal Posts
- Create a Journal
- Tech Library
- Featured Articles
- Submit an Article
- Buying a Used Vehicle
- Frequently Asked Questions
- General Maintenance
- Service & Repair
- Body Repair & Paint
- Restoration
- Video Library
- Scanned Publications
- Miscellaneous
- Early MGB Reference
- Motorsport Library
- Link Directory
- Link to This Website
- Member Services
- Parts Suppliers
- Reference & Tech
- Clubs & Registers
- Personal Sites
- Specialist Services
- General Suppliers
- Other Links
T-Series & Prewar Forum
Excessive clutch pedal travel to shift.

To reply or ask your own question: Members Sign In or Create an Account Registration is FREE and takes less than a minute

Having trouble posting or changing forum settings? Read the Forum Help (FAQ) or contact the webmaster Phorum Open Source Software -->

- Remember me Not recommended on shared computers
Forgot your password?
- Aygo & Aygo X Club
Join Toyota Owners Club
Join Europe's Largest Toyota Community! It's FREE!
Adjusting The Clutch Bite-Point

By Ambriel, April 30, 2014 in Aygo & Aygo X Club
- Reply to this topic
- Start new topic
Recommended Posts
The wife's got a little blue Aygo which I don't normally drive but when I have I've noticed that the clutch bite-point is very low, in just about the last inch of travel before hitting the floor.
I've searched and read some of the other topics on the subject that have been posted here so I know the cable is supposed to be checked and adjusted when it's serviced. Now, will adjusting the clutch cable by way of the plastic knob behind where the cables meet the gearbox/clutch housing bring the bite-point back up a bit or will that just take up slack where the cable has stretched?
It's awkward to get to with hands like mine so before I go to the trouble of working out a better way to get at it I wanted to check I wasn't wasting my time.
It's just had a new clutch and I notice the wife has stalled it a few times pulling away so presumably it was slipping quite a bit before.
Link to comment
Share on other sites.
The workings of the clutch themselves are not really adjustable.
Because of the way clutches wear, the fingers that are pressed on by the release bearing start off in a low position
and eventually end up higher, at some stage, either somebody has adjusted the cable to compensate or,
you simply have a new clutch which is in a naturally, slightly lower position.
Only the cable is adjustable. The latest spec. is 13 - 23 mm free play.
If you press down with one finger on the clutch pedal, you can see how far it travels before any resistance is felt.
Measure with a tape measure perpendicular to pedal movement.
I suspect you will have excessive free travel.
If you have, tighten up the outer cable using the adjuster you mention.
It works in a conventional manner, so you need to UNscrew it to give the desired effect.
Leaning under the bonnet, use your right hand, rotate the knurled bit moving the top, towards the rear nearside of the Aygo.
Mine took about 3 full turns or 18 "flats" to adjust 18mm at the pedal end.
Hope this helps.
Thanks, I'll give it a try then. It does appear to be excessive free play. Unfortunately, having quite large hands, it's rather a tight fit for me to get at the adjuster so I'll see what I can remove that will give me better access.
Same here......Sausage fingers.
Put on a pair of tight washing-up gloves......Those yellow ones.
Use NO lubricant and you can get a much better grip. Can't remember now
but might be one finger of each hand, one up, one down.
It would be really easy but the position of the other 2 cables right on top
of the one you want make it a right pain. You can't even see the thing with a torch properly.

Join the conversation
You can post now and register later. If you have an account, sign in now to post with your account.

× Pasted as rich text. Paste as plain text instead
Only 75 emoji are allowed.
× Your link has been automatically embedded. Display as a link instead
× Your previous content has been restored. Clear editor
× You cannot paste images directly. Upload or insert images from URL.
- Insert image from URL
- Submit Reply

Roker · Started July 19, 2023

2toyos · Started Yesterday at 04:51 PM
flash22 · Started March 19
lethal_21 · Started 4 hours ago
taxidriver50005 · Started May 3, 2023

Going back to its origins: World premiere of the all-new Toyota Land Cruiser
Toyota Owners Club posted a record in Toyota News & Articles , August 3, 2023

Toyota Gazoo Racing prepares for historic centenary edition of the Le Mans 24 Hours
Toyota Owners Club posted a record in Toyota News & Articles , June 5, 2023

Toyota Prius honoured with lifetime achievement award
Toyota Owners Club posted a record in Toyota News & Articles , April 5, 2023

Toyota Yaris reaches the landmark of 10 million global sales
Toyota Owners Club posted a record in Toyota News & Articles , March 31, 2023

Toyota develops THUMS crash test simulation software in preparation for automated driving
Toyota Owners Club posted a record in Toyota News & Articles , March 29, 2023
- Existing user? Sign In
- How To Guides
- Online Users
- Members Gallery
- Leaderboard
- Forum Rules
- Create Forum Account
- Premium Membership
- Club Discounts
- Latest Posts
- All Activity
My Activity Streams
- Create New...
The 'E' Type Forum
Celebrating 63 years of a motoring icon
Skip to content

- Board index The E-Type Forum Series 1
Clutch adjustment

Post by vikla » Sun Aug 24, 2014 5:01 pm

Post by chrisvine » Tue Feb 24, 2015 6:46 pm
Post by JEP41 » Wed Feb 25, 2015 5:34 am
Post by vikla » Wed Feb 25, 2015 8:33 am
chrisvine wrote: Steve, Did you manage to resolve the clutch pedal height issue? I've also encountered the same problem where the clutch pedal is approx. 2cm higher than the brake pedal.

Post by abowie » Wed Feb 25, 2015 10:19 pm
Post by chrisvine » Thu Feb 26, 2015 12:38 am
Post by vikla » Fri Feb 27, 2015 4:57 pm

Post by mgcjag » Fri Feb 27, 2015 6:14 pm
Post by abowie » Fri Feb 27, 2015 10:25 pm
Post by abowie » Fri Feb 27, 2015 10:33 pm
Post by mgcjag » Sat Feb 28, 2015 9:31 am
Post by vikla » Sat Feb 28, 2015 3:08 pm
Re: Clutch adjustment
Post by andrewh » Mon Dec 05, 2016 3:26 pm
Return to “Series 1”
- The E-Type Forum
- ↳ Welcome!
- ↳ General
- ↳ Technical
- ↳ Series 1
- ↳ Series 2
- ↳ Series 3
- ↳ E-Type Upgrades
- ↳ E-Type Running Reports
- ↳ Restoration Stories and Owners Gallery
- ↳ Wanted/For Sale
- ↳ Your Dream Garage
- ↳ Meet & Greet
- ↳ Rogue's Gallery
- ↳ Pub Chat
- Board index
- All times are UTC

HOW TO FIX EXCESSIVE BRAKE PEDAL TRAVEL
What Is Excessive Brake Pedal Travel?
Excessive brake pedal travel happens when you feel your pedal sinking rapidly while braking, or sitting lower than usual when activating your vehicle’s brakes. This can happen due to wobbly discs knocking pistons back or air in the braking system.
Performing DIY brake repair to fix excessive brake pedal travel can be a tedious task. Follow the steps below to diagnose and repair your sinking brakes.
How to Fix Excessive Brake Pedal Travel
1. Diagnose the Problem . To diagnose issues with the master cylinder, the first thing you need to do is remove the lines, install brass or plastic plugs into the outlets, and apply the brakes. What happens when you apply the brakes will tell you what issue your vehicle is having. You can continue this process of elimination by isolating each wheel.
2. Use Your Parking Brake. If you don’t typically engage your parking brake, the parking brake can be key in figuring out if your car is suffering from excessive brake pedal travel. If the parking brake doesn’t properly engage, that generally means a low pedal.
3. Bleed the Brakes. Bleeding your brakes is an important step in brake pedal travel repair and other brake issues. Use a jelly jar half full of brake fluid and a short hose to depress your brake pedal.
While depressing the pedal, rotate the star wheel to lose up the clearance. Then, go back one click when the wheel scrapes. It’s best to have a partner on hand when bleeding your brakes.
4. Bleed the Master Cylinders . After bleeding the brakes, bleeding the master cylinders is the next step. In traditional systems, you begin with the longest line in the circuit first, and go from the right rear, left rear, right front, and left the front. In diagonally split systems, the order is right rear, left front, left rear, and right front. Flush out the bleeder valves, and finally, remove the air from your master cylinder.
If you’re not sure which type of system your vehicle is or are unaware of the proper tools needed to fix excessive brake pedal travel, it’s best to bring your vehicle into Brake Works.
With two convenient locations with great weekend hours, getting proper brake maintenance is simpler than you think. Contact our team of certified specialists to schedule an appointment.

Erika Suarez
Previous post what problems can old power steering fluid cause, next post best brake pads for trucks, leave a reply cancel reply.
Save my name, email, and website in this browser for the next time I comment.

Brake Works is a family owned and operated brake and auto repair business, established in 1989 by Ray and Eddie Gruetzner. We are committed to providing the highest quality brake and auto repair service possible at affordable prices.
Our Services
Best Brake Shop In San Antonio Suspension Repair San Antonio Car AC Repair - San Antonio Auto Repair Shop San Antonio
Hours of Operation
14950 Nacogdoches | 210-657-3300 | San Antonio, TX | [email protected]| Copyright © 2023. Brake Works. All rights reserved.
- Brake Repair and Replacement Service
- Suspension Repair Service
- Car AC Repair Service
- Auto Repair Service
CALL US TODAY (210) 657-3300
Get an appointment

CONTACT FORM

- Forum Listing
- Marketplace
- Advanced Search
- Troubleshooting
Clutch Adjustment
- Add to quote
It seems like my clutch is not adjusted properly. With the clutch pedal pushed all the way down to the floor, as I slowly let the clutch pedal out it only engages at the top of the travel. I have one inch of play. Seems like all my previous clutches engaged much sooner in about the middle of the travel up. Is the engagement at the top OK? Jack
No. If you still have room (threads) on your adjustment rod, now is the time to shorten it. Big Dave
Big Dave said: No. If you still have room (threads) on your adjustment rod, now is the time to shorten it. Big Dave Click to expand...
Jack, you should have 1/4" of clearance between the face of the T/O bearing and the fingers. this allows for expansion with heat. it's very possible the issue arises from the adjustable pivot being slightly off it's sweet spot. might be off a little this way or that which still allows actuation but changes the leverage points. take a look under the car and see if the pivot is accessible with the trans installed. if it's not then the trans will need to be removed. the front bearing retainer on the trans can be removed for mock up purposes, it helps if a spare input shaft is available for this procedure too... install the input shaft and bearing retainer, fork & T/O assembly. jack up and support the bell housing and re-install all your linkage. now you can climb into the car and actuate the clutch. you can check the pedal travel, actuation/release levels of the clutch etc. any pivot adjustments needed will be quick and easy... is this an 1-1/8" x 10 spline clutch disc? or is it 1-1/8" x 26 splines? just asking in case you need to borrow an input shaft for mock ups. if you can drive the car now and pedal pressures are NOT excessive, it sounds as if the geometry is off but in the higher leverage not the lower. if it was the opposite way you'd be bending/breaking Zbar levers, tweaking rods etc... it's going to take some looking at and adjustments to get it right... any assistance/help i can offer, i'll do what i can... best of luck...
SHIFTY4 said: Jack, you should have 1/4" of clearance between the face of the T/O bearing and the fingers. this allows for expansion with heat. it's very possible the issue arises from the adjustable pivot being slightly off it's sweet spot. might be off a little this way or that which still allows actuation but changes the leverage points. take a look under the car and see if the pivot is accessible with the trans installed. if it's not then the trans will need to be removed. the front bearing retainer on the trans can be removed for mock up purposes, it helps if a spare input shaft is available for this procedure too... install the input shaft and bearing retainer, fork & T/O assembly. jack up and support the bell housing and re-install all your linkage. now you can climb into the car and actuate the clutch. you can check the pedal travel, actuation/release levels of the clutch etc. any pivot adjustments needed will be quick and easy... is this an 1-1/8" x 10 spline clutch disc? or is it 1-1/8" x 26 splines? just asking in case you need to borrow an input shaft for mock ups. if you can drive the car now and pedal pressures are NOT excessive, it sounds as if the geometry is off but in the higher leverage not the lower. if it was the opposite way you'd be bending/breaking Zbar levers, tweaking rods etc... it's going to take some looking at and adjustments to get it right... any assistance/help i can offer, i'll do what i can... best of luck... Click to expand...
if the clutch fully releases and engages then you should be fine. if it doesn't then some slipping may be occurring which wouldn't be too good. sounds like it's not that far off, might not take that much to repair...
SHIFTY4 said: if the clutch fully releases and engages then you should be fine. if it doesn't then some slipping may be occurring which wouldn't be too good. sounds like it's not that far off, might not take that much to repair... Click to expand...
Philip said: Jack the rod to the fork needs adjusting, remove half of the free play at the pedal and it should work better. If your z bar has 2 holes in it the top hole is used for the adjustment. Place the rod in the top hole and adjust the rod until the throwout bearing is against the pressure plate and tighten the locking nut. Move the rod to the lower hole and it should be adjusted correctly. Click to expand...
Not sure when GM started making the cross shaft with the gage hole, could have been in the mid 60's.
I did not know that was what the 2nd hole was for. Thanks Philip!
more info... http://www.mcleodracing.com/content/pdf5379.pdf http://prestoliteweb.com/Portals/0/...lation_Troubleshooting_Clutches_Flywheels.pdf
John IIRC Jacks set up is all stock and there should not be an issue with pivot ball height or fork angle.
Actually I have all stock linkage but have a Lakewood Bell & block plate with a Center Force Clutch and stock clutch fork with adjustable pivot ball. This is good stuff Bro's, thanks...Jack P.S. What is IIRC?
i thought he stated he has an adjustable pivot installed...
I hope that is the issue instead of the pivot ball needing to be adjusted as that involves more time under the car.
If I Remember Correctly...which I did not. I used a stock ball pivot with a scatter shield to keep it simple. Problem with the Lakewood units are they come in different depths and change the geometry causing the need for adjustable pivots and bearings. I used one that was the stock height, a flywheel that was the stock thickness just to keep it simple.
Philip said: If I Remember Correctly...which I did not. I used a stock ball pivot with a scatter shield to keep it simple. Problem with the Lakewood units are they come in different depths and change the geometry causing the need for adjustable pivots and bearings. I used one that was the stock height, a flywheel that was the stock thickness just to keep it simple. Click to expand...
1/8" should not be a problem, the unknown is the height the adjustable ball was set to. Depending on the type used it may not have the ability to adjust any taller than a stock pivot. There is a real good chance it will adjust just fine. If the clutch were engaging/disengaging right at the floor there would be larger issues.
OK, it was the pivot ball. We had to pull back out the trans and re-adjust the ball then put the trans back and adjust the linkage. It is working much better now. Thanks for the replies. Now that the motor is up and running I have another issue that has popped up. I will post a new thread for that...Jack
SHIFTY4 said: glad to hear it Action-Jackson!!! :thumbsup: regards to your Sweetie. Click to expand...
- ?
- 167.9K posts
- 14.8K members
Top Contributors this Month

IMAGES
VIDEO
COMMENTS
Shift the transmission into first gear and keep the clutch pedal fully depressed. Shift the transmission into neutral. Wait 5 seconds to allow the transmission to come to a complete stop. Without forcing the shift lever, shift into reverse. If you can hear the gear clash, the clutch is dragging.
Since this replacement, there is 'excessive clutch pedal travel', to start the vehicle. Excessive=pedal goes all the way to the floor before starter is engaged, and then still some delay, with key turned all the way. This is a 99% condition, sometimes the vehicle will start with a shorter pedal travel, and key turned to the maximum.
Too much pedal free-play isn't good, because too much pedal travel is used up doing nothing: There's not enough movement left at the bottom of its travel to compress the clutch springs and allow the engine flywheel and the clutch disk to separate. With this excessive pedal play, the gears clash whenever you shift into First or Reverse from ...
Clutch drag occurs when the clutch disc is not completely released as the clutch pedal is fully depressed. This can lead to dreaded gear clash. The most common culprits behind clutch drag are poorly adjusted clutch linkage (too much free travel), a defective clutch cable, or a leak or failure in the hydraulic system. Other possible causes include:
Clutch fails to disengage when pressed. In normal, modern stop-and-go driving, you probably press the clutch pedal in every few seconds. And on that one time when you press it and the car still creeps forward, you know you have a problem. Sometimes a part fails and the clutch goes from working normally, to not working in an instant.
The pedal height is the travel distance between the pedal sit and the floor. This height determines how much travel you can put on the pedal to disengage the clutch. This height is adjustable and may need adjustment if you change anything down the line, such as the master cylinder, throw bearing, or the clutch itself.
insightful October 20, 2014, 3:56am 3. Hondas usually have easy to push clutches and that long travel is needed for that. If you cut the travel in half, you'll double the force needed. It would take re-engineering the pedal and pivot point. Caddyman October 20, 2014, 6:06am 4. Or installing a clutch master cylinder with a larger bore diameter ...
Place the tape measure or ruler next to the clutch pedal. Ensure that one end of it is placed towards the floor and is resting on it. Remember to angle and align the ruler or tape measure based on which direction the clutch pedal will travel and sink into. Note down the default distance between the top of the clutch pedal, and your car's floor.
On average, clutch pedal ratios range from 5.0-7.0:1. To determine the pedal ratio, measure the pedal pad to the pivot, then measure from the master cylinder rod mount to the pivot and divide the second measurement into the first. The higher the ratio, the more leverage you will have over the clutch. This will decrease pedal effort and increase ...
Possible Causes: • Improper break-in procedure. • Excessive clutch preload (improper adjustment) • Excessive clutch slip due to driving style. • Oil leak from engine or transmission. Solutions: • Repair oil leak, clean bellhousing and clutch release components. • Inspect and resurface flywheel, replace if necessary. • Adjust ...
It seemed like another hydraulic issue to me as i had all new parts and still had black stuff in reservoir. So I ordered a LUK clutch master cylinder which had a different setup and changed out the slave as well to factor out all hydraulic issues. Well it definitely fixed the rough time getting it into gear, but i now have a super long travel ...
The influence of clutch pedal free travel on a manual car. The free travel of the clutch pedal is too large, which will cause incomplete disengaged and make the transmission shift difficult, so accelerate the wear of the driven plate, pressure plate and flywheel.In this case,it will strictly reduce the service life of the clutch. If the clutch ...
I recently purchased a 2000 Ranger 2.5L 5 speed. When I purchased the truck I noticed excessive clutch pedal free travel (1-1/2"). I have noticed during this winter that when the ambient temperatures are cool (~45F and below) that the clutch pedal free travel disappears and when the...
High Engagement Point: The clutch "grabs" too high in the pedal travel, making it difficult to find the friction zone (the sweet spot where the clutch engages smoothly). This can lead to jerky starts and stalling. Low Engagement Point: Conversely, the clutch engages too low in the pedal travel, requiring excessive pressure to shift gears ...
If your clutch is slipping or sticking, these may be signs that the clutch is wearing out. You may also hear a squeaking or grumbling noise when the clutch pedal is pressed, or have difficulties changing gear. Learn more about the signs of clutch failure below, along with information about how a car clutch works.
The pedal travel limitation/adjustement screw by the pedal box is at the position which limits the travel maximally i.e. shortest possible pedal travel. b) Is 348 hydraulic clutch system different than most and doesn't compensate for clutch wear? Anyway, I have a fresh clutch setup in place so that should not be a problem.
1954 MGTF It has original engine and I assume gearbox. I am not sure about the clutch. The synchros are wearing but I double clutch for downshifts. I have noticed that unless I push the pedal to the floor I get grinding in most gears even with double clutching. If I push clutch pedal to the floor i
It works in a conventional manner, so you need to UNscrew it to give the desired effect. Leaning under the bonnet, use your right hand, rotate the knurled bit moving the top, towards the rear nearside of the Aygo. Mine took about 3 full turns or 18 "flats" to adjust 18mm at the pedal end. Hope this helps. Ian.
Clutch adjustment. by vikla » Sun Aug 24, 2014 5:01 pm. My clutch operation has always been at the top of the pedal travel and is pretty stiff (probably due to being an old spring clutch fitted the late 70's). Even though my engine no. suggests the car should originally have had the longer 95mm slave cylinder, it had on it a leaking 80mm slave ...
3. Bleed the Brakes. Bleeding your brakes is an important step in brake pedal travel repair and other brake issues. Use a jelly jar half full of brake fluid and a short hose to depress your brake pedal. While depressing the pedal, rotate the star wheel to lose up the clearance. Then, go back one click when the wheel scrapes.
Jack the rod to the fork needs adjusting, remove half of the free play at the pedal and it should work better. If your z bar has 2 holes in it the top hole is used for the adjustment. Place the rod in the top hole and adjust the rod until the throwout bearing is against the pressure plate and tighten the locking nut.
Technician A says that a Solo clutch should automatically adjust for the life of the clutch pack. Technician B says that any clutch using a lockstrap to set the adjusting ring, must be periodically adjusted. ... Technician A says excessive clutch pedal free travel can result in a clutch that does not fully disengage. Technician B says that too ...
Study with Quizlet and memorize flashcards containing terms like As clutch friction facings wear on a truck pull-type clutch, how is clutch pedal free travel affected?, Clutch facing wear has resulted in zero clutch pedal free travel in a truck equipped with a manually adjustable, pull-type clutch. Which of the following is the recommended method of restoring clutch pedal free travel to ...