
10/11-speed Di2 beginner's guide to Di2
When you buy a Di2 bike it generally does not come with a Di2 manual. And even when it does it is usually horribly outdated or full of the information you just don’t need right now. On this page, I’ll explain the Di2 basics – everything you need to know to use your Di2 bike to its fullest potential.
12-speed Di2
If you have a 12-speed Di2 bike , read my updated guide with all the 12-speed Di2 specifics.
12-speed Di2 for beginners / new user guide .
There is a lot of Di2 information out there, but it’s all very fragmented. This guide is meant to help you get started. Some things I think every Di2 owner should know are:
What does Di2 mean?
Is there an on/off switch, how do i shift a di2 bike.
- How often do I charge my bike?
- Check your Di2 battery status
- How do I charge my Di2 bike?
- What does that Junction box button do?
What do those lights mean?
Why doesn't my mobile phone connect to my di2 bike.
- Shift modes and Synchronized shift
How can I change settings?
- How do I update component firmware?
- There are buttons on top of the shifters!
Should I take special care washing my bike?
How do i safely transport my bike.
- Manual and other resources
Di2 stands for “Digital Integrated Intelligence” – Shimano’s version of electronic shifting. DI2 gives you instant, accurate, lightning-fast shifts the first and every time, at the push of a button. Even in the most extreme conditions, shifting is precise and controlled. You can change gear even under heavy load while climbing or accelerating.
Once the system has been set up and shifting fully dialed in, it keeps running smoothly, all the time. You do not have to re-index Di2 systems or replace the shift cables. Ever.
Di2 is available on road bikes, mountain bikes, e-bikes, and since 2019, gravel bikes .
Check out my Favourite Di2 items
If you'd like to support the site , check out my Amazon storefront. My favourite Di2 components and tools are listed there. Any items you purchase on Amazon through this link will earn the site a small commission, at no cost to you.

Sometimes people ask me: "is it possible to switch off my Di2?", or: "How do I switch my bike on?". The simple answer is: you don't.
Generally speaking, a Di2 bike is always switched on. When you press any shifting switch or button, your bike will immediately shift the corresponding derailleur or hub. You do not have to " wake up " the bike before it'll work. (if you do, something is wrong )
The only exception to this rule is E-bikes. These sometimes do have dedicated on/off switches. These don't necessarily switch the Di2 system on, but their main purpose is to start or stop the motor unit or pedal assist.
Travelling with the bike
Since there isn't any off switch, take extra care when putting the bike in the back of your car. If one of the buttons gets pressed while driving you may end up at your destination with the bike in a different gear than you started out with. Or worse - a flat battery.
So you may or may not have found the buttons on top of your shifter hoods , but those don't actually change the gears. So how do you shift a Di2 bike? How do you change gears with Di2? Simple! Just press the buttons on the side of each brake lever as shown in this image:
Shift the Di2 Front derailleur
In order to shift the front derailleur, you use the left lever and press either switch X (the bigger button) or switch Y (smaller). If you find it hard to remember which button shifts up or down, think of it this way: pressing the larger button will shift to a larger chainring. Pressing the smaller of the two buttons will shift to the small ring - an easier gear.
Shift the Di2 Rear derailleur
Shifting the rear derailleur works just like shifting the front derailleur - you press either switch on the side of the right shift lever. Pressing switch X (larger button) will shift to an *easier *gear - a larger cog or sprocket. Pressing the Y button will shift to a smaller cog or sprocket - a harder gear.
How often should I charge my bike?
A modern Di2 battery will last between 2000 and 5000 kilometers per charge. This depends a bit on how often you shift and also your shifting style. The front derailleur has to work harder than the rear derailleur and therefore also consumes more energy.
This means that if you use the front derailleur a lot your battery will run out a bit quicker – don’t let this stop you from using the front derailleur though. It takes most people months to ride 2000-5000km and most Di2 users don’t charge their bikes more than three times a year.
Once the battery level reaches 10% the front derailleur will stop working . This way the most battery-hungry operations are disabled and you should be able to finish your ride using just the rear derailleur.
Check your battery status
Checking your Di2 battery status is easy on E-bikes or Urban bikes, you simply look at the display. This usually applies to Di2 mountain bikes as well - most of them have a display.
On road/gravel bikes there is no display, so you need to use a different method.
If your bike is an 11-speed or 10-speed road bike, and you have the EW-WU111/101 Wireless Unit wireless module - just hook your bike up to your bike computer and look up the battery charge level on your Wahoo/Garmin/other bike computer.
For those of us without a Bluetooth/ANT module, simply press and hold any of your shift buttons for half a second. The left LED on your junction box will illuminate to indicate the charge left in the battery.
Shimano recommends charging the battery when the level gets below 25%.
How do I charge the battery?
First, unpack that SM-BCR2 charger (11-speed Di2) .
One end of it plugs into your bike, the other (USB) end goes into either a laptop or an AC adapter with USB port (mobile phone charger adapter for example). The order in which you plug your devices in does not matter. Just connect the bike to the charger and leave it in until the orange charging indicator switches off – this can take up to 1.5 – 3 hours .
10-speed and 11-speed Di2 bikes can have the charge port in a couple of locations. If your bike has an internal battery you plug the charger into the junction box – either below the stem/handlebar or integrated into the frame or seatpost. It has a little cover that you can open using a screwdriver or knife.
Do you have an external battery on your bike? Then you'll have to take the battery out of the bike and place it in the charger.
You cannot charge external batteries through the junction box, only the SM-BCR1 can charge external batteries.
Have a look at the image below for some example charging port locations.
Important : Shimano recommends you use an AC adapter with a voltage of 5.0 Vdc and with a current equal to or higher than 1.0 Adc . If you use an adapter with a current lower than 1.0A it may “ heat up, potentially causing a fire, smoke, overheating, destruction, electric shock, or burns “. Also, it could result in a poorly charged battery.
If you have to use a computer or laptop to charge your bike, use a USB 3 port (usually blue) if you’ve got one – the (maximum) current on USB 3 ports is higher and it’ll charge quicker.
What does the button on the Junction box do?
Both the current and the previous generation Di2 have a button on the Junction box. Depending on what battery you use, the button does different things. If you use it combined with one of the old batteries ( external SM-BMR1, SM-BMR2 , or internal SM-BTR2 ) it:
- Enters adjustment mode if you press-and-hold the button for 0.5 seconds
- Enter rear derailleur crash protection reset mode if you press-and-hold the button for 3 seconds
The modern Di2 batteries allow you to enter Bluetooth LE connection mode. Note that this Bluetooth connection only works if you have a Wireless Unit on your bike. With a BT-DN110 or BM-DN100 battery installed:
- Press-and-hold the button for 0.5 seconds to enter Bluetooth LE connection mode
- Press-and-hold the button for 2 seconds or more to enter adjustment mode
- Press-and-hold the button for 5 seconds or more to trigger rear derailleur crash protection reset
Also, if you have a synchro-shift enabled bike, pressing the button twice will let you switch shift modes.
Depending on what mode you’re in different lights come on. Confused? Read on..
When you check your battery level different lights come on depending on the charge levels:
- Green for two seconds : 100% battery
- Blinking green five times : 75% – 50% battery
- Red for two seconds : 50% – 25% battery
- Blinking red five times : 25% – 0% charge left
Modern Di2 builds will switch on additional lights right after displaying the battery status. These show you the currently selected shift mode :
- Green and red lit for two seconds : manual shift mode
- Green and red blinking two times : shift mode 1 semi synchro shift
- Green and red blinking three times : shift mode 2 (full) synchro shift
Pressing the button can trigger other modes, as described above. The corresponding lights are:
- Adjustment mode : red led illuminated while in this mode
- Bluetooth LE connection mode : green and red flashing in alternating order (15 seconds)
- Rear derailleur crash protection reset : red fully lit and then blinking red (after 5 seconds)
I'll explain all of this in a minute, but also want to direct your attention to my Di2 Cheat Sheets . The cheat sheets explain what the button does, and what the LEDs mean. Download them, print them, and keep them in the garage, close to your bike. That way you never have to wonder what the LEDs mean.
Interested? Download the Di2 Cheat Sheets right here.
If you've read the little bit of paper that is the Junction A manual then you may have seen that you can connect your mobile phone or tablet to your bike. The document shows you how to enter pairing mode and how to make connections .
However, on road bikes this wireless (BluetoothLE / ANT) functionality is only available if you've got a D-Fly or Wireless Unit installed . No matter how much your bike cost, it most likely does not come with a D-fly. These units are considered add-ons.
On mountain bikes and e-bikes this wireless functionality is included in the SC-MT800 and SC-M9051 displays.
Shift modes / Synchronized shifting
All road Di2 builds that use the modern BT-DN110 battery support different shift modes and synchro-shifting. Mountain bikes also need an Information Display ( SC-M9050 , SC-M9051 , SC-MT800 ).
This means the system will switch the rear derailleur when you change the chainring, or shifts the front derailleur automatically when you shift the cassette to a certain sprocket.
I've written a pretty big 'complete guide' on Synchronized Shift before, so read that if you want to know everything there is to know about synchronized shifting. You can also set up synchronized shifting using the mobile app , if you have a wireless unit installed.
You can change between the shift modes by double-pressing the button on your junction box. When you do this the bike cycles through three modes:
- Manual mode - Indicated by solid red/green LEDs. This is traditional, full-manual shifting.
- Shift mode 1 (S1) - Indicated by both red and green LEDs flashing twice. The default S1 mode is semi-synchro: automatically shifts the rear derailleur when you shift the front derailleur.
- Shift mode 2 (S2) - Red and green LEDs flash three times. By default this is full-synchro and this automatically shifts the front derailleur as you shift the rear derailleur.
More information on these shift modes can be found on the Synchroshift: how does it work page.
If you're on Windows you can use E-Tube Project software to connect your bike to your computer and change a variety of settings:
- Update component firmware
- Adjust Gear Position Control
- Enable the buttons on the Shifter hoods
- Change your Wireless Passkey
- Customise Synchronized Shift settings
- Micro-adjust your derailleurs
However, if you are a Mac user then you're out of luck. Shimano haven't made the software available for Mac. GPLama has published a video on running E-Tube Project in VirtualBox . Have a look at his video on that and also his Di2 playlist for some more nice videos.
Also, if your bike has a D-fly installed you will be able to change settings using your mobile phone (Android and iOS) or tablet.
How do I update firmware on my bike?
Sometimes a firmware update is required in order for features to work, or to fix issues. One example is synchronized shifting. Synchro shifting is enabled on older generation Di2 if the firmware is up-to-date and the other requirements (see above) are met. You can read how to update your Di2 firmware on this page .
There are buttons on top of the shifter hoods?
If you have a current generation road or gravel Di2 system press the top of your shifters and you’ll see there’s a button on top of each shifter. The series that have these buttons are: Ultegra R8050 / R8070 , DURA-ACE R9150 / R9170 and GRX . Do you have and older generation bike but want to have buttons on the shifters? You probably can – have a look at the compatibility charts and see whether your system is compatible.
Even if you do have the buttons, they probably don’t do anything. They are set up to control your Wahoo/Garmin by default, even if you don’t have an EW-WU111 Wireless Unit . You can use the e-Tube project software to change the button functionality .
When it comes to washing your bike don't need to take special care of the Di2 system. Your bike won't electrocute you when riding in the rain, and it also won't spontaneously explode if you get it wet washing your bike.
Just like you would with a mechanically shifted bike, use water and soap or any other mild cleaner. Take care not to contaminate your disc brakes.
As long as all Di2 ports have either Di2 wires or dummy plugs in them, they're pretty water-resistant.
Don't worry about getting it wet, but also don't pressure wash your derailleurs. They can take some water but are not completely waterproof. To prevent oxidation, wipe off excess water and dry your Di2 parts using a towel.
Not much can go wrong with transporting your bike. The only thing you should keep in mind is that a Di2 derailleur will try to shift and keep trying when a shifter button is pressed. This means that if you put your bike in the back of your car you should take care that your bike is not trying to shift all the way to your destination – that would mean getting there with an empty battery. Speaking of empty batteries – it’s a good idea to bring your charger with you, even if you just charged your battery.
Shimano manuals and other resources
There is a lot of other information on Di2 out there, you just have to know where to look. Carlton Bale has an excellent page with in-depth Di2 information , GPLama / Shane Miller has a bunch of videos up on Youtube and of course there’s GCN and GCN Tech as well.
If you’re looking for more information you could of course visit the Shimano Tech website – si.shimano.com hosts all of Shimano’s manuals and even exploded views of most components they make. Simply search by keyword or series and then look for the ‘Dealer manual’ – those contain the most information on how to adjust or configure your bike. I’ve also uploaded them to BetterShifting.com:
- Ultegra Di2 6770 manual
- Ultegra Di2 6870 manual
- Ultegra Di2 R8050 manual
- GRX RX815 Di2 manual
- DURA-ACE 7970 service instructions
- DURA-ACE 9070 manual
- DURA-ACE R9150 manual
- XT M8050 manual
- XTR M9050 manual
- Shimano Torque Chart
Yes, but how do I…
Looking for something I forgot to mention? And it’s not in the Frequently Asked Questions ? Don’t hesitate to contact me – I’ll try my best to help you with any issues you have!
About the Author - BetterShifting Terry
I enjoy playing with bike tech - both bike building and wheel building, bike maintenance and of course, Di2. Besides writing content and working on the technical side of BetterShifting, I also work as a Software Developer in The Netherlands. Read more on the About this site page.

Support the site
If you want to support the site, consider using the site affiliate links , or buying me a coffee .
Was this page useful? Any questions? Leave a comment below and I'll get right back to you.
- MAGAZINE OFFERS
- BIKE INSURANCE
- Best Products
- Maintenance
- Accessories
- Long-Term Reviews
- BikeRadar Podcast
- First Look Friday
- Bike of the Week
- Tech Features
- Routes and Rides
- Bike Galleries
- BikeRadar Bargains
- Buyer's Guides
- Fitness & Training
- Sizing & Fit
- Mountain Biking UK
- Cycling Plus
Trek Speed Concept 2.5 review
Latest aerodynamic science at an affordable price
Joby Sessions
Guy Kesteven

Trek’s Speed Concept 2.5 gets the same aggressive position and chopped teardrop profiling as the carbon 7-series bikes. The overall ride is more heavy metal than an Aerosmith chart-topper though.
The Speed Concept looks amazing, with all sorts of tricks to cheat wind and attract buyers, while the alloy frame’s weight is impressively close to the carbon version’s. But it’s still heavy in comparative terms and although the aero effect is obvious at higher speeds, fit, handling and overall responsiveness issues meant our test team rarely experienced the benefits.
Ride & handling: Low acceleration and responsiveness
While Trek have clearly spent a vast amount of time in the wind tunnel and on the drawing board to chase drag out of every part of the bike, the war on wind seems to have been waged at the expense of friendly rider interaction and easy ergonomics. In other words, while there might be the option to extend the seat tube aerodynamics and store your mid-ride munchies in a more aero manner, all our testers, apart from a couple of die-hard drag queens, found the fit of the Speed Concept uncomfortable and restrictive, even after spending time tweaking the contact points.
The narrow shoulder and arm position caused by the narrow-span bar and extensions was an obvious problem for some broader-shouldered riders. Several riders also complained of reflux when trying to rev the bike, which was hard even in the tallest position possible. Issues like cable contact between the knees, the bulky tension screw adjusters looping out from behind the stem, and even rattling internal cables got on riders’ nerves.
While the handling in the tuck was sure-footed and stable for those who eventually got comfy, it’s positively frightening if you lift out of the saddle to inject speed out of a corner or up a climb. And although power transfer from the big frame tubes is reasonable, high bike weight – particularly the wheels – also meant low acceleration and responsiveness in general.
Combine this with the soft braking and you’ve got a bike with a cruiser rather than combative feel – as evidenced on group rides where the Trek struggled to keep the other bikes in sight. On the bright side it’s not as jarring as we feared from such a slab-sided alloy frame. You’ll need to keep an eye out for any significant potholes or rough patches though, otherwise you’ll be punished through your palms and shorts pad.
Frame: Kammtail aerodynamics and integrated storage
The aggressively deep maintubes and the tapered headtube (all coated in sparkling metallic paint) are certainly striking, and the Kammtail Virtual Foil (KVF) aerodynamics are something of a talking point too. The tubes’ blunt, flat backsides are designed to create flexible vortices trails and a smoother overall airflow in crosswinds than a full teardrop.
Anti-drag detailing is equally comprehensive. Internal brake and gear cable routing disappears vertically behind the stem. The extended fork top and downtube dovetail via a right-angled notch. The carbon aero seat mast is clamped with a wedge system that’s flush with the tapered horizontal top tube. While it’s not the complex, custom-faired in-brake of the carbon bikes, the rear U-brake is mounted under the chainstays behind the cranks in already ‘dirty’ air.
The frame is also drilled and pocketed to take Trek’s aero Speed Box top tube and Draft Box seat tube storage systems, as well as Speed Trap direct-mounted computer sensors. It’s not smooth-welded, but the Alpha Red aluminium is extensively shaped, which means this is actually a lighter frame than its carbon sibling if you include the integrated rear brake. It’s still heavy compared to most bikes though, especially if you include the amount of outer cable rattling round inside the frame.
Equipment: High weight and poor braking
Complete bike mass is relatively high too, and the Bontrager wheelset is the weightiest on test, which dulls acceleration. The SRAM Apex kit works smoothly though, and while we’d normally grumble about smaller compact chainset rings on a dedicated aero bike, when it’s designed for the entry-level market like this one, it’s much less of an issue. The Bontrager cockpit gives plenty of potential for adjustment too, although pad angle is crucial for a secure-feeling fit.
While the chrome-effect Trek brake levers are particularly neat and pretty, convoluted internal cable routing also makes braking feel mushy. The fat-nosed Vision saddle is also very much in the mushy mould, which was appreciated by some, although others found the breadth between their legs too much for comfort.
Share this article

- Terms & Conditions
- Subscribe to our magazines
- Manage preferences

- Rider Notes
2016 Trek Speed Concept 9.9

A carbon frame triathlon bike with ultra high-end components and rim brakes. Compare the full range
For This Bike
View more similar bikes →
A bike with lower gearing will be easier to ride up steep hills, while a higher top end means it will pedal faster down hills.
Speed Concept 9.9
Similar Bikes
(descending)
Add custom gearing
158cm – 171cm
168cm – 180cm
178cm – 189cm
186cm – 199cm
🐐 Estimated
Do you have this bike? Help other riders make a decision about which size will work for them by sharing your own size and fit notes. Report your fit

Oct 2015 · David Willey
Premium handling and compliance with triathlon-ready aerodynamics
Read Review

Oct 2013 · Ben Delaney
With a laser focus on aerodynamic performance, this bike flies on the open road

Jul 2013 · William Tracy
The 2014 versions can save around two minutes during the 112-mile bike leg of an Ironman race

Last updated 29 June Not listed for 2,466 days
Trek Speed Concept 9 Review
My new time trial bike (Trek Speed Concept 9) arrived at Beeline this week. Ironically, just as my time trial season is coming to an end. Anyway it looks nice. Which is the most important thing in a new bike.

Trek Speed Concept 9
- 600 Series OCLV Carbon,
- KVF (Kammtail Virtual Foil) tube shape,
- Carbon Fork
- Weight: frameset, cockpit setup, headset, BB and small frame parts come out to 1,874g
- Total bike weight (with Bontrager R5 training wheels and tyres) 8.1 kg

Bike with draft box
Project One
I bought the bike through Project One. You order the bike online (or through Trek dealer) and it gets delivered to bike shop. The great thing about Project One is that you can choose any combination of equipment. This enabled me to keep costs lower by choosing cheap training wheels. I also like to be able to choose the colour of the frame. You can spend quite a bit of time, switching equipment on the website
Another great thing about Project One is that it gets delivered to a good bike shop and experienced mechanics can put it together. The staff at Beeline bikes Oxford have been helpful in getting the bike on the road. Project One combines the best of the internet buying with also using a good bike shop. The best of both worlds really. Definitely adds to the experience to get a bike through a bike shop with enthusiastic workers to look after bike.
- Trek Speed Concept at Project One
The main disadvantage of Project One is the time taken for bike to arrive. I ordered in May. It arrived end of July. I kept waiting to have enough money in the bank before ordering, but if I’d known how long it would take, I could have ordered earlier.
Also, it has proved bad timing on my part. My time trial season is effectively over (I might do one 25 mile TT just to use bike). I should have waited for new model to come out in Autumn and got bike for start of 2015. When buying a bike, it’s always worth planning the best time of the year to buy it.
Clean lines on Trek Speed Concept
This is what you pay your money for. Nice neat lines, everything hidden away. Super aero.

Neat front section. Really clean. Though annoyingly the plastic cover doesn’t fit 100% flush with the fork.

Smooth rear view (the black plastic bit for draft box can be removed) The lines of the frame are immaculate.
What’s it like to ride?
First impressions are good. Pretty stable at high speed. Seems to cut through the wind pretty well. Though disappointingly if you want to go fast, you still have to pedal very hard. It is difficult to make quantitative judgements about how much time it saves from last bike (Trek Equinox SSL) Even when I race it will be difficult. I was more impressed by the electronic gears than new frame. Electronic gears are pretty cool and easy to see the difference. Marginal aero gains, hard to judge. But, it definitely looks Aero!
Overall I am happy. It looks good, it looks fast and it feels like a big upgrade from the last bike. It has some very nice touches like micro adjustment of saddle, aero fins, clean lines and integrated brakes. It isn’t perfect, some things spring to mind.
- Project One takes a long time to arrive
- For such a high quality bike, there are moments of ‘cheap plastic’. The draft box fell open on first ride, and it does have feeling of cheapness. The front aero brake cover is a great idea, but it doesn’t fit 100% flush. Disappointing, even if very marginal.
- I was surprised the aerobars had moments of cheap aluminium. They could have saved weight there.
- The aerobars are OK. Though I guess I was hoping for a bigger angle of adjustment.
Aerobar bolts keep breaking. See: this post on aerobar bolts that keep breaking.
Weight – The new bike is the same weight as my Trek Equinox SSL. Partly this is due to the extra bits and bigger frame which make it more aero. 8 kgs is still reasonably good for a time trial bike and this compares well against other TT bikes (though as I found when researching TT bikes, companies hate giving weights for bikes). Also, I might be able to reduce weight a little with lighter saddle and lighter wheels.
It’s easier to list the things which could be better. But, it’s still a very good bike. Nevertheless, it doesn’t quite feel like the finished product. Perhaps future models will be able to improve on this. I’m hoping I will be able to go faster on this bike than old bike – though I have a feeling these extra seconds will be relatively expensive seconds saved.
Still, if all else fails, it looks good, so that has to be worth it.
Other bits about bike.

Aero fin in front of rear wheel. It does look a little ‘fishy’. I’ve taken mine off.
Adjusting brakes

Inside the casing, the front brakes with plastic cover taken off. It’s quite easy to adjust brakes. (e.g. making wider for wide rim like Zipp 808)
Tribars and cockpit

The integrated tribars and cockpit offer a degree of adjust-ability. It’s not too difficult to change.

The integrated cockpit can be angled about 10 degrees. It’s good for those wanting to adjust angle (something many TT bikes don’t offer). But, it’s not enough angle for those who want to ride in the praying mantis position (potentially much more aero position)
I think the Speed Concept base bar is UCI legal though it does look to be stretching the 3:1 ratio rule.

The integrated tribars are not particularly light. This is fairly heavy aluminium. Pretty soon I decided to cut off those extra bits because they stick out in the wind, and weighed 50 grams.
Alternative to Speed Concept basebar.
If you are happy to have a flat aerobar and ditch angle, you can buy an adaptation which simplifies this base bar set up and save a bit of weight. I can’t remember what it’s called, but it will come to me sometime.

Unfortunately, the Dura Ace battery didn’t fit in that space by stem. Making it a little bit sticking out. This is the only area of the bike that is not super-smooth and clean.
The end of the tribars stick out and it looks like it needs cutting.

Shimano Dura Ace front mech. 54/42. My last bike was 56/39

Integrated fork and TT frame. This is the full foil fork. I choose the non UCI Legal fork, which I may regret for next year’s British Time Trial Championship

The rear brake pads are hidden behind the Chainring.If you want to change the brakeblock, you will need to take the outer chain ring off. (Ouch!)
I hope the aero benefit is worth the extra maintenance hassle.

Trek claim that the addition of the draft box doesn’t add any drag onto the bike. It is drag neutral.
It is a fantastic carrying space. Easily get a couple of spare inner tubes and mini pump. I’m often in a dilemma about carrying spare tub in race, but this makes it easier.
However, for such an expensive bike, it feels like surprisingly cheap plastic. On my first ride, the lid jumped out on a speed hump.
The bike looks better without it.

Adjustment of arm pads is quite good, you can change angle.
Dura Ace Di 2
It is a new bike, but also a new gear system. Electronic dura Ace Di2. I didn’t set it up, but left it to bike shop. They have quite a bit of experience with Di2 and say it is very low maintenance and easy to use.
I will review Dura Ace Di2 later, but first impressions are really good. I can definitely see how it will be very helpful in hilly timetrials. It’s just so easy to change gears!

Reasonably aero front mech. It’s a real surprise to feel how easy it is to change between chainrings. Just changing gears gives joy with Di2.

Non-invasive gear change Buttons.
Brake levers have wonderful ergonomics.
The brakes are incredibly powerful, though I have to change the brake blocks for carbon rims – so braking power will be affected.

- Best time trial bike
External links
- Trek bikes at Evans Cycles
- Time trial bikes at Evans Cycles
9 thoughts on “Trek Speed Concept 9 Review”
What are the brakes like with wide wheels?
I have a boardman air TT, and fitting 808 firecrests was very fiddly. I had to shave the brake blocks down and widen the brakes to their maximum. It has put me off buying a bike with integrated brakes.
Oli, Very easy to make brakes wider for wide wheels like Zipp 808. I too was nervous about that when I saw bike, but it seems easy to adjust that aspect.
Love the green although can’t help feel your disappointment as I read through, gears aside. Hopefully your first proper ride enamours you a little more. The draft box is interesting, does this mean my huge saddle bag has actually been making my bike drag free all of these years?!
- Pingback: Devil's Chimney and Bushcombe lane |Cycling uphill
I just love that Green. If looks could make it go faster then you have a winner.
- Pingback: 25 mile time trial |Cycling uphill
- Pingback: Benefits of cycling to work |Cycling uphill
- Pingback: Delayed muscle fatigue -
Just got SC9 as well ,awesome bike, I could not help to notice, your junction box is not installed properly. Cables should not be routed via “grove in stem but from the top, this way you will never pinch them and setup looks much cleaner.
Leave a Comment Cancel reply
Your Recent Searches
No recent searches are available.
Page Suggestions
Search Suggestions
Product Suggestions
Trending Products
- Create Account
Trek Speed Concept Di2 Internal Battery Mount

Video is unable to play due to Privacy Settings.
Adjust your Cookie Preferences to Opt-in "YES" to "Functional Cookies".
We're sorry, but unfortunately, we're unable to ship this item to your country
To be used with the Trek Speed Concept 9 2014 Seatpost, the Trek Speed Concept Di2 Internal Battery Mount is a seamless, neat and affordable means of carrying your Di2 internal battery.
The mount slots securely in the seatpost, preventing the battery from rattling about or becoming dislodged. Easy to fit and designed specifically for the Speed Concept so works perfectly with the seatpost's shape.
To be used with the Trek Speed Concept 9 2014 Seatpost, the Trek Speed Concept Di2 Internal Battery Mount is a seamless, neat and affordable means of carrying your Di2 internal battery. The mount slots securely in to the seatpost, preventing the battery from rattling about or becoming dislodged. Easy to fit and designed specifically for the Speed Concept so works perfectly with the seatpost's shape.
- Securely holds a Di2 internal battery
- Compatible with Trek Speed Concept 9 2014 Seatpost
- Keeps battery in the most aerodynamic position
- Minimum tools required for installation
Unable to display Reviews due to Privacy Settings.
Unable to display q&a due to privacy settings..
Join Our Community
It looks like you've already got an account!
Sign in now for faster checkout. We'll also make sure this order counts towards your Loyalty Scheme discount.
This Account Is Locked
Oh, dear. You tried too many passwords and now your account has been locked for the next 30 minutes .
Not sure of your password? Reset using the link below.
Reset Password Link Sent
We've sent you an email to reset your password.
To create your new password, click the link in the email and enter a new one. Didn't receive the email? Check your junk email.
Forgotten Your Password?
Please enter your registered email address below and we'll send you an email explaining the next step.
- Email Address
Select Your Delivery Location
Select a store
Select the store you visit most frequently below and their stock information will show on product pages.
Enter your Password
Red Square & Moscow City Tour
- Page active

Description
Highlights:.
- Experience medieval Kitay Gorod (China town).
- Wander picturesque Red Square and Alexander Garden.
- Explore grand Christ the Savior Cathedral on our Red Square tour.
- Breathtaking panoramic views from Patriarch bridge.
- Enjoy a hearty lunch on the large open verandah and marvel at the stunning views of the Kremlin.
- Learn about Russian culture from the local through relaxed cultural discussions.
Tour Itinerary:
Red square:.
Russia and Moscow are synonymous with Red Square and the Kremlin and that's hardly surprising as you'll find these places absolutely stunning!
- - Walk-through the Resurrection Gate and don’t forget to flip a coin so you’ll be sure to come back one day!
- - Visit the world's famous Kazan Cathedral .
- - See the State Department Store (GUM), once the Upper Trading Stalls, which were built over a century ago and still operating!
- - Admire the lovely St. Basil's Cathedral! The French diplomat Marquis de Custine commented that it combined "the scales of a golden fish, the enamelled skin of a serpent, the changeful hues of the lizard, the glossy rose and azure of the pigeon's neck" and wondered at "the men who go to worship God in this box of confectionery work".
- - Walk by Lobnoye Mesto (literally meaning "Execution Place", or "Place of Skulls"), once Ivan the Terrible's stage for religious ceremonies, speeches, and important events.
- - Entering the Alexander Garden , you’ll take in spectacular views of Russian architecture from ancient to Soviet times, as well as the Tomb of the Unknown Soldier with an eternal flame. Watch Changing of the Guard Ceremony every hour in summer and every half an hour in winter.
Kitai-gorod:
Stroll along medieval Kitai-gorod with its strong ancient Russia feel, known for its bohemian lifestyle, markets and arts.
- - Nikolskaya Street. Here you will find the Russia's first publishing house, the second oldest monastery, and Ferryn Pharmacy, known as the number one pharmacy back in Soviet times and famous for its Empire-style architecture.
- - Ilinka Street. The financial street of the Kitaigorod (China Town) district, where you’ll find the Gostiny Dvor (Merchant’s Yard), which is now a showroom for Ferraris and Maseratis. The street was designed in the 1790s by Catherine the Great.
- - Varvarka street. The oldest street in Moscow, which dates back to the 14th century, and still has remnants of early Muscovite architecture, such as the Old English Court and the Palace of the Romanov’s.
- - Kamergersky Lane. Only a small road of about 250 meters, it is home to some of the oldest artifacts of the city, as each building holds a fascinating story. Some of Russia's most famous writers, poets, and composers from as far back as the Golden Age of Russian culture, have lived or worked on this lane.
Historic City Center
Walk the historical old center of Moscow with its cool local vibe, including the main Tverskaya street , and indulge in desserts in the first grocery “Eliseev's store” , housed in an 18th century neoclassical building, famous for its baroque interior and decoration.
From our tour. Impressions of our American tourist:
At 3:30, as energy flagged, lunch was on the agenda at a Ukrainian restaurant. Just in time! We asked our guide to order for us. We all had the same thing....borscht (the Ukrainian version has beans and more tomatoes than the Russian version, which has more beets and includes beef).
The special high bread served is called galushki. Our main course was golubtsy...a dish of minced meat rolled in braised cabbage leaves. Both dishes called for optional sour cream as a topping....of course, yes, please....I recommend it.
Full, satisfied, and completely refreshed, it was off to Red Square and St. Basil's and GUM department store. Red Square is not so named because of the color of the brick walls of the Kremlin. Rather the word for 'red' and the word for 'beautiful' are similar in pronunciation....and, there you have it.
As we made the turn by the National Museum in front of which is the mounted sculpture of the "Marshall of Victory," Giorgy Zhukov from WWII and caught our first view of St. Basil's, my friend and I simultaneously emitted "Oooohhhhh!" There it was....the iconic onion domes of St. Basil's! Hooray....it was open until 7....we had about 30 minutes and were allowed in, AND we could take photos with no flash.
Now, I can give you a taste of what we saw in the other cathedrals in Cathedral Square. What we learned is that St. Vasily and St. Basil are one in the same....Russian/English. He was a common man who wandered Moscow unclothed and barefoot. But, all, even Ivan the Terrible, heeded his opinions derived from his visions. Ivan had this cathedral built over his tomb.
As we exited and took photos up close of the onion domes, Inna presented us with chocolate (how did she know we were ready for another energy boost, and we each got a big piece of chocolate. The baby's name pictured on the wrapper of this famous Russian chocolate is Alyonka....the Russian Gerber baby, don't you think?
One could wear out the credit card in GUM's (capitalized because it is actually a government abbreviation), but the 'kitty' and my credit card stayed in my pocket as we strolled through the glass-topped arcade.
We then strolled through some of Moscow's lovely pedestrian streets; paused to listen as a wonderful quartet performed Vivaldi's "Four Seasons" in an underground passage to cross the busy street (hooray!....we DID have our 'classical concert' experience after all; a request Alina tried in vain to fill because none was scheduled those days), saw the Bolshoi, which means 'big' (my friend has yet to recover that their performance schedule did not coincide with our cruise), saw the Central Telegraph Building, dating from the 1930's, and made our way to the Ritz-Carlton to see the night view of Moscow from the rooftop bar, called O2.
There were fleece blankets to wrap yourself in....yes, it got that cold when the sun set. We each ordered something hot to drink...the ginger, mint, lemon tea served to me in a parfait glass (for 600 rubles...about $9....you pay for the view here!) was delightful and hit the spot perfectly. It was time to call it a night....
What you get:
- + A friend in Moscow.
- + Private & customized Moscow tour.
- + An exciting city tour, not just boring history lessons.
- + An authentic experience of local life.
- + Flexibility during the tour: changes can be made at any time to suit individual preferences.
- + Amazing deals for breakfast, lunch, and dinner in the very best cafes & restaurants. Discounts on weekdays (Mon-Fri).
- + A photo session amongst spectacular Moscow scenery that can be treasured for a lifetime.
- + Good value for souvenirs, taxis, and hotels.
- + Expert advice on what to do, where to go, and how to make the most of your time.
*This Moscow city tour can be modified to meet your requirements.
Write your review
- Search Search for:
- Architecture
- Military Tech
- DIY Projects
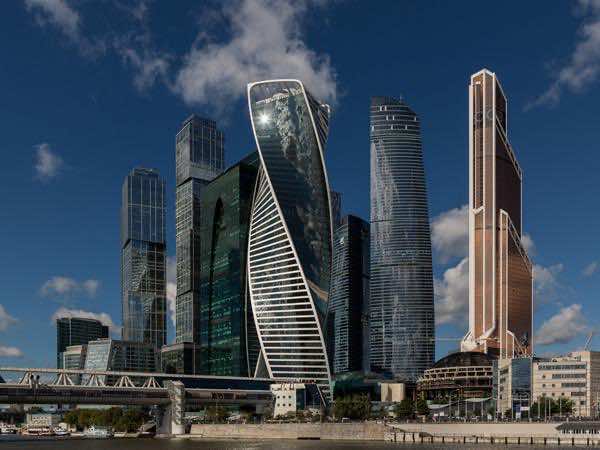
Meet Moscow’s Take On The Twisting Tower: Evolution Tower
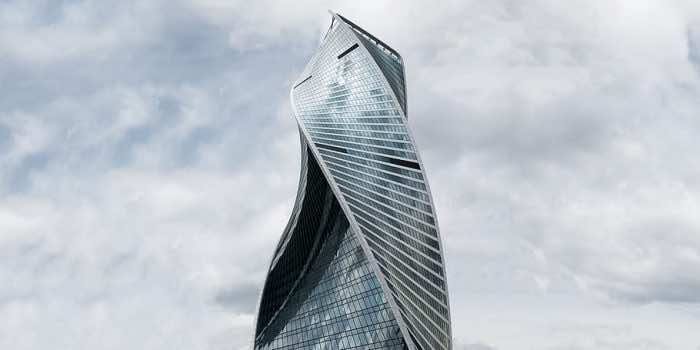
Evolution Tower is a twisting 255 meter tall skyscraper located in ‘Moscow City’, Moscow, an initiative by the Russian government to create a new business district on an old industrial site. The twisting tower provides approximately 85,000 m² of retail and leisure facilities and 85,000 m² of offices and public functions. It is the twelfth tallest building in Russia and the 20 th tallest in Europe.
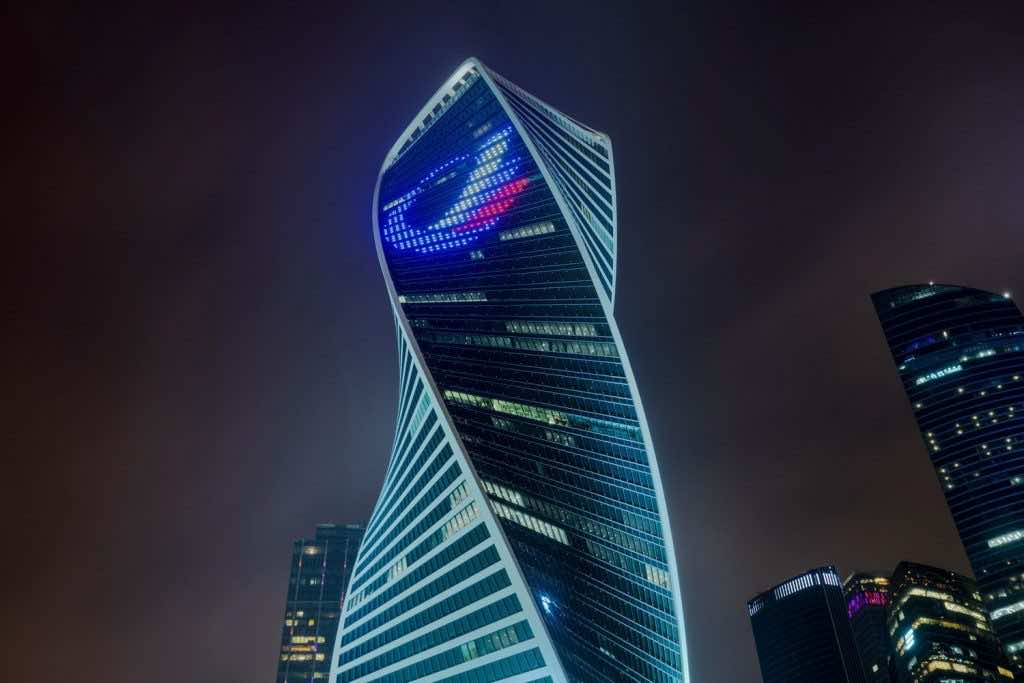
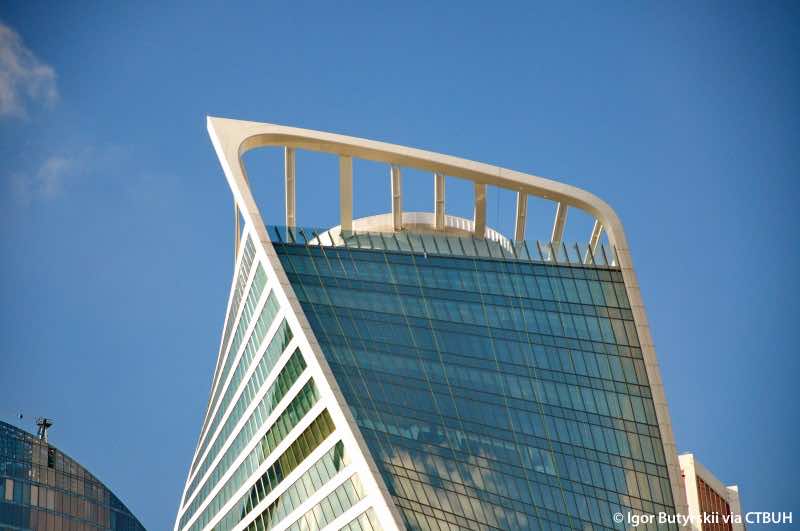
The dramatic form of the tower was designed by architects RMJM in collaboration with Scottish artist Karen Forbes. The double helix DNA inspired form has become an iconic landmark in the Moscow skyline, as the city has never been known for its skyscrapers or architectural identity. The form is also reminiscent of two ribbons wrapping around each other. Each of the 51 floors of the tower is rotated 3 degrees relative to the previous one, so the building is “swirled” by more than 150 degrees. In this way, the central core and eight columns with 15-meter spans between the axes remain strictly vertical all the way up. The spiral geometry is repeated only by four corners of the building. The top of the tower is crowned with two asymmetric “arches” spanning 41 m, visually uniting the two opposite facades.
The facade of the tower boasts a near complete covering of LED lights, this media façade is the largest in all of Asia. The scale and the form of the building made the installation and management of the LED system quite a challenge, thus the building also boasts one of the most sophisticated lighting management and control systems on the planet.
The plot covers an area of 2.55 hectares, of which most are landscaped into a terrace while the rest is used for the tower. The tower and the terrace are built on a three-level stylobate designated the Evolution Gallery with an area of 28,000 square metres (300,000 sq ft). There are exits from the tower that lead directly to the nearby metro station. This podium features a shopping mall and the roof is landscaped to provide additional space for users to unwind in the midst of fountains, terraces and cafes, thus providing a strong connection with the larger urban sphere.
Leave a Reply Cancel reply
Your email address will not be published. Required fields are marked *
Notify me of follow-up comments by email.
Notify me of new posts by email.

- Running Footwear
- Cycling Footwear
- Electronics
- Things that Roll
- Running Stores
- Fitter's Database
- Triathlon Clubs
- Race Calendar
- Map of Everything
- Your Local Listings
- General Training
- General Physiology
- Equipment and tools
- Geometry & Handling
- Choosing via Stack/Reach
- Road Bike Fit
- F.I.S.T. Workshops
- F.I.S.T. Tri Bike System
- STEM Calculator
- Bar to HT Calculator
- TRI Geometry Calculator
- Stack/Reach Database
- Fitter's Forum
- Official BMC Time Machine Owners Thread
- New BMC Tri/TT bike photo
- Official FIT ASSISTANCE for Canyon Speedmax CFR, SLX, and CF
- Official Canyon Speedmax CF Owners Thread
- Official FIT ASSISTANCE for Cervelo TT and Triathlon Bikes
- Diamondback Serios **OFFICIAL THREAD**
- Secondhand Dimond
- Dimond has some A2 data!
- The New Felt IA - IA 10, 14, 16
- Battle of the frames: Felt IA 10 vs IA 1?
- The official Fuji Norcom Straight thread
- Official Giant Trinity Advanced Owners Thread
- New Giant Trinity Advanced Hydration and Bento
- Arm Pad Spacing on Giant Trinity 2016
- 2016 Giant Trinity Advanced Pro Cable Issues
- Premier Tactical
- Official Specialized Shiv Thread
- Official Speed Concept Owners Thread
- TRIRIG OMNI IS HERE!!!
- Official Ventum Owners Thread
- Official 12th Annual 2018/19 Slowtwitch 100/100 Run Challenge Thread
- 2018/19 100 Runs in 100 Days Airing of the Grievances Thread
- 100 Runs 100 Days 2017-2018 Challenge Thread: Dec 15-Mar 23
- Tower 26 or Lessons?
- Ok Fishes, here is the interview we were all waiting for!!
- Offseason Pool Workout Distance
- November Swim Challenge
- January fish thread
- It's October - go swim (monthly fish thread)
- Good 500 Time?
- For the Fish: Ankle Flexibility and Kick Free vs Back
- December fish thread
- Can you make this set?
- August Fish thread
- 10k swim training
- what is Afib, really?
- Need a Doctor in the LA/SD area who specializes in Endurance Athletes...
- Atrial fibrillation as a athlete.
- Atrial Fibrillation ablation � recovery
- Atrial Fibrillation - post ablation
- Coronary Calcium Score (update)
- Platelet-Rich Plasma injections (PRP Injections)
- High Hamstring Tendinopathy Rehab Protocol
- Hamstring tendonosis
- Labral tear in hip
- Hip labrum tear surgery in TX
- Hip Labrum Repair - How long did yours last?
- Any Canadians with/had a hip labral tear here?
- Preventing Iliac Artery Endofibrosis - Cycling Overuse Injuries
- Illiac Artery Endofibrosis - I've got it.
- Sports Hernia/Inguinal Disruption Surgery
- Inguinal hernia repair for 57 yo Ironman
- inguinal hernia
- IM with hernia
- inguinal hernia and recovery
- hernia repair
- Slowtwitch approved IT Band rehab? Is swimming safe?
- Not recovering IT Band Friction Syndrome!!
- Glute tightness and IT band issues
- 1 year anniversary of IT band syndrome!
- Runners, calf strain?
- Mad Calf Disease
- How long to recover from a calf heart attack
- Help with calf issues!
- Calf muscle pull or tear? Experience?....
- Calf Issues
- Aging, calf injuries, and running speed
- Statins: experience training and racing on them
- Proximal right femur stress fracture
- Lucy Charles Hip Stress Fracture
- Biking during stress fracture?
- Swimming-Related Injuries: A literature review and injury risk screening
- Official power2max support thread
- Tacx Neo - Ask me anything
- New Tacx Neo Smart vs Wahoo Kickr trainers
- Elite Direto Owners Thread
- Official TrainingPeaks Thread
- New Zipp 858 NSW and 808
- Tubeless wheel and tire SUPER THREAD
- school me on finding correct pressures with tubeless
- go tubeless they said… it will be fun they said.
Triathlon Forum
Login required to started new threads
Login required to post replies
Our Partners
- Privacy Policy
- User Agreement
transition-DOT-area-AT-slowtwitch-DOT-com
©1999-2024 Slowtwitch, Inc., and Slowtwitch.com Reproduction of material from any Slowtwitch.com page without written permission is strictly prohibited.
- Trek Madone 9 Series Control Center Di2 Junction Box
We'll take care of you. Period.
It's our mission to provide you with world-class hospitality every time you visit us online or in-store. We're always here to help you. It's the Trek way.
30 Day Unconditional Guarantee
Ride it and love it, or we'll take it back. If for any reason you're not 100% happy with your trekbikes.com purchase, you can send it back within 30 days for a refund or exchange - no questions asked.
Free shipping on all orders over $49
Simple, free delivery options for however you prefer to shop. Orders over $49 ship to your home for free, and all orders ship free to your local retailer for in-store pickup
More options
IMAGES
VIDEO
COMMENTS
Re: Trek Speed Concept di2/etap junction box position question. [Ksavostin] [ In reply to ] The stem cover comes with little cutouts on the inside that are made to drill out for DI2. If I were you I would do what you have in your first picture, but route the cables through small holes drilled into the stem cover.
Checking your Di2 battery status is easy on E-bikes or Urban bikes, you simply look at the display. This usually applies to Di2 mountain bikes as well - most of them have a display. On road/gravel bikes there is no display, so you need to use a different method. If your bike is an 11-speed or 10-speed road bike, and you have the EW-WU111/101 ...
Product details. Stainless steel construction, black oxide finish. Shimano Di2 compatible only. Compatible with standard round 1-1/8" steerer tubes. Bendable for precise fit. 0.9mm thickness, 6.6g weight. Does not include Shimano Di2 junction box. Made in USA.
Fastest ever. Speed Concept is a triathlon bike engineered to be fastest in its class. But it's not all aerodynamics and ultra-light carbon. It's also seamlessly designed hydration and fueling systems that boost your energy post-swim, keep you strong as you cycle, and set you up for your best run ever. We put our best into this bike, and ...
Bontrager Speed Concept Speed Box II. Be the first to write a review! Model 436152. Retailer prices may vary. Shaped in the wind tunnel, this box holds ride essentials while also reducing drag. Compare. Color / Black. Select a color. Cargo Capacity.
2019 Trek. Speed Concept. A carbon frame triathlon bike with ultra high-end components and rim brakes. ... BB90, Speed Fin compatible, DuoTrap compatible, SC Draft Box 2 & SC Speed Box compatible ... SC full foil carbon, integrated brake & stem. Bottom Bracket: BB90. Headset: Integrated, sealed bearings. Stem: Bontrager Speed Concept, direct ...
Trek Speed Concept 2.5 review - BikeRadar
Tested: Trek Speed Concept 7.5 Triathlon Bike. ... 600 Series OCLV Carbon, KVF (Kammtail Virtual Foil) tube shape, BB90 w/Speed Fin, DuoTrap compatible, Speed Box II compatible, includes Draft Box II. ... Shimano Dura-Ace Di2, bar end control, 11 speed. Cassette: Shimano Dura-Ace, 11-25, 11 speed ...
Anyway it looks nice. Which is the most important thing in a new bike. Trek Speed Concept 9. 600 Series OCLV Carbon, KVF (Kammtail Virtual Foil) tube shape, Carbon Fork. Weight: frameset, cockpit setup, headset, BB and small frame parts come out to 1,874g. Total bike weight (with Bontrager R5 training wheels and tyres) 8.1 kg.
Speed Concept. Model 554987. Retailer prices may vary. Speed Concept is a lot of things, but above all, it's fast. It's our most aerodynamic bike, which makes it an ideal triathlon bike and a great choice for TT enthusiasts who know every second matters. Plus, it's an exceptional value: adjustability, integration, customization options, aero ...
Speed Concept Di2 Internal Battery Mount. £4.49. RRP £5.00 Save 10%. In stock at our suppliers warehouse, estimated dispatch Monday, 15th April. Add to Basket. To be used with the Trek Speed Concept 9 2014 Seatpost, the Trek Speed Concept Di2 Internal Battery Mount is a seamless, neat and affordable means of carrying your Di2 internal battery.
According to The Skyscraper Center, Evolution Tower is the 360th tallest building in the world, the 15th tallest in Europe. 9th tallest in Russia as well as Moscow city. This impressive building ...
K-EDGE Di2 Junction Box Mount. Be the first to write a review! $22.99. Model 5255760. Retailer prices may vary. An elegant mounting solution for Shimano Di2 junction boxes. Compare. Color / Black. Select a color.
Highlights: Experience medieval Kitay Gorod (China town). Wander picturesque Red Square and Alexander Garden. Explore grand Christ the Savior Cathedral on our Red Square tour. Breathtaking panoramic views from Patriarch bridge. Enjoy a hearty lunch on the large open verandah and marvel at the stunning views of the Kremlin.
Evolution Tower is a twisting 255 meter tall skyscraper located in 'Moscow City', Moscow, an initiative by the Russian government to create a new business district on an old industrial site. The twisting tower provides approximately 85,000 m² of retail and leisure facilities and 85,000 m² of offices and public functions.
I am thinking to upgrade my trek speed concept 2019 with di2 ultegra groupset, but i can not find specific information about the special mount to install battery inside of the seatpost.
This bespoke self-climbing formwork system achieved an impressive maximum framing speed of six days per fl oor, with an average speed of seven days per fl oor. The 12 concrete columns and central core are supported by the 3.5-meter-thick raft over piled foundations. It took 48 hours to pour 8,000 cubic meters of concrete for the raft.
Trek Speed Concept Di2 Battery Holder Assembly. Be the first to write a review! $8.99. Model 5294345. Retailer prices may vary. Integrates seamlessly into frame. Compare. Color / Black. Select a color.
Trek Madone 9 Series Control Center Di2 Junction Box. 1 Reviews / Write a Review. $39.99. Model 567609. Retailer prices may vary. For proper assembly. Compare. Color / Dnister Black. Select a color.