Car Insurance
Home & renters insurance, car repair estimates, read car content, jerry data & research, what is dynamic radar cruise control and how does it work, what is toyota dynamic radar cruise control, how does dynamic radar cruise control work, when to use dynamic radar cruise control, make safe driving pay.

- Weather: Your family is piled into the Toyota Sienna heading down to Grandma’s for Christmas. But a snowstorm hits and ice builds up on your minivan, blocking the DRCC receptors.
- Dirt: You just took your Toyota Highlander on the camping trip of a lifetime. But you'll need a major car wash to remove all the dirt smeared on the DRCC receptors—and the rest of the SUV, for that matter.
- Bugs: After a coast-to-coast road trip in your Toyota Camry , it looks like a million bugs are caked onto the front end. But it only takes a few to block the DRCC receptors.

Are you overpaying for your car insurance?
"My policy of 2.5 years lapsed, and I needed to look for something cheaper. Jerry found me a better policy with Progressive in 30 minutes––and I didn’t have to talk to anyone on the phone. Amazing!” —Jacques S.

What Does the Cruise Button Do in a Car?

Does GMC Have a Self-Driving Car?

What Does the Chevrolet Traverse Traction Control Light Mean?
Read advice from car experts at jerry.

Buick Enclave Gas Tank Size

What to Do If You Have a New Hampshire Speeding Ticket

Kia Forte EX V6

Browse Questions from Car Experts
Where is the 2020 ram 1500’s obd port location.

Does driving without a license violate probation?

What happens when you damage a rental car?

Browse More Content
Insurance resources.
- Is Jerry Legitimate?
- Types of Car Insurance
- Car Loan Payment Fluctuations
- Buying a Car With No Credit
- How to Lower Insurance Premiums
- Bad Insurance Decisions
- Why is Car Insurance so Expensive?
- Buying a Used Car
- Adding a Name to a Car Title
- Removing a Name From a Car Title
Insurance for Your Car
- Infiniti Q50 Insurance Cost
- Chevrolet Cobalt Insurance Cost
- Lincoln Corsair Insurance Cost
- Hyundai Sonata Insurance Cost
Insurance in Your State
Insurance in your city.
- Ville Platte LA Insurance
- Pelzer SC Insurance
- Charleston SC Insurance
- Lakeville MN Insurance
- Sweeny TX Insurance
Easiest way to compare and buy car insurance
Car insurance by make, car insurance by model, car insurance by state, car insurance by city, car loan by make, car insurance by company, car loan by state, car repair by service.


Ammaar's Toyota Vacaville
Official blog.

How the Toyota Dynamic Radar Cruise Control System Works
Toyota infuses its vehicles with a high level of safety. This includes the Toyota Safety Sense suite of safety-enhancing driver assistance technologies. One of the features in Toyota Safety Sense is Dynamic Radar Cruise Control, which utilizes radar sensors to help you keep a set speed and distance between your Toyota vehicle and the car in front of you. Watch this video to learn how it works.
View Our Toyota Inventory
More from Toyota Vacaville
What are the infotainment and safety features of the 2024 toyota sienna, how is the tech in the all-new 2023 toyota corolla cross, how the toyota safety sense pre-collision system works, how the toyota lane tracing assist system works.

- Toyota Manuals
- Land Cruiser Prado
- Owner's manual
Toyota Land Cruiser Prado Owner's Manual
- Owner's manual (862 pages)
- Owner's manual (160 pages)
- Owner's manual (348 pages)
- page of 663 Go / 663
Table of Contents
- Instrument Panel
- Accessories, Spare Parts and Modification of Your Toyota
- For Your Information
- Installation of a Mobile Two-Way Radio System
- Vehicle Data Recordings
- Disclosure of the EDR Data
- Event Data Recorder
- Scrapping of Your Toyota
- Cautions & Notices
1 Before Driving
1-1. key information.
- Key Number Plate
- Using the Mechanical Key
- When Riding in an Aircraft
- Smart Entry & Start System
1-2. Opening, Closing and Locking the Doors
- Unlocking and Locking the Doors (Front Door Handles Only)
- Unlocking and Locking the Back Door
- Antenna Location and Effective Range
- Opening the Glass Hatch
- Effective Range
- Alarms and Warning Indicators
- Operation Signals
- Security Feature
- Switching the Door Unlock Function
- Battery-Saving Function
- Conditions Affecting Operation
- Note for the Entry Function
- Note for Locking the Doors
- Note for the Unlocking Function
- When the Vehicle Is Not Driven for Extended Periods
- Electronic Key Battery Depletion
- If the Smart Entry & Start System Does Not Operate Properly
- To Operate the System Properly
- Vehicles with a Smart Entry & Start System
- Door Lock Buzzer
- Key Battery Depletion
- Door Lock Switch
- Inside Lock Button
- Locking the Driver’s Door from the Outside Without a Key
- Rear Door Child-Protector Lock
- Locking and Unlocking the Back Door
- Opening the Back Door from Outside the Vehicle
- Back Door Child-Protector Lock (5-Door Models)
- Rear Step Bumper
- Glass Hatch Opener
- After Closing the Glass Hatch
- Opening the Glass Hatch While Rear Window Wiper Is in Operation
- When Opening the Glass Hatch
- Manual Seat
Adjustable Components (Seats, Mirrors, Steering Wheel) Front Seats
- Active Head Restraints
- After Passengers Have Entered/Exited the Vehicle
- Getting in the Vehicle
- Getting out of the Vehicle
- Moving a Front Passenger’s Seat for Second Seat Access
- Second Seats (3-Door Models)
- Second Seats (5-Door Models with Third Seats)
- Second Seats (5-Door Models Without Third Seats)
- Third Seats (Manual Seat)
- Third Seats (Power Seat)
- Getting in the Vehicle (Left Side Only)
- Moving a Second Seat for Third Seat Access
- Before Tumbling the Second Seats
- Tumbling the Second Seats (3-Door Models)
- Returning the Second Seats
- Tumbling the Second Seats
- Before Folding down the Second Seatbacks
- Folding down Second Seatbacks
- Folding down the Second Seatbacks
- Folding down Second Center Seatback Only (5-Door Models)
- If You Cannot Raise the Second Seatback
- Before Folding down the Third Seats
- Folding down the Third Seats (Manual Seat)
- From Back Door Side
- From Rear Door Side
- Folding down the Third Seats (Power Seat)
- Returning the Third Seats
- During Third Power Seat Stowing Operation
- If the Warning Buzzer Sounds Continuously
- Driving Position Memory (Driver’s Seat)
- Entering a Position to Memory
- Recalling the Memorized Position
- Linking Driving Position Memory with Door Unlock Operation
- Canceling the Linked Door Unlock Operation
- Operating Driving Position Memory after Turning Engine off
- Stopping Seat Position Operation Part-Way through
- Front, Second and Third Manual Seats
- Third Power Seats
- Adjusting the Height of the Head Restraints
- Removing the Head Restraints (Front, Second and Third Manual Seats)
- Using the Second Center, Second Outer
- Installing the Head Restraints
- Using the Third Power Seats
- Correct Use of the Seat Belts
- Fastening and Releasing the Seat Belt
- Adjusting the Seat Belt Shoulder Anchor Height
- Seat Belt Pretensioners (Front Seats)
- Automatic Locking Retractor (ALR)
- Emergency Locking Retractor (ELR)
- Pre-Crash Seat Belts
- Child Seat Belt Usage
- People Suffering Illness
- Pregnant Women
- Replacing the Belt after the Pretensioner Has Been Activated
- Manual Adjustment
- Power Adjustment
- Auto Tilt Away (Power Adjustment Type)
- Automatic Adjustment of the Steering Position
- The Power Adjustment Type Steering Wheel Can be Adjusted When
- Auto Anti-Glare Inside Rear View Mirror
- Manual Anti-Glare Inside Rear View Mirror
- Adjusting the Height of Rear View Mirror
- To Prevent Sensor Error
- Folding the Mirrors
- Manual Type
- Power Windows
- Window Lock Switch
1-4. Opening and Closing the Windows and Moon Roof
- Jam Protection Function
- Operating the Power Windows after Turning the Engine off
- The Power Windows Can be Operated When
- When the Power Window Does Not Close Normally
- Door Lock Linked Window Operation
- Tilting up and down
- Door Lock Linked Moon Roof Operation
- Moon Roof Open Reminder Function
- Operating the Moon Roof after Turning the Engine off
- When the Moon Roof Does Not Close Normally
- Before Refueling the Vehicle
Refueling Opening the Fuel Tank Cap
- Closing the Fuel Tank Cap
- Fuel Tank Capacity
- Use of Ethanol Blended Gasoline in a Gasoline Engine
- Conditions that May Cause the System to Malfunction
- System Maintenance
Theft Deterrent System Engine Immobilizer System
- Deactivating or Stopping the Alarm
- Setting the Alarm System
- Triggering of the Alarm
- Items to Check before Locking the Vehicle
- Alarm-Operated Door Lock
- Correct Driving Posture
1-7. Safety Information
- SRS Front Airbags
- SRS Side and Curtain Shield Airbags
- Airbag System Components
- If the SRS Airbags Deploy (Inflate)
- SRS Airbag Deployment Conditions (SRS Front Airbags)
- Types of Collisions that May Not Deploy the SRS Airbags
- When to Contact Your Toyota Dealer
- Types of Child Restraints
- Baby Seat (Infant Seat)
- Child Seat (Convertible Seat)
- Junior Seat (Booster Seat)
- Child Restraint System Suitability for Various Seating Positions
- Removing a Child Restraint Installed with a Seat Belt
- Installation with ISOFIX Rigid Anchors (ISOFIX Child Restraint System)
- Child Restraint Systems with a Top Strap
- When Installing a Child Restraint System in the Seat with ELR Belt
2 When Driving
Driving procedures driving the vehicle.
- Parking the Vehicle
- Driving in the Rain
- Engine Speed While Driving
- Starting off on a Steep Uphill
- Breaking in Your New Toyota
- Drum-In-Disc Type Parking Brake System
- Idling Time before Stopping the Engine (Diesel Engine)
- Eco-Friendly Driving (Vehicles with an Automatic Transmission)
- Operating Your Vehicle in a Foreign Country
- Starting the Engine
- Changing the Engine Switch Positions
- If the Engine Does Not Start
- Key Reminder Function
- Turning the Key from “ACC” to “LOCK”
- When the Steering Lock Cannot be Released
- Stopping the Engine
- Changing “ENGINE START STOP” Switch Modes
- Auto Power off Function
- Vehicles with a Manual Transmission
- Vehicles with an Automatic Transmission
- Operation of the “ENGINE START STOP” Switch
- Steering Lock
- Steering Lock Motor Overheating Prevention
- Shifting the Shift Lever
- Non-Optitron Type Meters
- Selecting the Second Start Mode
- Shift Position Purpose
- Optitron Type Meters
- Changing Shift Ranges in S Mode
- Shift Ranges and Their Functions
- Downshift Restriction Warning Buzzer (S Mode)
- Driving on a Downhill
- Second Start Mode Automatic Deactivation
- Maximum Downshifting Speeds
- If the Indicator Flashes Faster than Usual
- Turn Signal Lever
- Turn Signals Can be Operated When
- Usage in Winter Time
- After Adjusting the Steering Wheel
Instrument Cluster Gauges and Meters
- Changing the Display
- Instrument Cluster Light Control
- The Brightness of the Instrument Cluster Lights
- The Meters and Display Illuminate When
- When Disconnecting and Reconnecting Battery Terminals
- Instrument Cluster (Non-Optitron Type Meters)
- Instrument Cluster (Optitron Type Meters)
- Center Panel
- Warning Lights
- Display Items
- Switching the Display
- Trip Meters a and B
- Average Vehicle Speed
- Current Fuel Consumption
- Eco Driving Indicator Light Setting Screen
- Eco Driving Indicator Zone Display
- Eco Driving Indicator
- Trip Information Contents
- Average Fuel Consumption
- Average Fuel Consumption after Refueling
- Driving Range
- Electronic Features Control Contents
- Other Contents
- Conditions for Ending Electronic Features Control
- Electronic Features Control Can be Turned On/Off When
- System Check Display
- Outside Temperature Display
- When “--” or “E” Is Displayed
- Elapsed Time
- Setting the Brightness
- Setting the Contrast
- Setting up the Information Display
- Setting the Day Mode
- Setting up the Display of the Monitors
- Liquid Crystal Display
- Headlight Switch
2-3. Operating the Lights and Wipers
- Manual Headlight Leveling Dial
- Turning on the High Beam Headlights
- Guide to Dial Settings
- AFS (Adaptive Front-Lighting System)
- Deactivating AFS
- Automatic Light off System
- Headlight Control Sensor
- Automatic Headlight Leveling System
- If the “AFS OFF” Indicator Flashes
- Fog Lights Can be Used When
- Intermittent Windshield Wipers with Interval Adjuster
- Rain-Sensing Windshield Wipers
- Effects of Vehicle Speed on Wiper Operation
- If no Windshield Washer Fluid Sprays
- Raindrop Sensor (Vehicles with Rain-Sensing Windshield Wipers)
- Rear Window Wiper and Washer
- If no Washer Fluid Sprays
- The Headlight Cleaners Can be Operated When
- Windshield Washer Linked Operation
- Cruise Control
- Setting the Vehicle Speed
Advertisement
Quick Links
Related manuals for toyota land cruiser prado.

Summary of Contents for Toyota Land Cruiser Prado
- Page 2 TABLE OF CONTENTS Adjusting and operating features such as door locks, Before driving mirrors, and steering column. When driving Driving, stopping and safe-driving information. Air conditioning and audio systems, as well as other in- Interior features terior features for a comfortable driving experience. Maintenance and Cleaning and protecting your vehicle, performing do-it- care...
Page 3: Table Of Contents
Page 4: table of contents, page 5: table of contents, page 6: table of contents, page 7: table of contents.
- Page 9 Pictorial index Exterior ∗ Moon roof P. 108 Outside rear view mirrors P. 102 Windshield wipers P. 233 Side turn signal lights Hood P. 472 P. 195 Front position lights P. 226 Front turn signal lights P. 195 Headlights (low beam) P.
- Page 10 Vehicles with back door mounted spare tire ∗ Roof luggage carrier P. 294 Rear window defogger P. 337 ∗ Glass hatch P. 59 License plate lights Spare tire P. 573 P. 226 Stop/tail lights P. 226 Side doors P. 50 Rear window wiper P.
- Page 11 Pictorial index Interior ∗ Console box P. 418 ∗ SRS driver airbag P. 123 Cool box P. 428 Head restraints P. 89 Seat belts P. 92 SRS front passenger ∗ airbag P. 123 Cup holders P. 421 Glove box P. 416 ∗...
- Page 12 Anti-glare inside rear view mirror P. 100 Auxiliary box P. 425 Conversation mirror P. 437 Personal/interior lights P. 412 Rear seat entertainment system Personal/interior lights P. 412 Assist grips P. 447 ∗ SRS curtain shield airbags P. 123 ∗ Moon roof switch P.
- Page 13 Pictorial index Interior Window lock switch P. 105 Inside door lock button P. 51 Door lock switch P. 51 ∗ Driving position memory switches P. 85 Power window switches P. 105...
- Page 14 Vehicles with an automatic transmission ∗ AUX port P. 381 Shift lever P. 187 Auxiliary box P. 425 Cup holders P. 421 Shift lock override button P. 594 Parking brake lever P. 196 ∗ Seat heater switches P. 442 Power outlet P.
- Page 15 Pictorial index Instrument panel Windshield wipers and washer switch P. 233 Rear window wiper and washer switch P. 238 Gauge and meters P. 198 Emergency flasher switch P. 532 ∗ Headlight switch P. 226 Accessory meter P. 219 Turn signal lever P.
- Page 16 Engine (ignition) switch (vehicles with a smart entry & start system) P. 179 Outside rear view mirror switches P. 102 Lounge illumination control ∗ switches P. 413 Headlight cleaner ∗ switch P. 240 ∗ Heater idle up switch P. 336 ∗...
- Page 17 ∗* AVS switches “ENTER” ∗ switch VSC OFF P. 212 switch P. 281 Horn P. 197 Toyota parking assist-sensor Cruise control ∗ ∗ switch (4 sensor type) P. 259 switch P. 242, 246 ∗* Height control OFF button Engine (ignition) switch (vehicles without a smart entry &...
- Page 18 Vehicles with a front manual air conditioning system Clock P. 433 Air conditioning system P. 314 Rear window defogger switch P. 337 Vehicles with a front automatic air conditioning system Clock P. 433 Air conditioning system P. 320 Rear window defogger switch P.
- Page 19 Pictorial index Instrument panel Vehicles with an automatic transmission Four-wheel drive control switch ∗* DAC switch ∗* Crawl Control switch ∗* Rear differential lock/unlock switch Center differential lock/unlock switch Vehicles with a manual transmission ∗ Seat heater switches P. 442 Four-wheel drive control switch Center differential lock/unlock switch...
- Page 20 ∗ : If equipped : Refer to the “Off-road Driving Owner’s Manual”.
Page 21: For Your Information
- Page 22 Furthermore, these computers do not record con- versations, sounds or pictures. ● Data usage Toyota may use the data recorded in these computers to diagnose malfunc- tions, conduct research and development, and improve quality. Toyota will not disclose the recorded data to a third party except: •...
- Page 23 ● Disclosure of the EDR data Toyota will not disclose the data recorded in an EDR to a third party except when: • An agreement from the vehicle’s owner (or the leasing company for a leased vehicle) is obtained •...
- Page 24 Be sure to have the systems of the SRS airbag and seat belt pretensioner removed and disposed of by a qualified service shop or by your Toyota dealer before you scrap your vehicle.
- Page 25 This is a warning against something which, if ignored, may cause damage to the vehicle or its equipment. You are informed about what you must or must not do in order to avoid or reduce the risk of damage to your Toyota and its equipment.
- Page 26 Before driving 1-1. Key information 1-4. Opening and closing the windows and moon roof Keys........26 Power windows....105 1-2. Opening, closing and Moon roof......108 locking the doors 1-5. Refueling Smart entry & start system ...... 29 Opening the fuel tank cap........
- Page 27 1-1. Key information Keys The following keys are provided with the vehicle. Vehicles without a smart entry & start system Master keys Operating the wireless remote control function (→P. 29) Valet key Key number plate Vehicles with a smart entry & start system Electronic keys •...
- Page 28 Keep the plate in a safe place such as your wallet, not in the vehicle. In the event that a mechanical key is lost, a new key can be made by your Toyota dealer using the key number plate. (→P. 595) ■...
- Page 29 Take your vehicle with all the electronic keys provided with your vehicle to your Toyota dealer. ■ When a vehicle key is lost If the key remains lost, the risk of vehicle theft increases significantly. Visit your Toyota dealer immediately with all remaining electronic keys that was provided with your vehicle.
Page 30: Locking The Doors Smart Entry & Start System
- Page 31 1-2. Opening, closing and locking the doors Locks and unlocks the back door (→P. 32) Opens glass hatch (vehicles with a glass hatch) (→P. 33)
- Page 32 1-2. Opening, closing and locking the doors Unlocking and locking the doors (front door handles only) Grip the handle to unlock the doors. Make sure to touch the sensor on the back of the handle. The doors cannot be unlocked for 3 seconds after the doors are locked.
- Page 33 1-2. Opening, closing and locking the doors Unlocking and locking the back door Vehicles with back door mounted spare tire Locks the all doors Unlocks the all doors The doors cannot be unlocked for 3 seconds after the doors are locked.
- Page 34 1-2. Opening, closing and locking the doors Opening the glass hatch Press the button to open the glass hatch. The glass hatch will pop up. The glass hatch can be opened only when the back door is closed. Antenna location and effective range ■...
- Page 35 1-2. Opening, closing and locking the doors ■ Effective range (areas within which the electronic key is detected) When locking or unlocking the doors The system can be operated when the electronic key is within about 0.7 m (2.3 ft.) of either of the outside front door handle.
- Page 36 1-2. Opening, closing and locking the doors ■ Operation signals A buzzer sounds and the emergency flashers flash to indicate that the doors have been locked/unlocked. (Locked: once; Unlocked: twice) ■ When the door cannot be locked by the lock sensor on the upper part of the door handle Touch both lock sensors on the upper and lower part of the door handle simulta-...
- Page 37 1-2. Opening, closing and locking the doors Alarm Situation Correction procedure An attempt was made to Retrieve the elec- lock the doors using the tronic key from the entry function while the passenger compart- electronic key was still Interior alarm ment and lock the inside the passenger com- pings once and...
- Page 38 1-2. Opening, closing and locking the doors Alarm Situation Correction procedure When the “ENGINE START STOP” switch is in IGNITION ON or ACCES- Shift the shift lever to Interior alarm SORY mode, an attempt “P” and turn the sounds continu- was made to open the “ENGINE START ously...
- Page 39 1-2. Opening, closing and locking the doors Alarm Situation Correction procedure The driver’s door was closed after the key was Turn the “ENGINE carried outside the vehicle, START STOP” switch and the “ENGINE START OFF and close the STOP” switch was not driver’s door again Interior alarm turned OFF...
- Page 40 1-2. Opening, closing and locking the doors ■ Switching the door unlock function It is possible to set which doors the entry function unlocks. Turn the “ENGINE START STOP” switch OFF. STEP STEP When the indicator on the key surface is turned off, press and hold (if equipped) for approximately 5 seconds while press- on the key.
- Page 41 1-2. Opening, closing and locking the doors ■ Battery-saving function In the following circumstances, the entry function is disabled in order to pre- vent the vehicle battery from discharging and the electronic key battery from depleting. ● When the entry function has not been used for 5 days or more ●...
- Page 42 1-2. Opening, closing and locking the doors ■ Conditions affecting operation The smart entry & start system uses weak radio waves. In the following situ- ations, the communication between the electronic key and the vehicle may be affected, preventing the smart entry & start system, wireless remote con- trol and immobilizer system from operating properly.
- Page 43 1-2. Opening, closing and locking the doors ■ Note for the entry function ● Even when the electronic key is within the effective range (detection areas), the system may not operate properly in the following cases: • The electronic key is too close to the window or outside door handle, near the ground, or in a high place when the doors are locked or unlocked.
- Page 44 1-2. Opening, closing and locking the doors ■ Note for locking the doors ● Touching the door lock sensor while wearing gloves may delay or prevent lock operation. Remove the gloves and touch the lock sensor again. ● When the lock operation is performed using the lock sensor, recognition signals will be shown up to two consecutive times.
- Page 45 1-2. Opening, closing and locking the doors ■ To operate the system properly Make sure to carry the electronic key when operating the system. Do not get the electronic key too close to the vehicle when operating the system from the outside of the vehicle.
- Page 46 (→P. 34) The radio waves may affect the operation of such devices. If necessary, the entry function can be disabled. Ask your Toyota dealer for details, such as the frequency of radio waves and timing of emitting the radio waves.
- Page 47 (press and hold) Unlocks all the doors Opens the windows and moon roof (press and hold) Opens glass hatch (press and hold) glass hatch opened only when the back door is closed. : This setting must be cus- tomized your Toyota dealer.
- Page 48 Opens the windows and moon roof (press and hold) Opens glass hatch (press and hold) (vehicles with a glass hatch) glass hatch opened only when the back door is closed. : This setting must be custom- ized at your Toyota dealer.
- Page 49 1-2. Opening, closing and locking the doors ■ Operation signals Doors: A buzzer sounds and the emergency flashers flash to indicate that the doors have been locked/unlocked. (Locked: Once; Unlocked: Twice) Windows and moon roof: A buzzer sounds to indicate that the windows and moon roof are operating.
- Page 50 1-2. Opening, closing and locking the doors ■ If the wireless remote control does not operate properly Locking and unlocking the doors: Use the mechanical key. (→P. 596) ■ Key battery depletion Vehicles without a smart entry & start system If the wireless remote control function does not operate, the battery may be depleted.
- Page 51 Open the windows and moon roof (turn and hold) : This setting must be cus- tomized your Toyota dealer. Vehicles with a smart entry & start system The doors can also be locked and unlocked with the mechanical key. (→P. 596)
- Page 52 1-2. Opening, closing and locking the doors ■ Door lock switch Unlocks all the doors Locks all the doors ■ Inside lock button Locks the door Unlocks the door The driver’s door can be opened by pulling the inside handle even if the lock button is in the lock position.
- Page 53 1-2. Opening, closing and locking the doors Locking the driver’s door from the outside without a key Move the inside lock button to the lock position. STEP Close the door while pulling the door handle. STEP Vehicles without a smart entry & start system The door cannot be locked if the key is in the engine switch.
- Page 54 1-2. Opening, closing and locking the doors ■ Using the mechanical key (vehicles with a smart entry & start system) The doors can also be locked and unlocked with the mechanical key. (→P. 596) ■ Customization Settings (e.g. unlocking function using a key) can be changed. (Customizable features →P.
- Page 55 1-2. Opening, closing and locking the doors Back door The back door can be locked/unlocked and opened the following procedures. ■ Locking and unlocking the back door Entry function (if equipped) →P. 32 Wireless remote control →P. 46 Door lock switch →P.
- Page 56 1-2. Opening, closing and locking the doors Vehicles without back door mounted spare tire Pull the handle Open the back door The back door can be kept open at a desired position. ■ Keeping the back door open Unlocks the back door stop- Locks the back door stop- The back door stopper can only be operated when the...
- Page 57 1-2. Opening, closing and locking the doors Rear step bumper The rear step bumper is for rear end protection and easier step- up loading. CAUTION ■ While driving ● Keep the back door closed while driving. If the back door is left open, it may hit near-by objects while driving or lug- gage may be unexpectedly thrown out, causing an accident.
- Page 58 1-2. Opening, closing and locking the doors CAUTION ■ Operating the back door Observe the following precautions. Failure to do so may cause parts of the body to be caught, resulting in seri- ous injury. ● When opening or closing the back door, thoroughly check to make sure the surrounding area is safe.
- Page 59 Doing so may cause hands to be caught or the back door damper stay to break, causing an accident. ● Do not attach any accessories other than genuine Toyota parts to the back door. Such additional weight on the back door may cause the back door to fall closed again after it is opened.
Page 60: Glass Hatch
- Page 61 1-2. Opening, closing and locking the doors ■ When opening the glass hatch ● Open the glass hatch slowly and carefully. ● Use the glass hatch opener when the back door is closed. ■ Opening the glass hatch while the rear window wiper is in operation Rear window wiper operation will stop moving.
- Page 62 1-2. Opening, closing and locking the doors CAUTION ■ While driving ● Keep the glass hatch closed while driving. If the glass hatch is left open, it may hit near-by objects while driving or luggage may be unexpectedly thrown out, causing an accident. In addition, exhaust gases may enter the vehicle, causing death or a seri- ous health hazard.
- Page 63 Doing so may cause hands to be caught or the glass hatch damper stay to break, causing an accident. ● Do not attach any accessories other than genuine Toyota parts to the glass hatch. Such additional weight on the glass hatch may cause the glass hatch to fall closed again after it is opened.
- Page 64 ● Do not attach any accessories other Damper stays than genuine Toyota parts to the glass hatch. ● Do not place your hand or foot on the damper stay or apply lateral forces to it.
- Page 65 1-3. Adjustable components (seats, mirrors, steering wheel) Front seats Manual seat Seat position adjustment lever Seatback angle adjustment lever Vertical height adjustment lever (driver’s side only) Lumbar support adjustment switch (driver’s side only)
- Page 66 1-3. Adjustable components (seats, mirrors, steering wheel) Power seat Seat position adjustment switch Seatback angle adjustment switch Seat cushion (front) angle adjustment switch (driver’s side only) Vertical height adjustment switch (driver’s side only) Lumber support adjustment switch (driver’s side only) Active head restraints When the occupant’s lower back presses against the seatback...
- Page 67 1-3. Adjustable components (seats, mirrors, steering wheel) Moving a front passenger’s seat for second seat access (3-door models) ■ Getting in the vehicle Pull the seatback angle adjust- ment lever and fold down the seatback. The seat will slide for- ward.
- Page 68 1-3. Adjustable components (seats, mirrors, steering wheel) ■ Active head restraints Even small forces applied to the seatback may cause the head restraint to move. Pushing up a locked head restraint forcibly may appear the head restraint inner structure. These do not indicate problems. During rear-end collision...
- Page 69 1-3. Adjustable components (seats, mirrors, steering wheel) Rear seats Second seats (3-door models) Seatback angle adjustment lever Second seats (5-door models without third seats) Seatback angle adjustment lever Second seats (5-door models with third seats) Seatback angle adjustment lever Seat position adjustment lever...
- Page 70 1-3. Adjustable components (seats, mirrors, steering wheel) Third seats (manual seat) Third seats (power seat) Seatback angle adjustment switch...
- Page 71 1-3. Adjustable components (seats, mirrors, steering wheel) Moving a second seat for third seat access (5-door models with third seats) ■ Getting in the vehicle (left side only) Pull the seatback angle adjust- ment lever and fold down the seatback. The seat will slide for- ward.
- Page 72 1-3. Adjustable components (seats, mirrors, steering wheel) Tumbling the second seats (3-door models) ■ Before tumbling the second seats Lower the head restraints to the lowest position. Use the seat belt hangers to pre- vent the belts from being tan- gled.
- Page 73 1-3. Adjustable components (seats, mirrors, steering wheel) ■ Tumbling the second seats Pull the seatback angle lever STEP and fold them down. Pull the seat lock release lever STEP on the back and swing the whole seat up and forward. ■...
- Page 74 1-3. Adjustable components (seats, mirrors, steering wheel) Folding down the second seatbacks (5-door models without third seats) ■ Before folding down the second seatbacks Stow the center seat belt buckle with the hook-and-loop fastener and lower the head restraints to the lowest position.
- Page 75 1-3. Adjustable components (seats, mirrors, steering wheel) Folding down the second seatbacks (5-door models with third seats) ■ Before folding down the second seatbacks Lower the head restraints to the lowest position. ■ Folding down second seatbacks Pull the seatback lock release lever and fold them down.
- Page 76 1-3. Adjustable components (seats, mirrors, steering wheel) ■ Folding down second center seatback only (5-door models) Pull the center seatback lock release lever behind the seatback and fold it down. To return the center seatback to its origi- nal position, lift it up until it locks. ■...
- Page 77 1-3. Adjustable components (seats, mirrors, steering wheel) Folding down the third seats (manual seat) ■ Before folding down the third seats Lower the head restraints to the lowest position. Use the seat belt hangers to pre- vent the belts from being tan- gled.
- Page 78 1-3. Adjustable components (seats, mirrors, steering wheel) ■ Folding down the third seats From back door side Pull the seat cushion/seatback lock release lever and fold seat- back down. The seat cushion is stowed auto- matically. From rear door side Pull seat cushion...
- Page 79 1-3. Adjustable components (seats, mirrors, steering wheel) ■ Returning the third seats While inside the vehicle, unlock STEP the seatbacks by pulling the lock release lever, and lift them up until they lock. Pull the grip and carry the seat STEP cushions out.
- Page 80 1-3. Adjustable components (seats, mirrors, steering wheel) ■ Before folding down the third seats Use the seat belt hangers to pre- vent the belts from being tan- gled. ■ Folding down the third seats Press and hold . Two STEP beeps sound and the seatback will rise.
- Page 81 1-3. Adjustable components (seats, mirrors, steering wheel) ■ Returning the third seats Press and hold STEP Two beeps sound and seatback and seat cushion begin to move. When operating is completed, two beeps sound again. Lift the head restraints up until STEP they lock.
- Page 82 1-3. Adjustable components (seats, mirrors, steering wheel) ■ The third power seats can be operated when ● The “ENGINE START STOP” switch is off. ● The shift lever is in P position (vehicles with an automatic transmission) or the parking brake is applied (vehicles with a manual transmission) with the “ENGINE START STOP”...
- Page 83 1-3. Adjustable components (seats, mirrors, steering wheel) ■ If the warning buzzer sounds continuously (vehicles with third power seats) If there is an abnormality in the system, the warning buzzer will sound con- tinuously while the “ENGINE START STOP” switch is in IGNITION ON mode.
- Page 84 1-3. Adjustable components (seats, mirrors, steering wheel) CAUTION ■ When folding the seatbacks down Observe the following precautions. Failure to do so may result in death or serious injury. ● Do not fold the seatbacks down while driving. ● Stop the vehicle on level ground, set the parking brake and shift the shift lever to P (automatic transmission) or 1 (manual transmission).
- Page 85 1-3. Adjustable components (seats, mirrors, steering wheel) CAUTION ■ When stowing the third seats Observe the following precautions. Failure to do so may result in death or serious injury. ● Check that there is no luggage and that there are no other people around the seat before stowing operation.
- Page 86 1-3. Adjustable components (seats, mirrors, steering wheel) ∗ Driving position memory (driver’s seat) Your preferred driving position (the position of the driver’s seat and steering wheel) can be memorized and recalled with the touch of a button. It is also possible to set this function to activate automati- cally when the driver’s door is unlocked.
- Page 87 1-3. Adjustable components (seats, mirrors, steering wheel) ■ Recalling the memorized position Check that the shift lever is in P. STEP Turn the “ENGINE START STOP” switch to IGNITION ON STEP mode. Press button 1 or 2 to recall STEP the desired position.
- Page 88 1-3. Adjustable components (seats, mirrors, steering wheel) Linking driving position memory with door unlock operation Record your driving position to button 1 or 2 before performing the following: Carry only the key to which you want to link the driving position. If 2 or more keys are in the vehicle, the driving position cannot be linked properly.
- Page 89 1-3. Adjustable components (seats, mirrors, steering wheel) ■ Operating the driving position memory after turning the engine off Memorized positions (except the steering wheel position) can be activated up to 180 seconds after the driver’s door is opened and another 60 seconds after it is closed again, even after turning the “ENGINE START STOP”...
Page 90: Head Restraints
- Page 91 1-3. Adjustable components (seats, mirrors, steering wheel) ■ Removing the head restraints (front, second and third manual seats) Pull the head restraint up while pressing the lock release button. ■ Adjusting the height of the head restraints Make sure that the head restraints are adjusted so that the center of the head restraint is closest to the top of your ears.
- Page 92 1-3. Adjustable components (seats, mirrors, steering wheel) ■ Using the third power seats Always lift the head restraints up until they lock when using. ■ Installing the head restraints STEP Align the head restraint with the installation holes. STEP Push down the head restraint to the lock position. CAUTION ■...
Page 93: Seat Belts
- Page 94 1-3. Adjustable components (seats, mirrors, steering wheel) ■ Adjusting the seat belt shoulder anchor height (front and outer second [5-door models] seats) Push the seat belt shoulder anchor down while pressing the release button. Push the seat belt shoulder anchor up. Move the height adjuster up and down as needed until you hear a click.
- Page 95 1-3. Adjustable components (seats, mirrors, steering wheel) Pre-crash seat belts (front seats of vehicles with pre-crash safety system) If the pre-crash sensor detects that a collision is unavoidable, the pre- crash safety system will retract the seat belt, thus enhancing the effectiveness of the seat belt pretensioner in a crash.
- Page 96 ■ Seat belt regulations If seat belt regulations exist in the country where you reside, please contact your Toyota dealer for seat belt replacement or installation.
- Page 97 Each seat belt should be used by one person only. Do not use a seat belt for more than one person at once, including children. ● Toyota recommends that children be seated in the rear seat and always use a seat belt and/or an appropriate child restraint system. ●...
- Page 98 ● Ensure that the belt and plate are locked and the belt is not twisted. If the seat belt does not function correctly, immediately contact your Toyota dealer. ● Replace the seat assembly, including the belts, if your vehicle has been involved in a serious accident, even if there is no obvious damage.
Page 99: Steering Wheel
- Page 100 1-3. Adjustable components (seats, mirrors, steering wheel) Auto tilt away (power adjustment type) When “ENGINE START STOP” switch is turned off, the steering wheel returns to its stowed position by moving up and away to enable easier driver entry and exit. Turning the “ENGINE START STOP”...
Page 101: Inside Rear View Mirror
- Page 102 1-3. Adjustable components (seats, mirrors, steering wheel) Adjusting the height of rear view mirror Adjust the height of the rear view mirror by moving it up and down. ■ To prevent sensor error (vehicles with auto anti-glare inside rear view mirror) To ensure that the sensors operate prop- erly, do not touch or cover them.
Page 103: Outside Rear View Mirrors
- Page 104 1-3. Adjustable components (seats, mirrors, steering wheel) Folding the mirrors Manual type Push the mirror back in the direc- tion of the vehicle’s rear. Auto type Press the switch to fold the mir- rors. Press it again to extend them to the original position.
- Page 105 1-3. Adjustable components (seats, mirrors, steering wheel) CAUTION ■ When driving the vehicle Observe the following precautions while driving. Failing to do so may result in loss of control of the vehicle and cause an acci- dent, resulting in death or serious injury. ●...
Page 106: Power Windows
- Page 107 1-4. Opening and closing the windows and moon roof ■ The power windows can be operated when The “ENGINE START STOP” switch is in IGNITION ON mode. ■ Operating the power windows after turning the engine off The power windows can be operated for approximately 45 seconds even after the “ENGINE START STOP”...
- Page 108 ■ Door lock linked window operation The power windows can be opened and closed using the wireless remote control or mechanical key if customized at your Toyota dealer. (→P. 46, 50) ■ Customization Settings (e.g. linked door lock operation) can be changed.
- Page 109 1-4. Opening and closing the windows and moon roof ∗ Moon roof Use the overhead switches to open and close the moon roof and tilt it up and down. ■ Opening and closing Opens the moon roof The moon roof stops slightly before the fully open position to reduce wind noise.
- Page 110 ■ Door lock linked moon roof operation The moon roof can be opened and closed using the wireless remote control or mechanical key if customized at your Toyota dealer. (→P. 46, 50) ■ Moon roof open reminder function An alarm will sound when the driver’s door is opened with the moon roof not...
- Page 111 1-4. Opening and closing the windows and moon roof ■ When the moon roof does not close normally Perform the following procedure: ● If the moon roof closes but then re-opens slightly STEP Stop the vehicle. Press and hold “∨” on the STEP The moon roof will close, re-open and pause for approximately 10 seconds.
- Page 112 Check to make sure that the moon roof is completely closed and then release the switch. If the moon roof does not fully close even after performing the above proce- dure correctly, have the vehicle inspected by your Toyota dealer. ■ Customization Settings (e.g.
- Page 113 1-4. Opening and closing the windows and moon roof CAUTION ■ Opening the moon roof Observe the following precautions. Failing to do so may cause death or serious injury. ● Do not allow any passengers to put their hands or heads outside the vehi- cle while it is moving.
- Page 114 1-5. Refueling Opening the fuel tank cap Perform the following steps to open the fuel tank cap. ■ Before refueling the vehicle Turn the “ENGINE START STOP” switch off and ensure that all the doors and windows are closed. ■ Opening the fuel tank cap Pull up the opener to open the STEP...
- Page 115 ■ Use of ethanol blended gasoline in a gasoline engine Toyota allows the use of ethanol blended gasoline where the ethanol content is up to 10 %. Make sure that the ethanol blended gasoline to be used has a Research octane number that follows the above.
- Page 116 1-5. Refueling CAUTION ■ When refueling the vehicle Observe the following precautions while refueling the vehicle. Failure to do so may result in death or serious injury. ● After exiting the vehicle and before opening the fuel door, touch an unpainted metal surface to discharge any static electricity.
- Page 117 ■ When replacing the fuel cap Do not use anything but a genuine Toyota fuel tank cap designed for your vehicle. Doing so may cause a fire or other incident which may result in death or serious injury.
- Page 118 1-6. Theft deterrent system Engine immobilizer system The vehicle’s keys have built-in transponder chips that prevent the engine from starting if a key has not been previously registered in the vehicle’s on-board computer. Never leave the keys inside the vehicle when you leave the vehicle. The indicator light flashes after the “ENGINE START STOP”...
- Page 119 1-6. Theft deterrent system ∗ Alarm The system sounds the alarm and flashes lights when forcible entry is detected. ■ Triggering of the alarm The alarm is triggered in the following situations when the alarm is set: ● A locked door or glass hatch is unlocked or opened in any way other than using the entry function or the wireless remote control.
- Page 120 1-6. Theft deterrent system ■ System maintenance The vehicle has a maintenance-free type alarm system. ■ Items to check before locking the vehicle To prevent unexpected triggering of the alarm and vehicle theft, make sure of the following. ● Nobody is in the vehicle. ●...
- Page 121 1-6. Theft deterrent system ■ Alarm-operated door lock ● When the alarm is operating, the doors are locked automatically to pre- vent intruders. ● Do not leave the key inside the vehicle when the alarm is operating, and make sure the key is not inside the vehicle when recharging or replacing the battery.
- Page 122 1-7. Safety information Correct driving posture Drive with a good posture as follows: Sit upright and well back in the seat. (→P. 64) Adjust the position of the seat forward or backward to ensure the pedals can be reached easily depressed to the extent required.
- Page 123 1-7. Safety information CAUTION ■ While driving ● Do not adjust the position of the driver’s seat. Doing so could cause the driver to lose control of the vehicle. ● Do not place a cushion between the driver or passenger and the seatback. A cushion may prevent correct posture from being achieved, and reduce the effectiveness of the seat belt and head restraint, increasing the risk of death or serious injury to the driver or passenger.
- Page 124 1-7. Safety information SRS airbags The SRS airbags inflate when the vehicle is subjected to certain types of severe impacts that may cause significant injury to the occupants. They work together with the seat belts to help reduce the risk of death or serious injury. SRS front airbags SRS driver airbag/front passenger airbag Can help protect the head and chest of the driver and front pas-...
- Page 125 1-7. Safety information SRS side and curtain shield airbags SRS side airbags (if equipped) Can help protect the torso of the front seat occupants SRS curtain shield airbags (if equipped) Can help protect primarily the head of occupants in the outer seats...
- Page 126 1-7. Safety information Airbag system components Curtain shield airbag Side and curtain shield air- sensors (if equipped) bag sensors (if equipped) Side airbags (if equipped) Front airbag sensors Curtain shield airbags Airbag sensor assembly (if equipped) Driver knee airbag Floor sensor (if equipped) (if equipped) Driver airbag Driver’s seat belt buckle...
- Page 127 1-7. Safety information ■ If the SRS airbags deploy (inflate) ● Bruising and slight abrasions may result from contact with a deploying (inflating) SRS airbag. ● A loud noise and white powder will be emitted. ● Vehicles with SRS curtain shield airbags Parts of the airbag module (steering wheel hub, airbag cover and inflator) as well as the front seats, second seats, and parts of the front, center and rear pillars and roof side rail, may be hot for several minutes.
- Page 128 1-7. Safety information ■ SRS airbag deployment conditions (SRS side airbags and curtain shield airbags) The SRS side and curtain shield airbags will deploy in the event of an impact that exceeds the set threshold level (the level of force corresponding to the impact force produced by an approximately 1500 kg [3307 lb.] vehicle collid- ing with the vehicle cabin from a direction perpendicular to the vehicle orien- tation at an approximate speed of 20 - 30 km/h [12 -18 mph]).
- Page 129 ● Vehicle rollover ■ When to contact your Toyota dealer In the following cases, contact your Toyota dealer, as soon as possible. ● Any of the SRS airbags have been inflated. ● The front of the vehicle is damaged or...
- Page 130 1-7. Safety information ● A portion of a door is damaged or deformed, or the vehicle was involved in an accident that was not severe enough to cause the SRS side airbags and curtain shield airbags to inflate. ● Vehicles without an SRS knee airbag The pad section of the steering wheel or dashboard near the front passenger airbag is scratched, cracked, or other-...
- Page 131 1-7. Safety information CAUTION ■ SRS airbag precautions Observe the following precautions regarding the SRS airbags. Failure to do so may cause death or serious injury. ● The driver and all passengers in the vehicle must wear their seat belts properly.
- Page 132 An infant or child who is too small to use a seat belt should be properly secured using a child restraint sys- tem. Toyota strongly recommends that all infants and children be placed in the rear seats of the vehicle and properly restrained. The rear seats are safer for infants and children than the front passenger seat.
- Page 133 1-7. Safety information CAUTION ■ SRS airbag precautions ● Vehicles without SRS curtain shield airbags Do not lean against the front door. Vehicles with SRS curtain shield air- bags Do not lean against the door, the roof side rail or the front, center and rear pil- lars.
- Page 134 Wash off any residue as soon as possible to prevent skin irritation. ● If the areas where the SRS airbags are stored, such as the steering wheel pad and front, center and rear pillar garnishes, are damaged or cracked, have them replaced by your Toyota dealer.
- Page 135 Modification and disposal of SRS airbag system components Do not dispose of your vehicle or perform any of the following modifications without consulting your Toyota dealer. The SRS airbags may malfunction or deploy (inflate) accidentally, causing death or serious injury.
- Page 136 General installation instructions are provided in this manual. (→P. 146) ● If child restraint system regulations exist in the country where you reside, please contact your Toyota dealer for the child restraint sys- tem installation. ● Toyota recommends that you use a child restraint system which conforms to the regulation ECE No.44.
- Page 137 1-7. Safety information Baby seat (infant seat) Equal to Group 0 and 0 of ECE No.44 Child seat (convertible seat) Equal to Group 0 and I of ECE No.44 Junior seat (booster seat) Equal to Group II and III of ECE No.44...
- Page 138 1-7. Safety information Child restraint system suitability for various seating positions Information provided in the table shows your child restraint system suitability for various seating positions. 3-door models Front passenger seat Seating position Second seat Airbag manual on-off switch Standard Mass groups Outside Center...
- Page 139 1-7. Safety information Key of letters inserted in the above table: Suitable for “universal” category child restraint system approved for the use in this mass group. UF: Suitable for forward-facing “universal” category child restraint system approved for the use in this mass group. Not suitable seat position for children in this mass group.
- Page 140 1-7. Safety information 5-door models Front passenger seat Seating Third position Second seat Airbag manual seat (if Stan- on-off switch equipp dard Outside Center Mass groups Up to 10 kg Never Never (22 lb.) (0 - 9 months) Up to 13 kg Never Never (28 lb.)
- Page 141 L2: Suitable for “TOYOTA DUO+ (without ISOFIX, 9 to 18 kg [20 to 39 lb.])” approved for the use in this mass group L3: Suitable for “TOYOTA KID (15 to 36 kg [34 to 79 lb.])” approved for the use in this mass group Not suitable seat position for children in this mass group.
- Page 142 1-7. Safety information Child restraint system suitability for various seating positions (with ISOFIX rigid anchors) Information provided in the table shows your child restraint system suitability for various seating positions. Vehicle ISOFIX positions Mass groups Size class Fixture Second seat Outside ISO/L1 Carrycot...
- Page 143 1-7. Safety information (1) For the child restraint system which do not carry the ISO/XX size class identification (A to G), for the applicable mass group, the car manufacturer shall indicate the vehicle specific ISOFIX child restraint system(s) recommended for each position Key of letters inserted in the above table: IUF: Suitable for ISOFIX forward-facing child restraint systems of uni- versal category approved for use in this mass group...
- Page 144 1-7. Safety information ■ When installing a child restraint system on the front passenger seat or second seat (5-door models with third seats) When you have to use a child restraint system, adjust the seat cushion to the fully rearward. ■...
- Page 145 ● Toyota strongly urges the use of a proper child restraint system that con- forms to the size of the child, installed on the rear seat. According to acci- dent statistics, the child is safer when properly restrained in the rear seat than in the front seat.
- Page 146 1-7. Safety information CAUTION ■ Child restraint precautions ● Do not allow the child to lean his/her head or any part of his/her body against the door or the area of the seat, front, center and rear pillars or roof side rail from which the SRS side airbags or SRS curtain shield air- bags deploy even if the child is seated in the child restraint system.
- Page 147 1-7. Safety information Installing child restraints Follow the child restraint system manufacturer’s instructions. Firmly secure child restraints to the seats using a seat belt or ISOFIX rigid anchors. Attach the top strap when installing a child restraint. Seat belts equipped with a child restraint locking mecha- nism (ALR/ELR belts on the second seats)
- Page 148 1-7. Safety information Installing child restraints using a seat belt (child restraint lock function belt) Rear-facing Baby seat (infant seat)/child seat (convertible ■ seat) 3-door models 1st lock position STEP 5th lock position Fold the seatback forward and then back to the 1st lock position (most upright position) until it locks into place.
- Page 149 1-7. Safety information Run the seat belt through the STEP child restraint system and insert the plate into the buckle. Make sure that the belt is not twisted. Fully extend the shoulder belt STEP and allow it to retract to put it in lock mode.
- Page 150 1-7. Safety information Latch the hook of the top strap STEP onto the anchor bracket. (→P. 155) Make sure the seat belt is tightly secured, and that there is no slack in the belt. Forward-facing Child seat (convertible seat) ■...
- Page 151 1-7. Safety information Place the child restraint system STEP on the seat facing the front of the vehicle. Run the seat belt through the STEP child restraint system and insert the plate into the buckle. Make sure that the belt is not twisted. Fully extend the shoulder belt STEP and allow it to retract to put it in...
- Page 152 1-7. Safety information While pushing the child restraint STEP system down into the second seats, allow the shoulder belt to retract until the child restraint system is securely in place. After shoulder belt retracted to a point where there is no slack in the belt, pull the belt to check that it cannot be extended.
- Page 153 1-7. Safety information 5-door models Fold the seatback forward. Then STEP return the seatback and secure it at the first lock position (most upright position). Place the child restraint system STEP on the seat facing the front of the vehicle. Sit the child in the child restraint STEP system.
- Page 154 1-7. Safety information Removing a child restraint installed with a seat belt Push the buckle release button and fully retract the seat belt. Installation with ISOFIX rigid anchors (ISOFIX child restraint system) 3-door models 1st lock position STEP 5th lock position Fold the seatback forward and then back to the 1st lock position (most upright position) until it...
- Page 155 1-7. Safety information 5-door models Fold the seatback forward. Then STEP return the seatback and secure it at the first lock position (most upright position). Flip the cover (3-door models STEP and 5-door models with third seats), and latch the buckles onto the anchors.
- Page 156 You need a locking clip to install the child restraint system. Follow the instructions provided by the manufacturer of the system. If your child restraint system does not provide a locking clip, you can purchase the fol- lowing item from your Toyota dealer: Locking clip for child restraint system (Part No. 73119-22010)
- Page 157 1-7. Safety information CAUTION ■ When installing a junior (booster) seat To prevent the belt from going into ALR lock mode, do not fully extend the shoulder belt. ALR mode causes the belt to tighten only. This could cause injury or discomfort to the child. (→P. 94) ■...
- Page 158 1-7. Safety information CAUTION ■ When installing a child restraint system ● Extreme Hazard! Do not use a rear- ward facing child restraint on a seat protected by an airbag in front of it! This is because the force of the rapid infla- tion of the front passenger airbag can cause death or serious injury to the child.
- Page 159 When installing a child restraint system ● If child restraint system regulations exist in the country where you reside, please contact your Toyota dealer for the child restraint system installation. ● When installing a child restraint system on the second center seat, adjust both seat cushions to the same position (vehicles with third manual/power seats) and align both seatbacks at the same angle.
- Page 160 1-7. Safety information CAUTION ■ To correctly attach a child restraint system to the anchors ● When using the lower anchors, be sure that there are no foreign objects around the anchors and that the seat belt is not caught behind the child restraint system.
- Page 161 2-1. Driving procedures Driving the vehicle .... 162 Engine (ignition) switch (vehicles without a smart entry & start system)..175 Engine (ignition) switch (vehicles with a smart entry & start system)..179 Automatic transmission..187 Manual transmission..193 Turn signal lever ....195 Parking brake....
- Page 162 Gauges and meters ..198 Cruise control....242 Indicators and warning Dynamic radar cruise lights ....... 202 control......246 Multi-information display Toyota parking (Non-Optitron type assist-sensor ....259 meters) ......206 Rear view monitor system Multi-information display (vehicles with an accessory (Optitron type meters)..
Page 163: Driving The Vehicle
- Page 164 2-1. Driving procedures Manual transmission While depressing the clutch pedal, depress the brake STEP pedal. If necessary, set the parking brake. STEP If the vehicle is to be stopped for an extended period of time, shift the shift lever to N. (→P. 193) ■...
- Page 165 2-1. Driving procedures Starting off on a steep uphill Automatic transmission Make sure that the parking brake is set and shift the shift lever STEP to D. Gently depress the accelerator pedal. STEP Release the parking brake. STEP Manual transmission With the parking brake firmly set and the clutch pedal fully STEP depressed, shift the shift lever to 1.
- Page 166 This type of brake system needs bedding-down of the brake shoes periodi- cally or whenever the parking brake shoes and/or drum are replaced. Have your Toyota dealer perform the bedding-down operation. ■ Idling time before stopping the engine (diesel engine) To prevent damage to the turbocharger, allow the engine to idle immediately after high-speed driving or driving up a hill.
- Page 167 2-1. Driving procedures ■ Operating your vehicle in a foreign country Comply with the relevant vehicle registration laws and confirm the availability of the correct fuel. (→P. 618) ■ Eco-friendly driving (vehicles with an automatic transmission) Vehicles with a non-optitron If Eco Driving Indicator Light turns on, it type meters indicates that you are driving at Eco-...
- Page 168 If the smell of exhaust is noticed inside the vehicle, open the windows and check that the back door is closed. Large amounts of exhaust in the vehicle can cause driver drowsiness and an accident, resulting in death or a serious health hazard. Have the vehicle inspected by your Toyota dealer immediately.
- Page 169 2-1. Driving procedures CAUTION ■ When driving the vehicle ● On vehicles with an automatic transmission, do not shift the shift lever to P while the vehicle is moving. Doing so can damage the transmission and may result in a loss of vehicle control.
- Page 170 ■ If you hear a squealing or scraping noise (brake pad wear indicators) Have the brake pads checked and replaced by your Toyota dealer as soon as possible. Rotor damage may result if the pads are not replaced when needed.
- Page 171 2-1. Driving procedures CAUTION ■ When the vehicle is stopped ● Do not race the engine. If the vehicle is in any gear other than P (vehicles with an automatic trans- mission only) or N, the vehicle may accelerate suddenly and unexpectedly, causing an accident.
- Page 172 The exhaust system should be checked occasionally. If there is a hole or crack caused by corrosion, damage to a joint or abnormal exhaust noise, be sure to have the vehicle inspected and repaired by your Toyota dealer. Failure to do so may allow exhaust gases to enter the vehicle, resulting in...
- Page 173 2-1. Driving procedures CAUTION ■ When taking a nap in the vehicle Always turn the engine off. Otherwise, if you accidentally move the shift lever or depress the accelerator pedal, this could cause an accident or fire due to engine overheating. Additionally, if the vehicle is parked in a poorly venti- lated area, exhaust gases may collect and enter the vehicle, leading to death or a serious health hazard.
- Page 174 2-1. Driving procedures NOTICE ■ When driving the vehicle Automatic transmission ● Do not depress the accelerator and brake pedals at the same time during driving, as this may restrain driving torque. ● Do not use the accelerator pedal or depress the accelerator and brake pedals at the same time to hold the vehicle on a hill.
- Page 175 Short in electrical components ● Engine damage caused by water immersion In the event that you drive on a flooded road and the vehicle is flooded, be sure to have your Toyota dealer check the following: ● Brake function ●...
Page 176: Engine (Ignition) Switch
- Page 177 2-1. Driving procedures ■ Changing the engine switch positions “LOCK” The steering wheel is locked and the key can be removed. (Vehicles with an automatic transmission: The key can be removed only when the shift lever is in P.) “ACC” Some electrical components such as the audio system can be used.
- Page 178 2-1. Driving procedures ■ Turning the key from “ACC” to “LOCK” Shift the shift lever to P (automatic transmission) or N (manual STEP transmission). (→P. 187, 193) Push in the key and turn to the “LOCK” STEP position. ■ If the engine does not start The engine immobilizer system may not have been deactivated.
- Page 179 2-1. Driving procedures CAUTION ■ When starting the engine Always start the engine while sitting in the driver’s seat. Do not depress the accelerator pedal while starting the engine under any circumstances. Doing so may cause an accident resulting in death or serious injury. ■...
- Page 180 2-1. Driving procedures Engine (ignition) switch (vehicles with a smart entry & start system) Performing the following operations when carrying the electronic key on your person starts the engine or changes “ENGINE START STOP” switch modes. ■ Starting the engine Automatic transmission Check that the parking brake is set.
- Page 181 2-1. Driving procedures Manual transmission Check that the parking brake is set. STEP Check that the shift lever is set in N. STEP Firmly depress the clutch pedal. STEP The “ENGINE START STOP” switch indicator will turn green. If the indicator does not turn green, the engine cannot be started. Press the “ENGINE START STEP STOP”...
- Page 182 2-1. Driving procedures ■ Stopping the engine Automatic transmission Stop the vehicle. STEP Shift the shift lever to P. STEP Set the parking brake. (→P. 196) STEP Press the “ENGINE START STOP” switch. STEP Release the brake pedal and check that the indicator on the STEP “ENGINE START STOP”...
- Page 183 2-1. Driving procedures ■ Changing “ENGINE START STOP” switch modes Modes can be changed by pressing the “ENGINE START STOP” switch with brake pedal (vehicles with an automatic transmission) or clutch pedal (vehicles with a manual transmission) released. (The mode changes each time the switch is pressed.) The emergency flashers can be used.
- Page 184 2-1. Driving procedures When stopping the engine with the shift lever in a position other than P (Vehicles with an automatic transmission) If the engine is stopped with the shift lever in a position other than P, the “ENGINE START STOP” switch will not be turned off but instead be turned to ACCESSORY mode.
- Page 185 2-1. Driving procedures ■ Operation of the “ENGINE START STOP” switch When operating the “ENGINE START STOP” switch, one short, firm press is enough. If the switch is pressed improperly, the engine may not start or the “ENGINE START STOP” switch mode may not change. It is not necessary to press and hold the switch.
- Page 186 ■ When the “ENGINE START STOP” switch indicator flashes in amber The system may be malfunctioning. Have the vehicle inspected by your Toyota dealer immediately. ■ If the electronic key battery is depleted →P. 501 CAUTION ■...
- Page 187 ■ Symptoms indicating a malfunction with the “ENGINE START STOP” switch If the “ENGINE START STOP” seems to be operating somewhat differently than usual, such as the switch sticking slightly, there may be a malfunction. Contact your Toyota dealer immediately.
Page 188: Automatic Transmission
- Page 189 2-1. Driving procedures ■ Shift position purpose Shift position Function Parking the vehicle/starting the engine Reversing Neutral Normal driving S mode driving (→P. 190) : Shifting to the D position allows the system to select a gear suitable for the driving conditions. Setting the shift lever to the D position is recom- mended for normal driving.
- Page 190 2-1. Driving procedures Optitron type meters Press the menu switch. STEP The multi-information display will change modes to elec- tronic features control mode. Press the “ENTER” switch upwards or downwards until “2ND START” appears. Press the “ENTER” switch to STEP change to “ON”.
- Page 191 2-1. Driving procedures Changing shift ranges in S mode When the shift lever is in the S position, the shift lever can be oper- ated as follows: For upshifting For downshifting The initial shift range in S mode is set automatically to 4 according to vehicle speed.
- Page 192 S This may indicate a malfunction in the automatic transmission system. Have the vehicle inspected by your Toyota dealer immediately. (In this situation, the transmission will operate in the same manner as when the shift lever is in D.) ■...
- Page 193 2-1. Driving procedures CAUTION ■ When driving on slippery road surfaces Do not accelerate or shift gears suddenly. Sudden changes in engine braking may cause the vehicle to spin or skid, resulting in an accident.
Page 194: Manual Transmission
- Page 195 2-1. Driving procedures ■ Maximum downshifting speeds Observe the downshifting speeds in the following table to prevent over-rev- ving the engine. Maximum speed (km/h [mph]) Shift Transfer position Transfer position position 50 (31) 20 (12) 103 (64) 40 (25) Gasoline engine 141 (88) 55 (34) 176 (109)
Page 196: Turn Signal Lever
Page 197: parking brake, page 198: horn, page 199: instrument cluster gauges and meters.
- Page 200 2-2. Instrument cluster Tachometer Displays the engine speed in revolutions per minute. Multi-information display →P. 206, 211 Speedometer Displays the vehicle speed. Odometer/trip meter display change button →P. 200 Fuel gauge Displays the quantity of fuel remaining in the tank. Odometer and trip meter display Odometer: Displays the total distance the vehicle has been driven.
- Page 201 2-2. Instrument cluster Changing the display Non-Optitron type meter (→P. 206) Optitron type meter Switches between odometer and trip meter displays. When the trip meter is displayed, pressing and holding the button will reset the trip meter. Instrument cluster light control The brightness of the instrument cluster lights can be adjusted by turning the knob.
- Page 202 2-2. Instrument cluster ■ The meters and display illuminate when Vehicles without a smart entry & start system The engine switch is in the “ON” position. Vehicles with a smart entry & start system The “ENGINE START STOP” switch is in IGNITION ON mode. ■...
Page 203: Indicators And Warning Lights
- Page 204 2-2. Instrument cluster Center panel ■ Indicators The indicators inform the driver of the operating state of the vehicle’s various systems. Turn signal indicator “SET” indicator (→P. 195) (→P. 242, 246) (if equipped) Dynamic radar cruise Headlight high beam control indicator indicator (→P.
- Page 205 There may be a malfunction in a system if a light does not turn on, or if the lights do not turn off. Have the vehicle inspected by your Toyota dealer. : Refer to the “Off-road Driving Owner’s Manual”...
- Page 206 Have the vehicle inspected by your Toyota dealer immediately if this occurs.
- Page 207 2-2. Instrument cluster ∗ Multi-information display (Non-Optitron type meters) The multi-information display presents the driver with a variety of driving-related data including the current outside air temperature. Automatic transmission Manual transmission ● Outside temperature display (→P. 434) ● Odometer/trip meter display (→P.
- Page 208 2-2. Instrument cluster Switching the display Items displayed can be switched by pressing the “ODO/TRIP” but- ton. Display items ■ Odometer Displays the total distance the vehicle has been driven. ■ Trip meters A and B Displays the distance the vehicle has been driven since the meter was last reset.
- Page 209 2-2. Instrument cluster ■ Current fuel consumption Displays the current rate of fuel consumption ■ Eco Driving Indicator Zone Display (→P. 209) and average fuel consumption Displays the average fuel consumption since the function was reset • The function can be reset by pressing the “ODO/ TRIP”...
- Page 210 2-2. Instrument cluster ■ Eco Driving Indicator Eco Driving Indicator Light During Eco-friendly acceleration (Eco driving), Eco Driving Indicator Light will turn on. Eco Driving Indicator Zone Display Suggests Zone of Eco driving with current Eco driving ratio based on acceleration.
- Page 211 2-2. Instrument cluster ■ When disconnecting and reconnecting battery terminals The following information data will be reset: ● Trip meter ● Average fuel consumption ● Average vehicle speed If the trip meter was displayed last, the ODO screen will be displayed after resetting.
- Page 212 2-2. Instrument cluster ∗ Multi-information display (Optitron type meters) The multi-information display presents the driver with a variety of driving-related data including the current outside air temperature. ● Trip information contents (→P. 212) Displays driving range, fuel consumption and other cruising-related information.
- Page 213 2-2. Instrument cluster Switching the display Menu switch Changes modes to electronic fea- tures control mode, customization mode or back to normal display mode “ENTER” switch Changes trip information items. This switch is also used to turn on/off electronic features controls and to change customization set- tings.
- Page 214 2-2. Instrument cluster ● Driving range Displays the estimated maximum distance that can be driven with the quantity of fuel remaining • This distance is computed based on your aver- age fuel consumption. As a result, the actual distance that can be driven may differ from that displayed.
- Page 215 2-2. Instrument cluster ● Average vehicle speed Displays the average vehicle speed since the engine was started or the function was reset The function can be reset by pressing the “ENTER” switch for longer than 1 second when the average vehicle speed is displayed. ●...
- Page 216 Electronic features control contents ● Multi-terrain Select (if equipped) →Refer to the “Off-road Driving Owner’s Manual” ● Toyota parking assist-sensor (if equipped) (→P. 259) ● AFS (Adaptive Front-lighting System) (if equipped) (→P. 229) ● Second start mode (if equipped) (→P. 188) ■...
- Page 217 ■ System check display After turning the “ENGINE START STOP” switch to IGNITION ON mode, “TOYOTA” is displayed while system operation is checked. When the sys- tem check is complete, the normal screen will return. ■ Conditions for ending electronic features control...
- Page 218 2-2. Instrument cluster ■ Eco Driving Indicator Eco Driving Indicator Light During Eco-friendly acceleration (Eco driving), Eco Driving Indicator Light will turn on. Eco Driving Indicator Zone Display Suggests Zone of Eco driving with current Eco driving ratio based on acceleration.
- Page 219 2-2. Instrument cluster ■ When “--” or “E” is displayed The system may be malfunctioning. Take your vehicle to your Toyota dealer. ■ When disconnecting and reconnecting battery terminals The following information data will be reset: ● Average fuel consumption after refueling ●...
- Page 220 →Refer to the “Off-road Driving Owner’s Manual” ● Wide view front & side monitor (if equipped) (→P. 273) ● Trip information (→P. 220) Displays driving range, fuel consumption and other cruising-related information. ● Toyota parking assist-sensor (if equipped) (→P. 259) ∗ : If equipped...
- Page 221 2-2. Instrument cluster Switching the display Items displayed can be switched by pressing the “MODE” switch. “DISP” switch “RESET” switch “MODE” switch “∨” switch “∧” switch Display items ■ Outside temperature display Displays the outside temperature The temperature range that can be displayed is from -40 °C (-40 °F) to 50 °C (122 °F)
- Page 222 2-2. Instrument cluster ■ Driving range Displays the estimated maxi- mum distance that can be driven with the quantity of fuel remain- This distance is computed based on your average fuel consump- tion. As a result, the actual dis- tance that can be driven may differ from that displayed.
- Page 223 2-2. Instrument cluster ■ Average fuel consumption Displays the average fuel con- sumption since the function was reset • The function can be reset by pressing holding “RESET” switch when average fuel consumption is displayed. • Use the displayed average fuel consumption as a reference.
- Page 224 2-2. Instrument cluster Setting up the display ■ Setting up the information display To set up the display, press the “DISP” switch until the desired item appears. If left idle for approximately 10 seconds, the display will revert to the previ- ous screen.
- Page 225 2-2. Instrument cluster ● Setting the day mode Press the “∧” or “∨” switch to select ON or OFF. ■ Setting up the display of the monitors To set up the display, press the “DISP” switch when the camera image is being displayed until the desired item appears. If left idle for approximately 10 seconds, the display will revert to the previ- ous screen.
- Page 226 ■ When “--” or “E” is displayed on the outside temperature display The system may be malfunctioning. Take your vehicle to your Toyota dealer. ■ When disconnecting and reconnecting battery terminals The following information data and settings will be reset: ●...
Page 227: Headlight Switch
- Page 228 2-3. Operating the lights and wipers Turning on the high beam headlights With the headlights on, push the lever away from you to turn on the high beams. Pull the lever toward you to the center position to turn the high beams off.
- Page 229 2-3. Operating the lights and wipers ■ Guide to dial settings Vehicles with third seats Occupancy and luggage load conditions Dial position With Without rear height rear height Occupants Luggage load control air control air suspension suspension Driver only, or driver and one passenger in None the front seat...
- Page 230 2-3. Operating the lights and wipers AFS (Adaptive Front-lighting System) (if equipped) AFS (Adaptive Front-lighting System) secures excellent visibility at intersections and on curves by automatically adjusting the direction of the light axis of the headlights according to vehicle speed and the degree of the tire’s angle as controlled by steering input.
- Page 231 2-3. Operating the lights and wipers ■ Headlight control sensor (if equipped) The sensor may not function properly if an object is placed on the sensor, or any- thing that blocks the sensor is affixed to the windshield. Doing so interferes with the sensor detecting the level of ambient light and may cause the automatic headlight sys- tem to malfunction.
- Page 232 ■ If the “AFS OFF” indicator flashes It may indicate a malfunction in the system. Contact your Toyota dealer. ■ Customization Settings (e.g. light sensor sensitivity) can be changed.
Page 233: Fog Light Switch
Page 234: windshield wipers and washer.
- Page 235 2-3. Operating the lights and wipers Washer/wiper dual opera- tion The wipers will automatically operate a couple of times after the washer squirts. Vehicles with the headlight cleaners: If the headlights are on, the headlight cleaners will operate once. Rain-sensing windshield wipers (if equipped) When is selected, the wipers will operate automatically when the sensor detects falling rain.
- Page 236 2-3. Operating the lights and wipers Decreases the sensitivity Increases the sensitivity Washer/wiper dual opera- tion The wipers operate automati- cally. (After operating several times, the wipers operate one more time after a short delay to prevent dripping.) Vehicles with the headlight cleaners: If the headlights are on, the headlight cleaners will operate once.
- Page 237 2-3. Operating the lights and wipers ■ The windshield wiper and washer can be operated when Vehicles without a smart entry & start system The engine switch is in the “ON” position. Vehicles with a smart entry & start system The “ENGINE START STOP”...
- Page 238 2-3. Operating the lights and wipers CAUTION ■ Caution regarding the use of windshield wipers in “AUTO” mode The windshield wipers may operate unexpectedly if the sensor is touched or the windshield is subject to vibration in “AUTO” mode. Take care that your fingers or anything else does not become caught in the windshield wipers.
Page 239: Rear Window Wiper And Washer
- Page 240 2-3. Operating the lights and wipers ■ The rear window wiper and washer can be operated when ● Vehicles without a smart entry & start system The engine switch is in the “ON” position. Vehicles with a smart entry & start system The “ENGINE START STOP”...
Page 241: Headlight Cleaner Switch
- Page 242 2-3. Operating the lights and wipers NOTICE ■ When the washer fluid tank is empty Do not press the switch continually as the washer fluid pump may overheat.
Page 243: Using Other Driving Systems Cruise Control
- Page 244 2-4. Using other driving systems ■ Adjusting the set speed To change the set speed, operate the lever until the desired set speed is obtained. Increases the speed Decreases the speed Fine adjustment: Momentarily move the lever in the desired direction.
- Page 245 If the cruise control speed cannot be set or if the cruise control cancels immediately after being activated, there may be a malfunction in the cruise control system. Have the vehicle inspected by your Toyota dealer.
- Page 246 2-4. Using other driving systems CAUTION ■ To avoid operating the cruise control by mistake Switch the cruise control off using the “ON-OFF” button when not in use. ■ Situations unsuitable for cruise control Do not use cruise control in any of the following situations. Doing so may result in loss of control and could cause an accident resulting in death or serious injury.
Page 247: Dynamic Radar Cruise Control
- Page 248 2-4. Using other driving systems ■ Setting the vehicle speed (vehicle-to-vehicle distance con- trol mode) Press the “ON-OFF” button to STEP activate the cruise control. Dynamic radar cruise control indicator will come on. Press the button again to deactivate the cruise control. Accelerate or decelerate the STEP vehicle to the desired speed,...
- Page 249 2-4. Using other driving systems In the vehicle-to-vehicle distance control mode, the set speed will be increased or decreased as follows: Fine adjustment: By approximately 1 km/h (0.6 mph) each time the lever is operated Large adjustment: By approximately 5 km/h (3.1 mph) for each 0.75 seconds the lever is held In the constant speed control mode (→P.
- Page 250 2-4. Using other driving systems ■ Vehicle-to-vehicle distance settings Select a distance from the table below. Note that the distances shown correspond to a vehicle speed of 80 km/h (50 mph). Vehi- cle-to-vehicle distance increases/decreases in accordance with vehicle speed. Distance options Vehicle-to-vehicle distance Long...
- Page 251 2-4. Using other driving systems Driving in vehicle-to-vehicle distance control mode This mode employs a radar sensor to detect the presence of vehicles up to approximately 120 m (400 ft.) ahead, determines the current vehicle-to-vehicle following distance, and operates to maintain a suit- able following distance from the vehicle ahead.
- Page 252 2-4. Using other driving systems Example of follow-up cruising When following a vehicle driving slower than the set speed The system continues follow-up cruising while adjusting for changes in the speed of the vehicle ahead in order to maintain the vehicle-to-vehicle dis- tance set by the driver.
- Page 253 2-4. Using other driving systems Selecting conventional constant speed control mode Constant speed control mode differs from vehicle-to-vehicle distance control mode. When constant speed control mode is selected, your vehicle will maintain a set speed regardless of whether or not there are other vehicles in the lane ahead.
- Page 254 Bad weather causes the detection function to become extremely unsta- ble. If vehicle-to-vehicle distance control driving is automatically canceled for any other reason, there may be a malfunction in the system. Contact your Toyota dealer. ■ Automatic cancelation of constant speed control...
- Page 255 2-4. Using other driving systems ■ Radar sensor and grille cover Always keep the sensor and grille cover clean to ensure that the vehicle-to- vehicle distance control operates properly. (Some obstructions, such as snow, ice and plastic objects, cannot be detected by the obstruction sensor.) Dynamic radar cruise control is canceled if an obstruction is detected.
- Page 256 2-4. Using other driving systems CAUTION ■ Before using dynamic radar cruise control Do not overly rely on vehicle-to-vehicle distance control. Be aware of the set speed. If automatic deceleration/acceleration is not appropriate, adjust the vehicle speed, as well as the distance between your vehicle and vehicles ahead by applying the brakes etc.
- Page 257 2-4. Using other driving systems CAUTION ■ To avoid inadvertent cruise control activation Switch the cruise control off using the “ON-OFF” button when not in use. ■ Situations unsuitable for dynamic radar cruise control Do not use dynamic radar cruise control in any of the following situations. Doing so may result in inappropriate speed control and could cause an acci- dent resulting in death or serious injury.
- Page 258 2-4. Using other driving systems CAUTION ■ When the sensor may not be correctly detecting the vehicle ahead Apply the brakes as necessary when any of the following types of vehicles are in front of you. As the sensor may not be able to correctly detect these types of vehicles, the approach warning (→P.
- Page 259 If the sensor moves even slightly off position, the system may malfunction. If the sensor or surrounding area is subject to a strong impact, always have the area inspected and adjusted by your Toyota dealer. ● Do not disassemble the sensor.
Page 260: Toyota Parking Assist-Sensor
- Page 261 “ON”. The Toyota parking assist- sensor indicator will be dis- played. Each pressing of the switch turns the Toyota parking assist- sensor on and off. When on, the buzzer sounds to inform the driver that the sys- tem is operational.
- Page 262 2-4. Using other driving systems Display When the sensors detect an obstacle, the Toyota parking assist-sen- sor indicator is illuminated by an LED (non-optitron type meters), or a graphic is shown on the multi-information display (optitron type meters and accessory meter) depending on the position and distance to the obstacle.
- Page 263 2-4. Using other driving systems ■ 8 sensor type (vehicles with an optitron type meters) Front corner sensor operation Front center sensor operation Front tire angle Rear corner sensor operation Rear center sensor operation ■ 8 sensor type (vehicles with an accessory meter) When the vehicle is moving for- ward or backward A simplified image is displayed...
- Page 264 2-4. Using other driving systems The distance display and buzzer When a sensor detects an obstacle, the direction of and the approxi- mate distance to the obstacle are displayed and the buzzer sounds. ■ Distance display Corner sensor 8 sensor type Approximate Accessory distance to...
- Page 265 2-4. Using other driving systems Center sensors 8 sensor type Approximate Accessory distance to 4 sensor type Optitron type meter (insert obstacle meter display) Front: 100 cm (3.3 ft.) to 50 cm (1.6 ft.) Rear: 150 cm (4.9 ft.) to (blinking (blinking (continuous)
- Page 266 2-4. Using other driving systems ■ Buzzer operation and distance to an obstacle A beep sounds when the corner sensors and center sensors are operating. ● The buzzer beeps faster as the vehicle approaches an obstacle. When the vehicle comes within the following distance of the obstacle, the buzzer sounds continuously.
- Page 267 2-4. Using other driving systems 8 sensor type Forward Backward ■ Detection range of the sensors Approximately 100 cm (3.3 ft.) Approximately 150 cm (4.9 ft.) Approximately 60 cm (2.0 ft.) Approximately 55 cm (1.8 ft.) The diagram shows the detection range of the sensors.
- Page 268 • The vehicle is approaching a tall or right-angled curb. • In harsh sunlight or intense cold weather. • A non-genuine Toyota suspension (lowered suspension etc.) is installed. In addition to the examples above, there are instances in which, because of their shape, signs and other objects may be judged by a sensor to be closer than they are.
- Page 269 If the vehicle indicator remains on while the rear corner and rear center indicators flash and the malfunction beep sounds for approximately 8 seconds. (vehicles with a non- optitron type meter) Have the vehicle inspected by your Toyota dealer. ■ If the vehicle indicator and the rear corner and rear center indicators flash and the malfunction beep sounds for approximately 8 seconds.
- Page 270 2-4. Using other driving systems ∗ Rear view monitor system (vehicles with an accessory meter) The rear view monitor assists the driver by displaying an image of the area behind the vehicle while reversing. The image is displayed in reverse on the screen. This reversed image is a similar image to the one on the inside rear view mirror.
- Page 271 2-4. Using other driving systems ■ Displayed area Vehicles with back door mounted spare tire The area covered by the camera is lim- ited. Objects which that are close to either corner of the bumper or under the spare wheel cover cannot be seen on the screen.
- Page 272 2-4. Using other driving systems ■ Rear view monitor camera Vehicles with back door In the following cases, it may be difficult mounted spare tire to see images on the screen even when the system is functioning correctly: ● The vehicle is in a dark area, such as at night.
- Page 273 Conditions which may affect the rear view monitor system ● If the back of the vehicle has been hit, the camera’s position and mounting angle may have changed. Have the vehicle inspected by your Toyota dealer. ● Rapid temperature changes, such as when hot water is poured on the vehicle in cold weather, may cause the system to function abnormally.
- Page 274 2-4. Using other driving systems ∗ Wide view front & side monitor (vehicles with an accessory meter) This system can display the wide view front monitor and the side monitor. The wide view front monitor uses a super-wide angle lens to display on screen the areas to the left and right of the vehicle and the blind spots to the front of the vehicle.
- Page 275 2-4. Using other driving systems ■ Changing the display The screen changes as follows with each press of the wide view front & side monitor switch. Wide view front monitor (Side monitor) Trip information Side monitor (Wide view front monitor) The wide view front monitor display and trip information are not acces- sible when the shift lever is in R.
- Page 276 2-4. Using other driving systems ■ Side monitor The image from the side camera is displayed. Use this monitor to help check the area to the left of the vehicle, for example when tak- ing off and stopping, when turning left, etc. (→P. 275) Using the side monitor Vehicle width line Indicates the width of the vehicle...
- Page 277 2-4. Using other driving systems ■ Using the vehicle width line Use the vehicle width line to check the vehicle’s distance from objects such as curbstones etc. As shown in the illustration, be sure that the vehicle width line does not overlap the object. If you also move the vehicle so that the vehicle width line and the object are parallel, you can...
- Page 278 2-4. Using other driving systems ■ When the outside rear view mirrors have been folded The side monitor screen can be displayed even if the outside rear view mir- rors have been folded. In this case, there will be a slight difference between the image displayed when the outside rear view mirrors are extended and when the outside rear view mirrors have been folded.
- Page 279 2-4. Using other driving systems Side camera Camera’s field of view Objects visible to the camera Left side of vehicle ■ Wide view front & side monitor cameras Side camera Front camera In the following cases, it may be difficult to see images on the screen even when the system is functioning correctly: ●...
- Page 280 2-4. Using other driving systems ■ Smear effect If a bright light, such as sunlight reflected off the vehicle body, is picked up by the camera, a smear effect characteristic to the camera may occur. : Smear effect A phenomenon that occurs when a bright light is picked up by the camera;...
- Page 281 • On roads that are not flat or straight, such as curves or slopes. ● If the tires are changed, the position of the guide lines displayed on the screen may be incorrect. When changing the tires, consult your Toyota dealer. ●...
Page 282: Driving Assist Systems
- Page 283 2-4. Using other driving systems When the VSC/TRC systems are operating If the vehicle is in danger of slip- ping or if any of the drive wheels spins, the slip indicator flashes to indicate that the VSC/TRC sys- tems are operating. A buzzer (intermittent) sounds to indicate that VSC is operating.
- Page 284 2-4. Using other driving systems ■ Turning off both TRC and VSC systems To turn the TRC and VSC sys- tems off, press and hold the but- ton for 3 seconds and more while the vehicle is stopped. The VSC OFF indicator light will come on and the “TRC OFF”...
- Page 285 “TRC OFF” indicator turns off (non-optitron type meters) or the message goes off (optitron type meters). (There is no problem with continuing normal driving.) ■ If the slip indicator comes on... It may indicate a malfunction in the VSC or TRC system. Consult your Toyota dealer.
- Page 286 2-4. Using other driving systems CAUTION ■ The ABS does not operate effectively when ● The limits of tire gripping performance have been exceeded (such as excessively worn tires on a snow covered road). ● The vehicle hydroplanes while driving at high speed on the wet or slick road.
- Page 287 The ABS and VSC will not function correctly if different tires are installed on the vehicle. Contact your Toyota dealer for further information when replacing tires or wheels. ■ Handling of tires and the suspension Using tires with any kind of problem or modifying the suspension will affect the driving assist systems, and may cause the system to malfunction.
Page 288: Pcs (Pre-Crash Safety System)
- Page 289 2-4. Using other driving systems Disabling pre-crash braking Pre-crash braking disabled Pre-crash braking enabled The “PCS” warning light turns on when pre-crash braking is dis- abled. Radar sensor The radar sensor detects vehi- cles or other obstacles on or near the road ahead and deter- mines whether a collision is imminent based on the position, speed, and heading of the obsta-...
- Page 290 2-4. Using other driving systems ■ The pre-crash safety system is operational when ● Pre-crash seat belts (situation 1): • Vehicle speed is greater than about 5 km/h (4 mph). • The speed at which your vehicle is approaching the obstacle or the vehicle ahead is greater than about 30 km/h (19 mph).
- Page 291 2-4. Using other driving systems ■ Conditions that may trigger the system even if there is no possibility of a collision ● When there is an object by the roadside at the entrance to a curve ● When passing an oncoming vehicle on a curve ●...
- Page 292 2-4. Using other driving systems ■ Situations in which the pre-crash safety system does not function properly The system may not function effectively in situations such as the following: ● On roads with sharp bends or uneven surfaces ● If a vehicle suddenly moves in front of your vehicle, such as at an inter- section ●...
- Page 293 2-4. Using other driving systems CAUTION ■ Limitations of the pre-crash safety system Do not overly rely on the pre-crash safety system. Always drive safely, taking care to observe your surroundings and checking for any obstacles or other road hazards. Failure to do so may cause an accident resulting in death or serious injury.
- Page 294 If the sensor moves even slightly off position, the system may become inaccurate or malfunction. If the sensor or surrounding area is subject to a strong impact, always have the area inspected and adjusted by your Toyota dealer. ● Do not disassemble the sensor.
Page 295: Driving Information Cargo And Luggage
- Page 296 Roof luggage carrier precautions To use the roof rails as a roof luggage carrier, you must fit the roof rails with two or more genuine Toyota cross rails or their equivalent. Follow the manufacturer’s instructions and precautions when installing the...
- Page 297 2-5. Driving information CAUTION ■ Load and distribution ● Do not overload your vehicle. ● Do not apply loads unevenly. Improper loading may cause deterioration of steering or braking control which may cause death or serious injury. ■ When loading cargo Observe the following precautions: ●...
Page 298: Winter Driving Tips
- Page 299 2-5. Driving information ■ When driving the vehicle Accelerate the vehicle slowly and drive at a reduced speed suit- able to road conditions. ■ When parking the vehicle (in the winter time or in the cold latitudes) Park the vehicle and move the shift lever to P (automatic trans- mission) or 1 or R (manual transmission) without setting the parking brake.
- Page 300 2-5. Driving information ■ Tire chain installation Observe the following precautions when installing and removing chains: ● Install and remove tire chains in a safe location. ● Install tire chains on the rear tires. Do not install tire chains on the front tires.
Page 301: Trailer Towing
- Page 302 2-5. Driving information ■ Gross axle weight The load on either the front or rear axle resulting from distribu- tion of the gross vehicle weight on both axles must not exceed the following: Front: 1450 kg (3197 lb.) Rear: 1800 kg (3968 lb.) ■...
- Page 303 2-5. Driving information Hitch Trailer hitch assemblies have different weight capacities established by the hitch manufacturer. Even though the vehicle may be rated for towing a higher weight, the operator must never exceed the maxi- mum weight rating specified for the trailer hitch. Connecting trailer lights Use the wire harness stored in the rear end under the jack.
- Page 304 ■ Break-in schedule Toyota recommends that you do not use a new vehicle or a vehicle with any new power train components (engine, transmission, differential, wheel bear- ings, etc.) to tow a trailer for the first 800 km (500 miles) of driving.
- Page 305 2-5. Driving information ■ When using a weight carrying hitch The gross vehicle weight value will differ when the weight carrying hitch is in use (only on models listed below). When using the weight carrying hitch, an amount up to the total trailer weight can be towed by reducing the number of passengers.
- Page 306 2-5. Driving information 3-door models Maximum seating capacity Gross vehicle Model code weight (kg, lb.) Front seats Second seats 2575 (5678) KDJ155R-GJAEYW 2590 (5711) : Model code is indicated on the Certification Label. (→P. 615) : Vehicles standard with 265/65R17 tires : Vehicles standard with 265/60R18 tires without electronically modulated air suspension system : Vehicles with electronically modulated air suspension system...
- Page 307 2-5. Driving information CAUTION ■ Speed limits Do not exceed the established speed limit for towing a trailer in built-up areas or 100 km/h (63 mph), whichever is lower. Failing to observe this precaution may lead to an accident causing death or serious injury.
- Page 308 ■ When installing a trailer hitch ● Use only the position recommended by your Toyota dealer. Do not install the trailer hitch on the bumper; this may cause body damage. ● Do not use axle-mounted hitches, as they can cause damage to the axle housing, wheel bearings, wheels or tires.
- Page 309 2-5. Driving information Trailer towing tips Your vehicle will handle differently when towing a trailer. The 3 main causes of vehicle-trailer accidents are driver error, excessive speed and improper trailer loading. Keep the following in mind when towing: ● Before starting out, check the trailer lights and the vehicle-trailer connections.
- Page 310 2-5. Driving information ● Crosswinds and rough roads will adversely affect handling of your vehicle and trailer, causing sway. Periodically check the rear to pre- pare for being passed by large trucks or buses, which may cause your vehicle and trailer to sway. If swaying occurs, firmly grip the steering wheel, reduce speed immediately but gradually, and steer straight ahead.
- Page 311 2-5. Driving information Apply the brakes and keep them applied. STEP Have someone place wheel blocks under both the vehicle and STEP trailer wheels. When the wheel blocks are in place, release the brakes slowly STEP until the blocks absorb the load. Apply the parking brake firmly.
- Page 312 2-5. Driving information...
- Page 313 3-1. Using the air conditioning system and defogger Front manual air conditioning system ......314 Front automatic air conditioning system ......320 Rear manual air conditioning system ......330 Rear automatic air conditioning system ......333 Heater idle up switch ..336 Rear window defogger switch......
- Page 314 Interior features 3-3. Using the hands-free system 3-5. Using the storage features (for mobile phone) List of storage features ..415 • Glove box ....... 416 Hands-free system • Card holder..... 417 (for mobile phone) ..386 • Console box....418 Using the hands-free system •...
Page 315: System
- Page 316 3-1. Using the air conditioning system and defogger To change the air outlets, press any button of STEP Air flow as shown below according to the mode selected. Air flows to the upper body. : Some models Air flows to the upper body and feet.
- Page 317 3-1. Using the air conditioning system and defogger Air flows to the feet. : Some models Air flows to the feet and the windshield defogger operates. : Some models ■ Switching between outside air and recirculated air modes Press The mode switches between outside air mode (introduces air from out- side the vehicle) (indicator off) and recirculated air mode (recycles air inside the vehicle) (indicator on) each time the button is pressed.
- Page 318 3-1. Using the air conditioning system and defogger Defogging the windshield Defogging The air intake is automatically switched to outside air mode. Pressing the “A/C” button to turn the cooling and dehumidification function on clears the windshield and side windows faster. Adjusting the position of and opening and closing the air outlets Front center outlets Direct air flow to the left or...
- Page 319 3-1. Using the air conditioning system and defogger Front side outlets Direct air flow to the left or right, up or down. Turn the knob to open or close the vent. Rear outlets (vehicles without a rear manual air conditioning system) Direct air flow to the left or right, up or down.
- Page 320 There may be a problem in the air conditioning system if the indicator light continues to flash. Turn the air conditioning system off and have it inspected by your Toyota dealer. ■ When outside air temperature is below 0 °C (32 °F) The cooling and dehumidification function may not operate even when the “A/C”...
Page 321: Front Automatic Air Conditioning System
- Page 322 3-1. Using the air conditioning system and defogger Using the automatic air conditioning system Press the “AUTO” button. STEP The air conditioning system begins to operate. Air outlets and fan speed are automatically adjusted according to the temperature set- ting. Turn the “TEMP”...
- Page 323 3-1. Using the air conditioning system and defogger To adjust the temperature setting, turn the “TEMP” knob STEP (driver’s side) clockwise to increases the temperature and turn the “TEMP” knob (driver’s side) counterclockwise to decreases the temperature. When the “DUAL” button is pressed (the indicator on the “DUAL” button is on) or the passenger’s side temperature control knob is turned, the temperature for the driver and passenger seats can be adjusted separately.
- Page 324 3-1. Using the air conditioning system and defogger Air flows to the feet. : Some models Air flows to the feet and the windshield defogger operates. : Some models ■ Switching between outside air and recirculated air modes Press The mode switches between outside air mode (introduces air from outside the vehicle) (indicator off) and recirculated air mode (recycles air inside the vehicle) (indicator on) each time the button is pressed.
- Page 325 3-1. Using the air conditioning system and defogger Changing the rear seat settings (vehicles with a rear automatic air conditioning system) ■ Adjusting the temperature setting Press the “REAR” button. STEP “REAR” is shown on the display. Turn the “TEMP” knob (passenger’s side) clockwise to STEP increases the temperature and turn the “TEMP”...
- Page 326 3-1. Using the air conditioning system and defogger Defogging the windshield Defogging The air conditioning system oper- ates automatically. Recirculated air mode may auto- matically switch to outside air mode when the ambient tempera- ture is low. Pollen removal mode button Operates pollen removal mode on/off.
- Page 327 3-1. Using the air conditioning system and defogger Adjusting the position and opening and closing the air outlets Front center outlets Direct air flow to the left or right, up or down. Turn the knob to open or close the vent. Front side outlets Direct air flow to the left or right, up or down.
- Page 328 3-1. Using the air conditioning system and defogger ■ Using automatic mode Fan speed is adjusted automatically according to the temperature setting and ambient conditions. As a result, the following may occur. ● Immediately after the switch is pressed, the fan may stop for a while until warm or cool air is ready to flow.
- Page 329 There may be a problem in the air conditioning control system if the indicator light continues to flash. Turn the air conditioning sys- tem off and have it inspected by your Toyota dealer. ■ When outside air temperature is below 0 °C (32 °F) The cooling and dehumidification function may not operate even when “A/C”...
- Page 330 3-1. Using the air conditioning system and defogger CAUTION ■ To prevent the windshield from fogging up Do not use during cool air operation in extremely humid weather. The difference between the temperature of the outside air and that of the wind- shield can cause the outer surface of the windshield to fog up, blocking your vision.
Page 331: Rear Manual Air Conditioning System
- Page 332 3-1. Using the air conditioning system and defogger Air flows to the upper body. Air flows to the upper body and feet. Air flows to the feet. ■ Adjusting the fan speed Turn the air volume control knob clockwise (increase) or counter- clockwise (decrease).
- Page 333 3-1. Using the air conditioning system and defogger Adjusting the position of and opening and closing the air outlets Roof side outlets Direct air flow to the left or right, up or down. Turn the knob fully to the back of the vehicle to close the vent.
Page 334: Rear Automatic Air Conditioning System
- Page 335 3-1. Using the air conditioning system and defogger Adjusting the settings manually ■ Adjusting the temperature setting Press “∧” on the “TEMP” button to increase the temperature and “∨” to decrease the temperature. ■ Changing the air outlets Press any button of Air flows as shown below according to the mode selected.
- Page 336 3-1. Using the air conditioning system and defogger Air flows to the feet. ■ Adjusting the fan speed Press “∧” (increase) or “∨” (decrease) on Pressing turns off the fan. Adjusting the position and opening and closing the air outlets Roof side outlets Direct air flow to the left or right, up or down.
Page 337: Heater Idle Up Switch
Page 338: rear window defogger switch.
- Page 339 3-1. Using the air conditioning system and defogger ■ The defoggers can be operated when Vehicles without a smart entry & start system The engine switch is in the “ON” position. Vehicles with a smart entry & start system The “ENGINE START STOP” switch is in IGNITION ON mode. ■...
Page 340: Using The Audio System Audio System Types
- Page 341 3-2. Using the audio system Title Page Using the radio P. 341 Using the CD player P. 344 Playing MP3 and WMA discs P. 353 Operating an iPod P. 361 Operating a USB memory P. 369 Optimal use of the audio system P.
Page 342: Using The Radio
- Page 343 3-2. Using the audio system Setting station presets ■ Manually operation Search for the desired stations by turning the “TUNE•SEL” STEP knob or pressing “∧” or “∨” on the “SEEK/TRACK” button. Press and hold the button (from the 1 button to the 6 button) STEP the station is to be set to until you hear a beep.
- Page 344 3-2. Using the audio system Silencing the sound (type A) Press the “MUTE” button. Press the button again to turn the system back on. ■ When the battery is disconnected All preset stations are erased. ■ Reception sensitivity ● It is difficult to maintain perfect radio reception at all times due to the con- tinually changing position of the antenna, differences in signal strength and surrounding objects, such as trains and transmitters.
Page 345: Using The Cd Player
- Page 346 3-2. Using the audio system Loading a CD ■ Loading a CD Type A Insert a CD. Type B Press the “LOAD” button. STEP “WAIT” is shown on the display. When the indicator on the slot turns from amber to green, STEP insert a CD.
- Page 347 3-2. Using the audio system Ejecting CDs ■ Ejecting a CD Type A Press and remove the CD. Type B To select the CD to be ejected, STEP press “∧” or “∨” on the “CH/ DISC” button. The selected disc number is shown on the display.
- Page 348 3-2. Using the audio system Selecting, fast-forwarding, reversing and scanning tracks ■ Selecting a track Press “∧” to move up or “∨” to move down using the “SEEK/ TRACK” button until the desired track number is displayed. ■ Fast-forwarding and reversing tracks To fast-forward or reverse, press and hold “∧”...
- Page 349 3-2. Using the audio system Playing and pausing tracks (type B) To play or pause a track, press the 3 ( ) button. Random playback ■ Current CD Press the 1 (RAND) button. Songs are played in random order. To cancel, press the 1 (RAND) button again. ■...
- Page 350 3-2. Using the audio system Switching the display Press the “TEXT” button. Each time the button is pressed, the display changes in the following order: Elapsed time → CD title → Track title. Silencing the sound (type A) Press the “MUTE” button. Press the button again to turn the system back on.
- Page 351 This indicates that operation is stopped due to a high tempera- ture inside the player. Wait for a while and then press the “CD” or “CD•AUX” button. If the CD still cannot be played back, contact your Toyota dealer. ■ Discs that can be used Discs with the marks shown below can be used.
- Page 352 3-2. Using the audio system NOTICE ■ CDs and adapters that cannot be used Do not use the following types of CDs, 8 cm (3 in.) CD adapters or Dual Disc. Doing so may damage the CD player and/or the CD insert/eject function. ●...
- Page 353 3-2. Using the audio system NOTICE ● CDs that have tape, stickers or CD-R labels attached to them, or that have had the label peeled off ■ CD player precautions Failure to follow the precautions below may result in serious damage to the CDs or the player itself.
Page 354: Playing Mp3 And Wma Discs
- Page 355 3-2. Using the audio system Loading and ejecting MP3 and WMA discs →P. 345, 346 Selecting MP3 and WMA discs →P. 347 Selecting and scanning a folder ■ Selecting a folder one at a time Press “∧” or “∨” on the “FOLDER” button or the 6 (∧) or 5 (∨) button to select the desired folder.
- Page 356 3-2. Using the audio system Selecting and scanning files ■ Selecting a file Turn the “TUNE•SEL” knob or press “∧” or “∨” on the “SEEK/ TRACK” button to select the desired file. ■ Scanning the files in a folder (type B) Press the “SCAN”...
- Page 357 3-2. Using the audio system Repeat play ■ Repeating a file Press the 2 (RPT) button. To cancel, press the 2 (RPT) button again. ■ Repeating all the files in a folder Press and hold the 2 (RPT) button until you hear a beep. To cancel, press the 2 (RPT) button again.
- Page 358 Wait for a while and then press the “CD” or “CD•AUX” button. If the CD still cannot be played back, contact your Toyota dealer. “NO MUSIC”: This indicates that an MP3/WMA file is not included in the CD.
- Page 359 3-2. Using the audio system ● MP3 file compatibility • Compatible standards MP3 (MPEG1 LAYER3, MPEG2 LSF LAYER3) • Compatible sampling frequencies MPEG1 LAYER3: 32, 44.1, 48 (kHz) MPEG2 LSF LAYER3: 16, 22.05, 24 (kHz) • Compatible bit rates (compatible with VBR) MPEG1 LAYER3: 64, 80, 96, 112, 128, 160, 192, 224, 256, 320 (kbps) MPEG2 LSF LAYER3: 64, 80, 96, 112, 128, 144, 160 (kbps) •...
- Page 360 3-2. Using the audio system ● Compatible disc formats The following disc formats can be used: • Disc formats: CD-ROM Mode 1 and Mode 2 CD-ROM XA Mode 2, Form 1 and Form 2 • File formats: ISO9660 Level 1, Level 2, (Romeo, Joliet) MP3 and WMA files written in any format other than those listed above may not play correctly, and their file names and folder names may not be displayed correctly.
- Page 361 3-2. Using the audio system ● MP3 and WMA playback When a disc containing MP3 or WMA files is inserted, all files on the disc are first checked. Once the file check is finished, the first MP3 or WMA file is played.
Page 362: Operating An Ipod
- Page 363 3-2. Using the audio system ■ Control panel Type A “PWR•VOL” knob Repeat play button Shuffle playback button Go back button Mute button Power Volume iPod menu/Song selector knob Song selector button Playback button Text button Playback/Pause button...
- Page 364 3-2. Using the audio system Type B “PWR•VOL” knob Repeat play button Shuffle playback button Go back button iPod menu/Song Power Volume selector knob Song selector button Playback button Text button Playback/Pause button Selecting a play mode Press the “TUNE•SEL” knob to select iPod menu mode. STEP Turning the “TUNE•SEL”...
- Page 365 3-2. Using the audio system ■ Play mode list First Second Third Fourth Play mode selection selection selection selection Playlists “PLAYLISTS” Songs select select “ARTISTS” Artists select Albums select Songs select “ALBUMS” Albums select Songs select “SONGS” Songs select “PODCASTS” Albums select Songs select “GENRES”...
- Page 366 3-2. Using the audio system Selecting songs Turn the “TUNE•SEL” knob or press “∧” or “∨” on the “SEEK/TRACK” button to select the desired song. Playing and pausing songs To play or pause a song, press the 3 ( ) button. Fast-forwarding and rewinding songs To fast-forward or rewind, press and hold “∧”...
- Page 367 3-2. Using the audio system Switching the display Press the “TEXT” button. Each time the button is pressed, the display changes in the following order: Elapsed time → Album title → Track title → Artist name Silencing the sound (type A) Press the “MUTE”...
- Page 368 3-2. Using the audio system ■ iPod problems To resolve most problems encountered when using your iPod, disconnect your iPod from the vehicle iPod connection and reset it. For instructions on how to reset your iPod, refer to your iPod Owner’s Man- ual.
- Page 369 3-2. Using the audio system CAUTION ■ Caution while driving Do not connect iPod or operate the controls. NOTICE ■ To prevent damage to iPod ● Do not leave iPod in the vehicle. The temperature inside the vehicle may become high, resulting in damage to the player. ●...
Page 370: Operating A Usb Memory
- Page 371 3-2. Using the audio system ■ Control panel Type A “PWR•VOL” knob Repeat play button Random playback button Search playback Mute button button Power Volume File selector knob File selector button Folder selector button Playback button Text button Playback/Pause button...
- Page 372 3-2. Using the audio system Type B “PWR•VOL” knob Search playback button Folder selector Random playback button buttons Power Volume File selector knob File selector button Text button Playback button Repeat play button Playback/Pause button Selecting and scanning a folder ■...
- Page 373 3-2. Using the audio system ■ Scanning the first file of all the folders Press and hold the “SCAN” button until you hear a beep. STEP The first ten seconds of the first file in each folder will be played. When the desired folder is reached, press the “SCAN”...
- Page 374 3-2. Using the audio system Random playback ■ Playing files from a folder in random order Press the 1 (RAND) button. To cancel, press the 1 (RAND) button again. ■ Playing all the files from a USB memory in random order Press and hold the 1 (RAND) button until you hear a beep.
- Page 375 3-2. Using the audio system ■ USB memory functions Depending on the USB memory that is connected to the system, certain functions may not be available. Disconnecting the device and reconnecting it once again may resolve some malfunctions. ■ Display →P.
- Page 376 3-2. Using the audio system ● MP3 and WMA files MP3 (MPEG Audio LAYER 3) is a standard audio compression format. Files can be compressed to approximately 1/10 of their original size using MP3 compression. WMA (Windows Media Audio) is a Microsoft audio compression format. This format compresses audio data to a size smaller than that of the MP3 format.
- Page 377 3-2. Using the audio system ● ID3 and WMA tags ID3 tags can be added to MP3 files, making it possible to record the track title, artist name, etc. The system is compatible with ID3 Ver. 1.0, 1.1, and Ver. 2.2, 2.3, 2.4 ID3 tags.
- Page 378 3-2. Using the audio system CAUTION ■ Caution while driving Do not connect USB memory or operate the controls. NOTICE ■ To prevent damage to USB memory ● Do not leave USB memory in the vehicle. The temperature inside the vehi- cle may become high, resulting in damage to the player.
Page 379: Optimal Use Of The Audio System
- Page 380 3-2. Using the audio system ■ Adjusting sound quality Turning the “TUNE•SEL” knob adjusts the level. Mode Sound Turn coun- Turn Level displayed quality mode terclockwise clockwise “BAS” Bass -5 to 5 “MID” Mid-range -5 to 5 High “TRE” Treble -5 to 5 Front/rear Shifts to...
- Page 381 3-2. Using the audio system ■ Trademark owned by SRS Labs, Inc. (Type A) The audio systems utilize SRS FOCUS and SRS TruBass audio enhancement technologies, under license from SRS Labs, Inc., in all mode except AM radio mode. FOCUS, TruBass, SRS and symbols are trademarks of SRS Labs, Inc.
Page 382: Using The Aux Port
- Page 383 3-2. Using the audio system ■ Operating portable audio devices connected to the audio system The volume can be adjusted using the vehicle’s audio controls. All the other adjustments must be made on the portable audio device itself. ■ When using a portable audio device connected to the power outlet Noise may occur during playback.
Page 384: Using The Steering Wheel Audio Switches
- Page 385 3-2. Using the audio system Turning the power on Press the “MODE” button when the audio system is turned off. The audio system can be turned off by holding the switch down for 1 sec- ond or more. Changing the audio source Press the “MODE”...
- Page 386 3-2. Using the audio system Selecting a track/file or song Press the “MODE” button to select CD, iPod or USB memory STEP mode. Press “∧” or “∨” on to select the desired track/file or STEP song. Selecting a folder Press the “MODE” button to select USB memory mode. STEP Press and hold “∧”...
- Page 387 3-3. Using the hands-free system (for mobile phone) ∗ Hands-free system (for mobile phone) The hands-free system is a function that allows you to use your mobile phone without touching it. ® ® This system supports Bluetooth mobile phones. Bluetooth is a wireless data system that allows the mobile phone to wirelessly con- nect to the hands-free system and make/receive calls.
- Page 388 3-3. Using the hands-free system (for mobile phone) Title Page Making a phone call ■ Making a phone call • Dialing by inputting a name • Speed dialing • Redial • Call back ■ Receiving a phone call P. 397 •...
- Page 389 3-3. Using the hands-free system (for mobile phone) ■ Conditions under which the system will not operate ● ® If using a mobile phone that does not support Bluetooth ● If the mobile phone is switched off. ● If you are outside service range. ●...
- Page 390 3-3. Using the hands-free system (for mobile phone) ■ When transferring ownership of the vehicle Be sure to initialize the system to prevent personal data from being improp- erly accessed. (→P. 405) ■ ® About Bluetooth Bluetooth is a registered trademark of Bluetooth SIG.
- Page 391 3-3. Using the hands-free system (for mobile phone) CAUTION ■ Caution while driving ® Do not use a mobile phone or connect the Bluetooth phone. ■ Caution regarding interference with electronic devices ® ● Your audio unit is fitted with Bluetooth antennas.
- Page 392 3-3. Using the hands-free system (for mobile phone) Using the hands-free system (for mobile phone) ■ Audio unit Display A message, name, phone number, etc. is displayed. Lower-case characters and special characters cannot be displayed. Selects speed dials Displays information that is too long to be displayed at one time on the display (press and hold)
- Page 393 3-3. Using the hands-free system (for mobile phone) ■ Steering wheel switches Type A Volume The voice guidance volume cannot be adjusted using this button. Off-hook switch Turns the hands-free sys- tem on/starts a call On-hook switch Type B Turns the hands-free sys- tem off/ends a call/refuses a call Talk switch...
- Page 394 3-3. Using the hands-free system (for mobile phone) Using the hands-free phone system for the first time Before using the hands-free phone system, it is necessary to register a mobile phone in the system. The system will enter phone registra- tion mode automatically when starting the system with no mobile phone registered.
- Page 395 3-3. Using the hands-free system (for mobile phone) Menu list of the hands-free phone system Second First menu Third menu Operation detail menu Dialing a number stored in “Callback” the incoming call history memory Dialing a number stored in “Redial” the outgoing call history memory “Add...
- Page 396 3-3. Using the hands-free system (for mobile phone) Second First menu Third menu Operation detail menu “Set PIN” Setting a PIN code “Security” “Phbk Lock” Locking the phone book “Phbk Unlock” Unlocking the phone book “Pair Phone” Registering a mobile phone Selecting a mobile phone to “Select Phone”...
- Page 397 3-3. Using the hands-free system (for mobile phone) ■ Automatic volume adjustment When vehicle speed reaches 80 km/h (50 mph) or more, the volume auto- matically increases. The volume returns to the previous volume setting when vehicle speed drops to 70 km/h (43 mph) or less. ■...
Page 398: Making A Phone Call
- Page 399 3-3. Using the hands-free system (for mobile phone) Speed dialing Press the off-hook switch. STEP Press the preset button in which the desired number is regis- STEP tered. Press the off-hook switch. STEP When receiving a phone call ■ Answering the phone Press the off-hook switch.
- Page 400 3-3. Using the hands-free system (for mobile phone) Using a call history memory Follow the procedure below to use number stored in call history memory: Press the off-hook switch and select “Redial” (when using a STEP number stored in the outgoing call history memory) or “Call back”...
Page 401: Setting A Mobile Phone
- Page 402 3-3. Using the hands-free system (for mobile phone) Registering a mobile phone Select “Pair Phone” using the “TUNE•SEL” knob, and perform the procedure for registering a mobile phone. (→P. 393) Selecting a mobile phone to be used Select “Select Phone” using the “TUNE•SEL” knob. STEP Select the mobile phone to be used using the “TUNE•SEL”...
- Page 403 3-3. Using the hands-free system (for mobile phone) Changing the passkey Select “Set Passkey” using the “TUNE•SEL” knob. STEP Select a 4 to 8-digit number using the “TUNE•SEL” knob. STEP The number should be input 1 digit at a time. When the entire number to be registered as a passkey has STEP been input, press the “TUNE•SEL”...
Page 404: Security And System Setup
- Page 405 3-3. Using the hands-free system (for mobile phone) Setting or changing the PIN ■ Setting a PIN Select “Set PIN” using the “TUNE•SEL” knob. STEP Enter a PIN using the “TUNE•SEL” knob. STEP Input the code 1 digit at a time. ■...
- Page 406 3-3. Using the hands-free system (for mobile phone) ® Displaying the Bluetooth device address and name Select “Device Name” using the “TUNE•SEL” knob. STEP ® Turn the “TUNE•SEL” knob to display the Bluetooth device STEP address and name. Select “Go Back” using the “TUNE•SEL” knob to return to STEP “System Setup”.
Page 407: Using The Phone Book
- Page 408 3-3. Using the hands-free system (for mobile phone) Adding a new phone number The following methods can be used to add a new phone number: ● Transferring data from the mobile phone ● Inputting a phone number using the “TUNE•SEL” knob ●...
- Page 409 3-3. Using the hands-free system (for mobile phone) Select “Record Name” using the “TUNE•SEL” knob, and say STEP the desired name after the beep. The name to be registered will be repeated aloud. Select “Confirm” using the “TUNE•SEL” knob. STEP Select “Confirm”...
- Page 410 3-3. Using the hands-free system (for mobile phone) Setting speed dials Select “Speed Dial” using the “TUNE•SEL” knob. STEP Select the desired data using the “TUNE•SEL” knob. STEP Select the desired preset button, and register the data into STEP speed dial by either of the following methods: a.
Page 411: Using The Interior Lights Interior Lights List
Page 412: personal/interior light main switch, page 413: personal/interior lights, page 414: lounge illumination control switches.
- Page 415 3-4. Using the interior lights ■ Illuminated entry system Vehicles without a smart entry & start system The lights automatically turn on/off according to the engine switch position, whether the doors are locked/unlocked, and whether the doors are open/ closed. Vehicles with a smart entry &...
Page 416: Using The Storage Features List Of Storage Features
Page 417: glove box, page 418: card holder, page 419: console box.
- Page 420 3-5. Using the storage features Console box ■ Items unsuitable for the console box ● Drinks in unsealed containers ● Fragile items, perishables or anything with strong odor ● Owner’s manual, electronic devices, CDs, etc. (when using the console box vent) ■...
Page 421: Bottle Holders/Door Pockets
Page 422: cup holders.
- Page 423 3-5. Using the storage features Cup holders Rear (type B) (if equipped) Pull the armrest down and press in and release the button. Rear (type C) (if equipped)
- Page 424 3-5. Using the storage features Cup holders ■ Removing the holder, separate tray and adapter Front (vehicles with an automatic transmission) Pull up the holder. Front (vehicles with a manual transmission) Pull up the separate tray. Rear (type A) Pull up the adapter.
- Page 425 3-5. Using the storage features Cup holders CAUTION ■ Items unsuitable for the cup holder Do not place anything other than cups, mugs or beverage cans in the cup holders. Other items may be thrown out of the holders in the event of sudden braking, sudden swerving or an accident, cause injury.
Page 426: Auxiliary Boxes
- Page 427 3-5. Using the storage features Auxiliary boxes Type D (vehicles with an automatic transmission) Type D (vehicles with a manual transmission)
- Page 428 3-5. Using the storage features Auxiliary boxes CAUTION ■ Caution while driving ● Keep the auxiliary boxes closed. In the event of sudden braking or sudden swerving, an accident may occur due to an occupant being struck by an open auxiliary box or the items stored inside. ●...
Page 429: Cool Box
- Page 430 If the indicator light continues to flash, there may be a malfunction in the sys- tem. Turn the air conditioning system off and have it inspected by your Toyota dealer. ■ When using the cool box lid as an armrest Slide the cool box lid forward or backward as needed.
- Page 431 3-6. Other interior features CAUTION ■ Caution while driving Keep the cool box closed. In the event of sudden braking or sudden swerv- ing, an accident may occur due to an occupant being struck by the open cool box or the items stored inside. NOTICE ■...
Page 432: Sun Visors
Page 433: vanity mirror, page 434: clock, page 435: outside temperature display.
- Page 436 When the vehicle is stopped, or moving at low speeds (less than 20 km/h [12 mph]) ● When the outside temperature has changed suddenly (at the entrance/ exit of a garage, tunnel, etc.) ■ When “--”or “E” is displayed The system may be malfunctioning. Take your vehicle to your Toyota dealer.
Page 437: Ashtray
Page 438: conversation mirror, page 439: power outlet.
- Page 440 3-6. Other interior features Rear of console box (12 V) Luggage compartment (12 V) (if equipped) 3 door models 5 door models...
- Page 441 3-6. Other interior features Luggage compartment (220 VAC) (if equipped) 3 door models 5 door models ■ The power outlet can be used when Vehicles without a smart entry & start system 12 V: The engine switch is in the “ACC” or “ON” position. 220 VAC: The engine switch is in the “ON”...
- Page 442 3-6. Other interior features NOTICE ■ To avoid damaging the power outlet Close the power outlet lid when the power outlet is not in use. Foreign objects or liquids that enter the power outlet may cause a short cir- cuit. ■...
Page 443: Seat Heaters
- Page 444 3-6. Other interior features Vehicles with a manual transmission Turns the seat heater on The indicator light comes on. Adjusts the seat tempera- ture The further you turn the dial upward, the warmer the seat becomes. ■ The seat heaters can be used when Vehicles without a smart entry &...
- Page 445 3-6. Other interior features CAUTION ■ Burns ● Use caution when seating the following persons in a seat with the seat heater on to avoid the possibility of burns: • Babies, small children, the elderly, the sick and the physically chal- lenged •...
Page 446: Armrest
Page 447: coat hooks, page 448: assist grips, page 449: floor mat.
- Page 450 3-6. Other interior features CAUTION ■ Before driving ● Check that the floor mat is securely fixed in the correct place with all the provided retaining hooks (clips). Be especially careful to perform this check after cleaning the floor. ● With the engine stopped and the shift lever in P (automatic transmission) or N (manual transmission), fully depress...
Page 451: Luggage Compartment Features
- Page 452 3-6. Other interior features Secure the warning reflector. STEP The warning reflector itself is not included as an original equipment. ■ Cargo net hooks To hang the cargo net, use the cargo net hooks. The cargo net itself is not included as an original equip- ment.
- Page 453 3-6. Other interior features ■ Auxiliary box (if equipped) Type A Remove the cover. Type B ■ Auxiliary tray (if equipped)
- Page 454 3-6. Other interior features ■ Luggage cover (if equipped) 3-doors models Attach the hooks to the head STEP restraints. 5-doors models Attach the hooks to the head STEP restraints. Vehicles with the third seats: When using the luggage cover, the third seat must be fold down.
- Page 455 3-6. Other interior features Removing the luggage cover The luggage cover can be removed by following the procedure below. Retract the cover and release both ends, then lift it out. After removing the luggage cover, place it somewhere other than the passenger compartment.
- Page 456 3-6. Other interior features CAUTION ■ When the cargo hooks are not in use To avoid injury, always return the cargo hooks to their stowed positions. ■ Caution while driving Keep the auxiliary box closed. In the event of sudden braking or sudden swerving, an accident may occur due to an occupant being struck by an open auxiliary box or the items stored inside.
- Page 457 3-6. Other interior features...
- Page 458 Maintenance and care 4-1. Maintenance and care Cleaning and protecting the vehicle exterior ..458 Cleaning and protecting the vehicle interior ..462 4-2. Maintenance Maintenance requirements....465 4-3. Do-it-yourself maintenance Do-it-yourself service precautions ..... 468 Hood ......... 472 Engine compartment..473 Tires........
Page 459: The Vehicle Exterior
- Page 460 4-1. Maintenance and care ■ Aluminum wheels ● Remove any dirt immediately by using a neutral detergent. Do not use hard brushes or abrasive cleaners. Do not use strong or harsh chemical cleaners. Use the same mild detergent and wax as used on the paint. ●...
- Page 461 4-1. Maintenance and care CAUTION ■ When washing the vehicle Do not apply water to the inside of the engine compartment. Doing so may cause the electrical components etc. to catch fire. ■ When cleaning the windshield (vehicles with rain-sensing windshield wipers) Set the wiper switch to off.
- Page 462 4-1. Maintenance and care NOTICE ■ To prevent paint deterioration and corrosion on the body and compo- nents (aluminum wheels etc.) ● Wash the vehicle immediately in the following cases: • After driving near the sea coast • After driving on salted roads •...
Page 463: Cleaning And Protecting The Vehicle Interior
- Page 464 4-1. Maintenance and care ■ Caring for leather areas Toyota recommends cleaning the interior of the vehicle at least twice a year to maintain the quality of the vehicle’s interior. ■ Shampooing the carpets There are several commercial foaming-type cleaners available. Use a sponge or brush to apply the foam.
- Page 465 4-1. Maintenance and care NOTICE ■ Cleaning detergents ● Do not use the following types of detergent, as they may discolor the vehi- cle interior or cause streaks or damage to painted surfaces: • Non-seat portions: Organic substances such as benzene or gasoline, alkaline or acidic solutions, dye, and bleach •...
Page 466: Maintenance Requirements
- Page 467 4-2. Maintenance ■ Where to go for service? It makes good sense to take your vehicle to your local Toyota dealer for ser- vice. Toyota technicians are well-trained specialists receiving the latest service information through technical bulletins, service tips, and in-dealership train- ing programs.
- Page 468 4-2. Maintenance CAUTION ■ If your vehicle is not properly maintained Improper maintenance could result in serious damage to the vehicle and possible serious injury or death. ■ Handling of the battery Battery posts, terminals and related accessories contain lead and lead com- pounds which are known to cause brain damage.
Page 469: Do-It-Yourself Service Precautions
- Page 470 4-3. Do-it-yourself maintenance Items Parts and tools • Fuse with same amperage rating Fuses (→P. 505) as original • Bulb with same number and watt- age rating as original Light bulbs (→P. 517) • Phillips-head screwdriver • Flathead screwdriver • Wrench Radiator, condenser and inter- ...
- Page 471 4-3. Do-it-yourself maintenance CAUTION The engine compartment contains many mechanisms and fluids that may move suddenly, become hot, or become electrically energized. To avoid death or serious injury, observe the following precautions: ■ When working on the engine compartment: ● Keep hands, clothing, and tools away from the moving fan and engine drive belt.
- Page 472 4-3. Do-it-yourself maintenance CAUTION ■ When working on or under the vehicle Do not get under the vehicle with just the jack supporting it. Always use automotive jack stands or other solid supports. ■ Safety glasses Wear safety glasses to prevent flying or falling material, fluid spray, etc. from getting in your eyes.
Page 473: Hood
Page 474: engine compartment.
- Page 475 4-3. Do-it-yourself maintenance 1KD-FTV engine Discharging dust valve Battery (→P. 483) (→P. 491) Fuse box (→P. 505) Engine coolant reservoir Fuel filter (→P. 490, 607) (→P. 480) Intercooler (→P. 482) Engine oil level dipstick (→P. 476) Condenser (→P. 482) Engine oil filler cap Cooling fan (→P.
- Page 476 4-3. Do-it-yourself maintenance Engine compartment cover ■ Removing the engine compartment cover ■ Installing the clips...
- Page 477 4-3. Do-it-yourself maintenance Engine oil With the engine at operating temperature and turned off, check the oil level on the dipstick. ■ Checking the engine oil Park the vehicle on level ground. After turning off the engine, STEP wait more than five minutes for the oil to drain back into the bottom of the engine.
- Page 478 4-3. Do-it-yourself maintenance Diesel engine Full ■ Adding engine oil If the oil level is below or near the low level mark, add engine oil of the same type as already in the engine. Make sure to check the oil type and prepare the items needed before adding oil.
- Page 479 Dispose of used oil and filters only in a safe and acceptable manner. Do not dispose of used oil and filters in household trash, in sewers or onto the ground. Call your Toyota dealer, service station or auto parts store for information concerning recycling or disposal.
- Page 480 4-3. Do-it-yourself maintenance NOTICE ■ To prevent serious engine damage Check the oil level on regular basis. ■ When replacing the engine oil ● Be careful not to spill engine oil on the vehicle components. ● Avoid overfilling, or the engine could be damaged. ●...
- Page 481 4-3. Do-it-yourself maintenance Engine coolant Gasoline engine The coolant level is satisfactory if it is between the “F” and “L” lines on the reservoir when the engine is cold. Reservoir cap “F” line “L” line If the level is on or below the “L” line, add coolant up to the “F”...
- Page 482 If the coolant level drops within a short time of replenishing Visually check the radiator, hoses, engine coolant reservoir caps, drain cock and water pump. If you cannot find a leak, have your Toyota dealer test the cap and check for leaks in the cooling system. CAUTION ■...
- Page 483 Check the radiator, condenser and intercooler and clear any foreign objects. If any of the above parts are extremely dirty or you are not sure of their condition, have your vehicle inspected by your Toyota dealer. CAUTION ■ When the engine is hot Do not touch the radiator, condenser or intercooler as they may be hot and cause serious injuries, such as burns.
- Page 484 4-3. Do-it-yourself maintenance Battery Check the battery as follows: ■ Battery exterior Make sure that the battery terminals are not corroded and that there are no loose connections, cracks, or loose clamps. Terminals Hold-down clamp ■ Checking battery fluid Check that the level is between the “UPPER”...
- Page 485 4-3. Do-it-yourself maintenance ■ Adding distilled water O.K. Remove the vent plug. STEP Add distilled water. STEP If the “UPPER” line cannot be seen, check the fluid level by looking directly at the cell. Put the vent plug back on and close securely. STEP STEP...
- Page 486 Make sure to turn off the engine before disconnect the battery. Take extra care when connecting the battery if the “ENGINE START STOP” switch mode prior to discharge is unknown. If the system will not start even after multiple attempts, contact your Toyota dealer.
- Page 487 4-3. Do-it-yourself maintenance CAUTION ■ Chemicals in the battery Batteries contain poisonous and corrosive sulfuric acid and may produce hydrogen gas which is flammable and explosive. To reduce the risk of death or serious injury, take the following precautions while working on or near bat- tery: ●...
- Page 488 4-3. Do-it-yourself maintenance NOTICE ■ When recharging the battery Never recharge the battery while the engine is running. Also, be sure all accessories are turned off. ■ When adding distilled water Avoid overfilling. Water spilled during battery recharging may cause corro- sion.
- Page 489 4-3. Do-it-yourself maintenance Washer fluid If the washer fluid level is at “LOW”, add washer fluid. ■ Using the gauge The washer fluid level is checked by observing the position of the level on the liquid covered holes in the gauge. Current If the level falls below the second hole fluid level...
- Page 490 4-3. Do-it-yourself maintenance CAUTION ■ When adding washer fluid Do not add washer fluid when the engine is hot or running as washer fluid contains alcohol and may catch fire if spilled on the engine etc. NOTICE ■ Do not use any fluid other than washer fluid Do not use soapy water or engine antifreeze instead of washer fluid.
- Page 491 4-3. Do-it-yourself maintenance Draining the fuel filter water (diesel engine only) The water in the fuel filter must be drained immediately if the warning light and buzzer or warning message appears: Vehicles with a non-optitron type meters When the fuel system warning light flashes and buzzer sounds. Vehicles with an optitron type meters When the warning message “DRAIN WATER FROM FUEL FILTER”...
- Page 492 4-3. Do-it-yourself maintenance Discharging dust valve Squeeze the rubber cap to remove the dust if the discharg- ing dust valve is dirty. Shape of the valve differs slightly in accordance with the engine. NOTICE ■ To prevent damaging the engine Do not drive with the discharging dust valve removed.
Page 493: Tires
- Page 494 Do not mix tires of different makes, models or tread patterns. Also, do not mix tires of remarkably different treadwear. ● Do not use tire sizes other than those recommended by Toyota. ● Do not mix differently constructed tires (radial, bias-belted or bias-ply tires).
- Page 495 4-3. Do-it-yourself maintenance NOTICE ■ Driving on rough roads Take particular care when driving on roads with loose surfaces or potholes. These conditions may cause losses in tire inflation pressure, reducing the cushioning ability of the tires. In addition, driving on rough roads may cause damage to the tires themselves, as well as the vehicle’s wheels and body.
Page 496: Tire Inflation Pressure
- Page 497 4-3. Do-it-yourself maintenance CAUTION ■ Proper inflation is critical to save tire performance Keep your tires properly inflated. Otherwise, the following conditions may occur and result in an accident causing death or serious injury: ● Excessive wear ● Uneven wear ●...
Page 498: Wheels
- Page 499 4-3. Do-it-yourself maintenance CAUTION ■ When replacing wheels ● Do not use wheels that are a different size from those recommended in the Owner’s Manual, as this may result in loss of handling control. ● Never use an inner tube in a leaking wheel which is designed for a tube- less tire.
Page 500: Air Conditioning Filter
- Page 501 4-3. Do-it-yourself maintenance Replace it with a new one. STEP The “↑UP” marks shown on the filter should be pointing up. ■ Checking interval Replace the air conditioning filter according to the maintenance schedule. In dusty areas or areas with heavy traffic flow, early replacement may be required.
Page 502: Wireless Remote Control Electronic Key Battery
- Page 503 4-3. Do-it-yourself maintenance Open the case cover using a STEP coin protected with tape etc. and remove the depleted bat- tery. Insert a new battery with the “+” terminal facing up. Vehicles with a smart entry & start system Take out the mechanical key. STEP Remove the cover.
- Page 504 Vehicles without a smart entry & start system: CR2016 Vehicles with a smart entry & start system: CR1632 ● Batteries can be purchased at your Toyota dealer, local electrical appli- ance shops or camera stores. ● Replace only with the same or equivalent type recommended by the manufacturer.
- Page 505 4-3. Do-it-yourself maintenance CAUTION ■ Removed battery and other parts These parts are small and if swallowed by a child, they can cause choking. Keep away from children. Failure to do so could result in death or serious injury. NOTICE ■...
Page 506: Checking And Replacing Fuses
- Page 507 Type A Normal fuse Blown fuse Replace the blown fuse with one of an appropriate amper- age rating. The amperage rat- ing can be found on the fuse box lid. ITY42C012 Type B Normal fuse Blown fuse Contact your Toyota dealer.
- Page 508 4-3. Do-it-yourself maintenance Type C Normal fuse Blown fuse Contact your Toyota dealer. Type D Normal fuse Blown fuse Contact your Toyota dealer. Type E Normal fuse Blown fuse Contact your Toyota dealer.
- Page 509 4-3. Do-it-yourself maintenance Fuse layout and amperage ratings Engine compartment Fuse Ampere Circuit A/C RR 40 A Rear air conditioning system PTC HTR NO.3 30 A Air suspension system, AIR SUS AIR SUS 50 A NO.2 15 A Inverter 30 A Rear window defogger FOG RR...
- Page 510 4-3. Do-it-yourself maintenance Fuse Ampere Circuit FUEL HTR 25 A Fuel heater AIR PMP 10 A Air pump heater PTC HTR NO.2 30 A PTC heater PTC HTR NO.1 50 A PTC heater 20 A Injector, ignition, meter HORN 10 A Horn EFI ECU, EDU, ECT ECU, fuel 25 A...
- Page 511 4-3. Do-it-yourself maintenance Fuse Ampere Circuit 50 A Air conditioning system WIP WSH RR 30 A Rear window wipers and washer H-LP CLN 30 A Headlight cleaner 30 A STARTER MTR 40 A H-LP HI 25 A DIM relay, headlights ALT-S 7.5 A Front turn signal light, rear turn sig-...
- Page 512 4-3. Do-it-yourself maintenance Fuse Ampere Circuit 7.5 A Starter system RAD NO.2 10 A Navigation system Multiport fuel injection system/ MAYDAY 7.5 A sequential multiport fuel injection system 30 A Audio system ABS NO.1 50 A ABS, VSC ABS NO.2 30 A ABS, VSC ...
- Page 513 4-3. Do-it-yourself maintenance Fuse Ampere Circuit Headlight low beam (right), head- H-LP RH-LO 15 A light leveling system H-LP LH-LO 15 A Headlight low beam (left) Coil, injector, ignition, ECT ECU, 10 A noise filter O2 SSR, AFM, ACIS VSV, AI COMB, EYP VSV, AI DRIVER, EGR VRV, SWIRL VSV, SWIRL EFI NO.2...
- Page 514 4-3. Do-it-yourself maintenance Under the instrument panel Fuse Ampere Circuit P/OUTLET 15 A Power outlet Outside rear view mirror motor, BODY ECU, air conditioning sys- tem, audio system, navigation sys- 7.5 A tem, parking assist system, sequential switch, back up relay, DSS#2 ECU, AT indicator, EFI ECU, shift lock ECU Back-up lights, audio system, multi...
- Page 515 4-3. Do-it-yourself maintenance Fuse Ampere Circuit Door lock motor, glass hatch D/L NO.2 25 A opener, BODY ECU 30 A PSB ECU TI & TE 15 A Tilt and telescopic steering FOG FR 15 A Front fog lights 7.5 A DLC 3 7.5 A Air conditioning system...
- Page 516 4-3. Do-it-yourself maintenance Fuse Ampere Circuit Front power window (passenger’s DOOR P 30 A side) DOOR 10 A Power window DOOR D 25 A Front power window (driver’s side) DOOR RR 25 A Rear power window (right) S/ROOF 25 A Moon roof 30 A Windshield wipers and washer...
- Page 517 Never use a fuse of a higher amperage rating than indicated, or use any other object in place of a fuse. ● Always use a genuine Toyota fuse or equivalent. Never replace a fuse with a wire, even as a temporary fix. ●...
Page 518: Light Bulbs
- Page 519 4-3. Do-it-yourself maintenance ■ Rear bulb locations Vehicles with under floor mounted spare tire Rear turn signal light License plate light Back-up light Vehicles with back door mounted spare tire Rear turn signal light License plate light Back-up light...
- Page 520 4-3. Do-it-yourself maintenance Replacing light bulbs ■ Headlight low beams (vehicles with halogen bulbs) Turn the bulb base counterclock- STEP wise. Unplug connector while STEP pushing the lock release.
- Page 521 4-3. Do-it-yourself maintenance ■ Headlight high beams Turn the bulb base counterclock- STEP wise. Unplug connector while STEP pushing the lock release.
- Page 522 4-3. Do-it-yourself maintenance ■ Front fog lights (if equipped) Remove the fender liner bolt STEP and partly remove the fender liner. Unplug the connector while pushing the lock release. Turn the light bulb counterclock- STEP wise.
- Page 523 4-3. Do-it-yourself maintenance ■ Front position lights Turn the bulb base counterclock- STEP wise. The shape of the bulb base dif- fers slightly on the let and right sides. Remove the light bulb. STEP...
- Page 524 4-3. Do-it-yourself maintenance ■ Front turn signal lights Remove the fender liner bolts. STEP Remove the fender liner. STEP...
- Page 525 4-3. Do-it-yourself maintenance Turn the bulb base counterclock- STEP wise. Remove the light bulb. STEP...
- Page 526 4-3. Do-it-yourself maintenance ■ Rear turn signal lights and back-up lights Open the back door. STEP Left-hand side: Remove the bolts and lamp assembly. Right-hand side: Remove the bolts. Close the back door half way and remove the lamp assembly.
- Page 527 4-3. Do-it-yourself maintenance Unplug connector while STEP pushing the lock release. Turn the bulb bases counter- STEP clockwise. Rear turn signal light Back-up light Remove the light bulb. STEP Rear turn signal light Back-up light...
- Page 528 4-3. Do-it-yourself maintenance ■ License plate lights Vehicles with under floor mounted spare tire Remove the screws. STEP Remove the lens and the license plate light unit. Remove the light bulb. STEP...
- Page 529 STEP ■ Lights other than the above If any of the lights listed below has burnt out, have it replaced by your Toyota dealer. ● Headlight low beams (high-intensity discharge bulbs) ● Side turn signal lights ● High mounted stoplight...
- Page 530 Toyota dealer to have the light replaced. ■ Condensation build-up on the inside of the lens Contact your Toyota dealer for more information in the following situations. Temporary condensation build-up on the inside of the headlight lens does not indicate a malfunction.
- Page 531 ■ High-intensity discharge (HID) headlights ● Contact your Toyota dealer before replacing high-intensity discharge headlights (including light bulbs). ● Do not touch the high-intensity discharge headlight’s high voltage socket when the headlights are turned on.
- Page 532 When trouble arises 5-1. Essential information 5-2. Steps to take in an emergency Emergency flashers ..532 If a warning light turns on If your vehicle needs or a warning buzzer to be towed ..... 534 sounds......543 If you think something is If a warning message is wrong......
- Page 533 5-1. Essential information Emergency flashers Use the emergency flashers if the vehicle malfunctions or is involved in an accident. Type A Press the switch to flash all the turn signal lights. To turn them off, push the switch once again. Type B Press the switch to flash all the turn signal lights.
- Page 534 5-1. Essential information NOTICE ■ To prevent battery discharge Do not leave the emergency flashers on longer than necessary when the engine is not running.
- Page 535 If your vehicle needs to be towed If towing is necessary, we recommend having your vehicle towed by your Toyota dealer or a commercial towing service, using a lift-type truck or a flat bed truck. Use a safety chain system for all towing, and abide by all state/pro- vincial and local laws.
- Page 536 5-1. Essential information Emergency towing If a tow truck is not available in an emergency, your vehicle may be temporarily towed using a cable or chain secured to the emergency towing hooks. This should only attempted on hard surfaced roads for short distances at low speeds.
- Page 537 5-1. Essential information Towing with a sling-type truck Do not tow with a sling type truck to prevent body damage. Towing with a wheel lift-type truck From the front Use a towing dolly under the rear wheels. From the rear Use a towing dolly under the front wheels.
- Page 538 5-1. Essential information Using a flat bed truck If your Toyota is transported by a flat bed truck, it should be tied down at the locations shown in the illustration. If you use chains or cables to tie down your vehicle, the angles shaded in black must be 45°.
- Page 539 5-1. Essential information ■ Before emergency towing Vehicles without a smart entry & start system STEP Release the parking brake. STEP Put the four-wheel drive control switch in H4F. (The center differen- tial is unlocked.) STEP Shift the shift lever in N (automatic transmission) or neutral (manual transmission).
- Page 540 5-1. Essential information CAUTION ■ Caution while towing ● Use extreme caution when towing the vehicle. Avoid sudden starts or erratic driving maneuvers which place excessive stress on the emergency towing hook and the cables or chains. Always be cautious of the surroundings and other vehicles while towing. ●...
- Page 541 5-1. Essential information NOTICE ■ To prevent causing serious damage to the transmission and transfer when towing using a wheel-lift type truck Never tow this vehicle with any of the wheels in contact with the ground. ■ To avoid serious damage to your vehicle (vehicles with an automatic transmission) Do not use the rear emergency towing hook.
- Page 542 5-1. Essential information If you think something is wrong If you notice any of the following symptoms, your vehicle probably needs adjustment or repair. Contact your Toyota dealer as soon as possible. ■ Visible symptoms ● Fluid leaks under the vehicle (Water dripping from the air conditioning after use is normal.)
- Page 543 5-1. Essential information Fuel pump shut off system (gasoline engine only) To minimize the risk of fuel leakage when the engine stalls or when an airbag inflates upon collision, the fuel pump shut off system stops the supply of fuel to the engine. Follow the procedure below to restart the engine after the system is activated.
Page 544: If A Warning Light Turns
- Page 545 Stop the vehicle immediately. The following warnings indicate the possibility of damage to the vehi- cle that may lead to an accident. Immediately stop the vehicle in a safe place and contact your Toyota dealer. Warning light Warning light/Details Charging system warning light Indicates a malfunction in the vehicle’s charging system.
- Page 546 Have the vehicle inspected immediately. Failure to investigate the cause of the following warnings may lead to the system operating abnormally and possibly cause an accident. Have the vehicle inspected by your Toyota dealer immediately. Warning light Warning light/Details Malfunction indicator lamp Indicates a malfunction in: •...
- Page 547 5-2. Steps to take in an emergency Warning light Warning light/Details Slip indicator light Indicates a malfunction in: • Vehicle Stability Control; • Traction Control The indicator will blink when the system listed above or below is operational. (→P. 281) •...
- Page 548 5-2. Steps to take in an emergency Follow the correction procedures. After taking the specified steps to correct the suspected problem, check that the warning light goes off. Warning light Warning light/Details Correction procedure Open door warning light (warning buzzer) Check that all doors or glass Indicates that a door or hatch are closed.
- Page 549 5-2. Steps to take in an emergency Warning light Warning light/Details Correction procedure Front passenger’s seat belt reminder light (warning buzzer) Fasten the seat belt. Warns the front passen- (On the center ger to fasten his/her seat panel) belt. Master warning light (if equipped) A buzzer sounds and the Take appropriate action in...
- Page 550 5-2. Steps to take in an emergency Follow the correction procedures. (Smart entry & start system warning light and buzzer) (vehicles with non-optitron type meters) After taking the specified steps to correct the suspected problem, check that the warning light turns off. Interior Correction Exterior...
- Page 551 5-2. Steps to take in an emergency Interior Correction Exterior Warning light Details buzzer procedure Indicates that the “ENGINE START • Turn the STOP” switch in any “ENGINE mode other than OFF, START Sounds the shift lever was in P STOP”...
- Page 552 If the fuel tank is empty, refuel the vehicle immediately. The malfunction indicator lamp will go off after several trips. If the malfunction indicator lamp does not go off, contact your Toyota dealer as soon as possible. ■...
- Page 553 ■ If both the ABS and the brake system warning lights remain on Stop your vehicle in a safe place immediately and contact your Toyota dealer. The vehicle will become extremely unstable during braking, and the ABS system may fail, which could cause an accident resulting in death or serious injury.
- Page 554 Multi-information display If any of the warning lights comes on again after the following actions have been performed, contact your Toyota dealer. ∗ : If equipped...
- Page 555 A buzzer sounds and a warning message is shown on the multi-infor- mation display. Failure to investigate the cause of the following warn- ings may lead to the system operating abnormally and possibly cause an accident. Have the vehicle inspected by your Toyota dealer immediately.
- Page 556 5-2. Steps to take in an emergency Warning message Details Indicates that the automatic transmission fluid temperature is too high Stop the vehicle in a safe place, shift the shift lever to P and wait until the light goes off. If the light goes off, you may start the vehicle again.
- Page 557 5-2. Steps to take in an emergency Warning message Details Indicates a malfunction in the pre-crash safety system (Flashes) (If equipped) Indicates a malfunction in the parking assist- sensor The malfunctioning sensor is shown flashing on the display. (If equipped)
- Page 558 5-2. Steps to take in an emergency Warning message Details Indicates a malfunction in the radar cruise con- trol system Press the “ON-OFF” button once to deactivate (Flashes) the system, and then press the button again to reactivate the system. (Flashes) (If equipped) Indicates a malfunction in the clutch switch...
- Page 559 5-2. Steps to take in an emergency Follow the correction procedures. A buzzer sounds and a warning message is shown on the multi-infor- mation display. After taking the specified steps to correct the sus- pected problem, check that the warning message goes off. Warning message Details Correction procedure...
- Page 560 5-2. Steps to take in an emergency Warning message Details Correction procedure Indicates that the glass hatch is not fully closed If the vehicle reaches a speed of 5 km/h (3 Close the glass hatch. mph), flashes and a buzzer sounds (If equipped) to indicate that the glass hatch is not yet...
- Page 561 Have the timing belt Indicates that the tim- checked and/or ing belt is scheduled changed by your to be changed. Toyota dealer. (Diesel engine) • Clean the grille and the Indicates that the pre- sensor if they are dirty. crash safety system •...
- Page 562 5-2. Steps to take in an emergency Warning message Details Correction procedure Indicates that parking assist-sensor is dirty Clean the sensor. or covered with ice A buzzer also sounds. (If equipped) Indicates that the radar cruise control Clean the grill and the sensor is dirty or cov- sensor if they are dirty.
- Page 563 5-2. Steps to take in an emergency Warning message Details Correction procedure Indicates that your vehicle is nearing the Slow the vehicle by vehicle ahead (in applying the brakes. radar cruise mode) A buzzer also sounds. (Flashes) (If equipped) Indicates that there is a high possibility of a frontal collision, or Slow the vehicle by...
- Page 564 5-2. Steps to take in an emergency Have the malfunction repaired immediately. After taking the specified steps to correct the suspected problem, check that the warning message and light go off. Interior Exterior Correction Warning message Details buzzer buzzer procedure The electronic key Confirm the is not detected...
- Page 565 5-2. Steps to take in an emergency Interior Exterior Correction Warning message Details buzzer buzzer procedure The electronic key was carried out- side the vehicle and a door other Bring the than the driver’s electronic door was opened key back and closed while into the the “ENGINE...
- Page 566 5-2. Steps to take in an emergency Interior Exterior Correction Warning message Details buzzer buzzer procedure An attempt was Turn the made to exit the “ENGINE Sounds vehicle with the START once electronic key and Sounds STOP” for 5 lock the doors once switch off sec-...
- Page 567 5-2. Steps to take in an emergency Interior Exterior Correction Warning message Details buzzer buzzer procedure The driver’s door was opened when the shift lever was Shift the Contin- not in P and the shift lever uous “ENGINE START to P.
- Page 568 5-2. Steps to take in an emergency Interior Exterior Correction Warning message Details buzzer buzzer procedure An attempt was made to lock the doors using the smart entry & start system while the electronic key was still inside the vehi- Retrieve cle.
- Page 569 5-2. Steps to take in an emergency Interior Exterior Correction Warning message Details buzzer buzzer procedure • When the doors Touch the were unlocked with electronic the mechanical key to the key and then the “ENGINE “ENGINE START START STOP” switch was STOP”...
- Page 570 5-2. Steps to take in an emergency Interior Exterior Correction Warning message Details buzzer buzzer procedure To turn off the engine, first shift An attempt was the shift made to turn the lever to P Sounds “ENGINE START and then once STOP”...
- Page 571 5-2. Steps to take in an emergency Interior Exterior Correction Warning message Details buzzer buzzer procedure Press the “ENGINE The driver’s door START was opened and STOP” closed with the switch “ENGINE START while STOP” switch depressing turned off and then the brake the “ENGINE pedal...
- Page 572 5-2. Steps to take in an emergency Interior Exterior Correction Warning message Details buzzer buzzer procedure Press the “ENGINE START The steering lock STOP” could not be switch released within 3 while Sounds seconds of the depressing once “ENGINE START the brake STOP”...
- Page 573 5-2. Steps to take in an emergency Message Correction procedure Confirm the operating conditions. (If equipped) ■ Warning light display in radar cruise mode (if equipped) In the following cases, the warning light may not be displayed even if vehi- cle-to-vehicle distance decreases: ●...
- Page 574 5-2. Steps to take in an emergency If you have a flat tire Remove the flat tire and replace it with the spare provided. ■ Before jacking up the vehicle ● Stop the vehicle on a hard, flat surface. ● Set the parking brake. ●...
- Page 575 5-2. Steps to take in an emergency Vehicles with back door mounted spare tire Jack Spare tire 5-door models 3-door models Tool box Jack...
- Page 576 5-2. Steps to take in an emergency Taking out the jack 5-door models Remove the cover. STEP Unhook the rubber band and STEP take out the jack. For loosening For tightening...
- Page 577 5-2. Steps to take in an emergency 3-door models Remove the cover. STEP Unhook the rubber band and STEP take out the jack. For loosening For tightening...
- Page 578 5-2. Steps to take in an emergency Taking out the tool box Open the cover. STEP Take out the tool box. STEP...
- Page 579 5-2. Steps to take in an emergency Taking out the spare tire Vehicles with back door mounted spare tire Remove the bolt cover STEP Bolt cover ITN52M007 Remove the bolt which fixes the STEP spare wheel cover. Disengage craws STEP remove the spare wheel cover.
- Page 580 5-2. Steps to take in an emergency Unlock the spare tire lock sys- STEP tem. Insert the key into the cylinder. Remove the key and the cylin- der. Turn the hold-down nuts counter- STEP clockwise with the wheel nut wrench and remove them.
- Page 581 5-2. Steps to take in an emergency Vehicles with under floor mounted spare tire Assembling the jack handle. STEP Remove the jack handle extension bar from the tool box and assemble by following these steps. Loosen the bolt and the screw using either the jack handle end or a screwdriver.
- Page 582 5-2. Steps to take in an emergency Insert the jack handle extension STEP into the lowering screw. Lower Raise Lower the spare tire completely STEP to the ground. Pull out the spare tire and STEP remove the holding bracket.
- Page 583 5-2. Steps to take in an emergency Replacing a flat tire Chock the tires. STEP STEP Flat tire Wheel chock positions Left-hand side Behind the rear right-hand side tire Front Right-hand side Behind the rear left-hand side tire Left-hand side In front of the front right-hand side tire Rear Right-hand side...
- Page 584 5-2. Steps to take in an emergency Assembling the jack handle. STEP Remove the jack handle, jack handle extension bar and jack handle bar from the tool box and assemble by following these steps. Loosen the bolt and the screw using either the jack handle end or a screwdriver.
- Page 585 5-2. Steps to take in an emergency Position the jack at the jack STEP points as shown. Front - Under the chassis frame side rail Rear - Under the rear axle hous- Raise the vehicle until the tire is STEP slightly raised off the ground.
- Page 586 5-2. Steps to take in an emergency Installing the spare tire Remove any dirt or foreign mat- STEP ter from the wheel contact sur- face. If foreign matter is on the wheel contact surface, the wheel nuts may loosen while the vehicle is in motion, and the tire to come off.
- Page 587 5-2. Steps to take in an emergency Firmly tighten each nut two or STEP three times in the order shown in the illustration. Tightening torque 112 N•m (11.4 kgf•m, 83 ft•lbf) Reinstall the wheel ornament. STEP Stow the flat tire, tools and jack securely, and replace all cov- STEP ers.
- Page 588 5-2. Steps to take in an emergency Firmly tighten each nut two or STEP three times in the order shown in the illustration. Tightening torque: 60 N•m (6.0 kgf•m, 44 ft•lbf) Tighten the spare tire lock nut first. Lock the spare tire lock system STEP Spare tire lock nut.
- Page 589 5-2. Steps to take in an emergency Vehicles with under floor mounted spare tire Lay down the tire with the outer STEP side facing up, and install the holding bracket. Insert the holding bracket tab into one of the holes in the wheel. Raise the tire.
- Page 590 5-2. Steps to take in an emergency CAUTION ■ Using the tire jack Improper use of the tire jack may cause the vehicle to suddenly fall off the jack, leading to death or serious injury. ● Do not use the tire jack for any purpose other than replacing tires or install- ing and removing tire chains.
- Page 591 If there are any cracks or deformations in the bolt screws, nut threads or bolt holes of the wheel, have the vehicle inspected by your Toyota dealer. Failure to follow these precautions could cause the wheel nuts to loosen and the tire to fall off, resulting in death or serious injury.
- Page 592 5-2. Steps to take in an emergency CAUTION ■ After using the tools and jack Before driving, make sure all the tools and jack are securely in place in their storage location to reduce the possibility of personal injury during a collision or sudden braking.
Page 593: Not Start
- Page 594 ● The battery may be discharged. (→P. 599) ● There may be a malfunction in the steering lock system. Contact your Toyota dealer if the problem cannot be repaired, or if repair procedures are unknown. Emergency start function (vehicles with a smart entry & start...
Page 595: If The Shift Lever Cannot Be Shifted From P
Page 596: if you lose your keys, page 597: if the electronic key does not operate properly.
- Page 598 5-2. Steps to take in an emergency Starting the engine Automatic transmission Ensure that the shift lever is in P and depress the brake pedal. STEP Touch the Toyota emblem side of STEP electronic “ENGINE START STOP” switch. If any of the doors is opened or...
- Page 599 5-2. Steps to take in an emergency ■ Stopping the engine Vehicles with an automatic transmission Shift the shift lever to P and press the “ENGINE START STOP” switch as you normally do when stopping the engine. Vehicles with a manual transmission Shift the shift lever to N and press the “ENGINE START STOP”...
Page 600: If The Vehicle Battery Is Discharged
- Page 601 5-2. Steps to take in an emergency Gasoline engine Diesel engine Positive (+) battery terminal on your vehicle Positive (+) battery terminal on the second vehicle Negative (-) battery terminal on the second vehicle Connect the jumper cable to ground on your vehicle as shown in the illustration.
- Page 602 Vehicles with 1GR-FE engine only: To install the engine STEP cover, conduct the removal procedure in reverse. After installing, check that the fixed pins are inserted securely. Once the engine starts, have the vehicle checked at your Toyota dealer as soon as possible.
- Page 603 5-2. Steps to take in an emergency ■ Starting the engine when the battery is discharged (vehicles with an automatic transmission) The engine cannot be started by push-starting. ■ To prevent battery discharge ● Turn off the headlights and the audio system while the engine is off. ●...
- Page 604 5-2. Steps to take in an emergency CAUTION ■ Battery precautions The battery contains poisonous and corrosive acidic electrolyte, while related parts contain lead and lead compounds. Observe the following pre- cautions when handling the battery: ● When working with the battery, always wear safety glasses and take care not to allow any battery fluids (acid) to come into contact with skin, clothing or the vehicle body.
Page 605: If Your Vehicle Overheats
- Page 606 (The fan may not operate in freezing temperatures.) If the fan is not operating: STEP Stop the engine immediately and contact your Toyota dealer. If the fan is operating: Have the vehicle inspected at the nearest Toyota dealer.
- Page 607 5-2. Steps to take in an emergency CAUTION ■ To prevent an accident or injury when inspecting under the hood of your vehicle ● If steam is seen coming from under the hood, do not open the hood until the steam has subsided. The engine compartment may be very hot, caus- ing serious injury such as burns.
- Page 608 If the engine does not start after the above steps have been per- formed, wait for 10 seconds and try step 2 and 3 again. If the engine still does not start, contact your Toyota dealer. After starting the engine, depress the accelerator pedal lightly until the engine runs smoothly.
Page 609: If The Vehicle Becomes Stuck
- Page 610 5-2. Steps to take in an emergency CAUTION ■ When attempting to free a stuck vehicle If you choose to push the vehicle back and forth to free it, make sure the sur- rounding area is clear, to avoid striking other vehicles, objects or people. The vehicle may also lunge forward or lunge back suddenly as it becomes free.
Page 611: If Your Vehicle Has To Be Stopped In An Emergency
- Page 612 5-2. Steps to take in an emergency If the shift lever cannot be shifted to N Keep depressing the brake pedal with both feet to reduce STEP vehicle speed as much as possible. Vehicles without a smart entry STEP & start system: Stop the engine by turning the engine switch to “ACC”.
- Page 613 5-2. Steps to take in an emergency...
- Page 614 Vehicle specifications 6-1. Specifications Maintenance data (fuel, oil level, etc.)..614 Fuel information ....630 6-2. Customization Customizable features ..632...
- Page 615 6-1. Specifications Maintenance data (fuel, oil level, etc.) Dimensions 4760 mm (187.4 in.) 5-door models 4930 mm (194.1 in.) Overall length 3-door models 4485 mm (176.6 in.) Overall width 1885 mm (74.2 in.) 1835 mm (72.2 in.) 1845 mm (72.6 in.) 5-door models 1880 mm (74.0 in.) Overall height...
- Page 616 The vehicle identification number (VIN) is the legal identifier for your vehicle. This is the primary identification number for your Toyota. It is used in registering the ownership of your vehicle. This number is stamped on the front right frame and on the top left of the instrument panel.
- Page 617 6-1. Specifications ■ Engine number The engine number is stamped on the engine block as shown. Gasoline engine Diesel engine...
- Page 618 6-1. Specifications Engine Gasoline engine Model 1GR-FE Type 6-cylinder V type, 4-cycle, gasoline 94.0 × 95.0 mm (3.70 × 3.74 in.) Bore and stroke Displacement 3956 cm (241.4 cu.in.) Valve clearance Automatic adjustment (engine cold) Drive belt tension Automatic adjustment Diesel engine Model 1KD-FTV...
- Page 619 6-1. Specifications Fuel Gasoline engine Fuel type Unleaded gasoline only Research octane 95 or higher number Vehicles with sub fuel tank 150 L (39.6 gal., 33.0 Imp.gal.) Fuel tank system capacity (Refer- Vehicles without ence) sub fuel tank 87 L (23.0 gal., 19.1 Imp.gal.) system Diesel engine Fuel type...
- Page 620 Without filter 5.7 L (6.0 qt., 5.0 Imp.qt.) ■ Engine oil selection “Toyota Genuine Motor Oil” is used in your Toyota vehicle. Use Toyota approved “Toyota Genuine Motor Oil” or equivalent to satisfy the following grade and viscosity. Oil grade: 5W-30 and 10W-30: API grade SL “Energy-Conserving”, SM “Energy-Conserving”, SN...
- Page 621 6-1. Specifications The 10W portion of the oil viscosity rating indicates the characteristic of the oil which allows cold startability. Oils with a lower value before the W allow for easier starting of the engine in cold weather. The 30 in 10W-30 indicates the oil viscosity when the oil is at its operating temperature.
- Page 622 6.7 L (7.1 qt., 5.9 Imp.qt.) ■ Engine oil selection “Toyota Genuine Motor Oil” is used in your Toyota vehicle. Use Toyota approved “Toyota Genuine Motor Oil” or equivalent to satisfy the following grade and viscosity. Oil grade: G-DLD-1, API CF-4, CF or ACEA B1...
- Page 623 6-1. Specifications DLD logo mark: The Global DLD-1 logo mark, attached on some oil containers to help in selecting the oil you should use, indicates that the oil meets the guidelines recom- mended by the following associ- ations: ● ACEA (Association des Con- structeurs Europeens d’Auto- mobiles) ●...
- Page 624 15.0 L (15.9 qt., 13.2 Imp.qt.) transmission Without rear heater 13.2 L (13.9 qt., 11.6 Imp.qt.) Use either of the following. • “Toyota Super Long Life Cool- ant” • A similar high-quality ethylene glycol-based non-silicate, Coolant type non-amine, non-nitrite, and...
- Page 625 Toyota Genuine Differential Gear Oil LT Oil type and viscosity 75W-85 GL-5 or equivalent : Your Toyota vehicle is filled with “Toyota Genuine Differential Gear Oil” at the factory. Use Toyota approved “Toyota Genuine Differential Gear Oil” or an equivalent of matching quality to satisfy the above specification.
- Page 626 Oil type and viscosity Gear Oil LT 75W-85 GL-5 or equivalent : Your Toyota vehicle is filled with “Toyota Genuine Differential Gear Oil” at the factory. Use Toyota approved “Toyota Genuine Differential Gear Oil” or an equivalent of matching quality to satisfy the above specification. Please contact your Toyota dealer for further details.
- Page 627 Recommended oil viscosity SAE 75W : Your Toyota vehicle is filled with “Toyota Genuine Transfer Gear oil LF” at the factory. Use Toyota approved “Toyota Genuine Transfer Gear oil LF” or an equivalent of matching quality to satisfy the above specification. Please con-...
- Page 628 6-1. Specifications Brakes Pedal clearance 101 mm (4.0 in.) Min. 1 6 mm (0.04 0.24 in.) Pedal free play 5 7 clicks Parking brake lever travel Fluid type SAE J1703 or FMVSS No. 116 DOT 3 : Minimum pedal clearance when depressed with a force of 490 N (50 kgf, 110 lbf) while the engine is running : Parking brake lever travel when pulled up with a force of 200 N (20.4 kgf, 45.0 lbf)
- Page 629 6-1. Specifications Tires and wheels 17-inch tires (type A) Tire size 245/70R17 110S Front wheel Rear wheel kPa (kgf/cm kPa (kgf/cm Tire inflation pressure or bar, psi) or bar, psi) (Recommended cold tire inflation pressure) 200 (2.0, 29) 200 (2.0, 29) 220 (2.2, 32) 17 ×...
- Page 630 6-1. Specifications Light bulbs Light bulbs Type Headlights Low beam (discharge bulbs Low beam (halogen bulbs High beam Front turn signal lights Front position lights Exterior Front fog lights Rear turn signal lights Back-up lights License plate lights Running board lights Personal/interior lights Front Rear (without personal lights)
- Page 631 ■ If your engine knocks ● Consult your Toyota dealer. ● You may occasionally notice light knocking for a short time while acceler- ating or driving uphill. This is normal and there is no need for concern.
- Page 632 6-1. Specifications NOTICE ■ Notice on fuel quality ● Do not use improper fuels. If improper fuels are used, the engine will be damaged. ● Do not use leaded gasoline. Leaded gasoline will cause the three-way catalytic converter to lose its effectiveness and the emission control system to function improperly.
- Page 633 It is also possible to customize certain vehicle features yourself using the menu switch and the “ENTER” switch. Some function settings are changed simultaneously with other functions being customized. Contact your Toyota dealer for further details. Customizing vehicle features It is possible to customize certain vehicle features using the menu switch and the “ENTER”...
- Page 634 6-2. Customization Press the “ENTER” switch STEP upwards or downwards to select the item to be custom- ized. Press the “ENTER” switch to confirm. Press the “ENTER” switch STEP upwards or downwards to select the desired setting for the item being customized. Press the “ENTER”...
- Page 635 6-2. Customization Customizable features Settings that can be changed using the menu switch and the “ENTER” switch Settings that can be changed by your Toyota dealer Definition of symbols: O = Available, – =Not available Default Customized Item Function setting setting Driver’s door...
- Page 636 6-2. Customization Default Customized Item Function setting setting Operation signal (buzzer) 1 to 6 Operation signal (Emergency flashers) Time elapsed 60 seconds before the automatic door lock function is 30 seconds – activated if a Smart entry & door is not start system opened after 120 seconds...
- Page 637 6-2. Customization Default Customized Item Function setting setting Smart door All the doors Driver’s door Smart entry & unlocking start system → P. 29) Smart entry & start system Driver’s door unlocked in Wireless All doors Unlocking one step, all remote control unlocked in operation...
- Page 638 6-2. Customization Default Customized Item Function setting setting Time elapsed before the inte- 7.5 seconds 15 seconds rior lights turn 30 seconds Time elapsed before the exte- 7.5 seconds 15 seconds rior lights turn 30 seconds Sensitivity of Illumination the ambient →...
- Page 639 6-2. Customization Default Customized Item Function setting setting Operation after the engine switch is turned to the “LOCK” position (with- out a smart entry & start – system) or the “ENGINE START STOP” switch is turned to OFF (with a smart entry &...
- Page 640 6-2. Customization Default Customized Item Function setting setting Running board – lights Operation when you approach the vehicle with the – electronic key on your per- Operation when the doors are unlocked Running board with the smart lights – entry & start (→P.
- Page 641 6-2. Customization Default Customized Item Function setting setting Switching between out- side air and recirculated air Auto Manual – Front auto- mode linked to matic air con- automatic ditioning mode button system operation A/C automatic mode button Auto Manual – operation Seat belt Speed-linked...
- Page 642 – operation Moon roof → P. 108) Wireless remote control – linked opera- tion Toyota parking assist- Buzzer 1 to 5 – sensor volume → P. 259) : If equipped. : Vehicles with a smart entry & start system only.
- Page 643 6-2. Customization ■ In the following situations, customize mode will automatically be turned off. ● A warning message appears after the customize mode screen is dis- played. ● The “ENGINE START STOP” switch is turned to OFF. ● The vehicle begins to move while the customize mode screen is dis- played.
- Page 644 “Navigation System Owner’s Manual” for information regarding the equipment listed below. • Navigation system • Air conditioning • Hands-free system (for cellular phone) • Toyota parking assist monitor • Rear view monitor system • Rear seat entertainment system • Audio/video system • Toyota parking assist-sensor •...
- Page 645 Abbreviation list Abbreviation/Acronym list ABBREVIATIONS MEANING Anti-lock Brake System Adaptive Front-lighting System AI-SHIFT Artificial Intelligence Shift control Automatic Locking Retractor Adaptive Variable Suspension System Child Restraint System Downhill Assist Control DISP Display Event Data Recorder Emergency Locking Retractor KDSS Kinetic Dynamic Suspension System Light Emitting Diode Pre-Crash Safety Supplemental Restraint System...
- Page 646 Alphabetical index Alphabetical index A/C........314, 320 Alarm ........118 ABS ........... 281 Antenna ........343 Active head restraint ... 65, 67 Anti-lock brake system ..281 Active traction control ..281 Armrest........445 Adaptive Front-lighting Ashtray ........436 System........229 Assist grips ......
- Page 647 Alphabetical index Back door Child seats, definition.... 135 Back door........ 54 Child seats, installation ..146 Back door child-protector Installing CRS with ISOFIX lock ........55 rigid anchor......153 Wireless remote control ..46 Installing CRS with seat Back-up lights belts........147 Replacing light bulbs.....
- Page 648 ....206, 211, 219 If the engine will not start ..592 Trip information ..206, 211, 219 If the shift lever cannot be Toyota parking shifted from P ..... 594 assist-sensor ...... 259 If the vehicle has discharged Warning message ....
- Page 649 Alphabetical index If your vehicle needs to be Fog lights towed ........534 Replacing light bulbs..... 521 If your vehicle overheats ..604 Switch ........232 Emergency flashers Wattage ........ 629 Switch ........532 Foot well lighting ..... 410 Engine Four-wheel drive system Compartment ......
- Page 650 Alphabetical index Glove box ......... 416 Jack Glove box light......417 Vehicle-equipped jack... 573 Jack handle ......573 Hands-free system (for mobile phone)....386 KDSS ........281 Head restraints Keyless entry ......46 Adjusting ........ 89 Keys Headlight cleaner..... 240 Electronic key ......
- Page 651 Alphabetical index Turn signal lever ....195 Outside temperature Vanity lights......432 display........434 Wattage......... 629 Overhead console ....425 Luggage cover ......453 Overheating, Engine....604 Maintenance Parking brake......196 Do-it-yourself maintenance ... 468 PCS ........... 287 Maintenance data ....614 Personal/interior lights Maintenance requirements ...
- Page 652 Alphabetical index Rear window defogger .... 337 Properly sitting in the seat ..121 Rear window wiper ....238 Rear seat adjustment....68 Replacing Seat heaters ......442 Key battery......501 Service reminder Fuses ........505 indicators ......202 Light bulbs......517 Shift lever Tires ........
- Page 653 If your vehicle becomes Towing stuck ........608 Emergency towing ....534 Sun visors ........ 431 Trailer towing ......300 Sunshade Toyota parking Roof ........109 assist-sensor ......259 Switch Traction control ....... 281 Engine switch......179 Trailer towing ......300 “ENGINE START STOP”...
- Page 654 Charging system ....544 Steering lock system..... 555 Driver’s seat belt reminder ..547 Timing belt replacement ..560 Front passenger’s seat belt Toyota parking assist..556, 561 reminder ......548 Warning reflector holder..450 Fuel system......546 Washer KDSS ........546 Checking.......
- Page 655 What to do if... What to do if... If you have a flat tire A tire punctures P. 573 P. 592 If the engine will not start If you run out of fuel and the P. 607 engine stalls The engine does not start P.
- Page 656 What to do if... The warning light or indicator If a warning light turns on P. 543 light comes on ■ Instrument cluster Non-Optitron type meters Optitron type meters...
- Page 657 What to do if... ■ Center panel...
Page 658: Warning Lights
- Page 659 What to do if...
- Page 660 What to do if...
Page 661: Gas Station Information
Rename the bookmark, delete bookmark, delete from my manuals, upload manual.
Toyota Owners
Toyota Español
Welcome, here you'll have access to your Support Dashboard where you can see your support requests status or create a new request.
How do I operate the adaptive cruise control in my vehicle?
Adaptive cruise control supplements conventional cruise control with an active vehicle-to-vehicle distance control feature. designed for use on freeways and express ways, in vehicle-to-vehicle distance control mode, your car automatically acceler... sep 24, 2022 • knowledge, new section, only answer.
Adaptive cruise control supplements conventional cruise control with an active vehicle-to-vehicle distance control feature. Designed for use on freeways and express ways, in vehicle-to-vehicle distance control mode, your car automatically accelerates or decelerates in order to maintain a preset following distance from the vehicle traveling directly ahead of you.
To activate the system, press the "ON/OFF" button at the end of the stalk on the lower end of the right side of the steering wheel. The radar-ready indicator will appear in the Multi Information Display.
Accelerate or decelerate to your intended speed, then press the stalk down to set it. If you want to go faster, push the stalk upward and hold until you've reached the desired speed and then release it. Or, if you want to slow down, push the stalk down and hold as you decelerate, then release it once you've reached the desired speed.
To cancel cruise control, tap the brakes, pull the stalk towards you or turn the system off with the ON/OFF button.
Adaptive Cruise Control was designed to maintain the preset distance between your car and the car driving in the same lane directly ahead of you.
When it’s active, it automatically adjusts for changes in the speed of the vehicle traveling directly ahead of you in order to maintain the vehicle-to-vehicle distance you set.
In the event that you would like to change the preset distance between vehicles, you can do so by using the radar range button located on the lower right side of the steering wheel. Simply press the button repeatedly to cycle through the ranges available. You'll find them displayed on the Multi Information Display. And finally, you can disable the distance holding feature by pushing the cruise control stalk away and holding it until the indicator disappears and the conventional cruise control indicator lights up.
Please click here to view a video.
Disclaimer: Adaptive Cruise Control is designed to assist the driver and is not a substitute for safe and attentive driving practices. See your Owner's Manual for important instructions and cautions.
Not all features are available on all vehicles and model grades. Please see your Owner's Manual for further details and important safety information.
Related Articles
- How do I operate the cruise control in my vehicle?
- How do I operate the dual zone automatic climate control in my vehicle?
- How do I operate the audio steering wheel controls in my vehicle?
Not finding your answer?
Toyota Land Cruiser Owners Manual When driving » Using other driving systems Dynamic radar cruise control
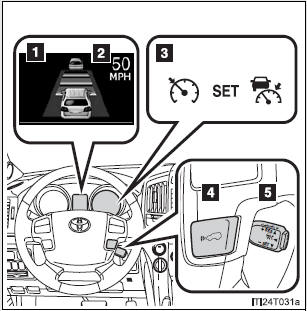
- Vehicle-to-vehicle distance button
- Cruise control switch
*: If equipped

- Press the “ON-OFF” button to activate the cruise control.
Dynamic radar cruise control indicator will come on.
Press the button again to deactivate the cruise control.

Accelerate or decelerate the vehicle to the desired speed, and push the lever down to set the speed.
“SET” indicator will come on.
The vehicle speed at the moment the lever is released becomes the set speed.
To change the set speed, operate the lever until the desired set speed is displayed.
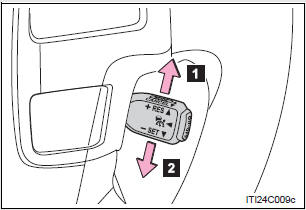
- Increases the speed
- Decreases the speed
Fine adjustment: Momentarily move the lever in the desired direction.
Large adjustment: Hold the lever in the desired direction.
In the vehicle-to-vehicle distance control mode, the set speed will be increased or decreased as follows:
- When the set speed is shown in “MPH”
Fine adjustment: By approximately 5 mph (8 km/h) each time the lever is operated Large adjustment: By approximately 5 mph (8 km/h) for each 0.75 seconds the lever is held
- When the set speed is shown in “km/h”
Fine adjustment: By approximately 3.1 mph (5 km/h) each time the lever is operated Large adjustment: By approximately 3.1 mph (5 km/h) for each 0.75 seconds the lever is held In the constant speed control mode , the set speed will be increased or decreased as follows: Fine adjustment: By approximately 1 mph (1.6 km/h) each time the lever is operated Large adjustment: The set speed can be increased or decreased continually until the lever is released

Pressing the button changes the vehicle-to-vehicle distance as follows:
The vehicle-to-vehicle distance is set automatically to long mode when the “ENGINE START STOP” switch is turned to IGNITION ON mode.
If a vehicle is running ahead of you, the preceding vehicle mark will also be displayed.
Select a distance from the table below. Note that the distances shown correspond to a vehicle speed of 50 mph (80 km/h). Vehicle- to-vehicle distance increases/decreases in accordance with vehicle speed
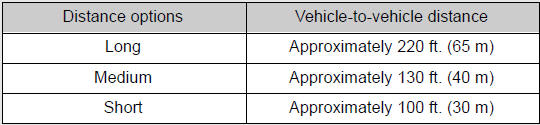
- Pulling the lever toward you cancels the cruise control.
The speed setting is also canceled when the brakes are applied.
- Pushing the lever up resumes the cruise control and returns vehicle speed to the set speed.
Resuming is available when the vehicle speed is more than approximately 25 mph (40 km/h).
This mode employs a radar sensor to detect the presence of vehicles up to approximately 400 ft. (120 m) ahead, determines the current vehicle-to-vehicle following distance, and operates to maintain a suitable following distance from the vehicle ahead.
Note that vehicle-to-vehicle distance will close in when traveling on long downhill slopes.
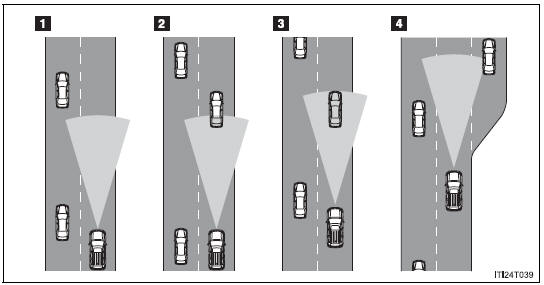
- Example of constant speed cruising
When there are no vehicles ahead
The vehicle travels at the speed set by the driver. The desired vehicle-tovehicle distance can also be set by operating the vehicle-to-vehicle distance control.
- Example of deceleration cruising
When the vehicle ahead is driving slower than the set speed
When a vehicle is detected running ahead of you, the system automatically decelerates your vehicle. When a greater reduction in vehicle speed is necessary, the system applies the brakes. A warning tone warns you when the system cannot decelerate sufficiently to prevent your vehicle from closing in on the vehicle ahead.
- Example of follow-up cruising
When following a vehicle driving slower than the set speed
The system continues follow-up cruising while adjusting for changes in the speed of the vehicle ahead in order to maintain the vehicle-to-vehicle distance set by the driver.
- Example of acceleration
When there are no longer any vehicles ahead driving slower than the set speed
The system accelerates until the set speed is reached. The system then returns to constant speed cruising.
When your vehicle is too close to a vehicle ahead, and sufficient automatic deceleration via the cruise control is not possible, the display will flash and the buzzer will sound to alert the driver. An example of this would be if another driver cuts in front of you while you are following a vehicle. Apply the brakes to ensure appropriate vehicleto- vehicle distance.
In the following instances, there is a possibility that the warnings will not occur:
- When the speed of the vehicle ahead matches or exceeds your vehicle speed
- When the vehicle ahead is traveling at an extremely slow speed
- Immediately after the cruise control speed was set
- At the instant the accelerator is applied
Constant speed control mode differs from vehicle-to-vehicle distance control mode. When constant speed control mode is selected, your vehicle will maintain a set speed regardless of whether or not there are other vehicles in the lane ahead.
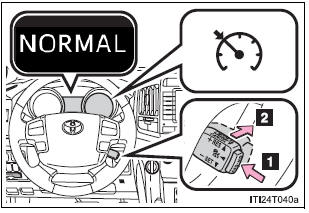
- Switch to constant speed control mode. (Push the lever forward and hold for approximately one second.)
Cruise control indicator will come on.
When in constant speed control mode, to return to vehicle-to-vehicle distance control mode, push the lever forward again and hold for approximately 1 second.
After the desired speed has been set, it is not possible to return to vehicleto- vehicle distance control mode.
If the “ENGINE START STOP” switch is turned off and then turned to IGNITION ON mode again, the vehicle will automatically return to vehicleto- vehicle distance control mode.
Adjusting the speed setting: Canceling and resuming the speed setting:
- The shift lever is in “D” or range “4” or higher of “S” has been selected.
- Vehicle speed is above approximately 30 mph (50 km/h).
The vehicle can accelerate normally. After acceleration, the set speed resumes.
However, during vehicle-to-vehicle distance control mode, the vehicle speed may decrease below the set speed in order to maintain the distance to the vehicle ahead.
Vehicle-to-vehicle distance control driving is automatically canceled in the following situations:
- Actual vehicle speed falls below approximately 25 mph (40 km/h).
- VSC is activated.
- The sensor cannot operate correctly because it is covered in some way.
- The windshield wipers are operating at high speed (when the wiper switch is set to the “AUTO” mode or high speed wiper operation position).
- When second start mode is set.
- The switching operation continues for 5 seconds or more after the center differential lock switch has been operated.
If vehicle-to-vehicle distance control driving is automatically canceled for any other reason, there may be a malfunction in the system. Contact your Toyota dealer.
The cruise control will stop maintaining the vehicle speed in the following situations:
Always keep the sensor and grille cover clean to ensure that the vehicle-tovehicle distance control operates properly. (Some obstructions, such as snow, ice and plastic objects, cannot be detected by the obstruction sensor.) Dynamic radar cruise control is canceled if an obstruction is detected.
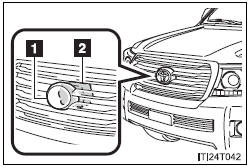
- Grille cover
- Radar sensor
Warning messages and buzzers are used to indicate a system malfunction or to inform the driver of the need for caution while driving.
FCC ID: HYQDNMWR005
This device complies with part 15 of the FCC Rules. Operation is subject to the following two conditions: (1) This device may not cause harmful interference, and (2) this device must accept any interference received, including interference that may cause undesired operation.
FCC WARNING
Changes or modifications not expressly approved by the party responsible for compliance could void the user’s authority to operate the equipment.
Radiofrequency radiation exposure Information: This equipment complies with FCC radiation exposure limits set forth for an uncontrolled environment.
This equipment should be installed and operated with minimum distance of 20 cm between the radiator (antenna) and your body.
This transmitter must not be co-located or operating in conjunction with any other antenna or transmitter.
Cruise control
Dynamic radar cruise control, intuitive parking assist, four-wheel drive system, crawl control (with turn assist function), multi-terrain select, multi-terrain monitor, driving assist systems, pre-collision system.
- Toyota Land Cruiser Owners Manual
- For your information
- Before driving
- When driving
- Interior features
- Maintenance and care
- When trouble arises
- Vehicle specifications
- Reporting safety defects for U.S. owners
- Toyota Land Cruiser Service Manual
- Search in titles only Search in Accessories (150 series) only Search
- Advanced Search
- Please update your email address to ensure you receive our emails.
- Welcome to the updated Pradopoint. The private message system has been enabled.
Announcement
Arb bullbar with radar cruise control.
- Latest Activity
- Time All Time Today Last Week Last Month
- Show All Discussions only Photos only Videos only Links only Polls only Events only
- Join Date: Nov 2009
- Join Date: Jan 2012
- Join Date: Oct 2011
- Join Date: Jun 2007
- Join Date: Nov 2011
- Join Date: Aug 2011
- Join Date: Jan 2013

- Remember me Not recommended on shared computers
Forgot your password?
Adaptive Cruise Control Warning and Apple CarPlay
By Adamthenav, August 27, 2020 in Rav 4 Club
- Reply to this topic
- Start new topic
Recommended Posts
Having only done 1000 miles in my new RAV, despite having it for 5months now, I’m still learning a few things, so if any of you have answers to the following two questions, that would be helpful:
1. When using the cruise control, if the car overspeeds whilst going downhill, it beeps at me. Is there a way of disabling the beep? I’ve found the RSA warnings and changed those but I think this is different.
2. My Apple CarPlay (sorry for those frustrated at having to wait, I’m not rubbing it in, honestly! 😀 ) only shows a few songs in a playlist then insists I use Siri to find the rest. Other cars with CarPlay haven’t done this. Can it be changed so that I can scroll rather than having to use Siri? I’m a visual person, so Siri isn’t how I like to control things.
Link to comment
Share on other sites, duncerduncs.
1. I've not noticed it beeping at me, are you using the cruise control, adaptive cruise control without lane keeping assist or cruise control with LKA? I've noticed that the LKA beeps when it loses the lines on the road to warn you that you need to steer. The only other beeping I've noticed is when you use the speed limiter and go too fast.
2. I use Android Auto (sorry).
Hope that helps?
On 8/28/2020 at 4:42 PM, duncerduncs said: 1. I've not noticed it beeping at me, are you using the cruise control, adaptive cruise control without lane keeping assist or cruise control with LKA? I've noticed that the LKA beeps when it loses the lines on the road to warn you that you need to steer. The only other beeping I've noticed is when you use the speed limiter and go too fast. 2. I use Android Auto (sorry). Hope that helps?
I’m using cruise control without lane keeping, but that’s not relevant. It’s linked to your second point about going too fast, as I’ve said, when the ACC is on and it’s going downhill and the speed has crept up beyond the nominated speed. Have you done anything about it? Do you just accept the beeping?

Yes, I get 4 beeps when the Adaptive Cruise Control is going faster than the sat speed by more than a couple of mph. I'm pretty sure it can't be disabled, but in my case it doesn't happen often enough to bother me.
There is one place it usually activates that I pass frequently, and I've got into the habit of cancelling the CC just before I reach a small hump, and hitting 'resume' as I pass it, thus avoiding the beeps.
- 1 month later...
I've noticed this problem when going over a humpback bridge, or if the is a sudden change in camber of the road.
A quick tap of the brake pedal cancels the alarm.
Is there anywhere in the manual which lists these alarms and what they signify?
Yes, a quick tap of the brake cancels the alarm because it cancels the cruise control! A bit of a sledgehammer to crack a nut. I’d much rather have the ability to delete the alarm (which isn’t listed; I too can’t find a definitive list of alerts).
Join the conversation
You can post now and register later. If you have an account, sign in now to post with your account.

× Pasted as rich text. Paste as plain text instead
Only 75 emoji are allowed.
× Your link has been automatically embedded. Display as a link instead
× Your previous content has been restored. Clear editor
× You cannot paste images directly. Upload or insert images from URL.
- Insert image from URL
- Submit Reply
Join Toyota Owners Club
Join Europe's Largest Toyota Community! It's FREE!
treborcik · Started Monday at 01:58 PM

Devon Aygo · Started November 21, 2023
FungleJunk57 · Started 5 hours ago
farenheit · Started Friday at 03:34 PM
benfromwigan · Started April 5

Going back to its origins: World premiere of the all-new Toyota Land Cruiser
Toyota Owners Club posted a record in Toyota News & Articles , August 3, 2023

Toyota Gazoo Racing prepares for historic centenary edition of the Le Mans 24 Hours
Toyota Owners Club posted a record in Toyota News & Articles , June 5, 2023

Toyota Prius honoured with lifetime achievement award
Toyota Owners Club posted a record in Toyota News & Articles , April 5, 2023

Toyota Yaris reaches the landmark of 10 million global sales
Toyota Owners Club posted a record in Toyota News & Articles , March 31, 2023

Toyota develops THUMS crash test simulation software in preparation for automated driving
Toyota Owners Club posted a record in Toyota News & Articles , March 29, 2023
- Existing user? Sign In
- How To Guides
- Online Users
- Members Gallery
- Leaderboard
- Forum Rules
- Create Forum Account
- Premium Membership
- Club Discounts
- Latest Posts
- All Activity
My Activity Streams
- Create New...
More From Forbes
2025 4runner rounds out toyota’s off-road suv lineup.
- Share to Facebook
- Share to Twitter
- Share to Linkedin
2025 Toyota 4Runner Trailhunter
The 4Runner has been a staple of the Toyota lineup for more than four decades and the new 2025 model completes the brand’s complete revamp of its body-on-frame lineup. Starting with the Tundra full-size pickup in 2022, Toyota has leveraged its TNGA-F architecture to launch redesigned versions of the Sequoia, Tacoma, Land Cruiser and Lexus GX and LX. The sixth-generation 2025 4Runner rounds out the family at least for North America.
2025 Toyota 4Runner
The original 4Runner debuted in 1983 based off the HiLux pickup. Like most pickup-derived SUVs of the time it featured a removable rear top section allowing it to be used like a half-open pickup with no rear wall and an extra row of seats. That architecture disappeared with the second-generation and starting with the third-generation 4Runner, it began sharing its platform with the Land Cruiser Prado. That relationship continues to this day and expands to all of Toyota’s body-on-frame models. The latest Land Cruiser and Lexus GX are effectively the Prado that is sold in other markets.
2025 Toyota 4Runner TRD Pro
Despite having debuted way back in 2009, the current fifth-generation 4Runner remains a surprisingly strong seller. Over the years most of the mainstream branded, midsize, off-road oriented two-row SUVs have fallen by the wayside such as the Nissan XTerra and Chevy S-10 Blazer, leaving the Jeep Wrangler and Ford Bronco as the main competition to the 4Runner.
Other nameplates like the Nissan Pathfinder and Ford Explorer have grown into larger three-row vehicles more targeted at on-road commuting. Even the 4Runner now offers a third-row option and continues to do so on the new model. Thus 4Runner sales have remained relatively strong despite the advanced age of the outgoing model.
2025 Toyota 4Runner and Tacoma
Like prior 4Runners, the new model also shares a lot with the latest Tacoma midsize pickup including the powertrains. Toyota’s increasingly ubiquitous 2.4-liter turbocharged four-cylinder will be under the hood of all sixth-generation 4Runners. The standard i-Force version delivers 278-hp and lb-ft of torque. The hybrid i-Force Max adds an electric motor and 1.87-kWh nickel-metal hydride battery for a total of 326-hp and 465 lb-ft of torque. Towing capability grows from 5,000-lbs to 6,000-lbs.
Both options come with the same eight-speed automatic transmission found in the Tacoma and Land Cruiser. As before, customers can choose a rear-wheel-drive, part-time four-wheel-drive or full-time four-wheel-drive system. Both 4WD systems have a two-speed transfer case and Toyota’s active traction control system to aid in sending torque to the wheels with the most grip. All variants get an automatic limited slip differential.
The TRD Off-Road, TRD Pro and the new Trailhunter version also get an electronic locking rear differential. The Platinum trim also gets a locking center differential that is optional on the Limited. New to the 4Runner is a front stabilizer bar disconnect that allows for improved articulation of the front wheels over rough terrain.
2025 Toyota 4Runner Limited
The wheelbase of the new model has grown by 2.4-inches and overall length has grown by 4.7-inches compared to the old model. The longer overhangs mean the approach and departure angles are slightly degraded for the new 4Runner at 32 and 24 degrees respectively compared to 33 and 26 degrees for the four-wheel-drive fifth-gen, However, the nearly 20-inch shorter wheelbase compared to the Tacoma should give the 4Runner a much better breakover angle giving it an advantage off-road.
Like Toyota’s other off-roaders and most competitors launched in recent years, the 4Runner gets a Multi-Terrain Select system that allows the driver to choose modes that are optimized for the type of surfaces being driven on. The modes which include Mud, Dirt and Sand adjust parameters like the slip thresholds for traction control and work in both 4WD-high and low ranges. The Crawl control manages speed on rough surfaces so the driver can focus on steering around obstacles on the trail.
The design shares a strong family resemblance to the new Tacoma but also has callbacks to early generations. The rear top may not be removable anymore, but the rear quarter windows do wrap into the roof again. The tailgate glass can also be lowered into the gate as has been the case in prior generations allowing for longer objects like surfboards to hang out the back.
The interior also shares a lot with the new Tacoma including the choice of a standard 8-inch infotainment screen or the optional 14-inch display. Both use Toyota’s latest infotainment software which is much improved from prior generations. Wireless support is included for both Apple Carplay and Android Auto and a Qi wireless charging pad is also available in addition to the standard USB-C ports. Toyota’s Safety Sense 3.0 driver assist package comes standard as it does on all other newly designed models. This includes blindspot monitoring, radar adaptive cruise control, lane keeping assist, road sign recognition, and proactive driving assist.
In addition to all of the usual trims found on Toyota trucks and SUVs, the 4Runner also offers the new Trailhunter trim. The Trailhunter includes ARB's Old Man Emu (OME) 2.5-inch forged shocks with remote reservoirs on the rear axle and a custom ARB roof rack. 33-inch Toyo Open Country all-terrain tires provide the grip along with two-inches of added front ground clearance and 1.5-inches in the rear.
Rock rails and high strength steel skid plates come standard on the Trailhunter along with a bronze grille and integrated 20-inch LED light bar. Toyota has also built in a 2400W inverter to power gear during overlanding adventures.
The 2025 4Runner goes on sale in fall 2024.

- Editorial Standards
- Reprints & Permissions
2025 Toyota 4Runner: What You Need to Know
The sixth-gen 2025 Toyota 4Runner has finally been revealed! Here's all the info we know so far.
Share this:
- Click to share on Facebook (Opens in new window)
- Click to email a link to a friend (Opens in new window)

The new 4Runner is very much an SUV version of a Tacoma, which we expected, as they share the same chassis. The sixth-generation 2025 Toyota 4Runner will start to hit U.S. dealerships in the fall of this year, 2024.
There aren’t a ton of surprises with the 2025 4Runner. But, I am excited for some new luxury and off-road trims, a powerful hybrid powertrain option, a massive infotainment screen, and a few new off-road capabilities goodies.
“This all-new 4Runner has incredible versatility and capability that nicely rounds out our truck family story,” said Dave Christ, Toyota group vice president and general manager. “We’ve sold over 3 million in the 40 years it has been on sale, and this sixth-generation model offers a cool new look and incredible features, yet retains the rugged style and capability our customers love about this icon of adventure.”
Now, let’s dive into all that we know about the sixth-gen 2025 Toyota 4Runner so far.
2025 Toyota 4Runner Revealed

2025 Toyota 4Runner Specs
- Powertrains: i-FORCE 2.4L 4-cyl. (278 hp, 317 lb.-ft.) or i-FORCE MAX 2.4L 4-cyl. hybrid (326 hp, 465 lb.-ft.)
- Dimensions: 112.2″ wheelbase, 194.9″ L / 77.8″ W / 70.8″ H
- Ground clearance: Up to 9.2″
- Towing capacity: Up to 6,000 lbs.
- Tire/Wheel size: 33″ (265/70R18) tire on 18″ wheel for TRD Pro & Trailhunter, 31″ (265/55R20) tire on 20″ wheel for Limited
- Angles: Up to 32-degree approach & 24-degree departure
- Seating: 5 or 7 (w/available 3rd row)
- Models: SR5, TRD Sport, TRD Sport Premium, TRD Off Road, TRD Off Road Premium, Limited, Platinum, TRD Pro, Trailhunter
- Safety: Safety Sense 3.0
- Key: Smart Key System w/Push-Button Start, optional Digital Key (with subscription)
- Screens: 7″ gauge cluster or 12.3″ digital gauge cluster & an 8″ or 14″ Infotainment Touchscreen
- Available: Fall 2024 (U.S. market)
- Fuel economy: TBD
- Pricing: TBD

4Runner Build
As expected, the new 4Runner will be built on the TNGA-F global truck platform. This is the same chassis found under the latest Tacoma , Land Cruiser , Tundra , and Sequoia . It has a boxed-steel ladder-frame design featuring double wishbone front and a multi-link coil rear suspension. What that should equate to is durability, off-road capability, and reasonable on-road manners.
Just like the current fifth-gen, the new 4Runner will be built in Japan, this time at its Tahara plant. It will be built alongside the latest Land Cruiser/Prado. On the other hand, the 4Runner’s pickup truck sibling, the Tacoma, is built in Mexico.
4-Cylinder Powertrains

Gone are the days of 4Runners with growling V8 or V6 motors under their hoods. The sixth generation of the icon gets a 2.4L four-cylinder powertrain, with and without an electric motor assist. Don’t fret, though, as the hybrid i-FORCE MAX powertrain offers up the most power ever offered from the factory in a 4Runner.
The SR5, TRD Sport, TRD Off-Road, and Limited trims come standard with the i-Force powertrain. That consists of a 2.4L turbocharged four-cylinder backed by an eight-speed automatic transmission. The base i-Force is good for 278 horsepower and 327 pound-feet of torque.
i-FORCE MAX is the upgraded 4Runner powertrain option. It’s available on TRD Off-Road and Limited, and standard on the TRD Pro, Trailhunter, and Platinum trims. It is the same gas 2.4L turbocharged four-cylinder, but now backed by a 48-horsepower electric motor integrated into the eight-speed automatic transmission.
The electric motor is fed by a 1.87-kWh NiMH battery pack. The i-FORCE MAX powertrain in the 2025 4Runner is good for 326 horsepower and 465 pound-feet of torque.
While the 2024 Tacoma gets essentially the same powertrain options — although with a bit less power — it also gets a six-speed manual transmission option. Sadly, that is not something that will be available on the new 4Runner, at launch at least.

2025 4Runner Off-Road Chops
As you’d expect from a 4Runner, it will be off-road-capable. Many owners can’t resist upgrading and personalizing their 4Runner for many miles of happy adventuring, and the new 4Runner will be available with more features from the factory than ever.
While you will be able to get a 2WD 4Runner, you’ll probably want to opt for the part-time or full-time 4WD options — so you can get out on adventures in any weather. Both 4WD systems have an electronically controlled two-speed — high and low range — transfer case, Active Traction Control (A-TRAC), and an automatic limited-slip differential (Auto LSD).

The TRD Off-Road, TRD Pro, and Trailhunter models get a selectable electronic locking rear differential as standard equipment. Limited models with the i-FORCE MAX hybrid powertrain can be optioned with a full-time 4WD system with center locking diff. This setup is standard on Platinum models.

Also on offer for the first time from the factory are things like an electronic Stabilizer Bar Disconnect Mechanism, 33-inch A/T tires, and a raised air intake/snorkel. Improved approach and departure angles — up to 32-degree approach and 24-degree departure — should also help when the trail gets tough. Sadly, the 4Runner does lose a bit of ground clearance, from 9.6 inches on the 2024 model to 9.2 inches on the 2025.

On top of all the new off-road hardware, the new 4Runner gets refined versions of Multi-Terrain Select, CRAWL Control, and Downhill Assist Control. Multi-Terrain Monitor is also available and is a handy tool that utilizes a plethora of cameras to show live video on the big central display to help navigate rough terrain.

9 Model Options
Toyota is very much about giving you options, as it showed with the huge range of new Tacoma configurations. It continues that trend with the new 4Runner, now with nine trim levels. On offer are; SR5, TRD Sport, TRD Sport Premium, TRD Off Road, TRD Off Road Premium, Limited, Platinum, TRD Pro, and Trailhunter.

Trailhunter and Platinum are the new models that have been added to the 2025 4Runner lineup.

Toyota describes the Trailhunter model as “a manufacturer-developed overland rig straight from the factory.” It is lifted — 2 inches front and 1.5 inches rear — through Old Man Emu (OME) 2.5-inch forged shocks and 33-inch Toyo Open Country all-terrain tires . It comes standard with a snorkel, rock rails, steel skid plates, a 20-inch lightbar, RIGID LED fog lamps, a 2,400W inverter, a prewired accessory switch panel, and a unique ARB roof rack.

Toyota describes the new top dog Platinum model as “a high-end, luxury experience with all the capability you expect in a 4Runner.” It adds things like black exterior styling, heated second-row seating, a tow tech package, a HUD, and automatic rain-sensing wipers to the already very well-equipped Limited model.
More Comfort, Convenience, and Safety Tech

Inside the 2025 Toyota 4Runner, you get loads new tech, as you’d expect. Screens get bigger, as they do in most vehicles these days. The driver gets a 7-inch gauge cluster or a 12.3-inch digital cluster, depending on the model.
The central infotainment touchscreen now comes standard in an 8-inch size, with a massive 14-inch screen available. Of course, Apple CarPlay and Android Auto are on offer.

As with nearly all modern cars, you get a push-button start and a Smart Key System. Also on offer on some models is Digital Key. This requires an active Remote Connect trial or subscription to work. But, a cool feature of it is that you can share access to the vehicle remotely with others without them giving them a physical key.
We all have a million electronic devices these days that need to stay charged up on our adventures, and the 4Runner is well equipped to do just that. There is an available wireless charging pad and three USB-C charge ports up front, with two available in the second row.

Toyota takes safety seriously and will offer its latest Safety Sense 3.0 suite as standard across all models of 2025 4Runner. The suite includes Pre-Collision System with Pedestrian Detection, Lane Departure Alert with Steering Assist, Full-Speed Range Dynamic Radar Cruise Control, Lane Tracing Assist, Road Sign Assist, Automatic High Beams, and Proactive Driving Assist.

Scheduled Maintenance & Warranties Included
ToyotaCare comes standard with all models of 2025 4Runner. That means that normal factory-scheduled maintenance for 2 years or 25,000 miles is fully covered — included in the purchase price. It also means you get 2 years and unlimited mileage of Roadside Assistance.
The new 4Runner also comes with some pretty impressive warranties. It’s best if I just let you read it in Toyota’s words:
“Toyota’s 36-month/36,000 mile basic new-vehicle warranty applies to all components other than normal wear and maintenance items. Additional 60-month warranties cover the powertrain for 60,000 miles and against perforation from corrosion for 60 months with no mileage limitation. Hybrid-related components that require repairs needed to correct defects in materials or workmanship are covered for 8 years/100,000 miles, whichever comes first from original date of first use when sold as new. The hybrid battery is covered for 10 years/150,000 miles, whichever comes first, and is transferable across ownership.”

Properly Modern, but DNA Remains
The 2025 Toyota 4Runner is pretty much all we could have hoped for. It is essentially the SUV version of the new Tacoma and retains the DNA that has made it a staple among outdoor adventurers and families alike; off-road capability, a power rear liftgate window, second-row tumble seats, and an available third row.
We don’t yet know fuel economy or pricing. I don’t expect fuel economy to be all that impressive with either powertrain option. I do expect pricing to be a touch more than the current 4Runner (starting at $40,705) but less than the new 2024 Land Cruiser (starting at $55,950).

I have little doubt that there will be big demand for the 2025 4Runner as it comes to market this fall. If you want one, I’d suggest getting down to your local Toyota dealer ASAP and getting on the waitlist, as there are sure to be long ones already.

First Bite of Some Tasty Tacos: 2024 Toyota Tacoma Review
The 2024 Toyota Tacoma is finally hitting dealerships, and we finally got some time behind the wheel, on and off road, in a few of the new truck's trims. It is still a Tacoma, but with lots of little improvements. Read more…

Bryon Dorr is the Motors Editor of GearJunkie. He has been writing about overland travel, off-road vehicles, general automotive, whitewater kayaks, and outdoor and travel gear for 12+ years. He has created content for a wide range of outdoor, automotive, and travel media outlets, both online and in print, as well as for a wide range of commercial clients as a photographer, social media marketer, business consultant, and copy editor.
After living on the road for nearly eight years, he is now based in Portland, Ore. Bryon is an avid kayaker, cyclist, skier/snowboarder, runner, and photographer. When not outdoors doing human-powered adventures, you’ll find him behind the wheel or bars of something with a motor and wheels finding adventure around the globe. You can keep up with his life of adventure on your favorite social media @ExplorElements .
Follow Us On
Subscribe Now
Get adventure news and gear reviews in your inbox!
Join Our GearJunkie Newsletter
Gear Top Stories Deals

2025 Toyota 4Runner revealed and a hot chance for Australia
The 2025 Toyota 4Runner has been revealed in the US and looks set to bolster the brand’s SUV range Down Under, with a nameplate that’s familiar to Australians and production in Japan already confirmed.
The local branch said it currently has no announcements to make on the Toyota 4Runner for Australia, but that it is “continually studying the market for new opportunities to offer exciting new products to Australian customers”.
Bearing a moniker that hasn’t been seen in Toyota showrooms for 15 years, the new-generation 4Runner could serve as yet another appealing off-road-capable 4x4 from Toyota, slotting in underneath the incoming new-generation 250 Series Prado .

It uses the same TNGA-F ladder-frame platform as Prado, LandCruiser 300 and a slew of other models and could possibly serve as a replacement for the current Toyota Fortuner, which is based on the HiLux ute.
The 4Runner is closely related to the US-market Tacoma ute, so just as the new Tacoma has shown the way towards the next-generation (and similarly sized) HiLux due in 2025 – in styling, architecture, technology and key mechanical areas – the 4Runner does likewise for Toyota Australia’s next ute-based SUV.
But whereas the Tacoma is built in Mexico, the 4Runner will be produced at Toyota’s Tahara plant in Japan, with first deliveries for North America scheduled for later this year.

The new 4Runner has emerged with a shorter wheelbase compared to the Tacoma , and uses a coil-sprung rear-end, however the two models have a similar tough, blocky design with bold creases.
Under the bonnet is the same 207kW/430Nm 2.4-litre four-cylinder turbo-petrol engine, along with a 235kW/630Nm hybrid powertrain.
An eight-speed automatic is the default transmission across the board, with the 4Runner set to be offered in North America in both 4x2 and 4x4 configuration, the latter spanning part-time and full-time systems .
All 4x4s will come with a low-range transfer case and an automatically locking rear differential (shared with 4x2s), while the TRD Off-Road, TRD Pro and Trailhunter models score a proper rear locker.
Supporting the 4x4 systems will be Toyota’s latest Multi-Terrain Select, which can now be employed in both high and low range.
The full portfolio will comprise the SR5, TRD Sport, TRD Sport Premium, TRD Off Road, TRD Off Road Premium, Limited, Platinum, TRD Pro and Trailhunter models (in that order), the latter coming with a series of unique enhancements like Old Man Emu suspension, an ARB roof rack and an integrated 20-inch LED light bar.
Headline standard equipment across the range includes an 8.0- or 14.0-inch infotainment system (variant dependent) offering wireless smartphone mirroring, a 7.0- or 12.0-inch digital instrument cluster, keyless start, radar cruise control, powered rear (tailgate) window and the latest Toyota Safety Sense 3.0 package.

The latter comprises a pre-collision system with pedestrian detection, lane departure alert with steering assist, lane tracing assist, road sign assist, automatic high beam and proactive driving assist (semi-autonomous driving).
With the unveiling of the 4Runner today, Toyota USA said the SUV “stays true to its original concept as an extremely capable, dynamic and durable off-roader and will continue to provide owners a window to bigger worlds”.
“The all-new youthful and dynamic 4Runner nicely rounds out Toyota’s rugged lineup of tough body-on-frame vehicles,” the company said.
Related: 2025 Toyota 4Runner to preview next Fortuner SUV
Related: lexus gx hybrid to be fast-tracked, related: toyota prado hybrid could be here in 2024, join the conversation at our facebook page or email us at [email protected].

- Corporate advertising
- Dealer advertising
- Shareholders
- Competitions
- Become a dealer
- Farm machinery
- Construction
- Responsible disclosure
- Terms and Conditions
2025 Toyota 4Runner Moves to Tundra Platform, Gets All Turbo Power
Toyota’s long-running 4Runner enters its sixth generation without a few cylinders.

- The 2025 Toyota 4Runner will usher in a sixth generation of Toyota’s off-roader.
- The redesigned 4Runner loses its V6 and replaces it with the choice of either a 2.4-liter inline four-cylinder engine or a 2.4-liter I4 hybrid powertrain.
- Toyota says the 2025 4Runner is scheduled to hit dealers in the fall of 2024.
Toyota’s current 4Runner debuted in 2009 and has only become more popular with time. For 2025, Toyota is moving the 4Runner to the same TNGA-F platform that underpins the latest Tacoma, downsizing the powerplant and totally replacing the sheetmetal.
For some, the underhood changes might be the biggest pivot. The venerable 4.0-liter V6 is finally gone, replaced, instead, with a 2.4-liter turbocharged I4. In base trim, this 2.4-liter I4 sends 278 hp and 317 lb-ft of torque through an eight-speed automatic.

Like the Toyota Tacoma , the 4Runner will also be available as a hybrid, which adds a 48-hp electric motor into the mix, cranking total output to 326 hp and 465 lb-ft of torque. This hybrid powertrain also uses an eight-speed automatic. From there, power travels to the rear wheels through a part-time or a full-time four-wheel-drive system.
For some context, the current 4Runner’s aforementioned V6 sends 270 hp and 278 lb-ft of torque through a five-speed transmission.
While Toyota hasn’t revealed any fuel economy figures, if the Tacoma is any indication, there will be gains. The 2.4-liter turbo under the hood of two-wheel-drive Tacoma pickups boasts 23 mpg combined, 26 highway mpg, and 20 city mpg. That’s a 2 mpg combined bump over the outgoing 3.5-liter V6 .
We should expect a similar bump for the next-gen 4Runner. We can also see the 2024 Land Cruiser, which offers a similar powertrain, turns out 23 mpg combined from 25 highway mpg and 22 city mpg.
Surrounding this engine is entirely new sheetmetal. This sixth-generation 4Runner has grown considerably in its latest iteration, gaining in every direction. The ’25 Toyota 4Runner is 194.4 inches long and rides on a 112.2-inch wheelbase, gaining 4.7 inches and 2.4 inches, respectively, over the outgoing model. It’s almost two inches wider, too, at 77.8 inches.
As for ground clearance, Toyota says the new 4Runner can clear 9.2 inches, which is 0.2 inches higher than the outgoing two-wheel-drive model, but 0.4 inches lower than the outgoing four-wheel-drive 4Runner.

Alongside a new engine, standard 4Runners will see an 8-inch touchscreen media system, with higher trim models getting a 14-inch multimedia screen. Likewise, entry-level 4Runners pack a 7-inch digital instrument cluster, replaced by a 12.3-inch digital cluster on upper trims.
Toyota is adding a smart-key system with a push-button ignition as standard equipment across the board, and wireless Apple CarPlay and Android Auto are standard.
Underpinning all of this is the new TNGA-F platform shared with the Tacoma, Tundra, Sequoia, and Land Cruiser. This means the new 4Runner will feature a multi-link rear suspension and a double-wishbone front suspension.
Slick features for off-roaders like sway bar disconnects are also joining the list of 4Runner features. Toyota is oddly secretive about wheel and tire options, except for with the new Trailhunter trim. This version will ride on 33 inches of Toyo Open Country A/T tires.
As for the trim walk, the entry-point is still the SR5 model. From there, you move into the TRD Sport and TRD Sport Premium models. Those models all see the standard 2.4-liter turbocharged I4 mill.
Kicking off the hybrid-equipped models is the Limited Trim, which is joined by TRD Off-Road, TRD Off-Road Premium, and TRD-Pro. Rounding out the list of available models are the new Trailhunter and the luxe-focused Platinum trim.

As you’d expect from any generational shift, this 4Runner is packed with active driver assistance features. The ’25 4Runner comes standard with Toyota’s Safety Sense 3.0, which includes automatic high beams, lane-tracing assist, and a full-speed range dynamic radar cruise control system as standard equipment.
The 4Runner also gets lane-departure alert with a steering-assist system, a pre-collision system with pedestrian detection, and Toyota’s Proactive Driving Assist system. This last system uses the camera suite to help subtly add steering and braking inputs around other vehicles, pedestrians, or curves.

Toyota says this new 4Runner will be built at the company’s plant in Tahara, Japan, and is scheduled to hit showrooms this fall.
Pricing is still locked inside a Toyota executive’s filing cabinet, but it’s safe to say there will be a price increase. Currently, a 4Runner will set you back at least $42,100. Likely, the next-gen 4Runner’s base SR5 model will still start closer to $45,000.
What do you think of the 2025 Toyota 4Runner ? Tell us your thoughts below.

.css-1u92ux6:before{background-color:#ffffff;border:0 solid transparent;bottom:38%;color:#000;content:'';display:none;height:0.3125rem;position:absolute;right:0;width:100%;z-index:under;}@media(min-width: 40.625rem){.css-1u92ux6:before{height:0.625rem;}}@media(min-width: 64rem){.css-1u92ux6:before{bottom:25%;}} Toyota

Gallery: 2025 Toyota 4Runner Exterior Photos

How Will the New and Old Toyota 4Runners Stack Up?

2025 Toyota 4Runner Teased on Social Media

Toyota bZ4X Joins the EV Party Just in Time

Gallery: 2023 Toyota bZ4X Limited AWD

2024 Land Cruiser Starts at $57,345

TWCB: 2023 Toyota Corolla Cross and Mazda CX-5

2024 Super Bowl Car Commercial Round-Up

2023 Toyota GR Corolla Is a Rally-Inspired Treat

Design Rants and Raves from 2023

2023 Toyota GR86 Is Budget Fun
2025 Toyota 4Runner: All The Tech On The New 6th-Gen SUV

Fifteen years after the Toyota 4Runner received its last generational update, Toyota has finally given the famed SUV a much-needed upgrade. The sixth-gen 4Runner is here, and this time around, the reliable SUV gets a complete makeover; built new from the ground up compared to the outgoing fifth-gen model. This update was due long ago, considering the fifth-generation 4Runner — despite several mid-life upgrades — traces its origins back to 2009 .
Some 4Runner fans and purists may not be happy with the radical design, tech, and platform changes the 2025 4Runner has undergone. However, considering the overall age of the platform on which the outgoing vehicle was based, this upgrade is necessary.
The outgoing fifth-gen 4Runner is among the most reliable cars one can buy in the U.S. What it isn't known for, however, is for sporting the latest technology. With the 2025 edition of the vehicle, it seems Toyota wants to shed this long-held image of the 4Runner being a tech dinosaur alongside potent 4-wheel drive.
Of course, while most discussions surrounding the sixth-gen 4Runner may center around its Tacoma-inspired design , some of the modern tech Toyota has incorporated into the new car is worth praising.
Goodbye, analog dials
The 2024 Toyota 4Runner was among the last of the traditional SUVs to feature good old, traditional analog dials and a plethora of physical buttons to control every infotainment feature. While the updated sixth-generation 4Runner isn't entirely devoid of physical buttons, the familiar analog instrument cluster has now been replaced with an 8-inch display on entry-level trims. On the higher tier variants, the instrument cluster gets an even larger 12.3-inch panel. This is in addition to a massive 14-inch multimedia touchscreen display that dominates the dashboard.
The overall experience of using this improved touchscreen interface should be leaps and bounds better than the clunky and dated 8-inch infotainment display used on the outgoing model. The new display (unsurprisingly) supports wireless Apple CarPlay and Android Auto, and sports many connected tech features. With a Qi-compatible wireless charging pad and a plethora of fast-charging USB-C ports scattered around the interiors, the 2025 Toyota 4Runner is quite gadget-friendly.
Displays aside, the 2025 4Runner also gets a Smart Key System with push-button start being offered as standard on all variants. There is also the option to subscribe to Toyota's Remote Connect subscription to get the ability to unlock the doors and start the vehicle using a smartphone. This subscription also adds a digital key function, which you can use to "share" the key with others when required.
A bucketload of safety features
The outgoing fifth-generation 4Runner, despite its 15-year-old origins, did not fare too badly on the safety front. Thanks to frequent and timely upgrades, the last iteration of the car came loaded with seemingly newer safety-focused features. These included a pre-collision system with pedestrian detection, dynamic radar cruise control, lane departure alert, and automatic high beams.
With the 2025 4Runner, Toyota is adding all the safety-focused features that are part of Toyota Safety Sense 3.0, the company's suite of active and passive safety features. These include an updated version of Lane Departure Alert with Steering Assist, Full-Speed Range Dynamic Radar Cruise Control, Lane Tracing Assist, Road Sign Assist, and Proactive Driving Assist. This is in addition to other vital additions like Blind Spot Monitor, Rear Cross-Traffic Alert, and Hill Start Assist Control, the latter being offered as standard on all trim levels.
While not entirely new tech, also part of the 2025 Toyota 4Runner experience is the new i-FORCE MAX hybrid powertrain, combining the power of a traditional turbocharged 4-liter, four cylinder ICE engine with an electric motor. The combined power output of both these engines reaches 326 horsepower, with a plentiful 465 pound-feet of torque. The 4Runner will also be offered in several grades , allowing drivers to pick which Toyota is right for them.
2025 Toyota 4Runner Refines Adventure Ready Heritage
- Standard i-FORCE turbocharged 2.4-litre four-cylinder engine produces 278 horsepower, 317 lb.-ft. of torque
- Available i-FORCE MAX hybrid powertrain produces up to 326 horsepower, 465 lb.-ft. of torque
- All-new Trailhunter is a Toyota built overlanding rig available with the latest integrated off-road equipment from ARB®, Old Man Emu® and RIGID Industries®
- Standard power rear window with an available power liftgate
- First-ever Platinum premium grade now offered
- Available 14-inch touchscreen displays latest Toyota Multimedia
- Toyota Safety Sense 3.0 standard on all models
- On-sale Fall 2024
TORONTO, Ontario (April 9, 2024) – The instant name recognition that 4Runner has built over the past four decades is undeniable. This legend has long established itself as a North American off-road icon, ready to tackle tough terrain in its way. The all-new 2025 Toyota 4Runner stays true to its original concept, as an extremely capable, dynamic, and durable off-roader and will continue to provide owners a window to bigger worlds. The new generation introduces a bold new look and adds new technology, premium materials, options, and safety. In fact, this all-new sixth generation 4Runner raises the bar in terms of go-anywhere capability and high-end refinement.
“The all-new 4Runner continues Toyota’s legacy of building legendary trucks while introducing a cool new look and incredible features that prepare this versatile and authentic body-on-frame SUV for the future,” said Cyril Dimitris, Vice President, Toyota Canada Inc. “The new 4Runner is designed to impress with new style and comfort, state of the art safety and off-roading technology ensuring this is a go-anywhere, do-anything truck – especially when coupled with the impressive torque of the available i-FORCE MAX powertrain.”
Solid Foundation
4Runner is all-new from the ground up and is built on Toyota’s tough TNGA-F global truck platform that is shared with Tacoma, Land Cruiser, Tundra and Sequoia. This platform utilizes a high-strength boxed, steel-ladder frame and features a multi-link coil rear and double wish-bone front suspension.
The adoption of the innovative TNGA-F platform not only adds strength, but it also improves the vehicle’s ride comfort and on-road manners. Passengers feel the benefits of this new platform, even when riding in the available third row. The enhanced frame, paired with the powerful i-FORCE MAX powertrain, allows 4Runner to tow up to 6,000 pounds.
Evolving the Legacy
“Designing the legendary 4Runner began with identifying its unique and memorable aspects linked to fun, outdoor recreation,” says Calty President, Kevin Hunter. “Inspired by Baja desert racing, the high lift, lean body, big tire, rugged athleticism defines the core of 4Runner’s go anywhere purpose”.
The Michigan-based CALTY design team spearheaded the design of this all-new 4Runner. Designers pulled inspiration from the past while also focusing on the future. The all-new 4Runner was designed alongside the Tacoma and shares a family resemblance but is unique in its own way. Both share inspiration from the desert racing scene and have a rugged-with-a-purpose appearance. In a nod to the first and second generations of 4Runners, designers were able to bring back the legacy “wrap over” quarter glass, and the popular roll-down rear window remains etched into the vehicle’s DNA. The design team meticulously labored to achieve the ideal interior design. They sought to achieve a vehicle with ease of operation and a functional interface that strikes a pure balance of modern sophistication and capable authenticity. For example, second-row tumble seats help increase 4Runners interior versatility and maximizes cargo floor usage.
i-FORCE Power MAXed
This next chapter of 4Runner offers two powerful and efficient turbocharged 2.4 litre four-cylinder powertrains including the i-FORCE engine with 278 horsepower and 317 lb.-ft. of torque that is paired to an eight-speed automatic transmission. SR5, TRD Sport, TRD Off-Road and Limited grades will come standard with the i-FORCE powertrain.
4Runner’s i-FORCE MAX hybrid powertrain is available on TRD Off-Road, while standard on the TRD Pro, Trailhunter and Platinum models. This powertrain pairs the turbocharged 2.4-litre engine with a 48-hp electric motor integrated into the eight-speed transmission, feeding off a 1.87-kWh NiMH battery pack that creates a total system output of up to 326 horsepower and 465 lb.-ft. of torque, the most powerful powertrain ever offered on 4Runner.
Trail Ready
4Runner is synonymous with rugged capability. In its latest form, 4Runner continues to add increased capability to an already incredible legacy. The newly available Stabilizer Bar Disconnect Mechanism increases suspension articulation at the push of a button. This feature allows the vehicle to flex while helping keep tires in contact with the trail. 4Runner raises the bar in another area with up to 32-degree approach and 24-degree departure angles. The available Multi-Terrain Monitor system aids the driver allowing them to see potential hazards on the centre display.
In Canada, 4Runner will be offered in part-time 4WD or Full-time 4WD, both matted to an electronically controlled two-speed transfer case with high/low range along with Active Traction Control (A-TRAC) and an automatic limited-slip differential (Auto LSD). An electronic locking rear differential is standard on TRD Off-Road, TRD Pro and Trailhunter grades. The Limited is offered with an available full-time four-wheel-drive system with a centre locking differential on i-FORCE MAX models, while this setup is standard on Platinum grades.
The Multi-Terrain Select system now functions in both 4WD-High and 4WD-Low. This offers adjustable settings to help control wheel spin on a variety of terrain such as Mud, Dirt, and Sand. 4Runner also adopts the new, quieter CRAWL Control function that acts as a low-speed, off-road cruise control that allows the driver to focus on steering. When traction is extremely limited, the available electronically activated locking rear differential can help split power 50/50 to the rear wheels. Downhill Assist Control is another off-road feature available and helps the driver navigate descents by limiting the speed of the vehicle.
A Grade for Everyone
4Runner expands its grade offering to provide customers with more choices than ever before. In Canada, seven grades will be available including SR5, TRD Sport, TRD Off Road Premium, Limited, Platinum, TRD Pro, and Trailhunter.
The Trailhunter grade has been added to the line up to allow owners to go further. 4Runner’s capability and durability have made it a fan favorite of overlanders, and now adventure seekers have a turnkey solution with a manufacturer-developed overland rig straight from the factory. Toyota collaborated with a number of off-road component companies to make the fit and finish that much better. For example, the Trailhunter will feature ARB's Old Man Emu (OME) 2.5-inch forged shocks with rear external piggyback remote reservoirs, along with a uniquely co-designed ARB Roof Rack. The OME shocks along with the 33-inch Toyo Open Country A/T tires boost up Trailhunter an additional two inches in the front and one and a half inches in the rear. A standard low-profile high-mount air intake sources cleaner air for the i-FORCE MAX powertrain. Trailhunter adds protection that include rock rails and high strength steel skid plates for serious off-the-grid-adventure capabilities. The Trailhunter is also equipped with a heritage grill with bronze “TOYOTA” lettering and an integrated 20-inch LED light bar that is complemented by colour selectable RIGID LED fog lamps. A seriously powerful 2400W AC inverter provides juice to two locations in the cabin and the rear cargo area. Trailhunter is ready for customization with other Toyota accessory offerings using three easy to reach auxiliary switches that are pre-wired throughout the vehicle.
The 2025 4Runner introduces its first-ever Platinum grade which offers customers a high-end, luxury experience with all the capability you expect in a 4Runner. Platinum slots above the Limited grade by adding unique black exterior styling elements, heated second-row seats, a standard tow tech package, Head-Up Display and automatic rain sensing wipers.
Latest Tech
4Runner receives Toyota’s latest technology with new screens. A new 8-inch or available 14-inch multimedia touchscreen displays Toyota Multimedia, which is designed and engineered by Toyota’s Connected Technologies team. The system supports wireless Apple CarPlay® and Android Auto™ compatibility, and pairs well with the available Qi wireless charging pad with enhanced power output. A USB-C data and charging port is integrated on the right side of the multimedia touchscreen, and dual USB-C charging ports are included in the front row and available for the rear passengers. A 7-inch gauge cluster is standard on lower grades and a 12.3-inch digital gauge cluster is standard on higher grades.
Smart Key System with push-button start is standard on all grades. With an active Remote Connect trial or subscription, an available Digital Key on select grades connects with compatible smartphones to allow vehicle entry, and vehicle starting (4G network dependent). The Digital Key can also be remotely shared with others to give more control over vehicle access rather than giving someone the physical key.
Rugged Choice
The all-new youthful and dynamic 4Runner nicely rounds out Toyota’s rugged lineup of tough body-on-frame vehicles. From the full-size Tundra to the iconic off-road legend Land Cruiser, customers now have five fresh trucks to choose from. These vehicles give customers more choice when it comes to finding a vehicle that can keep up with their dynamic lifestyles. They are designed to handle almost anything the elements throw their way, and their incredible capability gives owners the tools they need to get out and discover all the hidden wonders the world has to offer.
Toyota Safety Sense 3.0 Standard
All 2025 4Runner models come standard with Toyota Safety Sense 3.0, Toyota’s suite of active safety and convenience systems. This suite of features includes:
- Pre-Collision System with Pedestrian Detection
- Lane Departure Alert with Steering Assist
- Full-Speed Range Dynamic Radar Cruise Control
- Lane Tracing Assist
- Road Sign Assist
- Automatic High Beams
- Proactive Driving Assist
Proactive Driving Assist is now a part of Toyota Safety Sense. Proactive Driving Assist (PDA) uses the vehicle’s camera and radar, when system operating conditions are met, to provide gentle braking and/or steering to support driving tasks such as distance control between your vehicle and a preceding vehicle, pedestrian, or bicyclist. PDA can also provide gentle braking into curves. Proactive Driving Assist is not a substitute for the Pre-Collision System and operates in different circumstances.
Including the addition of Proactive Driving Assist, the Toyota Safety Sense features have been enhanced for TSS 3.0:
- The Pre-Collision System with Pedestrian Detection has enhanced detection capabilities thanks to new system sensors. It receives enhanced intersection support with improved detection capability in certain circumstances. In addition to pedestrian and bicyclist detection, this system now includes the capability to detect a motorcyclist.
- Lane Departure Alert will now provide Steering Assist as well as enhanced lane recognition that includes detection of certain 3D objects, like guardrails, that may be used to help define the lane.
- Dynamic Radar Cruise Control will have Full-Speed Range capability and adds a fourth following distance setting, from the previously available three. Enhanced vehicle detection allows for the ability to detect more than one preceding vehicle, as well as vehicles in adjacent lanes. This helps the system to provide smoother, more natural speed adjustments, especially when the driver changes lanes.
- Lane Tracing Assist requires Dynamic Radar Cruise Control to be enabled for it to function. The system requires detectable lane markings in order to function. Like Lane Departure Alert, lane recognition is enhanced over prior TSS generations. In addition to lane centering, this system also helps provide more space between vehicles being passed in adjacent lanes. It works by offsetting the vehicles’ driving path with minor steering adjustments while keeping the vehicle within its lane.
- An Emergency Driving Stop System is a new function of Lane Tracing Assist. It’s designed to monitor the driver’s inputs, such as steering operation, to determine if they’re inattentive or non-responsive, such as during a medical emergency. This feature is designed to bring the vehicle to a stop if the driver doesn’t respond to alerts to take control.
- Road Sign Assist is designed to detect speed limit signs, stop signs, Do Not Enter signs, yield signs, and certain warning signs, and display an icon of the sign on the Multi-Information Display (MID).
In addition to TSS 3.0, other available features include Blind Spot Monitor (BSM), which is designed to help detect and warn you of vehicles approaching or positioned in the adjacent lanes and Rear Cross-Traffic Alert (RCTA) for added peace of mind by helping to detect vehicles approaching from either side while backing out and alerting you with a visual and audible warning. Hill Start Assist Control (HAC) also comes standard.
The 2025 4Runner will be built in Toyota Motor Corporation’s Tahara plant in Japan and will arrive in Canada in the Fall of 2024.
Beyond Zero Vision
As part of Toyota’s diverse portfolio approach toward a carbon-neutral future, 4Runner is the latest hybrid offering in the lineup to wear the Beyond Zero badge. Very soon, Toyota will offer 19 electrified vehicles for customers to choose from. With the additions of Land Cruiser and Tacoma, Toyota will offer 15 hybrid models, two plug-in hybrid models, the bZ4X battery electric vehicle (BEV), and the zero-emission hydrogen fuel cell Mirai, Toyota provides more choices than any other automaker for customers to reduce their carbon footprint.
About Toyota Canada Inc.
Toyota Canada Inc. (TCI) is the exclusive Canadian distributor of Toyota and Lexus vehicles. Toyota has sold over six million vehicles in Canada through a national network of 287 Toyota and Lexus dealerships. Toyota is dedicated to bringing safety, quality, dependability and reliability to the vehicles Canadians drive and the service they receive. TCI’s head office is in Toronto, with regional offices in Vancouver, Calgary, Montreal and Halifax, and parts distribution centres in Clarington and Vancouver. Toyota also operates two manufacturing facilities in Canada. Having produced more than nine million vehicles, popular Canadian models built at these facilities include Toyota RAV4, Toyota RAV4 Hybrid, Lexus RX 350 and RX 450h hybrid, as well as Lexus NX 250, NX 350 and NX 350h hybrid. The company has sold more than 20 million electrified vehicles worldwide and is the number one seller of electrified vehicles in Canada.
Every effort has been made to ensure the product specifications, equipment, and content on this site are accurate based on information available at time of publishing. In some cases, certain changes in standard equipment or options may occur, which may not be reflected online. Toyota Canada reserves the rights to make these changes without notice or obligation.

2025 Toyota 4Runner Is Finally Here as a Turbo Hybrid Tacoma SUV
I was starting to doubt that I would ever see a new Toyota 4Runner , but it's finally, really happening. Gone is the old one that hung around for 15 years with its ancient platform and five-speed automatic; here to stay is the sixth-generation 4Runner with a 2.4-liter turbo-four, available hybrid tech, more trims than ever including a new Trailhunter off-road model, and a whole lot of fresh styling to keep things modern for years to come.
There's no confusing this new 'Yota with its predecessor . It looks like its own thing with angles and creases everywhere, especially up front where the fascia is high and tight. The 4Runner clearly resembles the Tacoma , just like it has in years past, but their faces aren't identical. Instead, it's a development of the design language that Toyota is using across its truck and SUV lineup, particularly the body-on-frame models that share the TNGA-F platform. That includes Tundra, Sequoia, Land Cruiser, Tacoma, and, now, 4Runner.
Toyota's design crew worked in a few callbacks to retro models. What would a new off-roader be without 'em? We already knew the drop-down back glass was returning, as it should, but take a look at the rear quarter glass, too. It wraps around the top, if ever so slightly, which pays tribute to early 4Runners— the ones with removable tops . It's still a shame we can't get that in a modern Toyota, but I digress.
Let's Take a Look Under the 4Runnin' Hood
Having given the 4Runner's exterior a good once-over, let's run through the powertrain stats. The gas-only 2.4-liter turbo—which comes standard in the SR5, TRD Sport, TRD Off-Road, and Limited trims—makes 278 horsepower and 317 lb-ft of torque. Both of those figures are up from the old 4Runner's 4.0-liter V6 with 270 hp and 278 lb-ft of torque. (That's also way better than the last time the 4Runner offered a four-cylinder: the gutless but unkillable 22RE.) When paired with an electric motor and a 1.87-kilowatt-hour battery, total output climbs to a stout 326 hp and 465 lb-ft of torque. That hybrid powertrain is available on TRD Off-Road and Limited, as well as standard on everything above those including TRD Pro and the new Trailhunter and Platinum trims.
No matter which power plant you pick, an eight-speed automatic is the only transmission on offer. Pour one out for the manual we so hoped for . Maybe, with enough public outcry, Toyota will do like it did with the Supra and give the 4Runner a stick at a later date.
2025 Toyota 4Runner TRD Pro, at top, and 4Runner Limited. José Rodríguez Jr.
As before, the 4Runner will be sold with two-wheel drive, part-time four-wheel drive, or full-time four-wheel drive, depending on which variant you snag. The 2WD models feature an automatic limited-slip differential, while 4WD models pack that in addition to a two-speed transfer case. Toyota also installs locking center differentials on full-time 4WD models like the Limited when spec'd with the hybrid powertrain, as well as on the Platinum trim.
I'm not sure how many people are towing big loads with their 4Runners, but for anyone interested, it's rated for a max capacity of 6,000 pounds with both the gas-only and hybrid powertrains.
2025 Toyota 4Runner Trailhunter More Fun to Choose From
The new Trailhunter model brings with it a slick suite of upgrades. It starts with an electronic rear locker and also includes a push-button sway bar disconnect, 33-inch Toyo Open Country all-terrains, Old Man Emu 2.5-inch shocks with rear external piggyback reservoirs, steel rock guards, and skid plates. Heck, it even has a snorkel in case you find yourself with the truck's hybrid battery and engine submerged in a water crossing. Now that's what I'm talking about.
The Trailhunter boasts 9.2 inches of ground clearance—more than any new Land Cruiser, which makes do with 8.0 inches. The big boy 4Runner also wins in the off-road angle categories with 32 degrees of approach and a 24-degree departure angle compared to the Land Cruiser's 31 and 17. As such, this new ‘Yota is positioned as a top choice in the brand’s impressive four-wheeling lineup.
It's interesting to see Toyota's treatment of the 4Runner with two top-shelf off-road trims. Of course, we've already seen this approach with the Tacoma TRD Pro and Trailhunter, but the fact that the dual halo models carry over to the adventure SUV gives us something to think on. Toyota is giving a lot more info on the Trailhunter at launch, but it's worth noting that the Tacoma TRD Pro's trick IsoDynamic seats with built-in air-over-oil shock absorbers are missing from the 4Runner TRD Pro.
2025 Toyota 4Runner Limited. Toyota
Finally, reinforcing that the 4Runner is a mass-market vehicle and not some niche four-wheeler is a new Platinum trim. It focuses on comfort and livability more than rock-crawling and trail-driving. The gloss black exterior accents allude to its more phosisticated ethos, as do the heads-up display and heated second-row seats. It's like a Limited but nicer, essentially, and you know people will buy 'em.
Less Modest, More Modern Interiors
Some 4Runners will feature an eight-inch infotainment screen, though most are likely to get the Mac Daddy 14-inch display. We've already seen it in other new Toyotas and for the most part, it's a good system to use. Operation is fairly simple and the resolution is crispy, marking quite the departure from the Toyota screens of old. It's in your face, no doubt, but you'll appreciate the clarity of a 360-degree camera feed when you're stuck between a rock and a hard place off-road. If you just want to use it for Apple CarPlay, that's cool too .
From left to right: Interiors of the 2025 Toyota 4Runner Limited, Trailhunter, and TRD Pro. Toyota
Likewise, a seven-inch gauge cluster is standard on lower trims while snazzier models get a 12.3-inch digital instrument display. That means a high-end 4Runner like the Platinum or TRD Pro packs more than two feet of screen real estate in front of the driver. It's almost like Toyota stayed in the same analog lane with dials, knobs, and buttons across most of the dash, then veered hard left into digital. Such is life in the new car industry these days.
Still, a lot of the key functions feature their own dedicated controls. Take the transfer case toggle, for example—it has a single-purpose flipper switch that swaps between 2WD, 4HI, and 4LO. Other off-road doo-dads like Multi-Terrain Select, which is now usable in both 4WD settings, and the much-improved Crawl Control are selectable via a dial within easy reach for the driver. You don't even need to fumble through multiple touchscreen menus to view the different camera angles; you just push the button and it pops up. In that sense, Toyota has thought out the UX clearly.
Something everyone should be happy about is the standard inclusion of Toyota Safety Sense 3.0 and all that comes with it. The pre-collision system with pedestrian detection is a big plus when driving around town, as are road sign assist, lane tracing assist, and full-speed range dynamic radar cruise control. I understand that all sounds like a bunch of marketing mumbo jumbo, and it kind of is, but the fact Toyota tosses its best safety equipment into every 4Runner is a plus. It may not have hands-free driving like some other SUVs do, but you know what? This works. It's more than fine.
From left to right: The 2025 Toyota 4Runner Trailhunter, TRD Pro, and Limited. What to Expect Next
Well, it's probably smart to expect to see these everywhere once they go on sale this fall.
It's anyone's guess how long this 4Runner will stay around. I was still in school when the outgoing generation debuted—elementary school, that is. But the new model is far better poised to face the future given its small displacement, forced induction powertrain, and the obvious hybrid element.
I don't anticipate Toyota rushing the 4Runner to full electrification anytime soon. The automaker has built its reputation on hybrids and doesn't view EVs as the move, at least not yet. What you see here is probably what we'll get for the foreseeable future, and I'm cool with that.
The 4Runner is finally modern again, even if that's what the traditionalist Toyota diehards lament as they read this. If you prefer simplicity, you're better off getting an old one. But if you want a new-age adventure mobile, this seems like a stellar platform.
Got a tip or question for the author? Contact them directly: [email protected]

IMAGES
VIDEO
COMMENTS
Toyota radar or active cruise control settings & operation. Toyota prado. Explains the 2 modes of cruise control & how to turn off the radar operation.
The system continually monitors the speed of the car ahead and automatically adjusts the speed of the vehicle to maintain a preset following distance between...
Learn more about Toyota Safety Sense ™ and the advanced standard safety that's designed with you and yours in mind. Learn more at https://www.toyota.com/safe...
Toyota Dynamic Radar Cruise Control is a driver-assistive safety feature that automatically adjusts your cruising speed while maintaining a preset following distance from the car ahead of you. Dynamic Radar Cruise Control is included on all versions of. Toyota Safety Sense. (TSS-P, TSS 2.0, and TSS 2.5). In addition, almost all Toyota vehicles ...
Cruise control is great for highway driving, but constantly adjusting it to match other drivers isn't. Using your Toyota's built-in camera and front-grille-mounted radar, Active Cruise Control keeps your vehicle at a pre-selected speed, automatically accelerating and decelerating with the traffic in front [S1] [J11].
Once the vehicle speed is set by the driver, Dynamic Radar Cruise Control uses millimeter-wave radar and a forward-facing camera to detect vehicles in front of your vehicle and help determine their distance. The system is designed to adjust vehicle speed automatically between approximately 25 to 110 mph. However, vehicle speed must be above ...
Press the Dynamic Radar Cruise Control Button on the Steering Wheel. Press SET When You Reach Your Desired Speed. Press +RES to Increase Your Speed by 1 MPH. Press -SET to Decrease Your Speed by 1 MPH. Press the Vehicle-to-Vehicle Distance Button to Adjust Following Distance. Press CANCEL to Cancel Cruise Control.
Toyota infuses its vehicles with a high level of safety. This includes the Toyota Safety Sense suite of safety-enhancing driver assistance technologies. One of the features in Toyota Safety Sense is Dynamic Radar Cruise Control, which utilizes radar sensors to help you keep a set speed and distance between your Toyota vehicle and the car in ...
Hi Prado Point, First post and and hopefully going to own a Kakadu in the near future. I was wondering if the radar cruise control is a must have or not really the end of the world. I am aware that the radar cruise is standard on post 2011 models but the earlier models it is an option.
View and Download Toyota Land Cruiser Prado owner's manual online. Land Cruiser Prado automobile pdf manual download. ... Page 17 ∗* AVS switches "ENTER" ∗ switch VSC OFF P. 212 switch P. 281 Horn P. 197 Toyota parking assist-sensor Cruise control ∗ ∗ switch (4 sensor type) ... 242 Indicators and warning Dynamic radar cruise lights ...
To activate the system, press the "ON/OFF" button at the end of the stalk on the lower end of the right side of the steering wheel. The radar-ready indicator will appear in the Multi Information Display. Accelerate or decelerate to your intended speed, then press the stalk down to set it. If you want to go faster, push the stalk upward and hold ...
It can't be turned off unfortunately, but it is fixed volume, so louder music makes the problem go away. Reply. lambroso. •. I've rented a Rav4 for 10 days in Norway and the overspending of the cruise control on every single hill (it keeps accelerating for a bit after it reached the peak, so it overspeeds 3-4km/h) is like a joke.
Setting the vehicle speed (vehicle-to-vehicle distance control mode) Press the "ON-OFF" button to activate the cruise control. Dynamic radar cruise control indicator will come on. Press the button again to deactivate the cruise control. Accelerate or decelerate the vehicle to the desired speed, and push the lever down to set the speed.
Anway, went out and bought a low km 2011 model Kakadu instead without radar. From all of it, I concluded that the installation of large driving lights was problem for the radar (ARB agreed). Having a bar by itself was no issue. [B]Bruce [/B] 2011 Kakadu D4D, Pearl, Cooper STMAX 275/65/18, Rhino Aero Racks, ARB BB, IPF 9000XS HID lights, Safari ...
11 Toyota Safety Sense 13 Prado GX 14 Prado GXL Prado VX 16 Prado Kakadu 17 Colours and Trim 18 Accessories ... for cruise control, audio and phone functions at your fingertips. ... and radar to help detect other vehicles in front of you, the PCS is designed ...
When using the cruise control, if the car overspeeds whilst going downhill, it beeps at me. Is the... Jump to content. Genuine Toyota parts & accessories from the Toyota official store on eBay ... Toyota today proudly reveals the all-new Land Cruiser, a model that draws directly on the original qualities that have made the Land Cruiser name ...
2025 Toyota 4Runner TRD Pro. Toyota. Both options come with the same eight-speed automatic transmission found in the Tacoma and Land Cruiser. As before, customers can choose a rear-wheel-drive ...
This video gives instructions on how to operate the cruise control feature in your new Toyota. SUBSCRIBE: http://bit.ly/ToyotaSubscribeAbout Toyota:We're in ...
The new 4Runner is very much an SUV version of a Tacoma, which we expected, as they share the same chassis. The sixth-generation 2025 Toyota 4Runner will start to hit U.S. dealerships in the fall ...
The 2025 Toyota 4Runner four-wheel-drive has been unveiled as a cheaper sibling to the latest Toyota Prado ... plus Crawl Control low-speed off-road cruise control, a locking rear differential ...
Toyota's Safety Sense 3.0 suite of active and passive safety systems is on every new 4Runner, bringing everything from adaptive cruise control to steering assistance. Platinum models also get a ...
Headline standard equipment across the range includes an 8.0- or 14.0-inch infotainment system (variant dependent) offering wireless smartphone mirroring, a 7.0- or 12.0-inch digital instrument cluster, keyless start, radar cruise control, powered rear (tailgate) window and the latest Toyota Safety Sense 3.0 package.
The '25 4Runner comes standard with Toyota's Safety Sense 3.0, which includes automatic high beams, lane-tracing assist, and a full-speed range dynamic radar cruise control system as standard ...
The all-new 4Runner brings the latest Toyota Safety Sense 3.0 system, which includes adaptive cruise control system, lane-keeping assist, automatic emergency braking, and much more.
Alongside the new TNGA-F platform, the 2025 Toyota 4Runner boasts a new and much-needed technology upgrade - both in creature comforts and safety features. ... dynamic radar cruise control, lane ...
Options shown. Not all features available on all vehicles and model grades. Please see your Owner's Manual for further details and important safety informati...
Toyota Safety Sense 3.0 Standard. All 2025 4Runner models come standard with Toyota Safety Sense 3.0, Toyota's suite of active safety and convenience systems. This suite of features includes: Pre-Collision System with Pedestrian Detection; Lane Departure Alert with Steering Assist; Full-Speed Range Dynamic Radar Cruise Control; Lane Tracing ...
Elektrostal is a city in Moscow Oblast, Russia, located 58 kilometers east of Moscow. Elektrostal has about 158,000 residents. Mapcarta, the open map.
2025 Toyota 4Runner TRD Pro, at top, and 4Runner Limited. José Rodríguez Jr. As before, the 4Runner will be sold with two-wheel drive, part-time four-wheel drive, or full-time four-wheel drive ...
Elektrostal Weather Forecasts. Weather Underground provides local & long-range weather forecasts, weatherreports, maps & tropical weather conditions for the Elektrostal area.