- How to Use Points for Free Flights
- The Best Carry-On Luggage
- The Ultimate Guide to Traveling Like a Pro
- My Favorite Travel Credit Cards
- lake louise
- new orleans
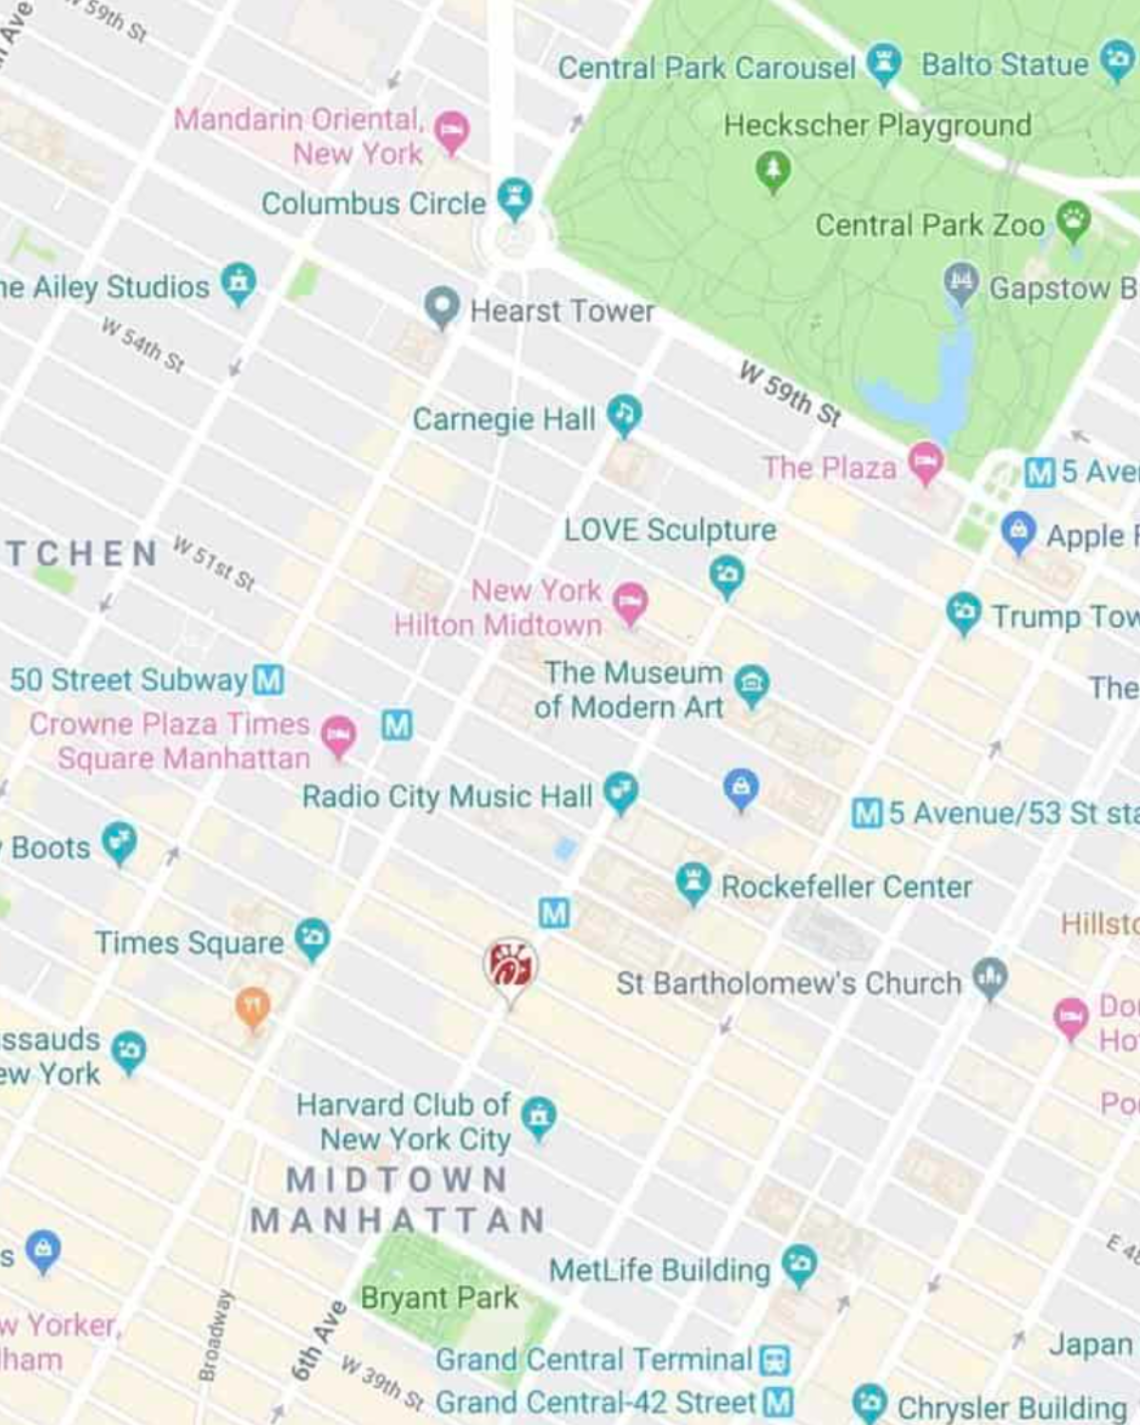
- new york city
- palm springs
- packing lists
- product reviews
- How to Use Vitamin C Serum
- Easy Step-by-Step Skincare Routine
- Drunk Elephant: Best & Worst Products
- Fitness & Wellness
- How I Edit My Photos for Instagram
- Furniture My Interior Designer Loves
- Best Strapless Bras
- blogging & business
- Amazon Finds
- Hotel Lobby Candle
- Shop My Faves
- Promo Codes and Discounts
- Shop My Instagram

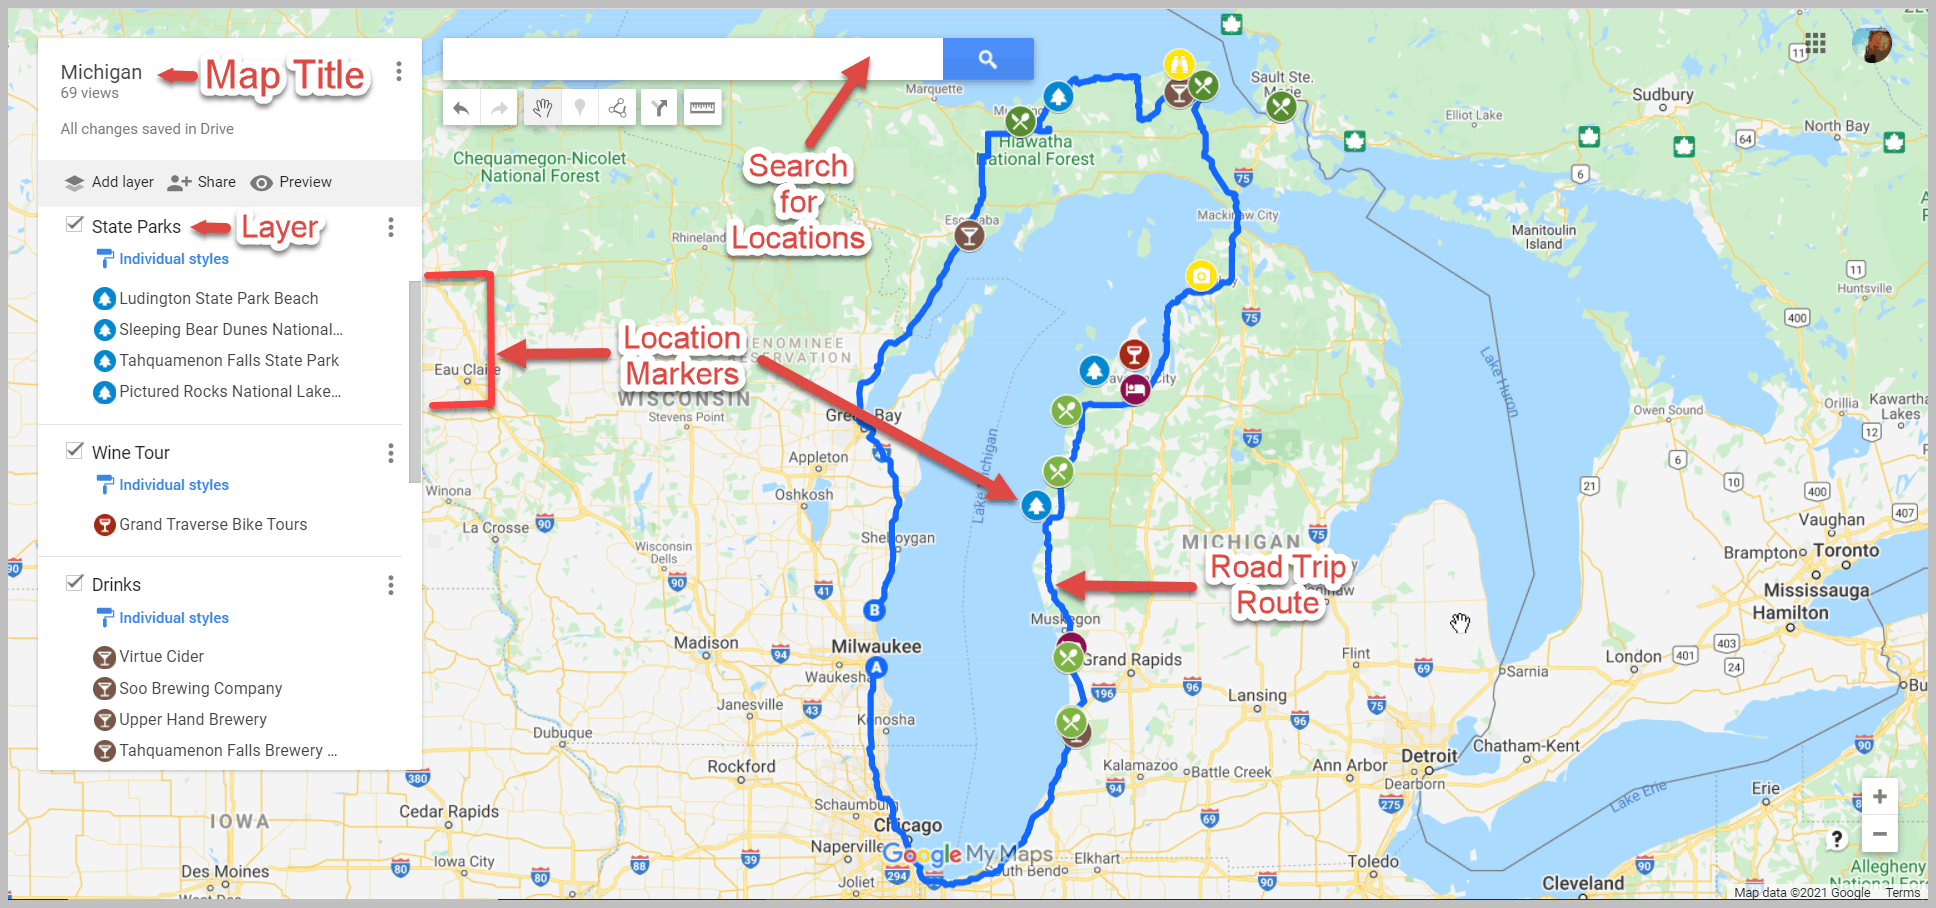
How To Use Google Maps Trip Planner
With so many different travel apps and websites available, it’s now easier than ever to keep yourself organized while planning a trip. One of my favorite tools to use, regardless of where I’m going, is Google Maps Trip Planner.
If you’re the type of person that gets easily overwhelmed when putting together an itinerary , you’ll want to follow this step-by-step guide which details exactly how I use it. Google Maps Trip Planner is not only a highly-visual way to get your bearings of an area, but it’s extremely useful for figuring out where you can realistically travel to during the duration of your trip.
It’s a fantastic way to use Google Maps for multiple stops in a single itinerary , and also comes in handy if you’ve received a TON of recommendations from friends, because you can add destination after destination, and then refer back to the map as you’re out and about exploring.
For example: if you’re visiting NYC and find yourself in Soho looking for a cute cocktail spot , rather than endlessly scrolling through Yelp or TripAdvisor, you’ll be able to pull out your trip planner to see if you’re near places that your friends have recommended! It’s also a particularly handy tool to use when creating a road trip itinerary.
Here’s the step-by-step outline that we’ll go over:
- Create a new Google map for your destination.
- Choose categories for your map.
- Start adding your locations and ideas.
- Customize and color-code your map.
- Decide which activities to group together.
- Plan your day-by-day itinerary.
- Download the Google Maps app on your phone.
- Share your map with friends.
This will all make more sense once I walk you through everything with screengrabs.
Whether you’re thinking about a girlfriends getaway or a honeymoon , Google Maps Trip Planner will be a game changer for you. Take my word for it! Here’s a step-by-step guide to using Google Maps to coordinate your next getaway — with a completely flawless travel plan.
How to Use Google Maps Trip Planner
1. make a new google map..
To get started, you’ll need to create a new Google Map by visiting this link .
It will take you to the main maps page, which you’ve likely seen before. (Make sure you’re logged into a Google account, and if you don’t already have one, you can sign up for free here .)
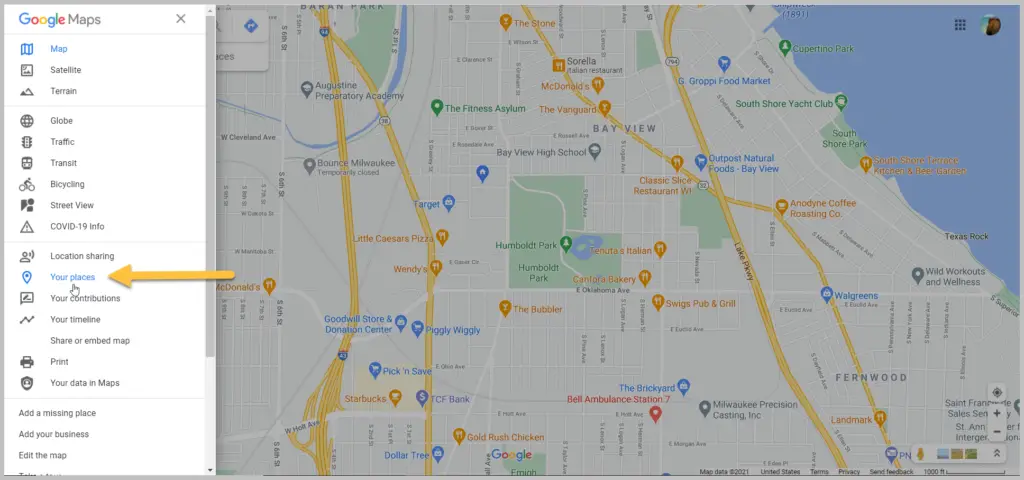
Once you’re signed in, simply click on the three bars icon in the top left corner and select “Your Places” from the menu.

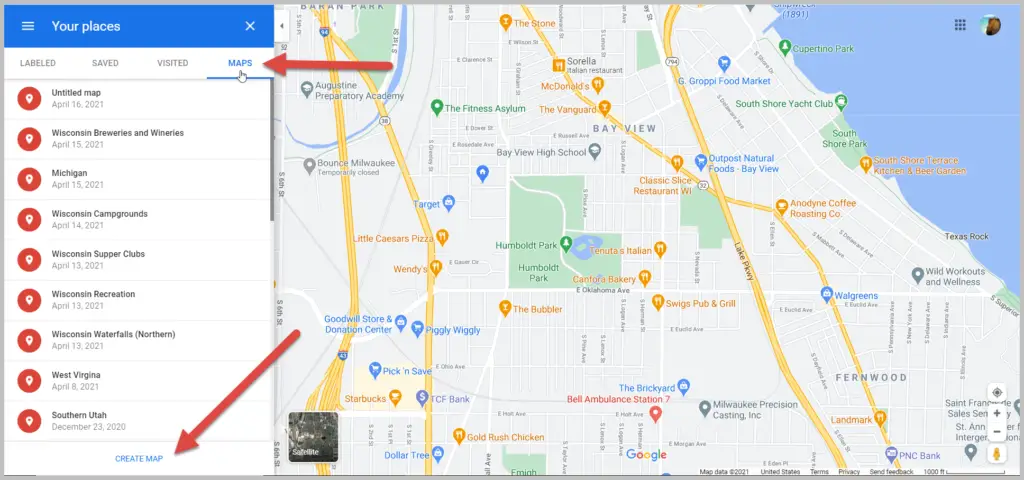
Next, you’ll want to click on “Maps” in the far right corner of the menu.
You won’t see anything listed yet, unless you’ve created a map previously.
Click “Create Map” (which is at the bottom of the menu.)

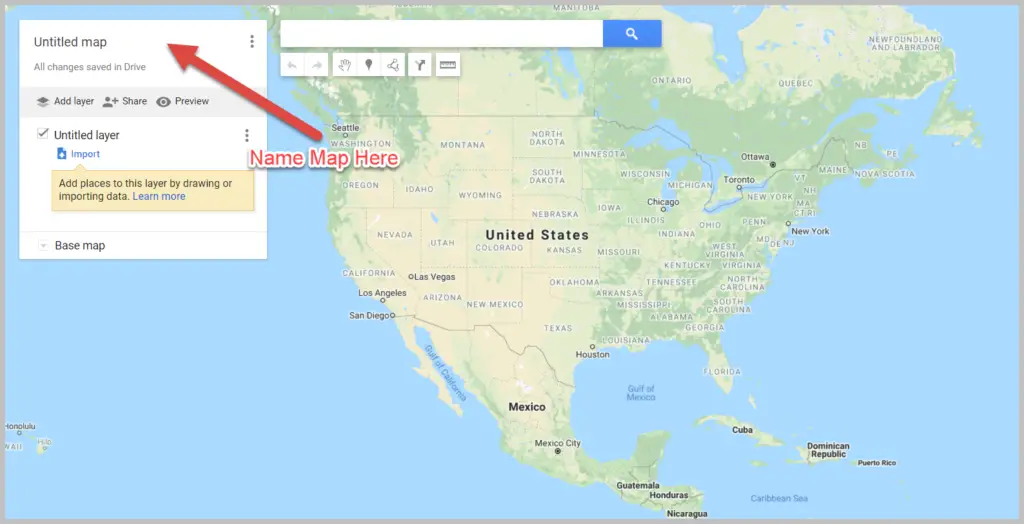
After that, you’ll be directed to an untitled map that you’ll want to name and add a description to.
Do this by clicking on “Untitled Map” and a text box will appear and allow you to fill out this information. Remember to be as specific as possible so you stay organized throughout the entire planning process.

2. Categorize Your Map.
Create a list of all the things you want to spend your time doing on your trip. Here are the categories I typically use:
- Restaurants & Bars
- Cities & Towns (this is good if you’re road-tripping or visiting multiple destinations during a single trip)
- Hotels (I’d only use this category if you’re staying in more than one)
- Activities (beaches, hikes, Instagram spots, etc)
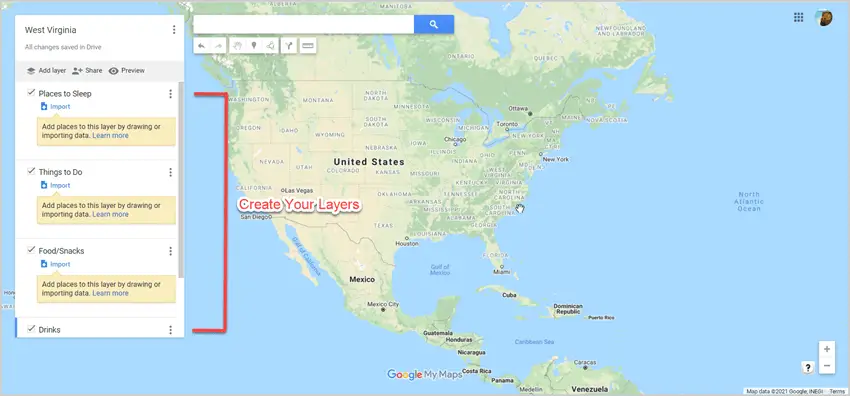
Now that you have your category ideas solidified, you’ll create a “layer” for each one by clicking on the “Add Layer” button on the left hand-side of your screen.
Be sure to name each individual layer by clicking on “Untitled Layer” text box, just like you did when you first named your map. I named my first layer “Hotels” as an example.

More: How I Use Points & Miles to Travel for Free
3. Add Your Ideas to the Google Map.
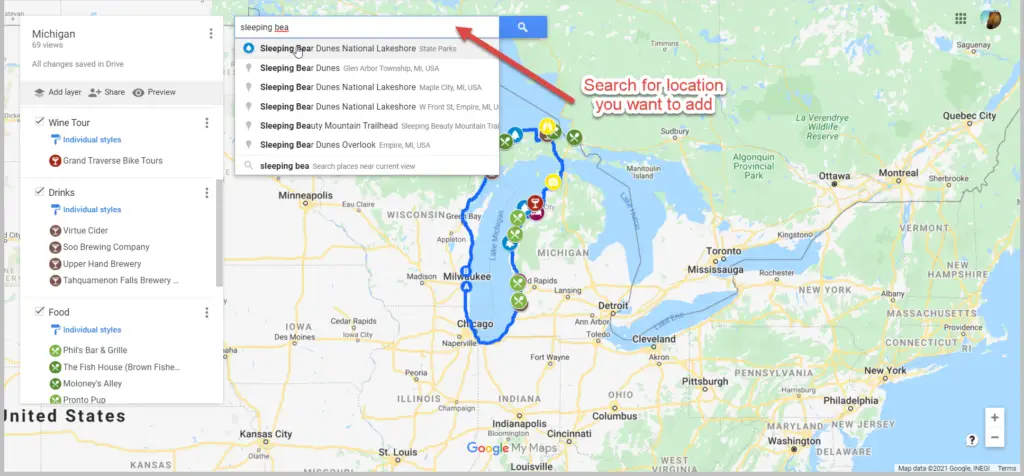
If you’re planning a trip to a destination you’ve been thinking about visiting for a while, it’s likely that you already have some things on your bucket list, whether it be from friends, bloggers, travel sites, or Instagram.
This is your chance to put those thoughts in one organized space and see which ones you’ll be able to make time for. (Shameless plug: I have guides for Tokyo , Maui , New York City , Thailand , Mykonos , Santorini , Positano , Miami , St Barths , and more. Feel free to use them for inspiration should you be heading to any of these locations!)
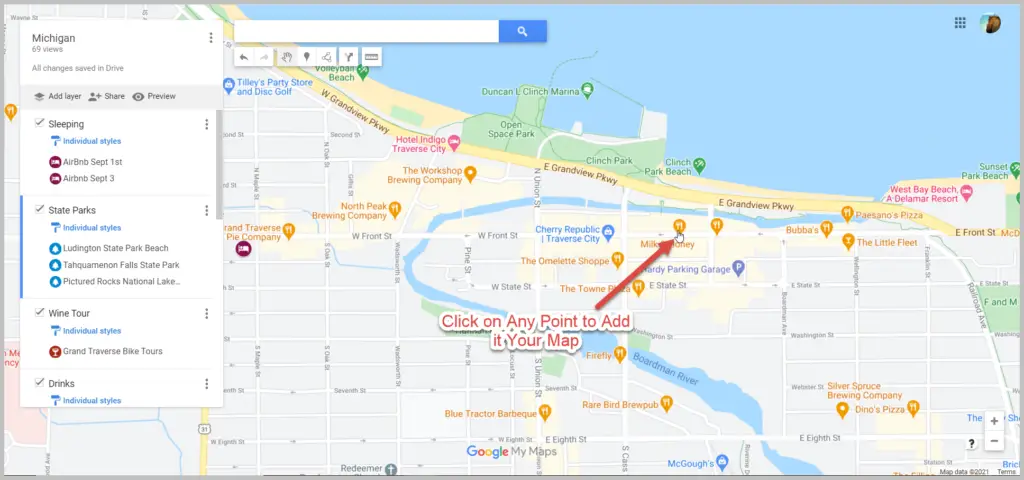
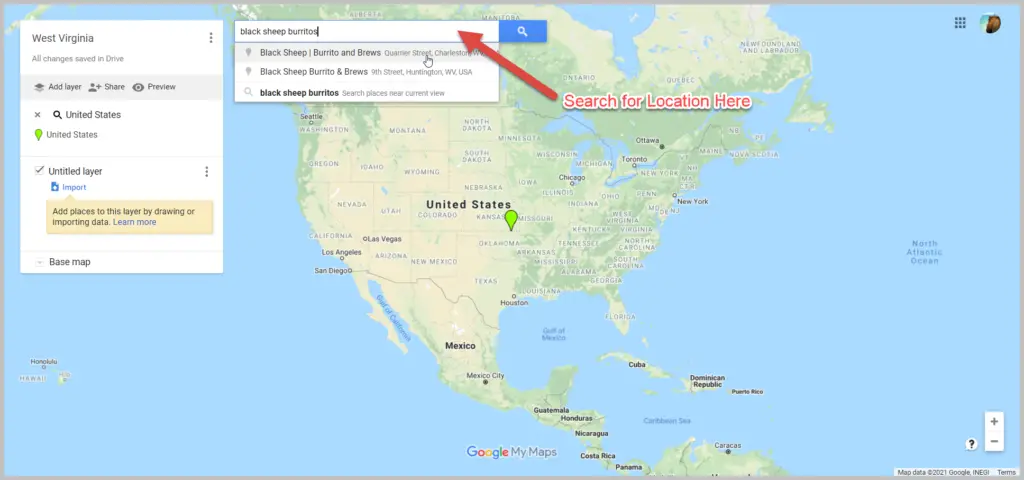
To add an idea you have for your trip, click on the layer (the category) that you want to add a location marker to.
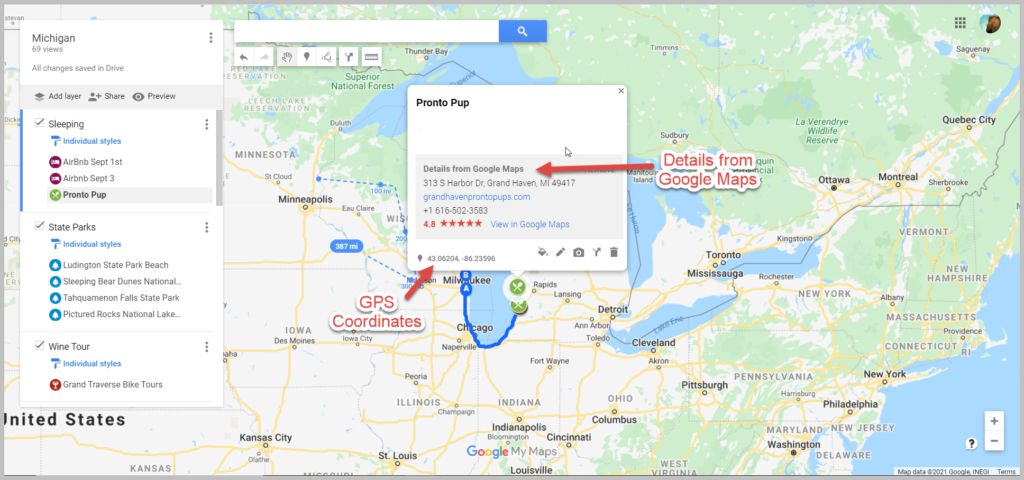
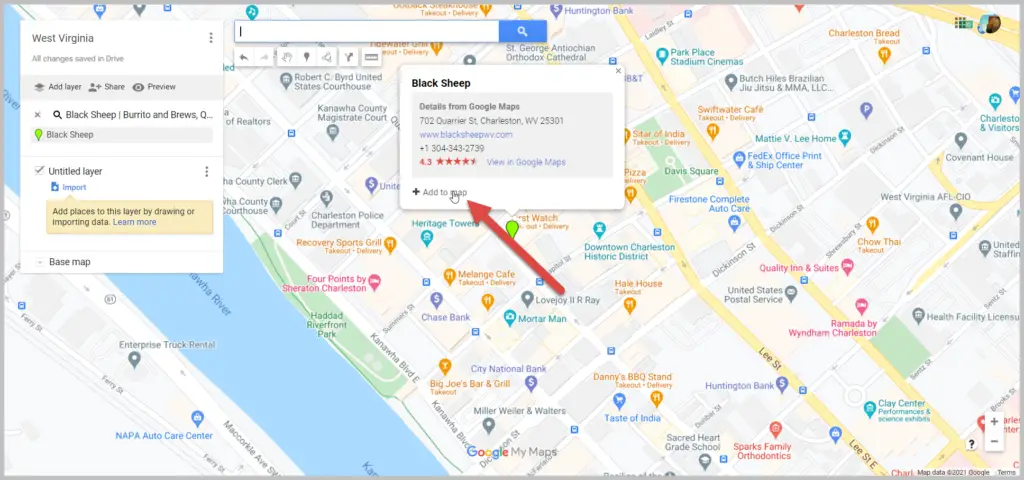
For example, I added this hotel to my map by checking the box on my “Hotels” layer and then typing the hotel name into the search bar. When the place you’re searching for pops up on the menu, click “Add to Map” and you’ll see that a marker is placed on the map. You’ll also notice that the name of the location is added underneath the layer description on the left side of the screen.
- If you accidentally put a location into the wrong layer: not to worry. You can easily drag the location and drop it into the correct category.
- If the place you’re searching for doesn’t auto-populate: it’s probably because Google hasn’t made a location for it yet. But don’t fret! You can just as easily add that spot to your map by typing the address into the search bar and writing the location name manually.

Need some trip inspiration? Check out my travel guides, go-to airport looks, and carry-on essentials here.
4. Customize Your Map.
One of the best ways to keep things visually organized is by color-coding your markers by their category.
To do this, click on the paint bucket that’s located at the bottom of the location marker’s pop-up window.
You can also add additional notes about a location (i.e. “LindsaySilb’s favorite bar; order their signature Bloody Mary) or write down other ideas that you have for that place by clicking on the pencil icon directly next to the paint bucket.
To remove an idea from your trip, just click the trash can icon that’s on the same panel.

There are a number of ways to use color coding:
- For example, you could mark all the restaurants that were on your “Must Visit” list in red, the ones you’d like to go to in yellow, and the ones you would stop by if you have the time in green. This will help you make sure that you get everything checked off of your “must-see” and “must-do” list first.
- For example, pricier sit-down restaurants can be marked in blue, while casual “grab and go” places could be labeled in green.
- You might have just one layer named “Activities” but instead of color coding all those places green, for example, you could mark the museums in purple, mark parks in blue, and stores in gray.
Pro tip: Even if you don’t want to color code everything, I recommend changing the default color from blue to something brighter, like red or yellow. In my experience, the blue location markers can be a bit hard to find on the map.
When you’re done organizing your categories, hit the save button and you’ll notice that they all show up underneath their accompanying layer.
Each location should be saved along with its phone number, address, and website information. This is super helpful because if you decide you want to make a reservation at a restaurant or purchase tickets to a theater show, you have all the tools you need to get there in one space.
5. Decide Which Activities to Group Together.
At this stage, you’ll be able to see a zoomed-out version of the map, with all of your points of interest plotted.
This might help you make decisions about which neighborhood to stay in, which hotel to book (if you’ve been debating between a few), which restaurants you can walk to, or which activities should be grouped together.
It’s nice to see your entire itinerary on a map and use a process of elimination approach to determine which pitstops make the most sense on which days. Seeing things on a map also makes it easier to keep track of the amount of time you’ll need to dedicate to get from place to place.

6. Plan Your Day-by-Day Itinerary.
I like to create a Google Doc that has a little outline of each day of the trip. I also use the doc as the place to store hotel confirmation numbers, car rental info, and flight info.
If you’re planning on driving when you get to your destination, you can easily pull up directions to your first stop by clicking on the arrow icon on the bottom of the pop-up’s panel.
This will automatically create a new layer on the left side of your screen with the location’s name on it. You’ll need to type in your starting location, like the airport, in the text box above it that’s labeled “A” and then click on the icon with the three dots to get step-by-step driving directions.

7. Download Google Maps on Your Phone & Log In.
Finally, to make the map you created accessible on your phone while you’re traveling, you’ll need to have Google Maps downloaded if you don’t already.
Then, be sure to sign in with the same Google account that you used to first create the map. Once you’re signed in, go to “Your Places,” and scroll to the last tab on the right called “Maps.”
8. Share Your Map with Friends and Travel Buddies.
One of the best parts about using Google Maps Trip Planner is being able to share the map. If you’re traveling with a group, sharing the map ahead of time will ensure that everyone is on the same page about where things are located.
And better yet, after you’ve returned from your trip, you now have a full list of everything that you can share with friends who are headed to that location.
To share the map on desktop, simply open the map like you’ve done previously. You’ll notice the “share” button directly underneath the title of your map. Click it, and you’ll have the option to share via Twitter, Facebook, or email.
To share the map on mobile, open the Google Maps app, then click the three bars > your places > maps. Select your preferred map, then select “View Map Legend,” and finally click share. You’ll be able to share your map via text, airdrop, Facebook, Twitter, email etc.
If you’re feeling particularly generous, I recommend going back into the map and adding notes about places that you went, what to order there, places that were worth skipping, etc. Your friends will thank you for it!
The verdict? This tool is a travel game changer .
Rather than sifting through an endless number of routes on Google Maps each time you want to go somewhere, using this process will help you streamline all of your travels. You can put together so many trip itineraries by using Google Maps Trip Planner, and it honestly offers the perfect way to plan a road trip.
Are there other apps or hacks that you use to plan trips? I’d love to hear about them. Drop your suggestions in the comments below.
Pin this post for later:

You Also Might Like

The 10 Most Instagrammable Places in London
THE GRAPE ESCAPE: SOUTH AFRICA’S VINEYARDS

70 Travel Hacks That Will Change Your Travel Game Forever
10 comments.

I do that all the time Lindsay! Since 2009, believe it or not! I always add a google maps to my travel posts so that people can follow exactly what I did. It’s so helpful!

This is the best thing ever! I love Google maps for making places I want to go but they were always just on my”normal” map and it really bothered me that I couldn’t colour code. I won’t be doing any work today I’m the office, just rearranging my whole maps! Thank you for this amazing tip & detailed guide!

Lindsay Silberman
yay!! So happy you found it helpful!

I had no idea about this, wow!!!! Incredible. Thank you, Lindsay 🙂

I love this and the Visit a City app, which figures out the grouping for you!

This was a great write up explaining the how to… only thing missing is multiple people cannot edit the map.

Actually, multiple people can edit: Just share your map with editor rights

How can you share the map with editor rights? I’m trying to do this right now, and I can’t quite figure it out! Thank you!!

How do you view all maps at once ?

love this tutorial!! thank you
Leave a Reply Cancel Reply
Save my name, email, and website in this browser for the next time I comment.
How to Apply Fake Nails Like a Nail Artist (in 15 Minutes or Less)
Here's exactly how to pack jewelry for travel.
There's an easier way to plan and organize your trips—here's how
May 14, 2019
[[read-time]] min read

Travel planning is complicated. The number of tools and amount of information you need to sift through when deciding where to go, where to stay and what flight to take can be time consuming and overwhelming. That’s why today, we’re simplifying the way we help travelers plan trips with Google across devices.
When you’re planning a trip—whether you’re on desktop or mobile—we want to help you find the information you need, fast. Last year , we simplified trip planning by making navigation between Google Flights, Hotels, and Trips easier on smartphones. We’re now rolling this out on desktop as well. You can either go to google.com/travel or search for something like “hotels in Tokyo” or “Vancouver” to find travel information from a variety of sources in one place.
As you plan a trip, your research and reservations will be organized for you in Trips. As we continue to evolve Google Trips, we’re making this information more accessible at google.com/travel, and in Google Search and Google Maps. We’re also adding a few new features to make planning and organizing your trips easier.
One place for all of your trip details
Last year , we started adding your trip reservations for things like hotels and flights to a trip timeline for your upcoming trips, when you’re signed into your Google account and you’ve received a confirmation in Gmail. When you go to google.com/travel, you can now make edits directly to your trips timeline, and in a few weeks you’ll be able to manually add new reservations as well.
Whether you’re packing your bags or finalizing your travel dates, the weather is an important part of every trip. You’ll now see the weather for any upcoming or potential trips at google.com/travel—so you can make sure you’re prepared, rain or shine.
Keep track of research and keep planning
It often takes days or weeks to plan a trip. When you need to pick up planning again, we’ll keep track of your trip research across Google. Recent searches, saved places and flights you’re tracking are added automatically to your trips when you’re signed into your Google Account. Soon, we’ll add viewed things to do and saved and viewed hotels to your trips. When you want to continue planning, all of your research will be waiting for you at google.com/travel. If you don’t want to see private results, you can opt out by adjusting your results and web & app activity settings.
When you’re ready to continue researching other parts of your trip, scroll down to see travel articles and find out more about a destination like suggested day plans, popular restaurants around your hotel and events happening during your dates.
Continue planning on-the-go
When you’re on-the-go or visiting a new place, we’ll do more to highlight things to do, restaurants and more with Google Maps. For instance, last year we made it easier to find the best places to see and things to do when using Google Maps to explore a new place. Now, we’ll also help you get the lay of the land when you’re traveling by pointing out popular neighborhoods nearby and what they’re known for.
And in the next few months, your trips—including reservations for things like hotels and restaurants—will be accessible in Google Maps, too.
Our goal is to simplify trip planning by helping you quickly find the most useful information and pick up where you left off on any device. We’ll continue to make planning and taking trips easier with Google Maps, Google Search and google.com/travel —so you can get out and enjoy the world.
Related stories

3 ways to find a great deal with Google Flights

A new advisory committee to improve flight emission estimates

Three tools for stress-free travel around Asia Pacific

New ways to browse hotels and save money on flights — plus other tools for summer travel
New ways to drive hotel bookings and reach travelers.

5 sustainability updates from 2022 that are good for you — and the Earth
Let’s stay in touch. Get the latest news from Google in your inbox.
How to use Google Maps as a trip planner and make a full itinerary
- You can use Google Maps as a trip planner through the "Places" and "My Maps" features.
- Both the Google Maps website and app let you save locations to lists, which you can then get immediate directions to.
- When getting directions, you can look up reviews and add multiple stops to your route.
Google Maps has become an essential part of any road trip. After all, it's a GPS, business directory, and reviews platform all-in-one.
But if you spend some time with it, you can integrate Google Maps even more seamlessly into your next vacation. Google Maps has a variety of features you can use to plan your trip and save any interesting spots you find on the way.
Here's how to make Google Maps your trip planner, using the Places feature, My Maps, and more.
How to use Google Maps as a trip planner
Use the 'places' feature to save points of interest.
Let's say you're traveling, and happen to stumble upon the cutest coffee shop you've ever seen. You want to visit, but don't have time right now — what's the best way to remember it?
Google Maps' Places feature can help you out. Both the Google Maps website and app let you save any location on the map to a list, which you can then easily find later.
1. Open Google Maps and click, tap, or search for the location that you want to save.
2. Find the Save icon , which has the icon of a bookmark. You'll find it right under the location's name, but you might need to swipe to find it in the mobile app.
3. Pick where you want to save the location to. You've got three lists to start with — Favorites , Starred places , and Want to go — but you can make a new one by tapping New list .
4. Once you've saved the location, you can find it again by opening the list. In the mobile app, tap Saved at the bottom of the screen; on the website, click the three stacked lines in the top-left and then Your places .
Tap on a location in your list to have the map jump straight to it.
Look at Google Reviews to find the best shops
Nearly every point of interest on Google Maps has a section for user reviews. Similar to sites like Yelp, these reviews can be a great way to see which stops are must-sees and which you can pass.
To check out reviews:
1. Open Google Maps and find the location that you're interested in.
2. At the top of its information page should be a star rating and a number, showing how many people have left reviews.
3. Scroll down until you hit the Reviews section, and you'll find reviews from other users who've visited the location. They'll include a star rating, a date, and occasionally a picture.
If you're interested in leaving a review of your own, check out our article on how to write Google reviews .
Make a custom My Maps page to share your road trip plan
Only available on a computer as of this month , Google's My Maps program lets you make a custom map or plot out a route with as many waypoints as you like, and then save and share it with others.
1. Head to the My Maps homepage and click Create a New Map .
2. You'll be given a world map. In the menu in the top-left, click the Untitled map name to give your map a name.
3. Use the search bar at the top of the page to find any location, then click Add to map to save it. You can add as many points of interest as you like.
4. You can also save multiple separate lists of locations to the same map; just click Add layer in the top-left menu.
5. To save directions between multiple locations, click the Add directions icon that looks like a curved arrow. It'll add a new layer that you can use to plot a path.
6. When you're done, click Share or Preview in the top-left window.
Add multiple stops to one trip
Driving from one city to another is simple. But if you want to make stops along the way — lunch, the beach, a mall — things get complicated.
Luckily, you don't need to start a new Google Maps route for every stop. You can create one navigation route that includes every stop from the start, giving you a clear way to see how long it'll all take.
1. Open the Google Maps app and start navigating to another location.
2. On the screen that lets you pick your starting and ending location, tap the three dot icon .
3. Select Add stop .
4. A third waypoint — labeled "B" — will appear. Tap it to choose your second destination, or drag it to reorder the waypoints.
On a computer
1. On the Google Maps app website, find a location and start getting directions to it.
2. Underneath the menu that lets you pick your starting and ending location, click Add destination .
3. A new field will appear. Enter your third waypoint.
4. Once you pick a new waypoint, you'll be able to click Add destination again and pick another one, as well as reorder them.
You can add up to nine destinations on both the website and mobile app.
On February 28, Axel Springer, Business Insider's parent company, joined 31 other media groups and filed a $2.3 billion suit against Google in Dutch court, alleging losses suffered due to the company's advertising practices.
- Main content
How To Plan A Trip With Google Maps: 7 Easy Steps
This page may contain affiliate links which earn us a commission at no extra cost to you to support the site. Thank you!
Wondering how to plan a trip with Google Maps? Below, we’ll show you how we plan all our trips on Google Maps – get ready for every Google Maps hack you’ll ever need!
There is a lot that goes into planning the perfect trip. What are you going to do? Where will you stay? How are you going to plan your days? How long do you even need to see everything? It’s overwhelming!
I love travel planning. As you can see on this website, I kind of made my career out of it. Because I want to make the most out of my trips (and write the best possible guides about the destinations I visit), I take travel planning pretty seriously.
There is so much research that goes into it, and I couldn’t do it without my favourite travel planning tool: Google Maps. In this guide, I’m sharing how I use Google Maps as a trip planner, along with some handy hacks to help you on your next adventure. Let’s take a look!
Add Directions
Embed your map on your site, 3. it is easy to plan your driving miles/time.

7 Steps to Plan a Trip With Google Maps
Here is how to use Google Maps trip planner:
1. Create a Map
To create a map on Google, you do need a Google account. Once signed up/logged in, go to this page .
Click on “ Saved” >> “My Maps “, which will take you to your maps. If you have created any maps in the past, you will also find them here. As you can see in the screenshots below, I’ve already created quite a few!
Alternatively, you can go to this page , where you see and access your maps in an instant.

To create a new map, click on “ Create Map ”. This will open a new tab with an empty map.

By clicking on “ Untitled Map ”, you can give your map a name and a description. And ta-da! You’re ready for some travel planning on Google Maps. Time to create the perfect itinerary .

2. Add Locations
Now it’s time to start brainstorming. What do you want to do and see on your trip? There are so many ways to find the best places to visit.
For starters, you can find things to do by reading travel guides, blog posts , and itineraries from other travel bloggers. It’s also a good idea to go through Instagram hashtags and location tags. And, of course, good old printed travel guides (by Lonely Planet and Rough Guides, for example) are always a good shout too.
You don’t have to worry about how to plan out your days in detail. For now, you simply want to get an idea of what you want to do on your trip.
Whenever you find something that seems interesting, you can add these to your map by typing the location into the search bar. This can be the name of the location or the address, or you can use the coordinates. Usually, you’ll see a drop-down menu with suggestions as you type.

By pressing enter or selecting one of the options, Google Maps will take you to the location. Here, you can add these locations to your maps. Simply click on “ Add to map ”. Afterwards, you’ll see it appear on the Untitled Layer .

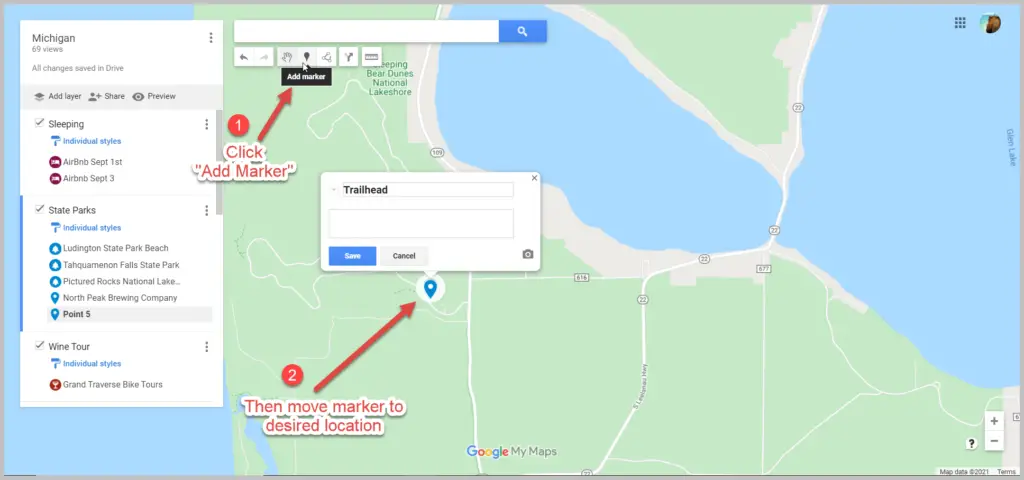
Alternatively, you can use the “ Add Market ” tool (shown in the screenshot below) to add a marker on the map. You can use this when a location isn’t on the map but you don’t have the coordinates, for example.

Before adding all your locations, make sure to read step 3. We explain how to customize your pins on Google Maps, making it much easier to plan your daily itineraries later on.

Planning a road trip on Google Maps? Start by adding the places you want to see/visit. Later on (see step 5), you can add directions to help you find the fastest routes. You can create on Google Maps for the overall road trip, and make another map for daily itineraries of your road trip.
3. Customise Your Categories (Icons and Colours)
The customisation options are another reason why planning trips on Google Maps is one of the best travel planning tools out there. By using colours, icons, pictures and notes, your map will be even easier to navigate.
These options let you break down your locations into categories, such as things to do, photography spots, restaurants, cafes, hotels, shops, etc.
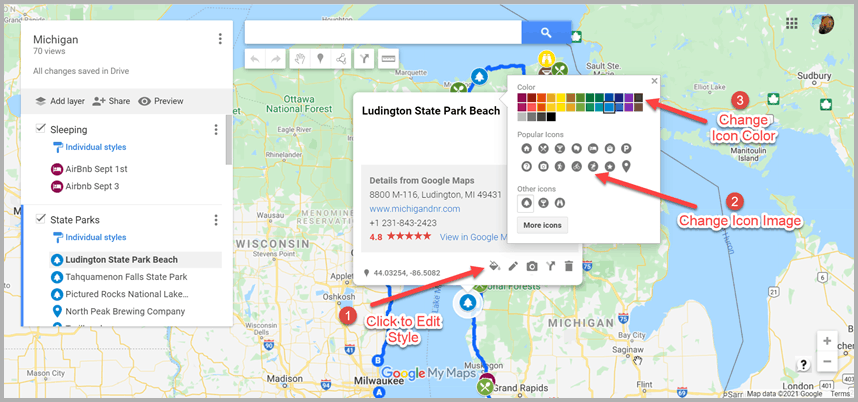
You can change the colour of your pin and add an icon under the “ Style ” option – it looks like a paint bucket. There are hundreds of different icons to choose from.
At this stage, it’s best to stick to changing the icons for now. I normally change the colours to divide the days on my itineraries. Obviously, you can completely style this the way you want.

You can also change the colour and icon of your pins in the side menu.

When clicking on the “ Edit ” icon, you can change the title and add a description for your location. This can be handy to help yourself remember any specifics about this place, such as good photography spots, opening times and whether you need to book a ticket in advance or not.

You can add an image or video to your pins, too. And lastly, you can delete the pin by clicking on the trash icon.

4. Create Layers
Now you’ve added all the things you want to do and given them some icons, it’s time to take a look at the layers. You can add a layer by clicking the “Add layer” option in the sidebar. This automatically creates a brand new untitled layer on your map.

You can rename and delete the layers by clicking on the three dots next to the name of the layer.

You can make layers invisible by unchecking the box next to the name of your layer.

To move points of interest from one layer to another, you can simply drag them over with your mouse.
Layers are an easy way to categorize and organise the locations on your map. There are multiple ways to do this, and you can choose a way that works best for your trip. For example, you can create one layer for restaurant options in Tokyo, one for sightseeing in Tokyo, one for hotels in Tokyo , etc.
When I’m planning a big trip, I like to use layers to break down my individual days or cities. This way, I can quickly see what I’m doing every day while I’m travelling. To make it even clearer, I change the colours of all my pins to match the different layers.
5. Plan Your Itinerary (with Directions)
After following these steps, we should have a good overview of all the things we want to do and see during our trip. This will make it much easier to break down the trip into days.
For the Tokyo itinerary I’ve been planning as part of this Google Maps tutorial, I’m going to spread it out over two days.
I created two layers to match my time in Tokyo in Google Maps.

Because I can see where all my hotspots are located, I can see which activities and sights I want to pair together. This way, I can efficiently plan what I want to see each day. You can even make squares to group things together with the “ Line Drawing ” tool.
For example, it makes sense to group these pins together per day – this will save me a ton of time travelling from one place to the other.

Always check whether these things actually work together, though. Sometimes, a ton of restaurants are located near each other, but there’s no point in planning to visit four restaurants on the same day.
Sometimes, there are museums that take way too long to visit alongside other sights or you can combine certain parts of the city in one day.
Take a look at your itinerary and plan it accordingly. As mentioned before, I like to use the colour tool to add the same colour per day to make it even easier to spot. My Google Map itinerary turned out like this:

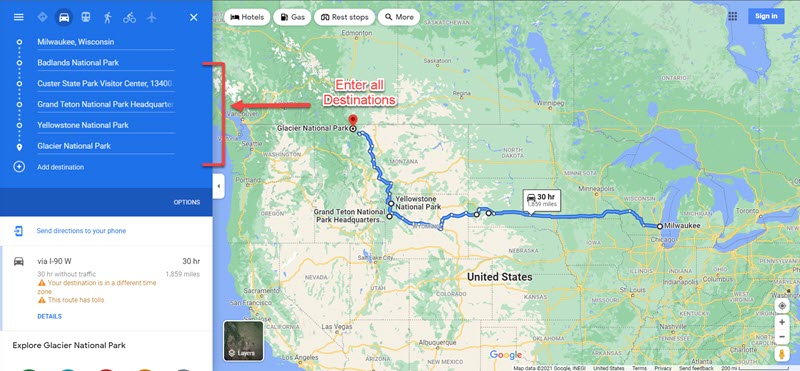
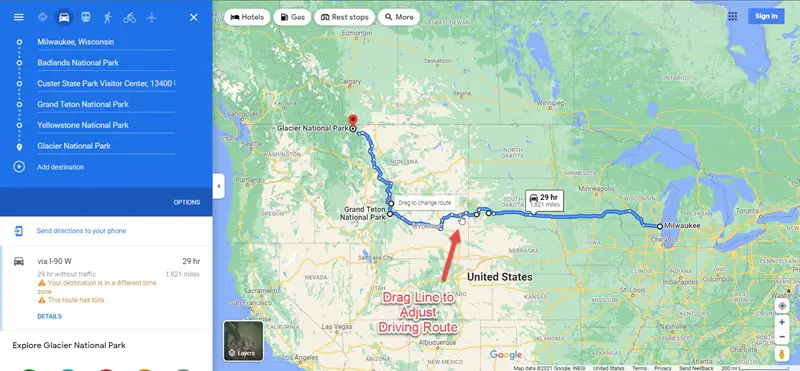
If you’re planning a road trip on Google Maps or want directions for walking from one point to another, you can use the direction tools. Click on one of the locations and select “ Directions to here ”.

This will create a new layer on your map. From here, you can add different locations to create a route. You can select points of interest on your map to easily add them to your route. Click on “ Add Destination ” to add more stops.
You can also change whether you want directions by car, bike, or on foot by clicking on the car icon. This opens up a small window with a car, bike and pedestrian. Changing the mode of transport will automatically change the directions to find the best route for you.
This tool allows you to create road trip itineraries or city walks with just a few clicks. I find this especially handy to plan a road trip with Google Maps, as it allows me to estimate the driving time and the amount of money I’ll have to spend on petrol.

By clicking on the three dots next to the name of this direction layer, you can click on “ Step-by-step directions ”. This will give you detailed directions, distances, and an estimation of how long it’ll take for you to get there. Super handy!

6. Book Your Hotels
Now you know exactly what your daily plans are for our trip, it makes it much easier to pick the perfect location for your accommodation . Since you know what parts of the city you’ll be visiting, you can pick a spot that’s near these locations. This will save you so much time (and money), as you won’t have to travel too far to go to start your daily itinerary.
I usually book hotels on Booking.com . The website’s map feature makes it perfect for choosing the location. Because I have my itinerary ready on Google Maps, I know exactly what area of the city I prefer to stay in.
Once you’ve booked your accommodation, you can add the location to your map too.
7. Share Your Trip & Access it on Your Phone
Once you’ve finished your map, you can share it with your travel buddies and download it onto your phone. Here is how to do it.
Access Your Map on Your Phone
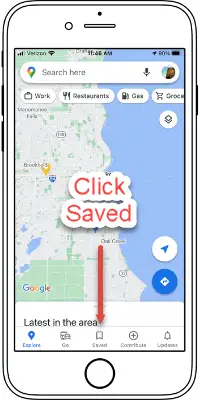
To view the map on your phone (with an internet connection), simply download the Google Maps app. Log into your account and click on the “ Saved ” button at the bottom.
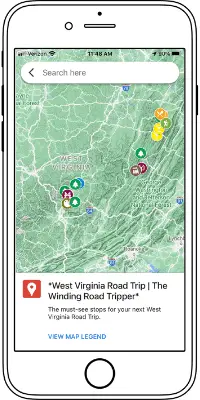
Then scroll down and click on “ Maps ”. This will take you to all the maps you created. Click on the map you want to access, and all your saved spots will appear.

Share Your Map
To share your map with your travel company or friends, click on the “ Share ” button. Make sure to enable link sharing , which will allow you to copy the shareable link. You can share this link with friends, who can then access your map and download it themselves.

If you’ve read any of my itineraries or travel guides , you have probably noticed some Google Maps. As I always use these maps for my own trips, I try to include them in my articles for you to use. If you want to embed your map onto your site, click on the three dots >> “Embed on site” .

This will give you a code that you can include on any site for an interactive map to appear.
Why Use Google Maps for Trip Planning?
Google Maps is one the best travel tools because it’s so easy to use for both planning your trip and using it during your trip. We use it for planning city trip itineraries and road trip routes, plus it allows us to save our favourite locations and hotspots.
Whenever we come across a location on social media that we’d like to check out, we add it to a bigger map so we can organise it into smaller itineraries when we’re ready to visit.
Here are some of the main reasons to use Google Maps:
1. It Allows You to Access Your Maps Anywhere
You can access Google Maps anywhere you want. After creating a map on your desktop, you can open it on your phone or tablet. Plus, you can download it so you can access it without being connected to the internet. This is especially handy when you’re abroad and internet access isn’t a given.
2. It Makes it Easy to Find the Best Hotel Location
Using Google Maps to plan my city breaks gives me insight on the perfect location for my accommodation. Because I have a visual representation of all the things I plan to do during my holiday, I know exactly what the best hotel spot is. I compare the map from Booking.com and my own map, and ta-da!
When planning road trip routes on Google Maps, you can easily estimate the time it takes to drive from one place to the next. You can use this to properly budget your trip in terms of petrol cost, too. And when on the road, you can use the directions from your own map while driving.
Conclusion: Using Google Maps Trip Planner
That concludes my tutorial on how to plan a trip with Google Maps. I hope this has shown you all the amazing features this tool offers and how easy it is to use when planning a road trip or city break.
Ever since I started using it, I’ve never looked back. It has saved me so much time and always takes away a ton of travel planning stress. I hope it can do the same for you!
Nele (Nay-la) graduated from Manchester Metropolitan University with an English and Creative Writing Degree and has lived in the UK for nearly 10 years. She has had an interest in Japan and its culture for as long as she can remember. Since her first trip in 2018 surpassed all expectations, she has continued to return to Japan to explore more of all it has got to offer. You can read her full story here .
View all posts
10 thoughts on “How To Plan A Trip With Google Maps: 7 Easy Steps”
WOW!! I had no idea this resource existed. Your detailed steps and screenshots make it easy for me to take the plunge and start using this tool. Thank you.
Thank you so much for the lovely comment, Anne! So glad the post was able to teach you a few things – it’s such a great tool to use for planning trips!
Hi, Thank you for sharing this interesting feature. I was looking for a hard copy of a plan for my travel in Malaysia.
Great guide, exactly what I was looking for, Great work, Thank you!
- Pingback: Blogs To Read This September - Bournemouth Girl
This was very helpful. Thank you 🙂
Amazing tutorial! I am so glad you came up in Google search just as I was looking for this kind of resource. And best of all its free and a tool that I am so used to. How did I not know this before about G Maps?!
So glad to hear the tutorial was helpful! It’s been such a useful tool in my travels, hopefully you can use it on your next trip too!
Very detailed explanation and very well explained too. Thanks for making this blog…
Great post! I recently planned a trip to a nearby city using Google Maps, and it was incredibly helpful in navigating unfamiliar roads and finding the best routes. I especially appreciated the feature that allowed me to save my route and share it with friends. Will definitely be using this method for future trips!
Leave a Comment Cancel reply
This site uses Akismet to reduce spam. Learn how your comment data is processed .
Must-Read Articles

50+ Best Things To Do In Japan

Is The Japan Rail Pass Worth it?

The Perfect Three Week Japan Itinerary
Japan Travel Tips Group

The Japan Travel Newsletter
Sign up to get inspired! Receive insider tips, special discounts and more to plan your perfect Japan trip.
You have successfully joined our subscriber list.
japan travel Blog
Tokyo Kyoto Osaka Hiroshima Hakone Kobe Nikko Nara Kyushu All Japan Content
Plan Your Trip
Best Things To Do Japan Rail Pass 2 Week Itinerary 3 Week Itinerary Accommodation Japanese Phrases
About The Navigatio Work With Us

A Step-By-Step Guide to Plan a Trip With Google Maps

Some articles on Rachel Off Duty contain ads and affiliate links. If you plan on buying or booking something I’ve recommended, please consider using my links, which help power this site at no additional cost to you! To learn more, read our Privacy Policy .
Some articles on Rachel Off Duty may contain affiliate links. Read more in our Privacy Policy.

Planning a trip is equal parts fun, exciting, and exhausting.
There’s a never-ending list of things to do:
- Book flights
- Find accommodation
- Look for things to do
- Decide how many days to spend in each place
- Figure out public transportation
- Pay deposits
- Book airport transfers
- Relay all this information to everyone else coming with you the trip
It’s almost like a second job to plan out the perfect getaway!
Over the years, I’ve run through tons of trip planning methods, but I haven’t found one that can hold a candle to Google Maps (and good old spreadsheets, but I’ll save that for a separate post).
It’s ridiculously easy to plan a trip with Google Maps, and it will save you hours (both before and during your trip).
If you’re over feeling overwhelmed by putting together an itinerary, this is the guide for you. I’m walking you through exactly how I use a Google Map planner to set the groundwork for my trips, decide where to book a hotel, and map out the logistics of all the activities and sights I’d like to see along the way.
Whether you’re spending a weekend away or using your hard-earned PTO to take a mega vacation, here’s my step-by-step guide for Google Maps trip planning.
RELATED: Road Tripping Like a Pro – Planning Tips to Help You Stay Sane on Long Drives
Why You Should Plan a Trip With Google Maps

Wondering how a map tool can help you plan an entire vacation? Here are five reasons why I think Google Maps is an underrated MVP, whether you’re like me and genuinely enjoy the puzzle of trip planning, or not!
The Google Maps Trip Planning is a Visual Brain Dump
What I love most about Google Maps trip planning is I can SEE everything in one place. After hours scrolling through Pinterest, Instagram, and countless guides around the web, I always come up with an extensive list of things I would love to do wherever it is I’m going.
Then, with Maps, I can take all that hard work and dump it into one centralized place. With a tap or swipe of my finger, I can quickly see a list of all the restaurants I want to visit and how far specific attractions are from one another, and go from there.
Having all my places of interest laid out gives me a crystal-clear idea of where everything is and helps familiarize myself with a new destination (or a road trip route).
Do you have a bunch of attractions clustered in one area, like in a specific neighborhood or on the coast near the beach? That’s your first clue on where to look for hotels if you don’t already know where you’d like to stay!
See How Many Days You Need to Spend in Each Destination
Do you struggle with figuring out how many days to spend in a country or each city? Google Maps trip planning can help with that, too.
With all your must-sees (and must-eats) on a map, you can see which areas have the most markers. You’ll want to spend more days in places with a high concentration of pins to give yourself enough time to see everything.
If you see that you have pins further away, you can do two things:
- Nix those from your Google itinerary if you don’t have time for detours.
- Sacrifice other things on your itinerary to make room for a day trip.
- Explore whether there are easy tours you can book to take you there without the added logistics of renting a car or navigating public transportation (unless that’s your jam!)
Get All The Information You Need in One Place

It happens to the best of us.
You’re exploring a new city, and you forgot to check the opening times for the museum you want to visit.
When everything you want to see is on Google Maps, you don’t need to waste time finding any of that information over and over again.
All you need to do is click on the listing, and you’ll instantaneously get:
- Hours of operation
- Phone number
Plus, you can see peak visitation times! This is super useful if you’re hoping to visit a popular attraction like the Tegalalang Rice Paddies in Bali and want to avoid the crowds.
P.S. Did you know if you tap on “Directions” and select the “Rideshare” icon, you’ll get a list of operators in the area with links to take you directly to the corresponding app for ride-hailing? Here’s to never putting in the wrong address into Uber again!
You Can Customize Your Google Maps Trip Planner

Maybe this is a minor thing for some people, but as a type-A personality, I love obsessing over customization details. From my office essentials to my Keep notes, everything is color-coded and carefully selected. And you might’ve guessed where this was going – on Google Maps, there’s actually a lot more customization capabilities than people realize!
You can make custom labels, icons, and color codes. It helps you get super organized and find things faster when you’re in a rush.
For instance, I might color-code free attractions versus the ones that cost money or require a reservation. Or, I might label the places I know I’d like to spend more time in for photography. The options are endless and entirely up to you.
It Saves You Time
Trip planning is TIME-CONSUMING. Did I say that already?
And it’s especially time-consuming if you have other people involved.
When you create a Google Map to plan a trip, you can effortlessly share it with your friends and family. From there, everyone can add their interests and preferences, and you save yourself from the pain of going back and forth with everyone as you narrow down your agenda.
It also makes you a much more organized and efficient traveler. By grouping areas with higher concentrations of pins, you can see more and save yourself from unnecessarily traveling back and forth from one end of the city to another.
Lastly, it makes you adaptable. Did an attraction close for maintenance? No problem. Whip out your Google Map, and you can make changes to your itinerary on the fly. Once again, saving you time and giving you more options in a pinch!
How to Use The Google Maps Travel Planner to Create an Itinerary
Creating a Google Map for your next trip is easy (and it can be really fun!). Let the planning commence!
Step 1: Make a New Google Map
The first step to create a trip in Google Maps is to visit the Google Maps home page. Click on the hamburger menu icon in the top left-hand corner.

Select “Your Places” from the dropdown menu.

Select “Maps” in the far right-hand corner menu. If you’ve created custom maps in the past, you’ll see the list here.

Click on “Create Map,” and it will redirect you to an untitled map. Add the name of your map and a description.

Tip: You need to sign in to your Google account for this to work.
Step 2: Create Categories for Your Map
Next, you want to break down everything you want to do in “categories.” Some of the ones I use are:
- Restaurants
- Coffee shops
- Fun photo spots / Photoshoot locations
- Activities (beaches, attractions, hiking trails, etc.)
- Hotels or campsites
Think about your interests and how you like to spend your trip. Are you all about feasting on the best vegan food from a city? Maybe you love shopping at markets and bringing home souvenirs. Whatever it is, use what you like to start planning your trip and creating categories around your top priorities.
Once you have your categories, you’ll create a layer for each one.
Click on the “Add Layer” button on the left-hand side of your screen.
Click on “Untitled Layer” to re-name the category and keep your map organized.

Step 3: Start Adding Your Trip Inspiration to Google Maps
Now it’s time to put all your research and endless scrolling to good use! Gather all your trip inspiration and start adding it to the map.
When I plan a trip with Google Maps, I go through all the blog posts I’ve saved as well as my “Saved” folder for a destination on Instagram. It makes the whole process so much easier and saves me from researching a place from scratch.
Here’s how it works for me:
Let’s say I want to go to Utah . I’ll go through a first-timers guide to Park City itinerary (shameless plug) and add all the places I want to visit onto the map. If I saw a friend recently visited a restaurant in Park City and saved her post on Instagram to refer to later, I might add that to my map as well.
How to Add a Place to Your Map
Step 1 : Select the layer you want the pin to be added to.
Step 2: Type the place’s name into the search box and select the listing from the dropdown list.

Step 3: Click on the “Add to Map” button, and you’re done!

Tip: If you accidentally add a location to the wrong layer, you can drag and drop it to the correct one.
What happens if the place you want to visit isn’t on Google Maps? As long as you have the address, you can manually add it to your map.
Step 4: Customize Your Map
As I mentioned earlier, I love how you can customize the Google Maps trip planner. There are dozens of options to keep things organized, from changing pin colors, to adding icons, to including images.
- Click on the “paint bucket” icon at the bottom of a location marker’s pop-up window to customize a listing.

- To add notes, click on the “pencil” icon next to the paint bucket.

- To remove a place from your Google itinerary, click on the trash bucket icon in the same panel.

How to Use Color-Coding to Plan a Trip with Google Maps
Option 1. Color-code things by priority: Mark your must-visit locations in red. The ones you’d like to see can be yellow, and things you don’t mind visiting if there’s time can be green.
Option 2. Break down your category: Under your “Activities” layer, you can color-code all hiking trails green, museums blue, and monuments yellow. This really helps you find what you’re looking for so much faster when you’re on the go.
Step 5: Create Your Google Maps Itinerary
With all your points of interest now included on your map, you can zoom out and see where you have the highest concentration of pins.
This will help you decide which neighborhood is the best fit for your trip, which hotel makes the most sense (with budget and location in mind), which restaurants are the easiest to start booking reservations for, and which activities you should group together.
Then, you can start the process of elimination.
- Which activities don’t make sense to keep included, given the time you have available?
- How long is it going to take to get from place to place?
- How many days would you need to see everything?
- What are “must-do” activities, and what are good back-ups if your plans change?
As you start answering these questions, you’ll see your itinerary start to come to life.
Step 6: How to Plan a Road Trip on Google Maps
For road trips , plotting your route on Google Maps helps you plan everything from fuel stops to attractions to see along the way. You’ll have a good idea of how long to spend in each destination, where you might need to spend a night, and what you don’t want to miss in between.
Your custom map can also show you how far things are from one another.
Click on the location you want directions to and select the arrow icon next to the trash icon.
A new layer for directions will be added to your map.
Add in your starting point, and you’ll see a blue path connecting point A to point B.

Click the “Add Destination” button to add multiple stops on Google Maps.
Tip: Select the transport icon on the layer to change the directions from driving to walking.
Step 7: Access Your Google Maps Trip Planner on Your Phone
Whew! You’ve made it.
All your planning is done, and you officially created a Google Maps itinerary for your next trip.
Next, you want to make sure you can access it on your phone. To do that, download Google Maps onto your phone and log in with your Google account.
When you’re signed in, tap on the “Saved” tab at the bottom of the screen.
Tap on “Maps” and select the map you want to view.

What happens if you’re exploring the streets of Rome, you get lost, and you’ve run out of data? Google Maps to the rescue!
You can make all your maps available offline.
Here’s how to access Google My Maps offline:
- Download the Google Earth app
- Go to your custom map on your desktop and select “Export to KML/KMZ.”
- Leave all the boxes unchecked and download it to your desktop.
- Email the download to yourself and open it on your phone.
- Open the file with the Google Earth app.
Tip: Information like addresses, opening times, and directions aren’t populated. You’ll need to add these manually to the notes section of each listing to see it on the Google Earth app.
Ready, Steady, Start Planning a Trip with Google Maps!
Congrats! You can officially plan a trip with Google Maps.
All that’s left to do now is click the “Share” button to share your map with your friends and start booking your accommodation .
Have you tried Google Map trip planning before? Got any tips? Let me know in the comments.
Read This Next:
- Road Tripping Like a Pro: Planning Tips To Help You Stay Sane on Long Drives
- 5 Websites I Use to Book Cheap Flights
- 11 Actionable Tips to Travel More this Year, Even If You Work Full-Time
- Checklist: 11 Things To Do the Day Before You Go on Vacation
Pin For Later:

Hey there! I’m Rachel, a travel writer and a full-time advertising / marketing expert. In 2019, I traveled more than 25 times while working 9 to 5, and since then I’ve committed myself to living a more adventurous life, even if it means bringing my laptop along for the ride. Are you hungry to travel more, but overwhelmed with how to juggle work and play? You’ve come to the right place!
Recent Adventures:

Top Woman-Owned Travel Companies That Should Be on Your Radar

Los Angeles Staycation Idea: Two Days in Palos Verdes, California

How to Ask Your Boss for More Vacation Time (The Right Way)
Let's go places.
- Updated on: July 16, 2021
Leave a Reply
Your email address will not be published. Required fields are marked *
Save my name, email, and website in this browser for the next time I comment.
Follow the Off Duty Life

Join a Community of Go-Getting Travelers.
Sign up below!

- PRO Courses Guides New Tech Help Pro Expert Videos About wikiHow Pro Upgrade Sign In
- EDIT Edit this Article
- EXPLORE Tech Help Pro About Us Random Article Quizzes Request a New Article Community Dashboard This Or That Game Popular Categories Arts and Entertainment Artwork Books Movies Computers and Electronics Computers Phone Skills Technology Hacks Health Men's Health Mental Health Women's Health Relationships Dating Love Relationship Issues Hobbies and Crafts Crafts Drawing Games Education & Communication Communication Skills Personal Development Studying Personal Care and Style Fashion Hair Care Personal Hygiene Youth Personal Care School Stuff Dating All Categories Arts and Entertainment Finance and Business Home and Garden Relationship Quizzes Cars & Other Vehicles Food and Entertaining Personal Care and Style Sports and Fitness Computers and Electronics Health Pets and Animals Travel Education & Communication Hobbies and Crafts Philosophy and Religion Work World Family Life Holidays and Traditions Relationships Youth
- Browse Articles
- Learn Something New
- Quizzes Hot
- This Or That Game New
- Train Your Brain
- Explore More
- Support wikiHow
- About wikiHow
- Log in / Sign up
How to Make a Travel Itinerary with Google Maps
Last Updated: March 14, 2022 Fact Checked
This article was reviewed by Stan Kats and by wikiHow staff writer, Nihal Shetty . Stan Kats is a Professional Technologist and the COO and Chief Technologist for The STG IT Consulting Group in West Hollywood, California. Stan provides comprehensive technology solutions to businesses through managed IT services, and for individuals through his consumer service business, Stan's Tech Garage. Stan holds a BA in International Relations from The University of Southern California. He began his career working in the Fortune 500 IT world. Stan founded his companies to offer an enterprise-level of expertise for small businesses and individuals. There are 8 references cited in this article, which can be found at the bottom of the page. This article has been fact-checked, ensuring the accuracy of any cited facts and confirming the authority of its sources. This article has been viewed 84,543 times.
If you’re planning a trip, you might be wondering how to figure out where to go and in what order. Luckily, Google has a free tool that you can use in order to get a better sense of your travel plans. We’ll walk you through how to make a travel itinerary with Google Maps through its My Maps feature. In a few easy steps, you can master an excellent organizational tool that’ll help you plan the best trip possible.
Setting Up Your Map

- Unfortunately, as of October 2021, Google no longer supports the “My Maps” app on phones. If you’re on mobile, you’ll have to use your phone’s web browser to access the site while on the go. [2] X Research source
- If you don’t already have a Google account, setting one up is a quick process. A Google account gives you a number of benefits, including a new gmail address. Check out this link to start the set-up process: https://accounts.google.com/signup/v2/webcreateaccount?flowName=GlifWebSignIn&flowEntry=SignUp

- For instance, your might name your map something like “California Summer Trip 2022,” and you could enter a description like, “Places to see and eat during two-week California road trip.”

- For example, for a California road trip, you might enter “Golden Gate Bridge” into the search box. My Maps will automatically direct you to its location.

- For instance, if you’ve searched for “Golden Gate Bridge,” there will be a white box that offers some information on the location, and even a rating from other users. Click on the “Add to map” button to send it to your saved locations.

- For example, you might fill in the description to the “Golden Gate Bridge” box with something like, “Spend at least 1 hour here—must-see location.”

- You might consider changing the colors of your pins to match how important each location is to your trip. For example, must-see locations could be red pins, your housing spots could be green pins, and optional places to visit could remain as blue pins.
Creating an Itinerary and Planning Routes

- For example, you might have a layer titled “Places to see,” one titled “Places to eat,” and one titled “Places to sleep.” You can then put sightseeing destinations, restaurants, and hotels you want to stay at in their respective layers.

- You can add more than one location to a single route. For example, if you wanted to plot a route from Big Sur to the Golden Gate Bridge, and then to Palo Alto, you can add all three locations to your route layer and create a multi-stop path. [11] X Research source
- By clicking on the three dots next to the layer with your travel route, then selecting “Step-by-step directions,” My Maps will create a set of directions for your travel. Handy!

- For example, by using My Maps, you might notice that seeing the Golden Gate Bridge, walking around San Francisco, and eating at a restaurant in Berkeley are close enough to all be doable in one day, while visiting Big Sur might be better saved for another afternoon. My Maps can help you plan out the most efficient trip possible, so you can enjoy your travels even more.

- When sharing your map, you can also choose the option that allows others to edit the map as well. With this option selected, your friends can pick places that they’re interested in as well, so you can have them all on the same document. [13] X Research source

- Although My Maps can’t be viewed offline, you can download an offline map of any areas you’re interested in on your phone. Using the Google Maps app, type in a location into the search bar, tap the name of the location, then navigate to the option “Download offline map.” [15] X Research source
Expert Q&A
You might also like.

- ↑ https://support.google.com/mymaps/answer/3024925?visit_id=637744367666134651-2428484219&p=lite_addplaces&rd=1
- ↑ https://9to5google.com/2021/07/20/google-my-maps-android-shutdown/
- ↑ https://support.google.com/mymaps/answer/3024454?hl=en&ref_topic=3024924
- ↑ https://support.google.com/mymaps/answer/3024925?visit_id=637744500327517491-717751493&p=lite_addplaces&rd=1
- ↑ https://support.google.com/mymaps/answer/3024925?hl=en&co=GENIE.Platform%3DDesktop
- ↑ https://support.google.com/mymaps/answer/3502610?hl=en&ref_topic=3024924
- ↑ https://support.google.com/mymaps/answer/3109452?hl=en
- ↑ https://support.google.com/maps/answer/6291838?hl=en&co=GENIE.Platform%3DiOS
About This Article

- Send fan mail to authors
Did this article help you?

Featured Articles

Trending Articles

Watch Articles

- Terms of Use
- Privacy Policy
- Do Not Sell or Share My Info
- Not Selling Info
wikiHow Tech Help Pro:
Level up your tech skills and stay ahead of the curve
How to Plan a Road Trip with Google Maps: A Step-by-Step Tutorial
This post may include affiliate links. As an Amazon Associate, I (The Winding Road Tripper) earn from qualifying purchases. Read more .
This post was originally published on August 8, 2021, and updated on February 16, 2023.
Ready to start planning your road trip using the power of Google Maps?
Then you’ve come to the right place.
Google has two amazing tools to help you plan your road trip: Google Maps and Google My Maps.
Google Maps is a great tool for plotting out your route, while Google My Maps is an amazing tool for road trip planning and organization.
In this post, I’ll teach you how and when to use each of these powerful free tools.
Let’s start by looking at Google Maps since it’s the simpler of the two.
But if you are looking for how to use Google My Maps, then click here .
How to Use Google Maps to Plot Your Road Trip Route
Google Maps is a great tool if you want to plot out your road trip route.
We use it as a starting point for all of our road trip planning to get a sense of how long our trip will be or what we can accomplish in the time we have.
Step 1: Open Google Maps
Start by opening up Google Maps on your desktop or phone.
When trip planning, we like to use our desktop computers to make use of the bigger screen.

Step 2: Plot Your Road Trip Route
To start plotting your road trip route, click on directions.

Then enter your starting point and your first destination.

Continue to add stops to your road trip by clicking on the (+) to add destinations.

Stop when you have all your road trip stops added to your map. Google Maps allows you to add up to 10 points to your map. If you want to add more, then Google My Maps is the tool for you.
Step 3: Reorder Road Trips Stops
If you want to play around with your route and reorder your stops, Google Maps makes it easy to do so.
On the left, where your stops are listed, you can drag and drop the stops to reorder them.

Step 4: Move the Driving Route
Google Maps will choose the fastest route between your road trip stops. But sometimes, there may be a scenic route you want to take.
You can easily move your driving route as desired by dragging and dropping your route.
Step 5: Send the Driving Route to Your Phone
Once you plan your road trip, you can send the directions to your phone for easy access during your trip. Directions can be sent via text message or email.
Note: You will have to have a Google Account to send directions to your phone.

Google Maps is a great starting point for planning a road trip.
But if you want to harness the power of Google and use it to plan your road trip and as a resource throughout your trip, Google My Maps is the choice for you.
Google My Maps: The Best Road Trip Planning Tool
Planning a road trip can be a daunting task. It’s hard to know where to start, and all the research can feel overwhelming. But that is where the ultimate road trip planning tool, Google My Maps, comes to the rescue.
Google My Maps is a very similar tool to traditional Google Maps, but it’s much more powerful and customizable.
In this section, we’ll start with detailed information on the features of Google My Maps. And then, we’ll get into exactly how we use Google My Maps to plan each one of our road trips.
Using this tool will help you seamlessly organize and plan your road trip.
Once we tried it, we never looked back.
Let’s start by giving you a little introduction to Google My Maps.
What is Google My Maps?
Google My Maps utilizes all of the data in Google Maps to allow you to create your very own custom map for your road trip. It’s a way for you to create a map containing the places important to you .
Once you create your map, you can access all of the personalized information you’ve added, so you never miss a beat while on the road.
Why is Google My Maps the Ultimate Road Trip Planning Tool?
Google My Maps is our favorite tool for planning a road trip. Here is why:
- It Helps You Visualize Your Trip Plotting all of your points of interest on a map helps see how your road trip may take shape. At the start of road trip planning, we typically have no idea what route we may take until we see all of the things we want to do on a map. And this is where Google My Maps can help.
- It Helps Organize Your Research When planning a road trip, you are likely gathering information from many sources, including websites, tourist bureaus, and recommendations from friends and family. Google My Maps can help you organize all of your research so you can more easily plan your road trip itinerary.
- It Consolidates Your Entire Itinerary Using Google My Maps allows you to have all of your road trip information in one place. There will be no need for a separate spreadsheet with your day-to-day itinerary or to bring your travel books with you.
What Are the Limitations of Google My Maps?
- Google My Maps Can Not Be Used Offline You will need access to wifi or cellular data to use your map on your road trip. But don’t let that stop you from using it to plan your road trip. There are ways to download your map to other apps for offline use, which I’ll take you through in the tutorial.
- You Can Only Add 2,000 Locations to Your Map Likely, you will not need over 2,000 locations when planning your road trip. And if you do, you can make separate maps, possibly divided by days or weeks, to get around this limitation.
- You Can Only Add 10 Layers to Your Map Layers are ways to categorize your location points. When using Google My Maps, you can only have ten layers per map.
- Planned Routes Can Not Be Accessed for Driving Directions on Google Maps When planning your trip, you may add a direction layer on your map to display the route you plan to take. Unfortunately, you can not use those directions to give you turn-by-turn navigation on your road trip. You’ll have to use Google Maps or click on a destination point on your custom Google My Map to bring up directions. I go through this in detail here .
How to Use Google My Maps to Plan a Road Trip
Now that you know why Google My Maps is the best road trip planning tool, let’s dive into the nuts and bolts of Google My Maps.
We’ll start with an in-depth overview and then show you exactly how we use Google My Maps to plan our road trips. Use the screenshots I’ve provided to help guide you through all of the steps.
Overview of Google My Maps
If you want to know how we use Google My Maps to plan our road trips, then feel free to skip down to the step-by-step guide for planning a road trip here .
But if you want to learn the ins and out of Google My Maps, this is where to start.
You can start from the beginning or jump to the section you want to learn more about by clicking on the links below.
Here is what we will cover to familiarize you with how Google My Maps works so you can start road trip planning like a boss.
Google My Maps Layout
- Markers/Locations
Google My Maps allows you to add locations and driving directions to your map while allowing you to organize them as you wish.
To get started, let’s get familiar with the layout of Google My Maps.
I suggest creating your first Google My Map and playing around with the functions of the map to help you get familiar with them.
Note: You must either create a Google Account or sign in to your Google account to start using Google My Maps .
Location Markers
Location markers are points that you add to a map. They can be things like restaurants, hotels, sights-to-see, bathroom stops, etc.
Find things to do along your route with our Favorite Tools to Find Things to Do Along Your Road Trip Route .
Each point you add to a map will include any information that Google already has for that point.
These include things like:
- GPS coordinates
- Website address
- Phone Number
Three Ways to Add Markers to Your Google My Map
You can add markers to your road trip map in three ways:
- Using the search function
- Selecting a Point already on Google Maps to add to your own map
- Add a point manually
Let’s look at how to do all three.
Search Function
You can find a marker by typing in the name, address, or GPS coordinates into the search bar.
Adding a Marker That is Already on Google Maps
Google Maps already has many markers in its database. When you zoom into an area, many points of interest will start to show up. If any of these markers look appealing to you, you can add them to your own map by clicking on them.
Adding a Marker Manually
You may need to add markers manually when you can not find them via the search function and don’t have the location’s GPS coordinates.
For example, sometimes, I struggle to find the exact location of a trailhead via the search bar. In these cases, I find the location of the trailhead via a different resource and plot it on the map myself.
Color Code and Change the Icons of Your Markers
To keep your map organized, you’ll want to customize and color-code your icons to help you group locations together.
Luckily, Google lets you fully customize your markers.
Map layers are a great way to organize your maps.
But before we dive into adding layers, let’s talk about map layers.
What are Map Layers?
A map layer is a set of markers that are layered on top of an existing map. You can see your different layers on the left-hand side of your map.
When you add a marker to a map, Google My Maps will add it to a layer. You can then use these layers to organize your map.
The added marker will appear on the selected layer. If you want to move a marker to a different layer, click and drag that marker to the desired layer.
For example, I made a map of Wisconsin Campgrounds to help me find campgrounds nearby during our road trips.
I have chosen to use separate layers for different types of campgrounds; National Forests, State Parks, and County Parks.
The benefit of using separate layers versus adding all of the campgrounds to a single layer is that I can check and uncheck specific layers depending on what information I want to see on my map.
If I don’t want to see the State Parks on my map, I can uncheck “Wisconsin State Parks,” and they will not be plotted on my map until I recheck the box.
How to Add Layers
Within Google My Maps, you can have up to 10 layers on a single map.
To add layers, click on “add layer” on the left-hand side of your map just below the map title and description.

Google My Maps then adds an “untitled layer” to your map.
To change the title, click on “Untitled layer,” and it will give you the option to rename the layer.
The current layer selected will have a solid vertical blue bar on the left side of the layer panel. Any new markers created will be added to the selected layer.

You can use Google My Maps to plot your driving route. Unfortunately, you can’t use these routes for navigation in Google Maps. This is one of the downfalls of Google My Maps.
But that is not to say that adding driving directions to your Google road trip map isn’t helpful. Adding driving directions helps you visualize your route so you can better understand where you are going while on your road trip. It also will help you figure out how long you can drive in one day .
Here’s how to add and use Directions on your Google Map:
Start by clicking on the direction icon located below the search bar.

You will then continue to add stops along your route to get a visual of your driving route.

Google Maps will default to the quickest route when creating your driving route. The quickest driving route will likely be the main highways and not always the most scenic. Therefore, there may be times you want to deviate from the quickest route and take a more scenic route.
Fortunately, you can adjust your route by dragging it to where you want it to go.
Start by clicking on the route, and a small circle will appear.

Then drag this route to where you want the route to go.
How to Plan a Road Trip with Google My Maps – A Step-by-Step Tutorial
Now that we know the ins and outs of Google My Maps let’s learn how to use it to create your very own customized road trip map.
- Create a New Google Map
- Add Layers for Different Types of Locations
- Add Locations to Your Map
- Plan Your Road Trip Route
Step 1: Create a New Google Map
You will need to sign in to your Google Account or create a new account to create your own Google My Map.
Once you’re logged into Google, follow this link to bring you to Google Maps .
Click on the hamburger ( 𝄘 ) in the top left-hand corner of Google Maps.
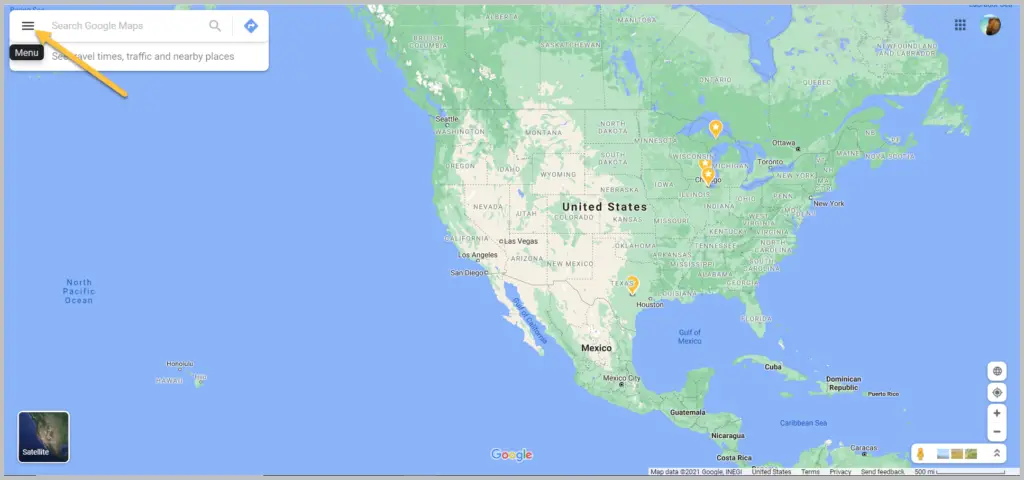
Click on “Your Places”.
This brings up any saved information you’ve stored in Google maps, like your favorites
Now it’s time to bring up your very first map.
Click on Maps on the top left →, then click “create map” on the bottom left.
You now have your blank map!
Give your map a title, and get ready to create your first custom road trip map.
Step 2: Create Layers for Different Types of Markers
I like to start trip planning by creating different layers for the types of markers I plan to add to my map.
The layers I typically use are: – Places to Sleep – Places to Eat – Places to Drink – Things to Do
You can always add layers while you plan. But I find it easier to stay organized if I start with some layers on my map before adding locations.
Step 3. Add Markers to Your Map
This is the best part of planning your road trip with Google My Maps.
Whether you are in your brainstorming stage of travel prep or you already know where you want to go, this step is where your trip starts to come together.
To start, you’ll research your destinations to find markers to add to your map.
I like to use the following resources for trip research:
- Google: Search for things to do, places to eat, places to stay, etc., in the areas you plan to visit or pass through
- Visitor Centers: Find tourism information online or request info from your destinations’ tourism bureaus to be mailed to you
- Travel books: We like to get ours from the library
- Facebook groups: Join a Facebook Group for the area you are traveling to. They are filled with tons of suggestions on the best things to do in the area.
When you find a location you want to make note of, add it to your map.
Do this by entering it into the search bar.
The great thing about Google Maps is that it pulls up all of the information on a location that Google has. If available, you can find the exact address, reviews, and website address.
If the location looks good, you can then add it as a marker to your map by clicking “add to map”.
Once added to your map, you can customize your marker by changing your icon’s color and/or shape by clicking on the paint bucket icon labeled “style”.
I like picking a specific color and icon for each marker category. For example, my “restaurants” may all be blue with a fork and spoon icon, while my “sights to see” will be yellow with a binocular icon.

One of my favorite features of Google My Maps is that I can add my own info to the marker. Typically, this info comes from the research I’ve done on the location. If I found a blog post recommending a specific restaurant, I’ll add that to the marker, so I have that info at my fingertips when we are on the road.
Add any info you want to your marker and click save.

Your marker will now be added to your map.
You can see your marker in two places: one on the map and the other in the layer it was added to in the layers menu on the left-hand side of the screen.
Continue to add locations until your map starts to take shape.
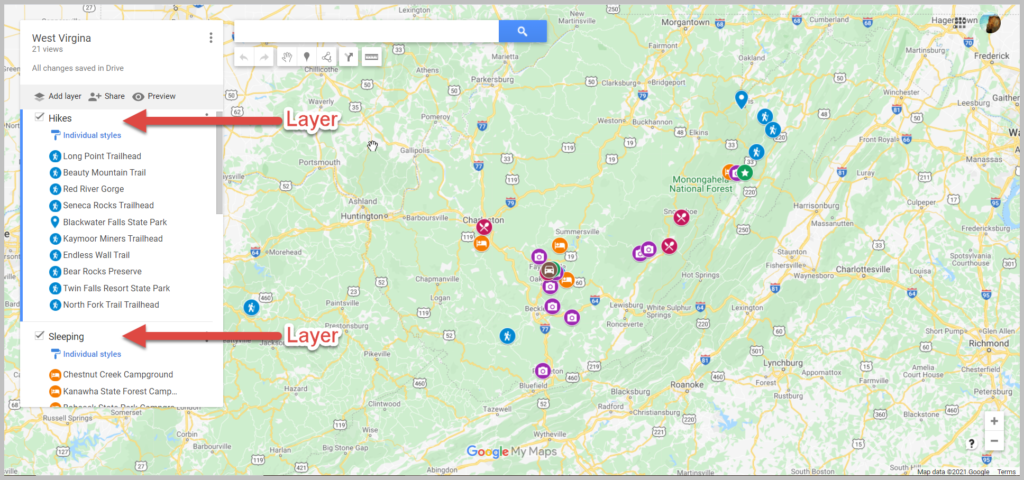
Here is an example of a map we made for a West Virginia Road Trip .

Step 4: Determine Your Route / Itinerary
Now that you have location markers on your map, you can determine your route and day-to-day itinerary.
Take a look at where all your location markers are situated and start planning your route.
Start by creating a directions layer on your map.
Once you have your directions layer, rename it, and begin plotting your route.
First, you will need to enter your starting point. This can be done by either entering an address manually or clicking on a marker on your map.
Continue to add stops until your route is complete.
Here is an example of what our Lake Michigan Circle Tour Road Trip looked like.

Google Maps will default to the quickest route from two points. If you want to go a different route than the one suggested, you can drag the route to force it to go a different way than it was originally displayed.
You now have your own customizable Google Map for your road trip.
We use these maps for both planning our trip and for reference during our trip.
Now let’s look at how to use your awesome map during your trip.
How to View Your Google My Map on Your Phone
Now that you have your map customized, you’ll likely want to be able to view it on your phone.
You will first need to download the Google Maps app from your phone’s app store.
Once you have the Google Map app, here is how you access your map:
- Click on “Saved” on the lower toolbar on your phone
- Click on “Maps” on the lower right
- Select your customized map
Now you can view your location markers and all the customized information you added to your map.
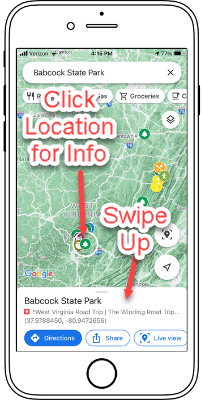
Click on your marker to bring up basic information. For the more detailed information you added, swipe up.
How to Use Your Google Map to Get Directions During Your Road Trip
Unfortunately, you can’t use the turn-by-turn directions you may have added to your map for actual driving instructions for your trip.
But not all is lost; you can still get directions to the next stop by using your customized map and Google Maps.
To do this, click on the location you want directions to and click on directions.
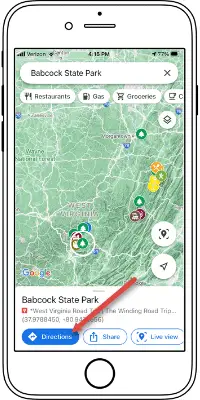
This will launch your Google Map app and allow you to get turn-by-turn directions to your next stop.
How to Export Your Map for Offline Access
Google My Maps works great when you have cell phone service on your trip. Unfortunately, you will not always have service, and you can’t download your Google My Map for offline use like you can in Google Maps.
Thankfully, there are ways to export your map for use offline.
To do this, we use Gaia GPS .
Let’s walk you through downloading your Google My Map for importing into Gaia GPS, an offline mapping app.
On your computer, click on the ( ⋮ ) in the top left corner by the map’s name. Then click on Export to KML/KMZ.
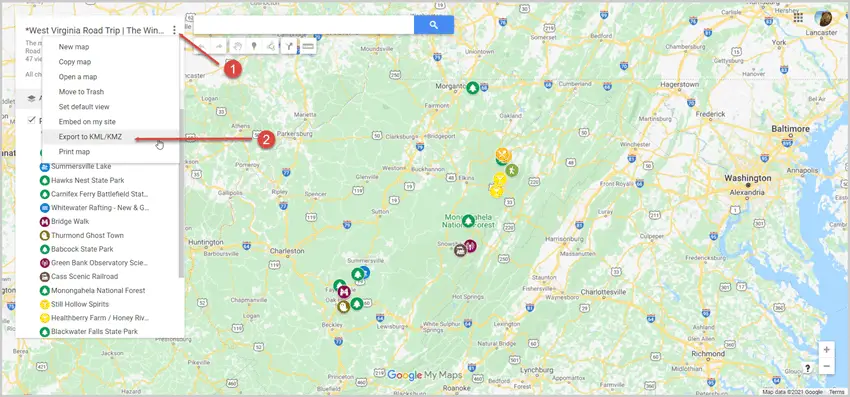
A pop-up will appear. Keep the default of “entire map” and click “download”.
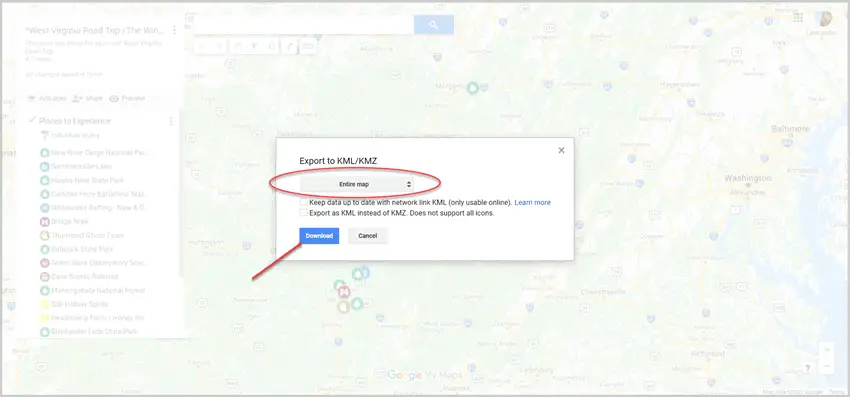
Now you can import this map into Gaia GPS.
Start by creating a Gaia GPS account .
Once logged in, click “Import Data” and select the .KMZ file you downloaded from Google My Maps.
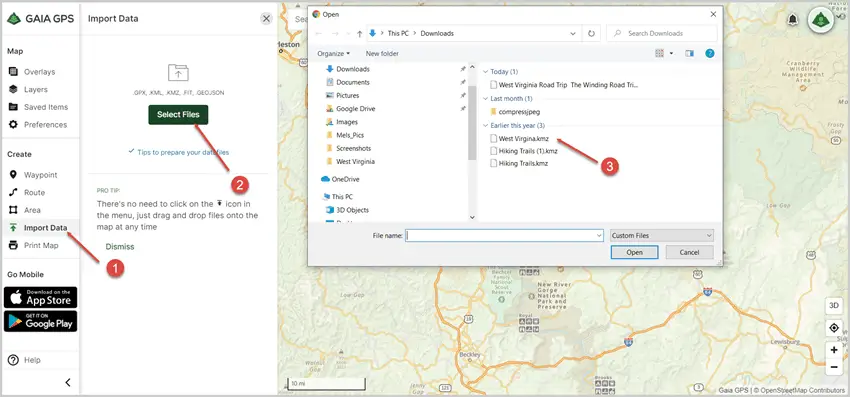
Your locations will now populate in your Gaia GPS map. Make sure to click “save” .
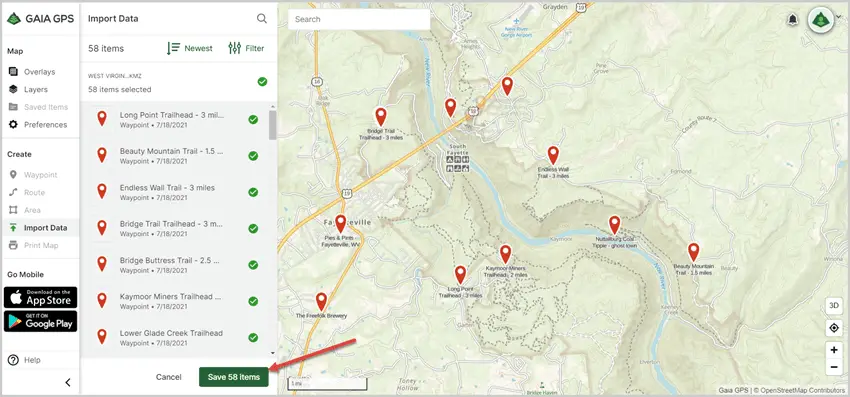
You can now access your map locations offline on your phone via Gaia GPS.
To do this, download the Gaia GPS App on your phone and log in.
Once logged in, you will see a notification that you have a saved location available.
Click on the Saved folder
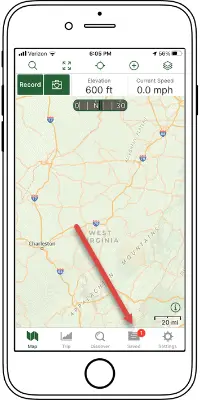
You can now see all your locations on your Google My Map. Including the details, you added.
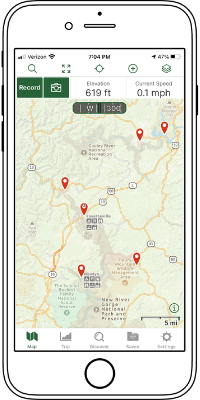
More Road Trip Tips: Road Trip Hacks for a Stress-free Trip Road Trip Activities for a Long Car Ride Road Trip Meal and Snack Ideas Money-Saving Tips for Your Next Road Trip How to Budget for a Road Trip
- Skip to right header navigation
- Skip to main content
- Skip to primary sidebar
Follow Me Away
Couples Travel & Travel Photography Blog
- Middle East
- North America
- South America
- Photography
- Travel Tips

Exactly How To Use The Google Maps Trip Planner
April 16, 2020 // by Follow Me Away // Leave a Comment
Out of the many different trip planning tools , the Google Maps Trip Planner may be the best. When you don’t have the right tools, trip planning can be so difficult and chaotic. But the Google Maps Trip Planner allows you to put everything you need all in the same place.
If you’re the kind of person that gets loads of trip recommendations and inspiration but doesn’t know how to organize them, the Google Maps Trip Planner is ideal for you! You can lay out all of the recommendations, organize them by category, and visualize how far apart they are from each other.
If you’re a road tripper, the Google Maps Trip Planner is ideal for you too! You’ll be able to map out each day of the road trip AND the overall road trip on the same map. Then, you’ll never forget about a stop that you want to make.
Basically, no matter what kind of traveler you are, the Google Maps Trip Planner will make your trip planning process super easy!

Why You Should Plan A Trip In Google Maps
You can see everything in one place.
If you’re a visual learner, planning a trip on Google Maps may be the trip planning tool that you’ve been searching for all along! Rather than having a list of activities, restaurants, hotels, and airports with no idea what they look like or where they are in relation to one another, the Google Maps trip planner allows you to see everything in one place!
Google Maps Allows You To Color Code Based On Attraction
In case seeing everything in one place sounds a bit too overwhelming, you can color code everything! Through a layering process (explained below), you can separate each type of attraction by area and then color code them. For example, you can make beaches blue, hikes green, and churches purple. Then, after just a quick glance at a map, you’ll be able to see what types of attractions you’ve added to your itinerary.

Google Maps Seamlessly Integrates Between Devices
This is one of the best features of the Google Maps Trip Planner. Everyone wants to plan a trip on a computer, but, at the same time, when you’re actually on the trip, you want all of the information on your phone. With other trip planning options, it can be a pain to try to transfer all of the information from one device to another. But with the Google Maps Trip Planner, it’s seamless! As long as you have the Google Maps app downloaded and you’re logged in to the proper account on both devices, you’re all set!
Google Maps Allows You To See Where Your Possible Stops Are Located
First and foremost, Google Maps is a map. This means that you’ll be able to plot out each of your stops and see where they are in relation to one another. This is perfect for planning an itinerary for each day, because, if there are a bunch of activities clustered together on a map, you’ll be able to decide if you can do them all in one day.
Along the same lines, if there’s one activity super far out of the cluster, you’ll know in advance. This will allow you to either skip that activity (and avoid driving for longer than you would like) or find more things to do near that activity.

Planning A Trip In Google Maps Is Great For Group Travel
In the same way that you can color code your Google Map trip planner based on attraction, you can also color code based on group member. Then, every group member will be able to add the things that they would like to do in their chosen color. So rather than having a lengthy, unmanageable list of everyone’s wish list of things to do, you can see everything in one place.
Google Maps Allows Photographers And Content Creators To Plan Out The Best Stops For Photos
Planning a trip in Google Maps is ideal for photographers and content creators. You can layout and map all of your potential photography or content spots in one place. If it makes it easier for you, you can color code them. And to help you remember everything you need to know about each location, you can add photos or notes to the marker on Google Maps.

Ways To Use Google Maps Trip Planner
Use google maps to plot out your vacation or road trip itinerary.
Google Maps is ideal for planning out your vacation or road trip itinerary! By mapping out everything you want to do in one day, you’ll be able to set more realistic itineraries. For example, while using the Google Maps road trip planner, you’ll know exactly how long the drive will take. Is that amount of time doable for you and your group? Will you have enough time to make the stops that you want to make? After answering those questions, you can adjust accordingly. And the same concept applies to planning out each day of your vacation.
If you’re planning a longer road trip, you can also use the color-coding layers of the Google Maps trip planner in a new way. Each layer can represent the itinerary for one day – you can add all of the stops that you want to make for that day – and then, when you look at all of the layers at once, you can see the overall itinerary. Do know that the Google trip planner allows for a maximum of ten layers, so this only works for road trip itineraries that are ten days or less. As a work around, you can split the itinerary in half and use two different maps.

Save Inspiration On Google Maps For Future Trips
Many of us gather tons of inspiration before each of our trips, whether that’s from Google searches, Pinterest pinning, Instagram posts, travel magazines, or suggestions from friends and family. If there are particular destinations that you find yourself drawn to again and again, consider saving all of these pieces of inspiration on Google Maps for your future trip!
Let’s be real. When we finally get to planning our trips, none of us actually remember all of the recommendations that we’ve found or heard about over the years. But if you’ve saved them as pins on Google Maps all this time, Google remembers them for you!
See How Close Stops Are Together On The Map
By plotting all of your potential stops on a map, you’ll be able to see how close they are to one another. If one is too far away from the others, you can cut it or find other things to do in the nearby area. This will also help you realistically divvy up what you can do each day of your trip.

Share Google Maps Trip Planner Between Groups
Google Maps makes it extra easy to share the Google Maps planner with multiple people. To do so, you’ll just click the “share” button under the title of your map and input your friends’ or family members’ email addresses. Be sure that you give them editing abilities! Then, you can all plan your trip together!
As an added bonus, you’ll have your itinerary saved forever! That means if some of your friends or family want to replicate your trip or try a few of your recommendations, you won’t have to try to piece it together again from memory. Instead, you can just share your Google Maps trip planner with them!
Access On Your Phone For Use When Traveling
Since Google Maps is accessible on both a computer and a phone, it is ideal for both the trip planning part of the process and actually traveling. However, unlike the rest of Google Maps, it’s not easy to download your customized map for offline access. That means that if you’re in an area with spotty service, you won’t be able to access your map. But there are work arounds using third-party apps, such as Map Plus or Maps.me.

Exactly How To Use Google Maps Trip Planner
Getting started with the google maps trip planner.
Head to Google My Maps on your computer. From there, press the “get started” button. Before you officially get to planning, check the top right corner of the screen to see if you are logged into your desired Google account. If not, change to the proper account.
Then, click the bright red button in the top left corner that says, “create a new map.”

Title your new map in the top left corner. If you would like to invite your fellow travelers to the map, click on the share button below the title. From there, you can either share the link at the top or input their emails in the bar at the bottom of the “sharing settings” pop-up. If you would like your fellow travelers to be able to edit the document, click on the pencil icon to the right of the email bar. Select “can edit” from the dropdown menu. On the other hand, if you only want your fellow travels to see the document, select “can view” from the dropdown menu.

Adding Categorized Layers
When you first create a customized Google Maps trip planner, Google will automatically create your first layer for you. To change the title of the first layer, head over to the box in the top left corner and find the vertical ellipses (“…”) across from “untitled layer.” Click on the ellipses and select “rename this layer” from the dropdown menu. Rename the layer however you would like and click the blue “save” button. To wisely make use of these layers, consider labelling them by category (e.g. hotels, restaurants), by day of the road trip (e.g. day 1), or by traveler (e.g. Sarah’s picks).
To add more layers, click on the “add layers” button just below the title. It will, once again, autofill as an “untitled layer,” so you’ll repeat the steps mentioned above to change the title.
To delete layers, click on the vertical ellipses (“…”) across from the title of the layer that you’d like to delete. From the dropdown menu, select “delete this layer.”

Placing Location Pins
After you’ve added all of your categorized layers, you’ll want to start adding location pins. To start adding these pins, select the proper categorized layers. (The selected layer will have a blue line along the left edge.)
From there, direct your attention to the top of the screen to the map search bar. Type the name or address of the desired location into the search bar. Select the desired location from the dropdown menu. This will automatically generate a pin on the map of this location. To add the location to the selected layer, find the location on the box on the left side of the screen and click the “+” icon to the right of it.

If Google Maps does not have the location that you’re looking for, you have a couple of options. First, if you can identify the location by looking at a map, you can add a pin by selecting the pin icon just below the map search bar. Then, press the location on the map. From there, a pop-up will appear, allowing you to rename the pin. Once you’ve renamed it, press the blue “save” button. As an alternative, if you happen to know the longitude and latitude coordinates, you can also input those into the search bar at the top.
If you decide that you want to move one pin to another layer, simply click and drag the pin from the incorrect layer to the desired layer.

Customizing Location Pins
To change the color of a pin, you can either click on the desired pin or hover over the name of the location in the box on the left side. Either way, you will see a paint bucket icon. Click on that and select the color that you would like for that pin.
To change the title of a pin, click on the desired pin and click on the pencil icon at the bottom of the pop-up. Edit the title as desired and click the blue save button.
To change or add notes to a pin, click on the desired pin and click on the pencil icon at the bottom of the pop-up. Change or add notes as desired and click the blue save button.
To add a photo or video to a pin, click on the desired pin and click on the camera icon. From there, choose where the photo or video is located: on your computer (upload), web camera, image URL, your photo, Google Drive, Google Image Search, YouTube search, or YouTube URL. When you select the photo or video, press the blue “select” button.

Adding Directions
To add directions between your pins, select the starting point pin. Then, click on the “add directions” arrow below the search bar. This will add another layer in the box on the left side. Then, click on the pin of your end destination. If you would like to add multiple locations to your route, click “add destination” at the bottom of the box on the left. Then, select the pin you would like to add to the route.
To alter the order of the route, simply click and drag the locations in the box on the left to the desired order.
To change the directions from “driving” to “biking” or “walking,” click the blue “driving” button in the box on the left. Select the image of the desired form of transportation.
To get step-by-step directions and an estimated amount of time, click the vertical ellipses (“…”) next to the title of this transportation layer. Select “step-by-step directions” from the dropdown menu.

Accessing Your Google Maps Trip Planner on Your Phone
To access your Google Maps Trip Planner on your phone, make sure that you have the Google Maps app downloaded. From there, login to the same account that you used to plan a trip in Google Maps.
Click on the menu in the top left corner and click “your places” from the dropdown menu. Then, click on “Maps” and select the customized map that you would like.

Planning a trip on Google Maps can be so easy and can make your trip so much more organized and enjoyable! I hope you love using the Google Maps Trip Planner as much as I do!

Reader Interactions
Leave a reply cancel reply.
Your email address will not be published. Required fields are marked *
Save my name, email, and website in this browser for the next time I comment.
This site uses Akismet to reduce spam. Learn how your comment data is processed .
Join The Newsletter
Travel + Beauty
How To Use Google Maps Trip Planner To Plan An Epic Trip

Planning a trip as exciting as it may be can quickly turn into an overwhelming process. Even though I have traveled frequently I get anxious thinking about where to go, how long to visit, where to stay, and how I’m going to around a city I don’t know. Since using Google maps trip planner it has put my mind more at ease.
As many travel applications as there are the one that has helped me the most is Google Maps trip planner.
So let me introduce you to your new pal and BFF when planning a trip. Let’s learn to plan one epic trip using the Google Maps trip planner!
This article may contain affiliate / compensated links. For full information, please see our disclosure here.

Lover of travel tips? Check out these related posts:
- Carry On For Long Flights
- How To Survive Long Flights In Economy
- How To Take Care Of Your Skin While Traveling
- Things To Do At The Aiport
- 66 Genius Travel Hacks
Why You Should Use Google Maps Trip Planner
The Google Maps trip planner is an excellent way to organize all the places you want to explore in one itinerary. You may have received an overabundance of recommendations from friends or reading blogs and this nifty application allows you to save them all in one spot. During your trip you can always whip our your Google Maps and see what is nearby.
How To Use Google Maps Trip Planner
1| set up a google maps account.
First thing is first, you need to create a Google account (it’s free), visit this link here if you do not have one already. You need to do this first before moving forward with the other steps.
2| Make A New Google Map
Before we get started I suggest using your computer, it makes the following steps a little easier. After you created your Google account open Google Maps with this link and log in with the account information you just created. Select the 3 horizontal lines located in the top left-hand corner and in the drop-down menu click “Your Places.”

After you select “Your Places” you will be redirected to another page, click on “Maps” in the top right-hand side of the menu. Do not freak out if you don’t see anything. Since you haven’t created any maps as I have, it will be empty. Don’t worry, we are going to make one!
Look at the bottom of the menu and select “Create Map.” After you made the selection you will be led to an untitled map with an empty menu where the name and description are missing.

Choose “Untitled Map” and immediately after a text box will appear in the middle of the screen. Give your map a name and put any description you like. Tada, you just created your first map on your Google Maps trip planner.

3| Add Categories To Your Google Maps Trip Planner
Before adding location pins, think of the types of things you would like to do on your trip. Putting all your activities into categories makes travel planning much easier. Here is a list of some of the categories I use in my Google Maps trip planner:
- Restaurants & Bars : This is a great category to add all the restaurants you would like to try. When you are out and about and decide to grab some grub or a cocktail, you can see what places are nearby.
- Cities: If you plan on hopping around a country or State it is great to tag additional locations for where you may want to pop in and visit.
- Activities: This is where I like to add activities planned such at tours, beaches, cooking classes, etc.
- Hotels: If you will be jumping around to different hotels you can figure out what sites and activities are near to where you will be staying.
- Sites : Here I like to include all the museums, historic places, and Instagram spots.
- Shopping: List all the farmer’s markets, souvenir shops, or boutiques you researched here in this category.
How To Add Categories To Google Maps
Once you created the list of categories to add to your map, we need to add “layers” AKA “categories. But, first, click on the 3 vertical dots next to “Untitled Layer” and when the dropdown menu appears select “rename” and choose your first category to add to your Google Map.

Now it is time to add all the categories you want to include on your map by selecting “Add Layer” the first selection on the left-hand side of the screen. Just like we renamed the first “Untitled Layer” above you will need to do the same for all your categories.

Don’t worry if you make an error it’s an easy peezy fix. Just click on the 3 vertical dots next to the “Untitled Layer” and you will have the option to delete or rename your mistake.

Or if you just need to rename your category, select the category name that needs some fixing and a box will appear for you to make changes.

RELATED POSTS: Everything You Need To Pack In Your Carry-On To Survive Long Flights
4| Input All Your Places To Visit
You probably have a pretty hefty bucket list of everything you want to see where you are going.
Now we need to put all the inspiration you collected from friends, Instagram, travel blogs, or Pinterest in one organized space onto your Google Maps.
To add your first item, select the category for your first location marker. Say I want to add a specific restaurant to my “Restaurants” layer, I will then type the name of the restaurant in the search bar.

When the location you are searching for appears in the bar, click “Add to Map.”

Voila, you added your first location pin to your Google Maps.

What If I Add My Location To The Wrong Category?
Now, if you put a location into the wrong category, don’t freak out. Select the location you need to change and drag it into the correct category.
Oh No! What If My Location Isn’t Listed On Google?
If you type in a location in the search bar and nothing pops up don’t panic. Google just hasn’t made a location yet. To fix this type in the address manually in the search box and give it a name you want.
* To remove a location from your category just highlight it and in the marker’s location box select the trashcan icon.
5| Customize Your Google Maps Trip Planner
Now it’s time to organize your map and make it super pretty. With Google Maps you can make customizations by adding icons, changing colors, and adding notes, and images.
Customize By Color Coding
Color coding your categories is a great way to visually organize your Google Map.
To do this highlight the location item you would like to customize than a marker’s pop-up window will appear. Click on the paint bucket icon located at the bottom of the box and a selection of colors will show up.

Let me tell you why color coding is great for organizing your Google Map:
- Color code categories : I personally prefer to make each individual layer (category) a specific color. For instance, all “Activities” may be black, “Shopping” orange, and “Hotels” green.
- Color code sub-categories : I like to put my items into sub-categories so I am not overwhelmed with too many layers. For instance, in my “Restaurants & Bars” layer I listed cafes, bars, and restaurants I would like to visit and assign each of the a different color. For example, you could mark all cafes yellow and restaurants purple and so forth.
- Color code priority : Another great way to use color coding is to prioritize all the places that are on top of your list in red or a preferred color you choose that will help you remember. So when you’re on your trip you know the places that are of highest priority so they get checked off your list so you know they are a must-see.
- Customize By Icon : Another great way to organize your Google Map is by changing the icon in your location pins. You can change the icon by following the same steps for color coding. Just highlight the location item you would like to customize from the marker’s pop-up window, when it appears click on the paint bucket symbol- then make your selection under “Popular Icons.”
If you don’t see the icon you’re looking for in the “Popular Icons” select the “More Icons” box and a large selection of additional icons will pop up.

Besides color coding I find changing the icon for my location pins super helpful. With all the excitement going on during your trip, you may forget what all the colors mean for each category. Well, I have a solution for that so don’t worry. This is where the icons come in handy so you don’t have to keep revisiting the legend.
For instance, let’s revisit my “Restaurants & Bars” category. I would select a martini glass icon for all the bars, restaurants use the fork and knife icon, and cafes select a coffee cup. It makes looking at your Google Maps trip planner super easy instead of looking at different colored location markers.
More Customizations
You can add additional customizations to your locations with notes or pictures. Just highlight the location you want to add specifics and select that paint bucket again- from there you will see a pencil symbol to add notes, or select the camera icon to add pictures.

RELATED POSTS: How To Take Care Of Your Skin While Traveling
6| Create Your Trip Itinerary
Now that you finished categorizing your Google Map, zoom out of the map so you can see where all your points of interest are located. Having this visual makes trip planning a piece of cake to creating one awesome itinerary.

Here you can get an idea of where to stay before booking your hotel and places that are walkable. To save time and money from transportation find all the location pins that are closely grouped together and within the same neighborhood so you can reach them all in the same day.
Once you have an idea of what locations to group together, I like to write an outline in my Notes application on my phone, which it is handy since more than likely you will be on the go. Here I usually write down the day of the week and underneath all the locations to see for each day.
7| Find Out Directions And Distance
Google Maps is great for step-by-step driving directions and distances if you plan on driving during your trip. Just select one of your locations in your categories and click on the merging arrow in the pop-up menu which will instantly create a new layer on the left side of the screen to complete.

Add your starting location in the empty box next to “A” and for driving directions click on the 3 vertical dots in the right corner of the box and select “Step By Step Directions.”
A pop-up box will appear and you will know the route to get to your location and the time it will take to reach your destination. Since you know how to access directions you can now easily plan a road trip with Google Maps or even sneak in a quick day trip.

8| Share Your Google Maps Trip Planner With Your BFF And Family
Got company joining you on your trip? What is great about Google Maps is you can share it with others. Your friends and family can add to the trip planning process too!

You can easily share your map, by selecting “Share” located underneath the title of the Google Map you just created. After your selection a pop-up box will appear, here you can add everyone’s email address you would like to send your map to into the “Invite People” bar. Just make sure in the box next to the email address “Editor” is selected so they can contribute and make changes before you send.
9| Download Google Maps Application To Your Phone
We finally made it to the last step! Now to have access to your Google Maps Trip Planner on your phone when you’re traveling, download the application from the app store.
Once you download Google Maps, sign in with the Google account you used to create your map on your computer. Access the map you just created by selecting “Save” located at the bottom, scroll to the “Maps” tab on the top right corner then find your map. Directions are for an iPhone, so not sure if accessing your map will be the same for Android. Just look for those same tabs and you should be good.
Yay, you made a custom map! Now give yourself a pat on the back and a round of applause.
Google Maps Trip Planner Conclusion
Woah! That was a lot. But, I hope you found this Google Maps trip planner guide helpful. For your next trip, I suggest following these suggestions and you will see your trip will be more organized.
I have more posts for travel tips and hacks that will be useful for your trip:
- Everything You Need To Pack In Your Carry-On To Survive Long Flights
- 11 Long Flight Tips To Survive Economy
- 66 Effortless Traveling Hacks
- Things To Do When Stuck At The Airport
Like this pin about using Google Maps Trip Planner? Share it with others or pin it for later!
Recommended Articles
115 idioms about travel: what they mean & how to use them.

Things To Do In Key West For An Epic Adventure

Rio de Janeiro Instagram Captions That Will Make You Want To Samba

24 Comments
This is such a great post! I love traveling “by neighborhood” — so I map out where I want to go using this method you show on my personal Google Map, then I head to each neighborhood & go from place to place.
Hey Shelley! That is so awesome you’re using this application. It makes travel planning and seeing everything really easy!
I just recently made a google map itinerary and i wish i had had these instructions with me :). Will definitely come back here for my next map, which btw, are super useful.
Hey Patri. It is a little tricky using it for the first time. Would love to hear about the next map you make for your next trip!
I love the Google Maps feature! A friend told me about it a few years ago and I’ve used it religiously ever since!
Jori it is such a great application! So glad to hear you love using it!
This was so helpful, thanks for the details. I can’t wait to use this tip on my next trip.
Cirrena I am so glad you found it helpful. Would love to hear how it worked for you on your next trip 😉
Literally love this level of organisation! It is so therapeutic to have an itinerary all mapped out! A really good step-by-step guide – thank you for sharing!
Thanks so much Tam! I try to stay as organized as I can traveling. Hope it helps your planning your next trip!
This is awesome!! Definitely saving for late. We usually use Visitacity, and plan out our whole trip day by day! It’s nice that we can do it on Google and share it! Thanks for the tip
Kelsey thanks for stopping by and reading. So glad you enjoyed the post!
This is such a good idea!! I use google maps a lot but never like this! THanks
Thanks so much Alice! Hopefully, you find it super easy to plan a trip with Google Maps for your next trip!
There’s a lot of great information there, thanks for sharing all of your knowledge with us!
Hi Krista, thanks for stopping by. Glad you enjoyed the information.
I am so impressed!! I’ve used Google Maps for marking down specific locations but I haven’t paid much attention obviously because I didn’t know you could add layers! This is so awesome. Now I can mark down restaurants to see how far it is from where we’re staying. These for these tips!!
Hey Sarah. Thanks so much for reading. Adding the layers is so helpful and makes planning super easy. So happy you enjoyed these tips!
This was such a great and informative post! Thank you for sharing!
Thanks so much Jasmine for reading!
HOMG GAMECHANGER. I never knew you could do this with Google Maps! This is going to save me SO MUCH TROUBLE when we can finally travel again!
Shafinah it really is a game changer! I cannot wait until you use it. I know you will love it!
this is a GREAT guide, I never knew there were so many options in google maps to customize your itinerary. Thank you for sharing! I can’t wait to plan my next trip with this.
That is so awesome Chelsea! I know you will love it. Would like to hear how it worked for you when you do plan a trip with Google Maps!
Comments are closed.
How to Plan a Road Trip with Google Maps – A Step-by-Step Illustrated Guide

By Jason Barnette | Travel writer and photographer with 15+ years of road tripping experience
- Last Updated on May 26, 2023
- Published on March 25, 2022
This post may contain affiliate links. Read my Affiliate Disclosure here .
My road trip planning always begins with Google Maps. In less than half an hour, I can create a new map, add a driving route, and fill layers with markers. Once completed, I sit back with a fully visualized road trip in front of me.
All of this is made possible with Google My Maps – a component of Google Maps that allows users to create customized maps. After years of road tripping, I have built an archive of over a hundred custom maps. It’s great for planning a road trip – and remembering my favorite moments years later.
Follow this step-by-step illustrated guide to learn how you can create custom maps, load them in Google Maps, and create the perfect road trip itinerary.
Google Maps vs Google My Maps
Google Maps has become one of the most popular navigation apps available on mobile devices and online. Users can get turn-by-turn voice navigation, search for points of interest, and save them to lists. However, that’s where the usability ends. It’s not the ideal way for planning a road trip.
Google My Maps is a tool for creating a custom map with layers, stylized markers, and routes.
READ MORE: 10 Ways to Save Money on Gas on Your Next Road Trip
This helps visualize a road trip, place destinations in the correct order, and make sense of the grand scale of the road trip. After creating a customized map, users can open it in Google Maps on any mobile device, plug into a compatible vehicle, and let the road trip adventure begin.
Here are three primary differences between Google Maps and Google My Maps:
- Google Maps cannot be shared with friends and family, but Google My Maps can be shared
- Google Maps cannot stylize the markers, but Google My Maps can style colors and icons
- Google Maps has an app for mobile devices, but Google My Maps can only be used in a web browser
Google Maps lists is a great way to build your road trip wish list, and Google My Maps is a great way to build your road trip itinerary. Used together, these are powerful tools for planning every moment of your road trip adventure.
Google My Map Example
“Wish, however, that you had added a road map that I could use on my GPS,” Karen commented on Road Trip: Exploring the Tennessee Mountains From Knoxville to Chattanooga . She wasn’t the first person to request a map to download to mobile devices and take on the road with them.
I listened.
One of the benefits of using Google My Maps is the ability to share the map with friends, family, and fellow road trippers. But after posting a story about a road trip, I would delete the Google My Map. Eek! I wish I hadn’t done that.
I am in the process of recreating all the road trip itineraries I’ve posted in Google My Maps. In the future, when you see a road trip itinerary, “things to do” post about a destination, or roundup of coffee shops, breweries, and restaurants, you will see a link to a custom Google My Map. You can download the map to your Google account and take it with you!
For now, here is an example to help you with this tutorial: Road Trip to the Southern Sixers at Google My Maps .

Step No. 01
Create a custom map.
To begin creating a custom map, visit the Google My Maps website. You’ll need a Google account if you don’t already have one – there are lots of travel benefits to having an account.
Google My Maps requires a web browser – Google recommends Safari, Firefox, or Chrome. It’s possible to create these custom maps a browser on a tablet, but the ideal situation would be desktop or laptop computer.
1. Create a New Map
Click the “Create a New Map” button.
2. Give the Map a Name
Initially, the map will be named “Untitled map.” Not exactly memorable or descriptive. Click on the map’s name to change it and make is something you can easily identify later.

Step No. 02
Edit the first layer.
By default, an “Untitled Layer” is already present in any new map. This is the starting point for creating a custom map.
1. Rename the Layer
Click the title of the layer and change it to “Destinations.” This will always be the first layer when creating a road trip map. In this instance, destinations are cities, towns, or parks used for creating the route of your road trip. You will create additional layers later for attractions, restaurants, and hotels.

2. Add Markers to the Layer
The next step is to lay out the road trip route. You may not yet know the exact route you want to drive, but you’ll likely know the destinations you want to visit.
Always begin by adding your home address as the first marker. You will need this when creating the driving route.
Using the search bar, search for the name of the destination. It can be a city or town, state or national park, or any type of business listed in Google Maps. Add each destination to the layer, and then drag the markers into the order you wish to visit them.
Layers can have an unlimited number of markers. But keep this first layer to strictly the destinations you want to visit.

Step No. 03
Create a route between destinations.
The hardest part of planning a road trip is determining the route to drive. Sometimes, it’s easy if there is only one way to get from one destination to another. Fortunately, creating a route with a Google Map presents options.
1. Create a Driving Route
In the Map Tools area, click on the icon to “Add Directions.” Clicking this tool will create a new, untitled layer. The default directions are for driving, however it’s possible to change the transportation mode to bicycling or hiking.
2. Enter the Start and End Points
Two empty boxes appear in the driving route. In Box A, begin typing the name of the first marker saved in the Destinations layer – most likely your home address, unless you’re on a multi-stop road trip. It will appear in a dropdown menu. Select the name of the destination to add it to Box A. Do the same with Box B, choosing the end point of your road trip.
An initial route will appear on the map. Like planning a route in Google Maps, this is Google’s default route based on traffic conditions, road closures, and speed limits. It’s just a suggestion. It’s possible to change this route depending on your personal preferences.
If you want to create a loop, simply enter the start point again as the end point. Google Maps will automatically create a loop connecting all the destinations.

3. Add Additional Stops
If you want to add additional stops to the driving route, click “Add Destination” at the bottom of the layer. Another empty box will appear. Begin typing the name of a destination and select it from the dropdown list.
Driving layers can have a maximum of 10 stops. If you’re road trip is longer than ten stops, consider dividing the route into multiple layers. One option would be to create a driving layer for each day of the road trip. Another option is to divide the road trip into segments.

4. Customize the Route
Click on any point along the route. With the route highlighted – a faint white line surrounding the bright blue line – you can now edit the route. Click on any point along the route and drag it in a different direction. Let go, and the route automatically adjusts to your preference.
Customizing the route must be the last step in the process of creating a driving layer. If you add another stop to the layer, it will reset the custom route and you’ll have to start over again.
Customizing the route gives you the option to avoid interstate highways, take the scenic route along national scenic byways, or to select country roads for a long summer drive.
5. Rename the Driving Layer
When a route is created, Google My Maps automatically generates a name for the layer. However, you may want to rename this layer something easier to remember. “Route” is always a good option.

6. Route Information
One of the neatest features of Google My Maps is the step-by-step directions with driving, biking, or hiking routes. Click the three dots beside the layer name and select “Step-by-Step Directions” in the dropdown menu. At the very top of the directions, you’ll find the total miles and suggested drive time for the route. This can be valuable information for budgeting gas and planning how long to drive each day of your road trip.

Step No. 04
Add additional layers and markers.
With the route finished, now comes the fun part. Adding the markers! Layers and markers are a good way to visualize your road trip adventure, adding places you don’t want to miss and roadside attractions you need to visit.
1. Create a New Layer
Click “Add Layer” to add a new layer to the custom map. Custom maps can have a maximum of 10 layers, including driving layers. Make use of this limit to organize your road trip information.
What kind of information would you want to save into layers?
Hotels, campgrounds, bed and breakfasts, and Airbnb rooms. It can help to save the place where you’ll spend each night of your road trip into a “Lodging” layer.
Restaurants, coffee shops, and dessert cafes. Everybody needs to eat. Creating a “Restaurants” layer can help you remember all those places your friends told you to visit.
Points of interest. Friends inevitably bombard you with tips on places you shouldn’t miss. The best way to keep up with that information is to drop a marker onto the map in a “POI” layer.
Layers can be organized by theme, date, location, or any way you could possibly think to organize the content. The purpose of layers is to organize the markers to make them easier to show or hide on the map while traveling.

2. Add Markers
There are three ways to add markers to any layer. The first is visually as you scroll through the map. Like Google Maps, Google My Maps allows users to click on business names to see more information.
The popup box includes a wealth of information. Typically, each marker will include “Details from Google Maps” like the street address, website, and phone number. Clicking the website will open it in a new tab or window in your browser.
At the bottom of the popup box, click “Add to Map” to add the marker to the current layer.
A second way to add markers is with the search box. After entering a search, lime green markers appear on the map and a list appears at the top of the layers. Clicking on the markers or names in the list will display the popup box and the option to add it to the current layer.

The final way to add a marker to the map is to create a custom marker. In the Map Tools menu, click “Add Marker.” The cursor changes to a crosshair. Wherever you click on the map, a new marker will be created.
A popup appears asking for information about the new marker. Enter a name for the marker in the top box. You can add a description in the second box, if needed. Click “Save” to add the marker to the layer.

Step No. 05
Stylize the markers.
After adding a route and dozens – perhaps hundreds – of markers, the data can be overwhelming to view on a single map. This is where Google My Maps differs the most from Google Maps: the ability to stylize the markers.
There are three ways to stylize markers in a custom map: Individual Styles, Uniform Styles, and Sequence of Numbers.
1. Individual Styles
By default, Individual Styles is selected. With this option, you can change the color and icon for each marker individually. This is helpful if you want to color code markers or create groups of icons within a single layer.
2. Uniform Style
The second option is to create a Uniform Style. This collapses the list of markers and allows you to choose a custom color and icon for all the markers in that layer at once. The markers are still viewable if you want to see them, but not editable. Uniform Style is a great way of grouping all the markers in a layer by subject like restaurants, hotels, or museums.
3. Sequence of Numbers
The third option is to create a Sequence of Numbers. This is a great option for creating an itinerary for the markers in the layer. The markers are still visible in the list and draggable to reorder them, automatically updating the number sequence. Changing the color of any of the markers will automatically pass that color to all the markers in the sequence.

4. Style Options
After clicking the edit button for any marker, a popup menu shows a color palette and popular icons. Unfortunately, Google My Maps does not support custom colors. But with 30 colors to choose from, you’re certain to find something that will work for your road trip.

Clicking “More Icons” at the bottom of the popup menu opens the full list of 432 available icons. A search bar makes it easy to find what you need for the markers on your road trip map. Here are some common icons you may want to use:
- Shopping Cart
- Information

Step No. 06
Open the custom map in google maps.
Every change made to a custom map in Google My Maps is automatically saved. Once you have finished customizing the map, it’s time to open it on your mobile device. If you created a new Google account, you will need to use that same login information with the mobile app.

1. Load a Custom Map on a Phone
Open the Google Maps app. Tap “Saved” on the bottom menu bar. Tap “Maps” underneath your lists. Here, you will see the custom map you created earlier. Tap on the map you want to open.
To begin using the map, tap “Go” in the bottom menu bar. You can now scroll through the custom map, zoom in and out, and tap on any of the markers you added earlier.

2. Load a Custom Map on a Tablet
Open the Google Maps app. On tablets, tap the three-line “hamburger” menu icon in the search bar and then tap “Your Places.” Tap “Maps” in the new menu along the top of the lists. You will now see the same list of custom maps you see in the phone menu. Tap on the map you want to open.
Once this map opens in Google Maps on a tablet, it is ready to use.

Step No. 07
Navigation with a custom map.
Although you can create driving directions with a custom map, you cannot use that route for turn-by-turn voice navigation.
So, what’s the point in doing all this work?
Long before Facebook was invented, in the era of Napster and Road Rules on MTV, pioneering road trippers used maps printed on paper. Using a custom map created in Google My Maps, loaded into Google Maps, would be a similar experience but in a digital format.
With the custom map loaded, users can zoom in and out to get more details of the route ahead. Like using Google Maps, your location is pinpointed with a blue circle – if you have location services enabled on your mobile device. Although it won’t be voice navigation, you will still be able to see where you need to make turns to follow the route you created earlier.
Quasi-Voice Navigation
It is possible to get turn-by-turn voice navigation, but it comes with a caveat. Tap on the next marker along the driving route, and then tap on the blue circle to get directions. Tap “Start” and turn-by-turn voice navigation starts.
However, you will notice the driving route may no longer match your customized route. That’s because this method creates a new “initial” route.
If you customized the driving route to use national scenic byways or avoid interstates, you lose that customization using this method. But, depending on how you customized your route, it may not matter anyway.

5 Responses
If you’re using your custom map without turn by turn navigation, it is a small headache to keep the phone from auto-locking. The best I was able to find was that you’d have to make a change in developer mode and even then it would only stay open if the phone was charging, not all the time.
Very helpful in creating the map and the layer with destintaions. Was able to see the map on the phone. When opening the map on the phone however there was no option to “go” so the map was useless.
That’s strange. I just tested it again on my iPhone 14 with Google Maps. I loaded the custom map I had created for places to eat brunch in Columbia, South Carolina, I tapped one of the pins I dropped on the map to a restaurant, and I was given the option to tap “Start” and it began voice navigation. You didn’t see that option on your phone?
MyMaps unfortunately is limited to ten stops on a trip route. So it’s rather useless for long road trips…
This is true. But that’s why this is only for PLANNING a road trip, not executing it. Google My Maps helps you visualize the stops and choose the best route. After that, I think you should use a Garmin automotive GPS for navigation.
Leave a Reply Cancel reply
Your email address will not be published. Required fields are marked *
- share this article
Privacy Policy
Copyright © 2023 Jason Barnette | All rights reserved | Seriously, don’t steal my stuff

Share this Article
Did you enjoy reading this article? If so, then share it with your friends. Sharing is caring, after all.
Google Maps
- Google Travel
How to get ready for a road trip using Google’s travel site and Maps
Due to the pandemic, travel has been slow this past year, and you might be a little rusty when it comes to picking up and traveling somewhere to visit friends and family or just planning a getaway. Whatever the case, Google has a few helpful tools in Google Maps and Google’s travel site to help you get started on making those plans and staying safe along the way.
Table of contents
Getting started with google’s travel website, using google map’s road trip feature, planning a trip around covid-19 restrictions.
Google’s travel website is meant to be a companion site that can help you plan all of the details of your trip. You can use it to book flights, make an itinerary, and even explore interesting places to visit at your destination. If you have a Gmail account , there’s a good chance that any flight reservation you make will automatically appear the next time you use Google’s travel site, making it that much easier to plan the trip’s details. If not, Google Travel may suggest locations based on your search history and interests. While that may be a little creepy, it can also be pretty helpful.
If no destination has been chosen yet, Google will suggest locations in the “Explore” tab. You can filter these locations based on flight and hotel cost, giving you a pretty good idea of where a nice place to go would be. After choosing a destination, Google gives you a few options as far as what you’d want to know. There’s a “Discover” section that will break down various points of interest. In bigger cities, you may find the number of things to do or see endless. Fortunately, you can filter out locations and activities based on your personal interest.
If there are a few places that pique your curiosity, or you already know you want to go there, Google allows you to save them to the trip and pin them to the trip’s detail page. This serves as a sort of to-do list when you get where you’re going.

If you don’t plan on flying and want to avoid certain COVID-19 hotspots, Google Maps is probably the way to go. Just this year, Google added a feature to the Maps website that allows you to add stops along the route when planning the trip. Previously this was possible on mobile, but it didn’t lend itself well to planning out a road trip to be shared with friends and family. Adding stops along the way with Google Maps on mobile was best for impromptu stops.
Once you’ve defined a starting point and destination, you can add stops along the way. You can add anything from a city to rest stops and gas stations. You can do this by either manually entering a stop you already know you would like to pause at, or by choosing one of the criteria towards the top of the screen. Google Maps lets you narrow down your search by these criteria:
When selecting from one of these criteria, Google will also suggest a few filters. For instance, choosing hotels will bring up a “Guest rating” filter, as well as an “Amenities” filter, so you make sure that you’re getting free wifi. Of course, if none of these fit the bill, you can always just search for what you want. The nice thing is that these suggestions can add a little flare to the trip by suggesting something you would have never thought about, making the road trip that much more exciting.
Once you find a point of interest, hit add stop , and Google Maps will automatically insert it in the right spot on the planned route. Unfortunately, there doesn’t seem to be a way to define how much time you plan on spending at that stop, so the trip time might have to be calculated manually. Besides that, Google Maps has become a handy road trip planner with enough tools to get you where you’re going and let you have some fun along the way.
The major caveat to traveling right now is the looming risk of COVID-19. Fortunately, the travel website by Google and Maps both supply some great tools for managing risk and assessing where you plan to go.
On the travel website, you can find up-to-date COVID-19 information for your destination pretty easily. You can access this information by searching for and clicking on the destination . Under the main card that lists the date of your trip, area name, and weather, there will be a COVID information section. This section has useful information like the CDC’s travel advisory website, COVID-19 stats for that specific area, and the number of local cases.
Clicking on the “Travel advisory” button brings you to the CDC’s COVID-19 map. This map is a risk assessment of most destinations in the world, color-coded depending on how risky it is to travel there. The second button will search Google for COVID-19 information on the location you’re traveling to, detailing data like news, statistics, and testing locations. The “Local cases” button will show even more detailed information about active cases, vaccines administered, and deaths in the area. All of this is fantastic information to have when traveling and comes in handy when planning your trip.
FTC: We use income earning auto affiliate links. More.

Check out 9to5Google on YouTube for more news:
Andrew Romero's favorite gear
Google Pixel 7 Pro
Pixel Watch
- Insider Reviews
- Tech Buying Guides
- Personal Finance
- Insider Explainers
- Sustainability
- United States
- International
- Deutschland & Österreich
- South Africa

- Home ›
- tech ›
- how-to »
How to use Google Maps as a trip planner and make a full itinerary

- You can use Google Maps as a trip planner through the "Places" and "My Maps" features.
- Both the Google Maps website and app let you save locations to lists, which you can then get immediate directions to.
- When getting directions, you can look up reviews and add multiple stops to your route.
Google Maps has become an essential part of any road trip. After all, it's a GPS, business directory, and reviews platform all-in-one.
But if you spend some time with it, you can integrate Google Maps even more seamlessly into your next vacation. Google Maps has a variety of features you can use to plan your trip and save any interesting spots you find on the way.
Here's how to make Google Maps your trip planner, using the Places feature, My Maps, and more.

How to use Google Maps as a trip planner
Use the 'places' feature to save points of interest.
Let's say you're traveling, and happen to stumble upon the cutest coffee shop you've ever seen. You want to visit, but don't have time right now - what's the best way to remember it?
Google Maps' Places feature can help you out. Both the Google Maps website and app let you save any location on the map to a list, which you can then easily find later.
1. Open Google Maps and click, tap, or search for the location that you want to save.
2. Find the Save icon , which has the icon of a bookmark. You'll find it right under the location's name, but you might need to swipe to find it in the mobile app.

On a computer
1. On the Google Maps app website, find a location and start getting directions to it.
2. Underneath the menu that lets you pick your starting and ending location, click Add destination .
3. A new field will appear. Enter your third waypoint.
4. Once you pick a new waypoint, you'll be able to click Add destination again and pick another one, as well as reorder them.
You can add up to nine destinations on both the website and mobile app.

- Current Location in Google
- Hide Whatsapp Messages
- Phone is hacked or not
- Whatsapp Deleted Messages
- Download photos from Whatsapp
- Instagram Messages
- How to lock facebook profile
- Unfollowed on Instagram
- Best printers for Home
- Best Mixer Grinder
- Best wired Earphones
- Best 43 Inch TV in India
- Best Wi Fi Routers
- Best Vacuum Cleaner
- Best Home Theatre in India
- Smart Watch under 5000
- Best Laptops for Education
- Best Laptop for Students

- Advertising
- Write for Us
- Privacy Policy
- Policy News
- Personal Finance News
- Mobile News
- Business News
- Ecommerce News
- Startups News
- Stock Market News
- Finance News
- Entertainment News
- Economy News
- Careers News
- International News
- Politics News
- Education News
- Advertising News
- Health News
- Science News
- Retail News
- Sports News
- Personalities News
- Corporates News
- Environment News
- Raj Kundra Scam
- Top 10 Richest people
- Cibil Score vs Cibil Report
- Top 10 Largest Economies
- Lucky Color for 2023
- How to check pan and Aadhaar
- Deleted Whatsapp Messages
- How to restore deleted messages
- 10 types of Drinks
- Instagram Sad Face Filter
- Unlimited Wifi Plans
- Recover Whatsapp Messages
- Google Meet
- Check Balance in SBI
- How to check Vodafone Balance
- Transfer Whatsapp Message
- NSE Bank Holidays
- Dual Whatsapp on Single phone
- Phone is hacked or Not
- How to Port Airtel to Jio
Copyright © 2024 . Times Internet Limited. All rights reserved.For reprint rights. Times Syndication Service.
How-To Geek
How to create a custom map in google maps.
Put the power of Google Maps to use for your own custom maps.
Quick Links
Creating a custom map in google maps, adding components to a custom map in google maps, sharing custom maps in google maps, key takeaways.
Go to maps.google.com and select "Saved" from the side menu. Go to the "Maps" tab and click "Create Map." From here, you have a number of options of creating a custom map that does not show up on the public Google Maps.
You don't need any special software to create a custom map for yourself or others. Google Maps is all you need, allowing you to add your own pinpoints, shapes, and directions to a custom map. Here's how.
You'll need to use Google Maps on your desktop to do this. If you're having problems with a blank Google Maps screen , you'll also need to clear your site data.
A custom map in Google Maps doesn't allow you to create a new landscape---you're stuck with planet Earth. What it does allow you to do, however, is add your own landmarks, routes, and locations.
You can also draw your own shapes onto the existing map to add more detail. While you can view a custom map in the Google Maps app for Android and iOS, you can only create it using the web version of Google Maps on your desktop.
To start, head to the Google Maps website , and sign in using your Google account. Once you're signed in, press the Put icon in the top-left.
In the options menu, click the "Saved" option.
In the "Your Places" menu that appears on the left, click the "Maps" tab. At the bottom of the menu, select the "Create Map" button.
The map creation window will appear in a new tab. To name it, select the "Untitled map" text at the top of the menu on the left.
In the "Edit map title and description" menu, add a name and description for your map and then click "Save" to save it.
Custom Map Layers
Your custom map is made up of layers, with the "Base Map" layer (the main Google Maps view) at the bottom.
You can customize the appearance of the "Base Map" layer by selecting the options arrow next to "Base Map" and choosing a different map theme.
When you create a new custom map in Google Maps, a new "Untitled Layer" is added by default.
You can add as many layers as you want to your custom map, allowing you to separate the different components of your new map from each other, by clicking the "Add layer" button.
If you want to rename this layer, select the three-dot menu icon next to the layer and then click "Rename Layer" in the drop-down menu.
To delete it, select "Delete Layer" instead.
A custom map in Google Maps can be customized with various different components. You can add marker points, shapes or lines, as well as directions directly onto the map.
To start, make sure you're in the custom map editor by heading to the Google Maps website and selecting the hamburger menu > Your Places > Maps > Create Map.
Adding a Marker Point
A custom marker point is a pinpoint that appears on the map. You can use this to add additional descriptions to an area, as well as to point map users to a location or area that isn't specified on the "Base Map" layer.
To add a new marker point to your map, make sure you've located a suitable area on the "Base Map" layer. When you're ready, select the "Add Marker" button in the menu below the search bar in the custom map editor.
Using your mouse or trackpad, click on an area of the map. This will bring up the marker editor---add a suitable name and description and then select "Save" to add it to your map.
Adding Lines or Shapes
You can add custom lines and shapes to your custom map to emphasize certain areas.
To do this, click the "Draw a Line" option in the menu below the search bar and then select the "Add line or shape" option.
In a suitable area on the map, draw a line using your mouse or trackpad---use multiple lines to create a joined-up shape. Press the Enter key to submit lines.
Add a custom name and description to your object in the pop-up menu before selecting "Save" to confirm.
Creating Custom Directions
A custom map can also be used to share directions from A to B by creating a directions layer.
To do this, click on the "Add Directions" option in the menu below the search bar to create this layer.
The directions layer will appear in the menu on the left. Add your departure point to the "A" text box and the arrival point to the "B" text box.
Once both the "A" and "B" boxes are filled, the map will update showing the route between your specified locations.
Once you've created your map, you're free to access it yourself from within Google Maps (hamburger menu > Saved > Maps) or from the Google My Maps website.
Only you can view your custom map by default, but you can share it with others. To do this, head to the Google My Maps website , sign in, and then select the "Owned" tab where your custom map should be listed.
To share it with others, click the "Share Map" button. This will give you options to share your custom map on various social media platforms, through email, or by embedding it on your website.
Select one of these options to proceed.
You can also grab a custom link to your map that will allow you to share it with others directly.
In the "Owned" tab of the Google My Maps website, select your map to return to the map editor and then click the "Share" button in the left-hand menu.
This will bring up the "Share Map" options menu. You can choose to allow anyone with the link to view your map, and make it searchable on the internet if you'd like.
Utilizing the power of Google Maps for your own custom maps is an awesome thing to be able to do. Along with " Local Guides ," it's one of the lesser-known features of Google Maps. Keep in mind that this is not the same as suggesting missing places or missing roads for the public map.
- Help Center
- Privacy Policy
- Terms of Service
- Submit feedback
Create or open a map
Use My Maps to create or view your own maps.
Create a map
- On your computer, sign in to My Maps .
- Click Create a new map .
- Go to the top left and click "Untitled map."
- Give your map a name and description.
- You’ll see maps you’ve made or viewed as well as maps shared with you.
- Optional: To see popular maps and staff picks, click Explore .
Change how a map looks
- Open a map you can edit or create a map.
- To choose a style, click one of the images.
View maps you can’t edit
If you can open a map but can’t edit what’s on it, you're in the map viewer. While in the map viewer, you can still:
- Search the map contents
- Show or hide layers
- View the map with satellite imagery
- Share, export, and print the map
To ask for edit access for a map you don't own, contact the map’s owner.
Related articles
- Delete a map from My Maps
- View your My Maps using Google Maps
- Manage your maps in Google Drive
- Great Tech Gifts for Any Occasion
- The Best Gadgets for The Beach or Pool
How to Create a Custom Route on Google Maps
Experiment with new ways to get to your destination
:max_bytes(150000):strip_icc():format(webp)/Nick_Steinberg-f81ad10e82ed41588636cd368e8a6210.jpg "google maps trip builder")
- Wilfrid Laurier University
:max_bytes(150000):strip_icc():format(webp)/jonfishersquare-93eb80e77a004035887f56816d3623c5.jpg "google maps trip builder")
- Wichita Technical Institute
- Android Auto
- Apple CarPlay
What to Know
- Desktop: Open Google My Maps > Add directions > Transportation mode > Departure point > Destination point . Click and drag route line to customize route.
- Add a marker to map : Open Google My Maps and click Add layer > Add marker > click location and select Save .
- Android and iOS (view only): In the Google Maps app, tap Saved > Maps . Select the saved custom route you'd like to view.
With the Google My Maps tool, you can build custom routes for any upcoming trip. This lets you plan the route exactly how you want, and you can even share your custom routes with others.
You can only create custom routes with My Maps from a desktop browser. However, you can view the routes you’ve made on both Android and iOS devices.
How Do I Create a Custom Route in Google Maps?
Creating a custom route in Google Maps is a two-step process. First, you'll need to create a new map in My Maps and add a custom route. Below, you'll find instructions for both tasks:
Navigate to Google Maps and make sure you’re signed in to your Google Account.
Click the three horizontal lines (hamburger menu) in the top-left corner.
Select Your places from the drop-down menu.
Select Maps in the top row and then click Create Map . Your custom map will open in a new window.
Click Untitled Map in the top-left to enter a name and description for your map.
Click Save to confirm.
One downside to My Maps is it doesn’t let you navigate your custom route in real-time in Google Maps. Instead, it’s more valuable as an offline map tool you can use as a reference while navigating to your destination.
Customize Your Route on Google Maps
Now that you have your map, it’s time to plan a route.
To begin, select Add directions under the search bar. This will create a new directions layer in the menu located on the left side of the screen.
You can add up to 10 layers on a custom map. Having additional layers is useful if you want to create multiple custom routes for a single trip.
Select your transportation mode by clicking the Driving icon under the new map layer.
Google’s custom routes do not support transit. You can only select driving, cycling, or walking.
Enter your departure point in the A text box.
Enter your destination point in the B text box.
You can add multiple stops along your route in Google Maps , up to a maximum of 10.
Google will automatically plot a route. Then, to customize it, click and drag the destination line to the desired point.
Your custom route will be saved to your Google Drive automatically.
How to Access Custom Routes on Mobile
Once you’ve finished a custom route, you’ll be able to access it on the go with your mobile device. While you won't be able to edit your maps, you can still view custom routes on any Android or iOS device using Google Maps.
The screenshots below were taken on an iPhone, but the process is identical on Android.
Open the Google Maps app.
Tap the Saved icon from the menu at the bottom of the screen.
Open the map you’d like to view. You should see your custom route displayed.
Can You Draw a Route on Google Maps?
In addition to directions, you can add markers, lines, and shapes to your custom route in My Maps.
Add a Marker
If you want to plan stops along your route, you can use a custom marker to indicate those points.
Click Add layer .
Click the Add marker icon under the search bar.
Click the location you’d like to pin. Enter a name for the pin and click Save .
The location will now be pinned to your map. From here, you’ll be able to:
- Change the font color.
- Change the pin icon.
- Edit location name.
- Add a photo or video to make the location more visible on your map.
- Add directions to the location.
Add a Line or Shape (Desktop)
You can use lines and shapes to fine-tune the route you're creating on Google Maps. Here's how to add them.
Click Draw a line under the search bar.
Select Add line or shape .
You can also choose to draw a driving, cycling, or walking route with this tool. This is useful if you want to fine-tune your route, but the Add directions tool is more intuitive for plotting an A to B route.
Click the location on your map where you’d like your line or shape to start.
Drag the cursor to another point and click to pin a line. Once you’re finished, double-click to confirm line or shape placement.
Your line or shape will now appear in your map legend on the left-side of the screen. From here, you can edit the color and width, change the name, add a photo or video, or delete.
After adding a starting point and a destination, select Add Destination on the left, below the destinations. Next, enter the destination for the next stop and repeat for all the stops you need to add. Finally, select a route to get the directions.
After you create a custom route, you can send it to someone by selecting the Share button. Google Maps will provide a link that you can copy and send to others. In addition, you can select Let others search for and find this map on the internet if you wish to share it publicly.
Get the Latest Tech News Delivered Every Day
- The 5 Best Ways to Use Google Maps Trip Planner
- The 7 Best Google Maps Alternatives of 2024
- Use Google My Maps to Send a Custom Route to Your Phone
- How to Drop Multiple Pins on Google Maps
- How to Draw on Google Maps
- How to Drop a Pin on Google Maps
- How to Add Stops on Google Maps
- How to Find Alternate Routes on Google Maps on iPhone
- How to Plan an Alternate Route With Google Maps
- The 7 Best Traffic Apps of 2024
- How to Save a Location on Google Maps
- How to Find Alternate Routes on Google Maps
- How to Fix It When Google Maps Is Not Showing Alternate Routes
- How to Drop a Pin in Maps on iPhone
- What Is Google Sky Map?
- How to Use Google Maps Cycling Directions
- Nation & World
Google unveils updates to make trip planning easier
Google Maps is launching new updates that are intended to make finding travel inspiration and local recommendations in your destination easier. Users will start seeing these lists of suggestions popping up in Google Maps in more than 40 cities across the U.S. and Canada this week. These updates will also be rolled out globally on Android and iOS mobile platforms later this month.
With this trio of updates, users can discover curated lists of local recommendations from other users and esteemed websites, customize their own lists and access key insights, making vacation planning a breeze and ensuring a seamless on-the-go experience. To access the new features, simply search for a city in Google Maps and swipe up to see curated lists of places from people who know the city inside and out. You’ll also see lists from such reputable sources as Lonely Planet, The New York Times and OpenTable.
And, when away from home, the question of where to eat is always top of mind. Now, whether you’re a traveler or just want to find a trendy spot in town, you can use new restaurant lists created by Google Maps. These lists will spotlight the eateries people are showing interest in or rating highly on Maps at the time. Google has sorted restaurants into three separate lists based on various criteria, creating indexes for trending, top-rated, and hidden gem locations.
The Trending list is updated weekly to spotlight places that experienced a recent spike in popularity on Maps, making it ideal for discovering the latest hot spots.
The Top list showcases the places that the Maps community has consistently shown love for. Use this list to find a neighborhood’s longstanding favorites.
The Gems list is for places that are considered an area’s best-kept secrets, highlighting great restaurants that still fly under the radar.
Creating Maps lists allows you to organize places you’d like to visit and places you’ve already been that you might wish to revisit. With the new lists format, users will also be able to more easily arrange their selections for easy reference, as they can now choose the order in which places appear. Simply move them up or down in whatever order you prefer to have them displayed. Users can also link in content from their social media streams, such as their own reviews of a certain venue.
Similarly, to give users a good sense of each place at a glance, Google’s AI pulls key insights to display from the Maps community. When you search a spot, you’ll see select photos and reviews that encapsulate what patrons love about it. The AI function can even help you identify the name of a particular dish and display helpful information based on a restaurant’s menu.
New design updates are also set to give Google Maps a fresh look, including a simplified home screen and new pin colors that make places on the map easier to find.
Trip-planning AI
Google has also just announced an update that’s coming to its Search Generative Experience (SGE), which will enable users to create travel itineraries and compile trip ideas using AI. This means that Google will be taking on other companies that are already applying the generative AI’s capabilities to help travelers plan their trips, such as Mindtrip and Layla.
To come up with its travel recommendations, Google’s AI engine relies upon information from sites across the internet, as well as photos, reviews and other specifics users have submitted about any given place. Conversationally, users can ask the AI something like “plan me a five-day trip to New York City that focuses on entertainment” and receive a sample itinerary that includes local restaurants, attractions and points of interest. Once you’ve constructed your ideal itinerary, you can export it to Gmail, or Google Docs or Maps.
This new capability is currently available only in the U.S. (in English) to those who are signed up for Google’s Search Labs program, which invites users to experiment with early-phase Google Search functions. The company has not stated if or when this function will become more widely available. According to TechCrunch, Google is not only testing out new realms for using generative AI, it’s also gathering data about consumers’ travel purchasing intent, which would support its wider ad business.
Most Read Nation & World Stories
- Attorneys for Bryan Kohberger file alibi defense in Idaho student homicide case
- 12 jurors have been picked for Donald Trump's hush money trial. Selection of alternates is ongoing VIEW
- These two Oregon and Washington cities named among best places to live in U.S.
- He built a ‘fantasy world’ in his apartment. It’s now a historic site.
- Trump loses bid to halt Jan. 6 lawsuits while he fights criminal charges in the 2020 election case
Account Options
Apps/Software
- Phones/Tablets/Mobile Tech
- Business Tech
Google Maps Launches New Updates to Improve Trip Planning
These updates aim to enhance the travel experience of users for the upcoming summer..
- Facebook facebook
- Twitter twitter
- Reddit reddit
- LinkedIn linkedin
- Email Email
- WhatsApp What's app
Google Maps introduced a series of updates aimed at enhancing trip planning and exploration just in time for the upcoming summer season. These updates promise to simplify the process of discovering travel inspiration, accessing local recommendations, and navigating unfamiliar destinations. Rolling out initially in over 40 cities across the United States and Canada, these updates will soon be available globally on both Android and iOS platforms.

The Trending, Top, and Gems Lists
One of the key features introduced is the ability for users to access curated lists of local recommendations sourced from reputable websites and the Google Maps community. By simply searching for a desired city in Maps, users can access these lists, which cover a wide range of interests and preferences. From expert-curated restaurant guides to iconic landmarks and hidden gems, these lists aim to provide users with recommendations tailored to their preferences. Additionally, Google Maps now offers a trio of curated lists, namely the Trending, Top, and Gems lists. These lists highlight places that have recently surged in popularity, longstanding community favorites, and hidden local treasures, respectively. This curated approach aims to assist users in discovering the latest hot spots and uncovering hidden gems within their chosen destination. Moreover, users can now create and customize their own lists within Maps, enabling them to organize potential attractions, restaurants, and activities for future reference. This feature facilitates collaboration and sharing, allowing users to seamlessly share their curated lists with friends and family. With the ability to customize the order of places within their lists, users can create personalized itineraries and rank their favorite destinations accordingly.
Read Also: Google Maps to Get New Color Palette That Looks Similar to Apple Maps: Here's Everything You Need to Know
Google Maps is Now Leveraging AI
In addition to these list-based updates, Google Maps now leverages AI to provide users with key insights and information about a destination at a glance. By analyzing data from the Maps community, Google's AI identifies noteworthy highlights about a place, such as popular dishes at a restaurant or the ambiance of a local bar. This feature aims to streamline the decision-making process for users, providing them with relevant information to aid in their exploration. Furthermore, Google Maps receives a visual refresh, introducing new design elements to improve user experience. These updates include a cleaner home screen layout with fewer tabs and new pin colors to enhance visibility and navigation. Overall, Google Maps' latest updates aim to empower users with the tools and information they need to plan and navigate their summer adventures with ease.
Related Article: Google Combines Maps and Waze Teams as Part of Cost-Cutting Efforts; Will User Experience be Affected?

[WATCH] US DARPA Releases Footage of First Ever AI vs Human Dogfight

Apple Audit Finds Nearly 100,000 Working iPhones Were Stolen, Shipped to China Instead of Scrapped

NASA James Webb Space Telescope Makes Shocking Discovery Regarding a Cold Brown Dwarf

Huawei Pura 70 Series Launches with Strong Demand, Pro and Ultra Models Out of Stock

Frontier Communications Suffers Cyber Breach by Unknown Cybercrime Group
Subscribe to tech times.
Sign up for our free newsletter for the Latest coverage!

More From Forbes
Google announces new features for travel.
- Share to Facebook
- Share to Twitter
- Share to Linkedin
Google has announced several new features for Google Maps and Google Search aimed at helping people find less carbon-intensive ways of traveling and commuting.
One of the key additions is a new EV filter on google.com/travel, enabling users to locate hotels that offer onsite EV charging facilities. Additionally, numerous updates have been made on Maps to facilitate the discovery of charging stations.
When planning a trip, users will now have access to suggested charging stops, forecasted energy consumption, and more.
Google Map EV Charger Stations Updates
Furthermore, in addition to the EV updates, Google Maps will now assist users in finding lower-carbon travel alternatives.
Highlights from Googles Press Release: More sustainable ways to commute & travel:
- Driving alternatives in Google Maps: When people look up driving directions, we’ll soon show a public transit or a walking suggestion next to driving routes, if travel times are comparable and practical (coming to 15+ cities).
- Trains & buses in Google Search: You can now see train schedules & ticket prices directly in Search, for rail travel in 38 countries around the world (including the US), as well as long-distance buses in 15 countries. This is an expansion of an existing feature.
- Train suggestions on Google Flights: In the months ahead, when you’re on Google Flights and there’s a reasonable rail alternative, you’ll see train route suggestions in the flight search results. This builds on similar suggestions we already show in Google Search for flight queries.
- Travel Impact Model: You can already see estimated emissions in Google Flights, powered by our Travel Impact Model methodology. Now, estimates from the Travel Impact Model are also available through a developer API , a Google Sheets extension and a calculator on the TIM website .
Electric vehicles:
- Google Maps (all features coming soon):
- EV Charging Station Pins: We’ll highlight nearby EV charging stations for in-car Maps, with information about station availability and charging speeds.
- AI-powered summaries for EV charging stations: AI summaries from user reviews will better help users pinpoint charging stations.
- Multi-waypoint EV trip planning: When users create a multi-stop trip, in-car Maps will suggest required charging stops.
- Google Search - Hotels:
- You can use the new EV filter on google.com/travel to find hotels that offer on-site EV charging. This is already live.
JPMorgan Joins Goldman Sachs In Serious Bitcoin Halving Price Warning
Google makes a major new sale offer to pixel 8 buyers, second trump juror dismissed as judge restricts press.

- Editorial Standards
- Reprints & Permissions
COMMENTS
Trip Planner is a Google My Maps project that helps you plan your trips and share them with others. You can customize your map with markers, routes, photos, and descriptions of your destinations ...
Next, you'll want to click on "Maps" in the far right corner of the menu. You won't see anything listed yet, unless you've created a map previously. Click "Create Map" (which is at the bottom of the menu.) After that, you'll be directed to an untitled map that you'll want to name and add a description to.
And in the next few months, your trips—including reservations for things like hotels and restaurants—will be accessible in Google Maps, too. Our goal is to simplify trip planning by helping you quickly find the most useful information and pick up where you left off on any device. We'll continue to make planning and taking trips easier ...
1. Head to the My Maps homepage and click Create a New Map. Any map you create will appear on this page. Google; William Antonelli/Insider. 2. You'll be given a world map. In the menu in the top ...
7 Steps to Plan a Trip With Google Maps. Here is how to use Google Maps trip planner: 1. Create a Map. To create a map on Google, you do need a Google account. Once signed up/logged in, go to this page. Click on " Saved" >> "My Maps ", which will take you to your maps. If you have created any maps in the past, you will also find them here.
Check the Google icon in the top right corner to make sure you're using the Google account you want to. Click "Create A New Map" and a window will open with a blank map. To give your map a name and description, click the map name ("Untitled Map"). You can also change the color and style of the base map if desired.
Share links: Directly share your maps to Facebook, Twitter, or Gmail. Draw a line: This tool lets you draw routes onto your map. It'll snap to known roads or trails on the map. Add directions: Use this tool to insert step-by-step directions one location at a time. You can add driving, biking, or walking directions.
How to Use The Google Maps Travel Planner to Create an Itinerary. Creating a Google Map for your next trip is easy (and it can be really fun!). Let the planning commence! Step 1: Make a New Google Map. The first step to create a trip in Google Maps is to visit the Google Maps home page. Click on the hamburger menu icon in the top left-hand corner.
2. Create a new map through the home screen. At the top left of the "My Maps" home screen, you'll see a red box with the text "+Create a New Map.". Click on it to be redirected to a map screen. [3] 3. Give your map a descriptive name. To keep yourself organized, give your map a name to remind you what it contains.
Make maps. Easily create custom maps with the places that matter to you. Add points or draw shapes anywhere. Find places and save them to your map. Instantly make maps from spreadsheets. Show your ...
Step 1 to Plan a Trip with Google Maps: Create A Custom Map. Step 2 to Plan a Trip with Google Maps: Add Your Major Stops. Step 3 to Plan a Trip with Google Maps: Add Destination Info. Step 4 to Plan a Trip with Google Maps: Outline Your Itinerary. Conclusion. Your Turn.
Step 2: Plot Your Road Trip Route. To start plotting your road trip route, click on directions. Then enter your starting point and your first destination. Continue to add stops to your road trip by clicking on the (+) to add destinations. Stop when you have all your road trip stops added to your map.
On your computer, open Google Maps. Make sure you're signed in. On the left, choose an option: Get directions to relevant places: Click a place in the list. You'll get places based on your Gmail, Calendar, and recent travel history. Get directions to saved places: If you saved your work or home address in your Google Account, click Home or ...
Getting Started with the Google Maps Trip Planner. Head to Google My Maps on your computer. From there, press the "get started" button. Before you officially get to planning, check the top right corner of the screen to see if you are logged into your desired Google account. If not, change to the proper account.
Add your starting location in the empty box next to "A" and for driving directions click on the 3 vertical dots in the right corner of the box and select "Step By Step Directions.". A pop-up box will appear and you will know the route to get to your location and the time it will take to reach your destination.
READ MORE: 10 Ways to Save Money on Gas on Your Next Road Trip This helps visualize a road trip, place destinations in the correct order, and make sense of the grand scale of the road trip. After creating a customized map, users can open it in Google Maps on any mobile device, plug into a compatible vehicle, and let the road trip adventure begin.
Using Google Map's road trip feature. If you don't plan on flying and want to avoid certain COVID-19 hotspots, Google Maps is probably the way to go. Just this year, ...
1. Head to the My Maps homepage and click Create a New Map. Any map you create will appear on this page. Google; William Antonelli/Insider. 2. You'll be given a world map. In the menu in the top ...
Once you're signed in, press the Put icon in the top-left. In the options menu, click the "Saved" option. In the "Your Places" menu that appears on the left, click the "Maps" tab. At the bottom of the menu, select the "Create Map" button. The map creation window will appear in a new tab. To name it, select the "Untitled map" text at the top of ...
Create a map. On your computer, sign in to My Maps. Click Create a new map. Go to the top left and click "Untitled map." Give your map a name and description. Open a map. On your computer, sign in to My Maps. You'll see maps you've made or viewed as well as maps shared with you. Optional: To see popular maps and staff picks, click Explore.
Build Maps in Minutes with Quick Builder - Google Maps Platform. Get $200 usage monthly for no charge. See pricing details. Welcome to the new Google Maps Platform website, your local language site will be available soon. New customers in India get up to 40% off. Start exploring . Welcome to the new Google Maps Platform website, your local ...
Click and drag route line to customize route. Add a marker to map: Open Google My Maps and click Add layer > Add marker > click location and select Save. Android and iOS (view only): In the Google Maps app, tap Saved > Maps. Select the saved custom route you'd like to view. With the Google My Maps tool, you can build custom routes for any ...
New design updates are also set to give Google Maps a fresh look, including a simplified home screen and new pin colors that make places on the map easier to find. Trip-planning AI. Google has ...
This map was created by a user. Learn how to create your own. Google Maps - Route planner.
Google Maps introduced a series of updates aimed at enhancing trip planning and exploration just in time for the upcoming summer season. These updates promise to simplify the process of ...
More sustainable ways to commute & travel: Driving alternatives in Google Maps: When people look up driving directions, we'll soon show a public transit or a walking s...
Give directions with real-time traffic. Provide an efficient route for your drivers with turn-by-turn directions, real-time traffic, and by displaying real-time traffic along a route. This can help create more efficient deliveries, a more seamless drop-off and pickup experience, and lower fuel, vehicle and employee costs.