

You'll never travel without our trip planner again
Travel planning at its best. build, organize, and map your custom itineraries in a free travel app designed for vacations & road trips, powered by our trip planner ai.
Your itinerary and your map in one view
No more switching between different apps, tabs, and tools to keep track of your travel plans.
Features to replace all your other tools
Add places from guides with 1 click, collaborate with friends in real time, import flight and hotel reservations, expense tracking and splitting, checklists for anything, get personalized suggestions, plan like a pro.
Unlock premium features like offline access, unlimited attachments, flight deals, export to Google maps, and much more
Offline access
Unlimited attachments, optimize your route.
4.9 on App Store, 4.7 on Google Play
Discover your next favorite destination
Have tips of your own? Write a guide to share with other travelers like you!
Ready to plan your trip in half the time?
For every kind of trip and every destination, the best road trip planner, the best vacation planner, the best group itinerary planner.
My itinerary
This is a free demo version of our mapping software.
Create an account to save your current itinerary and get access to all our features.
Otherwise your data will be automatically deleted after one week.
- © Roadtrippers
- © Mapbox
- © OpenStreetMap
- Improve this map
- Plan a Road Trip
- Plan a Flight
- Find an Airport
- Where to Stay
- All Questions
Road trip planner
Starting City
Destination City
Or switch to flying
Planning a road trip?
Get advice from people who have done the same trip.
The Trippy road trip planner automatically calculates the optimal itinerary including stops recommended by Trippy members, favorite restaurants and hotels, local attractions and things to do based on what people who live in the area have suggested, and more.
Once you have a quick trip planned, you can customize every detail, adding or removing stops, or changing what time you leave in the morning or how long you stay at each stop. Then you can save your custom trip and share it with friends and family.
Let us know if you have requests for more features you'd like to see in the trip planner!
- Plot a Route
- Walk Route Planner
- Run Route Planner
- Bike Route Planner
- Upload a Route
- Make Me a Route
- Plot with Waypoints
- Trace a Route
- Combine Routes
- Split a Route
- Create a Collection
- Challenge Tracker
- Plot a Radius Map
- My Collections
- My Challenges
- My Linked Apps
- Find a Route
- Browse Routes
- Browse Collections
- Browse Challenges
- GPS Art Gallery
- Hotels and B&B's
- Weather Forecast
Popular Routes
- Walking Routes
- Running Routes
- Cycling Routes
- Horse Rides
- Motorbike Routes
- Browse Clubs
- Create a Club
- About Clubs
- Tutorial Videos
- How-To Guides
- Registration Help
- Maps for Events
- Latest News
- Feature Requests
Sign In to My Account
Making routes made easy, run • walk • cycle route planning for outdoor pursuits, 4 ways to create routes, point and click.
Traditional route planner gives you full control to plan your route in detail
CHOOSE WAYPOINTS
Choose places to visit and let us work out the routes between them.
MAKE ME A ROUTE
Tell us how long you want your route to be and we'll create 10 suggestions for you!
UPLOAD A ROUTE
Import a route you recorded on your GPS device or created using another application.
PLAN WITH FORESIGHT

Check road surface, hills and Google Street View to plan routes suitable for your activity
World class maps, some of the best recreational maps in the world.
EXPLORE WITH CONFIDENCE
Go where others have already been search over one million routes and trails worldwide, make changes with ease, tap into an extensive range of powerful route editing tools.
Combine two or more routes into one
Split one route into multiple routes
Drag a route to change where it goes
Shorten a route by moving the start or finish
Do a route more than once
Replace a section of a route
Swap the start and end of a route
Move the start point of a circular route
Delete a section of a route
Rejoin an earlier section of a route
Repeat a loop in the middle of a route
Plot a route back to the start
Use another route as a guide to trace over
Aligns a route with roads and paths on the map
Measure the length of part of a route
Shrink a route by removing redundant points
ANALYSE IN DEPTH

Go prepared and admire your efforts with detailed route profiles and elevation stats
How far did i run, quickly and accurately measure distance on the map, expand your reach, generate radius maps to see where you can get to in a given time or distance.

YOUR ROUTES YOUR WAY
Tailor routes to suit your needs, annotate maps.
Add custom labels and symbols to your maps
MODIFY TURN CUES
Tailor cue sheets with edits and abbreviations
ADD DETOURS
Show optional extensions and shortcuts to routes
INCLUDE PHOTOS
Add photos of your route to the map and directions
CREATE COLLECTIONS
Show several different routes on one map
Adapted for small touch screens using techniques like magnification and mouseless interaction

VOICE NAVIGATION
Turn your smartphone into a recreational sat nav, share routes anywhere.

Share on your own website or social media, print tailored route guides and export to GPS devices

TAKE ON A CHALLENGE
Track and share your progress on long distance challenges.
RINGING ENDORSEMENTS
Loved by people in over 200 countries across the world.
- Colin on "I have used virtually all the route planning solutions over the years and I have to say, this is by far the best."
- Jim on "Found your site this morning. Best route plotting site I've ever seen!"
- Dave on "Best route planning site by a country mile..."
- Paul by "...it is by far the most intuitive, easy to use, and complete bike route mapping program I have used."
- Carter by "This is spectacular site; great tools...finally something intuitive and great for cyclists!!!"
- Richard by " plotaroute is the by far the best route creation tool I've come across."
- John by "Happily paid my renewal today for the premium version - best route plotting tool I've seen!"
- John by "Your site has been one of the best things I've ever discovered on the internet."
- Gary on "This app does exactly what it says perfectly. In fact its the most intuitive route plotter I've found..."
- Michael "...I'm really impressed with the quality of this site. This is by far the best route-planning tool I have used."
- Race Director on "Your program is so much easier to use than anything else I have found, and I have looked pretty hard."
- John by "What a great route planner. I am a Motorcyclist and this is the best route planner I have tried."
- Mark on "@plotaroute probably the best site for planning off road runs!!"
- Matthew by "...far better than any other cycling mapping software that I've come across and I've tried them all."
- Terry on "This is by far the best website of this type by far, thanks"
- Peter by "Many thanks for a brilliant route planner; the best online one I have used!"
- Alan on "I have tried all the plotting services and I find yours the most comprehensive and easiest to use. Superb."
- Dave by "You are to be congratulated for developing such an easy and fast route plotting app"
- Richard on "A superb way of plotting my rides. The best site I have used."
- Corinne on "Excellent route plotting site! First class and the best I've used."
- James on "best route plotting site I've used"
- Tony by "What a brilliant product..."
- Alexandre on "Best ever used. TOP!!!!"
- Leigh by "What an excellent site for plotting routes - so glad I've found it. Keep up the great work."
- Forrest on "Been trying to find a good route planner and this one is the best. Thank you."
- David by "plotaroute.com is fantastic and just what you are looking for!"
- Christian on "A thing of beauty: plotaroute.com"
- Steve by "I have tried this and it is absolutely brilliant..."
- James by "Thanks so, so, so very much for this wonderful product!!"
- Nick by "Your maps are the best I have seen..."
SIGN UP FOR FREE
Standard membership is free and gives you access to most features.
DESKTOP TABLET MOBILE

- Walking Route Planner
- Running Route Planner
- Cycle Route Planner
- Import Routes
- How Far Did I Run?
- Find Routes Near Me
- Popular Walks
- Popular Running Routes
- Popular Bike Routes
- Hilly Cycle Rides
- 5K Running Routes
- Voice Navigation
- Search the Website
- Share on Social Media
- Download to a GPS file
- Sync with Garmin Devices
- Download to Wahoo Devices
- Embed on Other Websites
- Download Route Map Images
- Share Photos of Your Routes
- Share Progress on Challenges
- Frequently Asked Questions
- Community Forum
STAY UPDATED
- Create Free Account
road trip planner
Miss the turns on your terms.
Use real dates, find interesting places, book hotels with ease.
Welcome to Furkot
Hello ,
Nice to see you again! Please sign in.
Plan a trip
Nickname or Email
Keep me signed in
By clicking Sign Up below, you agree to Furkot Terms and Conditions of Use including Privacy Policy
If you already have an account click here to sign in.
To sign in as a different user click here
Dates, distances and directions
Always wanted to travel across US but were not sure if you have enough time for that? Did you ever try to figure out how long it takes to drive from Yosemite to Yellowstone or from Lisbon to Rome?
Start clicking on the map. Choose your destination and have Furkot calculate how much time you need to get there. Set daily limits on the travel time so none of your sightseeing has to be done under moonlight — unless, of course, that's what you want.
Don't worry about putting stops in order. Furkot attempts to plan a route for your trip in the most efficient way. If you don't want efficient, you can drag your stops around or even reverse your itinerary .
Tell us how long you want to drive every day, and we will show you where to stop for the night Furkot suggests overnight stops along the route based on your schedule and preferences.
Furkot can help you with all your travel plans: a day trip, a weekend getaway, or a continent-crossing road trip. And driving is not the only option . You can also schedule motorcycle rides, biking excursions and walking tours with Furkot.
Read more …

It's not just about driving
It's also about all the things you do on the way. Leave your car parked for a couple of hours and hike one of the trails from the vast Everytrail collection.
Need some hints? Make sure to check interesting places described on Wikipedia . They are one click away from ending up on your road trip stop list.
If your car resembles ours you can't drive on water, but Furkot will route you to the closest dry land point for those spots that do require a boat ride. You can drive and dive with Furkot.
Are you after fresh powder? Or maybe shredding corduroy is your thing? Trees or bowls? Skis or snowboard? Regardless of the answer, you can use Furkot to find ski resorts — courtesy of Liftopia .
You can even plan meal stops and add gas stations to your itinerary. Not to mention biking paths, museums, monuments, climbing routes , national parks, scenic views — add as many as you want. Furkot will keep you on track. You just need to show up.

Campgrounds? Motels? Hotels? Staying with friends?
Whatever your lodging preference is — hotel, campground, apartment — Furkot will show you scores of accommodations on the map and will help you find the perfect place for every night of your trip.
Furkot makes it easy to decide which hotels offer the best combination of cost, amenities and convenient location. Whenever available, Furkot displays exactly what you are going to pay (including taxes and service fees). You are in charge of what they charge.
When you are ready to book, Furkot will take you directly to your favorite booking site and pre-fill the check-in and check-out dates so that you don't have to worry about reserving that hard found lodging on the wrong night.
Booking all hotels for your trip can be a daunting experience: multiple cities, multiple booking sites and many dates and details to mistype? Let Furkot help with that. We will take you through the whole process page by page and hotel by hotel. All you need to do is to keep pressing Next until you are Done .

This website receives commission when a visitor makes a reservation or a purchase after clicking on the link to: Amazon, Best Western, Booking.com, Choice Hotels International, Expedia, Good Sam Club, Hotels.com, InterContinental Hotels Group, liftopia, Lonely Planet, Marriott International, onX Offroad, Orbitz, Passport America, Rentalcars.com,
This website is a participant in the Amazon Services LLC Associates Program, an affiliate advertising program designed to provide a means for sites to earn advertising fees by advertising and linking to amazon.com .
This website uses the list of ethanol-free gas stations in the U.S. and Canada from pure-gas.org licensed under Creative Commons Attribution-NonCommercial 3.0 Unported with the explicit permission of the rights holder.
This website uses data from OpenStreetMap ® , open data , licensed under the Open Data Commons Open Database License (ODbL) by the OpenStreetMap Foundation (OSMF).
This website uses icons licensed under their respective licenses as follows
Icons from Meteocons Free License
Icons by Ionic MIT License
Icons from Noun Project . The original work has been modified CC BY 3.0
Icons from IcoMoon-Free . The original work has been modified CC BY 4.0
Icons from Noun Project Public Domain
Icons from Maki CC0 1.0 Universal
Icons from SVG Repo Public Domain
Icons in Public Domain
Icons of trademarks under Nominative fair use Licenses per copyright owners
Icons by Google Material Design from Iconify . The original work has been modified Apache License 2.0
5 Travel Planning Apps With Live Maps to Plot a Trip Itinerary
These free travel planning apps show all your activities and attractions on a live map and help you plot an itinerary.
Since the pandemic, you need to plan your trips carefully. So many things can change in no time, and people, in general, are traveling more, so advance bookings are crucial. These travel planning apps will help you plot an itinerary and ensure you don't miss out on any activities or attractions.
All the apps in this list come with maps that show all the locations you're traveling to. It's much better than using a Google Doc to write out your plan. Each app does something a little different or better than the others, so you'll likely find exactly what you're looking for in a travel planning app.
1. Scout (Web): Best Travel Planner for Cities With Detailed Map
When you're planning a trip to a new city, either alone or as a group, you will usually list many places you want to visit. With Scout, you can add these in different sections and see them on a live map, thus making it easier to figure out which places are within close distance and create an itinerary.
When you start a new trip in Scout, you'll first have to pick a city you're visiting and set your arrival and departure dates. By default, you get sections for attractions, food, and accommodations. But you can always add more custom sections. Each section gets its colored pin marker (for example, all food places will show as blue pins). You can add a place by searching for it or typing out the full address. It's powered by Google Maps, so it'll be easy to find any place.
Once you've added the points of interest, open the itinerary view to see your dates. Drag-and-drop places from the first bar to any day's itinerary. Once you add multiple places to a day, the map will automatically create a route for that day, linking all the places. You can rearrange them to find the best route to take.
You can also share your Scout trip with others, so that they can add their own points of interest and update the itinerary to create a group plan. It's also a helpful way to get tips from locals, as they'll be able to add recommendations directly to your map.
Scout also lets you publish your map or itinerary to its directory so that others can discover your helpful recommendations. And of course, you can browse the directory to find what others have recommended.
2. Puffin (Web): Find the Best Commute or Route for Your Travel Itinerary
Puffin is similar to Scout, with a few minor differences. When you create a new trip in Puffin and add a city, it automatically gives you a few recommendations for interesting and unique tourist spots , which show up as flowers on the map. Then, you start adding places of interest by searching for them in the left sidebar when set to Places, after which they'll show up as pins on the map.
Once you've added all the pins you want, switch the sidebar from Places to Itinerary. Create a new "day" and drag places from the map to that day. Puffin will automatically create a commute for you in the order of the places. Rearrange the places to get a better commute. You can also set a custom color for all the places and routes for a day.
For a detailed view of your entire itinerary, toggle the "View Full Schedule" button at the top of the sidebar. This will show a kanban board-like view of all your days. You can quickly drag and drop places between different days.
Puffin trips can also be shared between friends to build a trip collaboratively. Other users can comment on any place, so you can have a chat within Puffin on whether that place is worth going to or not.
3. Travel Trove (Web): Detailed Travel Planner for Multi-City Trips
Travel Trove is an excellent app if you go to a new country and plan to visit multiple cities. First, add the country you'll be going to, and then add the places you want to visit. For example, if you were going to Italy, search for the Colosseum and for the Leaning Tower of Pisa, and add both. Then, in your sidebar, Travel Trove will automatically list them under the different cities of Rome and Pisa.
For every place you add, you can also put in a few notes about it. Travel Trove also automatically scrapes information from Google Maps like the website, timings, and address of that place.
Once you've added all the places, switch to itinerary mode (and select all the cities in your trip when prompted). Now you'll be building a day-by-day itinerary for your visit. Each day has an "accommodation" slot and more slots for AM and PM to plan your holidays. Simply drag-and-drop your places to these slots to build the plan. You can also add notes for each day.
Travel Trove lets you quickly filter places by categories you have set while adding them, like must-visit, food, accommodation, etc. You can also add Packing Notes to your itinerary to ensure you don't forget anything. Once you're done with the travel plan, you can share it with others too.
4. Travel Mapper (Web): Google Sheets Travel Itinerary With Live Map
When you're planning the itinerary for your next trip, you usually want to visualize it on Google Maps too. Travel Mapper is a custom Google Sheets template that lets you create your travel itinerary, share it with friends, and instantly add the locations to Google Maps.
Travel Mapper is simple to use. Once you download the add-on, open a new Google Sheet and go to Extensions > Travel Mapper > Start Here > Generate Template . Add the date, time, activity, location, links, costs, and any additional notes in the sheet. The sidebar shows the Google Map for your itinerary, which you can update when you make any changes.
The map is customizable. You can add color codes for different elements and filter activities to see your map differently. The Google Maps in the sidebar can also be used to discover other places of interest nearby to any location. It's one of the best Google Maps hacks for travel trips .
Travel Mapper also includes a to-do list, a packing checklist, and a favorites list to ensure you don't forget anything. You can also share your newly created sheet with friends, who can add their own locations to the map.
5. Plip (Web, Android, iOS): Mobile-First Collaborative Trip Planner With Maps
The apps mentioned above in this list are all made to be used on computers. However, Plip bucks the trend by being a mobile-first travel planning app so that you can plan your entire trip on your phone or tablet. Plip also has a web app if you want to use it on your laptop.
Register for an account once you create a new trip; otherwise, your travels won't be saved. You can keep the trip private or share it with a group by adding others' emails.
When you want to add a new entry, there are eight types of plans to choose from: plan (generic), flight, reservation, lodging, restaurant, event, vehicle rental, and transit. The default details to fill for any entry are the title, the location, the start and end date and time, and any notes if necessary. Certain plans have additional entries, like "Provider" in events or "Confirmation number" in lodgings.
You can quickly filter your entries by the type of plan to view them in a list. Otherwise, switch to the Map view to view all your places of interest marked on the map, and scroll through a pane at the bottom.
Download: Plip for Android | iOS (Free)
Plan Well, But Look for Last Minute Deals
These apps will help plan out your entire trip, giving you a clear idea of when and where you will be. But don't yet rush to book it all.
The travel and hospitality industry has a lot of last-minute deals on flights, hotels, and tourist attractions. You should try to take advantage of these where you can. Since you will plan out your trip, add a few alternatives or flexible dates with flexible itineraries so that you can wait a bit more and benefit from these deals.
How to Use Google Maps to Plan Your Next Road Trip (Step-By-Step Tutorial With Examples)
Post summary: A comprehensive guide on how to use Google Maps to plan a road trip itinerary and why Google Maps is the best tool/app for planning a trip. Includes a road trip planning tutorial!
Author’s Note: This post was originally published in 2020 and was updated in April 2023 for accuracy and comprehensiveness.
So, you want to plan a road trip. But, where do you start? Better yet: How do you start?
I’m often asked about my trip planning process. Where to go, what to do, and how exactly to fit everything into a cohesive itinerary that, well, makes sense .
Planning a road trip can be hard. But, with the right tools and resources, it doesn’t have to be. I’ve already put together a list of my most trusted travel booking resources , and the best apps for road trips , but now I want to talk about one of my favorite road trip planning tools: Google Maps.
Google Maps is like a trip planning goldmine, and it’s always my very first step in organizing my itinerary whenever I take a trip.
Google Maps is one of the best tools for planning a cohesive and successful road trip, because it allows you to create a highly customizable, visual representation of your trip (shoutout to all my fellow visual learners out there). And its FREE!
Basically, if you’re planning a road trip, knowing how to customize Google Maps is going to make your life so much easier.
So if you’re wondering how to get started, then you’ve come to the right place. I’m breaking the entire process down into an easy to follow step-by-step tutorial on exactly how to use Google MyMaps to plan your next road trip. So, lets get started!
GOOGLE MAPS TRAVEL PLANNING OVERVIEW
Here’s exactly what we cover in this guide:
- Create a new Google Map for your trip.
- Add location pins to your map
- Customize and color code your location pins.
- Create Google Map layers to plan your day-to-day itinerary.
- Add driving directions to your map.
- Download your custom Google Map to your phone.
- Share your map with friends.
- Calculate gas milage for your road trip.
Scroll down for a super detailed step-by-step guide to planning your own travel itinerary for free using Google Maps or skip ahead with the table of contents.
Table of Contents
Need some road trip inspiration? Visit my most popular travel guides:
Las Vegas to Sedona Road Trip (3 Jam-Packed Itineraries to See it All in Less Time)
5-Day British Columbia Road Trip Itinerary
1-Day Yoho National Park Road Trip Itinerary
The Perfect 2-week Costa Rica Itinerary
. Don’t forget to grab my FREE Travel Expense Planner Download below to help you plan your next trip . Use it to easily and automatically calculate how much money you’ll spend on gas, flights, accommodation, food + more
WHY GOOGLE MAPS IS THE BEST TRAVEL PLANNING TOOL FOR YOUR NEXT TRIP
Google Maps is the best tool for planning your next trip , whether you’re just using it for adventure inspiration, to share ideas with your friends, or creating a detailed step-by-step road trip itinerary. Here’s why!
IT CREATES A VISUAL REPRESENTATION OF YOUR ROAD TRIP
If you’re a visual learner, Google Maps is going to be your best friend. But even if you’re not a visual learning, using Google Maps to plan your trip is still going to be incredibly helpful.
Planning your trip with Google Maps is the fastest way to familiarize yourself with the layout of an area. It allows you to wrap your head around how large an area is and where everything is in relation to each other, which, in my opinion, is the best way to start planning any trip.
Here’s an example of the Google Map I created for our 4-day road trip in Iceland.
Click here to access the interactive map.

GOOGLE MY MAPS HELPS YOU FIGURE OUT WHERE TO SPEND YOUR TIME
Have you ever had a list of places you wanted to see, only to find out that they’re super far away from each other?
Pinning your locations to your custom Google Map will show you where your stops are. This will help you figure out where to spend your time and plan accordingly.
Are your pins clustered in one place? If so, then you might want to allocate more time to that area. Or maybe your pins are spread out all over the map? If this is the case, then it might be best to prepare yourself for a lot of driving or focus on a smaller area instead.
YOUR GOOGLE MAP IS HIGHLY CUSTOMIZABLE
Whether you’re touring NYC, road tripping cross country, or backpacking to Beaver Falls in the Grand Canyon , you can create a highly customizable Google Map to help plan your adventure.
Handy features like customizable locations, adding multiple stops, pinning by GPS coordinates, organizing by categories, and overlaying direction layers, all make it incredibly easy to customize your Google Map to plan your travel itinerary.
Need to remember entrance fees, operating hours, or best places to see? You can even add notes to your location pins so you don’t forget important details!
IT HELPS YOU NAVIGATE AND PLAN YOUR ROUTE
Quickly learn how to navigate between stops by adding directions between multiple locations to your map.
This is an incredibly useful tool for figuring out the best routes to take, roads to avoid, and to plan for drive time. You can even choose between walking, biking, or public transportation directions. This is especially helpful for choosing the best entrance to Yellowstone National Park , taking the scenic route on an Ecuador road trip , or mapping out the best Hudson Valley wineries .
IT’S EASY TO COLLABORATE AND SHARE YOUR TRIP
Traveling with friends? Google Maps makes it super easy to collaborate by allowing you to share your map with your travel partners. You can even give them editing access so that everyone can add their must-do’s to the map.
YOUR MAP IS EASY TO SHARE BETWEEN DEVICES
You’ll have to create your Google Map on desktop. But, luckily, you can seamlessly share your custom map straight to your iPhone or Android using the Google Maps App!
Sharing your custom map to your phone makes it super convenient to access your itinerary on the go. You can even set up your map for offline use if you’re traveling without cell phone service.
HOW TO CREATE A CUSTOM MAP IN GOOGLE MAPS: A STEP-BY-STEP GUIDE
1. create a new google map, login to google drive on your desktop.
Before you start planning your road trip using Google Maps, make sure you’re signed into your Google Drive.
- Visit www.google.com/maps from your desktop and log in .
- If you don’t have a Google Drive account, create one now.
CREATE A NEW GOOGLE MAP
To create a new map, select “Saved” in the sidebar on the left > “Maps”. You can also click on the menu (the three lines) in the upper left corner > “Saved” > “Maps”.
For now, your list is probably empty. But as you create more maps, this is where they’ll be stored.
Begin creating your first custom map by selecting “CREATE MAP”

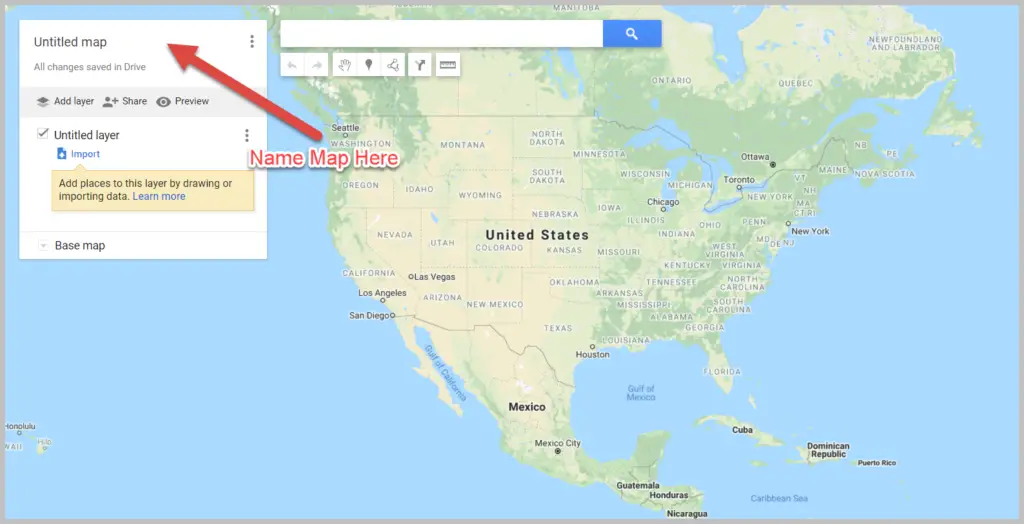
This opens a new blank map. Start by giving your map a title and a description.
Once you’ve named your map, you’re ready to start pinning stops! Keep reading to learn about adding and customizing location pins.
2. ADD LOCATIONS TO YOUR GOOGLE MAP
This is where you start adding the places you want to go!
HOW TO ADD LOCATION PINS
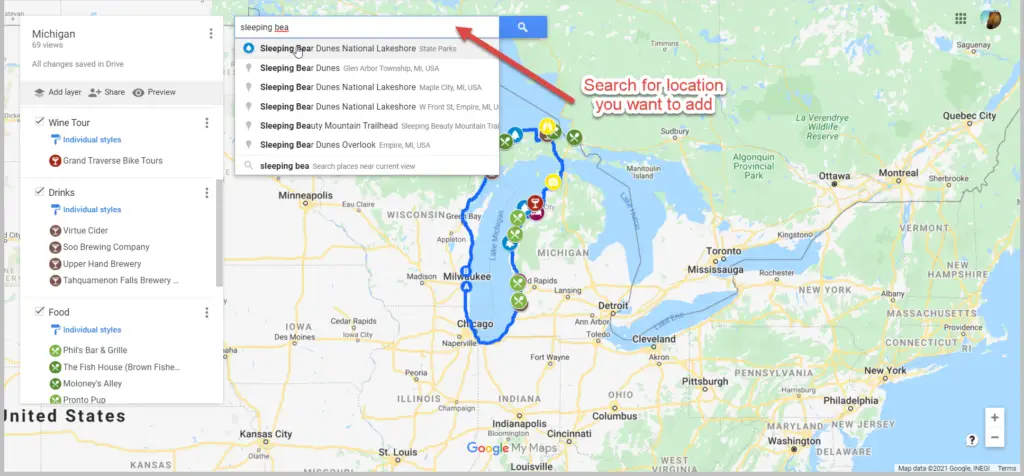
Add multiple stops to your Google map by pinning their locations. There are a few different ways to add location pins to your Google Map :

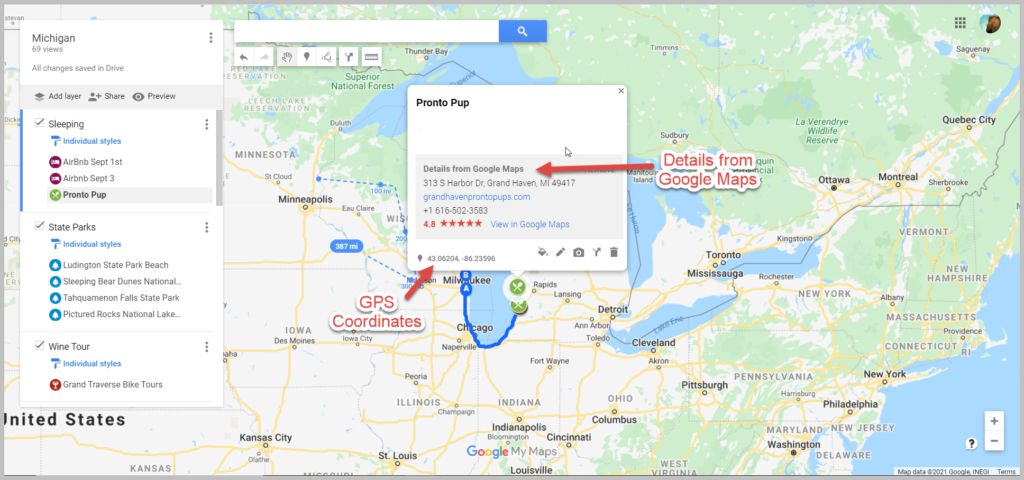
- Add a pin using coordinates if you can’t find the exact location in the search bar drop down list. You may have to use this method for extremely specific or remote locations, such as a backcountry campsite or an unmarked trailhead. Simply type the location’s latitude and longitude coordinates into the search bar. .
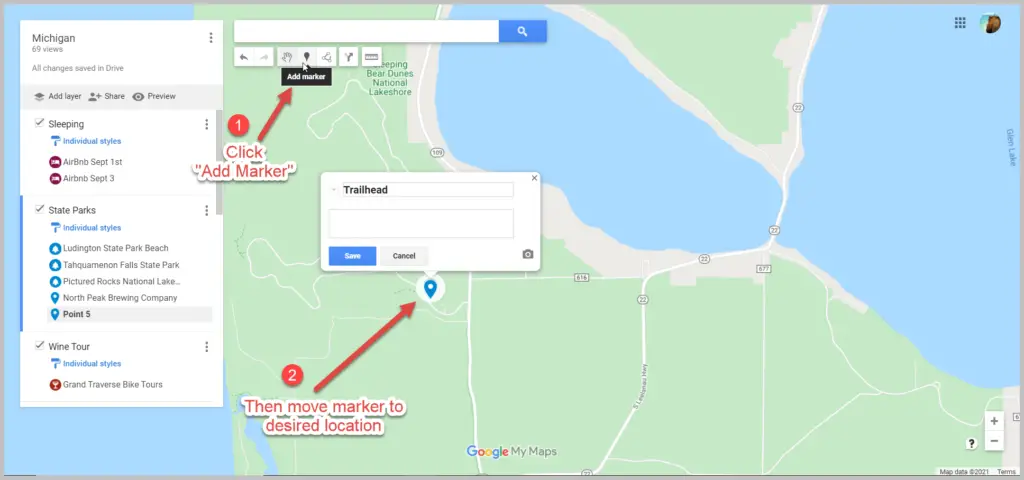
- To pin a general area, click on the “Add Marker” button below the map search bar . You’ll be able to drop a blank pin by clicking anywhere on the map. A box will appear asking you to add a title and description
NOTE: You’re allowed to pin 10 location pins per layer. Continue reading to learn how to use layers to add more than 10 location pins to your map.
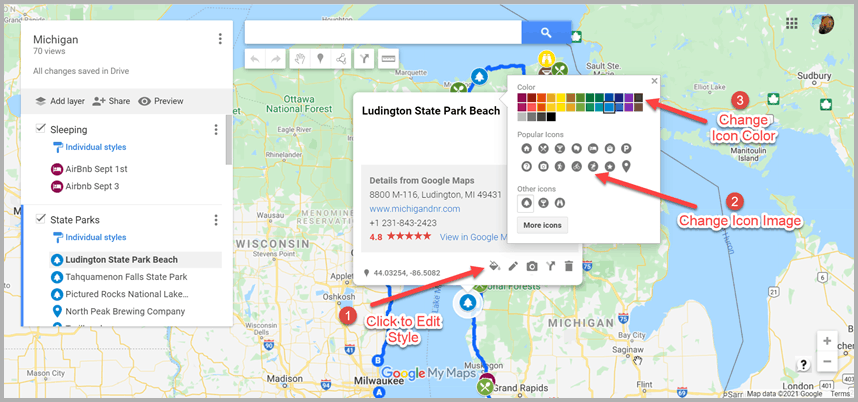
3. CUSTOMIZING LOCATION PINS
Once you save your pins to the map, they’ll be blue by default. However, you can customize a pin by changing the color, icon style, description, and title . You can even add pictures or videos if you’re feeling extra fancy.
To change the color and style , begin by clicking on your location pin (either in the list to the left or directly on the map) > “Style” (the little paint can) in the lower right hand corner of the text box. Click “More Icons” to view more options.

To change the location title , click”Edit” (the pencil icon) in the text box. You can also add notes in the “Notes” box. Use the notes box to add more details about finding trail heads, hiking logistics, packing reminders etc. I also like to use it to keep track of specific places to see within a general location, such as a National Park.
To add media (i.e. photos or videos) , click “Add Image or Video” (the camera icon) in the text box. I found this especially helpful on my first Iceland road trip to remember which waterfall was which, since they all sound the same (if you’ve been there, you know what I mean!). You can also add your own photos and videos if you want to create a map to share with others.
To delete a pin , click on it and then click on the trash can icon. .

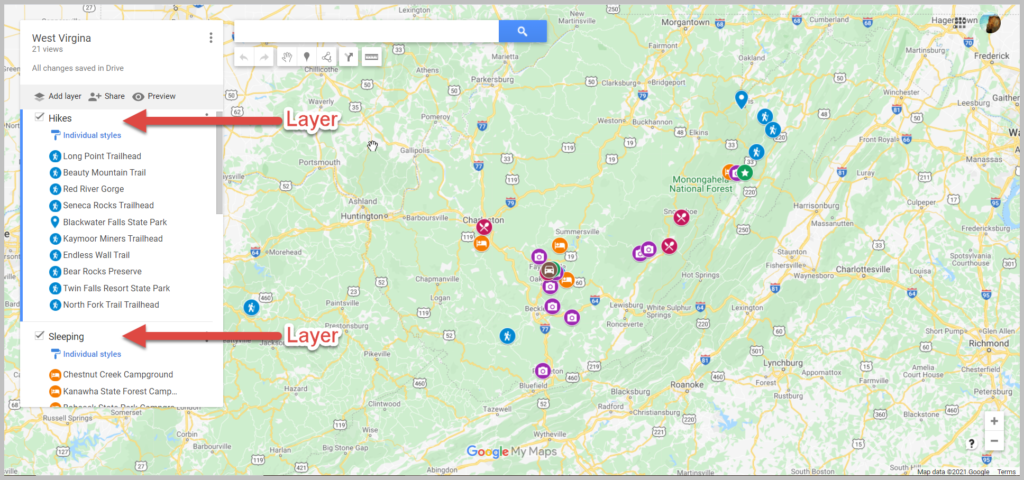
. 4. CREATING MAP LAYERS TO PLAN YOUR TRIP IN GOOGLE MAPS
What are google map layers.
Google Map layers are a really useful tool for organizing your road trip itinerary. But, what exactly is a layer? A layer in Google Maps is, by definition, a way to contain arbitrary geospatial data.
Okay, English please ?
In other words, each layer can be used to display different types of information on your map. You can dedicate different layers to different types of places like restaurants, cafe’s, hotels, hiking trails, etc. Or you can dedicate layers to different days of your trip. Or you can stick to one layer. Its up to you.
Here’s an example of how I broke up my Iceland itinerary, using a different layer for each day of our road trip:

HOW TO ADD LAYERS
When you create your map, you’re automatically using one layer (“Untitled Layer”). This is the layer that your location pins are added to by default, unless you add additional layers. You can add up to 10 location pins per layer, and 10 layers per map.
To add a new layer to your Google Map , simply click “Add Layer”. This creates a new “Untitled Layer”, which you can rename accordingly. To rename layers, click on the title name or click the 3 dots next to the title > “Rename Layer”.
To move a pin between layers , click on the location pin in the list, then drag and drop it into the desired layer.
Choose which layers to display by turning individual layers “on” and “off”. You can do this by checking/unchecking the box next to the layer’s name.
To delete a layer , click the 3 dots next to the layer’s title > “Delete this layer” > “Delete”.

. TIPS FOR USING LAYERS TO PLAN YOUR ITINERARY IN GOOGLE MAPS
When planning my road trip itineraries, I usually give each day its own layer (unless the trip is longer than 10 days, in which case then I’ll combine days or make another map). Then I color code all of my pins by day.
For example, all of my stops (i.e. location pins) on day 1 (layer 1) would be orange, all of my stops on day 2 (layer 2) would be red, and all of my stops on day 3 (layer 3) would be blue. Organizing pins and layers this way makes it a lot easier to visualize your day-to-day itinerary on the map.
That’s just what works for me, so obviously you don’t have to do it that way. You can organize your pins and layers in any way that makes sense to you.
WHEN TO MAKE SEPARATE MAPS
Personally, I prefer to make a single map for my road trip itineraries whenever possible. But that won’t work for everything or for everyone.
Sometimes maps can get confusing if you have a lot of stops to make. Other times you’ll find that you need more than 10 layers or directions between more locations than Google Maps allows.
To solve these problems, you may opt to create several maps. Perhaps you’ll find it easier to create a separate map for each day of your road trip, or create one map dedicated just to a certain type of location or activity.
For example, we created two separate maps for our road trip through New Zealand. One map for the North Island and one map for the South Island.
5. ADDING DIRECTIONS TO YOUR GOOGLE MAP
. What good would a Google Maps itinerary be if you couldn’t get driving directions?
To add driving directions to your Google Map , click on “Add Directions” (the arrow icon) under the search bar. A new layer will appear (you cannot add directions without it adding a new layer).

Click on “Add Directions” simply by clicking on a pinned location on the map. It will populate in point “A” . Click on a second location on the map, which will populate in point “B” . The route will show up as a blue line on the map.
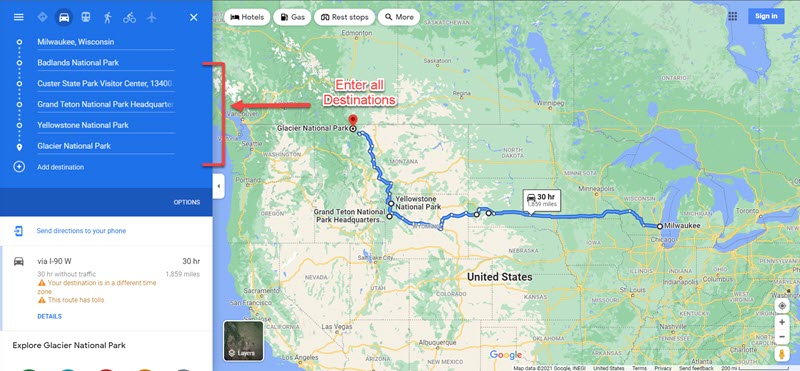
The original directions will only give you the option to add points “A” and “B”. To add more destinations, click on “Add destinations”. You can add up to 10 destinations.
NOTE: This may seem obvious, but I’ll say it anyway: When you connect locations, make sure to do it in the order that makes sense. Don’t just add directions between two random locations. Make sure to do it in order!

To choose between driving, walking, or bicycle directions , click on the Directions button in the layer (the blue car icon). Then click on the appropriate mode of transportation.
VIEW STEP-BY-STEP DIRECTIONS
To view step-by-step directions, click the three dots to the right of the little of the directions layer > click “Step-by-step directions”.

ADJUSTING YOUR ROUTE
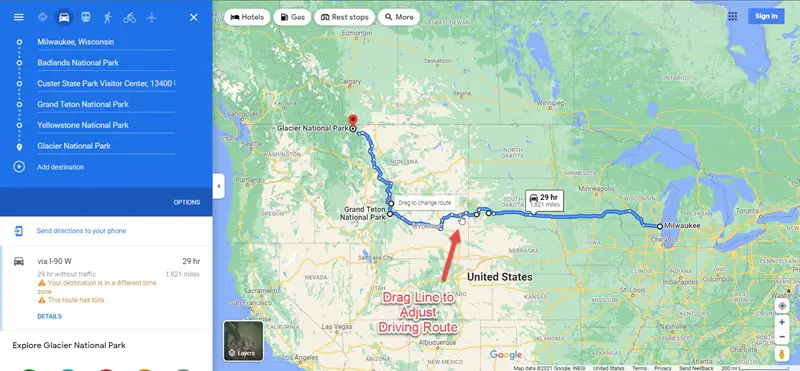
Google maps will automatically calculate the shortest route between locations. But you can easily change the route if you prefer to take a different one (i.e. to take the more scenic route, avoid tolls/highways, etc.).
To adjust the route between two points , hover your cursor anywhere along the blue line. Your cursor will change from a hand to an arrow over a white dot. A dialogue box will say “Drag to change route”. Click and drag the white dot to the desired road or highway on the map.

. 6. HOW TO ACCESS CUSTOM GOOGLE MAPS ON YOUR PHONE
. There are two ways to access your custom Google Maps on your phone. You can (1) reference your map through the Google Maps app or (2) export the entire map for offline access using Maps.me . Which method you use depends on your personal preference.
Steps are the same for iPhone and Android.
1. To view your maps in the Google Maps app:
- You will need to download Google Maps, if you haven’t done it already
- Sign into the same Google Drive account you used to create the map
- Click on the search bar > “…More” > scroll to the right and click “Maps”
- Select your custom map

How to view your custom Google Map on your phone using the Google Maps app .
Essential tips for using the Google Maps app:
- Accessing step-by-step directions: When you open your map in the Google Maps app, your directions layer will be visible, but you won’t be able to click on it and get the step-by-step directions. . Instead, navigate to the individual location pins on the map. Click the pin and the directions instruction will populate in the search bar. Click on the search bar and then hit “Search”. This will exit your custom map and open up the regular Google Maps navigation screen. .
- Accessing your map offline: You can’t. There is currently no way to access your custom map offline in the Google Maps app. Which is obviously not ideal if you’re traveling without cell phone service or wifi. . You can download an area for use offline by clicking on your photo (the circle in the upper right corner) > “Offline maps” > “select your own map”. However, when you do this, the map will be blank and you’ll have to repin/save all of your pins. You can repin/save locations by searching for the location > “save” > and then either add to an existing list or create a new list.
2. To export your custom map to Maps.me:
This method is quite a workaround, but (unlike the Google Maps app) it allows you to access your custom map offline without having to repin anything.
On your desktop:
- Open your map on desktop
- Click the 3 dots next to the map title > select “Export to KML” > check the box next to “Export to .KML file instead of .KMZ”.
- Make this file accessible through your phone by uploading it to Dropbox, Google Drive, email, or any other file sharing app.
On your phone:
- Download the Maps.me app
- Search for the city, state, or country your map is based in and then download
- Go to your photo sharing app and open your .KML file with Maps.me
- You’ll be directed to your custom map in Maps.me
Tips for using Maps.me
If you download your map in Maps.me, you’ll be able to use it offline. However, the major drawback is that you will only be able to access step-by-step directions from your current location. So, even though your directions layers will populate on your map, you’ll only be able to view the drive times and not the actual directions, unless one of those points is your current location.
That being said, I am not a Maps.me expert. So, if you have an update or workaround for this issue, please reach out and let me know :)
7. CREATE A SHARED GOOGLE MAP
You might want to share your map if you’re planning a trip with someone else, collaborating on an itinerary, or sharing your map on a website.
To share your Google Map , open the map > click “share” in the gray bar above the layers. Make sure the slider for “Anyone with this link can view” is set to blue. Then copy the link and send it to friends!
To embed your map on a website , check that your sharing sliders are set to “Anyone with this link can view” and “Let others search for and find this map on the internet”. Next, click the menu (the three dots) next to the map title > then click “Embed on my site”. Copy the HTML and paste it in the source code for your page.
8. BONUS: CALCULATE GAS MILEAGE
. Download my customizable Travel Expense Planner below for free . Use it to easily and automatically calculate how much money you’ll spend on gas, using your custom Google Map!
And there you have it! All the tips, tricks, and general instructions on how to use Google Maps as a road trip planning tool . As always, if you have any questions or have anything to add, leave a comment below. I love to hear from you!
Happy adventuring!
Did you find this Google Maps road trip planning tutorial helpful? Don’t forget to pin it for later!

Hi, I’m Jackie! I’m a travel photographer and content creator based near the Adirondack Mountains of Upstate New York. I’m also a millennial who works full-time, yet I still find ways to travel frequently without breaking the bank, because traveling is what makes me feel most alive. Now I help fellow travelers who also work 9-5 and are looking for ways to travel more with limited PTO.
Related Posts

15 Useful Apps to Download Before Your Next Road Trip (for Free!)

All You Need to Know About Renting a Car in Belize | Cost, Tips, FAQs – Updated Guide 2023

19 Important Things to Know About Ecuador Before You Go
27 comments.
[…] Krawiecki, J. (n.d.). How To Plan Your Road Trip With Google Maps. The Adventure Atlas. Retrieved from How To Plan Your Road Trip With Google Maps (Tutorial With Examples) | The Adventures Atlas […]
[…] that an SUV or an RV is better suited for the whole family. Once you’ve secured your vehicle, map out your route, research the stops that you want to make, and make a list of the things that you’ll need to […]
[…] You won’t have service once you get there though, so I suggest downloading offline Google Maps of the area before you go. To learn how to download offline Google Maps, visit my blog post on How To Plan Your Road Trip Using Google Maps […]
[…] How to Plan Your Road Trip Using Google Maps […]
[…] How to Plan Your Trip Using Google Maps […]

All I needed when I googled “how to plan a trip in google maps” was to be pointed in the right direction of where to look for the feature. This went WAY beyond what I could have ever asked for and helped SO MUCH! Thank you, thank you, thank you!

Hi Nicole – I’m SO glad to hear you found this post helpful!
[…] How to plan a road trip using Google Maps […]

Hello Jackie, and thanks for the very informative article! It was well written and I used Google Maps on my last trip to the Baja in Mexico. One other tool I used was the free trip planner from Geovea https://geovea.com/trip_plan/new_trip to create and share my trip, and estimate my trip budget. You can also take your itinerary with you on your phone for navigation. I really appreciate all of the great travel guides and already planning my next trip :-)

Thank you for sharing all of this valuable information! I see how to view the turn-by-turn directions, but is there a way to start the route so you can follow it while driving? Thanks!!
[…] How to Plan Your Road Trip using Google Maps […]

This literally just changed my life! Thank you for sharing how to use google maps to plan a road trip. I will use this all the time now!
Hey there – so happy to hear you found this post useful!
[…] Planning a Costa Rica road trip? Read: How To Plan Your Road Trip With Google Maps (Tutorial With Examples) […]
[…] a large geographical area you need to give your trip a bit of structure. You can start by using Google Maps to plot and plan your journey so you can make a note of all the destinations you are interested in. You can then agree on a few […]
[…] Read next: How To Plan Your Road Trip With Google Maps (Tutorial With Examples) […]

said no driving directions from point a to point b, so i couldn’t get started. E.G. Badland SD to Mt Rushmore to Custer Nat. Park, I need a little more direction, i’m not to good with comp. thanks
Hey Billy – Sometimes Google Maps won’t recognize directions to very general areas because it wants you to use something more specific. This most often happens with National Parks and wilderness areas. In those cases, Google Maps will generally present you with a list of specific locations you can choose from, such as the park’s ranger stations, visitors centers, etc. However, in your situation, I was able to pull up directions using “Badlands National Park”, “Mount Rushmore National Memorial”, and “Custer National Forest”. Hope that helps!
[…] necessary than you suppose to sleep, bathe and plan for slower days. A very good rule of thumb is to plan in rest time each three days. That method, you possibly can push your self however forestall exhaustion in your […]
[…] essential than you assume to sleep, bathe and plan for slower days. An excellent rule of thumb is to plan in rest time each three days. That means, you possibly can push your self however stop exhaustion in your […]

I’ve been a user of paper maps, since before the Internet, or color TV for that matter. For an up coming trip, basically Texas to FL, and back, I decided to make better use of Google Maps. A google search brought me to this page. Super helpful, and the pins per layer note answered a long standing confusion of mine. Thank you. I do have one question. Is there a way to to add waypoints based on distance or travel time? For example, this is going to be a two day trip. I want to find the halfway point (easily)? Or in the case of a longer trip, I want to drive X miles or Y hours? I know I can trial and error it, but what if I want the half-way point? What’s the easiest way to find it? Or where will I be in 8 hours of driving? Thank so much! Cheers, Eric
Hey Eric – thanks so much for your comment! Unfortunately, I don’t know of an easy way to calculate your half way point or location after x amount of hours. I typically eyeball it, which might be the only way to find your answer

Thanks very much, it is really helpful

This was most helpful for creating a personal map. I tried it and created a practice map on my laptop; named it and accessed it exactly like your instructions indicate. The part that has me puzzled is the accessing it from your phone. I have used Google maps on my phone for a long time and believe I am signed in using the same account. The Google Maps app on the phone identifies me (the right end if the search bar has my initial and shows the account when tapped.) When I tap the search bar I get to the … More but that is it. All I then see is the opportunity to set my Home and Work Locations but no listing of My Maps.
On the laptop going to the Menu (bars at left side of Search) allows access to Lists, Labeled, Visited, and Maps. (Maps is the one, as you indicate, to get to your personal Maps.) On my phone the only thing that seems to be available is the Labeled option. What am I missing to get to the Maps? I feel like there must be a switch somewhere to have the Maps come through … but I can’t seem to find it! Hoping you or someone can point me in the right direction. Thank you.

Without creating a custom map, is there a way to display a route in Google Maps and show attractions at the same time?

You’ve written a terrific guide and I’m learning a lot more about Google maps. Is there some way to print this guide or download a printable copy? Thanks.
Leave A Comment Cancel reply
Save my name, email, and website in this browser for the next time I comment.
WANT TO SAVE MONEY TRAVELING?
Check out the travel resources →
Check out my list of reliable budget-friendly travel resources that are guaranteed to save you the most money, without compromising your experience.
This error message is only visible to WordPress admins Error: There is no connected account for the user 17841400792270379.
Get in touch
Contact Portfolio Let’s work together
Explore the blog
Destinations Guides and itineraries Travel planning tips
Let’s connect
Never miss an adventure, privacy policy | terms of service | disclaimer | by zazen designs.
Back to top
How to Plan a Road Trip with Google Maps: A Step-by-Step Tutorial
This post may include affiliate links. As an Amazon Associate, I (The Winding Road Tripper) earn from qualifying purchases. Read more .
This post was originally published on August 8, 2021, and updated on February 16, 2023.
Ready to start planning your road trip using the power of Google Maps?
Then you’ve come to the right place.
Google has two amazing tools to help you plan your road trip: Google Maps and Google My Maps.
Google Maps is a great tool for plotting out your route, while Google My Maps is an amazing tool for road trip planning and organization.
In this post, I’ll teach you how and when to use each of these powerful free tools.
Let’s start by looking at Google Maps since it’s the simpler of the two.
But if you are looking for how to use Google My Maps, then click here .
How to Use Google Maps to Plot Your Road Trip Route
Google Maps is a great tool if you want to plot out your road trip route.
We use it as a starting point for all of our road trip planning to get a sense of how long our trip will be or what we can accomplish in the time we have.
Step 1: Open Google Maps
Start by opening up Google Maps on your desktop or phone.
When trip planning, we like to use our desktop computers to make use of the bigger screen.

Step 2: Plot Your Road Trip Route
To start plotting your road trip route, click on directions.

Then enter your starting point and your first destination.

Continue to add stops to your road trip by clicking on the (+) to add destinations.

Stop when you have all your road trip stops added to your map. Google Maps allows you to add up to 10 points to your map. If you want to add more, then Google My Maps is the tool for you.
Step 3: Reorder Road Trips Stops
If you want to play around with your route and reorder your stops, Google Maps makes it easy to do so.
On the left, where your stops are listed, you can drag and drop the stops to reorder them.

Step 4: Move the Driving Route
Google Maps will choose the fastest route between your road trip stops. But sometimes, there may be a scenic route you want to take.
You can easily move your driving route as desired by dragging and dropping your route.
Step 5: Send the Driving Route to Your Phone
Once you plan your road trip, you can send the directions to your phone for easy access during your trip. Directions can be sent via text message or email.
Note: You will have to have a Google Account to send directions to your phone.

Google Maps is a great starting point for planning a road trip.
But if you want to harness the power of Google and use it to plan your road trip and as a resource throughout your trip, Google My Maps is the choice for you.
Google My Maps: The Best Road Trip Planning Tool
Planning a road trip can be a daunting task. It’s hard to know where to start, and all the research can feel overwhelming. But that is where the ultimate road trip planning tool, Google My Maps, comes to the rescue.
Google My Maps is a very similar tool to traditional Google Maps, but it’s much more powerful and customizable.
In this section, we’ll start with detailed information on the features of Google My Maps. And then, we’ll get into exactly how we use Google My Maps to plan each one of our road trips.
Using this tool will help you seamlessly organize and plan your road trip.
Once we tried it, we never looked back.
Let’s start by giving you a little introduction to Google My Maps.
What is Google My Maps?
Google My Maps utilizes all of the data in Google Maps to allow you to create your very own custom map for your road trip. It’s a way for you to create a map containing the places important to you .
Once you create your map, you can access all of the personalized information you’ve added, so you never miss a beat while on the road.
Why is Google My Maps the Ultimate Road Trip Planning Tool?
Google My Maps is our favorite tool for planning a road trip. Here is why:
- It Helps You Visualize Your Trip Plotting all of your points of interest on a map helps see how your road trip may take shape. At the start of road trip planning, we typically have no idea what route we may take until we see all of the things we want to do on a map. And this is where Google My Maps can help.
- It Helps Organize Your Research When planning a road trip, you are likely gathering information from many sources, including websites, tourist bureaus, and recommendations from friends and family. Google My Maps can help you organize all of your research so you can more easily plan your road trip itinerary.
- It Consolidates Your Entire Itinerary Using Google My Maps allows you to have all of your road trip information in one place. There will be no need for a separate spreadsheet with your day-to-day itinerary or to bring your travel books with you.
What Are the Limitations of Google My Maps?
- Google My Maps Can Not Be Used Offline You will need access to wifi or cellular data to use your map on your road trip. But don’t let that stop you from using it to plan your road trip. There are ways to download your map to other apps for offline use, which I’ll take you through in the tutorial.
- You Can Only Add 2,000 Locations to Your Map Likely, you will not need over 2,000 locations when planning your road trip. And if you do, you can make separate maps, possibly divided by days or weeks, to get around this limitation.
- You Can Only Add 10 Layers to Your Map Layers are ways to categorize your location points. When using Google My Maps, you can only have ten layers per map.
- Planned Routes Can Not Be Accessed for Driving Directions on Google Maps When planning your trip, you may add a direction layer on your map to display the route you plan to take. Unfortunately, you can not use those directions to give you turn-by-turn navigation on your road trip. You’ll have to use Google Maps or click on a destination point on your custom Google My Map to bring up directions. I go through this in detail here .
How to Use Google My Maps to Plan a Road Trip
Now that you know why Google My Maps is the best road trip planning tool, let’s dive into the nuts and bolts of Google My Maps.
We’ll start with an in-depth overview and then show you exactly how we use Google My Maps to plan our road trips. Use the screenshots I’ve provided to help guide you through all of the steps.
Overview of Google My Maps
If you want to know how we use Google My Maps to plan our road trips, then feel free to skip down to the step-by-step guide for planning a road trip here .
But if you want to learn the ins and out of Google My Maps, this is where to start.
You can start from the beginning or jump to the section you want to learn more about by clicking on the links below.
Here is what we will cover to familiarize you with how Google My Maps works so you can start road trip planning like a boss.
Google My Maps Layout
- Markers/Locations
Google My Maps allows you to add locations and driving directions to your map while allowing you to organize them as you wish.
To get started, let’s get familiar with the layout of Google My Maps.
I suggest creating your first Google My Map and playing around with the functions of the map to help you get familiar with them.
Note: You must either create a Google Account or sign in to your Google account to start using Google My Maps .
Location Markers
Location markers are points that you add to a map. They can be things like restaurants, hotels, sights-to-see, bathroom stops, etc.
Find things to do along your route with our Favorite Tools to Find Things to Do Along Your Road Trip Route .
Each point you add to a map will include any information that Google already has for that point.
These include things like:
- GPS coordinates
- Website address
- Phone Number
Three Ways to Add Markers to Your Google My Map
You can add markers to your road trip map in three ways:
- Using the search function
- Selecting a Point already on Google Maps to add to your own map
- Add a point manually
Let’s look at how to do all three.
Search Function
You can find a marker by typing in the name, address, or GPS coordinates into the search bar.
Adding a Marker That is Already on Google Maps
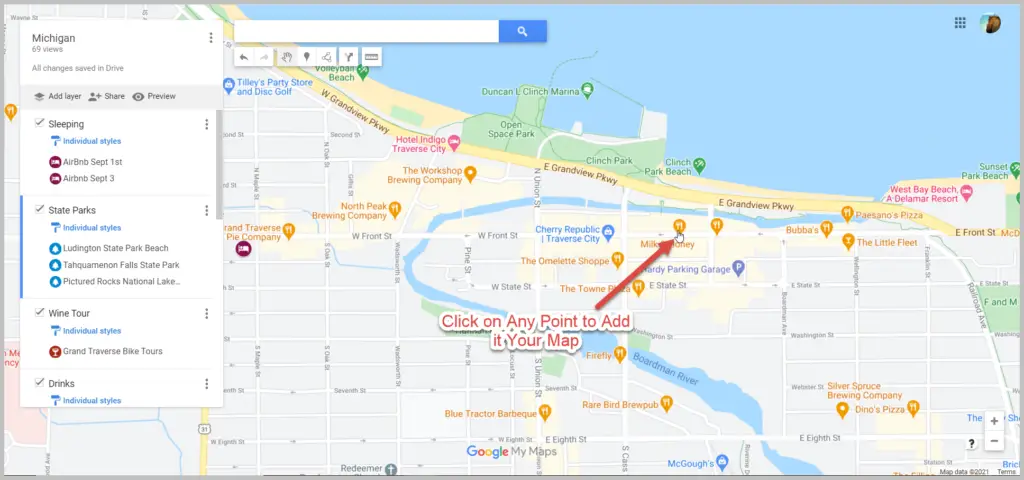
Google Maps already has many markers in its database. When you zoom into an area, many points of interest will start to show up. If any of these markers look appealing to you, you can add them to your own map by clicking on them.
Adding a Marker Manually
You may need to add markers manually when you can not find them via the search function and don’t have the location’s GPS coordinates.
For example, sometimes, I struggle to find the exact location of a trailhead via the search bar. In these cases, I find the location of the trailhead via a different resource and plot it on the map myself.
Color Code and Change the Icons of Your Markers
To keep your map organized, you’ll want to customize and color-code your icons to help you group locations together.
Luckily, Google lets you fully customize your markers.
Map layers are a great way to organize your maps.
But before we dive into adding layers, let’s talk about map layers.
What are Map Layers?
A map layer is a set of markers that are layered on top of an existing map. You can see your different layers on the left-hand side of your map.
When you add a marker to a map, Google My Maps will add it to a layer. You can then use these layers to organize your map.
The added marker will appear on the selected layer. If you want to move a marker to a different layer, click and drag that marker to the desired layer.
For example, I made a map of Wisconsin Campgrounds to help me find campgrounds nearby during our road trips.
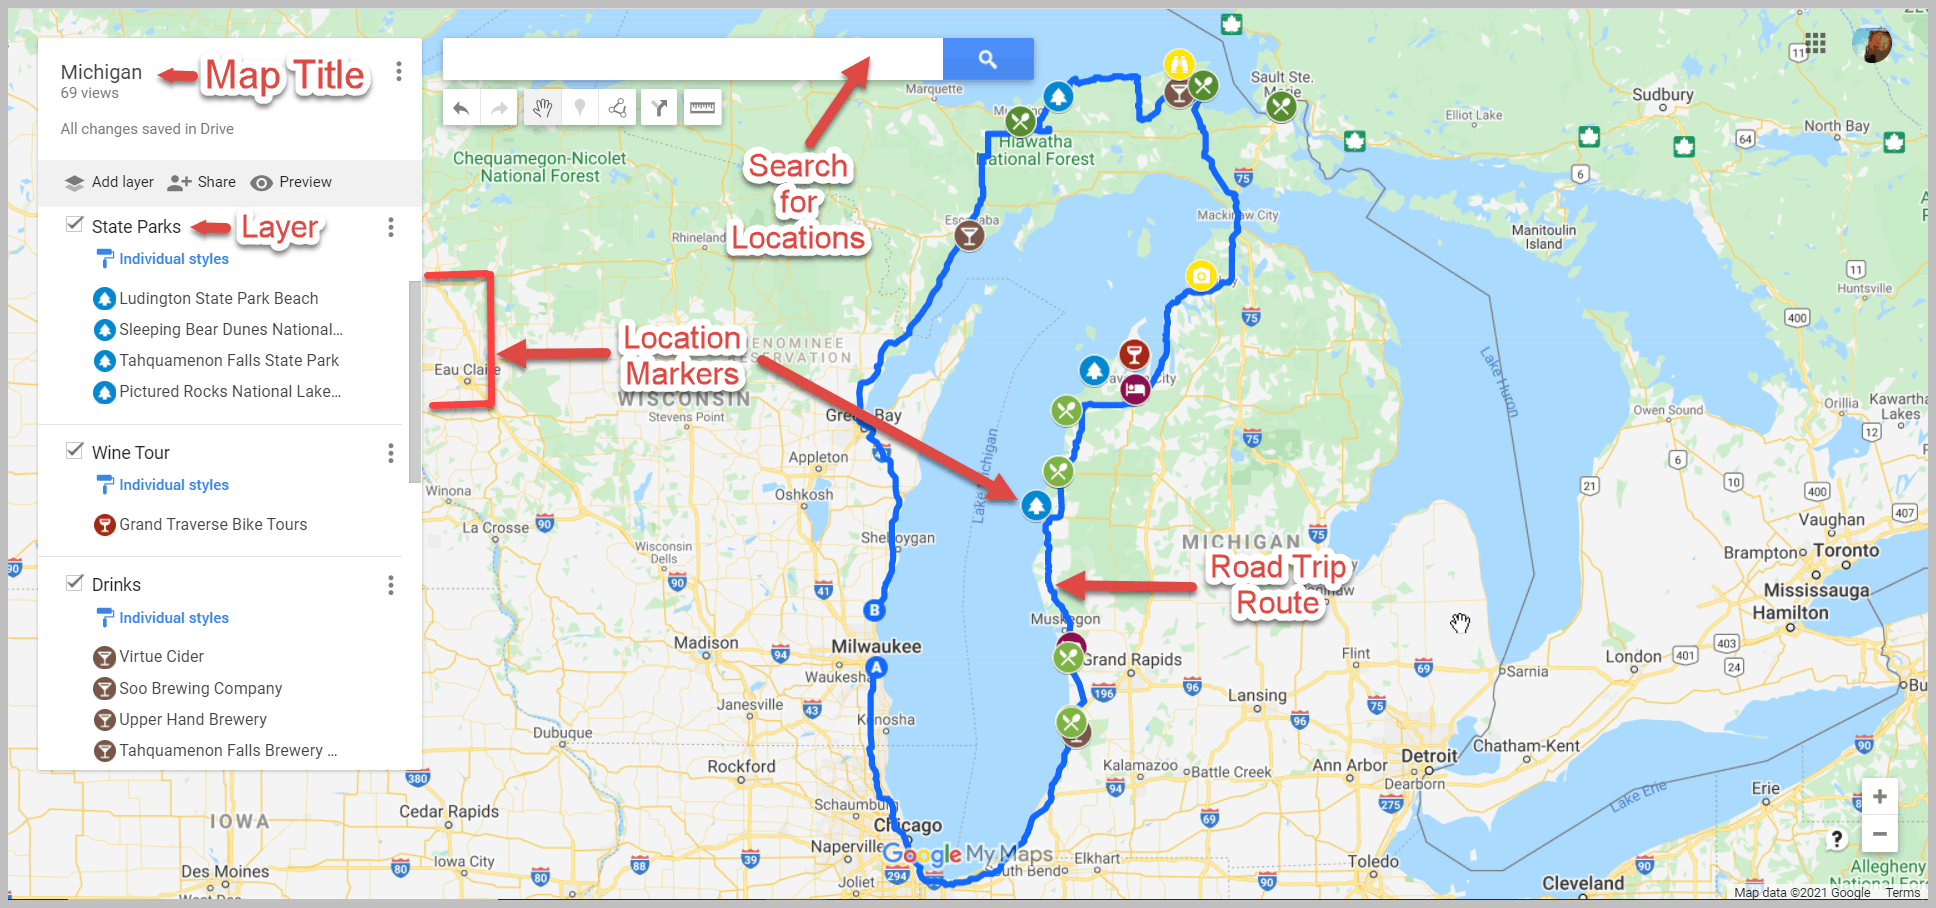
I have chosen to use separate layers for different types of campgrounds; National Forests, State Parks, and County Parks.
The benefit of using separate layers versus adding all of the campgrounds to a single layer is that I can check and uncheck specific layers depending on what information I want to see on my map.
If I don’t want to see the State Parks on my map, I can uncheck “Wisconsin State Parks,” and they will not be plotted on my map until I recheck the box.
How to Add Layers
Within Google My Maps, you can have up to 10 layers on a single map.
To add layers, click on “add layer” on the left-hand side of your map just below the map title and description.

Google My Maps then adds an “untitled layer” to your map.
To change the title, click on “Untitled layer,” and it will give you the option to rename the layer.
The current layer selected will have a solid vertical blue bar on the left side of the layer panel. Any new markers created will be added to the selected layer.

You can use Google My Maps to plot your driving route. Unfortunately, you can’t use these routes for navigation in Google Maps. This is one of the downfalls of Google My Maps.
But that is not to say that adding driving directions to your Google road trip map isn’t helpful. Adding driving directions helps you visualize your route so you can better understand where you are going while on your road trip. It also will help you figure out how long you can drive in one day .
Here’s how to add and use Directions on your Google Map:
Start by clicking on the direction icon located below the search bar.

You will then continue to add stops along your route to get a visual of your driving route.

Google Maps will default to the quickest route when creating your driving route. The quickest driving route will likely be the main highways and not always the most scenic. Therefore, there may be times you want to deviate from the quickest route and take a more scenic route.
Fortunately, you can adjust your route by dragging it to where you want it to go.
Start by clicking on the route, and a small circle will appear.

Then drag this route to where you want the route to go.
How to Plan a Road Trip with Google My Maps – A Step-by-Step Tutorial
Now that we know the ins and outs of Google My Maps let’s learn how to use it to create your very own customized road trip map.
- Create a New Google Map
- Add Layers for Different Types of Locations
- Add Locations to Your Map
- Plan Your Road Trip Route
Step 1: Create a New Google Map
You will need to sign in to your Google Account or create a new account to create your own Google My Map.
Once you’re logged into Google, follow this link to bring you to Google Maps .
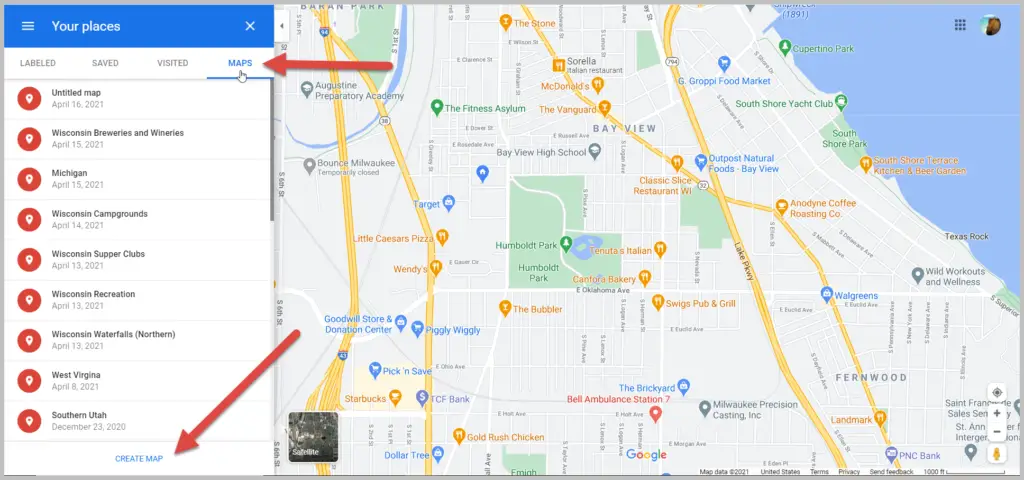
Click on the hamburger ( 𝄘 ) in the top left-hand corner of Google Maps.
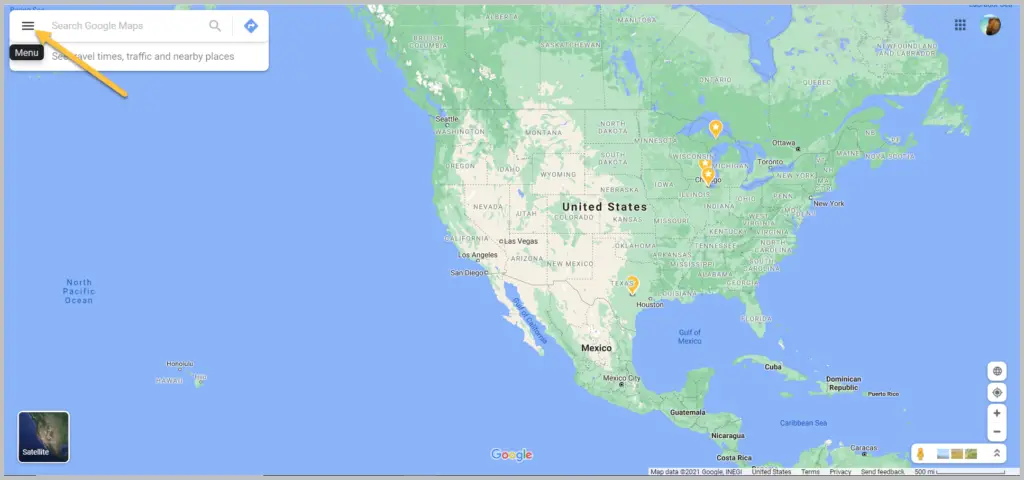
Click on “Your Places”.
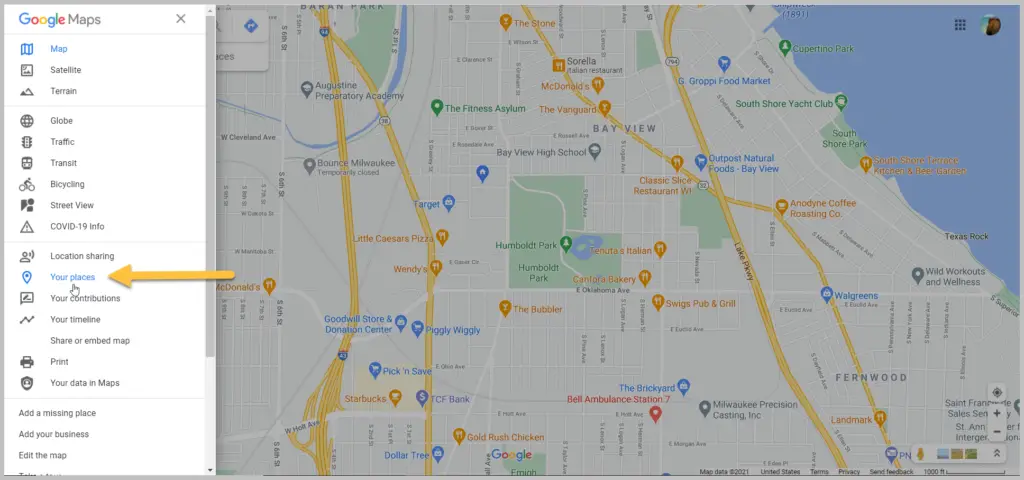
This brings up any saved information you’ve stored in Google maps, like your favorites
Now it’s time to bring up your very first map.
Click on Maps on the top left →, then click “create map” on the bottom left.
You now have your blank map!
Give your map a title, and get ready to create your first custom road trip map.
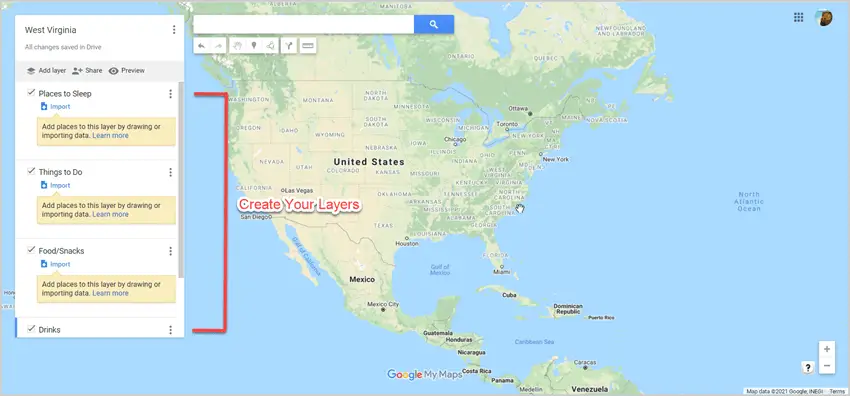
Step 2: Create Layers for Different Types of Markers
I like to start trip planning by creating different layers for the types of markers I plan to add to my map.
The layers I typically use are: – Places to Sleep – Places to Eat – Places to Drink – Things to Do
You can always add layers while you plan. But I find it easier to stay organized if I start with some layers on my map before adding locations.
Step 3. Add Markers to Your Map
This is the best part of planning your road trip with Google My Maps.
Whether you are in your brainstorming stage of travel prep or you already know where you want to go, this step is where your trip starts to come together.
To start, you’ll research your destinations to find markers to add to your map.
I like to use the following resources for trip research:
- Google: Search for things to do, places to eat, places to stay, etc., in the areas you plan to visit or pass through
- Visitor Centers: Find tourism information online or request info from your destinations’ tourism bureaus to be mailed to you
- Travel books: We like to get ours from the library
- Facebook groups: Join a Facebook Group for the area you are traveling to. They are filled with tons of suggestions on the best things to do in the area.
When you find a location you want to make note of, add it to your map.
Do this by entering it into the search bar.
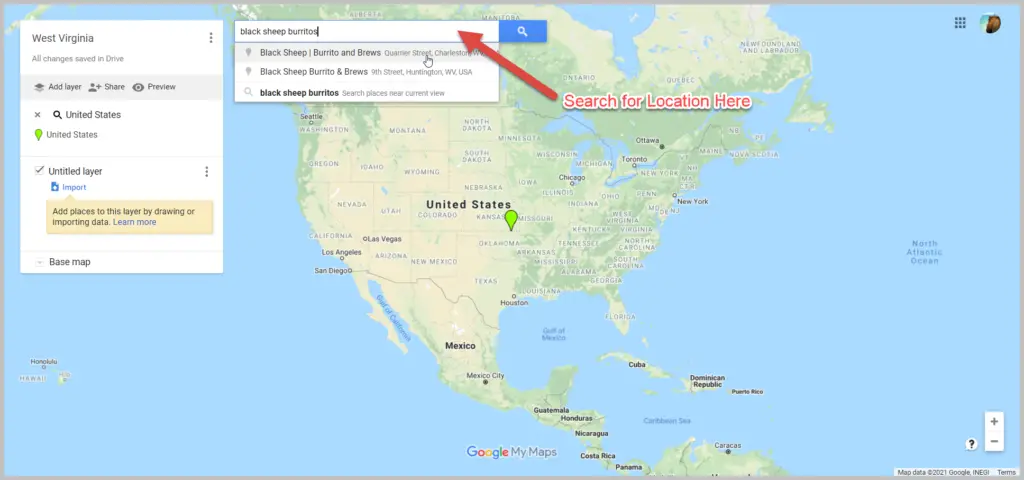
The great thing about Google Maps is that it pulls up all of the information on a location that Google has. If available, you can find the exact address, reviews, and website address.
If the location looks good, you can then add it as a marker to your map by clicking “add to map”.
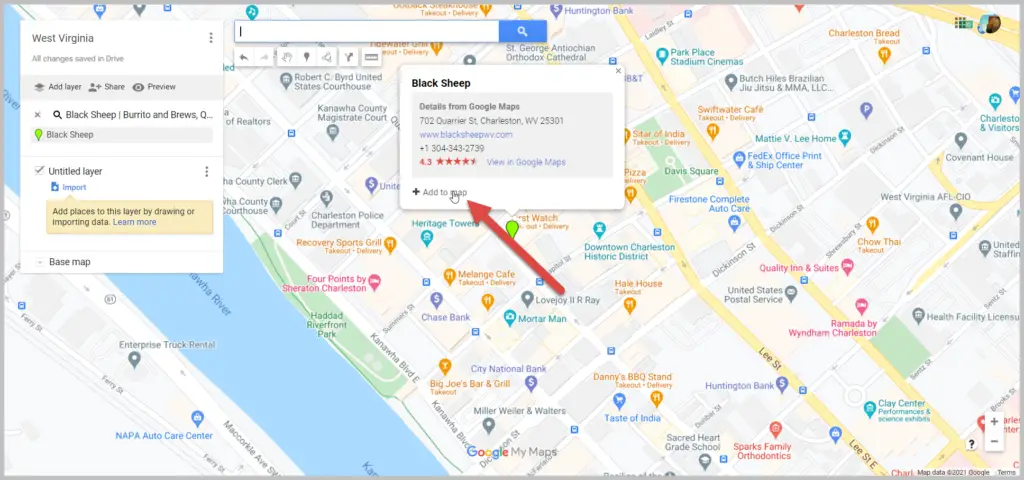
Once added to your map, you can customize your marker by changing your icon’s color and/or shape by clicking on the paint bucket icon labeled “style”.
I like picking a specific color and icon for each marker category. For example, my “restaurants” may all be blue with a fork and spoon icon, while my “sights to see” will be yellow with a binocular icon.

One of my favorite features of Google My Maps is that I can add my own info to the marker. Typically, this info comes from the research I’ve done on the location. If I found a blog post recommending a specific restaurant, I’ll add that to the marker, so I have that info at my fingertips when we are on the road.
Add any info you want to your marker and click save.

Your marker will now be added to your map.
You can see your marker in two places: one on the map and the other in the layer it was added to in the layers menu on the left-hand side of the screen.
Continue to add locations until your map starts to take shape.
Here is an example of a map we made for a West Virginia Road Trip .

Step 4: Determine Your Route / Itinerary
Now that you have location markers on your map, you can determine your route and day-to-day itinerary.
Take a look at where all your location markers are situated and start planning your route.
Start by creating a directions layer on your map.
Once you have your directions layer, rename it, and begin plotting your route.
First, you will need to enter your starting point. This can be done by either entering an address manually or clicking on a marker on your map.
Continue to add stops until your route is complete.
Here is an example of what our Lake Michigan Circle Tour Road Trip looked like.

Google Maps will default to the quickest route from two points. If you want to go a different route than the one suggested, you can drag the route to force it to go a different way than it was originally displayed.
You now have your own customizable Google Map for your road trip.
We use these maps for both planning our trip and for reference during our trip.
Now let’s look at how to use your awesome map during your trip.
How to View Your Google My Map on Your Phone
Now that you have your map customized, you’ll likely want to be able to view it on your phone.
You will first need to download the Google Maps app from your phone’s app store.
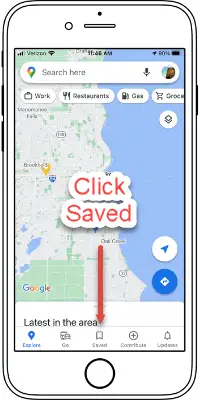
Once you have the Google Map app, here is how you access your map:
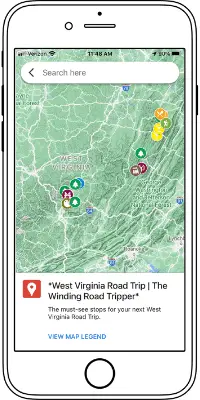
- Click on “Saved” on the lower toolbar on your phone
- Click on “Maps” on the lower right
- Select your customized map
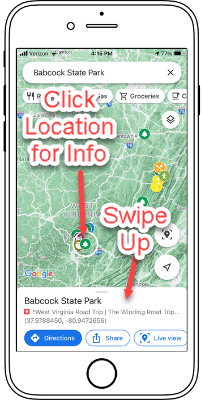
Now you can view your location markers and all the customized information you added to your map.
Click on your marker to bring up basic information. For the more detailed information you added, swipe up.
How to Use Your Google Map to Get Directions During Your Road Trip
Unfortunately, you can’t use the turn-by-turn directions you may have added to your map for actual driving instructions for your trip.
But not all is lost; you can still get directions to the next stop by using your customized map and Google Maps.
To do this, click on the location you want directions to and click on directions.
This will launch your Google Map app and allow you to get turn-by-turn directions to your next stop.
How to Export Your Map for Offline Access
Google My Maps works great when you have cell phone service on your trip. Unfortunately, you will not always have service, and you can’t download your Google My Map for offline use like you can in Google Maps.
Thankfully, there are ways to export your map for use offline.
To do this, we use Gaia GPS .
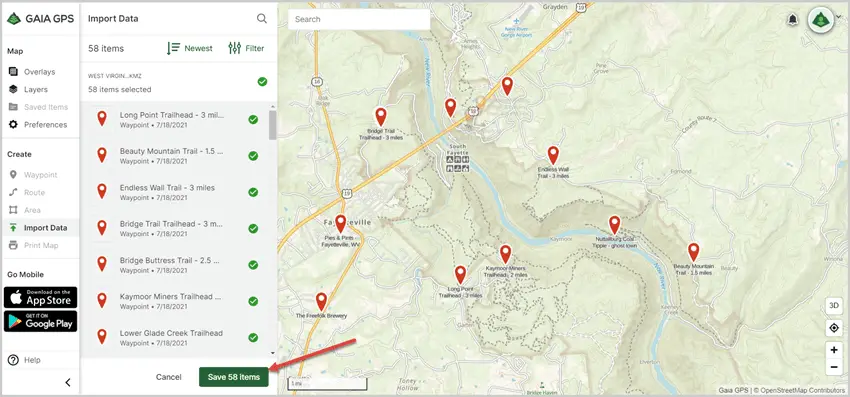
Let’s walk you through downloading your Google My Map for importing into Gaia GPS, an offline mapping app.
On your computer, click on the ( ⋮ ) in the top left corner by the map’s name. Then click on Export to KML/KMZ.
A pop-up will appear. Keep the default of “entire map” and click “download”.
Now you can import this map into Gaia GPS.
Start by creating a Gaia GPS account .
Once logged in, click “Import Data” and select the .KMZ file you downloaded from Google My Maps.
Your locations will now populate in your Gaia GPS map. Make sure to click “save” .
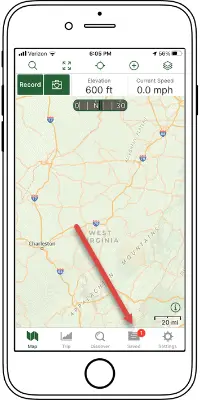
You can now access your map locations offline on your phone via Gaia GPS.
To do this, download the Gaia GPS App on your phone and log in.
Once logged in, you will see a notification that you have a saved location available.
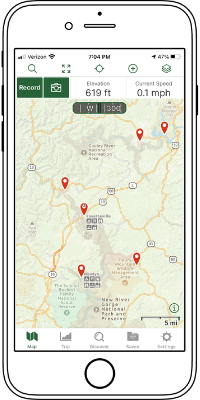
Click on the Saved folder
You can now see all your locations on your Google My Map. Including the details, you added.
More Road Trip Tips: Road Trip Hacks for a Stress-free Trip Road Trip Activities for a Long Car Ride Road Trip Meal and Snack Ideas Money-Saving Tips for Your Next Road Trip How to Budget for a Road Trip

- Scenic Drives
- Road Trip Planner
Road Trip Planning Made Easy
Create custom day trips, weekend getaways, and cross country adventures worldwide
Powerful features for planning your epic road trips (and the shorter adventures in between)
Unlimited stops.
Add unlimited stops and sub-stops. Combine your own stops with our pre-planned routes and recommended places of interest.
Smart Scheduling
By the minute, hour, or overnight, set preferences for each stop. Export your trip to your own Calendar.
Set Vehicle Type
Car, RV, camper trailer, truck, motorcycle, pulling a boat? Get a realistic estimate of driving time. Adjust travel speed by percentages for each unique situation.
Divide Trips Into Days
Divide your trips into manageable driving days based on your custom settings by time or distance. And of course you can customize each day differently.
Route Preferences
Configure route preferences such as avoiding highways or tolls for each day or any segment of your trip.
Use Any Device
Plan trips from your desktop computer, iPad, Android tablet, and mobile phone with the same easy-to-use interface. No app to download or software to install.
Automated To Do List guides you through the road trip planning process.
Manage Your Budget
Track expenditures before you go and along the way. See a summary of expenses for entrance fees, activities, restaurants, and lodging, etc.
Gas Calculator
See the estimated fuel cost for your vehicle type.
EV Charging
Find EV charging stations along your route. Get reminders to recharge. Use Charging Ranges to display icons on the map where your vehicle will require recharging.
Export Options
We support Google Earth (KML), Garmin Communicator, BaseCamp and MapSource (GPX), Co-Pilot Live (TRP), Microsoft Streets and Trips, TomTom itineraries (ITN), TomTom Places of Interest (OV2), Comma Separated Files (CSV), and Tab Separated Files (TSV).
Directions on paper come in handy. Print your road trip with turn-by-turn maps and full directions, divided into your day-by-day itinerary.
Is This Really Free?
Yes! It is free to use our Scenic Drive Itineraries and Road Trip Planner. Please consider purchasing your National Park or National Forest passes on myscenicdrives.com.
Why Do I Need An Account?
A free account is only required for the Road Trip Planner, enabling you to create, edit, and save your trips. Your account is secure. We never share your information.
Do I Need to Download An App or Install Software?
No app or software is needed. myscenicdrives.com works in any browser. Simply go to myscenicdrives.com
More Resources
Documentation, myscenicdrives.com, how it works.

Create Your Free Travel Map
With minimal effort you'll have a beautiful map of your travels to share with friends and family.
Map and visualise your trips. It's fast, simple, fun and free.
Start mapping your trips now!
- Plan your upcoming trips and map previous travels
- Add notes, photos and blog entries to build a rich story of your travels
- Embed your trip map on your own blog
- Save your map as a high resolution image
- Draw custom routes between your trip stops
- Unlimited trips on one map
- Bookmark websites and save them to your trip plan
See how easy it is to make a trip map in this video
Try it yourself!
Create an itinerary map to plan an upcoming trip
Our free travel mapping tool can be a great resource when you are planning your trips. If you are travelling to multiple cities and want to get an idea of which itineraries are going to be the most efficient, just map all your stops out and see what the route looks like. Once you have worked out the route, you can add notes and bookmarks to each stop to keep all your ideas in one place. Also, don't forget to tap into our amazingly helpful community of travellers by asking for trip advice in our forums .
Map out all your old trips
We spent a lot of time making this as easy to use as possible, especially when mapping out lots of stops and lots of trips. You can very quickly add new stops to trips with minimal detail. For example, you can choose to add dates to each stop. Or not. This mapping tool is flexible that way. Mapping out all your travels can be a huge amount of fun, as it's a great way to relive memories.
Add photos to your trips
Travellerspoint allows you to upload as many photos you want. And if you geotag them, you'll find they will automatically link to stops near where the photos were taken.
Embed your map on your blog
If you are just looking for a simple route map to add to a blog post you're creating then this will do that for you nicely. You can either use the standard embed code or customise the map tiles to various other looks as well. A beautiful interactive travel map will ensure your blog entry stands out from the crowd.
Generate stats for all your travels
Some map samples.
Would you like to see examples of some trips people have mapped out? Click on any of the maps below to see a fully interactive version.
Questions and Answers
What are some typical users of this mapping platform.
- People wanting to map out an upcoming trip
- People wanting to map out all their previous travels
- Travel agents wanting to create a trip map for their clients
- People wanting to explore different destinations for an upcoming trip
Create your map
What tool do you recommend people use to map out their life's travels?
The Travellerspoint mapping system is the perfect tool for this job. It can map out lots of trips in broad strokes or in great deal.
How many stops can I add to a trip?
There is no limit to the number of stops you can add to your trip map.
Is there a limit to how many trips I can map?
No, you can map all your life's travels on one map. We have members with over a hundred trips mapped!
What mapping platform do you use?
We use Mapbox GL JS which is a competitor to Google Maps. We allow you to choose which map tiles you use with options available from Mapbox.com and Maptiler.com
How can I use the maps I've created on Travellerspoint?
Once you've mapped out your trip, you can embed the map in a blog on Travellerspoint or elsewhere. You can also generate a shareable link that shows the map in a standalone way.
Can I save the map as an image?
Yes, we offer an easy button save the map as a high resolution PNG. Perfect for photobooks or for printing out.
How long has Travellerspoint been around for?
Travellerspoint has been around since 2002. Our mapping tool has evolved over the years from a simple log of countries to the detailed trip mapper it is today.
Where do you get the travel information from that's used in the map?
We have our own member created travel guide. When people view your trip map they will see content from that guide included with the locations.
Can I turn off the guide content that's included?
Yes, if you are a supporting member you can turn off the guide content.
Can I get turn by turn directions from this tool?
No, that's not what our mapping tool is intended for. If you need turn by turn directions, we recommend using something like Google Maps instead.
Can I create custom routes?
Yes, it's possible to create custom routes. This is particularly useful when you are plotting a boat trip that we don't have any routing information for.
Looking for a Step by Step guide?
This How To Create a Map of Your Travels guide will take you through the process of creating your travel map in a series of easy to follow steps.
Need more convincing?
You can do a lot more than just map your travels on Travellerspoint. Creating an account is totally free and gives you acess to other handy features like:
- A blogging platform where you can write about your travels
- An active travel forum to ask for advice from other travellers
- Unlimited photo uploads. We also feature our members' best travel photos
Create your trip map now!
How to draw a route on Google Maps to create custom directions or plan a trip
- To create a route in Google Maps, open "Your places" and then choose "Create Map" in the "Maps" tab.
- To draw a route, click "Add directions," choose transportation mode, and enter start and end points.
- You can draw lines and shapes on maps by clicking "Draw a line" and selecting "Add line or shape."
Google Maps may be best known for its ability to deliver turn-by-turn directions, but it has another useful purpose: You can use it to create maps on which you can draw routes, lines, and shapes.
You can then save those maps or share them with others. It's a handy way to pre-plan a trip or share driving directions with someone without needing an internet connection.
How to draw a custom route on Google Maps on Windows or macOS
Google Maps includes the tools you need to draw a route on a map and save it for future reference — you can open it anytime you want to or share a link with others.
1. Open Google Maps in a browser and make sure you are signed into your Google account.
2. Click the horizontal lines in the top left corner and then, in the menu, click Your places .
3. Click the Maps tab at the top of the page. You should now see any maps you've already saved. If you've never used Your Places before, this list may be empty.
4. At the bottom of the page, click Create Map .
5. On the Untitled map page, you can now choose the kind of map you want to put the route on top of. Click the dropdown arrow to the left of Base map and choose the map style you prefer.
6. Under the search field at the top of the page, click Add directions (the button looks like a Y-shaped road). You should now see an Untitled layer with fields to enter driving destinations.
7. By default, you'll get driving directions. If you are using a different mode of transportation, such as cycling or walking, click the car-shaped icon and choose how you're going to travel through the route; then click the X to close the flyout window.
8. Click in the A field and enter an address or location name, and choose it when you see it appear in the search results.
9. Repeat that process to select a location for B .
10. If you want to add additional waypoints or destinations, click Add destination and continue to add new places.
11. When you're done, click Untitled map at the top of the page and give it a name.
How to add a custom route on a separate layer on Google Maps desktop
You can add more than one custom route on the map you have created, and it will be on a separate layer.
1. After completing the steps in the previous section, click Add directions to create another route – it will be added on a separate layer.
2. Click the car-shaped icon , choose the transportation mode for that route, then click the X button to close the flyout window.
3. Enter directions for the start point in the text box next to A – like you did in the previous section.
4. Enter the directions for the end point in the text box next to B .
5. If you want to name the layers to make them easily distinguishable, click the Untitled layer heading and give it a name.
How to draw a line or shape on Google Maps desktop
Google Maps has a couple of simple drawing tools you can use to customize a map that you've saved to Your places. Here's how to draw a line or a shape (like a square, triangle or polygon) on a map:
2. Click the three horizontal lines menu in the top left corner and then, in the menu, click Your places .
3. Click the Maps tab at the top of the page.
4. Open an existing map or click Create Map at the bottom of the page to create a new one.
5. Under the search field at the top of the page, click Draw a line (the button looks like three lines and three dots). Click Add line or shape in the dropdown menu.
6. Click the map where you want the shape to begin. Then:
To make a single straight line, drag the mouse to create the line and double-click where you want the line to end.
- To make a line with multiple intermediate points, make a series of single clicks wherever you want the line to go, and double-click the last point to end the line.
- To make a polygon (any shape with three or more sides), click on the map in each place you want to put a corner. To close the shape, double-click on the starting point.
7. Name the line or shape in the dialog box and click Save .
You can edit the shape after you create it. Position the mouse pointer over the line or shape — when it changes from an open hand (which you can use to drag the map around) to a closed hand with a pointing finger, click. You'll then see the edit window. Use the tools in the lower-right corner to change the color, rename the shape, and upload an image to associate with the shape.
How to draw a line or shape on Google Maps on a mobile device
It's easiest to draw lines and shapes on maps in a browser on your PC or Mac, but if you need to work on a mobile device, you can use Google's My Maps, a web app that you can access from both Android and iOS.
1. Open My Maps in a browser on your mobile device.
2. If necessary, tap Get Started .
3. You can select an existing map to edit it or tap the plus icon in the bottom right corner to create a new map.
4. Under the search field at the top of the page, tap Draw a line (the button looks like three lines and three dots). Tap Add line or shape in the dropdown menu. Then follow the directions in the previous section to add and edit lines and shapes on your map.
- Main content
Best road trip planner apps: 5 apps to map out your adventure
How to plan your roadtrip with apps in the driver's seat

Regardless of your destination, planning your trip is an integral part of the adventure. Otherwise, you’ll spend way more than you need to and, chances are, you won’t get to see everything on your wishlist.
We live in a golden age of technology that we often take for granted. But, in all the time we spend playing our ‘Spin Addicts’ and our ‘Cat Quests’, very rarely do we think about the utility that our smart devices can provide on the open road.
As such, we’ve gone out of our way to do the thinking for you.
That’s right, to help you out with your next big outing we’ve assimilated five of the best road trip planner apps for your lengthy expedition below. Above all else, we imagine you’ll be enticed by the fact that they’re all free to download, even if you may or may not be tempted later on to shell out some cash for a monthly subscription fee. (You’ll know what we mean when you see it.)

1. Roadtrippers
As its name and slogan suggests, this is the only map built for travelers. Okay, maybe that’s a bit of hyperbole, but this app will help you find virtually everything you could ever need along the way.
Open Roadtrippers and you’ll find millions of locations, including local diners and roadside attractions that, admittedly, Google Maps is prone to miss. Then, once you’ve outlined your road trip plan, you can share it with your travel buddies so that they can make suggestions.
Download it now on iOS | Download it now on Android

2. Waze
Like Roadtrippers, Waze hones in on social interaction, but it does so by letting the community decide which routes are the best to take. Users can report nearby collisions, police radar and traffic jams so that you can safely avoid those routes in favor of arriving on time. What’s more, you’ll find the cheapest gas prices around, as gathered by the community. Regardless of whether you set out to save time or money, Waze is the best way to do both.

3. GasBuddy
Unlike our previous mentions which can potentially save time or money, GasBuddy promises a specific amount of money you’ll save by using it.
Similar to Waze, GasBuddy is a community-driven platform that helps you locate the most affordable gas prices around so that you never have to pay full price for fossil fuels again. The difference is that, with this app, you can subscribe to GasBuddy Pay for additional savings of 15 cents per gallon on your first fill-up and 5 cents per gallon on every fill-up after that.
Download it now on iOS | Download it now on Android

4. Hotel Tonight
We’ve all been in that position. The one where we get too tired to continue driving and we need to find a hotel quickly and cheaply, else suffer the wrath of sleepy driving with the windows rolled down and the music turned all the way up. (Pro tip: don't do that, ever. It's super dangerous.)
But if that sounds like a horror story that you’ve experienced before, Hotel Tonight is the app for you. Specializing in last-minute hotel deals, Hotel Tonight makes it possible to book a room in three easy taps and one seamless swipe.

5. Spotify
Close your eyes. Now imagine you can listen to any song you want, including but not limited to “I’m Gonna Be (500 Miles)” by The Proclaimers. Now open them.
Though it seems jokingly obvious now, Spotify would have been a dream come true in the days when top 40 radio hits triumphed over all else. Finally, you don’t have to listen to the same handful of songs on repeat.
Instead, you can hand-pick your own playlists, choosing between over 30 million songs in the Spotify catalog. Of course, if Spotify isn't your music scene, both Apple Music and Google's own Play Music streaming service are also good travel companions.
TechRadar’s The Road to the Show 2018 sees our intrepid writers braving a cross-country trip across the US, using the best gadgets to bring you their daily travel blog and offering the best tips for a tech-based roadtrip. The journey is brought to you in association with ZTE and the ZTE Axon M, with car transportation provided by Genesis.
Get daily insight, inspiration and deals in your inbox
Get the hottest deals available in your inbox plus news, reviews, opinion, analysis and more from the TechRadar team.

I got a Dolby Atmos soundtrack mixing demo at Sony Pictures Studios, and now I know how Spider-Man sounds get made
Today's Wordle answer is the hardest this year, with an average score of 5.4, and 'Wordle 1037 X' is trending on Twitter – here's why it's so tough and what to do in future
JLab JBuds Lux ANC review: budget headphones that are all about that bass
Most Popular
- 2 Scientists inch closer to holy grail of memory breakthrough — producing tech that combines NAND and RAM features could be much cheaper to produce and consume far less power
- 3 Meta rolls out new Meta AI website, and it might just bury Microsoft and Google's AI dreams
- 4 DJI drones just got a new rival in the US that licenses… DJI technology
- 5 7 new movies and TV shows to stream on Netflix, Prime Video, Max, and more this weekend (April 19)
- 2 Apple's M4 plans could make the latest MacBooks outdated already
- 3 The latest macOS Ventura update has left owners of old Macs stranded in a sea of problems, raising a chorus of complaints
- 4 Bad bots made up almost a third of all internet traffic last year
- 5 Boston Dynamics reveals its most astonishing humanoid robot so far – and I can’t stop watching it
- PRO Courses Guides New Tech Help Pro Expert Videos About wikiHow Pro Upgrade Sign In
- EDIT Edit this Article
- EXPLORE Tech Help Pro About Us Random Article Quizzes Request a New Article Community Dashboard This Or That Game Popular Categories Arts and Entertainment Artwork Books Movies Computers and Electronics Computers Phone Skills Technology Hacks Health Men's Health Mental Health Women's Health Relationships Dating Love Relationship Issues Hobbies and Crafts Crafts Drawing Games Education & Communication Communication Skills Personal Development Studying Personal Care and Style Fashion Hair Care Personal Hygiene Youth Personal Care School Stuff Dating All Categories Arts and Entertainment Finance and Business Home and Garden Relationship Quizzes Cars & Other Vehicles Food and Entertaining Personal Care and Style Sports and Fitness Computers and Electronics Health Pets and Animals Travel Education & Communication Hobbies and Crafts Philosophy and Religion Work World Family Life Holidays and Traditions Relationships Youth
- Browse Articles
- Learn Something New
- Quizzes Hot
- This Or That Game New
- Train Your Brain
- Explore More
- Support wikiHow
- About wikiHow
- Log in / Sign up
How to Make a Travel Itinerary with Google Maps
Last Updated: March 14, 2022 Fact Checked
This article was reviewed by Stan Kats and by wikiHow staff writer, Nihal Shetty . Stan Kats is a Professional Technologist and the COO and Chief Technologist for The STG IT Consulting Group in West Hollywood, California. Stan provides comprehensive technology solutions to businesses through managed IT services, and for individuals through his consumer service business, Stan's Tech Garage. Stan holds a BA in International Relations from The University of Southern California. He began his career working in the Fortune 500 IT world. Stan founded his companies to offer an enterprise-level of expertise for small businesses and individuals. There are 8 references cited in this article, which can be found at the bottom of the page. This article has been fact-checked, ensuring the accuracy of any cited facts and confirming the authority of its sources. This article has been viewed 84,972 times.
If you’re planning a trip, you might be wondering how to figure out where to go and in what order. Luckily, Google has a free tool that you can use in order to get a better sense of your travel plans. We’ll walk you through how to make a travel itinerary with Google Maps through its My Maps feature. In a few easy steps, you can master an excellent organizational tool that’ll help you plan the best trip possible.
Setting Up Your Map

- Unfortunately, as of October 2021, Google no longer supports the “My Maps” app on phones. If you’re on mobile, you’ll have to use your phone’s web browser to access the site while on the go. [2] X Research source
- If you don’t already have a Google account, setting one up is a quick process. A Google account gives you a number of benefits, including a new gmail address. Check out this link to start the set-up process: https://accounts.google.com/signup/v2/webcreateaccount?flowName=GlifWebSignIn&flowEntry=SignUp

- For instance, your might name your map something like “California Summer Trip 2022,” and you could enter a description like, “Places to see and eat during two-week California road trip.”

- For example, for a California road trip, you might enter “Golden Gate Bridge” into the search box. My Maps will automatically direct you to its location.

- For instance, if you’ve searched for “Golden Gate Bridge,” there will be a white box that offers some information on the location, and even a rating from other users. Click on the “Add to map” button to send it to your saved locations.

- For example, you might fill in the description to the “Golden Gate Bridge” box with something like, “Spend at least 1 hour here—must-see location.”

- You might consider changing the colors of your pins to match how important each location is to your trip. For example, must-see locations could be red pins, your housing spots could be green pins, and optional places to visit could remain as blue pins.
Creating an Itinerary and Planning Routes

- For example, you might have a layer titled “Places to see,” one titled “Places to eat,” and one titled “Places to sleep.” You can then put sightseeing destinations, restaurants, and hotels you want to stay at in their respective layers.

- You can add more than one location to a single route. For example, if you wanted to plot a route from Big Sur to the Golden Gate Bridge, and then to Palo Alto, you can add all three locations to your route layer and create a multi-stop path. [11] X Research source
- By clicking on the three dots next to the layer with your travel route, then selecting “Step-by-step directions,” My Maps will create a set of directions for your travel. Handy!

- For example, by using My Maps, you might notice that seeing the Golden Gate Bridge, walking around San Francisco, and eating at a restaurant in Berkeley are close enough to all be doable in one day, while visiting Big Sur might be better saved for another afternoon. My Maps can help you plan out the most efficient trip possible, so you can enjoy your travels even more.

- When sharing your map, you can also choose the option that allows others to edit the map as well. With this option selected, your friends can pick places that they’re interested in as well, so you can have them all on the same document. [13] X Research source

- Although My Maps can’t be viewed offline, you can download an offline map of any areas you’re interested in on your phone. Using the Google Maps app, type in a location into the search bar, tap the name of the location, then navigate to the option “Download offline map.” [15] X Research source
Expert Q&A
You might also like.

- ↑ https://support.google.com/mymaps/answer/3024925?visit_id=637744367666134651-2428484219&p=lite_addplaces&rd=1
- ↑ https://9to5google.com/2021/07/20/google-my-maps-android-shutdown/
- ↑ https://support.google.com/mymaps/answer/3024454?hl=en&ref_topic=3024924
- ↑ https://support.google.com/mymaps/answer/3024925?visit_id=637744500327517491-717751493&p=lite_addplaces&rd=1
- ↑ https://support.google.com/mymaps/answer/3024925?hl=en&co=GENIE.Platform%3DDesktop
- ↑ https://support.google.com/mymaps/answer/3502610?hl=en&ref_topic=3024924
- ↑ https://support.google.com/mymaps/answer/3109452?hl=en
- ↑ https://support.google.com/maps/answer/6291838?hl=en&co=GENIE.Platform%3DiOS
About This Article

- Send fan mail to authors
Did this article help you?

Featured Articles

Trending Articles

Watch Articles

- Terms of Use
- Privacy Policy
- Do Not Sell or Share My Info
- Not Selling Info
Don’t miss out! Sign up for
wikiHow’s newsletter
- Help Center
- Google Maps
- Privacy Policy
- Terms of Service
- Submit feedback
Plan your commute or trip
Find ways to get to relevant places.
- On your computer, open Google Maps . Make sure you’re signed in.
- Get directions to relevant places : Click a place in the list. You’ll get places based on your Gmail, Calendar, and recent travel history.
- Get directions to saved places: If you saved your work or home address in your Google Account, click Home or Work . You can edit your home or work addresses in your Google Account. Learn how to set your work and home addresses .
Learn more about your surroundings
- Find places of interest: Click an option, such as Restaurants, Hotels, or More.
Was this helpful?
Need more help, try these next steps:.
Create and share custom maps with Google My Maps.
Get started
Easily create custom maps with the places that matter to you.
Add points or draw shapes anywhere.
Find places and save them to your map.
Instantly make maps from spreadsheets.
Show your style with icons and colors. Add photos and videos to any place.
Share & collaborate
Allow friends to see and edit your maps, or publish them to the whole world.
Embed maps in your website or blog.
Work together on building your map, just like Google Docs.
Easily organize all your maps alongside your other documents in Google Drive.
Take anywhere
View custom maps in the Google Maps mobile app so you can find places on-the-go.
Find all your maps in the Your Places menu on Google Maps.
Chart your favorite places or explore a new city.
Save maps you find on the web and use them on-the-go.
Get started now
- Frequently asked questions
- About this site
Plot multiple locations on Google Maps
Welcome to MapCustomizer.com!
You can use this site to plot multiple addresses on a single map using Google Maps. To get started, enter an address in the form below. You can give the location a description if you like, or you can leave that field blank.
If you have a lot of addresses that you want to paste in all at once, you can use the Bulk Entry button, and paste them in, one address per line.
Once you have all the locations plotted, you can save your map and share the link. Don't worry, you can edit the map later if you need to add or remove locations.
Enter your locations one per line. You can add a description by including it in {curly braces} after the address. You can specify the marker type in <angle brackets> at the end of the line. Both of these are optional. If you don't specify a marker type, a default numbered one will be used.
The marker types possible are:
For example, if you enter the following lines:
Plotting locations...
The following addresses could not be located. Please check them and try again.
The following addresses were added to your map, but it looked like you tried to specify a marker type that was not recognized.
All of your addresses have been mapped.
Something went wrong plotting your locations. Please try again later, or contact [email protected] for assistance. It would be helpful to include the following list of addresses:
Your map will be accessible at https://www.mapcustomizer.com/map/
To print a map, you can use your browser's built-in print functionality. You may need to adjust the zoom level and/or move the map a bit to ensure all of the locations are visible (because printer paper and computer screens are generally a different shape). You can use the print preview feature to help with this, so you don't have to waste paper. You can also use the print-to-PDF functionality if you want a PDF copy of it.
IMAGES
VIDEO
COMMENTS
Use Wanderlog to share your itinerary with tripmates, friends, and families and collaborate in real time, so everyone stays in the loop. Plan your road trip or vacation with the best itinerary and trip planner. Wanderlog travel planner allows you to create itineraries with friends, mark routes, and optimize maps — on web or mobile app.
Add your travel destinations on a map, select your transport modes, visualize and share your itinerary for free. My itinerary This is a free demo version of our mapping software. Create an account to save your current itinerary and get access to all our features. ...
Keep exploring with the Roadtrippers mobile apps. Anything you plan or save automagically syncs with the apps, ready for you when you hit the road! Download from Apple App Store Download from Google Play Store. Connect with us and hit up #roadtrippers. Plan your next trip, find amazing places, and take fascinating detours with the #1 trip planner.
Did you know: If you use the Roadtrippers mobile app, your trips will instantly auto-sync over... Ready for navigation and good times! Search. The ultimate road trip planner to help you discover extraordinary places, book hotels, and share itineraries all from the map.
Provide up to 26 locations and Route Planner will optimize, based on your preferences, to save you time and gas money. Find the shortest routes between multiple stops and get times and distances for your work or a road trip. Easily enter stops on a map or by uploading a file. Save gas and time on your next trip.
The Plot With Waypoints feature enables you to plot a route by placing a small number of waypoints on the map, which you can drag to different positions to experiment with different route options. To plot a more complex route with many waypoints, close this message, turn on the Auto-Plot switch and plot points on the map.
The Trippy road trip planner automatically calculates the optimal itinerary including stops recommended by Trippy members, favorite restaurants and hotels, local attractions and things to do based on what people who live in the area have suggested, and more. Once you have a quick trip planned, you can customize every detail, adding or removing ...
Repeat a loop in the middle of a route. RETURN. Plot a route back to the start. TRACE. Use another route as a guide to trace over. SNAP. Aligns a route with roads and paths on the map. ... Add photos of your route to the map and directions. CREATE COLLECTIONS. Show several different routes on one map . MOBILE APP. Adapted for small touch screens
At Geovea, we have a world of travel options to discover for your next Road Trip Plan or Vacation Travel itinerary. We've divided up travel ideas and destinations into different sections to make your trip planning easier. Visit as many times as you want, and as often as you'd like to plan your special trip.
Start clicking on the map. Choose your destination and have Furkot calculate how much time you need to get there. Set daily limits on the travel time so none of your sightseeing has to be done under moonlight — unless, of course, that's what you want. Don't worry about putting stops in order. Furkot attempts to plan a route for your trip in ...
5. Plip (Web, Android, iOS): Mobile-First Collaborative Trip Planner With Maps. The apps mentioned above in this list are all made to be used on computers. However, Plip bucks the trend by being a mobile-first travel planning app so that you can plan your entire trip on your phone or tablet.
Post summary: A comprehensive guide on how to use Google Maps to plan a road trip itinerary and why Google Maps is the best tool/app for planning a trip.Includes a road trip planning tutorial! Author's Note: This post was originally published in 2020 and was updated in April 2023 for accuracy and comprehensiveness.
Step 2: Plot Your Road Trip Route. To start plotting your road trip route, click on directions. Then enter your starting point and your first destination. Continue to add stops to your road trip by clicking on the (+) to add destinations. Stop when you have all your road trip stops added to your map.
Find EV charging stations along your route. Get reminders to recharge. Use Charging Ranges to display icons on the map where your vehicle will require recharging. Export Options. We support Google Earth (KML), Garmin Communicator, BaseCamp and MapSource (GPX), Co-Pilot Live (TRP), Microsoft Streets and Trips, TomTom itineraries (ITN), TomTom ...
Map and visualise your trips. It's fast, simple, fun and free. Start mapping your trips now! Plan your upcoming trips and map previous travels. Add notes, photos and blog entries to build a rich story of your travels. Embed your trip map on your own blog. Save your map as a high resolution image. Draw custom routes between your trip stops.
Trip Planner is a Google My Maps project that helps you plan your trips and share them with others. You can customize your map with markers, routes, photos, and descriptions of your destinations ...
Thomas Trutschel/Photothek via Getty Images. To create a route in Google Maps, open "Your places" and then choose "Create Map" in the "Maps" tab. To draw a route, click "Add directions," choose ...
2. Waze. Like Roadtrippers, Waze hones in on social interaction, but it does so by letting the community decide which routes are the best to take. Users can report nearby collisions, police radar ...
2. Create a new map through the home screen. At the top left of the "My Maps" home screen, you'll see a red box with the text "+Create a New Map.". Click on it to be redirected to a map screen. [3] 3. Give your map a descriptive name. To keep yourself organized, give your map a name to remind you what it contains.
On your computer, open Google Maps. Make sure you're signed in. On the left, choose an option: Get directions to relevant places: Click a place in the list. You'll get places based on your Gmail, Calendar, and recent travel history. Get directions to saved places: If you saved your work or home address in your Google Account, click Home or ...
Find local businesses, view maps and get driving directions in Google Maps.
Make maps. Easily create custom maps with the places that matter to you. Add points or draw shapes anywhere. Find places and save them to your map. Instantly make maps from spreadsheets. Show your ...
To print a map, you can use your browser's built-in print functionality. You may need to adjust the zoom level and/or move the map a bit to ensure all of the locations are visible (because printer paper and computer screens are generally a different shape). You can use the print preview feature to help with this, so you don't have to waste paper.
Last year we announced that Maps suggests the best charging locations for vehicles with Google built-in. This capability is expanding to multi-stop trips. So if you're planning a multi-stop summer road trip to several national parks, Maps will suggest the best charging stops along the way, based on your battery's charge level.