- RV Parts & Accessories
- Waste Water & Sanitation
- Sewer Hose Carriers & Fittings

To see product details, add this item to your cart. FREE Returns Return this item for free
Free returns are available for the shipping address you chose. You can return the item for any reason in new and unused condition: no shipping charges
- Go to your orders and start the return
- Select the return method
Return this item for free
Another way to buy to see product details, add this item to your cart. ships from: treadyway sold by: treadyway, sorry, there was a problem..

Image Unavailable

- To view this video download Flash Player
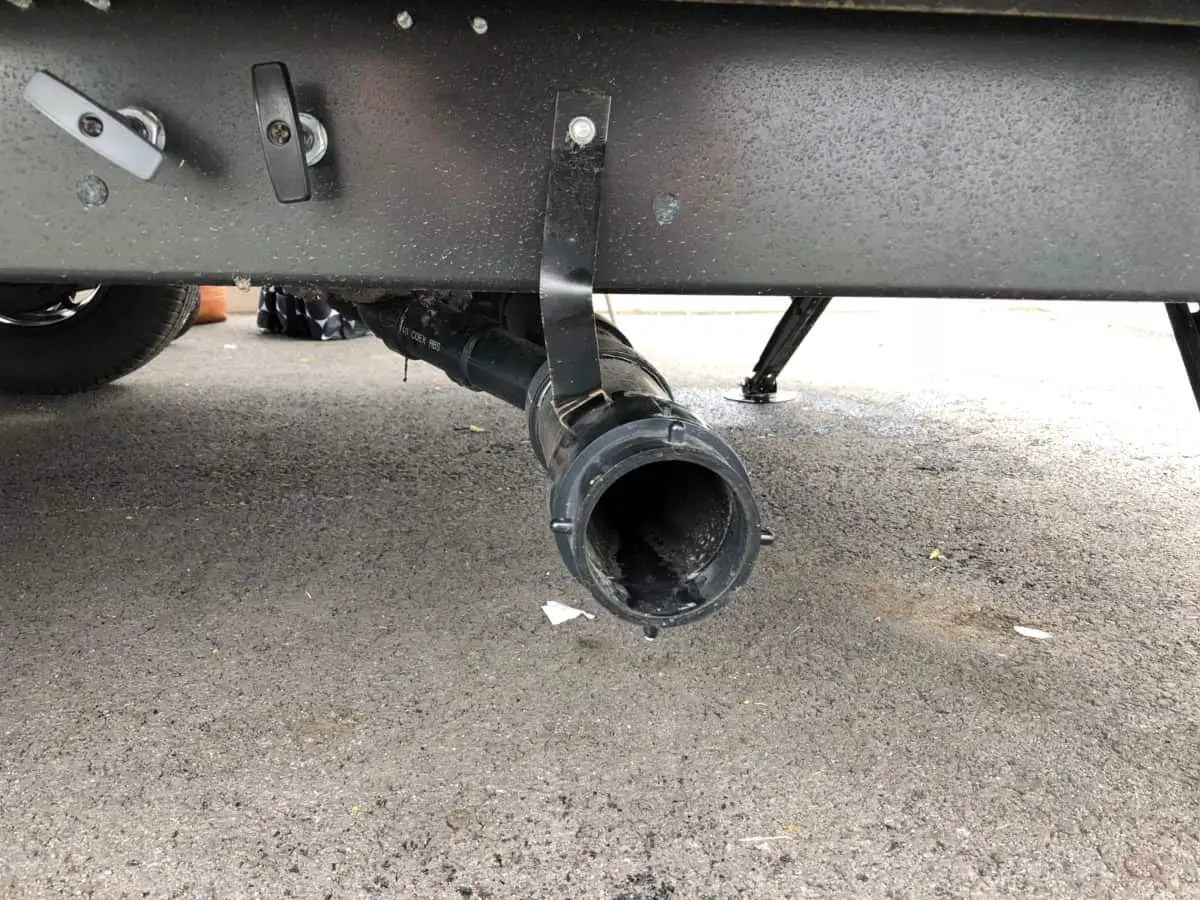
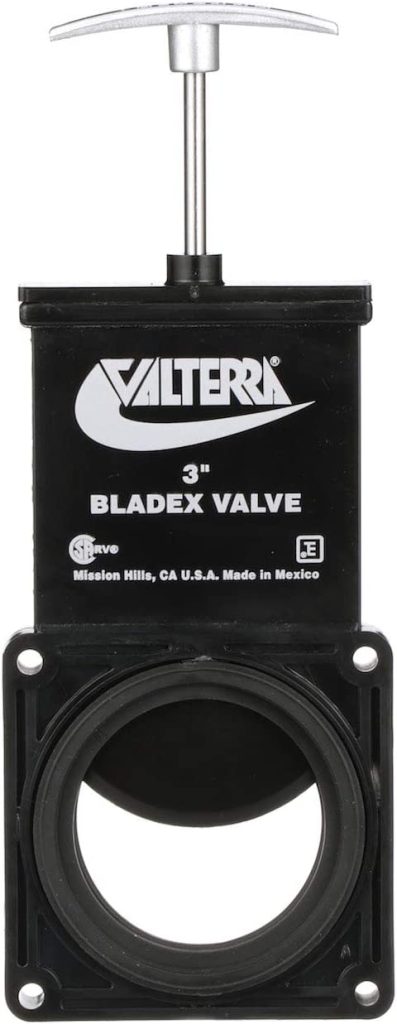
Valterra T58 Twist-On Waste Valve, Mess-Free Waste Valve for RV's, Campers, Trailers
Purchase options and add-ons, about this item.
- No more mess with an old valve problem.Fit Type: Universal Fit
- Twists onto your current waste valve
- Eliminates expensive service work
- Rotates to most convenient position
- 3 Inch valve for trailers, 5th Wheels and Most Motor Homes
Frequently bought together

Similar items that may deliver to you quickly

From the manufacturer

Product Description
TWIST ON WASTE VALVE, BOXED
Product information
Technical details, additional information, warranty & support, what's in the box.
- Valterra T58 Twist-On Waste Valve
Compare with similar items
Looking for specific info, top brand: valterra, customer reviews.
Customer Reviews, including Product Star Ratings help customers to learn more about the product and decide whether it is the right product for them.
To calculate the overall star rating and percentage breakdown by star, we don’t use a simple average. Instead, our system considers things like how recent a review is and if the reviewer bought the item on Amazon. It also analyzed reviews to verify trustworthiness.
Customers say
Customers like the cleanliness, quality and ease of installation of the valve. They mention that it makes life a lot easier and cleaner when hooking up your RV to the sewer. They say it's well made and easy to install. Customers are also happy with value, and performance. However, some customers have reported issues with stability and fit.
AI-generated from the text of customer reviews
Customers are satisfied with the performance of the valve. For example, they mention it's easy to install, works great, and does the trick. Some say it'll stop any mishaps or leakage when dumping tanks. Overall, most are happy with the product's performance and recommend it to others.
" This item works perfectly . Was as described and delivered with speed and good condition" Read more
"...stop waste valve fit right on where cap goes and stays put and works perfectly . Thank You Valterra" Read more
"Shut off the valve for sewer was priced properly and is working great " Read more
"The product was very good except for the fact in the reviews I read before ordering it had a habit of coming loose to solve the problem...." Read more
Customers find the installation of the valve to be easy. They mention that it attaches very easily, works great for flushing tanks, and adds to their camper with no fuss or mess.
"...very time consuming so this is a great tip and hack and very easy to install and maintain now too." Read more
"...Just pull the lever and no fuss or mess ." Read more
" Easy to install great price " Read more
"Fit great and easy to use , works great for flushing tanks" Read more
Customers like the quality of the valve. They mention it's well-made, should work as advertised, and has a robust construction that should last a long time. Some say the product is awesome, has sturdiness, and is a must-have for RV owners.
"...Was as described and delivered with speed and good condition " Read more
" This product is awesome . I don’t get any mess on my hands from the black water tank. Just pull the lever and no fuss or mess." Read more
"...* they have leaking valves but in reality it's just a poorly designed system on the RV ." Read more
"Like the fit, well made . Used it for a leaking valve and it solved the problem." Read more
Customers appreciate the value of the valve. They say it's well worth the cost, cost effective, and priceless for preventing accidents. They also describe it as an excellent product and a great addition to their RV.
" Great product , exactly what I needed, makes being able to open the other valves while travelling to empty that tanks fully." Read more
"...The salmon thank you!A great value and a must have for anything with a dump hose!!!!" Read more
"... Saved me some money since I already had the 45 degree clean out before I bought the other 2 items! Happy camper!" Read more
"...This additional gate valve puts an end to the black tank burp. Great accessory ." Read more
Customers like the cleanliness of the valve. They say it makes life a lot easier and cleaner when hooking up their RV to the water source. They also say it takes away the dirty part of connecting and disconnecting the RV. Customers also mention that it keeps their hands clean when removing the sewer cap. They appreciate that it helps prevent messy stuff from coming out when connecting or disconnecting.
"...Now the cap is removed dry and no mess , attache the hose, pull the value, open the tank value and it all works as expected...." Read more
"...Cap goes on the outside of this valve. No more mess ." Read more
"...This was super easy to install and keeps you clean and dry when attaching the sewer hose" Read more
"This unit was so easy to install and now it makes dumping very clean and easy ...." Read more
Customers are mixed about the leaking of the valve. Some mention that it solves any potential leak issue, is great to block off a leaking RV valve, and prevents spillage when opening the cap. However, others say that it had a slight leak from the gray tank and that the original gate leaked at the connection and the gate itself.
"Arrived quickly and stopped the drip without any tools ... just fits on old cap with a half turn! Problem solved!" Read more
"Our inner valve leaks a little bit so every time you go to drain the tanks, when you take the cap off poo water comes out...." Read more
"This product is great. It will stop any mishaps or leakage when dumping tanks." Read more
"...(one for each grey tank... So now it doesn't leak but I still like the insurance of a double valve!Highs:..." Read more
Customers are mixed about the fit of the valve. Some mention that it fits perfectly, while others say that it's a rather loose fit. Some customers also mention that the plastic ears on the outer cover are snug and the handle is a bit tight for pulling out. Overall, the opinions are mixed, and it'll be up to individual customers to decide which one is best for their application.
" Like the fit , well made. Used it for a leaking valve and it solved the problem." Read more
"...Only issue with install is that the plastic ears on the outer cover are so snug that when trying to remove the outer cover, the valve would rotate,..." Read more
" Fit great and easy to use, works great for flushing tanks" Read more
"...falls off and dangles going down the road, whatever, this valve keeps everything in ...." Read more
Customers are dissatisfied with the stability of the valve. They mention that it comes unscrewed and falls off, the pipe loosens and could come off, it's difficult to keep the unit attached to the trailer connection, and it can't be trusted to stay on tight. Some say the product does not stay on the existing tank drain connection and constantly gets knocked off.
"...one thing you need to be aware of, though -- this seems to come off the bayonet mount VERY easily if you move it...." Read more
"...to remove the outer cover, the valve would rotate, and the cover would not come off . I used a block of wood to stop that the first time...." Read more
"...But this stop waste valve fit right on where cap goes and stays put and works perfectly. Thank You Valterra" Read more
"...But, as others have stated, it comes off pretty easy . Just taking off the cap will turn the valve enough to come off...." Read more
Reviews with images

- Sort reviews by Top reviews Most recent Top reviews
Top reviews from the United States
There was a problem filtering reviews right now. please try again later..

Top reviews from other countries

- Conditions of Use
- Privacy Notice
- Consumer Health Data Privacy Disclosure
- Your Ads Privacy Choices
- You are here:
- Home »
- Blog »
- » How to Repair an RV Sewer Valve that is Leaking or Stuck

How to Repair an RV Sewer Valve that is Leaking or Stuck
- June 24, 2019 /
- By R. Geraldi /
One way to save money is to learn how to fix your RV yourself. At least the simple repairs need to be done by you. That way you can enjoy your RV and get it fixed no matter where you are. Only the most complicated repairs or when you are at your wit’s end should broken RV parts be taken to a qualified RV technician.
How to Repair an RV Sewer Valve that is Leaking or Stuck: Repairing a leaky or stuck sewer valve does not take a lot of mechanical skill. All you have to do for the simplest and quickest fix is to replace the valve with a new one. It only takes a little time and a little wrench turning skills.
To get more details and more information on how to fix a leaky or stuck sewer valve just continue to read our article. It is filled with the information you need to know so you can fix those simple repairs yourself and save a lot of money.
RV Sewer Valve Leak

One estimate given by a professional to fix this problem was about $500. That is because the problem is not conveniently located on the RV. You can avoid this expense by turning to a couple of good fixes that solve the problem for you.
The first fix is done by adding a twist on valve on the terminal end of the dump line. These twist on valves may not look sleek and attractive but they stop the black rush and give you a safety margin to work with.
If you decide to remove the valve and replace the seals or replace the valve entirely, the hardest part of the job is flushing the tank and getting them clean enough to remove the 4 bolts that hold the valve in place.
Another tip you should consider, if the black water valve is leaking, you might want to go ahead and replace the gray water valve at the same time. The logic behind this is that if one is broken, it may not be that long before the other one goes bad.
Since you are already underneath your RV, you can save time and energy doing both at the same time.
RV Sewer Valve Stuck Open
There are those RV users who do not see the importance of closing their black water valve and leave it open all the time. When RV users do this, a lot of solid waste material can dry out and clog up the valve.

There are two basic ways to handle this problem. First, you can use some mixture that will eat the clog and loosen the valve. The only thing is you shouldn’t use bleach as that chemical can damage your plastic holding tank and other plastic parts.
The second alternative would be to use a pressure wand to back wash the pipe, valve and tank. The water pressure may be enough to dislodge any dried debris and loosen the valve where it will close again.
The final possible problem could be that the blades inside the valve got stuck during its winter storage time. To fix it, you would have to get inside the valve and loosen the blades manually. Then the next time you winterize your RV make sure you use RV anti-freeze to avoid having this happen again
This may be a dirty job to fix, but it may save you $600 one RV user had to pay when they faced a similar problem.
RV Sewer Valve Won't Open
One of the causes of this problem is that when you winterized your RV some waste material did not get flushed out. When this happens, the waste materials harden and dry out clogging your valve. This keeps the valve from opening properly.
Or the valve is getting old and when this happens it is tougher to pull the cable open and dump your tanks. In either case you will need to replace the valve. One sign that there is a problem is when it becomes tougher and tougher to open the valve.
When this situation arrives, you want to replace the valve before it becomes broken. Replacing the valve prior to breaking keeps you in control of the situation. You get to choose when and where you make the repair.
If you wait till the valve is broken, then you may not have those choices to make. When you do decide to replace the valve try to avoid doing it at a busy dump station. The process takes some time and you do not want a lot of angry RV users waiting for you to finish the repair.
Find a campsite with hook ups or a not so busy dump station when you are ready to do the job.
One maintenance tip to avoid having problems with the valve sticking open or closed. You should spray the valve pull cord once or twice a year with grease or other lubricant. This will help keep the pull cord and blades in shape. Other than that there is not much else you can do to avoid this issue
RV Sewage Valve Broken
This can be a very messy chore to do. Replacing a broken valve can tale some time and there may still be leftovers even after you have flushed and dumped your black water tank.
When replacing the valve, you should try to keep the valve body as vertical as you can. This helps keep waste solids from entering the valve body. It also helps avoid those drying issues that can clog a valve and keeping the valve door from opening or closing.
At no time should you follow the manufacturers and pl;ace the valve horizontally or facing downwards. This is just asking for trouble. Once you have done this installation, you want to make sure to place the cable in a convenient location for easy pulling.
If you do not like the cable system on most manual sewer valves, there is a good solution. Instead of replacing the broken valve with a similar cable type model, switch to an electric valve.
With this switch, you do not have to worry about the cable breaking when you pull on it. All you do is push a button and the valve opens for you. Push the button again and the valve door closes for you.
The only difficult task about this installation is routing the wire connection so that it is out of the way while safe at the same time. You may need a little expert help to do this part of the repair
Do You Keep Your RV Sewer Valve Open or Closed
There are some RV users who leave their black water sewer valve open until it is time to dump the tanks. This is not the right way to handle your black water tanks. The consensus among most RV users supports that sentiment.

The reason you do not keep your black water holding tank valve open is that all thew water will run out and leave the solids behind. When the water goes, then the solids have time to dry and get stuck in your valve.
The valve will become clogged and you will not be able to open or close it. This situation will lead you to costly repairs if you do not handle it yourself. When it comes time to dump your black water tank, it is best to wait till it is about 3/4 full.
This is so because the water volume will help push the solids out leaving little left for the gray water tank to flush out. Always dump your gray water tank after you have dumped your black water tank.
Also, along with closing the black water valve, you should keep the gray water valve closed as well. This position allows for the gray water tank to fill with water and make flushing the sewer lines a lot easier.
How to Replace RV Sewer Valve
When your sewer valve breaks, the only real fix you have available is to replace it. This repair may take you a little while to complete but it is better than spending a lot of money having a professional RV tech do it for you.
Here are the steps you need to follow to make the exchange correctly:
Removing the Broken Valve
First dump and flush the black water holding tank. Then flush it again with the gray water tank
Close the valve and place a open top container underneath to catch any drips
Now find the four bolts. Hold the bolts still with a wrench while loosening the nuts with another one
Pry apart the two flanges but be careful. You do not want to break these and ad to your repair expenses. When the flanges are far enough apart, pull your valve out. Make sure to move the sewer pipes if the fit is still too tight to get the valve out
Check to see if the two rubber gaskets came out with the valve. If not, reach in and remove the gaskets
Putting the New Valve On
Clean the flanges first and apply a light coat of grease or lubricant
Put the new gaskets on the new valve. Don’t put them on the flanges.
Carefully slide the valve in place between the flanges. Start the bolts and work the valve gently to make sure it fits in correctly. One tip, use new stainless steel nuts and bolts. This will make replacement the next time a lot easier.
Do not tighten quickly and do not over tighten the nuts and bolts. You want it snug and secure not too tight.
Clean up any mess around the valve and the ground and you are ready for more RV fun
Tips to Avoid Sticky RV Sewer Valves
A little prevention maintenance goes a long way. These tips will help you avoid some of the issues mentioned above. Practicing good preventive maintenance is one way to make sure you avoid costly repairs.
Here are some of those tips:
- Keep the valve rod will lubricated . Use a silicone or Teflon based lubricant and spray it on the rod. After that just work the rod a few times to spread the lubricant around
- Do not use WD-40 to lubricate. The reason for this is that this lubricant can find its way to the seal and ruin it. Instead of lubricating, it makes the seal sticky and hard to use
- You can add a grease fitting to the dump valve assembly. This innovative fix allows you to put grease on the steel rod. The only issue is that the petroleum based grease may also ruin the rubber seal
- Watch the valve handle . If it cracks or has smaller pieces break off, you should replace it as soon as possible. A broken handle makes opening and closing the valve more difficult
- Before you check the valve make sure to check the fittings and the pipes first . The leaking issue may be coming from a cracked pipe or a loose connection
- Use good RV anti-freeze when winterizing your RV . This will help keep the dump valves from becoming sticky after they have sat for a long time
Some Final Comments
It is a messy job but someone has to do it. If you do not want to fool with broken or stuck dump valves then you can pay out a lot of money and have the professionals handle it for you.
But if you are like most of us and not made of money, then learning how to fix your dump valves is the best way to go. You save money and time by fixing the issue right where you are. Just make sure to have the right protective equipment and clothing on hand before you get started.
Simple solutions work the best and one simple solution to a leaky dump valve is by adding a twist on valve. This protects you and keeps you from having a messy clean up to deal with.
IN most cases, you can fix leaky or stuck valves with a little know how. The easiest fix of all is simply to replace the old valve with a new one. You can also opt to install an electric one making opening and closing the valve a lot simpler.
No matter how you handle these issues, go with the best fix for you.
Related Posts
Replacing the Air Admittance Valve For RV (Rooftop, Sink)
Finding an RV Honey Pot For Sale (6 Honey Pots For Campers)
How To Use a Honey Wagon (Portable and Service) Helpful Guide
Leave a Comment:
The Savvy Campers
My RV Waste Valve is Stuck Closed, Why, and How to Fix It?
Nothing can be quite as frustrating to a recreational vehicle owner as a stuck waste valve. If this valve is stuck or hard to open it not only makes dumping the vehicle’s tanks an intensive process, but it almost always signifies that repairs to the waste valve will need to be made in the near future.
While it is rare, your RV’s waste valve could be stuck because it is not seated correctly. If so, you are in luck, and you should be able to fix the problem with little effort and supplies. The proper processes for loosening a recreational vehicle’s stuck waste valve and for replacing a recreational vehicle’s waste valve are explored below.
In addition, common treatments and preventive maintenance procedures that can prevent a stuck valve from occurring in the future are also mentioned. Therefore, if you are currently having problems with your RV’s waste valve, or you are simply looking to prevent such problems from occurring, you should continue reading through the various sections below!
How To Loosen a Stuck Waste Valve on Your RV
In general, when the waste valve on your RV begins to stick you should take this as a good indicator that you should replace the gate valve in the near future. You do not want to wait for the waste valve to break fully as this could land you in a messy situation. However, if you are in the middle of a road trip or simply need to open the valve to dump your tanks, you can attempt to loosen the waste valve using various methods.
The most common method to loosen a stuck waste valve involves taping the outer portion of the valve, around the circumference of where it is seated, with a hammer. You may be frustrated with the valve at this point, but you will want to keep your taps at moderate strength.
Once again, you do not want to break the waste valve as this can lead to your rv waste tank spilling all over the place. This will cause you to have to make repairs immediately and be quite the mess of sewer waste or grey tank mess.
If tapping the valve with a hammer does not work, there are several other at home tricks you may be able to implement to try and get the valve open. While it may sound strange, dumping a container of dish soap or RV drain valve lubricant into your black water tank and then driving the RV around may help loosen the stuck valve. Before you go to drive your RV around, you can also add a bag of ice to your vehicle’s black water tank to hopefully help distribute the dish soap or lubricant further.
This method may seem unorthodox, but as you drive your vehicle around the dish soap should be pushed all over the black water tank by the ice cubes. If the soap manages to reach the waste valve it could loosen the valve enough for it to open. If you can’t get your rv’s waste valve open, you will need to replace it.
Adding lubricant to your waste valve as well as flange seals could also help open your stuck sewer valve. Whether it is your black tank valve or your grey tank waste valve, this should be the same process. Lubricate the rubber seals, as well as the plunger on your gate valve. This may require letting it sit after you do so to let the lubricate penetrate in.
Always make sure your sewer hose is hooked up to a dump station when doing this as this could lead to RV black tank contents all over the ground if it suddenly flies open.
How to open a stuck RV Electric Waste Water Gate Valve
If your electric valve is not working, this could be a power issue, mechanical, or just stuck like a normal gate valve.
To troubleshoot, start by checking for power. If you have power, have someone hit the switch while you are listening to the valve, do you hear a solenoid clicking or gears grinding? If so, this may mean there is internal damage and you need to repair or replace the valve. If not, try lubricating the valve seals as well as any mechanical areas and try to open the stuck valve again.
How to open a stuck low point drain?
If your low point drain is stuck, try the same process as above, use lubrication on the mechanical items and seals and see if you can work it open.
How To Remove the Waste Valve on Your RV
The first step in replacing the waste valve on your RV is to remove the old waste valve from the RV. To complete this step in the repair, you will need to first locate the four bolts that hold the valve tight to the black water tank or the piping on the grey water tank. Once these bolts are located you will then need to remove them using one wrench to hold the bolts and another to loosen the nuts. If you can open your waste valve, you should always empty your black water tank before making this repair. If you can not open your waste valve, the process might get messy and more disgusting if your tank is full.
Keep in mind toilet items will be still in these pipes so always wear gloves and any other protective clothing when removing a holding tank drain valve.
Once you have loosened the four bolts holding the waste valve to your RV, you will then need to locate the two flanges that are placing pressure on the valve. Once located, use your fingers to pry open these two flanges. However, be careful not to damage the flanges as this will only increase the cost and extent of your repairs. After you have removed the four bolts and have the flanges pried back, you should be able to remove the valve. Next, you will need to install the new valve.
HOW TO REMOVE AN OLD WASTE VALVE ON AN RV
Step 1: Locate the four bolts holding the valve in position
Step 2: Loosen these four bolts using a wrench to hold the bolts and another to turn the nuts
Step 3: Pry back the flanges and carefully remove the valve
How To Install a New Waste Valve on Your RV
When purchasing a new waste valve, make sure you buy a quality component so it does not happen again. The first step to installing a new waste valve on your RV is to clean and lubricate the flanges on the RV waste system. These flanges need to be lubricated to ensure they will continue to function properly. Failure to properly lubricate these flanges could lead to another stuck valve in the future.
After cleaning the drain valve flanges, installing a new waste valve on your RV is pretty much like removing the old waste valve, except the steps are repeated in reverse order. Therefore, you should first locate your new valve and then pry back the two flanges to properly place the valve in its correct location. Once the valve is seated properly, you can then begin to tighten down the four bolts that hold it in place. This step should be completed just as before when you removed the broken valve. However, this time one wrench should be holding the nuts on the end of the bolts and the other wrench is tightening the bolts. After you have the bolts tightened, you should attempt to open and close the waste valve a few times to make sure it is functioning properly.
HOW TO INSTALL A NEW WASTE VALVE ON AN RV
Step 1: Clean and lubricate the rv’s waste system flanges
Step 2: Pry back the flanges and position the new valve
Step 3: Tighten down the four bolts
Tips to Avoid a Stuck Waste Valve in the Future
The best maintenance is always preventive, and there are several different procedures and tricks one can implement in their RV maintenance regiment to prevent the vehicle’s waste valve from sticking in the future.
The most common method for preventing the waste valve from sticking is to lubricate the seals or grease the valve every other month. In the winter, you should also make sure that you clean your RV’s tanks thoroughly before winterizing the vehicle. If any waste or water is left in the tank through the winter it can freeze and solidify around the waste valve seal. If this does happen, loosening the waste valve will be very intensive and frustrating.
Stuck Waste Valves
A broken or stuck waste valve stinks, and that’s not even taking into account the smell of the RV toilet waste it is holding back. Of course, every recreational vehicle owner will try their best to prevent their RV’s waste valve from becoming stuck.
However, these things just happen sometimes. Once you notice your waste valve is stuck you can attempt to loosen it with a hammer or dish shop as prescribed above. Though if the valve is stuck well enough, you might need to break down and replace it.
As you previously read, replacing the waste valve on your RV is not a challenging process, but it can take several minutes or hours if they are enclosed valves. If you are replacing the valve at a dump station with your sewer hose connected, make sure the station is not busy to be courteous to other RV owners. Good luck!
Be the first to be notified about FREE tips, hints, coupon codes, and email-exclusive information. All for FREE!
Related Posts:

Similar Posts

Can You Put a Lift Kit on a Travel Trailer?
Most people who own a travel trailer spend their time in campgrounds, some of the best campgrounds are difficult to get to. Whether the road is bumpy, hilly, or simply not maintained, you may run into an issue of hitting your sewer line or rear bumper on obstacles. Lifting your travel trailer is one way…

Here Are The Differences Between Class A, B, and C Motorhomes
When deciding on which motorhome to buy, you need to learn the basics of the different types of classes of motorhomes. We’ll be diving into the pros and cons of each one, but first, you have to answer the following questions. What type of trips you’ll be taking? How big is your family? Have you…

Why Does My RV Shock Me and How to Solve the Issue
In the world of RVing, there are tons of issues and things that can pop up unexpectedly. However, one of the more unusual and “shocking” problems happens when you touch your RV, and it zaps you with an electrical shock. Obviously, an RV that shocks you is abnormal, and you’ll want to solve the problem…

Do Travel Trailers have Titles, VINS, Odometers, Plates, and Insurance?
Does a Travel Trailer have a title? Most vehicles on the road today have titles to prove ownership. Travel Trailers or RV’s are not any different. Does a travel trailer have a title? Yes, travel trailers, RV’s, Campers, and tent trailers all will have titles. Titles are for the owners protection to prove ownership. If…

How Long Do the Brakes Last on a Travel Trailer?
When you purchase a travel trailer, it is absolutely necessary to have brakes on it. Regular vehicle brakes are not equipped to stop both the vehicle and a trailer that can weigh between 1,200 and over 9,000 lbs., not including the weight of extra items you put inside the trailer. Travel trailer brakes typically last…

Can You Take an RV Through a Truck Wash?
Being on the road for such a long time, your RV can get dirty faster than expected. However, finding a spot that allows you to wash an RV is not easy. But if you pass numerous signs indicating truck wash ahead, you may consider taking your RV through a truck wash. You can take an…
Join our Newsletter to stay up to date on the latest RV topics and receive our FREE RV Inspection Cheat Sheet Today. Use this tool to inspect new or used campers you are looking at purchasing.
No thanks, I’m not interested!

Select store
Internet # 310641528
Model # t58, twist-on waste valve.

- 3 in. Dia passage lets wastewater travel freely when valve opens
- Designed as quick fix for RV's black water waste-valve issues
- Lug fitting end secures to sewer hose to create a secure seal
- View More Details
Product Details
About this product.
Have you ever delayed fixing an old valve problem. Now just twist a new one onto your current waste valve bayonet fitting and eliminate messy replacements or paying for expensive service. Valterra's Twist-On Waste Valve twists directly onto your current waste valve, eliminating expensive service work. It even rotates to convenient positions to save you time.
- No more mess with an old valve problem
- Twists onto your current waste valve
- Eliminates expensive service work
- Rotates to most convenient position
- Return Policy
Product Information
Additional resources, specifications.
Dimensions: H 5.25 in , W 4.75 in , D 10.0 in
Warranty / Certifications
Questions & answers.
A: A 3" pipe will fit on this waste valve.
A: 3 inch. It's same size as a standard sewer hose.that they sale at stores.
Customer Reviews
4.3 out of 5
- 4.3 out of 7 reviews
- 50 % recommend this product
- Verified Purchase
- Recommended
Compare Similar Items
Related searches, related products.

Flanged Valve Fitting
Valterra's T1010 Sanitary Tee connects to black-water and gray-water waste valves to combine them into one pipe. The 3" rotating flange connects to black-water valve and the 1-1/2" rotating flange connects to gray-water valve. The hose connects to 3" lug fitting.

EZ Accessory Carrier
Valterra's EZ Accessory Carrier accommodates elbows and sewer fittings and can be attached to the bumper or frame using included hose clamps or self-tapping screws. The carrier measures 15 in. long with a 5.5 in. opening. Fits 90° sewer fittings.

30 Amp Power Inlet - Black
Valterra's Power Inlets are threaded to secure the cord set to the inlet. They are constructed of durable polyester with an easy open/close watertight cover. Each power inlet is cETL listed.

Slunky Hose Support - 10 ft., Black
Valterra's Slunky Hose Support keeps your RV drain hose off the ground. The deep pocket design provides enhanced stability and the individual nature of each support allows the hose to be curved around any obstacle while maintaining the proper elevation for best drainage. They are light and easily stored, three tie down straps are included.
Explore More on homedepot.com
- Beige Artistic Weavers Rugs
- Shop 12 X 18 Abstract Area Rugs
- My Texas House 5 X 8 Area Rugs
- Cork Underlayment 30 MIL Vinyl Plank Flooring
- Shop nuLOOM 3 X 5 Kids Rugs
- Shop 0.4 in BALTA Rugs
- Shop Blue Polyester Accent Chairs
- Grey Without Arms Bedroom Benches
- Queen Intex Air Mattresses
- Shop Medium Adjustable Mattresses
- Queen Auto-Inflate Air Mattresses
Heating, Venting & Cooling
- Built-In Pump Blacks Dehumidifiers
- Rectangular Emerson Thermostats
- Wall Mount 36000 BTU Mini Split Systems
- Shop US Stove Heating, Venting & Cooling
- 30" or Greater Steel Gas Fireplace Inserts
- Master Flow Appliance Vents
- Buy Merra 1-Light Matt Black Pendant with Seeded Glass Shade
- Metallic Outdoor Ceiling Lights
- Shop Brass Height Adjustable Floor Lamps
- Adjustable White Dimmable Light Bulbs
- Gold Small Flush Mount Ceiling Lights
- Shop Fabric Livex Lighting Flush Mount Ceiling Lights
Storage & Organization
- Ventilated Fixed Shelves Shelving
- Hampton Bay Deck Boxes
- Shop With Floor and Runners Best Barns Garages
- Highly Rated BENCHPRO Workbenches
- 96 sq ft Handy Home Products Wood Sheds
- Gray 42 or Greater Shoe Cabinets
Download Our App
Our Other Sites
How can we help?
- ©2000-2024 Home Depot |
- Privacy & Security Statement |
- My Preference Center |
- California Privacy Rights & Report |
- Limit the Use of My Sensitive Personal Information |
- Do Not Sell or Share My Personal Information |
- California Supply Chain Act
- Store Directory
- Motorhome Classes
- Travel Trailer
- Fifth Wheel
- Pop Up Camper
- Teardrop Camper
- Hybrid Camper
- Truck Camper
- RV Manufacturers
- Best RV Brands
- Buying An RV
- Backup Camera
- Electric Trailer Jack
- Portable Generator
- Portable Refrigerator
- Portable Solar Panel
- RV Power Cord
- RV Surge Protector
- RV Vent Fan
- RV Camping Chair
- Camping Table
- Portable Dog Playpen
- Propane Fire Pit
- RV Leveling Block
- RV Patio Mat
- RV Wheel Chock
- Wood Burning Fire Pit
- Portable Camping Toilet
- RV Black Tank Treatment
- RV Macerator Pump
- RV Portable Waste Tank
- RV Sewer Hose
- RV Shower Head
- RV Toilet Paper
- RV Water Pump
- Towed Vehicle Braking System
- Weight Distribution Hitch
- 12-Volt Air Compressor
- Collapsible RV Ladder
- Discount Camping Club
- Good Sam Club Membership
- Portable Propane Heater
- RV Mattress
- RV Step Cover
- Quick Reviews
- Full-Time RV Living
- RV Upgrades
- RV Boondocking
- Public Lands
- Overnight RV Parking
- Amazon Storefront
- Must-Have RV Accessories
- Travel Trailer Accessories
- Pop-Up Camper Accessories
- RV Kitchen Accessories
- Luxe RV Accessories
- Gifts For RV Owners
- RVers Online University
- Talk To RV Mechanic
- About Camp Addict
- Events & Press
- Camp Addict
- 🏕️ RV Holding Tanks
- RV Waste Valves
RV Waste Valves: What You Need To Know
By Kelly Beasley
RVing is fun and exciting! It's a great way to see new destinations and to create new memories. As fun as it is, part of the 'joys' of RVing is dealing with the good AND the bad.
Sure, camping is a great way to take a family vacation, but it's not always unicorns and rainbows. Sometimes it involves dealing with some gross.
The specific gross we're covering here is your RV holding tanks and the corresponding RV waste valves.
While waste tanks are FAR from delightful, it's best you know a few things about them. One thing to know is every tank has an RV waste valve that keeps the liquid in until you dump.
The most important thing to know is that the RV waste valve assembly on every tank can leak.
If your RV waste dump valve leaks or breaks, it must be addressed (unless you like having sewage on your hands and on the ground every time you dump.)
That said, let's look at what an RV waste gate valve is/looks like and familiarize you with what to do when it goes wrong.
What Is An RV Waste Valve?
An RV waste valve simply allows you to dump your holding tanks at an appropriate facility. Let's explain a bit more.
So your recreational vehicle has holding tanks underneath it. Their job is to hold everything that goes down your toilet and drains (typically a kitchen sink, bathroom sink, and shower).
They are called the black tank and the gray tank.
- Black Tanks : Holds sewage from the toilet
- Gray Tanks : Holds wastewater that goes down your drains (sink & shower)
These waste tanks have pipes that lead to your dump opening. The dump opening is where RV sewer hoses are attached when emptying your tanks.
In between the tank itself and the outlet pipe where you dump is a waste gate valve (a door). Without this door, what goes into the tank would simply come down the waste pipe.
Waste Valve Assembly (outlined)
If that were the case, liquid waste would come pouring out once you took off the cap at the end of the pipe (to dump).
Hence, the need for a door in between, to hold the waste water in the appropriate tank until it is time for you to empty the tank(s).
Usually, the valves are opened and closed by a connected long 'arm' with a handle at the end (though some higher-end RVs dump by the push of a button via an electrically operated camper waste valve).
These valves are called 'gate valves' (or an RV slide valve) because they operate much like a gate. When in the closed position, the 'gate' closes the outlet much like a gate closes off a road. When in the open position, the 'gate' slides out of the way and allows for free flow of water (opens the 'road').
What Goes Wrong With RV Sewer Valves?
RV sewer valves can go bad in a couple of ways. They either will leak waste water (not seal the tank closed completely), or they will get stuck and not slide freely.
Your sign that there is a problem is when you remove the sewer cap to dump, and you're greeted by liquid waste (sewage or gray water) that shouldn't be there.
Holding Tank Valve Handle & Extension Rod
It COULD be that you didn't fully close a valve, so don't panic just yet.
However, if it happens more than once, you have one of these three issues:
- Cracks: The RV sewer valve seals are cracked/leaking
- Debris: Debris can get stuck in the valve 'doorway,' causing waste water to leak through the seals
- Jam: The RV waste valve is stuck closed (or open, or partially between open and closed)
When it's a debris issue, opening and closing the valve while rinsing water through it (either by flushing it through from toilet or sink, OR by doing a backflush from the sewer pipe) might dislodge the offending bits.
This is an easy fix when it works. If you have a very slow leak, it could be debris. Try this resolution first.
If that doesn't stop the problem, you should replace the leaky RV holding tank valve.
Figure Out Which Valve Is Leaking
To find out which valve is leaking, just follow the below steps. (You likely have two RV waste tank valves. However, you may have three, or you may have one.)
If you only have one, there's no need to test.
If you have two or three, test.
Gray Tank Valve (left) & Black Tank Valve (right)
How To Find Which Valve Is Leaking
- Empty your tanks and then close your valves.
- It's a good idea to wait until the sewer pipe has thoroughly dried out.
- Put a bucket under the opening of your sewer outlet.
- Run 5-10 gallons or so of water into your toilet. Wait a few minutes and see if it leaks out of the sewer outlet.
- If it's leaking, you have debris in that valve opening, or it's leaking. Drain that water.
- Perform the same test with your gray tank.
- Whichever one leaks needs a new gate valve. If both leak, both valves need replacing.
How To Replace A Leaky Valve
Thankfully, installing a new gate valve is pretty simple for not much money. Valves come in two sizes.
- Black tank: 3 inches
- Gray tank: 1.5 inches
All you need is a wrench and a socket (OR you can take it to a service center).
Here's a short video showing how easy it is to replace your valve:
It's a simple procedure. Take out the bolts holding the RV black tank valve (or gray tank valve) assembly in place.
Remove the assembly and seals. For best results, check for any leftover debris and remove. Clean around the openings in between the pipes.
Insert the new assembly. Tighten the bolts down, and your RV sewage valve is ready for you to leave for your next trip!
These instructions are assuming you have easy access to your RV holding tank valves. Some trailers have heated tanks that are covered with a shroud or underbelly covering which makes accessing the valve assemblies a bit more challenging.
You may first have to undo the shroud or even cut an access panel into the covering to gain access. Not a deal breaker, but does complicate the process a bit more.
RV Sewer Valve Frequently Asked Questions:
How do you unstick a black valve.
You can try a few things to unstick your black tank valve. However, in the end, your best course of action is likely to replace the whole valve assembly.
First, pour some dawn dishwashing detergent into the offending tank. Make sure you put water into the tank first, of course. Let it soak, then try opening the waste valve again.
Next, try tapping on the valve lightly with a hammer, and this might create enough disturbance to get the closed waste valve to open.
Try tapping on the 'door' itself to get it moving. Be aware that if you use the hammer method, the whole thing could break, and you'll need to replace the gate valve after all. (Tap gently! Don't smack it like it's a nail.)
No big deal though, it's a pretty cheap and easy fix that you probably needed to do regardless.
How Do You Lubricate An RV Holding Tank Valve?
Lubricating an RV holding tank valve is another job that is relatively easy and costs very little money.
It involves disconnecting the gate valve from the drain pipe (be sure to wipe/clean around the seals), spraying a proper lubricant on it, such as Blaster White lithium grease, and re-installing it.
If you don't want to remove the waste gate valve assembly, here's an easier method.
Drill a small hole in the gate valve and spray grease inside that area. The below video shows this better than we can explain it:
What Is The RV Black Water Tank Valve?
The black tank holds only waste that goes down the toilet, including solids and liquids.
So, your black tank holds sewage . The RV sewer gate valve stops the sewage from draining out until you are ready to dump.
What Is The Grey Water Valve On An RV?
The grey water valve holds back the waste contents of the grey tank until you are ready to drain it.
The grey tank holds all liquids that go down your shower and sink drains.
Should You Shut The Holding Tank Valve On A Camper?
Well, yes and no you should shut the holding tank of a camper.
If connected to a sewer drain at a campsite or a septic tank (at home, for example), you should NEVER leave your black tank valve open 24/7.
Only open it when you intend to drain the entire tank.
However, you can leave your grey waste tank open at all times.
It still isn't a bad idea to let the grey tank fill up now and then, so when you drain it, the force carries out any leftover bits and you don't end up with food particles building up at the bottom of the tank.
RV waste tanks have valves that hold the liquids inside the tank until you are ready to dump. They act as a door that keeps the wastewater in the appropriate tank until you wish to empty it at an appropriate dump facility.
Sometimes the door (RV waste water valve) has issues, causing nasty leaks to happen.
This is usually apparent when you take off the cap from your dump pipe and you're met with waste you weren't prepared for. Leakage should not happen when your valve(s) are working correctly.
Thankfully, it's not hard to diagnose and fix the issue, no matter what it is. Just be sure you address any problems that arise so your camping trip goes smoothly!
Author: Kelly Beasley
I dedicated myself to living the full-time RV life for over 6.5 years, immersing myself in the unique quirks and joys of the boondocking lifestyle and gaining a wealth of knowledge and experience along the way. In December 2020, my business partner and I made the transition to part-time RVing, but in January 2023, we hit the road once again, this time in our trusty vans. My mission is to help others embrace the RVing lifestyle with confidence and excitement, armed with the knowledge and resources needed to make the most of their adventures. I believe that the more you know, the more you can truly appreciate and enjoy the freedom and flexibility of the open road.
Session expired
Please log in again. The login page will open in a new tab. After logging in you can close it and return to this page.

RV Plumbing System Basics: Diagrams & How It All Works
RVs can be intimidating, especially if you’re brand new to them. They have so many different systems and it’s all so different from what we’re used to in our homes. Learning it all can feel overwhelming, but RVing Headquarters is here to help! If you want to learn RV plumbing system basics, you’re in the right place.
Not only do we cover the basics and include RV plumbing diagrams, we’ve also got several step-by-step “how-to” tutorials in this post!
This guide covers:
- RV plumbing system basics
- RV holding tanks
- How RV toilets work and how to use them
- How to sanitize your fresh water tank
- How to dump your waste water
- How to find RV dump stations
- Essential RV plumbing accessories
- And so, so much more!
This post contains affiliate links. This means if you make a purchase after clicking a link on our website, we may earn a small commission at no extra cost to you.
Table of Contents
RV Plumbing System Basics
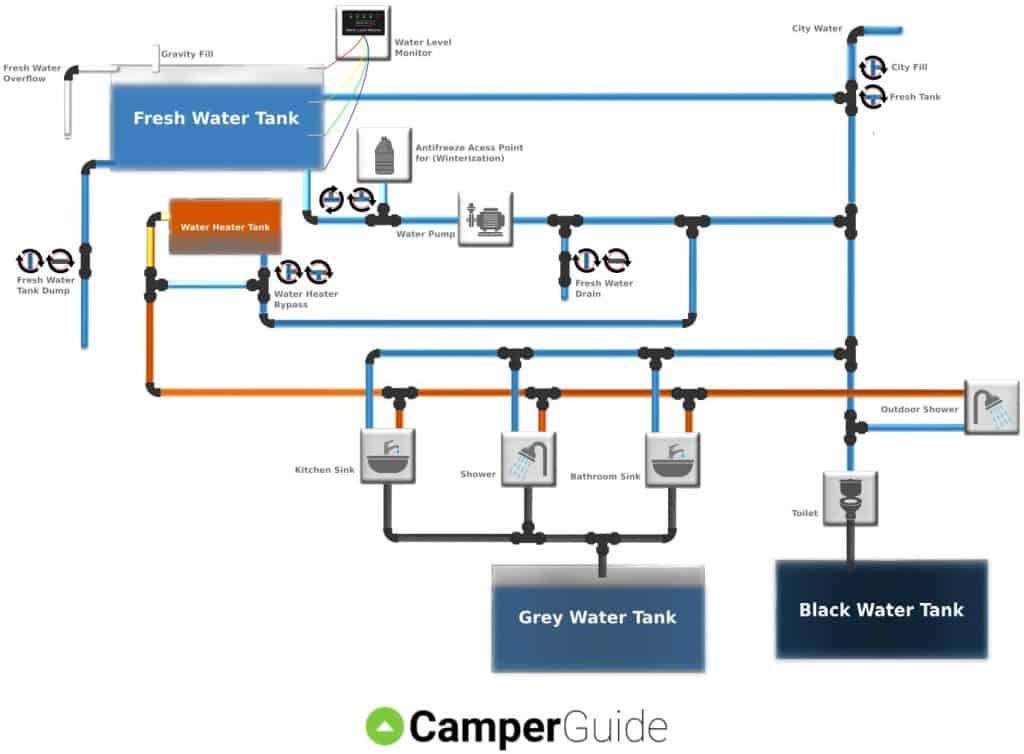
Your RV plumbing system is made up of many of the same components as a house plumbing system, with a major difference: you store your fresh AND waste water on board.
Every self-contained RV will have at least 3 water holding tanks, and the size of the tanks is dependent on the size of the RV. The holding tanks on an RV are:
- Fresh water tank – stores fresh, potable* water for drinking, cleaning, and showering.
- Grey water tank – stores waste water from your sinks and shower.
- Black water tank – stores waste water from your toilets–aka sewage.
*Potable water is water that is safe for human consumption.
Some larger RVs and fifth wheels may have 4 tanks if they have two bathrooms.
These 3 tanks allow you to have all the comforts of home, no matter where you are.
You can use the toilet in your RV, shower in your RV , wash dishes, cook, and yes: you can even drink the water from your RV fresh water tank.
You can fill your RV with fresh water from home, campgrounds, or anywhere with a potable water spigot.
When it’s time to dump your waste water, you need to find an approved RV dump station and connect a sewer hose to dump your RV–we explain all of this later in this post.
RV waste water must always be dumped at an approved dump station. Never dump your RV waste water on the ground. It’s illegal and it’s a biohazard!
Your RV has holding tank sensors on each tank and a panel inside the RV that tells you how full your tanks are so you always know if you need water or if you need to find a dump station.
RV Plumbing System Diagram: An Overview
Water-Using Appliances and Fixtures in an RV
Every self contained RV will have these fixtures and appliances at minimum:
- Hot water heater
The bigger and more luxurious an RV you have, the more water-using appliances and fixtures you will have. These include:
- Shower(s) – indoor and outdoor
- Washing machine
RV Holding Tanks Explained
To understand RV plumbing system basics, you need to understand RV holding tanks. There are 3 types of holding tanks in every self-contained RV , and each type of tank holds a different kind of water.
Although larger RV types may have more than 3 tanks total, there are only 3 kinds.
Fresh Water Tank
The fresh water tank holds fresh, potable water. You can use this water for drinking, showering, cooking, and washing dishes.
The fresh water tank supplies water to every water-using appliance in your RV. This tank has a filling port on the RV exterior called the city water connection.
“City Water” can mean potable water from any potable source, like from your house spigot, a campground, etc.
Depending on the size of your RV, your fresh water holding tank may be able to hold anywhere from 12 – 100 gallons of fresh water.
Grey Water Tank
“Grey water” is the term used to describe waste water from your sinks, showering, dishwasher, and washing machines. This waste water contains soaps, washing chemicals, and even food particles from washing dishes. Grey water is not true sewage, but it can definitely develop a terrible odor!
Typically, the grey water tank on your RV is as big as (or bigger) than your RV fresh water tank. The grey water tank also fills up the fastest and needs dumped more often.
This tank is plumbed to the grey tank waste valve on the exterior of your RV for dumping.
Black Water Tank
“Black water” is the term used to describe sewage, so your black water tank is your sewage tank. The black tank holds waste and waste water from your toilets, and occasionally your bathroom sink.
If your RV has two bathrooms on either end of the RV, you will likely have 2 black tanks. This is because the black tank is always directly beneath the toilet. This allows solid waste and paper to drop straight from the toilet into the black tank, so you never have to worry about toilet clogs (unless you develop a poop pyramid).
The black tank is plumbed to the black tank waste valve on the exterior of your RV for dumping, located right next to the gray tank waste valve.
RV Holding Tank Diagram

The RV Toilet Explained & RV Toilet Diagram
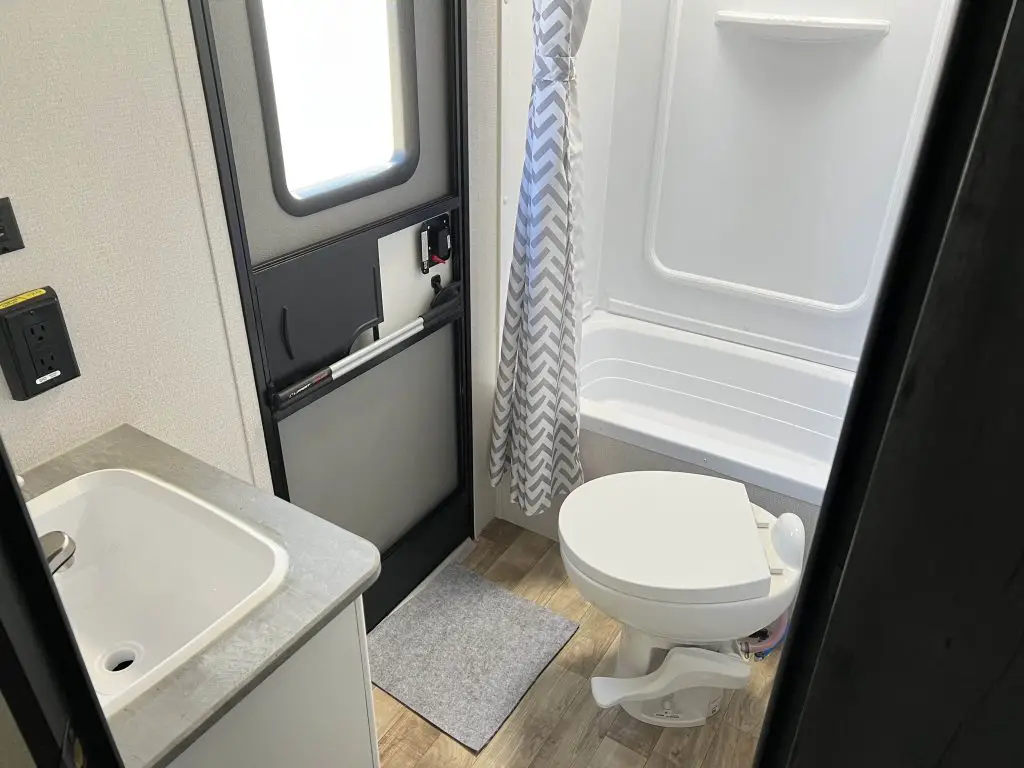
If you’ve ever stepped foot in an RV bathroom, you probably noticed that RV toilets are nothing like residential toilets .
They have a flap that closes the hole, and a pedal on the exterior of the toilet. They don’t have a fresh water holding tank and they also look quite a bit different from a residential toilet. Some RV toilets even have a sprayer or spraying wand for rinsing the bowl.
So how does an RV toilet work ?
How Your RV Toilet Works
There are 3 things that make the RV toilet work:
An RV toilet doesn’t have a freshwater tank, but it is hooked up to a water line which you can usually see on the back of the toilet.
The RV toilet pedal works to open the flap and flush the toilet, but it also serves two purposes.
If you hold the pedal down halfway, it fills the toilet bowl with water but doesn’t open the flap.
If you press the pedal all the way, it opens the flap AND activates the water.
The flap in the bottom of the toilet bowl is lined with a rubber gasket, called the flush seal. This rubber gasket serves two purposes: it holds water in the toilet bowl, and it also creates an air-tight seal to prevent odors from the black tank from entering the RV.
RV Toilet Diagram

How to Use an RV Toilet
You can use your RV toilet for both #1s and #2s, but the process is a little different for each.
To use an RV toilet, first hold down the pedal halfway to add some water to the toilet bowl. If you’re going #2, be sure there is plenty of water in the bowl.
To flush, depress the pedal all the way. Hold the pedal down long enough to flush all debris out of the toilet bowl and rinse it.
If you go #2 or you use toilet paper, hold the pedal down for several seconds to flush with plenty of water.
The key to preventing RV black tank clogs is making sure you always have plenty of water in the tank to help liquify solid waste.
This information is for a standard RV toilet which is the most common, but there are many other RV toilet types. Examples include the composting toilet , cassette toilet, macerating toilet, and more.
IMPORTANT RV TOILET TIP: How to Avoid RV Black Tank Clogs
RV black tank clogs are something no one wants to deal with, but they happen often. One of them is the dreaded RV poop pyramid that happens when solid waste and paper build up and create a literal pyramid in the tank.
Here are 4 important tips to prevent RV black tank clogs (essential RV plumbing system basics tips).
- Always flush with plenty of water.
- Use RV-specific toilet paper in your RV toilet, or don’t flush your paper and put it in a trash can instead.
- NEVER leave your black tank waste valve open, even at a full hook-up campground. This causes poop pyramids by allowing liquids to drain and solids will build up. Leave it closed until the tank is full and ready to dump.
- Use a black tank treatment like RV Digest-It to help dissolve solid waste. 2oz treats a 40 gallon tank, add it in after you dump and rinse your tank. This will prevent dried waste from accumulating in your black tank.
RV Plumbing System Inputs and Outputs
So how does fresh water go IN your RV, and waste water go OUT?
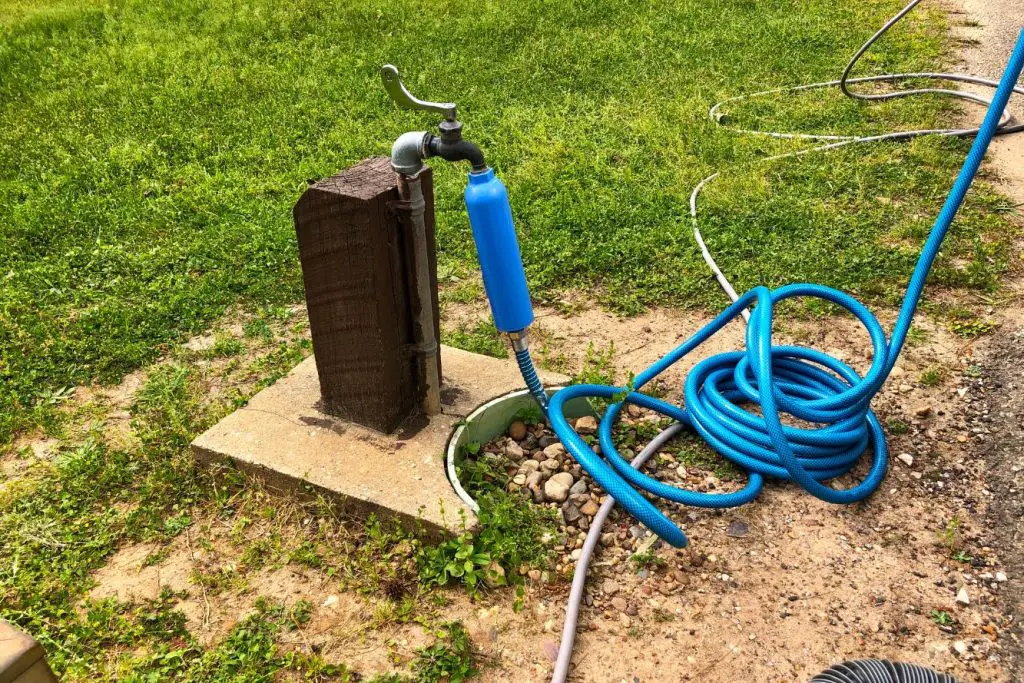
City Water Connection/Fresh Water Fill
Fresh water goes into your RV via the city water connection, which is a port on the exterior of your RV that you hook a hose up to.
Never use a regular garden hose to add fresh water to your RV–you need a potable water hose. Potable water hoses are made specifically for clean drinking water and are free of the chemicals that can leach into the water that you find in garden hoses.
Never use your potable water hose for anything other than drinking water. You can use a utility hose for everything else! Store your potable water hose in its own separate and SANITARY container. You never want to risk cross-contaminating!
RV Waste Valves
RV waste valves are exactly what they sound like: valves that open to dump your RV waste water.
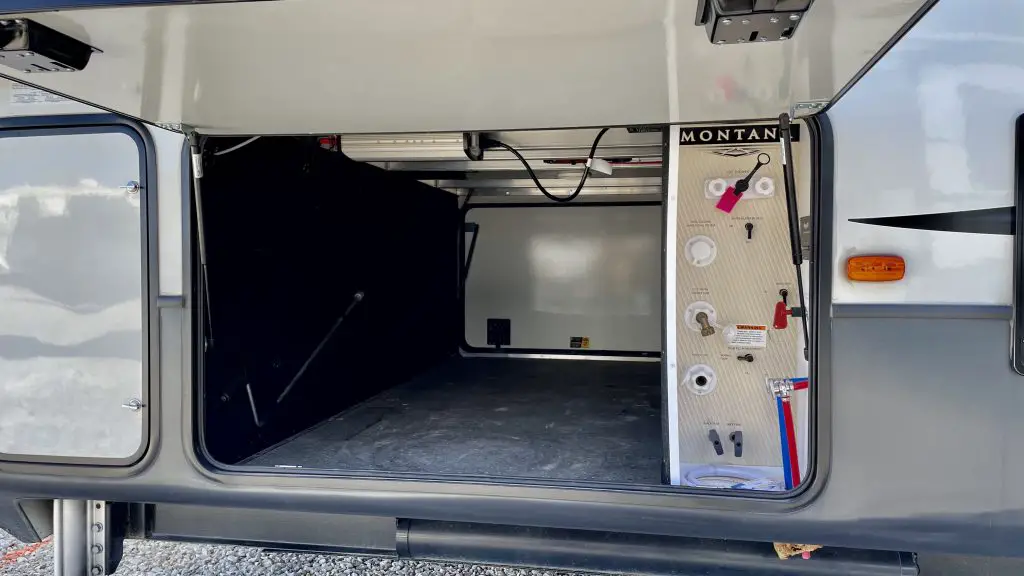
Your RV fresh water fill and RV waste valves are both located on the driver’s side exterior of your RV.
In many cases, they are all located in the same general area. Some RVs have a sanitation-station area located in a storage bay, but others have them exposed.
The gray water and black water waste valves will usually look just like handles attached to a metal rod. Pulling these handles will open a valve, called a gate valve, that dumps your RV waste water tanks.
These valves have a rubber gasket, similar to the one on your toilet flap. This keeps them closed and watertight, but they can fail from time to time. If you notice waste water dripping from this area, you may need to replace your gate valve.
Never pull your gate valve handle until you are absolutely sure that your RV sewer hose is tightly connected and securely attached to a dump station.
Once you pull the valve to dump your tanks, water comes out with such force that the hose can easily pop off or come out of the sewer port on the ground.
Editor’s Note: The sewer hose popping off mid-dump has happened to me more than once and it’s a disgusting mess! Now I am always sure to tug on my sewer hose at the connection after I hook it up to make sure it’s secure.
How to Fill Your RV Fresh Water Tank
One of the easiest RV plumbing system basics is filling your fresh water tank. Filling your fresh water tank is as simple as hooking up your potable water hose to a spigot, connecting it to your RV, and turning on your “Fresh Tank Fill”.
The fresh tank fill may be labeled differently on different RVs, but it should say something similar.
On most RVs, it’s a knob that can point in one of two directions: city water or fresh tank fill.
Leaving the knob on “City Water” does not fill your fresh water tank. This simply allows the water from the spigot to go directly to your taps and appliances any time you use them. This is a good option if you are staying in one spot for a long period of time, as long as the temps are above freezing.
Turning the knob to “Fresh Water Fill” will allow the water to go through your RV plumbing and fill up your fresh tank. Be sure to constantly monitor your tank monitoring panel so you can turn the water off before your fresh water tank overflows.
Can You Drink Water From Your RV?
Yes! You can drink water from your RV, as long as you keep up on your fresh water tank sanitization maintenance. Your RV is meant to be a home-away-from-home, and it’s meant to have every creature comfort as a house.
If you regularly sanitize your fresh water tank, the water in your RV can be used for drinking, bathing, washing dishes, and cooking!
Sanitizing Your RV Fresh Water Tank – RV Plumbing System Basics
You should sanitize your RV fresh water tank every 6 months if you’re a full-time RVer, or before every camping season if you’re a part-time RVer.
Sanitizing your RV water tank is a pretty simple procedure. It involves adding chlorinated water to your fresh water tank and running it through all your faucets. Then, let it sit for several hours, drain it out, and run fresh water through your system.
Important: Never add undiluted bleach to your RV plumbing system. This will damage your tank and pipes! Always be sure to mix bleach with plenty of water and have a few gallons of water already in your tank before adding the bleach mixture.
You’ll need about ½ cup of bleach for every 25 gallons of fresh water. Mix your required amount of bleach with several gallons of fresh water before adding to your RV tank.
- Drain your RV fresh water system including all faucets, toilet, shower, etc.
- Turn off and bypass your hot water heater and any other appliance you don’t want bleach to get in. There are knobs to do this, refer to your owners manual if necessary.
- Mix your bleach with several gallons of fresh water.
- Add bleach water to your RV fresh water system.
- Fill fresh water tank.
- Turn on your water pump and open all faucets one by one until you smell the bleach water mixture.
- Let sit for 6-12 hours.
- Drain your fresh water tank and refill.
- Run fresh water through all your faucets (one-by-one) until you no longer smell bleach, and you’re done!
How and Where to Dump Your RV Waste Water

To dump your RV waste water, you need:
- An RV sewer hose kit with a clear attachment
- Clorox wipes
- Utility hose
- A dump station!
The quality of your accessories will make all the difference when doing this dirty job.
Not all RV sewer hoses are made the same, and some can make the job a lot harder, messier, and more disgusting than others.
Editor’s Note: I tried the cheap, flimsy RV sewer hoses ONE TIME and vowed I would never go back! It was an awful experience, the sewer hose slithered around like a snake and the attachments were impossible to screw on.
Now, I use the Rhino Extreme sewer hose kit (shown in photo above) because it’s rigid and stays in place. It’s a bit pricey, but I promise you it’s worth it… I’ll never use another brand!
Most RVers recommend having a clear attachment so you can see the color of the water draining as you rinse out your tanks. It might seem gross, but it’s a fact of life and it’s the only way you can know if your tanks are actually clean! (The Rhino kit comes with one, so no worries on that.)
How to Dump Your RV Waste Tanks – RV Plumbing System Basics
RVHQ Tip: always dump your black tank first. Dumping your grey tank after your black tank helps rinse out the sewer hose and remove any remaining sewage or debris.
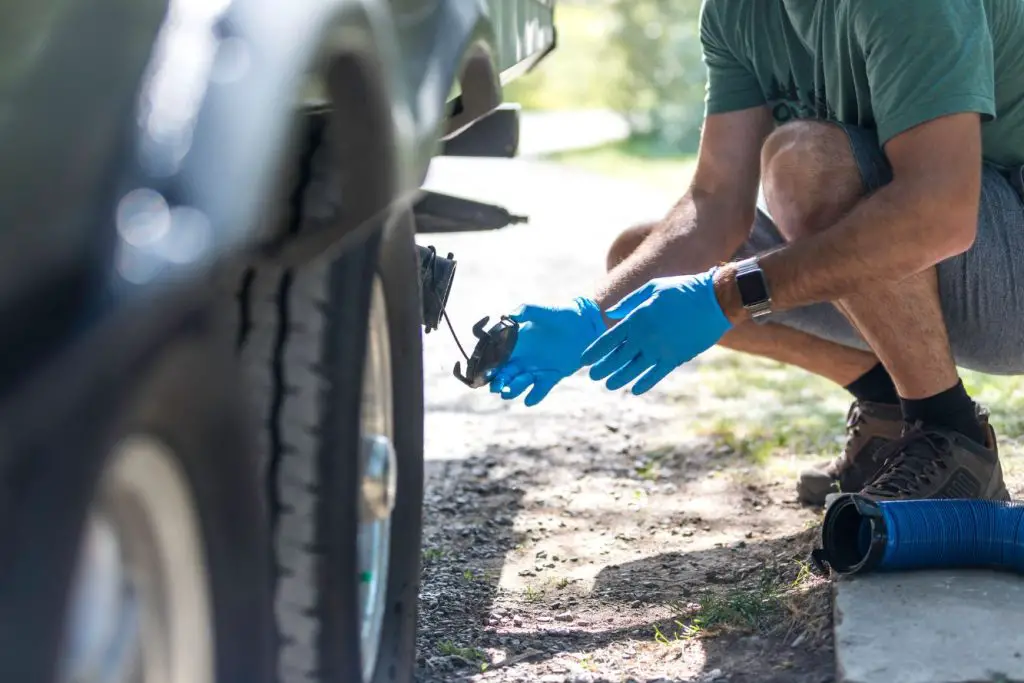
- Put on gloves.
- Hook up your RV sewer hose to your RV sewer hose hookup, and give it a good tug or jiggle to make sure it’s locked in place.
- Put the other end of the sewer hose into the dump port on the ground. Be sure this is secure in the hole. Sometimes there will be a large rock or cement block to put on the top of the hose to hold it in place.
- Once you’re sure everything is tight and secure, slowly start to open the black tank valve. If the hose is remaining tight and secure, you can open the waste valve all the way.
- Once the black tank is empty, close the valve.
- Hook up your utility hose to your black tank flush (if applicable) and flush your black tank for 10-15 minutes, then drain again and close the valve.
- Repeat the process with your grey tank, then close the grey tank valve.
- Remove your sewer hose from your RV but leave it in the dump port.
- Use your utility hose to rinse out your RV sewer hose.
- Put your sewer hose and utility hose away.
- Use sanitizing wipes to wipe down the spigot and all valves and handles on your RV that you touched during the process.
How to Find RV Dump Stations Near You
Dumping RV waste water is just a fact of life, and you can find RV dump stations all over the place.
By law, you cannot dump RV waste water on the ground. Both grey water and black water should only ever be disposed of in an approved RV dump station.
RV dump stations can be found:
- At your campsite if you have full hook-ups.
- At campgrounds, RV parks, state parks, etc.
- At RV dealerships.
- At RV service centers.
- At some gas stations.
- At some rest stops.
Apps and Websites to Find RV Dump Stations:
- Allstays RV Dumps App
- FreeRoam App
- RV Dump Stations App
Essential RV Plumbing System Accessories
We say “essential” because these accessories really are essential in some way or another. For example, you can’t dump your RV waste water without a sewer hose.
And, in some campgrounds, you’re not allowed to hookup to the sewer unless you have a sewer donut and/or a sewer hose support.
Each of these essential accessories has a link to a recommended product on Amazon and a brief description of why you need it.
Important: RVers should carry two hoses. You need a potable water hose AND a utility hose. Your utility hose can be a garden hose, and you can use this hose for everything from rinsing your feet to washing your RV or rinsing your sewer accessories. NEVER store your utility hose and potable hose together.
- Water Filter – A water filter is essential for filtering out sediment from varying water sources. Some campgrounds have a lot of sediment in the water that can damage your RV plumbing.
- Water Pressure Regulator – Campgrounds do not regulate their water pressure, but your RV can only handle 40-60 PSI. Some campgrounds have 100+ PSI and can rupture your RV pipes.
- RV Sewer Hose and Clear Attachment – This is essential for dumping your tanks.
- RV Sewer Donut – This is a sewer port attachment that helps your sewer hose stay in securely. Some campgrounds require this.
- RV Sewer Hose Support – This keeps your RV up off the ground and provides a slope for draining. Required by some campgrounds and RV parks.
- Extra RV Waste Valves – Essential to have if one of your waste valves fails and starts leaking.
- Potable Water Hose – For drinking water only. Be sure to get a potable hose that’s rated specifically for drinking water.
- Utility Hose – For everything else.
Storing Your RV Plumbing Accessories
Always store your fresh water supplies in a sanitary container that’s watertight and never cross-contaminated with other things.
Editor’s Note: I like to use clear plastic totes to organize my sewer accessories and I label the exterior so I never mix them up.
All of my fresh water supplies like fresh water hose, water filters, and water pressure regulator all go in one tote. I keep this tote clean and dry and I clean it with a bleach water spray bottle mixture every few months to keep it sanitized.
All my sewer supplies go in a designated sewer tote that I store away from my fresh water tote. If you have to store them together, store your sewer tote on the bottom.
Wrapping Up RV Plumbing System Basics
This RV Plumbing System Basics is a beast of a guide, and I hope by now you have a solid understanding of how the RV plumbing system works. And how to actually use it, clean it, and dump it!
The RVHQ editors are constantly adding to this post and updating it to keep the information fresh, and adding additional insight when we find it.
RVing Headquarters Team
RVing Headquarters is operated by long-time RV enthusiasts with over 8 years of RV industry expertise and full-time and part-time RV ownership experience. From motorhomes to trailers and campervans, we've done it all. Our Mission: to inspire, educate, and entertain anyone who is interested in the RV lifestyle.
Recent Posts
Should I Leave My Black Tank Open or Closed? Waste Tank Tips
Full hookup RV parks and campsites are the creme-de-la-creme of campsites, providing all the convenience of a sticks-and-bricks house in nature, with an ever-changing backyard. If you’re on full...
Why Are Campers 5th Wheel and Not Gooseneck Hitches?
Fifth wheel RVs are the largest towable campers with the most amenities and features. As you’re RV shopping or researching, you may be wondering: why are campers 5th wheel and not...

RV Tip of the Day
Rv tips, news & information about rving lifestyle, how to replace an rv waste dump valve.

Last updated on November 4th, 2019 at 10:05 pm
A properly working RV waste dump valve should not leak and should be easy to operate. If you have a waste valve that leaks even a little, or the gate doesn’t open and close with ease then it’s time to replace it. Don’t wait… it won’t get better and as it gets worse the replacement may get more difficult.
Also, if you have a hard-to-reach waste valve you may want to consider installing an electrically operated waste valve . Although installing the wiring and switch will require additional time and labor, in the long run, you’ll appreciate the convenience of remotely operating the valve.
RV Waste Dump Valve Leaks
Keep in mind it is not uncommon to have a leaking valve on occasion. This is often caused by debris that gets stuck in the valve when closing it after dumping. You can usually remove the obstruction and eliminate the leak by opening and closing the valve a few times during the next dump.
If you continually find liquid each time you remove the drain cap it’s time to replace the leaking waste valve.
Waste Valve Hard to Open and Close
Over time you may find the valve handle getting harder to pull open and/or push closed. If it gets too hard to open you may find the last pull of the handle will pull the rod right out of the valve blade and drastic measures will be needed to dump the tank. Of course, you will have to replace the valve then anyway so why wait?
Often times a difficult to operate valve will also be a leaking valve. But you will need to determine if another valve isn’t the source of the leak or also is leaking.
Determining Which Valve Is Leaking
Before I go further, I need to say what will be obvious to most. You need to have access to a sewer connection to perform a waste valve replacement. You will have to dump then thoroughly flush each waste tank. After the tanks are flushed as clean as possible the tanks should be completely drained. All of this takes a lot of time. Out of courtesy to your fellow RVers, this work should not be attempted at a public dump station.
Also, while most RVs have two holding tanks, one gray and one black, it is not unusual for RVs to have three tanks and it’s possible to have more.
So, now that you have all the tanks dumped, flushed, and drained you can determine which tanks are leaking by closing the valve of each tank individually… one at a time… and filling the tank with a few gallons of water. Depending on how much the tank leaks, you may have to wait several minutes to see a flow. Test each tank in this manner since you may have more that one valve leaking.
As an alternative to this testing, you may just want to replace all the valves. They are not expensive and a little preventive maintenance now could save you repeating the dump, flush and drain procedure in the future.
Removing the Old Waste Valve
RV builders are some of the most ‘creative’ folks you’ll ever meet. They can devise amazing ways to plumb waste holding tanks to the waste drain. Unfortunately, this creativity sometimes overlooks the fact that, someday, the waste valves may need to be replaced.
My RV tech has told me a few horror stories. Like trying to get access to a valve and needing to remove one holding tank to replace a valve on another tank.
The usual problem stems from the need to spread the valve flanges wide enough… about 2 inches… to remove and replace the gate valve. Two inches may not seem like much but depending on how the manufacturer plumbed the waste system there might not be enough give in the plumbing to do it.
So, before you make the decision to DIY it, be sure you know what you’re getting in to.
If you go ahead, you may want to consider making some modifications, if possible, to the plumbing to make future valve replacements easier.

The rubber couplers are tough but you may need to install an additional hanger or bracket to support the weight of the plumbing.
I used flexible couplers on my RV plumbing modification several years ago and they are still doing fine. Click Here to see what I did.
Fortunately, on most RVs, removing and replacing a waste valve is straight forward and reasonably quick.
Once you have the old gate valve and flange seals removed, clean and dry the flanges.
Installing a New RV waste dump valve

If you need to make modifications to the waste tank drain plumbing that requires additional materials you may be able to get it all at your RV shop. Check there first as some plumbing parts are RV specific. Common plumbing supplies such as additional pipe, elbows, and couplers not available at the RV shop can be purchased at any home improvement store.
The photo below shows a typical waste valve replacement kit. It contains a new gate valve, two new seals and new bolts and nuts.
For the purpose of good photography and so that you don’t have to look at some nasty old plumbing I’ve used new parts to illustrate my text. It should be easy enough for you to extrapolate what you see here to what your plumbing looks like.
Installing New Flange Seals
With the flanges clean and dry it’s time to install the flange seals.
Start by applying a liberal coat of petroleum jelly to each seal and the slide track for the gate. You don’t have to gob it on. The petroleum jelly acts as an additional seal and helps the valve assembly seat properly on the seal. Once the new gate valve is installed, the petroleum jelly lubricates the gate and helps to keep it sliding easily.

Installing the Gate Valve Assembly
With the new seals placed on each flange, it’s time to install the gate valve.
To ensure you don’t dislodge the seals it is important that you spread the flanges far enough apart to easily slip the gate valve into place. It’s not difficult or complicated and you should be able to feel and see that the valve is properly placed.
With the gate valve held in place by the two flanges, check for even spacing between the valve body and the flanges. Even spacing is a good indication the valve is placed properly.
Align the valve body so the bolt holes line up and install the bolts and nuts. With the nuts finger tight, again check for even spacing between the flange and valve body. Now operate the slide gate a couple of times. It should slide easily with no hesitation. If it doesn’t, disassemble the valve and reinstall the seals.

If the gate valve slides freely then tighten the nuts to close the gap between the flanges and the valve body. The nuts should be snugged tight but not over tightened.
With the bolts tightened and the gap closed, check the valve operation again. It should slide easily with no hesitation. If it doesn’t, disassemble the valve and reinstall the seals.

If you are happy with the valve operation, you are done.
Congratulations you just saved yourself a lot of money by doing the job yourself!
———
Empty holding tanks with the press of a switch!

Also see: Broken RV Waste Valve the Tank Won’t Drain
Share this post, related posts.

RV Awning Fabric Recall 49k RVs Affected

Breakaway Brake Switch Wiring – Forest River Recall

Jaco – Highland Ridge – Starcraft RVs Recalled

Spare Tire Carrier U-bolts May Fail
13 responses to "how to replace an rv waste dump valve".

Can’t see the pictures with this article.

Thank you, thank you! I tried something different with the graphic and it didn’t work. The images were there when I viewed the post but it was loading them from my desktop.

Good pictures Rubber coupler, “outside the box” Genius
Thanks, Glen
Thanks, Glen.

If the bottom of your RV is sealed how do you get to your waste waste water valve
If the bottom pan cannot be removed (no screws or bolts) then you will have to cut an access hole to get at the valve. Once the valve is repaired, you can patch the opening with compatible material.

Thanks for the great info, Your pictures are perfect and provide the understanding that is needed. Double thanks for NOT video. (We are traveling and have limited Internet access.) Now, I need to find new valves and then to see if I have the necessary 2″ of space to do the replacement.
Thank you.. It is always nice to hear that someone finds our information helpful. We all learn from each other.

I have veri light Forest River 70 series how do I put sewer and grey valves back together
Mark, I did my best to explain the process in the article above. Unless you have specific questions, I cannot provide more information.

how do i replace the valve when the holding tank is full?

See this article: I Pulled the Dump Valve but the Tank Won’t Drain?

Robert and Steven you guys got a problem . if you cannot pull the handle to dump because they are broken then you have to disassemble the valve while the waste is still in the tank. Going to be a messy job. Loosen all the screws 4 of them as far as they will go without removing them then get a prybar and seperate the gate allowing it to drain the tank. Nasty.
Post Comment
This site uses Akismet to reduce spam. Learn how your comment data is processed .
Replace RV Sewer Valve | 8 Easy Steps
Are you finding it difficult to open and close your fresh or black water valves?
When you remove the cover from your sewer system does it leak water?
If so, it might be time for you to replace them.
These are the two main reasons why you may consider having to replace the valve. Replacing the sewer valve is a relatively easy task and can be accomplished within about an hour.
Table of Contents
Sewer valve leaks
It is quite common for a valve to leak if you have some debris that has been lodged between the blade and the rubber gasket.
If this is the case, try opening and closing the valve several times and see if that resolves the issue.
If you continue to find liquid when you remove the drain cap then it is time to replace the leaking valve.
Product prices and availability are accurate as of the date/time indicated and are subject to change. Any price and availability information displayed on [relevant Amazon Site(s), as applicable] at the time of purchase will apply to the purchase of this product.
For a quick fix you could try applying light grease to the metal handle shaft or spraying with a lubricant and moving the handle in and out. if this doesn’t help then I’d recommend you replace the valve before it gets stuck closed and you have a full tank which makes it impossible to replace.
Don’t wait until it’s stuck
If you’re experiencing either the leaky valve or sticking valve head over to your local RV store and pick up the replacement valve. you don’t want to be the guy with the valve stuck closed and a full tank. this turns and easy 1 hour job into a very disgusting task.
RV waste valve sizing
The typical freshwater valve is 1 1/2 inches in diameter. Your black water valve will be 3 inches in diameter. Valterra sells an aftermarket valve for both your fresh and black water. They are relatively cheap and come with all the hardware required for the average DYI person.
The only recommendation that I would make is to replace the standard bolts that are provided with the kit with stainless steel ones that you can purchase from your local hardware store. The reason I switch to stainless steel bolts is because they don’t rust and when I have to replace the valve again in the future, I won’t have to use a hacksaw to remove them.
Tools Required to Replace Waste Valve
The 3″ Valterra replacement kit come with everything that’s needed to replace the valve. You will need a wrench to remove the bolts and possibly a hacksaw if the original bolts are rusted.
When I went to go replace mine after about 5 years of use, they were totally rusted and I needed to use the hacksaw to cut them off and that’s when I made the decision to use stainless steel bolts.
Another thing to consider when you are installing the valve you may want to use some grease on the blade and the rubber seals to ensure that they don’t seize sooner than necessary.
- Sewer Valve Replacement Kit
- Two wrenches
- Light grease for lubrication
Removing the Valve
- Empty and thoroughly flush the black tank. Drain the gray tank to flush away any remaining black material. Close the valve.
- Place a container underneath the valve to catch drips. Suitable containers include an old coffee can or aluminum baking tray.
- The valve slides in between two flanges. It is held on with four nuts, bolts and washers. Hold the bolt still with one wrench and turn the nut until all are removed–or vice-versa.
- Gently pry apart the two flanges and work the valve out. If there is resistance, push on the sewer pipes so that they move away from one another. The valve may drop out, or you may need to twist it gently.
- The valve has two rubber gaskets, one for each flange. Check to see that they came out with the valve. If not, pull them off the valve. There may be some dripping at this stage.
Replacing the Valve
- Gently slide the new valve between the flanges. Using stainless steel bolts start the bolts and turn the valve gently to ensure it is seated firmly.
- Gently tighten, but do not overtighten, the bolts and nuts. Use the stainless steel bolts that you purchased at your local hardware store. They are 1/4″x20 at 2″ in length. This will ensure the next time you have to replace the valve it will go much easier. Mine were totally rusted after only 5 years of use.
- Wipe off any remaining mess and discard the rags. Your new valve is ready to use.
Use stainless steel bolts that can be purchased from your local hardware store for under $2. This will ensure an easy replacement the next time you have to replace the valve.
Maintenance
Preventing a sticky valve is much easier than having to go and replace the valve every three to five years. Applying a small amount of light grease or some silicone spray on the pull handle shaft should be done once or twice a year at the minimum. as there is no way to access the blade without removing the valve there’s not much else you can do.
What can I do if my valve is stuck open in an emergency?
In an emergency, Valterra has a Twist on waste valve that that connects to the end of your sewer outlet just like the normal 3 inch sewer hose does. You should be able to get this at your local Walmart or RV parts store.
How to open a stuck closed valve
If your tanks are full and your valve is stuck closed there’s only a couple things that you can do. You can try spraying with penetrating oil and letting it sit for a while and see if that helps. The other option is to use a set of vice-grips to get better leverage while trying to open the valve.
Dennis Dunbar
Recent Posts
Sanitize Your Fresh Water Tank | Easy Method
You should sanitize your RV water system at least 2 times a year. Once in the beginning of the camping season and again at the end of the season before winterizing. Clean and safe water is very...
12 Rules For RV Camping and Campsite Etiquette
Whether this is your first time or one of many, it's a good idea to respect your fellow campers. Following these simple campsite etiquette rules will make sure you and your neighbours have a...
Automated page speed optimizations for fast site performance
- Shopping Cart 0
RV Sewer Valves

In order to comply with certain requirements related to mobility, water heating, and the ability to hold the wastewater, a typical RV plumbing system includes pumps , tanks, several types of valves, and other components that are usually not installed in buildings. A camper's plumbing is self-contained, and little space available forces designers to do a meticulous job to optimize the size and shape of every single component. Valves are especially crucial, and their correct use will prevent annoying problems and expensive repairs. Issues with the black water valves can even be more frustrating, given the matter involved! Indeed, the good condition and proper use of the valves are necessary to provide comfort.
RV sewer valves play a major role in preventing clogs and bad odors, while also ensuring the correct work of the system's sensors. A typical RV sewer system includes both electric and manual valves. Different diameters and designs are available, featuring various combinations of spigots, handles, rotating parts, and assorted caps to meet every need. If you want to replace some components or upgrade the sewer system, browse our online catalog. Aside from a wide assortment of well-designed RV sewer valves, we have useful replacement parts such as cable kits , handles, valve bodies, and valve extension rod kits.
Featured Brands

Related Categories
IMAGES
VIDEO
COMMENTS
For Outdoor Accessories black Dump Waste Sewer ABS Valve 50mm/1.97inch RV Drain Valve waste valve for Caravan Trailer 4.6 out of 5 stars 3 2 offers from $33.99
Twist-on valve is designed to be a quick fix for your RV's black-water waste valve issues. 3" Diameter passage allows wastewater to travel freely when valve is open. Bayonet hooks twist onto existing valve. Lug fitting end connects to hose. Great Prices for the best rv waste valves from Valterra. Valterra Waste Valve for RV Black Water Tank - Twist On - 3" Bayonet Hooks to 3" Lug part number ...
Pry apart the two flanges but be careful. You do not want to break these and ad to your repair expenses. When the flanges are far enough apart, pull your valve out. Make sure to move the sewer pipes if the fit is still too tight to get the valve out. Check to see if the two rubber gaskets came out with the valve.
After you have the bolts tightened, you should attempt to open and close the waste valve a few times to make sure it is functioning properly. HOW TO INSTALL A NEW WASTE VALVE ON AN RV. Step 1: Clean and lubricate the rv's waste system flanges. Step 2: Pry back the flanges and position the new valve.
Hover Image to Zoom. $ 24 30. 3 in. Dia passage lets wastewater travel freely when valve opens. Designed as quick fix for RV's black water waste-valve issues. Lug fitting end secures to sewer hose to create a secure seal. View More Details.
How to replace an rv dump waste valve On a 3-inch ABS pipe with a 3 Inch Valterra Waste valve. In this video, we go over the steps to replace an rv waste val...
RV sewer valves can go bad in a couple of ways. They either will leak waste water (not seal the tank closed completely), or they will get stuck and not slide freely. Your sign that there is a problem is when you remove the sewer cap to dump, and you're greeted by liquid waste (sewage or gray water) that shouldn't be there.
Camco RhinoFLEX 45 Degree Clear Sewer Hose Swivel Fittings. 22 Reviews. $8.99. Add To Cart. Quality Plastics RV Sewer Weights. 42 Reviews. $17.99. Add To Cart. Camco RhinoFLEX Elbow & 4-in-1 Adapter with Swivel Bayonet Fitting.
Replaces the valve for your RV's black-water tank. 3" Diameter passage allows wastewater to travel freely when valve is open. 3" Hub slides onto sewer pipe. Bayonet cap fits over the 3" lug fitting that connects to your sewer hose. Great Prices for the best rv waste valves from Valterra. Valterra Bladex Waste Valve for RV Black Water Tank - 3" Hub to 3" Lug part number T50 can be ordered ...
Double RV Waste Valves - Sanitation Tee - Rotating - 3" Spigot and 1-1/2" Hub. RV sanitation tee combines rotating black-water and gray-water waste valves. 3" Spigot slides into black-water line. 1-1/2" Hub slides over gray-water line. Bayonet cap fits over 3" lug fitting that connects to your sewer hose.
One topic about our RV seldom discussed in-depth is the RV waste valves. You know what I mean, the valves you open when it's time to empty the RV holding tanks. ... While you have a sewer connection, use a clear plastic elbow and some colored tank deodorizer to determine which tank/valve needs to be repaired. 0. April 13, 2010. River ...
RV Plumbing System Basics. Your RV plumbing system is made up of many of the same components as a house plumbing system, with a major difference: you store your fresh AND waste water on board. Every self-contained RV will have at least 3 water holding tanks, and the size of the tanks is dependent on the size of the RV.
Empty holding tanks with the press of a switch! Eliminates bending, reaching and straining to open the RV waste dump valve on your RV. Attach the hose and press the switch to drain your tank. An LED indicator shows when valve is open, to avoid accidental leaks and spills. Easily attaches to your manual valve.
If you're experiencing either the leaky valve or sticking valve head over to your local RV store and pick up the replacement valve. you don't want to be the guy with the valve stuck closed and a full tank. this turns and easy 1 hour job into a very disgusting task. RV waste valve sizing. The typical freshwater valve is 1 1/2 inches in diameter.
Simply attach the twist-on valve to the broken valve and open the handle of the broken valve for a quick fix. Valve rotates to most convenient location. Mess-free. Pre-installed fittings hooks ensure a leak-proof system. Fits most standard RV's and campers for a universal match. 1.6 x 0.8 x 0.8 inches.
RV sewer wye combines rotating black-water and gray-water waste valves. 3" Spigot slides into black-water line. 1-1/2" Hub slides over gray-water line. Bayonet cap fits over the 3" lug fitting that connects to your sewer hose. Great Prices for the best rv waste valves from Valterra. Double RV Waste Valves - Sewer Wye - Rotating - 3" Spigot and 1-1/2" Hub part number TR38A can be ordered online ...
︎ About the episode:In this video I will show you How To Replace RV Sewer Gate Valve In Under 10 Minutes. Recently the handle on our grey sewer gate valve b...
RV sanitation and RV sewer parts, including all you'll need for RV sanitation and RV sewage problems. RV Parts Country ... Valterra Sewer Waste Valve For RV Black Water System. For Sale. $87.16. View Details. Item In Cart. Valterra RV Waste Valve w/Plastic Handles - Bladex 3" For Sale. $15.99. View Details.
Add To Cart. Camco RV RhinoFLEX Sewer Hose Extension Kit. 62 Reviews. Starting at. $17.99. Choose Options. Thetford Titan Multi-length Premium Sewer Hose Kit. 35 Reviews. $45.58 - $54.97.
With DVD. Maintaining your RV sewer and plumbing system is a messy task, which is why at etrailer.com it is our goal to help you find the parts you need without getting your hands dirty. From replacement sewer hoses to sewer adapters, waste valves to hose supports, and even minty fresh holding tank treatments, we've got what you need.
RV sewer valves play a major role in preventing clogs and bad odors, while also ensuring the correct work of the system's sensors. A typical RV sewer system includes both electric and manual valves. Different diameters and designs are available, featuring various combinations of spigots, handles, rotating parts, and assorted caps to meet every ...
Valterra Waste Valve for RV Black Water Tank - Twist On - 3" Bayonet Hooks to 3" Lug - T58. Our Price: $36.92. (366) In Stock. Add to Cart. Twist-on valve is designed to be a quick fix for your RV's black-water waste valve issues. 3" Diameter passage allows wastewater to travel freely when valve is open.