How to manage privacy and security settings in Safari on Mac

Apple continues to add new features to Safari on a regular basis to try to make our web browsing experience faster, easier, and—above all—more secure.
You can open up a private browser window anytime you want in Safari's file menu and Safari won't save your browsing history and will ask websites you visit not to track you. But there are a few more steps you might want to consider taking.
The place to go for most of these things is in Safari's preferences window, accessed from the Safari menu.

How to guard against unsafe files
How to identify fraudulent websites, how to disable javascript, how to prevent cross-site tracking, how to block all cookies in safari, how to remove website data, how to clear your browsing history, how to check for apple pay on websites, how to allow or deny camera, microphone, and location access, how to block pop-up windows.
As with all things related to security, there's a balancing act between convenience and safety. Safari will automatically open certain types of "safe" files you download from the web as a matter of convenience. But because a malicious file could be disguised as a "safe" file, it's a good idea to guard against unsafe files—and it's as easy as checking a box.
- Launch Safari . If it's not in the Dock, you can find it in the Applications folder.
- From the Safari menu, choose Preferences... .

- Click the General button.
- Uncheck the box to Open "safe" files after downloading .

Downloads will occur as they usually do, and to the location you have chosen, but the files won't automatically open.
Safari already identifies websites that use encryption (indicated by a padlock icon in the address bar) and an EV certificate which indicates a more extensive identity verification of the website operator (indicated in green). Safari also uses Google Safe Browsing technology--which is simply a list of websites that may contain malware, unwanted software, or phishing scams.
If it's not already on, here's how to do so:
Master your iPhone in minutes
iMore offers spot-on advice and guidance from our team of experts, with decades of Apple device experience to lean on. Learn more with iMore!
- Click the Security button.
- Check the box to Warn when visiting a fraudulent website .

If you happen to run across one of these sites, Safari will put up a full-screen warning about the site before you can proceed.
Many—if not all—webpages contain JavaScript, which enables certain functionality for web pages, such as displaying the time and date or displaying an image from a set of options.
You can disable JavaScript if you like, but it may impact the functioning of the web page.
- Uncheck the box to disable JavaScript .

If you've been using Safari and suddenly seen a plethora of lawnmower ads not long after doing some web research about lawnmowers, then congratulations: you've discovered crop-site tracking. It's a way of keeping track of your behavior on one part of the internet to show you ads while using a different part of the internet. If you prefer, you can turn it off.
- Click the Privacy button.
- Check the box to Prevent cross-site tracking and check the box to Ask websites not to track me .

Keep in mind that while you can ask websites not to track you, it's up to the website creator to honor your request.
Cookies are small text files a website may store on your Mac to help identify you or your Mac when you visit the website in the future. Examples of content stored in a cookie are your name, site browsing history, and preferences. If you don't want Safari to use cookies, you can shut it off.
- Uncheck the box to Block all cookies .

If you ever decide to remove website data from your Mac, you can do it selectively for certain websites or remove all the data.

- Click the Manage Website Data... button.
- Select a website and click the Remove button to remove the site's cache, cookies, or local storage or click the Remove All button to delete data for all websites.

Rather than root around through a set of checkboxes and pop-up menus, you can clear your browsing history, cookies, and website data with a menu command.
- From the Safari menu, choose Clear History... .
- From the Clear pop-up menu, choose how far back you want to go.
- Click Clear History .

In addition to the history of the website pages you've visited, you'll also give the heave-ho to recent searches, a list of items you have downloaded, the frequently visited site list, and other information.
If your Mac and other devices have Safari turned on in iCloud preferences, the clear history command will remove the browsing history from Safari on those other devices.
You can enable Safari on your Mac to show you websites that can accept payments via Apple Pay. You can then make the payments from your Apple Watch or iPhone, or using Touch ID if it's built into your Mac.
- Check the box to Allow websites to check if Apple Pay is set up .

Safari includes the ability to determine whether or not websites ask can use your Mac's camera and microphone. Here's how to set it up.
- Click the Websites button.

- From the General section of the sidebar, click Camera .
- Click the pop-up menu for "When visiting other websites" and choose Ask, Deny, or Allow , depending on your preference.

The settings work in exactly the same way for your Mac's microphone and your location. Simply click Microphone or Location in the sidebar. Similarly, you can change the setting for currently open websites to suit your preference.
Some web pages that you visit will automatically display a pop-up window that will block content—often with an ad—that you're trying to view. While this can be annoying, there are some sites that require pop-up windows to work properly. Fortunately, Safari provides fine-grained control of these pop-up windows.
- From the General section of the sidebar, click Pop-up Windows .
- Click the pop-up menu for "When visiting other websites" and choose Block and Notify, Block, or Allow , depending on your preference.

Similarly, you can change the setting for currently open websites to suit your preference.
If you choose Block and Notify, a small icon will appear on the right side of the Smart Search field. Click it to display the pop-up windows for the web page.
Great Mac accessories

Apple AirPods 2 (From $159 at Apple)
The best Apple accessory has gotten betting with AirPods 2. Now offering a wireless charger case, the popular earbuds feature the new Apple H1 headphone chip that delivers a faster wireless connection to your devices, as well as support for "Hey Siri."

Samsung T5 SSD (From $88 at Amazon)
This solid-state drive from Samsung is speedy, tiny, and portable. It also connects using USB-C, making it a perfect companion for your new Mac.
Let us know in the comments below.
Updated August 2019: Updated through macOS Mojave and the macOS Catalina beta.

Mike Matthews is a writer at iMore.com. He has used Apple products all the way back to the Apple II+. He appreciates no longer having to launch apps by loading them from a cassette tape recorder.
iOS 17.5 to deliver major upgrade to iPhone repairs — send your device away without disabling Find My
Why I found a fresh install of macOS the solution to (almost) all my problems
"Your iPhone does not go to sleep with you" — harrowing experiment reveals just how much data your iPhone shares, even with Russia... Thankfully it's worse on Android
Most Popular
- 2 "Your iPhone does not go to sleep with you" — harrowing experiment reveals just how much data your iPhone shares, even with Russia... Thankfully it's worse on Android
- 3 Apple might have to ban Tiktok before President Biden does — report reveals app is dodging Apple's App Store payment rules
- 4 Did you know you can drag and drop between your iPhone apps? Here's how to quickly move photos and files within iOS 17
- 5 Do you need to spend $100 on an iPhone case? I’ve tested hundreds of them, and here’s what you have to consider
How To Change Safari Privacy Settings On Mac

- Software & Applications
- Browsers & Extensions

Introduction
Safari, the default web browser for Mac, is renowned for its sleek interface, robust performance, and advanced privacy features. As users navigate the vast landscape of the internet, safeguarding their online privacy becomes increasingly crucial. Fortunately, Safari offers a plethora of privacy settings that empower users to customize their browsing experience and protect their sensitive information from prying eyes.
In this comprehensive guide, we will delve into the intricacies of Safari's privacy settings on Mac, equipping you with the knowledge and tools to navigate the digital realm with confidence. From managing website data to controlling access to your camera and microphone, Safari's privacy settings provide a multifaceted approach to fortifying your online privacy.
Whether you're a privacy-conscious individual, a business professional handling sensitive data, or a parent concerned about your child's online safety, understanding and harnessing Safari's privacy settings is paramount. By the end of this guide, you will possess the expertise to tailor Safari's privacy features to your specific needs, ensuring a secure and seamless browsing experience.
Let's embark on this enlightening journey through Safari's privacy settings, unraveling the nuances of online privacy and empowering you to take control of your digital footprint. Together, we will navigate the intricate web of privacy options, unveiling the tools that Safari provides to safeguard your personal information and enhance your browsing privacy. So, without further ado, let's dive into the world of Safari's privacy settings and unlock the full potential of your browsing experience.
Accessing Safari Privacy Settings
Accessing Safari's privacy settings on your Mac is a straightforward process that empowers you to customize your browsing experience and fortify your online privacy. To begin this journey, launch Safari, the default web browser on your Mac, by clicking on its icon in the dock or locating it in the Applications folder.
Once Safari is open, navigate to the top-left corner of your screen and click on "Safari" in the menu bar. A drop-down menu will appear, presenting a range of options. From this menu, select "Preferences." Alternatively, you can use the keyboard shortcut "Command," and the comma key (Command + ,) to access the Preferences window swiftly.
Upon selecting "Preferences," a new window will emerge, unveiling a plethora of customization options for Safari. Within this window, you will find a series of tabs at the top, including "General," "Tabs," "Search," "Security," "Privacy," "Websites," "Extensions," and "Advanced." To access Safari's privacy settings, click on the "Privacy" tab, which is represented by a shield icon.
By clicking on the "Privacy" tab, you will gain access to a myriad of privacy settings that allow you to manage website data, block pop-up windows, enable Do Not Track, and control access to location services, camera, microphone, and notifications. This centralized hub of privacy options empowers you to tailor Safari's behavior according to your preferences, ensuring a secure and personalized browsing experience.
In summary, accessing Safari's privacy settings on your Mac is a seamless process that grants you the power to customize your browsing privacy and security. By navigating to the "Privacy" tab within Safari's Preferences window, you can unlock a treasure trove of privacy features, enabling you to safeguard your personal information and enhance your digital privacy while traversing the vast landscape of the internet.
Managing Website Data
Managing website data is a pivotal aspect of maintaining your privacy and security while browsing the internet. Safari empowers users to have granular control over the data stored by websites, including cookies, cache, and local storage. By managing website data, you can mitigate tracking, enhance browsing speed, and protect your sensitive information from unauthorized access.
To embark on the journey of managing website data in Safari, navigate to the "Privacy" tab within the Preferences window, as outlined in the previous section. Once in the "Privacy" tab, locate and click on the "Manage Website Data" button. This action will unveil a comprehensive list of websites that have stored data on your Mac.
Within the "Manage Website Data" window, you have the ability to view detailed information about the stored data, including the website's name, the amount of data stored, and when it was last modified. This transparency empowers you to make informed decisions about which websites have access to your data and to what extent.
Furthermore, Safari provides the option to remove website data selectively. By selecting a specific website from the list and clicking the "Remove" button, you can purge the stored data associated with that particular website. This level of control ensures that you can manage your digital footprint effectively, eradicating any unnecessary or intrusive data stored by websites.
In addition to selective removal, Safari offers the convenience of clearing all website data in one fell swoop. By clicking the "Remove All" button, you can expunge all stored website data, providing a fresh start and bolstering your privacy and security measures.
By managing website data in Safari, you can curate a browsing experience that aligns with your privacy preferences. Whether it's decluttering accumulated data, preventing tracking, or safeguarding sensitive information, Safari's robust tools for managing website data empower you to navigate the digital realm with confidence and peace of mind.
Blocking Pop-up Windows
Safari's ability to block pop-up windows is a fundamental feature that enhances the browsing experience by preventing intrusive and distracting pop-ups from disrupting your online activities. These pop-ups, often used for advertising or malicious purposes, can not only hinder your browsing but also pose security risks. Safari's robust pop-up blocking functionality ensures a seamless and secure browsing experience.
To access the pop-up blocking settings in Safari , navigate to the "Privacy" tab within the Preferences window, as detailed earlier. Within the "Privacy" tab, you will find the option to "Block pop-up windows." By enabling this feature, Safari will effectively prevent pop-ups from appearing while you browse the web, allowing you to focus on the content without interruptions.
Safari's pop-up blocking feature is designed to discern between legitimate pop-ups, such as those generated by trusted websites for specific functionalities, and intrusive or potentially harmful pop-ups. This intelligent approach ensures that essential pop-ups, such as those for login screens or interactive elements, are not indiscriminately blocked, preserving the functionality of legitimate websites.
By default, Safari's pop-up blocking feature strikes a balance between thwarting intrusive pop-ups and preserving the essential functionality of websites. However, users have the flexibility to customize the pop-up blocking settings according to their preferences. For instance, Safari allows users to create exceptions for specific websites, ensuring that essential pop-ups from trusted sources are not inadvertently blocked.
The ability to block pop-up windows in Safari contributes to a streamlined and secure browsing experience, shielding users from disruptive and potentially harmful pop-ups while preserving the essential functionality of legitimate websites. This proactive approach to pop-up management underscores Safari's commitment to empowering users with robust privacy and security features, ensuring a seamless and uninterrupted browsing experience.
In summary, Safari's pop-up blocking functionality is a cornerstone of its privacy features, providing users with the means to mitigate distractions and security risks associated with intrusive pop-ups. By leveraging Safari's pop-up blocking capabilities, users can navigate the digital landscape with confidence, knowing that their browsing experience is safeguarded against disruptive and potentially harmful pop-ups.
Enabling Do Not Track
Enabling the "Do Not Track" feature in Safari is a proactive step towards asserting your privacy preferences while navigating the digital realm. This feature serves as a signal to websites and online services, conveying your preference to opt out of online behavioral tracking. By activating "Do Not Track," you assert your desire for privacy and signal to websites that you do not wish to be tracked across the internet for targeted advertising or data collection purposes.
To enable "Do Not Track" in Safari, begin by accessing the "Privacy" tab within the Preferences window, as outlined in the earlier sections. Within the "Privacy" tab, you will find the option to "Ask websites not to track me." By enabling this feature, Safari will transmit a "Do Not Track" request to websites, expressing your preference for privacy and non-tracking.
It's important to note that while enabling "Do Not Track" sends a clear signal of your privacy preference, its effectiveness relies on websites and online services honoring this request. Not all websites and online platforms adhere to "Do Not Track" requests, and the decision to respect this preference ultimately lies with the individual websites and their privacy policies.
Safari's "Do Not Track" feature aligns with the broader industry efforts to empower users with privacy controls and transparency regarding online tracking practices. By activating this feature, users can assert their privacy preferences and contribute to shaping a digital landscape that respects individual privacy rights.
In summary, enabling "Do Not Track" in Safari is a proactive step towards asserting your privacy preferences and signaling to websites your desire to opt out of online behavioral tracking. While its effectiveness depends on website compliance, the "Do Not Track" feature in Safari aligns with the broader industry push for enhanced privacy controls and transparency in online tracking practices. By activating this feature, users can take a stand for their privacy rights and contribute to fostering a more privacy-centric digital ecosystem.
Managing Location Services
Safari's capability to manage location services provides users with a pivotal tool to safeguard their privacy and control the access to their geographical information while browsing the web. Location services, often utilized by websites and web applications, can offer tailored content based on a user's geographic location. However, this functionality also raises privacy concerns, as it involves sharing sensitive location data. Safari's robust privacy settings empower users to manage location services according to their preferences, ensuring a balance between personalized experiences and privacy protection.
To manage location services in Safari, navigate to the "Privacy" tab within the Preferences window, as detailed earlier. Within the "Privacy" tab, you will find the option to manage location services under "Website use of location services." By default, Safari prompts users when a website requests access to their location. This proactive approach ensures that users have the opportunity to grant or deny access to their geographical information based on individual preferences and trust in the requesting website.
Safari's granular control over location services extends to the ability to customize permissions for specific websites. Upon visiting a website that requests access to your location, Safari presents a prompt, allowing you to choose whether to grant one-time access, deny access, or enable location sharing for that particular website. This level of control empowers users to make informed decisions about sharing their location data, enhancing their privacy and security while browsing the web.
Furthermore, Safari provides the option to manage location access for individual websites after the initial prompt. By accessing the "Security" tab within the "Preferences" window and clicking on "Website Settings," users can review and modify location access permissions for specific websites. This flexibility ensures that users can revisit and adjust their location sharing preferences based on evolving trust levels and privacy considerations.
By managing location services in Safari, users can navigate the digital landscape with confidence, knowing that their geographical information is protected and shared only when deemed necessary and trustworthy. This proactive approach to location services aligns with Safari's commitment to empowering users with robust privacy controls, ensuring that personalized experiences are balanced with privacy protection.
In summary, Safari's comprehensive tools for managing location services provide users with the means to control access to their geographical information, fostering a privacy-centric browsing experience. By leveraging Safari's granular control over location services, users can navigate the web with confidence, knowing that their privacy and security are prioritized without compromising the personalized features offered by location-based content.
Managing Camera and Microphone Access
Safari's robust privacy settings extend to the management of camera and microphone access, providing users with essential controls to safeguard their privacy and regulate the usage of these sensitive hardware components while browsing the web.
When it comes to managing camera and microphone access in Safari, users can navigate to the "Privacy" tab within the Preferences window, as detailed earlier. Within the "Privacy" tab, the option to manage camera and microphone access is prominently featured. This pivotal feature empowers users to control which websites have permission to access their camera and microphone, ensuring that these hardware components are utilized only when explicitly authorized.
Upon visiting a website that requests access to the camera or microphone, Safari prompts users, seeking their consent before enabling access to these hardware components. This proactive approach ensures that users have the opportunity to grant or deny access based on their trust in the requesting website and the specific context of the access request.
Safari's granular control over camera and microphone access further extends to the ability to customize permissions for specific websites. Users can revisit and modify camera and microphone access permissions for individual websites by accessing the "Security" tab within the "Preferences" window and clicking on "Website Settings." This level of flexibility ensures that users can tailor their permissions based on evolving trust levels and privacy considerations, thereby maintaining a proactive stance in protecting their privacy.
By providing users with the means to manage camera and microphone access, Safari reinforces its commitment to empowering users with robust privacy controls, ensuring that sensitive hardware components are utilized responsibly and with explicit user consent. This proactive approach aligns with Safari's overarching mission to prioritize user privacy and security without compromising the functionality and interactivity offered by websites and web applications.
In summary, Safari's comprehensive tools for managing camera and microphone access offer users the essential controls to regulate the usage of these hardware components, fostering a privacy-centric browsing experience. By leveraging Safari's granular control over camera and microphone access, users can navigate the web with confidence, knowing that their privacy and security are prioritized without compromising the interactive features that utilize these hardware components.
Managing Notifications
Safari's privacy settings extend to the management of notifications, providing users with essential controls to regulate the display of notifications from websites. Notifications, while serving as a means for websites to engage users with timely updates and alerts, can also pose privacy concerns if not managed effectively. Safari's robust tools for managing notifications empower users to strike a balance between staying informed and protecting their privacy.
To manage notifications in Safari, users can navigate to the "Privacy" tab within the Preferences window, as detailed earlier. Within the "Privacy" tab, the option to manage website notifications is prominently featured. This pivotal feature empowers users to control which websites have permission to display notifications, ensuring that notifications are presented only from trusted sources.
Upon visiting a website that seeks to display notifications, Safari prompts users, seeking their consent before allowing the website to show notifications. This proactive approach ensures that users have the opportunity to grant or deny notification permissions based on their trust in the website and the relevance of the notifications.
Safari's granular control over notifications further extends to the ability to customize permissions for specific websites. Users can revisit and modify notification permissions for individual websites by accessing the "Security" tab within the "Preferences" window and clicking on "Website Settings." This level of flexibility ensures that users can tailor their notification preferences based on evolving trust levels and privacy considerations, thereby maintaining a proactive stance in protecting their privacy.
By providing users with the means to manage notifications, Safari reinforces its commitment to empowering users with robust privacy controls, ensuring that notifications are displayed responsibly and with explicit user consent. This proactive approach aligns with Safari's overarching mission to prioritize user privacy and security without compromising the functionality and engagement offered by websites.
In summary, Safari's comprehensive tools for managing notifications offer users essential controls to regulate the display of notifications, fostering a privacy-centric browsing experience. By leveraging Safari's granular control over notifications, users can navigate the web with confidence, knowing that their privacy and security are prioritized without compromising the timely updates and alerts offered by websites.
In conclusion, Safari's privacy settings on Mac offer a comprehensive suite of tools and controls that empower users to navigate the digital landscape with confidence, ensuring that their online privacy and security are prioritized without compromising the functionality and interactivity offered by websites and web applications. By delving into the intricacies of Safari's privacy settings, users can tailor their browsing experience to align with their privacy preferences, mitigating tracking, preventing intrusive pop-ups, and controlling access to sensitive hardware components.
The ability to manage website data provides users with the means to curate their digital footprint, declutter accumulated data, and safeguard sensitive information from unauthorized access. Safari's robust pop-up blocking functionality ensures a seamless and uninterrupted browsing experience, shielding users from disruptive and potentially harmful pop-ups while preserving the essential functionality of legitimate websites.
Enabling the "Do Not Track" feature in Safari serves as a proactive step towards asserting privacy preferences and signaling to websites a desire to opt out of online behavioral tracking. While its effectiveness depends on website compliance, the "Do Not Track" feature aligns with the broader industry push for enhanced privacy controls and transparency in online tracking practices.
Safari's granular control over location services, camera, microphone access, and notifications empowers users to regulate the sharing of sensitive information, ensuring that access is granted only to trusted sources and based on individual preferences. This proactive approach underscores Safari's commitment to prioritizing user privacy and security, fostering a browsing experience that balances personalized features with robust privacy protection.
In essence, Safari's privacy settings on Mac embody a user-centric approach to online privacy, providing users with the essential tools and controls to navigate the digital realm with confidence and peace of mind. By leveraging Safari's privacy features, users can assert their privacy preferences, mitigate tracking, and safeguard their sensitive information, thereby shaping a digital landscape that respects individual privacy rights and prioritizes user empowerment.
Leave a Reply Cancel reply
Your email address will not be published. Required fields are marked *
Save my name, email, and website in this browser for the next time I comment.
- Crowdfunding
- Cryptocurrency
- Digital Banking
- Digital Payments
- Investments
- Console Gaming
- Mobile Gaming
- VR/AR Gaming
- Gadget Usage
- Gaming Tips
- Online Safety
- Software Tutorials
- Tech Setup & Troubleshooting
- Buyer’s Guides
- Comparative Analysis
- Gadget Reviews
- Service Reviews
- Software Reviews
- Mobile Devices
- PCs & Laptops
- Smart Home Gadgets
- Content Creation Tools
- Digital Photography
- Video & Music Streaming
- Online Security
- Online Services
- Web Hosting
- WiFi & Ethernet
- Browsers & Extensions
- Communication Platforms
- Operating Systems
- Productivity Tools
- AI & Machine Learning
- Cybersecurity
- Emerging Tech
- IoT & Smart Devices
- Virtual & Augmented Reality
- Latest News
- AI Developments
- Fintech Updates
- Gaming News
- New Product Launches
Learn To Convert Scanned Documents Into Editable Text With OCR
Top mini split air conditioner for summer, related post, comfortable and luxurious family life | zero gravity massage chair, when are the halo awards 2024, what is the best halo hair extension, 5 best elegoo mars 3d printer for 2024, 11 amazing flashforge 3d printer creator pro for 2024, 5 amazing formlabs form 2 3d printer for 2024, related posts.

How To Unlink Safari From Mac And IPhone

How To Turn Off Safari Autofill

How To Make Safari Your Default Browser

What Is The Latest Safari Version For Mac

How To Stop Autofill In Safari

How To Disable Javascript On Safari

Why Can’t I Clear Safari Search History
How To Allow Cross-Site Tracking In Safari On Mac
Recent stories.

Fintechs and Traditional Banks: Navigating the Future of Financial Services

AI Writing: How It’s Changing the Way We Create Content

How to Find the Best Midjourney Alternative in 2024: A Guide to AI Anime Generators

How to Know When it’s the Right Time to Buy Bitcoin

Unleashing Young Geniuses: How Lingokids Makes Learning a Blast!
- Privacy Overview
- Strictly Necessary Cookies
This website uses cookies so that we can provide you with the best user experience possible. Cookie information is stored in your browser and performs functions such as recognising you when you return to our website and helping our team to understand which sections of the website you find most interesting and useful.
Strictly Necessary Cookie should be enabled at all times so that we can save your preferences for cookie settings.
If you disable this cookie, we will not be able to save your preferences. This means that every time you visit this website you will need to enable or disable cookies again.
- Apple Watch
- Accessories
- Digital Magazine – Subscribe
- Digital Magazine – Info
- Smart Answers
- Let Loose iPad event
- New iPad Air
- iPad mini 7
- Best Mac antivirus
- Best Mac VPN
When you purchase through links in our articles, we may earn a small commission. This doesn't affect our editorial independence .
How to use Safari on a Mac

Safari is the web browser app bundled with all Macs as part of macOS. You don’t have to use it – if you prefer to use Chrome or Firefox, for example, you can install those apps for your web surfing needs. But in our experience, Safari is a good option – and as you can see from our round-up of best web browser apps for the Mac , it’s pretty much the best you can get.
If you are new to Safari this article will help you find your way around the app. And if you are a seasoned Safari user we will reveal a few Safari tips and tricks that you might not know, including some of the fab new features in Safari 11, the latest version of Safari for Mac.
If you’d like to read about using Safari on the iPad or iPhone, read this .
How to get the latest version of Safari for Mac
First things first. You will want to make sure you have the latest version of Safari. At the time of writing the most up-to-date version is Safari 11.1.
Here’s how to find out which version of Safari you are running:
- Open Safari.
- Click on Safari > About Safari in the menu.
- The resulting window will reveal the version number.
As long as your copy of MacOS – the Mac operating system – is up to date your copy of Safari should be because Safari is bundled as part of an operating system update.
However, you don’t have to be using the latest version of macOS to have the latest version of Safari. Apple is bundling Safari 11 with High Sierra, Sierra and El Capitan versions of the Mac OS. If you need to update your version of MacOS read this: how to update your Mac operating system software .
Now that you have the latest version of Safari you can start enjoying some of the new features that we will discuss below.
Safari basics
If you are a surfing novice you might want to familiarise yourself with these tips.
We’ll start off with the basics, such as how to get into Safari, how to search, and other useful pointers. You can skip this bit if you aren’t a Safari beginner, there are plenty of tips below that you might find useful.
You can find Safari in the Dock at the bottom of your Mac’s screen. Its icon looks like a compass.
How to use Safari
The big bar at the top of the Safari window is where you can enter a website URL or a search term to either take you directly to a website, or to a list of pages that match your query.
It will automatically search in Google (but you can change it so it defaults to another search engine).
You rarely have to enter a complete URL for a website. Once you have visited a site once you only need to type a few letters of its name and it will autofill the rest of the URL.
For example, type: ‘Face’ and it will autofill the rest of the URL and when you press enter it will take you straight to Facebook.
How to make it easy to find your favourite sites in Safari
There are lots of ways of making it easy to get to websites you frequently visit.
When you open a new tab (see below for details of how to do that) you will see your Favourites view including Frequently Visited Sites. You could also choose to see a Top Sites view, set a Homepage, just see an empty page, or have the Same Page show up. These are all options you can access in Safari > Preferences > General. Just click on the menu beside New tabs open with.
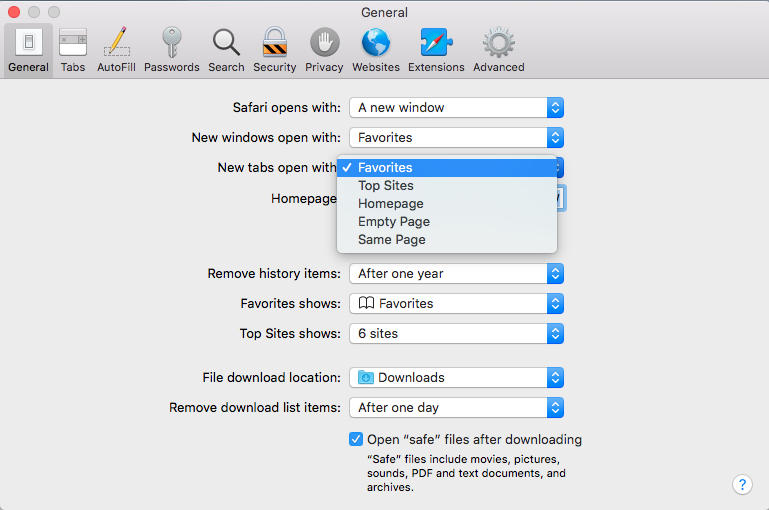
If you choose the Top Sites view you can adjust it to show 6, 12 or 24 sites. To add and remove Top Sites hover over the preview until you see an x and a pin icon. Pin those sites you wish to keep and click x on those you don’t image you will want to find again. The sites that appear in Top Sites tend to be those you visit most frequently.
You can choose one of these views for every time you open a new Safari window.
How to Pin a site in Safari
In Safari you can also ‘Pin’ favourite sites to the menu bar – a simple way of adding a shortcut to Facebook, YouTube or any site you visit frequently.
When you Pin a site you will see a small icon representing that site on the left of your tabs.
To Pin a particular web page right- or control-click on the tab and choose Pin Tab. Then it’s very easy to go straight to that site.

Using tabs in Safari
Back to tabs. You can open multiple tabs in a Safari window, this means that rather than having a different Safari window open for every website you are on, you can just have one Safari window open and multiple pages accessible through that.
To open a new tab press Command + T.
There are two ways that you can see a preview of the different tabs you have open:
- You can see a short summary of the name of the web page on the tabs themselves. This might be sufficient if you only have one or two tabs open, but once you have more than eight you’ll probably find the summary is too short to be useful.
- Or, you can click on the icon that looks like two boxes on the right of the search/URL box. This will show a thumbnail view of all the web pages you have open.
While we’re on the subject of Tabs, you can close a single tab just by hovering over the tab and clicking on the x that shows up in the corner of that tab.
It’s also possible to close all but one tab. Just hold down the Option/Alt key when you click on the x to get rid of all the other tabs that are open, except for the page on that tab.
How to tell which Safari tabs are playing audio
Not everyone wants to surf the web in silence though. There is lots of very worthy audio and video content available on the web and no doubt many surfers wouldn’t want to miss out on that.
The problem is when you have multiple web pages open and more than one of them is blaring out audio.
Luckily there is another Safari tip to fix that.
You can identify which of your open tabs is playing audio by the speaker symbol that appears in the far right of the Safari tab associated with that web page.
It’s possible to mute the audio with a single click on the speaker symbol without even opening the tab.

And if more than one Safari webpage is playing audio you can choose to mute them all at once. Just click on the speaker symbol in the URL bar and choose Mute all Tabs.
Alternatively, you can Option/Alt-click on the speaker icon of the tab you do wish to listen to and mute the audio on all the other tabs.
How to reopen all windows from the last session
Here’s another useful tip. You can easily reopen all the tabs you had open last time you were using Safari.
Click History > Reopen All Windows from Last Session to quickly recover all the windows you were recently looking at. You might also find this helpful: How to export bookmarks from Chrome to Safari
How to show the full URL in Safari
Another handy Safari tip. In Yosemite Safari stopped showing the whole URL – a feature designed to help avoid users being taken in by phishing scams, wherein the URL is obfuscated. In other words, if you’re visiting https://macworld.co.uk/this/page/that/page then all you’ll see in the address bar is macworld.co.uk.
If this isn’t what you want, perhaps you want to see the full URL of the article you are reading, you can change things so that the whole URL is shown.
Open Safari’s preferences dialog box (Cmd+,) then click the Advanced icon and put a check alongside Show Full Website Address.
How to change how you view websites in Safari
One of our favourite features in Safari 11 is the extra control we have over the web. You can tweak the settings of specific websites so that they suit you for example.
How to change the font size on a website
You can tweak your settings so that when you visit a specific site the images and text are bigger – perfect if you are frustrated to find that the text on a favourite website is a bit too small for your eyes.
Here’s how to enlarge (or reduce) the font size on a particular website so that it stays that size whether you visit:
- Go to Safari > Preferences.
- Click on the Websites tab.
- Click on Page Zoom.
- Find the site you want to customise (any site you have open or have recently visited will be listed here).
- Choose a number bigger or smaller than 100% depending on how large you want the text and images to be.
You can do this on a per website basis, or if you frequently find that the text on websites is too small for you, you can choose to default to the percentage that suits you wherever you go on the web. Note that not all websites are created the same so some will naturally have larger type than others.

To choose the zoom percentage for all websites, click in the drop down box beside “When visiting other websites”.
Another benefit of having access to these controls that allow you to change the way you view the web is that it enables you to stop seeing ads and auto-playing videos. We’ll look at that below.
How to stop ads and auto-playing videos in Safari
Another enticing feature of Safari is the way you can choose to adjust the settings so that you never see another ad or auto-playing video again. We’ll look at how to do that next.
How to stop autoplay audio and video in Safari
Perhaps you are frustrated by auto-playing video blaring out every time you visit a website.
With Safari 11 you can disable autoplay video, so you will never again have to hear voices while you are browsing the web. Here’s what to do:
- Open the offending website.
- Click on Safari > Settings for This Website (or right-click the URL box and select Settings for This Website).
- Allow All Auto-Play
- Stop Media with Sound
- Never Auto-Play
Stop Media with Sounds is the default option, and it will essentially stop any video from starting if the sound is set to be on. If the video is set to play silently it will still run but you won’t hear it, unless you choose to.
If you would rather not let auto-playing video play, you can choose Never Auto-Play.
Remember that if you adjust the settings this way it will only apply to autoplay videos on that website. If you’d like to never see an autoplaying video again follow these steps:
- Go to Safari > Preferences and click on Websites.
And there is an option below to choose the same settings “When visiting other websites”.
We have a complete tutorial that explains how to use this feature here: How to stop autoplay video in Safari & Chrome on Mac .
We also cover how to stop Safari asking to use your location data here .
How to stop seeing ads on websites in Safari
While ads pay a part of our wage, we realise that some ads can really reduce the enjoyment of web browsing. Usually these are ads that have something wrong with the way they have been coded and aren’t behaving as intended, or even worse they are spam ads that have crept onto the ad networks. We are honestly as frustrated as you are!
One of the big changes Apple bought to Safari 11 was the ability to really manage the ads that you see – this was part of Apple’s effort to make the web work better. Effectively, if Apple can remove ads that aren’t behaving as intended and are jamming up page loading times and the like, then Safari will perform quicker, which means that the surfer has a better time surfing.
There are a few ways you can take advantage of these anti-ad related features in Safari 11.
One way is to choose to surf the web – or certain pages – in Reader mode.
Reader mode is a way of viewing webpages that Apple introduced back in 2010 in Safari 5. Reader displays just the text and images from a webpage, without any of the other page furniture. We think it is a bit like reading a Word document or a PDF. The feature hasn’t changed much over the years, but in Safari 11 it’s became possible to choose for a site to always be viewed in Reader Mode.
First, here’s how to view a site in Reader mode:
- Click on the stack of lines to the left of the URL bar.
- This will automatically change the webpage to Reader view.
- Click on the stack of lines to turn Reader view off.
It’s worth checking how a site appears in this mode before switching over to it because not all sites implement it particularly well (sometimes you will find that an article stops abruptly because only one page has been carried into Reader view). Some sites don’t have a Reader view at all (such as Apple, for example).
And here is how to customise your settings so that whenever you visit that site the pages are viewed in Reader mode:
- Click on Reader.
- Find the site you want to customise (any site you have open, or have recently visited will be listed here).
- Toggle the drop-down menu beside that site to On.
A quicker way to do this is to right-click or control-click on the stack of lines beside the URL and choose Use Reader Automatically.
Or, as long as you are on the website you wish to change the setting for, you can click on Safari > Settings for this Website, and choose Use Reader When Available.
How to surf in private using Safari
Another useful feature in Safari is the option to use a private browsing window. This doesn’t just keep your browsing habits private from someone else who has access to your Mac, it also means that you are incognito – in other words even the websites you are visiting don’t have any information about you.
Go to Safari > File > New Private Window (or shift-cmd-n). You can tell if a window is private because the search bar will be grey. Any new tabs you open in this window will be private.
Alternatively, to open a Private Browsing window you can click shift, command and N.
You can tell it’s a private window because the URL field will be greyed out.
Hold down Option/Alt while picking Private Browsing to quickly switch it on and bypass the ‘Do you want to switch on Private Browsing?’ alert window if you happen to see it frequently. We have a complete guide to private browsing on Safari here .
For even more privacy, you can choose to always search with privacy-obsessed DuckDuckGo as your default search engine. Go to Safari > Preferences > Search, and click on the Search Engine. Then select Duck Duck Go from the Search Engine dropdown list. You can choose from Google, Bing, Yahoo or DuckDuckGo.
How to delete your histroy in Safari
If you didn’t search using a private browsing window you can still delete your history and evidence of what you were up to.
- Click on History.
- Scroll down and click on Clear History.
- You can choose to clear history for Today, the last hour, today and yesterday, or all history.
- You’ll see a warning that Clearing history will remove related cookies and other website data. Basically this is warning you that if you go ahead and Clear History you may find that you have to log onto websites, or shopping cart information may disappear.
- If you are happy with that then click on Clear history.
We have a complete tutorial all about how to delete your browser history on a Mac here .
How to delete cookies in Safari
Another new feature that came in Safari 11 was the introduction of privacy protection, a feature that’ll stop those annoying Amazon adverts showing you products after you’ve bought them.
Safari actively tries to block the cross-site tracking data that powers targeted adverts. While it won’t completely stop it, it should have a noticeable effect when using the browser.
According to Apple this isn’t an attempt to block ads, but rather to protect your privacy.
This means that you should no longer need to delete cookies if you want to stop seeing targeted ads (cookies have also been known to affect the price for goods if you have previously shown an interest in a product so deleting cookies could avoid such practices).
If you want to go a step further regarding cookies in Safari 11 there are some preferences changes you can make.
- Beside Website tracking click on Ask websites not to track me.
- Beside Cookies and website data click on Block all cookies.
If you aren’t using Safari 11 you can still delete cookies.
- Click on the Privacy tab.
- Click on Remove All Website Data…
Here’s how to add your own background image to Safari.
Author: Karen Haslam , Managing Editor

Karen has worked on both sides of the Apple divide, clocking up a number of years at Apple's PR agency prior to joining Macworld more than two decades ago. Karen's career highlights include interviewing Apple's Steve Wozniak and discussing Steve Jobs’ legacy on the BBC. Having edited the U.K. print and online editions of Macworld for many years, more recently her focus has been on SEO and evergreen content as well product recommendations and buying advice on Macworld.com.
Recent stories by Karen Haslam:
- How to clear cache on a Mac
- Apple Spring event: Date, time, new product rumors for Let Loose event
- How to clear cache on iPhone & iPad
Newsletters
- Our sponsors
- Watch Store
- Hot topics:
- Apple rumors
- Apple deals
- Editor’s picks
- Buying guides
Crank up Safari’s privacy to the max
By D. Griffin Jones • 6:00 am, March 20, 2024
- Top stories

Apple’s Safari web browser packs loads of privacy features that will keep your online activity hidden from ad networks, user tracking and data farms. But are you sure you have everything turned on? Some of Apple’s most important privacy-protecting features don’t come enabled by default.
In light of Google baking ever-more invasive user tracking into Chrome , there are even more reasons to use Safari instead . If you want to make the most out of the best and most secure mainstream browser, here’s how.
Turn on all Safari privacy features on iPhone, iPad and Mac
Toggle on safari privacy settings.
Safari offers a bunch of features to help protect your privacy even when you’re not in Private Browsing mode. Make sure you have them all turned on.
On iPhone and iPad

On an iPhone or iPad, open Settings > Safari (scroll down a bit to find it). Then scroll down a bit on this page to the Privacy & Security section. I have all the features enabled: Prevent Cross-Site Tracking, Hide IP Address From Trackers, Require Face ID to Unlock Private Browsing and Fraudulent Website Warning.
Then, scroll down to the bottom and tap Advanced . Set “Advanced Tracking and Fingerprinting Protection” to All Browsing and then disable “Privacy Preserving Ad Measurement.” You can leave “Block All Cookies” disabled and “Check for Apple Pay” enabled, as changing those settings will break website functionality.
On a Mac, open Safari. In the menu bar, go to Safari > Settings… ( ⌘, ) and click on the Privacy tab.
First, enable Prevent cross-site tracking and Hide IP address from trackers . Neither of these will have a significant impact on website functionality; they’ll simply make your browsing safer.
Then, click Advanced Settings for a few more options. In the Privacy section, set “Use advanced tracking and fingerprinting protection” to in all browsing . Leave “Allow privacy-preserving measurement of ad effectiveness” unchecked .
Personally, I have “Allow websites to check for Apple Pay and Apple Card” checked and “Block all cookies” unchecked; changing these options will break website features.
How to enable iCloud Private Relay on iPhone, iPad and Mac

If you have an iCloud+ subscription, you’ll also want to turn on iCloud Private Relay for maximum protection . This feature works kind of like a VPN for your web browsing — your personal internet activity is funneled through an Apple server, so the websites you visit can’t track you as easily.
This premium Safari privacy feature is available to anyone with an iCloud+ subscription. With it, you also get cloud storage to back up your phone (which everyone should do) and other features like Hide My Email . If you’re paying for iCloud+ subscription, you should take advantage of Private Relay on iPhone, iPad and Mac.
To do so on iPhone and iPad, go back to Settings , tap on your name at the very top, then tap iCloud > Private Relay . Turn it on.
To turn on Private Relay on a Mac, go to the menu, then System Settings > iCloud > iCloud+ > Private Relay . Toggle it to on.
On iPhone, iPad and Mac, you can set your IP Address Location to choose how accurate or private you want it to be. Apple gives you two options: “Maintain general location” or “Use country and time zone.” The latter setting will offer more privacy in Safari at the expense of location-based features on the web being less fine-tuned for you.
How to turn on Private Browsing on iPhone, iPad and Mac

Using a Safari privacy feature called Private Browsing mode offers yet another layer of online anonymity . “With Private Browsing, Safari won’t remember the pages you visit, your search history, or your AutoFill information,” Apple says. “Private Browsing also blocks known trackers, removes tracking used to identify individual users from URLs, and adds protections against advanced fingerprinting techniques.”
To turn on Private Browsing on an iPhone or iPad, first open Safari. Then swipe up on the address bar or tap the Tabs button in the bottom-right. On the bottom, you’ll see a row of tab groups. Tap Private on the left to switch to Private Browsing. You may need to authenticate with Face ID before showing your private tabs.
From the Home Screen, there’s a shortcut to quickly enter Private Browsing . Tap and hold on the Safari icon and select New Private Tab from the pop-up menu.
How to turn off Private Browsing on iPhone or iPad
Turning off Private Browsing works the same way on iPhone and iPad. Swipe up on the address bar or tap the Tabs button in the bottom-right. Select any of your other tab groups to the right to exit Private Browsing.
From the Home Screen, you can also tap and hold on the Safari icon and select New Tab to quickly exit Private Browsing without opening it.
How to turn on Private Browsing on Mac
On a Mac, you can create a new Private Browsing window by hitting File > New Private Window in the menu bar, or with the keyboard shortcut ⇧⌘N .
Learn more about Safari
- 5 tips and tricks in Safari on iPhone
- How to block YouTube ads in Safari
- How to use Safari profiles
- 5 reasons to use Safari instead of Chrome
- How to create a Safari web app on the Mac
Daily round-ups or a weekly refresher, straight from Cult of Mac to your inbox.

Cult of Mac Today
Our daily roundup of Apple news, reviews and how-tos. Plus the best Apple tweets, fun polls and inspiring Steve Jobs bons mots. Our readers say: "Love what you do" -- Christi Cardenas. "Absolutely love the content!" -- Harshita Arora. "Genuinely one of the highlights of my inbox" -- Lee Barnett.

The Weekender
The week's best Apple news, reviews and how-tos from Cult of Mac, every Saturday morning. Our readers say: "Thank you guys for always posting cool stuff" -- Vaughn Nevins. "Very informative" -- Kenly Xavier.
Popular This Week
How to check ipad battery health, how to make a custom ringtone on your iphone, how to download and convert youtube videos to mp4 [sponsored], amazon matches record-low prices on coveted apple gear [deals], users report mysteriously being locked out of apple id accounts, new net neutrality rules should end mobile video throttling, how to rename your apple devices so you can tell them apart, these rechargeable batteries can save you hundreds [deals], how to remove an apple id from an iphone without the password [sponsored], nonconsensual ai nude apps kicked out of the app store.

- Get started with computers
- Learn Microsoft Office
- Apply for a job
- Improve my work skills
- Design nice-looking docs
- Getting Started
- Smartphones & Tablets
- Typing Tutorial
- Online Learning
- Basic Internet Skills
- Online Safety
- Social Media
- Zoom Basics
- Google Docs
- Google Sheets
- Career Planning
- Resume Writing
- Cover Letters
- Job Search and Networking
- Business Communication
- Entrepreneurship 101
- Careers without College
- Job Hunt for Today
- 3D Printing
- Freelancing 101
- Personal Finance
- Sharing Economy
- Decision-Making
- Graphic Design
- Photography
- Image Editing
- Learning WordPress
- Language Learning
- Critical Thinking
- For Educators
- Translations
- Staff Picks
- English expand_more expand_less
Safari - Privacy and Security in Safari
Safari -, privacy and security in safari, safari privacy and security in safari.

Safari: Privacy and Security in Safari
Lesson 5: privacy and security in safari.
/en/safari/bookmarking-in-safari/content/
Safari privacy and security
Safari has several security features , including security indicators and malware protection . Because of its advanced security features , Safari offers a safe browsing experience. Safari also allows you to control what information you share online, keeping your personal information private.
Watch the video below to learn the basics of privacy and security in Safari.
Website security indicators
Whenever you navigate to an encrypted website, Safari will display a security indicator to the left of the web address in the address bar.

Understanding this indicator can help you stay safe when entering personal information online.

- If no indicator appears, this means the site is not using a secure connection. This is not important for many websites, like a news source or weather forecast, but you should avoid entering sensitive personal information on these pages.
Safari offers a high level of protection from malicious websites, but you should still use your best judgement when browsing online. Review our Internet Safety tutorial to learn more about staying safe online.
Maintaining your privacy in Safari
Safari takes great care to keep your personal information private. It offers many ways to control your privacy, like modifying your privacy settings , deleting your history , and browsing in a private window.
Privacy settings
Safari allows you to control some of the information you share online, which you can modify in your privacy settings . We recommend not changing Safari's default selections, as they allow for the best balance of privacy and security while browsing. However, you can modify them if you want.
To modify your privacy settings:

Deleting browsing history
Like all browsers, Safari keeps a record of every website you visit in your browsing history . You may want to remove some or all of your browsing history for the sake of privacy.
To remove specific sites from history:

- A new History tab will appear with your full browsing history .

To clear all browsing data:
Safari makes it easy to delete some or all of your history. For example, sometimes you might want to remove only your history from the past hour instead of removing your entire history. You might also want to remove all of your saved pages and cookies but keep your saved passwords.

- The selected browsing history will be cleared.
Private browsing
For added privacy, Safari also offers private browsing , which allows you to browse the web without recording your history or storing cookies. This is a great way to keep your browsing history secret when planning a party or buying a gift for someone who shares your computer.
To create a private window:

Private browsing does not make Safari more secure —it only stops Safari from saving history and cookies for that session. Don't use a private window to view any websites you wouldn't feel safe viewing in a regular Safari window.
- Smart Home Device
- How to Guides
- IoT Security
- IoT Guides & Tutorials
The Basics of Safari’s Security and Privacy Settings
Privacy and security are a huge concern when using any computer device. Cyberattacks and advanced privacy invasions are on the rise, with criminals constantly evolving in targeting and launching attacks.
Simply put your security and privacy are no longer guaranteed, no matter what device you use. Luckily, if you’re a Mac user, Apple has always championed the idea of user privacy that allows you to stay safe and protected as you go about your online activities.
One area Apple has excelled over its competitors is providing users with a built-in macOS browser—Safari. Widely regarded as the best way to experience the internet on all your Apple devices, Safari currently boasts over 1 billion users globally .
The best part is that there’s still more you can do with this browser to make it work even better for you. In this article, we’ll cover all you the basics of Safari’s security and privacy and how to configure some of the settings for the best internet experience!
Safari browser on Mac
A faster and more secure internet experience is everyone’s dream when surfing the web. Safari is a fantastic all-round browser that relies on a blazing-fast JavaScript engine to give you a faster browsing experience.
Seamlessly integrated into both macOS and iOS, you can use Safari across all Apple devices. It’s a better fit for Mac users thanks to a vast range of useful security and privacy features you won’t find on other browsers.
Basic privacy and security settings on Safari
Privacy and security on your Mac means ensuring the safety of your information and keeping the bad guys away. Safari has been designed from the ground up to ensure this by focusing on how to protect your privacy.
For example, you’ll enjoy Intelligent Tracking Prevention (ITP) and fingerprinting defense among its default key privacy features. The best part is that you won’t need to turn on your Mac and change Settings or Safari preferences to enjoy the benefits of these features.
All the privacy protections in these features are designed to process data on the device you’re using. For instance, ITP prevents tracking while enabling websites you access via Safari to function normally.
The feature relies on machine learning to classify tracking data locally so that your browsing history isn’t sent to Apple.
Basic security settings on Safari
Safari employs various security settings to ensure the information on your device is well protected. These include:
1. Security indicators on websites
Security indicators for websites will help you know whether the site you visited is secure or not. Ideally, a secure website URL should start with “https.” HTTPS or Hypertext Transfer Protocol Secure means the website you visited uses a Secure Sockets Layer (SSL) Certificate
Safari makes the process of identifying secure websites even easier by displaying a security indicator next to the web address. The lack of a security indicator in the Safari browser bar implies the site needs a proper secure connection.
2. Privacy settings and controls
Besides security, Safari also preserves user privacy through the multiple tools you can leverage to manage and control your personal information. For example, you can:
Delete browsing history
There’s a log of websites you visited kept in Safari under your ‘browsing history.’ The browser allows you the option to delete some or all of this history for privacy purposes. You can clear portions of your browsing history within a certain period, such as an hour, 7 hours, or even a day.
Here are simple steps to clear your browsing history in Safari:
1. Open Safari on your Mac.
2. Choose History.
3. Click on Clear History.
4. Choose the period you want your browsing history cleared.
Private browsing
Safari lets you surf the internet privately, ensuring your browsing activity isn’t recorded and cookies aren’t stored. This feature comes in handy when you share your Mac with another person. The sites you visit or searches you make won’t be visible to them.
Here is how to enable private browsing in Safari on your Mac:
2. Click on File.
3. Select New Private Window , or switch to a private browsing window.
How to enhance more security and privacy in Safari
Safari is your go-to browsing companion if you’re a proud Mac user. The good news is, just like other leading browsers, you can upgrade Safari on Mac and leverage more security and privacy features.
Below are more security and privacy features you get to enjoy when using Safari as a default browser on your Mac.
1. Stop website tracking
Have you ever felt like every online move you make is closely monitored? Websites track your activities, aiming to personalize ads and your browsing experience. Worse, they might access your location, storage, or microphone without your awareness.
Safari allows you to take back control by updating website permissions. You can command it to stop website tracking and ensure no one monitors your browsing experience.
Here is how you can implement this setting on your Safari:
1. Launch Safari on your Mac.
2. Click on the Safari tab in the menu bar.
3. Choose Preferences from the dropdown menu.
4. Navigate to the Privacy tab.
5. Check the box on Prevent Cross-Site Tracking.
2. Hide IP address
Your IP address isn’t just a number; it can reveal your personal information, including your location. Safari is automatically set to protect your IP address from known trackers.
For instance, if you’re an iCloud+ subscriber, your IP address is always protected from trackers and websites.
However, this option may be off, meaning your IP address isn’t hidden from the general public. Fear not, Safari lets you mask this information from prying eyes through the following simple steps:
2. Click on the Safari tab in the menu.
3. Choose Preferences and move to the Privacy tab.
4. Check the box titled Hide IP address from trackers.
3. Opt out of location services
When browsing the internet in Safari, you may occasionally be met with pop-ups asking permission for websites to use information about you. Most of them want to know your location so that they can tailor your recommendations, such as shopping places.
Overall, location services play a vital role in your device’s functionalities. However, if you prefer not to disclose your whereabouts while browsing, it’s easily manageable:
1. Launch Safari , click on the Safari tab.
2. Select Preferences.
3. Navigate to the Websites tab.
4. Choose Location.
5. Configure the setting when visiting other sites by selecting Ask or Deny .
4. Manage cookies
If you’ve disabled cross-site tracking, cookies can still track your online movements. To heighten your privacy further, consider blocking all cookies:
1. Open Safari.
2. Choose Preferences .
3. Head to the Privacy tab , and next to Advanced settings .
4. Tick Block all cookies .
Final thoughts
Safari in Mac OS is renowned for its robust security and privacy features. Leveraging these functionalities is imperative in safeguarding your digital footprint. If well utilized, these privacy and security settings effectively fortify your online security, shielding yourself from potential threats.

Latest from our Blog
- Privacy Policy
- Terms Of Use
- Cookie Policy
- Editorial Guidelines
- Write For Us
- PRO Courses Guides New Tech Help Pro Expert Videos About wikiHow Pro Upgrade Sign In
- EDIT Edit this Article
- EXPLORE Tech Help Pro About Us Random Article Quizzes Request a New Article Community Dashboard This Or That Game Popular Categories Arts and Entertainment Artwork Books Movies Computers and Electronics Computers Phone Skills Technology Hacks Health Men's Health Mental Health Women's Health Relationships Dating Love Relationship Issues Hobbies and Crafts Crafts Drawing Games Education & Communication Communication Skills Personal Development Studying Personal Care and Style Fashion Hair Care Personal Hygiene Youth Personal Care School Stuff Dating All Categories Arts and Entertainment Finance and Business Home and Garden Relationship Quizzes Cars & Other Vehicles Food and Entertaining Personal Care and Style Sports and Fitness Computers and Electronics Health Pets and Animals Travel Education & Communication Hobbies and Crafts Philosophy and Religion Work World Family Life Holidays and Traditions Relationships Youth
- Browse Articles
- Learn Something New
- Quizzes Hot
- This Or That Game
- Train Your Brain
- Explore More
- Support wikiHow
- About wikiHow
- Log in / Sign up
- Computers and Electronics
- Internet Browsers
- Safari Browser
Simple Steps to Change Your General Preferences on Safari
Last Updated: June 13, 2023 Fact Checked
This article was co-authored by wikiHow staff writer, Darlene Antonelli, MA . Darlene Antonelli is a Technology Writer and Editor for wikiHow. Darlene has experience teaching college courses, writing technology-related articles, and working hands-on in the technology field. She earned an MA in Writing from Rowan University in 2012 and wrote her thesis on online communities and the personalities curated in such communities. This article has been fact-checked, ensuring the accuracy of any cited facts and confirming the authority of its sources. This article has been viewed 225,964 times. Learn more...
Do you want to increase your privacy on Safari or maybe make it more useful for you? To change your Safari preferences on an iOS device, you'll need to use your device's Settings app instead of the Safari app. On macOS computers, you can change the settings from Safari's Preferences menu. Both the mobile and the desktop share some similar settings, but the desktop version has many more options available.
Things You Should Know
- On an iPhone or iPad, go to your device's Settings app to change the general preferences of Safari.
- On Mac, change your general preferences in "Safari > Settings > General."
- Changing things like your search engine and preventing trackers will provide you with more privacy and increase your security.

- This method works for iPhone, iPad, and iPod Touch.
- Forgot your iPhone's password? You can reset it in 2 ways !

- The "Search Engine Suggestions" toggle will provide search suggestions from your default search engine as you type.
- The "Safari Suggestions" toggle provides search suggestions curated by Apple.

- Use the Safari app instead of Settings to change how your Home page behaves .

- You can enable or disable various search preferences underneath this menu, including using Safari Suggestions.

Community Q&A
You Might Also Like

- ↑ https://support.apple.com/en-us/HT201265
- ↑ https://support.apple.com/guide/iphone/customize-your-safari-settings-iphb3100d149/ios
- ↑ http://www.macworld.com/article/2042451/exploring-safaris-preferences.html
About This Article

- Send fan mail to authors
Is this article up to date?

Featured Articles

Trending Articles

Watch Articles

- Terms of Use
- Privacy Policy
- Do Not Sell or Share My Info
- Not Selling Info
wikiHow Tech Help Pro:
Level up your tech skills and stay ahead of the curve
Tell websites to stop tracking you
Change your search engine to duckduckgo.
- Hide your IP address
Stop using location services
Disable autofill, clear your browsing history, block your cookies, 7 settings you should change in safari to enhance your privacy.
- If you use Safari on your Mac, iPhone, or iPad, you can enable settings to enhance your privacy while web browsing.
- You can easily disable cookies, change your search engine to DuckDuckGo, hide your IP address, and more.
- Here are seven of the top ways to make your online activity more private.
While Apple has allowed alternative browsers on the iPhone and iPad for quite some time, odds are good that if you have one of those devices (or a Mac computer, of course) you frequently use Safari to browse the web. It's relatively safe and private, but you can do much better by tweaking a few settings. Here are seven Safari settings that'll enhance your privacy when you're online.
Almost every step you take online is tracked by websites to target you for ads and to customize your experience. But you can shut most of that down by telling Safari to stop tracking you. On your iPhone or iPad, start the Settings app and then tap Safari . In the Privacy & Security section, enable Prevent Cross-Site Tracking by swiping the button to the right.
On a Mac, start Safari and then click Safari in the menu bar at the top of the screen. Click Preferences in the dropdown menu. In the Preferences window, click the Privacy tab and then click the checkbox for Prevent Cross-Site Tracking .
Google is most people's default, but that search engine fundamentally lacks privacy. If you don't want a large corporation to know your browsing history, switch to DuckDuckGo. On an iPhone or iPad, start the Settings app and then tap Safari . In the Search section, tap Search Engine and choose DuckDuckGo from the options.
If you're using a Mac, start Safari and then click Safari in the menu bar at the top of the screen. Click Preferences in the dropdown menu. In the Preferences window, click the Search tab. Finally, to the right of Search Engine , click the dropdown menu and switch from Google to DuckDuckGo .
Hide your IP address
By default, websites can see your IP address, which can reveal personal details about you including your location. If you prefer, you can hide this from online trackers. On your iPhone or iPad, start the Settings app and then tap Safari . In the Privacy & Security section, tap Hide IP Address and choose From Trackers .
On a Mac, start Safari and then click Safari in the menu bar at the top of the screen. Click Preferences in the dropdown menu. In the Preferences window, click the Privacy tab and then click the checkbox for Hide IP address from trackers .
A lot of your mobile device's secret sauce is based on location services — your iPhone and iPad need to know where you are to make smart suggestions and offer location-based features. But if you don't want Safari to know where you are, it's easy to turn off. On an iPhone or iPad, start the Settings app and then tap Safari . In the Settings for Websites section, tap Location and change the setting to Deny (or, if you want to be asked every time, choose Ask ).
On a Mac, start Safari and then click Safari in the menu bar at the top of the screen. Click Preferences in the dropdown menu. In the Preferences window, click the Websites tab. Choose Location in the pane on the left. At the bottom of the window, configure When visiting other sites by clicking the dropdown menu and choosing Ask or Deny .
Autofill is a great feature if you don't like to enter basic personal information into web forms over and over again, but for that to work, Safari has to record private data. Don't want that? On an iPhone or iPad, start the Settings app and then tap Safari . In the General section, tap Autofill and turn off Use Contact Info and Credit Cards by swiping the buttons to the left.
On a Mac, start Safari and then click Safari in the menu bar at the top of the screen. Click Preferences in the dropdown menu. In the Preferences window, click the AutoFill tab. You can disable autofill data in four categories by clearing the checkboxes.
This one is the traditional, go-to way to enhance your privacy — you can clear your browsing history from time to time to erase records on your device about where you've been online, along with your saved website passwords. On an iPhone or iPad, start the Settings app and then tap Safari . Then scroll down and tap Clear History and Website Data . Conform you want to do that in the popup window.
On a Mac, start Safari and then click History in the menu bar at the top of the screen. Click Clear History in the dropdown menu, choose the timeframe you want from the dropdown menu, and click Clear History .
If you prevent cross-site tracking (see the earlier tip in this article), Safari prevents some third-party cookies. But you can disable all cookies if you want to amp up your privacy — just be aware that your online experience will be less convenient, and some sites won't work properly. To try it on an iPhone or iPad, start the Settings app and then tap Safari . In the Privacy & Security section, enable Block All Cookies by swiping the button to the right.
On a Mac, start Safari and then click Safari in the menu bar at the top of the screen. Click Preferences in the dropdown menu. In the Preferences window, click the Privacy tab. Beside Cookies and website data , click the checkbox for Block all cookies .
- Main content
Safari privacy settings on Mac: Medium level

How to protect yourself against malicious websites
What for: So cybercriminals do not get your data by fraudulent means.
Scammers often make copies of popular websites to steal user data. If you fail to spot a fake in time, your credentials or bank card details could wind up in cybercriminals’ hands.
By default, Safari protects against fake sites and warns users if a page is not genuine. Check the settings in case you or someone else in your family has disabled this feature.
- Click Safari in the upper left corner of the screen;
- In the drop-down menu, select Settings ;
- Go to the Security tab;

How to hide your data from prying eyes
What for: To hide your favorite websites from prying eyes.
By default, when you open a new window, Safari loads all your Favorites tabs. This lets speeds up opening the websites you often visit. However, if you are in a public place, outsiders might see the list of these pages. To hide this information:
- Go to the General tab;

What for: Anonymous browsing.
The browser usually saves information about the pages you visit, the passwords you enter, the permissions you give, and some website data. If you want to hide these — for example, when using someone else's computer — browse in private mode. In this case, Safari won’t save your browsing and download history. Additionally, a separate session is created for each page, which means advertisers won’t be able to sniff out your online activity through trackers in other tabs.
To open a private window:
- Click File in the upper left corner of the screen;

What for: To prevent strangers from finding out what sites you visit and what you download.
By default, Safari stores the history of the websites you visit and files you download throughout the year. If someone gains access to your computer, they will be able to see that information. You can set a shorter storage period for this data, such as one day, week, or month.

How to keep corporations out of your business
What for: So advertisers do not know which websites you visit.
Some websites use third-party cookies. They are placed by ad networks to track your online activity. You can ban websites from sharing this data with third parties.
- Go to the Privacy tab;

What for: To figure out who has tried to track you.
If you have blocked cross-site tracking, Safari will stop third-party websites from watching your actions on the page. At any time, you can view the list of resources having tried to spy on you.
- Open the page you want to check;
- Click the shield icon to the left of the URL;

What for: So no one can eavesdrop or spy on you.
Websites can request permission to access your computer’s camera and microphone. For example, a technical support page can request such permission to enable voice chat with an expert. However, malicious websites can trick you into giving them this permission and then spy on you. To protect yourself, restrict access to your camera and microphone:
- Go to the Websites tab;
- Open the Camera section and select Ask or Deny under the When visiting other websites option;

What for: So no one knows where you are.
Some websites may ask for permission to access your geolocation. For example, a delivery service page can request that to enter your address for you. By default, this permission is permanent, so when you visit the website again, it will learn where you are.
To avoid this, you can limit the permission to one day only, or ban websites from requesting geolocation.
To restrict location access when a website requests it, check the box next to Remember my decision for one day and click Allow .
To permanently ban websites from requesting geolocation:
- Go the Websites tab and open the Location section;

Downside: Having to enter your location by hand.
How to protect your data
What for: To protect against hacking.
When you sign in to a website, Safari prompts you to save your password. This lets you automatically enter your credentials on subsequent visits. In your browser settings, you can check the strength of saved passwords, and replace duplicate or weak ones.
- Go to the Passwords tab and enter your computer password;
- If you use the same password for multiple sites, or the password you use is not strong enough, the browser will flag the corresponding resource with a warning icon;

What for: So no one gains access to your accounts and money.
Safari can autofill credentials and contact/billing information that is saved in your browser. If someone gets hold of your computer, they will be able to log in to your account on a social network or pay for things even without knowing your username and password combinations or card number. To protect against such scenarios, turn off the autofill option.
- Go to the AutoFill tab;

To delete previously saved information:
- One by one, press Edit to the right of Usernames and passwords , Credit cards , and Other forms ;
- Enter your computer password;
- Select the desired entry and click Delete in the bottom right corner of the window.
Downside: Having to enter credentials or card details every time you log in or buy something online.
You can avoid the inconvenience and improve the security of your accounts using a password manager. Unlike a browser, it does not access third-party resources on the Web, which means it is protected from malicious websites. Neither can it be hacked via a vulnerable extension or plug-in.
How to feel comfortable online
What for: To keep banners from distracting you.
Safari blocks intrusive ads by default, but you can enable them for specific websites in the Settings. If you enabled ads for a particular website by mistake, then you can disable them again:
- Open the websites where you want to block ads;
- Open the Content Blockers section;

Note that you will not be able to get rid of ads completely. For example, Safari will always display Google Ads.
What for: To save traffic and avoid distractions.
Some websites automatically start playing videos as soon as you open a page. It saves you pressing the start button. However, if you are in a public place or on a limited network, this feature can be a pain. You can turn off automatic playback or mute it in the settings.
- Open the Auto-Play section;

If you want to enable it on selected websites:
- Open the page where you want to enable automatic playback;
- Go the Websites tab and open the Auto-Play section;

What for: Not to dig around in the settings when having problems with a single page.
You can fine tune individual websites without opening browser settings. This is handy if you need to change permissions or turn off notifications for a certain page, but do not want to alter the general settings.
- Open the website;

What for: To avoid distractions while web surfing or working.
Websites can send you in-browser notifications about new messages or posts etc. It is convenient, yet multiple notifications may distract you from work. Moreover, some dishonest developers may also use notifications for ads and spam. You can revoke previously given permissions to send notifications and stop websites from requesting them in the future:
- Go the Websites tab and open the Notifications section;
- Find all the websites that are authorized to display notifications in the list and revoke the permission;

What would have happened if you had chosen another privacy level?

Also recommended
Basic privacy settings, maximum convenience.
A golden mean respecting privacy matters but preserving convenience.
A choice of security over convenience; instructions contain a lot of details.

VPNoverview.com Privacy Anonymous Browsing Everything You Need to Know About Safari Private Browsing
Everything You Need to Know About Safari Private Browsing
Ever wondered what Safari Private Browsing does exactly? Chances are it might not be giving you the level of online privacy you expect. Safari Private Browsing does have some perks, including:
- Stopping Safari from remembering the websites you’ve visited
- Not storing any new usernames, passwords, payments cards, and other information you input into private browsing
- Forgetting any search engine queries you’ve run
- Allowing you to save money by avoiding marketing cookies that might inflate prices
However, this is pretty much all the privacy that you’ll get with Safari Private Browsing. This incognito mode won’t cloak your IP address, encrypt your internet traffic, or make you safe on public Wi-Fi . Private browsing still leaves you pretty exposed to a lot of the risks that come with connecting to the internet.
For true online anonymity, you’ll need to use a VPN to change your IP address . We’re big fans of ExpressVPN, one of the fastest VPNs in the industry.
Below, you’ll find more information on how to use Safari Private Browsing on all your Apple devices, as well as more details on how this incognito mode does and doesn’t protect your privacy.
If you use a Mac, iPhone, or iPad, then chances are you’ve encountered Safari Private Browsing before. Whether you’re shopping for a partner’s gift or want to snoop on a long-lost colleague’s LinkedIn, there are many reasons why you might want to use private mode in Safari.
In this article, we answer the question, what is Safari Private Browsing ? We’ll also tell you what this handy tool can’t do to save you any embarrassment or risk to your online security.
What is Safari Private Browsing?
There’s a little more to this method of browsing than meets the eye, but we’ll go into specifics further down in this article. The point is, for a more private experience, you can use Safari’s incognito mode . You’ll be logged out of all accounts, and Safari won’t autofill user logins, passwords, or payment information. When you turn on private browsing, Safari won’t remember :
- Your search engine history
- Webpages you’ve visited
- Browsing activity or history
You should, however, be aware of a major drawback of this tool on Macs: your browsing activity likely isn’t as hidden as you might think. Websites you visit can still see who you are and what you’re doing . You can read more about this in our general incognito mode article .
With Macs, Private Browsing information is logged in a different place, as well: your Terminal archive.
Beware the Mac Terminal archive
On Macs, there’s something called the Terminal archive , and it’s as scary as it sounds — well, for fans of privacy at least. It’s a treasure trove for snoops. The Terminal archive contains all of the websites you visit , whether you’re using Safari Private Browsing or not. This is because your Mac stores static images and other files when you visit a website for the first time. This makes future visits to these sites and page loading much faster, as your Mac pulls the relevant files from the Terminal archive.
This command-line function also lets you make systemic changes to your Mac . For most users, there’ll never be a need to make any changes in the Terminal archive, and you shouldn’t if you don’t know what you’re doing. You could end up breaking something critical in your computer’s operating system if you tinker with the Terminal.

However, it is good to know that, even when you’re using Safari’s Private Browsing mode, your online activity is logged here.
Make your Safari Private Browsing truly private
By now, you might be asking yourself: how do I clear the cache on my Mac? Well, today’s your lucky day. Below, you’ll find a brief, step-by-step guide to clearing the cache on a Mac . Just make sure not to do anything else while inside the Terminal.
- Open “ Finder ,” then search for “ Terminal ” in the search bar.
- Run the Terminal application.
- Paste the following text into the Terminal and hit enter: sudo killall -HUP mDNSResponder
You may have to enter your Admin password to proceed. This is going to flush the DNS cache.
Remember that you shouldn’t do anything else inside of the Terminal application unless you know what you’re doing. It only takes a short command to nuke files or entire directories in this app forever! So, tread carefully.
Why You Should Use Safari Private Browsing on Macs and iOS
We can hypothesize all we want, but you’ve probably got a good idea of why you use private browsing. According to a 2018 research study , the most common reason people use private browsing is so others that are using a shared device can’t see what they’re doing. This comes down to protecting two things from other users of your device:
- Their personal data
- Their browsing activity
Fortunately, these are two things that Safari Private Mode manages to do wonderfully. Below, you can read more about what else Safari Private Browsing does for you .
Online privacy
- Your browser won’t remember what websites you’ve visited. Anything you browse while you’re in private browsing mode won’t be remembered by Safari. So, if you start shopping online for gifts or a product that you find embarrassing, you won’t usually have to worry about your friends or family coming across your browsing history.
- Safari won’t suggest usernames, passwords, credit card numbers, and so on. You’ve probably noticed that Safari can remember usernames, passwords, credit cards, and other information when you use it for the first time. If you tell your Mac, smartphone, or tablet to remember those details, they’ll be automatically filled in the next time you visit the website. With Safari Private Mode enabled, these kinds of details won’t be stored: you won’t be prompted to save or autofill them at all.
- Your search engine queries won’t be remembered . If you’ve been shopping for gifts or trying to self-diagnose, you probably don’t want other users of the computer to see what you’ve searched for . Normally, you’ll see suggested searches popping up in search engines like Google. Based on your past searches and clicks, some links might be colored purple instead of blue, too. In private browsing mode, these won’t appear, nor will any new searches be stored.
How to pay less with Safari Private Browsing
There’s more to private mode options than just online security. You could also save money with Safari Private Browsing, as you won’t be quoted higher prices for products you’ve already viewed. When you visit a website, cookies (small text files) are stored on your computer by your browser.
These kinds of cookies aren’t delicious or rewarding at all. Instead, they allow the site to track you and figure out that you’re interested in, for example, a particular holiday destination. This can result in you seeing higher airfares, hotel booking fees, and more. Just turn on Safari’s Private Browsing to s top cookies from being stored on your browser and avoid hiked prices.
How to Go Incognito on Safari
Safari Private Browsing on a Mac
Using Safari Private Browsing on a Mac is simple. If you’re reading this on a Mac, you can skip step one in our step-by-step guide below:
- Open Safari on your Mac.
- Click on “ File ” in the menu bar at the top of the screen.
- Select “ New Private Window .” This will open a new private tab, but you can open as many private tabs in your tab bar as you need.

It’s that simple. Now, any new tab you open within this new private browsing window will be a private browsing tab. Give it a whirl by opening some new private tabs and navigating to a website you frequently log into. You’ll notice that your username and password aren’t suggested for autofill as they usually would be .
Also, you’ll know that you’re in private browsing, as the URL bar will have a gray background rather than the usual white. Just remember to ignore or close your existing browser window if you had any open. If in doubt, check the background color of the URL bar.
Finally, to turn off private browsing in Safari , simply click the red cross in the corner of the browser window as you usually would.
Safari Private Browsing on an iPhone
Using Safari’s private browsing mode on an iPhone or iPad is fairly straightforward and could increase your privacy on an iPhone . If you’re running iOS 14 or earlier , simply follow the steps below:
- Open Safari on your phone.
- Tap on the “ Tabs ” button. That’s the two small squares in the bottom-right corner of your Safari window on iPhone.
- A new option called “Private” should appear.
- Tap “ Private ” and you’ll be taken to a blank screen confirming that you’re using Private Browsing Mode . You’ll notice that it’s using the same gray color scheme as Safari for Mac.
- Lastly, click on the small “ + ” (plus) icon to launch a private browsing window.

If you’re using Apple’s latest iPhone update, iOS 15.1.1 , you’ll need to follow a slightly different (and hey, we’ll say it — more confusing) set of steps:
- Tap on the “ Tabs ” button.
- Tap where it says “ X Tab(s) ” – this number will reflect the number of windows you have open.
- Tap “ Private .”
- Now, you’re in Private Browsing mode and can click the small “ + ” (plus) icon to launch a new private window.

Again, turning off private browsing in Safari for iPhones or iPads is simple. Just press the same “ Private ” button that you used to enable the feature. Don’t forget, if you have multiple private tabs open, they won’t close automatically. Swipe each tab closed before you exit private mode if you want to leave no trace.
How to Set Safari Private Browsing as the Default
If you’d rather always browse privately, you can also set Safari Private Browsing as your default, so that it opens automatically whenever you open a new tab or window. Check out the step-by-step instructions below for a Mac :
- Make sure your active application is Safari, then select “ Safari ” from your Mac’s toolbar at the top of your screen. Click on “ Preferences ” next, which can also be accessed using the keyboard shortcut “ Command ” + “ , ” (that’s Command, plus a comma).
- Now, you should see the Privacy window for Safari. Click on the “ General ” tab.
- Next to “Safari opens with”, select “ A new private window ” from the drop-down list.
While you can’t automatically use Safari Private Browsing by default on mobile , there are some options for minimizing what’s remembered, stored, or recommended. Here’s how you get there:
- Open the “ Settings ” application.
- Scroll down until you see “ Safari ” and tap on that option.
Now, you’ll have the choice to use a number of features. You can:
- Disable search engine suggestions
- Disable Safari suggestions specifically
- Turn off autofill for Safari , either for personal information, payment information, or both
- Disable “ Favorites “, which you can save in your Safari app’s home screen
- Turn off “ Frequently Visited Sites “, which appear below your favorites
In this menu, you can also prevent cross-site tracking and block all cookies on the websites that you visit. In the event that you forget to launch Safari Private Browsing, these options should give you at least a little more privacy whenever you go online.
Is Safari Private Browsing Safe?
That last risk is surprisingly common on public Wi-Fi networks too. Bear in mind that private browsing doesn’t protect you against malware (malicious software) either, nor does it protect your payment information or other personal details . For true online anonymity and to improve your online security , you should give serious thought to using a VPN (Virtual Private Network) .
How to use a VPN with Safari Private Browsing
Using a VPN along with Safari Private Browsing should give you the online security you’re looking for. In addition to avoiding any logged browsing history or search history , you’ll be much harder to track and enjoy greater online anonymity. You can check out the many advantages of a VPN for more information. Want to get started right away? The following steps will only take a few minutes of your time:
- Choose a VPN provider and create an account. We recommend checking out our list of the best VPNs if this is new ground for you. Alternatively, ExpressVPN is a market-leading VPN provider that we’re always happy to recommend.
- Download and install the VPN software onto your Mac. You can also download ExpressVPN for mobile on your iPhone. Other premium providers like NordVPN, CyberGhost, and Surfshark all offer really slick mobile apps for iOS, too.
- Log into your account , either in the desktop software or the mobile app.
- Choose a VPN server in a country of your choice. If you’re purely interested in online security, then the location you choose isn’t too important (though some will be faster than others). However, if you want to save money on subscriptions , for example, you should give it some more thought.
- Connect to the VPN server . When you connect, you’ll be changing your IP address to mirror the VPN server’s IP. It’s safe, legal ( in most countries ), and best of all, it’ll give you far greater online security than simply using Safari Private Browsing alone.
Safari Private Browsing is perfect for hiding those Christmas or birthday purchases from your family before the big day. It’s also a great way to save money on flights, hotels , or other purchases. However, it won’t do much for your online security. If you want truly private browsing , then use a VPN along with Safari private mode.
Interested in exploring other private browsers? Check out these articles below:
- How Anonymous Is DuckDuckGo?
- Is Vivaldi Browser Safe?
- How to Set Up Firefox as an Anonymous Browser
Do you want to know how to enable private browsing on Safari? Are you wondering how much privacy Safari Private Browsing actually gives you? You’ll find these answers and more in our frequently asked questions below.
To turn on Private Browsing in Safari for Mac, follow these simple steps:
- Make sure Safari is the active application that you’re using.
- Click on File in the menu bar along the top of the screen.
- Click on New Private Window to switch to private browsing mode.
To turn on Private Browsing in Safari for iPhone or iPad, the process is much the same:
- Open the Safari application.
- Tap on the Tabs icon (the two small squares in the lower-right corner of your screen).
- Tap on Private to switch to private browsing.
- Click on the small + (plus) icon to open a new private browsing tab.
Check out our full article for more information on Safari Private Browsing.
No. Safari Private Browsing, like any browser’s private mode, won’t protect you against a lot of online threats. Your IP address will still be visible to many third-party individuals and organizations. For example, your ISP will know what websites you’ve visited, and hackers could determine your location using your IP (though some private modes do limit location tracking). For true online privacy and anonymity, you’re safer using a VPN like ExpressVPN .
With Private Browsing, it’s more difficult for websites to track you, since cookies are cleared the moment you close the browser — but it’s not impossible. Your ISP (Internet Service Provider), employer, school, or college could still see your internet history . That is, unless you use a VPN along with the incognito mode.
Yes. The owner of an internet connection can absolutely check up on your browsing session if they have the right technical knowledge. Some routers can be set up to remember all URLs a device accesses. So, if you’re trying to fly under your parents’ radar, for example, they could potentially bust you using the family router, even if you’re exclusively using private browsing modes.
For true anonymity , you’ll want to use a VPN. With a VPN connection, all of your internet traffic is encrypted, which gives you far better anonymity and privacy than using private browsing on its own.

Chris Bluvshtein Author
Senior journalist.
Chris is a tech journalist with many years’ experience covering online privacy and cybersecurity. He’s also a published author and works as a Product Manager for some of the most innovative software development companies.
Share this article
More articles from the anonymous browsing section.

Kanary Review (2024): A Cheap and Secure Data Removal Service

OneRep Review (2024): Can OneRep Protect Your Private Data?

The Best Data Removal Services (Personal Information Removal Made Easy)
Hi Chris , I’m finding while using private mode in safari my sound is being cut out and I have not been able to find a way to reconnect it. I use it on a iPad with a vpn and trend anti spam for protection as much as it can in private mode. I have not been able to find any reason as to why this is happening.
Hey Wayne, I've done a bit of digging, and I've found something that might be worth a try. It seems that recent versions of Safari have a built-in feature that can prevent audio from playing when you visit a website; it's enabled by default too. Give this a try and let me know if the issue goes away: 1. Open the Safari menu and click preferences 2. Click on the websites tab 3. Look for the setting: "When visiting other websites", which has a drop-down selection beside it 4. Change this setting so that it allows websites with media to play sound. You can alternatively add individual websites to this list if you'd rather have control over which ones can play sound by default.
Hi Chris Just tried your Terminal Commands, I am running macOS Monterey The Terminal Commands Below are not working dscacheutil -cachedump -entries Host dscacheutil -flushcache
You're right. Thank you for pointing it out to us! There is a new terminal command you'll now need instead: "sudo killall -HUP mDNSResponder". We've adjusted the article to reflect this. Hope this helps!
Looking for a VPN?
Take a look at our overview of the most trustworthy, fast, and safe VPN services. Extensively tested by our experts.

Sign up for our daily newsletter
- Privacy Policy
- Advertise with Us
How to Check and Search Safari History on Mac

Browsing history is one of the essential features of Safari that keeps a detailed record of your online activity, allowing you to quickly access previously visited websites and track your digital footprint. Whether you need it for research or personal security, learning how to manage Safari’s browsing history is essential for every Mac user. Follow this guide to learn how to check, search and clear your Safari browsing history on a Mac.
How to Check Safari Browsing History on a Mac
How to manage browsing history in safari.
Safari for Mac offers several different methods to access your browsing history. You can do it via the Safari menu, toolbar, or a keyboard shortcut.
Use the Safari Menu to Access Browsing History
The easiest way to check browsing history in Safari is from the web browser’s menu. Follow the steps below to check Safari history on your Mac.
Launch the Safari browser on your Mac. Find the ribbon menu in the upper-left corner of your screen, and select History .

You’ll get access in the drop-down menu to a list of all the websites you’ve previously visited.
If you want a more detailed view, click on Show All History at the top of the drop-down menu. This opens a dedicated browsing history window where you can search for specific websites and delete individual entries.

View Browsing History in the Safari Toolbar
If you often need to check or search Safari history, customize your Safari toolbar, and add a button to quickly access your browsing history.
Open the Safari browser on your Mac. From the ribbon menu, select View -> Customize Toolbar .

Drag History from the options and place it in any place you would like on the Toolbar.

Select Done in the bottom right of the window.
If you want to change the position of this button later or delete it from the toolbar altogether, follow the same steps and drag the button back to the items menu.
Use a Keyboard Shortcut to Check Safari History
For those who prefer using keyboard shortcuts, you can use a shortcut to open and check Safari history.
When you have a Safari window open, press the Command + Y keys to open your browsing history in a new window.
Along with viewing your browsing history, you can also keep your history organized.
Search Your History for Specific Websites
It’s easy to locate a particular website in your Safari history. When you open your browsing history, use the Search bar in the upper-right corner of the window to search within the list of your previously visited websites.
Enter the website’s name or any related keywords, and Safari will display all relevant results.
Clear Safari Search History
See something you don’t like in your browsing history? Or maybe it’s something you want to hide from prying eyes, should someone else access the list? You can delete specific entries from Safari history.
Open your browsing history window in Safari on either your Mac, right-click on the website entry you wish to delete, and select Delete .
You can also clear your entire browsing history or auto-delete it instead.
Open your browsing history window in Safari on your Mac. Look for the Clear History or Clear option at the bottom of the screen and select it. Select the time range of your browsing history that you want to clear (e.g., last hour , today , today and yesterday , or all history ).

Confirm your selection by clicking on Clear History or Clear Browsing History .
Improve Your Safari Experience
Mastering your Safari browsing history is essential for efficient web browsing and maintaining privacy on your Mac. With the various methods outlined here, you can easily access, search, and clear your browsing history to suit your needs. For those looking to optimize the Safari experience and protect their privacy, we recommend taking the next step and learning how to create Safari profiles on Mac, iPhone and iPad .
Image credit: Unsplash . All screenshots by Anya Zhukova.
Our latest tutorials delivered straight to your inbox

Anya is a bilingual writer who has spent over 8 years writing about all things tech. She's contributed to high-traffic tech publications such as MakeUseOf, Online Tech Tips, Help Desk Geek, and Switching to Mac. Anya's always looking for new ways to make life easier using technology. When she's not writing, you can find her shredding fresh pow on a snowboard, or exploring new mountain bike trails.

More From Forbes
Ios 18—new apple overhaul reveals exciting iphone ai privacy feature.
- Share to Facebook
- Share to Twitter
- Share to Linkedin
Apple’s soon-to-launch iOS 18 software could include an exciting AI-based privacy feature as part of an overhaul of the Safari browser. The new iPhone feature, dubbed Web Eraser, allows you to browse the web while removing portions of the page, such as ads or other content you don’t want to see.
Web Eraser comes as part of a wider AI-based browser overhaul in iOS 18, according to Apple-focused website Apple Insider , which first reported the news.
Apple’s soon-to-launch iOS 18 software could include an exciting AI based privacy feature as part of ... [+] an overhaul of the Safari browser.
Currently being tested by the iPhone maker, the overhaul includes the advanced content blocking features enabled by Web Eraser, as well as UI tweaks and AI-powered Intelligent Search. The changes to Safari will be included in iOS 18 and macOS 15, according to the report, which cites “people familiar with the matter.”
What Web Eraser Does In iOS 18
From the looks of it, Web Eraser in iOS 18 is a pretty cool feature, building on privacy tools already built into the iPhone maker’s Safari browser. Specifically, it's “designed to allow users to remove, or erase, specific portions of web pages,” including banner ads, images, text or entire page sections.
The Top 10 Richest People In The World (May 2024)
Toyota s suv lineup is new and refreshed which one is right for you, at the heart of the ai pc battle lies the npu.
Apparently, Safari will remember your preferences so they aren’t limited to one specific browsing session. “When visiting a web page with previously erased content, Safari will inform the user that the page has been modified to reflect their desired changes. The browser will also give the user the option to revert changes and restore the webpage to its initial, unaltered state,” Apple Insider writes.
The new controls will be easy to access in the Safari Settings menu.
Exciting New iOS 18 Features Coming Soon
Web Eraser comes alongside multiple new AI-based iOS 18 features for your iPhone, most of which will be processed on the device , at least initially.
It looks like Intelligent Search will use Apple’s large language model Ajax to identify topics and key phrases within a web page.
Essentially, Web Eraser in iOS 18 is an ad blocking feature as offered by many companies, but it’s built into the Safari browser. It’s a great move for privacy—and ease of use since it’s ready made. However, it could create problems for publishers, who rely on web ads for their business revenue.
Apple of course, values privacy as one of its key marketing messages and iOS 18 seems to embrace that ethos wholeheartedly. Apple’s new iPhone operating system will launch in just over a month at its Worldwide Developers Conference and there’s a lot to look forward to for privacy-conscious users.

- Editorial Standards
- Reprints & Permissions
You are using an outdated browser. Please upgrade your browser to improve your experience.
Apple to unveil AI-enabled Safari browser alongside new operating systems

Safari getting new AI tools in iOS 18

The software — expected to debut as Safari 18 later in 2024 — is currently undergoing evaluation alongside internal builds of Apple's next-generation operating system updates, namely iOS 18 and macOS 15, according to people familiar with the matter. Should all of the new features make it to the release candidate stage, users will be treated to a new user interface (UI) for customizing popular page controls, a "Web eraser" feature, and AI-driven content summarization tools.
Intelligent Search - AI-enhanced browsing and text summarization
Engineers evaluating the latest builds of Safari 18 can find a toggle for the new page controls menu within the browser's address bar. The menu consolidates — and provides quick access to — old and new page control tools, among them being the browser's new "Intelligent Search" feature.

This feature is not automatically enabled in test builds of Safari 18 and instead requires manual activation from the page controls menu. Once enabled, it's believed the tool leverages Apple's on-device AI technology — specifically the Ajax language-learning model — to identify topics and key phrases within a webpage for which to base the summarization.
In selecting key phrases, Apple's LLM software identifies sentences that provide explanations or describe the structure of objects, depending on the text in question. Words repeated within a text and key sentences are recognized as text topics.
These early indications suggest Apple is striving to deliver text summarization alongside Safari 18 later this year, though the exact implementation of this feature remains fuzzy.
Apple's text summarization features could be a response to rival generative AI tools, such as OpenAI's ChatGPT. But Apple's on-device models and technologies like Private Relay could make the experience much more secure for users. Intelligent Search is also likely to be the same AI browser assistant that one X user hinted at a couple of weeks back.
Web Eraser for better content-blocking
Also accessible from the new page controls menu is a feature Apple is testing called "Web Eraser." As its name would imply, it's designed to allow users to remove, or erase, specific portions of web pages, according to people familiar with the feature.
The feature is expected to build upon existing privacy features within Safari and will allow users to erase unwanted content from any webpage of their choosing. Users will have the option to erase banner ads, images, text or even entire page sections, all with relative ease.

The erasure is said to be persistent, rather than limited to a browsing session. This means that Safari will remember the changes even after the original tab or window has been closed.
When visiting a web page with previously erased content, Safari will inform the user that the page has been modified to reflect their desired changes. The browser will also give the user the option to revert changes and restore the webpage to its initial, unaltered state.
As for where Apple got the inspiration for Web Eraser, the company could have Sherlocked the feature from the third-party app 1Blocker. The application features a similar way of erasing ads, where users would tap ads to make them disappear.
Updated UI will move key tools into one easy location
The new page controls menu referenced throughout this article will attempt to offer Safari 18 users quick and easy access to several options previously located across different menus and the Share Sheet. Running on pre-release versions of macOS 15, for instance, the menu also pulls in the "Aa" menu common on existing iPadOS versions of the browser. These include zoom options, webpage settings for privacy controls, content blocking options, extension shortcuts, and access to the new AI and erasure tools.

These various options existed previously on macOS, but were found by navigating through the Safari settings menu. Having all of these controls in one central location in the Address Bar will make these options more discoverable for end users. Other options like on-page text search and reader mode are also in this menu.
This all suggests Apple intends to unite the iPadOS and macOS Safari UI paradigms when it unveils its new OS releases during its Worldwide Developers Conference in June.
AI-enhanced Visual Lookup feature could be available in 2025
Simultaneously, Apple is also working on a much more powerful visual search feature scheduled for integration sometime in 2025 that will allow users to obtain information on consumer products when browsing through images. People familiar with the tool say it's similar to the Visual Lookup feature, through which Siri can identify plants, pets and landmarks from photos.

Visual Search could be implemented as a system-wide feature. So, instead of surfacing search results in the Photos app, the user may be able to use Visual Search directly in Safari by selecting an image.
Given development of this tool is in the earlier stages, it remains unclear how Apple will ultimately go about implementing it. It also remains to be seen whether or not the feature will make it through internal testing.
The iPhone maker has expressed significant interest in artificial intelligence and more recently published research related to on-device language learning models. This goes hand in hand with widespread rumors about several other AI-powered software features, many of which are expected to make their debut later this year with iOS 18.
Another big year for Safari
From its inception, Safari was always meant to rival existing web browsers.

Safari was originally added to macOS as a means of replacing Microsoft's Internet Explorer for Mac, which was the default browser. Over the years, the app made its way to the iPhone , and has since received various upgrades over the years.
More recent versions of Safari provide users with personalized web suggestions, and allow for greater privacy protection with features such as iCloud Private Relay.
This latest set of enhancements only serves to better position Safari against the competition, in an ever-increasing landscape of generative AI tools and third-party ad-blockers.
While Apple tests many such features during different development stages, it is important to remember that not all of them make it to release. Apple has been known to delay features or cancel them entirely, so there's always a chance we may not see these new Safari features after all.
Along with Safari 18 and its associated improvements, we should also see a revamped Calculator with Math Notes make its way to iPadOS 18. Freeform Scenes and Adaptive Voice Shortcuts are new OS features, which are also expected to debut later this year.
Apple is expected to introduce various AI-related enhancements as part of iOS 18 and macOS 15, both of which should be announced at the company's annual WWDC on June 10.
35 Comments
"As for where Apple got the inspiration for Web Eraser, the company could have Sherlocked the feature from the third-party app 1Blocker. The application features a similar way of erasing ads, where users would tap ads to make them disappear." They may also have been inspired by Simplified Page....
As long as I can turn it off/hide it they can knock themselves out.
Will the web eraser feature remove pop up videos, such as the ones that appear on this site?
I use the 'Reader' function in Safari quite a bit, but sometimes it doesn't work very well. Seems like something that AI could help make better.
Web ads suck but how else do you think your favorite websites will stay in business? Are you prepared to pay a subscription to every site? I doubt it…
Top Stories

Save $200 on this 14-inch MacBook Pro M3 Pro with 36GB RAM, 1TB SSD

Apple charms investors with record $110B stock buyback, dividend hike

Apple blows away Wall Street earnings estimates, even with weak China iPhone sales

Apple's iOS 18 to streamline task management with unified events and reminders

Apple headphone shootout: Beats Solo 4 vs AirPods Max
Featured deals.

Amazon discounts the Apple Studio Display to $1,299 ($300 off)
Latest exclusives.

An inside look at Apple's various internal iOS variants that aid development

Apple's iOS 18 AI will be on-device preserving privacy, and not server-side

Apple's macOS 15 to get rare cognitive boost via Project GreyParrot
Latest comparisons.

M3 15-inch MacBook Air vs M3 14-inch MacBook Pro — Ultimate buyer's guide

M3 MacBook Air vs M1 MacBook Air — Compared
Latest news.

Tim Cook teases AI ambitions & Apple's developmental advantages
During the earnings call, CEO Tim Cook dodged as many questions as he answered about Apple's AI plans, but did share some insights into the company's philosophies about the approach.

Apple Vision Pro a big hit in enterprise
During the Apple earnings call, Apple CEO Tim Cook shared that half of Fortune 100 companies have purchased Apple Vision Pro units.

Apple reversed its stock trajectory for the year in 30 minutes
Apple stock was having a tough year after some early gains — until investors erased the loss after Thursday's earnings report.

Tim Cook dismisses misguided DOJ lawsuit in the shadow of strong earnings
Ahead of Apple's second-quarter earnings call, CEO Tim Cook addressed the ongoing antitrust lawsuit filed by the US Department of Justice, calling it "misguided."

Apple CEO Tim Cook bullish on China, thinking long-term
After revealing Apple's Q2 earnings, CEO Tim Cook shared he "feels great" about China due to beating expectations in a competitive environment.

Alongside disclosing its earnings for Q2 2024, Apple also announced that it is increasing the dividend it pays to shareholders by 4%, and is also buying back more stock in one program than ever before.

Apple has released its financial results for the Q2 2024 quarter, with earnings beating predictions despite China iPhone fears.

Beats Pill revival resurfaces thanks to F1 driver Daniel Ricciardo
The unannounced Beats Pill has made another public appearance. This time, it's caught in the hand of F1 racing driver Daniel Ricciardo.

EU Core Technology Fee for small & non-profit developers pared way back
Responding to criticism that its Core Technology Fee for EU developers could see small App Store developers owing Apple excessive fees, the company has revised its rules for eligibility.

Rabbit R1 isn't an iPhone killer, because its AI can run on Apple hardware
The Rabbit R1 handheld AI device is a simple Android device, and a developer made the AI run on an iPhone.

How to use Siri in CarPlay with or without your voice
Being able to make a request using Siri while driving helps keep your eyes on the road, but just asking for Siri may not work on older cars or in certain other circumstances. Here's the fix.
Latest Videos

Beats Solo 4 headphones review: Great audio quality and features

iPhone 16 Pro: what to expect from Apple's fall 2024 flagship phone

New iPad Air & iPad Pro models are coming soon - what to expect
Latest reviews.

Unistellar Odyssey Pro review: Unlock pro-level astronomy with your iPhone from your backyard

Ugreen DXP8800 Plus network attached storage review: Good hardware, beta software

Espresso 17 Pro review: Magnetic & modular portable Mac monitor

{{ title }}
{{ summary }}
How to use Hide My Email on iPhone, iPad, Mac, and Web
Learn how to keep your main email address private by using the Hide My Email feature to generate random email addresses for apps, websites, newsletters, and other online services.

You may not want to use your main iCloud, Gmail, or other email address when you sign up for a website, app, newsletter, or send an email to someone you do not know or trust.
In these cases, you can rely on Apple’s Hide My Email option, which creates unique and random email addresses for whatever service you are signing up for. Unlike other throwaway or burner email services , these email addresses seem to work with all services as they end in @iCloud , and the service treats it as your main email address.
When you receive an email on these unique Hide My Email addresses, they are forwarded to your main email address. You can check it there or even reply to it.
All in all, things are so smooth, that it won’t even feel like you are using a random email address.
What you need
There are two ways to hide your email address:
- Sign in with Apple: This is a free service for all Apple users, and you can use it to create an account in apps and websites . The random email address for this ends in @privaterelay.appleid.com .
- Hide My Email: You can use this when composing an email, signing up for newsletters, and elsewhere. Its random email address ends in @iCloud.com . This feature requires a paid subscription to iCloud+ or Apple One .
Additionally, your device must be on iOS 15 or later or macOS Monterey or later. However, some features require the latest version of iOS and macOS, so it’s best to ensure your devices are updated to iOS 17, iPadOS 17, and macOS Sonoma.
Create and use Hide My Email address
You can enjoy this feature in several places, and we have listed them below.
- Start composing an email in the Apple Mail app. Fill in the recipient’s email address in the “ To ” section. Note that you must not add more than one recipient.
- Tap Cc/Bcc, From .
- Tap the From section and choose Hide My Email .
- You will see a random email address ending in @icloud.com in the From section. Now, finish writing your email and hit the send button.

You can follow the above steps even when replying to an email.
You can hide your main email address when signing up for websites or newsletters in Safari. Note that if a website supports Sign in with Apple , you can simply use that as well.
- Visit a website and tap the email address field .
- Tap Hide My Email above your keyboard. If you don’t see it, tap the arrow or Done and then retry.
- You will now see a Hide My Email interface that shows the random email address, where emails sent to it will be forwarded to, and the website where it’s being used. Add an optional note if you want and tap Continue .
- That random, unique Hide My Email address is auto-filled in the email address section. Finish the rest of the sign up or newsletter requirements as needed.

In Apple Pay
Some apps and websites may require you to enter an email address on the payment sheet. In this case, tap Contact on the payment sheet and choose Hide My Email to fill in a random email address instead of typing your main email.
In Wallet & Apple Pay settings
Similar to a default card and shipping address, you can also set a default email address for your transactions. And if you do not want to disclose your main email, you have the option to mask it with a Hide My Email address.
- Open the Settings app on your iPhone or iPad.
- Scroll down and tap Wallet & Apple Pay .
- Tap Email under the Transaction Defaults heading.
- Tap Hide My Email .

In third-party apps
Imagine you download an app, and it needs you to create an account.
In this case, you can use the Sign in with Apple or Continue with Apple buttons to create a new account. When you do that, you will notice that iOS has already checked the Hide My Email option. So, you can tap Continue to finish the sign-up process. However, if you’d like to use your main email, tap Share My Email.

In case the app requires you to sign in with an email address, tap this field and then select Hide My Email above the keyboard. This is similar to what we have explained under the Safari method.

For custom usage
There may be times when you do not get the Hide My Email option above the keyboard when you try to sign up for an app, websites, newsletter, etc. Other times, someone may ask you for your email address, and you do not want to share the main one.
So, in these cases, you can manually create a Hide My Email address and use it instead.
- Open the Settings app on your iPhone or iPad and tap your Apple ID name from the top.
- Select iCloud .
- Tap Hide My Email under the iCloud+ heading.
- Tap Create New Address .
- You will see a random @icloud.com email address at the top. If you are not happy with it, tap Use Different Address . In case the random address seems palatable for the job, use the Label Your Address field to enter where you are using this random email address.
- Now, type an optional note and hit Next > Done .

Where to look for emails that are sent to these random addresses
For the majority of people, emails sent to these Hide My Email addresses are automatically forwarded to your primary Apple ID email address .
Simply open the Mail app on your iPhone, iPad, Mac, Apple Watch, iCloud.com/mail , or wherever you use your iCloud email, and you will find the messages.
If these emails are not forwarded to your Apple ID email, follow the steps under the heading below.
Change where these random email addresses are forwarded to
Similar to iCloud Email Aliases , all messages sent to all your unique Hide My Email addresses are forwarded to your main Apple ID email address. But you can choose to forward them to another email address.
- Open the Settings app and tap your name from the top.
- Tap iCloud > Hide My Email .
- Scroll past all the Sign in with Apple and Hide My Email addresses and tap Forward To .
- Select another email address that you have added to your Apple ID account, and tap Done .

You can add or remove email addresses to your Apple ID by tapping Email & Phone Numbers or navigating manually to Settings > your name > Sign-In & Security > Edit > Add Email or Phone Number .
See and copy these random email addresses for use when needed
Go to Settings > your name > iCloud > Hide My Email and you will see all the Sign in with Apple and Hide My Email addresses you are using in various apps, websites, and other places. Tap one and then touch and hold the Hide My Email section to copy this email address to your clipboard.

Deactivate a Hide My Email address
If you no longer want to keep a Hide My Email address active, you can deactivate it.
If the Hide My Email address was created when you used Sign in with Apple , go to Settings > your name > Sign-In & Security > Sign in with Apple . Now, select an app or website and tap Stop Using Apple ID .
In case you created the Hide My Email address somewhere else, follow these steps to deactivate it.
- Go to iPhone or iPad Settings > your name > iCloud > Hide My Email .
- The tiny “ From ” section like “From Mail” will tell you where you created this Hide My Email address. Select an entry here.
- Tap Deactivate Email Address > Deactivate .

Reactivate your deactivated Hide My Email addresses or delete it permanently
Return to the Hide My Email screen and tap Inactive Addresses from the bottom of the screen. Tap an inactive address and hit Reactivate Address .
You can also use the Delete Address option to permanently remove it. However, this may result in you losing access to the app or website where you still use that random iCloud Hide My Email address.

The basics for using Hide My Email on Mac are similar to what we’ve explained under the iPhone section.
Mail: Click the Form section and choose Hide My Email .

System Settings: You can manually create and manage it in Mac’s System Settings > your Apple ID name > iCloud > Hide My Email . Click the plus button (+) to create a new random address.

Note that you may not always find the option to use Hide My Email in Safari and apps on Mac, even though that site or app may give you this option on an iOS device. So, if this happens, go to System Settings to manually create a random, unique address.
On iCloud Web
Click the From section in the Mail app on iCloud Web and select Hide My Email .

Additionally, you can create and manage Hide My Email addresses by following these steps:
- Log in to iCloud.com and click your profile picture from the top right, followed by iCloud Settings .
- Select iCloud+ Features from the top.
- Click the Hide My Email tile.
- From here, you can see your active email addresses, where they are forwarded to, and inactive addresses.
- To create a new random email address, click the plus button , give it a name, and hit Create email address .

On a related note: What is Mail Drop and how to use it on iPhone, Mac, and PC
Record the screen on your iPhone, iPad, or iPod touch
Learn how to create a screen recording and capture sound on your iPhone, iPad, or iPod touch.
How to record your screen
Open Control Center on your iPhone , or on your iPad .
Exit Control Center to record your screen.
Go to the Photos app and select your screen recording.
Some apps might not allow you to record audio or video. You can't record your screen and use screen mirroring at the same time.
Learn how to take a screenshot on your iPhone .
Explore Apple Support Community
Find what’s been asked and answered by Apple customers.
Contact Apple Support
Need more help? Save time by starting your support request online and we'll connect you to an expert.
IMAGES
VIDEO
COMMENTS
See Share analytics information from your Mac with Apple and Siri & Spotlight settings. Apple Advertising. You may sometimes receive ads in Apple News, Stocks, and the Mac App Store that are targeted to your interests. To understand why a specific ad was shown to you, click the Ad button on the ad.
The settings work in exactly the same way for your Mac's microphone and your location. Simply click Microphone or Location in the sidebar. Similarly, you can change the setting for currently open websites to suit your preference.
In the Safari app on your Mac, choose Safari > Preferences, then click a preference pane: General: Change your homepage, and choose what to see when you open a window or tab, how long to keep your browsing history, which bookmarks to show in Favorites view, and choose where to save downloads and how long to keep them. Tabs: Choose when to open ...
If the firewall is on, you can also use "stealth mode," which prevents your Mac from being discovered by others on the web. See Block connections to your Mac with a firewall. To set up and customize your firewall, use Network settings. Choose Apple menu > System Settings, click Network in the sidebar, then click Firewall on the right. (You ...
In essence, Safari's privacy settings on Mac embody a user-centric approach to online privacy, providing users with the essential tools and controls to navigate the digital realm with confidence and peace of mind. By leveraging Safari's privacy features, users can assert their privacy preferences, mitigate tracking, and safeguard their ...
Safari Features for Better Security. In addition to keeping your information private, Safari also keeps you safe from hackers and malware as you browse the internet. 4. Safari's Password Manager. One of its major security features is its built-in password manager.
Open the Safari app on your iPhone or iPad, then tap the Tabs button in the bottom-right corner to view your open pages. In the bottom-left corner, tap Private to enable private browsing mode. Then tap the Add ( +) button to open a private browsing window. Tap the Tabs button in the bottom-right corner.
Private Browsing in Safari hides browsing history, autofill details, downloads, and locks tabs after inactivity. Safari on Mac groups private and non-private tabs, while on iPhone it shows all tabs regardless of mode. To use Private Browsing in Safari, identify it by a dark address bar, "Private" indicator, or "Private" next to the site URL.
Open the offending website. Click on Safari > Settings for This Website (or right-click the URL box and select Settings for This Website). You will see a pop-up window with the option Auto-Play ...
Toggle on Safari privacy settings Safari offers a bunch of features to help protect your privacy even when you're not in Private Browsing mode. Make sure you have them all turned on.
Safari allows you to control some of the information you share online, which you can modify in your privacy settings. We recommend not changing Safari's default selections, as they allow for the best balance of privacy and security while browsing. However, you can modify them if you want. To modify your privacy settings: Click Safari, then ...
Here is how to enable private browsing in Safari on your Mac: 1. Open Safari on your Mac. 2. Click on File. 3. Select New Private Window, or switch to a private browsing window. How to enhance more security and privacy in Safari. Safari is your go-to browsing companion if you're a proud Mac user.
On an iPhone or iPad, go to your device's Settings app to change the general preferences of Safari. On Mac, change your general preferences in "Safari > Settings > General." Changing things like your search engine and preventing trackers will provide you with more privacy and increase your security. Method 1.
On a Mac, start Safari and then click Safari in the menu bar at the top of the screen. Click Preferences in the dropdown menu. In the Preferences window, click the AutoFill tab.
Block marketers from spying on you. Check the list of blocked trackers. Restrict access to your camera and microphone. Deny location data access. Your digital life matters Protect it with the new Kaspersky.
Open Safari on your phone. Tap on the " Tabs " button. Tap where it says " X Tab (s) " - this number will reflect the number of windows you have open. Tap " Private .". Now, you're in Private Browsing mode and can click the small " + " (plus) icon to launch a new private window.
Safari for Mac offers several different methods to access your browsing history. You can do it via the Safari menu, toolbar, or a keyboard shortcut. ... Mastering your Safari browsing history is essential for efficient web browsing and maintaining privacy on your Mac. With the various methods outlined here, you can easily access, search, and ...
Step 6: Save Your Settings - Click "OK" to close the advanced settings. - Click "Apply" on the network settings page to save and apply your new proxy settings. Step 7: Test the Proxy in Safari - Open Safari and navigate to any website to ensure the proxy is working. If there are issues, you may need to revisit your proxy settings ...
Apple's soon-to-launch iOS 18 software could include an exciting AI-based privacy feature as part of an overhaul of the Safari browser. The new iPhone feature, dubbed Web Eraser, allows you to ...
Apple is testing a version of its Safari web browser that includes UI tweaks, advanced content blocking features, and a new AI-powered tool dubbed Intelligent Search, AppleInsider has learned.
In Wallet & Apple Pay settings. Similar to a default card and shipping address, you can also set a default email address for your transactions. And if you do not want to disclose your main email, you have the option to mask it with a Hide My Email address. Open the Settings app on your iPhone or iPad. Scroll down and tap Wallet & Apple Pay.
The company will likely rope Web Eraser in with its other Safari privacy settings, such as iCloud Private Relay ... Apple has an opportunity with Safari 18 on iOS 18 and macOS 15 to make the ...
In the Safari app on your Mac, choose Safari > Preferences, then click a preference pane: General: Change your homepage, and choose what to see when you open a window or tab, how long to keep your browsing history, which bookmarks to show in Favourites view, and choose where to save downloads and how long to keep them. Tabs: Choose when to open ...
Go to Settings > Control Center, then tap the Add button next to Screen Recording. Open Control Center on your iPhone, or on your iPad. Tap the gray Record button, then wait for the three-second countdown. Exit Control Center to record your screen. To stop recording, tap the Screen Recording button at the top of your screen, then tap the Stop ...